
- All
- Common Tasks
- General
- MCU Side
- Nextion
- Nextion Editor
- Troubleshooting
- Useful Links
As of Nextion Editor v1.65.0, the Nextion 10 bytes of power on preamble Nextion Startup 00 00 00 FF FF FF (NIS 7.19) and Nextion Ready 88 FF FF FF (NIS 7.29) have been moved from firmware into Program.s as a printh statement printh 00 00 00 FF FF FF 88 FF FF FF. This change allows users to keep as Nextion has always been, modify to have their own custom preamble, or remove the preamble all together.
Program.s is the place for startup code prior to the first page of a users HMI to begin running. Items as global integer declarations such as int sys0, sys1, and sys2, to instructions setting defaults from brightness to baudrates such as baud=9600, dim=100, recmod=0, to launching the first HMI page such as page 0 will now be found in the new default Program.s tab. (Any code after the page instruction will not run as the HMI does not return back for Program.s to continue)
The Data Error message signifies the uploaded *.tft file can not be used
– it can be a result of line noise and *.tft did not arrive in tact, or
– it can also be a result of your device requiring to use a newer Nextion Editor.
Data Error can occur with newer Nextion devices needing v1.63.3 Nextion Editor
– if receiving Data Error, you must use v1.63.3 or above (card noting this included in box)
Due to the pandemic, second source flash ICs may be used in your Nextion device since mid 2021. Where such is the case, a card noting that the need to use Editor version 1.63.3 or higher is included. These devices have a QR code on the microSD card slot of the Nextion so it can be visually identified. For such devices, the firmware in v1.63.3 has the ability to communicate with both the existing and new second source flash ICs whereas the older Editor versions do not have the ability to communicate with the new second source flash ICs. For such devices, the ability to revert to an earlier version of the Nextion Editor is simply not available. Using an elder *.TFT file will cause a Data Error message and you will need to upgrade your project HMI and compile it with the Editor version v1.63.3 or later.
Due to the pandemic, second source flash ICs may be used in your Nextion device since mid 2021. Where such is the case, a card noting that the need to use Editor version 1.63.3 or higher is included. These devices have a QR code on the microSD card slot of the Nextion so it can be visually identified. For such devices, the firmware in v1.63.3 has the ability to communicate with both the existing and new second source flash ICs whereas the older Editor versions do not have the ability to communicate with the new second source flash ICs. For such devices, the ability to revert to an earlier version of the Nextion Editor is simply not available. Using an elder *.TFT file will cause a Data Error message and you will need to upgrade your project HMI and compile it with the Editor version v1.63.3 or later.
Important Note for Legacy Nextion devices.
Every Nextion device was factory tested to work with the Nextion Editor version that current at the time the Nextion device was made. This is to say a Nextion device purchased in Apr 2016 would work with the (current at that time) Nextion Editor version v0.33. For very old Nextion devices with project firmware v0.32 and before, some will need to upgrade to an intermediary Nextion firmware (v0.42 TFTs supplied below) BEFORE the newer Nextion Editors (LTS Edition or v0.58 or later) can be used. Note the Nextion Editor LTS Edition code is based on version v0.53, the Nextion Editor LTS Edition is not Nextion Editor version v0.53, it is Nextion Editor LTS Edition.
Which Nextion devices are classed Legacy and may need intermediary upgrade
– your Nextion is a T Series Basic Model NX----T---_011 (Basic models have blue PCBs)
– your Nextion has the Itead logo (not the Nextion logo)
– your last Nextion project uploaded used Editor v0.37 or prior
– your Nextion connect reports firmware below S62
If these conditions apply then an intermediary upgrade is needed to use the newer Nextion Editors.
An Intermediary upgrade is performed by
– creating a simple project using Nextion Editor v0.42 (found in Forum Announcements)
– compile this project and upload its TFT file to your device (over serial or microSD)
– or download v0.42 T_intermediary.zip here, extract and upload the TFT for your model
– your device is now ready to use the newer LTS and v0.58 or later Editors
– create and upload the TFT project made by the newer Editors as usual
Note: Once version v0.38 is used, you can not use an earlier than v0.38 version Editor
Q: I have a Legacy device and want to continue using my existing v0.34 Editor
A: There is no issue to use your Legacy Nextion device with the elder Nextion Editor as long as you do not A) upgrade to v0.38 or later (can not go back) or B) attempt to skip the Intermediary upgrade before using the newer Editors (LTS or v0.58 and later)
Q: How do I know my Nextion device firmware version is? ie S62
A: The Nextion firmware Ver:S--- shows in the Editor Debug Simulator Status Bar area when connecting to the Nextion Device (see Editor Guide or the Upload Protocol v1.1 published in the Blog section)
Q: I skipped the Intermediary step and went straight to the newer Editor, now what?
A: The best solution would have been following the Intermediary steps and avoid bricking. If your Legacy device is now showing a device null error, you can try to reanimate your device using the LegacyFix TFT file (download link) and exactly follow the steps in the Readme.txt file.
After uploading a HMI project to Nextion display via PC and power on, the screen shows “model does not match”.
Reasons:
– The wrong model was chosen when set up the HMI project, please go to “Device” and select the correct model, re-compile the HMI project.
– The USB to TTL module for uploading is not reliable, please try with another USB to TTL module. Our recommendation is to use the Foca Max.
Please note:
Due to the pandemic, second source flash ICs may be used in your Nextion device. Where such is the case, a card noting that the need to use Editor version 1.63.3 or higher is required. These devices have a QR code on the microSD card slot of the Nextion so it can be visually identified. For such devices, the firmware in v1.63.3 has the ability to communicate with both the existing and new second source flash ICs whereas the older Editor versions do not have the ability to communicate with the new second source flash ICs. For such devices, the ability to revert to an earlier version of the Nextion Editor is simply not available. Using an elder *.TFT file will cause a Data Error message and you will need to upgrade your project HMI and compile it with the Editor version v1.63.3 or later.
For Nextion devices not using the new second source flash ICs:
If reverting back to an earlier Nextion Editor version, use your “backup copy” of your HMI file that you backed-up before installing and trying out new software. If you forgot to make a backup (no-no-no tsk-tsk), open the “Version backup folder” and copy your old HMI file from the folder to use (and thank the Nextion Editor that it made a backup before converting into the new Editor version format).
All Editor versions before v0.38 are now prevented from use. Version v0.38 and later versions are more stable and incorporated many more features and capabilities than early Editor versions. Elder versions if truly required can found in the Forum Announcements > Nextion Editors and Change Logs. (Users must register and login to access the Forum)
The LTS Edition (Long Term Support) based on v0.53 is provided for code compatibility for existing projects created with v0.53 and prior. LTS Edition is not capable of communications with the new second source flash ICs.
Ensure that your Microsoft Visual C++ Redistributables are up-to-date. Updates from Microsoft for their Visual C++ Library Redistributables includes bug fixes for existing Microsoft Visual C++ Redistributables that for a few users has solved rare and user specific issues related to the Nextion Editor starting properly. For most users, the Redistributables are updated automatically in their periodic Microsoft Windows Updates.
Visual C++ Redistributables can be found [here] on the Microsoft website.
Programming and Electronics knowledge are prerequisite
– there are many external internet resources available
– there is no need to replicate all global information here
Nextion can be used with 68,000+ MCUs with a Hardware/Software
TTL Serial, in 130+ programming languages.
It is the User Duty to know
– their chosen MCU
– their chosen Programming Language
– their chosen Compiler
– their chosen Libraries used
The Hobby Lobby is not to be used as a Jobs Board.
– For this, Itead offers Enhanced Support and Project Units
If Enhanced Support is not the path you would like to go
– there are other Freelance sites on the Internet.
Attaching Files to your Forum Posts
To upload files (such as .HMI, .TFT, .ino, .pas, .cpp, etc) as attachments
1) please zip your files
2) then use this zip file as your attachment
3) Attachments are limited to 500K per attachment, 4 files per post allowed
Such also saves much storage space and time for others to download.
– not all community members live in super high bandwidth locales.
Create a new HMI project:
– in the Page Preinitialize Event add the code
touch_j
Compile, upload and run your project.
Follow the on-screen instructions.
It is pretty straight forward – there is no recovery.
It becomes locked to protect the project
DO NOT LOSE YOUR PASSWORD, or do not use password.
Select Import page to open dialog, select *. page file, click “Open”
Itead’s Iteadlib Arduino Nextion Library is available
via github and can be downloaded from
https://github.com/itead/ITEADLIB_Arduino_Nextion
Default configuration is for the Arduino MEGA 2560
The Arduino UNO is also supported – see readme.md file
This framework concept can be used to port to another MCU
Newer components and Intelligent Series support has not been added.
However, most components can “borrow” from another existing component
and then be extended to suit your needs.
The latest version of Nextion Editor can be downloaded [here]
To maintain code compatibility with projects created with version 0.53 or prior, an LTS Edition (Long Term Support) of the Nextion Editor can be downloaded [here]. The LTS Edition is not an excuse to be fearful of creating a new HMI project in the newer versions of the Editor (just as you were not fearful to create your current HMI).
If reverting back to the LTS Edition for code compatibility, or an earlier Nextion Editor version, use your “backup copy” of your HMI file that you backed-up before installing and trying out new software. If you forgot to make a backup (no-no-no tsk-tsk), open the “Version backup folder” and copy your old HMI file from the folder to use (and thank the Nextion Editor that it made a backup before converting into the new Editor version format).
The Nextion Datasheets can be found [here]
If it was burned by faulty operation, we certainly will not repair it for free.
The Unit of Screen Brightness is in percentage %
The Range of Screen Brightness is 0 to 100.
– Please refer to dim and dims in the Nextion Instruction Set [here]
For the brightness in NITS of your Nextion device
– Please refer to your Nextion model’s Datasheets [here]
Note that you need to use the two characters r and not n
Component .isbr attribute needs to be set to true.
Any desired whitespace padding is done via user code.
Check the back of your display. If imprinted with “TJCxxxxTxxx_xxx”, or “TJCxxxxKxxx_xxx” it means your display is a TJC model, which is not sold by ITEAD and we offer no support to such models.
Nextion’s microSD slot is primarily used to upload a TFT project file.
– The Intelligent Series has added capabilities, see Forum Announcements
Not all microSD cards are made for use with embedded devices.
– especially newer microSD cards made for cameras, etc.
Class 10 HC 8GB to 32GB cards have had good success. Others too.
Ensure
– microSD card formatted as FAT32 under Windows
– microSD card is less than 32 GB
– only 1 TFT project file exists on the microSD card
– Nextion device is powered off before inserting microSD card
– insert the microSD card containing TFT project file
– power on Nextion with recommended clean power as per Datasheets
– Nextion device is undisturbed while uploading
– after upload “successed” indication power off Nextion
– after Nextion device is powered off then remove microSD card
– power on Nextion with recommended clean power as per Datasheets
– if new version of Nextion Editor, allow time for firmware to update
– wait for uploaded project to begin running on Nextion device
Data Error can occur with newer Nextion devices needing v1.63.3 Nextion Editor
– if receiving Data Error, you must use v1.63.3 or above (card noting this included in box)
If microSD upload is unsuccessful
– Reformat the microSD card – ensuring FAT32 under Windows, and try.
– use a different microSD card (HC, Class 10, under 32GB), and try.
– compile a blank HMI project and try again.
– microSD card is not the only method to upload project – try via USB to TTL.
Using the above steps, the Nextion device will always run firmware upload
when an inserted microSD is detected at power on (power off before insert/remove)
This may be a Power supply problem. Please ensure to power your device according to the datasheet power supply range with the recommended supply of current. Under Voltage or under Current can cause damage. Over Voltage will cause damage. Too high or too low voltage is likely to damage back-light. For datasheet please refer to your model’s Datasheets [here]
Standard Support (Level 2) is offered to Itead customers.
– you must deal your Seller as per Buyer-Seller protection laws
– we only ensure the hardware itself works as expected
– please understand that we can not debug your code.
Supported is stated on the Standard Support page.
Enhanced Support is available by purchasing Tickets here
– quick and professional service, but indeed paid
Community Support is available via the Forum here
– community members will voluntarily answer when they desire.
Nextion is a 5V TTL Serial HMI device, be mindful
to ensure connecting to an appropriate adapter
The connection between Nextion and control device
Nextion Display -------- Control Device
   5V (Red) ------------------------- 5V
  GND (Black) ----------------------- GND
   TX (Blue) ------------------------ RX
   RX (Yellow)----------------------- TX
Ensure Ground with all used devices is common.
Control device: FOCA, USB-to-TTL, USB-to-UART, PC, MCU, Arduino
Ensure sufficient current supply as per Datasheets (here)
Not directly. For Basic or Enhanced Series models, animation can be frame by frame via user code. For the Intelligent Series, use the GmovMaker tool to create animations for the Gmov component.
No, this is not supported.
HMI is Human Machine Interface, not HDMI.
Sorry, No. The 2016 Goal for multiplatform was never met. Therefore, we will only support a Windows version. Ensure Microsoft .Net 3.5 is installed for Windows.
Others have used Windows under Linux and Mac (virtual machines, WINE, etc). Although user operating systems and used software is beyond the scope of Nextion support, it is indirectly possible.
No. TJC devices are not sold by Itead and we will offer no support.
TJC versions are allowed to be sold in China mainland only and supports Chinese only.
See TJC for support for TJC devices.
No. Nextion is not Open Source. Nextion will not be Open Source.
– we will not provide Nextion schematics, Nextion PCB layout, components used, Nextion Editor source code, or any of the design data involved.
What is available to the public has been made available
– please refer to your Nextion model’s Datasheet [here]
Page load link
Winehq version: 5.0.1
OS: Ubuntu 18.04.4 64bit
Wine appears to run ok. Winefile, winecfg, and notepad all start and appear to run ok.
Gecko and mono are installed:
wine uninstaller —list
Code: Select all
{92E6986F-9DE7-4D94-A27F-3601B260C881}|||Wine Gecko (32-bit)
{83F3DB41-CE50-411F-B218-93FD46CE0AB0}|||Wine Gecko (64-bit)
{0A3CE9B1-FEEE-59FE-9F5B-6AD87E9D6D55}|||Wine Mono Runtime
{8938A429-407D-5208-903D-37777470D766}|||Wine Mono Windows Support
WINEARCH is set to win32 and I’m just going with the default .wine prefix.
I’m attempting to install the Nextion Editor application. The setup
file I’ve downloaded is nextion-setup-v1-60-2.exe, currently their latest I believe.
From the Downloads directory when I execute wine nextion-setup-v1-60-2.exe, the following is
echoed to terminal and then the setup dialog starts:
Code: Select all
002d:fixme:explorerframe:taskbar_list_SetProgressValue iface 00111638, hwnd 00030054, ullCompleted 10000, ullTotal 9e000 stub!
002d:fixme:explorerframe:taskbar_list_SetProgressState iface 00111638, hwnd 00030054, flags 0 stub!
0030:fixme:ntdll:NtLockFile I/O completion on lock not implemented yet
0030:fixme:ntdll:NtQuerySystemInformation info_class SYSTEM_PERFORMANCE_INFORMATION
The installer appears to work and starts the typical install process but never gets to the expected
«Program installed» press OK type dialog, It just quits and the following lines are output
to terminal:
Code: Select all
0030:fixme:msi:internal_ui_handler internal UI not implemented for message 0x0b000000 (UI level = 5)
0030:fixme:msi:internal_ui_handler internal UI not implemented for message 0x0b000000 (UI level = 5)
Failed to run module constructor due to (null) assembly:C:windowsmonomono-2.0libmono4.5mscorlib.dll type:TypeInitializationException member:(null)
Now it appears in installed software list:
Code: Select all
{A32FC570-5615-409B-BD34-2DCBBF90A697}|||Nextion Editor
{92E6986F-9DE7-4D94-A27F-3601B260C881}|||Wine Gecko (32-bit)
{83F3DB41-CE50-411F-B218-93FD46CE0AB0}|||Wine Gecko (64-bit)
{0A3CE9B1-FEEE-59FE-9F5B-6AD87E9D6D55}|||Wine Mono Runtime
{8938A429-407D-5208-903D-37777470D766}|||Wine Mono Windows Support
An entry is created in my Applications tabs and a desktop shortcut is created with the following properties:
Code: Select all
env WINEPREFIX="/home/huw/.wine" wine C:\Program Files (x86)\Nextion Editor\Nextion Editor.exe Double click on the desktop shortcut brings up Ubuntu Untrusted dialog. Click on Trust and Launch and then nothing.
I’ve tried starting the .exe up using winefile but I get the following line in terminal:
Code: Select all
Failed to run module constructor due to (null) assembly:C:windowsmonomono-2.0libmono4.5mscorlib.dll type:TypeInitializationException member:(null)I’ve also changed into the prefix directory where it installed The Nextion app and tried
starting with wine ‘Nextion Editor.exe’ but get the same line as above.
I specified the WINEARCH=win32 intially because posts relating to Nextion Editor
software under wine (there werent that many) all seemed to reference that in their
attempts, albeit a year or more ago.
Any advice on moving forward from this point would be much appreciated.
проблемы с Nextion
- Войдите на сайт для отправки комментариев
Crussherhead
Offline
Зарегистрирован: 24.12.2021
Друзья, у меня такая проблема. В программе Nextion Editor пробую слепить анимацию из 22х кадров.
Создаю таймер, прописываю код:
if(p0.pic<=22)
{p0.pic++}
else
{p0.pic=0}
нажимаю дебаг.
Выдается такая ошибка.
ЧТо он от меня хочет? куда ему скобку добавить ??? помогите разобраться пожалуйста, что я не так делаю?
Error:SYNTAX ERROR: Missing «{«:if(p0.pic<=22)( Double click to jump to code)
Error:Compile failed! 1 Errors, 0 Warnings,
- Войдите на сайт для отправки комментариев
- Radioartisan
- Topics
Nextion Editor Please Install Visual C++ Error
#nextion
|
I’m trying to install the Nextion editor and keep getting the Please Install Visual C++ 2015 error. I’ve spent hours uninstalling all versions of C++ then reinstalling the latest from Microsoft, rebooting and trying again. Anyone else fought this battle and won? |
|
Hi Randy, I had no trouble loading the editor into my Win10 machine. Sorry, I got nothing other than to ask if you are running Win10 or not. Good luck, Scott iPad transmission
|
|
Yes, sorry, running Windows 10. Can you tell me all of the versions of Visual that are installed on your computer? Wonder if the Editor needs more than just 2015? I found a script from major geeks that installs all supported versions. But I’m not very interested in running a script from a site like that. |
|
Hi Randy and all, I have solved problem in my WIN7 64BIT with this look video. V V pet., 21. jan. 2022 ob 21:01 je oseba Randy Nelson <rlnou812@…> napisala:
|
The Nextion display I just received from Amazon was from your link on Github. It has NX3224T024_011 on the back. There’s a sticker over the SD Card Slot that says DE607C43435D5236. On the edge of the display it has HST024042 3-2.
Here is some output from the ESP8266 GUI, in case that might shed some light:
MQTT Status: Disconnected
MQTT return code: 0
MQTT last error: -3
MQTT broker ping check: FAILED
MQTT broker port check: FAILED
MQTT ClientID: plate01-bcff4d193588
HASPone FW Version: 1.05
LCD Model:
LCD FW Version: 0
LCD Active Page: -1
LCD Serial Speed: 115200
CPU Frequency: 160MHz
Sketch Size: 661728 bytes
Free Sketch Space: 2482176 bytes
Heap Free: 19288
Heap Fragmentation: 2
ESP core version: 3.0.2
IP Address: 192.168.10.244
Signal Strength: -78
Uptime: 16
Last reset: Software/System restart
Since I’m getting the «File Version is too low» when trying both the SDCard and ESP8266 method of installing the HASwitchPlate.tft file, do you think I’m doing everything correct and there is some other issue that is going on? Something that can be fixed? Or should I return the display to Amazon? I’d really like to get this HASPone working since I’ve spent this money on it.
FYI — when I load the .hmi into the Nextion Editor, I get this:
In the Nextion Editor, I see this when loading the .hmi
Available Memory3584
Global Memory:3552
Total size of picture:60,576
Total size of font:2,739,934
Error:Page:p0 Error! Memory overflow:3552+36=3588
Error:Compile failed! 1 Errors, 0 Warnings,
Does that mean that it’s only the first page that is too large? That appears to be a QR code that might only be for setting up WiFi — which I don’t think I’d need anyway. Can this be fixed somehow? I have no idea how to use the Nextion Editor software.
I had a complex setup with Nextion working and running fine. I made some changes to the order and names of some pages on the Nextion tft file and started getting «Nextion is not connected» error in the logs and obviously it all stopped working. Very odd.
As part of my troubleshooting and because the changes I made to the Nextion tft file had no reference in the esphome yaml I reduced the esphome yaml and the Nextion tft file to bare minimium and am still getting the error.
esphome:
  name: thermostat_dashboard
  platform: ESP32
  board: featheresp32

wifi:
  ssid: "name"
  password: "pass"

api:
  password: "pass"

ota:
  password: "pass"

logger:
  baud_rate: 0
  level: VERBOSE

uart:
  id: serial
  rx_pin: RX
  tx_pin: TX
  baud_rate: 9600

display:
  - platform: nextion
    id: nextion_display
    uart_id: serial
INFO Reading configuration /config/esphome/thermostat_dashboard.yaml...
INFO Starting log output from thermostat_dashboard.local using esphome API
INFO Connecting to thermostat_dashboard.local:6053 (192.168.0.47)
INFO Successfully connected to thermostat_dashboard.local
[15:49:04][I][app:105]: ESPHome version 1.20.0 compiled on Jul 24 2021, 15:46:24
[15:49:04][C][wifi:499]: WiFi:
[15:49:04][C][wifi:359]:   SSID: [redacted]
[15:49:04][C][wifi:360]:   IP Address: 192.168.0.47
[15:49:04][C][wifi:362]:   BSSID: [redacted]
[15:49:04][C][wifi:363]:   Hostname: 'thermostat_dashboard'
[15:49:04][C][wifi:367]:   Signal strength: -71 dB ▂▄▆█
[15:49:04][V][wifi:369]:   Priority: 0.0
[15:49:04][C][wifi:371]:   Channel: 11
[15:49:04][C][wifi:372]:   Subnet: 255.255.255.0
[15:49:04][C][wifi:373]:   Gateway: 192.168.0.1
[15:49:04][C][wifi:374]:   DNS1: 194.168.4.100
[15:49:04][C][wifi:375]:   DNS2: 194.168.8.100
[15:49:04][C][uart_esp32:088]: UART Bus:
[15:49:04][C][uart_esp32:090]:   TX Pin: GPIO17
[15:49:04][C][uart_esp32:093]:   RX Pin: GPIO16
[15:49:04][C][uart_esp32:094]:   RX Buffer Size: 256
[15:49:04][C][uart_esp32:096]:   Baud Rate: 9600 baud
[15:49:04][C][uart_esp32:097]:   Data Bits: 8
[15:49:04][C][uart_esp32:098]:   Parity: NONE
[15:49:04][C][uart_esp32:099]:   Stop bits: 1
[15:49:04][C][logger:189]: Logger:
[15:49:04][C][logger:190]:   Level: VERBOSE
[15:49:04][C][logger:191]:   Log Baud Rate: 0
[15:49:04][C][logger:192]:   Hardware UART: UART0
[15:49:04][C][nextion:117]: Nextion:
[15:49:04][C][nextion:118]:   Device Model:
[15:49:04][C][nextion:119]:   Firmware Version:
[15:49:04][C][nextion:120]:   Serial Number:
[15:49:04][C][nextion:121]:   Flash Size:
[15:49:04][C][nextion:122]:   Wake On Touch:    True
[15:49:04][C][ota:029]: Over-The-Air Updates:
[15:49:04][C][ota:030]:   Address: thermostat_dashboard.local:3232
[15:49:04][C][ota:032]:   Using Password.
[15:49:04][W][nextion:072]: Nextion is not connected!
[15:49:06][C][api:095]: API Server:
[15:49:06][C][api:096]:   Address: thermostat_dashboard.local:6053
[15:49:06][W][nextion:072]: Nextion is not connected!
[15:49:06][W][nextion:072]: Nextion is not connected!
Skip to content
![]()
FAQsPatrick2019-07-19T00:09:21+08:00
- All
- Common Tasks
- General
- MCU Side
- Nextion
- Nextion Editor
- Troubleshooting
- Useful Links
Nextion preamble Startup/Ready in Program.sPatrick2022-12-24T06:06:53+08:00
As of Nextion Editor v1.65.0, the Nextion 10 bytes of power on preamble Nextion Startup 00 00 00 FF FF FF (NIS 7.19) and Nextion Ready 88 FF FF FF (NIS 7.29) have been moved from firmware into Program.s as a printh statement printh 00 00 00 FF FF FF 88 FF FF FF. This change allows users to keep as Nextion has always been, modify to have their own custom preamble, or remove the preamble all together.
Program.s is the place for startup code prior to the first page of a users HMI to begin running. Items as global integer declarations such as int sys0, sys1, and sys2, to instructions setting defaults from brightness to baudrates such as baud=9600, dim=100, recmod=0, to launching the first HMI page such as page 0 will now be found in the new default Program.s tab. (Any code after the page instruction will not run as the HMI does not return back for Program.s to continue)
Data Error messagePatrick2022-09-20T23:47:16+08:00
The Data Error message signifies the uploaded *.tft file can not be used
– it can be a result of line noise and *.tft did not arrive in tact, or
– it can also be a result of your device requiring to use a newer Nextion Editor.
Data Error can occur with newer Nextion devices needing v1.63.3 Nextion Editor
– if receiving Data Error, you must use v1.63.3 or above (card noting this included in box)
Due to the pandemic, second source flash ICs may be used in your Nextion device since mid 2021. Where such is the case, a card noting that the need to use Editor version 1.63.3 or higher is included. These devices have a QR code on the microSD card slot of the Nextion so it can be visually identified. For such devices, the firmware in v1.63.3 has the ability to communicate with both the existing and new second source flash ICs whereas the older Editor versions do not have the ability to communicate with the new second source flash ICs. For such devices, the ability to revert to an earlier version of the Nextion Editor is simply not available. Using an elder *.TFT file will cause a Data Error message and you will need to upgrade your project HMI and compile it with the Editor version v1.63.3 or later.
Newer Nextion devices require Editor version 1.63.3 or later.Patrick2022-09-20T23:41:21+08:00
Due to the pandemic, second source flash ICs may be used in your Nextion device since mid 2021. Where such is the case, a card noting that the need to use Editor version 1.63.3 or higher is included. These devices have a QR code on the microSD card slot of the Nextion so it can be visually identified. For such devices, the firmware in v1.63.3 has the ability to communicate with both the existing and new second source flash ICs whereas the older Editor versions do not have the ability to communicate with the new second source flash ICs. For such devices, the ability to revert to an earlier version of the Nextion Editor is simply not available. Using an elder *.TFT file will cause a Data Error message and you will need to upgrade your project HMI and compile it with the Editor version v1.63.3 or later.
Using Legacy Nextion devicesPatrick2020-06-11T19:39:35+08:00
Important Note for Legacy Nextion devices.
Every Nextion device was factory tested to work with the Nextion Editor version that current at the time the Nextion device was made. This is to say a Nextion device purchased in Apr 2016 would work with the (current at that time) Nextion Editor version v0.33. For very old Nextion devices with project firmware v0.32 and before, some will need to upgrade to an intermediary Nextion firmware (v0.42 TFTs supplied below) BEFORE the newer Nextion Editors (LTS Edition or v0.58 or later) can be used. Note the Nextion Editor LTS Edition code is based on version v0.53, the Nextion Editor LTS Edition is not Nextion Editor version v0.53, it is Nextion Editor LTS Edition.
Which Nextion devices are classed Legacy and may need intermediary upgrade
– your Nextion is a T Series Basic Model NX----T---_011 (Basic models have blue PCBs)
– your Nextion has the Itead logo (not the Nextion logo)
– your last Nextion project uploaded used Editor v0.37 or prior
– your Nextion connect reports firmware below S62
If these conditions apply then an intermediary upgrade is needed to use the newer Nextion Editors.
An Intermediary upgrade is performed by
– creating a simple project using Nextion Editor v0.42 (found in Forum Announcements)
– compile this project and upload its TFT file to your device (over serial or microSD)
– or download v0.42 T_intermediary.zip here, extract and upload the TFT for your model
– your device is now ready to use the newer LTS and v0.58 or later Editors
– create and upload the TFT project made by the newer Editors as usual
Note: Once version v0.38 is used, you can not use an earlier than v0.38 version Editor
Q: I have a Legacy device and want to continue using my existing v0.34 Editor
A: There is no issue to use your Legacy Nextion device with the elder Nextion Editor as long as you do not A) upgrade to v0.38 or later (can not go back) or B) attempt to skip the Intermediary upgrade before using the newer Editors (LTS or v0.58 and later)
Q: How do I know my Nextion device firmware version is? ie S62
A: The Nextion firmware Ver:S--- shows in the Editor Debug Simulator Status Bar area when connecting to the Nextion Device (see Editor Guide or the Upload Protocol v1.1 published in the Blog section)
Q: I skipped the Intermediary step and went straight to the newer Editor, now what?
A: The best solution would have been following the Intermediary steps and avoid bricking. If your Legacy device is now showing a device null error, you can try to reanimate your device using the LegacyFix TFT file (download link) and exactly follow the steps in the Readme.txt file.
The ” model does not match” issueDaniel Zhan2020-01-17T12:08:13+08:00
After uploading a HMI project to Nextion display via PC and power on, the screen shows “model does not match”.
Reasons:
– The wrong model was chosen when set up the HMI project, please go to “Device” and select the correct model, re-compile the HMI project.
– The USB to TTL module for uploading is not reliable, please try with another USB to TTL module. Our recommendation is to use the Foca Max.
Reverting to an earlier Nextion Editor versionPatrick2022-09-20T23:37:24+08:00
Please note:
Due to the pandemic, second source flash ICs may be used in your Nextion device. Where such is the case, a card noting that the need to use Editor version 1.63.3 or higher is required. These devices have a QR code on the microSD card slot of the Nextion so it can be visually identified. For such devices, the firmware in v1.63.3 has the ability to communicate with both the existing and new second source flash ICs whereas the older Editor versions do not have the ability to communicate with the new second source flash ICs. For such devices, the ability to revert to an earlier version of the Nextion Editor is simply not available. Using an elder *.TFT file will cause a Data Error message and you will need to upgrade your project HMI and compile it with the Editor version v1.63.3 or later.
For Nextion devices not using the new second source flash ICs:
If reverting back to an earlier Nextion Editor version, use your “backup copy” of your HMI file that you backed-up before installing and trying out new software. If you forgot to make a backup (no-no-no tsk-tsk), open the “Version backup folder” and copy your old HMI file from the folder to use (and thank the Nextion Editor that it made a backup before converting into the new Editor version format).
All Editor versions before v0.38 are now prevented from use. Version v0.38 and later versions are more stable and incorporated many more features and capabilities than early Editor versions. Elder versions if truly required can found in the Forum Announcements > Nextion Editors and Change Logs. (Users must register and login to access the Forum)
The LTS Edition (Long Term Support) based on v0.53 is provided for code compatibility for existing projects created with v0.53 and prior. LTS Edition is not capable of communications with the new second source flash ICs.
Microsoft Visual C++ RedistributablesPatrick2020-01-03T21:40:29+08:00
Ensure that your Microsoft Visual C++ Redistributables are up-to-date. Updates from Microsoft for their Visual C++ Library Redistributables includes bug fixes for existing Microsoft Visual C++ Redistributables that for a few users has solved rare and user specific issues related to the Nextion Editor starting properly. For most users, the Redistributables are updated automatically in their periodic Microsoft Windows Updates.
Visual C++ Redistributables can be found [here] on the Microsoft website.
User Duty to Know their …Patrick2019-11-21T22:50:34+08:00
Programming and Electronics knowledge are prerequisite
– there are many external internet resources available
– there is no need to replicate all global information here
Nextion can be used with 68,000+ MCUs with a Hardware/Software
TTL Serial, in 130+ programming languages.
It is the User Duty to know
– their chosen MCU
– their chosen Programming Language
– their chosen Compiler
– their chosen Libraries used
Nextion Forum is not a Jobs BoardPatrick2017-11-22T16:53:13+08:00
The Hobby Lobby is not to be used as a Jobs Board.
– For this, Itead offers Enhanced Support and Project Units
If Enhanced Support is not the path you would like to go
– there are other Freelance sites on the Internet.
Attaching Files to your Forum PostsPatrick2020-01-04T02:22:41+08:00
Attaching Files to your Forum Posts
To upload files (such as .HMI, .TFT, .ino, .pas, .cpp, etc) as attachments
1) please zip your files
2) then use this zip file as your attachment
3) Attachments are limited to 500K per attachment, 4 files per post allowed
Such also saves much storage space and time for others to download.
– not all community members live in super high bandwidth locales.
Recalibrating the Resistive NextionPatrick2020-01-04T02:00:01+08:00
Create a new HMI project:
– in the Page Preinitialize Event add the code
touch_j
Compile, upload and run your project.
Follow the on-screen instructions.
Resetting HMI/Page passwordsPatrick2017-11-06T11:54:57+08:00
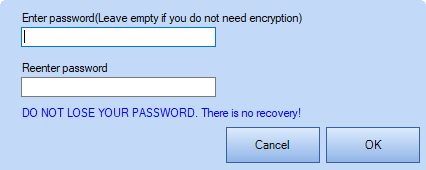
It is pretty straight forward – there is no recovery.
It becomes locked to protect the project
DO NOT LOSE YOUR PASSWORD, or do not use password.
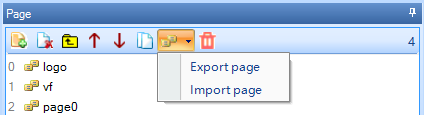
How to Import a PagePatrick2017-11-01T21:28:17+08:00
Select Import page to open dialog, select *. page file, click “Open”
Iteadlib Arduino Nextion LibraryPatrick2020-01-04T01:58:23+08:00
Itead’s Iteadlib Arduino Nextion Library is available
via github and can be downloaded from
https://github.com/itead/ITEADLIB_Arduino_Nextion
Default configuration is for the Arduino MEGA 2560
The Arduino UNO is also supported – see readme.md file
This framework concept can be used to port to another MCU
Newer components and Intelligent Series support has not been added.
However, most components can “borrow” from another existing component
and then be extended to suit your needs.
Nextion Editor DownloadPatrick2020-01-04T01:54:18+08:00
The latest version of Nextion Editor can be downloaded [here]
To maintain code compatibility with projects created with version 0.53 or prior, an LTS Edition (Long Term Support) of the Nextion Editor can be downloaded [here]. The LTS Edition is not an excuse to be fearful of creating a new HMI project in the newer versions of the Editor (just as you were not fearful to create your current HMI).
If reverting back to the LTS Edition for code compatibility, or an earlier Nextion Editor version, use your “backup copy” of your HMI file that you backed-up before installing and trying out new software. If you forgot to make a backup (no-no-no tsk-tsk), open the “Version backup folder” and copy your old HMI file from the folder to use (and thank the Nextion Editor that it made a backup before converting into the new Editor version format).
Nextion DatasheetsPatrick2020-01-04T01:36:05+08:00
The Nextion Datasheets can be found [here]
The Nextion device has burned to deadPatrick2017-10-10T04:40:09+08:00
If it was burned by faulty operation, we certainly will not repair it for free.
What is the Range and Unit of Screen BrightnessPatrick2020-01-04T00:39:23+08:00
The Unit of Screen Brightness is in percentage %
The Range of Screen Brightness is 0 to 100.
– Please refer to dim and dims in the Nextion Instruction Set [here]
For the brightness in NITS of your Nextion device
– Please refer to your Nextion model’s Datasheets [here]
Using Component Word WrapPatrick2020-01-04T00:33:48+08:00
Note that you need to use the two characters r and not n
Component .isbr attribute needs to be set to true.
Any desired whitespace padding is done via user code.
<84 78> Resource File ErrorPatrick2017-10-10T04:42:06+08:00
Check the back of your display. If imprinted with “TJCxxxxTxxx_xxx”, or “TJCxxxxKxxx_xxx” it means your display is a TJC model, which is not sold by ITEAD and we offer no support to such models.
Microsoft .Net 3.5 Runtime LibraryPatrick2017-10-10T04:15:35+08:00
Using the Nextion microSD (upload)Patrick2022-09-20T23:42:40+08:00
Nextion’s microSD slot is primarily used to upload a TFT project file.
– The Intelligent Series has added capabilities, see Forum Announcements
Not all microSD cards are made for use with embedded devices.
– especially newer microSD cards made for cameras, etc.
Class 10 HC 8GB to 32GB cards have had good success. Others too.
Ensure
– microSD card formatted as FAT32 under Windows
– microSD card is less than 32 GB
– only 1 TFT project file exists on the microSD card
– Nextion device is powered off before inserting microSD card
– insert the microSD card containing TFT project file
– power on Nextion with recommended clean power as per Datasheets
– Nextion device is undisturbed while uploading
– after upload “successed” indication power off Nextion
– after Nextion device is powered off then remove microSD card
– power on Nextion with recommended clean power as per Datasheets
– if new version of Nextion Editor, allow time for firmware to update
– wait for uploaded project to begin running on Nextion device
Data Error can occur with newer Nextion devices needing v1.63.3 Nextion Editor
– if receiving Data Error, you must use v1.63.3 or above (card noting this included in box)
If microSD upload is unsuccessful
– Reformat the microSD card – ensuring FAT32 under Windows, and try.
– use a different microSD card (HC, Class 10, under 32GB), and try.
– compile a blank HMI project and try again.
– microSD card is not the only method to upload project – try via USB to TTL.
Using the above steps, the Nextion device will always run firmware upload
when an inserted microSD is detected at power on (power off before insert/remove)
Flashing or blurred screen when powered onPatrick2020-01-04T00:28:05+08:00
This may be a Power supply problem. Please ensure to power your device according to the datasheet power supply range with the recommended supply of current. Under Voltage or under Current can cause damage. Over Voltage will cause damage. Too high or too low voltage is likely to damage back-light. For datasheet please refer to your model’s Datasheets [here]
Standard, Enhanced and Community SupportPatrick2020-01-04T00:25:03+08:00
Standard Support (Level 2) is offered to Itead customers.
– you must deal your Seller as per Buyer-Seller protection laws
– we only ensure the hardware itself works as expected
– please understand that we can not debug your code.
Supported is stated on the Standard Support page.
Enhanced Support is available by purchasing Tickets here
– quick and professional service, but indeed paid
Community Support is available via the Forum here
– community members will voluntarily answer when they desire.
Connecting Nextion to a Control DevicePatrick2021-03-13T08:16:26+08:00
Nextion is a 5V TTL Serial HMI device, be mindful
to ensure connecting to an appropriate adapter
The connection between Nextion and control device
Nextion Display -------- Control Device
   5V (Red) ------------------------- 5V
  GND (Black) ----------------------- GND
   TX (Blue) ------------------------ RX
   RX (Yellow)----------------------- TX
Ensure Ground with all used devices is common.
Control device: FOCA, USB-to-TTL, USB-to-UART, PC, MCU, Arduino
Ensure sufficient current supply as per Datasheets (here)
Can Nextion display animation directly?Patrick2020-01-03T22:51:22+08:00
Not directly. For Basic or Enhanced Series models, animation can be frame by frame via user code. For the Intelligent Series, use the GmovMaker tool to create animations for the Gmov component.
Can Nextion work as a Raspberry-pi primary HDMI display?Patrick2020-01-04T00:19:36+08:00
No, this is not supported.
HMI is Human Machine Interface, not HDMI.
Nextion IDE Runtime requires Microsoft .Net 3.5Patrick2017-10-10T01:15:21+08:00
Is there a Mac or Linux version of EditorPatrick2020-01-03T22:56:18+08:00
Sorry, No. The 2016 Goal for multiplatform was never met. Therefore, we will only support a Windows version. Ensure Microsoft .Net 3.5 is installed for Windows.
Others have used Windows under Linux and Mac (virtual machines, WINE, etc). Although user operating systems and used software is beyond the scope of Nextion support, it is indirectly possible.
Can I use Nextion Editor with TJC DevicesPatrick2017-10-10T01:04:09+08:00
No. TJC devices are not sold by Itead and we will offer no support.
TJC versions are allowed to be sold in China mainland only and supports Chinese only.
See TJC for support for TJC devices.
Is Nextion Open Source?Patrick2020-01-03T22:35:38+08:00
No. Nextion is not Open Source. Nextion will not be Open Source.
– we will not provide Nextion schematics, Nextion PCB layout, components used, Nextion Editor source code, or any of the design data involved.
What is available to the public has been made available
– please refer to your Nextion model’s Datasheet [here]
Page load link

Страница 3 из 3
-
Через флешку удобней, но.
На флешке не должно быть ничего кроме tft файла. Флешка должна быть 32гб максимум и fat16/fat32.
Так ли это у вас? По симптомам экран не нашел на флешке ничего подходящего. Когда экран прошивается там красные буквы на белом фоне. -
Да, конечно … — CD =32Gb, отформатировал fat32, скопировал на неё tft файл (созданный в Nextion Editor) …
Вроде всё сделал правильно …Прошу прощения — где смотреть? Пока не вижу …
-
А скриншот того что на флешке лежит можно посмотреть?
-
ничем.
он не предназначен для открытий, его только в экран можно залить -
Могу просто переслать Вам его. Напишите куда?
-
прям сюда прикрепляйте, «загрузить файл» и zip архив, в котором hmi и tft
-
как открыть на экране? я только название, размер и т.д. вижу
-
да вы можете скрин вашего проводника прикрепить где показано что у вас на флешке лежит?
уверены что tft файл а не hmi например и он в корне флешки и не на русском и без пробелов и все такое прочее что так обожают новички? ))
уверены что при создании проекта в редакторе вы выбрали правильную модель экрана? -
На CD находится 1 файл с расширением ftf
Новичок, но «всё такое прочее» мне не нравится.
Размер 320х240
В остальном не уверен …
Файлы с расширениями tft иHMI на форум не грузятся -
Это с EDITORа, а как содержимое флешки открыть не знаю
Вложения:
-
Спасибо! Заработало! Загрузил через UART, провода поменял и загрузка прошла.
timon и Daniil нравится это.
-
Timon, здравствуйте.
Ещё вопросик возник: «Как, если можно, в Nextion Editor создавая Progress bar сделать его «движок» (bpic) прозрачным (невидимым)?»
Это для переключения страниц … -
Используйте полностью прозрачную PNG в виде картинки.
-
Если Вы не против — я Вас ещё помучаю …
На экране есть числа — n0,n1,n2.n3
Есть скетч часов:
#include <SoftwareSerial.h>
#include <iarduino_RTC.h>
iarduino_RTC time(RTC_DS1302,47,49,48);void setup()
{
delay(300);
Serial.begin(9600);
time.settime(0,59,23,31,12,18,1); // 0 сек, 59 мин, 23 час, 31, декабря, 2018 года, понедельник
time.begin();
}void loop(){
if(millis()%1000==0){ // если прошла 1 секунда
Serial.println(time.gettime(«H»)); // выводим часы
Serial.println(time.gettime(«i»)); // выводим минуты
Serial.println(time.gettime(«d»)); // выводим число
Serial.println(time.gettime(«m»)); // выводим месяц
delay(1); // приостанавливаем на 1 мс, чтоб не выводить время несколько раз за 1мс
}
}
Надо привязать к каждому числу соответствующее значение — часы, минуты,дата,месяц — чтобы они отражались на экране в нужных местах.
Благодарю -
Я с этого начал … Не получилось — или не грузится или отображается не прозрачным …
Применил две невидимые кнопки -
A.K.M., а вы вообще что нибудь на экран передавали до этого? Хотя бы просто значение переменной? Есть хотя бы минимальные понятия как работает обмен с Nextion-экранами по uart?
-
Не стоит никого мучать, полистайте вот тут:
http://forum.amperka.ru/threads/Дисплей-nextion-азы-arduino-esp8266.9204/Много интересных ответов найдете…
Последнее редактирование: 6 фев 2019
A.K.M. и timon нравится это.
")
")
Страница 3 из 3
Winehq version: 5.0.1
OS: Ubuntu 18.04.4 64bit
Wine appears to run ok. Winefile, winecfg, and notepad all start and appear to run ok.
Gecko and mono are installed:
wine uninstaller —list
Code: Select all
{92E6986F-9DE7-4D94-A27F-3601B260C881}|||Wine Gecko (32-bit)
{83F3DB41-CE50-411F-B218-93FD46CE0AB0}|||Wine Gecko (64-bit)
{0A3CE9B1-FEEE-59FE-9F5B-6AD87E9D6D55}|||Wine Mono Runtime
{8938A429-407D-5208-903D-37777470D766}|||Wine Mono Windows Support
WINEARCH is set to win32 and I’m just going with the default .wine prefix.
I’m attempting to install the Nextion Editor application. The setup
file I’ve downloaded is nextion-setup-v1-60-2.exe, currently their latest I believe.
From the Downloads directory when I execute wine nextion-setup-v1-60-2.exe, the following is
echoed to terminal and then the setup dialog starts:
Code: Select all
002d:fixme:explorerframe:taskbar_list_SetProgressValue iface 00111638, hwnd 00030054, ullCompleted 10000, ullTotal 9e000 stub!
002d:fixme:explorerframe:taskbar_list_SetProgressState iface 00111638, hwnd 00030054, flags 0 stub!
0030:fixme:ntdll:NtLockFile I/O completion on lock not implemented yet
0030:fixme:ntdll:NtQuerySystemInformation info_class SYSTEM_PERFORMANCE_INFORMATION
The installer appears to work and starts the typical install process but never gets to the expected
«Program installed» press OK type dialog, It just quits and the following lines are output
to terminal:
Code: Select all
0030:fixme:msi:internal_ui_handler internal UI not implemented for message 0x0b000000 (UI level = 5)
0030:fixme:msi:internal_ui_handler internal UI not implemented for message 0x0b000000 (UI level = 5)
Failed to run module constructor due to (null) assembly:C:windowsmonomono-2.0libmono4.5mscorlib.dll type:TypeInitializationException member:(null)
Now it appears in installed software list:
Code: Select all
{A32FC570-5615-409B-BD34-2DCBBF90A697}|||Nextion Editor
{92E6986F-9DE7-4D94-A27F-3601B260C881}|||Wine Gecko (32-bit)
{83F3DB41-CE50-411F-B218-93FD46CE0AB0}|||Wine Gecko (64-bit)
{0A3CE9B1-FEEE-59FE-9F5B-6AD87E9D6D55}|||Wine Mono Runtime
{8938A429-407D-5208-903D-37777470D766}|||Wine Mono Windows Support
An entry is created in my Applications tabs and a desktop shortcut is created with the following properties:
Code: Select all
env WINEPREFIX="/home/huw/.wine" wine C:Program Files (x86)Nextion EditorNextion Editor.exe Double click on the desktop shortcut brings up Ubuntu Untrusted dialog. Click on Trust and Launch and then nothing.
I’ve tried starting the .exe up using winefile but I get the following line in terminal:
Code: Select all
Failed to run module constructor due to (null) assembly:C:windowsmonomono-2.0libmono4.5mscorlib.dll type:TypeInitializationException member:(null)I’ve also changed into the prefix directory where it installed The Nextion app and tried
starting with wine ‘Nextion Editor.exe’ but get the same line as above.
I specified the WINEARCH=win32 intially because posts relating to Nextion Editor
software under wine (there werent that many) all seemed to reference that in their
attempts, albeit a year or more ago.
Any advice on moving forward from this point would be much appreciated.
I had a complex setup with Nextion working and running fine. I made some changes to the order and names of some pages on the Nextion tft file and started getting «Nextion is not connected» error in the logs and obviously it all stopped working. Very odd.
As part of my troubleshooting and because the changes I made to the Nextion tft file had no reference in the esphome yaml I reduced the esphome yaml and the Nextion tft file to bare minimium and am still getting the error.
esphome:
  name: thermostat_dashboard
  platform: ESP32
  board: featheresp32

wifi:
  ssid: "name"
  password: "pass"

api:
  password: "pass"

ota:
  password: "pass"

logger:
  baud_rate: 0
  level: VERBOSE

uart:
  id: serial
  rx_pin: RX
  tx_pin: TX
  baud_rate: 9600

display:
  - platform: nextion
    id: nextion_display
    uart_id: serial
INFO Reading configuration /config/esphome/thermostat_dashboard.yaml...
INFO Starting log output from thermostat_dashboard.local using esphome API
INFO Connecting to thermostat_dashboard.local:6053 (192.168.0.47)
INFO Successfully connected to thermostat_dashboard.local
[15:49:04][I][app:105]: ESPHome version 1.20.0 compiled on Jul 24 2021, 15:46:24
[15:49:04][C][wifi:499]: WiFi:
[15:49:04][C][wifi:359]:   SSID: [redacted]
[15:49:04][C][wifi:360]:   IP Address: 192.168.0.47
[15:49:04][C][wifi:362]:   BSSID: [redacted]
[15:49:04][C][wifi:363]:   Hostname: 'thermostat_dashboard'
[15:49:04][C][wifi:367]:   Signal strength: -71 dB ▂▄▆█
[15:49:04][V][wifi:369]:   Priority: 0.0
[15:49:04][C][wifi:371]:   Channel: 11
[15:49:04][C][wifi:372]:   Subnet: 255.255.255.0
[15:49:04][C][wifi:373]:   Gateway: 192.168.0.1
[15:49:04][C][wifi:374]:   DNS1: 194.168.4.100
[15:49:04][C][wifi:375]:   DNS2: 194.168.8.100
[15:49:04][C][uart_esp32:088]: UART Bus:
[15:49:04][C][uart_esp32:090]:   TX Pin: GPIO17
[15:49:04][C][uart_esp32:093]:   RX Pin: GPIO16
[15:49:04][C][uart_esp32:094]:   RX Buffer Size: 256
[15:49:04][C][uart_esp32:096]:   Baud Rate: 9600 baud
[15:49:04][C][uart_esp32:097]:   Data Bits: 8
[15:49:04][C][uart_esp32:098]:   Parity: NONE
[15:49:04][C][uart_esp32:099]:   Stop bits: 1
[15:49:04][C][logger:189]: Logger:
[15:49:04][C][logger:190]:   Level: VERBOSE
[15:49:04][C][logger:191]:   Log Baud Rate: 0
[15:49:04][C][logger:192]:   Hardware UART: UART0
[15:49:04][C][nextion:117]: Nextion:
[15:49:04][C][nextion:118]:   Device Model:
[15:49:04][C][nextion:119]:   Firmware Version:
[15:49:04][C][nextion:120]:   Serial Number:
[15:49:04][C][nextion:121]:   Flash Size:
[15:49:04][C][nextion:122]:   Wake On Touch:    True
[15:49:04][C][ota:029]: Over-The-Air Updates:
[15:49:04][C][ota:030]:   Address: thermostat_dashboard.local:3232
[15:49:04][C][ota:032]:   Using Password.
[15:49:04][W][nextion:072]: Nextion is not connected!
[15:49:06][C][api:095]: API Server:
[15:49:06][C][api:096]:   Address: thermostat_dashboard.local:6053
[15:49:06][W][nextion:072]: Nextion is not connected!
[15:49:06][W][nextion:072]: Nextion is not connected!
|
|
Нужна помощь «нолику» |
|
|
Администратор запретил публиковать записи гостям. |
|
В чем именно проблема загрузки в дисплей? |
|
|
Администратор запретил публиковать записи гостям. |
|
1. Вставил CD, с записанным файлом, включил, некоторое время экран был тёмный, потом появилась первоначальная заставка. Выключил, вынул, включил. На экране первоначальная заставка … Вроде всё сделал правильно … Причины не пойму … |
|
|
Администратор запретил публиковать записи гостям. |
|
Скорость 115200? Либо конвертер врет либо сам дисплей. |
|
|
Администратор запретил публиковать записи гостям. |
|
Пробовал на всех скоростях … Но и через CD тоже не получается … |
|
|
Администратор запретил публиковать записи гостям. |
|
Спасибо! Заработало! Загрузил через UART, провода поменял и загрузка прошла. |
|
|
Администратор запретил публиковать записи гостям. |
|
Создавать
проекты, и
загружать картинки в Nextion
Editor
мы научились в
предыдущем уроке.
Сегодня продолжаем осваивать работу с
дисплеем Nextion, также подключим данный
устройство к
Arduino.
Но прежде чем начать сегодняшний урок хотелось бы напомнить некоторые особенности работы с дисплеям.
Знание которых поможет вам сэкономить время при разработке проектов:
1. Команды
заканчивается
тремя байтами «0xff
0xff 0xff»
2.
Все команды и параметры находятся в
ASCII
3. Все команды написаны строчными
буквами.
Любая электроника нуждается в корпусе, исполнительном механизме. Где же заказать изготовление деталей? Для данных работ отлично подойдет ООО «М-Техника».
Основные направления деятельности компании:
- изготовление деталей и металлических изделий различной сложности;
- нанесение защитных и декоративных покрытий гальваническим способом на металлоизделия заказчика;
- термообработка металлоизделий;
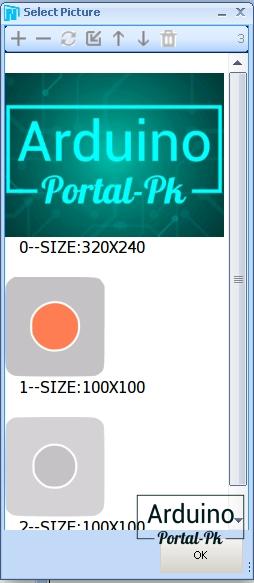
Вернемся к нашему уроку. Первое что мы сделаем это
добавим страницу в наш проект для этого
воспользуемся областью вывода списка
страниц.
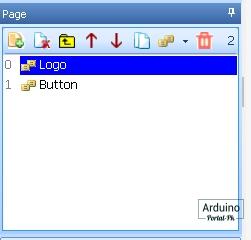
Добавляем страницу с названием Button.
Сейчас у нас есть 2 страницы. Как же нам сделать переключения между страницами. Переключает между страницами можно командой:
page Button или page 1
Переключение происходит по имени
страницы или по ее индикатору. Для меня
проще по имении. Вы можете использовать
и по индексу страница.
Куда же добавить
данную команду?
В данном уроке мы
сделаем переключение со
страница
Logo
с задержкой в 3 сек на страницу
Button.
Для этого нажмем на страницу
Logo и в обработчике событий загрузки
страницы добавим следующие строки.
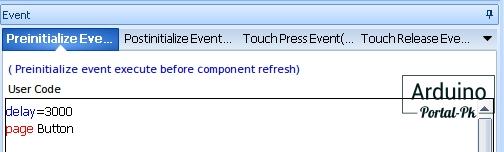
Первая
строка
delay=3000 работает аналогично delay()
в
Arduino IDE. Задержка 3000 мс.
Все параметры
и команды вы можете посмотреть в
официальной документации. Здесь есть
кое-какие ошибки в синтаксисе. Но описано
все подробно.
&amp;amp;amp;lt;span id=»selection-marker-1″ class=»redactor-selection-marker»&amp;amp;amp;gt;&amp;amp;amp;lt;/span&amp;amp;amp;gt;
Давайте сделаем
индикатор загрузки, через сколько мы
будем перенаправлены на с
траницу Button.
Для этого добавим
прогресс бар, и в его
свойствах
добавим цикл.

Как
поменять цвет прогресс бара, и прочие
настройки расскажу в видео.
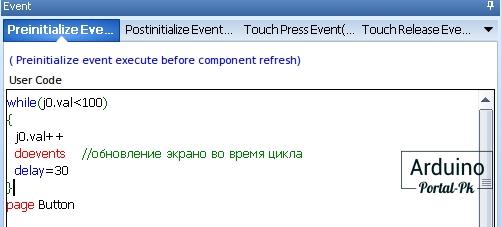
Из цикла видно, что мы добавляем по 1 к свойству j0.val. Это значение заполнения школы в свойствах прогресс бара.
 Прогресс бар. Отображает заполненную на заданное значение процентов линейку.
- Sta – возможные значения:
solid color и image - dez – направление. Возможные
значения:- horizontal – по горизонтали
- vertical
– по вертикали
- bco – цвет при заполнении
0%. Этот атрибут появляется при выборе
значения solid color в атрибуте sta - pco
– цвет при заполнении 100%. Этот атрибут
появляется при выборе значения solid color
в атрибуте sta - bpic – индекс картинки
кнопки при заполнении в 0%. Этот атрибут
появляется при выборе значения image в
атрибуте sta - ppic – индекс картинки при
заполнении в 100%. Этот атрибут появляется
при выборе значения image в атрибуте
sta - val – наполнение. Возможные значения:
от 0 до 100. - x и y – координаты вставки
прогресс бара - w и h – ширина и высота
прогресс бара.
Прогресс бар не будет
обновляться если не добавить
переменную
doevents //обновление экрана
во время цикла
Приветственная
страница готово.
Оформим страницу
Button.
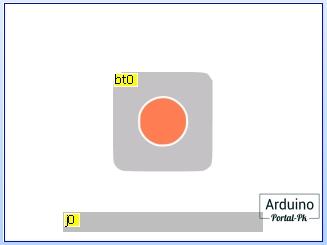
Добавим прогресс бар и кнопку с двумя состояниями.
 -Кнопка с двумя положениями.
- bco0 – цвет переключателя
в положении 0. Этот атрибут появляется
при выборе значения solid color в атрибуте
sta - bco1 – цвет переключателя в положении
1. Этот атрибут появляется при выборе
значения solid color в атрибуте sta - pic0 –
индекс картинки переключателя в положении
0. Этот атрибут появляется при выборе
значения image в атрибуте sta - pic1 – индекс
картинки переключателя в положении 1.
Этот атрибут появляется при выборе
значения image в атрибуте sta - picс0 – индекс
вырезанной картинки переключателя в
положении 0. Этот атрибут появляется
при выборе значения crop image в атрибуте
sta - picс1 – индекс вырезанной переключателя
в положении 1. Этот атрибут появляется
при выборе значения crop image в атрибуте
sta - val – положение переключателя.
Возможные значения 0 и 1 - x и y – координаты
вставки кнопки - w и h – ширина и высота кнопки.
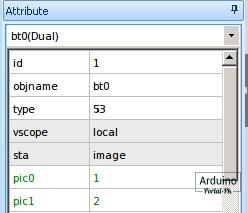
В атрибутах кнопки sta поменяем
значение на
image. И подгрузим картинки в
поля:
pic0 и pic1.
В свойствах кнопки
добавим такой код, который отправится
на Arduino при нажатии.
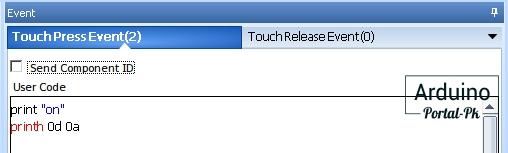
Просто я не использую
стандартную
библиотеку Nextion.h. Поэтому
формировать команды нужно вручную. Но
на мой взгляд это оправданно. Как вы
считаете, пишите в комментариях.
С
дизайном и подготовкой в
Nextion Editor
закончили. Сейчас нашу прошивку можно
загрузить в дисплей.
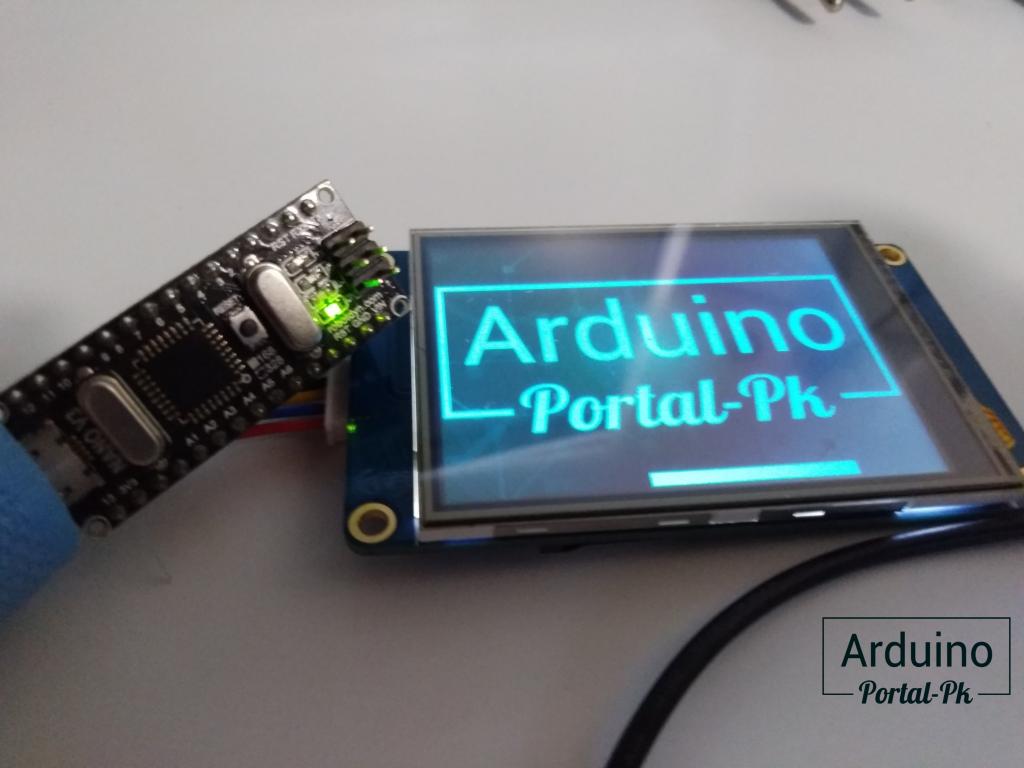
Подключаем
дисплей
Nextion к Arduino NANO по схеме.
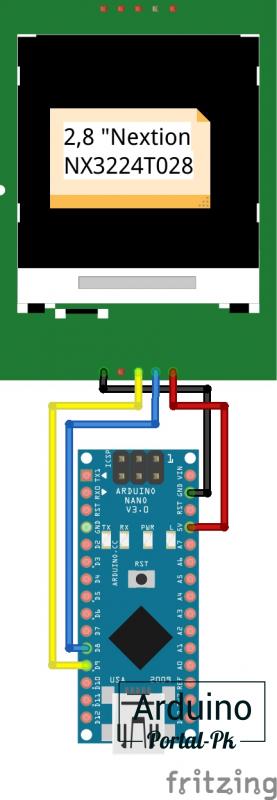
Подключение
к Arduino UNO аналогично.
// библиотека для эмуляции Serial порта
#include <SoftwareSerial.h>
// создаём объект mySerial и передаём номера управляющих пинов RX и TX
// RX - цифровой вывод 8, необходимо соединить с выводом TX дисплея
// TX - цифровой вывод 9, необходимо соединить с выводом RX дисплея
SoftwareSerial mySerial(8, 9);
byte flag = 0;
byte i = 0;
// переменная для хранения данных
String data;
// функция отправки конца команды
// команда поступающая в дисплей должна кончаться символами «0xFF0xFF0xFF»
void comandEnd() {
  for (int i = 0; i < 3; i++) {
    mySerial.write(0xff);
  }
}
// отправка на Nextion (номер экрана, название переменной) + данные
void SendInt(String dev, int data)
{
  mySerial.print(dev);   // Отправляем данные dev(номер экрана, название переменной) на Nextion
  mySerial.print("=");   // Отправляем данные =(знак равно, далее передаем сами данные) на Nextion
  mySerial.print(data);  // Отправляем данные data(данные) на Nextion
  comandEnd();
  dev = "";    // Очищаем переменную
  data = "";   // Очищаем переменную
}
void setup() {
   // открываем последовательный порт
  mySerial.begin(9600);
  pinMode(LED_BUILTIN, OUTPUT);
}
void loop() {
    // ждём данные от дисплея
if (mySerial.available()) {
    char inc;
    inc = mySerial.read();
    data += inc;
    if (inc == 0x0A) { //конец команды
      // если пришёло 'on'
        if (data.indexOf("on") >= 0) {
          flag = !flag;
          digitalWrite(LED_BUILTIN, flag);   // turn the LED on (HIGH is the voltage level)
          SendInt("Button.bt0.val", flag);
        }
      data = "";
    }
  }
  if (flag)
  {
    SendInt("Button.j0.val", i);    //Передаем Свойства и чифры
    i++;
    delay(20);
      if (i==100)
        {
          flag = 0;
          digitalWrite(LED_BUILTIN, flag);
          i=0;
          SendInt("Button.j0.val", i);    //Передаем Свойства и чифры
          SendInt("Button.bt0.val", flag);    //Передаем Свойства и чифры
        }
    }
}
Скетч также подойдет
для
обоих плат. При желании можно
использовать и на A
rduino MEGA, ESP32, ESP8266 и
пр.
У данной платы всего 1 аппаратный
Serial Port. Будем использовать программный
порт. Для этого нужно установить и
подключить
библиотеку SoftwareSerial.h.
// библиотека для эмуляции Serial порта
#include <SoftwareSerial.h>
// создаём объект mySerial и передаём номера управляющих пинов RX и TX
// RX - цифровой вывод 8, необходимо соединить с выводом TX дисплея
// TX - цифровой вывод 9, необходимо соединить с выводом RX дисплея
SoftwareSerial mySerial(8, 9);
Следующие
две функции формируют и отправляют
цифровые параметры на дисплей.
// функция отправки конца команды
// команда поступающая в дисплей должна кончаться символами «0xFF0xFF0xFF»
void comandEnd() {
  for (int i = 0; i < 3; i++) {
    mySerial.write(0xff);
  }
}
// отправка на Nextion (номер экрана, название переменной) + данные
void SendInt(String dev, int data)
{
  mySerial.print(dev);   // Отправляем данные dev(номер экрана, название переменной) на Nextion
  mySerial.print("=");   // Отправляем данные =(знак равно, далее передаем сами данные) на Nextion
  mySerial.print(data);  // Отправляем данные data(данные) на Nextion
  comandEnd();
  dev = "";    // Очищаем переменную
  data = "";   // Очищаем переменную
}
Здесь
мы считываем полученные параметры и
сравниваем, если пришла команда то
выполняем.
    // ждём данные от дисплея
if (mySerial.available())  // ждём данные от дисплея
{
    char inc;
    inc = mySerial.read();
    data += inc;
    if (inc == 0x0A) { //конец команды
        if (data.indexOf("on") >= 0) // если пришёло 'on'
        {
        // делаем что-то
        }
      data = "";
    }
  }
Эта строчка отправляет
состояние кнопки на дисплей. Для чего
это нужно? Чтобы не получилось так, что
на дисплее кнопка нажата, а светодиод
не горит.
SendInt("Button.j0.val", i); //Передаем значение для заполнения прогрксс бара
Эта функции отправляет
процент заполнения прогресс бара.
SendInt("Button.bt0.val", flag); //Передаем состояние кнопки
Более
подробно объясняю в видео. Если есть
вопросы пишите на форум.
Если
вам интересна данная тема пишите в
комментарии.
Не забывайте подписываться на канал Youtube и вступайте в группы в Вконтакте и Facebook.
Всем Пока-Пока. И до встречи в следующем уроке.
Понравилась статья? Поделитесь ею с друзьями:
Файлы для скачивания
| Дисплей Nextion урок 2.zip | 196 Kb | 1256 | Скачать |