
Модуль ngx_http_auth_request_module (1.5.4+) предоставляет
возможность авторизации клиента, основанной на результате подзапроса.
Если подзапрос возвращает код ответа 2xx, доступ разрешается.
Если 401 или 403 — доступ запрещается с соответствующим кодом ошибки.
Любой другой код ответа, возвращаемый подзапросом, считается ошибкой.
При ошибке 401 клиенту также передаётся заголовок
“WWW-Authenticate” из ответа подзапроса.
По умолчанию этот модуль не собирается, его сборку необходимо
разрешить с помощью конфигурационного параметра
--with-http_auth_request_module.
Модуль может быть
скомбинирован с другими модулями доступа, такими как
ngx_http_access_module,
ngx_http_auth_basic_module
и
ngx_http_auth_jwt_module,
с помощью директивы satisfy.
До версии 1.7.3 ответы на авторизационные подзапросы не могли быть закэшированы
(с использованием директив
proxy_cache,
proxy_store и т.п.).
Пример конфигурации
location /private/ {
    auth_request /auth;
    ...
}

location = /auth {
    proxy_pass ...
    proxy_pass_request_body off;
    proxy_set_header Content-Length "";
    proxy_set_header X-Original-URI $request_uri;
}
Директивы
| Синтаксис: |
auth_request
|
|---|---|
| Умолчание: |
auth_request off; |
| Контекст: |
http, server, location
|
Включает авторизацию, основанную на результате выполнения подзапроса,
и задаёт URI, на который будет отправлен подзапрос.
| Синтаксис: |
auth_request_set
|
|---|---|
| Умолчание: |
— |
| Контекст: |
http, server, location
|
Устанавливает переменную в запросе в заданное
значение после завершения запроса авторизации.
Значение может содержать переменные из запроса авторизации,
например, $upstream_http_*.
Asked
6 years, 8 months ago
Viewed
16k times
I have a Nginx virtualhost with the following content:
server {
    listen 80;
    location /.well-known {
        alias /usr/local/etc/letsencrypt-webroot/.well-known;
    }
    return 301 https://$host$request_uri;
}

server {
    listen 443 ssl;
    ssl_certificate /etc/letsencrypt/live/sub.domain.com/fullchain.pem;
    ssl_certificate_key /etc/letsencrypt/live/sub.domain.com/privkey.pem;
    ssl_dhparam /etc/nginx/ssl/dh.pem;

        add_header Strict-Transport-Security "max-age=31536000; includeSubDomains";

    location / {
        proxy_pass http://127.0.0.1:3000;
        proxy_cookie_path / "/; secure; HttpOnly";
        auth_basic "No no no!";
        auth_basic_user_file /etc/nginx/.htpasswd;
    }
}
I’m having a problem when the URL is /.well-known/.... I get a 401 because it keeps asking for credentials.
So my questions are:
-
Why is
/.well-knownuser-protected? Shouldn’t it be processed before reaching thelocation /in the SSL section, which is the one requiring authentication? -
How can I fix this? Basically I need that everything requested to the proxy needs authentication except for
/.well-known.
asked Sep 27, 2016 at 15:40
  location /.well-known {
    auth_basic off;
  }
answered Jan 16 at 7:19
![]()
IvanIvan
311 silver badge5 bronze badges
1
Try opening http://yourserver/.well-known/ instead of https://yourserver/.well-known.
If this works reconsider moving both location blocks to single server {...} block.
//edit to make it working you have to either remove redirect from. well-known block or adding it to block in https server definition.
answered Sep 27, 2016 at 15:55
![]()
Maciek SawickiMaciek Sawicki
6,6579 gold badges33 silver badges47 bronze badges
1
Trying to access a site and being met with an error page is at best inconvenient, whether that site is yours or someone else’s. As with many HTTP response codes, part of what makes a 401 error so frustrating is the lack of information it offers for diagnosing and resolving the issue.
The 401 error can happen with any browser, so it’s a pretty common issue people face. In most cases, this problem is relatively simple and straightforward to fix.
In this post, we’ll explain what 401 error messages are and why they happen. Then, we’ll walk you through five methods you can use to fix them.
Let’s get started!
What is the 401 Error Code?
The Internet Engineering Task Force (IETF) defines the error 401 Unauthorized as:
The 401 (Unauthorized) status code indicates that the request has not been applied because it lacks valid authentication credentials for the target resource. The server generating a 401 response MUST send a WWW-Authenticate header field containing at least one challenge applicable to the target resource.
An Introduction to the 401 Error Code
HTTP 400 status codes are encountered when there is a problem making a request. A 401 error, in particular, happens when your browser denies you access to the page you’re trying to visit.
As a result, instead of loading the web page, the browser will load an error message. 401 errors can happen within any browser so the message appearing may differ.
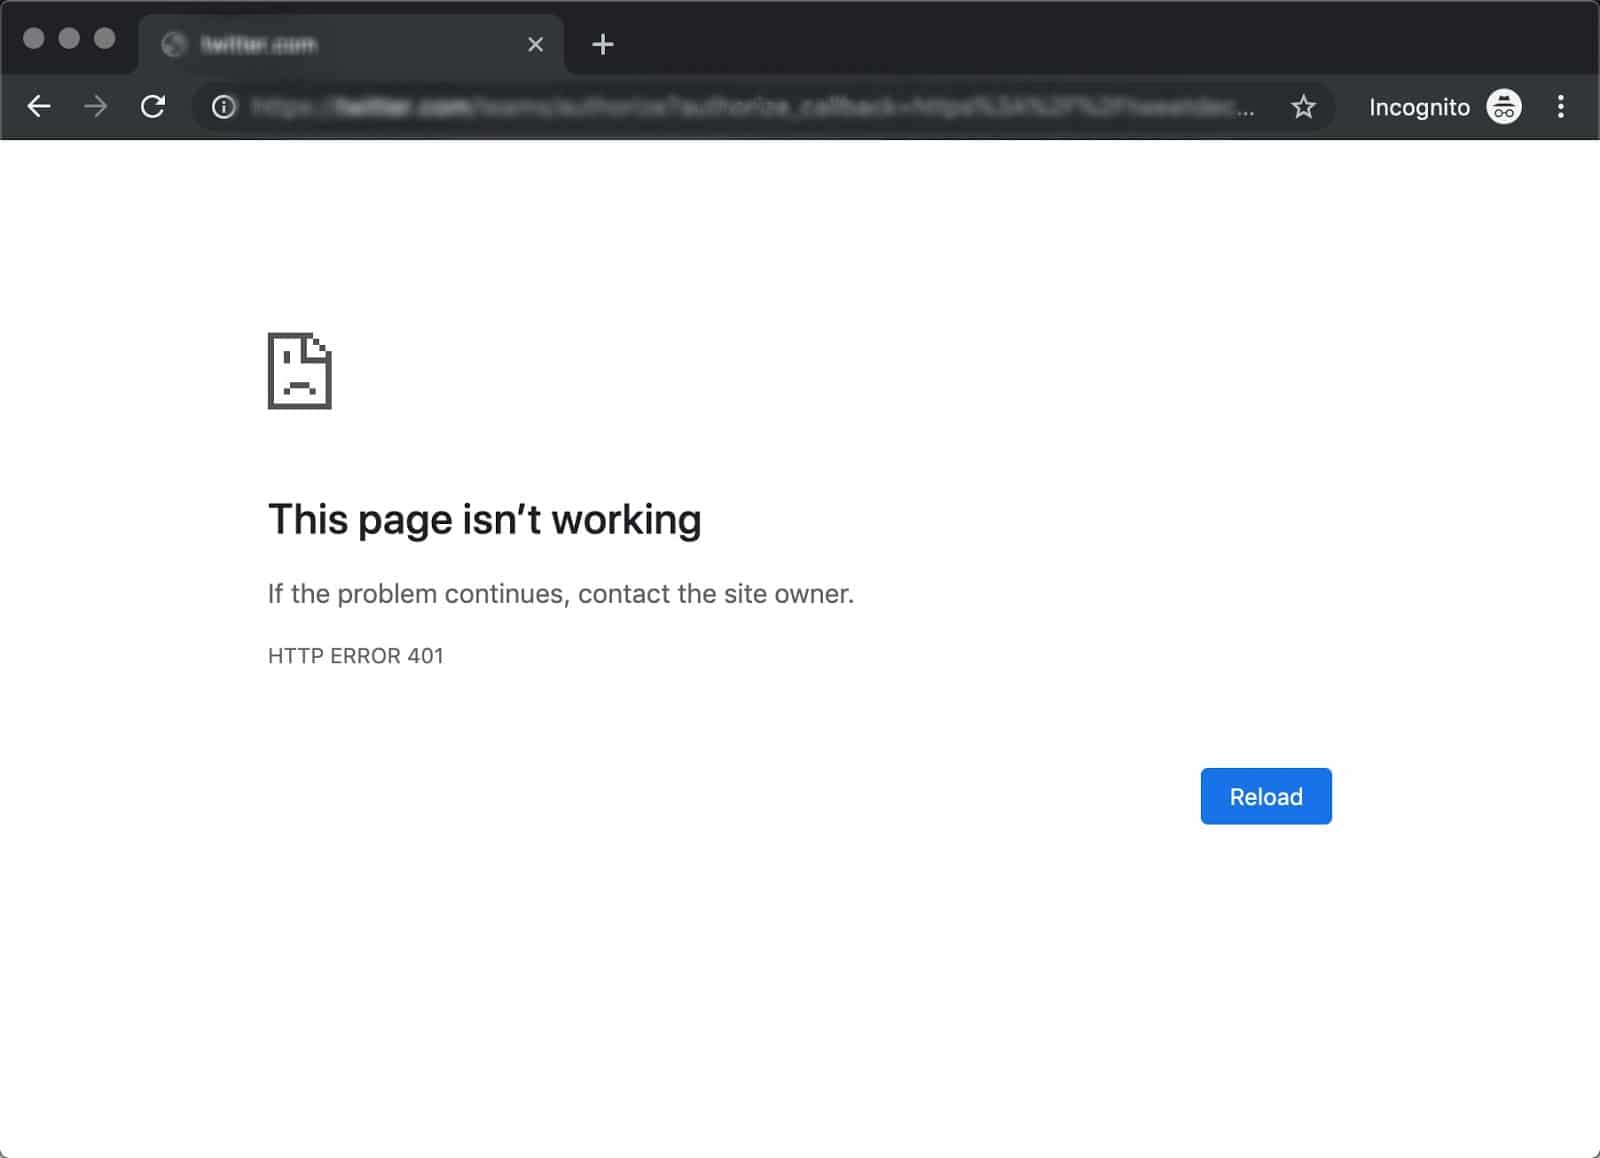
For example, in Chrome or Edge, you’ll likely see a paper icon along with a simple message telling you that the page in question isn’t working. It will include the phrase “HTTP Error 401” at the bottom, and instruct you to contact the site’s owner if the problem persists:
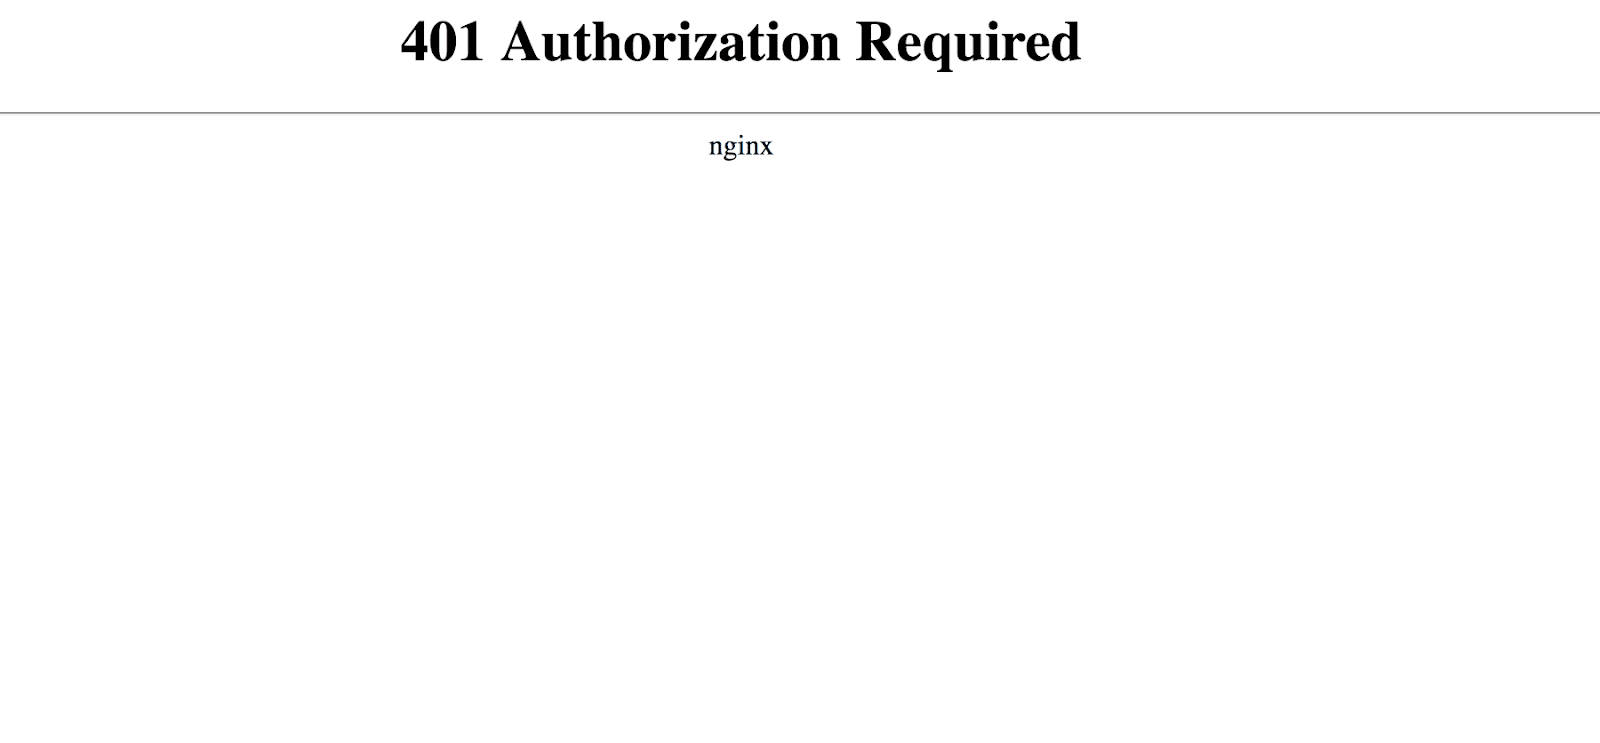
At other times and in other browsers, you might get a slightly less friendly warning that’s just a blank page with a “401 Authorization Required” message:
Other variations include:
- “HTTP 401 Error – Unauthorized”
- “401 Unauthorized”
- “Access Denied”
These errors occur on websites that require a login in order to access them. In most cases, it means that something is either wrong with the credentials or with the browser’s ability to read them as valid.
This is similar to HTTP 403 Forbidden Error, in that access isn’t permitted to the user. However, unlike with the 403 error, the 401 error message indicates that the authentication process failed.
The code is sent via the WWW-Authenticate header, which is responsible for identifying the authentication method used for granting access to a web page or resource.
| Error Code | HTTP 401 Unauthorized Error |
| Error Type | Commonly a client-side error |
| Error Variations | 401 Authorization Required 401 Unauthorized HTTP 401 Error – Unauthorized Access Denied |
| Error Causes | Outdated Browser Cache and Cookies Plugin Incompatibility Incorrect URL or Outdated Link |
The HTTP 401 error is all too common 🤦♀️ — and this guide will give you everything you need to fix it the next time you see that message showing up ✅Click to Tweet
What Causes a 401 Error?
If you encounter an error code in the 400s, you know you’re dealing with a client-side (or browser-side) issue. While the problem may be happening within your browser, however, it doesn’t necessarily always mean that’s the culprit, which we’ll explain in more detail later.
401 errors occur on restricted resources, such as password-protected pages of your WordPress site. So it’s safe to assume that the cause of the problem has something to do with the authentication credentials.
Outdated Browser Cache and Cookies
One of the most common reasons you might experience a 401 error is that your browser’s cache and cookies are out of date, preventing the authorization from successfully going through. If your browser isn’t using the valid authentication credentials (or any at all), the server will reject the request.
Plugin Incompatibility
At other times, this error is caused by a plugin incompatibility or error. For example, a firewall or security plugin can mistake your login attempt as malicious activity, and return a 401 error to protect the page.
Incorrect URL or Outdated Link
It’s also possible that the source of the problem can be attributed to a minor mistake. Common culprits in this category include an incorrectly-typed URL or an outdated link.
How to Fix the 401 Error?
Now that we’ve gone through a bit of background on the 401 error, it’s time to discuss how you can resolve it.
Let’s take a look at five methods you can use:
1. Look for Errors in the URL
We’ll start off with the easiest potential fix: making sure you used the correct URL. This may sound simple, but 401 errors can sometimes appear if the URL wasn’t correctly entered in.
Another possibility is that the link you used to visit the page in question points to the wrong URL. For example, it might be outdated, or leading to a page that no longer exists (and no redirects are in place).
Therefore, it’s worth double-checking the URL you used. If you typed it in yourself, verify that you spelled everything correctly. If you clicked on a link, confirm that it’s pointing to the page you’re trying to access (or try to visit that page directly through the website).
2. Clear Your Browser’s Cache
Your browser’s cache is designed to improve your online experience, by reducing page loading times. Unfortunately, sometimes it can also cause unwanted interruptions.
As we mentioned earlier, one of the common causes of the 401 error is outdated or incorrect cache data or cookies. Therefore, if you don’t notice any issues with the page’s URL, the next step is to clear your browser’s cache.
This will clean out any invalid information that’s locally stored in your browser, which could be interrupting the authentication process. Similarly, your browser’s cookies might contain authentication data that simply needs to be refreshed.
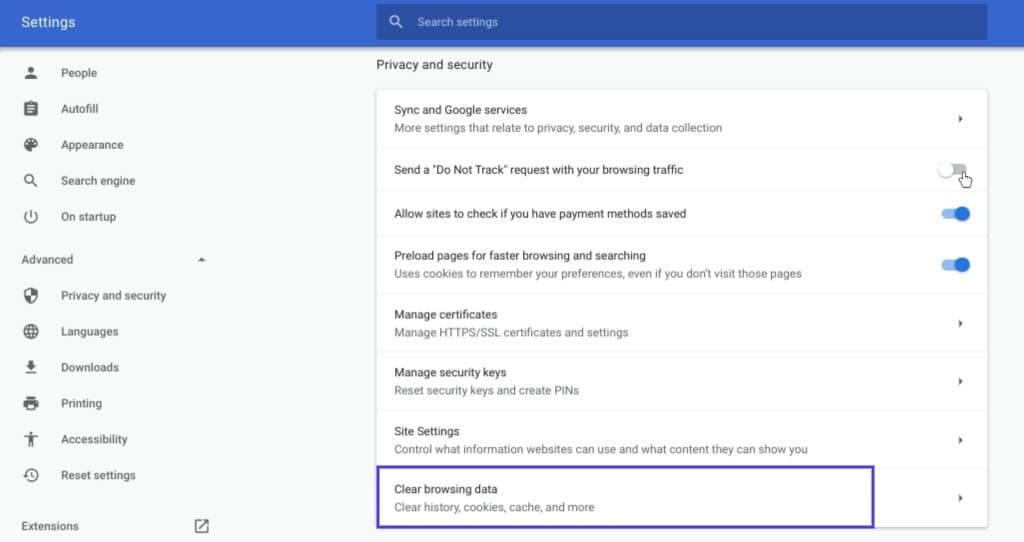
If you’re a Google Chrome user, you can do this by clicking on the menu icon in the top-right corner of the browser, and then going to Settings. Under the Privacy and security section, click on Clear browsing data:
A new window will open. Under the Basic tab, make sure all three boxes are selected, and then select Clear data:

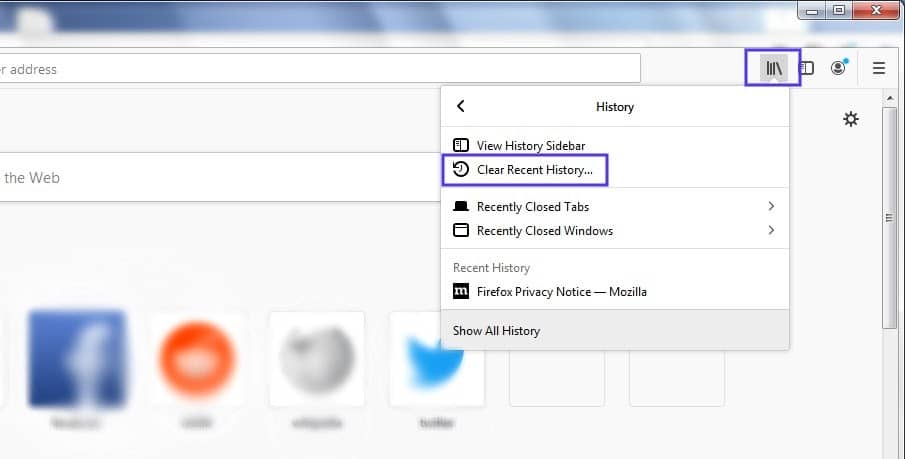
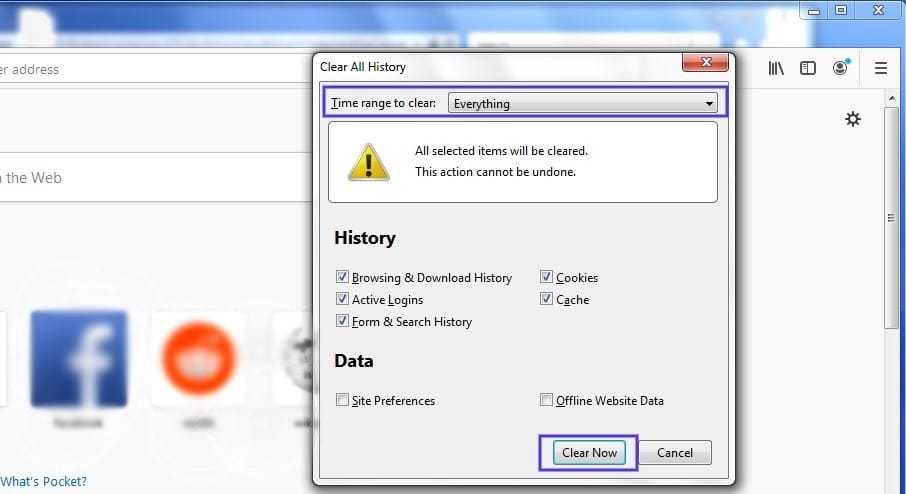
This process will look a little different in other browsers. For example, in Mozilla Firefox, you would click on the library icon in the top-right corner of the browser, followed by History > Clear Recent History:
In the panel that opens next, select Everything in the drop-down menu at the top, make sure “Cache” is selected, and then click on the Clear Now button:
If you’re using a different browser, please refer to this guide for clearing the cache
3. Flush Your DNS
Another method you can try to resolve the 401 error is flushing your Domain Name Server (DNS). While this is a rarer issue, it can be a possible cause, so it’s worth giving it a try if the first two solutions don’t work.
To do this in Windows, click on the Start button and type cmd into the search bar. Hit Enter, and the Command Prompt will open. Copy and paste the command ipconfig/flushdns, and then hit Enter again:

On a Mac, you can do this by going to Finder > Applications > Utilities > Terminal:
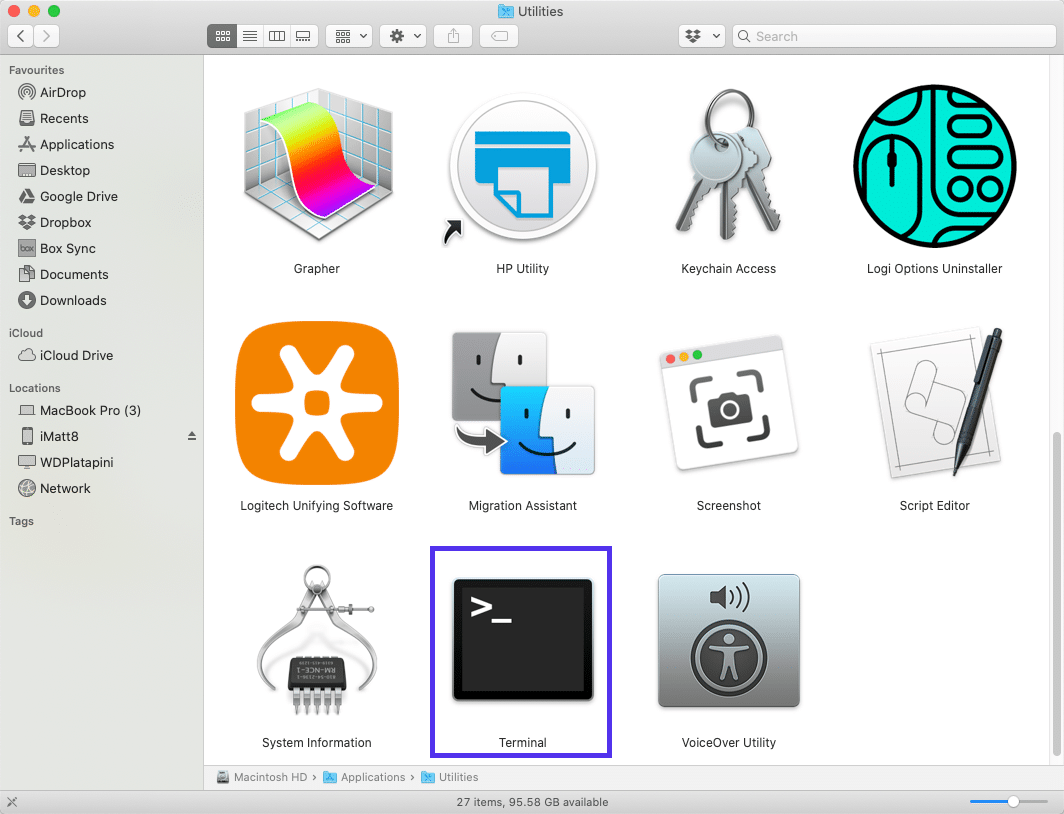
Input the command line sudo killall -HUP mDNSResponder and press Enter. Then, you can try refreshing the page you were trying to visit, to see if the 401 error has been resolved.
4. Deactivate Your WordPress Plugins
The problem causing your 401 error might not be due to your browser. If you’re having trouble accessing your WordPress site, it’s also possible that one or more plugins are to blame.
Some plugins, especially security-focused plugins, are configured to show a 401 error when they suspect suspicious login activity that might indicate an attack. Others might just be suffering from compatibility issues. Therefore, it’s a good idea to deactivate all of your WordPress plugins and see if that resolves the issue.
You can deactivate your plugins all at the same time in your dashboard, by going to Plugins > Installed Plugins. Check the box at the top to select all of them. Then under the Bulk Actions drop-down menu, select Deactivate and click on the Apply button:
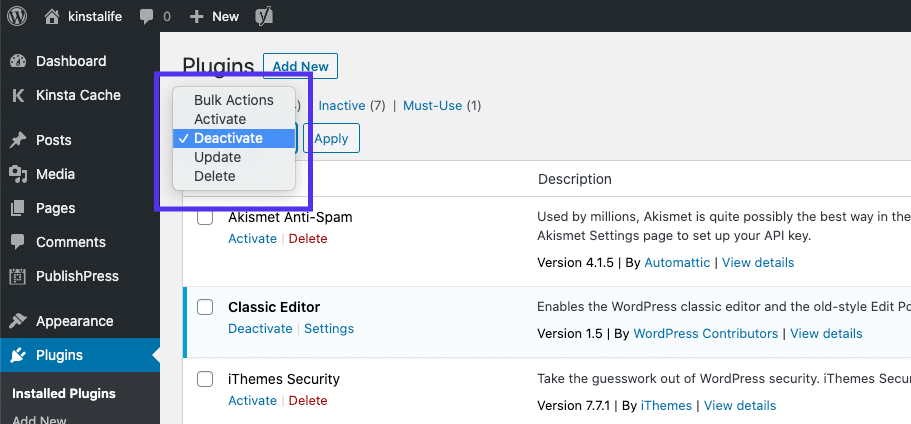
After that, try reloading the page that returned the 401 error to see if this has resolved the issue. If it has, you can manually activate each plugin one at a time, in order to determine which one is causing the problem.
Then you can remove that plugin, replace it with a new one, or contact its developer for assistance.
5. Check the WWW-Authenticate Header Response
At this point, if the issue hasn’t been fixed, it may be caused by a server-side problem. This means our last fix will be a bit more involved.
As we saw earlier, the 401 response is sent through the WWW-Authenticate header, which appears as “WWW-Authenticate: <type> realm=<realm>”. It includes ‘challenges’, or strings of data that indicate what type of authentication is required in order for access to be granted.
In a nutshell, you’ll want to check and see if the header response was sent, and more specifically, what authentication scheme was used. At the very least, this can help narrow down the cause of the problem, and bring you one step closer to a solution.
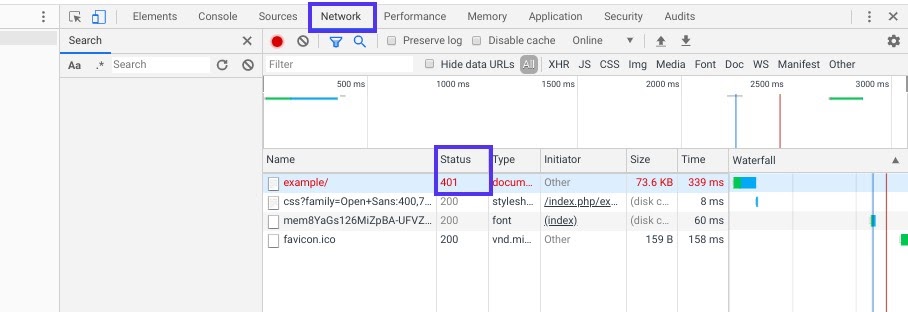
To do this, go to the web page that’s displaying the 401 error, and access the developer console in Chrome. You can right-click on the page and select Inspect, or use Ctrl+Shift+J.
Next, click on the Network tab and reload the page. This will generate a list of resources. Select the Status header to sort the table and locate the 401 status code:
Select that entry, and then click on the Headers tab. Under Response Headers, locate the WWW-Authenticate header:
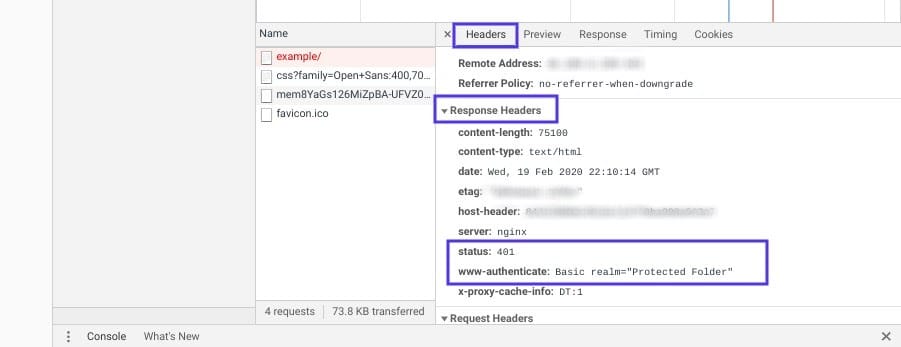
The information that is present in the response header, particularly the authentication schemes, can give you more information about what’s happening and point you towards a solution. It can help you understand what type of authentication the server is expecting.
For example, in the above example, we can see that the authentication scheme is “Basic”. This means the authentication request should only require an ID and password. For more detailed information and instructions on how to use this information, we recommend referring to the HTTP Authentication Scheme Registry.
HTTP 401 errors, begone! 🧙♂️ 5 ways to stop those pesky messages (no magic required) ✨Click to Tweet
Summary
When your browser and server have trouble communicating or authenticating requests, you’re sometimes forced to deal with errors such as the 401 error. While this problem is irritating, the message is usually temporary and fixable.
Here are five methods you can use to fix the 401 error:
- Look for errors in the URL.
- Clear your browser’s cache.
- Flush your DNS.
- Deactivate your WordPress plugins.
- Check the WWW-Authenticate header response.
Появление сообщения об ошибке 401 Unauthorized Error («отказ в доступе») при открытии страницы сайта означает неверную авторизацию или аутентификацию пользователя на стороне сервера при обращении к определенному url-адресу. Чаще всего она возникает при ошибочном вводе имени и/или пароля посетителем ресурса при входе в свой аккаунт. Другой причиной являются неправильные настройки, допущенные при администрировании web-ресурса. Данная ошибка отображается в браузере в виде отдельной страницы с соответствующим описанием. Некоторые разработчики интернет-ресурсов, в особенности крупных порталов, вводят собственную дополнительную кодировку данного сбоя:
- 401 Unauthorized;
- Authorization Required;
- HTTP Error 401 – Ошибка авторизации.
Попробуем разобраться с наиболее распространенными причинами возникновения данной ошибки кода HTTP-соединения и обсудим способы их решения.
Причины появления ошибки сервера 401 и способы ее устранения на стороне пользователя
При доступе к некоторым сайтам (или отдельным страницам этих сайтов), посетитель должен пройти определенные этапы получения прав:
- Идентификация – получение вашей учетной записи («identity») по username/login или email.
- Аутентификация («authentic») – проверка того, что вы знаете пароль от этой учетной записи.
- Авторизация – проверка вашей роли (статуса) в системе и решение о предоставлении доступа к запрошенной странице или ресурсу на определенных условиях.
Большинство пользователей сохраняют свои данные по умолчанию в истории браузеров, что позволяет быстро идентифицироваться на наиболее часто посещаемых страницах и синхронизировать настройки между устройствами. Данный способ удобен для серфинга в интернете, но может привести к проблемам с безопасностью доступа к конфиденциальной информации. При наличии большого количества авторизованных регистрационных данных к различным сайтам используйте надежный мастер-пароль, который закрывает доступ к сохраненной в браузере информации.
Наиболее распространенной причиной появления ошибки с кодом 401 для рядового пользователя является ввод неверных данных при посещении определенного ресурса. В этом и других случаях нужно попробовать сделать следующее:
- Проверьте в адресной строке правильность написания URL. Особенно это касается перехода на подстраницы сайта, требующие авторизации. Введите правильный адрес. Если переход на страницу осуществлялся после входа в аккаунт, разлогинитесь, вернитесь на главную страницу и произведите повторный вход с правильными учетными данными.
- При осуществлении входа с сохраненными данными пользователя и появлении ошибки сервера 401 проверьте их корректность в соответствующих настройках данного браузера. Возможно, авторизационные данные были вами изменены в другом браузере. Также можно очистить кэш, удалить cookies и повторить попытку входа. При удалении истории браузера или очистке кэша потребуется ручное введение логина и пароля для получения доступа. Если вы не помните пароль, пройдите процедуру восстановления, следуя инструкциям.
- Если вы считаете, что вводите правильные регистрационные данные, но не можете получить доступ к сайту, обратитесь к администратору ресурса. В этом случае лучше всего сделать скриншот проблемной страницы.
- Иногда блокировка происходит на стороне провайдера, что тоже приводит к отказу в доступе и появлению сообщения с кодировкой 401. Для проверки можно попробовать авторизоваться на том же ресурсе с альтернативного ip-адреса (например, используя VPN). При подтверждении блокировки трафика свяжитесь с провайдером и следуйте его инструкциям.
Некоторые крупные интернет-ресурсы с большим количеством подписчиков используют дополнительные настройки для обеспечения безопасности доступа. К примеру, ваш аккаунт может быть заблокирован при многократных попытках неудачной авторизации. Слишком частые попытки законнектиться могут быть восприняты как действия бота. В этом случае вы увидите соответствующее сообщение, но можете быть просто переадресованы на страницу с кодом 401. Свяжитесь с администратором сайта и решите проблему.
Иногда простая перезагрузка проблемной страницы, выход из текущей сессии или использование другого веб-браузера полностью решают проблему с 401 ошибкой авторизации.
Устранение ошибки 401 администратором веб-ресурса
Для владельцев сайтов, столкнувшихся с появлением ошибки отказа доступа 401, решить ее порою намного сложнее, чем обычному посетителю ресурса. Есть несколько рекомендаций, которые помогут в этом:
- Обращение в службу поддержки хостинга сайта. Как и в случае возникновения проблем с провайдером, лучше всего подробно описать последовательность действий, приведших к появлению ошибки 401, приложить скриншот.
- При отсутствии проблем на стороне хостинг-провайдера можно внести следующие изменения в настройки сайта с помощью строки Disallow:/адрес проблемной страницы. Запретить индексацию страницам с ошибкой в «rоbоts.txt», после чего добавить в файл «.htассеss» строку такого типа:
Redirect 301 /oldpage.html http://site.com/newpage.html.
Где в поле /oldpage.html прописывается адрес проблемной страницы, а в http://site.com/newpage.html адрес страницы авторизации.
Таким образом вы перенаправите пользователей со всех страниц, которые выдают ошибку 401, на страницу начальной авторизации.
- Если после выполнения предыдущих рекомендаций пользователи при попытках авторизации все равно видят ошибку 401, то найдите на сервере файл «php.ini» и увеличьте время жизни сессии, изменив значения следующих параметров: «session.gc_maxlifetime» и «session.cookie_lifetime» на 1440 и 0 соответственно.
- Разработчики веб-ресурсов могут использовать более сложные методы авторизации и аутентификации доступа для создания дополнительной защиты по протоколу HTTP. Если устранить сбой простыми методами администрирования не удается, следует обратиться к специалистам, создававшим сайт, для внесения соответствующих изменений в код.
Хотя ошибка 401 и является проблемой на стороне клиента, ошибка пользователя на стороне сервера может привести к ложному требованию входа в систему. К примеру, сетевой администратор разрешит аутентификацию входа в систему всем пользователям, даже если это не требуется. В таком случае сообщение о несанкционированном доступе будет отображаться для всех, кто посещает сайт. Баг устраняется внесением соответствующих изменений в настройки.
Дополнительная информация об ошибке с кодом 401
Веб-серверы под управлением Microsoft IIS могут предоставить дополнительные данные об ошибке 401 Unauthorized в виде второго ряда цифр:
- 401, 1 – войти не удалось;
- 401, 2 – ошибка входа в систему из-за конфигурации сервера;
- 401, 3 – несанкционированный доступ из-за ACL на ресурс;
- 401, 501 – доступ запрещен: слишком много запросов с одного и того же клиентского IP; ограничение динамического IP-адреса – достигнут предел одновременных запросов и т.д.
Более подробную информацию об ошибке сервера 401 при использовании обычной проверки подлинности для подключения к веб-узлу, который размещен в службе MS IIS, смотрите здесь.
Следующие сообщения также являются ошибками на стороне клиента и относятся к 401 ошибке:
- 400 Bad Request;
- 403 Forbidden;
- 404 Not Found;
- 408 Request Timeout.
Как видим, появление ошибки авторизации 401 Unauthorized не является критичным для рядового посетителя сайта и чаще всего устраняется самыми простыми способами. В более сложной ситуации оказываются администраторы и владельцы интернет-ресурсов, но и они в 100% случаев разберутся с данным багом путем изменения настроек или корректировки html-кода с привлечением разработчика сайта.
New issue
Have a question about this project? Sign up for a free GitHub account to open an issue and contact its maintainers and the community.
By clicking “Sign up for GitHub”, you agree to our terms of service and
privacy statement. We’ll occasionally send you account related emails.
Already on GitHub?
Sign in
to your account
Closed
sepulrator opened this issue
Apr 4, 2018
· 13 comments
Comments
![]()
NGINX Ingress controller version: 0.12.0
What happened:
Nginx returns custom error page instead of external http auth service response body when auth service return 401 status code with json response body. Is it possible to return auth service response body in the case of auth errors except 2xx status codes?
Nginx response when got 401 error:
<html>
    <head>
        <title>401 Authorization Required</title>
    </head>
    <body bgcolor="white">
        <center>
            <h1>401 Authorization Required</h1>
        </center>
        <hr>
        <center>nginx/1.13.9</center>
    </body>
</html>
Nginx conf:
ingress.kubernetes.io/ssl-redirect: "false"
kubernetes.io/ingress.class: nginx
nginx.ingress.kubernetes.io/auth-method: "POST"
nginx.ingress.kubernetes.io/service-upstream: "true"
nginx.ingress.kubernetes.io/rewrite-target: /
nginx.ingress.kubernetes.io/auth-url: "http://auth-svc.default.svc.cluster.local/api/auth"
nginx.ingress.kubernetes.io/auth-response-headers: UserRole
What you expected to happen:
I expect to be able to return auth service response body to client when auth service gives error unless the status code is 2xx.
![]()
same issue here, I need to get whatever response body is generated by auth service but cannot get dynamically. It would be very helpful if there is any workaround for solving the problem
![]()
Fom Nginx auth_request documentation:
If the subrequest returns a 2xx response code, the access is allowed. If it returns 401 or 403, the access is denied with the corresponding error code. Any other response code returned by the subrequest is considered an error.
However I was able to create custom errors with auth_request using the following configuration:
location = /error/401 {
        internal;
        proxy_method GET;
        proxy_set_header x-code 401;
        proxy_pass http://custom-default-backend;
}
location = /error/403 {
        internal;
        proxy_method GET;
        proxy_set_header x-code 403;
        proxy_pass http://custom-default-backend;
}
location = /error/500 {
        internal;
        proxy_method GET;
        proxy_set_header x-code 500;
        proxy_pass http://custom-default-backend;
}

# Your authenticated location, just an example to be simple
location ~ ^/(.*)$ {
        auth_request /auth;
        error_page 401 =401 /error/401;
        error_page 403 =403 /error/403;
        error_page 500 =500 /error/500;
        # proxy_pass and etc...
}
But with this your errors (401, 403, 500) will ALWAYS come from custom locations. And still it is not possible to have the auth_request response body.
It seems to be a limitation of Nginx. Has anyone got around to this?
![]()
Issues go stale after 90d of inactivity.
Mark the issue as fresh with /remove-lifecycle stale.
Stale issues rot after an additional 30d of inactivity and eventually close.
If this issue is safe to close now please do so with /close.
Send feedback to sig-testing, kubernetes/test-infra and/or fejta.
/lifecycle stale
![]()
Stale issues rot after 30d of inactivity.
Mark the issue as fresh with /remove-lifecycle rotten.
Rotten issues close after an additional 30d of inactivity.
If this issue is safe to close now please do so with /close.
Send feedback to sig-testing, kubernetes/test-infra and/or fejta.
/lifecycle rotten
![]()
k8s-ci-robot
added
lifecycle/rotten
Denotes an issue or PR that has aged beyond stale and will be auto-closed.
and removed
lifecycle/stale
Denotes an issue or PR has remained open with no activity and has become stale.
labels
Sep 5, 2018
![]()
Rotten issues close after 30d of inactivity.
Reopen the issue with /reopen.
Mark the issue as fresh with /remove-lifecycle rotten.
Send feedback to sig-testing, kubernetes/test-infra and/or fejta.
/close
![]()
@fejta-bot: Closing this issue.
In response to this:
Rotten issues close after 30d of inactivity.
Reopen the issue with/reopen.
Mark the issue as fresh with/remove-lifecycle rotten.Send feedback to sig-testing, kubernetes/test-infra and/or fejta.
/close
Instructions for interacting with me using PR comments are available here. If you have questions or suggestions related to my behavior, please file an issue against the kubernetes/test-infra repository.
![]()
I expect to be able to return auth service response body to client when auth service gives error unless the status code is 2xx.
Exactly what we need as well…
has anyone found an alternative solution?
![]()
I needed this as well, but I found a workaround by using the nginx.ingress.kubernetes.io/auth-signin to redirect to a page with the error response body. For example, my authenticate endpoint is /auth/authenticate, my ingress annotations are:
nginx.ingress.kubernetes.io/auth-url: <internal host>/auth/authenticate
nginx.ingress.kubernetes.io/auth-signin: /auth/authenticate
It seems that it converts all requests into GET requests but preserves the headers, which means that you just have to support GET requests (and reuse the auth-url endpoint).
![]()
/reopen
/remove-lifecycle rotten
This is still an issue with v0.25.0. It would be great if we could return the auth service’s body as the result instead of requiring custom error pages or redirects.
![]()
@bekriebel: You can’t reopen an issue/PR unless you authored it or you are a collaborator.
In response to this:
/reopen
/remove-lifecycle rottenThis is still an issue with v0.25.0. It would be great if we could return the auth service’s body as the result instead of requiring custom error pages or redirects.
Instructions for interacting with me using PR comments are available here. If you have questions or suggestions related to my behavior, please file an issue against the kubernetes/test-infra repository.
![]()
I’m using Nginx 1.17 and found this limitation as well. If I access the upstream auth server directly I could see the 401 status with response content. But the custom response body served by the upstream server gets overwritten by the default Nginx 401 page through the auth_request proxy.
![]()
For anyone else running into this, here’s my workaround. It’s a big of a config kludge but it solves the problem of returning the auth backend response to the client and relies almost entirely on annotations in ingress configuration. The one exception is the proxy_pass directive in the error location; it uses the $target variable set in the generated auth location block to point to the auth backend. That’s very much an implementation detail internal to the ingress machinery so be aware that this could break in the future if someone renames that variable.
apiVersion: networking.k8s.io/v1beta1
kind: Ingress
metadata:
  name: my-ingress
  namespace: default
  annotations:
    nginx.ingress.kubernetes.io/auth-url: http://auth-service.namespace.svc.cluster.local/authorize
    nginx.ingress.kubernetes.io/auth-response-headers: |
      X-My-Header,
      X-My-Other-Header,
      X-Yet-Another-Header
    nginx.ingress.kubernetes.io/server-snippet: |
      location /error/401 {
        internal;
        proxy_method GET;
        proxy_pass $target;
      }
    nginx.ingress.kubernetes.io/configuration-snippet: |
      error_page 401 =401 /error/401;
spec:
  rules:
    ...
![]()
nginx.ingress.kubernetes.io/server-snippet: |
  location /authz {
    internal;
    proxy_set_header Host $host;
    proxy_set_header X-Forwarded-For $proxy_add_x_forwarded_for;
    proxy_set_header X-Request-Id $req_id;
    proxy_set_header X-Request-Origin-Host $host;
    proxy_set_header X-Request-Origin-Path $request_uri;
    proxy_set_header X-Request-Origin-Method $request_method;
    #proxy_set_header Connection "Upgrade";
    #proxy_set_header Upgrade $http_upgrade;
    #proxy_http_version 1.1;
    proxy_method GET;
    proxy_pass http://vsc-leo2go-0.vsc-me-dev.ws03.svc.cluster.local;
  }
nginx.ingress.kubernetes.io/configuration-snippet: |
  access_by_lua '
    local res = ngx.location.capture("/authz")
    if res.status >= ngx.HTTP_OK and res.status < ngx.HTTP_SPECIAL_RESPONSE then
      ngx.req.set_header("X-Request-User-KID", res.header["X-Request-User-KID"])
      ngx.req.set_header("X-Request-Role-KID", res.header["X-Request-Role-KID"])
      return
    --elseif res.status == ngx.HTTP_UNAUTHORIZED then
    --  ngx.redirect("http://sso.sims-cn.com?redirect=")
    --  return
    end
    ngx.header.content_type = res.header["Content-Type"]
    ngx.status = res.status
    ngx.say(res.body)
    ngx.exit(res.status)
  ';