
This command works to get the files and compile them:
git clone a-valid-git-url
for example:
git clone git://cfdem.git.sourceforge.net/gitroot/cfdem/liggghts
However, git status (or any other git command) then gives the above fatal: Not a git repository (or any of the parent directories) error.
What am I doing wrong?
![]()
asked Aug 14, 2012 at 22:14
![]()
Kevin KostlanKevin Kostlan
3,2417 gold badges28 silver badges33 bronze badges
1
You have to actually cd into the directory first:
$ git clone git://cfdem.git.sourceforge.net/gitroot/cfdem/liggghts
Cloning into 'liggghts'...
remote: Counting objects: 3005, done.
remote: Compressing objects: 100% (2141/2141), done.
remote: Total 3005 (delta 1052), reused 2714 (delta 827)
Receiving objects: 100% (3005/3005), 23.80 MiB | 2.22 MiB/s, done.
Resolving deltas: 100% (1052/1052), done.

$ git status
fatal: Not a git repository (or any of the parent directories): .git
$ cd liggghts/
$ git status
# On branch master
nothing to commit (working directory clean)
answered Aug 14, 2012 at 22:19
![]()
Michael DurrantMichael Durrant
92.9k95 gold badges326 silver badges490 bronze badges
2
I just got this message and there is a very simple answer before trying the others. At the parent directory, type git init
This will initialize the directory for git. Then git add and git commit should work.
![]()
Syden
8,3555 gold badges26 silver badges45 bronze badges
answered Jan 10, 2017 at 21:40
![]()
2
In my case, was an environment variable GIT_DIR, which I added to access faster.
This also broke all my local repos in SourceTree 
answered Oct 2, 2015 at 9:15
![]()
lucasvclucasvc
7671 gold badge11 silver badges35 bronze badges
2
Sometimes its because of ssh. So you can use this:
git clone https://cfdem.git.sourceforge.net/gitroot/cfdem/liggghts
instead of:
git clone git://cfdem.git.sourceforge.net/gitroot/cfdem/liggghts
answered Dec 19, 2016 at 3:44
![]()
Umit KayaUmit Kaya
5,7613 gold badges38 silver badges52 bronze badges
1
If Existing Project Solution is planned to move on TSF in VS Code:
open Terminal and run following commands:
-
Initialize git in that folder (root Directory)
git init -
Add Git
git add . -
Link your TSf/Git to that Project — {url} replace with your git address
git remote add origin {url} -
Commit those Changes:
git commit -m "initial commit" -
Push — I pushed code as version1 you can use any name for your branch
git push origin HEAD:Version1
answered Jun 17, 2020 at 8:46
![]()
in my case, i had the same problem while i try any git — commands (eg git status) using windows cmd. so what i do is after installing git for window https://windows.github.com/
in the environmental variables, add the class path of the git on the «PATH» varaiable. usually the git will installed on C:/user/"username"/appdata/local/git/bin add this on the PATH in the environmental variable
and one more thing on the cmd go to your git repository or cd to where your clone are on your window usually they will be stored on the documents under github
cd Document/Github/yourproject
after that you can have any git commands
![]()
EricSchaefer
25.1k21 gold badges67 silver badges103 bronze badges
answered Aug 11, 2014 at 17:41
![]()
git clone https://github.com/klevamane/projone.git
Cloning into 'projone'...
remote: Counting objects: 81, done.
remote: Compressing objects: 100% (66/66), done.
remote: Total 81 (delta 13), reused 78 (delta 13), pack-reused 0
Unpacking objects: 100% (81/81), done.
you have to «cd projone»
then you can check status.
One reason why this was difficult to notice at first, i because you created a folder with the same name already in your computer and that was where you cloned the project into, so you have to change directory again
![]()
answered Aug 30, 2017 at 6:31
![]()
This error got resolved when I tried initialising the git using git init . It worked
answered Jan 26, 2019 at 21:51
![]()
I had another problem. I was in a git directory, but got there through a symlink. I had to go into the directory directly (i.e. not through the symlink) then it worked fine.
answered Aug 14, 2014 at 16:56
![]()
Frank ConryFrank Conry
2,6533 gold badges29 silver badges35 bronze badges
In my case, the original repository was a bare one.
So, I had to type (in windows):
mkdir   dest
cd dest
git init
git remote add origin avalidyetbarerepository
git pull origin master
To check if a repository is a bare one:
git rev-parse --is-bare-repository
answered Aug 9, 2017 at 10:34
![]()
MadlozozMadlozoz
3374 silver badges15 bronze badges
Simply, after you clone the repo you need to cd (change your current directory) to the new cloned folder
git clone https://User_Name@bitbucket.org/Repo_Name.git

cd Repo_Name
answered Jul 10, 2017 at 13:16
![]()
I suddenly got an error like in any directory I tried to run any git command from:
fatal: Not a git repository: /Users/me/Desktop/../../.git/modules/some-submodule
For me, turned out I had a hidden file .git on my Desktop with the content:
gitdir: ../../.git/modules/some-module
Removed that file and fixed.
answered Oct 4, 2018 at 19:39
![]()
i have the same problem from my office network.
i use this command but its not working for me
url,
so like this:
before
$ git clone https://gitlab.com/omsharma/Resume.git
After i Use this URL : $ git clone https://my_gitlab_user@gitlab.com/omsharma/Resume.git
try It.
answered Apr 19, 2019 at 5:49
![]()
In my case I was dealing with github workflow jobs and simply forgot to checkout the repo before my step. Adding pre requisite step actions/checkout@v2 resolved the issue.
answered Dec 12, 2022 at 6:31
![]()
A Git repository is a collection of files and information regarding past changes made in them. While working with Git, you may encounter errors that seem confusing, especially if you are a beginner and the terms used are not familiar to you. In this article, we will explore what causes, how to prevent, and how to solve the fatal: not a git repository error.
Table of Contents:
- What is the “fatal: not a git repository” error?
- What causes “fatal: not a git repository”?
- Solving “fatal: not a git repository”
- Preventing “fatal: not a git repository”
- How do Git repositories work?
a. Stage the files
b. Commit the changes
c. Push the code - What are some common Git errors?
a. Permission Denied
b. Failed to Push Some Refs
c. fatal: A branch named <branch-name> already exists.
d. Can’t switch between branches - What causes Git errors?
- Conclusion
What is the “fatal: not a git repository” error?
Most of the Git commands must be executed against a Git repository. For example, if you run git push -u origin master outside of a git repository, Git will simply not know what to push and where to push. The error above, fatal: not a git repository (or any of the parent directories): .git, states that you tried to execute a repository-specific command, outside of the Git repository. Fortunately, even if it is a very common problem, it is also very easy to solve.
![]()
What causes “fatal: not a git repository”?
The fatal: not a git repository error makes it clear that you’re not in a git repository, but the reason you’re not in such a repository may be one of two:
1. You tried to run the command but did not navigate to the project folder where the git repository is located.
2. You are in the project directory, but you didn’t initialize the Git repository for that project folder.
Solving “fatal: not a git repository”
Let’s refer back to the previous section where we discussed the two situations in which one gets a fatal: not a git repository error. To solve the first situation, check the folder in which you are currently trying to run the command again.
Is that the correct folder? If not then simply use the cd command to navigate to the correct path.
There is a simple trick that you can use to be sure that you always open a command prompt in the correct folder. Navigate to the project directory using the file explorer and then type in the search bar, cmd. This will open a command prompt to the current folder path.
For the second situation, you need to initialize the Git repository in your project folder. To do so, you need to navigate to the correct folder and then run the command git init, which will create a new empty Git repository or reinitialize an existing one.
Preventing “fatal: not a git repository”
When you run a Git command, the first step Git will take is to determine the repository you are in. To do this, it will go up in the file system path until it finds a folder called .git. Basically, the repository starts with the directory that has a .git folder as a direct child.
To prevent the fatal:not a git repository error, you need to make sure that you are in a Git repository before running any commands. One way you can do this is to check for the existence of the .git folder.
That period in front of the .git folder means that it’s a hidden folder. Therefore, it will not appear in the file explorer unless you have explicitly set it to show hidden folders.
On Windows, you can do this from the iew tab.

If you are on Linux or you use a console emulator that allows you to execute Linux commands, you can run the ls command with the flag -a to lists all files including hidden ones.
![]()
Another quick solution that you can use to check that you are inside a Git repository is to run the git status command. This command will show the current state of the repository if the current folder is part of a Git repository.
How do Git repositories work?
Git errors can be confusing, especially if you’re a beginner. This confusion mainly occurs because users are taught to create a connection between problem and solution, where someone encounters a problem and then looks for and uses a solution generally valid without trying to understand too much about the cause of the problem
This simple problem-solution connection is enough for most issues on Git: clone a repository, write some code, commit the changes and push the commits; or clone a repository, create a new branch, write some code, merge the branches and solve the conflicts. However, learning how Git works and its basic concepts will help you understand the technology you are working with and even do much more than those simple use cases described above.
Here’s some basic information to help you better understand how Git repositories work.
First and foremost, Git is a Distributed Version Control System (DVCS). With Git, we have a remote repository stored on a third-party server and a local repository stored in our local computer. Therefore, one can find the code in more than one place. Instead of having just one copy on a central server, we have a copy on each developer’s computer.
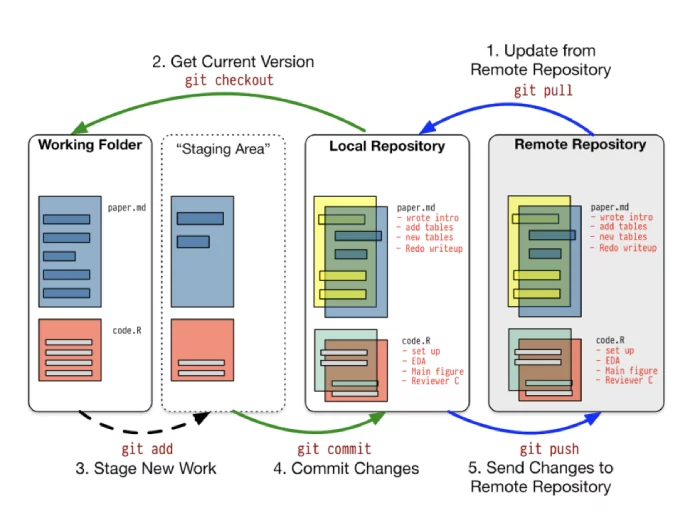
Source: Working with Git
Git, like any other software, must first be downloaded and installed in order to be used. You can even run the git --version command to see what your current version of Git is.
The first step to using a repository is to either clone one if you have access to it or to initialize one.
git clone <repo_path> and git init
These commands will create a new folder named .git, which will contain all the information about your repository that Git tracks: commits, branches, history, and so on.
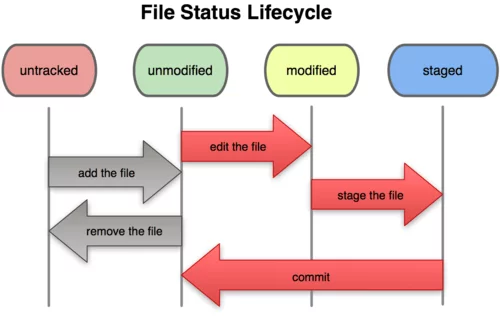
The workflow of contributing to a Git repository is the following:
1. Stage the files
The first step is to add the files you want to add to a repository in the staging area. The purpose of this staging area is to keep track of all the files that are to be committed.
You can stage files using the git add <file_name> command or git add . to stage all the files.
Source: What are the differences between git file states
2. Commit the changes
The second step is to commit the changes. In this step, all the files that were added to the staged zone will be added to the local repository. The command for this is git commit -m "<your_message_here>". The message should be something relevant about the changes you have added.
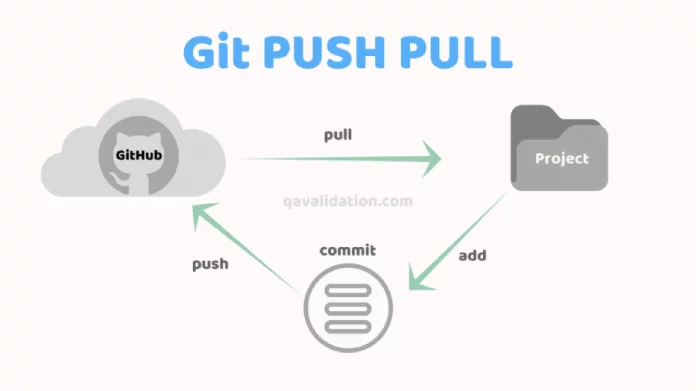
3. Push the code
The last step is to push your changes from your local repository to the remote repository with the help of the git push command.
What are some common Git errors?
Fatal: not a git repository (or any of the parent directories): .git is just one of many other errors that can occur when working with Git. Here is a list of other common errors that may occur along with a brief explanation.
1. Permission denied
Permission denied when accessing 'url-path' as user 'username'
Git repositories can be of two types: public or private. In a public Git repository, everyone can view the code and clone it on their local machines. For the private ones, you need to be authenticated on the platform that the repository is hosted on in order to clone it onto your computer. At the same time, you need to have explicit rights to it.
The error stated above indicates that you possess an authenticated useraddname-password pair, but you do not maintain the files in the repository you are accessing. Thus, your assigned role in the repository must be increased to at least that of a maintainer or some similar position that the distribution platform provides, like maintainer, developer, admin, and so on.
2. Failed to Push Some Refs
Source: What are the differences between git file states
The purpose of Git is to collaborate and share work within a project while all the participants contribute to the same code base. One common scenario is when someone else pushes some code to the same branch you are working on, and you are trying to make your changes as well. The above error indicates that there is one more commit that was pushed to the same branch, but you don’t have that commit on your local machine.
To fix this, you can easily run a git pull origin <your-branch>, solve the conflicts if any, and then run git push origin <your-branch> to push your changes as well.
3. fatal: A branch named <branch-name> already exists
Most VCS (version control systems) have some form of support for branching mechanisms, including Git. Branches can be created directly in the remote repository, or they can be created locally and then pushed to the remote repository.
To create a new branch locally, you can run either:
git branch <new-branch or git branch <new-branch> <base-branch>
The first one, git branch <new-branch>, is used to create a new branch based on the currently checked out (HEAD) branch, meaning that if you are on a branch master and run git branch dev, it will create a new branch named dev from the branch master.
The second one is used when you want to create a new branch from a different branch, then the one that you are currently checked out. git branch qa master will create a new branch named ‘qa‘ from the master branch.
The branch names must be unique, therefore the error above, fatal: A branch named <branch-name> already exists., states that you already have a branch in your local repository with the same name.
4. Can’t switch between branches
Imagine this scenario: you have two branches, master and dev, both with committed files to the repository. On your local system, you do some changes in a file from the dev branch. At this point, if you want to move back to master and you run the command git checkout master, you will receive the following error:
error: Your local changes to the following files would be overwritten by checkout
This error means that you have some files that have been edited but not committed, and by checking out another branch, you’ll overwrite and lose these edits. The solution is to either commit these changes or if you don’t want to commit them yet, to stash them.
What causes Git errors?
Git errors are like any other CLI software errors. Most of the time, they represent a misuse of the command, wrong command names, missing parameters, wrong scope, etc.
There may also be cases where the error is not a user error but a software error. In those situations, either the application encountered a bug or the integrity of the application is corrupted. This can usually originate from missing data or the unintentional deletion of the required files.
In the former case, you can report the bug, and once it is fixed, the Git application can be updated. For the latter, the easiest solution is to remove the software and install it again.
Conclusion
Git is one of those applications you can use without ever thoroughly learning it because most of the time, the way you use it is straightforward as you limit yourself to the same commands over and over again. But if you never take the time to understand how it works and the philosophy behind it entirely, the confusion will never go away, and you can reach a stalemate if you have to do a few more complex operations. In this article, we covered the "fatal:not a git repository" error and everything to do with it, and then explored a few more Git errors.
Sometimes, a developer may encounter the fatal: not a git repository error when running any git command. This is a very common error but is luckily easily fixable.
This article will go through the causes and solutions for the fatal: not a git repository (or any of the parent directories): .git error.
Let’s get to it 😎.

Page content
- Why does the fatal: not a git repository error happen?
- How to fix the fatal: not a git repository error?
- Final thoughts
Why does the fatal: not a git repository error happen?
The fatal: not a git repository error happens because you are not inside a Git repository.
Here are a few reasons why this error happens:
- You are inside the wrong working directory.
- You didn’t initialize the Git repository.
- Your HEAD file is corrupted.
Luckily, each of those reasons is easily fixable.
How to fix the fatal: not a git repository error?
To fix this error, you need to go through the list of reasons, find the one that causes the error by using the elimination method and finally fix it.
Here is the process to follow:
1. Ensure you are inside the correct directory that contains the Git repository.
2. Verify that the Git repository has been initialized by checking if a .git folder exists.
To check if this folder exists, use the ls -la command.
If the .git folder does not exist in the correct directory, initialize the Git repository using the git init command.
bashgit init
3. Verify that the HEAD file is not corrupted.
bash> cat .git/HEAD
ref: refs/heads/main
If this command outputs something unexpected, find the branch you are working on and put it in your HEAD file.
One of those fixes should do the job and fix the error.
Final thoughts
As you can see, multiple reasons can cause this error.
Most of the time, however, it happens because you are not in the correct working directory.

Here are some other Git tutorials for you to enjoy:
- Reset to remote in Git
- Find the current tag with git describe

written by:
Hello! I am Tim Mouskhelichvili, a Freelance Developer & Consultant from Montreal, Canada.
I specialize in React, Node.js & TypeScript application development.
If you need help on a project, please reach out, and let’s work together.
https://gbcdn.mrgcdn.ru/uploads/post/2934/image/original-25ae90aeb7d4039934160dbd7a5fd5a4.png

Периодически от студентов приходят вопросы о работе системы контроля версий Git. Частая причина возникновения этих вопросов — непонимание разницы между репозиторием и обычной папкой.
Чтобы исправить ситуацию, Ильнар Шафигуллин, эксперт по data science и методолог программы «Разработчик», подготовил небольшую заметку на эту тему. Давайте разберемся, как работать с папками и репозиториями с точки зрения практики, то есть без строгих определений.
Пункт 1. Про папки и репозитории
Если папка — это то, к чему мы все привыкли как пользователи компьютеров, то репозиторий — это что-то новое, что нужно создать, инициализировать. Сам по себе репозиторий без наших указаний не появляется. Репозиторий в наших задачах — это папка, над которой были произведены некоторые действия, и Git в ней начинает выполнять свои задачи, например:
-
отслеживать изменения файлов;
-
хранить информацию о ветках.
Важно! Репозиторий не возникает сам по себе, его нужно создать.
Пункт 2. Как понять, в репозитории мы находимся или в папке
Самый простой способ это сделать — набрать в терминале команду «git status». Если в ответ вы увидите ошибку «fatal: not a git repository (or any of the parent directories): .git», значит, в терминале вы вызываете команду не из репозитория, а из обычной папки. Если вы увидели что-то другое, то вы находитесь в репозитории или внутри одной из папок, которая находится в нем.
Важно! Репозиторий отслеживает изменения во всех вложенных в него папках.
Если вы сделаете репозиторием корневую папку на диске C (не делайте этого!), то весь ваш диск станет репозиторием и Git будет пытаться отслеживать все изменения на этом диске. Создаем репозитории очень аккуратно.
Пункт 3. Как можно создать репозиторий
На лекциях программы «Разработчик» мы рассматриваем два способа:
-
Если мы находимся в папке (!) и хотим сделать из нее репозиторий, то вызываем команду «git init», и эта папка становится репозиторием.
-
Если мы хотим клонировать репозиторий из GitHub на свой ПК, то мы пользуемся командой «git clone». При этом обратите внимание: не нужно пользоваться командой «git init», команда clone не только скачивает файлы из интернета, но и инициализирует репозиторий в скачанной папке. На самом деле она делает сильно больше, но нам важно, что в скачанной папке у нас уже будет репозиторий и никак дополнительно инициализировать его не надо.
Пункт 4. Внимательно следим за тем, из какой папки вы вызываете команды
Терминал всегда показывает, в какой папке вы сейчас находитесь, но первое время студенты чаще смотрят на то, какая папка открыта в визуальном интерфейсе VSCode, а не на то, что написано в терминале. Обращайте, пожалуйста, внимание на название папки, которая указана в приглашении к вводу команд терминала. До тех пор, пока вы не привыкнете к работе с терминалом, внимательно следите за тем, что вы создаете репозитории только во вновь созданных для урока папках. Не нужно создавать репозитории из рабочего стола или других больших папок.
Пункт 5. Не нужно создавать репозитории внутри другого репозитория
Повторюсь: не нужно создавать репозиторий внутри репозитория. Прежде чем вызывать команды «git init» или «git clone», сначала убедитесь, что вы точно не внутри репозитория. Вызовите «git status» и убедитесь, что вы находитесь в папке, а не в репозитории. Если «git status» выдал ошибку «fatal: not a git repository (or any of the parent directories): .git», значит, вы в этой папке можете воспользоваться одним из способов создания репозитория, рассмотренным выше и на лекциях. Либо «git init», либо «git clone», но не обоими одновременно.
Важно! Иногда студенты сначала вызывают «git init» и потом «git clone». Но тем самым вы нарушаете правило не создавать репозиторий внутри репозитория. Обращайте на это внимание.
Пункт 6. Как репозиторий сделать обычной папкой
Когда вы создаете репозиторий, у вас в папке появляется новая скрытая папка с названием «.git». Это специальная папка, в которой хранится все, что необходимо для работы системы контроля версий. Если вы удалите эту папку, то потеряете всю историю, которую Git успел сохранить, но при этом превратите ваш репозиторий обратно в папку.
Итак, чтобы из репозитория снова сделать папку, достаточно всего лишь удалить скрытую папку «.git». При этом вы потеряете историю, которую собрал Git (все коммиты, ветки и т. п.), но файлы в самой папке останутся в том же виде, в котором они были в момент удаления папки «.git».
Пункт 7. Что делать, если все вокруг стало репозиторием
У студентов, которые неаккуратно вводят команду «git init», такое встречается. Поэтому давайте разберемся, что делать в такой ситуации. Надо проверить, успели ли вы уже совершить такую ошибку. Создайте новую пустую папку, например на рабочем столе, и в терминале вызовите «git status» в этой папке. Если вы увидите «fatal: not a git repository …», то радуемся. Все у вас в порядке.
Если же вы увидели что-то другое, значит, ваша вновь созданная папка является частью какого-то другого репозитория. Важно: мы только что создали новую папку и внутри нее никаких команд кроме «git status» не вызывали, то есть мы не создали сейчас новый репозиторий, но Git при этом не говорит нам, что это «not a git repository». Это может быть только в том случае, если вы эту новую папку создали уже внутри другого репозитория, то есть чуть раньше сделали репозиторием ваш рабочий стол или даже весь ваш диск C. Вылечить такую ситуацию можно следующим образом: нужно найти репозиторий, который вы создали по ошибке, и сделать его обратно папкой (см. предыдущий пункт — нужно удалить папку .git).
Если вы работаете на Windows, включите отображение скрытых файлов и папок, так как папка .git скрытая. Далее начинаем подниматься по иерархии папок вверх и искать в них папки «.git». Например, если вы создали папку по адресу «C:UsersUserPicturesControlCenterScan», то сначала проверяете папку Scan, потом проверяете папку ControlCenter, потом Pictures и так далее, пока не найдете скрытую папку .git. Когда нашли и удалили, проводим проверку из начала этого пункта заново.
Успехов в освоении Git и терминала!
Git is the most frequently used version control system. This is mainly because it is capable of handling anything from websites to large microservice-based apps. Working with Git is usually a seamless process. A real walk in the park until it starts to rain. You create your branch and do countless regular commits. But, suddenly, something happens that completely catches you by surprise. You are not quite sure why and what it is that you have done wrong, but Git just faced you with the following message:
fatal: not a git repository (or any of the parent directories): .git
In today’s article, our web development agency in Chicago reveals possible reasons for this outcome as well as ways to solve the fatal: not a git repository error.

Understand how Git repositories work
We, as human beings, are wired to build a one-way connection between problem and solution. As soon as we encounter an issue, we search for a generally valid solution without trying to understand the cause of the problem. While this approach can be valuable for most of Git’s issues, understanding the under-the-hood mechanisms of this version control system can get you much further. This section of the article will outline some basic information to help you better understand how Git repositories work.
Git features a remote repository stored on a third-party server and a local repository in our local machine. Instead of having a single copy on a central server, each developer has a copy on their own computer. That means that we can find the code in more than one place.
The first thing you need to do upon downloading and installing Git is to clone a repository (if you have access to it) or initialize one. These two actions are respectively done with the following commands:
- git clone <repo_path>
- git init
This way, you’ll create a folder named .git. The folder contains all the info about your repository that Git tracks, such as:
- Commits
- Branches
- History

The process of contributing to a repository goes as follows:
- Stage the files: The first step in adding the files to a repository is adding them to the staging area. The staging area serves to track the files that are yet to be committed. You can stage individual files with git add <file_name> or all files with git add . command.

- Commit the changes: In this step, you move the files from the staging area to the local repository with the git commit -m <your_message> command. The message should contain info on the changes you made to the files.
- Push the code: Now, you use git push to push the changes from your local repository to the remote repository.
What are the usual reasons for fatal: not a git repository error?
The error you received is a Git error. That means that Git is installed on your local system and that the executable is accessible on the local path. With that in mind, we can rule out any issues associated with installation.
The error message is telling you that you issued a command inside a directory that Git doesn’t recognize as a Git repository. In other words, the version control system doesn’t track the directory, so Git can not perform the action you requested, such as:
- git status
- git add
- git commit
So, how does Git determine whether you are in a Git repository? It does that by looking for a hidden folder named .git in the current directory or one of its parents. That folder should be located at the root of your project tree. In case Git doesn’t find this folder in your directory, it will display a message:
fatal: not a git repository (or any of the parent directories): .git
There are a few common reasons for this message. We’ll present them in the order of likelihood:
- You are most likely required to set up a new local repository or clone an existing one.
- It is somewhat likely that Git couldn’t locate an existing repository on your local machine.
- This is very unlikely, but you may have deleted the entire Git repository or the .git hidden folder.
- This happens almost never, but let’s say that the state of your local repository somehow got corrupted.
In continuation, let’s explore the ways to mend the fatal: not a git repository error by addressing these reasons.
How to set up a new repository?
Before running commands in Git, you have to create a Git repository. Whether you are just starting with your project and need to create a new folder, or you already have a project folder that contains all the resources, the process goes as follows:
The first thing you need to do is open the command shell of your choice, based on the operating system you are using:
- cmd on Windows
- bash on Unix-like systems
- Terminal on Mac
Once there, follow these steps:
- Create a new project folder in case you already don’t have one
- Use cd to go into your project folder (you need to be at the root of your project’s folder tree)
- Enter git init
This is what the command output should look like:
mkdir my-project (Only in case you are creating a new folder)
cd my-project
Git init
Initialized empty Git repository in /home/me/projects/my-project/ .git/
If you already have existing sources, you need to add them to the repository via git add and git commit. By entering git add, you are actually staging (preparing) the changes you made to files in the repository for a check-in. To check-in (commit) these changes, you need to enter the git commit command followed by a short commit message. That message should describe the changes that are being committed. This is what it should look like:
Git add .
Git commit -m “Initial commit”
[master (root-commit) 0879183] initial commit
33 files changed, 6589 insertions (+)
create mode 100644 LICENSE-MIT
create mode 100644 README.md
The repository will store the info on the state of your files each time you make a commit in Git. That is why it is in your best interest to do a commit as soon as you make any significant change to any of the files.
How to clone an existing Git repository?
This action would be necessary only if you are joining an existing project, as opposed to starting a new one. In that case, you’ll need to clone an existing repository to your local machine.
This is a relatively simple process, and it is performed via the git clone command. However, if you are cloning remotely, you need a URL to the remote repository. On the other hand, in case you are cloning locally, you need a file system path to your repository folder or share.
For example, let’s clone a repository from GitHub. Luckily, they offer various training projects for us to experiment with. We’ll use the project called Spoon-Knife. As we have already mentioned, to download the files, we simply need to enter the git clone command. Here is how:
git clone https://github.com/octocat/Spoon-Knife
Cloning into ‘Spoon-Knife’…
remote: Enumerating objects: 16, done.
remote: Total 16 (delta 0), reused 0 (delta 0), pack-reused 16
Unpacking objects: 100% (16/16), 2,24 KiB | 458.00 KiB/s, done.
After using the cd command to navigate to the Spoon-Knife folder, you can issue any Git command to verify that the fatal: not a git repository message will not appear for this local repository. Let’s use the git status command and follow what happens:
Git status
On branch master
Your branch is up to date with ‘origin/master’
Nothing to commit, working tree clean
Voila. You have successfully retrieved the sources and created a local repository.
How to locate an existing repository?
In case you already had a local project folder tracked by Git, you should manually check if there is a hidden .git folder in the current directory. To do so, use the following commands:
Unix-like systems:
ls -a
Windows:
C:…>dir /d
These commands will list all the hidden folders along with visible ones. By issuing cd .., you can go back through each of the parent folders and check if the hidden .git folder exists.
Alternatively, you can employ the Linux find command to search the entire system:
find / -type d -name “.git”
With the help of /, you can specify the path of the folder from which you want the search to start descending into child folders. In our example, the search starts from the system’s root directory. The -type d command means that we are only looking for directories, while the -name “.git” specifies the name of the directories we want to be listed if discovered.
Windows users can search for the .git folder via file explorer. However, the tool doesn’t search for hidden folders by default, so you’ll need to specify it in the settings menu.
What if you have sources along with the Git repository, but there is no .git folder?
This is not unusual. You may download the sources in a compressed archive that doesn’t include the version control files. Or perhaps there was the .git hidden folder, but you accidentally deleted it.
In case you made no modifications to the sources, you can always download a fresh local project copy. On the other hand, if you modified the sources and you need to add those changes to the repository, you can clone the project into a new folder and copy the files you modified over their counterparts in the new tree.
Remember to compare your version of the files in question to their counterparts. By failing to do so, you risk overwriting recent changes made by other members of your team. You can make a side-by-side comparison for more minor changes, and then simply cut and paste those changes. Alternatively, you can use the git diff command.
However, we believe that the best thing you can do in the current situation is create a new branch in the repository. Then you should copy your files over those in the newly created branch and merge the branch with the master. Here is how:
Note: Every Git repository contains one main branch. That branch is usually named master, but it may also be named main. If you are unsure about the name of your main branch, use the git branch command, and Git will list all the branch names within your project.
Let’s begin by creating a new branch and switching to it:
git status
On branch master
git checkout -b my-changes
Switched to a new branch ‘my-changes’
Now, copy the files you modified over the files in the repository. Don’t worry; the changes we make here won’t affect the master branch just yet. Once the files are copied, let’s commit the changes and switch over to the master branch.
git commit -a -m “Copied over files.”
[temp 64295f3] Copied over files.
1 file changed, 6 insertions(+)
git checkout master
Switched to branch ‘master’
Your branch is up to date with ‘origin/master’.
The files have now reverted to the original state. However, if we were to go to our my-changes branch, we would still find the copied versions. The next thing we should do is interactively merge the changes from the my-changes branch into the master branch.
git checkout -p my-changes –
Git will display the changes in small blocks for you to approve. It will show the code that is being replaced above the one replacing it. You can use the s option (if displayed) if you want Git to break its currently displayed block into smaller pieces. This is what the entire process should look like:
git checkout -p my-changes –
diff –git b/index.html a/index.html
index a83618b..cf2b983 100644
— b/index.html
+++ a/index.html
@@ -16,5 +16,11 @
-<img src=”my-dog.jpg” id=pet-pic” alt=” “ />
+<img src=”my-cat.jpg” id=”pet-pic” alt=” “ />
(1/1) Apply this hunk to index and worktree [y,n,q,a,d,e,?]?
Lines preceded by a “-” are going to be removed, while lines preceded by a “+” are going to be added. You can enter “?” to display a list of useful options. Here are some of them:
- ? – available options
- n – reject the currently displayed block’s changes
- y – accept the current block
- s – break the current block into smaller chunks
- e – edit the current block in the terminal’s graphical editor
Once the session is finished, your changes will be merged. Also, the changes made by your team members will be preserved. Keep in mind that this process doesn’t automatically commit changes, so you need to do it yourself.
What to do if your Git repository gets corrupted?
Although you’ll probably never face this problem, there are still ways to fix it. However, before we start working on this issue, it would be wise to make a copy of the project tree in case something goes wrong.
First, let’s use the git fsck command to verify that the problem exists. Like in the cases above, Git will display the fatal: not a git repository message.
git fsck
fatal: not a git repository (or any of the parent directories): .git
When a Git repository gets broken, it is usually extremely challenging to outline the specific issue. However, let’s quickly check the .git folder just in case there is an obvious problem like missing files:
ls .git
branches config FETCH_HEAD hooks info objects refs
COMMIT_EDITMSG description HEAD index logs ORIG_HEAD
Luckily, there is an application that may be able to fix the broken Git repository automatically. The app is called git-repair, and this valuable tool can help with a wide range of issues.
First, we should check whether the tool is already installed on your machine. We can do this by trying to invoke it with the git-repair –help command. If the app is there, you should notice the help text displayed.
On Linux, this tool is often available via a package manager such as apt. Here is the command you can use to check if that’s the case:
sudo apt-get update
sudo apt-get install git-repair
If you don’t already have the tool installed on your machine, simply follow the installation guidelines on their homepage. Let’s run the tool and see what we get:
git-repair
Running git fsck …
No problems found
Although the tool reported no problems, that doesn’t mean that our actions were in vain. To confirm that something actually changed, let’s run git fsck once again and hope that the fatal: not a git repository error won’t appear:
git fsck
Checking object directories: 100% (256/256), done.
notice: HEAD points to an unborn branch (master)
As you can see, the situation looks much better now. From what we can see, it seems that HEAD (a file with one line of text that indicates which branch we are currently working on) is pointing to the wrong place. That’s a minor problem, and it is not too difficult to fix. Now, let’s switch to the master branch and see what happens:
git switch master
error: The following untracked working tree files would be overwritten by checkout:
README.md
index.html
styles.css
Please move or remove them before you switch branches.
Aborting
Git warns us that we will lose our work unless we move or remove the listed files. Let’s remove them and switch back to the master branch.
rm README.md
rm index.html
rm styles.css
git switch master
Switched to branch ‘master’
Your branch is up to date with ‘origin/master’.
ls
backup git-repair index.html README.md styles.css
We’ve managed to recover the repository, and you can now copy the files back. Since the files were restored from the local repository, they are up to date. However, they don’t feature some changes that haven’t been checked in yet.
Final thoughts
In this article, we’ve covered multiple scenarios along with ways to resolve the fatal: not a git repository error. Git is an outstanding version control system. Aside from the fact that it truly shines in project collaboration, you can also use it for your own projects as you experiment with new branches while preserving the work on others or simply reverting files to their previous state. The options are virtually limitless for those who manage to understand its structure and master the control line.
If you are interested in Git’s inner mechanisms, whether to code a business app or arm your company with custom-coded websites, feel free to schedule a call with our dev-ops team.