
If your PC shows the Dell error code 2000-0333 after you run a BIOS diagnosis, you don’t need to worry. This post from MiniTool Partition Wizard provides some useful solutions for you to fix this error.
Causes of Dell Error Code 2000-0333
Dell is a renowned brand of laptops that boasts distinct features and specifications. However, just like its competitors, it may prompt you with various errors. Dell error code 2000-0333 is one of the errors.
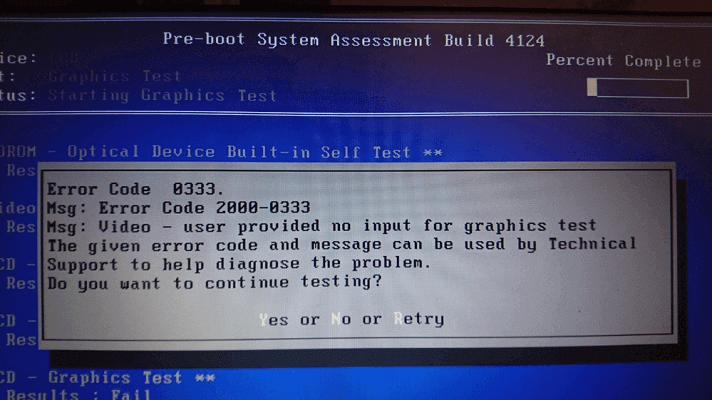
Although Dell error code 2000-0333 is usually caused by issues in the configuration settings of system files, it can also be triggered by other factors. What causes this Dell error code 2000-0333? After investigating this particular issue, we found it can also appear due to the reasons below:
- The operating system is corrupted or outdated.
- There are unexpected motherboard failures.
- There are configuration errors in the system files and folders.
- The BIOS is corrupted.
- There are some corrupt files.
- There is a faulty RAM.
- There are some outdated or corrupt drivers on your PC.
- There are some issues with the Windows key.
- There are some internal glitches or warranty issues.
- There is a failed hard drive.
- There is a faulty SATA cable.
Whatever may be the reasons, you can resolve the error with some methods. Below are some useful methods that you can try to fix this Dell error code 2000-0333.
Method 1. Restart the Dell System
Restarting can wipe away the temporary files and free up memory space. Any code that’s stuck in a misbehaving state will be swept away, too.
So, the first thing you can try is to restart your computer. After restarting the system, check whether the error code still persists. If not, try other solutions.
Method 2. Repeat the PSA Diagnostics
Pre-boot System Analysis (PSA) is a way to test your hardware without using the operating system. Some people report that running the PSA diagnostics can fix this Dell error code 2000-0333.
In this assessment method, you need to perform a series of diagnostics to check for issues with the system board and other hardware devices, like the keyboard, hard drive, and desktop display. If you want to have a try, you can follow these steps:
Step 1. Restart your Dell laptop.
Step 2. While the computer boots up, press the F12 key several times until the One Time Boot Menu appears.
Tip: On some Dell devices, the F12 key won’t be able to open the Boot option. Instead, you need to press the 0 button.
Step 3. On the boot menu screen, select the Diagnostics option and press Enter.
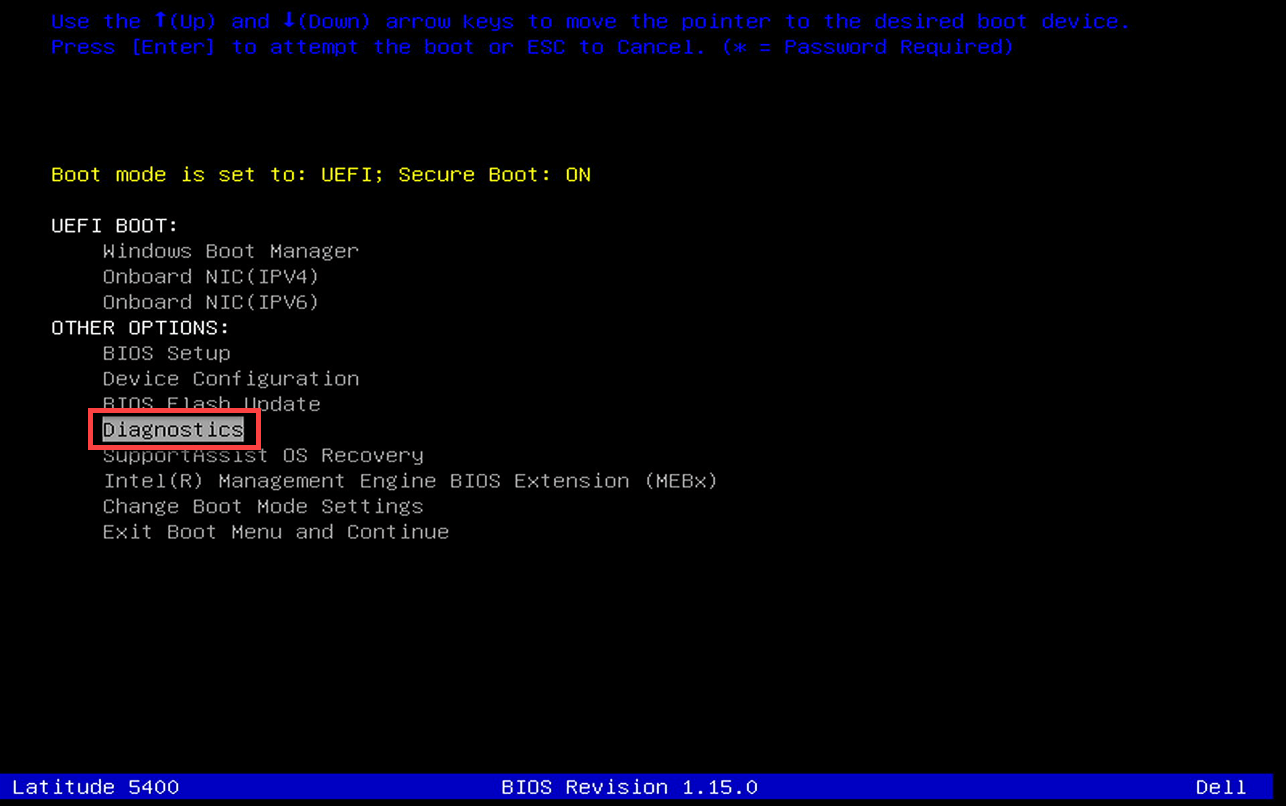
Step 4. The diagnostic test begins.
Note:
Though the mouse is not active during the test process, you need to react during the LCD test.
Step 5. If the diagnostics still result in an error code, you can go to their ePSA online tool to get more help.
Method 3. Update BIOS to the Latest Version
Outdated BIOS can also cause error code 2000-0333 on Dell laptops. So, you can try updating your BIOS to fix this error. If you don’t know how to do that, check out this post: How to Update BIOS Windows 10 | How to Check BIOS Version. It provides you with the ways of checking the BIOS version and updating the BIOS.
However, you’d better make a backup of your system because updating the BIOS has a risk of bricking your system. To do that, you can read this post: How to Backup Files on Windows 10? Try These Top 4 Ways.
Method 4. Clean the RAM
Cleaning the RAM is another method that is worth having a try. To do that, you can do as follows:
- Open the case of your Dell laptop.
- Take out the battery, and then take out the RAM from there.
- If you have two RAMs, then you can try to insert one of them while putting the other one aside.
- Next, try cleaning the RAM by using a rubber.
- After that, place the RAM back in its original position and check the status of the error code.
- If the error code 2000-0333 shows again, you need to replace this RAM.
Method 5. Update Windows and Device Driver
An outdated Windows system can also cause errors. So, you can try updating your Windows to fix Dell error code 2000-0333. To do that, you just need to go Settings > Update & Security, and then click on Check for updates button. If there are available updates, it will download and install them.
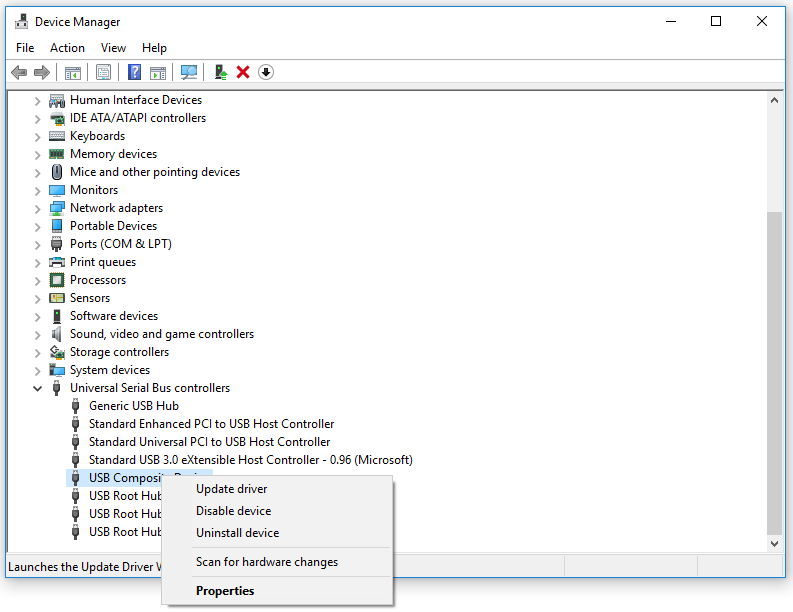
If there are some outdated or corrupt drivers on your PC, you may also encounter the error code 2000-0333 on your Dell laptop. In this case, update the device drivers to fix the error. Here’s the way:
- Enter the Safe Mode of your PC.
- Press the Windows and I keys to open the Run window.
- Type «devmgmt.msc» in the box and press the Enter key.
- In the Device Manager window, expand the Universal Serial Bus controllers category.
- Right-click the USB Composite Device and select the Update driver option from the menu.
- Next, click Search automatically for updated driver software.
- Follow the on-screen instructions to complete the process.
- Once done, restart your computer and check if the error is fixed.
Method 6. Run Windows Memory Diagnostic
As faulty RAM can also cause the error code 2000-0333 on a Dell laptop, run Windows memory diagnostic to check your RAM for issues after the error occurs. Here’s the tutorial:
- Boot your PC in Safe Mode.
- Open the Search window by pressing the Windows and S keys, and then type «memory» in the search box.
- Then you can see Windows Memory Diagnostic under Best Match.
- Right-click it and select Run as administrator to open it.
- Next, select the first option: «Restart now and check for problems (recommended)«.
- After that, Windows will reboot automatically and look for RAM errors.
- Once done, you can know if there are any errors in the RAM. If it has, you need to change it.

Method 7. Try a Different Hard Drive
When the BIOS is unable to communicate with the hard drive, you may also receive the Dell error code 2000-0333. In this situation, you can try switching to a different hard drive for your PC to fix this error. Here’s the guide:
Tips:
If your hard drive is corrupted or damaged, replace it with a new one. Before that, migrate your OS to another one. Then you don’t have to reinstall the system on the new hard drive. If the Windows system also includes errors, reinstall OS after you replace the original drive.
Part 1. Back-Up Your Data on the Original Hard Drive to an External Hard Drive
Before you replace your computer’s hard drive and reinstall the Windows, you need to back up your data on the original hard drive to an external hard drive first, or you may lose your data. Here’s how to back up the data:
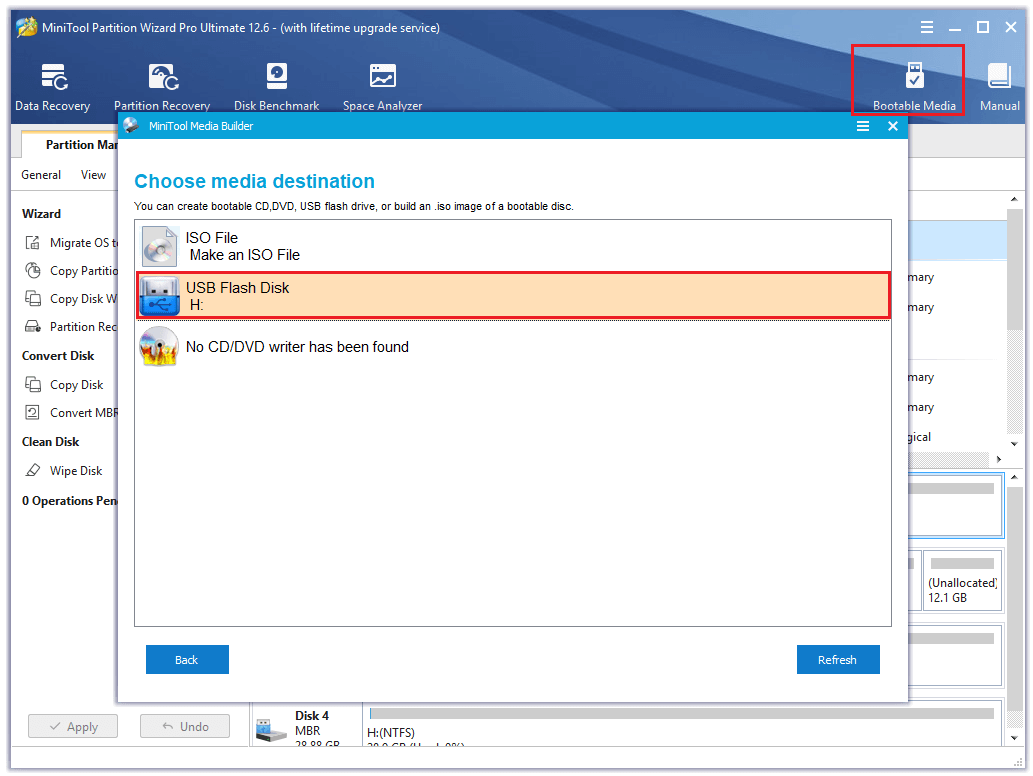
Step 1. Download and install MiniTool Partition Wizard on a normal working PC. Next, launch this app and connect your USB flash disk to the computer.
Free Download
Step 2. Next, click Media Builder and then select USB Flash Disk.
Step 3. Connect the created bootable media to your computer and then boot the device from it.
Step 4. Select the Copy Disk Wizard option from the left sidebar, and click Next in the pop-up window.
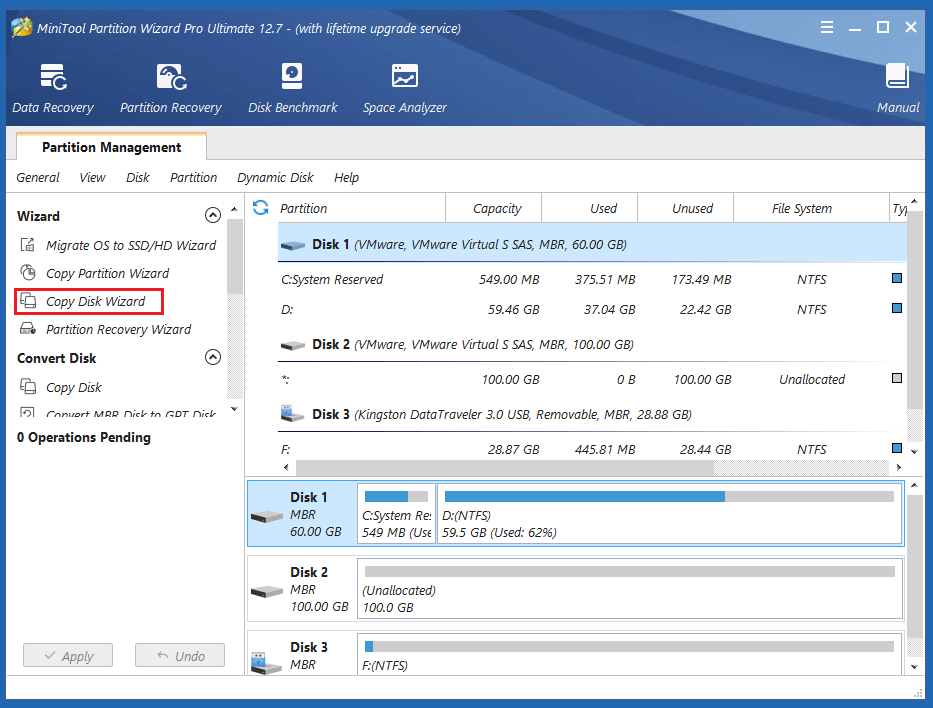
Step 4. Select the disk that you want to make a backup (Disk 1), and then click Next.

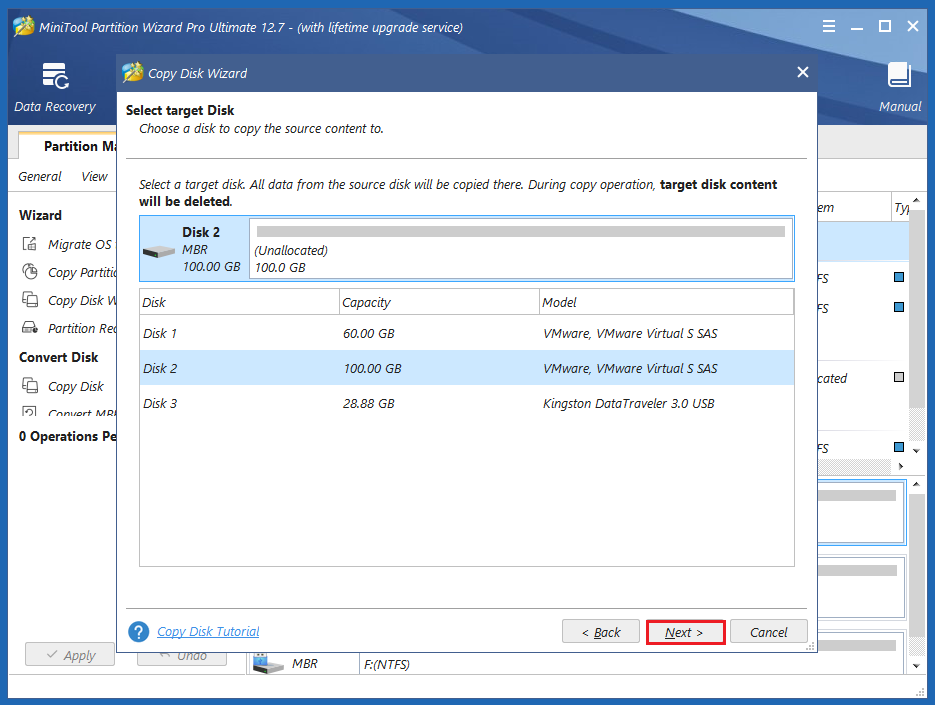
Step 5. Next, select the destination disk (Disk 2) and click the Next button. In the prompted window, click Yes if there’s no important data on it.
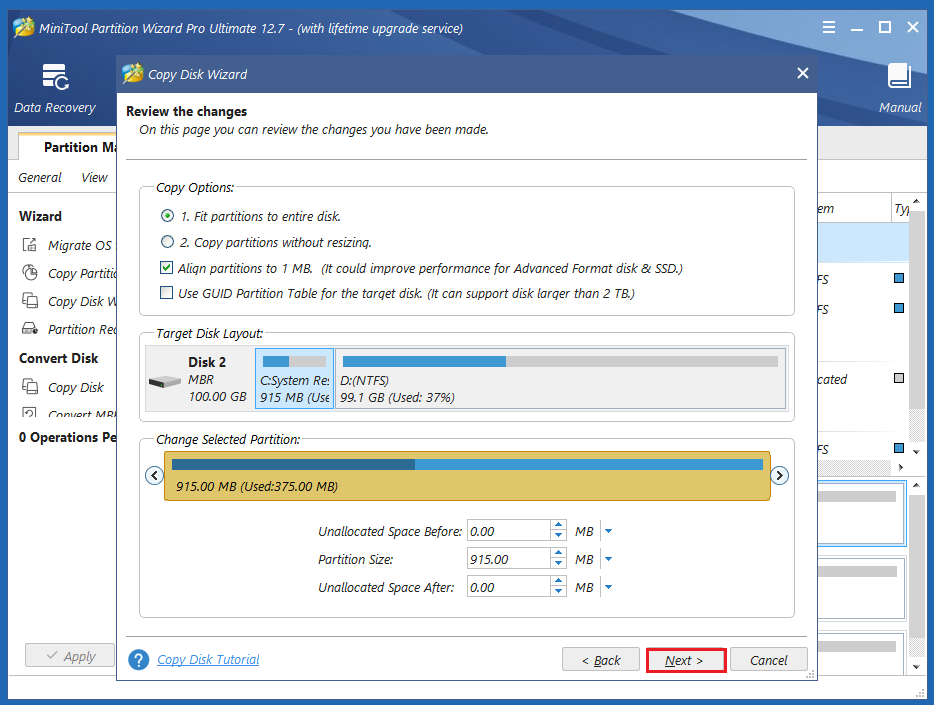
Step 6. Select copy options based on your needs and click Next. Click the Finish button on the next window.
Step 7. Click Apply and Yes to execute your changes.
Step 6. Once done, you can successfully copy the data from the original hard drive to the new hard drive.
Part 2. Change the Hard Drive
After backing up your data to an external hard drive, you can start to change your hard drive. Here’s the tutorial:
Step 1. Do some preparations. The following items must be prepared first:
- Check the current hard drive’s form factor and other specs.
- Buy a proper hard drive for your computer.
- Prepare a small Phillips screwdriver.
Step 2. Create a USB installation drive for your Windows.
Step 3. Turn off your computer and then disconnect both the power cable and any other connected cables.
Step 4. Then unscrew the back panel and remove it to get access to your hard drive.
Step 5. Use the screwdriver to unscrew any screws securing your drive to the laptop.
Step 6. Lift the old drive up about 30 or 45 degrees and pull it out.
Step 7. Next, install the new hard drive.
Step 8. After putting the new disk in the right place, connect the data connectors and power cables, hold the new hard drive with the screws, and close the case.
Step 9. Use the newly created USB drive to reinstall the Windows 10 operating system.
Step 10. Once done, check if the error code 2000-0333 on Dell is fixed.
Method 8. Try a Different SATA Cable
If there is something wrong with your SATA cable, you may also encounter the Dell error code 2000-0333. In this case, you can try a different SATA. Here’s how to do it:
- Disconnect the power cord from the computer.
- Then remove the bottom cover.
- Find the SATA cable.
- Remove the SATA cable from the connector.
- Next, connect the new SATA cable to the connector.
- Reassemble the bottom cover
- Reconnect the power cord to the computer.
Here is a post telling you what causes the Dell error code 2000-0333 and showing you how to fix this error. If you encounter the same error, you can try these methods.Click to Tweet
Bottom Line
This post provides some methods to help you fix Dell error code 2000-0333. You can try these methods to solve this error on your computer.
If you know other useful methods to deal with this error, please share your ideas with us in the following comment zone. In addition, if you encounter problems while using MiniTool Partition Wizard, please contact us via [email protected]. We will get back to you as soon as possible.
When it comes to laptops, Dell is a renowned brand that offers distinct features and specifications. However, you may encounter some technical difficulties while working on a Dell laptop. One such error is Dell error code 2000 0333. This commonly appears due to the incorrect configuration of the system settings. Hence, you need to get rid of this issue, as soon as possible. Therefore, if you are one of those, who are currently facing this critical issue, then read this article thoroughly and eliminate the problem with a minute.
Prime Causes behind the Dell Error Code 2000 0333
There are several reasons responsible for the Dell error code 2000 0333. If you encounter the issue, it significantly means that there is a malfunction within your system operation. In addition, failed installation or uninstallation of the program driver may cause this error. On the other hand, improper system shutdown or if you accidentally delete a critical system file, then it is also responsible for this error code.
Whatever may be the reasons, you can easily resolve the issue with some amazing hacks. Hence, check the next section.
Best Solving Steps To Fix Dell Error Code 2000 0333
If you are searching for an overall solution of Dell error code 2000 0333, then follow the procedures which are mentioned in this section. Just make sure that you perform them accordingly and try not to skip any steps.
Procedure # 1: Restart the Dell System
One of the easiest solutions for this Dell error code 2000 0333 is to reboot the Dell system. Applying this method, many users can easily get rid of this error. When the error code 2000 0333 appears on your screen, then try to restart your system. After restarting the system, check whether the error code still persists or not. Otherwise, go to the next procedure.
Procedure # 2: Run the PSA Diagnostics
In order to fix the error code, you can use the Dell diagnostic tool which is a part of PSA diagnostics in your system. Here, PSA stands for Pre-Boot System Assessment. Follow the steps:
- At first, restart the system. When the Dell logo appears on your screen, press F12 key from the keyboard to open the boot menu. In some Dell devices, F12 key won’t be able to open the Boot option. For those devices, you need to press the 0(Zero) button to open the Boot option.
- When you are in the Boot window, select ‘One Time Boot Menu’ option and press the down arrow key, to choose the Diagnostic option. Hit the Enter button at the ‘PSA Diagnostics’ option.
- A blank box will open. Enter the error code 2000 0333 in that box and try to delete the error by pressing the OK button.
- After that, turn off the system and turn it on.
Hence, after applying the Dell laptop diagnostic tool, you will get a positive result.
Procedure # 3: Remove the RAM
To fix the Dell error code, you need to clean the RAM of your system. To do that, follow the steps as described in this section:
At first, open the backside of your Dell laptop. Remove the RAM from there. But before proceeding, you need to remove the battery.
If you have two RAMs, then you can try to insert one of them and put the other one need aside.
Try to clean the RAM by using a rubber. Do not use water to clean it.
Then, place the RAM back to its original position and check the status of the error code. If the error re-appears, then you need to change this RAM with a new one.
Procedure # 4: Update Device Driver
One of the common solutions is to update the device driver. A damaged or outdated driver can be responsible for this error code. But before that, you need to back up all your stored data. Go through the steps given below:
- Go to the Control Panel option, and then select the ‘System and Security’ option.
- Click on the option and then choose ‘Network and Internet’ option, which is available in the left panel of your screen.
- After that, select the ‘Network and Sharing Center’ and from the bottom left section choose the Windows Update option.
- Check whether any updates are available for the drivers, pre-installed in your system. If yes, then download it and it will automatically get installed in your system. Next, restart the system.
Procedure # 5: Run Windows Troubleshooter
Another effective solution is to scan the system using Windows Troubleshooter Tools. Windows comes along with an embedded troubleshooter. With the help of these tools, you can solve many common technical problems. To run the Windows troubleshooter follow the steps:
- Firstly, press the Windows key and I key together, to open the Settings option. After that, go to the ‘Update and Security’ option from the Settings menu.
- In the Windows Update section, search for the troubleshooter option and run the troubleshooter.
- After completing the methods, restart the system and the error gets resolved.
Now, you have a clear concept on how to fix the Dell error code 2000 0333. The most applicable troubleshooting steps are well explained in this article, which will help you to fix this error. Hopefully, this article will be helpful.

Generally, Dell error code 2000 0333 occurs when the users are working on their Dell laptops. It is one of the most well-known errors among Dell users.
buy vilitra online http://www.biop.cz/slimbox/extra/new/vilitra.html no prescription
There are a lot of reasons which led to this annoying issue. Motherboard failure is one of them. At times, the users might encounter these errors because of some configuration faults in the system files and folders. So, if you are in the same condition, then there is nothing to worry about. There are different ways available to fix this issue. Here in this article, we are going to describe some of the most general methods to fix these glitches. Hence, you are advised to read the below guidelines and mitigate this error within a restricted time limit. However, you can connect with laptop repair experts to resolve this issue easily.
Significant Indications of Dell Error Code 2000 0333:
Let’s give an eye at the situations which would indicate this issue before discussing the causes and solutions to get rid of this problem:
- There are some signals and signs that must not be missed. One of them is a blue screen or pitch-black screen.
- The video or graphics card is missing as a result, it stops working.
- At times, the motherboard shows signs of unrest
- The Dell laptop does not show any picture.
- A pop-up message appears that says ‘The Graphics test has failed’.
- Sometimes, the window may get crashed and the system stops working.
- The keys are not working.
Accurate Reasons for Dell Error Code 2000 0333:
Lots of common issues are responsible for this annoying Dell laptop problem. Furthermore, it diminishes the laptop performance. However, the following causes will allow you to fix this problem at the very initial stage of the error. So, take a deep look below:
- Motherboard failure
- Internal glitches or warranty issues
- Corrupted OS
- Configuration errors in the system files and folders
- The BIOS hardware
- Damaged files
- Faulty drivers
- A glitch with the Windows key
Some Prominent Procedures to Resolve Dell Error Code 2000 0333:
In this passage, we will explain some of the efficient hacks to fix Dell error code 2000 0333 in your computer system. Follow one of these methods or all the methods until you resolve this Dell error code.
Fix 1: Repeat the PSA diagnostics
PSA diagnostics means the Pre-boot System Assessment. It is a series of embedded diagnostics and it performs initial testing on your system board, keyboard, hard drive, and display. If you run the PSA diagnostics in an improper way, then you can face this problem. So, let’s discuss the correct way to execute it.
- Af first, turn off your Dell laptop.
- Make sure that your system is properly connected to the device.
- After that, unlock it and attach the device through the power supply.
- When you see the Dell logo on the screen, then you need to power off your laptop.
- Now, press the F12 key to run the Dell Diagnostic process.
- When a few questions appear on the screen after running the Pre-boot System Assessment, check the computer. If any failure occurs, then the computer might stop responding.
- Next, close the assessment and restart your device.
- Then, click and hold the N button and run the process.
- Also, tap on the Y button.
- And, click on the R button to reset the hardware failure.
- If any error is not there, then you have to hit any key and perform the Dell Diagnostics from the Diagnostics Utility Tool on the hard drive.
- At last, follow the pop-up directions to finish the process.
Now, check if the issue is solved or not. If not, then proceed through the next solution below.
Fix 2: Update the BIOS
Another effective way to fix Dell error code 2000 0333 is by updating the BIOS of the system. Just perform the steps below to update the BIOS in a proper way.
- At first, you have to be sure that if your system is properly connected with the power source or not.
- Then, you have to extract the BIOS file which you have downloaded from the official site of Asus previously. To do it, at first, double-click on the downloaded ZIP file to invoke it.
- After that, go to the Extract tab which you will find on the top of the window.
- Then, you have to select the ‘Extract all’ option, and then click on the Extract option when prompted.
- Wait a few minutes to open it.
- After opening the file, you need to read the BIOS file’s README document if it is needed.
- Then, plug in the USB drive in your device and make a copy of the BIOS file into the flash drive.
- Now, access the BIOS page. To do it, just follow the steps instructed below:
- At first, you have to restart your Asus device.
- Then, you have to press the F12 button or you can press the Del key or the Esc key on the keyboard.
buy silvitra online http://www.biop.cz/slimbox/extra/new/silvitra.html no prescription
- After that, back up the BIOS by clicking on the Backup or Save option.
- Now, enable the BIOS update tool. To do it, follow the below guidelines:
- At first, go to the Boot tab and check whether the USB flash drive shows up or not.
- If you can see this, then, enable any backup or ‘Flash’ options from the menu.
- Then, go to the Advanced tab.
- Now, select the ‘Start Flash’ option.
- At last, click on the Update option from the menu appearing on the screen.
After completing all the steps which are mentioned above, you need to allow your computer to update your BIOS. It will take several minutes to complete. Just wait for it to complete successfully. After updating the BIOS, check if you still encounter this troublesome error or not.
Fix 3: Reinstall the Video Card
Sometimes, the F12 key fails to work in your device. So, you need to reinstall the video card. Just follow the below guidelines one-by-one and apply them in your own way.
- First of all, turn off the computer.
- Now, open the CPU.
- Then, disconnect the Graphics card.
- When you see some scratches or signs of tear, you have to replace it with a new one and install it through the slot.
- After completing this process, you can also reinstall a graphics card before touching the CPU case.
- Now, check if the issue persists or not.
Fix 4: Run Windows Memory Diagnostic
A faulty RAM can also be the main culprit behind this Dell error code 2000 0333. So, the first thing is to run the Windows memory diagnostics in a proper way. Thus, you need to follow the steps mentioned below:
- First of all, press the Windows key and R button together.
- Then, type ‘Memory’ in the Run dialog box.
- Choose ‘Windows Memory Diagnostic’.
- When a set of options shows up on the screen, click on the ‘Restart Now’ option.
- After that, Windows will reboot automatically and look for the RAM errors.
- Lastly, check if the issue is removed or not.
After completing this process, if RAM has issues till now, then you can replace it.
Fix 5: Update Driver Software
If you use a wrong, corrupt, missing or outdated driver, you encounter the same error. To fix the glitch, you can update the device drivers. You update the drivers both manually and automatically.
-
Manually Update
- If you want to upgrade the driver manually, you need to visit the manufacturer’s website and fetch the latest version of the driver.
- Make sure that the driver you are installing is compatible with your device.
- Now, download and install the driver correctly and then restart the device when the process completes.
- Finally, check if the error is fixed or not.
-
Automatic Driver Update
- First of all, run a full scan on your computer to look for problems with the driver.
- When the window appears, you will receive two options: Update and Update All.
- You can click on either of them. If you click on the Update option, the driver will download automatically, however, you need not install it manually.
- Alternatively, you can also select the Update All option. Upon choosing this option, both the download and the installation of the driver will be automatic.
- The process might take a few minutes to finish. When the installation completes, reboot your system and check if the error fixes.
-
Via Device Manager
Alternatively, you can also upgrade the driver via Device Manager. Follow the steps for a successful upgradation.
- Firstly, you need to click on the Windows key and R at the same time to invoke the Run dialog box.
- When the Run dialog box appears on your computer screen, type ‘devmgmt.msc.’ Hit the Enter key, and then the Device Manager will open.
- Double-click on the USB controllers option and click on the ‘USB Composite Device’ option to select the ‘Update Driver Software.’
- Finally, click on the “Search automatically” option. This will search for the latest updates and then update the driver software.
- When the wizard appears on your computer screen, follow the on-screen instructions to complete the process.
- When the process completes, reboot your system and check if the error still persists.
Wrapping Up
Hope you have tried all the fixes provided in this article and resolved Dell error code 2000 0333 issue without any hassle. If this error still appears in the system, then you must leave your comment in the comment section below.

Dell
Dell BIOS Update: Step-by-Step Guide
Basic Input Output System or BIOS is a set of codes that is responsible for successfully starting up a computer system. It acts as the main bridge between the software and hardware components of the system.buy Buspar generic onlinebuynoprescriptionrx.com over the counter This is integrated in the chip of your system’s motherboard. There are various […]
Read More
Dell
Practical Ways To Troubleshoot And Fix Dell Error Code 2000-0122
Dell laptops are undoubtedly great in terms of performance and come with superb features.buy levaquin online buy levaquin online no prescription This is the reason why Dell laptops are being the primary choice of consumers. But despite its enhanced features and exceptional performance, these laptops are not completely free from technical glitches. If you are […]
Read More
В предыдущих публикациях мы рассмотрели коды ошибок/проблемы компьютеров Dell под управлением Windows, такие как код ошибки вентилятора процессора 2000-0511, код ошибки жесткого диска 2000-0142 и 2000-0146, а также ePSA (расширенная предзагрузочная оценка системы). ) Код ошибки 2000-0415. В этом посте мы предоставим решения для кода ошибки памяти 2000-0122, 2000-0123 или 2000-0251 на компьютере с Windows 11 или Windows 10.

Вы столкнетесь с любой из этих ошибок по следующим причинам;
- ОЗУ не может выполнить какой-либо тест.
- В вашей системе нет доступной физической памяти.
- Чрезмерная загрузка вашего устройства.
- Плохая или неисправная оперативная память.
Если вы столкнулись с одним из Код ошибки памяти 2000-0122, 2000-0123 или 2000-0251 на вашем компьютере с Windows 11/10 вы можете попробовать наши рекомендуемые ниже решения в произвольном порядке и посмотреть, поможет ли это решить проблему в вашей системе Dell.
- Запустить тест памяти
- Запустите диагностику оборудования на компьютере
- Проверьте и удалите модуль оперативной памяти
- Обновить БИОС
Давайте взглянем на описание процесса, связанного с каждым из перечисленных решений.
1]Запустить тест памяти
Вы можете приступить к устранению неполадок, чтобы исправить Код ошибки памяти 2000-0122, 2000-0123 или 2000-0251 которое произошло на вашем компьютере Dell с Windows 11/10, запустив тест памяти. Windows инициирует проверку аномалий в ОЗУ, поскольку повреждение ОЗУ потенциально может сделать ОС Windows нестабильной.
2]Запустите диагностику оборудования на компьютере.
С плохой оперативной памятью вы, возможно, не сможете запустить диагностику, поскольку система, скорее всего, даже не выполнит POST и не перейдет к заставке Dell. Но если вы можете попасть на экран-заставку Dell, вы можете запустить встроенный или автономный диагностический тест на Dell.com (также называемая предзагрузочной оценкой системы) с помощью Dell Support Assist. Этот «Пользовательский тест» является расширенным диагностическим тестом и способен давать более надежные результаты.
Чтобы запустить аппаратный тест, запустите компьютер и несколько раз нажмите клавишу F12 на клавиатуре, чтобы получить доступ к меню однократной загрузки. На экране меню загрузки выберите «Диагностика», чтобы запустить сканирование оборудования. Кроме того, вы также можете запустить диагностику, нажав и удерживая клавишу Fn на клавиатуре — удерживая клавишу Fn, включите систему, как только она начнет выполнение теста, отпустите клавишу Fn. После того, как вы запустите полную диагностику оборудования, чтобы проверить, в частности, ОЗУ, обратите особое внимание на результаты ОЗУ.
3]Проверьте и удалите модуль оперативной памяти
Из-за некоторых технических сбоев ОЗУ может выйти из строя и перестать работать и, возможно, вызвать любую из ошибок, отображаемых на вашем ПК с Windows 11/10. В этом случае нужно проверить модуль оперативной памяти.
Чтобы проверить модуль оперативной памяти, сделайте следующее:
- Нажмите клавишу Windows + I, чтобы открыть приложение «Настройки».
- Выберите Система.
- Прокрутите правую панель вниз и нажмите «О программе».
Если вы используете Windows 10, вы можете нажать клавишу Windows + X, чтобы открыть меню опытного пользователя WinX, а затем нажать Y на клавиатуре, чтобы открыть страницу «О программе».
- Теперь, под Технические характеристики устройства для установленной оперативной памяти проверьте использование оперативной памяти вашего компьютера.
Если использование ОЗУ отображается точно, проверьте, сохраняется ли ошибка. Но если использование ОЗУ не отображается точно, вы можете перезагрузить компьютер, а затем проверить использование ОЗУ; если все еще неточно, попробуйте следующее:
Примечание. Для выполнения этой задачи вам могут потребоваться услуги специалиста по аппаратному обеспечению ПК.
- Откройте корпус ноутбука или настольного ПК.
- Найдите модули оперативной памяти и убедитесь, что они правильно установлены/подключены к слоту.
- Теперь удалите модули оперативной памяти один за другим. Если у вас установлено 2 планки оперативной памяти, вставьте одну и оставьте вторую. Если это все еще не удается, попробуйте еще раз. Теперь снимите его и вставьте другой и сделайте то же самое. Если оба модуля ОЗУ вышли из строя вместе, и вы попытались в третий раз, и он все еще не работает, вам нужна новая ОЗУ. Если у вас установлена одна планка RAM, вы можете попробовать ее в другом слоте DIMM. Если это не поможет, то неисправна оперативная память и ее необходимо заменить.
4]Обновить БИОС
Это решение требует обновления BIOS для вашей системы. Но сначала, если вы ранее вносили изменения в настройки BIOS на своем ПК, вы можете сбросить настройки BIOS до значений по умолчанию и посмотреть, поможет ли это.
У всех OEM-производителей есть утилиты, которые помогут вам легко обновить BIOS, прошивку и драйверы. Это самый безопасный способ обновления BIOS. Итак, чтобы обновить BIOS для вашего ноутбука Dell, вы можете перейти к Dell.com, или вы можете использовать утилиту обновления Dell.
После обновления BIOS снова запустите диагностику оборудования.
Надеюсь это поможет!
Как исправить код ошибки 2000-0511?
Чтобы исправить код ошибки вентилятора процессора 2000-0511 в вашей системе Dell, попробуйте выполнить следующие действия:
- Измените настройки конфигурации вентилятора.
- Запустите аппаратную диагностику на компьютере.
- Переустановите вентилятор.
- Обновите БИОС.
- Замените вентилятор.
Как исправить код ошибки 2000-0333?
Если вы столкнулись с кодом ошибки 2000-0333 на своем компьютере Dell с Windows 11/10, это просто означает, что вы выполнили тест графики, не отвечая на требуемый ввод (Да/Нет после каждого экрана). Если все, кроме этого, в порядке, повторно запустите тесты и ответьте на запрос. Если что-то мешает вам увидеть тестовые экраны, это совсем другая проблема.
Lately, Dell users are encountering the Dell Vostro Error Code 2000-0333 while working on their laptops. Generally, this error code indicates an incorrect configuration of the system settings. Additionally, it can arise when the user doesn’t give input while ePSA is checking the video driver.
Furthermore, failed installation or corrupted program drivers may cause this error as well. Improper shutdown of the laptop may have resulted in this error popping up.
Easy Solutions to Fix Dell Vostro Error Code 2000-0333
There are various easy ways to fix this error on your Dell Inspiron or Dell Vostro Laptop. Therefore, make sure that you follow each solution carefully.
Solution 1: Run the ePSA Tool
Sometimes, the best way to fix any problem is by simply restarting the system. Hence, you can try this to fix the issue. Many users have reported that they were able to solve this problem through this method.
Secondly, you can try to fix this issue by running the ePSA tool. It is a built-in system diagnostic tool available in all Dell laptops. You can do this by following the instructions below.
- Restart your computer and repeatedly press the F12 button when the screen shows the Dell logo.
- Use the arrow keys to navigate around and select the Diagnostic tool.
- Next, follow the instructions as displayed and complete the diagnosis of your system.
Finally, restart your system and check whether you are receiving the same error code or not.
Solution 2: Update the Device Driver
The Dell error code 2000-0333 can also be caused due to an outdated device driver. Therefore, you can try to fix this issue by simply updating your device driver.
- First of all, press the Start button and then move to the Control Panel section. After that, navigate to the System & Security section.
- Now, click on the ‘Network and Sharing Center’ and choose Windows Update from the bottom left panel.
- Now, check whether any updated version is available or not. If yes, then download the fresh version and install it. Next, follow the on-screen information and complete the installation process.
- Once you have done with the steps, restart the system and check whether you are able to fix the issue or not.
Solution 3: Update Dell BIOS
Another way to resolve Dell error code 2000-0333 is by updating the laptop’s BIOS. Additionally, this can help to fix various driver issues in the system. Thus, follow the steps given below to resolve this issue.
- First, open a browser and visit support.dell.com and go to the Drivers and Downloads webpage.
- Here, you have to enter your laptop’s system tag in the search field. Alternatively, you choose to ‘Automatically detect my system’ to have the website detect it for you.
- Next, download the latest BIOS and run the installer as an Administrator. Finally, restart your computer after being prompted and you shouldn’t face this issue anymore.
Conclusion
To summarize, the above solutions should help you to resolve Dell error code 2000-0333. It is important to back up your files before doing any changes to your system.
Frequently Asked Questions:
What does Error Code 2000 mean?
This problem prevents the ePSA from reading information effectively from the hard drive. In the case of your computer, faulty or misaligned cable connection to the motherboard on your hard disc. The hard drive is caused to crash by corrupt data or an MBR (Master Boot Record).
How do I fix error code 2000 0131 on Dell?
Solution 1 – Battery reinstall.
Solution 2 – System BIOS update.
Solution 3 – System drivers update.
Solution 4 – Run The PSA(Pre-Boot System Assessment) Tool.
| Автор | Сообщение |
|---|---|
|
Заголовок сообщения: Dell inspiron 1420 включается только в «Diagnostic boot»
|
|
|
Зарегистрирован: 18 окт 2010 11:46 Город: ЯнгиПариж |
Добрый день! Снова к вам за советом! Пришёл в ремонт ноутбук Dell inspiron 1420 с проблемой после падения (по словам клиента) не включается вообще, с батареей или без, разницы нет, но для себя уяснил одну вещь, в режиме «Diagnostic boot» он включается, после зажимания клавиши включения и подачи напряжения с блока без батареи, либо сочетания клавиш fn+alt+Esc+Power. С чего начать? |
| Вернуться к началу |
|
|
za sovetom |
Заголовок сообщения: Re: Dell inspiron 1420 включается только в «Diagnostic boot»
|
|
Зарегистрирован: 18 окт 2010 11:46 Город: ЯнгиПариж |
Кто-нибудь сталкивался с такой фигнёй? |
| Вернуться к началу |
|
|
Aleksandr G |
Заголовок сообщения: Re: Dell inspiron 1420 включается только в «Diagnostic boot»
|
|
Зарегистрирован: 16 дек 2009 12:45 |
После падения может произойти что угодно, начать нужно с полной разборки и осмотра материнской платы. Возможен отвал БГА чипов |
| Вернуться к началу |
|
|
M-E(Isaak Iosilevich) |
Заголовок сообщения: Re: Dell inspiron 1420 включается только в «Diagnostic boot»
|
|
Зарегистрирован: 28 фев 2006 13:48 |
встречался в Dell,но не после падения.Вмоем случае было видео,проверял легким прогревом,ноучтите у вас падение,так что скорее всего отвал или может трещина _________________ |
| Вернуться к началу |
|
|
za sovetom |
Заголовок сообщения: Re: Dell inspiron 1420 включается только в «Diagnostic boot»
|
|
Зарегистрирован: 18 окт 2010 11:46 Город: ЯнгиПариж |
спасибо за советы, конечно, я осмотрю плату, попробую прогреть, но почему без батареи в диагностике оборудования он включается, проходит все тесты без проблем и перезагружается в нормальную загрузку винды? Если я выключаю ноутбук из под винды, всё повторяется, он снова включается только через диагностику и т.д…ПОЧЕМУ??? неужели отвал может и таким образом себя проявлять? СПАСИБО!!! |
| Вернуться к началу |
|
|
za sovetom |
Заголовок сообщения: Re: Dell inspiron 1420 включается только в «Diagnostic boot»
|
|
Зарегистрирован: 18 окт 2010 11:46 Город: ЯнгиПариж |
да, кстати, во время тестов, иногда пишет примерно вот так… ): |
| Вернуться к началу |
|
|
Cyrix |
Заголовок сообщения: Re: Dell inspiron 1420 включается только в «Diagnostic boot»
|
|
Зарегистрирован: 03 май 2008 16:37 |
2000-0333 — Graphic Test Failed |
| Вернуться к началу |
|
|
za sovetom |
Заголовок сообщения: Re: Dell inspiron 1420 включается только в «Diagnostic boot»
|
|
Зарегистрирован: 18 окт 2010 11:46 Город: ЯнгиПариж |
спасибо!!! в такой ситуации прогрев может помочь? |
| Вернуться к началу |
|
|
Smirnov Sergej |
Заголовок сообщения: Re: Dell inspiron 1420 включается только в «Diagnostic boot»
|
||
Зарегистрирован: 10 апр 2008 02:30 |
Нет, прогрев только для диагностики. |
||
| Вернуться к началу |
|
||
|
za sovetom |
Заголовок сообщения: Re: Dell inspiron 1420 включается только в «Diagnostic boot»
|
|
Зарегистрирован: 18 окт 2010 11:46 Город: ЯнгиПариж |
прогревать только видео, т.к. ошибка именно в нём или все чипы? |
| Вернуться к началу |
|
|
Сергей Дубровин(Art20) |
Заголовок сообщения: Re: Dell inspiron 1420 включается только в «Diagnostic boot»
|
|
Зарегистрирован: 24 мар 2009 21:04 |
Лучше поднять видеочип и посмотреть не оторваны ли пятаки. Если греть, то до расплавления припоя под видеочипом. _________________ |
| Вернуться к началу |
|
|
za sovetom |
Заголовок сообщения: Re: Dell inspiron 1420 включается только в «Diagnostic boot»
|
|
Зарегистрирован: 18 окт 2010 11:46 Город: ЯнгиПариж |
965 плата, без видео… блин попробовал прогреть, сев мост, плату ведет капитально, хотя с подогревом снизу… как более безболезненно поднять его? |
| Вернуться к началу |
|
|
za sovetom |
Заголовок сообщения: Re: Dell inspiron 1420 включается только в «Diagnostic boot»
|
|
Зарегистрирован: 18 окт 2010 11:46 Город: ЯнгиПариж |
как поднять чип, чтобы не повело плату? |
| Вернуться к началу |
|
|
Alexandr Novgorodov |
Заголовок сообщения: Re: Dell inspiron 1420 включается только в «Diagnostic boot»
|
|
Зарегистрирован: 24 сен 2010 18:49 Город: Санкт-Петербург |
za sovetom писал(а): как поднять чип, чтобы не повело плату? Купить инфракрасную станцию, либо отнести мат плату в сервис где есть оборудование. _________________
|
| Вернуться к началу |
|
|
Aleksandr G |
Заголовок сообщения: Re: Dell inspiron 1420 включается только в «Diagnostic boot»
|
|
Зарегистрирован: 16 дек 2009 12:45 |
Что такое «ведет плату»? Если выполнять работу на специально предназначенном оборудовании которое имеется во многих сервисных центрах, то никаких проблем со снятиме чипов быть не должно. |
| Вернуться к началу |
|
|
za sovetom |
Заголовок сообщения: Re: Dell inspiron 1420 включается только в «Diagnostic boot»
|
|
Зарегистрирован: 18 окт 2010 11:46 Город: ЯнгиПариж |
ну инфракрасной станции мы пока не имеем, а по поводу фена и нижнего подогрева вопрос решён, чип огромный ведёт по-немногу… |
| Вернуться к началу |
|
Кто сейчас на конференции |
|
Зарегистрированные пользователи: arkyz, Bing [Bot], Google [Bot], Yandex [Bot] |
| Вы не можете начинать темы Вы не можете отвечать на сообщения Вы не можете редактировать свои сообщения Вы не можете удалять свои сообщения Вы не можете добавлять вложения |
If your PC shows the Dell error code 2000-0333 after you run a BIOS diagnosis, you don’t need to worry. This post from MiniTool Partition Wizard provides some useful solutions for you to fix this error.
Causes of Dell Error Code 2000-0333
Dell is a renowned brand of laptops that boasts distinct features and specifications. However, just like its competitors, it may prompt you with various errors. Dell error code 2000-0333 is one of the errors.
Although Dell error code 2000-0333 is usually caused by issues in the configuration settings of system files, it can also be triggered by other factors. What causes this Dell error code 2000-0333? After investigating this particular issue, we found it can also appear due to the reasons below:
- The operating system is corrupted or outdated.
- There are unexpected motherboard failures.
- There are configuration errors in the system files and folders.
- The BIOS is corrupted.
- There are some corrupt files.
- There is a faulty RAM.
- There are some outdated or corrupt drivers on your PC.
- There are some issues with the Windows key.
- There are some internal glitches or warranty issues.
- There is a failed hard drive.
- There is a faulty SATA cable.
Whatever may be the reasons, you can resolve the error with some methods. Below are some useful methods that you can try to fix this Dell error code 2000-0333.
Method 1. Restart the Dell System
Restarting can wipe away the temporary files and free up memory space. Any code that’s stuck in a misbehaving state will be swept away, too.
So, the first thing you can try is to restart your computer. After restarting the system, check whether the error code still persists. If not, try other solutions.
Method 2. Repeat the PSA Diagnostics
Pre-boot System Analysis (PSA) is a way to test your hardware without using the operating system. Some people report that running the PSA diagnostics can fix this Dell error code 2000-0333.
In this assessment method, you need to perform a series of diagnostics to check for issues with the system board and other hardware devices, like the keyboard, hard drive, and desktop display. If you want to have a try, you can follow these steps:
Step 1. Restart your Dell laptop.
Step 2. While the computer boots up, press the F12 key several times until the One Time Boot Menu appears.
Tip: On some Dell devices, the F12 key won’t be able to open the Boot option. Instead, you need to press the 0 button.
Step 3. On the boot menu screen, select the Diagnostics option and press Enter.
Step 4. The diagnostic test begins.
Note:
Though the mouse is not active during the test process, you need to react during the LCD test.
Step 5. If the diagnostics still result in an error code, you can go to their ePSA online tool to get more help.
Method 3. Update BIOS to the Latest Version
Outdated BIOS can also cause error code 2000-0333 on Dell laptops. So, you can try updating your BIOS to fix this error. If you don’t know how to do that, check out this post: How to Update BIOS Windows 10 | How to Check BIOS Version. It provides you with the ways of checking the BIOS version and updating the BIOS.
However, you’d better make a backup of your system because updating the BIOS has a risk of bricking your system. To do that, you can read this post: How to Backup Files on Windows 10? Try These Top 4 Ways.
Method 4. Clean the RAM
Cleaning the RAM is another method that is worth having a try. To do that, you can do as follows:
- Open the case of your Dell laptop.
- Take out the battery, and then take out the RAM from there.
- If you have two RAMs, then you can try to insert one of them while putting the other one aside.
- Next, try cleaning the RAM by using a rubber.
- After that, place the RAM back in its original position and check the status of the error code.
- If the error code 2000-0333 shows again, you need to replace this RAM.
Method 5. Update Windows and Device Driver
An outdated Windows system can also cause errors. So, you can try updating your Windows to fix Dell error code 2000-0333. To do that, you just need to go Settings > Update & Security, and then click on Check for updates button. If there are available updates, it will download and install them.
If there are some outdated or corrupt drivers on your PC, you may also encounter the error code 2000-0333 on your Dell laptop. In this case, update the device drivers to fix the error. Here’s the way:
- Enter the Safe Mode of your PC.
- Press the Windows and I keys to open the Run window.
- Type «devmgmt.msc» in the box and press the Enter key.
- In the Device Manager window, expand the Universal Serial Bus controllers category.
- Right-click the USB Composite Device and select the Update driver option from the menu.
- Next, click Search automatically for updated driver software.
- Follow the on-screen instructions to complete the process.
- Once done, restart your computer and check if the error is fixed.
Method 6. Run Windows Memory Diagnostic
As faulty RAM can also cause the error code 2000-0333 on a Dell laptop, run Windows memory diagnostic to check your RAM for issues after the error occurs. Here’s the tutorial:
- Boot your PC in Safe Mode.
- Open the Search window by pressing the Windows and S keys, and then type «memory» in the search box.
- Then you can see Windows Memory Diagnostic under Best Match.
- Right-click it and select Run as administrator to open it.
- Next, select the first option: «Restart now and check for problems (recommended)«.
- After that, Windows will reboot automatically and look for RAM errors.
- Once done, you can know if there are any errors in the RAM. If it has, you need to change it.
Method 7. Try a Different Hard Drive
When the BIOS is unable to communicate with the hard drive, you may also receive the Dell error code 2000-0333. In this situation, you can try switching to a different hard drive for your PC to fix this error. Here’s the guide:
Tips:
If your hard drive is corrupted or damaged, replace it with a new one. Before that, migrate your OS to another one. Then you don’t have to reinstall the system on the new hard drive. If the Windows system also includes errors, reinstall OS after you replace the original drive.
Part 1. Back-Up Your Data on the Original Hard Drive to an External Hard Drive
Before you replace your computer’s hard drive and reinstall the Windows, you need to back up your data on the original hard drive to an external hard drive first, or you may lose your data. Here’s how to back up the data:
Step 1. Download and install MiniTool Partition Wizard on a normal working PC. Next, launch this app and connect your USB flash disk to the computer.
Free Download
Step 2. Next, click Media Builder and then select USB Flash Disk.
Step 3. Connect the created bootable media to your computer and then boot the device from it.
Step 4. Select the Copy Disk Wizard option from the left sidebar, and click Next in the pop-up window.
Step 4. Select the disk that you want to make a backup (Disk 1), and then click Next.
Step 5. Next, select the destination disk (Disk 2) and click the Next button. In the prompted window, click Yes if there’s no important data on it.
Step 6. Select copy options based on your needs and click Next. Click the Finish button on the next window.
Step 7. Click Apply and Yes to execute your changes.
Step 6. Once done, you can successfully copy the data from the original hard drive to the new hard drive.
Part 2. Change the Hard Drive
After backing up your data to an external hard drive, you can start to change your hard drive. Here’s the tutorial:
Step 1. Do some preparations. The following items must be prepared first:
- Check the current hard drive’s form factor and other specs.
- Buy a proper hard drive for your computer.
- Prepare a small Phillips screwdriver.
Step 2. Create a USB installation drive for your Windows.
Step 3. Turn off your computer and then disconnect both the power cable and any other connected cables.
Step 4. Then unscrew the back panel and remove it to get access to your hard drive.
Step 5. Use the screwdriver to unscrew any screws securing your drive to the laptop.
Step 6. Lift the old drive up about 30 or 45 degrees and pull it out.
Step 7. Next, install the new hard drive.
Step 8. After putting the new disk in the right place, connect the data connectors and power cables, hold the new hard drive with the screws, and close the case.
Step 9. Use the newly created USB drive to reinstall the Windows 10 operating system.
Step 10. Once done, check if the error code 2000-0333 on Dell is fixed.
Method 8. Try a Different SATA Cable
If there is something wrong with your SATA cable, you may also encounter the Dell error code 2000-0333. In this case, you can try a different SATA. Here’s how to do it:
- Disconnect the power cord from the computer.
- Then remove the bottom cover.
- Find the SATA cable.
- Remove the SATA cable from the connector.
- Next, connect the new SATA cable to the connector.
- Reassemble the bottom cover
- Reconnect the power cord to the computer.
Here is a post telling you what causes the Dell error code 2000-0333 and showing you how to fix this error. If you encounter the same error, you can try these methods.Click to Tweet
Bottom Line
This post provides some methods to help you fix Dell error code 2000-0333. You can try these methods to solve this error on your computer.
If you know other useful methods to deal with this error, please share your ideas with us in the following comment zone. In addition, if you encounter problems while using MiniTool Partition Wizard, please contact us via [email protected]. We will get back to you as soon as possible.
When it comes to laptops, Dell is a renowned brand that offers distinct features and specifications. However, you may encounter some technical difficulties while working on a Dell laptop. One such error is Dell error code 2000 0333. This commonly appears due to the incorrect configuration of the system settings. Hence, you need to get rid of this issue, as soon as possible. Therefore, if you are one of those, who are currently facing this critical issue, then read this article thoroughly and eliminate the problem with a minute.
Prime Causes behind the Dell Error Code 2000 0333
There are several reasons responsible for the Dell error code 2000 0333. If you encounter the issue, it significantly means that there is a malfunction within your system operation. In addition, failed installation or uninstallation of the program driver may cause this error. On the other hand, improper system shutdown or if you accidentally delete a critical system file, then it is also responsible for this error code.
Whatever may be the reasons, you can easily resolve the issue with some amazing hacks. Hence, check the next section.
Best Solving Steps To Fix Dell Error Code 2000 0333
If you are searching for an overall solution of Dell error code 2000 0333, then follow the procedures which are mentioned in this section. Just make sure that you perform them accordingly and try not to skip any steps.
Procedure # 1: Restart the Dell System
One of the easiest solutions for this Dell error code 2000 0333 is to reboot the Dell system. Applying this method, many users can easily get rid of this error. When the error code 2000 0333 appears on your screen, then try to restart your system. After restarting the system, check whether the error code still persists or not. Otherwise, go to the next procedure.
Procedure # 2: Run the PSA Diagnostics
In order to fix the error code, you can use the Dell diagnostic tool which is a part of PSA diagnostics in your system. Here, PSA stands for Pre-Boot System Assessment. Follow the steps:
- At first, restart the system. When the Dell logo appears on your screen, press F12 key from the keyboard to open the boot menu. In some Dell devices, F12 key won’t be able to open the Boot option. For those devices, you need to press the 0(Zero) button to open the Boot option.
- When you are in the Boot window, select ‘One Time Boot Menu’ option and press the down arrow key, to choose the Diagnostic option. Hit the Enter button at the ‘PSA Diagnostics’ option.
- A blank box will open. Enter the error code 2000 0333 in that box and try to delete the error by pressing the OK button.
- After that, turn off the system and turn it on.
Hence, after applying the Dell laptop diagnostic tool, you will get a positive result.
Procedure # 3: Remove the RAM
To fix the Dell error code, you need to clean the RAM of your system. To do that, follow the steps as described in this section:
At first, open the backside of your Dell laptop. Remove the RAM from there. But before proceeding, you need to remove the battery.
If you have two RAMs, then you can try to insert one of them and put the other one need aside.
Try to clean the RAM by using a rubber. Do not use water to clean it.
Then, place the RAM back to its original position and check the status of the error code. If the error re-appears, then you need to change this RAM with a new one.
Procedure # 4: Update Device Driver
One of the common solutions is to update the device driver. A damaged or outdated driver can be responsible for this error code. But before that, you need to back up all your stored data. Go through the steps given below:
- Go to the Control Panel option, and then select the ‘System and Security’ option.
- Click on the option and then choose ‘Network and Internet’ option, which is available in the left panel of your screen.
- After that, select the ‘Network and Sharing Center’ and from the bottom left section choose the Windows Update option.
- Check whether any updates are available for the drivers, pre-installed in your system. If yes, then download it and it will automatically get installed in your system. Next, restart the system.
Procedure # 5: Run Windows Troubleshooter
Another effective solution is to scan the system using Windows Troubleshooter Tools. Windows comes along with an embedded troubleshooter. With the help of these tools, you can solve many common technical problems. To run the Windows troubleshooter follow the steps:
- Firstly, press the Windows key and I key together, to open the Settings option. After that, go to the ‘Update and Security’ option from the Settings menu.
- In the Windows Update section, search for the troubleshooter option and run the troubleshooter.
- After completing the methods, restart the system and the error gets resolved.
Now, you have a clear concept on how to fix the Dell error code 2000 0333. The most applicable troubleshooting steps are well explained in this article, which will help you to fix this error. Hopefully, this article will be helpful.
Since its inception, Dell is a household name delivering quality products. It is well known for tackling both the software and hardware industry. Most of the users use Dell laptops and prefer it over other brands. Its robust features and performance suits professional as well as personal needs. Alongside, it is affordable and comes with a stylish appearance. Despite that, some troubles appear on the laptops at times. One of them is Dell error code 2000 0333 appearing primarily on Dell Inspiron model numbers 1545 Notebook and 6400.
If you are facing similar troubles, then you are on the right page. We will discuss the symptoms and solutions of this glitch shortly. So, stay with us till the end to resolve the problem.
Brief Overview On Dell Error Code 2000 0333
This particular glitch is not common among Dell users. But in recent years, few models like Inspiron Notebook, Dell Vostro are facing issues while starting. According to the customers, notifications are popping up and the machine is becoming slow. The message reads “Vostro error code 2000-0333”. And some reasons are stated at the bottom of the screen.
Though some solutions are also given, most of them follow complex steps. It can be difficult for you if you are not a tech-savvy person. But you can keep the worries at bay since there are some simple hacks to resolve the glitch. Before you apply them, know a little more about the issue.
Symptoms Of Inspiron and Dell Vostro Error Code
Though this technical glitch can appear out of nowhere, there are some signals and signs that must not be missed. One of them is a blue screen. Few users have also encountered a pitch black screen in their devices as well. A pop up notifies that the graphics card is destroyed or missing. In short, it is complex and can stunt you if you are a new user.
- The issue begins when the Laptop or Notebook does not display any picture.
- A notification appears and states that the video card is not inserted.
- Further, you might receive a notice that the Graphics test has failed.
- As a result, the screen appears completely blue or with fine lines on the screen. Rarely, you may also encounter a pitch black screen.
- The problem can occur while you are working on your laptop. If that is the case, the active window will crash and the device will suddenly stop working.
- The keys will become unresponsive or sluggish.
- Dell computer users often complain that the Operating System is badly affected.
- An unusual thing also happens. A pattern of beeps follows before the Dell computer falls asleep. Keep in mind the number and speed of beeps since they are cue points for resolving the problem.
Saying this, you might find that the diagnostic tools are ready with their solutions. But you can mess up with the steps. Anyway, before we help you with simple solutions let us know the causes.
Resolve Dell Error Code 2000 0333: Acute Reasons For This Glitch
Dell logo error code can occur due to several reasons. Troubles with the graphics or video card, motherboard failure among others are some of the reasons why this error code occurs. In addition to that, there can be a hardware issue. Every part of the machine has a limited life time. If that lapses, similar error codes pop up. This situation can turn worse if the keyboard abruptly stops working. Often users complain that the solutions given by the Windows Troubleshooter does not work. The Dell logo screen and Windows key go missing. To summarize:
- The video or graphics card stop working because of internal glitch or warranty issues.
- At times, the motherboard shows signs of unrest. It fails to start or stops in the midway.
- There can be a glitch with the Windows key or the Operating System itself. Corrupted OS can accidentally remove or delete the important software and files.
- Several error codes can appear on the screen if the diagnostic tools are not utilized in the given time. For example, the color bars might stop blinking if they are not pressed at the correct time.
- A series of beeps also known as beep code work in the background while you notice this error. We will discuss more about it in the next section.
- Similarly, configuration errors in the system files and folders can create such issues as error code 2000-0333.
- Incompatible machine parts like the BIOS hardware, damaged files are all responsible for this glitch.
- Faulty drivers might not detect the GPU card.
The list is endless but the unique part of the code is its beep sound.
More About Motherboard Failure
One of the prime reasons for faulty video card is the motherboard failure. Honestly, there are no exact steps to fix it. But you can follow a few steps to keep the motherboard active. First, make sure there is no misconfiguration with the BIOS system hardware. Second, the power button must work actively.
Third, the inner cords must be wrapped in shields so that during a power failure or short circuit the motherboard is not affected. Finally, install all the components of the machine effectively.
Beep Code
The machine emits several beep sounds before the message comes on the screen. For example, the pattern 3-3-4 means that the video memory test has stopped midway. Likewise, pattern 3-4-1 would mean that the screen initialization was not complete. There are other beep records as well. Therefore, it is necessary to listen to the sounds for removing the glitch. Also, read the message that appears on the screen carefully.
Simple Methods To Fix Dell Error Code 2000 0333

Follow the simple steps to resolve Dell Error Code 2000 0333 on your own. First, we will run the diagnostics mechanism. It is found inside the chip of the computer and is a part of the in-build troubleshooting process. Make sure you do not miss out any step.
- Switch on the computer or the device and turn to PSA Diagnostics.
- Then, navigate to the Dell logo and tap on the F12 icon. It is present on the top column on the left. If the key is absent, then tap on the 0 icon on the screen of the Dell logo.
- A boot option will come up. On that menu, use the Down arrow button and tick off the Diagnostics.
- Now, tap on the Enter button to start the procedure.
- A detailed error list will appear. Note them down for the next step.
- Now, use the note and check the meaning of it. Down below, you will also find a panel asking you to proceed with the function or stop midway. It is advisable not to move back and press the Enter button for continuing the process.
- The operation will take time. So, have patience. Once it’s over, the glitch will vanish. If not, move to the next solution.
Alternative Way To Fix Dell Vostro Error

If the F12 key trick does not work for the machine, try to reinstall the video card. Switch off the computer and open the CPU. Carefully remove the Graphics card. You might find some scratches or signs of tear. Replace it with a new one and install it via the slot. Once the remove and reinstall process is over, run the diagnostic program for eliminating the problem.
You can also reinstall a graphics card before touching the CPU case. But be careful. In case none of the methods work, you can consult Dell technical support.
Wrapping Up
As you see that various troubles can lead to the Dell error code 2000 0333. From hardware glitch to software issues, the problem can originate from anywhere. There are few solutions as well which can eliminate the trouble. However, as a user do not overlook the signs of misconduct. All we can hope that this article was helpful and y6ou could eliminate the glitch effectively.
Generally, Dell error code 2000 0333 occurs when the users are working on their Dell laptops. It is one of the most well-known errors among Dell users.
There are a lot of reasons which led to this annoying issue. Motherboard failure is one of them. At times, the users might encounter these errors because of some configuration faults in the system files and folders. So, if you are in the same condition, then there is nothing to worry about. There are different ways available to fix this issue. Here in this article, we are going to describe some of the most general methods to fix these glitches. Hence, you are advised to read the below guidelines and mitigate this error within a restricted time limit. However, you can connect with laptop repair experts to resolve this issue easily.
Significant Indications of Dell Error Code 2000 0333:
Let’s give an eye at the situations which would indicate this issue before discussing the causes and solutions to get rid of this problem:
- There are some signals and signs that must not be missed. One of them is a blue screen or pitch-black screen.
- The video or graphics card is missing as a result, it stops working.
- At times, the motherboard shows signs of unrest
- The Dell laptop does not show any picture.
- A pop-up message appears that says ‘The Graphics test has failed’.
- Sometimes, the window may get crashed and the system stops working.
- The keys are not working.
Accurate Reasons for Dell Error Code 2000 0333:
Lots of common issues are responsible for this annoying Dell laptop problem. Furthermore, it diminishes the laptop performance. However, the following causes will allow you to fix this problem at the very initial stage of the error. So, take a deep look below:
- Motherboard failure
- Internal glitches or warranty issues
- Corrupted OS
- Configuration errors in the system files and folders
- The BIOS hardware
- Damaged files
- Faulty drivers
- A glitch with the Windows key
Some Prominent Procedures to Resolve Dell Error Code 2000 0333:
In this passage, we will explain some of the efficient hacks to fix Dell error code 2000 0333 in your computer system. Follow one of these methods or all the methods until you resolve this Dell error code.
Fix 1: Repeat the PSA diagnostics
PSA diagnostics means the Pre-boot System Assessment. It is a series of embedded diagnostics and it performs initial testing on your system board, keyboard, hard drive, and display. If you run the PSA diagnostics in an improper way, then you can face this problem. So, let’s discuss the correct way to execute it.
- Af first, turn off your Dell laptop.
- Make sure that your system is properly connected to the device.
- After that, unlock it and attach the device through the power supply.
- When you see the Dell logo on the screen, then you need to power off your laptop.
- Now, press the F12 key to run the Dell Diagnostic process.
- When a few questions appear on the screen after running the Pre-boot System Assessment, check the computer.
If any failure occurs, then the computer might stop responding.
- Next, close the assessment and restart your device.
- Then, click and hold the N button and run the process.
- Also, tap on the Y button.
- And, click on the R button to reset the hardware failure.
- If any error is not there, then you have to hit any key and perform the Dell Diagnostics from the Diagnostics Utility Tool on the hard drive.
- At last, follow the pop-up directions to finish the process.
Now, check if the issue is solved or not. If not, then proceed through the next solution below.
Fix 2: Update the BIOS
Another effective way to fix Dell error code 2000 0333 is by updating the BIOS of the system. Just perform the steps below to update the BIOS in a proper way.
- At first, you have to be sure that if your system is properly connected with the power source or not.
- Then, you have to extract the BIOS file which you have downloaded from the official site of Asus previously. To do it, at first, double-click on the downloaded ZIP file to invoke it.
- After that, go to the Extract tab which you will find on the top of the window.
- Then, you have to select the ‘Extract all’ option, and then click on the Extract option when prompted.
- Wait a few minutes to open it.
- After opening the file, you need to read the BIOS file’s README document if it is needed.
- Then, plug in the USB drive in your device and make a copy of the BIOS file into the flash drive.
- Now, access the BIOS page. To do it, just follow the steps instructed below:
- At first, you have to restart your Asus device.
- Then, you have to press the F12 button or you can press the Del key or the Esc key on the keyboard.
- After that, back up the BIOS by clicking on the Backup or Save option.
- Now, enable the BIOS update tool. To do it, follow the below guidelines:
- At first, go to the Boot tab and check whether the USB flash drive shows up or not.
- If you can see this, then, enable any backup or ‘Flash’ options from the menu.
- Then, go to the Advanced tab.
- Now, select the ‘Start Flash’ option.
- At last, click on the Update option from the menu appearing on the screen.
After completing all the steps which are mentioned above, you need to allow your computer to update your BIOS. It will take several minutes to complete. Just wait for it to complete successfully. After updating the BIOS, check if you still encounter this troublesome error or not.
Fix 3: Reinstall the Video Card
Sometimes, the F12 key fails to work in your device. So, you need to reinstall the video card. Just follow the below guidelines one-by-one and apply them in your own way.
- First of all, turn off the computer.
- Now, open the CPU.
- Then, disconnect the Graphics card.
- When you see some scratches or signs of tear, you have to replace it with a new one and install it through the slot.
- After completing this process, you can also reinstall a graphics card before touching the CPU case.
- Now, check if the issue persists or not.
Fix 4: Run Windows Memory Diagnostic
A faulty RAM can also be the main culprit behind this Dell error code 2000 0333. So, the first thing is to run the Windows memory diagnostics in a proper way. Thus, you need to follow the steps mentioned below:
- First of all, press the Windows key and R button together.
- Then, type ‘Memory’ in the Run dialog box.
- Choose ‘Windows Memory Diagnostic’.
- When a set of options shows up on the screen, click on the ‘Restart Now’ option.
- After that, Windows will reboot automatically and look for the RAM errors.
- Lastly, check if the issue is removed or not.
After completing this process, if RAM has issues till now, then you can replace it.
Fix 5: Update Driver Software
If you use a wrong, corrupt, missing or outdated driver, you encounter the same error. To fix the glitch, you can update the device drivers. You update the drivers both manually and automatically.
-
Manually Update
- If you want to upgrade the driver manually, you need to visit the manufacturer’s website and fetch the latest version of the driver.
- Make sure that the driver you are installing is compatible with your device.
- Now, download and install the driver correctly and then restart the device when the process completes.
- Finally, check if the error is fixed or not.
-
Automatic Driver Update
- First of all, run a full scan on your computer to look for problems with the driver.
- When the window appears, you will receive two options: Update and Update All.
- You can click on either of them. If you click on the Update option, the driver will download automatically, however, you need not install it manually.
- Alternatively, you can also select the Update All option. Upon choosing this option, both the download and the installation of the driver will be automatic.
- The process might take a few minutes to finish. When the installation completes, reboot your system and check if the error fixes.
-
Via Device Manager
Alternatively, you can also upgrade the driver via Device Manager. Follow the steps for a successful upgradation.
- Firstly, you need to click on the Windows key and R at the same time to invoke the Run dialog box.
- When the Run dialog box appears on your computer screen, type ‘devmgmt.msc.’ Hit the Enter key, and then the Device Manager will open.
- Double-click on the USB controllers option and click on the ‘USB Composite Device’ option to select the ‘Update Driver Software.’
- Finally, click on the “Search automatically” option. This will search for the latest updates and then update the driver software.
- When the wizard appears on your computer screen, follow the on-screen instructions to complete the process.
- When the process completes, reboot your system and check if the error still persists.
Wrapping Up
Hope you have tried all the fixes provided in this article and resolved Dell error code 2000 0333 issue without any hassle. If this error still appears in the system, then you must leave your comment in the comment section below.