
I got it working with following code
import axios from 'axios';
import config from '../../configuration.json';
import qs from 'qs';

const baseURL = config['baseUrl_local'];
let authTokenRequest;

/**
  * @description axios instance for ajax requests
*/

var client = axios.create({
baseURL: baseURL,
headers: {
    appID: 8,
    version: "1.1.0",
    empID: localStorage.getItem('empID'),
    token: localStorage.getItem('accessToken')
}
});

/**
 * @description this method calls a requestNewToken method to issue a
 new token to the client
*/

 function getAuthToken() {
   if (!authTokenRequest) {
   authTokenRequest = requestNewToken();
   authTokenRequest.then(resetAuthTokenRequest, resetAuthTokenRequest);
 }
 return authTokenRequest;
 }

/**
  * @description this method requests the server to issue a new token,
  the server response is updated in local storage accessToken
*/

function requestNewToken() {
  var newToken = request({
  method: "post",
  url: '/sign-in',
  data:  qs.stringify({
         "userName":localStorage.getItem('userName'),
         "password":localStorage.getItem('password')
         })
  }).then((res)=>{
  if(res.status == "success"){
    localStorage.setItem('accessToken',res.data.accessToken);
    //if featureArray is present in response object, update the
    featureArray in local storage
    if(res.data.features){
      localStorage.setItem(
      'featureArray',
     JSON.stringify(res.data.features));
    }
    client = axios.create({
     baseURL: baseURL,
     headers: {
          appID: 8,
          version: "1.1.0",
          empID: localStorage.getItem('empID'),
          token: localStorage.getItem('accessToken')
      }
   });
 } else {
  window.location = "/logout";
 }
});
 return newToken;
}

function resetAuthTokenRequest() {
  authTokenRequest = null;
 }

/**
  * @description if any of the API gets 401 status code, this method
   calls getAuthToken method to renew accessToken
  * updates the error configuration and retries all failed requests
  again
*/

client.interceptors.response.use(undefined, err => {
  const error = err.response;
  // if error is 401
  if (error.status===401 && error.config &&
  !error.config.__isRetryRequest) {
  // request for a new token
  return getAuthToken().then(response => {
   // update the error config with new token
   error.config.__isRetryRequest = true;
   error.config.headers.token= localStorage.getItem("accessToken");
   return client(error.config);
  });
 }
});

/**
 * @description wrapper for making ajax requests
 * @param {object} object with method,url,data etc.
*/

const request = function(options) {
  const onSuccess = function(response) {
    return response.data;
  }
 const onError = function(error) {
  //console.error('Request Failed:', error.config);
   if (error.response) {
  //console.error('Status:',  error.response.status);
  //console.error('Data:',    error.response.data);
  //console.error('Headers:', error.response.headers);
  } else {
  console.error('Error Message:', error.message);
  }
 return Promise.reject(error.response || error.message);
 }

return client(options)
        .then(onSuccess)
        .catch(onError);
        options
}

export default request;
[EDIT] Its 2019, Here is yet another implementation for the same. The above solution is great but does not work well with multiple failed request, in turn it calls getToken with the updated token as well.
 import axios from "axios";

 /* @internal */
 import config from "../config";
 import TokenService from "./token_service";

class Request {
    constructor() {
        this.baseURL = config.baseUrl;
        this.isRefreshing = false;
        this.failedRequests = [];
        this.tokenService = new TokenService();
        this.client = axios.create({
            baseURL: config.apiServerBaseUrl,
            headers: {
               clientSecret: this.clientSecret,
            },
        });
        this.beforeRequest = this.beforeRequest.bind(this);
        this.onRequestFailure = this.onRequestFailure.bind(this);
        this.processQueue = this.processQueue.bind(this);
        this.client.interceptors.request.use(this.beforeRequest);
        this.client.interceptors.response.use(this.onRequestSuccess,
this.onRequestFailure);
}

beforeRequest(request) {
    const token = TokenService.getAccessToken();
    request.headers.Authorization = `Token ${token}`;
    return request;
}

static onRequestSuccess(response) {
    return response.data;
}

async onRequestFailure(err) {
    const { response } = err;
    if (response.status === 401 && err && err.config && !err.config.__isRetryRequest) {
        if (this.isRefreshing) {
            try {
                const token = await new Promise((resolve, reject) => {
                    this.failedRequests.push({ resolve, reject });
                });
                err.config.headers.Authorization = `Bearer ${token}`;
                return this.client(err.config);
            }
            catch (e) {
                return e;
            }
        }
        this.isRefreshing = true;
        err.config.__isRetryRequest = true;
        return new Promise((resolve, reject) => {
            this.tokenService.refreshAccessToken().then((token) => {
                this.tokenService.setAccessToken(token);
                err.config.headers.Authorization = `Bearer ${token}`;
                this.isRefreshing = false;
                this.processQueue(null, token);
                resolve(this.client(err.config));
            }).catch((e) => {
                this.processQueue(e, null);
                reject(err.response);
            });
        });
    }
    throw response;
}

processQueue(error, token = null) {
    this.failedRequests.forEach((prom) => {
        if (error) {
            prom.reject(error);
        } else {
            prom.resolve(token);
        }
       });
        this.failedRequests = [];
    }

}

const request = new Request();

export default request.client;
I need to catch error 401 Code of response so that I can retry after getting a new token from token endpoint. I am using fetch method get data from API.
   const request: Request = new Request(url.toString(), {
        headers: this.defaultRequestHeaders,
        method: "get",
        mode: "cors"
    });

   const headers: Headers = new Headers({
        "Accept": "application/json",
        "Content-Type": "application/json"
    });

   fetch(request)
        .then(function(response)
         {
          ///Logic code
         })
        .catch(function(error)
        {
          ///if status code 401. Need help here
        });
asked Apr 18, 2018 at 14:32
![]()
Vikrant SinghVikrant Singh
6321 gold badge5 silver badges17 bronze badges
15
You can check the status and if it’s not 200 (ok) throw an error
 fetch("some-url")
    .then(function(response)
     {
      if(response.status!==200)
       {
          throw new Error(response.status)
       }
     })
    .catch(function(error)
    {
      ///if status code 401...
    });
answered Jan 9, 2019 at 21:22
![]()
3
Because 401 is actually a valid response to a request to a server, it will execute your valid response regardless. Only if security issues occur, or if the server is unresponsive or simply not available will the catch clause be used. Just think of it like trying to talk to somebody. Even if they say «I am currently not available» or «I don’t have that information», your conversation was still successful. Only if a security guy comes in between you and stops you from talking to the recipient, or if the recipient is dead, will there be an actual failure in conversation and will you need to respond to that using a catch.
Just separate out your error handling code so you can handle it in instances that the request was successful, but does not have the desired outcome, as well as when an actual error is being thrown:
function catchError( error ){

    console.log( error );

}

request.then(response => {

    if( !response.ok ){

        catchError( response );

    } else {

        ... Act on a successful response here ...

    }

}).catch( catchError );
I am using the response.ok suggested by @Noface in the comments, as it makes sense, but you could check for only the response.status === 401 if you want to.
answered Apr 18, 2018 at 15:34
![]()
somethingheresomethinghere
16.2k2 gold badges28 silver badges42 bronze badges
4
You can try this
fetch(request)
  .then(function(response) {
    if (response.status === 401) {
      // do what you need to do here
    }
  })
  .catch(function(error) {
        console.log('DO WHAT YOU WANT')
});
answered Jul 31, 2018 at 12:42
![]()
You can check the status of the response in then:
fetch(request)
  .then(function(response) {
    if (response.status === 401) {
      // do what you need to do here
    }
  })
  .catch(function(error) {});
answered Apr 18, 2018 at 14:48
![]()
DarioDario
6,0929 gold badges38 silver badges49 bronze badges
4
fetch(url,{
            method: 'GET',
            headers,
            body: JSON.stringify(aData)
        }).then(response => {
            if(response.ok){
                return response.json();
            }

            return Promise.reject(response);
        }).catch(e => {
            if(e.status === 401){
                // here you are able to do what you need
                // refresh token ..., logout the user ...
                console.log(e);
            }

            return Promise.reject(e.json());
        });
answered Aug 26, 2020 at 1:43
![]()
2
(function () {
var originalFetch = fetch;
fetch = function() {
    return originalFetch.apply(this, arguments).then(function(data) {
        someFunctionToDoSomething();
        return data;
    });
};})();
source
Can one use the Fetch API as a Request Interceptor?
answered Jul 11, 2019 at 8:22
![]()
When you want to…
catch (error) {
  console.dir(error) // error.response contains your response
}
answered Mar 31, 2020 at 10:09
![]()
Because 401 is actually a valid response to a request to a server, it will execute your valid response regardless. Only if security issues occur, or if the server is unresponsive or simply not available will the catch clause be used. Just think of it like trying to talk to somebody. Even if they say «I am currently not available» or «I don’t have that information», your conversation was still successful. Only if a security guy comes in between you and stops you from talking to the recipient, or if the recipient is dead, will there be an actual failure in conversation and will you need to respond to that using a catch.
Just separate out your error handling code so you can handle it in instances that the request was successful, but does not have the desired outcome, as well as when an actual error is being thrown:
function catchError( error ){

    console.log( error );

}

request.then(response => {

    if( !response.ok ){

        catchError( response );

    } else {

        ... Act on a successful response here ...

    }

}).catch( catchError );
I am using the response.ok suggested by @Noface in the comments, as it makes sense, but you could check for only the response.status === 401 if you want to.
Когда я только начинал работать с Express и пытался разобраться с тем, как обрабатывать ошибки, мне пришлось нелегко. Возникало такое ощущение, будто никто не писал о том, что мне было нужно. В итоге мне пришлось самому искать ответы на мои вопросы. Сегодня я хочу рассказать всё, что знаю об обработке ошибок в Express-приложениях. Начнём с синхронных ошибок.

Обработка синхронных ошибок
Если вам нужно обработать синхронную ошибку, то вы можете, для начала, с помощью инструкции throw, выдать такую ошибку в обработчике запроса Express. Обратите внимание на то, что обработчики запросов ещё называют «контроллерами», но я предпочитаю использовать термин «обработчик запросов» так как он кажется мне понятнее.
Вот как это выглядит:
app.post('/testing', (req, res) => {
  throw new Error('Something broke! ')
})
Такие ошибки можно перехватить с помощью обработчика ошибок Express. Если вы не написали собственный обработчик ошибок (подробнее об этом мы поговорим ниже), то Express обработает ошибку с помощью обработчика, используемого по умолчанию.
Вот что делает стандартный обработчик ошибок Express:
- Устанавливает код состояния HTTP-ответа в значение 500.
- Отправляет сущности, выполнившей запрос, текстовый ответ.
- Логирует текстовый ответ в консоль.
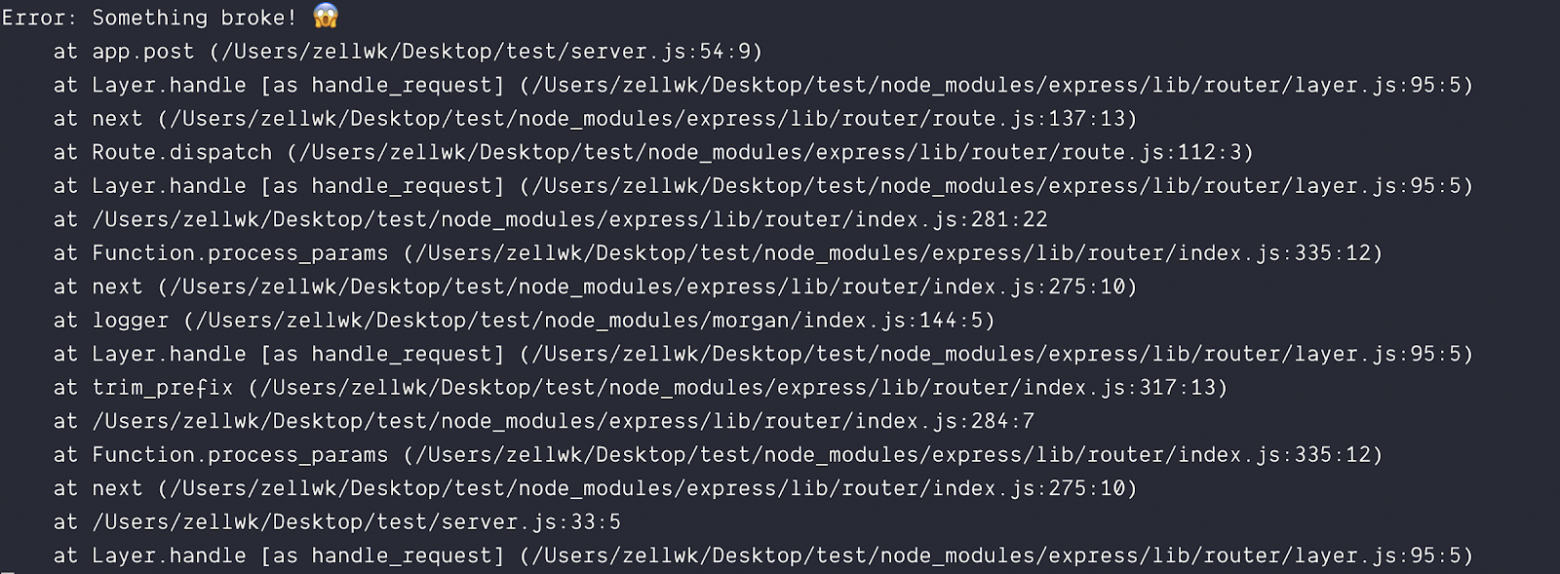
Сообщение об ошибке, выведенное в консоль
Обработка асинхронных ошибок
Для обработки асинхронных ошибок нужно отправить ошибку обработчику ошибок Express через аргумент next:
app.post('/testing', async (req, res, next) => {
  return next(new Error('Something broke again! '))
})
Вот что попадёт в консоль при логировании этой ошибки.
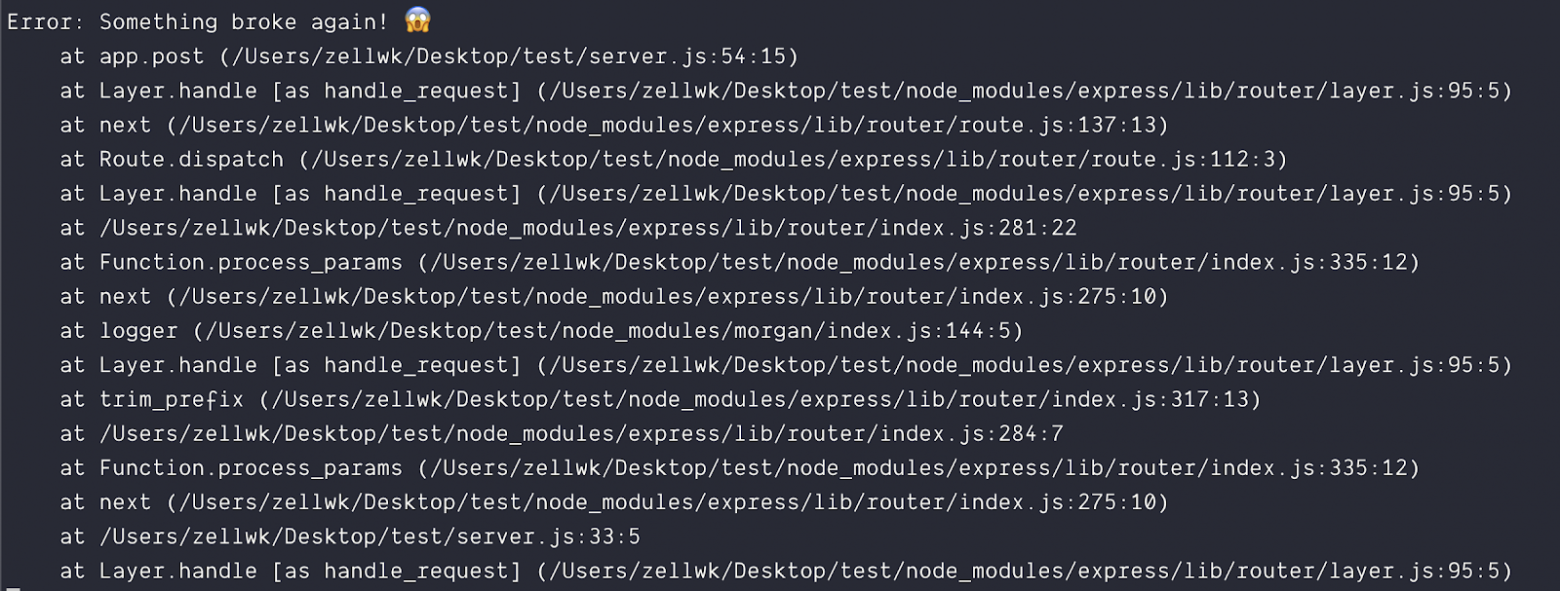
Сообщение об ошибке, выведенное в консоль
Если вы пользуетесь в Express-приложении конструкцией async/await, то вам понадобится использовать функцию-обёртку, наподобие express-async-handler. Это позволяет писать асинхронный код без блоков try/catch. Подробнее об async/await в Express можно почитать здесь.
const asyncHandler = require('express-async-handler')

app.post('/testing', asyncHandler(async (req, res, next) => {
  // Сделать что-нибудь
}))
После того, как обработчик запроса обёрнут в express-async-handler, то можно, так же, как было описано выше, выбросить ошибку с использованием инструкции throw. Эта ошибка попадёт к обработчику ошибок Express.
app.post('/testing', asyncHandler(async (req, res, next) => {
  throw new Error('Something broke yet again! ')
}))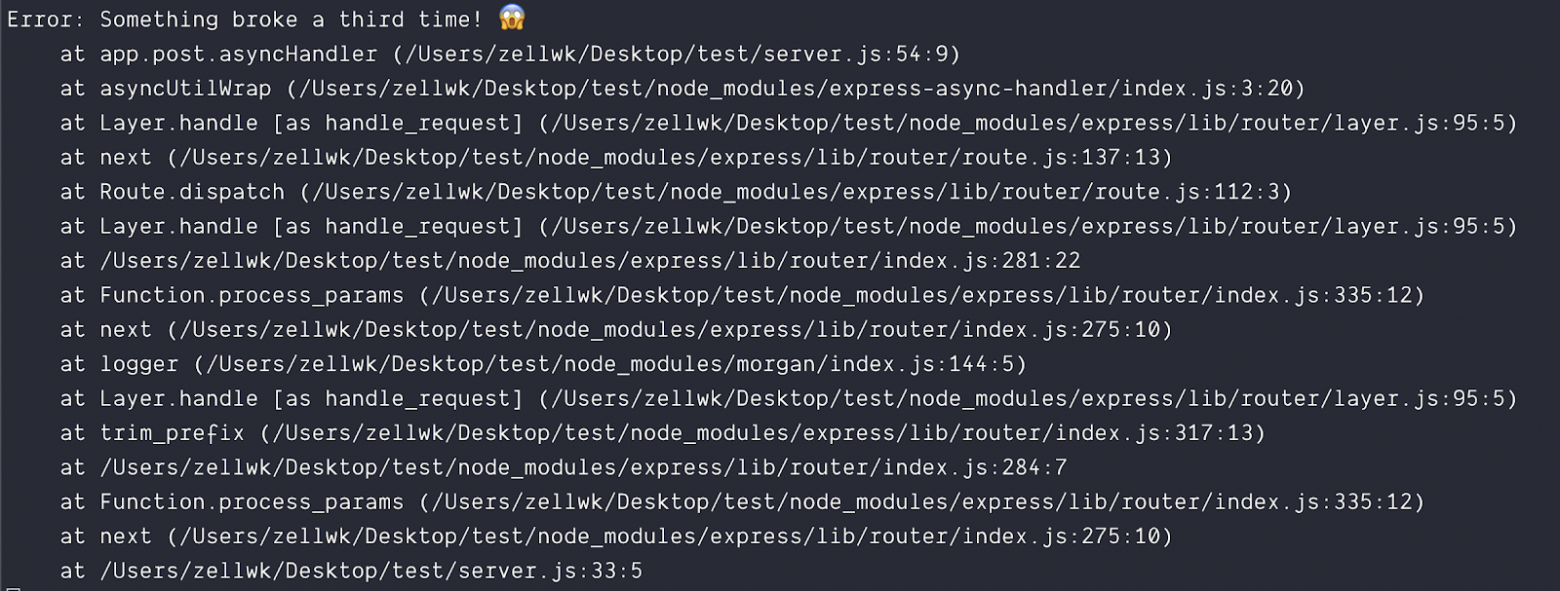
Сообщение об ошибке, выведенное в консоль
Написание собственного обработчика ошибок
Обработчики ошибок Express принимают 4 аргумента:
- error
- req
- res
- next
Размещать их нужно после промежуточных обработчиков и маршрутов.
app.use(/*...*/)
app.get(/*...*/)
app.post(/*...*/)
app.put(/*...*/)
app.delete(/*...*/)

// Собственный обработчик ошибок нужно поместить после всех остальных промежуточных обработчиков
app.use((error, req, res, next) => { /* ... */ })
Если создать собственный обработчик ошибок, то Express прекратит использование стандартного обработчика. Для того чтобы обработать ошибку, нужно сформировать ответ для фронтенд-приложения, которое обратилось к конечной точке, в которой возникла ошибка. Это означает, что нужно выполнить следующие действия:
- Сформировать и отправить подходящий код состояния ответа.
- Сформировать и отправить подходящий ответ.
То, какой именно код состояния подойдёт в каждом конкретном случае, зависит от того, что именно произошло. Вот список типичных ошибок, к обработке которых вы должны быть готовы:
- Ошибка
400 Bad Request. Используется в двух ситуациях. Во-первых — тогда, когда пользователь не включил в запрос необходимое поле (например — в отправленной платёжной форме не заполнено поле со сведениями о кредитной карте). Во-вторых — тогда, когда в запросе содержатся некорректные данные (например — ввод в поле пароля и в поле подтверждения пароля разных паролей). - Ошибка
401 Unauthorized. Этот код состояния ответа применяется в том случае, если пользователь ввёл неправильные учётные данные (вроде имени пользователя, адреса электронной почты или пароля). - Ошибка
403 Forbidden. Используется в тех случаях, когда пользователю не разрешён доступ к конечной точке. - Ошибка
404 Not Found. Применяется в тех случаях, когда конечную точку невозможно обнаружить. - Ошибка
500 Internal Server Error. Применяется тогда, когда запрос, отправленный фронтендом, сформирован правильно, но на бэкенде при этом возникла какая-то ошибка.
После того, как определён подходящий код состояния ответа, его нужно установить с помощью res.status:
app.use((error, req, res, next) => {
  // Ошибка, выдаваемая в ответ на неправильно сформированный запрос
  res.status(400)
  res.json(/* ... */)
})
Код состояния ответа должен соответствовать сообщению об ошибке. Для этого нужно отправлять код состояния вместе с ошибкой.
Легче всего это сделать с помощью пакета http-errors. Он позволяет отправлять в ошибке три фрагмента информации:
- Код состояния ответа.
- Сообщение, сопутствующее ошибке.
- Любые данные, которые нужно отправить (это необязательно).
Вот как установить пакет http-errors:
npm install http-errors --saveВот как этим пакетом пользоваться:
const createError = require('http-errors')

// Создание ошибки
throw createError(status, message, properties)
Рассмотрим пример, который позволит как следует в этом всём разобраться.
Представим, что мы пытаемся обнаружить пользователя по адресу его электронной почты. Но этого пользователя найти не удаётся. В результате мы решаем отправить в ответ на соответствующий запрос ошибку User not found, сообщающую вызывающей стороне о том, что пользователь не найден.
Вот что нам нужно будет сделать при создании ошибки:
- Установить код состояния ответа как
400 Bad Request(ведь пользователь ввёл неправильные данные). Это будет наш первый параметр. - Отправить вызывающей стороне сообщение наподобие
User not found. Это будет второй параметр.
app.put('/testing', asyncHandler(async (req, res) => {
  const { email } = req.body
  const user = await User.findOne({ email })

  // Если пользователь не найден - выбросим ошибку
  if (!user) throw createError(400, `User '${email}' not found`)
}))
Получить код состояния можно с помощью конструкции error.status, а сообщение ошибки — с помощью error.message:
// Логирование ошибки
app.use((error, req, res, next) => {
  console.log('Error status: ', error.status)
  console.log('Message: ', error.message)
})
Результат логирования ошибки в консоли
Затем состояние ответа устанавливают с помощью res.status, а сообщение записывают в res.json:
app.use((error, req, res, next) => {
  // Установка кода состояния ответа
  res.status(error.status)

  // Отправка ответа
  res.json({ message: error.message })
})
Лично я предпочитаю отправлять в подобных ответах код состояния, сообщение и результат трассировки стека. Это облегчает отладку.
app.use((error, req, res, next) => {
  // Установка кода состояния ответа
  res.status(error.status)

  // Отправка ответа
  res.json({
    status: error.status,
    message: error.message,
    stack: error.stack
  })
})
▍Код состояния ответа, используемый по умолчанию
Если источником ошибки не является createError, то у неё не будет свойства status. Вот пример, в котором сделана попытка прочесть несуществующий файл с помощью fs.readFile:
const fs = require('fs')
const util = require('util')

// Преобразуем readFile из функции, использующей коллбэки, в async/await-функцию.
// Подробности об этом смотрите здесь: https://zellwk.com/blog/callbacks-to-promises
const readFilePromise = util.promisify(fs.readFile)

app.get('/testing', asyncHandler(async (req, res, next) => {
  const data = await readFilePromise('some-file')
})
У такого объекта ошибки не будет свойства status:
app.use((error, req, res, next) => {
  console.log('Error status: ', error.status)
  console.log('Message: ', error.message)
})
Результат логирования ошибки в консоли
В подобных случаях можно задать код ошибки, используемый по умолчанию. А именно, речь идёт об ошибке 500 Internal Server Error:
app.use((error, req, res, next) => {
  res.status(error.status || 500)
  res.json({
    status: error.status,
    message: error.message,
    stack: error.stack
  })
})
▍Изменение кода состояния ошибки
Предположим, мы собираемся прочитать некий файл, воспользовавшись данными, предоставленными пользователем. Если такого файла не существует, это значит, что нам нужно выдать ошибку 400 Bad Request. Ведь в том, что файл найти не удаётся, нет вины сервера.
В подобном случае нужно воспользоваться конструкцией try/catch для перехвата исходной ошибки. Затем нужно воссоздать объект ошибки с помощью createError:
app.get('/testing', asyncHandler(async (req, res, next) => {
  try {
    const { file } = req.body
    const contents = await readFilePromise(path.join(__dirname, file))
  } catch (error) {
    throw createError(400, `File ${file} does not exist`)
  }
})
▍Обработка ошибок 404
Если запрос прошёл через все промежуточные обработчики и маршруты, но так и не был обработан, это означает, что конечная точка, соответствующая такому запросу, не была найдена.
Для обработки ошибок 404 Not Found нужно добавить, между маршрутами и обработчиком ошибок, дополнительный обработчик. Вот как выглядит создание объекта ошибки 404:
// Промежуточные обработчики...
// Маршруты...

app.use((req, res, next) => {
  next(createError(404))
})

// Обработчик ошибок...
Сведения об ошибке
▍Замечания об ошибке ERR_HTTP_HEADERS_SENT
Не впадайте в панику если видите сообщение об ошибке ERR_HTTP_HEADERS_SENT: Cannot set headers after they are sent to the client. Она возникает из-за того, что в одном и том же обработчике многократно вызывается метод, устанавливающий заголовки ответа. Вот методы, вызов которых приводит к автоматической установке заголовков ответа:
- res.send
- res.json
- res.render
- res.sendFile
- res.sendStatus
- res.end
- res.redirect
Так, например, если вы вызовете методы res.render и res.json в одном и том же обработчике ответа, то вы получите ошибку ERR_HTTP_HEADERS_SENT:
app.get('/testing', (req, res) => {
  res.render('new-page')
  res.json({ message: '¯_(ツ)_/¯' })
})
В результате, в том случае, если вы сталкиваетесь с этой ошибкой, тщательно проверьте код обработчиков ответа и убедитесь в том, что в нём нет ситуаций, в которых вызывается несколько вышеописанных методов.
▍Обработка ошибок и потоковая передача данных
Если что-то идёт не так при потоковой передаче ответа фронтенду, то можно столкнуться с той же самой ошибкой ERR_HTTP_HEADERS_SENT.
В подобном случае обработку ошибок нужно передать стандартным обработчикам. Такой обработчик отправит ошибку и автоматически закроет соединение.
app.use((error, req, res, next) => {
  // Сделать это нужно только в том случае, если ответ передаётся в потоковом режиме
  if (res.headersSent) {
    return next(error)
  }

  // Остальной код обработки ошибок
})
Итоги
Сегодня я рассказал вам всё, что знаю об обработке ошибок в Express. Надеюсь, это поможет вам писать более надёжные Express-приложения.
Уважаемые читатели! Как вы обрабатываете ошибки в своих Node.js-проектах?


The 4xx HTTP status codes may not be enough to describe the cause of the error to the client. For this reason, several companies introduced a custom error response format to provide the caller with everything they need to deal with the error. This is a great addition you can make to your backend application, especially considering that implementing it requires only a few lines of code. Let’s see what you need to get started with error response customization for 401 Unauthorized and 403 Forbidden errors in Express.
An Introduction to HTTP Error Status Codes
The HTTP status code is a code number returned by the server in response to a client’s request. The many HTTP status codes available can be grouped into the following five classes based on their number:
1xx: informational responses2xx: successful responses3xx: redirection messages4xx: client error responses5xx: server error responses
As you can see, there are only two categories of HTTP status codes that represent errors: 4xx and 5xx.
The 4xx class of HTTP status code refers to errors due to the client’s request, for example, because of a malformed request. When it comes to 4xx errors, the server should provide the client with additional info behind the error to prevent it from causing it again.
The 5xx class of HTTP status code refers to errors encountered by the server while processing the request. For security reasons, you should not provide the client with additional info about this type of error. This is because you do not want an attacker to understand how the server works based on what you returned to them.
Using the right HTTP error status codes is important to help the client understand what occurred. In fact, each 4xx or 5xx HTTP status code corresponds to a particular type of error. For example, the 400 status code should be used when the form of the client request is not as the API expects, while the 401 status code should be returned when the client provides no credentials or invalid credentials. However, with 4xx errors, the HTTP status code alone may not be enough, and you should provide the client with more info.
Let’s delve into why you might need to customize your HTTP error responses.
Why Customize Error Responses?
Considering that 4xx errors are caused by the client’s request, not receiving enough info to understand why that request failed may be frustrating. Therefore, you need to customize error responses to provide the client with more details about the problem that occurred. This means returning additional data along with the HTTP error status code.
For example, imagine a situation where an API requires a numeric customerId parameter. Now, a client calls that API without the customerId parameter or using a non-numeric string. As a result, it will receive a generic 400 Bad Request error from the server. As you can imagine, the default «Bad Request» message cannot help the caller understand how they should call the API. On the other hand, if the server returned a 400 HTTP status code response containing the «customerId required» or «customerId must be a number» message, the client could figure out how they need to call the API properly and avoid making the same mistake twice. Therefore, providing a detailed message on 4xx errors helps end-users, and it is also why several companies with public APIs use custom error responses.
Notice that customizing error responses represent a security concern. Although providing extra info in case of errors can be helpful, you should never return info that could jeopardize the security of your application. This is why you should consider customization on error responses only on
4xxerrors, which are all directly referable to the client. On the contrary, you should never provide additional info on your5xxerror responses.
Now, let’s see an interesting format for your custom error responses.
A Format for Your Error Responses
To get an idea of how to define a good custom error response format, you can have a look at what reputable companies with public APIs like Google, Apple, and Amazon do in case of errors. For example, this is what GitHub returns in case of a 401 error:
{
   "message": "Requires authentication",
   "documentation_url": "https://docs.github.com/rest/reference/repos#create-an-organization-repository"
}
Returning a string message containing the error description is a common practice, but what is particularly insightful is the documentation_url field. This is a brilliant idea to provide the caller with pathways to solutions and not just report error messages. Also, if something changes, you do not have to update your error responses. What will be changing is the content of the documentation page used in the error response. In addition, returning a public link to the documentation does not pose a security problem by definition because anyone can already access the documentation.
Now, let’s see how to customize your error responses to follow this format in an Express server.
Customize Error Responses in Express
Here, you will learn how to customize the 401 Unauthorized or 403 Forbidden HTTP errors by extending the Auth0 Hello World API. This is a good example of a demo Express application in JavaScript to start from. Also, HTTP 401 and 403 errors fall into the 4xx class and are good examples of errors that may require custom responses.
Let’s now dive into the Auth0 Express Hello World API.
Get started with the Auth0 Hello Word API
You can find the Auth0 Express Hello World API repo here. In detail, let’s focus on the basic-role-based-access-control branch. You can clone it to take a look at its code with the command below:
git clone https://github.com/auth0-developer-hub/api_express_javascript_hello-world.git --branch basic-role-based-access-controlThis codebase contains the Express.js Hello World API protected via role validation provided by Auth0. You need an Auth0 account to configure the application, If you don’t have one, sign up for free right now!
Notice that this RBAC (Role-Based Access Control) strategy depends on the Auth0 User Management features. You can learn more about the Express Hello World API with basic RBAC protection here.
Specifically, authentication and authorization error logic is handled in the error.middleware.js file as below:
// src/middleware/error.middleware.js

const errorHandler = (error, request, response, next) => {
  if (error.status === 401 && error.message === "Unauthorized") {
    const status = 401;
    const message = "Requires authentication";

    response.status(status).json({ message });

    return;
  }

  if (
    error.status === 401 &&
    error.code === "invalid_token" &&
    error.message === "Permission denied"
  ) {
    const status = 403;
    const message = error.message;

    response.status(status).json({ message });

    return;
  }

  const status = error.statusCode || error.code || 500;
  const message = error.message || "internal error";

  response.status(status).json({ message });
};

module.exports = {
  errorHandler,
};
Here, the «Unauthorized» 401 error raised by the Auth0 SDK is intercepted and transformed into the following 401 HTTP status code error response:
"Requires authentication"Similarly, the “Permission denied” 401 error generated by the Auth0 SDK is converted into the following 403 HTTP status code error response:
"Permission denied"Note that the Auth0 Express library used to provide authorization and authentication does not return a 403 error when the access token is not associated with a user with the expected role, as you might expect. This is because the Auth0 SDK team wanted to keep the library as generic as possible and always returns a generic 401 error. It is up to you to weigh in and determine whether that error returned by the SDK is the most appropriate for your use case. Here, it is not, and that is why the 401 error becomes a 403 error.
Let’s now learn more about the Auth0 library used.
How is access checked?
The Express Hello World API relies on the express-oauth2-jwt-bearer Auth0 library to implement authorization and authentication. If you are not familiar with it, express-oauth2-jwt-bearer is an authentication middleware for Express that validates bearer access tokens in JWT format.
In detail, express-oauth2-jwt-bearer is used in the src/middleware/auth0.middleware.js file as follows:
// src/middleware/auth0.middleware.js

const { auth, claimCheck } = require("express-oauth2-jwt-bearer");
const dotenv = require("dotenv");

dotenv.config();

const validateAccessToken = auth({
  issuerBaseURL: `https://${process.env.AUTH0_DOMAIN}`,
  audience: process.env.AUTH0_AUDIENCE,
});

const checkRequiredPermissions = (requiredPermissions) => {
  return (req, res, next) => {
    const permissionCheck = claimCheck((payload) => {
      const permissions = payload.permissions || [];

      return requiredPermissions.every((requiredPermission) =>
        permissions.includes(requiredPermission)
      );
    }, "Permission denied");

    permissionCheck(req, res, next);
  };
};

module.exports = {
  validateAccessToken,
  checkRequiredPermissions,
};
The validateAccessToken() function is generated by the express-oauth2-jwt-bearer auth() function, which takes a AuthOptions object and returns a middleware function that can be used to restrict an Express endpoint to authorized users. Similarly, the checkRequiredPermissions() function is generated by the express-oauth2-jwt-bearer claimCheck() function, which takes a JWTPayload object and returns a middleware function that can be used to restrict an Express endpoint to authenticated users.
The two functions can be used to provide authentication and authorization as follows:
// src/services/example.js

const express = require("express");
const {
  checkRequiredPermissions,
  validateAccessToken,
} = require("../middleware/auth0.middleware.js");

const messagesRouter = express.Router();

// a public endpoint
messagesRouter.get("/public", (req, res) => {
  res.status(200).json("Hello, World!");
});

// an Express endpoint accessible only by authenticated users
// thanks to the validateAccessToken middleware
messagesRouter.get("/protected", validateAccessToken, (req, res) => {
  res.status(200).json("Hello, World!");
});

// an Express endpoint accessible only by authenticated and authorized users
// thanks to the validateAccessToken and checkRequiredPermissions middleware
// functions respectively
messagesRouter.get(
  "/admin",
  validateAccessToken,
  checkRequiredPermissions(["read:admin-messages"]),
  (req, res) => {
    const message = getAdminMessage();

    res.status(200).json(message);
  }
);

module.exports = { messagesRouter };
Customizing 401 and 403 Error Responses
Let’s now see how to extend the basic-role-based-access-control branch application to implement custom error responses on 401 and 403 errors. You can find the full code in the GitHub repository that supports the article. To achieve the goal, simply change the file error.middleware.js as follows:
// src/middleware/error.middleware.js

const errorHandler = (error, request, response, next) => {
  if (error.status === 401 && error.message === "Unauthorized") {
    // defining the HTTP status code
    const status = 401;
    // standard HTTP 401 error message
    const message = "Unauthorized";
    // the link to the hosted version of the "how-to-handle-authentication" HTML page
    // you can find in the /docs folder
    const authority = `${request.protocol}://${request.hostname}:${process.env.PORT}`;
    const documentationLink = `${authority}/docs/how-to-handle-authentication.html`;

    // implementing a custom error response on 401 errors
    // matching the GitHub error response format
    response.status(status).json({
      message: message,
      documentationLink: documentationLink
    });

    return;
  }

  if (
      error.status === 401 &&
      error.code === "invalid_token" &&
      error.message === "Permission denied"
  ) {
    // defining the HTTP status code
    const status = 403;
    // standard HTTP 403 error message
    const message = "Forbidden";
    // the link to the hosted version of the "how-to-handle-authorization" HTML page
    // you can find in the /docs folder
    const authority = `${request.protocol}://${request.hostname}:${process.env.PORT}`;
    const documentationLink = `${authority}/docs/how-to-handle-authorization.html`;

    // implementing a custom error response on 403 errors
    // matching the GitHub error response format
    response.status(status).json({
      message: message,
      documentationLink: documentationLink
    });

    return;
  }

  const status = error.statusCode || error.code || 500;
  const message = error.message || "internal error";

  response.status(status).json({ message });
};

module.exports = {
  errorHandler,
};
This is what the 401 error response will look like:
{
   "message": "Unauthorized",
   "documentationLink": "https://your-domain.com/docs/how-to-handle-authentication.html"
}
And this is what the 403 error response will look like:
{
   "message": "Forbidden",
   "documentationLink": "https://your-domain.com/docs/how-to-handle-authorization.html"
}
Note that in both cases the error message matches the standard HTTP error message. Also, the links used in the error responses point to the hosted version of the two custom static HTML pages you can find in the /docs folder of the project.
Keep in mind that these HTML documents are only sample pages with lorem ipsum text. Therefore, you should populate the pages with complete information to handle authentication and authorization errors or replace the URLs with appropriate links to your documentation.
Testing the 401 and 403 Error Response
First, clone the extended version of the basic-role-based-access-control Auth0 Hello World API branch with the following command:
git clone https://github.com/auth0-blog/extended-basic-role-based-access-controlThen, enter the extended-basic-role-based-access-control project directory with this command:
cd extended-basic-role-based-access-controlNow, install the npm project dependencies with:
npm installThen, create a .env file under the root directory of the project and populate it as follows:
PORT=6060
CLIENT_ORIGIN_URL=http://localhost:4040
AUTH0_AUDIENCE=<YOUR-AUTH0-AUDIENCE>
AUTH0_DOMAIN=<YOUR-AUTH0-DOMAIN>
Replace <YOUR-AUTH0-AUDIENCE> and <YOUR-AUTH0-DOMAIN> with the values you can find in the Auth0 dashboard. Also, you will need to retrieve a valid <AUTH0-ACCESS-TOKEN> value. Follow this guide from the official Auth0 documentation to learn how to retrieve these values.
Launch the Express.js API server with the command below:
npm run devYou are now ready to start testing the 401 error response. For example, let’s try to call the api/messages/protected API that requires authentication without the required Auth0 access token:
curl --request GET
  --url http:/localhost:6060/api/messages/protected
You will receive a 401 error response containing the following JSON:
{
   "message": "Unauthorized",
   "documentationLink": "https://your-domain.com/docs/how-to-handle-authentication.html"
}
On the contrary, let’s try to use the valid <AUTH0-ACCESS-TOKEN> retrieved earlier.
curl --request GET
  --url http:/localhost:6060/api/messages/protected
  --header 'authorization: <AUTH0-ACCESS-TOKEN>'
In this case, you would get:
{
    text: "This is a protected message."
}
Replicating a 403 error requires a little more effort. This is because you need to run a frontend client application that uses the Auth0 SDK. Follow this tutorial from the official documentation to learn how to set up RBAC in Auth0. Make sure to set up a «read:admin-messages» role and associate it with the admin user role.
Then, use any of the Auth0 frontend client demos from the list you can find here to login and access the GET /api/messages/admin endpoint exposed by the Express server launched earlier on port 6060.
When logging with an authorized admin user, you will get:
{
    "text": "This is an admin message."
}
On the other hand, when using an unauthorized user, you will receive the following JSON error response:
{
   "message": "Forbidden",
   "documentationLink": "https://your-domain.com/docs/how-to-handle-authorization.html"
}
Conclusion
In this article, we looked at how to customize error responses when dealing with REST applications developed in Express. This requires just a bunch of lines of code, but you should not take it lightheartedly. On the contrary, it should be implemented with security in mind to avoid providing attackers with useful information about how your backend works. First, we introduced HTTP error status codes and clarified why you might need error response customization on 4xx errors. Then, we studied how companies with public APIs deal with the 4xx errors to define a real-world backed error response format. Finally, we learned how to implement this format when it comes to 401 and 403 errors returned by the Auth0 Express Hello World API using the express-oauth2-jwt-bearer library for authentication and authorization.
Thanks for reading! I hope that you found this article helpful. Feel free to reach out to me with any questions, comments, or suggestions.
This is a quick example of how to automatically logout of a React app if a fetch request returns a 401 Unauthorized or 403 Forbidden response.
The code snippets in this tutorial are from a React + Recoil Login tutorial I posted recently, to see the code running in a live demo app check out React + Recoil — User Registration and Login Example & Tutorial.
Recoil is used in the example to store the current authenticated user in the auth shared state object, but Recoil isn’t required if your React app uses another way to store the user’s logged in state such as Redux or RxJS etc, the only requirement is that you can get and set the user’s logged in state.
Fetch Wrapper with Logout on 401 or 403
Path: /src/_helpers/fetch-wrapper.js
The fetch wrapper is a lightweight wrapper around the native browser fetch() function used to simplify the code for making HTTP requests by automatically handling request errors, parsing JSON response data and setting the HTTP auth header. It returns an object with methods for making get, post, put and delete requests.
The handleResponse() function checks if there is an HTTP error in the response (!response.ok), if there is an error and the response status code (response.status) is 401 or 403 the user is logged out of the React app and redirected to the login page.
With the fetch wrapper a POST request can be made as simply as this: fetchWrapper.post(url, body);. It’s called in the example app by user actions.
import { useRecoilState } from 'recoil';

import { history } from '_helpers';
import { authAtom } from '_state';
import { useAlertActions } from '_actions';

export { useFetchWrapper };

function useFetchWrapper() {
    const [auth, setAuth] = useRecoilState(authAtom);
    const alertActions = useAlertActions();

    return {
        get: request('GET'),
        post: request('POST'),
        put: request('PUT'),
        delete: request('DELETE')
    };

    function request(method) {
        return (url, body) => {
            const requestOptions = {
                method,
                headers: authHeader(url)
            };
            if (body) {
                requestOptions.headers['Content-Type'] = 'application/json';
                requestOptions.body = JSON.stringify(body);
            }
            return fetch(url, requestOptions).then(handleResponse);
        }
    }

    // helper functions

    function authHeader(url) {
        // return auth header with jwt if user is logged in and request is to the api url
        const token = auth?.token;
        const isLoggedIn = !!token;
        const isApiUrl = url.startsWith(process.env.REACT_APP_API_URL);
        if (isLoggedIn && isApiUrl) {
            return { Authorization: `Bearer ${token}` };
        } else {
            return {};
        }
    }

    function handleResponse(response) {
        return response.text().then(text => {
            const data = text && JSON.parse(text);

            if (!response.ok) {
                if ([401, 403].includes(response.status) && auth?.token) {
                    // auto logout if 401 Unauthorized or 403 Forbidden response returned from api
                    localStorage.removeItem('user');
                    setAuth(null);
                    history.push('/account/login');
                }

                const error = (data && data.message) || response.statusText;
                alertActions.error(error);
                return Promise.reject(error);
            }

            return data;
        });
    }
}
User Actions
Path: /src/_actions/user.actions.js
The user actions object returned by the useUserActions() hook function contains methods for user registration, authentication and CRUD operations. It handles communication between the React app and the backend api for everything related to users, and also handles Recoil state update operations for users and auth atoms. HTTP requests to the API are sent with the fetch wrapper.
I included it here to show examples of the fetchWrapper being called to make HTTP requests to the API from the React app.
import { useRecoilState, useSetRecoilState, useResetRecoilState } from 'recoil';

import { history, useFetchWrapper } from '_helpers';
import { authAtom, usersAtom, userAtom } from '_state';

export { useUserActions };

function useUserActions () {
    const baseUrl = `${process.env.REACT_APP_API_URL}/users`;
    const fetchWrapper = useFetchWrapper();
    const [auth, setAuth] = useRecoilState(authAtom);
    const setUsers = useSetRecoilState(usersAtom);
    const setUser = useSetRecoilState(userAtom);

    return {
        login,
        logout,
        register,
        getAll,
        getById,
        update,
        delete: _delete,
        resetUsers: useResetRecoilState(usersAtom),
        resetUser: useResetRecoilState(userAtom)
    }

    function login({ username, password }) {
        return fetchWrapper.post(`${baseUrl}/authenticate`, { username, password })
            .then(user => {
                // store user details and jwt token in local storage to keep user logged in between page refreshes
                localStorage.setItem('user', JSON.stringify(user));
                setAuth(user);

                // get return url from location state or default to home page
                const { from } = history.location.state || { from: { pathname: '/' } };
                history.push(from);
            });
    }

    function logout() {
        // remove user from local storage, set auth state to null and redirect to login page
        localStorage.removeItem('user');
        setAuth(null);
        history.push('/account/login');
    }

    function register(user) {
        return fetchWrapper.post(`${baseUrl}/register`, user);
    }

    function getAll() {
        return fetchWrapper.get(baseUrl).then(setUsers);
    }

    function getById(id) {
        return fetchWrapper.get(`${baseUrl}/${id}`).then(setUser);
    }

    function update(id, params) {
        return fetchWrapper.put(`${baseUrl}/${id}`, params)
            .then(x => {
                // update stored user if the logged in user updated their own record
                if (id === auth?.id) {
                    // update local storage
                    const user = { ...auth, ...params };
                    localStorage.setItem('user', JSON.stringify(user));

                    // update auth user in recoil state
                    setAuth(user);
                }
                return x;
            });
    }

    // prefixed with underscored because delete is a reserved word in javascript
    function _delete(id) {
        setUsers(users => users.map(x => {
            // add isDeleting prop to user being deleted
            if (x.id === id)
                return { ...x, isDeleting: true };

            return x;
        }));

        return fetchWrapper.delete(`${baseUrl}/${id}`)
            .then(() => {
                // remove user from list after deleting
                setUsers(users => users.filter(x => x.id !== id));

                // auto logout if the logged in user deleted their own record
                if (id === auth?.id) {
                    logout();
                }
            });
    }
}
Subscribe to my YouTube channel or follow me on Twitter, Facebook or GitHub to be notified when I post new content.
I’m currently attempting to travel around Australia by motorcycle with my wife Tina on a pair of Royal Enfield Himalayans. You can follow our adventures on YouTube, Instagram and Facebook.
This is kind of a two part question, the first being specific to my personal circumstance and the second being an overall understanding of how things function.
I am performing a password reset for my application. The email gets sent along with a jwt attached to the URL. After the user clicks the URL they are taken to the reset password page that fires of an action with the jwt through componentWillMount function. This action then fires off the fetch:
static verifyResetPasswordToken(token) {
  const obj = JSON.stringify(token);
  return fetch('/api/auth/verifyResetPasswordToken', {
    method: 'POST',
    headers: {
      Accept: 'application/json',
      'Content-Type': 'application/json',
    },
    credentials: 'include',
    body: obj
  })
    .then(res => {
      console.log('THEN');
    })
    .catch(error => {
      console.log('CATCH');
    });
}
On the API I’m handling this by taking the token passed in the body and checking if it has expired or not:
export function verifyResetPasswordToken(req, res, next) {
  const token = jwt.decode(req.body.token);
  if (token.exp > Date.now() / 1000) {
    res.status(200).json();
  } else {
    res.status(401).json();
  }
}
NOTE I understand this is not a secure way to check the validity of a token. I just need to figure out if it is expired or not.
Here is where the confusion lies. When the 401 status gets returned, my promise is rejected. It is my understanding that fetch does not handle errors this way. That the only thing fetch catches is network connectivity and that I should still hit my then() block even with 400 & 500 http status errors. Any idea as to why my promise is getting rejected with a 401 status? Why am I landing in the catch block? How do I avoid this from happening? How do I handle different status that I want to respond with on my server?
My second question revolves around all of this. What is the best practice for handling server errors when working with fetch and maybe specifically React Redux? This is my first time using fetch and any light that can be shed to understanding how I should handle server side errors would be greatly appreciated.
static verifyResetPasswordToken(token) {
  const obj = JSON.stringify(token);
  return fetch('/api/auth/verifyResetPasswordToken', {
    method: 'POST',
    headers: {
      Accept: 'application/json',
      'Content-Type': 'application/json',
    },
    credentials: 'include',
    body: obj
  })
    .then(res => {
      if(res.ok) {
        console.log('THEN');
      } else {
        console.log('ELSE');
      }
    })
    .catch(error => {
      console.log('CATCH');
    });
}
![]()
Disclaimer
This is not the best solution, is just a solution, there are probably better and more refined solutions on the web, but this one is simply a very simple one to implement.
Also here we are assuming you are using axios to fetch data from the client.
What’s the use case?
Let’s say that you have your frontend application that consumes some APIs, and also your APIs requires some authentication token, like a JWT token, to be sent at every request, and you got this token after a login screen for example.
And JWT token they generally have an expiration date, it could be a hour, a day, or more (but you shouldn’t use longer than that). Doesn’t matter if here we are talking about a refresh token or the actual token, but at some point the API you are calling might refuse your requests because the token expired.
One way to solve this problem, is to handle it when you do the request in your code, so if you have an error on your request, you just redirect it back to the login screen.
Something like this perhaps:
import axios from 'axios';

const fetchData = async () => {
  try {
    const { data } = await axios.get('some/endpoint');
    return data;
  } catch (error) {
    // this failed, so let's redirect to the login page
    console.log(error);
    window.location.href = '/';
  }
}
Enter fullscreen mode
Exit fullscreen mode
And the above solution is ok, if you do only one request on your page it could work.
But, this also mean that if you have multiple pages, and maybe in every page you do multiple requests, this strategy becomes a bit cumbersome.
Use axios interceptors instead!
A better and simple way to handle the same problem, in a centrealized way, is to use axios interceptors instead.
With interceptors you can hook to a specific lifecycle of the API call, the request and response, and maybe modify the behaviours of them.
The axios.intercepotrs.request.use(config) function has one argument, which is the configuration of the headers, while the axios.intercepotrs.response.use(response, error) has two, which hooks with the .then, or a successful response, and the .catch, when we get an Error (any status that is not 2xx) as a response.
For example on the example below, we’ll tell to axios to execute the code on every requests we do:
import axios from 'axios';

axios.interceptors.response.use(
  response => response,
  error => {
    window.location.href = '/';
  });
Enter fullscreen mode
Exit fullscreen mode
As you see above, we do nothing to the response, but if the error is invoked, we redirect to our login page.
Note: you don’t need to do this on every file, you just need to do it once, like on a configuration file for example.
If you want to have better control, like you want to target only some specific http status codes, let’s say the 401 Unauthorized, you can access to that via the error.response.status, so our code will look like this:
axios.interceptors.response.use(
  response => response,
  error => {
    if (error.response.status === 401) {
      window.location.href = '/';
    }
  });
Enter fullscreen mode
Exit fullscreen mode
Do you want to handle this only for some requests?
Well, then you can also create an axios instance and use that instance only for some calls, for example:
// lib/customAxios.js
export const customAxios = axios.create({
  baseURL: 'http://yourcoolapi.com/api',
  headers: {
    'X-Custom-Header': 'foobar'
  }
});

customAxios.interceptors.response.use(
  response => response,
  error => {
    if (error.response.status === 401) {
      window.location.href = '/';
    }
  });

export default customAxios;

// yourcode.js
import customAxios from '/lib/customAxios.js';

const fetchData = async () => {
  try {
    const { data } = await customAxios.get('some/endpoint');
    return data;
  } catch (error) {
    // this failed, so let's redirect to the login page
    console.log(error);
  }
}
Enter fullscreen mode
Exit fullscreen mode
Again, this is a very simple use case on how to use axios interceptors, there could be different strategies that works as well or better than this one.
Another one could be to use the request interceptor, check the JWT token even before we actually call the API, and then request a new token, or redirect to the login, or else.
But the one I’ve explained in this post is probably the easiest to grasp and handle.
Появление сообщения об ошибке 401 Unauthorized Error («отказ в доступе») при открытии страницы сайта означает неверную авторизацию или аутентификацию пользователя на стороне сервера при обращении к определенному url-адресу. Чаще всего она возникает при ошибочном вводе имени и/или пароля посетителем ресурса при входе в свой аккаунт. Другой причиной являются неправильные настройки, допущенные при администрировании web-ресурса. Данная ошибка отображается в браузере в виде отдельной страницы с соответствующим описанием. Некоторые разработчики интернет-ресурсов, в особенности крупных порталов, вводят собственную дополнительную кодировку данного сбоя:
- 401 Unauthorized;
- Authorization Required;
- HTTP Error 401 – Ошибка авторизации.
Попробуем разобраться с наиболее распространенными причинами возникновения данной ошибки кода HTTP-соединения и обсудим способы их решения.
Причины появления ошибки сервера 401 и способы ее устранения на стороне пользователя
При доступе к некоторым сайтам (или отдельным страницам этих сайтов), посетитель должен пройти определенные этапы получения прав:
- Идентификация – получение вашей учетной записи («identity») по username/login или email.
- Аутентификация («authentic») – проверка того, что вы знаете пароль от этой учетной записи.
- Авторизация – проверка вашей роли (статуса) в системе и решение о предоставлении доступа к запрошенной странице или ресурсу на определенных условиях.
Большинство пользователей сохраняют свои данные по умолчанию в истории браузеров, что позволяет быстро идентифицироваться на наиболее часто посещаемых страницах и синхронизировать настройки между устройствами. Данный способ удобен для серфинга в интернете, но может привести к проблемам с безопасностью доступа к конфиденциальной информации. При наличии большого количества авторизованных регистрационных данных к различным сайтам используйте надежный мастер-пароль, который закрывает доступ к сохраненной в браузере информации.
Наиболее распространенной причиной появления ошибки с кодом 401 для рядового пользователя является ввод неверных данных при посещении определенного ресурса. В этом и других случаях нужно попробовать сделать следующее:
- Проверьте в адресной строке правильность написания URL. Особенно это касается перехода на подстраницы сайта, требующие авторизации. Введите правильный адрес. Если переход на страницу осуществлялся после входа в аккаунт, разлогинитесь, вернитесь на главную страницу и произведите повторный вход с правильными учетными данными.
- При осуществлении входа с сохраненными данными пользователя и появлении ошибки сервера 401 проверьте их корректность в соответствующих настройках данного браузера. Возможно, авторизационные данные были вами изменены в другом браузере. Также можно очистить кэш, удалить cookies и повторить попытку входа. При удалении истории браузера или очистке кэша потребуется ручное введение логина и пароля для получения доступа. Если вы не помните пароль, пройдите процедуру восстановления, следуя инструкциям.
- Если вы считаете, что вводите правильные регистрационные данные, но не можете получить доступ к сайту, обратитесь к администратору ресурса. В этом случае лучше всего сделать скриншот проблемной страницы.
- Иногда блокировка происходит на стороне провайдера, что тоже приводит к отказу в доступе и появлению сообщения с кодировкой 401. Для проверки можно попробовать авторизоваться на том же ресурсе с альтернативного ip-адреса (например, используя VPN). При подтверждении блокировки трафика свяжитесь с провайдером и следуйте его инструкциям.
Некоторые крупные интернет-ресурсы с большим количеством подписчиков используют дополнительные настройки для обеспечения безопасности доступа. К примеру, ваш аккаунт может быть заблокирован при многократных попытках неудачной авторизации. Слишком частые попытки законнектиться могут быть восприняты как действия бота. В этом случае вы увидите соответствующее сообщение, но можете быть просто переадресованы на страницу с кодом 401. Свяжитесь с администратором сайта и решите проблему.
Иногда простая перезагрузка проблемной страницы, выход из текущей сессии или использование другого веб-браузера полностью решают проблему с 401 ошибкой авторизации.
Устранение ошибки 401 администратором веб-ресурса
Для владельцев сайтов, столкнувшихся с появлением ошибки отказа доступа 401, решить ее порою намного сложнее, чем обычному посетителю ресурса. Есть несколько рекомендаций, которые помогут в этом:
- Обращение в службу поддержки хостинга сайта. Как и в случае возникновения проблем с провайдером, лучше всего подробно описать последовательность действий, приведших к появлению ошибки 401, приложить скриншот.
- При отсутствии проблем на стороне хостинг-провайдера можно внести следующие изменения в настройки сайта с помощью строки Disallow:/адрес проблемной страницы. Запретить индексацию страницам с ошибкой в «rоbоts.txt», после чего добавить в файл «.htассеss» строку такого типа:
Redirect 301 /oldpage.html http://site.com/newpage.html.
Где в поле /oldpage.html прописывается адрес проблемной страницы, а в http://site.com/newpage.html адрес страницы авторизации.
Таким образом вы перенаправите пользователей со всех страниц, которые выдают ошибку 401, на страницу начальной авторизации.
- Если после выполнения предыдущих рекомендаций пользователи при попытках авторизации все равно видят ошибку 401, то найдите на сервере файл «php.ini» и увеличьте время жизни сессии, изменив значения следующих параметров: «session.gc_maxlifetime» и «session.cookie_lifetime» на 1440 и 0 соответственно.
- Разработчики веб-ресурсов могут использовать более сложные методы авторизации и аутентификации доступа для создания дополнительной защиты по протоколу HTTP. Если устранить сбой простыми методами администрирования не удается, следует обратиться к специалистам, создававшим сайт, для внесения соответствующих изменений в код.
Хотя ошибка 401 и является проблемой на стороне клиента, ошибка пользователя на стороне сервера может привести к ложному требованию входа в систему. К примеру, сетевой администратор разрешит аутентификацию входа в систему всем пользователям, даже если это не требуется. В таком случае сообщение о несанкционированном доступе будет отображаться для всех, кто посещает сайт. Баг устраняется внесением соответствующих изменений в настройки.
Дополнительная информация об ошибке с кодом 401
Веб-серверы под управлением Microsoft IIS могут предоставить дополнительные данные об ошибке 401 Unauthorized в виде второго ряда цифр:
- 401, 1 – войти не удалось;
- 401, 2 – ошибка входа в систему из-за конфигурации сервера;
- 401, 3 – несанкционированный доступ из-за ACL на ресурс;
- 401, 501 – доступ запрещен: слишком много запросов с одного и того же клиентского IP; ограничение динамического IP-адреса – достигнут предел одновременных запросов и т.д.
Более подробную информацию об ошибке сервера 401 при использовании обычной проверки подлинности для подключения к веб-узлу, который размещен в службе MS IIS, смотрите здесь.
Следующие сообщения также являются ошибками на стороне клиента и относятся к 401 ошибке:
- 400 Bad Request;
- 403 Forbidden;
- 404 Not Found;
- 408 Request Timeout.
Как видим, появление ошибки авторизации 401 Unauthorized не является критичным для рядового посетителя сайта и чаще всего устраняется самыми простыми способами. В более сложной ситуации оказываются администраторы и владельцы интернет-ресурсов, но и они в 100% случаев разберутся с данным багом путем изменения настроек или корректировки html-кода с привлечением разработчика сайта.
Когда я только начинал работать с Express и пытался разобраться с тем, как обрабатывать ошибки, мне пришлось нелегко. Возникало такое ощущение, будто никто не писал о том, что мне было нужно. В итоге мне пришлось самому искать ответы на мои вопросы. Сегодня я хочу рассказать всё, что знаю об обработке ошибок в Express-приложениях. Начнём с синхронных ошибок.

Обработка синхронных ошибок
Если вам нужно обработать синхронную ошибку, то вы можете, для начала, с помощью инструкции throw, выдать такую ошибку в обработчике запроса Express. Обратите внимание на то, что обработчики запросов ещё называют «контроллерами», но я предпочитаю использовать термин «обработчик запросов» так как он кажется мне понятнее.
Вот как это выглядит:
app.post('/testing', (req, res) => {
  throw new Error('Something broke! ')
})
Такие ошибки можно перехватить с помощью обработчика ошибок Express. Если вы не написали собственный обработчик ошибок (подробнее об этом мы поговорим ниже), то Express обработает ошибку с помощью обработчика, используемого по умолчанию.
Вот что делает стандартный обработчик ошибок Express:
- Устанавливает код состояния HTTP-ответа в значение 500.
- Отправляет сущности, выполнившей запрос, текстовый ответ.
- Логирует текстовый ответ в консоль.

Сообщение об ошибке, выведенное в консоль
Обработка асинхронных ошибок
Для обработки асинхронных ошибок нужно отправить ошибку обработчику ошибок Express через аргумент next:
app.post('/testing', async (req, res, next) => {
  return next(new Error('Something broke again! '))
})
Вот что попадёт в консоль при логировании этой ошибки.

Сообщение об ошибке, выведенное в консоль
Если вы пользуетесь в Express-приложении конструкцией async/await, то вам понадобится использовать функцию-обёртку, наподобие express-async-handler. Это позволяет писать асинхронный код без блоков try/catch. Подробнее об async/await в Express можно почитать здесь.
const asyncHandler = require('express-async-handler')

app.post('/testing', asyncHandler(async (req, res, next) => {
  // Сделать что-нибудь
}))
После того, как обработчик запроса обёрнут в express-async-handler, то можно, так же, как было описано выше, выбросить ошибку с использованием инструкции throw. Эта ошибка попадёт к обработчику ошибок Express.
app.post('/testing', asyncHandler(async (req, res, next) => {
  throw new Error('Something broke yet again! ')
}))
Сообщение об ошибке, выведенное в консоль
Написание собственного обработчика ошибок
Обработчики ошибок Express принимают 4 аргумента:
- error
- req
- res
- next
Размещать их нужно после промежуточных обработчиков и маршрутов.
app.use(/*...*/)
app.get(/*...*/)
app.post(/*...*/)
app.put(/*...*/)
app.delete(/*...*/)

// Собственный обработчик ошибок нужно поместить после всех остальных промежуточных обработчиков
app.use((error, req, res, next) => { /* ... */ })
Если создать собственный обработчик ошибок, то Express прекратит использование стандартного обработчика. Для того чтобы обработать ошибку, нужно сформировать ответ для фронтенд-приложения, которое обратилось к конечной точке, в которой возникла ошибка. Это означает, что нужно выполнить следующие действия:
- Сформировать и отправить подходящий код состояния ответа.
- Сформировать и отправить подходящий ответ.
То, какой именно код состояния подойдёт в каждом конкретном случае, зависит от того, что именно произошло. Вот список типичных ошибок, к обработке которых вы должны быть готовы:
- Ошибка
400 Bad Request. Используется в двух ситуациях. Во-первых — тогда, когда пользователь не включил в запрос необходимое поле (например — в отправленной платёжной форме не заполнено поле со сведениями о кредитной карте). Во-вторых — тогда, когда в запросе содержатся некорректные данные (например — ввод в поле пароля и в поле подтверждения пароля разных паролей). - Ошибка
401 Unauthorized. Этот код состояния ответа применяется в том случае, если пользователь ввёл неправильные учётные данные (вроде имени пользователя, адреса электронной почты или пароля). - Ошибка
403 Forbidden. Используется в тех случаях, когда пользователю не разрешён доступ к конечной точке. - Ошибка
404 Not Found. Применяется в тех случаях, когда конечную точку невозможно обнаружить. - Ошибка
500 Internal Server Error. Применяется тогда, когда запрос, отправленный фронтендом, сформирован правильно, но на бэкенде при этом возникла какая-то ошибка.
После того, как определён подходящий код состояния ответа, его нужно установить с помощью res.status:
app.use((error, req, res, next) => {
  // Ошибка, выдаваемая в ответ на неправильно сформированный запрос
  res.status(400)
  res.json(/* ... */)
})
Код состояния ответа должен соответствовать сообщению об ошибке. Для этого нужно отправлять код состояния вместе с ошибкой.
Легче всего это сделать с помощью пакета http-errors. Он позволяет отправлять в ошибке три фрагмента информации:
- Код состояния ответа.
- Сообщение, сопутствующее ошибке.
- Любые данные, которые нужно отправить (это необязательно).
Вот как установить пакет http-errors:
npm install http-errors --saveВот как этим пакетом пользоваться:
const createError = require('http-errors')

// Создание ошибки
throw createError(status, message, properties)
Рассмотрим пример, который позволит как следует в этом всём разобраться.
Представим, что мы пытаемся обнаружить пользователя по адресу его электронной почты. Но этого пользователя найти не удаётся. В результате мы решаем отправить в ответ на соответствующий запрос ошибку User not found, сообщающую вызывающей стороне о том, что пользователь не найден.
Вот что нам нужно будет сделать при создании ошибки:
- Установить код состояния ответа как
400 Bad Request(ведь пользователь ввёл неправильные данные). Это будет наш первый параметр. - Отправить вызывающей стороне сообщение наподобие
User not found. Это будет второй параметр.
app.put('/testing', asyncHandler(async (req, res) => {
  const { email } = req.body
  const user = await User.findOne({ email })

  // Если пользователь не найден - выбросим ошибку
  if (!user) throw createError(400, `User '${email}' not found`)
}))
Получить код состояния можно с помощью конструкции error.status, а сообщение ошибки — с помощью error.message:
// Логирование ошибки
app.use((error, req, res, next) => {
  console.log('Error status: ', error.status)
  console.log('Message: ', error.message)
})
Результат логирования ошибки в консоли
Затем состояние ответа устанавливают с помощью res.status, а сообщение записывают в res.json:
app.use((error, req, res, next) => {
  // Установка кода состояния ответа
  res.status(error.status)

  // Отправка ответа
  res.json({ message: error.message })
})
Лично я предпочитаю отправлять в подобных ответах код состояния, сообщение и результат трассировки стека. Это облегчает отладку.
app.use((error, req, res, next) => {
  // Установка кода состояния ответа
  res.status(error.status)

  // Отправка ответа
  res.json({
    status: error.status,
    message: error.message,
    stack: error.stack
  })
})
▍Код состояния ответа, используемый по умолчанию
Если источником ошибки не является createError, то у неё не будет свойства status. Вот пример, в котором сделана попытка прочесть несуществующий файл с помощью fs.readFile:
const fs = require('fs')
const util = require('util')

// Преобразуем readFile из функции, использующей коллбэки, в async/await-функцию.
// Подробности об этом смотрите здесь: https://zellwk.com/blog/callbacks-to-promises
const readFilePromise = util.promisify(fs.readFile)

app.get('/testing', asyncHandler(async (req, res, next) => {
  const data = await readFilePromise('some-file')
})
У такого объекта ошибки не будет свойства status:
app.use((error, req, res, next) => {
  console.log('Error status: ', error.status)
  console.log('Message: ', error.message)
})
Результат логирования ошибки в консоли
В подобных случаях можно задать код ошибки, используемый по умолчанию. А именно, речь идёт об ошибке 500 Internal Server Error:
app.use((error, req, res, next) => {
  res.status(error.status || 500)
  res.json({
    status: error.status,
    message: error.message,
    stack: error.stack
  })
})
▍Изменение кода состояния ошибки
Предположим, мы собираемся прочитать некий файл, воспользовавшись данными, предоставленными пользователем. Если такого файла не существует, это значит, что нам нужно выдать ошибку 400 Bad Request. Ведь в том, что файл найти не удаётся, нет вины сервера.
В подобном случае нужно воспользоваться конструкцией try/catch для перехвата исходной ошибки. Затем нужно воссоздать объект ошибки с помощью createError:
app.get('/testing', asyncHandler(async (req, res, next) => {
  try {
    const { file } = req.body
    const contents = await readFilePromise(path.join(__dirname, file))
  } catch (error) {
    throw createError(400, `File ${file} does not exist`)
  }
})
▍Обработка ошибок 404
Если запрос прошёл через все промежуточные обработчики и маршруты, но так и не был обработан, это означает, что конечная точка, соответствующая такому запросу, не была найдена.
Для обработки ошибок 404 Not Found нужно добавить, между маршрутами и обработчиком ошибок, дополнительный обработчик. Вот как выглядит создание объекта ошибки 404:
// Промежуточные обработчики...
// Маршруты...

app.use((req, res, next) => {
  next(createError(404))
})

// Обработчик ошибок...
Сведения об ошибке
▍Замечания об ошибке ERR_HTTP_HEADERS_SENT
Не впадайте в панику если видите сообщение об ошибке ERR_HTTP_HEADERS_SENT: Cannot set headers after they are sent to the client. Она возникает из-за того, что в одном и том же обработчике многократно вызывается метод, устанавливающий заголовки ответа. Вот методы, вызов которых приводит к автоматической установке заголовков ответа:
- res.send
- res.json
- res.render
- res.sendFile
- res.sendStatus
- res.end
- res.redirect
Так, например, если вы вызовете методы res.render и res.json в одном и том же обработчике ответа, то вы получите ошибку ERR_HTTP_HEADERS_SENT:
app.get('/testing', (req, res) => {
  res.render('new-page')
  res.json({ message: '¯_(ツ)_/¯' })
})
В результате, в том случае, если вы сталкиваетесь с этой ошибкой, тщательно проверьте код обработчиков ответа и убедитесь в том, что в нём нет ситуаций, в которых вызывается несколько вышеописанных методов.
▍Обработка ошибок и потоковая передача данных
Если что-то идёт не так при потоковой передаче ответа фронтенду, то можно столкнуться с той же самой ошибкой ERR_HTTP_HEADERS_SENT.
В подобном случае обработку ошибок нужно передать стандартным обработчикам. Такой обработчик отправит ошибку и автоматически закроет соединение.
app.use((error, req, res, next) => {
  // Сделать это нужно только в том случае, если ответ передаётся в потоковом режиме
  if (res.headersSent) {
    return next(error)
  }

  // Остальной код обработки ошибок
})
Итоги
Сегодня я рассказал вам всё, что знаю об обработке ошибок в Express. Надеюсь, это поможет вам писать более надёжные Express-приложения.
Уважаемые читатели! Как вы обрабатываете ошибки в своих Node.js-проектах?

