
One of the fundamental skills you need to learn in your development field is to learn how to deal with unthought errors. As a react native developer, shipping a new application with a high percentage bugs-free is a little bit challenging.
Through my experience using react-native, I think using a cross-platform solution to build an Application always comes up with a stability price. And to be honest, having at least 3 different languages to build a framework is not easy to make it bugs-free.
With all these facts, it does not mean that your app should quit or return a white screen whenever an error happened. It’s your responsibility to handle these errors and provide the best experience for the end-users. > I am here to help
This article will guide you through some techniques and tools to catch these unhandled exceptions, perform tasks to provide the best experience for users, and report these errors to make sure you are going to fix them on the next release.
Note to mention that using static typing such as typescript will help you avoid all errors caused by typos and typing errors as you write the code which leads to fewer errors to deal with in the execution.
I also encourage writing higher coverage tests for your app as testing is the only way to ensure everything works as expected.
As I already mentioned React Native has two sides, Javascript and Native, this fact will introduce two types of errors you need to deal with :
- JS Exceptions: Errors produced by Javascript code including React.
- Native Exceptions: Error produced by Native Modules

JS Exception
In general, javascript is not hard regarding error handling, and a try/catch is great but it only works for imperative code. However, React components are declarative (specify what should be rendered) which means you can’t use a try-catch for react components errors.
To solve this problem, React 16 introduced a new concept of an Error boundary.
Error boundaries are React components that catch JavaScript errors anywhere in the child component tree.
Make sure to read about Error boundaries from React official docs
The error boundaries API only works with class Component, and a class component becomes an error boundary if you define one of these lifecycle methods static getDerivedStateFromError() or componentDidCatch().
React-error-boundary is a simple reusable component based on React error boundary API that provides a wrapper around your components and automatically catch-all error from the children’s components hierarchy, and also provides a great way to recover your component tree.
My suggestion is to wrap every navigation screen in your Application with a react-error-boundary component and provide a fullback component to Make sure the user knows what’s happening, and maybe you can recover the screen with a rerender.
The best way to do it is to create an Errorhandler component like the following.
import * as React from "react";
import { ErrorBoundary } from "react-error-boundary";
import { View, StyleSheet, Button } from "react-native";

import { Text } from "components";

const myErrorHandler = (error: Error) => {
  // Do something with the error
  // E.g. reporting errors using sentry ( see part 3)
};

function ErrorFallback({ resetErrorBoundary }) {
  return (
    <View style={[styles.container]}>
      <View>
        <Text> Something went wrong: </Text>
        <Button title="try Again" onPress={resetErrorBoundary} />
      </View>
    </View>
  );
}

export const ErrorHandler = ({ children }: { children: React.ReactNode }) => (
  <ErrorBoundary FallbackComponent={ErrorFallback} onError={myErrorHandler}>
    {children}
  </ErrorBoundary>
);

const styles = StyleSheet.create({
  container: {
    flex: 1,
    flexDirection: "column",
    alignItems: "stretch",
    justifyContent: "center",
    alignContent: "center",
    paddingHorizontal: 12,
  },
});
As you can see I am using an error fullback component to provide more information to the user instead of a white screen.
I also added a try again button to programmatically re-render the screen as a way to recover it and solve the issue. when the user clicks the try again button the error boundary will trigger a rerender for the Screen Component which can help to avoid error and show the correct components.
Read More about Error Recovery
To mention, I am also wrapping the error boundary component for every component that may throw an error.
Is Error Boudry enough for JS Exceptions?
Unfortunately, it’s not, Error boundaries do not catch errors for :
- Event handlers
- Asynchronous code (e.g. setTimeout or requestAnimationFrame callbacks)
- Errors thrown in the error boundary itself (rather than its children)
These limitations lead us to use a react-native-exception-handler to create a global handler for the App that can catch all uncaught Js errors.
react-native-exception-handler is a react native module that lets you register a global error handler that captures fatal/non-fatal uncaught exceptions.
To make it work you need to install and link the module then you register your global handler for Js exception like the following :
import { setJSExceptionHandler } from "react-native-exception-handler";

setJSExceptionHandler((error, isFatal) => {
  // This is your custom global error handler
  // You do stuff like show an error dialog
  // or hit google analytics to track crashes
  // or hit a custom api to inform the dev team.
});
Native Exception
As I already mention Native Exceptions were produced from Native modules errors and Internal native react native code.
From my experience, we usually face few uncaught Native exceptions compared to Js ones, the good news is that we are going to use the same library( react-native-exception-handler) to handle native exceptions too but you cannot show a JS alert box or do any UI stuff via JS code. The only solution was to show a native alert provided by the library but native code has to be written in case you want to customize the alert.
To create a global handler for Native exception, you only need to register your handler using setNativeExceptionHandler function like the following :
import { setNativeExceptionHandler } from "react-native-exception-handler";

const exceptionhandler = (exceptionString) => {
  // your exception handler code here
};
setNativeExceptionHandler(
  exceptionhandler,
  forceAppQuit,
  executeDefaultHandler
);
Tracking Exceptions
Handling exceptions without tracking them has no sense because all the solutions we discussed only improve the user experience and give more information to the user about the error instead of a white screen or an app crash.
Sentry is a cloud-based error monitoring platform that helps us track all these errors in real-time. By creating a free account and installing react-native-sentry you can use it inside your handler (js and Native) to send the stack errors using captureException like the following:
// ErrorHandler.js
import * as Sentry from "@sentry/react-native";

const myErrorHandler = (error: Error) => {
  Sentry.captureException(error);
};
Now, Make sure to fix your errors 😉
Wrap Up
Libraries we use to handle errors in React Native :
- React-error-boundary
- React-native-exception-handler
- Sentry
I hope you found that interesting, informative, and entertaining. I would be more than happy to hear your remarks and thoughts.
If you think other people should read this post. Tweet, share, and Follow me on twitter for the next articles.
More React Native Guides :
👉 17 React Native libraries you should use in 2020
👉 Authentication in React Native, Easy, Secure, and Reusable solution 💪.
👉 Forms in React Native, The right way
👉 Spotify Login Animation With React Navigation V5
React Native has recently gained popularity among the mobile app developer community due to its cross platform compatibility, quick development cycle and better user experience. It is easier to develop, build and maintain apps using React Native.
For mobile apps, business success or failure is determined by user experience and retention rate. The retention rate can drop immediately if the application does not work properly, causing customers to switch to other apps or leave poor reviews in the app store. A fast response to critical errors is essential to minimize customer impact.
Let’s start by covering how to handle errors in vanilla React Native. We will then show you how Rollbar is a game changer to get better error monitoring.

How to handle errors in React Native
Error handling in vanilla JavaScript can be achieved using try, catch and finally statements. You can use these statements to handle caught exceptions in React Native components.
try {
  var test;
  test.color;
} catch(err) {
  // handle error here
}
React Native has its own mechanism to handle uncaught exceptions. This allows you to track the error, display a message to the user, or attempt to recover. See the example below:
const previousHandler = ErrorUtils.getGlobalHandler();
ErrorUtils.setGlobalHandler((error, isFatal) => {
// handle the error here
  console.log(error);
});
Logging to the console works fine during development, but there is no out-of-the-box way to track these errors centrally after they are installed. This is essential to see how many of your users are affected by React Native errors, so that you can handle and prioritize fixes to critical ones.
Monitoring errors with Rollbar
Rollbar offers a real-time feed and instant alerts to make you aware of errors as they appear. It automatically tracks uncaught errors and crashes in your apps, as well as any items you report using the SDK. Even uncaught exceptions can quickly be tracked without the need for user-generated feedback. Rollbar provides detailed statistics, charts, and historical graphs about the errors within your software. Learn more about Rollbar’s features and how it can help you solve problems faster.
Next, we’ll show you to set up React Native to send errors to Rollbar and how to use it. The example below shows an application that triggers an exception when the user clicks on a button. The error message can be seen in Rollbar, including a stack trace which provides information about the line of code that caused the error.
How to set up a React Native error handling project on Rollbar
Here are some simple steps describing how to set up your project on Rollbar. You can find more details in the React Native documentation. You can also follow along using our open source example application on GitHub.
-
Visit https://rollbar.com and sign up for an account if you haven’t done so yet. Next, create your project and select Other from the list of notifiers. Select the client side access token that is generated for you. You’ll need this to configure Rollbar in the steps below.
-
Open the command prompt in your project directory and type the following command to install the Rollbar React Native SDK.
$ npm install rollbar-react-native --saveOr
$ yarn add rollbar-react-native- Link the React Native modules with the underlying project.
$ react-native link rollbar-react-nativeOpen the project entry point js file (in our case it’s index.js) and add the following code snippet.
import { Client } from 'rollbar-react-native';
const rollbar = new Client('MY_ACCESS_TOKEN');
Enable a source map in the Rollbar configuration
A source map will help you when handling and debugging a React Native error because it will show you the exact line in your code where errors occur. Mapping production React Native JavaScript code to your source files is slightly more complicated than in traditional JavaScript environments. This is due to the fact that iOS and Android generate different JavaScript bundles. Therefore, they have different stack traces, which need separate source maps.
You can specify which source map to use using the code_version parameter. Please note that code_version must be nested under the client and JavaScript keys to work.
import { AppRegistry } from 'react-native';
import App from './App';
import { Client } from 'rollbar-react-native'
const rollbar = new Client(new Configuration('MY-ACCESS-TOKEN', {
  payload: {
    client: {
      javascript: {
        source_map_enabled: true,
        code_version: '1234566.android',
        environment: 'production'
      }
    }
}
}));
AppRegistry.registerComponent('RollbarExample', () => App);
Generate Sourcemap
Next, you need to generate a source map of your source code bundle to find the actual place where an error occurred. Generating a source map for error handling in React Native is slightly different for each platform.
Android:
react-native bundle --platform android --dev false --entry-file index.js --bundle-output android/index.android.bundle --assets-dest android/app/src/main/res/ --sourcemap-output sourcemap.android.js --sourcemap-sources-root ./IOS:
react-native bundle --platform ios --entry-file index.ios.js --dev false --bundle-output
ios/main.jsbundle --assets-dest ios --sourcemap-output sourcemap.ios.js --sourcemap-sources-root ./
Upload the source map to Rollbar
Finally, you should upload the source map to the Rollbar. Be sure to specify the code version when you upload the source map to see full stacktraces for handling React Native errors. For example, via curl:
curl https://api.rollbar.com/api/1/sourcemap
-F access_token=b2dea1fe24b44c5f86bbadf7a0d33782   -F version=1234566.android
-F minified_url=http://reactnativehost/index.android.bundle
-F source_map=@sourcemap.android.js
-F index.js=@index.js
-F App.js=@App.js
Source maps use file names for mapping minified symbols to the symbols contained in your original source code. Due to the nature of the JavaScript environment when using React Native, these file names include a prefix. Rollbar automatically rewrites these file names to be http://reactnativehost/<regular file path>. This allows you to set the minified_url with the fake protocol and host of http://reactnativehost to specify your minified JavaScript code.
Test Rollbar with an example React Native app
To test that it’s working, let’s create a page that will generate an error message. In the example below, you can generate an error by clicking the «Generate an error» button.
import React, { Component } from 'react';
import {
  Platform,
  StyleSheet,
  Text,
  View,
  Button, Alert
} from 'react-native';

export default class App extends Component<{}> {
  constructor(props) {
    super(props);
    this.state = {};
  }

  generateError = () => {
    var test;
    test.color; //This will generate a TypeError: undefined
  }

  render() {
    return (
      <View style={styles.container} >
        <Text style={styles.welcome}>
          Rollbar Example
        </Text>
        <View style={styles.loginButton} >
          <Button onPress={this.generateError} title='Generate an Error' />
        </View>
      </View>
    );
  }
}
When you click the «Generate an error» button it will generate an error message. It calls generateError which is creates a “TypeError: undefined is not an object (evaluating ‘(void 0).color’)” error.
Viewing and handling errors in Rollbar
Next, open Rollbar to see what these errors look like in your account’s item page.The error we just generated should be called «TypeError: undefined is not an object (evaluating ‘(void 0).color’).»
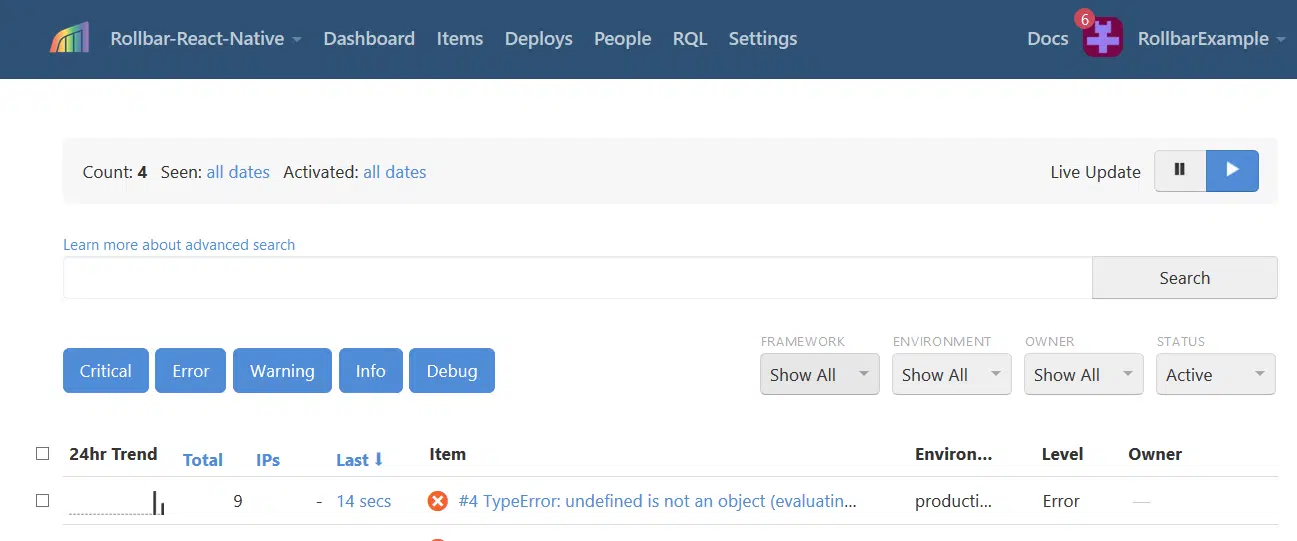
Get more details by clicking on the item near the top of the list that says «TypeError: undefined is not an object (evaluating ‘(void 0).color’).»
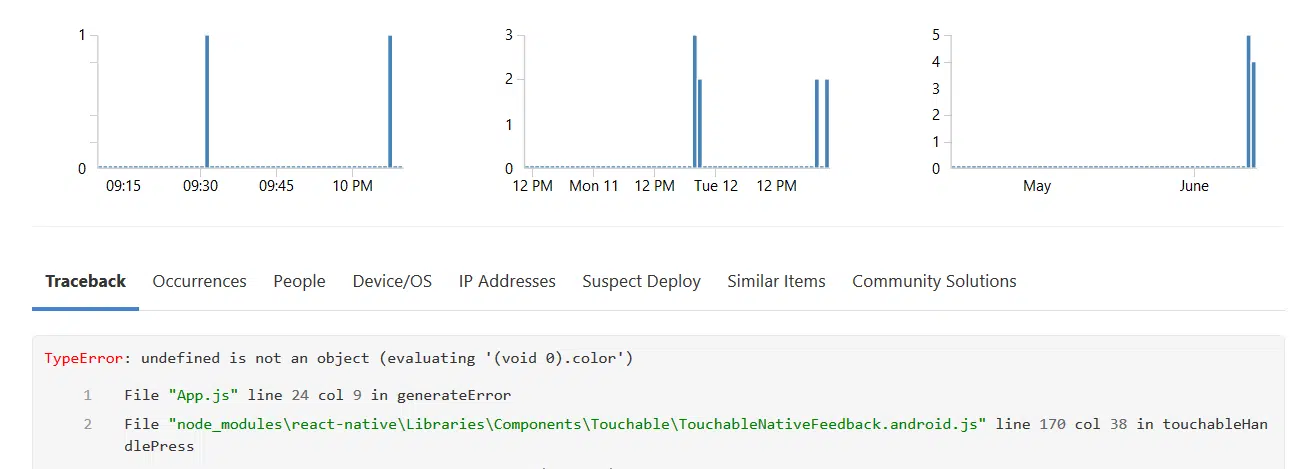
You can now see the full traceback including the code file, line number and function name where the error occurred.
Conclusion
Error monitoring is one of the most important tools for identifying and handling React Native errors. Rollbar provides developers with information about what happened before, during and after an error was generated.
Rollbar’s React Native SDK makes it easy to add error tracking to your app. It captures detailed tracebacks when errors occur and only takes a few minutes to set up. You’ll know about errors right away so that your users can experience your app the way it is meant to be.
If you haven’t already, sign up for a 14-day free trial of Rollbar and let us help you take control of React Native errors.
There are a few approaches which people use.
1: One way is to use hoc’s(Higher Order components) with global handlers using interceptors in axios.
2: Another way is to create an action creator for error and store errors in Reducer store, Fire the one action creator which is responsible for catching errors from the catch block. Currently, in most places, we have unhandled promise rejection.
Please let me know if there is any other approach to error handling, we want to show different error messages to the user for different errors. Example: Error can occur while accepting the order.
react-native-exception-handler 
A react native module that lets you to register a global error handler that can capture fatal/non fatal uncaught exceptions.
The module helps prevent abrupt crashing of RN Apps without a graceful message to the user.
In the current scenario:
In DEV mode , you get a RED Screen error pointing your errors.In Bundled mode , the app just quits without any prompt !🙄
To tackle this we register a global error handler that could be used to for example:
- Send bug reports to dev team when the app crashes
- Show a creative dialog saying the user should restart the application
UPDATE — V2:
V2 of this module now supports catching Unhandled Native Exceptions also along with the JS Exceptions ✌🏻🍻
There are NO breaking changes. So its safe to upgrade from v1 to v2. So there is no reason not to 😉.
V2.9
- Adds support for executing previously set error handlers (now this module can work with other analytics modules)
- Adds an improved approach for overwriting native error handlers.
- Thanks @ Damien Solimando
Example repo can be found here:
_https://github.com/master-atul/react-native-exception-handler-example _
Screens
Without any error handling
In DEV MODE

In BUNDLED MODE

With react-native-exception-handler in BUNDLED MODE

Installation:
yarn add react-native-exception-handler
or
npm i react-native-exception-handler --save
Mostly automatic installation
react-native link react-native-exception-handler
For react-native@0.60.0 or above
As react-native@0.60.0 or above supports autolinking, so there is no need to run linking process.
Read more about autolinking here.
Manual installation
iOS
- In XCode, in the project navigator, right click
Libraries➜Add Files to [your project's name] - Go to
node_modules➜react-native-exception-handlerand addReactNativeExceptionHandler.xcodeproj - In XCode, in the project navigator, select your project. Add
libReactNativeExceptionHandler.ato your project’sBuild Phases➜Link Binary With Libraries - Run your project (
Cmd+R)<
Using Cocoapods
- add
pod 'ReactNativeExceptionHandler', :podspec => '../node_modules/react-native-exception-handler/ReactNativeExceptionHandler.podspec'to your Podfile - run
pod install
Android
- Open up
android/app/src/main/java/[...]/MainApplication.java
- Add
import com.masteratul.exceptionhandler.ReactNativeExceptionHandlerPackage;to the imports at the top of the file - Add
new ReactNativeExceptionHandlerPackage()to the list returned by thegetPackages()method
- Append the following lines to
android/settings.gradle:include ':react-native-exception-handler' project(':react-native-exception-handler').projectDir = new File(rootProject.projectDir, '../node_modules/react-native-exception-handler/android') - Insert the following lines inside the dependencies block in
android/app/build.gradle:compile project(':react-native-exception-handler')
PLEASE READ BEFORE GOING TO USAGE SECTION
Lets introduce you to the type of errors in a RN app.
-
Errors produced by your Javascript code (includes all your react code). We will refer to these errors as JS_Exceptions going forward.
-
Errors produced by Native Modules. We will refer to these as Native_Exceptions going forward.
Unhandled exceptions leave the app in a critical state.
In case of JS_Exceptions you can catch these unhandled exceptions and perform tasks like show alerts or popups, do cleanup or even hit an API to inform the dev teams before closing the app.
In case of Native_Exceptions it becomes much worse. While you can catch these unhandled exceptions and perform tasks like cleanup or logout or even hit an API to inform the dev teams before closing the app,
you CANNOT show a JS alert box or do any UI stuff via JS code. This has to be done via the native methods provided by this module in the respective NATIVE codebase for iOS and android. The module does provide default handlers though :P. So you will get default popups incase of errors. Obviously you can customise them. See CUSTOMIZATION section.
Usage
To catch JS_Exceptions
import {setJSExceptionHandler, getJSExceptionHandler} from 'react-native-exception-handler';

.
.
// For most use cases:
// registering the error handler (maybe u can do this in the index.android.js or index.ios.js)
setJSExceptionHandler((error, isFatal) => {
  // This is your custom global error handler
  // You do stuff like show an error dialog
  // or hit google analytics to track crashes
  // or hit a custom api to inform the dev team.
});
//=================================================
// ADVANCED use case:
const exceptionhandler = (error, isFatal) => {
  // your error handler function
};
setJSExceptionHandler(exceptionhandler, allowInDevMode);
// - exceptionhandler is the exception handler function
// - allowInDevMode is an optional parameter is a boolean.
//   If set to true the handler to be called in place of RED screen
//   in development mode also.

// getJSExceptionHandler gives the currently set JS exception handler
const currentHandler = getJSExceptionHandler();
To catch Native_Exceptions
import { setNativeExceptionHandler } from "react-native-exception-handler";

//For most use cases:
setNativeExceptionHandler((exceptionString) => {
  // This is your custom global error handler
  // You do stuff likehit google analytics to track crashes.
  // or hit a custom api to inform the dev team.
  //NOTE: alert or showing any UI change via JS
  //WILL NOT WORK in case of NATIVE ERRORS.
});
//====================================================
// ADVANCED use case:
const exceptionhandler = (exceptionString) => {
  // your exception handler code here
};
setNativeExceptionHandler(
  exceptionhandler,
  forceAppQuit,
  executeDefaultHandler
);
// - exceptionhandler is the exception handler function
// - forceAppQuit is an optional ANDROID specific parameter that defines
//    if the app should be force quit on error.  default value is true.
//    To see usecase check the common issues section.
// - executeDefaultHandler is an optional boolean (both IOS, ANDROID)
//    It executes previous exception handlers if set by some other module.
//    It will come handy when you use any other crash analytics module along with this one
//    Default value is set to false. Set to true if you are using other analytics modules.
It is recommended you set both the handlers.
NOTE: setNativeExceptionHandler only works in bundled mode — it will show the red screen when applied to dev mode.
See the examples to know more
CUSTOMIZATION
Customizing setJSExceptionHandler.
In case of setJSExceptionHandler you can do everything that is possible. Hence there is not much to customize here.
const errorHandler = (error, isFatal) => {
  // This is your custom global error handler
  // You do stuff like show an error dialog
  // or hit google analytics to track crashes
  // or hit a custom api to inform the dev team.
})
//Second argument is a boolean with a default value of false if unspecified.
//If set to true the handler to be called in place of RED screen
//in development mode also.
setJSExceptionHandler(errorHandler, true);
Customizing setNativeExceptionHandler
By default whenever a Native_Exceptions occurs if you have used setNativeExceptionHandler, along with the callback specified you would see a popup (this is the default native handler set by this module).
In Android and iOS you will see something like


Modifying Android Native Exception handler (RECOMMENDED APPROACH)
(NATIVE CODE HAS TO BE WRITTEN) recommended that you do this in android studio
- In the
android/app/src/main/java/[...]/MainApplication.java
import com.masteratul.exceptionhandler.ReactNativeExceptionHandlerModule;
import com.masteratul.exceptionhandler.NativeExceptionHandlerIfc
...
...
...
public class MainApplication extends Application implements ReactApplication {
...
...
  @Override
  public void onCreate() {
    ....
    ....
    ....
    ReactNativeExceptionHandlerModule.setNativeExceptionHandler(new NativeExceptionHandlerIfc() {
      @Override
      public void handleNativeException(Thread thread, Throwable throwable, Thread.UncaughtExceptionHandler originalHandler) {
        // Put your error handling code here
      }
    });//This will override the default behaviour of displaying the recover activity.
  }
Modifying Android Native Exception handler UI (CUSTOM ACTIVITY APPROACH (OLD APPROACH).. LEAVING FOR BACKWARD COMPATIBILITY)
(NATIVE CODE HAS TO BE WRITTEN) recommended that you do this in android studio
- Create an Empty Activity in the
android/app/src/main/java/[...]/. For example lets say CustomErrorDialog.java - Customize your activity to look and behave however you need it to be.
- In the
android/app/src/main/java/[...]/MainApplication.java
import com.masteratul.exceptionhandler.ReactNativeExceptionHandlerModule;
import <yourpackage>.YourCustomActivity; //This is your CustomErrorDialog.java
...
...
...
public class MainApplication extends Application implements ReactApplication {
...
...
  @Override
  public void onCreate() {
    ....
    ....
    ....
    ReactNativeExceptionHandlerModule.replaceErrorScreenActivityClass(YourCustomActivity.class); //This will replace the native error handler popup with your own custom activity.
  }
Modifying iOS Native Exception handler UI (NATIVE CODE HAS TO BE WRITTEN) recommended that you do this in XCode
Unlike Android, in the case of iOS, there is no way to restart the app if it has crashed. Also, during a Native_Exceptions the UI becomes quite unstable since the exception occured on the main UI thread. Hence, none of the click or press handlers would work either.
Keeping in mind of these, at the most we can just show the user a dialog and inform the user to reopen the app.
If you noticed the default native exception popup does exactly that. To customize the UI for the popup.
- In XCode, open the file
AppDelegate.m
#import "AppDelegate.h"

#import <React/RCTBundleURLProvider.h>
#import <React/RCTRootView.h>

//Add the header file
#import "ReactNativeExceptionHandler.h"
...
...
@implementation AppDelegate

- (BOOL)application:(UIApplication *)application didFinishLaunchingWithOptions:(NSDictionary *)launchOptions
{
...
...

[ReactNativeExceptionHandler replaceNativeExceptionHandlerBlock:^(NSException *exception, NSString *readeableException){

    // THE CODE YOU WRITE HERE WILL REPLACE THE EXISTING NATIVE POPUP THAT COMES WITH THIS MODULE.
    //We create an alert box
    UIAlertController* alert = [UIAlertController
                                alertControllerWithTitle:@"Critical error occurred"
                                message: [NSString stringWithFormat:@"%@n%@",
                                          @"Apologies..The app will close now nPlease restart the appn",
                                          readeableException]
                                preferredStyle:UIAlertControllerStyleAlert];

    // We show the alert box using the rootViewController
    [rootViewController presentViewController:alert animated:YES completion:nil];

    // THIS IS THE IMPORTANT PART
    // By default when an exception is raised we will show an alert box as per our code.
    // But since our buttons wont work because our click handlers wont work.
    // to close the app or to remove the UI lockup on exception.
    // we need to call this method
    // [ReactNativeExceptionHandler releaseExceptionHold]; // to release the lock and let the app crash.

    // Hence we set a timer of 4 secs and then call the method releaseExceptionHold to quit the app after
    // 4 secs of showing the popup
    [NSTimer scheduledTimerWithTimeInterval:4.0
                                     target:[ReactNativeExceptionHandler class]
                                   selector:@selector(releaseExceptionHold)
                                   userInfo:nil
                                    repeats:NO];

    // or  you can call
    // [ReactNativeExceptionHandler releaseExceptionHold]; when you are done to release the UI lock.
  }];

...
...
...

 return YES;
}

@end
What is this [ReactNativeExceptionHandler releaseExceptionHold];?
In case of iOS we lock the UI thread after we show our popup to prevent the app from closing.
Hence once we are done showing the popup we need to close our app after some time.
But since our buttons wont work as our click handlers wont work (explained before).
To close the app or to remove the UI lockup on exception, we need to call this method
[ReactNativeExceptionHandler releaseExceptionHold];
Hence we set a timer of 4 secs and then call the method releaseExceptionHold to quit the app after
4 secs of showing the popup
[NSTimer scheduledTimerWithTimeInterval:4.0
                                 target:[ReactNativeExceptionHandler class]
                               selector:@selector(releaseExceptionHold)
                               userInfo:nil
                                repeats:NO];
Examples
Restart on error example
This example shows how to use this module show a graceful bug dialog to the user on crash and restart the app when the user presses ok !
import {Alert} from 'react-native';
import RNRestart from 'react-native-restart';
import {setJSExceptionHandler} from 'react-native-exception-handler';

const errorHandler = (e, isFatal) => {
  if (isFatal) {
    Alert.alert(
        'Unexpected error occurred',
        `
        Error: ${(isFatal) ? 'Fatal:' : ''} ${e.name} ${e.message}

        We will need to restart the app.
        `,
      [{
        text: 'Restart',
        onPress: () => {
          RNRestart.Restart();
        }
      }]
    );
  } else {
    console.log(e); // So that we can see it in the ADB logs in case of Android if needed
  }
};

setJSExceptionHandler(errorHandler);

setNativeExceptionHandler((errorString) => {
    //You can do something like call an api to report to dev team here
    ...
    ...
   // When you call setNativeExceptionHandler, react-native-exception-handler sets a
   // Native Exception Handler popup which supports restart on error in case of android.
   // In case of iOS, it is not possible to restart the app programmatically, so we just show an error popup and close the app.
   // To customize the popup screen take a look at CUSTOMIZATION section.
});
Bug Capture to dev team example
This example shows how to use this module to send global errors to the dev team and show a graceful bug dialog to the user on crash !
import { Alert } from "react-native";
import { BackAndroid } from "react-native";
import { setJSExceptionHandler } from "react-native-exception-handler";

const reporter = (error) => {
  // Logic for reporting to devs
  // Example : Log issues to github issues using github apis.
  console.log(error); // sample
};

const errorHandler = (e, isFatal) => {
  if (isFatal) {
    reporter(e);
    Alert.alert(
      "Unexpected error occurred",
      `
        Error: ${isFatal ? "Fatal:" : ""} ${e.name} ${e.message}

        We have reported this to our team ! Please close the app and start again!
        `,
      [
        {
          text: "Close",
          onPress: () => {
            BackAndroid.exitApp();
          },
        },
      ]
    );
  } else {
    console.log(e); // So that we can see it in the ADB logs in case of Android if needed
  }
};

setJSExceptionHandler(errorHandler);

setNativeExceptionHandler((errorString) => {
  //You can do something like call an api to report to dev team here
  //example
  // fetch('http://<YOUR API TO REPORT TO DEV TEAM>?error='+errorString);
  //
});
More Examples can be found in the examples folder
- Preserving old handler (thanks to zeh)
Known issues and fixes:
react-native-navigation (Wix)
This is specifically occuring when you use wix library for navigation along with react-native-exception-handler. Whenever an error occurs, it will recreate the application above the crash screen.
Fix:
You need to set second parametera as false while calling setNativeExceptionHandler.
The second parameter is an android specific field which stands for forceQuitOnError.
When set to false it doesnt quit the app forcefully on error. In short :
Credit goes to Gustavo Fão Valvassori
setNativeExceptionHandler(nativeErrorCallback, false);
Previously defined exception handlers are not executed anymore
A lot of frameworks (especially analytics sdk’s) implement global exception handlers. In order to keep these frameworks working while using react-native-exception-hanlder, you can pass a boolean value as third argument to setNativeExceptionHandler(..., ..., true) what will trigger the execution of the last global handler registered.
CONTRIBUTORS
- Atul R
- Zeh Fernando
- Fred Chasen
- Christoph Jerolimov
- Peter Chow
- Gustavo Fão Valvassori
- Alessandro Agosto
- robinxb
- Gant Laborde
- Himanshu Singh
- Paulus Esterhazy
- TomMahle
- Sébastien Krafft
- Mark Friedman
- Damien Solimando
- Jens Kuhr Jørgensen
- Szabó Zsolt
- Andrew Vyazovoy
- Pierre Segalen
- Denis Slávik
TESTING NATIVE EXCEPTIONS/ERRORS
To make sure this module works. You can generate a native exception using the module rn-test-exception-handler.
https://github.com/master-atul/rn-test-exception-handler
rn-test-exception-handler module does only one thing. It raises a Native_Exceptions.
This will help you to verify your customizations or functionality of this module.
Peace ! ✌🏻🍻
If you have built a React app at any point in your programming career, you probably have experienced an error at some point that was cryptic and did not provide any meaningful context on what actually happened.
This probably means the error occurred at some point in the application and our React component did not handle the error gracefully, well mostly because it was none of its business to make sure the entire app holds.
A common problem in React JS is that if a part of a component breaks, the whole application is broken. A JavaScript error in a part of the UI shouldn’t break the whole app. To solve this problem for React users, React 16 introduces a new concept of an “error boundary”.
Error boundaries are React components that catch JavaScript errors anywhere in their child component tree, log those errors, and display a fallback UI instead of the component tree that crashed. Error boundaries catch errors during rendering, in lifecycle methods, and in constructors of the whole tree below them.
Error screens
Before we dig deeper let’s have a look at some error screens of some famous applications. These are the error screens(fallback UI) of some applications, which will be displayed when something goes wrong in their application.

Developers spend 50% of their time finding errors and fixing them. And errors in your application will naturally lead to unhappy customers, which in turn leads to unhappy management and which in turn makes the developer unhappy. So we need a better approach to find errors, track them and solve them. If we can’t solve them, show some fallback UI which will not disrupt the user experience.
What is the problem in React till now?
- White Screen of death ⚰️(Error in one small component renders a blank page)
- Whole React component tree is crashed 🌲.
- Very difficult to track the issue and debug the code in production 😥
Traditional Ways of capturing errors
1.window.onerror
A window has a callback function called onerror, which will get called if something goes wrong in the browser’s window.

Cons:
- Not supported by all the browsers
- Does not capture Cryptic “Script error”
“Script error”: Happens in Firefox, Safari, and Chrome when an exception violates the browser’s same-origin policy – i.e. when the error occurs in a script that’s hosted on a domain other than the domain of the current page.
- try-catch
Enclose the part of the code in try-catch block.

Cons:
- It only works with imperative code
- Doesn’t capture error due to the state change in react component
- Promise-Catch
Every guarantee Ought to Be followed closely by a grab to Allow You to handle the exceptions.
- ComponentDidCatch
ComponentDidCatch became a part of this React 16 lifecycles. It means that once an error happens on a child’s part, the parent could catch & handle it gracefully. The good news is that by componentDidCatch, you can get the gorgeous Error Boundaries. But the bad news is that it just can capture the error which is going on in the respond lifecycles(constructor, componentDidCatch, render). Here is a good example. If the child component has a button and then pressing on the button throws an exception, that exception will not be captured inside its parent element. You don’t have to mention that this consists of the events like setTimeout & setInterval or some other occasions.
- International Error Handling
For other cases, the above methods do not work correctly; there is another way in which we’re able to utilize the global handler to catch the uncaught exceptions.
6.Others
There are a lot of other methods to capture logs like below
- react-transform-catch-errors
- react-guard
- react-component-errors
- react-safe-render
React 16 (Super Dad)
I call React 16 as Super Dad because what it does to child components.

componentDidCatch() a new life cycle method does the above same thing to its child component.
The componentDidCatch() method works like a JavaScript catch {} block, but for components. Only class components can be error boundaries. In practice, most of the time you’ll want to declare an error boundary component once and use it throughout your application.
A class component becomes an error boundary if it defines a new life cycle method called componentDidCatch(error, info)
class ErrorBoundary extends React.Component {
constructor(props) {
super(props);
this.state = { hasError: false };
}componentDidCatch(error, info) {
// Display fallback UI
this.setState({ hasError: true });
// You can also log the error to an error reporting service
logErrorToMyService(error, info);
}render() {
if (this.state.hasError) {
// You can render any custom fallback UI
return <h1>Something went wrong.</h1>;
}
return this.props.children;
}
}
Then you can use it as a regular component:
<ErrorBoundary>
<MyWidget />
</ErrorBoundary>
Where to use ErrorBoundary ?
- Root Component (must)
- Main Sections of the page like Header, Footer and Middle Content
- Stand-alone components like Chat Window, Search Bar
- Wherever you suspect that the error might occur
The granularity of error boundaries is up to you. You can wrap top-level route components, you might also wrap components that might contain obscure code. It’s up to you how to best handle protecting against application crashes.
Note that error boundaries only catch errors in the components below them in the tree. An error boundary can’t catch an error within itself. If an error boundary fails when trying to render the error message, the error will propagate to the closest error boundary above it. This, too, is similar to how catch {} block works in JavaScript.
Let me show you some examples of how error boundary works

In the above example, there is one <Parent />component which has a <Child />. <Child/> has three sub childrens <Child1/>,<Child2/> and <Child3/>.
<Child3> is throwing some error, which will be thrown to its successive parent <Child>, as the <Child/> does not implement componentDidCatch() it will be thrown to its successive parent which is <Parent/>

Output:

And console logs this

If the componentDidCatch() would have implemented in the <Child/> it would have been more granular

Output:

When does error boundary catch errors?
- When there is an error in the render
- In lifecycle methods
- In Constructor
- The whole tree below them
When will it won’t catch?
- Errors in the same component
- On event handlers, unless the error is due to a state change
- Error in try catch block unless an error is due to state change
- Error in asynchronous code unless the error is due to state change
- Server-side rendering
Capturing errors
Error monitoring and crash reporting is a vital part of building a high-quality customer centric application.
A release isn’t the end… Errors are your first chance to iterate.
There are various tools for capturing errors
- Sentry
- Bugsnag
- Firebase
- Visual Studio App Center
One of the most popular crash reporting tools for mobile applications is Firebase Crashlytics. But Crashlytics cannot be used in React Native apps because it won’t capture javascript errors. There are other very good crash reporting tools for React Native like Sentry, Bugsnag etc.
One of the most important features of Bugsnag which made the developers life easy was tagging users who got crashes. When a user reports a crash in our app, we can easily search their email id and search for crashes for that particular users.
Conclusion
Building an error-free application is a vital part of product development. React 16 helps us in making React web applications and React Native apps to capture errors and give enough insights to rectify those errors. Especially, here at Groww we use React 16 and using some advanced tools we manage to avoid most of the errors and give a better user experience to our end users.