
Время на прочтение
4 мин
Количество просмотров 18K
Приветствую!
В статье посвященной моему профайлеру для Entity Framework-a, я вкратце описал примененную мной форму для сообщения пользователю об исключительной ошибке в приложении. После оценки количества скачиваний примера кода, было решено выделить этот пример в отдельный проект, а также добавить поддержку WPF приложений.
Исходники библиотеки вместе с примерами опубликованы на CodePlex под свободной лицензией MIT: https://uiexceptionhandler.codeplex.com/
Подробности под катом.
Введение
Всем известно, что приложения периодически падают по самым разным причинам, при этом, крайне желательно показывать пользователю дружественное сообщение об ошибке в приложении, вместо стандартного сообщения Windows.
Что получилось
При подключенной библиотеке, в случае падения приложения будет показано следующие сообщение с просьбой добавить описание шагов которые привели к ошибке и свой email для ответа, при этом текст ошибки сохраняется в лог файл.
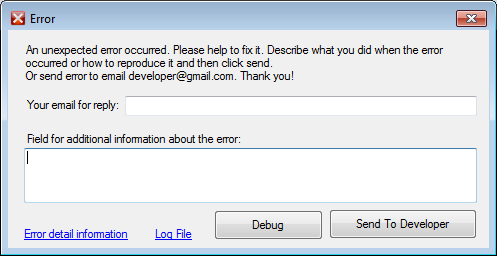
При клике по кнопке «Error detail information» выводиться дополнительная информация об ошибке:

Кнопка Debug позволяет подключить отладчик Visual Studio.
Кнопка «Send to Developer» отправляет письмо на почту разработчику. В случае ошибки отправки сообщения, пользователю будет предложено самому отправить лог файл разработчику на почту.
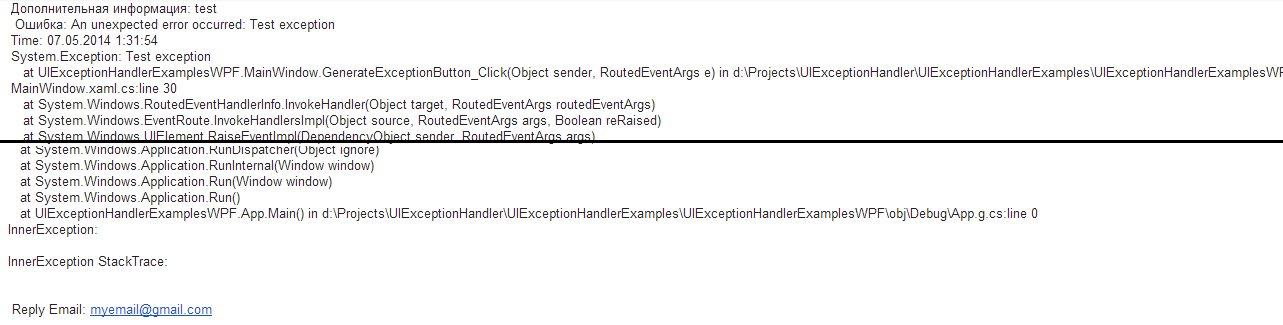
Отправленное разработчику сообщение придет в таком виде:
Использование
1. Забрать последнюю версию кода https://uiexceptionhandler.codeplex.com/SourceControl/latest
2. Собрать в Release mode.
3. Из папки «UIExceptionHandlerLibsDeploy» подключить в проект библиотеку UIExceptionHandlerWinForms.dll в случае WinForms приложения и UIExceptionHandlerWPF.dll в случае WPF приложения.
4. Инициализировать путем вызова статического метода с рядом параметров:
UIException.Start(
   string serverSmtp,
   int portSmtp,
   string passwdSmtp,
   string userSmtp,
   string programmerEmail,
   string fromEmail,
   string subject
)
Как это работает
Статический метод UIException.Start подписывает метод HandleError на событие AppDomain.CurrentDomain.UnhandledException:
AppDomain.CurrentDomain.UnhandledException += (sender, e) => HandleError((Exception)e.ExceptionObject);
Метод HandleError:
private static void HandleError(Exception exception)
{
    try
    {
        // запускаем обработчик формы и передаем ему ссылку на форму наследованную от интерфейса IErrorHandlerForm
        new ErrorHandlerController(exception, new ErrorHandlerForm()).Run();
    }
    catch (Exception e)
    {
        // сохраняем ошибку в лог файл
        LogHelper.Logger.Error(e);
        // в случае ошибки обработки выводим сообщение с просьбой отправить лог файл разработчику на почту
       MessageBox.Show("Error processing exception. Please send log file " + LogHelper.ExceptionLogFileName + " to developer: " + Settings.ProgrammerEmail + " rn Exception:" + e);
        // спрашиваем нужно ли подключить отладчик
        if (MessageBox.Show("Attach debugger? n Only for developer!!!", "Debugging...", MessageBoxButton.YesNo, MessageBoxImage.Question) == MessageBoxResult.Yes)
        {
            Debugger.Launch();
            throw;
        }
    }
    finally
    {
        // обязательно завершаем приложение чтобы windows не вывела стандартное сообщение об ошибке
        Environment.Exit(1);
    }
}
Интерфейс IErrorHandlerForm:
public interface IErrorHandlerForm
{
    event Action OnSendButtonClick;
    event Action OnShowErrorLinkClick;
    event Action OnLogFileLinkClick;
    event Action OnDebugButtonClick;

    // меняет высоту формы
    void SetHeight(int height);
    // задает подробное сообщение об ошибке
    string ExceptionInfoText { get; set; }
    // получает текст из поля дополнительной информации введенной пользователем
    string ExceptionDetailText { get; set; }
    // email пользователя для ответа
    string ReplyEmail { get; }
    void ShowExceptionInfoTextBox(bool isShow);
    // выводит информационное сообщение
    void ShowInfoMessageBox( string text, string caption);
    // выводит диалоговое сообщение
    bool ShowQuestionDialog( string text, string caption);
    // показывает окно в режиме диалога! необходимо чтобы приложение дожидалось закрытия окна и завершилось в finaly
    void ShowViewDialog();
    void UpdateContactEmail(string contactEmail);
}
В качестве библиотеки для логгирования используется NLog. Для того чтобы избежать появления лишних xml файлов, вся конфигурация Nlog-а делается в коде:
private static void ConfigureNlog()
{
    var config = new LoggingConfiguration();

    var fileTarget = new FileTarget();
    config.AddTarget("file", fileTarget);

    fileTarget.Layout = @"${longdate} ${message}";
    fileTarget.FileName = "${basedir}/" + ExceptionLogFileName;

    var rule2 = new LoggingRule("*", LogLevel.Trace, fileTarget);
    config.LoggingRules.Add(rule2);

    LogManager.Configuration = config;
}
Чтобы добиться максимальной простой интеграции в проект, я решил все используемые сборки объединить в одну библиотеку. Делается это при помощи приложения ILMerge, путем добавления скрипта в post-build событие:
if $(ConfigurationName) == Release (
"$(SolutionDir)ILMergeILMerge.exe" /out:"$(SolutionDir)Deploy$(TargetFileName)" "$(TargetDir)*.dll" /target:dll /targetplatform:v4,C:WindowsMicrosoft.NETFramework64v4.0.30319 /wildcards
)

Послесловие
Данное решение было написано для достаточно крупного проекта, применяется уже более 2-х лет, значительно улучшив процесс исправления ошибок, поскольку о каждом падении приложения узнаешь моментально, без дополнительной нотификации от пользователя.
Надеюсь это все будет кому-то полезно!
Всем спасибо за внимание!
Диалоговые окна:
WPF предлагает на выбор несколько видов диалоговых окон для приложений, но самым простым является MessageBox. Единственной его целью является отображение сообщений пользователю, и один/несколько вариантов выбора.
Использование MessageBox осуществляется с помощью вызова статического метода Show(), который может принимать на входе несколько различных параметров, необходимых для реализации запланированного Вами поведения. Мы рассмотрим некоторые варианты перегрузок данного метода, которые будут подкреплены кодом MessageBox.Show() и скриншотами. В конце главы Вы найдете полный код примера, который позволит Вам протестировать различные варианты использования MessageBox.
В своей самой простой форме, MessageBox принимает один параметр (сообщение для отображения пользователю):
MessageBox.Show("Hello, world!");
MessageBox с заголовком
Предыдущий пример не является особо полезным. Ситуацию может улучшить заголовок диалогового окна. К счастью, второй возможный параметр метода Show() позволяет определить заголовок:
MessageBox.Show("Hello, world!", "My App");
MessageBox с дополнительными кнопками
По умолчанию MessageBox имеет только одну «Ok» кнопку, но это можно легко изменить, если Вы вдруг захотите дать пользователю возможность ответа, а не просто показать какую-либо информацию. Также, обратите внимание, как с помощью n осуществляется поддержка многострочных сообщений в MessageBox:
MessageBox.Show("This MessageBox has extra options.nnHello, world?", "My App", MessageBoxButton.YesNoCancel);Тем, какие кнопки отображать, Вы управляете, используя значение из перечисления MessageBoxButton. В него входят кнопки Yes, No и Cancel. Данные значения могут использоваться в следующих комбинациях:
- OK
- OKCancel
- YesNoCancel
- YesNo
Теперь Вам необходимо обработать варианты выбора пользователя. К счастью, метод MessageBox.Show() возвращает значение из перечисления MessageBoxResult. Вот пример:
MessageBoxResult result = MessageBox.Show("Would you like to greet the world with a "Hello, world"?", "My App", MessageBoxButton.YesNoCancel);
switch(result)
{
	case MessageBoxResult.Yes:
		MessageBox.Show("Hello to you too!", "My App");
		break;
	case MessageBoxResult.No:
		MessageBox.Show("Oh well, too bad!", "My App");
		break;
	case MessageBoxResult.Cancel:
		MessageBox.Show("Nevermind then...", "My App");
		break;
}

Проверяя значение-результат метода MessageBox.Show(), становится возможной обработка пользовательского выбора, как видно из скриншотов.
MessageBox с иконкой
С помощью четвертого параметра, MessageBox может отображать иконки «по умолчанию» слева от текста сообщения:
MessageBox.Show("Hello, world!", "My App", MessageBoxButton.OK, MessageBoxImage.Information);![]()
С использованием перечисления MessageBoxImage Вы можете выбирать между несколькими иконками, подходящими под определенную ситуацию. Вот полный список:
- Asterisk (звезда)
- Error (ошибка)
- Exclamation (восклицательный знак)
- Hand (рука)
- Information (информация)
- None (без иконки)
- Question (знак вопроса)
- Stop (стоп)
- Warning (внимание)
В основном названия этих иконок соответствуют содержанию, но Вы с легкостью можете поэкспериментировать с помощью статьи на MSDN, в которой проиллюстрировано использование всех иконок:
http://msdn.microsoft.com/en-us/library/system.windows.messageboximage.aspx
MessageBox с выбором по умолчанию
MessageBox выберет кнопку по умолчанию, при нажатии на Enter. Например, если вы отображаете диалоговое окно с кнопками «Yes» и «No», первая будет определена как выбор по умолчанию. Вы можете изменить это поведение, используя пятый параметр метода MessageBox.Show():
MessageBox.Show("Hello, world?", "My App", MessageBoxButton.YesNo, MessageBoxImage.Question, MessageBoxResult.No);
Обратите внимание как на скриншоте приподнята кнопка «No» (выделена как выбранная).
Она сработает при нажатии на Enter или Space.
Полный пример
Как было обещано в начале главы, вот полный пример:
<Window x:Class="WpfTutorialSamples.Dialogs.MessageBoxSample"
        xmlns="http://schemas.microsoft.com/winfx/2006/xaml/presentation"
        xmlns:x="http://schemas.microsoft.com/winfx/2006/xaml"
        Title="MessageBoxSample" Height="250" Width="300">
    <StackPanel HorizontalAlignment="Center" VerticalAlignment="Center">
        <StackPanel.Resources>
            <Style TargetType="Button">
                <Setter Property="Margin" Value="0,0,0,10" />
            </Style>
        </StackPanel.Resources>
        <Button Name="btnSimpleMessageBox" Click="btnSimpleMessageBox_Click">Simple MessageBox</Button>
        <Button Name="btnMessageBoxWithTitle" Click="btnMessageBoxWithTitle_Click">MessageBox with title</Button>
        <Button Name="btnMessageBoxWithButtons" Click="btnMessageBoxWithButtons_Click">MessageBox with buttons</Button>
        <Button Name="btnMessageBoxWithResponse" Click="btnMessageBoxWithResponse_Click">MessageBox with response</Button>
        <Button Name="btnMessageBoxWithIcon" Click="btnMessageBoxWithIcon_Click">MessageBox with icon</Button>
        <Button Name="btnMessageBoxWithDefaultChoice" Click="btnMessageBoxWithDefaultChoice_Click">MessageBox with default choice</Button>
    </StackPanel>
</Window>
using System;
using System.Windows;
namespace WpfTutorialSamples.Dialogs
{
public partial class MessageBoxSample : Window
{
public MessageBoxSample()
{
InitializeComponent();
}
private void btnSimpleMessageBox_Click(object sender, RoutedEventArgs e)
{
MessageBox.Show("Hello, world!");
}
private void btnMessageBoxWithTitle_Click(object sender, RoutedEventArgs e)
{
MessageBox.Show("Hello, world!", "My App");
}
private void btnMessageBoxWithButtons_Click(object sender, RoutedEventArgs e)
{
MessageBox.Show("This MessageBox has extra options.nnHello, world?", "My App", MessageBoxButton.YesNoCancel);
}
private void btnMessageBoxWithResponse_Click(object sender, RoutedEventArgs e)
{
MessageBoxResult result = MessageBox.Show("Would you like to greet the world with a "Hello, world"?", "My App", MessageBoxButton.YesNoCancel);
switch(result)
{
case MessageBoxResult.Yes:
MessageBox.Show("Hello to you too!", "My App");
break;
case MessageBoxResult.No:
MessageBox.Show("Oh well, too bad!", "My App");
break;
case MessageBoxResult.Cancel:
MessageBox.Show("Nevermind then...", "My App");
break;
}
}
private void btnMessageBoxWithIcon_Click(object sender, RoutedEventArgs e)
{
MessageBox.Show("Hello, world!", "My App", MessageBoxButton.OK, MessageBoxImage.Information);
}
private void btnMessageBoxWithDefaultChoice_Click(object sender, RoutedEventArgs e)
{
MessageBox.Show("Hello, world?", "My App", MessageBoxButton.YesNo, MessageBoxImage.Question, MessageBoxResult.No);
}
}
}This article has been fully translated into the following languages:
-
Chinese
-
Czech
-
Danish
-
French
-
German
-
Hungarian
-
Italian
-
Japanese
-
Korean
-
Polish
-
Portuguese
-
Russian
-
Slovak
-
Spanish
-
Turkish
-
Ukrainian
-
Vietnamese
Is your preferred language not on the list? Click here to help us translate this article into your language!
When my textbox is empty/null, i need to display «Required».
In my xaml:
  <TextBox Name="txtLastName"  Grid.Column="1"  Grid.Row="1"  Margin="3">
            <TextBox.Text>
                <Binding Path="LastName">
                    <Binding.ValidationRules>
                        <validators:Contractor
                                    MinimumLength="1"
                                    MaximumLength="40"
                                    ErrorMessage="Required" />
                    </Binding.ValidationRules>
                </Binding>
            </TextBox.Text>
        </TextBox>
In my class:
public string LastName
        {
            get { return _lastName; }
            set
            {
                _lastName = value;
              NotifyPropertyChanged("LastName");

            }
        }

public event PropertyChangedEventHandler PropertyChanged;

    private int _minimumLength = -1;
    private int _maximumLength = -1;
    private string _errorMessage;

    public int MinimumLength
    {
        get { return _minimumLength; }
        set { _minimumLength = value; }
    }

    public int MaximumLength
    {
        get { return _maximumLength; }
        set { _maximumLength = value; }
    }

    public string ErrorMessage
    {
        get { return _errorMessage; }
        set { _errorMessage = value; }
    }

    public override ValidationResult Validate(object value,CultureInfo cultureInfo)
    {
        ValidationResult result = new ValidationResult(true, null);
        string inputString = (value ?? string.Empty).ToString();
        if (inputString.Length < this.MinimumLength || value==null ||
               (this.MaximumLength > 0 &&
                inputString.Length > this.MaximumLength))
        {
            result = new ValidationResult(false, this.ErrorMessage);
        }
        return result;
    }


  private void NotifyPropertyChanged(string propertyName)
        {
            if (PropertyChanged != null)
                PropertyChanged(this, new PropertyChangedEventArgs(propertyName));
        }
What i get is the textbox turns into red border when the data is null/empty and i am not able to see the «Required» error message, any thoughts?
asked Feb 16, 2012 at 23:36
![]()
Sharpeye500Sharpeye500
8,70525 gold badges94 silver badges142 bronze badges
(The red border is the default behavior of a TextBox when the attached property Validation.HasError is true.
In order to display the error messsage you’ll have to do that yourself by binding to Validation.Errors
. Validation.Errors is a list of error from each validator applied to the TextBox.
Now in your case you only have one validator so in order to get the error message you need to bind to Validation.Errors[0].ErrorContent
Example
<StackPanel Orientation="Horizontal">
    <TextBox Name="txtLastName" Width="100">
        <TextBox.Text>
            <Binding Path="LastName">
                <Binding.ValidationRules>
                    <validators:Contractor
                                MinimumLength="1"
                                MaximumLength="40"
                                ErrorMessage="Required" />
                </Binding.ValidationRules>
            </Binding>
        </TextBox.Text>
    </TextBox>
    <!-- Show error message tot the right of the TextBox-->
    <TextBlock Text="{Binding (Validation.Errors)[0].ErrorContent, ElementName=txtLastName}"/>
</StackPanel>
answered Feb 16, 2012 at 23:56
![]()
3
Диалоговые окна
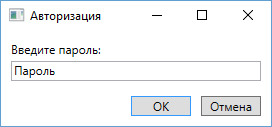
Последнее обновление: 21.03.2016
WPF поддерживает возможность создания модальных диалоговых окон. При вызове модальное окно блокирует доступ к родительскому окну, пока пользователь
не закроет модальное окно.
Для работы добавим в проект новое окно, которое назовем PasswordWindow. Это окно будет выполнять роль модального.
Изменим интерфейс PasswordWindow:
<Window x:Class="WindowApp.PasswordWindow"
        xmlns="http://schemas.microsoft.com/winfx/2006/xaml/presentation"
        xmlns:x="http://schemas.microsoft.com/winfx/2006/xaml"
        xmlns:d="http://schemas.microsoft.com/expression/blend/2008"
        xmlns:mc="http://schemas.openxmlformats.org/markup-compatibility/2006"
        xmlns:local="clr-namespace:WindowApp"
        mc:Ignorable="d"
        Title="Авторизация" SizeToContent="WidthAndHeight" WindowStartupLocation="CenterScreen">
    <Grid Margin="10">
        <Grid.RowDefinitions>
            <RowDefinition Height="20" />
            <RowDefinition Height="20" />
            <RowDefinition Height="Auto" />
        </Grid.RowDefinitions>

        <TextBlock>Введите пароль:</TextBlock>
        <TextBox Name="passwordBox" Grid.Row="1" MinWidth="250">Пароль</TextBox>

        <WrapPanel Grid.Row="2" HorizontalAlignment="Right" Margin="0,15,0,0">
            <Button IsDefault="True" Click="Accept_Click" MinWidth="60" Margin="0,0,10,0">OK</Button>
            <Button IsCancel="True" MinWidth="60">Отмена</Button>
        </WrapPanel>

    </Grid>
</Window>
Здесь определено текстовое поле для ввода пароля и две кнопки. Вторая кнопка с атрибутом IsCancel="True" будет выполнять роль отмены.
А первая кнопка будет подтверждать ввод.
Для подтверждения ввода и успешного выхода из модального окна определим в файле кода PasswordWindow определим обработчик первой кнопки Accept_Click:
using System.Windows;

namespace WindowApp
{
    public partial class PasswordWindow : Window
    {
        public PasswordWindow()
        {
            InitializeComponent();
        }

        private void Accept_Click(object sender, RoutedEventArgs e)
        {
            this.DialogResult = true;
        }

        public string Password
        {
            get { return passwordBox.Text; }
        }

    }
}
Для успешного выхода из модального диалогового окна нам надо для свойства DialogResult установить значение true. Для
второй кнопки необязательно определять обработчик, так как у нее установлен атрибут IsCancel="True", следовательно, ее нажатие будет эквивалентно
результату this.DialogResult = false;. Этот же результат будет при закрытии диалогового окна на крестик.
Кроме того, здесь определяется свойство Password, через которое мы можем извне получить введенный пароль.
И изменим главную форму MainWindow, чтобы из нее запускать диалоговое окно. Во-первых, определим кнопку:
<Window x:Class="WindowApp.MainWindow"
        xmlns="http://schemas.microsoft.com/winfx/2006/xaml/presentation"
        xmlns:x="http://schemas.microsoft.com/winfx/2006/xaml"
        xmlns:d="http://schemas.microsoft.com/expression/blend/2008"
        xmlns:mc="http://schemas.openxmlformats.org/markup-compatibility/2006"
        xmlns:local="clr-namespace:WindowApp"
        mc:Ignorable="d"
        Title="MainWindow" Height="250" Width="300">
    <Grid>
        <Button Width="100" Height="30" Content="Авторизация" Click="Login_Click" />
    </Grid>
</Window>
И определим обработчик для этой кнопки:
private void Login_Click(object sender, RoutedEventArgs e)
{
    PasswordWindow passwordWindow = new PasswordWindow();

    if(passwordWindow.ShowDialog()==true)
    {
        if(passwordWindow.Password=="12345678")
            MessageBox.Show("Авторизация пройдена");
        else
            MessageBox.Show("Неверный пароль");
    }
    else
    {
        MessageBox.Show("Авторизация не пройдена");
    }
}
В итоге при нажатии на кнопку будет отображаться следующее диалоговое окно:
И в зависимости от результатов ввода будет отображаться то или иное сообщение.
Introduction
A message box is a dialog box that displays an alert or a message or also lets the user have some options to choose from. A simple message box has an OK button and looks as in Figure 1.
Figure 1
A message box can have a title and multiple options such as Yes, No, and Cancel. A message box can also have some input control to take input from a user.
MessageBox Class
The MessageBox class in WPF represents a modal message box dialog, which is defined in the System.Windows namespace. The Show static method of the MessageBox is the only method that is used to display a message box. The Show method returns a MessageBoxResult enumeration that has the values None, OK, Cancel, Yes, and No. We can use MessageBoxResult to determine what button was clicked on a MessageBox and take an appropriate action.
Show method has 13 overloaded methods. Here are the code samples and their results of these 13 overloaded methods.
Simple MessageBox
A simple MessageBox shows a message and only has an OK button. Clicking on the OK button closes the MessageBox. The following line of code uses the Show method to display a message box with a simple message:
- MessageBoxResult result = MessageBox.Show(«Hello MessageBox»);
The MessageBox generated by the line of code above is a modal dialog with an OK button on it and looks as in Figure 2.
Figure 2
MessageBox with Title
A MessageBox can have a title. The first parameter of the Show method is a message string and the second parameter is title string of the dialog. The following code snippet creates a MessageBox with a message and a title.
- MessageBoxResult result = MessageBox.Show(«Hello MessageBox», «Confirmation»);
The output looks like Figure 3.
Figure 3
MessageBox with Owner
A MessageBox does not have an owner by default but you can specify an owner by setting the following code. In this code, the first parameter is the current window.
- MessageBoxResult result = MessageBox.Show(this, «Hello MessageBox»);
MessageBoxButton Enumeration
The MessageBoxButton enumeration is responsible for showing various buttons on the dialog. It has the following values:
- OK — OK button is displayed
- OKCancel — OK and Cancel buttons are displayed
- YesNo — Yes and No buttons are displayed
- YesNoCancel — Yes, No, and Cancel buttons are displayed
MessageBox with Title, Yes and No Buttons
A MessageBox can be used to ask the user a question and have Yes and No buttons. Based on the user selection (Yes or No), you can execute the appropriate code. The third parameter of the Show method is a MessageBoxButton enumeration.
The following code snippet creates a MessageBox with a message, a title, and two Yes and No buttons.
- if (MessageBox.Show(«Do you want to close this window?»,
- «Confirmation», MessageBoxButton.YesNo) == MessageBoxResult.Yes)
- {
- }
- else
- {
- }
The output looks as in Figure 4.
Figure 4
MessageBox with Title, Yes, No and Cancel Buttons
The following code snippet creates a MessageBox with a message, a title, and two Yes, No, and Cancel buttons.
- MessageBoxResult result = MessageBox.Show(«Do you want to close this window?»,
- «Confirmation», MessageBoxButton.YesNoCancel);
- if (result == MessageBoxResult.Yes)
- {
- }
- elseif (result == MessageBoxResult.No)
- {
- }
- else
- {
- }
The output looks as in Figure 5.
Figure 5
MessageBox with Title, Icon, Yes and No Buttons
A MessageBox also allows you to place an icon that represents the message and comes with some built-in icons. The MessageBoxImage enumeration represents an icon. Here is a list of MessageBoxImage enumeration values that represent the relative icons.
- None
- Hand
- Question
- Exclamation
- Asterisk
- Stop
- Error
- Warning
- Information
The following code snippet creates a MessageBox with a message, a title, and two Yes and No buttons and an icon.
- string message = «Are you sure?»;
- string caption = «Confirmation»;
- MessageBoxButton buttons = MessageBoxButton.YesNo;
- MessageBoxImage icon = MessageBoxImage.Question;
- if (MessageBox.Show(message, caption, buttons, icon) == MessageBoxResult.OK)
- {
- }
- else
- {
- }
The output looks as in Figure 6.
Figure 6
MessageBox with Title, OK, and Cancel Buttons
By simply using MessageBoxButton.YesNo in the Show method, a MessageBox with OK and Cancel buttons is created. The following code snippet creates a MessageBox with a message, a title, and two OK and Cancel buttons:
- if (MessageBox.Show(«Do you want to close this window?»,
- «Confirmation», MessageBoxButton.YesNo) == MessageBoxResult.Yes)
- {
- }
- else
- {
- }
The output looks as in Figure 7.
Figure 7
MessageBox with Title, Icon, OK, and Cancel Buttons
The following code snippet creates a MessageBox with a message, a title, icon, and two OK and Cancel buttons:
- MessageBoxResult result = MessageBox.Show(this, «If you close this window, all data will be lost.»,
- «Confirmation», MessageBoxButton.OKCancel, MessageBoxImage.Warning);
- if (result == MessageBoxResult.OK)
- {
- }
- else
- {
- }
The output looks as in Figure 8.
Figure 8
Mixing it up
These are not the only options. You can mix any of these options to show whatever kind of MessageBox you want to display.
Customizing MessageBox
Even though it looks like WPF MessageBox is a part of System.Windows namespace, it is just a wrapper of the Win32 API and this is why you can’t use it at design-time in XAML or customize it. To customize a MessageBox, you will be better off creating your own Custom Control. See my articles on how to build Custom Controls in WPF by searching this website for custom controls in WPF.
Summary
In this tutorial, we saw various avatars (reincarnations) of MessageBox in WPF.