Are you experiencing the issue “Oops!, something went wrong” on ChatGPT? If so, then this is the right guide to help you fix the issue.
To fix the ChatGPT error “Oops!, something went wrong”, you should check whether ChatGPT servers are working fine, clear your browser cache, try using a different browser/device or try contacting the OpenAI helpdesk.
Why does “Oops!, something went wrong” error occur on ChatGPT?
The problem could lie with your device, your network, or with ChatGPT itself. Here are some specific things that could be happening:
- OpenAI is having a wider problem that affects more than just your device.
- Open AI might have detected an authentication error in your account.
- Your browser’s cache is corrupted in some way.
- You’re not properly connected to the internet.
There are a number of proven tech tips that can help you fix this issue.
It’s best to work through them in the order listed below as these solutions are organized from simplest and quickest to more complex and lengthy.
Fix 1: Check OpenAI Servers
Before making any changes to your device, the first thing that you should always do is verify whether the problem is with OpenAI or at your end.
You can also check third-party sites which track the up-down status of other websites. They will track OpenAI as well.
You can use these websites to check whether Open AI is down right now or not. Here are a few:
Down For Everyone or Just Me
Is it Down Right Now?
Fix 2: Check the internet connection
Check whether you have a proper internet connection.
You need to make sure of its connectivity, network availability, proper connection with the system, etc. Also, ensure that you are properly signed in to your network.
Fix 3: Restart your device
Try restarting your mobile phone or laptop. Most phone-related problems can be fixed by restarting your device.
Follow the below steps to restart your mobile phone.
- Hold down the power button until the shutdown menu appears.
- Choose the “Power off” icon.
- Once the device completely shuts off, start it back up by holding the power button.
Check whether the ChatGPT issue is fixed now.
Fix 4: Try another device/browser to use ChatGPT
You can try chatting with ChatGPT on another device.
If someone is already using the ChatGPT on that device, you should log it off before using it.
If the error persists, try using a different web browser to chat with ChatGPT.
Fix 5: Clear the cache
When you are using ChatGPT on a browser or phone, cache will accumulate over a period of time. Refresh your browser’s cache and cookies.
Sometimes, the cache data already stored in your browser can interfere with navigation and streaming. The info may be corrupted, out of date, or there may just be too much of it.
Clearing the cache can improve ChatGPT’s performance and fix the issue.
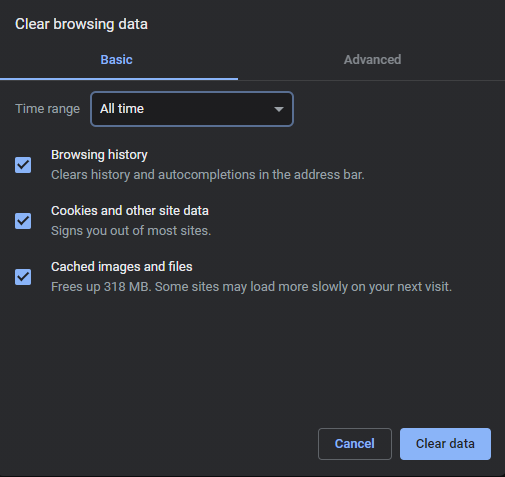
If you are using Google Chrome, then follow the below steps to clear browser cookies and cache in Google chrome through desktop or laptop.
- Open the Google Chrome browser.
- Click the 3 vertical dots on the top right of the page.
- Click on “More tools”.
- Click on “Clear browsing data”.
- Now Clear browsing data page is open.
- Adjust the “Time Range” .
- Choose Cookies and other site data and Cached images and files.
- Click on Clear data.
Fix 6: Use the right Authentication
Ensure that you are using the correct authentication method.
For example, if you signed up using ‘Continue with Google’, you will need to log in using that method too.
ChatGPT currently don’t support switching authentication methods.
Fix 7: Contact Open AI Customer Support
If all else fails, it may be time to report the issue to Open AI.
It could be an issue with your account, and Open AI customer support should be able to help you determine if that’s the case.
Fix 8: Wait it out
If none of the above steps works out, then it is advisable to wait for a few days before repeating the steps mentioned above.
Wrapping Up
Summing up, if your keeps showing “Oops!, something went wrong”, then
- Start with the basic things like restarting the device
- Clear cache
- Use the right authentication
- Try different browser/device
- If nothing works out, contact Open AI Customer Support.
This sums up our guide on what to do if you keep getting “Oops!, something went wrong” on ChatGPT.
Similar Posts
10 OpenAI Statistics You Need to Know
How to Create Your AI Avatars For Free ? (No Coding Needed) (~ 1 hr)
201 Best LinkedIn Ad Examples from LinkedIn Ads Library
Jasper Reed is the founder of heyhowtodoit.com with 8+ years of experience in Search Engine Optimization.He has researched, tested, and written hundreds of articles ranging from social media platforms to messaging apps.
With a passion for technology and a natural aptitude for understanding consumer behavior, Jasper has built a successful career in blogging.He has been quoted and referenced by major publications and media companies.
An avid traveler and tech enthusiast, Jasper loves to explore new places and experience different cultures. With his thick-rimmed glasses and geeky demeanor, Jasper is a true tech nerd at heart.
Follow Jasper on Twitter and Reddit.
You can read more about the team here.
Many Android or iPhone users get notifications of the error “something went wrong please try again later”, when they try to open any application such as Facebook, Phone Pay, Instagram, play store, or YouTube. For instance, while watching a movie on YouTube, this sort of error tests the user’s patience.
In this article, we have discussed some ways to fix this problem.
- Method 1: Check Device’s Internet Connection
- Method 2: Check App’s Internet Connection Restrictions
- Method 3: Log out and Log in to the App
- Method 4: Clear Apps’ Cache Data
- Method 5: Clear Device’s Storage Space
- Method 6: Repair the Device System by Tenorshare ReiBoot
Method 1: Check Device’s Internet Connection
The notification “something went wrong please try again Instagram” may sound familiar to frequent Instagram users. It can be solved by the basic step of checking your internet connection. This problem can be caused by a poor network connection. Mobile data or Wi-Fi may be turned off or unstable.
The simplest way to fix this error is to make sure that your phone has a good internet connection.
-
You can toggle mobile data and Wi-Fi to solve the problem.
- You can also check if the internet is causing this problem by checking the internet speed using internet speed test sites. This will give you an idea about the cause of this problem.
Method 2: Check App’s Internet Connection Restrictions
Something went wrong please try again later instagram notification troubles users a lot. You can fix this problem by enabling your applications to use cellular data or WLAN.
It sometimes happens that apps are working normally on a Wi-Fi network but as the users try to switch to mobile data, the error starts showing up. The main reason for this issue is restricted data usage on a specific App. The steps to stop the restricted data usage are following:
On your iPhone:
- Go to Settings and choose WLAN.
-
Then choose “Apps Using WLAN & Cellular”. Find the App that appears error and tick “WLAN & Cellular Data.
On your Android phone:
- Go to Settings and Tap on Apps.
- Choose Manage Apps and find the app.
-
Open data usage and then toggle on all the options.
Method 3: Log out and Log in to the App
You might have come across “Roblox something went wrong” error while playing Roblox. If so, you do not need to worry as you may fix this problem by logging out of the app and logging in again. You can try to log out from any application that is presenting the same error and then log in.
However, if the error appears on WhatsApp or LINE, which does not support users logging out, then you can offload the app and reinstall it.
Method 4: Clear Apps’ Cache Data
The reason behind “something went wrong please try again Google assistant» notification might be the low storage space on phone. In this situation, you should try removing the cache data of the application that is causing the problem.
Removing cache data from android:
- Open Settings and tap on Storage.
- Then choose Manage storage and find the app.
-
Select Clear cache.
Removing cache data from iPhone:
For removing cache data from Apps on iPhone, they should be offloaded first. By doing so, storage space will free up. The data will be restored when you reinstall the app.
- Go to your iPhone’s settings. Click on general and tap on the iPhone storage.
-
Now select the app to be offloaded and click on “Offload App”.
- Then you need to reinstall the app from your App Store.
Method 5: Clear Device’s Storage Space
Some android and iPhone users complain about the “something went wrong please try again” message that appears when they open an application. An effective solution to this problem is clearing the device’s storage space.
Clearing Android’s storage space:
There is a built-in tool to clear storage space on android. To find it:
- Go to the phone’s Settings and tap on storage. The amount of space and file category list will show up.
- Click on the “free up space” option.
- Google file App will open on the screen. There will be a “clean” feature that suggests how you should free up space by removing unwanted files, large videos, unused applications, and backed-up media.
Clearing iPhone’s storage space:
- Check the total storage by opening the “Settings” and tapping on “General”. Then go to the “Storage”.
-
Find the Apps that have taken large space. You can see this by scrolling down the options under Storage. The Apps will be arranged in order of the space they occupy.
- Delete the apps, photos or files that you don’t intend to use anymore. To delete an App, hold the App. The apps will begin to wiggle with a minus sign present on all icons. Tap the minus sign on the App icon to confirm its deletion.
- For temporarily disabling an app, you can try offloading them. This includes finding the app in the storage and then tapping it and selecting offload. It does not erase the file data permanently.
Method 6: Repair the Device System by Tenorshare ReiBoot
The problem of something went wrong please try again YouTube notification and Facebook something went wrong please try again notification may also be caused by the system glitch. You need a professional tool to repair the system issues.
Tenorshare ReiBoot is the best option to repair the iPhone system problems. It is a professional system recovery tool, which has several features to solve problems such as a system stuck on a black screen or Apple logo, recovery mode loop, iPhone errors. It also allows putting the iPhone in recovery mode or exiting from recovery mode by one click only.
Follow the steps below:

-
Download ReiBoot and install it on the computer. Then connect your iPhone to the computer. After the computer recognizes your device, tap on the start button to start the iOS System Recovery.
-
From the interface shown on the screen click on ‘Standard Repair’. You should read the instruction or notes given on the screen to avoid the failure of this process.
-
Click on download to start downloading the firmware package. This process will take some time as the firmware package is about five GB.
-
When you have downloaded the firmware package, select the standard repair option to start repairing the system. The whole process will take some time. After completion of this process, your iPhone will reboot automatically. Standard repair does not erase your data.
You can also use ReiBoot for Android if you are using an Android phone.


Conclusion
Something went wrong try again error sometimes occurs when an Android or an iPhone user opens an application such as Facebook, Instagram, play store, or YouTube. Some ways to fix this problem are discussed in this article.
If you have encountered phone system issues, you can use ReiBoot or ReiBoot for Android.

Despite the existence of alternative app marketplaces, Google Play Store is the biggest source for downloading apps on Android. With its vast scale, the Play Store offers access to a variety of useful Android apps in one place. However, no software is entirely flawless, and there might be times when Google Play Store won’t function as you would expect. If you are facing issues with Google Play Store and are getting the ‘Something went wrong, please try again’ error, here are some useful tips and tricks to fix the problem.
Before we look at the workaround to fix this problem, let’s discuss why does this Google Play Store error occur in the first place. And well, the reasons are pretty obvious and should already be known to most Android users.
- The most common reason as to why you face this error could be because of your Google account. You are either signed in with multiple accounts, and one of those is causing the error. Or, you recently changed the password to your Google account and need to relogin with the new credentials.
- The Play Store error is also caused due to data storage and cache issues on your Android device. We have detailed the steps to clear the Play Store cache in the article below.
- Other common reasons for the ‘Something Went Wrong, Please Try Again’ error in the Google Play Store are poor internet connectivity, date and time mismatch, and more.
Fix ‘Something Went Wrong, Please Try Again’ Error in Google Play Store (2021)
Although Google has added a mini easter egg game on the Play Store to keep you entertained during downtimes, there’s no hiding the fact that Play Store errors are often a frustrating experience. If you have trouble accessing the Play Store to download the best Android games, check out some measures outlined below to get the Google Play Store functional again.
Table of Contents
Check Internet Connection
The easiest way to fix the Google Play Store error is to ensure your internet connection is working as intended. There are times when the Play Store is unable to establish a connection with Google servers. So, as a simple fix, you could try toggling Wi-Fi and mobile data and see if that fixes the issue.
While you are at it, you could also run a quick internet speed test using one of the best internet speed test sites to check your internet speed. This way, you can ensure that a slow internet connection is not the culprit.
Force Quit and Relaunch Play Store App
If you have good internet connectivity, the next best hack to fix the ‘Something went wrong’ or ‘Try again’ error in the Google Play Store is to force quit and restart the app.
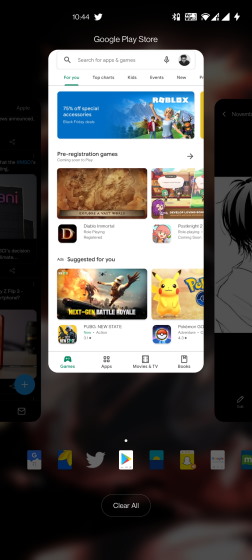
If you are using fullscreen gestures on your Android phone, swipe up from the bottom and hold in the middle of the screen. Then, swipe up (or right/ left in some custom skins) on the Play Store app card to force quit the app. Now, go back to the App drawer and relaunch the Play Store to check if you have fixed the error.
Check There’s no Date and Time Mismatch
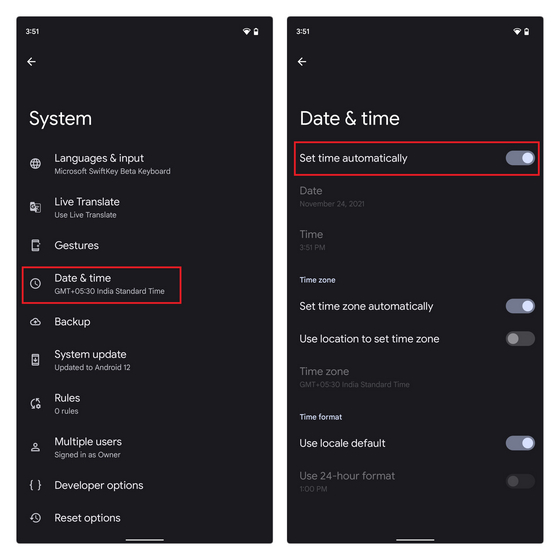
One possible cause of the ‘Something went wrong, please try again’ error in Google Play Store is incorrect date and time. If your phone’s default timezone doesn’t match your region or the time is running behind or ahead of the actual time, it could cause issues with the Play Store. Here’s how you can fix the problem by setting the right date and time on your Android phone:
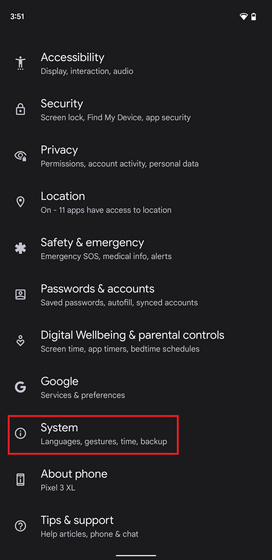
1. Open the Settings app and scroll down until you find the “System” section. Tap on it to access system settings.
2. Under System, choose “Date & time” and make sure “Set time automatically” and “Set time zone automatically” toggles are enabled. If they are not, switch on the two toggles to automatically set your phone’s time and date.
Toggle Airplane Mode On/ Off
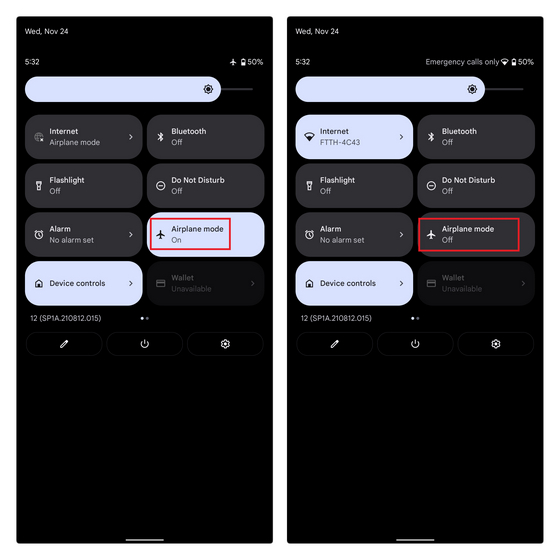
You could try toggling airplane mode to reset the network connection and make Google Play functional again. To do so, swipe down from the home screen to access the Quick Settings menu and tap the “Airplane mode” toggle. An alternate way to access Airplane mode is from Settings -> Network & internet -> Airplane mode.
Clear Google Play Store Cache
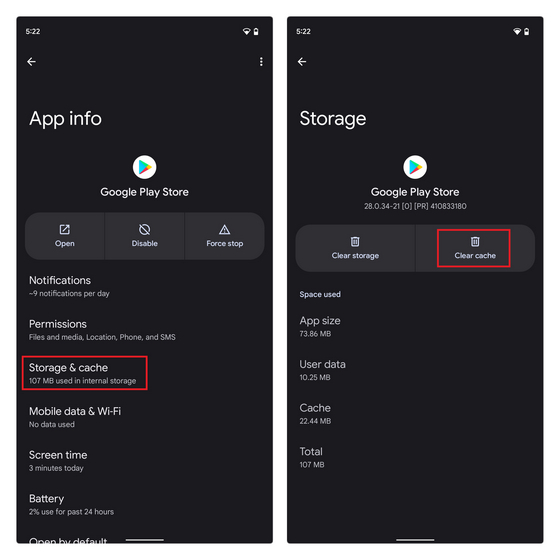
Now, if you still haven’t gotten better of the situation and the ‘Something went wrong, try again’ error is not letting you download your favorite Android apps from the Google Play Store, the next best course of action is to look at data storage issues. We will clear the data cache for the Play Store app to try and fix the error.
To do that, open the app info page of Google Play Store from Settings -> Apps -> See all apps -> Google Play Store, and tap “Storage & cache”. Under Storage settings, tap “Clear cache” to delete the cache of the Google Play Store. Before opening the app again, we suggest tapping the “Force stop” button to force quit and restart the app.
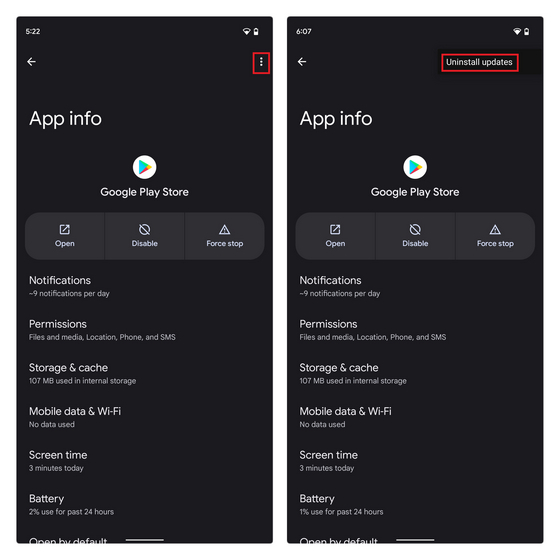
Uninstall Google Play Store Updates to Fix ‘Something Went Wrong’ Error
If clearing the cache didn’t do the trick, you could try uninstalling Google Play Store updates. On the Google Play Store App info page in the settings app, tap the vertical three dots menu at the top-right corner. Then, choose “Uninstall updates” to restore the factory version of the Play Store. If a new Google Play Store update is what caused the issue, this should fix it.
Clear Google Play Services Cache
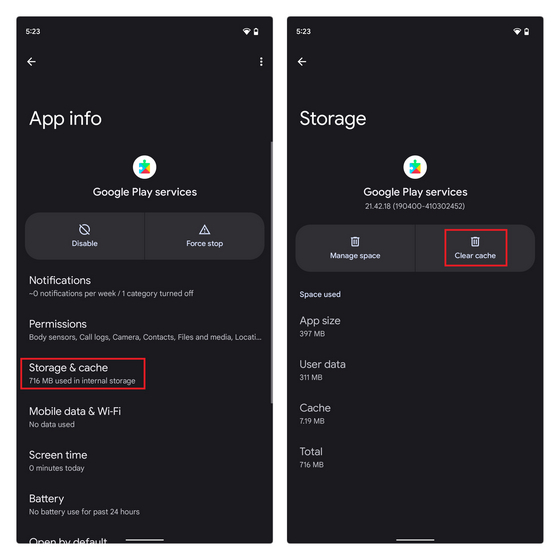
Google Play Services could also prove to be the troublemaker at times. Hence, you could try clearing the Google Play Services cache to solve your Play Store problems.
To clear the cache of Google Play services, go to Settings -> Apps -> See all apps -> Google Play services, tap “Storage & cache”, and press the “Clear cache” button.
Remove Google Account and Sign in Again
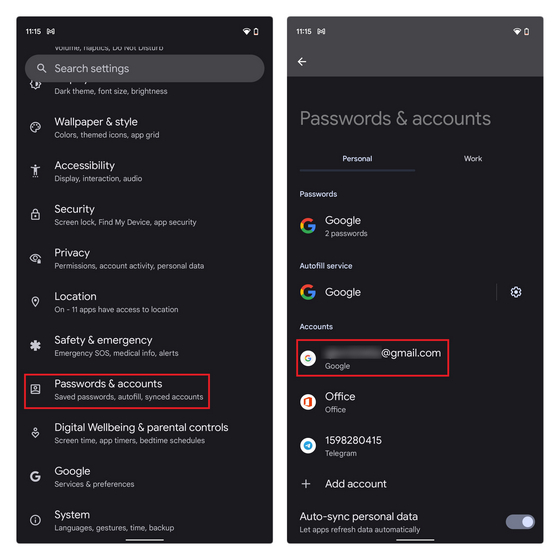
If none of the above measures worked for you, try signing out of your Google account and signing back in again. This method also works if you have recently changed your Google account password. Follow the steps below to learn how it works:
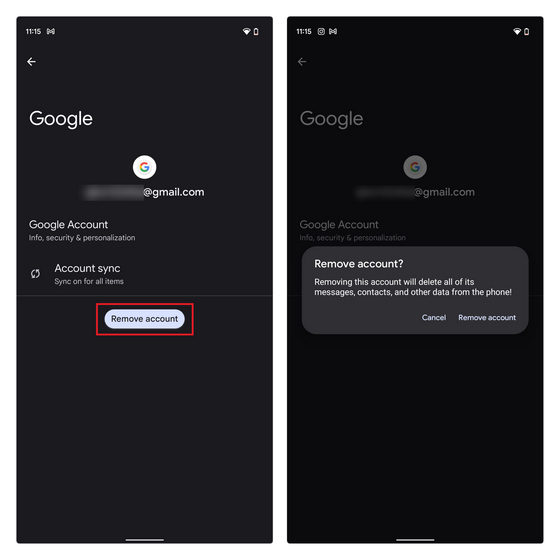
1. To do that, open the Settings app and tap on “Passwords & accounts“. From the next screen, tap your Google account email address.
2. Under your Google account settings page, press “Remove account” to sign out of your account and tap “Remove account” again in the confirmation prompt. Once you have signed out, you can log back into your account from the same page. Simply select the “Add account” option and login into your Google account.
Fix Google Play Store Errors in Easy Steps
So those are some effective measures to fix Google Play Store errors on your Android phone. In case you are getting the incompatible region error in Play Store, follow our guide on installing Android apps not available in your country. For more such tips, do not forget to check out our list of the best Google Play tips and tricks. If you still have any queries, do comment them down below, and we will help you out.
Are you stuck with the Instagram “Something Went Wrong” or “Try Again Later” error messages?
Are you trying to show off your OOTD or life updates on the gram 📸, but some error message boxes keep coming in your way?
Unfortunately, there are some issues you may encounter while using Instagram and they could halt you from interacting with others and posting your content.
One of the major issues users have reported is a couple of error messages that wouldn’t settle even after refreshing their Instagram app. Plus, these errors may not always be due to their Internet connection.
That being said, there are a couple of major error issues that have reportedly prevented many users from accessing Instagram’s full features:
Types of Instagram Error Problems
“Something Went Wrong” is a common error message reported by Instagram users.
This issue usually occurs when users log in, make changes to their profile or publish new posts.
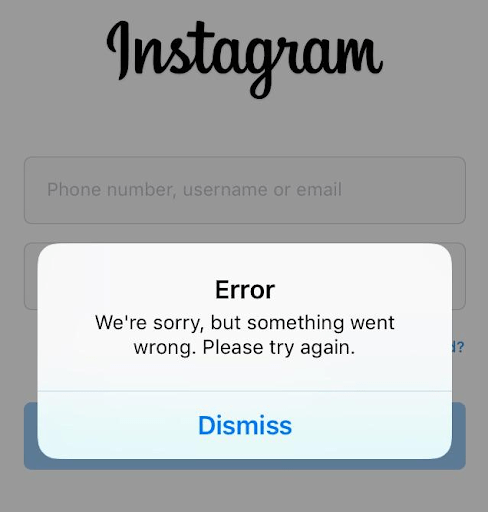
a) “We’re sorry, but something went wrong. Please try again” error when logging in to Instagram. For more fixes to resolve the login problems on Instagram, check out our other guide here.
b) “Something went wrong. Please try again” error when publishing posts or stories on Instagram. Feel free to check out our other guide to solving Instagram story upload problems here.
c) “We’re sorry, but something went wrong. Please try again.” error when viewing Instagram Reels. For a more comprehensive guide in fixing Instagram Reels problems, check out our other guide here.
d) “We’re sorry, but something went wrong. Please try again.” error when refreshing feed and loading posts.
e) “We’re sorry, but something went wrong. Please try again.” error when viewing the Explore page or using the search function.
f) “We’re sorry, but something went wrong. Please try again.” error when viewing the Shop page on Instagram.
Unfortunately, this error is often caused by the Instagram app’s technical problems while occasionally caused by Instagram server issues.
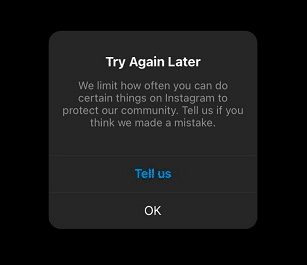
Other than that, the “Try Again Later” error message is often associated with the activities and interactions you’ve made on your Instagram account.
So, if Instagram finds that you’ve either violated their set of guidelines or associated your account with suspicious activities, this error would be something you should expect to see.
That being said, did you spot a similar error when using Instagram? Feel free to share your experience in the comments!
On any platform on the Internet, bots 🤖 and users who use harmful tools to their advantage are like uninvited guests that just won’t stop. With over 1 billion active users, Instagram is not an exception to this issue.
As a way to conquer this problem, Instagram has implemented multiple types of blocks to eliminate these kinds of users. But, this system may mistakenly take effects on you even though you’re not a bot or some fake account asking for credit card credentials.
To eliminate these threats, Instagram has been implementing updates that introduce more types of blocks. The “Try Again Later” error message shows that they’ve possibly taken actions against your account. With that said, these error messages haven’t been thoroughly explained as users can still get them even if they haven’t done anything wrong.
Nonetheless, we’ve gathered the 12 best fixes that can help you combat these errors and get back to posting as soon as possible. 😎
Don’t keep your followers waiting, let’s get to fixing!
Note: This guide provides pictures and steps taken from the Instagram app or website on Windows, macOS, Android, iPhone and iPad.
Table of Content
12 Fixes for the Instagram “Something Went Wrong” or “Try Again Later” Errors
- Check the Instagram Server Status
- Restart the Instagram App or Refresh Your Web Browser
- Check Your Internet Connection
- Try Logging in Via Facebook
- Reset Your Instagram Account Password
- Remove the Link on Your Profile Bio
- Delete the Draft of Your Post and Recreate
- Clear the Instagram App Cache and Data
- Reinstall the Instagram App
- Try Using Instagram on Another Device or Web Browser
- Temporarily Deactivate Your Instagram Account
- Report the Error to Instagram Support
1. Check the Instagram Server Status
The most crucial factor to check when error messages such as “Something Went Wrong” or “Try Again Later” keep popping up on Instagram is the social media platform’s server status.
A major social media platform like Instagram has its own occasional downtime which causes the app’s features to stop working and get the said error messages. Therefore, checking the Instagram server status is important to determine whether the issue needs fixing on your end or the opposite.
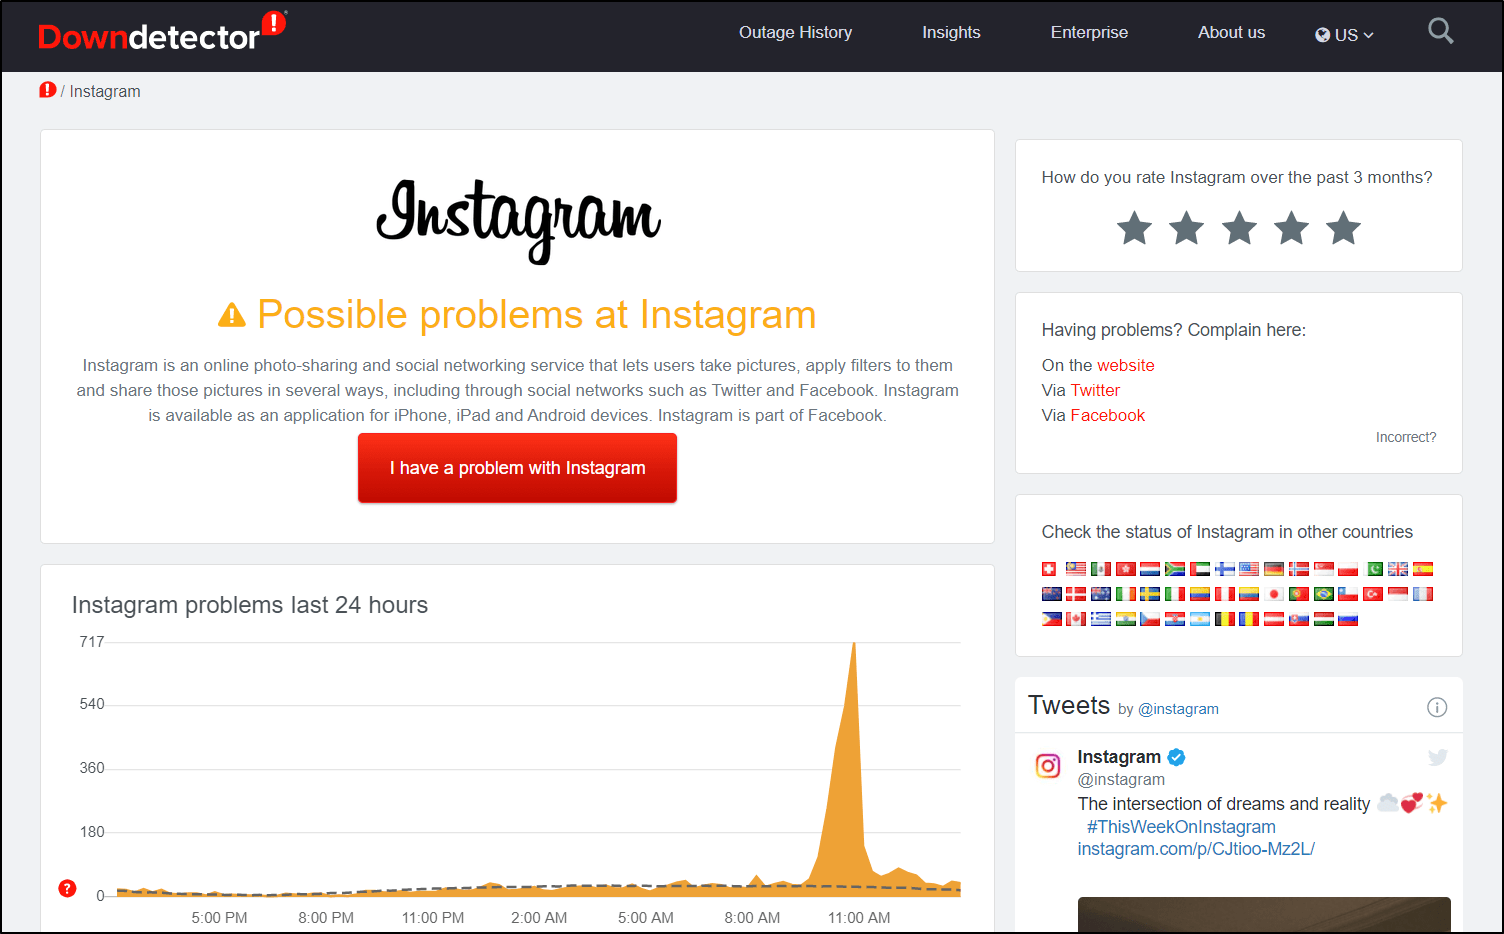
To do so, we recommend that you visit DownDetector’s page for Instagram to monitor its current server status.
Not only will you get to check if the Instagram server is experiencing downtime, but you can also use the comments section and live map tools on DownDetector to check on issues faced by other users as well as the regions affected.
Let’s say there’s a server outage reported for Instagram, the only solution is to wait it out while the Instagram developers team 👩💻 work to bring the server back up.
You may proceed with the next fixes if it’s not a server issue.
2. Restart the Instagram App or Refresh Your Web Browser
Moving on, it’s crucial that you refresh the Instagram app or its web page so the fixes you’ve done will be properly applied. Plus, it ensures to refresh your session with the Instagram platform, so you can resolve any temporary issues or internal errors that were present in the previous session. Hence these errors could be a result of an issue with your previous session with the Instagram platform.
Restart the Instagram App
At first, you might’ve tried this as it’s a simple step to do when you encounter an app bug or glitch, but there’s a more effective way to force stop the Instagram app.
The following is a simple two-step procedure for restarting the Instagram app on your mobile device:
- First, completely close the Instagram app. Remove it from your Recent Apps or App Switcher to accomplish this.
- If you’re using Android devices, you can Force Stop the Instagram app through your Settings app.
- Then, from your homepage, reopen the Instagram app.
Refresh Your Web Browser
Similarly, we suggest that you hard refresh your web browser when you’re using Instagram on a desktop device to properly apply the previous fixes. Additionally, refreshing your web browser also helps to clear minor cache and overloaded data on the Instagram page.
To perform a hard refresh on Windows, press the Ctrl + F5 keys simultaneously at the Instagram page. Most online browsers, including Google Chrome, Mozilla Firefox, Opera, and Microsoft Edge, recognise this key combination or hotkey.
For Safari and other web browsers on macOS, hold down the Command + Option + R keys at the same time.
3. Check Your Internet Connection
Apart from making sure the Instagram server is not having any issues on their end, it’s important to check your Internet connection.
An unstable Internet connection can halt app operations as the Instagram app needs to connect to its server and download the necessary data.
Subsequently, this will lead to the Instagram app not connecting and showing Instagram “Something Went Wrong” and “Try Again Later” errors.
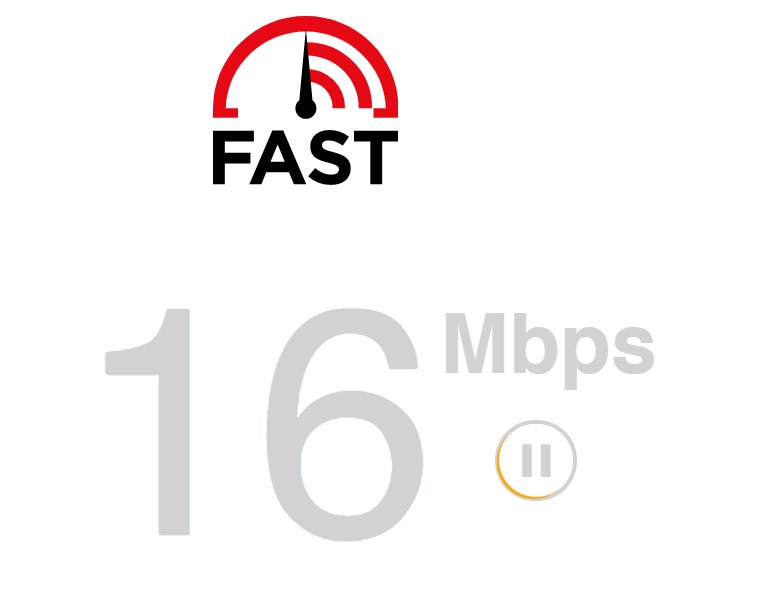
Therefore, we suggest testing your Internet connection to determine its speed and latency, which you can do so via Fast.com.
Presumably, there’s an apparent fluctuation in your Internet connection with poor speeds or latency. What can you do to quickly fix this?
Well, here are 3 methods you can do to reset your Internet if you’re using Instagram on its mobile app:
- Turn on Airplane Mode ✈ and then disable it
- Switch between a mobile data and Wi-Fi connection
- Forget and reconnect to your Wi-Fi connection
Generally, if an unstable or weak mobile internet connection is causing this issue, these solutions should fix it. If the problem persists, you can go on to the next fixes in this post.
4. Try Logging in Via Facebook
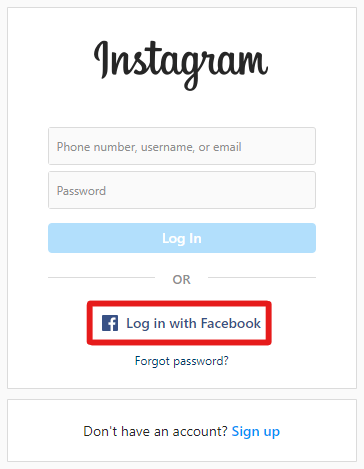
As we’ve said before, these error messages on Instagram are rather vague and leave you wondering what exactly is wrong. Well, if you get an error message while trying to log in to your Instagram account that says “Something Went Wrong”, you might want to try another log in alternative.
Apart from logging in using your Instagram credentials, you can also try to log in to your Instagram account via Facebook.
If you have linked your Instagram account to Facebook before, this should fix the error and let you sign in immediately. However, if this isn’t the case, you can try Step 4 if you still can’t get past the login page.
5. Reset Your Instagram Account Password
It’s understandably frustrating when you simply can’t log in to your Instagram account. 😓
Perhaps you believe you’ve typed in the right username and password and the error is purely on Instagram’s end, but it could be an error within your account.
Thus, we suggest that you reset your Instagram account password, as many users have reported this method to resolve the said issue successfully.
For this, you can follow these steps to request a password reset:
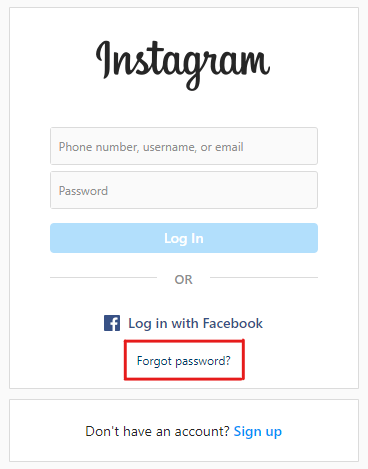
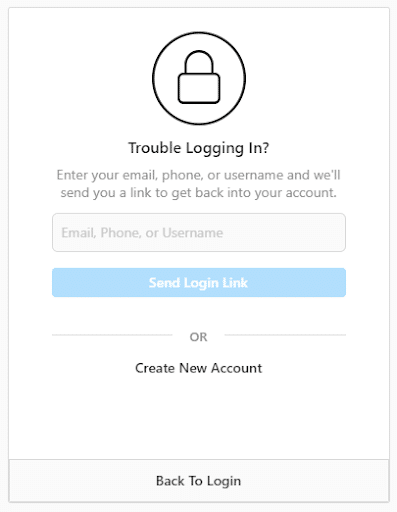
- Firstly, click on the Forgot Password button at the bottom of the login page.
- Then, enter the username, email or phone number that you used to register your Instagram account.
- Afterwards, check your email inbox and you should see an email from Instagram with a verification link that’ll lead to a password reset page.
Now, you can try logging in to your Instagram account and see if you still get the same error. In case you do, we still have other fixes for you to try.
6. Remove the Link on Your Profile Bio
Instagram has a clear set of guidelines to protect users from dangerous, discriminative and inappropriate content.
From there, those who violate the guidelines risk losing access to their account either temporarily or permanently. This rule applies to every feature on Instagram, including your profile bio and website link.
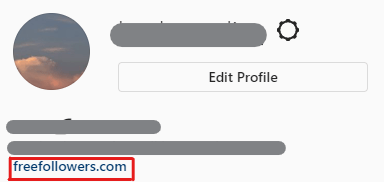
As Instagram is expected to hit 2 billion active users by 2023, the system is littered with spammers, bot accounts 🤖 and those who try to go the extra length for attention. Furthermore, Instagram prohibits certain third-party websites, especially those that help you gain followers or boost your posts with bot accounts.
Hence, you might get Instagram “Something Went Wrong” and “Try Again Later” error messages when your account is found unsafe and possibly taking advantage of said websites.
Therefore, we recommend that you determine whether the link you’ve attached to your profile bio is safe and trusted.
If you believe so, it’s still worth trying to remove the link on your profile as the website may have been reported to Instagram as violating its guidelines.
7. Delete the Draft of Your Post and Recreate
As stated previously, the “something went wrong” error often comes up when users try to make a new post. While there’s no clear explanation as to why this happens, it’s best not to waste your time trying to repeatedly click the “Post” button if you keep getting the same error.
We understand the amount of time and effort put in crafting the perfect Instagram post, but sometimes it’s better to delete the draft and recreate it than waiting for Instagram to tell you what’s wrong.
Don’t worry, keep the immaculate captions on your Notes app to use after you’ve done recreating the post! 😉
8. Clear the Instagram App Cache and Data
Error popups that indicate “something went wrong” or “try again later” might well be caused by the Instagram app’s bugs or glitches 👾. So, the major factor that could malfunction an app is outdated or misconfigured cache data.
Essentially, cache data aids Instagram’s algorithm to identify your preferences as well as to improve the app for lower loading and processing time.
However, as the cache data piles up over time, they’re prone to become corrupted, leading to app bugs that prevent the app from working properly. 🤕
Therefore, we suggest that you clear the Instagram app cache and data and, which you can do so through the following steps for Android devices:
- First, launch the Settings app.
- Then, tap on Apps & Notifications.
- Afterwards, select Instagram from the app list.
- On the Instagram App info page, tap on Storage & Cache.
- Finally, select Clear Cache followed by Clear Storage.
9. Reinstall the Instagram App
In continuation to the previous fix, reinstalling the Instagram app is considered to be more effective as it’ll wipe out the app of its entirety from your device. This includes leftover cache and junk data files.
Also, the option to clear app cache is not available for every device, namely iOS devices that only allow you to uninstall the app you intend to clear its data of.
Hence, we suggest that you try reinstalling the Instagram app if the error messages keep bothering you. You can do so by uninstalling the app and installing it once again as you can see below:
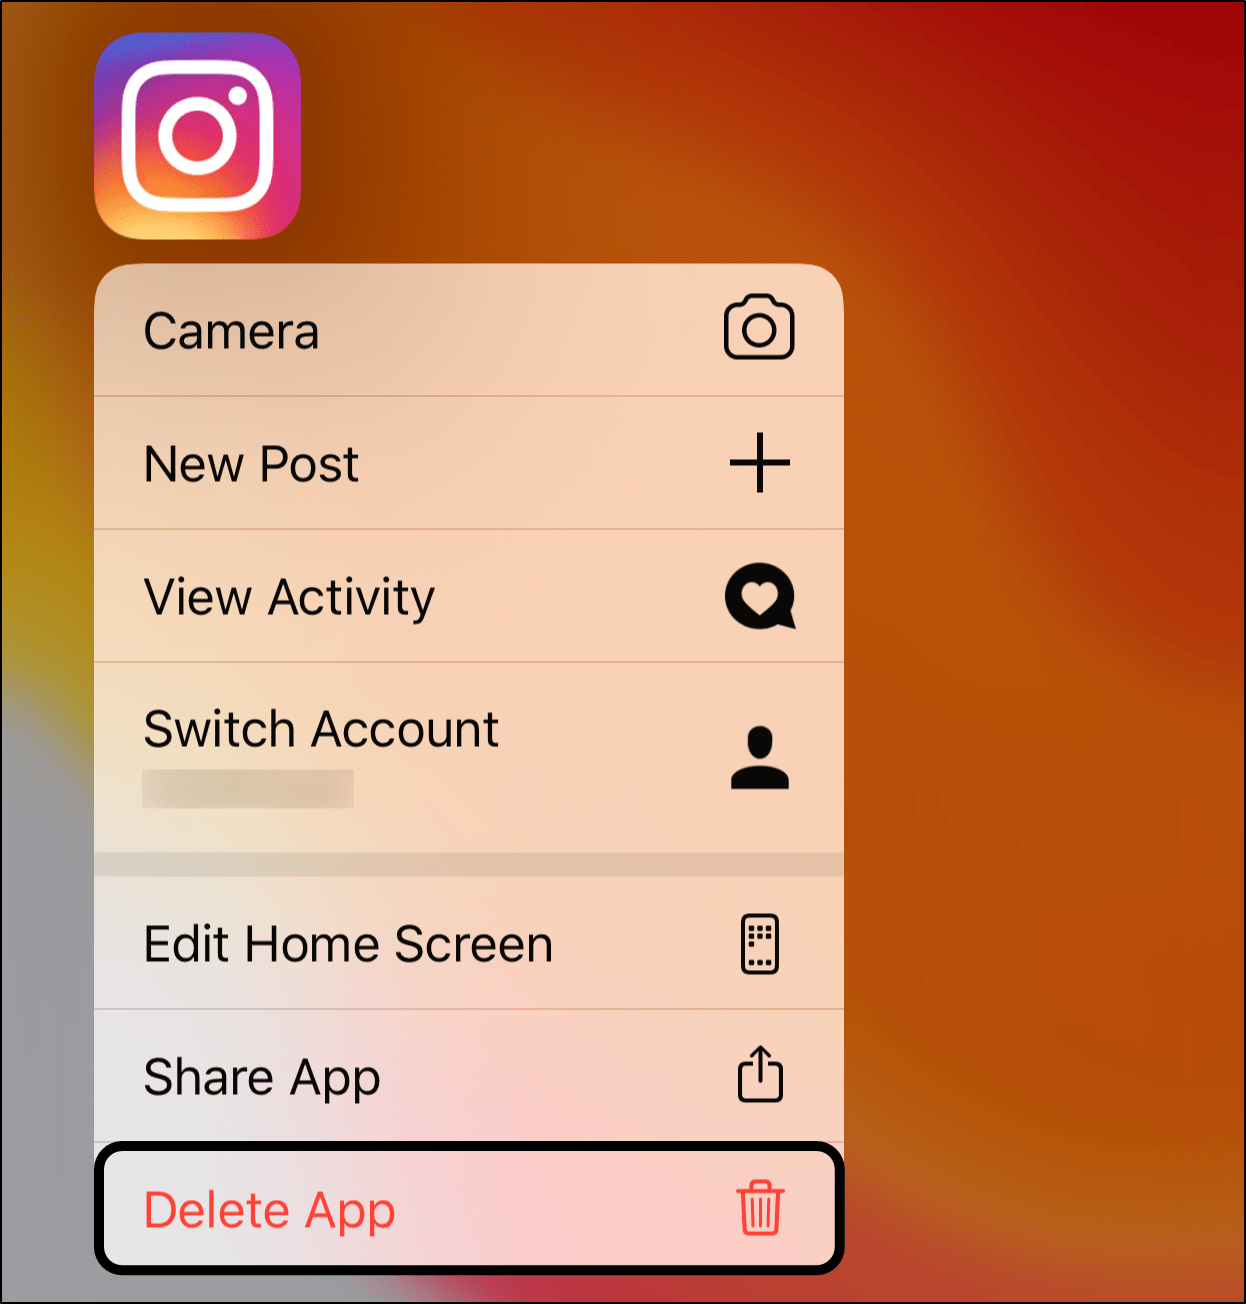
- To begin, long-press on the Instagram app for the selection menu or go to Settings.
- Then, choose Uninstall or Remove app.
- After that, you can either restart your device or directly go to your device’s App Store to install the Instagram app.
Additionally, reinstalling the Instagram app will help to retrieve the latest updates that you haven’t acquired before.
This is the final step that you can do if you think the issue is related to your Instagram app. If you still encounter the same error after trying all the fixes, we suggest that you try to use other ways to go on Instagram without using the app (Step 9).
10. Try Using Instagram on Another Device or Web Browser
Another way to get around the issue of error messages popping up on Instagram is to hop on another device or use its web platform.
The web version of Instagram has no apparent difference from its mobile app and you can access the same features on both platforms. However, the web version is usually free of errors that you might find on the app as updates are directly integrated without having to manually install any. Moreover, the web version of Instagram wouldn’t be directly involved with corrupted data or outdated software.
This further makes it a good alternative when you need that daily dose of Instagram but are bombarded with error messages.
Hence, we recommend that you visit Instagram on its web platform by searching for instagram.com on a native browser app (Google Chrome, Safari).
Besides that, you can also switch to a desktop device 💻 to visit the same link via a web browser of your choice. Most web browsers such as Google Chrome, Firefox and Edge are support access to Instagram’s web platform.
Previously, there were some limits to the functions of Instagram on its web platform but good news, you can now make Instagram posts from your desktop as well! 🥳
11. Temporarily Deactivate Your Instagram Account
If you’ve tried all the fixes we compiled, this is yet another solution that’s left that could help you to resolve the issue. Although it’s rare, Instagram users have reported that temporarily deactivating their Instagram accounts has helped in fixing various issues on the social media platform.
We consider this as one of the final solutions, you can try to deactivate your account temporarily. It may sound like a huge deal but your account will remain the way it was.
Hence, we suggest that you do this by following these steps:
- First, go to the Instagram website on your web browser.
- Then, head to your profile page, by tapping your profile picture icon at the bottom-right.
- Here, select Edit Profile.
- At the bottom, select Temporarily disable my account.
- Next, answer the following questions and click the Temporarily Disable Account button.
- Finally, wait a few hours or a day, then try logging back into your Instagram account. Doing this will reactivate your account, and it’ll become visible again.
Your Instagram account is now out of reach from the public but every data remains. From here, you can choose to wait or straight ahead reactivate your Instagram account to check if you still get the same error messages.
Note: You can only temporarily disable or deactivate your Instagram account via a mobile or desktop web browser.
12. Report the Error to Instagram Support
Maybe you’ve tried every fix under the sun and you’ve given up 🏳 because you’re still stuck with the same errors, preventing you from posting your content, viewing others’ or even logging in to your account!
Well, Instagram is a leading platform and they care about you. So, don’t feel discouraged yet as you can always directly reach out to them through Instagram Support.
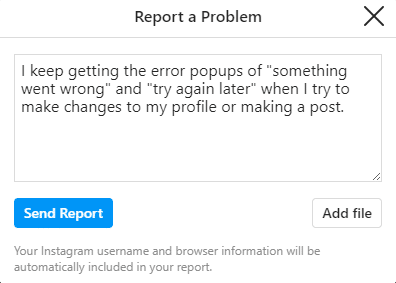
For this, you can proceed by submitting a report to Instagram Support regarding the errors bothering you. To do this:
- First, go to your Instagram profile and click on the Settings icon for more options.
- Then, select Report a Problem from the list of options.
- Finally, briefly describe the issue you’re facing and click Send Report. You may attach screenshots of the error messages you’ve been getting.
The final thing you can do is to wait for a response from the Instagram Support team. While their reply might not be prompt as they cater to numerous issues, we recommend that you occasionally try all the previous fixes again, just in case. 😉
Conclusion
Instagram is the leading social media platform for sharing updates among friends and as a business platform and creative outlet. You wouldn’t want to miss out on the updates from your favorite Instagram accounts as well as posting your own content.
For that reason, we understand why it could be such a mess when the Instagram “Something Went Wrong” and “Try Again Later” error messages just won’t disappear. 😞
That’s the reason why we’ve compiled 12 fixes for you to try when you’re faced with these errors as we don’t want anything to hold you back from enjoying the Instagram world!
If you encounter any other technical issue, visit Pletaura.com to find the perfect fix from our array of articles. Need more? Kindly leave a comment, and we will be happy to assist you. 👼
Lastly, let us know in the comments:
- Are you seeing the same Instagram “Something Went Wrong” and “Try Again Later” errors?
- Which device are you using for Instagram?
- Did any of the above fixes work for you?
- Is there another fix that you think we should add to the list?
Share this guide with your followers so they don’t struggle with the same errors! 😃
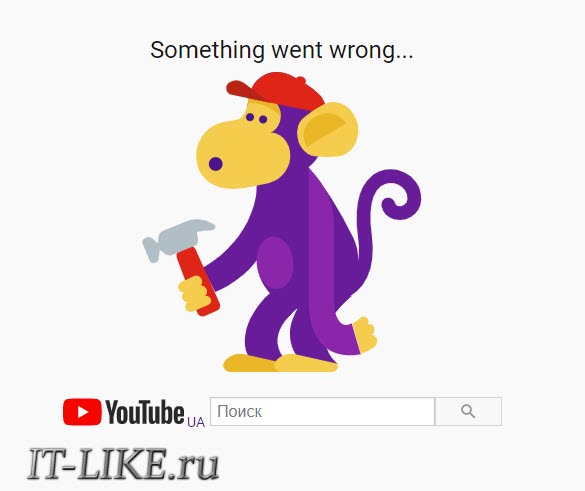
Иногда ломаются сервисы Google, в том числе не работает YouTube. На главной странице отображается ошибка , что в переводе означает , то же самое пишет при открытии любого видео. Уже открытые вкладки с видео продолжают работать в обычном режиме, за исключением загрузки комментариев. Ошибка наблюдается не только в России и Украине, но и в Европе и других странах.
Как зайти на Youtube
Ошибка связана с проблемой авторизации на сервисах Google. Это означает, что зайти на YouTube можно только в режиме в любом браузере.
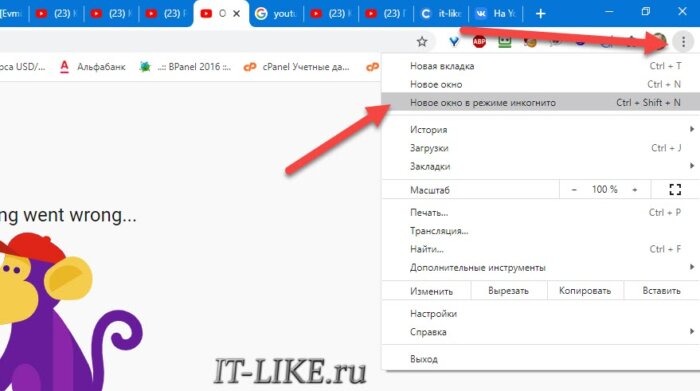
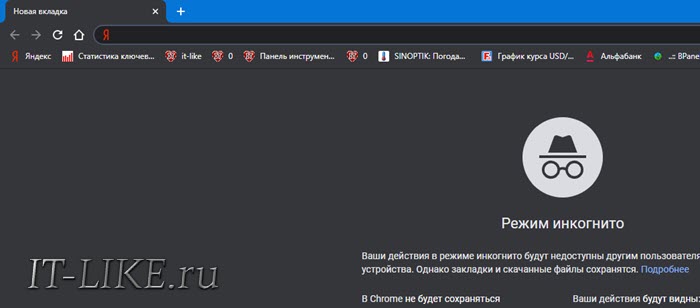
В Google Chrome нажимаем на значок :
Откроется новое окно браузера, в котором не сохраняются куки, пароли и история просмотров. Это значит, что здесь не работают ранее сохранённые входы на сайты, здесь вы гость, инкогнито. Ютуб открывается без проблем в окне инкогнито.
Кроме меню, в режим можно войти с помощью комбинации клавиш . Это работает не только в Хроме, но и Яндекс-Браузере, Opera и других обозревателях.
Do you see an error message saying “Oops, something went wrong” on YouTube?
If you are looking for a trending video or want to watch highlights from a recent sporting event, you’ll probably see it on YouTube. It is currently the largest streaming platform online where gamers, tech reviewers, news outlets, and content creators upload their videos.
Aside from watching videos, users can also create accounts where they can follow their favorite channels.
However, it can be a problem if you see random error messages when navigating through YouTube’s interface or accessing your account.
The error message “Oops, something went wrong” on YouTube indicates that your device is struggling to connect with YouTube’s servers. This is due to a faulty network connection or a problem on YouTube’s end.
Whatever the case is, we’re here to help you out!
Today, we’re going to show you a few tips for fixing “Oops, something went wrong” on YouTube.
Let’s get right into it!
1. Check YouTube’s Servers.
As we’ve mentioned above, faulty servers could be the reason why you see error messages on YouTube. To verify this, you can use tools like Downdetector that display the current status of websites and applications.
If YouTube’s servers are not working, the best thing that you can do for now is to wait. However, you can still try the methods below and see if anything works out for you.
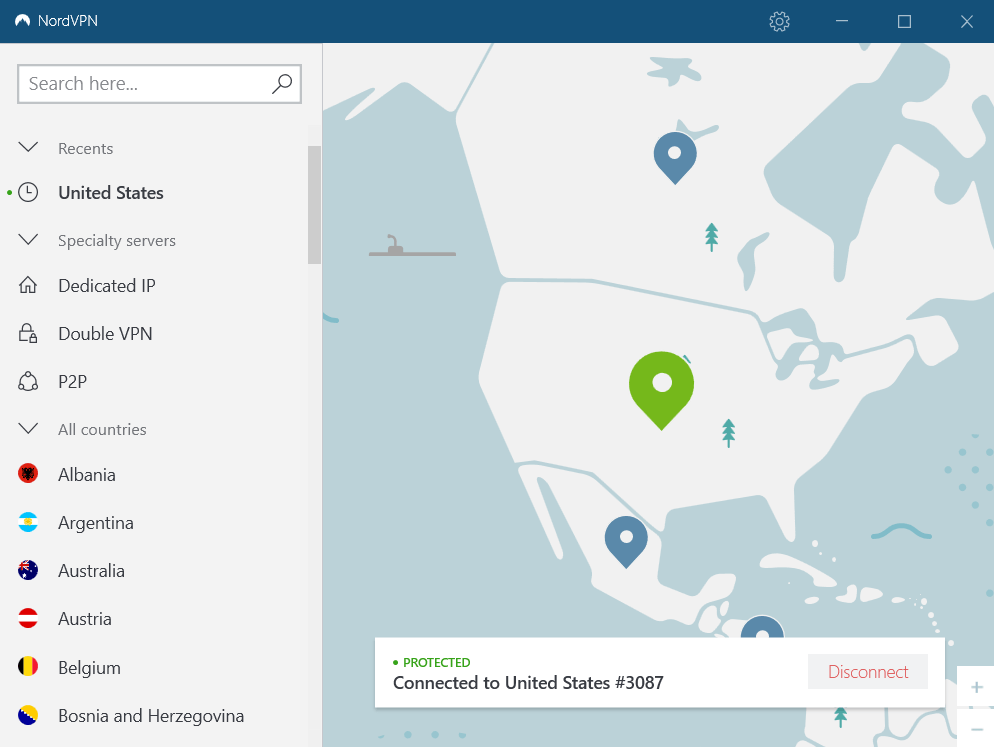
2. Turn Off VPN.
If your device struggles to communicate with YouTube’s servers, you might want to turn off your VPN. Although they work great for providing security, they can also interfere with your connection and cause issues on your device.
Since VPNs change your IP address randomly, your device may struggle to keep a stable connection with YouTube’s servers.
Disable your VPN first and try using YouTube again.
3. Change Your YouTube Region Manually.
In some cases, the dedicated server for your region may encounter issues. If this is the case, the problem would be isolated only in your place. To fix this, you can try using other servers by changing your region manually.
Do take note that this would only work on browsers and not on the app.
- First, open your browser and go to YouTube.
- After that, tap the URL box of your browser and highlight ‘www’.
- Finally, change it to ‘ca’ and hit Enter.
Now, try using YouTube as you would and see if you would still encounter any error message.
4. Use PureVPN.
If you’re not comfortable turning off your VPN, try switching to a better one.

PureVPN is a VPN service provider with 6500+ servers across the globe for optimized unparalleled performance. It has many helpful features like split-tunneling, port forwarding, 256bit AES Encryption, and more!
With PureVPN, you are sure that your data is safe and protected online without dealing with network connectivity issues.
Besides, PureVPN also has 24/7 customer support available via phone, email, and live chats to help you with problems that you may encounter on the platform.
Get the most out of your network with PureVPN!
Try PureVPN Now
5. Lower the Playback Quality.
If the error message occurs while watching videos, your internet connection cannot keep up with the video’s bandwidth requirement. In this case, you can try lowering the playback quality on your device to improve its performance.
If you’re on a browser, see the steps below to change YouTube videos’ playback quality.
- First, go to YouTube and open a video that you want to play.
- After that, click on the Gear icon inside the video control.
- Finally, click on Quality and lower the video playback resolution.
For mobile users, check out the guide below to change your video playback quality.
- On your device, open YouTube and select a video that you want to play.
- Now, tap on the More button and select Quality.
- Lastly, change the video resolution to 720p or lower.
After changing the playback quality, try playing the video again and see if the error message “Oops, something went wrong” on YouTube would still occur.
6. Check for Updates.
YouTube releases updates on its app occasionally to address problems on the platform. If you haven’t updated to the latest version yet, now is the time to do so.
On Android, you can update the app by doing the following:
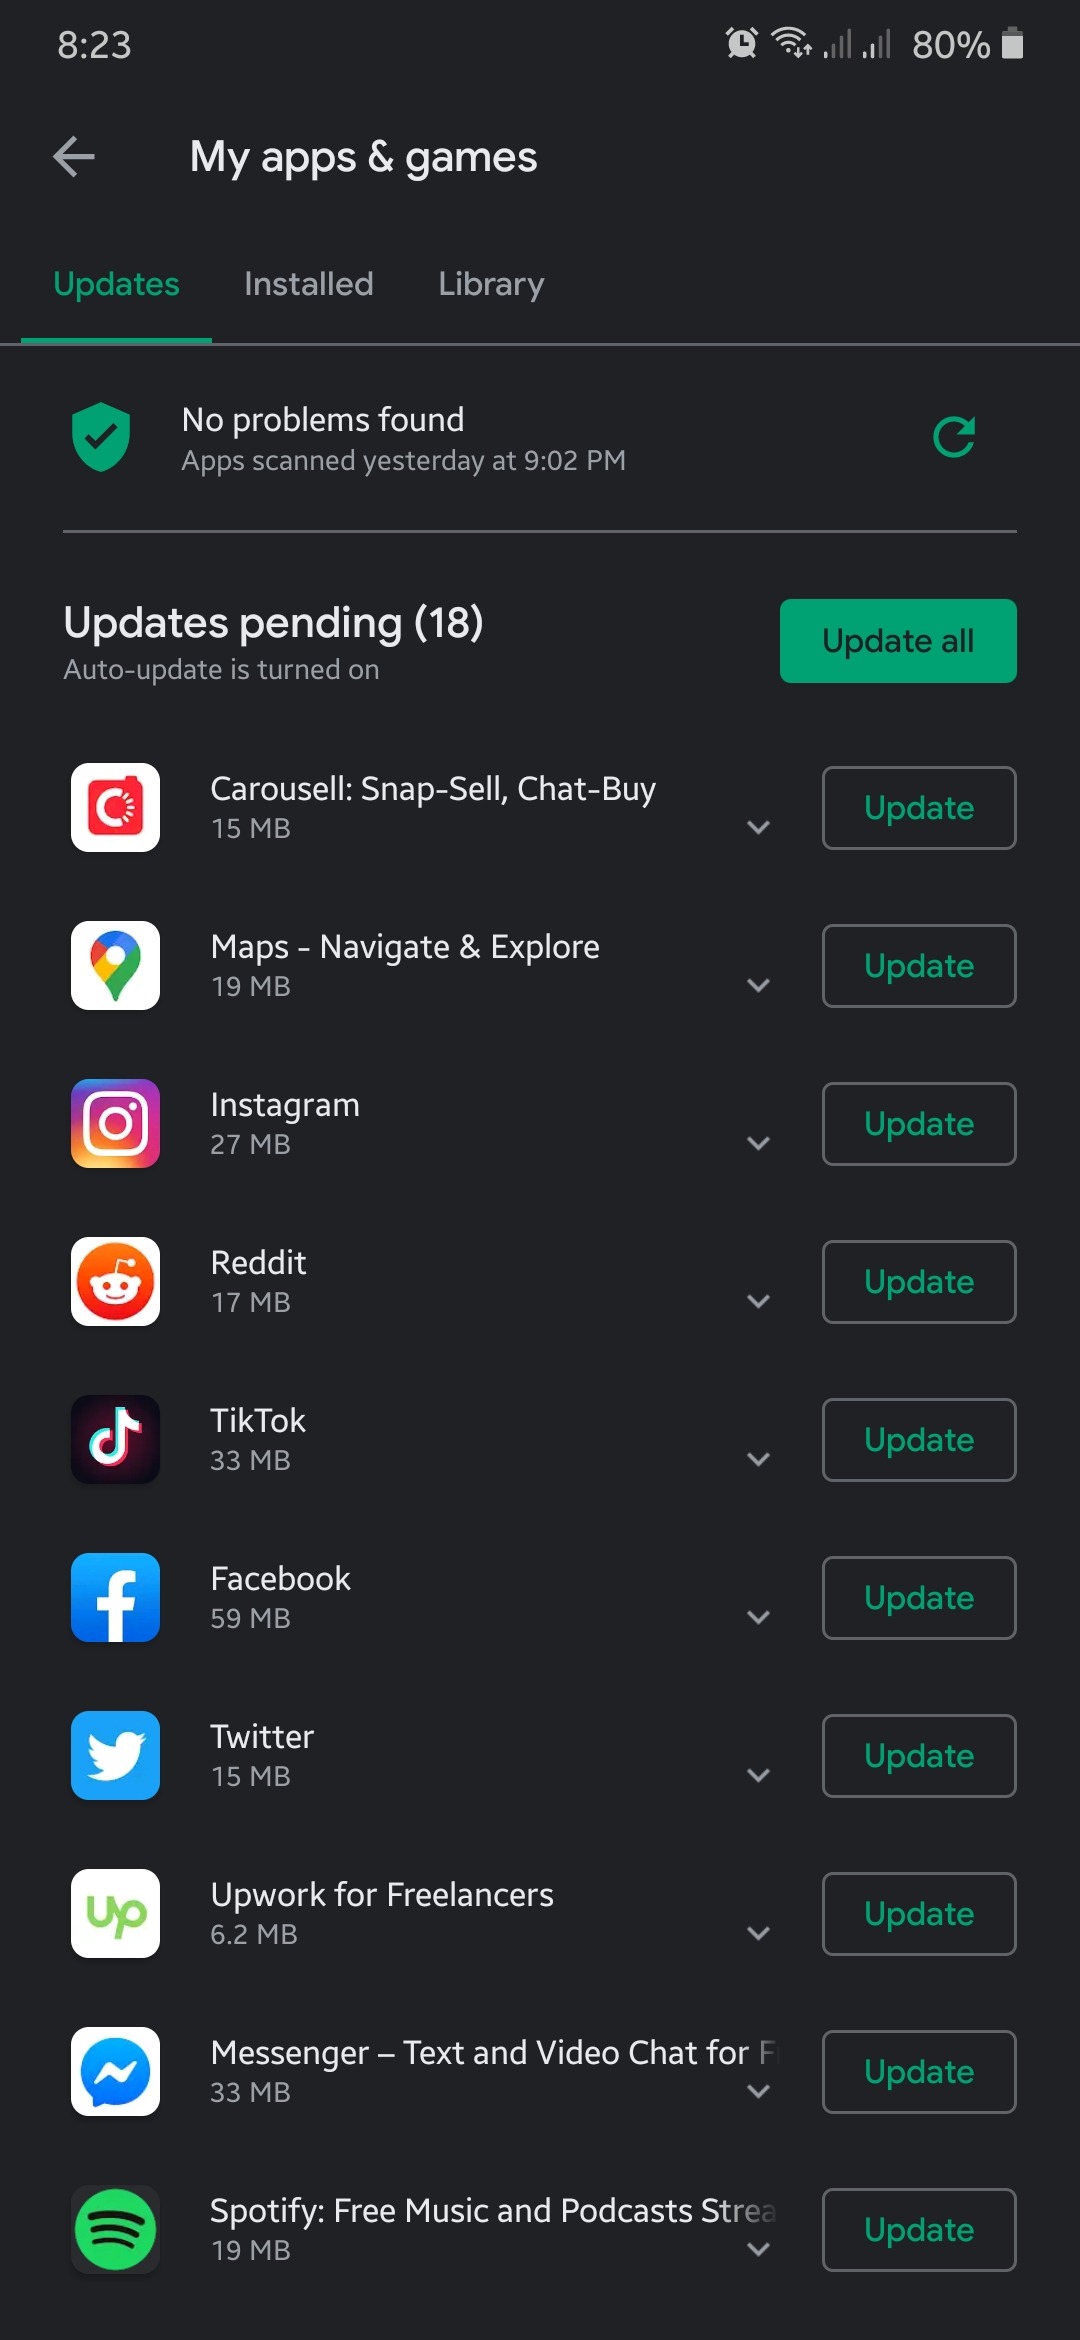
- First, open the Play Store from your home screen and access its side menu.
- Now, tap on My Apps & Games to prompt the Play Store to check for updates.
- Finally, tap the Update button if there is an available update.
If you are using an iOS device, check out the guide below to update YouTube.
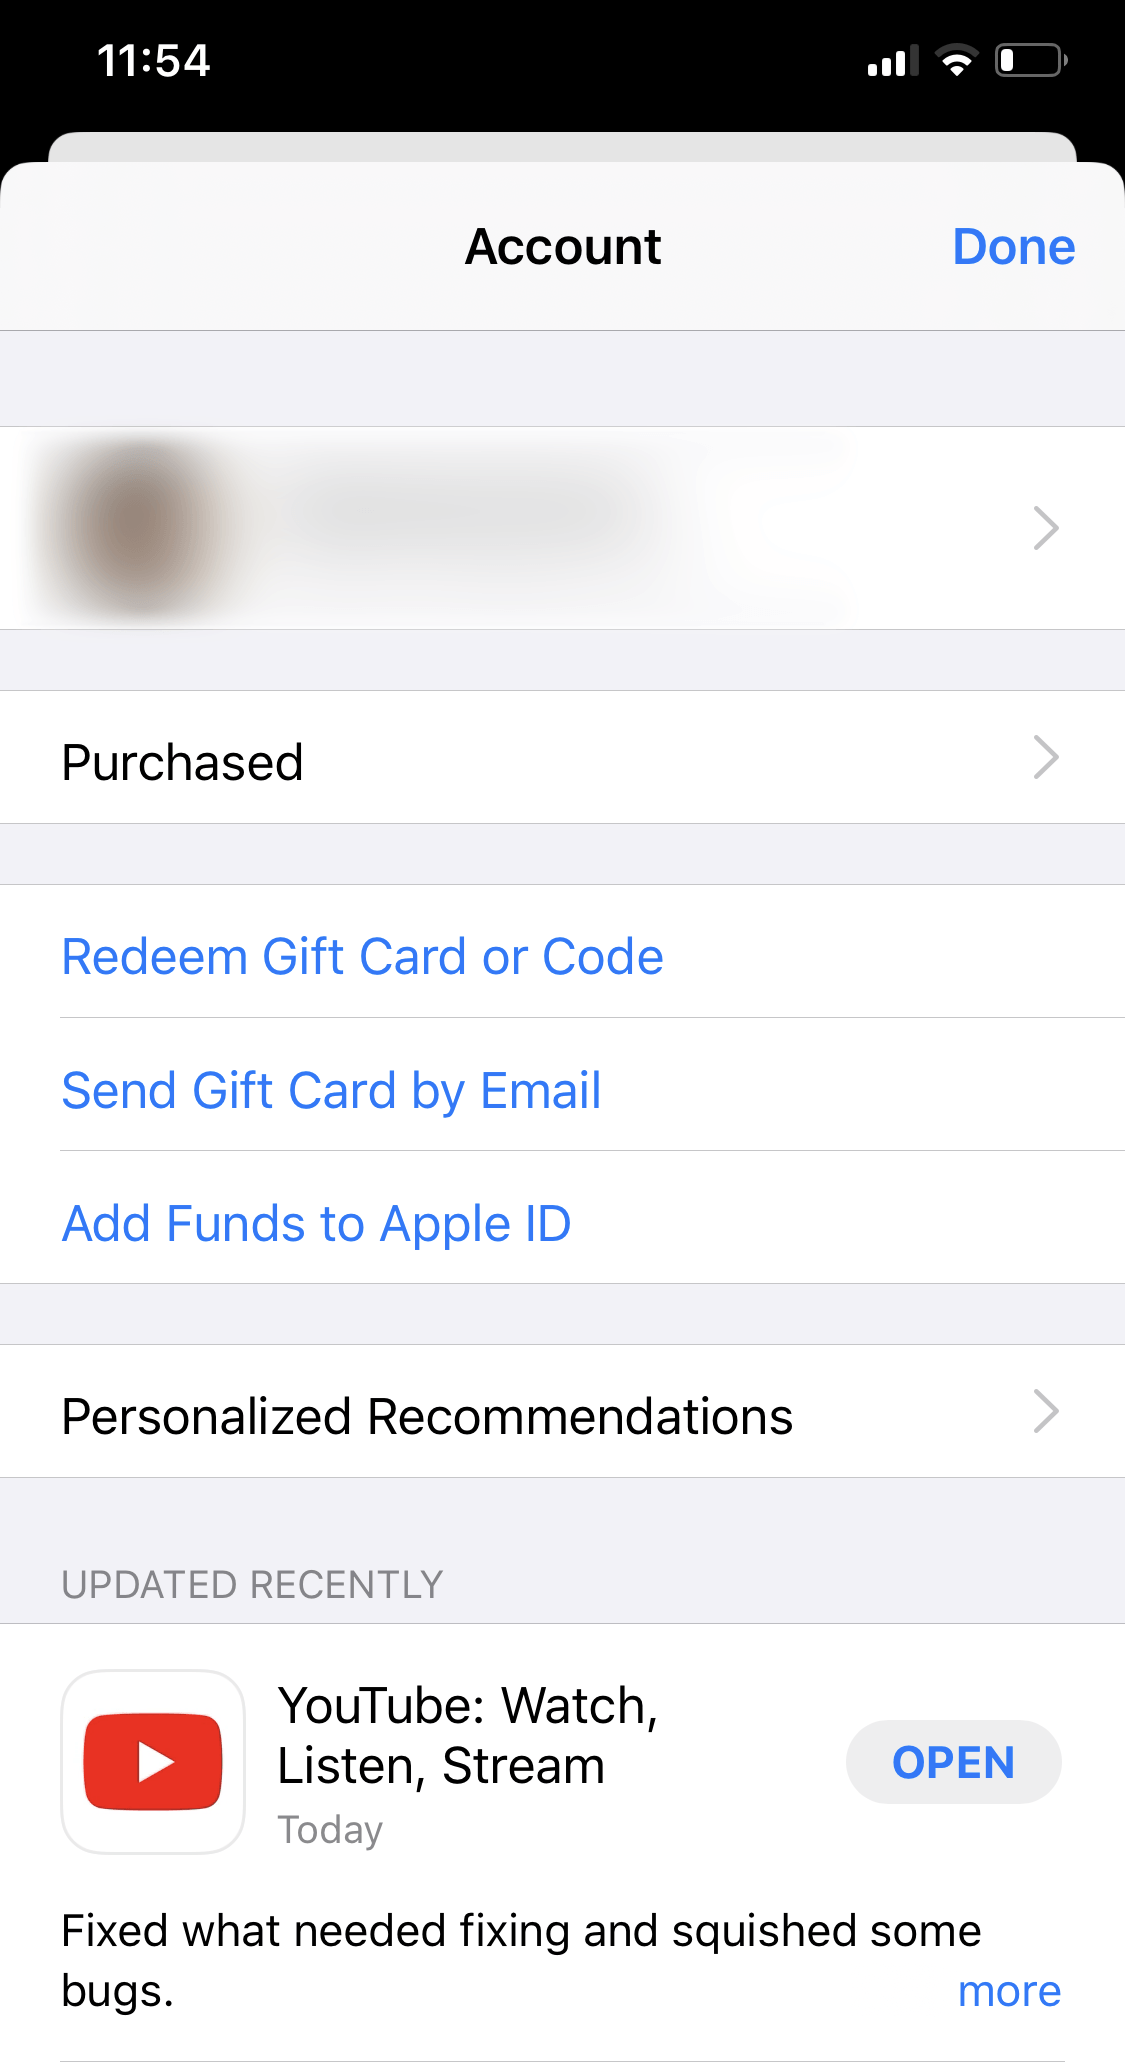
- On your home screen, tap on the App Store to launch it.
- After that, tap on Updates located at the bottom navigation bar.
- Lastly, tap the Update button next to YouTube to install its latest version.
After updating YouTube, try using it normally and see if you would encounter any errors.
7. Clear Your Browser Cache and Cookies.
If YouTube and other websites are not working correctly on your browser, try clearing your browsing data. Your browsing data contains caches and cookies that may have gotten corrupted and affected some websites.
To clear your browsing data, check out the guide below.
- First, open your default browser and go to the History tab.
- Now, click on Clear Browsing Data from the side drawer.
- After that, include ‘Cached Images and Files’ and ‘Cookies and Other Site Data’ in the process.
- Lastly, click on Time Range and select All Time from the dropdown menu before hitting the Clear Data button to start.
Once done, go back to YouTube to check if the error message would still occurs.
8. Try Another Browser.
Browsers use engines that render the contents of websites and display them on our screens. However, browsers don’t use the same render engines, and they interpret the codes written on websites differently from one another.
This means that some browsers may load a specific website without issues, but other browsers can struggle.
If this is the case, try another browser to access YouTube. Ideally, try using browsers with many users, like Chrome, Firefox, and Opera, which are highly optimized for most websites.
9. Check and Reset Your Internet.
As we said, the error message indicates that your device is struggling to communicate with YouTube’s servers. If this is the case, try running a speed test on your network using Fast.com to verify the problem.
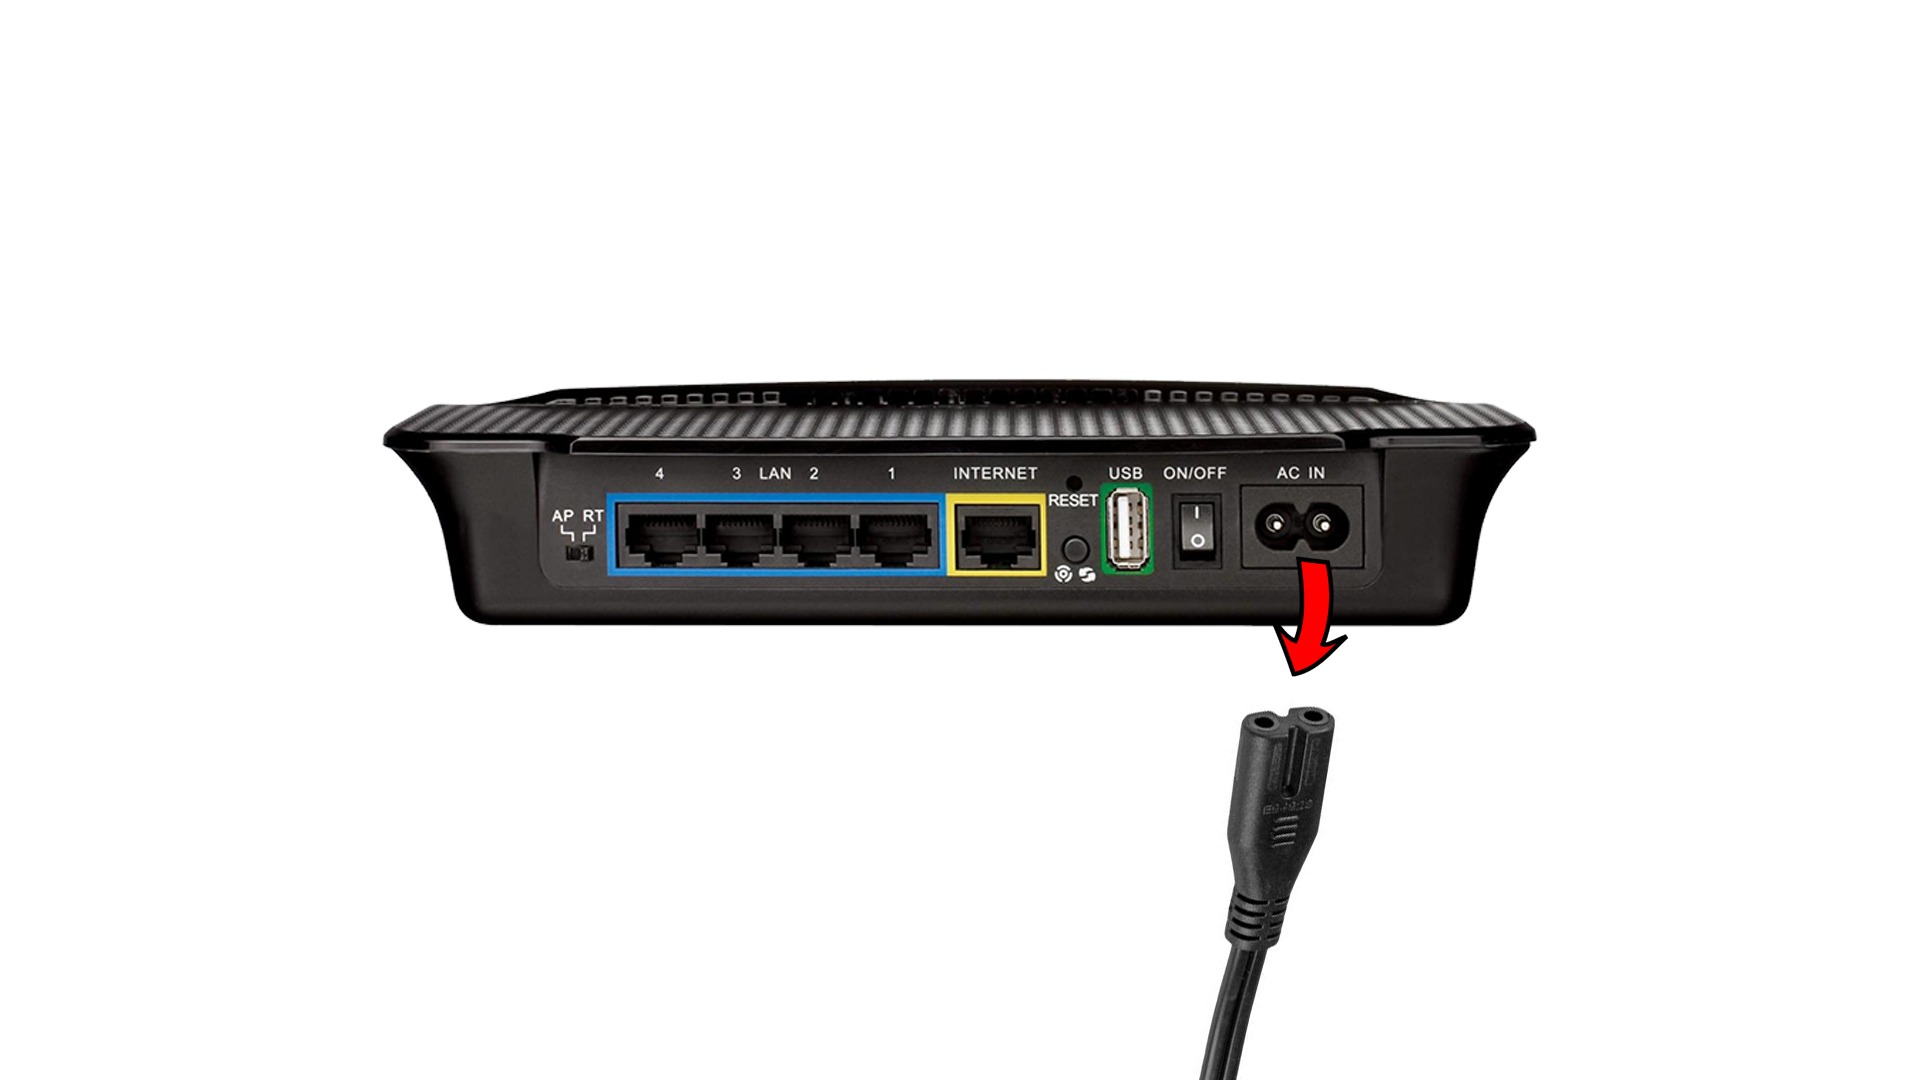
Restart your router if the result shows that your connection is unstable or running slow. Locate your router’s power chord and unplug it from the wall outlet for at least 10 seconds. After that, plug back in the power chord to restart your router.
After the restart, run another test to see if everything is in order. If you continue to experience network issues, contact your ISP immediately and ask them to fix their service.
10. Block CDN Addresses.
Content delivery networks are used by your device when streaming videos on platforms like YouTube. However, using CDNs can prompt your ISP to throttle your connection, which can cause issues on YouTube.
To fix this, block CDN addresses on your device to connect directly with YouTube’s servers.
- First, open Command Prompt on your computer.
- After that, enter the following commands on CMD.
netsh advfirewall firewall add rule name=”YouTubeTweak” dir=in action=block remoteip=173.194.55.0/24,206.111.0.0/16 enable=yes
- Finally, hit Enter on your keyboard to run the command.
Once done, go back to YouTube and try watching a few videos to see if the issue is solved.
This sums up our guide in fixing the error message “Oops, something went wrong” on YouTube. If you have other concerns, please let us know in the comment section below, and we’ll do our best to help you out.
If this guide helped you, please share it. 🙂
-
John is a staff writer at Saint and comes from a SAP ABAP development background. He has a Bachelors in IT and has been writing since 2018, with over 500 posts published. He loves to build PCs and has a deep curiosity in understanding how different components and configurations work. John spends hundreds of hours at a time, researching and testing the software and apps, before he proceeds to write about it. LinkedIn
Twitter
People are getting Oops Something Went Wrong error in different apps or website when they use.
So, today we will discuss this error in detail.
Were you watching an interesting video on YouTube and the YouTube video cut off midway with a message?
You must have surely encountered this message “Oops something went wrong.” Do not think you are the only one who is facing this issue because many users are in the same boat.
If you are looking forward to ways to fix this issue, you have come to the right place.
In this post, we will discuss some of the major fixes you can try out to fix this problem.
Let’s dive in!
What Does “Oops Something Went Wrong” Mean?
“Oops something went wrong” errors means the server could not identify or receive the data from the other side, as a result, it is incomplete or stuck and therefore you will receive this message telling you something went wrong.
This error message occurs on almost every social media platform when there is a connection or server issue.
You may encounter this message on YouTube, Snapchat, Facebook, Gmail, etc.
It is not a serious issue, it can be easily resolved, as mentioned earlier it is due to a bad internet connection or the server on the other end is down.
Why Does It Show Oops Something Went Wrong?
After you have gone through the above fixes, by now you must know why does it happen, it is mostly due to:
- A poor internet connection lets the server be down and hence it is directly affecting your youtube account.
- Often it can be a bug or glitch, if you restart your device it will most likely be fixed.
- An older version of YouTube would not help you to overcome this problem, please update your software, this can be one of the reasons.
- Your browsing data can be of the reasons if you are using a web browser to access Youtube, (for hand device users)you can clear the cookies and caches from settings and then take general settings for apps.
- If you are using VPN then sometimes this can be the main reason. Make sure you use a Private VPN
How To Fix “Oops Something Went Wrong” Message?
You can fix this issue by following the steps mentioned with the fixes.
They are as follows:
Fix 1: Fix VPN Issue
This is a prerequisite to turning off your VPN service.
Either turn it off or simply close the software completely.
You must be aware that VPN constantly and randomly changes the Internet Protocol (IP) address, as a result, your mobile phone or PC will struggle to get a strong internet connection service.
After turning off your VPN, you can either switch to Wifi or use your internet pack (mobile data).
Fix 2: Decrease The Playback Speed/Quality
If you get this message or get interfered with constantly while you are on YouTube watching a video. It is suggested you lower the quality of the video and decrease the playback speed, the server is not able to cope with the requirement and hence it will cut off the connection (Oops Something went wrong).
You can do so by clicking on the settings icon (from your device) present on the top right of the screen and then you will see the first option “Quality” and below that Playback speed, decrease both of them.
Fix 3: Look For Updates
Sometimes it is the version of YouTube you are using, it may affect or disable the working of your YouTube account efficiently.
Go to Play Store (for Android users) or Apple’s App Store and type in the search bar “YouTube” and check if you have any updates.
If yes, then update the version.
Fix 4: Wait For The Server
Most of the time this error comes when your server is not able to take signals or is down.
Here, all you need to do is wait for some time and have patience.
You can also download an application to check the status of all your applications (if the server is working properly or not). https://downdetector.com/status/youtube/
Fix 5: Set The Region Manually
You can try changing your servers on YouTube manually, it is not as difficult a task as you may think.
The steps are given below that can help you to do this:
Steps to Set the Region Manually:
Step 1: Open Your YouTube Browser
From your home screen, select a web browser and type “www.youtube.com” on the search bar.
Do not use this fix on the YouTube app as it would not be valid.
Step 2: Type ‘CA’ In Place Of WWW
Next, you will see the URL on top, in place of www, type “ca”, it will be like ca.youtube.com
Step 3: Click Enter
Once you have followed the second step, you have to click Enter.
You can try using YouTube and check if the message appears again.
Most likely it won’t if it’s a server issue.
Also Read: How To Disable YouTube Shorts?
Fix 6: Clean Your Browsing Cache
If you are using the web browser to access your YouTube account then maybe it is your uncleared browsing data, caches and cookies, as you have not cleaned them the temporary files in them may have been corrupted or affected and now they are directly affecting the working of YouTube.
You can clear your browsing data by following the given steps:
Step 1: Tap On History From The Browser
Open the browser you mostly use or the browser from which you access YouTube and tap on History.
Step 2: Select The Browsing Data Option
Next, you will see a list of options, click on the ” Clear browsing data” option.
Step 3: Tick Cached Images And Files
Once you have clicked on clear browsing data, tick on the option “cached images and files” and “Cookies and other site data”.
Step 4: Click On Clear Data
Before you can tap on clear data, make sure you have specified the time range by clicking on the dropdown arrow.
And then tap on Clear data on the bottom right of the page.
Fix 7: Use Other Browsers
Sometimes it can be the search engine of a specific browser.
In other words, every browser has its way of accessing websites and other services without buffering or downloading with any issues.
If you are using a browser which is not highly optimized, it is better if you switch to other browsers like Firefox, Opera and most importantly Chrome.
Fix 8: Reboot Your Device
Often it is the device you are using, there may be a system glitch or background running apps that are creating a hurdle for YouTube.
Reboot/Restart your Android phone/iOS device or your Windows PC.
Prior to that make sure you have closed YouTube.
After you have restarted your device, you can try opening YouTube and see if it is working without any issues.
Also Read:
Fix 9: Check Internet Connection Speed
An instance internet connection can be the major one, after you have tried every fix, you should check your internet and if possible reset it.
(On hand devices) simply turn off the mobile data or wifi connection and wait for some time and reboot your device then restart it. (On PC) all you have to do is unplug the cord from the wall and wait for about one minute and then plug it back and refresh your computer.
Fix 10: Turn Off Browser Extensions And Add Ons
Another fix you can opt for is to turn off all your browser extensions and add ons, they often restrict the server(of YouTube) to get the signals and data.
You can turn off your browser extensions in Chrome by following the given steps:
Step 1: Launch Chrome Store
From your default web browser visit, the chrome web store or you simply visit it via this address https://chrome.google.com/webstore
Step 2: Click On The Extension
You may be wondering why you have to click on extensions when you have to turn them off.
One thing you need to keep in mind is you cannot just turn off all your browser extensions, you need to choose some important ones.
So from the web store click on the extensions you want.
Step 3: Tap On Add To Chrome
Next, the extensions you have clicked then click on the ” add to chrome” option, this will add the extension to chrome, make sure you add only the reliable ones.
In case you are using your PC in the school computer lab, you cannot access YouTube because your school authorities have issued a security lock.
You can ask your teacher about it.
Also Read: How to Use Live Redirect on YouTube?
Conclusion
Social Media has become the part and parcel of every individual and encountering such errors can give some of you stress.
Do not worry it is quite simple to fix this issue .
The first step is always to check your internet connection, turn it off, close the app and reboot your device.
If that does not work you can follow the above fixes.
They will surely troubleshoot your problem.
If you are facing a grave issue, do not worry you can always contact the respective App Help Centre, they will ask you out to fill in some basic details.
For your reference, here we are with a help centre link for YouTube https://support.google.com/youtube/?hl=en.
Similar Posts:


