
Восстановление системы в Windows — одна из старейших и важных функций, которая может помочь вам восстановить удаленный файл и подвести вас к точке, где все работает нормально. Но что, если восстановление системы не работает или не работает? Мы заметили одну такую ошибку — При восстановлении системы не удалось извлечь файл, ошибка 0x80071160. Эта проблема возникает из-за проблем с разрешениями и не выполняется при попытке извлечь файлы из резервной копии восстановления системы. Мы поделимся, как можно решить эту проблему.
Чтобы исправить эту ошибку восстановления системы, вам нужно будет использовать учетную запись администратора, так как вам нужно будет изменить разрешение. Затем следуйте этим советам:
- Восстановление системы из расширенной среды восстановления
- Переименовать папку WindowsApps
- Восстановление Windows с помощью команд DISM и SFC
Всегда полезно иметь резервную копию вместе с функцией восстановления системы. В случае сбоя восстановления системы, как в этом случае, резервную копию можно использовать для восстановления недостающих файлов.
1]Восстановление системы из расширенной среды восстановления
Поскольку это, вероятно, из-за проблем с разрешениями, Advanced Recovery Environment предлагает лучшую поддержку в этом случае. Вы можете загрузиться в Advanced Startup Options из Windows или с загрузочного USB-накопителя Windows 10.
- Откройте настройки Windows 10 (Win + I)
- Перейдите в Обновление и безопасность> Восстановление> Нажмите кнопку «Перезагрузить сейчас» в разделе «Расширенный запуск».
- Находясь в режиме восстановления, нажмите «Дополнительные параметры»> «Устранение неполадок»> «Дополнительные параметры».
- Нажмите «Восстановление системы» и посмотрите, сможете ли вы вернуться к более раннему состоянию.
Если это сработает, все будет готово. Но если вы не можете этого сделать, то в среде восстановления у вас есть возможность выполнить восстановление при запуске. Сделайте это, а затем попробуйте выполнить восстановление системы.
2]Переименовать папку WindowsApps
Одно из известных и заявленных решений — переименовать папку приложений Windows, доступную в папке программ на установочном диске Windows. Обычно он находится в папке «C: Program Files». Однако папка скрыта, поэтому не забудьте установить флажок «Скрытые элементы» в разделе «Показать / скрыть» на вкладке просмотра.
Известно, что это многим помогает. Поэтому сначала создайте точку восстановления системы, а затем переименуйте папку WindowsApps либо в безопасном режиме, либо с помощью среды Advanced Recovery Environment. В последнем случае вам нужно будет выбрать командную строку и выполнить следующие команды.
Метод безопасного режима
Загрузитесь в безопасном режиме Windows и войдите в систему с учетной записью администратора. Найдите и откройте командную строку и выполните следующие команды, как показано ниже. Предполагается, что ваша Windows установлена на диске C.
cd C:Program Files
takeown /f WindowsApps /r /d Y
icacls WindowsApps /grant “%USERDOMAIN%%USERNAME%”:(F) /t
attrib WindowsApps -h
rename WindowsApps WindowsApps.old
Перезагрузите Windows в обычном режиме и повторите попытку восстановления системы.
Расширенный метод восстановления
Загрузитесь в режиме расширенного восстановления и перейдите в раздел Устранение неполадок> Дополнительные параметры> Командная строка. Выполните следующую команду:
cd C:Program Files
attrib WindowsApps -h
rename WindowsApps WindowsAppsOld
Перезагрузите Windows в обычном режиме и повторите попытку восстановления системы.
Читать: Восстановление системы зависло или зависло.
3]Восстановление образа системы Windows с помощью DISM
Если ничего не работает, последнее, что мы можем предложить, — это запустить команду DISM, чтобы исправить любую форму повреждения, которая могла произойти с системными файлами. Откройте командную строку или Power Shell с правами администратора и выполните следующие команды.
DISM.exe /Online /Cleanup-image /Scanhealth
DISM.exe /Online /Cleanup-image /Restorehealth
DISM.exe /online /cleanup-image /startcomponentcleanup
Восстановление системы, как и все остальное, подвержено повреждению и проблемам с разрешениями. Это то, что должно работать без проблем, но и Windows не лишена недостатков и проблем. Это основная причина, по которой должно быть как минимум две резервные копии, поэтому, если одна не работает, вы всегда можете вернуться ко второй.
Связанный: Ошибка обновления Windows 10 0x80071160.
Надеюсь, этот пост помог вам устранить ошибку восстановления системы 0x80071160.
Исправить ошибку обновления Windows 10 0x80071160 (06.05.23)
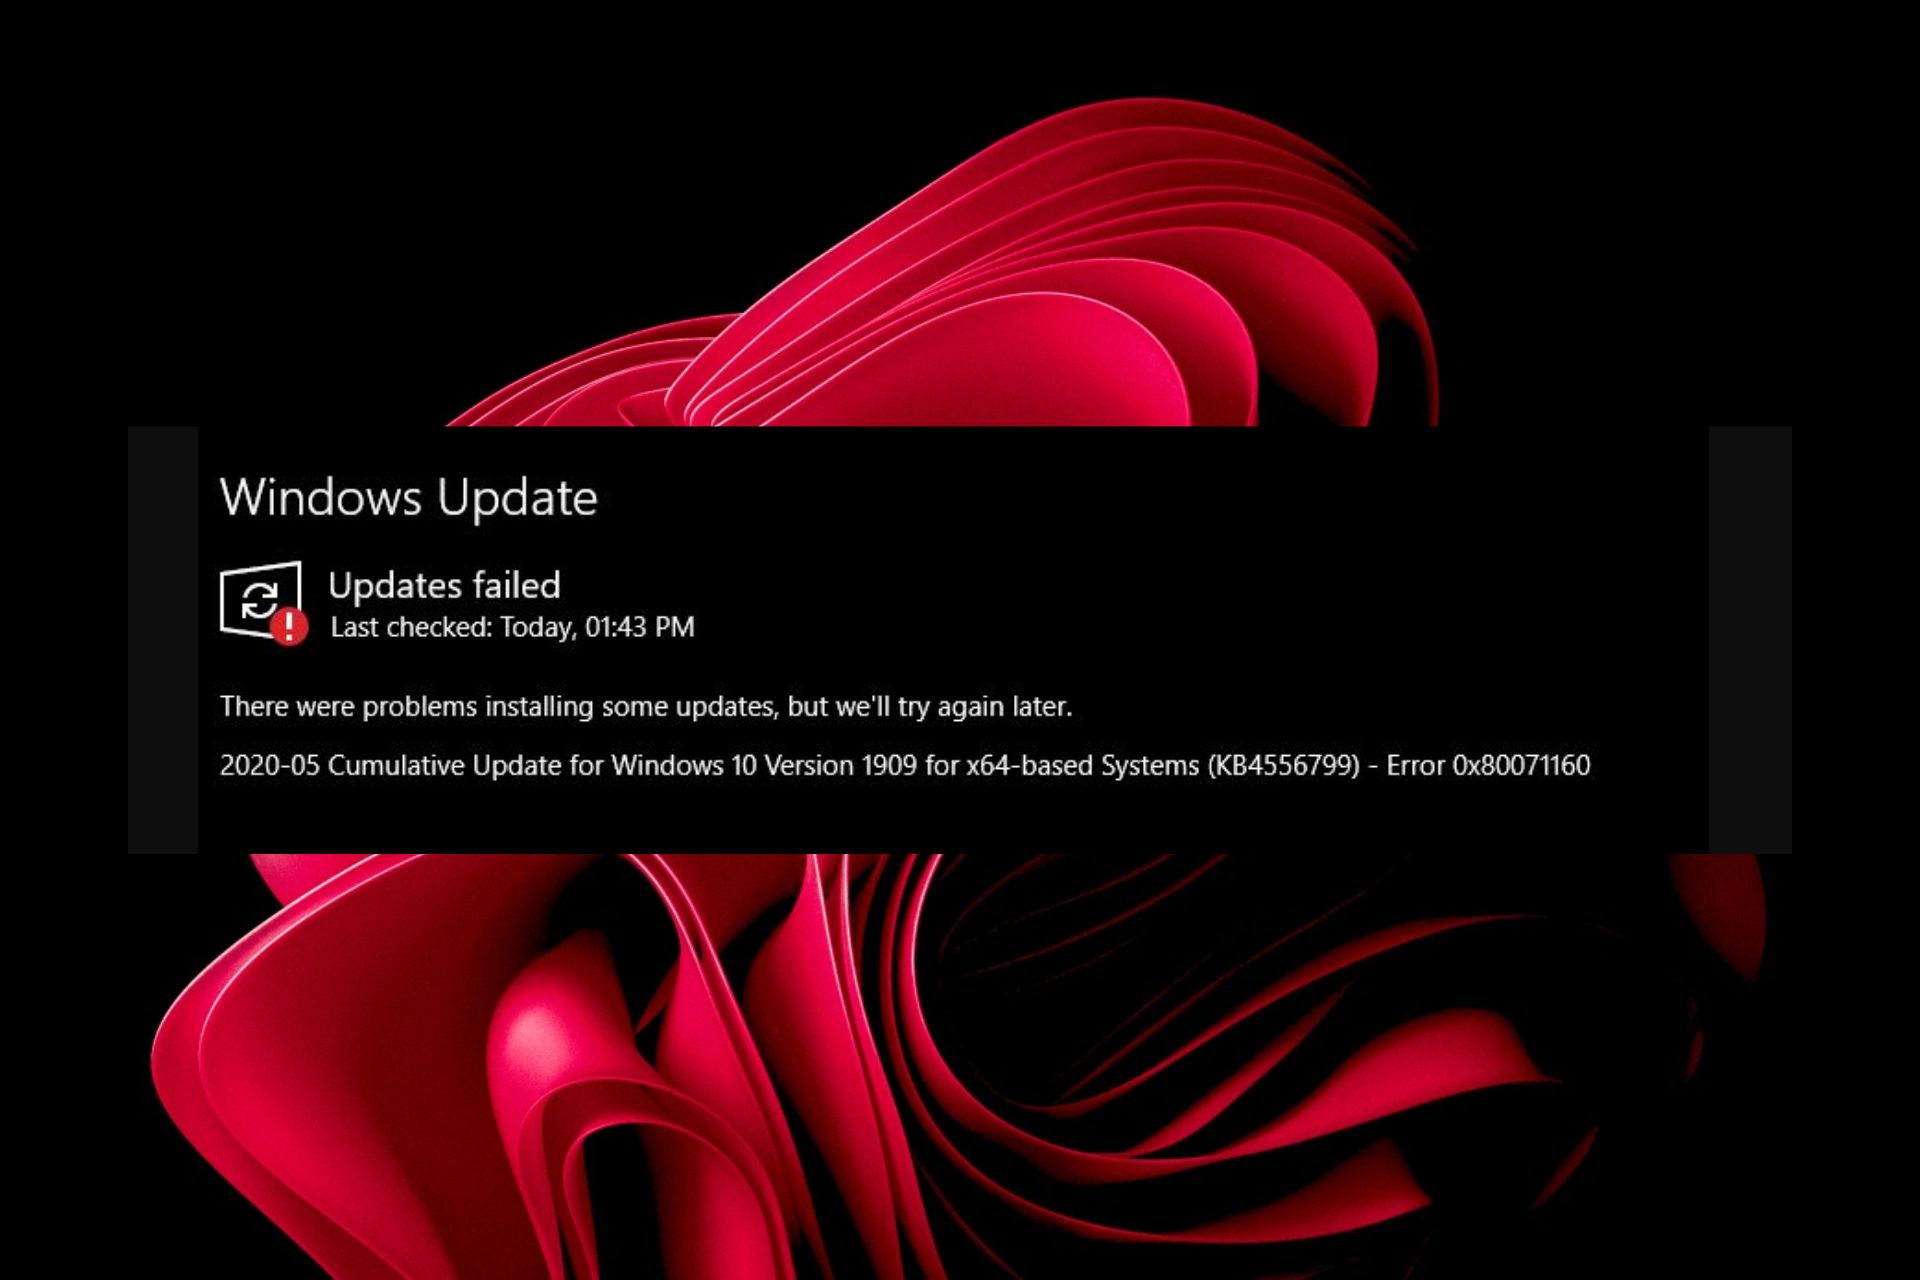
Обновления Windows выпускаются для защиты пользователей Windows от злонамеренных атак. Однако бывают случаи, когда они вызывают ошибки. Одной из таких ошибок является ошибка Центра обновления Windows 0x80071160.
Если вы не можете установить ожидающее обновление Windows 10 из-за ошибки обновления Windows 0x80071160, эта статья для вас. Здесь мы предоставим вам все, что вам нужно знать о коде ошибки, включая ее причины и возможные решения.
Об ошибке Центра обновления Windows 0x80071160
По словам затронутых пользователей, ошибка в основном возникает из-за поврежденных Компоненты Центра обновления Windows или системные сбои. Но опять же, эксперты Windows также отмечают, что следующий код ошибки также может вызвать отображение кода ошибки.
Что вызывает ошибку обновления 0x80071160 в Windows 10?
- Неверная дата и настройки времени
- Отсутствует служба автоматических обновлений или фоновой интеллектуальной передачи.
- Троянские программы, вирусы и другие вредоносные объекты.
- Неисправное обновление Windows
Ошибка обновления 0x80071160 Разрешения
Если вы столкнулись с ошибкой Центра обновления Windows 0x80071160, попробуйте наши рекомендуемые ниже исправления. Для получения лучших результатов мы рекомендуем вам следовать им в указанном порядке.
Совет для профессионалов: просканируйте свой компьютер на наличие проблем с производительностью, ненужных файлов, вредоносных приложений и угроз безопасности
, которые могут вызвать системные проблемы или низкая производительность.
Бесплатное сканирование для ПК, проблемы с загрузкой 3.145.873Совместимость с: Windows 10, Windows 7, Windows 8
Специальное предложение. Об Outbyte, инструкции по удалению, лицензионное соглашение, политика конфиденциальности.
Исправление №1: запустите средство устранения неполадок Центра обновления Windows
Многие пользователи сообщают, что ошибка была исправлена путем простого запуска средства устранения неполадок Центра обновления Windows. Этот инструмент разработан Microsoft для автоматического выявления и исправления ошибок.
Чтобы запустить средство устранения неполадок, выполните следующие действия:
Исправление №2: Удалите содержимое папки SoftwareDistribution
Другое возможное исправление включает очистку содержимого папки SoftwareDistribution. Вот как это сделать:
- net stop wuauserv
- net stop bits
Эти команды остановят службу фоновой интеллектуальной передачи, а также службу Центра обновления Windows.
- net start wuauserv
- net start bits
Эти команды перезапустят фоновую интеллектуальную службу передачи и службу Центра обновления Windows.
Исправление № 3: Загрузите и установите Центр обновления Windows вручную
Если ошибка сохраняется после удаления содержимого папки SoftwareDistribution, попробуйте загрузить и установить Центр обновления Windows вручную.
Вот что вам следует сделать:
Исправление №4: выполните чистую загрузку
Если ни один из первых методов не работает, вы можете выполнить чистую загрузку, чтобы избавиться от проблем с программным обеспечением, возникающих при установке Центра обновления Windows.
Вот как продолжить чистую загрузку:
Исправление №5: Запустите сканирование SFC
Если ошибка не исчезнет, возможно, пора запустить сканирование SFC с помощью утилиты Windows System File Checker. Однако, чтобы использовать его, вам нужно сначала запустить инструмент DISM.
Для этого следуйте этим инструкциям:
Последние мысли
Если ничего не помогает, возможно это просто проблемный Центр обновления Windows. Бывают случаи, когда Microsoft выпускает ошибочные обновления, поэтому вы можете просто пропустить их. Мы знаем, что это не стоит всех усилий, но это все равно случается.
Опять же, мы все еще надеемся, что один из вышеперечисленных методов вернул вас на правильный путь и помог обновить Windows. Поделитесь с нами своими мыслями ниже!
06, 2023
Код ошибки 0x80071160 иногда может помешать вам установить последние обновления Windows на вашем компьютере. Если это временная проблема, перезагрузки компьютера и маршрутизатора должно быть достаточно, чтобы исправить ее. Если проблема не устранена, выполните приведенные ниже действия по устранению неполадок.
Как исправить код ошибки 0x80071160 в Windows?
Запустите средство устранения неполадок Центра обновления Windows.
Запуск встроенного средства устранения неполадок Центра обновления Windows — это первое решение, которое следует использовать для исправления ошибок Центра обновления Windows. Microsoft разработала этот инструмент специально для исправления ошибок обновления.
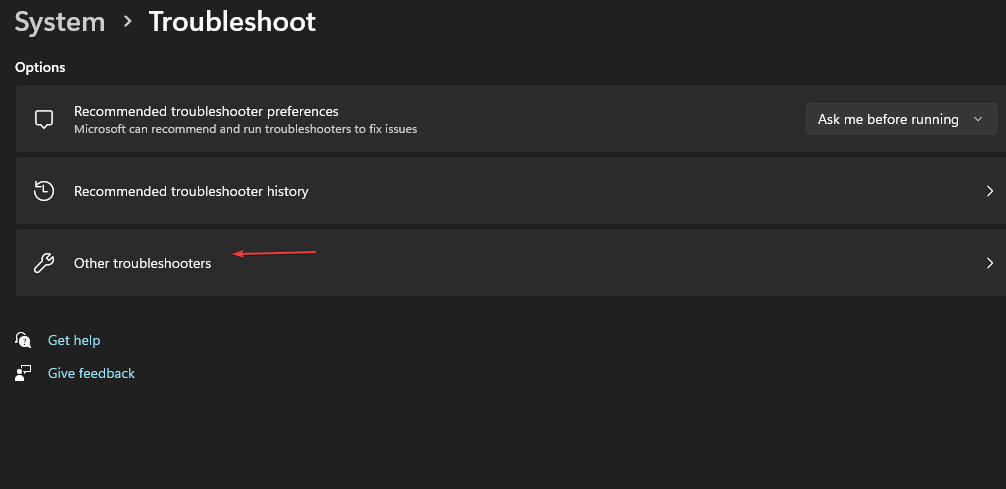
Идти к Настройкии выберите Система. Затем нажмите на Устранение неполадоки выберите Другие средства устранения неполадок. Пусть Средство устранения неполадок Центра обновления Windows просканируйте свой компьютер и исправьте код ошибки 0x80071160.
Затем перезагрузите компьютер и проверьте, сохраняется ли ошибка.
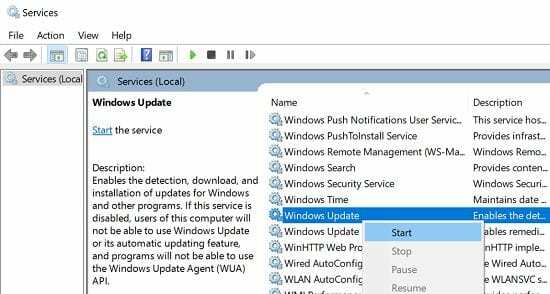
Перезапустите службы обновления
Убедитесь, что на вашем компьютере запущены Центр обновления Windows и Фоновые интеллектуальные службы передачи.
- Нажать на Значок поиска и введите Сервисы.
- Дважды щелкните на Приложение «Службы».
- Щелкните правой кнопкой мыши на Служба обновления Windows.

- Если статус услуги Остановлено, Выбрать Начинать.
- Затем дважды щелкните по Фоновая интеллектуальная служба передачи.
- Перезапустите службу, если она не запущена.
Сброс компонентов Центра обновления Windows
Кроме того, вы также можете использовать командную строку для сброса компонентов Центра обновления Windows.
- Запустите командную строку от имени администратора.
- Выполните приведенные ниже команды, чтобы остановить службы обновления:
чистые стоповые битычистая остановкачистая остановка appidsvcчистая остановка cryptsvc
- Выполните следующие команды, чтобы удалить файлы qmgr*.dat, созданные BITS:
Удалить "%ALLUSERSPROFILE%ПриложениеДанныеМайкрософтСетьЗагрузчик*.*"
- нажимать Д чтобы подтвердить свой выбор.
- Введите приведенные ниже команды, чтобы очистить кэш Центра обновления Windows:
rmdir %systemroot%SoftwareDistribution /S /Qкаталог %systemroot%system32catroot2 /S /Q
- Затем введите следующие команды, чтобы перезапустить службы обновления:
чистые стартовые битычистый стартчистый старт appidsvcчистый старт cryptsvc
- Проверьте наличие обновлений еще раз.
Запустите DISM и SFC для восстановления системных файлов
Если некоторые из ваших системных файлов были повреждены, не удивляйтесь, если вы не сможете установить последние обновления Windows. Запустите DISM и SFC, чтобы восстановить системные файлы, и снова проверьте наличие обновлений.
- Запустите командную строку с правами администратора.
- Затем выполните следующие команды:
DISM.exe/Online/Cleanup-Image/Restorehealth-
sfc/scannow
- Перезагрузите компьютер и проверьте, можете ли вы установить последние обновления.
Вручную загрузите обновления
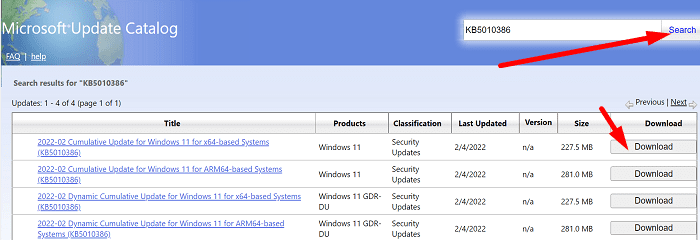
Если ничего не работает, попробуйте установить проблемные обновления вручную. Если вы пытаетесь установить накопительное обновление, перейдите на Веб-сайт каталога Центра обновления Майкрософт. Введите номер КБ обновления в Поле поиска и нажмите Enter. Выберите интересующее вас обновление и нажмите кнопку Скачать кнопка.
Если при попытке установить новую версию ОС выскакивает код ошибки 0x80071160, использовать помощник по обновлению для обновления вашего компьютера.
Заключение
Если код ошибки 0x80071160 не позволяет вам обновить Windows, запустите средство устранения неполадок обновления и перезапустите службы обновления. Если проблема не устранена, сбросьте компоненты Центра обновления Windows. Кроме того, запустите DISM и SFC для восстановления неисправных системных файлов. Если ничего не работает, установите проблемные обновления вручную.
Вам удалось решить проблему и обновить компьютер? Нажмите на комментарии ниже и сообщите нам, какое решение сработало для вас.
Восстановление системы в Windows — одна из старейших и важных функций, которая может помочь вам восстановить удаленный файл и подвести вас к точке, где все работает нормально. Но что, если восстановление системы не работает или не работает? Мы заметили одну такую ошибку — При восстановлении системы не удалось извлечь файл, ошибка 0x80071160. Эта проблема возникает из-за проблем с разрешениями и не выполняется при попытке извлечь файлы из резервной копии восстановления системы. Мы поделимся, как можно решить эту проблему.
Чтобы исправить эту ошибку восстановления системы, вам нужно будет использовать учетную запись администратора, так как вам нужно будет изменить разрешение. Затем следуйте этим советам:
- Восстановление системы из расширенной среды восстановления
- Переименовать папку WindowsApps
- Восстановление Windows с помощью команд DISM и SFC
Всегда полезно иметь резервную копию вместе с функцией восстановления системы. В случае сбоя восстановления системы, как в этом случае, резервную копию можно использовать для восстановления недостающих файлов.
1]Восстановление системы из расширенной среды восстановления
Поскольку это, вероятно, из-за проблем с разрешениями, Advanced Recovery Environment предлагает лучшую поддержку в этом случае. Вы можете загрузиться в Advanced Startup Options из Windows или с загрузочного USB-накопителя Windows 10.
- Откройте настройки Windows 10 (Win + I)
- Перейдите в Обновление и безопасность> Восстановление> Нажмите кнопку «Перезагрузить сейчас» в разделе «Расширенный запуск».
- Находясь в режиме восстановления, нажмите «Дополнительные параметры»> «Устранение неполадок»> «Дополнительные параметры».
- Нажмите «Восстановление системы» и посмотрите, сможете ли вы вернуться к более раннему состоянию.
Если это сработает, все будет готово. Но если вы не можете этого сделать, то в среде восстановления у вас есть возможность выполнить восстановление при запуске. Сделайте это, а затем попробуйте выполнить восстановление системы.
2]Переименовать папку WindowsApps
Одно из известных и заявленных решений — переименовать папку приложений Windows, доступную в папке программ на установочном диске Windows. Обычно он находится в папке «C: Program Files». Однако папка скрыта, поэтому не забудьте установить флажок «Скрытые элементы» в разделе «Показать / скрыть» на вкладке просмотра.
Известно, что это многим помогает. Поэтому сначала создайте точку восстановления системы, а затем переименуйте папку WindowsApps либо в безопасном режиме, либо с помощью среды Advanced Recovery Environment. В последнем случае вам нужно будет выбрать командную строку и выполнить следующие команды.
Метод безопасного режима
Загрузитесь в безопасном режиме Windows и войдите в систему с учетной записью администратора. Найдите и откройте командную строку и выполните следующие команды, как показано ниже. Предполагается, что ваша Windows установлена на диске C.
cd C:Program Files
takeown /f WindowsApps /r /d Y
icacls WindowsApps /grant “%USERDOMAIN%%USERNAME%”:(F) /t
attrib WindowsApps -h
rename WindowsApps WindowsApps.old
Перезагрузите Windows в обычном режиме и повторите попытку восстановления системы.
Расширенный метод восстановления
Загрузитесь в режиме расширенного восстановления и перейдите в раздел Устранение неполадок> Дополнительные параметры> Командная строка. Выполните следующую команду:
cd C:Program Files
attrib WindowsApps -h
rename WindowsApps WindowsAppsOld
Перезагрузите Windows в обычном режиме и повторите попытку восстановления системы.
Читать: Восстановление системы зависло или зависло.
3]Восстановление образа системы Windows с помощью DISM
Если ничего не работает, последнее, что мы можем предложить, — это запустить команду DISM, чтобы исправить любую форму повреждения, которая могла произойти с системными файлами. Откройте командную строку или Power Shell с правами администратора и выполните следующие команды.
DISM.exe /Online /Cleanup-image /Scanhealth
DISM.exe /Online /Cleanup-image /Restorehealth
DISM.exe /online /cleanup-image /startcomponentcleanup
Восстановление системы, как и все остальное, подвержено повреждению и проблемам с разрешениями. Это то, что должно работать без проблем, но и Windows не лишена недостатков и проблем. Это основная причина, по которой должно быть как минимум две резервные копии, поэтому, если одна не работает, вы всегда можете вернуться ко второй.
Связанный: Ошибка обновления Windows 10 0x80071160.
Надеюсь, этот пост помог вам устранить ошибку восстановления системы 0x80071160.
Исправить ошибку обновления Windows 10 0x80071160 (01.28.23)
Обновления Windows выпускаются для защиты пользователей Windows от злонамеренных атак. Однако бывают случаи, когда они вызывают ошибки. Одной из таких ошибок является ошибка Центра обновления Windows 0x80071160.
Если вы не можете установить ожидающее обновление Windows 10 из-за ошибки обновления Windows 0x80071160, эта статья для вас. Здесь мы предоставим вам все, что вам нужно знать о коде ошибки, включая ее причины и возможные решения.
Об ошибке Центра обновления Windows 0x80071160
По словам затронутых пользователей, ошибка в основном возникает из-за поврежденных Компоненты Центра обновления Windows или системные сбои. Но опять же, эксперты Windows также отмечают, что следующий код ошибки также может вызвать отображение кода ошибки.
Что вызывает ошибку обновления 0x80071160 в Windows 10?
- Неверная дата и настройки времени
- Отсутствует служба автоматических обновлений или фоновой интеллектуальной передачи.
- Троянские программы, вирусы и другие вредоносные объекты.
- Неисправное обновление Windows
Ошибка обновления 0x80071160 Разрешения
Если вы столкнулись с ошибкой Центра обновления Windows 0x80071160, попробуйте наши рекомендуемые ниже исправления. Для получения лучших результатов мы рекомендуем вам следовать им в указанном порядке.
Совет для профессионалов: просканируйте свой компьютер на наличие проблем с производительностью, ненужных файлов, вредоносных приложений и угроз безопасности
, которые могут вызвать системные проблемы или низкая производительность.
Бесплатное сканирование для ПК, проблемы с загрузкой 3.145.873Совместимость с: Windows 10, Windows 7, Windows 8
Специальное предложение. Об Outbyte, инструкции по удалению, лицензионное соглашение, политика конфиденциальности.
Исправление №1: запустите средство устранения неполадок Центра обновления Windows
Многие пользователи сообщают, что ошибка была исправлена путем простого запуска средства устранения неполадок Центра обновления Windows. Этот инструмент разработан Microsoft для автоматического выявления и исправления ошибок.
Чтобы запустить средство устранения неполадок, выполните следующие действия:
Исправление №2: Удалите содержимое папки SoftwareDistribution
Другое возможное исправление включает очистку содержимого папки SoftwareDistribution. Вот как это сделать:
- net stop wuauserv
- net stop bits
Эти команды остановят службу фоновой интеллектуальной передачи, а также службу Центра обновления Windows.
- net start wuauserv
- net start bits
Эти команды перезапустят фоновую интеллектуальную службу передачи и службу Центра обновления Windows.
Исправление № 3: Загрузите и установите Центр обновления Windows вручную
Если ошибка сохраняется после удаления содержимого папки SoftwareDistribution, попробуйте загрузить и установить Центр обновления Windows вручную.
Вот что вам следует сделать:
Исправление №4: выполните чистую загрузку
Если ни один из первых методов не работает, вы можете выполнить чистую загрузку, чтобы избавиться от проблем с программным обеспечением, возникающих при установке Центра обновления Windows.
Вот как продолжить чистую загрузку:
Исправление №5: Запустите сканирование SFC
Если ошибка не исчезнет, возможно, пора запустить сканирование SFC с помощью утилиты Windows System File Checker. Однако, чтобы использовать его, вам нужно сначала запустить инструмент DISM.
Для этого следуйте этим инструкциям:
Последние мысли
Если ничего не помогает, возможно это просто проблемный Центр обновления Windows. Бывают случаи, когда Microsoft выпускает ошибочные обновления, поэтому вы можете просто пропустить их. Мы знаем, что это не стоит всех усилий, но это все равно случается.
Опять же, мы все еще надеемся, что один из вышеперечисленных методов вернул вас на правильный путь и помог обновить Windows. Поделитесь с нами своими мыслями ниже!
01, 2023
Download PC Repair Tool to quickly find & fix Windows errors automatically
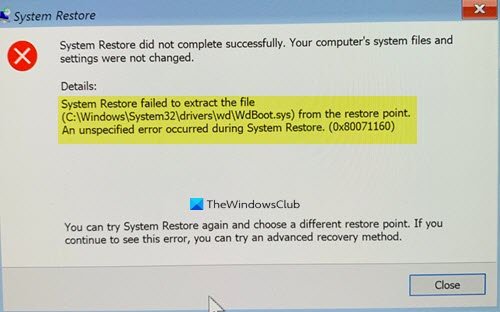
System Restore in Windows is one of the oldest and essential features which can help you recover a deleted file, and take you to the point where everything was working fine. But what if System Restore doesn’t work and fails? One such error we have noticed is — System restore failed to extract the file, error 0x80071160 or appxstaging. This problem occurs because of permission issues and fails when trying to extract files from System Restore backup.
In this case, it is WdBoot.sys, which is the Microsoft antimalware boot driver OS file.
If System Restore has failed, then to fix this System Restore error, you will need to use an admin account as you will have to change permission. Then follow these suggestions:
- System Restore from Advanced Recovery Environment
- Rename WindowsApps Folder
- Repair Windows using DISM and SFC Commands
It is always a good idea to have a backup in place along with System Restore. In the case of System Restore failure like in this case, the backup can be used to restore missing files.
1] System Restore from Advanced Recovery Environment

Since it’s probably because of permission issues, the Advanced Recovery Environment offers better support in this case. You can boot into Advanced Startup Options from within Windows or using a Windows 10 Bootable USB drive.
- Open Windows 10 Settings (Win + I)
- Navigate to Update and Security > Recovery > Click on Restart now button under Advanced Startup
- When in Recovery, click on Advanced Options > Troubleshoot > Advanced Options
- Click System Restore, see if you can go back to an earlier time.
If this works, you will be all set. But if you cannot, then in the Recovery Environment, you have the option to perform startup repair. Do that, and later try to perform a system restore.
2] Rename WindowsApps Folder
One of the known and the reported solution is to rename the Windows Apps Folder available in the Programs Folder in the installation drive of Windows. It will usually be available at “C:Program Files.” However, the folder is hidden, so make sure to check the box next to Hidden Items under the Show/Hide section of the view tab.
This has been known to help many. So create a system restore point first and then rename the WindowsApps folder either in Safe Mode or using the Advanced Recovery Environment. In the latter, you will have to choose the command prompt and execute the following commands.

Safe Mode Method
Boot into Windows Safe Mode and log in with an admin account. Find and open Command Prompt, and execute the following commands as below. It is assuming that your Windows is installed in C drive.
cd C:Program Files
takeown /f WindowsApps /r /d Y
icacls WindowsApps /grant “%USERDOMAIN%%USERNAME%”:(F) /t
attrib WindowsApps -h
rename WindowsApps WindowsApps.old
Reboot Windows normally, and try System Restore again.
Advanced Recover Method
Boot into Advanced Recovery mode, and navigate to Troubleshoot > Advanced Options > Command Prompt. Execute the following command:
cd C:Program Files
attrib WindowsApps -h
rename WindowsApps WindowsAppsOld
Reboot Windows normally, and try System Restore again.
Read: System Restore stuck or hung up.
3] Repair Windows System Image using DISM
If nothing else is working, the last thing we can suggest here is to run the DISM command to fix any form of corruption that might have happened to system files. Open Command Prompt or Power Shell with admin privileges, and execute the following commands
DISM.exe /Online /Cleanup-image /Scanhealth
DISM.exe /Online /Cleanup-image /Restorehealth
DISM.exe /online /cleanup-image /startcomponentcleanup
System Restore, like anything else, is prone to corruption, and permission issues. It is something that should work without issues, but then Windows is not without its share of drawbacks and problems. It is the primary reason why there is should at least two backups in place, so in case one doesn’t work, you can always fall back to the second.
Related: Windows 10 Update error 0x80071160.
I hope the post was able to help you resolve the System Restore Error 0x80071160.

Anand Khanse is the Admin of TheWindowsClub.com, a 10-year Microsoft MVP (2006-16) & a Windows Insider MVP (2016-2022). Please read the entire post & the comments first, create a System Restore Point before making any changes to your system & be careful about any 3rd-party offers while installing freeware.
Download PC Repair Tool to quickly find & fix Windows errors automatically
System Restore in Windows is one of the oldest and essential features which can help you recover a deleted file, and take you to the point where everything was working fine. But what if System Restore doesn’t work and fails? One such error we have noticed is — System restore failed to extract the file, error 0x80071160 or appxstaging. This problem occurs because of permission issues and fails when trying to extract files from System Restore backup.
In this case, it is WdBoot.sys, which is the Microsoft antimalware boot driver OS file.
If System Restore has failed, then to fix this System Restore error, you will need to use an admin account as you will have to change permission. Then follow these suggestions:
- System Restore from Advanced Recovery Environment
- Rename WindowsApps Folder
- Repair Windows using DISM and SFC Commands
It is always a good idea to have a backup in place along with System Restore. In the case of System Restore failure like in this case, the backup can be used to restore missing files.
1] System Restore from Advanced Recovery Environment
Since it’s probably because of permission issues, the Advanced Recovery Environment offers better support in this case. You can boot into Advanced Startup Options from within Windows or using a Windows 10 Bootable USB drive.
- Open Windows 10 Settings (Win + I)
- Navigate to Update and Security > Recovery > Click on Restart now button under Advanced Startup
- When in Recovery, click on Advanced Options > Troubleshoot > Advanced Options
- Click System Restore, see if you can go back to an earlier time.
If this works, you will be all set. But if you cannot, then in the Recovery Environment, you have the option to perform startup repair. Do that, and later try to perform a system restore.
2] Rename WindowsApps Folder
One of the known and the reported solution is to rename the Windows Apps Folder available in the Programs Folder in the installation drive of Windows. It will usually be available at “C:Program Files.” However, the folder is hidden, so make sure to check the box next to Hidden Items under the Show/Hide section of the view tab.
This has been known to help many. So create a system restore point first and then rename the WindowsApps folder either in Safe Mode or using the Advanced Recovery Environment. In the latter, you will have to choose the command prompt and execute the following commands.
Safe Mode Method
Boot into Windows Safe Mode and log in with an admin account. Find and open Command Prompt, and execute the following commands as below. It is assuming that your Windows is installed in C drive.
cd C:Program Files
takeown /f WindowsApps /r /d Y
icacls WindowsApps /grant “%USERDOMAIN%%USERNAME%”:(F) /t
attrib WindowsApps -h
rename WindowsApps WindowsApps.old
Reboot Windows normally, and try System Restore again.
Advanced Recover Method
Boot into Advanced Recovery mode, and navigate to Troubleshoot > Advanced Options > Command Prompt. Execute the following command:
cd C:Program Files
attrib WindowsApps -h
rename WindowsApps WindowsAppsOld
Reboot Windows normally, and try System Restore again.
Read: System Restore stuck or hung up.
3] Repair Windows System Image using DISM
If nothing else is working, the last thing we can suggest here is to run the DISM command to fix any form of corruption that might have happened to system files. Open Command Prompt or Power Shell with admin privileges, and execute the following commands
DISM.exe /Online /Cleanup-image /Scanhealth
DISM.exe /Online /Cleanup-image /Restorehealth
DISM.exe /online /cleanup-image /startcomponentcleanup
System Restore, like anything else, is prone to corruption, and permission issues. It is something that should work without issues, but then Windows is not without its share of drawbacks and problems. It is the primary reason why there is should at least two backups in place, so in case one doesn’t work, you can always fall back to the second.
Related: Windows 10 Update error 0x80071160.
I hope the post was able to help you resolve the System Restore Error 0x80071160.
Anand Khanse is the Admin of TheWindowsClub.com, a 10-year Microsoft MVP (2006-16) & a Windows Insider MVP (2016-2022). Please read the entire post & the comments first, create a System Restore Point before making any changes to your system & be careful about any 3rd-party offers while installing freeware.
Ошибка 0x80071160 чаще всего преследует пользователей в процессе обновления. Она может отображаться после достижения какого-то процентного уровня при установке апдейта Windows 10. У некоторых зависает на 27%, у других – на 100%. Однако также данный код изредка всплывает у тех, кто пытается восстановить систему. Плохая новость в том, что крайне мало сведений по данной проблеме. Но не все так уж плохо, ведь на одном из форумов ряд пользователей указали, что у них сработал один способ.
«При установке некоторых обновлений возникли проблемы, но мы попробуем позже.»
«Предварительный просмотр накопительного обновления 2020-09 для .NET Framework 3.5 и 4.8 для Windows 10 версии 1903 для x64 (KB4576947) — ошибка 0x80071160»
Причины
Основная причина заключается в повреждении системных файлов Windows. Все затронутые пользователи имеют какие-то неполадки в этом отношении. Что еще характерно – очень часто sfc /scannow не работает. Может появляться сообщение, что «защита ресурсов Windows не может выполнить запрошенную операцию». DISM тоже может обрываться с ошибкой, например, 87. Проще говоря, код 0x80071160 указывает именно на системные неполадки Windows, а не на какой-то случайный сбой.
Существует одна небольшая утилита, созданная для исправления различных ошибок обновления Windows 10. Есть ряд упоминаний ее эффективности в отношении данного кода сбоя, поэтому попробовать стоит. Хотя загрузка exe-файлов является довольно опасной процедурой, похоже, что данная утилита не содержит чего-либо нежелательного.
Что нужно сделать:
- Скачиваем SFCFix с официального сайта.
- Запускаем exe-файл, выдав утилите необходимые разрешения в UAC.
- Ожидаем некоторое время, пока инструмент проанализирует и восстановит систему.
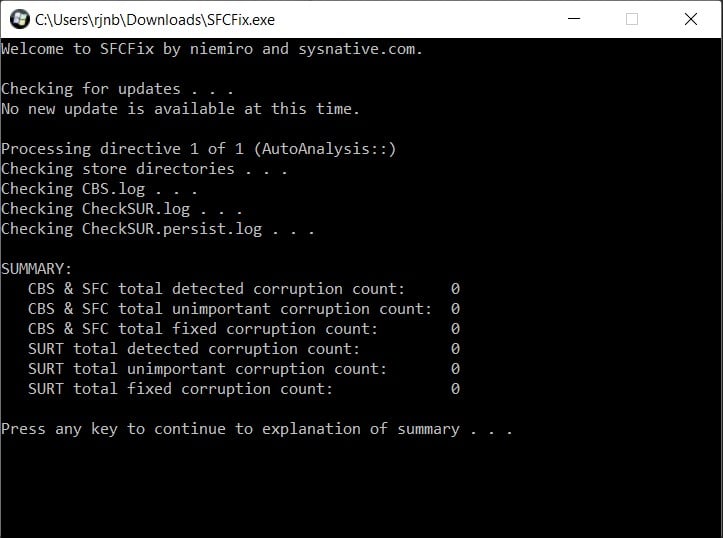
Это не всегда срабатывает с первого раза, но попробовать стоит. К сожалению, никакого другого рабочего способа найти не удалось, так как традиционные методы по перезапуску служб, удалению кэша, загрузке обновления вручную, видимо, не работают. По этой причине очень важно, чтобы вы написали комментарий, удалось ли вам исправить ошибку 0x80071160 и какие способы уже были опробованы.
Windows Updates usually contain some important patches that protect your system from different malicious attacks. But they can also cause errors at times and one such error is Windows Update Error 0x80071160 which has been experienced while trying to update or install security/optional patches on Windows 11 or 10 PC.
This error mostly occurs due to a glitch or corrupted Windows Update system components. In this guide, we’ll take you through a few potential solutions that will help you to address this issue.

Note: If you are getting this error code while using a system restore point on your computer, read and apply the fixes discussed in this article.
To fix Windows Update Error 0x80071160, try these workarounds –
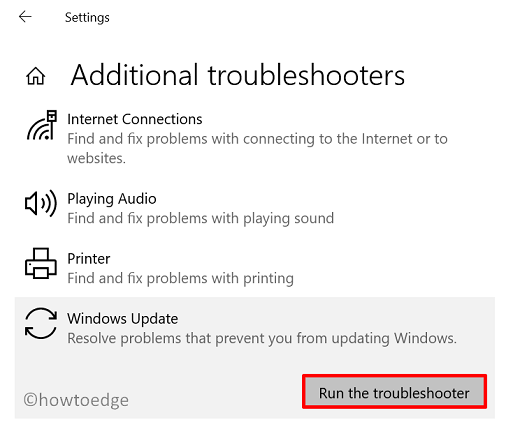
1] Run Windows Update Troubleshooter
Many times it has been reported to fix such kind of issue simply by running the Windows Update Troubleshooter tool. It identifies the problem and tries to fix it automatically which protects you from going through a hassle. The procedure to run this tool is as follows:
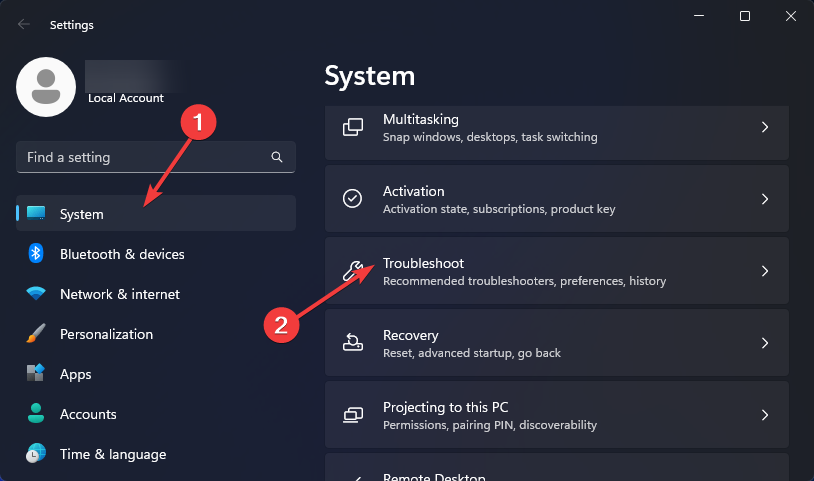
Windows 11:
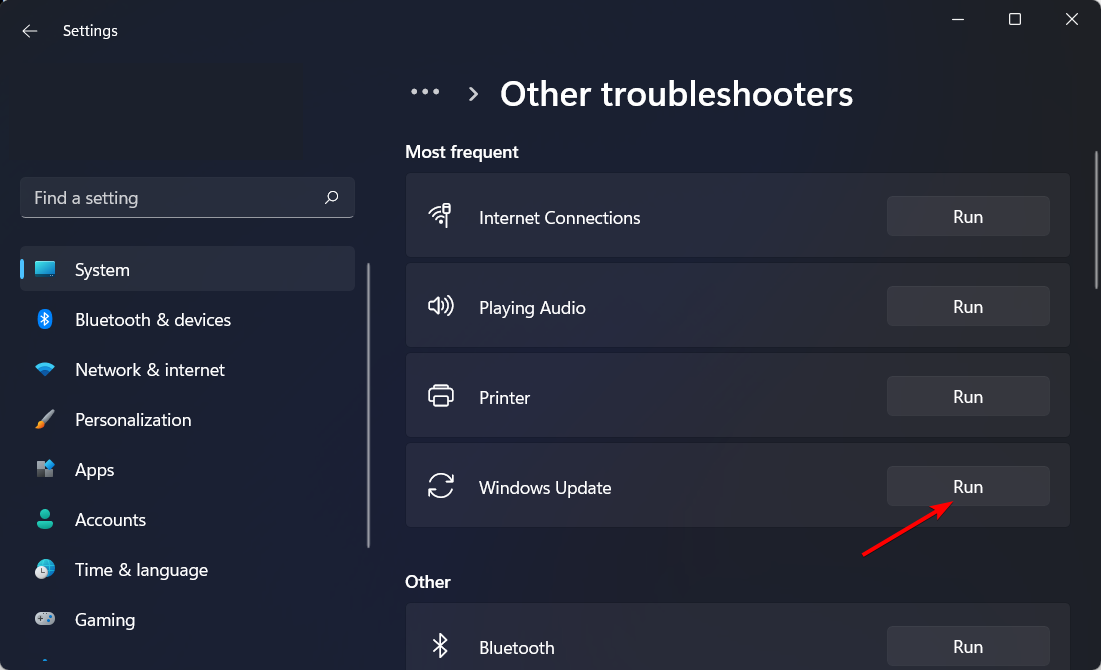
- Press Win + I to open Settings then navigate to the path below –
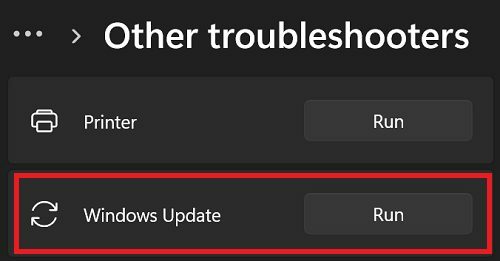
System > Troubleshoot > Other troubleshooters
- Under Most frequent, you will find Windows Update. Well, click the Run button available beside it.

- When the troubleshooter launches, hit Next and follow the on-screen instructions.
Windows 10:
- Right-click on the Start menu and select the Settings app.
- Choose Update & Security > Troubleshoot.
- Go to the right pane and select “Additional troubleshooters”.
- Select Windows Update and then click Run the troubleshooter to start the repair process.
- It might take a little while to complete the task. Once it completes, restart your computer and try to install the updates.
2] Clear the SoftwareDistribution folder
Remove the contents of the Software Distribution folder and try to install the Windows Update again. The procedure is as follows:
- Open the Run dialog box using the Win + R keys.
- Type “cmd” in the text field and press the Ctrl+Shift+Enter keys altogether.
- If the UAC pop-up menu appears on your screen, hit Yes.
- In the elevated command prompt window, run the below commands one after another:
net stop wuauserv
net stop bits

The above commands will stop the Windows Update Service and the Background Intelligent Transfer Service.
- Now open the File Explorer (Windows+E) and navigate to the folder –
C:WindowsSoftwareDistribution
- Select all the contents of the folder and delete them.
Note: You may not be able to delete a file if the file is being used at that time. In that case, restart your device, execute the above commands, and then delete the files.
- After deleting the files, run the following commands:
net start wuauserv
net start bits
This will restart the Windows Update and Background Intelligent Transfer services.
3] Manually download and install the Update
If even after deleting the SoftwareDistribution folder, the error is still persisting, then download and install the update manually via Microsoft Update Catalog.
- Open the Windows 11/Windows 10 Update History page first.
- Go to the left navigation and select your Windows 11/10 edition.
- Scroll down to the below “In this Release” section and click the top link.
- Head over to the adjacent right pane and note down the KB number.
- Visit Microsoft Update Catalog and search for the “KB” number you noted.
- Then press Enter and it will display a list of available updates.
- Select the update that matches your system architecture.
- Click the Download button and then select the Topmost link on the next page.
- Once it completes, double-click the setup file to start updating your Windows OS.
4] Perform a Clean Boot
In case none of the above methods work to solve the Update Error 0x80071160, you may perform a clean boot on your PC. Doing so will eliminate any software conflicts that may arise when you install a Non-Microsoft program or update. Here is how to proceed –
- Right-click on the Windows icon and select Run.
- Type “
msconfig” in the text files and hit enter. - In the System Configuration window, switch to the Services tab.
- Mark the checkbox next to Hide all Microsoft services and hit the Disable all button.

- Then go to the Boot tab and mark the checkbox next to Safe boot.
- Make sure the Minimal option is selected automatically, if not then select it.
- Then click Apply > OK to save the changes. At this time, your computer will restart and will enter Safe Mode.

- Now run the Windows Updates. For this, go to Settings > Update & Security > Windows Update > Check for updates.
- If you’re on Windows 11, go to Settings > Windows Update and hit Check for updates.
If Windows Update is running in Safe Mode, it means any third-party application is interfering with the update and causing the error. In such a case, restart your computer and enable all third-party applications one by one to determine which app was the real culprit. Once you find it, make sure you uninstall it.
Frequently Asked Questions (FAQs)
What is Update Error 0x80071160?
0x80071160 is a Windows update error that occurs when the system fails to download or install updates from the Microsoft Store. This issue can be caused by an inadequate connection or an outdated version of Windows.
What are the Symptoms of the 0x80071160 Update Error?
Symptoms include a “Failed to install” or similar message when trying to access the store, as well as a 0x80071160 error code being displayed. In some cases, the system may also be unable to access the Windows Update page.
How do I Fix Update Error 0x80071160?
To troubleshoot this issue, try running Windows Update Troubleshooter and check your internet connection. If that doesn’t work, then you can check for Windows Update service-related issues or reinstall the latest version of Windows.
What can I do to Prevent 0x80071160 Update Error?
To reduce the risk of 0x80071160 errors, keep your system and all its software up-to-date by regularly checking for updates. You can also create a restore point before starting any Windows update process, to ensure that you can easily revert back if something goes wrong
Read Next:
- Fix System Restore fails to extract Files on Error 0x80071160
- How to Fix Windows 10 Update Error Code 0xc1900201
- How to Fix Update Error 0x8007042c on Windows 10
Tip: If you are facing update, activation, or driver issues on your Windows PC, try RESTORO PC Repair Tool. This software will scan your device for potential issues and resolve them automatically.
Windows Updates are rolled out to protect Windows users from malicious attacks. However, there are times when they cause errors. One such error is the Windows Update error 0x80071160.
If you cannot install a pending Windows 10/11 update because of the Windows update error 0x80071160, then this article is for you. Here, we’ll provide you with everything you need to know about the error code, including its causes and possible solutions.
About the Windows Update Error 0x80071160
According to affected users, the error mostly occurs because of corrupted Windows Update components or system glitches. But then again, Windows experts also point out that the following can also trigger the error code to show.
What causes update error 0x80071160 on Windows 10/11?
- Incorrect date and time settings
- Missing Automatic Updates or Background Intelligent Transfer service
- Trojan, viruses, and other malware entities
- Faulty Windows Update
Update Error 0x80071160 Resolutions
If you encounter the Windows Update error 0x80071160, try our recommended fixes below. For better results, we suggest that you follow them in the order presented.
Fix #1: Run the Windows Update troubleshooter
Many users have reported that the error has been fixed by simply running the Windows Update Troubleshooter. This tool is designed by Microsoft to automatically identify and fix errors.
To run the troubleshooter, follow these steps:
- Right-click on the Start menu.
- Choose Settings.
- Go to Update and Security and select Troubleshoot.
- Navigate to the right pane and choose Additional troubleshooters.
- Click Windows Update, and then hit the Run the troubleshooter button.
- At this point, the repair process should begin. It may take a while to complete the repair process. Once done, restart your PC and attempt to install the update again.
Fix #2: Erase the contents of the SoftwareDistribution folder
Another possible fix involves clearing the contents of the SoftwareDistribution folder. Here’s how to do it:
- Launch the Run dialog box by pressing the Windows + R keys.
- Into the text field, input cmd. Do not hit Enter. Instead, press CTRL + SHIFT + ENTER altogether.
- If prompted for permissions, hit Yes.
- Into the elevated command prompt, run the following commands one after the other:
- net stop wuauserv
- net stop bits
These commands will stop the Background Intelligent Transfer service, as well as the Windows Update service.
- Next, open File Explorer by pressing the Windows + E keys.
- Go to this location: C:WindowsSoftwareDistribution.
- Select all the contents in this folder and delete them.
- Once the files have been deleted, run these commands and hit Enter after each one of them:
- net start wuauserv
- net start bits
These commands will restart the Background Intelligent Transfer service and the Windows Update service.
- Restart your PC for the changes to take effect.
Fix #3: Download and install the Windows Update manually
If the error persists after deleting the contents of the SoftwareDistribution folder, then try to download and install the Windows Update manually.
Here’s what you should do:
- Launch the Windows 10/11 Update History page.
- Navigate to the left pane and choose your Windows edition.
- Scroll down to the In This Release section and click the above link.
- Next, check the right pane and take note of the KB number.
- Now, open your favorite browser and visit the official Microsoft Update Catalog website. On the site, search for the KB number you have just noted.
- Hit Enter to display a list of related updates. Choose one that matches your system architecture.
- Click Download, and then press the top-most link on the page.
- Once the download completes, double-click on the setup file and wait as Windows 10/11 updates.
Fix #4: Perform a clean boot
If none of the first few methods works, you may perform a clean boot to get rid of software issues that arise when you install a Windows Update.
Here’s how to proceed with a clean boot:
- Right-click on the Windows menu and select Run.
- Into the text field, input msconfig and hit Enter.
- The System Configuration window will now open. Go to the Services tab.
- Tick the box next to the Hide all Microsoft services option.
- Hit the Disable All button.
- Now, navigate to the Boot tab and tick the box beside the Safe boot option. Be sure the Minimal option is ticked as well.
- Hit Apply then click OK to save your changes.
- At this point, your PC will restart and boot into Safe Mode.
- Finally, run the Windows Update utility by going to Settings > Update and Security > Windows Update > Check for Updates. Hopefully, the error code is gone.
Fix #5: Run an SFC scan
If the error persists, maybe it’s time to run an SFC scan using the Windows System File Checker utility. However, to use it, you will need to run the DISM tool first.
To do that, follow these instructions:
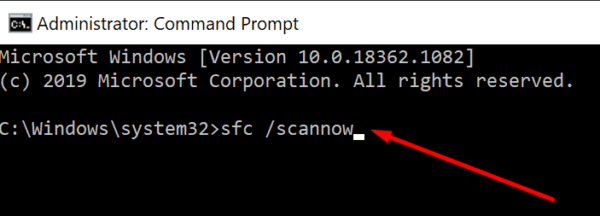
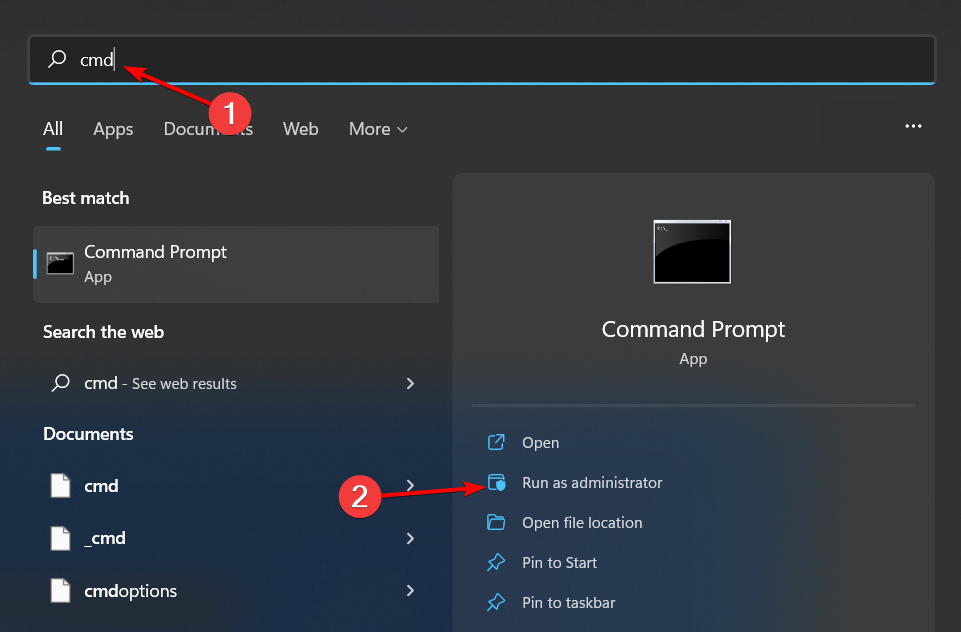
- Go to the Windows menu and type Command Prompt.
- Select Run as Administrator.
- Into the command line, input this command: DISM /online /cleanup-image /restorehealth. Hit Enter. This should clean and restore any corrupt system component. This may take a few minutes to run. You’ll know the process is done once you see the message “The operation completed successfully.”
- After running a DISM scan, it’s time to proceed with an SFC scan. In the same command-line interface, input this command: sfc /scannow.
- Hit Enter to start the scan.
- Once errors are detected, they will be repaired right away.
- Reboot your PC after both scans.
- Finally, retry to install the Windows Update.
Final Thoughts
If all else fails, perhaps it’s just a problematic Windows Update. There are times when Microsoft releases faulty updates, so you might just want to skip them. We know that it’s not worth all the effort, but it happens anyway.
Then again, we still hope that one of the above methods has got you back on track and helped you update Windows. Let us know your thoughts below!

Vic is a certified gadget freak who feels the need to surround himself with cutting-edge technology. And this passion has helped him a lot in creating content that informs and guides users on using and troubleshooting the latest technology. He is an avid researcher who is always hungry for the latest news and updates on the most cutting-edge technology.
Vic is the one in charge of keeping our website running smoothly and efficiently, to make sure that our readers have a wonderful experience while visiting the website. He’s good at troubleshooting errors and fixing Windows issues that come up either when playing games or working on the computer.
Download the update manually as an alternative
by Claire Moraa
Claire likes to think she’s got a knack for solving problems and improving the quality of life for those around her. Driven by the forces of rationality, curiosity,… read more
Updated on March 27, 2023
Reviewed by
Alex Serban

After moving away from the corporate work-style, Alex has found rewards in a lifestyle of constant analysis, team coordination and pestering his colleagues. Holding an MCSA Windows Server… read more
- Sometimes, Windows updates fail because of an interrupted connection or just a corrupt update altogether.
- The built-in Windows update troubleshooter should be able to fix any related issues, but if it doesn’t, you can turn to Windows update repair tools.
XINSTALL BY CLICKING THE DOWNLOAD FILE
Windows update failures can be annoying! With Fortect, you will get rid of errors caused by missing or corrupted files after an update. The utility maintains a repository of the original Windows system file versions, and it uses a reverse algorithm to swap out the damaged ones for good ones.
- Download Fortect and install it on your PC
- Start the tool’s scanning process to look for corrupt files that are the source of the issues
- Right-click on Start Repair to resolve security and performance issues with your computer
- Fortect has been downloaded by 0 readers this month.
Windows updates are important if you want to keep your PC running optimally. Unfortunately, some users are experiencing the error 0x80071160 when running the update. According to reports, the update begins normally, but when it gets to 100, it stalls and then fails.
Windows update errors are not new; usually, the built-in troubleshooter should be able to fix such issues. However, that is not the only way to address such errors, and in this article, we shed more light on other troubleshooting techniques.
Why am I getting the 0x80071160 error?
0x80071160 is a common error code in Windows when you try to update your computer. Some of its possible causes include:
- Incomplete installation – It is possible that a previous update was not completed, which resulted in some files failing to install correctly, causing this error.
- Corrupt update – If there is a problem with the update files themselves, the update will fail no matter how many times you try to download it.
- Interrupted connection – Your Internet connection may have dropped out during installation, causing the process to stall before finishing completely.
- Corrupt system files – If your system files somehow got corrupted, it will be impossible for Windows to recognize what version of Windows you are running on your computer.
- Insufficient hard drive space – More often than not, Windows updates complete successfully, but when it comes to installation, your hard drive does not have enough storage to accommodate the update.
- Server updates – Sometimes, Microsoft might be doing some scheduled maintenance on its servers so that they can work smoothly without any glitches.
How do I fix error 0x80071160?
Before any technical troubleshooting, we recommend that you perform the following basic checks:
- Check your network connection. If you have another device connected to the same router as your computer, ensure they aren’t using up all of your bandwidth.
- Verify the server status and ensure no planned outages or maintenance schedules exist.
- Check for known issues with the update. If there are known problems with it, Microsoft will post information about those issues on its support site.
- If you have a third-party firewall installed on your PC, check if it is blocking updates from being installed successfully for security reasons.
- Ensure you have enough storage for the updates by freeing up some space.
1. Run the Windows Update troubleshooter
- Hit the Windows key and click on Settings.

- Click on System and select Troubleshoot.

- Navigate to Other troubleshooters.

- Click the Run option for the Windows Update troubleshooter.

2. Restart the Windows Update service
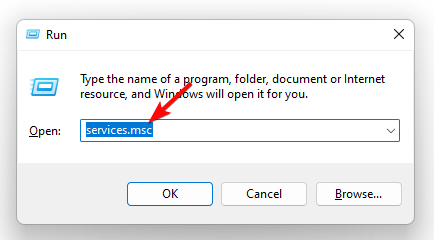
- Hit the Windows + R keys to open the Run command.
- Type services.msc and hit Enter.

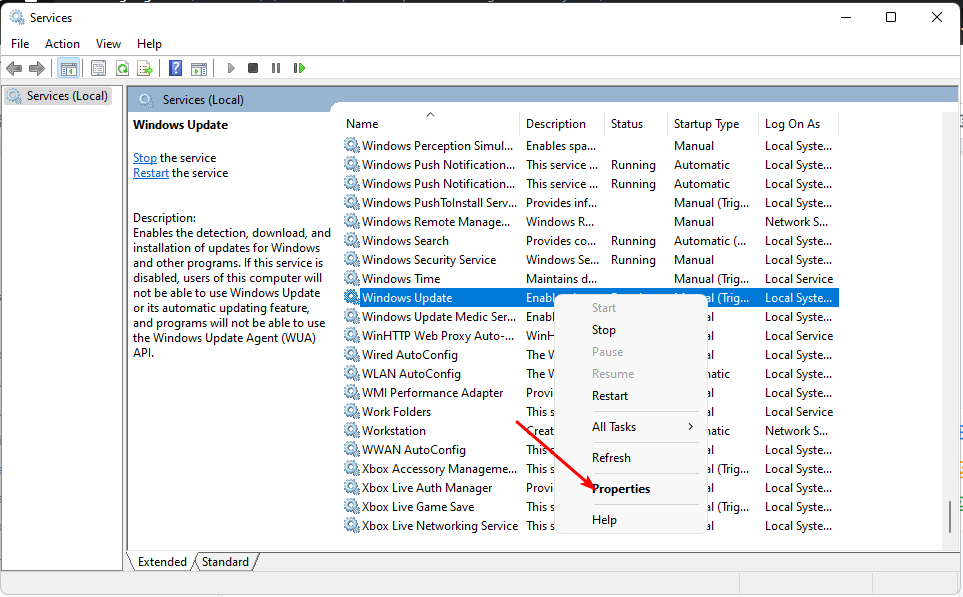
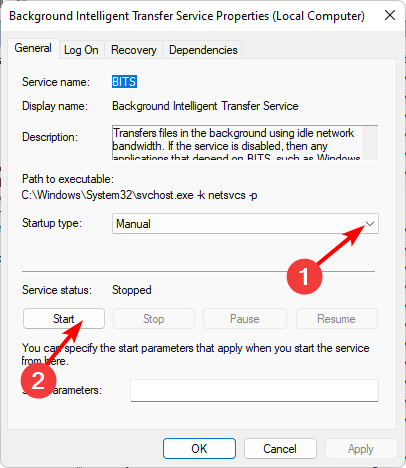
- Locate Windows Update service, right click on it and select Properties.

- Navigate to the General tab, under Startup type, select Automatic from the drop-down options, and click on the Start button.

- Next, click Apply and then OK.

- What is Runtime Error 216 & How to Quickly Fix it
- What is Runtime Error 339 & How to Quickly Fix it
- Services.exe: What is It & How to Fix Its High CPU Usage
- What is Runtime Error 255 & How to Quickly Fix It
- Fix: Windows Update May Have Automatically Replaced AMD
3. Restart the Background Intelligent Transfer Service
- Hit the Windows + R keys to open the Run command.
- Type services.msc and hit Enter.
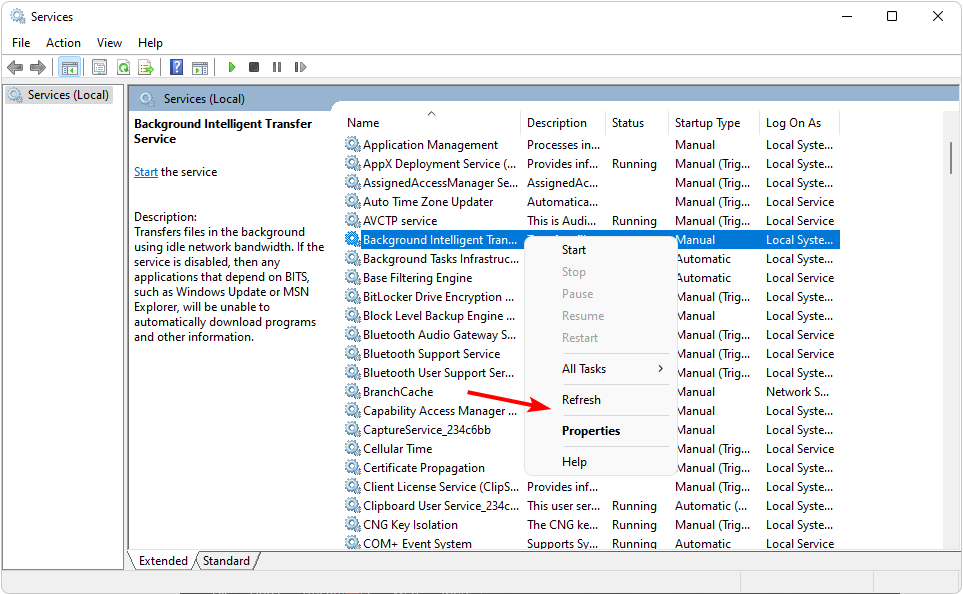
- Locate the Background Intelligent Transfer Service, right-click on it, and select Properties.

- Navigate to the General tab, under Startup type, select Automatic from the drop-down options, and click on the Start button.

- Next, click Apply and then OK.
4. Reset Windows update components
- Hit the Windows key, type cmd in the search bar, and click Run as administrator.

- Type the following commands and press Enter after each one:
net stop bitsnet stop wuauservnet stop appidsvcnet stop cryptsvcDel "%ALLUSERSPROFILE%Application DataMicrosoftNetworkDownloader*.*"rmdir %systemroot%SoftwareDistribution /S /Qrmdir %systemroot%system32catroot2 /S /Qregsvr32.exe /s atl.dllregsvr32.exe /s urlmon.dllregsvr32.exe /s mshtml.dllnetsh winsock resetnetsh winsock reset proxynet start bitsnet start wuauservnet start appidsvcnet start cryptsv
5. Download the update manually
Some PC issues are hard to tackle, especially when it comes to corrupted repositories or missing Windows files. If you are having troubles fixing an error, your system may be partially broken.
We recommend installing Restoro, a tool that will scan your machine and identify what the fault is.
Click here to download and start repairing.
If none of the above methods work, try downloading the updates manually. You can get the specific update from the Microsoft update catalog. Sometimes, it may be that your computer has some other problem that’s preventing the update from installing.
If the manual update still fails, you may have to perform a System Restore or reinstall Windows to avert the error 0x80071160.
Given how frequently Windows update errors occur, it is recommended that you install a Windows update repair tool that can take care of such issues automatically.
It can be hard to pinpoint the exact cause of the error while doing a trial and error with multiple solutions. At least with these tools, your work is made easier, and they can fix a plethora of issues.
Please share with us in the comment section below if there is a solution that may have fixed this same issue but missing from our list.
Still having issues? Fix them with this tool:
SPONSORED
If the advices above haven’t solved your issue, your PC may experience deeper Windows problems. We recommend downloading this PC Repair tool (rated Great on TrustPilot.com) to easily address them. After installation, simply click the Start Scan button and then press on Repair All.
![]()