
Во время обновления Windows 10 можно наткнуться на ошибку 0x80096004. Данный код возникает во время процесса загрузки файлов обновления и их проверки.
Причина — система не может убедиться в подлинности загружаемого обновления. Такая ситуация может возникать из-за поврежденного хранилища сертификатов или поврежденных файлов ОС Windows 10.
В сегодняшней статье мы посмотрим с вами, как можно избавиться от ошибки 0x80096004 в кратчайшие сроки. В этой статье будут рассмотрены такие методы:
- замена файла crypt32.dll;
- сброс компонентов Центра обновления Windows;
- использование средства устранения неполадок;
- отключение брандмауэра и антивируса;
- загрузка обновления вручную;
- задействование утилиты System File Checker.
Содержание
- Решение ошибки 0x80096004 в Windows 10
- Метод №1 Замена файла crypt32.dll
- Метод №2 Сброс компонентов Центра обновления
- Метод №3 Использование средства устранения неполадок
- Метод №4 Отключение брандмауэра и антивируса
- Метод №5 Загрузка обновления вручную
- Метод №6 Задействование утилиты System File Checker
Решение ошибки 0x80096004 в Windows 10
Метод №1 Замена файла crypt32.dll
crypt32.dll — это модуль, который занимается реализацией сертификатов в Windows и который тяжело задействован в интерфейсе программирования приложений CryptoAPI.
Данный файл можно найти в следующих директориях:
- C:WindowsSystem32;
- C:WindowsSysWOW64.
Раздобудьте файл crypt32.dll такой же версии, как и у вас с какого-то другого компьютера. После перейдите в безопасный режим и копируйте добытый файл в указанные выше директории.
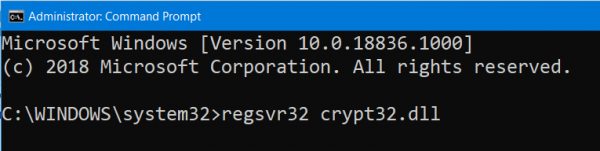
Далее откройте Командную строку (ПКМ+Пуск) и выполните в ней следующую команду:
- regsvr32 crypt32.dll.
Этой командой вы повторно зарегистрируете файл crypt32.dll в своей операционной системе. После регистрации перезагрузите компьютер и войдите в систему в обычном режиме. Пробуем обновить Windows 10 и смотрим, исчезла ли ошибка 0x80096004.
Метод №2 Сброс компонентов Центра обновления
Возможно, некоторые компоненты Центра обновления Windows были повреждены. Если это действительно так, то вам нужно попробовать восстановить их, а затем снова провести обновление системы. Для сброса компонентов Центра обновления вам нужно сделать следующее:
- откройте Командную строку;
- выполните в ней следующие команды для остановки службы BITS и Центра обновления:
- net stop bits;
- net stop wuauserv;
- теперь выполните эту команду для удаления файлов qmgr*.dat:
- Del “%ALLUSERSPROFILE%Application DataMicrosoftNetworkDownloaderqmgr*.dat”;
- далее прописываем и выполняем следующую команду:
- cd /d %windir%system32;
- теперь прописываем весь список нижеуказанных команд для перерегистрации файлов BITS и Центра обновления:
- regsvr32.exe atl.dll;
regsvr32.exe urlmon.dll;
regsvr32.exe mshtml.dll;
regsvr32.exe shdocvw.dll;
regsvr32.exe browseui.dll;
regsvr32.exe jscript.dll;
regsvr32.exe vbscript.dll;
regsvr32.exe scrrun.dll;
regsvr32.exe msxml.dll;
regsvr32.exe msxml3.dll;
regsvr32.exe msxml6.dll;
regsvr32.exe actxprxy.dll;
regsvr32.exe softpub.dll;
regsvr32.exe wintrust.dll;
regsvr32.exe dssenh.dll;
regsvr32.exe rsaenh.dll;
regsvr32.exe gpkcsp.dll;
regsvr32.exe sccbase.dll;
regsvr32.exe slbcsp.dll;
regsvr32.exe cryptdlg.dll;
regsvr32.exe oleaut32.dll;
regsvr32.exe ole32.dll;
regsvr32.exe shell32.dll;
regsvr32.exe initpki.dll;
regsvr32.exe wuapi.dll;
regsvr32.exe wuaueng.dll;
regsvr32.exe wuaueng1.dll;
regsvr32.exe wucltui.dll;
regsvr32.exe wups.dll;
regsvr32.exe wups2.dll;
regsvr32.exe wuweb.dll;
regsvr32.exe qmgr.dll;
regsvr32.exe qmgrprxy.dll;
regsvr32.exe wucltux.dll;
regsvr32.exe muweb.dll;
regsvr32.exe wuwebv.dll;
- regsvr32.exe atl.dll;
- сбрасываем Winsock, выполнив следующую команду:
- netsh winsock reset;
- снова запускаем службы BITS и Центра обновления:
- net start bits;
- net start wuauserv;
- перезагружаем компьютер.
Попытайтесь снова обновить свою Windows 10 и проверьте, исчезла ли ошибка 0x80096004 или нет.
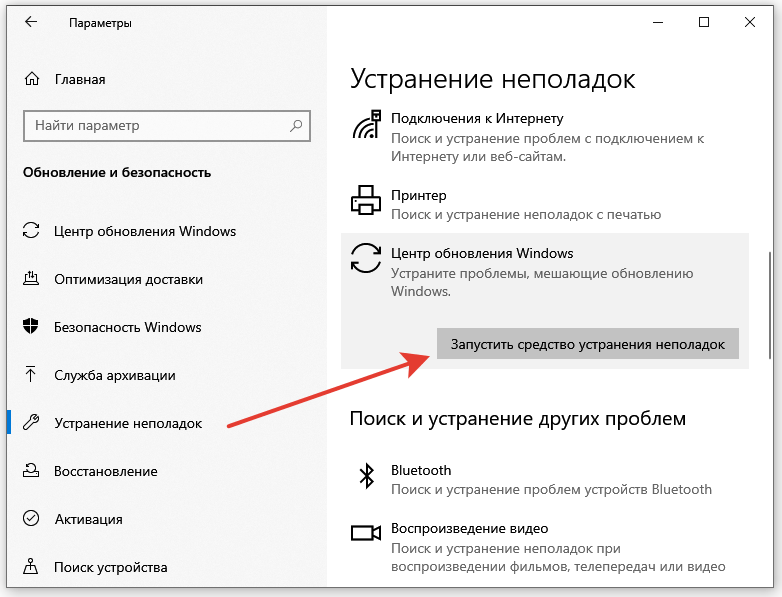
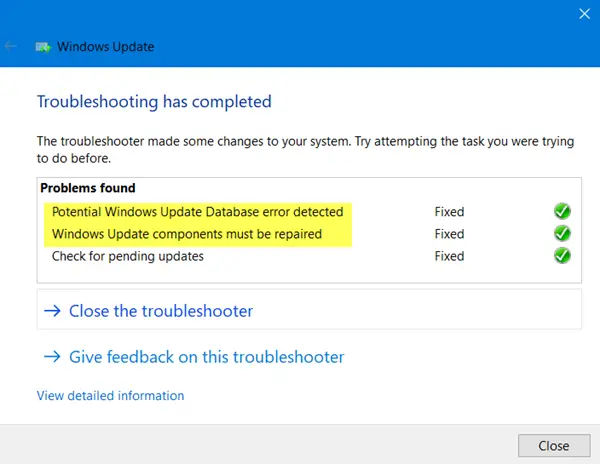
Метод №3 Использование средства устранения неполадок
Мы советуем вам воспользоваться системным средством устранения неполадок. Данное средство помогает в довольно редких случаях, тем не менее оно может быть полезно. Для его запуска вам нужно сделать следующее:
- откройте параметры системы;
- пройдите в раздел «Обновление и безопасность»;
- перейдите во вкладку «Устранение неполадок»;
- найдите пункт «Центр обновления Windows» и нажмите на него ЛКМ;
- теперь кликните на кнопку «Запустить средство устранения неполадок»;
- далее вам нужно подождать окончания сканирования системы и нажать на кнопку «Применить это исправление»;
- перезагрузите компьютер.
После применения предложенного исправления попробуйте зайти в Центр обновления и запустить апдейт системы. Ошибка 0x80096004 могла исчезнуть.
Метод №4 Отключение брандмауэра и антивируса
Есть вероятность, что вы не можете нормально обновить свою Windows 10 из-за «деятельности» системного брандмауэра или антивируса. Проверить это довольно легко, отключив эти компоненты системы.
Чтобы отключить Брандмауэр Windows, сделайте следующее:
- нажмите Windows+R;
- пропишите в строку «control.exe» и нажмите Enter;
- откройте раздел «Система и безопасность»;
- перейдите в подраздел «Брандмауэр Защитника Windows»;
- кликните на строчку «Включение и отключение брандмауэра Защитника Windows»;
- поставьте галочки после пунктов отключения и сохраните изменения.
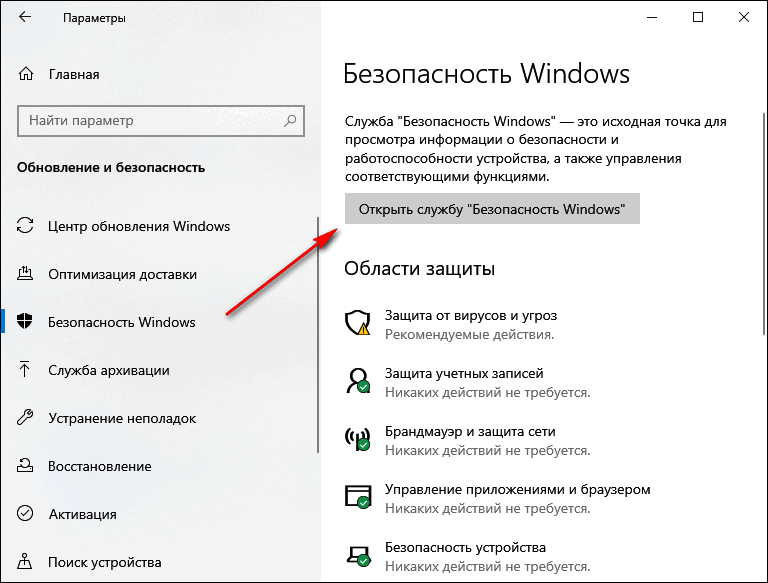
Для отключение Защитника Windows вам нужно сделать следующее:
- нажмите Windows+I;
- откройте раздел «Обновление и безопасность»;
- перейдите во вкладку «Безопасность Windows»;
- нажмите на кнопку «Открыть Центр безопасности Защитника Windows»;
- пройдите во вкладку «Защита от вирусов и угроз»;
- кликните на пункт «Параметры защиты от вирусов и других угроз»;
- выставьте переключатель «Защита в режиме реального времени» в положение «Откл.».
Попробуйте теперь обновить Windows 10 и проверьте, появится ли ошибка 0x80096004.
Метод №5 Загрузка обновления вручную
Все безуспешно? Почему бы тогда не попробовать загрузить нужное вам обновление вручную? Вы можете запросто загрузить установщик того или иного обновления с каталога обновлений Майкрософт и провести установку самостоятельно.
Но как понять, какое обновление нужно скачать? Для этого вам нужно воспользоваться этими шагами:
- откройте параметры своей системы;
- пройдите в раздел «Обновление и безопасность»;
- перейдите во вкладку «Центр обновления Windows»;
- нажмите на кнопку «Просмотр журнала обновлений».
В этом месте вы увидите нужный вам номер обновления, ведь рядом с ним будет указан код ошибки 0x80096004.
Метод №6 Задействование утилиты System File Checker
Некоторые системные файлы Windows 10 могли повредиться, вследствие чего вы и наталкиваетесь на рассматриваемую сегодня ошибку. Вы можете попробовать восстановить поврежденные файлы, задействовав утилиту System File Checker.
Она просканирует вашу систему, найдет поврежденные файлы и попытается их исправить, но только в том случае, если это возможно. Чтобы запустить SFC, вам нужно сделать следующее:
- нажмите ПКМ на Пуск и выберите «Командная строка (администратор)»;
- пропишите «sfc /scannow» и нажмите Enter;
- перезагрузите свой компьютер после окончания работы утилиты SFC.
Ошибка 0x80096004 должна исчезнуть, если какие-то системные файлы были повреждены и восстановлены через System File Checker.
When trying to install Visual Studio 2017 Community I got the error:
Couldn’t download ‘Microsoft.VisualStudio.WCF.DiagnosticPack.Msi.msi’
Error 0x80096004 there is a problem verifying the signature of a certificate.
Windows 10 Pro Version: 20h2
OS build: 19042.804
Visual Studio 2017 Community version: 15.9.33

click to enlarge
Checking the logs I found it seems that the problem is the hash of the file.
Error: Package ‘Microsoft.VisualStudio.WCF.DiagnosticPack.Msi, version
= 15.0.27005.2’ failed to download from ‘https://download.visualstudio.microsoft.com/download/pr/7b52e873-c823-471c-b1e9-ca1224f499fa
/74a24f8c005b1d09066b357104945dc94d3a18156c0433352a718aefd1a616d7/Microsoft.VisualStudio.WCF.DiagnosticPack.Msi.msi
‘. WebClient download failed: SHA256 check for
‘Microsoft.VisualStudio.WCF.DiagnosticPack.Msi.msi’ failed. Expected
hash:
74A24F8C005B1D09066B357104945DC94D3A18156C0433352A718AEFD1A616D7,
Actual hash: FEB8356FD3CF6E8520F3675E426C02C11399F94B4A3B0B4E21A1D5B9.
Bits download failed: SHA256 check for
‘Microsoft.VisualStudio.WCF.DiagnosticPack.Msi.msi’ failed. Expected
hash:
74A24F8C005B1D09066B357104945DC94D3A18156C0433352A718AEFD1A616D7,
Actual hash: FEB8356FD3CF6E8520F3675E426C02C11399F94B4A3B0B4E21A1D5B9.
WinInet download failed: SHA256 check for
‘Microsoft.VisualStudio.WCF.DiagnosticPack.Msi.msi’ failed. Hash
expected:
74A24F8C005B1D09066B357104945DC94D3A18156C0433352A718AEFD1A616D7, real
hash:
FEB8356FD3CF6E8520F3675E426C02C11399F94B4A3B0B4E21A1D5AF186192B9,
Signature: PackageId = Microsoft.VisualStudio.WCF.DiagnosticPack.Msi;
PackageAction = DownloadPackage; ReturnCode = 0x80131500
Please, does anyone know how to fix this?
Thank you.
![]()
asked Mar 6, 2021 at 18:56
![]()
Someone from Microsoft support gave me a few steps to do and the problem was fixed.
I did the following:
- I delete all content from the %temp% folder
- I deleted the folder «%programdata%MicrosoftVisualStudioPackagesMicrosoft.VisualStudio.WCF.DiagnosticPack.Msi,version=15.0.27005.2»
- I disabled my antivirus program (Microsoft Defender Antivirus)
- I confirmed that all Windows updates were installed
- I opened the Visual Studio Installer and repaired the VS 2017 Community
Fortunately the error message did not appear anymore, that is, it seems that the installation was successful for the package «Microsoft.VisualStudio.WCF.DiagnosticPack.Msi».
Note: on the day of the problem I even deleted all the contents of the %temp% folder, the Windows updates were the most current (I had just formatted my PC and installed Windows 10), and even then the problem continued however today the repair worked.
Thanks.
answered Mar 8, 2021 at 17:31
![]()
Ошибка 0x80096004 появляется в процессе обновления Windows 10. Причина — система не признаёт подлинность загружаемых файлов. Ошибка чаще всего возникает из-за повреждения хранилища сертификатов или системных файлов Виндовс. Так как точную причину определить сложно, придётся перепробовать несколько методов, пока ошибка не будет устранена.
Автоматическое устранение неполадок
Первым делом попробуем устранить неполадки с помощью встроенного инструмента системы.
- Открываем раздел «Обновление и безопасность» в «Параметрах» Windows 10.
- Переходим на вкладку «Устранение неполадок».
- Находим «Центр обновления» и нажимаем «Запустить средство устранения неполадок».
Устраняем неполадки в автоматическом режиме
К сожалению, чаще всего встроенное средство устранения неполадок не находит причину ошибки или не может с ней справиться. Однако попробовать в любом случае стоит.
Замена файла crypt32.dll
Одна из возможных причин появления ошибки — проблемы с сертификатами, из-за которых система не опознает обновления. Чтобы её устранить, попробуем заменить файл crypt32.dll, связанный с реализацией сертификатов на Виндовс.
Найти файл crypt32.dll можно в папках C:WindowsSystem32 (на 32-битных версиях Windows) и C:WindowsSysWOW64 (на 64-битных версиях). Самый безопасный способ — скопировать его с другого компьютера и перенести на тот, при обновлении которого появляется ошибка.
Другой вариант — скачать файл crypt32.dll из онлайн-хранилища динамических библиотек. Я обычно использую сервис DLL-Files.
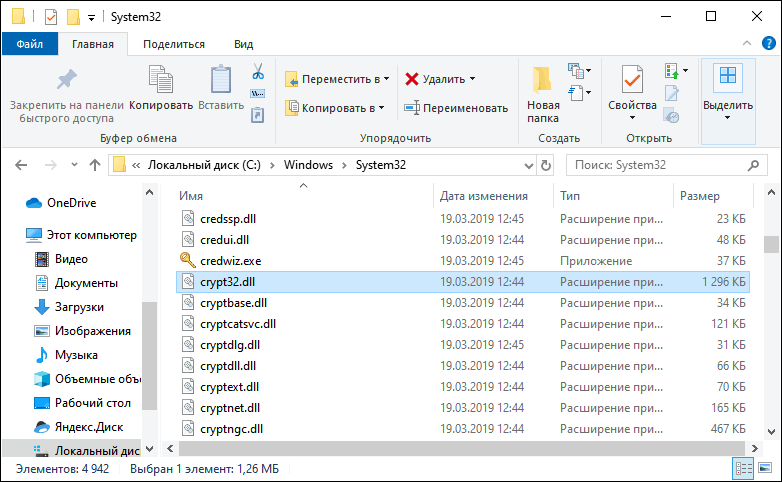
Проблема может быть в этом файле
После того, как заведомо исправный файл будет получен, необходимо добавить его в системную папку.
- Загружаем WIndows 10 в безопасном режиме.
- Заходим в папку C:WindowsSystem32 или C:WindowsSysWOW64 в зависимости от разрядности системы.
- Перемещаем файл crypt32.dll с заменой исходной библиотеки.
- Запускаем командную строку с правами администратора.
- Выполняем команду regsvr32 crypt32.dll.
Командная строка нужна нам для регистрации компонента в системе. После выполнения команды закрываем консоль и пробуем ещё раз обновить Виндовс.
Сброс компонентов системы обновления
Ошибка может появиться из-за повреждения служб, отвечающих за работу системы обновления. Устранить эти неполадки можно сбросом компонентов.
Запускаем командную строку с правами администратора и выполняем две команды:
- net stop bits
- net stop wuauserv
Затем удаляем файлы обновлений — Del «%ALLUSERSPROFILE%Application DataMicrosoftNetworkDownloaderqmgr*.dat».
Следующая команда — cd /d %windir%system32.
Затем перерегистрируем компоненты системы обновления. Вводим следующие команды:
regsvr32.exe atl.dll;
regsvr32.exe urlmon.dll;
regsvr32.exe mshtml.dll;
regsvr32.exe shdocvw.dll;
regsvr32.exe browseui.dll;
regsvr32.exe jscript.dll;
regsvr32.exe vbscript.dll;
regsvr32.exe scrrun.dll;
regsvr32.exe msxml.dll;
regsvr32.exe msxml3.dll;
regsvr32.exe msxml6.dll;
regsvr32.exe actxprxy.dll;
regsvr32.exe softpub.dll;
regsvr32.exe wintrust.dll;
regsvr32.exe dssenh.dll;
regsvr32.exe rsaenh.dll;
regsvr32.exe gpkcsp.dll;
regsvr32.exe sccbase.dll;
regsvr32.exe slbcsp.dll;
regsvr32.exe cryptdlg.dll;
regsvr32.exe oleaut32.dll;
regsvr32.exe ole32.dll;
regsvr32.exe shell32.dll;
regsvr32.exe initpki.dll;
regsvr32.exe wuapi.dll;
regsvr32.exe wuaueng.dll;
regsvr32.exe wuaueng1.dll;
regsvr32.exe wucltui.dll;
regsvr32.exe wups.dll;
regsvr32.exe wups2.dll;
regsvr32.exe wuweb.dll;
regsvr32.exe qmgr.dll;
regsvr32.exe qmgrprxy.dll;
regsvr32.exe wucltux.dll;
regsvr32.exe muweb.dll;
regsvr32.exe wuwebv.dll;
Затем сбрасываем Winsock — netsh winsock reset.
Последний шаг — запуск служб BITS и Центра обновления:
- net start bits
- net start wuauserv
После выполнения этих двух команд перезагружаем систему.
Можно не вводить все эти команды в консоль, а создать BAT-файл.
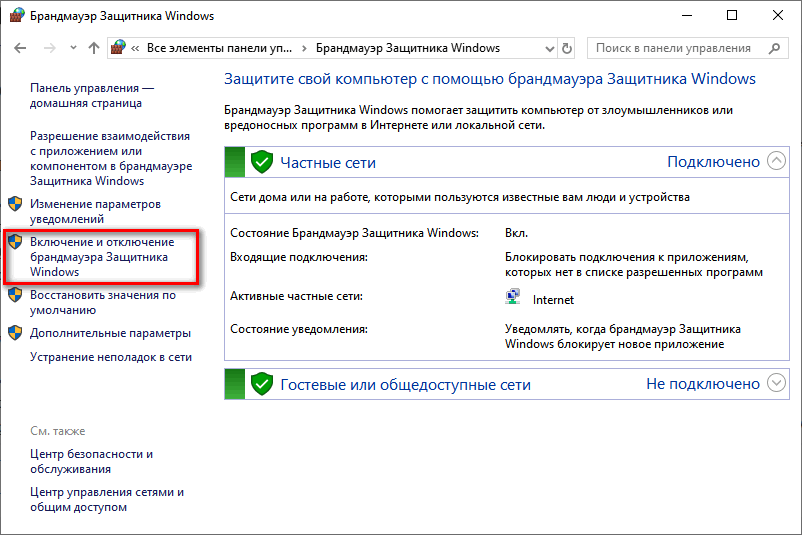
Отключение брандмауэра и антивируса
Запрещать установку обновления может также брандмауэр или «Защитник Windows». Чтобы преодолеть этот запрет, на время отключим их. Начнём с брандмауэра «Защитника Windows»:
- Открываем «Панель управления».
- Переключаемся в режим «Крупные значки» и переходим в раздел «Брандмауэр Защитника Windows».
- Кликаем по ссылке «Включение и отключение брандмауэра Защитника Windows» в меню слева.

Настройка брандмауэра Виндовс
- Отключаем брандмауэр для частной и общественной сетей.
Отказываемся от защитного экрана на время установки обновления
- Сохраняем изменения.

Теперь отключим сам «Защитник»:
- Открываем «Параметры».
- Переходим на вкладку «Обновление и безопасность».
- Выбираем вкладку «Безопасность» и нажимаем на кнопку «Открыть службу Безопасность».

Переходим в настройки безопасности Windows
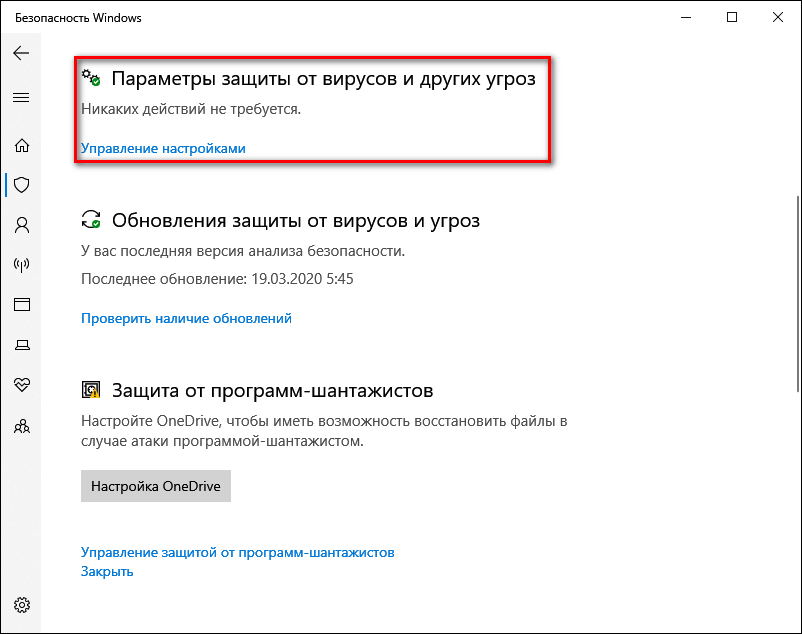
- Открываем вкладку «Защита от вирусов и угроз».
- Кликаем по ссылке «Управление настройками» в поле «Параметры защиты от вирусов и угроз».

Меняем параметры защиты от вирусов и угроз
- Отключаем защиту в реальном времени.
Если за безопасность системы отвечает антивирус от сторонних разработчиков, отключаем его вместе со всеми дополнительными функциями вроде брандмауэра. После успешной установки обновлений включаем защитные функции обратно.
Проверка системных файлов
Одна из возможных причин появления ошибки 0x80096004 — повреждение системных файлов. Найти и устранить сбои поможет системная утилита System File Checker (SFC). Запускаем командную строку с правами администратора и выполняем команду sfc/scannow.
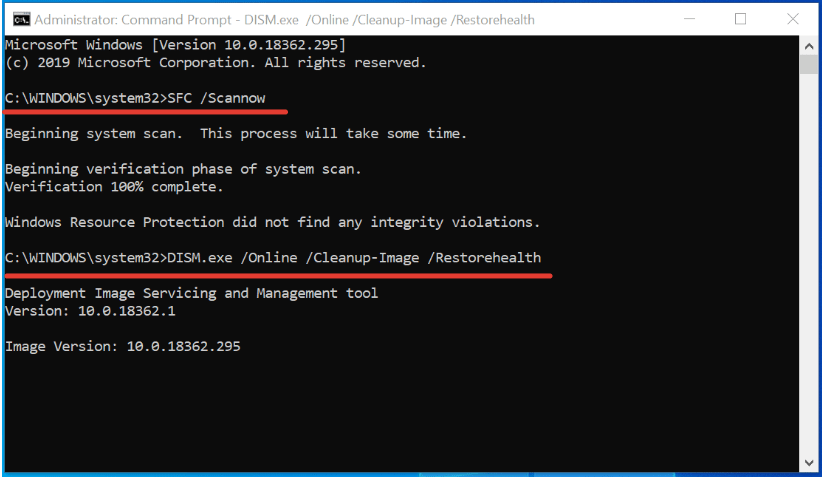
Проверяем целостность системных файлов
Если после сканирования с помощью SFC ошибка сохраняется, запускаем проверку системных файлов другой встроенной утилитой — DISM. Для этого выполняем команду DISM/Online/Cleanup-Image/RestoreHealth. Подробнее о том, как работают эти инструменты, мы рассказали в статье о проверке целостности системных файлов.
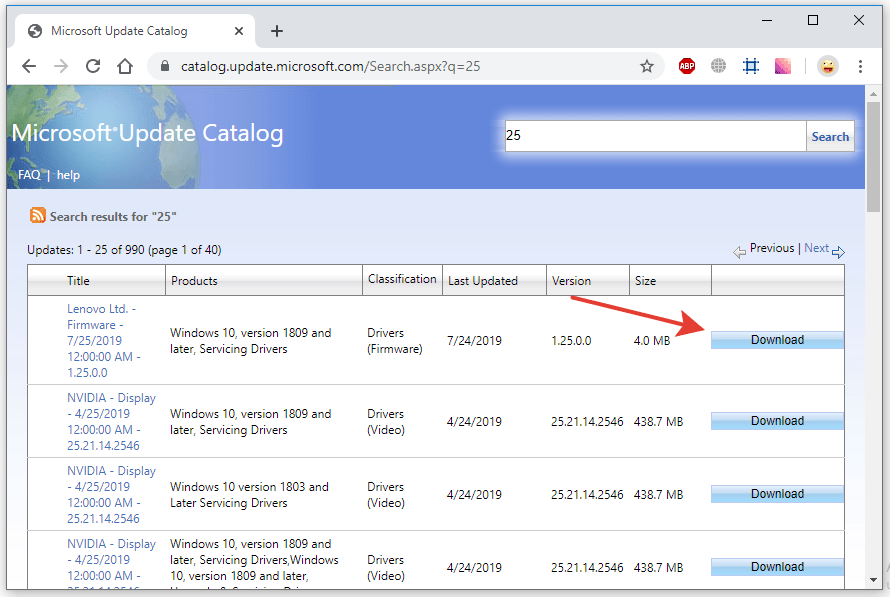
Ручная установка обновлений
Если автоматическая установка через Центр обновлений всё равно не работает, используем ручную инсталляцию.
- Открываем каталог обновлений Microsoft.
- В поисковой строке пишем номер обновления, при установке которого появляется сообщение об ошибке, и нажимаем на кнопку «Search».
- Скачиваем апдейт с подходящей версией и разрядностью.
- Запускаем загруженный файл и устанавливаем обновление.

Устанавливаем обновление вручную
Единственный непонятный момент во всей этой процедуре — номер обновления. Чтобы уточнить его, выполняем следующие действия:
- Открываем раздел «Обновление и безопасность» в «Параметрах».
- На вкладке «Центр обновления» нажимаем на кнопку «Просмотр журнала обновлений».
- Находим обновление, рядом с котором указан код ошибки 0x80096004.
Для ручной инсталляции обновлений подходит также утилита Media Creation Tool. Обычно её используют для создания установочной флешки Windows 10. Но можно сделать так:
- Скачиваем и устанавливаем утилиту Media Creation Tool.
- Выбираем режим «Обновить этот компьютер сейчас».
- Следуем советам мастера, чтобы установить доступные апдейты.

Обновление через Media Creation Tool
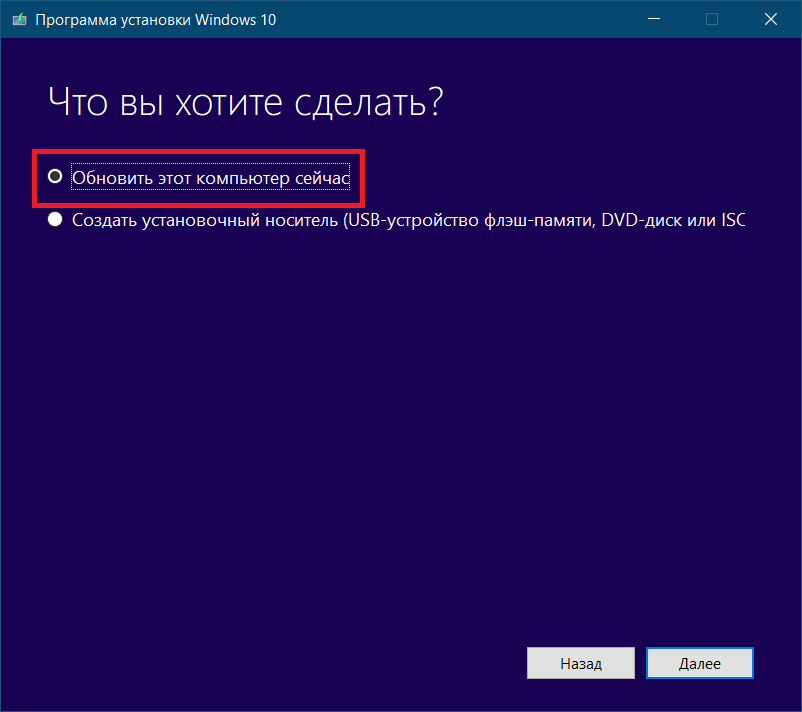
Это принудительное обновление системы, которое должно пройти без ошибки 0x80096004.
![]() Загрузка …
Загрузка …
Post Views: 2 224
Download PC Repair Tool to quickly find & fix Windows errors automatically
People have reported Microsoft of encountering error 0x80096004 for Windows Updates. This is caused during the initial download and verification process, and even Windows features (FODs) are also affected by this error. The error code says TRUST_E_CERT_SIGNATURE. This means that the signature of the certificate could not be confirmed.

It is caused due to a broken certificate store or a corrupt copy of the Windows operating system being installed.
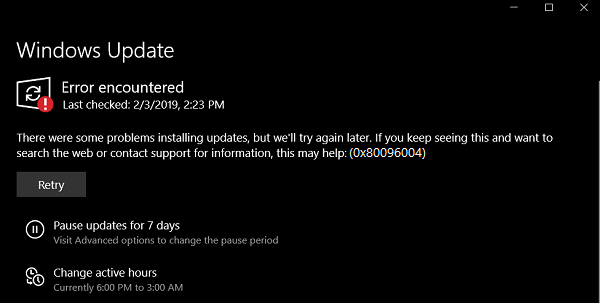
There were problems installing some updates, but we’ll try again later. If you keep seeing this and want to search the web or contact support for information, this may help (0x80096004)
Today, we will be checking out how to fix error code 0x80096004 for Windows Updates on Windows 11/10.
To fix the error 0x80096004 for Windows Update on Windows 11/10, we will be carrying out the following fixes,
- Replace the crypt32.dll file.
- Reset Windows Update folders.
- Use Windows Update Troubleshooter.
- Configure the Firewall or Antivirus.
- Download the required update manually.
- Use System File Checker.
- Run Windows Updates in Clean Boot State.
1] Replace the crypt32.dll file
Crypt32.dll is the module that implements many of the Certificate and Cryptographic Messaging functions in the CryptoAPI
The file mentioned above is located on this path-
For x86:
This PC > C:WindowsSystem32.
For x64:
This PC > C:WindowsSysWOW64.
Get the new file from another computer with the same file version number.
Then, you need to boot into Safe Mode, navigate to the path mentioned above, and replace the file.
Next, open Command Prompt by searching for cmd in the Cortana search box and run it with Administrator level privileges.
Type in the following command and hit the Enter key to re-register the dll file–
regsvr32 crypt32.dll
Reboot and see.
2] Reset Windows Update related folders
You need to delete the contents of the SoftwareDistribution folder & reset the Catroot2 folder.
3] Use Windows Update Troubleshooter
You can run the Windows Update Troubleshooter and also Microsoft’s Online Windows Update Troubleshooter and check if that is any help in fixing any of your issues.
4] Configure the Firewall or Antivirus
You can try to temporarily disable Windows Defender which is installed out of the box on your Windows 10 computer. You can also disable your Windows Firewall on your computer and check if that fixes the errors that you are encountering. If you are using 3rd-party security software, disable them and see.
5] Download the required update manually
If it’s not a feature update, and only a cumulative update, you can manually download and install the Windows Update. To find which update has failed to follow the steps:
- Go to Settings > Update and Security > View Update History
- Check which particular update has failed. Updates that have failed to install will display Failed under the Status column.
- Next, go to Microsoft Download Center, and search for that update using the KB number.
- Once you find it, download, and install it manually.
6] Use System File Checker
Open Command Prompt as administrator and run System File Checker by executing the following command:
sfc /scannow
Restart your system after the scan is completed.
You can also use our freeware FixWin to Run the System File Checker utility with a click.
7] Run Windows Updates in Clean Boot State
A Clean Boot starts a system with minimal drivers and startup programs. When you start the computer in clean boot, the computer starts by using a pre-selected minimal set of drivers and startup programs, and because the computer starts with a minimal set of drivers, some programs may not work as you expected.
You can run Windows Update after booting into the Clean Boot State and check if that makes the error go away.
All the best!

Ayush has been a Windows enthusiast since the day he got his first PC with Windows 98SE. He is an active Windows Insider since Day 1 and has been a Windows Insider MVP.
Download PC Repair Tool to quickly find & fix Windows errors automatically
People have reported Microsoft of encountering error 0x80096004 for Windows Updates. This is caused during the initial download and verification process, and even Windows features (FODs) are also affected by this error. The error code says TRUST_E_CERT_SIGNATURE. This means that the signature of the certificate could not be confirmed.
It is caused due to a broken certificate store or a corrupt copy of the Windows operating system being installed.
There were problems installing some updates, but we’ll try again later. If you keep seeing this and want to search the web or contact support for information, this may help (0x80096004)
Today, we will be checking out how to fix error code 0x80096004 for Windows Updates on Windows 11/10.
To fix the error 0x80096004 for Windows Update on Windows 11/10, we will be carrying out the following fixes,
- Replace the crypt32.dll file.
- Reset Windows Update folders.
- Use Windows Update Troubleshooter.
- Configure the Firewall or Antivirus.
- Download the required update manually.
- Use System File Checker.
- Run Windows Updates in Clean Boot State.
1] Replace the crypt32.dll file
Crypt32.dll is the module that implements many of the Certificate and Cryptographic Messaging functions in the CryptoAPI
The file mentioned above is located on this path-
For x86:
This PC > C:WindowsSystem32.
For x64:
This PC > C:WindowsSysWOW64.
Get the new file from another computer with the same file version number.
Then, you need to boot into Safe Mode, navigate to the path mentioned above, and replace the file.
Next, open Command Prompt by searching for cmd in the Cortana search box and run it with Administrator level privileges.
Type in the following command and hit the Enter key to re-register the dll file–
regsvr32 crypt32.dll
Reboot and see.
2] Reset Windows Update related folders
You need to delete the contents of the SoftwareDistribution folder & reset the Catroot2 folder.
3] Use Windows Update Troubleshooter
You can run the Windows Update Troubleshooter and also Microsoft’s Online Windows Update Troubleshooter and check if that is any help in fixing any of your issues.
4] Configure the Firewall or Antivirus
You can try to temporarily disable Windows Defender which is installed out of the box on your Windows 10 computer. You can also disable your Windows Firewall on your computer and check if that fixes the errors that you are encountering. If you are using 3rd-party security software, disable them and see.
5] Download the required update manually
If it’s not a feature update, and only a cumulative update, you can manually download and install the Windows Update. To find which update has failed to follow the steps:
- Go to Settings > Update and Security > View Update History
- Check which particular update has failed. Updates that have failed to install will display Failed under the Status column.
- Next, go to Microsoft Download Center, and search for that update using the KB number.
- Once you find it, download, and install it manually.
6] Use System File Checker
Open Command Prompt as administrator and run System File Checker by executing the following command:
sfc /scannow
Restart your system after the scan is completed.
You can also use our freeware FixWin to Run the System File Checker utility with a click.
7] Run Windows Updates in Clean Boot State
A Clean Boot starts a system with minimal drivers and startup programs. When you start the computer in clean boot, the computer starts by using a pre-selected minimal set of drivers and startup programs, and because the computer starts with a minimal set of drivers, some programs may not work as you expected.
You can run Windows Update after booting into the Clean Boot State and check if that makes the error go away.
All the best!
Ayush has been a Windows enthusiast since the day he got his first PC with Windows 98SE. He is an active Windows Insider since Day 1 and has been a Windows Insider MVP.
Windows 10 получила в основном положительные отзывы от людей, у которых обновились из предыдущих версий системы. Хотя новая Windows и не идеальна. У нее есть нюансы, такие же, как и в других программах, но к счастью большинство этих проблем может быть легко исправлено.
Рекомендуем ознакомиться: как сбросить пароль на Windows 10.
При попытке обновления Windows 10 отображается ошибка 0x80096004 и пользователю предлагается обратиться за помощью в интерактивном режиме или обратиться в службу поддержки. Ошибка также известна как TRUST_E_CERT_SIGNATURE и вызвана неправильным сертификатом.
Вот несколько способов исправить ошибку 0x80096004 при обновлении Windows 10.
Откройте порт 443 или 80 в брандмауэре, чтобы исправить ошибку 0x80096004
Эта ошибка также известна как ошибка TRUST_E_CERT_SIGNATURE. Это недопустимая ошибка сертификата, которая может быть исправлена путем открытия портов 443 и порта 80 в брандмауэре для исходящего трафика.
Отключите брандмауэр «Защитника Windows»
Существует два типа брандмауэров. Одним из них является брандмауэр в вашем WiFi / Ethernet-маршрутизаторе, а другой — программный брандмауэр, например, «Защитник Windows». Вы можете проверить, не возникает ли проблема именно с брандмауэром, отключив программы и снова попытавшись выполнить обновление Windows. Если это не помогает, вам необходимо изменить настройки брандмауэра на маршрутизаторе WiFi / Ethernet.
Изменение настроек брандмауэра в маршрутизаторе
Иногда это может быть немного сложно, так что вы должны быть немного осторожным, когда делаете это. Если говорить о том, как изменить настройки брандмауэра на вашем WiFi / Ethernet-маршрутизаторе, то советы могут и будут отличаться, потому что существует много разных моделей. Но все же они должны быть предельно похожи в многих местах, для всех моделей.
Перед началом работы обязательно подключитесь к маршрутизатору с помощью кабеля Ethernet. Вам также необходимо знать IP-адрес маршрутизатора для доступа к его настройкам. Эту информацию можно узнать на коробке или самом модеме. Обратите внимание: если вы допустили ошибку, вы можете сбросить настройки маршрутизатора, нажав и удерживая кнопку сброса, но он может сбросить все настройки, поэтому будьте осторожны и сделайте резервную копию настроек, прежде чем начинать что-либо менять.
Если у вас остались какие-то вопросы по теме «Как исправить ошибку 0x80096004», то можете писать их в форму комментариев на нашем сайте.
Люди сообщили, что Microsoft обнаружила ошибку 0x80096004 для обновлений Windows. Это происходит во время начальной загрузки и процесса проверки, и эта ошибка также затрагивает даже функции Windows (FOD). Код ошибки говорит: TRUST_E_CERT_SIGNATURE . Это означает, что подпись сертификата не может быть подтверждена.

Это вызвано поврежденным хранилищем сертификатов или поврежденной копией устанавливаемой операционной системы Windows.
Были проблемы с установкой некоторых обновлений, но мы попробуем позже. Если вы продолжаете видеть это и хотите искать информацию в Интернете или обратиться в службу поддержки, это может помочь (0x80096004)
Сегодня мы рассмотрим, как исправить код ошибки 0x80096004 для обновлений Windows в Windows 10.
Ошибка Центра обновления Windows 0x80096004
Чтобы исправить ошибку 0x80096004 для Центра обновления Windows в Windows 10, мы будем выполнять следующие исправления:
- Заменить файл crypt32.dll.
- Сбросить папки Windows Update.
- Используйте средство устранения неполадок Центра обновления Windows.
- Настройте брандмауэр или антивирус.
- Загрузите необходимое обновление вручную.
- Используйте проверку системных файлов.
- Запустите обновления Windows в чистом состоянии загрузки.
1] Замените файл crypt32.dll
Crypt32.dll – это модуль, который реализует многие функции сертификатов и криптографических сообщений в CryptoAPI
Файл, упомянутый выше, находится по этому пути
Для x86:
Это ПК> C: Windows System32.
Для х64:
Это ПК> C: Windows SysWOW64.
Получите новый файл с другого компьютера с тем же номером версии файла.
Затем вам нужно загрузиться в безопасном режиме, перейти по указанному выше пути и заменить файл.
Затем откройте командную строку, выполнив поиск cmd в поле поиска Cortana, и запустите ее с привилегиями уровня администратора.

Введите следующую команду и нажмите клавишу Enter, чтобы заново зарегистрировать файл DLL.
regsvr32 crypt32.dll
Перезагрузись и посмотри.
2] Сброс папок, связанных с Центром обновления Windows
Вам необходимо удалить содержимое папки SoftwareDistribution и сбросить папку Catroot2.
3] Использование средства устранения неполадок Центра обновления Windows

Вы можете запустить средство устранения неполадок Центра обновления Windows, а также средство устранения неполадок Центра обновления Windows от Microsoft и проверить, поможет ли это в решении любой из ваших проблем.
4] Настройте брандмауэр или антивирус .
Вы можете попытаться временно отключить Защитника Windows, который установлен из коробки на вашем компьютере с Windows 10. Вы также можете отключить брандмауэр Windows на своем компьютере и проверить, исправляет ли это ошибки, с которыми вы сталкиваетесь. Если вы используете стороннее программное обеспечение безопасности, отключите их и посмотрите.
5] Загрузите необходимое обновление вручную .
Если это не обновление функции, а только накопительное обновление, вы можете вручную загрузить и установить Центр обновления Windows. Чтобы узнать, какое обновление не удалось выполнить, выполните следующие действия:
- Выберите «Настройки»> «Обновление и безопасность»> «Просмотреть историю обновлений».
- Проверьте, какое именно обновление не удалось. Обновления, которые не удалось установить, будут отображаться как Failed в столбце Status.
- Затем перейдите в Центр загрузки Microsoft и найдите это обновление по номеру КБ.
- Как только вы найдете его, скачайте и установите его вручную.
6] Используйте средство проверки системных файлов
Откройте командную строку от имени администратора и запустите средство проверки системных файлов, выполнив следующую команду:
sfc/scannow
Перезагрузите систему после завершения сканирования.
Вы также можете использовать нашу бесплатную программу FixWin для запуска утилиты проверки системных файлов одним щелчком мыши.
7] Запуск обновлений Windows в чистом состоянии загрузки
Чистая загрузка запускает систему с минимальными драйверами и программами запуска. При запуске компьютера в режиме чистой загрузки компьютер запускается с использованием предварительно выбранного минимального набора драйверов и программ запуска, а поскольку компьютер запускается с минимальным набором драйверов, некоторые программы могут работать не так, как ожидалось.
Вы можете запустить Центр обновления Windows после загрузки в состояние чистой загрузки и проверить, устраняет ли это ошибку.
Всего наилучшего!
В последнее время многие пользователи сообщали в Microsoft о получении кода ошибки 0x80096004 при попытке обновить свои компьютеры с Windows 10. Такая ошибка Центра обновления Windows возникает во время начальной загрузки и проверки. Это также влияет на функции Windows (FOD), и когда вы столкнетесь с этой ошибкой, вы также увидите этот код ошибки «TRUST_E_CERT_SIGNATURE». Этот код ошибки указывает на то, что подпись сертификата не может быть подтверждена. Это вызвано повреждением хранилища сертификатов или установленной поврежденной копией операционной системы Windows.
Вот полное сообщение об ошибке:
«Были некоторые проблемы с установкой обновлений, но мы попробуем позже. Если вы продолжаете видеть это и хотите искать информацию в Интернете или обратиться в службу поддержки, это может помочь: (0x80096004) ».
Чтобы исправить ошибку Windows Update 0x80096004, вы можете проверить параметры, представленные ниже.
Вариант 1. Удалите содержимое папки «Распространение программного обеспечения» и папки Catroot2.
- Откройте меню WinX.
- Оттуда откройте командную строку от имени администратора.
- Затем введите следующую команду — не забудьте нажать Enter сразу после ввода каждого из них.
net stop wuauserv
net start cryptSvc
чистые стартовые биты
net start msiserver
- После ввода этих команд он остановит службу обновления Windows, фоновую интеллектуальную службу передачи (BITS), криптографию и установщик MSI.
- Затем перейдите в папку C: / Windows / SoftwareDistribution и избавьтесь от всех папок и файлов, нажав клавиши Ctrl + A, чтобы выбрать их все, а затем нажмите «Удалить». Обратите внимание: если файлы уже используются, вы не сможете их удалить.
После сброса папки SoftwareDistribution вам необходимо сбросить папку Catroot2, чтобы перезапустить только что остановленные службы. Для этого выполните следующие действия:
- Введите каждую из следующих команд.
net start wuauserv
net start cryptSvc
чистые стартовые биты
net start msiserver
- После этого выйдите из командной строки и перезагрузите компьютер, а затем попробуйте запустить Центр обновления Windows еще раз.
Вариант 2. Запустите средство устранения неполадок Центра обновления Windows.
Запуск встроенного средства устранения неполадок Центра обновления Windows — это одна из вещей, которую вы можете сначала проверить, поскольку известно, что она автоматически устраняет любые ошибки Центра обновления Windows, такие как код ошибки 0x80096004. Чтобы запустить его, обратитесь к этим шагам:
- Нажмите клавиши Win + I, чтобы открыть Настройки.
- Оттуда нажмите «Обновить и безопасность» и перейдите в раздел «Устранение неполадок».
- Затем выберите Центр обновления Windows и нажмите кнопку «Запустить средство устранения неполадок» и дождитесь его завершения, а затем попробуйте снова запустить Центр обновления Windows.
Вариант 3. Попробуйте временно отключить антивирус и брандмауэр Защитника Windows.
Как уже упоминалось, ошибка может быть связана с антивирусной программой или брандмауэром Защитника Windows, установленным на вашем компьютере. Таким образом, отключение их или любого программного обеспечения безопасности, установленного на вашем компьютере, — это всегда хорошая идея, которую вы можете попробовать, когда у вас нет доступа к общему диску на вашем компьютере. Бывают случаи, когда вы сталкиваетесь с такими проблемами, как код ошибки 0x80096004, из-за вмешательства антивируса или программ безопасности. Таким образом, вы должны на время отключить как антивирусную программу, так и брандмауэр Защитника Windows и проверить, исправляет ли он ошибку или нет.
Вариант 4. Попробуйте заменить файл DLL из надежного источника.
Вы также можете попробовать заменить файл crypt32.dll, так как это может помочь в исправлении ошибки Центра обновления Windows. Просто убедитесь, что вы получаете один из надежных источников.
- Во-первых, вам нужно получить новый DLL-файл с другого компьютера, желательно с тем же номером версии файла.
- После этого вам необходимо загрузить компьютер в безопасном режиме и перейти по нижеуказанным путям, а затем заменить файл с помощью USB-накопителя или других внешних устройств хранения.
- x86: Этот компьютер> C: / Windows / System32
- x64: Этот компьютер> C: / Windows / SysWOW64
- Затем введите «cmd» в поле поиска Cortana, щелкните правой кнопкой мыши командную строку и выберите «Запуск от имени администратора», чтобы открыть ее с правами администратора.
- Теперь введите «regsvr32 crypt32.dll”И нажмите Enter.
- Перезагрузите компьютер и проверьте, исправлена ли ошибка.
Вариант 5. Попробуйте загрузить и установить обновления Windows вручную.
Код ошибки 0x80096004 может быть связан с ошибкой Центра обновления Windows. Поэтому, если это не обновление функций, а только накопительное обновление, вы можете загрузить Центр обновления Windows и установить его вручную. Но сначала вам нужно выяснить, какое обновление не удалось, и для этого выполните следующие действия:
- Перейдите в Настройки и оттуда перейдите в Обновление и безопасность> Просмотреть историю обновлений.
- Затем проверьте, какое именно обновление не удалось. Обратите внимание, что обновления, которые не удалось установить, будут отображаться в столбце «Состояние» с меткой «Ошибка».
- После этого перейдите в Центр загрузки Microsoft и найдите это обновление по номеру КБ, а после того, как найдете его, загрузите, а затем установите его вручную.
Примечание: Вы также можете использовать каталог обновлений Microsoft — службу от Microsoft, которая предоставляет список обновлений программного обеспечения, которые можно распространять по корпоративной сети. С помощью этой службы вам может быть проще найти обновления программного обеспечения Microsoft, драйверы, а также исправления.
Вариант 6– запустить проверку системных файлов или сканирование SFC
Проверка системных файлов или SFC — это встроенная командная утилита, которая помогает восстановить поврежденные и отсутствующие файлы. Он заменяет плохие и поврежденные системные файлы на хорошие системные файлы. Для запуска команды SFC выполните шаги, указанные ниже.
- Нажмите Win + R, чтобы запустить Run.
- Введите CMD в поле и нажмите Enter.
- После открытия командной строки введите ПФС / SCANNOW
Команда запустит сканирование системы, которое займет несколько секунд, прежде чем завершится. Как только это будет сделано, вы можете получить следующие результаты:
- Защита ресурсов Windows не обнаружила нарушений целостности.
- Защита ресурсов Windows обнаружила поврежденные файлы и успешно восстановила их.
- Windows Resource Protection обнаружила поврежденные файлы, но не смогла исправить некоторые из них.
Перезагрузите компьютер.
Вариант 7. Попробуйте запустить службу Центра обновления Windows в состоянии чистой загрузки
В некоторых случаях некоторые конфликтующие программы, установленные на вашем компьютере, могут вызывать ошибку Центра обновления Windows. Чтобы определить, какая программа вызывает проблему, необходимо перевести компьютер в состояние чистой загрузки. Для этого выполните следующие действия.
- Войдите на свой компьютер как администратор.
- Введите MSConfig в Начальном поиске, чтобы открыть утилиту конфигурации системы.
- Оттуда перейдите на вкладку Общие и нажмите «Выборочный запуск».
- Снимите флажок «Загрузить элементы запуска» и убедитесь, что установлены флажки «Загрузить системные службы» и «Использовать исходную конфигурацию загрузки».
- Затем щелкните вкладку «Службы» и установите флажок «Скрыть все службы Microsoft».
- Нажмите Отключить все.
- Нажмите Apply / OK и перезагрузите компьютер. (Это переведет ваш компьютер в состояние чистой загрузки. И настройте Windows на обычный запуск, просто отмените изменения.)
- Теперь попробуйте снова запустить службу Центра обновления Windows и посмотрите, исчезла ли ошибка Центра обновления Windows 0x80096004.
Расширенный ремонт системы Pro
Автоматизированное решение для ремонта ПК в один клик
![]()
С Advanced System Repair Pro вы можете легко
Замените поврежденные файлы
Восстановить производительность
Удалить вредоносные программы
СКАЧАТЬ
Advanced System Repair Pro совместим со всеми версиями Microsoft Windows, включая Windows 11.
Поделиться этой статьей:
Вас также может заинтересовать
То, что мы привыкли делать в Windows 10 определенным образом, в Windows 11 немного изменилось. Одна из таких вещей — это то, как вы открываете диспетчер задач, в некотором роде.
 Возможность щелкнуть правой кнопкой мыши на панели задач и запустить диспетчер задач исчезла, но не беспокойтесь, есть другие такие же простые способы его запуска.
- Нажмите CTRL + SHIFT + ESC or CTRL + ALT + О
- Щелкните правой кнопкой мыши кнопку ПУСК.
- Введите диспетчер задач в начало поиска сверху в меню Пуск
- Введите taskmgr в командной строке
- Нажмите ⊞ ОКНА + R чтобы открыть диалоговое окно запуска и введите taskmgr
И все, теперь, в зависимости от вашей ситуации, вы можете использовать разные методы для вызова диспетчера задач.
Узнать больше
Обычные и игровые наушники имеют много различий между собой, и незнание того, что они из себя представляют, может привести к тому, что вы ошибетесь. В этой статье наша цель — проанализировать различия между ними, чтобы вы могли выбрать подходящий для вас.

Цена
Одна вещь, которая имеет место в обоих мирах, заключается в том, что самые дешевые модели с обеих сторон на самом деле не стоят покупки, поскольку и качество, и долговечность будут очень низкими. Если сравнивать high-end модели, то обычные наушники намного дороже игровых. Высококачественные игровые модели могут стоить до 400 долларов, возможно, немного больше, но обычные наушники с высококачественным звуком стоят даже более 2000 долларов.
Если мы сравним наушники по той же цене, как правило, обычные наушники предложат вам немного лучшее качество звука, но игровые наушники предложат некоторые функции, такие как позиционный звук, которых нет у обычных.
Объемный звук и позиционный звук
Одним из главных преимуществ игровых гарнитур является позиционный звук и настоящий объемный звук. эта технология встроена, поэтому вы можете более четко слышать, откуда идет ваш враг, что очень помогает в соревновательных играх. Это достигается размещением нескольких динамиков в разных положениях и под разными углами внутри них. Каждый динамик имеет отдельный звуковой канал, который микшируется с другим динамиком, чтобы обеспечить полное объемное звучание.
Обычные наушники обычно имеют один или два динамика с обеих сторон, направленных под одним и тем же углом, и не могут обеспечить точное объемное или позиционное звучание.
Подавление шума
И игровые, и Hi-Fi наушники предлагают какое-то шумоподавление, чтобы свести к минимуму внешний шум, но если вы действительно хотите сосредоточиться и иметь хорошее шумоподавление, вам придется искать наушники с активным шумоподавлением или ANC.
Качество микрофона
Скажем сразу, большинство обычных аудионаушников среднего и высокого качества вообще не имеют микрофона, а те, которые могут его упаковать, обычно имеют более низкое качество, чем игровые. Это, конечно, имеет смысл, поскольку обычные наушники будут сосредоточены на звуке, а игровые — на играх, где наличие хорошего микрофона необходимо для правильной игры.
Качество звука и звука
Качество динамиков будет напрямую отражаться на качестве и точности звука. В этом преимущество обычных наушников перед игровыми. Поскольку у них не так много маленьких динамиков, расположенных под разными углами, а вместо этого есть только несколько, обычно 2 или 1 большой, он имеет гораздо лучшее качество и диапазон для звука, чем набор маленьких. Если вы ищете четкость и качество самого звука, особенно если вы слушаете несжатую музыку FLAC, то обычные наушники HiFi — гораздо лучший выбор.
Долговечность и долговечность
Еще одна область, в которой у обычных есть преимущество, но это неудивительно, поскольку их цена намного выше по сравнению с игровыми. В большинстве случаев все в высококачественных аудионаушниках сделано из качественных материалов и рассчитано на долгий срок службы и, следовательно, преимущество. Большую часть времени игровые наушники выпускаются в пластиковых версиях, в то время как более качественные аудио содержат много прочного металла в оправах и вкладышах, что делает их намного более долговечными. Разумеется, речь здесь идет о правильном использовании наушников, а не о крайних случаях забрасывания и т. д.
Узнать больше
Код 21 — Что это?
Код 21 является Код ошибки диспетчера устройств это появляется, когда вы пытаетесь использовать аппаратное устройство, подключенное к вашему компьютеру, и Windows запрещает вам использовать его.
Это связано с тем, что Windows испытывает проблемы с загрузкой драйвера устройства. Это сообщение об ошибке отображается в следующем формате:
«Windows удаляет это устройство. (Код 21) »
Решения
 Причины ошибок
 Причины ошибок
Код ошибки 21 означает, что Windows находится в процессе удаления устройства, и устройство не было полностью удалено. Это происходит, когда вы устанавливаете устройство для удаления, а затем выбираете то же устройство для запуска в вашей системе.
По вашим инструкциям Windows начинает удалять это устройство, и когда вы, с другой стороны, пытаетесь использовать / получить доступ к тому же устройству, которое вы выбрали для удаления, запускается Код 21.
Дополнительная информация и ручной ремонт
Если на вашем ПК появляется ошибка с кодом 21, рекомендуется немедленно ее устранить.
Хотя эта ошибка не повредит вашу систему, но значительно снизит производительность вашего ПК, чего вы определенно не хотите, особенно если вы работаете на своем компьютере ежедневно и используете его для выполнения важных дел, требующих срочного выполнения.
Чтобы исправить и устранить, попробуйте методы, приведенные ниже:
Способ 1 — подождите несколько секунд, а затем нажмите F5
Это один из лучших и простых способов решить проблему с кодом 15 в вашей системе. Подождите несколько секунд, а затем нажмите клавишу F5. Это обновит Диспетчер устройств вид и ошибка скорее всего уйдут.
MСпособ 2 — Перезагрузите компьютер
Иногда коды ошибок могут появляться из-за временных сбоев. Чтобы устранить такие ошибки, достаточно перезагрузить компьютер. Завершите работу Windows, а затем перезагрузите систему.
Скорее всего, это разрешит код 21. Однако, если ошибка все еще сохраняется, это означает, что основная проблема для кода 21 глубже, чем вы думаете. Попробуйте метод 3, чтобы решить эту проблему.
Способ 3 — установить DriverFIX
Как упоминалось ранее, код ошибки 21 может возникнуть, если вы выбрали устройство для удаления, а затем пытаетесь использовать его повторно.
Чтобы решить эту проблему, вам, возможно, придется снова установить устройство и драйвер для этого переустановленного устройства. Чтобы без проблем переустановить драйвер, просто скачайте DriverFIX.
Это интеллектуальная, удобная и интуитивно понятная программа, предназначенная для решения проблем с драйверами. В программу встроена интеллектуальная технология идентификации устройств, которая:
- Автоматически обнаруживает все соответствующие системные драйверы
- Соответствует им с последними доступными версиями
- А затем регулярно обновляет драйверы в соответствии с их совместимыми версиями.
Кроме того, он обеспечивает точную установку и гарантирует, что ваша система работает с оптимальной скоростью.
Другие функции, которыми может похвастаться эта программа, — это полное резервное копирование и восстановление, безопасное управление через USB и извлечение.
Если ничего не работает, вы можете попробовать функцию полного резервного копирования и восстановления и восстановить ваш компьютер в прежнее состояние, когда он работал должным образом до возникновения ошибки.
ДрайверFIX создает резервную копию всех ваших файлов, а хеджирование данных защищает вас от таких бедствий, как потеря данных. Восстанавливает систему на то время, когда она работала исправно.
Открыть скачать драйверFIX в вашей системе и устраните код ошибки 21 сегодня.
Узнать больше
Код ошибки 17 — Что это?
Код 17 — типичный код ошибки Spotify. Spotify — это сервис потоковой передачи музыки. С помощью этого программного обеспечения пользователи ПК могут просматривать песни и выполнять поиск по исполнителю, альбому и списку воспроизведения. Проще говоря, это аудиоплеер, доступный для настольных компьютеров BlackBerry, iOS и Microsoft Windows. Вы можете столкнуться с кодом ошибки 17, если процесс завершается сбоем при загрузке Spotify из Интернета. Сообщение об ошибке отображается в одном из следующих форматов:
Ошибка 17: Spotify столкнулся с проблемой и должен быть закрыт. Приносим свои извинения за неудобства.
Не удалось запустить Spotify (код ошибки 17)
Некоторые из симптомов этого кода ошибки — сбой программы, низкая производительность Windows и периодическое зависание системы.
Решения
Причины ошибок
 Причины ошибок
Ошибка 17 может быть вызвана несколькими причинами, такими как:
- Вирусная инфекция
- Неполная установка программного обеспечения Spotify
- Поврежденная загрузка
- Повреждение реестра
- Служба установщика Windows прекращена
Чтобы успешно использовать аудиоплеер Spotify на вашем ПК, рекомендуется сразу же исправить ошибку 17 в вашей системе. Задержка может вызвать неудобства и ограничить ваш доступ к желаемой программе.
Дополнительная информация и ручной ремонт
Чтобы исправить этот код ошибки на вашем ПК, вам не нужно нанимать профессионала или самому быть техническим гением. Хорошая новость заключается в том, что эту ошибку довольно легко исправить. Вам не нужно быть технически грамотным, чтобы решить эту проблему. Вот несколько проверенных способов исправить код ошибки 17 в вашей системе. Итак, приступим:
Способ 1. Убедитесь, что установщик Windows запущен
Иногда ошибка Spotify 17 может произойти, если Служба установщика Windows прекращается. Поэтому перед загрузкой убедитесь, что установщик Windows запущен. Это хороший способ гарантировать, что сообщения об ошибке с кодом 17 больше не будут появляться на вашем компьютере. Для этого вот что вам нужно сделать, сначала закройте все программы. Теперь перейдите в меню «Пуск» и в поле поиска введите «Выполнить» и нажмите «Ввод». В поле «Открыть» введите msiexec /unregister и нажмите OK для подтверждения. После этого выполните те же действия еще раз, а теперь в поле «Открыть» введите msiexec /regserver и нажмите «ОК» для сохранения. Перезагрузите компьютер и попробуйте скачать Spotify снова. Если программа успешно загружается в вашей системе, это означает, что ошибка 17 устранена. Однако, если код ошибки все еще сохраняется, попробуйте другие методы, приведенные ниже.
Способ 2. Используйте восстановление системы, чтобы отменить последние изменения
Еще одной причиной возникновения ошибки 17 является неправильная или неполная установка Spotify. Неправильная установка может привести к настройке параметров, а также оставить неверные записи в реестрах. Разрешить, использовать утилиту восстановления системы встроенная винда. С помощью этого системного инструмента вы можете отменить недавние изменения и вернуть компьютер в прежнее состояние, в котором он находился до попытки правильной установки. Для этого перейдите в меню «Пуск», затем в поле поиска введите «Восстановление системы» и нажмите «Ввод». Перейдите в «Восстановление системы» и выберите точку восстановления. После того, как вы выбрали точку, перезагрузите компьютер, чтобы активировать изменения.
Способ 3 — удаление вирусов
Вирусы могут проникнуть в ваш компьютер и повредить его, если вы загружаете программы с неизвестных веб-сайтов. Это не только повредит ваш компьютер, но и помешает вам успешно установить нужные программы, в данном случае аудиоплеер Spotify. В таком случае просто используйте антивирус, чтобы удалить все вирусы, заражающие вашу систему. После их удаления обязательно загрузите и установите программное обеспечение Spotify с надежного веб-сайта.
Способ 4 — восстановить реестр
Другой причиной ошибки 17 является повреждение реестра. Это происходит из-за плохих записей, недействительных и ненужных файлов, сохраненных в реестре. Чтобы исправить поврежденный реестр, просто скачайте Restoro. Это удобный PC Fixer со встроенным мощным очистителем реестра. Это программное обеспечение совместимо со всеми версиями Windows. Очиститель реестра обнаруживает все проблемы с реестром, удаляет все файлы, повреждающие реестр, и немедленно очищает его всего за несколько кликов.
Открыть чтобы загрузить Restoro на свой компьютер и устранить ошибку 17.
Узнать больше
Код ошибки 16 — Что это?
Код 16 — это тип кода ошибки диспетчера устройств. Пользователи Windows XP, скорее всего, столкнутся с этим. Эта ошибка появляется в системах XP с устаревшим оборудованием или без него.
Код ошибки 16 отображается в следующем формате:
«Windows не может определить все ресурсы, которые использует это устройство. (Код 16)
Решения
Причины ошибок
Код ошибки 16 возникает, когда вы используете периферийное устройство, такое как внешний диск или принтер, и это устройство не настроено должным образом или полностью. Хотя устройство могло быть распознано до того, как Windows не смогла проверить его конфигурацию. Проще говоря, код ошибки 16 появляется, когда устройства настроены частично.
В дополнение к этому, еще одной причиной ошибки 16 являются устаревшие или поврежденные драйверы устройств. Часто устройства не запускаются из-за проблем с драйверами.
Драйверы устройств — это программы, которые предоставляют инструкции для управления различными устройствами, подключенными к компьютерной системе, такими как аудиоустройства и принтеры, и многие другие.
Хотя код ошибки 16 не является фатальным, как другие коды ошибок ПК, такие как BSoD; однако это может ограничить вашу способность использовать определенные устройства, установленные в вашей системе, и снизить производительность труда.
Чтобы избежать неудобств, рекомендуется немедленно устранить ошибку, чтобы избежать неудобств.
Дополнительная информация и ручной ремонт
Коды ошибок ПК часто считаются техническими и их трудно решить, поэтому многие предпочитают нанимать профессионала для ремонта, а не делать это самостоятельно.
Небольшие ремонтные работы, такие как исправление кода ошибки 16 профессиональным программистом, могут стоить вам сотни долларов.
Итак, зачем платить столько, когда вы можете легко отремонтировать его самостоятельно, даже если вы не технический специалист.
Код ошибки 16 легко исправить.
Вот некоторые эффективные методы DIY, которые вы можете использовать для разрешения кода ошибки 16 на вашем ПК. Эти методы не требуют технических знаний, знаний или опыта в этом отношении. Просто следуйте инструкциям и устраните ошибку с кодом 16.
Давайте начнем…
Способ 1 — установка с диска, прилагаемого к аппаратному устройству
Запустите установку с диска, поставляемого с аппаратным устройством, или вы можете просто скопировать файл установочного программного обеспечения на свой жесткий диск / флэш-накопитель. Обратитесь к инструкции поставщика для настройки.
Если по какой-либо причине вы не можете найти маршрут, просто удалите устройство. Затем перейдите в меню «Пуск», «Панель управления» и выберите «Добавить новое оборудование».
Теперь выберите подходящее оборудование и следуйте инструкциям мастера. Это, скорее всего, разрешит код ошибки.
Тем не менее, если код ошибки все еще сохраняется, попробуйте способ 2.
Способ 2 — выделить больше ресурсов ПК
Другой альтернативный способ устранения кода ошибки 16 состоит в том, чтобы выделить больше ресурсов ПК устройству. Чтобы указать дополнительные ресурсы:
- Перейти в меню «Пуск»
- Тип Диспетчер устройств
- Затем перейдите в свойства устройства и нажмите ресурсы
- Здесь укажите устройство в диспетчере устройств
- Если вы видите ресурс с вопросительным знаком, назначьте этот ресурс устройству
- Однако, если по какой-либо причине ресурс не может измениться, просто нажмите «Изменить настройки».
- Если Изменить параметры недоступно, установите флажок «Использовать автоматические настройки». Это сделает опцию доступной.
Способ 3 — установить DriverFIX
Как указывалось выше, коды ошибок диспетчера устройств, такие как код ошибки 16, также могут возникать из-за проблем с драйверами. Если это основная причина кода ошибки 16 в вашей системе, то лучший способ решить эту проблему — установить драйвер.FIX.
ДрайверFIX это удобное, продвинутое и многофункциональное программное обеспечение, развернутое с интеллектуальной системой программирования, которая автоматически обнаруживает все проблемные драйверы устройств за секунды.
Он сопоставляет эти драйверы с их последними версиями и без проблем обновляет их, решая код ошибки 16 сразу.
Более того, как только вы установите это программное обеспечение на свой компьютер, вам больше не придется беспокоиться о проблемах с драйверами, поскольку оно регулярно обновляет драйверы до совместимых и новых версий, обеспечивая правильную работу вашего компьютера. Он прост в установке и совместим со всеми версиями Windows.
Открыть скачать драйверFIX исправить код ошибки 16
Узнать больше
Как известно, Интернет сильно изменил мир. В настоящее время JavaScript продвигает современную сеть вперед. Одна из вещей, которая делает этот опыт работы с Интернетом беспрепятственным и менее загроможденным, — это перенаправление. Он часто используется на веб-страницах, и бывают случаи, когда пользователю предлагается узнать о них, и в большинстве случаев мы едва замечаем их. Тем не менее, есть также случаи, когда с перенаправлениями что-то может пойти не так, поскольку они могут стать петлей, которая может все испортить. А поскольку браузер потребляет много системных ресурсов, перенаправление может привести к плохому взаимодействию с пользователем. Вот почему в этом посте вы узнаете, как остановить эти автоматические перенаправления в браузерах, таких как Microsoft Edge, Google Chrome и Mozilla Firefox, на вашем компьютере с Windows 10. Чтобы начать работу, обратитесь к каждому из приведенных ниже вариантов, чтобы остановить автоматическое перенаправление в Microsoft Edge, Google Chrome и Mozilla Firefox.
Вариант 1. Настройте браузеры, чтобы не показывать всплывающие окна и вводить в заблуждение.
Существует множество браузеров со встроенными настройками, которые позволяют пользователям блокировать всплывающие окна и вводящий в заблуждение контент. Чтобы настроить эти параметры, выполните следующие действия:
-
Microsoft Edge:
- Нажмите на значок трех горизонтальных точек или кнопку меню.
- Затем нажмите «Настройки» и выберите «Конфиденциальность и безопасность» на левой панели навигации.
- После этого прокрутите вниз на правой панели и найдите Блокировать всплывающие окна и SmartScreen Защитника Windows, а затем поверните их переключатели в положение Вкл.
-
Google Chrome:
- Откройте Google Chrome и нажмите значок с тремя вертикальными точками для меню, расположенного в верхнем правом углу браузера.
- Затем нажмите «Настройки» и прокрутите вниз, пока не увидите опцию «Дополнительно». Нажмите на него, чтобы открыть Расширенные настройки.
- Теперь прокручивайте вниз, пока не дойдете до раздела «Конфиденциальность и безопасность», найдите опцию «Безопасный просмотр» и установите его переключатель в положение «Вкл».
-
Mozilla Firefox
- Откройте Mozilla и щелкните значок с тремя горизонтальными линиями для кнопки меню, расположенной в правом верхнем углу браузера, и щелкните Параметры.
- Затем перейдите в раздел «Настройки», перейдите на вкладку «Конфиденциальность и безопасность», прокрутите вниз и нажмите «Разрешения».
- Оттуда убедитесь, что флажок Блокировать всплывающие окна установлен.
- Наконец, прокрутите вниз, пока не дойдете до раздела «Безопасность», и убедитесь, что флажок «Блокировать опасный и вводящий в заблуждение контент» установлен.
Вариант 2 — попробуйте сбросить Winsock, TCP / IP и очистить DNS
Чтобы остановить перенаправления, вы также можете сбросить Winsock и TCP / IP, а также очистить кэш DNS. Для этого выполните следующие действия:
- Щелкните правой кнопкой мыши кнопку «Пуск» и выберите «Командная строка (администратор)», чтобы открыть командную строку с повышенными привилегиями.
- После этого выполните каждую из перечисленных ниже команд. И после того, как вы набрали один за другим, вы должны нажать Enter.
- Netsh сброс Winsock — введите эту команду для сброса Winsock
- Netsh Int IP resettcpip.txt сброс — введите эту команду для сброса TCP / IP
- IPCONFIG / flushdns — введите эту команду, чтобы очистить кэш DNS
- Затем перезагрузите компьютер и проверьте, устранена ли проблема.
Вариант 3. Отредактируйте файл Hosts
- Нажмите клавиши Win + R, чтобы открыть, затем введите % WinDir% и нажмите «ОК».
- Перейдите в System32 / drivers / etc.
- Откройте файл хоста с помощью Блокнота.
- Удалите все подозрительные записи.
- После этого сохраните внесенные изменения и закройте файл.
Узнать больше
Мы все ждем выпуска процессоров Intel серии Alder Lake и реальных результатов по их производительности. К сожалению, в последнее время мы обратили внимание на то, что в некоторых играх могут быть проблемы с процессором.
 Теперь, прежде чем вы начнете наносить удары по самой Intel, обратите внимание, что это вовсе не вина Intel. Возникающая проблема в основном связана с программным обеспечением DRM и тем, как оно работает. Как вы, возможно, знаете или нет, у Alder Lake есть два набора ядер: ядра со стандартной производительностью и ядра питания, а с интегрированным в чип Intel Thread Director правильные ядра будут использоваться для правильных задач, и здесь кроется проблема. Программное обеспечение DRM может определить Thread Director как нечто подозрительное и вредоносное, а затем закрыть доступ к игре из-за этого. Intel, конечно же, связалась с производителями DRM и разместила документацию о том, как следует разрабатывать программное обеспечение с учетом этой гибридной технологии. Конечно, новые игры будут обновляться при необходимости, и все будет работать нормально, также игры в GOG будут работать нормально из-за политики GOG, запрещающей магазин DRM, но некоторые старые игры могут остаться в подвешенном состоянии. Они могут работать нормально, но DRM может сработать и помешать их загрузке, обычно разработчик игры сам снимает защиту DRM через некоторое время, но на самом деле это не всегда так, и есть вероятность, что некоторые игры могут просто не работать на Alder Lake. ЦП только из-за защиты DRM.
Заключение
Я признаю, что я не был большим поклонником DRM в целом, я понимаю, что разработчики игр хотят защитить себя от пиратства, но, как это выглядит, они не очень преуспели в этом. Даже сегодня однопользовательские игры становятся пиратскими в день их выпуска, а легально купленные игры всегда создают проблемы для людей, которые на самом деле заплатили за них. Я помню времена, когда DRM был ужасным, и игру можно было установить ограниченное количество раз, к счастью, это было удалено, но, похоже, многие старые привычки все еще остаются, к сожалению, и DRM присутствует даже сегодня в различных формах. GOG является доказательством того, что люди будут покупать игры без DRM и что они будут поддерживать такую модель. Может пора забыть о борьбе с пиратством, вы его не уберете и люди, которые не хотят покупать игры, не будут их покупать, с другой стороны многие пользователи, которые покупают игры, если они не могут ими пользоваться, то отдыхают на пиратскую версию, так как она будет работать. Грустно видеть, что пиратское программное обеспечение может работать лучше, чем легальное, и предлагать более приятный опыт.
Узнать больше
 Много раз мы говорили и писали здесь о Errortools.com о безопасности, конфиденциальности, взломе, краже личных данных и т. д. Мы попытались поднять важные вопросы безопасности, и я надеюсь, что мне удалось хотя бы пролить свет и изменить, возможно, некоторые плохие привычки для некоторых, помогая им принять более эффективные процедуры в отношении своей безопасности. на их ПК. В свете этого сегодня я представлю вам одну изящную и потрясающую программу, менеджер паролей, который стоит вашего времени и денег (если вам нужны дополнительные функции): BitWarden.
Что предлагает BitWarden?
Первое, что он предлагает, — это полностью бесплатный базовый план, при условии, что BitWarden не является проектом с открытым исходным кодом и не является полностью бесплатным, но у него есть неограниченный бесплатный базовый план, который покроет 90% потребностей пользователей. Существует также бесплатный базовый неограниченный план для организаций, позволяющий вам и еще одному пользователю обмениваться файлами и другими вещами через BitWarden, что делает его отличным вариантом, если вам это нужно. Премиум-функции предлагают вам зашифрованный обмен файлами, двухэтапный вход в систему, вложения файлов размером 1 ГБ (зашифрованные), Bitwarden Authenticator (TOTP), отчеты о состоянии хранилища, экстренный доступ и приоритетную поддержку. Стоимость всех этих дополнительных функций составляет 10 долларов США в год для индивидуального плана или 40 долларов США в год для организаций, где вы получите увеличение максимального количества пользователей с 2 до 6. Да, вы правильно прочитали, всего 10 долларов США в ГОД. на весь набор функций. Конечно, если вам не нужен ни один из них, наслаждайтесь бесплатной версией навсегда. Помимо очень низкой стоимости премиум-класса, BitWarden предложит вам совместимость со всеми основными браузерами и устройствами, включая платформы Android и iOS, что делает его отличным кросс-платформенным решением для входа в систему и сохранения ваших паролей в любом месте одним щелчком мыши. После установки все, что вам нужно сделать, это установить один мастер-пароль и быть очень осторожным, чтобы не потерять или забыть его, если вы это сделаете, все другие сгенерированные вами пароли будут потеряны навсегда.
Особенности
Безопасный обмен паролями
Делитесь своими зашифрованными данными быстро и легко и только с теми пользователями или группами, которым нужен доступ
Межплатформенная доступность
Доступ к критически важным данным в вашем хранилище Bitwarden из любого места, браузера и устройства
Облачный или самостоятельный хостинг
Начните работу в облаке за считанные минуты или самостоятельно разместите Bitwarden для полного контроля данных.
Аудит безопасности и соответствие
Открытый исходный код и сторонний аудит, Bitwarden соответствует требованиям Privacy Shield, GDPR, CCPA.
Отчеты о работоспособности Vault
Получите доступ к подробным отчетам, чтобы выявить ненадежные, повторно используемые пароли и другие полезные показатели безопасности данных.
Синхронизация каталога
Наш мощный коннектор каталогов упрощает подключение пользователей и групп и поддерживает их синхронизацию.
Постоянная поддержка
Наши агенты по работе с клиентами готовы помочь вам круглосуточно.
Подробные журналы событий
Bitwarden создает контрольные журналы, чтобы помочь вам отслеживать доступ пользователей и групп к конфиденциальным данным.
Гибкая интеграция
Объедините существующие системы с Bitwarden, используя аутентификацию SSO, службы каталогов или мощные API
Заключение
Есть много менеджеров паролей, но по рекомендации я попробовал BitWarden, и, честно говоря, я действительно никогда не чувствовал необходимости пробовать что-то еще, он отлично справляется со своей задачей, он развивается с функциями и постоянно обновляется и поддерживается.
Узнать больше
Каждый раз, когда в Windows создается новая папка, предлагается имя «Новая папка», которое устанавливается в качестве имени по умолчанию. Если по какой-либо причине вы хотите изменить это и установить собственное имя по умолчанию вместо стандартного, следуйте этому руководству. Имейте в виду, что это руководство потребует от вас изменения реестра Windows. Обычной практикой является создание резервной копии вашего реестра каждый раз, когда вы хотите вручную изменить какие-либо значения в нем, на случай, если что-то пойдет не так.
- Чтобы изменить имя новой папки по умолчанию, сначала нажмите ⊞ ОКНА + R чтобы открыть диалоговое окно запуска, введите его RegEdit, и нажмите ENTER

- В редакторе реестра найдите ключ:

HKEY_CURRENT_USER SOFTWARE Microsoft Windows CurrentVersion Explorer,
- Выберите Именование ключ. Если его нет, вам нужно его создать.
- Щелкните правой кнопкой мыши что собой представляет Именование ключ, чтобы добавить Строковое значение.
- Присвойте ему следующее имя: RenameNameTemplate.
- Двойной клик на RenameNameTemplate значение данных, чтобы открыть Редактировать Строковый диалог пунктом.
- В разделе Значение введите новый текст, который будет отображаться при создании новой папки. Вы должны убедиться, что не используете ни один из следующих символов: / ? : * » > < |
- Закройте редактор реестра и выйдите.
- Теперь, когда вы создаете новую папку, она будет называться «Как бы вы ни выбрали» вместо «Новая папка».
И это все, теперь у вас есть собственный шаблон именования новых папок.
Узнать больше
VSSControl: 2147467259 Не удалось выполнить задание резервного копирования. Невозможно создать теневую копию томов, содержащих данные писателя. Асинхронная операция VSS не завершена. Код: [0x8004231f]
Это сообщение появляется, когда вы создаете снимок восстановления системы, обычно проблема связана с нехваткой места или остановкой службы. Мы подробно расскажем, как исправить и то, и другое, чтобы вы могли без проблем завершить операцию.
-
Проверьте службы теневого копирования тома
Более легкое и быстрое исправление, чем следующее. Запуск Услуги в меню «Пуск» найдите Volume Shadow Copy, дважды щелкните по нему и проверьте Состояние службы. Если он остановлен, нажмите на Начать кнопка. Если он запущен, перезапустите его, нажав Стоп> Старт.
-
Увеличьте пространство для хранения теней
Если первое исправление не устранило проблему, вам необходимо увеличить пространство для теневого хранилища. Запуск Командная строка как администратор. Теперь введите следующую команду, чтобы проверить место для теневого хранилища.
VSSadmin список shadowstorage
Теперь введите следующую команду, чтобы выделить больше места для хранения (вы можете изменить 10 ГБ с объемом пространства, которое хотите выделить)
vssadmin изменить размер shadowstorage / For = C: / On = C: / MaxSize = 10GB
Узнать больше
![]()
Авторское право © 2022, ErrorTools, Все права защищены
Товарные знаки: логотипы Microsoft Windows являются зарегистрированными товарными знаками Microsoft. Отказ от ответственности: ErrorTools.com не аффилирован с Microsoft и не претендует на прямую аффилированность.
Информация на этой странице предоставлена исключительно в информационных целях.
![]()
Ремонт вашего ПК одним щелчком мыши
Имейте в виду, что наше программное обеспечение необходимо установить на ПК с ОС Windows. Откройте этот веб-сайт на настольном ПК и загрузите программное обеспечение для простого и быстрого устранения ваших проблем.
В этой статье рассматривается ошибка 0x80096004, также известная как Ошибка 0x80096004 и означающая Ошибка 0X80096004 может быть вызвана повреждением системных файлов Windows.
Об ошибке Windows
Операционная система Windows сегодня используется миллионами пользователей персональных компьютеров и ноутбуков. И вполне вероятно, что большинство из них в свое время сталкивались с тем или иным типом ошибки Windows. Отчеты об ошибках были представлены компанией Microsoft для обеспечения средств сбора и отправки отладочной информации после ошибки или для применения шагов по устранению неполадок в зависимости от того, получил ли пользователь синтаксическую, логическую ошибку или ошибку времени выполнения.
Если пользователь получает код остановки, то вместе с сообщением об ошибке предоставляется краткая информация по устранению неполадок. Затем пользователь может найти конкретное сообщение об ошибке и применить исправление, предоставленное на сайтах поддержки Microsoft, а также в других доступных в Интернете статьях и журналах по данной теме.
В других случаях пользователь получает только уведомление о сбое компьютера, после чего ему предлагается отправить отчет о сбое в Microsoft. Это делается для сбора данных для анализа, чтобы компания Microsoft могла отправить пользователю решение проблемы.
Каким бы ни был случай, вот некоторые общие сведения об устранении неполадок, которые можно использовать для устранения ошибок Windows.
Определения (Бета)
Здесь мы приводим некоторые определения слов, содержащихся в вашей ошибке, в попытке помочь вам понять вашу проблему. Эта работа продолжается, поэтому иногда мы можем неправильно определить слово, так что не стесняйтесь пропустить этот раздел!
- Система — система может относиться к набору взаимозависимых компонентов; Инфраструктура низкого уровня, такая как операционная система с точки зрения высокого языка, или объект или функция для доступа к предыдущей
- Windows — ОБЩАЯ ПОДДЕРЖКА WINDOWS НЕВОЗМОЖНА
- Файлы — блок произвольной информации или ресурс для хранения информации, доступный по строковому имени или пути.
Симптомы 0x80096004 — Ошибка 0x80096004
Ошибки Windows можно классифицировать как синтаксические ошибки, логические ошибки или ошибки времени выполнения.
Когда пользователь получает синтаксическую ошибку, компьютер просто внезапно выдает сообщение об ошибке, что в фоновом режиме произошел сбой. Программы, к которым обращается пользователь, могут застопориться или полностью завершиться. Пользователь может продолжать использовать другие приложения, но время от времени появляется непонятное сообщение о том, что запущенная программа не может запуститься, потому что какой-то процесс не работает.
Ошибки времени выполнения происходят во время работы приложения. Поэтому, когда ошибка возникает, она просто происходит без предупреждения, и компьютер выдает уведомление о том, что произошла ошибка.
Логические ошибки связаны с программированием. Ошибка вызывает непреднамеренный вывод или поведение. Если говорить о компьютерных системах, которые прошли все испытания и поступили в продажу, то логические ошибки случаются только тогда, когда произошли значительные изменения в физическом состоянии логической платы. Возможно, часть шин расплавилась или возникла подобная ситуация. Это может привести к тому, что компьютер внезапно издаст громкий звуковой сигнал или скрежещущий звук, и даже может перейти к внезапной нестабильной работе, замерзнуть или резко изменить температуру перед фактическим сбоем.
 Repair Tool")
(Только для примера)
Причины ошибок Ошибка 0x80096004 — 0x80096004
Ошибки Windows могут быть вызваны неисправностью аппаратных компонентов или повреждением ОС. Некоторые из них могут быть даже связаны с проблемами программирования, которые не были решены, поскольку ошибки не были устранены на этапе проектирования. Иногда ошибки Windows могут возникать из-за изменений, внесенных в компьютер.
Методы исправления
Для разных категорий ошибок Windows существуют разные шаги по устранению неполадок. Однако существуют общие шаги, которые можно применить, столкнувшись с этими ошибками. Вот они.
Если метод ремонта вам подошел, пожалуйста, нажмите кнопку upvote слева от ответа, это позволит другим пользователям узнать, какой метод ремонта на данный момент работает лучше всего.
Обратите внимание: ни ErrorVault.com, ни его авторы не несут ответственности за результаты действий, предпринятых при использовании любого из методов ремонта, перечисленных на этой странице — вы выполняете эти шаги на свой страх и риск.
Метод 1 — Восстановить базу данных Центра обновления Windows
Когда хороший компьютер внезапно начинает работать странным образом, причиной могут быть обновления Windows. Чтобы исправить это, пользователи могут запустить Восстановление системы, если есть дата восстановления, сохраненная до ошибки. Вот как это делается.
Восстановление в Windows 7:
- Нажмите Пуск и введите Восстановление системы в поле поиска, затем нажмите клавишу ввода.
- Когда появится окно восстановления системы, нажимайте Далее , пока не дойдете до окна, в котором вы можете выбрать точку восстановления. Вы увидите список дат восстановления с описанием.
- Затем снова нажмите Далее и подтвердите процесс восстановления. Подождите, пока он прекратит обработку, и появится окно, в котором вы можете нажать кнопку Готово . Закройте окно и дайте компьютеру перезагрузиться.
Вы также можете восстановить свой компьютер с помощью установочного диска ОС .
- Для этого загрузитесь с компакт-диска с ОС или с носителя для восстановления.
- Следуйте инструкциям, пока не дойдете до экрана, на котором будет предложена опция Восстановить мой компьютер , нажмите и выберите Восстановление системы из списка инструментов восстановления.
- Вы можете выбрать любую точку восстановления в окне «Восстановление системы», но убедитесь, что вы восстановили дату, при которой ваш компьютер работает нормально.
- Дождитесь завершения процесса и позвольте вашему компьютеру перезагрузиться на рабочий стол.
Вы также можете загрузиться в безопасном режиме .
- Загрузите компьютер и нажмите F8. Выберите Безопасный режим с командной строкой , нажимая стрелки на клавиатуре, чтобы переместить выделение вниз к этому элементу.
- В безопасном режиме введите rstrui.exe и нажмите Enter в командной строке. Следуйте указаниям мастера восстановления и перезагрузите компьютер в обычном режиме.
Восстановление в Windows 8:
Восстановление в среде Windows
- В Windows 8 щелкните значок поиска и введите Восстановление системы.
- Продолжайте нажимать кнопку «Далее», пока не дойдете до окна, в котором можно выбрать дату восстановления.
- Подтвердите восстановление, выполнив оставшиеся шаги. После этого перезагрузите компьютер в обычном режиме.
Восстановить при загрузке
- Перезагрузите компьютер и нажмите F11, чтобы начать восстановление системы.
- Вы увидите экран «Дополнительные параметры», на котором вы найдете пункт «Восстановление системы».
- Вам будет предложено выбрать учетную запись администратора, просто выберите и войдите в свою учетную запись администратора.
- Нажимайте кнопку «Далее», пока не дойдете до экрана, на котором можно выбрать даты восстановления.
- Нажимайте кнопку «Далее», пока не дойдете до конца процесса восстановления и не увидите кнопку «Готово».
- Перезагрузите компьютер в обычном режиме.
Восстановление в Windows 10:
Внутри окна
- Запустите восстановление системы, введя его в поле поиска. Щелкните элемент, который появится в результатах поиска.
- Когда откроется окно «Восстановление системы», нажимайте «Далее», пока не получите список для выбора даты восстановления, выберите ту, которая, как вы знаете, лучше всего подходит для вас.
- Подтвердите процесс, нажав «Далее», затем «Да» и, наконец, «Готово». После закрытия окна перезагрузите компьютер.
Использование установочного носителя
- Если вы не можете загрузиться в Windows, вам лучше загрузить файл Media Creator из Microsoft. Создайте загрузочный диск с помощью DVD или флэш-диска.
- После этого перезагрузите компьютер и войдите в BIOS, чтобы изменить загрузочное устройство на DVD или флэш-диск.
- Когда вы перейдете к экрану установки, выберите «Устранение неполадок»> «Дополнительные параметры»> «Восстановление системы» и выполните процесс таким же образом.
Метод 2 — Исправить неправильную системную дату и время
Иногда Windows может работать неправильно из-за неправильной настройки времени. Чтобы установить время и дату:
В Windows 7
- Нажмите «Пуск», затем «Панель управления».
- Нажмите «Дата и время».
- В окне «Дата и время» нажмите «Изменить часовой пояс», чтобы выбрать правильный часовой пояс.
- Нажмите «Применить» и «ОК».
В Windows 8
- Откройте «Настройки», переместив указатель мыши вправо, при открытии вкладки щелкните значок шестеренки.
- Откроется новая всплывающая вкладка «Настройки», нажмите «Панель управления».
- На панели управления нажмите «Часы, язык и регион». Затем нажмите «Установить время и дату» в разделе «Дата и время».
- Когда откроется окно «Дата и время», нажмите «Изменить дату и время» и перейдите к нужной дате и времени в следующем окне. Чтобы подать заявку, просто нажмите «ОК».
В Windows 10
- Просто щелкните правой кнопкой мыши дату и время на панели задач, расположенной в правой нижней части экрана.
- Нажмите «Настроить дату и время». Откроются настройки даты и времени.
- Вы можете выбрать часовой пояс, а затем закрыть окно. Это автоматически обновит время и дату на панели задач.
Метод 3 — Проверьте отсутствие или повреждение файлов
- Запустить проверку системных файлов
- Чтобы запустить команду, откройте командную строку с повышенными привилегиями, набрав ее в окне поиска, затем щелкните правой кнопкой мыши командную строку и выберите «Запуск от имени администратора».
- Введите в командной строке sfc / scannow и дождитесь успешного завершения процесса проверки.
- Запустите Checkdisk — Chkdsk исправляет многие несоответствия с ОС. Системные ошибки также можно исправить с помощью этой утилиты. Чтобы запустить это,
- Откройте командную строку, введя ее в поле поиска, а затем, когда вы увидите результат в верхней части списка, щелкните его правой кнопкой мыши и выберите «Запуск от имени администратора».
- Ваша система может сказать, что вы не можете запустить ее в данный момент, потому что вы все еще обрабатываете данные, и спросит вас, хотите ли вы запустить ее перед следующим запуском, просто нажмите y для подтверждения, а затем выйдите с экрана и перезагрузите компьютер.
- После перезагрузки компьютера вы увидите, что checkdisk работает вне Windows, просто дайте ему закончить, пока он не даст вам отчет о том, что было найдено, исправлено или отмечено.
- Закройте окно и дайте компьютеру нормально перезагрузиться.
Другие языки:
How to fix 0x80096004 (Error 0x80096004) — The 0X80096004 error may be caused by windows system files damage.
Wie beheben 0x80096004 (Fehler 0x80096004) — Der Fehler 0X80096004 kann durch Schäden an Windows-Systemdateien verursacht werden.
Come fissare 0x80096004 (Errore 0x80096004) — L’errore 0X80096004 può essere causato da danni ai file di sistema di Windows.
Hoe maak je 0x80096004 (Fout 0x80096004) — De 0X80096004-fout kan worden veroorzaakt door schade aan Windows-systeembestanden.
Comment réparer 0x80096004 (Erreur 0x80096004) — L’erreur 0X80096004 peut être causée par des dommages aux fichiers système Windows.
어떻게 고치는 지 0x80096004 (오류 0x80096004) — 0X80096004 오류는 Windows 시스템 파일 손상으로 인해 발생할 수 있습니다.
Como corrigir o 0x80096004 (Erro 0x80096004) — O erro 0X80096004 pode ser causado por arquivos de sistema do Windows danificados.
Hur man åtgärdar 0x80096004 (Fel 0x80096004) — 0X80096004 -felet kan orsakas av skador på Windows -systemfiler.
Jak naprawić 0x80096004 (Błąd 0x80096004) — Błąd 0X80096004 może być spowodowany uszkodzeniem plików systemu Windows.
Cómo arreglar 0x80096004 (Error 0x80096004) — El error 0X80096004 puede deberse a daños en los archivos del sistema de Windows.
![]() Об авторе: Фил Харт является участником сообщества Microsoft с 2010 года. С текущим количеством баллов более 100 000 он внес более 3000 ответов на форумах Microsoft Support и создал почти 200 новых справочных статей в Technet Wiki.
Об авторе: Фил Харт является участником сообщества Microsoft с 2010 года. С текущим количеством баллов более 100 000 он внес более 3000 ответов на форумах Microsoft Support и создал почти 200 новых справочных статей в Technet Wiki.
Следуйте за нами: ![]()
![]()
![]()
Рекомендуемый инструмент для ремонта:

Этот инструмент восстановления может устранить такие распространенные проблемы компьютера, как синие экраны, сбои и замораживание, отсутствующие DLL-файлы, а также устранить повреждения от вредоносных программ/вирусов и многое другое путем замены поврежденных и отсутствующих системных файлов.
ШАГ 1:
Нажмите здесь, чтобы скачать и установите средство восстановления Windows.
ШАГ 2:
Нажмите на Start Scan и позвольте ему проанализировать ваше устройство.
ШАГ 3:
Нажмите на Repair All, чтобы устранить все обнаруженные проблемы.
СКАЧАТЬ СЕЙЧАС
Совместимость
![]()
Требования
1 Ghz CPU, 512 MB RAM, 40 GB HDD
Эта загрузка предлагает неограниченное бесплатное сканирование ПК с Windows. Полное восстановление системы начинается от $19,95.
ID статьи: ACX014390RU
Применяется к: Windows 10, Windows 8.1, Windows 7, Windows Vista, Windows XP, Windows 2000
Совет по увеличению скорости #25
Отключить восстановление системы:
Отключите встроенную функцию восстановления системы в Windows, если вы уже используете стороннее программное обеспечение для резервного копирования. Это повысит скорость вашего компьютера, освободив ценное дисковое пространство на жестком диске. Учтите, что восстановление системы на самом деле не является надежным решением для резервного копирования файлов и папок.
Нажмите здесь, чтобы узнать о другом способе ускорения работы ПК под управлением Windows
I’m tired of this. Every damn time it fails the same way, without a reason.
Error:
unable to download the channel manifest from «https://aka.ms/vs/16/channel
Cannot install visual studio from web installer (2019 community)
Any solution provided doesn’t work.
Installcleaner with full param
cleaning all the random stuff in folders of visual studio
removing old visual studio
hacking registry keys in awkward ways based on your suggestions
Disabling windows firewall, antivirus
Error:
2019-07-29T21:12:23 : Verbose : Resolved RemoteSettingsProviderService.GetActionsAsync(actionPath) actionPath: vsinstallercommonerroractions, result: [{«Action»:{«Rules»:[{«ErrorCode»:»0x80072ee7″,»PackagesAppliesTo»:[],»CommonErrorMessage»:»**Error
0x80072ee7: No internet connection**rnThere is a problem connecting to our content delivery network servers. This might be a temporary server outage, or it could be an issue with your internet connection.rnrn**Fix**: First, select View Logs and try to
go to the URL in the report. If you can, try installing Visual Studio again. If you can not access the URL in the View Logs report, or if you are on an unreliable network, please try our recommended steps to [install Visual Studio 2017 on low–bandwidth or
unreliable network environments](https://docs.microsoft.com/en-us/visualstudio/install/install-vs-inconsistent-quality-network).»,»Resources»:[{«Locale»:»en-us»,»Message»:»**Error 0x80072ee7: No internet connection**rnThere
is a problem connecting to our content delivery network servers. This might be a temporary server outage, or it could be an issue with your internet connection.rnrn**Fix**: First, select View Logs and try to go to the URL in the report. If you can, try
installing Visual Studio again. If you can not access the URL in the View Logs report, or if you are on an unreliable network, please try our recommended steps to [install Visual Studio 2017 on low–bandwidth or unreliable network environments](https://docs.microsoft.com/en-us/visualstudio/install/install-vs-inconsistent-quality-network).»}]}]},»Precedence»:0,»RuleId»:»1343144E-3B75-4673-AA34-82674D5F4AB0″,»FlightName»:»»},{«Action»:{«Rules»:[{«ErrorCode»:»-2146233033″,»PackagesAppliesTo»:[],»CommonErrorMessage»:»**Error
–2146233033: Package is corrupted**rnThe Visual Studio installer found a corrupted package. A package usually gets partially saved if the system was interrupted while downloading and writing the package to the disk.rnrn**Fix**: This issue usually resolves
by running a repair.»,»Resources»:[{«Locale»:»en-us»,»Message»:»**Error –2146233033: Package is corrupted**rnThe Visual Studio installer found a corrupted package. A package usually gets partially saved if
the system was interrupted while downloading and writing the package to the disk.rnrn**Fix**: This issue usually resolves by running a repair.»}]}]},»Precedence»:0,»RuleId»:»17674D21-417D-45EB-B671-58D521DF3D57″,»FlightName»:»»},{«Action»:{«Rules»:[{«ErrorCode»:»1303″,»PackagesAppliesTo»:[],»CommonErrorMessage»:»**Error
1303: Access is denied**rnThere is a problem accessing a file or folder. This can happen if another process has locked a folder. n rnrn**FIX**: Rebooting and running a repair has helped unblock other users.»,»Resources»:[{«Locale»:»en-us»,»Message»:»**Error
1303: Access is denied**rnThere is a problem accessing a file or folder. This can happen if another process has locked a folder. n rnrn**FIX**: Rebooting and running a repair has helped unblock other users.»}]}]},»Precedence»:0,»RuleId»:»384E5F4B-26EC-4277-94B4-74E2A843FBA9″,»FlightName»:»»},{«Action»:{«Rules»:[{«ErrorCode»:»0x80070194″,»PackagesAppliesTo»:[«JavaJDKV1″,»JavaJDKV2″],»CommonErrorMessage»:»**Error
Code 0x80070194: JavaJDK may not be available to you based on your current connection**rnrn**Fix**: If you’ve experienced this error, please visit [their website](https://www.oracle.com/technetwork/java/javase/downloads/index.html) and attempt to download
and install the component from there. Afterwards, you can install by clicking «Modify» and then «Install». If you are still unable to acquire the component, please disable Java SE Development Kit to address this warning in the installation.»,»Resources»:[{«Locale»:»en-us»,»Message»:»**Error
Code 0x80070194: JavaJDK may not be available to you based on your current connection**rnrn**Fix**: If you’ve experienced this error, please visit [their website](https://www.oracle.com/technetwork/java/javase/downloads/index.html) and attempt to download
and install the component from there. Afterwards, you can install by clicking «Modify» and then «Install». If you are still unable to acquire the component, please disable Java SE Development Kit to address this warning in the installation.»},{«Locale»:»fr-fr»,»Message»:»**Code
d’erreur 0x80070194: JavaJDK n’est peut-être pas disponible d’après votre connexion actuelle. Correctif : Si vous avez rencontré cette erreur, accédez à [leur site web](https://www.oracle.com/technetwork/java/javase/downloads/index.html), puis tentez de télécharger
et d’installer le composant à partir de cet emplacement. Vous pourrez ensuite l’installer en cliquant sur Modifier, puis Installer. Si, malgré tout, vous ne parvenez pas à obtenir le composant, désactivez Java SE Development Kit pour mettre fin à cet avertissement
durant l’installation.»},{«Locale»:»it-it»,»Message»:»**Codice errore 0x80070194: JavaJDK potrebbe non essere disponibile in base alla connessione corrente. Correzione: se si è verificato questo errore, visitare il [sito
Web](https://www.oracle.com/technetwork/java/javase/downloads/index.html) e provare a scaricare e installare il componente. Successivamente, è possibile eseguire l’installazione facendo clic su «Modifica», quindi su «Installa». Se non
è ancora possibile acquisire il componente, disabilitare Java SE Development Kit per risolvere l’avviso nell’installazione.»},{«Locale»:»cs-cz»,»Message»:»**Kód chyby 0x80070194: JavaJDK možná nebude na základě vašeho
aktuálního připojení k dispozici. Oprava: Pokud k této chybě došlo, navštivte prosím [příslušný web](https://www.oracle.com/technetwork/java/javase/downloads/index.html) a zkuste součást stáhnout a nainstalovat tam. Pak můžete instalaci provést tak, že kliknete
na Upravit a následně na Nainstalovat. Pokud se vám součást stále nedaří získat, zakažte prosím Java SE Development Kit možnost reagovat na toto upozornění v instalaci.»},{«Locale»:»de-de»,»Message»:»**Fehlercode 0x80070194:
JavaJDK ist je nach Ihrer aktuellen Verbindung möglicherweise nicht für Sie verfügbar. Fix: Wenn dieser Fehler aufgetreten ist, besuchen Sie [die entsprechende Website](https://www.oracle.com/technetwork/java/javase/downloads/index.html), und versuchen Sie,
die Komponente von dort herunterzuladen und zu installieren. Anschließend können Sie die Installation durch Klicken auf «Ändern» und «Installieren» durchführen. Wenn Sie die Komponente noch immer nicht abrufen können, deaktivieren Sie
Java SE Development Kit, um diese Warnung in der Installation zu verarbeiten.»},{«Locale»:»es-es»,»Message»:»**Código de error 0x80070194: JavaJDK puede no estar disponible en función de la conexión actual. Corregir:
si ha experimentado este error, visite [el sitio web correspondiente](https://www.oracle.com/technetwork/java/javase/downloads/index.html) e intente descargar e instalar el componente desde ahí. A continuación, puede hacer clic en «Modificar» y,
después, en «Instalar» para instalarlo. Si aun así no puede adquirir el componente, deshabilite Java SE Development Kit para solucionar esta advertencia en la instalación.»},{«Locale»:»ja-jp»,»Message»:»*
* エラーコード 0x80070194: 現在の接続では JavaJDK を使用できない可能性があります。修正: このエラーが発生した場合は、 [このウェブサイト](https://www.oracle.com/technetwork/java/javase/downloads/index.html) にアクセスして、そこからコンポーネントをダウンロードしてインストールしてみてください。 後で [変更] をクリックしてから [インストール] をクリックしてインストールすることができます。それでもコンポーネントを取得できない場合は、Java
SE Development Kit を無効にしてインストールでこの警告を解決します。»},{«Locale»:»ko-kr»,»Message»:»**오류 코드 0x80070194: 현재 연결에서는 JavaJDK을(를) 사용할 수 없습니다. 해결 방법: 이 오류가 발생한 경우 [관련 웹 사이트](https://www.oracle.com/technetwork/java/javase/downloads/index.html)를
방문하여 해당 구성 요소를 다운로드 및 설치하세요. 그런 다음, «수정»과 «설치»를 차례로 클릭하여 설치할 수 있습니다. 계속 해당 구성 요소를 설치할 수 없는 경우 Java SE Development Kit을(를) 사용하지 않도록 설정하여 설치에서 이 경고를 해결하세요.»},{«Locale»:»pl-pl»,»Message»:»** Kod
błędu 0x80070194: Produkt JavaJDK może być niedostępny, biorąc pod uwagę bieżące połączenie. Rozwiązanie: Jeśli wystąpił ten błąd, odwiedź [witrynę internetową produktu](https://www.oracle.com/technetwork/java/javase/downloads/index.html) i spróbuj pobrać
oraz zainstalować składnik stamtąd. Następnie możesz przeprowadzić instalację, klikając pozycję „Modyfikuj”, a następnie pozycję „Zainstaluj”. Jeśli nadal nie możesz uzyskać składnika, wyłącz produkt Java SE Development Kit, aby rozwiązać problem tego ostrzeżenia
na etapie instalacji.»},{«Locale»:»pt-br»,»Message»:»**Código de Erro 0x80070194: JavaJDK pode não estar disponível com base na sua conexão atual. Correção: se você tiver recebido esse erro, visite [o site deles](https://www.oracle.com/technetwork/java/javase/downloads/index.html)
e tente baixar e instalar o componente de lá. Após o download, você poderá instalar clicando em «Modificar» e, em seguida, em «Instalar». Se você ainda não conseguiu adquirir o componente, desabilite Java SE Development Kit para resolver
este aviso na instalação.»},{«Locale»:»ru-ru»,»Message»:»**Код ошибки 0x80070194: JavaJDK может быть недоступен в зависимости от вашего текущего подключения. Исправление: если вы столкнулись с этой ошибкой,
посетите [их сайт](https://www.oracle.com/technetwork/java/javase/downloads/index.html) и попробуйте скачать и установить компонент оттуда. Впоследствии вы можете выполнить установку, выбрав «Изменить» и затем «Установить».
Если вы по-прежнему не можете получить компонент, отключите Пакет средств разработки Java SE, чтобы устранить это предупреждение в установке.»},{«Locale»:»tr-tr»,»Message»:»**Hata Kodu 0x80070194: Geçerli
bağlantınıza dayalı olarak, JavaJDK kullanılamıyor olabilir. Düzeltme: Bu hatayla karşılaştıysanız lütfen [web sitelerini](https://www.oracle.com/technetwork/java/javase/downloads/index.html) ziyaret ederek bileşeni oradan indirip yüklemeyi deneyin. Daha sonra
«Değiştir» ve ardından «Yükle» seçeneğine tıkayarak bileşeni yükleyebilirsiniz. Bileşeni yine de alamıyorsanız, lütfen yüklemede bu uyarıyı gidermek için Java SE Development Kit öğesini devre dışı bırakın.»},{«Locale»:»zh-cn»,»Message»:»**错误代码
0x80070194: 基于你的当前连接,JavaJDK 可能不可用。修复: 如果遇到此错误,请访问[其网站](https://www.oracle.com/technetwork/java/javase/downloads/index.html),并尝试从此处下载和安装组件。然后,可依次单击“修改”和“安装”进行安装。如果仍无法获取组件,请禁用 Java SE 开发工具包以在安装中处理此警告。»},{«Locale»:»zh-tw»,»Message»:»**錯誤碼
0x80070194: 根據您目前的連線,JavaJDK 可能無法使用。修正方式: 若您發生此錯誤,請前往[他們的網站](https://www.oracle.com/technetwork/java/javase/downloads/index.html),然後嘗試從該處下載並安裝元件,之後即可依序按一下 [修改] 與 [安裝] 來予以安裝。若您仍無法取得元件,請停用 Java SE 開發套件以解決安裝中的這項警告。»}]}]},»Precedence»:0,»RuleId»:»543D70B1-FA71-4EE4-BBB2-E1039C835F92″,»FlightName»:»»},{«Action»:{«Rules»:[{«ErrorCode»:»0x80072efd»,»PackagesAppliesTo»:[«AntV1″],»CommonErrorMessage»:»**Error
Code 0x80072efd: Ant may not be available to you based on your current connection**rnrn**Fix**: If you’ve experienced this error, please visit [their website](https://ant.apache.org/bindownload.cgi) and attempt to download the component from there. If
you are still unable to acquire the component, please disable Apache Ant to address this warning in the installation.»,»Resources»:[{«Locale»:»en-us»,»Message»:»**Error Code 0x80072efd: Ant may not be available
to you based on your current connection**rnrn**Fix**: If you’ve experienced this error, please visit [their website](https://ant.apache.org/bindownload.cgi) and attempt to download the component from there. If you are still unable to acquire the component,
please disable Apache Ant to address this warning in the installation.»},{«Locale»:»fr-fr»,»Message»:»**Code d’erreur 0x80072efd: Ant n’est peut-être pas disponible d’après votre connexion actuelle. Correctif : Si vous
avez rencontré cette erreur, accédez à [leur site web](https://ant.apache.org/bindownload.cgi), puis tentez de télécharger le composant à partir de cet emplacement. Si, malgré tout, vous ne parvenez pas à obtenir le composant, désactivez Apache Ant pour mettre
fin à cet avertissement durant l’installation.»},{«Locale»:»it-it»,»Message»:»**Codice errore 0x80072efd: Ant potrebbe non essere disponibile in base alla connessione corrente. Correzione: se si è verificato questo errore,
visitare il [sito Web](https://ant.apache.org/bindownload.cgi) e provare a scaricare il componente. Se non è ancora possibile acquisire il componente, disabilitare Apache Ant per risolvere l’avviso nell’installazione.»},{«Locale»:»cs-cz»,»Message»:»**Kód
chyby 0x80072efd: Ant možná nebude na základě vašeho aktuálního připojení k dispozici. Oprava: Pokud k této chybě došlo, navštivte prosím [příslušný web](https://ant.apache.org/bindownload.cgi) a zkuste součást stáhnout tam. Pokud se vám součást stále nedaří
získat, zakažte prosím Apache Ant možnost reagovat na toto upozornění v instalaci.»},{«Locale»:»de-de»,»Message»:»**Fehlercode 0x80072efd: Ant ist je nach Ihrer aktuellen Verbindung möglicherweise nicht für Sie verfügbar.
Fix: Wenn dieser Fehler aufgetreten ist, besuchen Sie [die entsprechende Website](https://ant.apache.org/bindownload.cgi), und versuchen Sie, die Komponente von dort herunterzuladen. Wenn Sie die Komponente noch immer nicht abrufen können, deaktivieren Sie
Apache Ant, um diese Warnung in der Installation zu verarbeiten.»},{«Locale»:»es-es»,»Message»:»**Código de error 0x80072efd: Ant puede no estar disponible en función de la conexión actual. Corregir: si ha experimentado
este error, visite [el sitio web correspondiente](https://ant.apache.org/bindownload.cgi) e intente descargar el componente desde ahí. Si aun así no puede adquirir el componente, deshabilite Apache Ant para solucionar esta advertencia en la instalación.»},{«Locale»:»ja-jp»,»Message»:»*
* エラーコード 0x80072efd: 現在の接続では Ant を使用できない可能性があります。修正: このエラーが発生した場合は、 [このウェブサイト](https://ant.apache.org/bindownload.cgi) にアクセスして、そこからコンポーネントをダウンロードしてみてください。 それでもコンポーネントを取得できない場合は、Apache Ant を無効にしてインストールでこの警告を解決します。»},{«Locale»:»ko-kr»,»Message»:»**오류
코드 0x80072efd: 현재 연결에서는 Ant을(를) 사용할 수 없습니다. 해결 방법: 이 오류가 발생한 경우 [관련 웹 사이트](https://ant.apache.org/bindownload.cgi)를 방문하여 해당 구성 요소를 다운로드하세요. 계속 해당 구성 요소를 설치할 수 없는 경우 Apache Ant을(를) 사용하지 않도록 설정하여 설치에서 이 경고를 해결하세요.»},{«Locale»:»pl-pl»,»Message»:»**
Kod błędu 0x80072efd: Produkt Ant może być niedostępny, biorąc pod uwagę bieżące połączenie. Rozwiązanie: Jeśli wystąpił ten błąd, odwiedź [witrynę internetową produktu](https://ant.apache.org/bindownload.cgi) i spróbuj pobrać oraz zainstalować składnik stamtąd.
Jeśli nadal nie możesz uzyskać składnika, wyłącz produkt Apache Ant, aby rozwiązać problem tego ostrzeżenia na etapie instalacji.»},{«Locale»:»pt-br»,»Message»:»**Código de Erro 0x80072efd: Ant pode não estar disponível
com base na sua conexão atual. Correção: se você tiver recebido esse erro, visite [o site deles](https://ant.apache.org/bindownload.cgi) e tente baixar o componente de lá. Se você ainda não conseguiu adquirir o componente, desabilite Apache Ant para resolver
este aviso na instalação.»},{«Locale»:»ru-ru»,»Message»:»**Код ошибки 0x80072efd: Ant может быть недоступен в зависимости от вашего текущего подключения. Исправление: если вы столкнулись с этой ошибкой, посетите
[их сайт](https://ant.apache.org/bindownload.cgi) и попробуйте скачать компонент оттуда. Если вы по-прежнему не можете получить компонент, отключите Apache Ant, чтобы устранить это предупреждение в установке.»},{«Locale»:»tr-tr»,»Message»:»**Hata
Kodu 0x80072efd: Geçerli bağlantınıza dayalı olarak, Ant kullanılamıyor olabilir. Düzeltme: Bu hatayla karşılaştıysanız lütfen [web sitelerini](https://ant.apache.org/bindownload.cgi) ziyaret ederek bileşeni oradan indirip. Bileşeni yine de alamıyorsanız,
lütfen yüklemede bu uyarıyı gidermek için Apache Ant öğesini devre dışı bırakın.»},{«Locale»:»zh-cn»,»Message»:»**错误代码 0x80072efd: 基于你的当前连接,Ant 可能不可用。修复: 如果遇到此错误,请访问[其网站](https://ant.apache.org/bindownload.cgi),并尝试从此处下载组件。如果仍无法获取组件,请禁用
Apache Ant 以在安装中处理此警告。»},{«Locale»:»zh-tw»,»Message»:»**錯誤碼 0x80072efd: 根據您目前的連線,Ant 可能無法使用。修正方式: 若您發生此錯誤,請前往[他們的網站](https://ant.apache.org/bindownload.cgi),然後嘗試從該處下載並安裝元件。若您仍無法取得元件,請停用 Apache Ant 以解決安裝中的這項警告。»}]}]},»Precedence»:0,»RuleId»:»7E4F47B1-1D23-4930-87C7-CA24FCA1478C»,»FlightName»:»»},{«Action»:{«Rules»:[{«ErrorCode»:»1714″,»PackagesAppliesTo»:[],»CommonErrorMessage»:»**Error
Code 1714: Cannot uninstall older version of an MSI**rnAn older version of an MSI is on your computer. You will need to uninstall it before you can install Visual Studio.rnrn**Fix**: Please try the recommended steps to [troubleshoot MSI errors 1714 and
1612](https://aka.ms/VSMSIError)»,»Resources»:[{«Locale»:»en-us»,»Message»:»**Error Code 1714: Cannot uninstall older version of an MSI**rnAn older version of an MSI is on your computer. You will need to
uninstall it before you can install Visual Studio.rnrn**Fix**: Please try the recommended steps to [troubleshoot MSI errors 1714 and 1612](https://aka.ms/VSMSIError)»}]}]},»Precedence»:0,»RuleId»:»818EBFDE-E794-4A31-AA70-2C427B920C33″,»FlightName»:»»},{«Action»:{«Rules»:[{«ErrorCode»:»0x80096004″,»PackagesAppliesTo»:[],»CommonErrorMessage»:»**Error
0x80096004: Signature can’t be verified**rnThere is a problem verifying the signature of a certificate. This usually happens when a package has been damaged.rnrn**FIX**: First, select View Logs to get the name of the damaged package. In File Explorer,
delete that package from the ProgramData\Microsoft\VisualStudio\Packages folder and try installing Visual Studio again. If you are installing from a local or network layout, try following the recommended steps to [update a network–based installation of
Visual Studio.](https://docs.microsoft.com/en-us/visualstudio/install/update-a-network-installation-of-visual-studio)»,»Resources»:[{«Locale»:»en-us»,»Message»:»**Error 0x80096004: Signature can’t be verified**rnThere
is a problem verifying the signature of a certificate. This usually happens when a package has been damaged.rnrn**FIX**: First, select View Logs to get the name of the damaged package. In File Explorer, delete that package from the ProgramData\Microsoft\VisualStudio\Packages
folder and try installing Visual Studio again. If you are installing from a local or network layout, try following the recommended steps to [update a network–based installation of Visual Studio.](https://docs.microsoft.com/en-us/visualstudio/install/update-a-network-installation-of-visual-studio)»}]}]},»Precedence»:0,»RuleId»:»8A7E5F65-4C5B-43ED-8360-6542C6FC958C»,»FlightName»:»»},{«Action»:{«Rules»:[{«ErrorCode»:»-2147024891″,»PackagesAppliesTo»:[«Win10SDK_Hidden_10.0.10240_2″,»Win10SDK_10.0.10586.212″,»Win10SDK_10.0.14393.795″,»Win10SDK_10.0.15063″,»Win10SDK_10.0.16299″,»Win10SDK_10.0.17134″,»Win10SDK_10.0.17763″,»Win10SDK_IpOverUsb»,»Win10_Emulator_10.0.14393.0″,»Win10_Emulator_10.0.15063″,»Win10_Emulator_10.0.15254″],»CommonErrorMessage»:»**Error
-2147024891: Access is denied**rnThere is a problem accessing the registry or file system of this machine. This can happen if Windows Defender or other anti-virus software is restricting access. n rnrn**FIX**: Please review your anti-virus settings
and ensure the Visual Studio Installer has unrestricted access to the registry and file system.»,»Resources»:[{«Locale»:»en-us»,»Message»:»**Error -2147024891: Access is denied**rnThere is a problem accessing
the registry or file system of this machine. This can happen if Windows Defender or other anti-virus software is restricting access. n rnrn**FIX**: Please review your anti-virus settings and ensure the Visual Studio Installer has unrestricted access to
the registry and file system.»}]}]},»Precedence»:0,»RuleId»:»95BA07F6-0D32-4903-8507-8708A7B20898″,»FlightName»:»»},{«Action»:{«Rules»:[{«ErrorCode»:»0x80072efd»,»PackagesAppliesTo»:[«Cocos2DV1″],»CommonErrorMessage»:»**Error
Code 0x80072efd: Cocos may not be available to you based on your current connection**rnrn**Fix**: If you’ve experienced this error, please visit [their website](https://cocos2d-x.org/download) and attempt to download and install the component from there.
Afterwards, you can install by clicking «Modify» and then «Install». If you are still unable to acquire the component, please disable Cocos to address this warning in the installation.»,»Resources»:[{«Locale»:»en-us»,»Message»:»**Error
Code 0x80072efd: Cocos may not be available to you based on your current connection**rnrn**Fix**: If you’ve experienced this error, please visit [their website](https://cocos2d-x.org/download) and attempt to download and install the component from there.
Afterwards, you can install by clicking «Modify» and then «Install». If you are still unable to acquire the component, please disable Cocos to address this warning in the installation.»},{«Locale»:»fr-fr»,»Message»:»**Code
d’erreur 0x80072efd: Cocos n’est peut-être pas disponible d’après votre connexion actuelle. Correctif : Si vous avez rencontré cette erreur, accédez à [leur site web](https://cocos2d-x.org/download), puis tentez de télécharger et d’installer le composant à
partir de cet emplacement. Vous pourrez ensuite l’installer en cliquant sur Modifier, puis Installer. Si, malgré tout, vous ne parvenez pas à obtenir le composant, désactivez Cocos pour mettre fin à cet avertissement durant l’installation.»},{«Locale»:»it-it»,»Message»:»**Codice
errore 0x80072efd: Cocos potrebbe non essere disponibile in base alla connessione corrente. Correzione: se si è verificato questo errore, visitare il [sito Web](https://cocos2d-x.org/download) e provare a scaricare e installare il componente. Successivamente,
è possibile eseguire l’installazione facendo clic su «Modifica», quindi su «Installa». Se non è ancora possibile acquisire il componente, disabilitare Cocos per risolvere l’avviso nell’installazione.»},{«Locale»:»cs-cz»,»Message»:»**Kód
chyby 0x80072efd: Cocos možná nebude na základě vašeho aktuálního připojení k dispozici. Oprava: Pokud k této chybě došlo, navštivte prosím [příslušný web](https://cocos2d-x.org/download) a zkuste součást stáhnout a nainstalovat tam. Pak můžete instalaci provést
tak, že kliknete na Upravit a následně na Nainstalovat. Pokud se vám součást stále nedaří získat, zakažte prosím Cocos možnost reagovat na toto upozornění v instalaci.»},{«Locale»:»de-de»,»Message»:»**Fehlercode 0x80072efd:
Cocos ist je nach Ihrer aktuellen Verbindung möglicherweise nicht für Sie verfügbar. Fix: Wenn dieser Fehler aufgetreten ist, besuchen Sie [die entsprechende Website](https://cocos2d-x.org/download), und versuchen Sie, die Komponente von dort herunterzuladen
und zu installieren. Anschließend können Sie die Installation durch Klicken auf «Ändern» und «Installieren» durchführen. Wenn Sie die Komponente noch immer nicht abrufen können, deaktivieren Sie Cocos, um diese Warnung in der Installation
zu verarbeiten.»},{«Locale»:»es-es»,»Message»:»**Código de error 0x80072efd: Cocos puede no estar disponible en función de la conexión actual. Corregir: si ha experimentado este error, visite [el sitio web correspondiente](https://cocos2d-x.org/download)
e intente descargar e instalar el componente desde ahí. A continuación, puede hacer clic en «Modificar» y, después, en «Instalar» para instalarlo. Si aun así no puede adquirir el componente, deshabilite Cocos para solucionar esta advertencia
en la instalación.»},{«Locale»:»ja-jp»,»Message»:»* * エラーコード 0x80072efd: 現在の接続では Cocos を使用できない可能性があります。修正: このエラーが発生した場合は、 [このウェブサイト](https://cocos2d-x.org/download) にアクセスして、そこからコンポーネントをダウンロードしてインストールしてみてください。 後で [変更]
をクリックしてから [インストール] をクリックしてインストールすることができます。それでもコンポーネントを取得できない場合は、Cocos を無効にしてインストールでこの警告を解決します。»},{«Locale»:»ko-kr»,»Message»:»**오류 코드 0x80072efd: 현재 연결에서는 Cocos을(를) 사용할 수 없습니다. 해결 방법: 이 오류가 발생한 경우 [관련 웹 사이트](https://cocos2d-x.org/download)를
방문하여 해당 구성 요소를 다운로드 및 설치하세요. 그런 다음, «수정»과 «설치»를 차례로 클릭하여 설치할 수 있습니다. 계속 해당 구성 요소를 설치할 수 없는 경우 Cocos을(를) 사용하지 않도록 설정하여 설치에서 이 경고를 해결하세요.»},{«Locale»:»pl-pl»,»Message»:»** Kod błędu 0x80072efd:
Produkt Cocos może być niedostępny, biorąc pod uwagę bieżące połączenie. Rozwiązanie: Jeśli wystąpił ten błąd, odwiedź [witrynę internetową produktu](https://cocos2d-x.org/download) i spróbuj pobrać oraz zainstalować składnik stamtąd. Następnie możesz przeprowadzić
instalację, klikając pozycję „Modyfikuj”, a następnie pozycję „Zainstaluj”. Jeśli nadal nie możesz uzyskać składnika, wyłącz produkt Cocos, aby rozwiązać problem tego ostrzeżenia na etapie instalacji.»},{«Locale»:»pt-br»,»Message»:»**Código
de Erro 0x80072efd: Cocos pode não estar disponível com base na sua conexão atual. Correção: se você tiver recebido esse erro, visite [o site deles](https://cocos2d-x.org/download) e tente baixar e instalar o componente de lá. Após o download, você poderá
instalar clicando em «Modificar» e, em seguida, em «Instalar». Se você ainda não conseguiu adquirir o componente, desabilite Cocos para resolver este aviso na instalação.»},{«Locale»:»ru-ru»,»Message»:»**Код
ошибки 0x80072efd: Cocos может быть недоступен в зависимости от вашего текущего подключения. Исправление: если вы столкнулись с этой ошибкой, посетите [их сайт](https://cocos2d-x.org/download) и попробуйте скачать и установить компонент оттуда.
Впоследствии вы можете выполнить установку, выбрав «Изменить» и затем «Установить». Если вы по-прежнему не можете получить компонент, отключите Cocos, чтобы устранить это предупреждение в установке.»},{«Locale»:»tr-tr»,»Message»:»**Hata
Kodu 0x80072efd: Geçerli bağlantınıza dayalı olarak, Cocos kullanılamıyor olabilir. Düzeltme: Bu hatayla karşılaştıysanız lütfen [web sitelerini](https://cocos2d-x.org/download) ziyaret ederek bileşeni oradan indirip yüklemeyi deneyin. Daha sonra «Değiştir»
ve ardından «Yükle» seçeneğine tıkayarak bileşeni yükleyebilirsiniz. Bileşeni yine de alamıyorsanız, lütfen yüklemede bu uyarıyı gidermek için Cocos öğesini devre dışı bırakın.»},{«Locale»:»zh-cn»,»Message»:»**错误代码
0x80072efd: 基于你的当前连接,Cocos 可能不可用。修复: 如果遇到此错误,请访问[其网站](https://cocos2d-x.org/download),并尝试从此处下载和安装组件。然后,可依次单击“修改”和“安装”进行安装。如果仍无法获取组件,请禁用 Cocos 以在安装中处理此警告。»},{«Locale»:»zh-tw»,»Message»:»**錯誤碼 0x80072efd: 根據您目前的連線,Cocos
可能無法使用。修正方式: 若您發生此錯誤,請前往[他們的網站](https://cocos2d-x.org/download),然後嘗試從該處下載並安裝元件,之後即可依序按一下 [修改] 與 [安裝] 來予以安裝。若您仍無法取得元件,請停用 Cocos 以解決安裝中的這項警告。»}]}]},»Precedence»:0,»RuleId»:»AFBE5FF9-2F41-47EE-BD0E-077BBC5F2184″,»FlightName»:»»},{«Action»:{«Rules»:[{«ErrorCode»:»1618″,»PackagesAppliesTo»:[],»CommonErrorMessage»:»**Error
1618: Another installation in progress**rnAnother program is using the Windows Installer Service. This might be due to an automatic update.rnrn**Fix**: If Windows is installing updates, we recommend that you wait until the update is complete. If an installation
did not close properly, select the Processes tab in Task Manager to locate and stop any MSIExec.exe entries. You can also restart your computer and try installing again.»,»Resources»:[{«Locale»:»en-us»,»Message»:»**Error
1618: Another installation in progress**rnAnother program is using the Windows Installer Service. This might be due to an automatic update.rnrn**Fix**: If Windows is installing updates, we recommend that you wait until the update is complete. If an installation
did not close properly, select the Processes tab in Task Manager to locate and stop any MSIExec.exe entries. You can also restart your computer and try installing again.»}]}]},»Precedence»:0,»RuleId»:»B0F3C77A-61DC-4C6E-945B-60B6519BC988″,»FlightName»:»»},{«Action»:{«Rules»:[{«ErrorCode»:»1601″,»PackagesAppliesTo»:[],»CommonErrorMessage»:»**Error
1601: Windows Installer Service unavailable**rnThere is a problem with the Windows Installer Service, or it has been turned off.rnrn**Fix**: This problem usually resolves when you retry the Visual Studio installation after one of the following workarounds.rn1.
Restart your computer. rn2. Make sure Windows Installer Service is turned on. Run Services.msc and double-click on Windows Installer. If it has turned off, change Status to Manual, then select Apply and OK. If it is already running, select Stop and then
Start. rn3. If you are still getting this problem, try the [recommended Windows Installer service troubleshooting steps](https://support.microsoft.com/en-us/help/17588/fix-problems-that-block-programs-from-being-installed-or-removed).»,»Resources»:[{«Locale»:»en-us»,»Message»:»**Error
1601: Windows Installer Service unavailable**rnThere is a problem with the Windows Installer Service, or it has been turned off.rnrn**Fix**: This problem usually resolves when you retry the Visual Studio installation after one of the following workarounds.rn1.
Restart your computer.rn2. Make sure Windows Installer Service is turned on. Run Services.msc and double-click on Windows Installer. If it is turned off, change Status to Manual, then select Apply and OK. If it is already running, select Stop and then Start.rn3.
If you are still getting this problem, try the [recommended Windows Installer service troubleshooting steps](https://support.microsoft.com/en-us/help/17588/fix-problems-that-block-programs-from-being-installed-or-removed))»}]}]},»Precedence»:0,»RuleId»:»DFC5CD1E-D038-4A37-B5DD-82A4D220E0B9″,»FlightName»:»»}]
2019-07-29T21:12:23 : Error : Failed to start the products provider service. error: Non è possibile scaricare il manifesto del canale da «https://aka.ms/vs/16/pre/channel». at ChannelManifestDownloadException: Non è possibile scaricare il manifesto
del canale da «https://aka.ms/vs/16/pre/channel». 2019-07-29T21:12:23 : Error : Failed to start the installed products provider service. error: Non è possibile scaricare il manifesto del canale da «https://aka.ms/vs/16/pre/channel». at
ChannelManifestDownloadException: Non è possibile scaricare il manifesto del canale da «https://aka.ms/vs/16/pre/channel». 2019-07-29T21:12:23 : Verbose : Window showing 2019-07-29T21:12:23 : Error : Failed to get product summaries. [installerId:
SetupEngine, error: Non è possibile scaricare il manifesto del canale da «https://aka.ms/vs/16/pre/channel». at Microsoft.VisualStudio.Setup.ChannelManifestDownloadException: Non è possibile scaricare il manifesto del canale da «https://aka.ms/vs/16/pre/channel».
—> System.ObjectDisposedException: Impossibile accedere a un file chiuso. in System.IO.__Error.FileNotOpen() in System.IO.FileStream.SetLength(Int64 value) in Microsoft.VisualStudio.Setup.Download.DownloadManager.DownloadWithRetry(IDownloadEngine[] engines,
Uri uri, Stream outputStream, ProgressUpdateCallback progress, CancellationToken cancellationToken, DownloadContext downloadContext, Boolean verifySignature) in Microsoft.VisualStudio.Setup.Download.DownloadManager.<>c__DisplayClass23_1.<Download>b__0()
in System.Threading.Tasks.Task`1.InnerInvoke() in System.Threading.Tasks.Task.Execute() — Fine traccia dello stack da posizione precedente dove è stata generata l’eccezione — in System.Runtime.ExceptionServices.ExceptionDispatchInfo.Throw() in System.Runtime.CompilerServices.TaskAwaiter.HandleNonSuccessAndDebuggerNotification(Task
task) in Microsoft.VisualStudio.Setup.ChannelManager.<GetLatestChannelManifestAsync>d__80.MoveNext() — Fine traccia dello stack da posizione precedente dove è stata generata l’eccezione — in System.Runtime.ExceptionServices.ExceptionDispatchInfo.Throw()
in System.Runtime.CompilerServices.TaskAwaiter.HandleNonSuccessAndDebuggerNotification(Task task) in Microsoft.VisualStudio.Setup.ChannelManager.<AddAsync>d__40.MoveNext() — Fine traccia dello stack da posizione precedente dove è stata generata l’eccezione
— in System.Runtime.ExceptionServices.ExceptionDispatchInfo.Throw() in Microsoft.VisualStudio.Telemetry.WindowsErrorReporting.WatsonReport.GetClrWatsonExceptionInfo(Exception exceptionObject) — Fine della traccia dello stack dell’eccezione interna —
in Microsoft.VisualStudio.Setup.ChannelManager.<AddAsync>d__40.MoveNext() — Fine traccia dello stack da posizione precedente dove è stata generata l’eccezione — in System.Runtime.ExceptionServices.ExceptionDispatchInfo.Throw() in System.Runtime.CompilerServices.TaskAwaiter.HandleNonSuccessAndDebuggerNotification(Task
task) in Microsoft.VisualStudio.Setup.ProductsProviderService.<Initialize>d__5.MoveNext()] 2019-07-29T21:12:23 : Error : Failed to get installed product summaries. [installerId: SetupEngine, error: Non è possibile scaricare il manifesto del canale da
«https://aka.ms/vs/16/pre/channel». at Microsoft.VisualStudio.Setup.ChannelManifestDownloadException: Non è possibile scaricare il manifesto del canale da «https://aka.ms/vs/16/pre/channel». —> System.ObjectDisposedException: Impossibile
accedere a un file chiuso. in System.IO.__Error.FileNotOpen() in System.IO.FileStream.SetLength(Int64 value) in Microsoft.VisualStudio.Setup.Download.DownloadManager.DownloadWithRetry(IDownloadEngine[] engines, Uri uri, Stream outputStream, ProgressUpdateCallback
progress, CancellationToken cancellationToken, DownloadContext downloadContext, Boolean verifySignature) in Microsoft.VisualStudio.Setup.Download.DownloadManager.<>c__DisplayClass23_1.<Download>b__0() in System.Threading.Tasks.Task`1.InnerInvoke()
in System.Threading.Tasks.Task.Execute() — Fine traccia dello stack da posizione precedente dove è stata generata l’eccezione — in System.Runtime.ExceptionServices.ExceptionDispatchInfo.Throw() in System.Runtime.CompilerServices.TaskAwaiter.HandleNonSuccessAndDebuggerNotification(Task
task) in Microsoft.VisualStudio.Setup.ChannelManager.<GetLatestChannelManifestAsync>d__80.MoveNext() — Fine traccia dello stack da posizione precedente dove è stata generata l’eccezione — in System.Runtime.ExceptionServices.ExceptionDispatchInfo.Throw()
in System.Runtime.CompilerServices.TaskAwaiter.HandleNonSuccessAndDebuggerNotification(Task task) in Microsoft.VisualStudio.Setup.ChannelManager.<AddAsync>d__40.MoveNext() — Fine traccia dello stack da posizione precedente dove è stata generata l’eccezione
— in System.Runtime.ExceptionServices.ExceptionDispatchInfo.Throw() in Microsoft.VisualStudio.Telemetry.WindowsErrorReporting.WatsonReport.GetClrWatsonExceptionInfo(Exception exceptionObject) — Fine della traccia dello stack dell’eccezione interna —
in Microsoft.VisualStudio.Setup.ChannelManager.<AddAsync>d__40.MoveNext() — Fine traccia dello stack da posizione precedente dove è stata generata l’eccezione — in System.Runtime.ExceptionServices.ExceptionDispatchInfo.Throw() in System.Runtime.CompilerServices.TaskAwaiter.HandleNonSuccessAndDebuggerNotification(Task
task) in Microsoft.VisualStudio.Setup.ProductsProviderService.<Initialize>d__5.MoveNext()] 2019-07-29T21:12:23 : Verbose : Pipe: \.pipe4623ec44-61bc-473b-bd91-69cde3ad46ec connection is established 2019-07-29T21:12:23 : Verbose : Pipe is closed 2019-07-29T21:12:23
: Verbose : Dispatched ProductUpdateCheckStartedEvent event. 2019-07-29T21:12:23 : Verbose : Dispatched ProductUpdateCheckFinishedEvent event with wasManifestUpdated=false.
When trying to install Visual Studio 2017 Community I got the error:
Couldn’t download ‘Microsoft.VisualStudio.WCF.DiagnosticPack.Msi.msi’
Error 0x80096004 there is a problem verifying the signature of a certificate.
Windows 10 Pro Version: 20h2
OS build: 19042.804
Visual Studio 2017 Community version: 15.9.33
click to enlarge
Checking the logs I found it seems that the problem is the hash of the file.
Error: Package ‘Microsoft.VisualStudio.WCF.DiagnosticPack.Msi, version
= 15.0.27005.2’ failed to download from ‘https://download.visualstudio.microsoft.com/download/pr/7b52e873-c823-471c-b1e9-ca1224f499fa
/74a24f8c005b1d09066b357104945dc94d3a18156c0433352a718aefd1a616d7/Microsoft.VisualStudio.WCF.DiagnosticPack.Msi.msi
‘. WebClient download failed: SHA256 check for
‘Microsoft.VisualStudio.WCF.DiagnosticPack.Msi.msi’ failed. Expected
hash:
74A24F8C005B1D09066B357104945DC94D3A18156C0433352A718AEFD1A616D7,
Actual hash: FEB8356FD3CF6E8520F3675E426C02C11399F94B4A3B0B4E21A1D5B9.
Bits download failed: SHA256 check for
‘Microsoft.VisualStudio.WCF.DiagnosticPack.Msi.msi’ failed. Expected
hash:
74A24F8C005B1D09066B357104945DC94D3A18156C0433352A718AEFD1A616D7,
Actual hash: FEB8356FD3CF6E8520F3675E426C02C11399F94B4A3B0B4E21A1D5B9.
WinInet download failed: SHA256 check for
‘Microsoft.VisualStudio.WCF.DiagnosticPack.Msi.msi’ failed. Hash
expected:
74A24F8C005B1D09066B357104945DC94D3A18156C0433352A718AEFD1A616D7, real
hash:
FEB8356FD3CF6E8520F3675E426C02C11399F94B4A3B0B4E21A1D5AF186192B9,
Signature: PackageId = Microsoft.VisualStudio.WCF.DiagnosticPack.Msi;
PackageAction = DownloadPackage; ReturnCode = 0x80131500
Please, does anyone know how to fix this?
Thank you.
![]()
asked Mar 6, 2021 at 18:56
![]()
Someone from Microsoft support gave me a few steps to do and the problem was fixed.
I did the following:
- I delete all content from the %temp% folder
- I deleted the folder «%programdata%MicrosoftVisualStudioPackagesMicrosoft.VisualStudio.WCF.DiagnosticPack.Msi,version=15.0.27005.2»
- I disabled my antivirus program (Microsoft Defender Antivirus)
- I confirmed that all Windows updates were installed
- I opened the Visual Studio Installer and repaired the VS 2017 Community
Fortunately the error message did not appear anymore, that is, it seems that the installation was successful for the package «Microsoft.VisualStudio.WCF.DiagnosticPack.Msi».
Note: on the day of the problem I even deleted all the contents of the %temp% folder, the Windows updates were the most current (I had just formatted my PC and installed Windows 10), and even then the problem continued however today the repair worked.
Thanks.
answered Mar 8, 2021 at 17:31
![]()
Ошибка 0x80096004 появляется в процессе обновления Windows 10. Причина — система не признаёт подлинность загружаемых файлов. Ошибка чаще всего возникает из-за повреждения хранилища сертификатов или системных файлов Виндовс. Так как точную причину определить сложно, придётся перепробовать несколько методов, пока ошибка не будет устранена.
Автоматическое устранение неполадок
Первым делом попробуем устранить неполадки с помощью встроенного инструмента системы.
- Открываем раздел «Обновление и безопасность» в «Параметрах» Windows 10.
- Переходим на вкладку «Устранение неполадок».
- Находим «Центр обновления» и нажимаем «Запустить средство устранения неполадок».
Устраняем неполадки в автоматическом режиме
К сожалению, чаще всего встроенное средство устранения неполадок не находит причину ошибки или не может с ней справиться. Однако попробовать в любом случае стоит.
Замена файла crypt32.dll
Одна из возможных причин появления ошибки — проблемы с сертификатами, из-за которых система не опознает обновления. Чтобы её устранить, попробуем заменить файл crypt32.dll, связанный с реализацией сертификатов на Виндовс.
Найти файл crypt32.dll можно в папках C:WindowsSystem32 (на 32-битных версиях Windows) и C:WindowsSysWOW64 (на 64-битных версиях). Самый безопасный способ — скопировать его с другого компьютера и перенести на тот, при обновлении которого появляется ошибка.
Другой вариант — скачать файл crypt32.dll из онлайн-хранилища динамических библиотек. Я обычно использую сервис DLL-Files.
Проблема может быть в этом файле
После того, как заведомо исправный файл будет получен, необходимо добавить его в системную папку.
- Загружаем WIndows 10 в безопасном режиме.
- Заходим в папку C:WindowsSystem32 или C:WindowsSysWOW64 в зависимости от разрядности системы.
- Перемещаем файл crypt32.dll с заменой исходной библиотеки.
- Запускаем командную строку с правами администратора.
- Выполняем команду regsvr32 crypt32.dll.
Командная строка нужна нам для регистрации компонента в системе. После выполнения команды закрываем консоль и пробуем ещё раз обновить Виндовс.
Сброс компонентов системы обновления
Ошибка может появиться из-за повреждения служб, отвечающих за работу системы обновления. Устранить эти неполадки можно сбросом компонентов.
Запускаем командную строку с правами администратора и выполняем две команды:
- net stop bits
- net stop wuauserv
Затем удаляем файлы обновлений — Del «%ALLUSERSPROFILE%Application DataMicrosoftNetworkDownloaderqmgr*.dat».
Следующая команда — cd /d %windir%system32.
Затем перерегистрируем компоненты системы обновления. Вводим следующие команды:
regsvr32.exe atl.dll;
regsvr32.exe urlmon.dll;
regsvr32.exe mshtml.dll;
regsvr32.exe shdocvw.dll;
regsvr32.exe browseui.dll;
regsvr32.exe jscript.dll;
regsvr32.exe vbscript.dll;
regsvr32.exe scrrun.dll;
regsvr32.exe msxml.dll;
regsvr32.exe msxml3.dll;
regsvr32.exe msxml6.dll;
regsvr32.exe actxprxy.dll;
regsvr32.exe softpub.dll;
regsvr32.exe wintrust.dll;
regsvr32.exe dssenh.dll;
regsvr32.exe rsaenh.dll;
regsvr32.exe gpkcsp.dll;
regsvr32.exe sccbase.dll;
regsvr32.exe slbcsp.dll;
regsvr32.exe cryptdlg.dll;
regsvr32.exe oleaut32.dll;
regsvr32.exe ole32.dll;
regsvr32.exe shell32.dll;
regsvr32.exe initpki.dll;
regsvr32.exe wuapi.dll;
regsvr32.exe wuaueng.dll;
regsvr32.exe wuaueng1.dll;
regsvr32.exe wucltui.dll;
regsvr32.exe wups.dll;
regsvr32.exe wups2.dll;
regsvr32.exe wuweb.dll;
regsvr32.exe qmgr.dll;
regsvr32.exe qmgrprxy.dll;
regsvr32.exe wucltux.dll;
regsvr32.exe muweb.dll;
regsvr32.exe wuwebv.dll;
Затем сбрасываем Winsock — netsh winsock reset.
Последний шаг — запуск служб BITS и Центра обновления:
- net start bits
- net start wuauserv
После выполнения этих двух команд перезагружаем систему.
Можно не вводить все эти команды в консоль, а создать BAT-файл.
Отключение брандмауэра и антивируса
Запрещать установку обновления может также брандмауэр или «Защитник Windows». Чтобы преодолеть этот запрет, на время отключим их. Начнём с брандмауэра «Защитника Windows»:
- Открываем «Панель управления».
- Переключаемся в режим «Крупные значки» и переходим в раздел «Брандмауэр Защитника Windows».
- Кликаем по ссылке «Включение и отключение брандмауэра Защитника Windows» в меню слева.
Настройка брандмауэра Виндовс
- Отключаем брандмауэр для частной и общественной сетей.
Отказываемся от защитного экрана на время установки обновления
- Сохраняем изменения.
Теперь отключим сам «Защитник»:
- Открываем «Параметры».
- Переходим на вкладку «Обновление и безопасность».
- Выбираем вкладку «Безопасность» и нажимаем на кнопку «Открыть службу Безопасность».
Переходим в настройки безопасности Windows
- Открываем вкладку «Защита от вирусов и угроз».
- Кликаем по ссылке «Управление настройками» в поле «Параметры защиты от вирусов и угроз».
Меняем параметры защиты от вирусов и угроз
- Отключаем защиту в реальном времени.
Если за безопасность системы отвечает антивирус от сторонних разработчиков, отключаем его вместе со всеми дополнительными функциями вроде брандмауэра. После успешной установки обновлений включаем защитные функции обратно.
Проверка системных файлов
Одна из возможных причин появления ошибки 0x80096004 — повреждение системных файлов. Найти и устранить сбои поможет системная утилита System File Checker (SFC). Запускаем командную строку с правами администратора и выполняем команду sfc/scannow.
Проверяем целостность системных файлов
Если после сканирования с помощью SFC ошибка сохраняется, запускаем проверку системных файлов другой встроенной утилитой — DISM. Для этого выполняем команду DISM/Online/Cleanup-Image/RestoreHealth. Подробнее о том, как работают эти инструменты, мы рассказали в статье о проверке целостности системных файлов.
Ручная установка обновлений
Если автоматическая установка через Центр обновлений всё равно не работает, используем ручную инсталляцию.
- Открываем каталог обновлений Microsoft.
- В поисковой строке пишем номер обновления, при установке которого появляется сообщение об ошибке, и нажимаем на кнопку «Search».
- Скачиваем апдейт с подходящей версией и разрядностью.
- Запускаем загруженный файл и устанавливаем обновление.
Устанавливаем обновление вручную
Единственный непонятный момент во всей этой процедуре — номер обновления. Чтобы уточнить его, выполняем следующие действия:
- Открываем раздел «Обновление и безопасность» в «Параметрах».
- На вкладке «Центр обновления» нажимаем на кнопку «Просмотр журнала обновлений».
- Находим обновление, рядом с котором указан код ошибки 0x80096004.
Для ручной инсталляции обновлений подходит также утилита Media Creation Tool. Обычно её используют для создания установочной флешки Windows 10. Но можно сделать так:
- Скачиваем и устанавливаем утилиту Media Creation Tool.
- Выбираем режим «Обновить этот компьютер сейчас».
- Следуем советам мастера, чтобы установить доступные апдейты.
Обновление через Media Creation Tool
Это принудительное обновление системы, которое должно пройти без ошибки 0x80096004.
![]() Загрузка …
Загрузка …
Post Views: 2 383
Recently, a lot of users reported to Microsoft about getting an error code 0x80096004 while trying to update their Windows 10 computers. This kind of Windows Update error occurs during the initial download and verification process. It also affects the Windows features (FODs) and when you encounter this error, you will also see this error code, “TRUST_E_CERT_SIGNATURE”. This error code indicates that the signature of the certificate could not be confirmed. This is caused by a broken certificate store or a corrupt copy of the Windows operating system is installed.
Here’s the complete error message:
“There were some problems installing updates, but we’ll try again later. If you keep seeing this and want to search the web or contact support for information, this may help: (0x80096004).”
To fix Windows Update error 0x80096004, you can check out the options provided below.
Option 1 – Delete the contents in the Software Distribution folder and Catroot2 folder
- Open the WinX Menu.
- From there, open Command Prompt as admin.
- Then type in the following command – don’t forget to hit Enter right after typing each one of them.
net stop wuauserv
net start cryptSvc
net start bits
net start msiserver
- After entering these commands, it will stop the Windows Update Service, Background Intelligent Transfer Service (BITS), Cryptographic, and the MSI Installer
- Next, go to the C:/Windows/SoftwareDistribution folder and get rid of all the folders and files thereby tapping the Ctrl + A keys to select them all and then click on Delete. Note that if the files are in use, you won’t be able to delete them.
After resetting the SoftwareDistribution folder, you need to reset the Catroot2 folder to restart the services you just stopped. To do that, follow these steps:
- Type each one of the following commands.
net start wuauserv
net start cryptSvc
net start bits
net start msiserver
- After that, exit Command Prompt and restart your computer, and then try to run Windows Update once more.
Option 2 – Run the Windows Update Troubleshooter
Running the built-in Windows Update troubleshooter is one of the things you can first check out as it is known to automatically resolve any Windows Update errors like error code 0x80096004. To run it, Refer to these steps:
- Tap the Win + I keys to open Settings.
- From there, click Update and Security and go to the Troubleshoot section.
- Next, select Windows Update and click the “Run the troubleshooter” button and wait until it’s finished, and then try to run Windows Update again.
Option 3 – Try to temporarily disable anti-virus and Windows Defender Firewall
As mentioned, the error could be due to the antivirus program or the Windows Defender Firewall installed on your computer. Thus, disabling them or any security software installed in your computer is always a good idea you can try when you’re not able to access the shared drive on your computer. There are times when you encounter problems like Error Code 0x80096004 due to interference of antivirus or security programs. Thus, you have to disable both your antivirus program and Windows Defender Firewall for the meantime and check if it fixes the error or not.
Option 4 – Try to replace the DLL file with a trusted source
You can also try to replace the crypt32.dll file as it could help in fixing the Windows Update error. Just make sure that you get one from a trusted source.
- First, you need to get the new DLL file from another computer with preferably the same file version number.
- After that, you need to boot your PC into Safe Mode and navigate to the paths listed below and then replace the file using a USB drive or other external storage devices.
- x86: This PC > C:/Windows/System32
- x64: This PC > C:/Windows/SysWOW64
- Next, type “cmd” in the Cortana search box and right-click on Command Prompt, and select “Run as administrator” to open it with administrator privileges.
- Now type the “regsvr32 crypt32.dll” command and hit Enter.
- Restart your PC and check if the error is now fixed.
Option 5 – Try downloading and installing the Windows Updates manually
Error Code 0x80096004 might be due to a Windows Update that has failed. So if it is not a feature update and only a cumulative update, you can download the Windows Update and install it manually. But first, you need to find out which update has failed, and to do so, refer to the following steps:
- Go to Settings and from there go to Update and Security > View Update History.
- Next, check which particular update has failed. Note that Updates that have failed to install will be displayed under the Status column which has a label of “Failed”.
- After that, go to the Microsoft Download Center and look for that update using its KB number and once you find it, download and then install it manually.
Note: You can also use the Microsoft Update Catalog, a service from Microsoft that provides a list of software updates that can be distributed over a corporate network. With the help of this service, it can be easier for you to find Microsoft software updates, drivers as well as fixes.
Option 6– Run System File Checker or SFC scan
System File Checker or SFC is a built-in command utility that helps in restoring corrupted files as well as missing files. It replaces bad and corrupted system files to good system files. To run the SFC command, follow the steps given below.
- Tap Win + R to launch Run.
- Type in cmd in the field and tap Enter.
- After opening Command Prompt, type in sfc /scannow
The command will start a system scan which will take a few whiles before it finishes. Once it’s done, you could get the following results:
- Windows Resource Protection did not find any integrity violations.
- Windows Resource Protection found corrupt files and successfully repaired them.
- Windows Resource Protection found corrupt files but was unable to fix some of them.
Reboot your PC.
Option 7 – Try to run the Windows Update Service in a Clean Boot State
There are some instances that some conflicting programs installed in your computer might be the one that’s causing Windows Update error. To identify which program is causing the problem, you need to put your computer in a Clean Boot State. To do so, follow the steps below.
- Log onto your PC as an administrator.
- Type in MSConfig in the Start Search to open the System Configuration utility.
- From there, go to the General tab and click “Selective startup”.
- Clear the “Load Startup items” check box and make sure that the “Load System Services” and “Use Original boot configuration” options are checked.
- Next, click the Services tab and select the “Hide All Microsoft Services” check box.
- Click Disable all.
- Click on Apply/OK and restart your PC. (This will put your PC into a Clean Boot State. And configure Windows to use the usual startup, just simply undo the changes.)
- Now try to run the Windows Update Service again and see if Windows Update error 0x80096004 is now gone.
Do You Need Help with Your Device?
Our Team of Experts May Help

Troubleshoot.Tech Experts are There for You!
GET HELP
Troubleshoot.Tech experts work with all versions of Microsoft Windows including Windows 11, with Android, Mac, and more.
Share this article:
You might also like
Error 0x80070571 — What is it?
If you are a Windows 7 user and you also have a Maxtor One Touch 4 external hard drive installed on your PC, then you may come across the error code 0x80070571.
The error code is displayed in the following format:
«The disk structure is corrupt and unreadable. Error 0×80070571»
Solution
Error Causes
Here are some of the common causes of the error 0×80070571:
- Changed Windows files or settings
- Maxtor 750G driver damaged or corrupt
- Damaged or corrupt registry keys
- System files are missing or broken
In short, the error code 0×80070571 indicates an unhealthy system and is a surefire sign of poor PC maintenance.
It is advisable to repair and resolve the error immediately especially if the underlying cause of the error is related to the registry. Such errors can expose your PC to serious threats like system failure, crashes, and valuable data loss. And retrieving data is often the hardest.
Further Information and Manual Repair
To resolve the error 0×80070571 on your system, you don’t need to be a computer programmer or hire a technician either.
We have listed down the best and simplest ways to fix this error on your system. These solutions are so easy to follow and execute that it requires no technical expertise whatsoever.
So, let’s get started:
Solution 1: Update The Maxtor 750G Driver
The best way to fix the error 0×80070571 on your system is to update the Maxtor 750G driver. This can be easily done by either contacting the manufacturer or downloading the updated version from Maxtor’s official website.
Solution 2: Update Windows
For the smooth running of the PC, it is crucial to keep Windows updated. Therefore, update Windows on your PC. To do this, go to the Windows Update option in the control panel. This will show your updated status. Turn it on and click on update.
Solution 3: Clean the Registry
The registry basically stores all the activities and information on your PC. This includes both important and unimportant data including the junk files, cookies, internet history, bad registry keys and invalid entries.
Such files if not removed, take up a lot of disk space. It corrupts the registry and damages the system files as well.
Furthermore, it also leads to disk fragmentation because of which new files are stored in fragments in different locations and this is exactly why it takes a long time to call system files. The registry damage and corruption then generates various errors on your PC and one of them is error 0×80070571.
The best way to clean and restore the registry is to download Restoro.
This is a highly functional and next-generation registry cleaner.
It is embedded with a smart algorithm that detects and scans all registry issues and errors on your system in seconds. It removes all the unnecessary and obsolete files accumulated and cluttering your PC. Furthermore, it fixes the damaged system files and restores the registry right away.
It has a sophisticated and an easy to use interface that enables users to work around it without any hassle or technical expertise. It is compatible with all Windows versions.
In addition to this, this tool is also deployed with several other value-added utilities such as an antivirus, a system optimizer and Active X controls, and a class ID scanner.
It is safe and efficient. Click here to download Restoro on your PC and repair error 0×80070571 today!
Read More
As you know, Diskpart is a useful utility that helps in managing the disks in a computer. It is a very useful tool that even when the GUI-based disk management tools in Windows 10 operating system fails, the Diskpart utility still tends to work. However, it also does not mean that this utility does not experience issues as it still does, from time to time. One of the issues you may encounter when using the Diskpart utility is when you encounter an error message that says, “DiskPart has encountered an error, Access is denied”.
This kind of error in the Diskpart utility could be caused by a number of factors. For one, it could be that the Write-Protection is enabled on the drive where the operating is being performed or it could also be that the Command Prompt terminal does not have administrator-level permissions to carry out the command. Thus, you can try to run the Diskpart utility again but this time with admin privileges or you could also remote the Write-Protection from the concerned drive. For more details, refer to the instructions given below.
Option 1 – Try running Command Prompt with Administrator-level permissions
- In the Start Search, type “command prompt” and from the search results that appear, look for Command Prompt.
- Once you found it, right-click on it and select the “Run as administrator” option.
- After that, try to execute the Diskpart operation once again and see if you still encounter the same error.
Option 2 – Try to remove the Write Protection from the drive
As mentioned, removing the Write-Protection on the concerned drive could also help you fix the problem and there are two ways to get rid of the write protection – you can either use the Diskpart utility or the Registry Editor. How? Refer to the following steps.
Via Diskpart utility:
- Open Command Prompt with admin privileges and then type the “diskpart” command and tap Enter to execute it.
- Next, type “list disk” and tap Enter to get the list of all the Disk connects or all the partitions that are formed on those disks.
- After that, you need to choose one command depending on the list of commands you entered. Type “select disk #” and tap Enter to select the disk or partition you want to select.
- Then type “attribute disk clear readonly” and tap Enter to Disable the Write Protection on the selected disk or partition.
Via Registry Editor:
- Tap the Win + R keys to open the Run utility and type “Regedit” in the field and then tap Enter to open the Registry Editor.
- Next, navigate to the following registry key:
ComputerHKEY_LOCAL_MACHINESYSTEMCurrentControlSetControlStorageDevicePolicies
- After that, look for the DWORD named “WriteProtect” and double click on it, and then set its Value Data to “0”.
- Now restart your computer and see if the problem is now fixed or not.
Read More
ListenToTheRadioNow is a Browser Extension that allegedly lets you listen to radio from your browser. However, all this extension does is add links to the popular radio stations on your home page.
This extension hijacks your home page and changes your default search provides to MyWay. While running it monitors browsing data from your browser, mining information such as website visits, clicked links, and sometimes even personal information. This information is later used to display targeted ads through your browser.
Several anti-virus scanners have marked this extension as a possible Browser Hijackers, and due to its data mining nature, it is not recommended to keep it on your computer.
About Browser Hijackers
Browser hijacking is a type of unwanted software, commonly a browser add-on or extension, which then causes modifications in the web browser’s settings. Browser hijackers could do more than just modifying homepages. In most cases, browser hijacking is used for earning ad revenue that comes from forced advert clicks and website visits. Even though it may seem naive, all browser hijackers are dangerous and therefore always regarded as security threats. They don’t just ruin your internet browsers, but browser hijackers could also modify the system registry to make your PC susceptible to other malicious programs.
How you can know whether the browser is hijacked?
There are several symptoms of browser hijacking:
1. home-page is changed
2. new bookmarks pointing to porn websites have been added to your bookmarks
3. the default internet search engine and/or the default web browser settings are altered
4. find new toolbars that you did not add
5. unstoppable flurries of popup ads show up on your PC screen
6. webpages load very slowly and often incomplete
7. you have prohibited entry to certain web pages, for example, the site of an anti-malware software firm like SafeBytes.
So how does a browser hijacker infect a PC
A browser hijacker could be installed on your computer or laptop if you visit an infected website, click on an e-mail attachment, or download something from a file-sharing website. They also come from add-on programs, also referred to as browser helper objects (BHO), browser plug-ins or toolbars. Also, some shareware and freeware can put the hijacker inside your computer through “bundling”. A good example of some popular browser hijackers includes Babylon, Anyprotect, Conduit, SweetPage, DefaultTab, Delta Search, and RocketTab, but the names are regularly changing.
Tips on how to get rid of a browser hijacker
Some hijackers can be removed by uninstalling the freeware they were included with or by eliminating any extension you’ve recently added to your computer. However, most hijacking codes are not very easy to eliminate manually, since they go deeper into your operating system. Furthermore, manual removal expects you to perform several time-consuming and tricky actions that are hard to do for new computer users.
Professionals always recommend users to get rid of any malicious software including browser hijacker with an automatic malware removal tool, which is simpler, safer, and faster than the manual removal technique. One of the top tools for correcting browser hijacker malware is SafeBytes Anti-Malware. It can help you eliminate any pre-existing malicious software in your computer and provides you real-time monitoring and protection from the latest internet threats. Employ a PC optimizer along with your anti-malware software to correct various registry problems, remove computer vulnerabilities, and improve your computer overall performance.
Help! Malware Preventing Antivirus Installation And Access To The Internet
All malware is bad, but certain kinds of malware do a lot more damage to your computer than others. Some malware sits in between the computer and the net connection and blocks some or all internet sites that you want to check out. It will also prevent you from installing anything on your system, especially anti-virus applications. If you’re reading this, chances are you’re stuck with a malware infection that is preventing you to download and install the Safebytes Anti-Malware program on your computer. Do as instructed below to get rid of the malware by alternate methods.
Install the anti-malware in Safe Mode
Safe Mode is actually a special, basic version of Windows in which just minimal services are loaded to counteract viruses and other troublesome programs from loading. In the event, the malicious software is set to load automatically when the computer boots, switching to this mode may well prevent it from doing so. To start the computer into Safe Mode, hit the “F8” key on your keyboard just before the Windows logo screen comes up; Or right after normal Windows boot up, run MSConfig, check Safe Boot under Boot tab, and click Apply. Once you’re in Safe Mode, you can attempt to download and install your antivirus software application without the hindrance of the virus. After installation, run the malware scanner to get rid of most standard infections.
Download the security program using an alternate web browser
Some malware mainly targets particular browsers. If this sounds like your case, use another web browser as it could circumvent the virus. If you appear to have a virus attached to Internet Explorer, then switch over to an alternate browser with built-in security features, such as Firefox or Chrome, to download your preferred anti-malware program – Safebytes.
Install and run anti-virus from the Thumb drive
Another solution is to store and operate an anti-malware program entirely from a Pen drive. Do these simple steps to clear up your affected PC using a portable antivirus.
1) Download the anti-malware on a virus-free PC.
2) Insert the USB drive onto the same system.
3) Run the setup program by double-clicking the executable file of the downloaded software, with a .exe file format.
4) Choose the drive letter of the pen drive as the place when the wizard asks you where you would like to install the antivirus. Follow the instructions on the computer screen to complete the installation process.
5) Unplug the pen drive. You may now utilize this portable anti-virus on the affected computer.
6) Double-click the EXE file to open the Safebytes software right from the pen drive.
7) Click the “Scan” button to run a full system scan and remove viruses automatically.
Protect Your PC and Privacy With SafeBytes Anti-Malware
To help protect your laptop or computer from many different internet-based threats, it’s important to install an anti-malware program on your laptop. However, with so many antimalware companies in the marketplace, nowadays it is hard to decide which one you should buy for your laptop. Some of them are great and some are scamware applications that pretend as genuine anti-malware software waiting to wreak havoc on your computer. While looking for an anti-malware tool, choose one that offers dependable, efficient, and complete protection against all known computer viruses and malware. On the list of recommended software by industry analysts is SafeBytes Anti-Malware, a popular security application for Windows computers.
SafeBytes anti-malware is really a powerful, highly effective protection software made to assist users of all levels of computer literacy in finding and removing harmful threats from their computer. Through its cutting-edge technology, this software protects your computer against infections caused by different kinds of malware and similar threats, including spyware, adware, viruses, worms, trojans, keyloggers, ransomware, and potentially unwanted program (PUPs).
SafeBytes anti-malware provides a myriad of advanced features that sets it apart from all others. Below are some of the great features included in the tool.
Robust Anti-malware Protection: Built on a highly acclaimed anti-virus engine, this malware removal application can find and get rid of many obstinate malware threats like browser hijackers, PUPs, and ransomware that other common antivirus applications will miss.
Live Protection: SafeBytes provides complete and real-time security for your computer. This software will continuously keep track of your computer for suspicious activity and updates itself continuously to keep current with the latest threats.
Web Filtering: Through its unique safety rating, SafeBytes informs you whether a site is safe or not to visit it. This will make sure that you’re always certain of your safety when browsing the web.
Faster Scanning: SafeBytes Anti-Malware possesses a multi-thread scan algorithm that works up to five times faster than any other antivirus software.
Lightweight Application: SafeBytes gives you complete protection from online threats at a fraction of the CPU load due to its enhanced detection engine and algorithms.
24/7 Live Expert Support: You will get 24/7 technical support to promptly resolve any issue with your security application.
SafeBytes can keep your PC safe from most advanced malware threats automatically, thus keeping your online experience secure and safe. Malware issues can become a thing of the past when you put this application to use. If you want sophisticated forms of protection features & threat detections, buying SafeBytes Anti-Malware will be worth the dollars!
Technical Details and Manual Removal (Advanced Users)
If you do not wish to use malware removal software and like to get rid of ListenToTheRadioNow manually, you might accomplish this by going to the Windows Add/Remove Programs menu in the control panel and deleting the offending software; in cases of web browser plug-ins, you could remove it by visiting the browser’s Add-on/Extension manager. You will likely also want to reset your web browser.
Finally, check your hard drive for all of the following and clean your Windows registry manually to get rid of leftover application entries after uninstalls. Please keep in mind that only experienced users should attempt to manually edit the system files because removing any single critical registry entry results in a serious problem or even a system crash. In addition, certain malware is capable of replicating or preventing removal. It is highly recommended that you carry out the removal process in Safe Mode.
Files:
%LOCALAPPDATA%GoogleChromeUser DataDefaultSync Extension Settingsmlpfmcjpkbijcpegdbkplcddgacjlgpf
%UserProfile%Local SettingsApplication DataGoogleChromeUser DataDefaultSync Extension Settingsmlpfmcjpkbijcpegdbkplcddgacjlgpf
%LOCALAPPDATA%GoogleChromeUser DataDefaultExtensionsmlpfmcjpkbijcpegdbkplcddgacjlgpf
%UserProfile%Local SettingsApplication DataGoogleChromeUser DataDefaultExtensionsnhpggpakfcgbidnmlheodkbccemlenag
%LOCALAPPDATA%GoogleChromeUser DataDefaultExtensionsnhpggpakfcgbidnmlheodkbccemlenag
%USERPROFILE%AppDataLocalGoogle
Registry:
HKEY_LOCAL_MACHINESoftwareListenToTheRadioNowMicrosoftWindowsCurrentVersionUninstall..Uninstaller
ListenToTheRadioNow
Read More
If you are tried encrypting or decrypting a file using the default EFS engine but you receive an error message instead saying, “Error Applying Attributes, An error occurred applying attributes to the file: The specified file could not be decrypted”, read on as this post will help you sort out the problem. If you encounter this error you can use the error code in it. You will most likely get error code 0x80071771. This kind of error occurs when the File Explorer’s copy and paste feature was not able to read the source file being encrypted or decrypted. It could also occur if you try to access a file that has been on another computer previously.
To fix error code 0x80071771 when decrypting or encrypting a file, refer to the instructions provided below.
Step 1: You need to check first if you can decrypt the files encrypted by EFS. However, if you can’t, just proceed and then take full control of the file.
Step 2: To take control of the file, open File Explorer and right-click on the partition, and then click on Properties.
Step 3: After that, click on the Edit button under the Security tab.
Step 4: Next, make sure that “Everyone” is selected under the Group or user names section.
Step 5: Afterwards, the Permissions for Everyone section will be activated. Just make sure that all the checkboxes for Allow are checked and then click on the Apply button.
Step 6: Once you’re done, click on the Advanced button. This will open a new window labeled Advanced Security Settings. From there, click on the Change link under the Owner section.
Step 7: Now type your account name in the field and click on Check Names to verify the account name and click OK.
Step 8: After that, select the “Replace owner on sub-containers and objects” option and then click OK.
Step 9: Next, select Administrators in the Group or User names list and select Full Control in the Permissions for Administrators panel and click OK.
Read More
If you have multiple keyboards, things can get quite tricky. There are times when the keyboard language changes on its own since the keyboard changes while you are typing. The thing is, the keyboard changes because sometimes we accidentally tap shortcuts like Win key + Space key or Alt + Shift or Ctrl + Shift which changes the keyboard pairs or language. Thus, if your keyboard language changes on its own, there are two ways to resolve it. First, you have to make sure that Windows 10 does not add keyboards without your permission. Second, you have to make sure that the shortcut keys don’t change the keyboard language. This second option is what we’re going to discuss in this post.
You need to first set a different input method for each app window. To do that, you have to disable the change in layout. Refer to these steps:
- Go to Settings > Language and input.
- Next, type “switching input methods” to open the Advanced keyboard settings with this option inside.
- After that, select the checkbox labeled as “Let me set a different input method for each app window” and then click the Save button.
- Restart your computer.
Now that you’ve disabled the change in layout, you now have to find the keyboard settings. Just go to Settings > Devices > Typing > Advanced Keyboard settings. From there, you have the option to select which keyboard is going to be used for any app. When you change the keyboard every time you use an app, usually, Windows remember it so that you won’t have to set it up all over again. In addition, the Advanced keyboard settings page also allows you to override the default input method which could be different from the first one in your language list. Aside from that, there is also a Language bar option that comes in handy as you can quickly switch between keyboards. And if you removed it, you have the option to restore the language bar back as well.
Now all that’s left for you to do is to change the Language Settings under the Administrative tab. A user from a forum that came up with this solution, reported that the issue occurred when he started typing in some program with non-Unicode characters which caused Windows to use the default system local language to interpret these characters even though the language is unavailable in the Language bar. To change the Language Settings under the Administrative tab, follow these steps:
- Go to Settings > Time and Language > Language > Administrative language settings.
- After that, click on Copy Settings under the Administrative tab.
- Now make sure that all the Display language, Input language, and Format are English (United States) or any language you prefer.
- Then mark the two checkboxes in “Copy your current settings to Welcome screen and system accounts & New user accounts”.
- After that, click OK and then exit.
Note: You also have the option to disable those shortcut combinations which can change your keyboard settings accidentally.
Read More
The Google Chrome browser checks the SSL Security Certificate of the website that you are trying to open. However, if Chrome is not able to check the certificate then you might encounter an error related to the SSL Certificates which you might face when browsing the web. This particular error is the ERR BAD SSL CLIENT AUTH CERT error which is caused by many factors such as the computer’s Time, Cached Data is corrupt, Date is out of sync, as well as third party software installed in your computer is the one that’s blocking the site and many more.
The ERR_BAD_SSL_CLIENT_AUTH_CERT error might also be coming from the website’s end. It could be that the server is rejecting the certificate the client website is sending. The certificate might have already expired or the server may not trust its issuer – whichever the case may be, here are some options you can check out to fix the error.
Option 1 – Sync Date and Time
The first thing you can try is to sync the Date and Time of your computer as the wrong Date and Time settings are one of the most common causes of connection problems like the ERR_BAD_SSL_CLIENT_AUTH_CERT error. This is because of the incompatibility between the SSL Certificate validation date and the System Clock. Thus, you have to sync your System Clock. Refer to the steps below to do so.
- Right-click on the Taskbar and click on the Adjust Date and Time option.
- Next, click on the Sync Now button to synchronize the Date and Time with the Microsoft Servers.
- Now make sure that the Time Zone that’s set on the same page is correct.
Option 2 – Try clearing the browser data
There are times when some data in the browser is conflicting with the loading of the website and triggers errors like ERR_BAD_SSL_CLIENT_AUTH_CERT. And so you can try to clear your browser’s data. This might be a very basic solution but oftentimes it works in fixing this kind of error in Google Chrome. Follow the steps below to clear the data in your browser.
- Open your Google Chrome browser.
- After that, tap the Ctrl + H keys. Doing so will open a new panel that allows you to delete the browsing history and other data in your browser.
- Now select every checkbox that you see and click on the Clear browsing data button.
- Then restart your Chrome browser and check if you can now open any website or not.
Option 3 – Try to check and fix any possible conflicts with third-party programs
Third-party programs like internet protection software could be interrupting the connection and causing the error. For some unknown reason, your antivirus program or firewall might be detecting the webpage you are trying to open as malicious or with less credibility which is why it is blocking the browser from opening the website. To fix that, if you have third-party programs installed like VPN, security software, or any add-on, or firewall, you can disable them temporarily and see if it fixes the problem and you’re able to pull up the website. After a while, you have to enable them back and configure their settings so that the website won’t get blocked again.
Option 4 – Try enabling SSL 3 / TLS and disable QUIC Protocol
If you were using Google Chrome when you got the ERR_BAD_SSL_CLIENT_AUTH_CERT error, then you need to follow the protocol fixes for SSL3/TLS and QUIC which are usually some of the reasons that cause the SSL version / Cipher Mismatch. It also has a few fixes for Windows 10 computer where you can clear the certificates and make sure that your computer date and time is in sync with your time zone and so on.
If you were using Edge or Internet Explorer when you got the error, then you have to follow the steps below.
- Type “Internet” in the search box of your browser. After that, you should see the Internet Options from the search results.
- Next, open the Internet Properties window and switch to the Advanced tab and then scroll down to the Security section.
- From there, check the “Use TLS 1.1” checkbox as well as the “Use TLS 1.2” checkbox and then click OK to save the changes made.
- Restart the browser.
On the other hand, if you were using Firefox when you go the error, here’s what you have to do.
- Open Firefox and in the address bar, type “about:config” and hit Enter.
- If a warning appears, just click on the “I accept the risk!” button to proceed.
- Next, type in “TLS” in the search field and hit Enter.
- Then look for “security.tls.version.min” and double click on it and set its integer value to 3 to force the protocol of TLS 1.3.
- Now click OK and restart Firefox and do the same thing with SSL.
Option 5 – Try to update Google Chrome
You might also want to try updating your browser to its latest version and have it installed in your computer. After you install the update, check if you can now open the website you were trying to open earlier.
Option 6 – Get rid of any conflicting browser extensions
- Open Chrome and press Alt + F keys.
- Go to More tools and click Extensions to look for any suspicious browser extensions or toolbars.
- Click the Recycle bin and select Remove.
- Restart Chrome and press Alt + F keys again.
- Proceed to On Startup and mark Open a specific page or set of pages.
- To check if the browser hijacker is still active, click Set pages, if it is active, overwrite the URL.
Note: If removing the browser extensions or toolbars didn’t work, you can also try to reset your Google Chrome browser.
- Open Google Chrome, then tap the Alt + F keys.
- After that, click on Settings.
- Next, scroll down until you see the Advanced option, once you see it, click on it.
- After clicking the Advanced option, go to the “Restore and clean up option and click on the “Restore settings to their original defaults” option to reset Google Chrome.
- Now restart Google Chrome.
Read More
To turn password login in Windows 10 you will need approximately one minute of your time.
So let’s do it fast and efficient
Press ⊞ WINDOWS + X to open the secret menu
 Click on command prompt (admin)
 Type in command prompt following:
powercfg /SETDCVALUEINDEX SCHEME_CURRENT SUB_NONE CONSOLELOCK 0
press ENTER
powercfg /SETACVALUEINDEX SCHEME_CURRENT SUB_NONE CONSOLELOCK 0
press ENTER
And you are done!
Next time when you open your laptop from sleep you will no longer need to type in the password.
Read More
The ntkrnlmp.exe file is a file associated with the Windows operating system’s NT Kernel and other system processes. It is also related to the “CRITICAL PROCESS DIED” error. So if you encounter a Blue Screen of Death error that’s related to this file, then you’ve come to the right place as this post will guide you in fixing the ntkrnlmp.exe Blue Screen error.
This kind of Blue Screen error might be caused by the file getting corrupted or infected with some malware. Aside from these causes, the error might also be due to the corruption and malfunction of the graphics card drivers.
Before you troubleshoot the problem, you might want to try performing System Restore especially if you tend to create a System Restore point every now and then. Performing System Restore could help you resolve the ntkrnlmp.exe Stop error. You can do this option either by booting into Safe Mode or in System Restore. If you are already in the Advanced Startup Options, just directly select System Restore and proceed with the next steps. And if you have just booted your PC into Safe Mode, refer to the steps below.
- Tap the Win + R keys to open the Run dialog box.
- After that, type in “sysdm.cpl” in the field and tap Enter.
- Next, go to the System Protection tab then click the System Restore button. This will open a new window where you have to select your preferred System Restore point.
- After that, follow the on-screen instructions to finish the process and then restart your computer and check if the problem is fixed or not.
If System Restore didn’t help, then proceed to the given options below.
Option 1 – Disable the C-states and EIST in the BIOS
The first thing you can do is try to disable the C-states and EIST in the BIOS. To do that, refer to the steps given below.
- Go to the BIOS and from there look for an option named CPU Configuration which can usually be found under the Advanced menu.
- Next, look for CPU Power Management and under that section, disable both the “Intel EIST” and “Intel C-state” options.
- After you disable them, save the changes you’ve made and exit the BIOS.
- Now restart your computer and check if the ntkrnlmp.exe BSOD error is now fixed.
Option 2 – Try to update, rollback or disable drivers
If the first option didn’t help in fixing the ntkrnlmp.exe Blue Screen error the next thing you can do is to roll back, or update, or disable device drivers in your computer. It is most likely that after you updated your Windows computer that your driver also needs a refresh. On the other hand, if you have just updated your device drivers then you need to roll back the drivers to their previous versions. Whichever applies to you, refer to the steps below.
- Open the Devices Manager from the Win X Menu.
- Then locate the device drivers and right-click on them to open the Properties.
- After that, switch to the Driver tab and click on the Uninstall Device button.
- Follow the screen option to completely uninstall it.
- Finally, restart your computer. It will just reinstall the device drivers automatically.
Note: You can install a dedicated driver on your computer in case you have it or you could also look for it directly from the website of the manufacturer.
Option 3 – Configure the Driver Verifier Manager
The Driver Verifier Manager is another tool in Windows that could help you fix driver-related issues. And so if you want to fix the ntkrnlmp.exe Blue Screen error you need to use the Driver Verifier Manager:
- Type in the keyword “Verifier” in the Cortana search box to search for Verifier in Windows 10.
- After that, select the option “Create custom settings”.
- Make sure that you have checked everything except the options “DDI compliance checking” and “Randomized low resources simulation”.
- Next, select the option “Select driver names from a list” option.
- Afterward, you have to select all the drivers from any unofficial or third-party provider. To simply put it, you have to select all the drivers that are not supplied by Microsoft.
- Then click on the Finish button.
- Open Command Prompt as administrator and execute this command – verifier /querysettings
- The command you just executed will display the Driver Verifier settings so if you see any of the flags enabled boot your Windows 10 PC into Safe Mode.
- Open the Command Prompt as admin again and run this command – verifier /reset
- The command will reset the Driver Verifier. Once the process is done, restart your PC and check.
Option 4 – Run the Blue Screen Troubleshooter
The Blue Screen troubleshooter is a built-in tool in Windows 10 that helps users in fixing BSOD errors like ntkrnlmp.exe. It can be found on the Settings Troubleshooters page. To use it, refer to these steps:
- Tap the Win + I keys to open the Settings panel.
- Then go to Update & Security > Troubleshoot.
- From there, look for the option called “Blue Screen” on your right-hand side and then click the “Run the troubleshooter” button to run the Blue Screen Troubleshooter and then follow the next on-screen options. Note that you might have to boot your PC into Safe Mode.
Read More
According to some reports, using RDP or Remote Desktop Protocol on recent versions of Windows 10 results in a black screen. One encounters this issue is when using the Remote Desktop Connection feature on Windows 10. The real causes of this black screen are either the display drivers or some misconfiguration with the Remote Desktop Connection utility.
In most cases, the Remote Desktop in Windows 10 will display a black screen and then disconnects afterward. To fix this kind of issue on your Remote Desktop, there are two suggestions you need to check out. First, you can try to disable the persistent bitmap caching, and then you can also try to update your display driver. Follow the given options below for more troubleshooting instructions.
Option 1 – Try to disable Persistent Bitmap caching
The first thing you can do to resolve the black screen issue with the remote desktop is to disable the persistent bitmap caching. All you have to do is follow these steps:
- First, open the Remote Desktop Connection client.
- Next, click on the Show Options button to configure the Remote Desktop Connection.
- After that, go to the Experience tab and uncheck the Persistent bitmap caching option.
- Once done, you should now be able to connect to the remote computer without the black screen.
Option 2 – Try to update or rollback the Graphics driver
You can try to update your Graphics card driver using the Device Manager in your computer to resolve the blank dialog boxes problem or you can also go directly to the website of your graphics card manufacturers like NVIDIA, Intel, or AMD and go to the section called Drivers then check if there’s a new available update – if there is, download and install it.
To update your Graphics driver via Device Manager, refer to these steps:
- First, boot your computer into Safe Mode.
- After that, tap the Win + R keys to launch Run.
- Type in devmgmt.msc into the box and tap Enter or click OK to open the Device Manager.
- After that, a list of device drivers will be displayed. From there, look for the Display Adapters and click on them.
- After that, right-click on each entry under the Display Adapters and select the “Uninstall Device” option from the menu.
- Now restart your computer.
- After restarting your computer, go to the Settings app and Check for Updates in the Windows Update section.
Note: If updating the Graphics driver didn’t fix the problem, you can also try to roll back to its previous version and see if that helps or you could also try to roll back, update or reinstall the Network Adapter drivers.
Option 3 – Try performing a System Restore
You might also want to perform a System Restore that might help you in fixing the error. You can do this option either by booting into Safe Mode or in System Restore. If you are already in the Advanced Startup Options, just directly select System Restore and proceed with the next steps. And if you have just booted your PC into Safe Mode, refer to the steps below.
- Tap the Win + R keys to open the Run dialog box.
- After that, type in “sysdm.cpl” in the field and tap Enter.
- Next, go to the System Protection tab then click the System Restore button. This will open a new window where you have to select your preferred System Restore point.
- After that, follow the on-screen instructions to finish the process and then restart your computer and check if the problem is fixed or not.
Read More
When trying to run Computer Management, or when running mmc.exe or compmgmt.msc from a command prompt you get the error that the application has been blocked for your protection then keep reading in order to solve the issue. This is a permission issue where if a regular user tries to run such system tools will result in saying that it has been blocked. Along with this, you may have a Group Policy issue. This can be fixed, but you will need admin permission to achieve it. It’s because when they are run from the command prompt with elevated privileges, it works.
-
Change Group Policy Settings
If your account is an admin account, and you are still facing the issue, then change the group policy settings:
Open Group Policy Settings by typing gpedit.msc in the run prompt followed by pressing ENTER
Navigate to User Configuration > Administrative Templates > Windows Components > Microsoft Management Console > Restricted/Permitted snap-ins
Locate Computer Management policy, and double click to open it
Enable it, exit Group Policy.
When Enabled: The snap-in is permitted and can be added into the Microsoft Management Console or run from the command line as a standalone console.
When Disabled: The snap-in is prohibited and cannot be added into the Microsoft Management Console or run from the command line as a standalone console. An error message is displayed stating that the policy is prohibiting the use of this snap-in. -
Temporarily disable UAC
UAC is the user access control panel, and if you need to run the command right away, you can choose to disable it for some time. Click on the Start button, and then type UAC to find the User Account Control Settings.
Click to open, and then slide down the notification setting at the bottom. It will temporarily allow launching the application as there is no check. However, make sure to switch to default once you are done.
Read More
![]()
Copyright © 2022, ErrorTools. All Rights Reserved
Trademark: Microsoft Windows logos are registered trademarks of Microsoft. Disclaimer: ErrorTools.com is not affiliated with Microsoft, nor claims direct affiliation.
The information on this page is provided for information purposes only.
![]()