
While making an effort to update the copy of Windows 10, there are a number of times when the system fails to complete the installation process and shows unexpected codes. 0x800F0830-0x20003 is such an error that is usually generated due to the enabled developer mode. Other potential reasons for this upgrade issue might be corrupted system elements, software conflict, and disabled Windows update services. The message thrown with this error is “The Installation failed in the Safe_OS phase with an error during apply_image operation: Error: 0x800f081f – 0x20003” or “We couldn’t install Windows 10. The installation failed in the SAFE_OS phase with an error during INSTALL_UPDATES operation: Error 0x800F081F”.
Though a hard restart oftentimes fixes Windows 10 Upgrade Error 0x800F0830-0x20003, you might need to try some advanced workarounds too. Fortunately, you don’t need to use any third-party program, as most of these kinds of programs are stacked with malware. Windows 10 offers a Fixit troubleshooter that commonly solves updated errors automatically.
Here is how to Fix Windows 10 Upgrade Error 0x800F0830-0x20003 –
1] Disable Developer mode
With developer mode set to on, Windows 10 automatically downloads and installs the developer’s package. That is why the update gets stuck in the midway and prompts this error code. To bring back the original settings, follow the steps given below –
- Press – Windows + I.
- Click – Update & Security.
- From the left sidebar, select – For developers.
- Move to the right and turn off the toggle button located under Developer Mode.
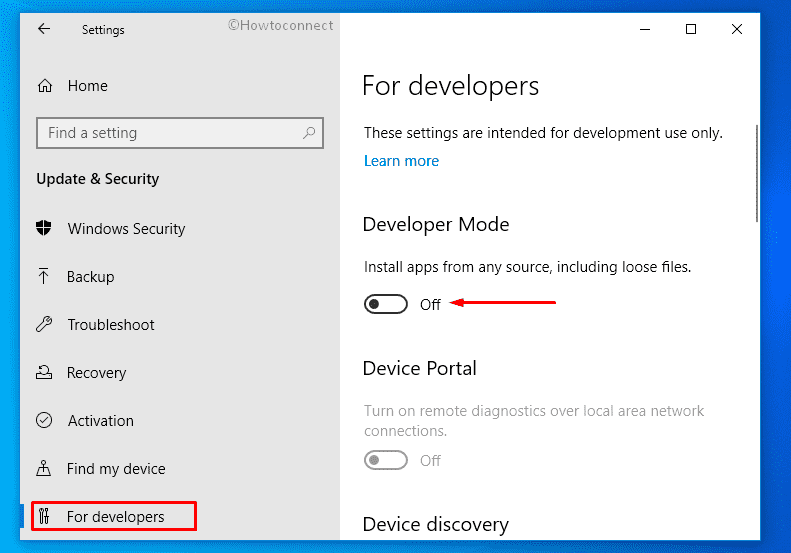
- For final consent, click – Yes.
- After that, go back to the home page of Windows Settings.
- Click – Apps.
- From the right pane, select the link – Optional features.
- Locate – Windows Developer mode entry.
- Select the same and click – Uninstall.
- After removing the component, restart the device.
2] Run Windows Update troubleshooter to fix error 0x800F0830-0x20003
In most cases, Windows update troubleshooter diagnoses the reason furthermore fixes the errors automatically. To make the built-in tool work better, you need to ensure the presence of an active internet connection.
- Press – Windows + S.
- Type in – troubleshoot.
- Hit – Enter.
- From the right-pane, click – Additional troubleshooters.
- Select – Windows update.
- Click – Run the troubleshooter.
- Follow on-screen guidelines if any.
- When the utility comes up with a resolution, click – Apply this fix.
- Close the troubleshooter and check if Windows 10 Upgrade Error 0x800F0830-0x20003 still persists.
3] Reset Windows update components
Corruption in Windows update components is a major cause of the error coming out when attempting to install an update in almost all cases. Similarly, in this situation, the files downloaded in softwaredistribution folder might be broken or Catroot2 might find itself unable to store the signatures of the packages. Resettings Windows update components will create alternatives of both the folders and further they will work freshly to perform the actions. So follow the steps –
- Click Search icon from the taskbar.
- Type in – cmd.
- Press – Ctrl + Shift + Enter.
- To approve User Account Control, click – Yes.
- In the Command Prompt, insert the following commands one by one and hit Enter after each –
net stop wuauserv
net stop bits
net stop appidsvc
ren %systemroot%SoftwareDistribution SoftwareDistribution.bak
ren %systemroot%system32catroot2 catroot2.bak
This will stop all the update services running on Windows 10 moreover replace SoftwareDistribution folder and Catroot2 folder with fresh ones. However, you will have to start all these stoped services again by executing the below commands –
net start wuauserv
net start bits
net start appidsvc
net start cryptsvc
- Close Command Prompt.
- Reboot Windows 10 to make the changes effective.
Alternatively, you can also follow – How to Reset Windows Update to Default in Windows 10
4] Fix corrupted system components
Unreadable system elements are another factor responsible to cause any kind of update errors and 0x800F0830-0x20003 is not an exception. To repair the files misbehaving during the update process System File Checker is the best utility to opt for.
- Open Command Prompt as admin.
- In the black console, type in –
sfc /scannow. - Hit – Enter.
- Wait until the process touches 100% mark and then reboot your computer.
- After that, type –
dism /online /cleanup-image /restorehealth - Press Enter and again restart your PC after the completion of the execution of the DISM command.
If System file checker could not repair the corruption earlier but the second scan is successful, run sfc /scannow command once again to repair.
5] Turn off third-party antimalware program to fix error 0x800F0830-0x20003
Third-party security suites are often found to cause error 0x800F0830-0x20003 when you try to update Windows 10. The tools don’t treat properly the Windows updates files downloaded through internet even sometimes understand them malware. As a result, the process is disturbed due to strict actions from the side of antimalware programs. Therefore, either uninstall the program or disable the same to get rid of such problems. However, you can use them later after the update is successfully installed.
Uninstall third-party antivirus program
- Press – Windows + R.
- In the Run command, type – appwiz.cpl.
- Click – OK.
- Look for the third-party antimalware program installed on your PC.
- Select the same and click Uninstall from the top ribbon.
- Comply with further instructions to completely remove the program.
- Reboot the PC and try to install the update.
Disable antimalware software
- Click the up arrow icon from the system tray.
- Right-click on the icon of your antivirus software.
- Choose – Disable.
- Set a period of time that decides how long the tool will remain disabled.
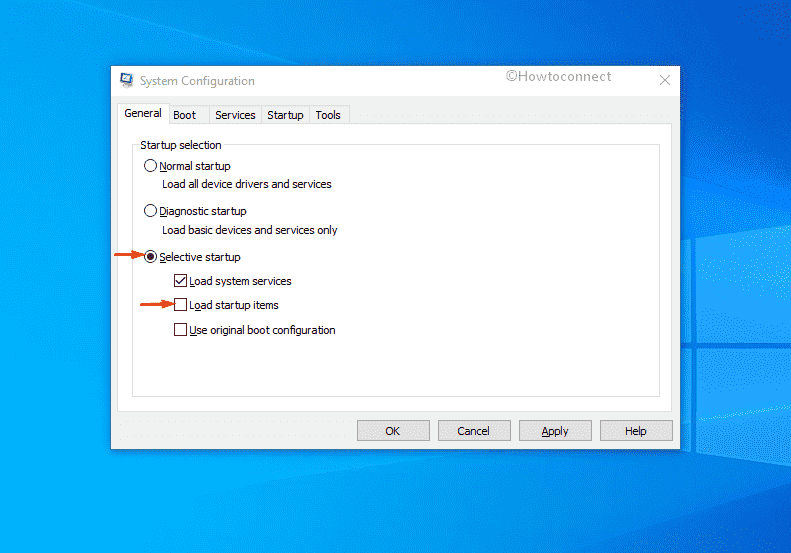
6] Start Windows 10 in Clean boot
External software and the associated services, on many occasions, create conflict and obstruct the system from upgrading. Since Clean boot lets Windows start with only limited resources, you should give an attempt to update Windows in this state.
- Press – Windows key.
- Type in – MSConfig.
- Hit – Enter.
- Select the radio button set before Selective startup.
- Uncheck the box of Load startup items.
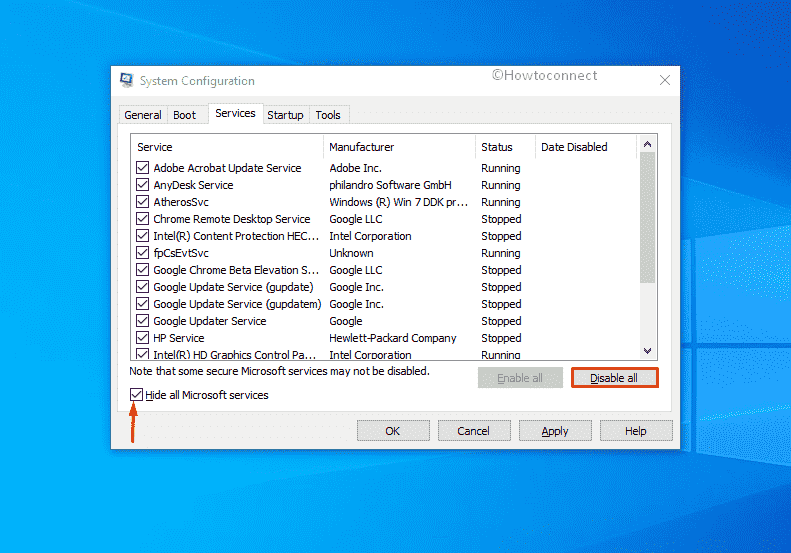
- Go to Services tab
- Check the box present next to Hide all Microsoft services.
- Select – Disable all.
- Shift to Startup tab.
- Click – Open Task Manager.
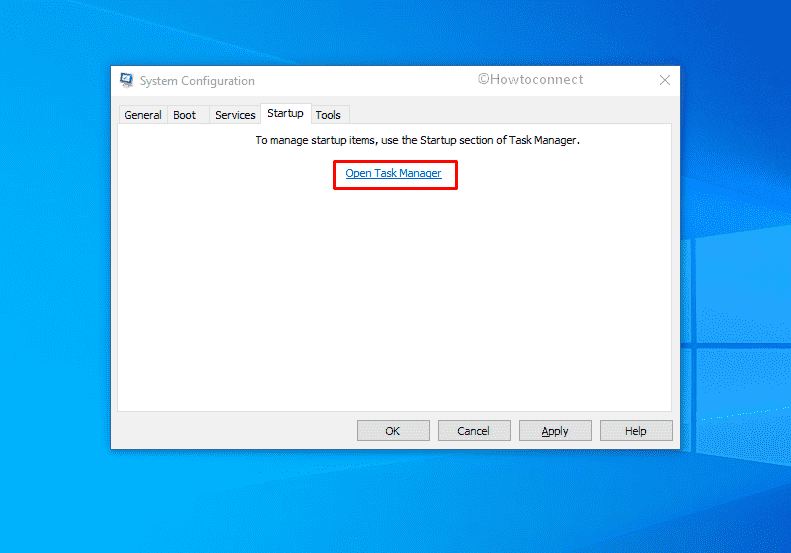
- Right-click on an enabled program and choose – Disable.
- Similarly, disable all startup programs.
- Close Task Manager and go back to the System Configuration.
- Click Apply and then OK.
- Restart the PC to start clean boot.
7] Try in-place upgrade to get rid of 0x800F0830-0x20003
Performing an in-place upgrade is the last resort to try out to fix error 0x800F0830-0x20003. This process should upgrade the device to the latest version of Windows. Also, it will repair all issues without deleting any files.
- Visit Software Download page of Microsoft.
- Click – Download tool now.
- Visit the directory where system saves downloaded items.
- Double-click the setup file you got.
- Allow User Account Control by clicking – Yes.
- When the license terms page shows up, hit – Accept.
- Click the radio button set before – Upgrade this PC now.
- Hit – Next.
Methods list
1] Disable Developer mode
2] Run Windows update troubleshooter
3] Reset Windows update services
4] Fix corrupted system components
5] Turn off third-party antimalware program
6] Start Windows 10 in Clean boot
7] Try in-place upgrade
That’s all!!
Repair any Windows problems such as Blue/Black Screen, DLL, Exe, application, Regisrty error and quickly recover system from issues using Reimage.
Microsoft has released Windows 11 on October 5, 2021. Most of us can enjoy the new features, interface, and improvements after installing the brand new Windows 11. But many users are faced with the problem of «we couldn’t install Windows 11» — error code 0x800f0830 — 0x20003.
«I get the following error when trying to upgrade to Win 11: ‘0x800F0830 — 0x20003’, and its description says ‘The installation failed in the SAFE_OS phase with an error during INSTALL_UPDATES operation’. Does anyone have any idea why?»
| Workable Solutions | Step-by-step Troubleshooting |
|---|---|
| 1. Use Built-in Tips | Try every USB port available; Determine you’re using USB 2.0 or 3.0…Full steps |
| 2. Enable TPM 2.0 | Restart PC and press F2/F10/Del key to enter BIOS. Use the left key…Full steps |
| 3. Enable UEFI Secure Boot | Restart and press Del/F2 to enter the BIOS system. Keys are different depending…Full steps |
| 4. Create Installation Media | Download EaseUS Win11builder on your computer. It’s a free Windows 11 iso downloader…Full steps |
Windows 11 Update/Installation Requirements
Many reasons could cause Windows 11 installation failure, and the most common one is that the computer does not fulfill the minimum system requirements for installing Windows 11. Before installing Windows 11, make sure that your PC meets the minimum requirements.
Processor: 1 gigahertz (GHz) or faster with 2 or more cores on a compatible 64-bit processor or System on a Chip (SoC)
RAM: 4GB
Storage: 64GB or larger storage device
System firmware: UEFI, Secure Boot capable
TPM: Trusted Platform Module (TPM) version 2.0
Graphics card: Compatible with DirectX 12 or WDDM 2.0 driver
Display: H>9″ with HD Resolution (720p)
Internet connection and Microsoft accounts: Windows 11 Home edition requires internet connectivity and a Microsoft account to complete device setup for first use
If your computer can’t fulfill the requirements, you may receive these errors:
- This PC can’t run Windows 11
- PC must support Secure Boot
- The processor isn’t supported for Windows 11
- The system disk needs to be 64GB or larger
How do I know that my computer is Windows 11 compatible? EaseUS provides you with Windows 11 Upgrade Checker that enables you to check Windows 11 compatibility easily and quickly.
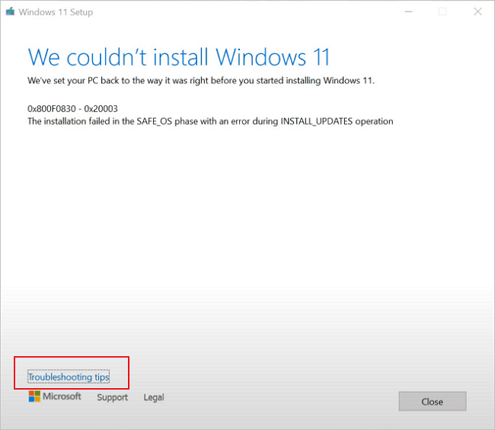
Troubleshoot We Couldn’t Install Windows 11
After checking your Windows 11 compatibility, you may receive the reports. Then, you can fix the error accordingly. Usually, when you get error code 0x800f0830, you also get the «Troubleshooting tips» to help you.
Method 1. Use Built-in Troubleshoot Tips
Follow the steps below to fix we couldn’t install Windows 11.
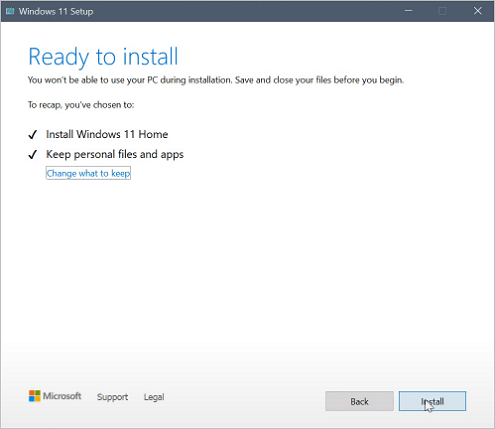
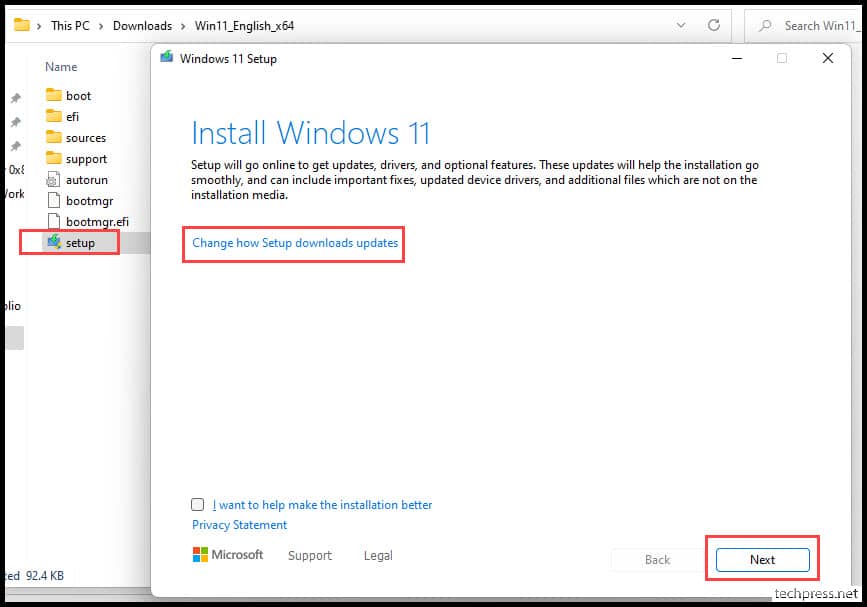
Step 1. Click the «Troubleshooting tips» button when you can’t install Windows 11.
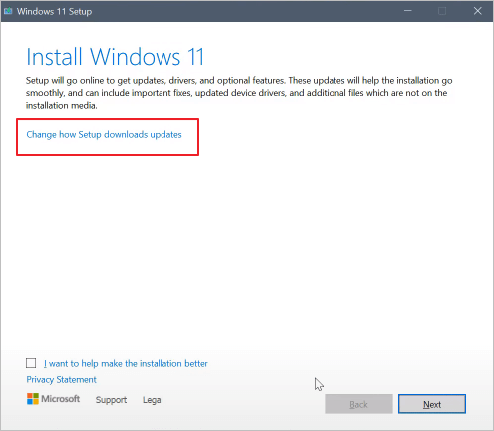
Step 2. Select «Change how Setup downloads updates».
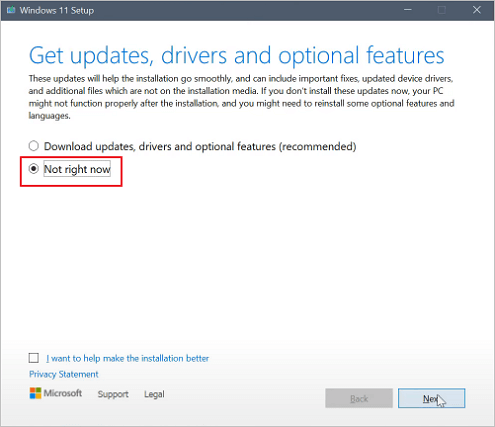
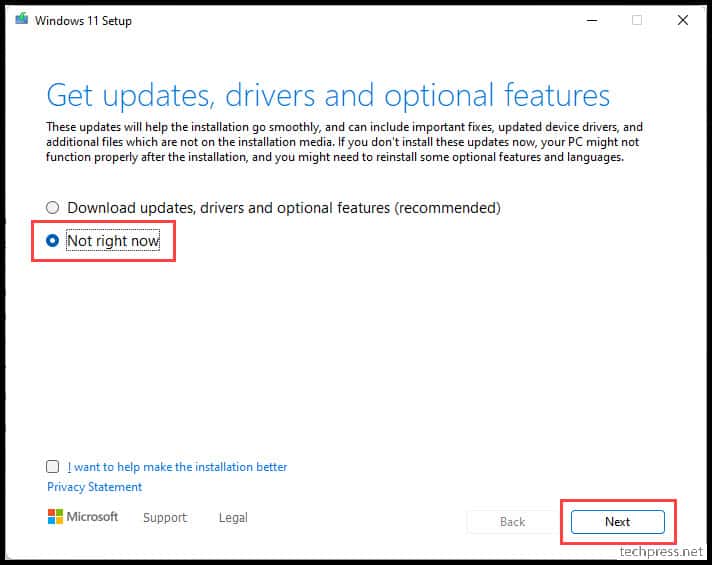
Step 3. When you see the «Get updates, drives, and optional features» screen, select «Not right now» and click «Next».
Step 4. Then, follow the on-screen instructions after the automatic check. When you see the installation interface, click install to get Windows 11 on your computer successfully.
Method 2. Enable TPM 2.0 on Your Computer
If you forget to enable TPM 2.0, your Windows 11 installation may get stuck. Therefore, you can fix the installation error by enabling TPM 2.0.
Step 1. Restart PC and press F2/F10/Del key to enter BIOS.
Step 2. Use the left key and go to the Security section.
Step 3. Check the TPM State and if it’s Disabled, change it to Enabled.
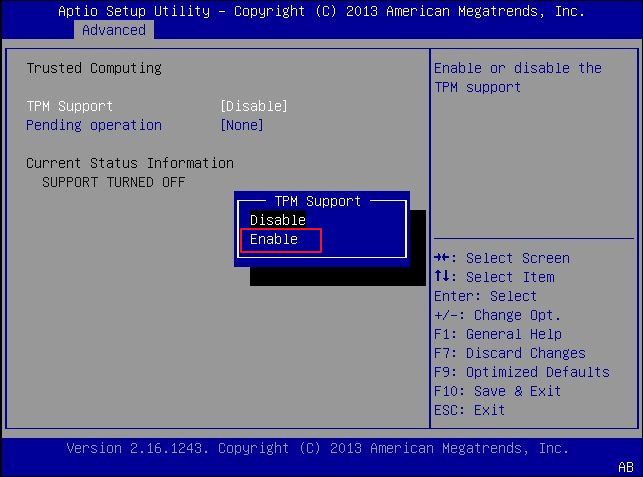
Step 4. Save the changes and exit BIOS.
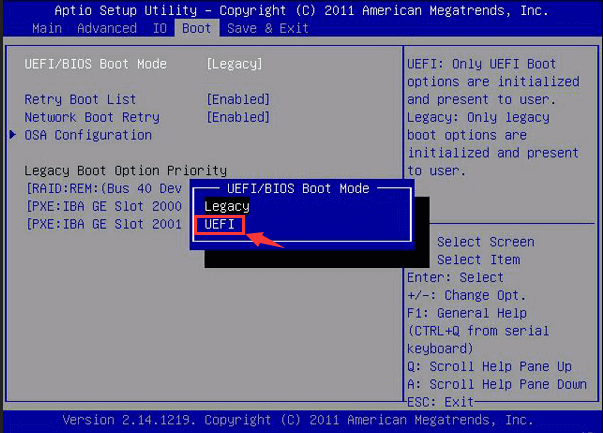
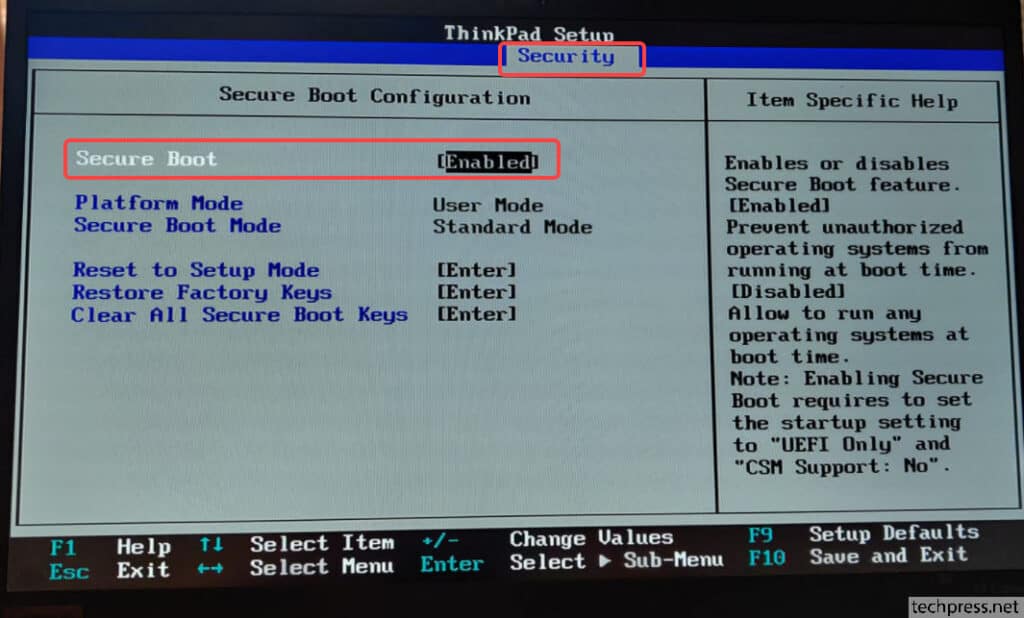
Method 3. Enable UEFI Secure Boot on a Supported Computer
Windows 11 requires Secure Boot to be enabled on the system to run the latest version. If your PC support it, but it isn’t enabled, you will encounter the error — we couldn’t install Windows 11. To enable secure boot:
Step 1. Restart and press Del/F2 to enter the BIOS system (keys are different depending on the computer host).
Step 2. Under the Boot tab, find the UEFI/BIOS Boot Mode. Use the up or down arrow key to choose the UEFI mode and press Enter.
Step 3. Returning to the previous column, we can see that Secure Boot has been enabled.
Method 4. Create Windows 11 Installation Media to Install Windows 11
You can also install Windows 11 by creating a portable Windows 11 USB drive. Things could be easier if you have EaseUS Win11builder. This tool helps you download Windows 11 and create a portable USB. Follow the steps to get detailed information.
Step 1. Launch OS2Go after installation, and click Windows Install Drive Creator. The obtained system information is available on the home screen, and it keeps updating all the time. Apart from Windows 11, Win11 builder also supports you to download Windows 10/8.1.
Step 2. Connect your USB flash drive to the computer. Win11 builder will automatically detect your USB device, so all you need to do is click the Create button.
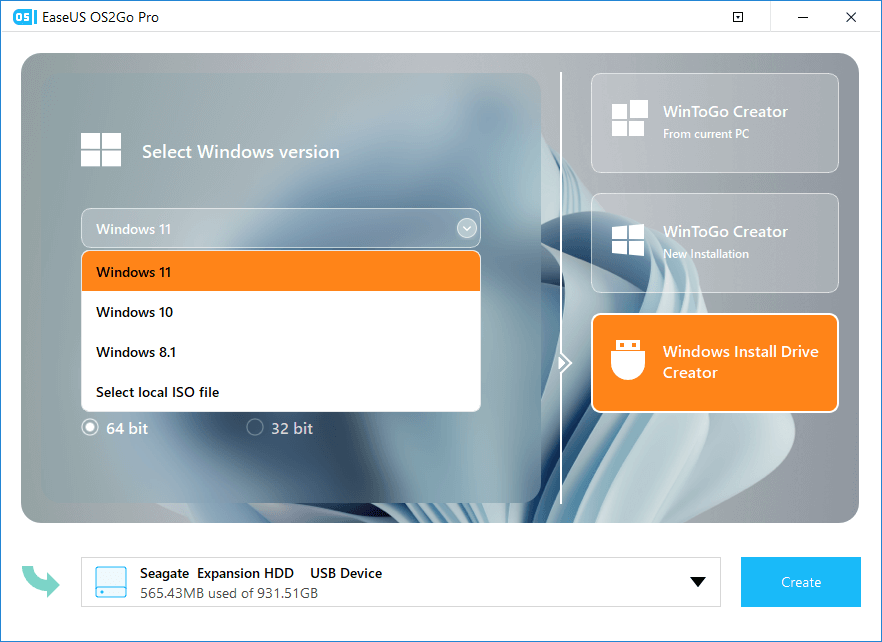
Step 3. The software will empty your USB drive data if it’s a used one. Once the downloading process begins, wait there until it finished or leave for a while to do you own job.
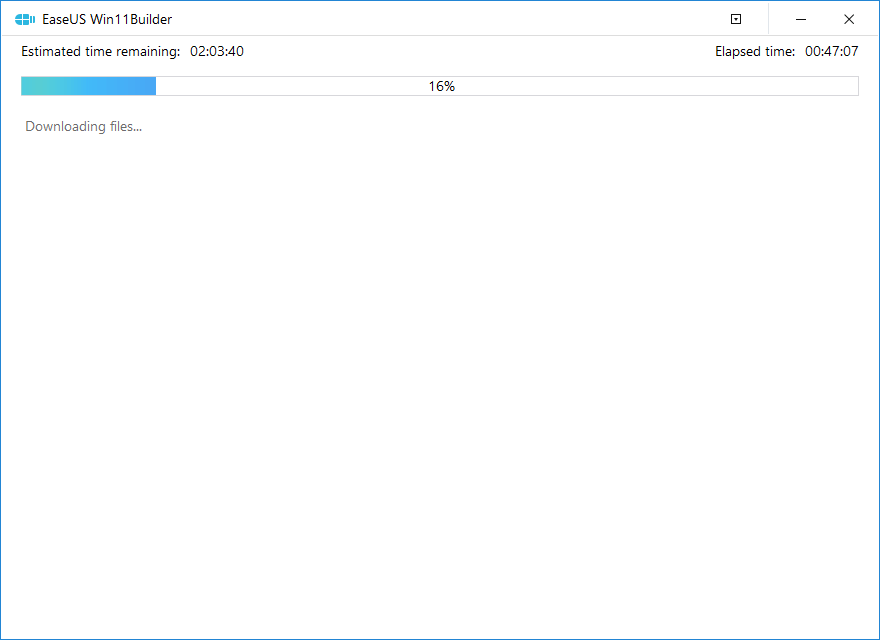
Step 4. After successfully downloading the Windows 11 iso image file on the USB drive, start to install Windows 11 from the bootable USB drive on your computer by following the installation wizard step by step.
If you have data loss problems during the process, you can ask EaseUS Data Recovery Wizard for help. This hard drive recovery program can help you in SD card recovery, file recovery, USB flash drive recovery, partition recovery, and more.
Conclusion
There’s a pretty good chance the above resolutions will fix error 0x800f0830 and you can update Windows again. If you still fail to solve your problem, you can contact Microsoft support for further resolutions by clicking Contact support on Microsoft’s help page. Or, contact EaseUS’s experts to get remote help.
| FIX BELOW ERRORS DURING WINDOWS 11 INSTALLATION |
|---|
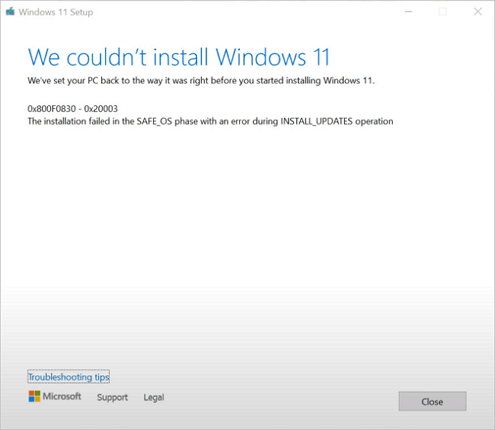
| ✅ “We couldn’t install Windows 11” We’ve set your PC back to the way it was right before you started installing Windows 11. 0x800F0830 – 0x2003 The Installation failed in the SAFE_OS phase with an error during INSTALL_UPDATES operation. |
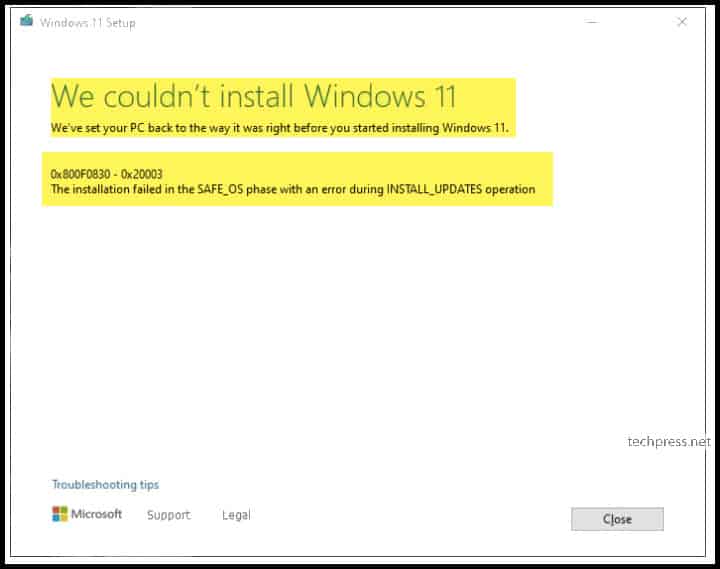
Recently I have tried to upgrade my Windows 10 Home PC to Windows 11 Home. I have spent a lot of time and effort trying to fix the error 0x800f0830 - 0x20003. I have tried the installation / upgrade couple of times on both of my laptops and was getting this error message.
To upgrade my windows 10 PC to Windows 11, I first downloaded the installation media / ISO of windows 11 from microsoft website https://www.microsoft.com/en-us/software-download/windows11 and then extracted the ISO into a folder. After that I started setup.exe file from the extracted Windows 11 ISO folder.
The Installation process starts fine by checking the updates and then shows Installing Windows 11 page with a cancel button. After that the system reboots and it tries to check / install updates which fails everytime when it reaches 10 to 11 percent.
System restarts again and then you see a message on the screen “Undoing changes made to your computer” which reverts the windows 11 installation and recovers your system to as it was before.

After another restart, You will get a pop-up window with error message:
| We couldn’t install Windows 11 |
|---|
| “We couldn’t install Windows 11” We’ve set your PC back to the way it was right before you started installing Windows 11. 0x800F0830 – 0x2003 The Installation failed in the SAFE_OS phase with an error during INSTALL_UPDATES operation. |
Once I fixed this error code, Since then i have installed / upgraded Windows 11 on two of my systems. One with Windows 10 Home to Windows 11 Home and second one is from Windows 10 Enterprise to Windows 11 Enterprise. The fix provided in this blog post will help and will save a lot of time. The installation of Windows 11 will get completed successfully.
While trying a lot of solutions to fix the issues like to checking the developer mode is disabled on Windows 10 system before starting the windows 11 installation process, resetting windows update service, rebooting the system etc. None of the fixes worked for me. Everytime, I have received this error (0x800F0830 – 0x2003) message.
As we know that this error message is occuring during Install_Updates (when the setup is trying to download the updates and Install it to make sure your system will have the latest drivers of all connected components). Disconnect from the internet before starting windows 11 setup using ISO and keep it in disconnected state during the whole installation process.
If possible, Disable the Wi-Fi Adaptor and remove any LAN / Ethernet cable attached to the system. Along with that disconnect any external devices like USB Hub, External HDD or any connected USB or Printer before starting the installation.
This should definitely work for you to fix this particular error. Also, another tip is to choose Not right now on Get updates, drivers and optional features window just after you start the setup process by double clicking on the setup.exe (as shown in below screenshots).
Select Not right now on the Get Updates, drivers and option features window.
How to Fix The PC doesn’t meet the minimum system requirements
Please note there are below requirements before starting the installation / upgrade to Windows 11:
| Processor | 1 gigahertz (GHz) or faster with 2 or more cores on a compatible 64-bit processor or System on a Chip (SoC). |
| RAM | 4 gigabyte (GB). |
| Storage | 64 GB or larger storage device Note: See below under “More information on storage space to keep Windows 11 up-to-date” for more details. |
| System firmware | UEFI, Secure Boot capable. Check here for information on how your PC might be able to meet this requirement. |
| TPM | Trusted Platform Module (TPM) version 2.0. Check here for instructions on how your PC might be enabled to meet this requirement. |
| Graphics card | Compatible with DirectX 12 or later with WDDM 2.0 driver. |
| Display | High definition (720p) display that is greater than 9” diagonally, 8 bits per colour channel. |
| Source:Microsoft |
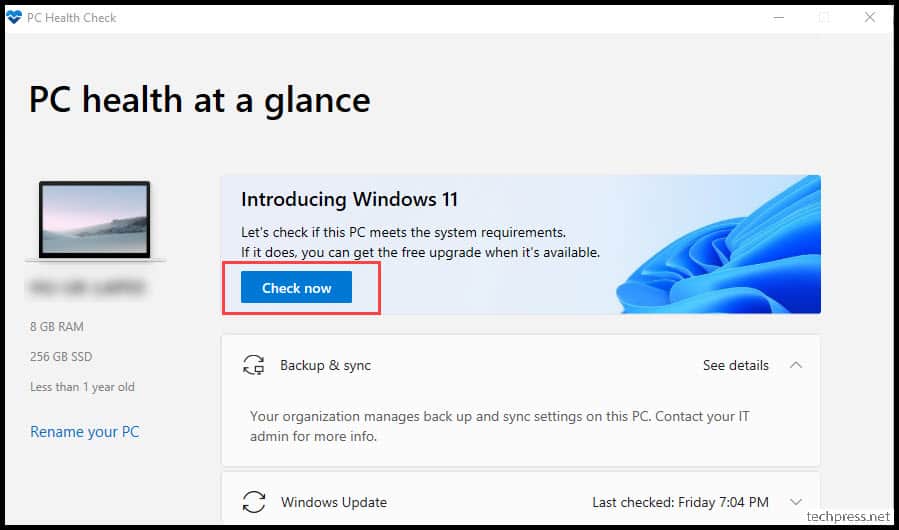
To check if you are meeting all the requirements for Windows 11 installation, Download and Install PC Health Check App and click on Check now button. If you are meeting all the requirements that’s great, you can start the upgrade process.
But as we know there are a lot of systems which are not meeting the CPU or TPM requirements, you can follow the steps as given in the next sections of this article to bypass this requirement.
Also, If you have TPM 1.2 and your laptop is compatible with TPM 2.0 then you can upgrade it using BIOS security settings. Please check the next section on how to upgrade it. If Secure Boot is disabled on your system, you can enable it via BIOS.
How to upgrade TPM level from TPM 1.2 to TPM 2.0 and enable secure boot
If you are using TPM (Trusted Module Platform) 1.2 and want to upgrade it to TPM level from 1.2 o 2.0. First you need to check if your laptop / desktop is compatible with TPM 2.0.
If yes, then you can change BIOS security settings from TPM 1.2 to TPM 2.0. If your local drives are encrypted with Bitlocker, disable bitlocker and decrypt your drive before the upgrade. Also, make sure to take a backup copy of all your data before taking this action.
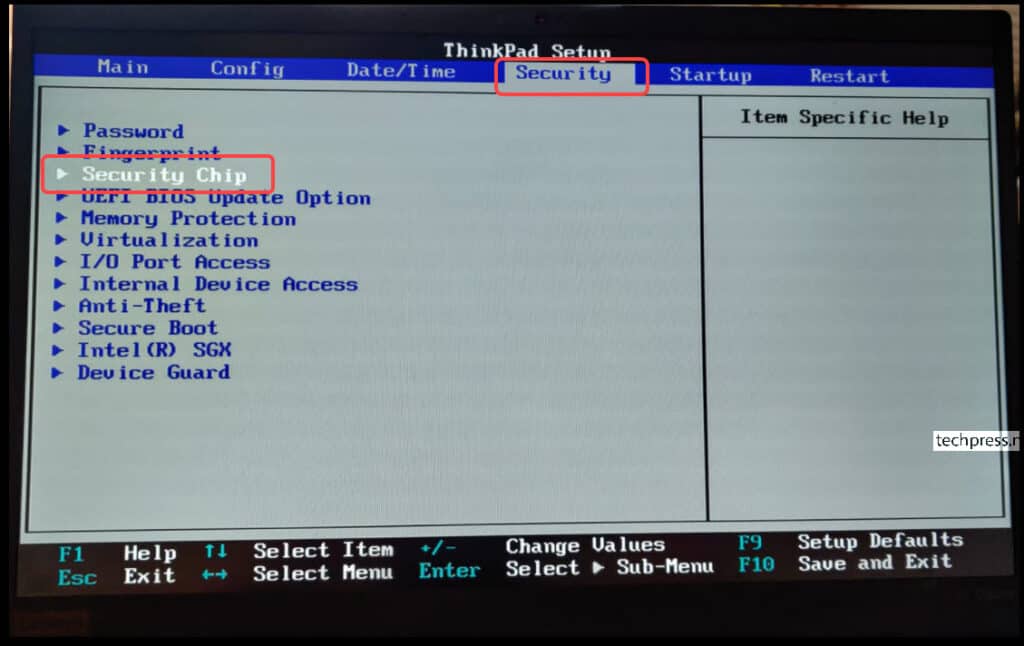
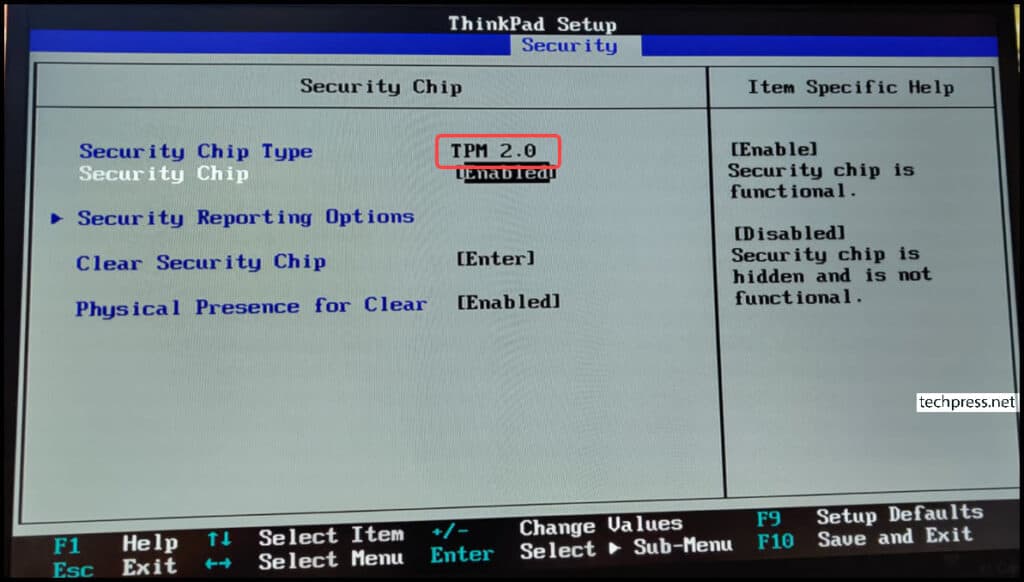
- Restart the machine and press F1 to enter into the BIOS mode. Go to Security tab and using your keyboard select Security Chip and Press Enter.
- Check the Security Chip Type to see if you can change the TPM level from 1.2 to TPM 2.0. On my laptop it was set to TPM 1.2 which i updated it to TPM 2.0.
- To check the Secure Boot, Go to Security tab -> select Secure Boot and press Enter.
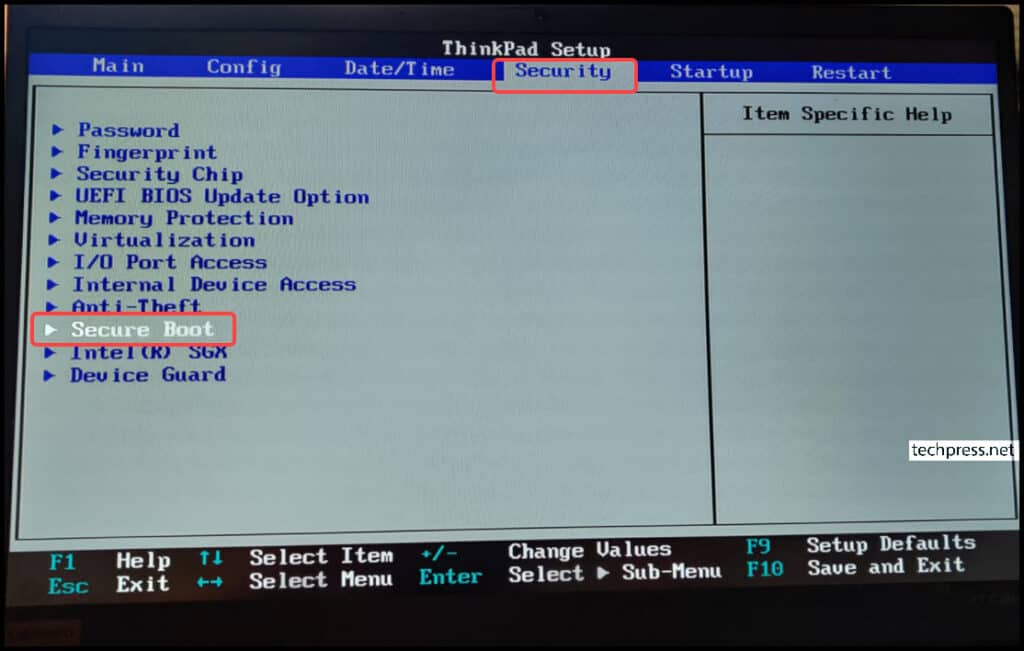
- Make sure Secure Boot is Enabled.
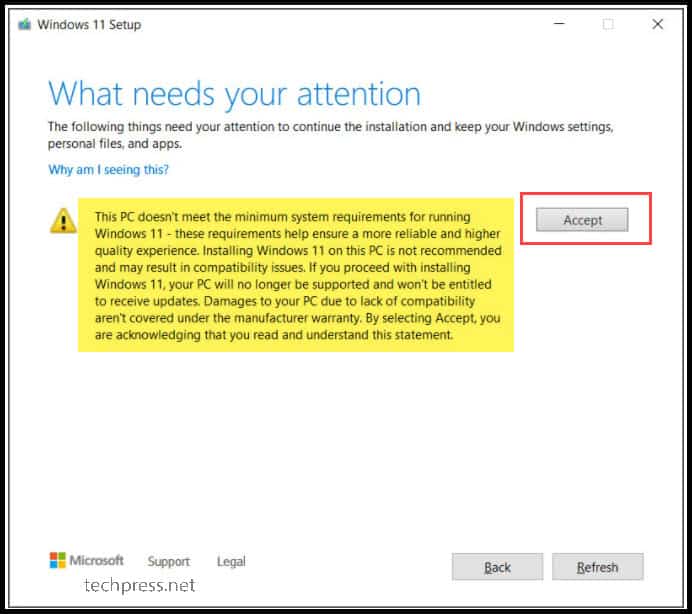
If you are not meeting the TPM 2.0 or CPU requirements then below registry entry needs to be created to bypass the TPM or CPU checks. You will still require TPM 1.2 at least to proceed with the installation. During Windows 11 setup process, a warning message will be shown, click on Accept to continue with the installation process.
Steps to create registry entry (Please note that you will require administrator rights on the PC to make changes in the registry and your system will require a reboot after the registry entry is created)
- Click on Start and search for Registry Editor.
- Navigate to HKEY_LOCAL_MACHINESYSTEMSetupMoSetup.
- Create a REG_DWORD registry entry
AllowUpgradesWithUnsupportedTPMOrCPUand set its value to 1.

Once the registry entry is created and you start the setup process to install windows 11, you will receive below Warning message to state that your PC doesn’t meet the minimum system requirements for running Windows 11. Click on Accept and then click on Refresh to proceed with the installation of Windows 11.

Conclusion
- Use Windows 11 ISO to install or upgrade from Windows 10. Download it from https://www.microsoft.com/en-us/software-download/windows11.
- Make sure to use PC Health Check App to check if your device is compatible before upgrade to Windows 11.
- If Device is not compatible w.r.t. TPM or CPU then create a reg key as I had mentioned earlier in this post. This will bypass TPM and CPU checks.
- If you are getting the error 0x800F0830 – 0x2003 – The Installation failed in the SAFE_OS phase with an error during INSTALL_UPDATES operation. Then try disconnecting from Internet during the whole installation process and select Not right now on Get updates, drivers and options features window.
Windows 11/10 error 0x800F0830-0x20003 is an installation failed error, which prevents you from successfully installing the latest version of Windows 11/10 on your device. You can use the solutions mentioned in this MiniTool article to get rid of this error code.
Windows 11/10 Installation Failed Error 0x800F0830-0x20003
It is a good idea to keep your Windows 10/11 update-to-date. But the update/upgrade install process may be stopped by an installation failed error code like 0x800F0830-0x20003. The following screenshot is an example of Windows 11 installation failed error 0x800F0830-0x20003. The error message is:
We couldn’t install Windows 11
We’ve set your PC back to the way it was right before you started installing Windows 11.
0x800f0955 — 0x20003
The installation failed in the SAFE_OS phase with an error during INSTALL_UPDATES operation

The full error message of Windows 10 installation failed error 0x800F0830-0x20003 is:
We couldn’t install Windows 10
We’ve set your PC back to the way it was right before you started installing Windows 11.
0x800f0955 — 0x20003
The installation failed in the SAFE_OS phase with an error during INSTALL_UPDATES operation

The error message shows that the installation process is failed and the system will go back to the previous version of Windows 11/10 you are running. Are you frightened by this error message? You should not worry so much about it. In theory, this will not ruin your system or delete your files. It just means that you have to continue running the previous Windows version unless you take measures to solve the issue.
Well then, why do you get Windows 11 installation error 0x800F0830 or Windows 10 installation error 0x800F0830?
When you upgrade to Windows 11, you may encounter different kinds of error codes like 0xC1900101, 0x80070070, 0x80070002 0x20009, 0xC1900107, 0xC1900208, and more. If so, you can find solutions in this post: Fixes for Some Windows 11 Upgrade and Installation Errors.
Top Reasons for Windows 11 Installation Error 0x800F0830
You are upgrading or installing an incorrect Windows version
This always happens when you want to upgrade your Windows 10 PC to Windows 11. For example, when you want to upgrade Windows 10 Home version to Windows 11 PRO, this error message can easily appear. So, you need to make sure that you are installing a compatible version. You can also directly perform a clean install rather than an upgrade to avoid this issue.
There is not enough available space on the Windows partition
When you upgrade to or install a new version of Windows, you need to make sure that there is enough free space on your computer. For example, if you want to upgrade to Windows 11, there should be at least 64GB of free space on the C drive. If not, you may receive the installation failed error 0x800F0830-0x20003.
Windows 11/10 update glitch
When you use the Windows Update Assistant to update your computer, the update process may be failed when you are suffering from the “Optional Update” glitch. If so, you can configure the installer and then complete the operation without downloading and installing the optional updates.
Secure Boot is disabled on your PC
Windows 11 has new hardware and system requirements. One of the main requirements is that a secure boot should be supported and enabled. If it is disabled, the Windows 11 upgrade process will be not successful.
The update or installation process is blocked by a 3rd-party antivirus
When you use Windows 10/11 Update Assistant to help you upgrade Windows to the latest version, this tool may be blocked by your installed third-party antivirus software by mistake. To rule out this possibility, you can temporarily close the antivirus software or uninstall it.
Now you know the possible reasons for this Windows 11/10 installation failed error. Then, do you know what you should do to get rid of the issue? You can try the methods we will mention in the following sections.
Fix 1: Use the Built-in Troubleshoot Tips
On the bottom section of the error code interface, you will see a Troubleshooting tips link. You can just use this option to try to solve the issue.
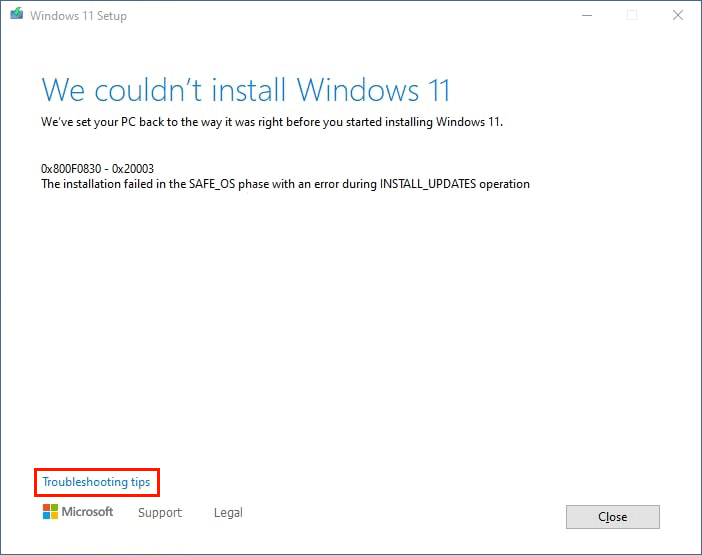
Step 1: Click Troubleshooting tips to continue.
Step 2: On the next page, click the Change how Setup downloads updates link.
Step 3: On the Get updates, drives, and optional features interface, select Not right now and click Next.
Step 4: Follow the on-screen guide to try to install the update again.
Fix 2: Make Sure You Are Installing a Compatible Windows Version
This means that you need to install the same level Windows edition on your computer. For example, if you are currently running Windows 10 Home Edition, you only have to upgrade to Windows 11 Home Edition but not Windows 11 Pro Edition. If you do wrong, you need to start over again.
Fix 3: Free up Disk Space on Drive C
You can press Windows + E to open File Explorer and check if there is enough free space on the C drive.
- If you want to upgrade to Windows 11, you need to make sure there is at least 64GB of free space.
- If you are updating Windows 10, you need to make sure that there is at least 16 GB of free space for 32-bit OS or 20 GB of free space for 64-bit OS.
If the free space is not enough, you need to free up disk space on your Windows computer.
Fix 4: Enable Secure Boot on Windows
This is for Windows 11 installation because Windows 11 has new hardware and system requirements. If you want to install Windows 11 on your device, you need to enable Secure Boot before doing this.
>> See how to enable Secure Boot on Windows.
Fix 5: Run DISM and SFC
Windows 11/10 installation failed error 0x800F0830-0x20003 can also be caused by missing system files. You can run the System File Checker (SFC) to scan Windows and restore your files. For Windows 10 and Windows 11, you need to first run the inbox Deployment Image Servicing and Management (DISM) tool prior to running the System File Checker.
Step 1: Click the search icon in the taskbar and search for cmd.
Step 2: Right-click Command Prompt from the search result and select Run as administrator.
Step 3: Run the following commands one after another.
- DISM /Online /Cleanup-Image /RestoreHealth
- DISM /Online /Cleanup-Image /CheckHealth
- DISM /Online /Cleanup-Image /ScanHealth
Step 4: Type sfc /scannow and press Enter to run the System File Checker.
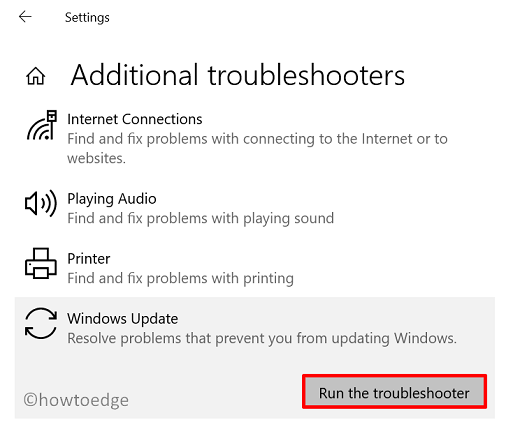
Fix 6: Run the Windows Update Troubleshooter
Windows also has a built-in tool to fix Windows update issues. This tool is the Windows Update troubleshooter.
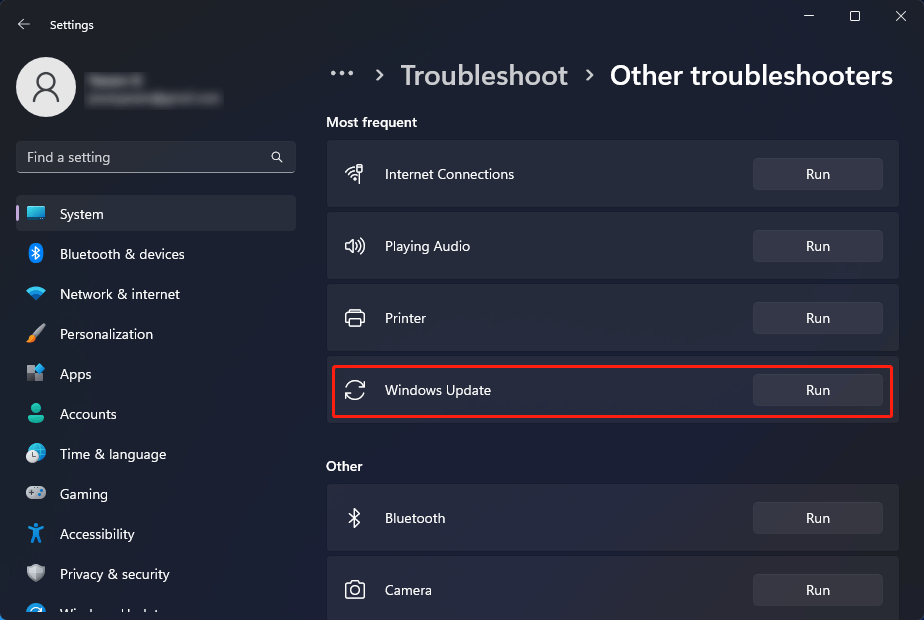
On Windows 11, you can do this to run the Windows Update troubleshooter:
Step 1: Press Windows + I to open the Settings app.
Step 2: Go to System > Troubleshoot > Other troubleshooters.
Step 3: Click the Run button next to Windows Update to run it. This tool can automatically fix the found issues.
Step 4: Restart your computer. Then, update your system again and see if the Windows 11 installation error 0x800F0830 disappears.
On Windows 10, you can do this to run the Windows Update troubleshooter:
Step 1: Press Windows + I to open the Setting app.
Step 2: Go to Update & Security > Troubleshoot > Additional troubleshooters.
Step 3: Under Get up and running, click Windows Update, then click Run the troubleshooter.
Step 4: Restart your computer. Then, update your system again and see if the Windows 10 installation error 0x800F0830 disappears.
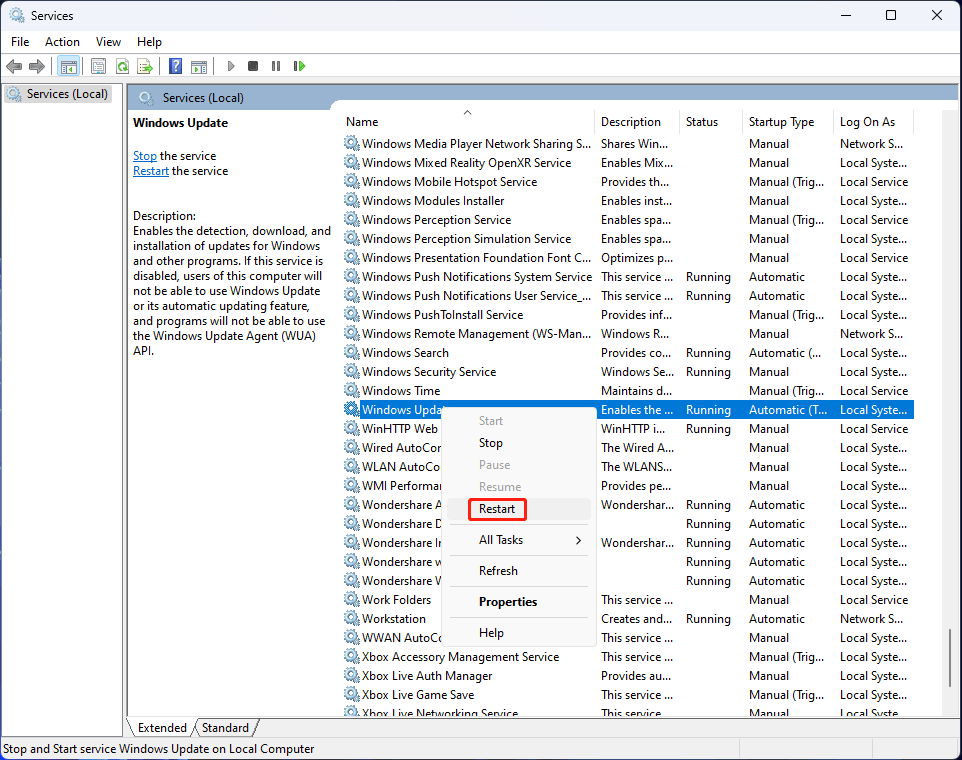
Fix 7: Restart the Windows Update Service
Step 1: Press Windows + R to open the Run box.
Step 2: Type services.msc into the Run dialog and press Enter to open Services.
Step 3: Scroll down to find Windows Update and right-click it, then select Restart.
Step 4: Restart your computer and check if the Windows 11/10 installation failed issue is solved.
Fix 8: Clean Boot Your Computer
The clean boot can boot your computer with a minimal set of drivers and startup programs so that you can find out whether it is a background program that prevents you from installing Windows 11 or Windows 10 on your device.
>> See how to clean boot your Windows computer.
Fix 9: Disable the Third-Party Antivirus Software
If your third-party antivirus software is running, you’d better temporarily disable it because it may block your Windows update unexpectedly. If you can successfully update your system after that, it means that the third-party antivirus software is the cause. You can uninstall it and use another trusted antivirus.
After updating/upgrading Windows 10/11, you may find that some of your files get lost. If you want to recover your files, you can try MiniTool Power Data Recovery. This is a free file recovery tool, which can help you recover all kinds of files from different types of data storage devices.
This data recovery software has a trial edition. You can first use it to scan the drive that previously saved the lost files and see if it can find these files. If you want to use this tool to recover your files, you need to use a full edition.
Free Download
Step 1: Download and install this software on your computer. To prevent your lost files from being overwritten, you should not install this software on the original location of the lost files.
Step 2: Open the software to enter its main interface.
Step 3: Hover over the target drive and click the Scan button. If you don’t know the original location of the lost files, you can switch to the Devices section and select the whole disk to scan.

Step 4: After scanning, you can go to check if you can find your lost files. If yes, you can upgrade to a full edition to recover all your needed files.
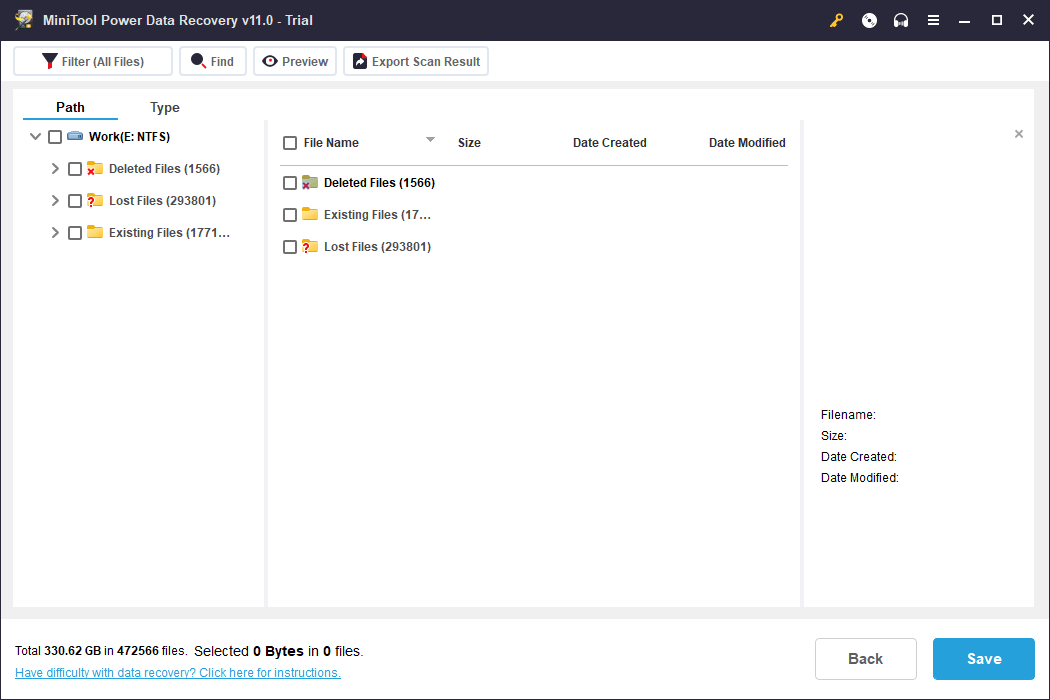
The destination drive of the recovered files should be a different folder rather than their original location. Otherwise, the lost files might be overwritten and become unrecoverable.
Back up Your Computer before Updating/Upgrading Your System
Data loss is a rare issue during the Windows update process. Besides, a Windows update could damage your system in some cases. To protect your computer, you’d better back up your files and system before you perform a Windows update.
You can use MiniTool ShadowMaker, a professional Windows backup software, to make a full backup of your computer. You need to back up your Windows computer to an external hard drive (the drive should have enough space to store the backup).
This software has a trial edition. You can use it for free within 30 days.
Free Download

The End
Can’t install Windows 11 or Windows 10 on your device due to Windows 11/10 installation failed error 0x800F0830-0x20003? Why not just try the methods mentioned in this article to help you out. All of the methods are very easy.
However, if you have other useful solutions, you can share them with us in the comments. You can also contact us via [email protected].
In this guide, we will help you find the prime reasons behind Error 0x800f0830-0x20003 along with five possible ways that you can apply in order to get rid of this problem. Enabled Developer Mode is the main reason why it occurs while installing Windows 10.
Basically, when you download the required setup file, the developer package gets downloaded as well. And, when you try installing the Build Update, this is the developer package that blocks installing the setup file. When this error occurs, you receive an error message that resembles the below Snapshot –

This error may also occur due to corrupted update components, missing system files, or disabled update services. Whatever the reason in your case, this tutorial will help to sort them out and solve SafeOS boot failure. Let’s explore the solutions in detail –
Fix – Can’t Install Windows 10 Error 0x800F0830-0x20003
To solve Windows 10 Installation Error 0x800F0830-0x20003, read and implement the solutions discussed below –
1] Disable Developer Mode
Enabled Developer Mode is the main culprit behind the error 0x800F0830-0x20003 while installing Windows 10. So, in order to fix it, disable this mode first and try upgrading your operating system again. I hope this method alone, will resolve this issue. Here’s how to perform this task –
- First of all, browse the following location –
Win + I > Update & Security > For Developers
- On the right pane, you will find a toggle switch under Developer Mode. Check the current status of this switch. In case you find this option enabled, slide the toggle switch to the left.

- If there appears any confirmation window, hit Yes.
- Restart your PC next and check whether you can now upgrade to Windows 10 OS or not.
2] Enter Clean Boot State
Many a time, errors like 0x800f0830-0x20003 occur just after installing buggy software on the device. If you had installed any third-party application on your computer and started getting this error during Windows 10 Update, we advise you to remove the installed programs. To be sure whether the installed program is the main culprit or not, you better boot your device into Safe Mode.
Clean Boot State doesn’t allow third-party apps or services to start thus there won’t be any conflicts or obstructions because of them. Go and check if you can install Windows 10 Updates. In case, the error 0x800f0830-0x20003 occurs here as well, you better try the next solution.
Here’s how to enter Clean Boot State in Windows 10 –
- Press Win + R to open the Run dialog box.
- Type “
msconfig.msc” in the text box and press Enter. - Head over to the Services tab next.
- Uncheck the box that reads “Hide all Microsoft services” and hit Disable all.

- Go to the Boot tab next and check the box left of “Safe boot”.
- Hit Apply then OK.
- Restart your PC and the system will boot into Safe Mode.
If you were able to install Windows 10 Updates while being inside the Clean Boot, uninstall all third-party apps from your device, especially Antivirus software.
3] Run Windows Update Troubleshooter
Windows Update Troubleshooter is a great in-built tool that you may run to find and repair underlying problems on Windows 10 PC. Even if it doesn’t solve the problem, this will guide you in ways how to solve the issue at hand.
Here’s how to troubleshoot Windows 10 –
- Right-click on the Windows icon and select Settings.
- Select Update & Security > Troubleshoot (on the left column).
- On the right pane, you will find a link – “Additional troubleshooters“, click on it.
- Select Windows Update and hit the option – Run the troubleshooter.
- Now, follow the on-screen instructions to complete the remaining steps.
4] Fix System Files Corruption using SFC
Windows Install or Upgrade Errors mostly occur because of the presence of corrupted system files. There are several tools available on Windows 10 that you can use to fix such corruption. A few of them are SFC and DISM. Let’s see how to fix system files corruption using these tools –
- Open Command Prompt as an Administrator.
- Type “
sfc /SCANNOW” near the blinking cursor and press Enter. - The SFC scan usually takes 10-15 minutes to find and repair corrupt or missing system files. In certain cases, this may take even more time, so wait patiently.
- Once the above scan reaches 100%, execute the below code –
Dism /Online /cleanup-image /RestoreHealth
- This command will check for possible corruption inside the Windows 10 Image and fix it (if found).
- After this scan completes successfully, restart your PC.
If the error 0x800F0830 – 0x20003 is occurring due to corrupted system files, you should be now able to install or upgrade to Windows 10.
5] Disable the Third-Party Antivirus Program
Some antiviruses are known to interfere with the Windows update process. If you have one installed, you may need to disable your third-party antivirus program temporarily and check if it solves the issue.
If yes, it means that the antivirus program installed on your computer caused the issue. In such a case, you might want to re-enable it after installing Windows updates or consider switching to another antivirus program.
6] Reset Windows Update Components
Whenever you install a pending update to your device, some information is added to the Windows Cache folders. With time, huge data get stored inside the cache folders and hence cause update-related issues on the computer.
In order to successfully install Windows 10 updates, all update-related services should be enabled and running. However, there are times when one disables such services and simply forgets to turn them back ON.
So, if you are still getting Error 0x800F0830, we suggest checking the above two statements. If you don’t want to get into details, simply reset Windows Updates Components. You can complete resetting in four steps –
- Disable all update-related Services like – Cryptographic, Windows update, and BITS.
- Rename Both Cache Folders i.e. SoftwareDistribution and Catroot2 to
sd.oldandcat.oldrespectively. - Re-register all DLL Files.
- In the end, restart all the services that you stopped earlier.
After resetting corrupted update components, try upgrading Windows 10 again. I think this would work normally. If not, performing a clean install is the last resort available to you.
Tip: If you are facing update, activation, or driver issues on your Windows PC, try RESTORO PC Repair Tool. This software will scan your device for potential issues and resolve them automatically.