
I encounter this error :
syntax error near unexpected token `(‘
Or this error :
error “sh: -c: line 0: unexpected EOF while looking for matching `”
sh: -c: line 1: syntax error: unexpected end of file” number
Basically, there is something in the pathname of your macOS Install app that DiskMaker X does not like, and most of the time the issue is parenthesis because you renamed the app or included it in a folder that has the version or build number between parenthesis, i.e. (18F132). Parenthesis are difficult to deal with when integrating shell script code in AppleScript, so the best way to avoid this bug at this time is to just remove the parenthesis from the path of the app.
Where can I get a previous macOS Install app ?
Charles Edge nicely compiled the list of download links for previous versions of macOS installer apps. Beware that some of these versions must be purchased (basically, all macOS versions before 10.9).
When using DiskMaker X 7 for High Sierra, I encounter this error message : “The disk could not be created because of an error: An error occured: -10006. Finder got an error: Can’t set alias ”Install macOS High Sierra:Install macOS High Sierra.app” to {425, 76}.”
When using DiskMaker X 8 for Mojave, I encounter this error message : “The disk could not be created because of an error: An error occured: -10006. Finder got an error: Can’t set alias ”Install macOS Mojave:Install macOS Mojave.app” to {425, 76}.”
First, please update to DiskMaker X 7.0.1 or DiskMaker X 8.0.1. It should fix this bug and some.
Second, it may happen that your macOS Install app (either High Sierra or Mojave) is not complete. Check its size : if the installer is about 20 MB large, it’s a stub which can’t be used with DiskMaker X. You need the FULL installer. To be sure to download the full macOS installer, have a look here for macOS High Sierra or here for macOS Mojave. The idea is to use an app that will force download of the full macOS install app.
I plan to add a feature to check the size of the installer before trying to build an install disk in the not-too-distant future.
When creating the Install disk with DiskMaker X, I encounter this error message : “The disk could not be created because of an error: An error occured: -10006.”
This happens sometimes when creating the install disk because a false mount is created as some point. Basically, a false mount is a folder created with the same name as your Install drive, and that makes the Install disk adopt the same name with “1” at the end, i.e. “Install Mac OS Sierra 1”.
If this error happens:
- in Finder, click on Go > Go to Folder menu ;
- Type /Volumes/
- If a folder (not a disk !) is named “Install macOS Sierra”, “Install OS X Yosemite”, or “Install OS X El Capitan”, delete the folder (you may need admin rights, thus type your admin name and password).
- Reboot your Mac
- Try again.
That should do it. I will try to fix it in a future version (if I manage to get why this happens sometimes in some configurations…
“This copy of the Install OS X [OS X Name] application can’t be verified. It may have been corrupted or tampered with during downloading.”
Due to an expiration of OS X App Store certificates, installers of OS X downloaded prior to February 14th of 2016 can’t be used to re-install OS X without encoutering this error. This is not a problem with DiskMaker X per se, but with the installers provided by Apple.
I encounter this message:
“This copy of the Install OS X [OS X Name] application can’t be verified. It may have been corrupted or tampered with during downloading.”
Due to an expiration of OS X App Store certificates, installers of OS X downloaded prior to February 14th of 2016 can’t be used to re-install OS X without encoutering this error. This is not a problem with DiskMaker X per se, but with the installers provided by Apple.
There are three ways to avoid this problem :
- If you did not erase your Mac and its OS is still working fine, reboot on its hard drive, open System Preferences > Date and Time, uncheck Automatically set up date and time and set the date 13th of February 2016, then disconnect from network and reboot;
- If you don’t have an OS installed anymore, reboot on your OS X install disk built with DiskMaker X, open Terminal and type:
date 1010101015
Which will set the date and time on the 10th of October 2015 at 10:10 (it’s just easier for me to remember, but any date in the five last years or so should work).
The last solution (and the best) is to re-download the OS X installers from the App Store. Which is OK for El Capitan if you currently run it, but what if you want to re-download older OS? Sadly, Apple does not allow to re-download say, Lion or Mountain Lion, if your Mac already runs a more recent version of OS X (which sucks REALLY badly). There are two solutions here :
- Re-install at least Lion on a drive, boot on it, open App Store and re-download the apps…
- If your Mac does not support older versions of OS X to reboot on, use a virtual machine with Parallels Desktop or VMWare Fusion to re-install Lion in it, then re-download the installers from Lion’s App Store.
Also, beware that if you have OS X installers on any volume mounted on your Mac: the first copy of the installer the App Store will find will be updated if you decide to download a new version, wherever this copy of the installer is on your boot drive or not.
I bought a recent Mac, I built a disk with DiskMaker X but I can’t boot on it !
This one is tricky to explain. Please take a drink first.
When a new model of Mac is available, it usually ships with an “almost” standard version of OS X. I wrote “almost” as it is a special build of OS X, designed only for this specific kind of new Mac.
The problem is quite well explained here:
http://support.apple.com/kb/ht1159
The following points are especially important:
- Some Macs may include a slightly later build version (but same numbered version) of Mac OS X on the Install or Restore discs than was preinstalled on your computer.
- Do not use a Mac OS X version earlier than the one included with the computer.
- Retail copies of Mac OS X may not always work properly with new Macs. Even if the retail version has been updated via Software Update to a later version of Mac OS X than originally came with a Mac, you may have unexpected issues. Always confirm operating system functionality by using the install disc that shipped with your particular Mac.
So ? If you get a new Mac, you won’t be able to use the installer downloaded from the App Store. The only solution to fully re-install your OS is to use OS X Internet Recovery.
However, there is also another way.
Basically: please be patient. When Apple will release a new version of OS X (say, 10.9.2), you will be able to download from the App Store the full OS X 10.9.2 installer which will provide a new “universal” build of OS X, allowing full install and allowing to build a new boot disk with DiskMaker X on your brand new Mac.
And please, wait before buying a new Mac the next time.
I stumble on a message: “An error occured: -2753. The variable OSX_App is not defined”
This happens if you use the 10.9.x DMG file instead of the full OS X Mavericks Installer app. It just won’t work. Please use the installer app.
When installing, I stumble on this error message: “This copy of the Install OS X Mavericks application can’t be verified. It may have been corrupted or tampered with during downloading.”
Known bug from Apple, your Mac’s clock is set to a wrong date/time. Check this KB article for a solution.
An error -1782 occurs after DiskMaker X copies files: “Can’t get disk “OS X Mountain Lion Install Disk” or similar.
Bug in version 3.0.1, corrected with 3.0.2 and later. The USB boot disk will work however.
An “Error -10660” happens in the building process.
Run DiskMaker X in an admin session (not a standard user session). It should work much better.
I built a disk with Lion DiskMaker 3.0 but can’t boot on it! It does not appear at startup or in the Startup disk Preference.
This has been fixed with DiskMaker X 3.0.1 and later. Give it a try. The (funny) explaination for this bug is here.
Can DiskMaker X build a drive with different versions of OS X ? Say, one partition with Lion Install, another one with Mountain Lion, and another one with Mavericks ?
Sure! Just format your removable drive with a few 8 GB partitions, and launch DiskMaker X. Then choose the “another kind of disk” option and select the right volume each time.
I can’t use DiskMaker X with Mac OS X 10.6.x if I try to use it with my Mavericks installer!
Because of a bug (or a feature?) in Apple’s built-in command createinstallmedia with 10.6.X, DiskMaker X is not compatible with versions of OS X prior to 10.7. I’m working on a fix, but it may take some time to make it available as it means using another completely different method. Check the blog regularly for updates.
I get an error: “The domain/default pair of (/Volumes/OS X Base System/System/Library/CoreServices/SystemVersion, Production Version) does not exist.”
This happens mostly because your OS X Install App is damaged. To check if this theory is correct :
- Right-click or Ctrl+Cllick on the Installer OS X Mavericks application;
- Go to Contents/SharedSupport;
- Double-click InstallESD.dmg.
If an error message appears, you’ll have to download again the Installer app from the App Store. If it mounts properly, get in touch with me.
Note that Lion DiskMaker 3.0.1 should better handle this case.
I keep encountering an ASObjC Runner error (Error -43. File ASObjC Runner wasn’t found)!
This one is quite tricky. It’s a bug which happens randomly with Lion DiskMaker and has no real explaination, except some coding error.
The only way I found that could remove the problem would be to :
- Use Activity Monitor (in /Applicationsl/Utilities) to quit any instance of ASObjC Runner ;
- Reboot your Mac ;
- Check again if ASObjC Runner is still running in the Activity Monitor ;
- Then launch Lion DiskMaker again and try to build your disk.
Also sometimes, using a different, clean session may help.
If you have any insight in this problem, please get in touch with me.
After choosing the OS, Lion DiskMaker seems to hang.
This is related to some issues with Spotlight. To workaround this, open Terminal and type :
killall -9 mdfind
then type Enter key. Lion DiskMaker should resume automatically.
I am told I have no copy of OS X Install available.
The OS X Install application is automatically erased after you upgrade to the new version of OS X. If you need to download it again, open the Mac App Store, then open the Purchase page. You’ll be able to download Mac OS X Lion Install again.
The best time to use Lion DiskMaker is when you just finish downloading OS X from the Mac App Store. Create your disk with Lion Disk Maker , then install OS X.
I got my version of OS X pre-installed with my Mac. How can I get the OS X installer ?
There are two ways to do it.
– If you already purchased OS X on the Mac App Store (and therefore have a valid copy of OS X Install application), you can download the latest installer from Mac App Store first. This installer is compatible with Macs pre-equiped with your version of OS X.
– If you did not purchase OS X, but want to get an Install disc, there is a way to get the InstallESD.dmg file for your Mac. The method is not really easy though. Check Macworld for the full story. After you got the InstallESD.dmg file, use it to build your key or DVD with Lion DiskMaker.
I encountered the following message: The disk could not be created because of an error: An error occurred: 1. hdiutil: attach failed – No such file or directory
This happens if you chose the wrong Mac OS X Lion Install application, or if you mounted manually the InstallESD.dmg file first.
The simple answer is: don’t do this 🙂 Lion DiskMaker is clever enough to detect your copy of OS X Install itself. Then it will mount the DMG file itself.
Yes, that’s cool, but I don’t have the complete OS X Install app and I just kept the InstallESD.dmg file. So do I have to re-download Lion again?
Don’t worry, if it does not find your OS X Install app, Lion DiskMaker will allow to select manually an InstallESD.dmg file.
Can I use a FireWire or SD-Card?
Yes, you can, though the USB drive has the advantage of being « universal » and works on any Mac.
My drive was completely erased!
DiskMaker X proposes two different ways to make a bootable disk:
– You can choose to use a dedicated 8 GB thumb drive ;
– Or you can choose a volume from any drive.
If you choose the 8 GB thumb drive option, the WHOLE disk will be erased. If you choose the second option, ONLY the dedicated volume will be erased, leaving any other volume on your disk intact.
However, if you chose the wrong option, Lion DiskMaker will list every volume that may be erased at the end of the process. Read slowly 🙂
And of course, backup any file on your drive before using the software if necessary. And use a dedicated, small drive (a 8 GB USB key is incredibly cheap these days).
Why did you remove the option to use a 4 GB USB Thumb drive?
The OS X install apps tend to be bigger and bigger with each new release. I used to remove some less essential package in the previous versions of Lion DiskMaker, but this could create some issues (many people complained that the installer then failed when installing OS X).
Also, the price of 8 GB USB thumb stick drives fell , as you can get an 8 GB drive for less than $7 now. So please do yourself a favor, and get one. This drive should be « future-proof » (until Apple makes OS X installer larger than 8 GB…).
Can I redistribute this software ?
Sure, as long as you mention the author and don’t suppress any comment or change anything in its package.
Booting from the DVD is slooooow as hell…
A DVD will always be slower than a USB key, and it seems Lion’s disk image is not optimized for use with optical disks. Avoid it, and use a USB key.
Why did you not rename Lion Diskmaker now that Mountain Lion is available ?
Well, I like this name better than « OS X Diskmaker ». That’s it.
(also: « Lion Diskmaker » should make Apple’s lawyers go less ballistic than « OS X Diskmaker ».
So yes I changed my mind on the last one 🙂
Hi everyone —
I am trying to use DiskMaker X to create a High Sierra bootable disk with a USB drive. I have followed all the steps but at the very end I get the following message:
The disk could not be created because of an error: An error occured: -10006. Finder got an error: Can’t set alias «Install macOS High Sierra:Install macOS High Sierra.app» to {425, 76}.
I have read in several other places how easy it is to create a bootable disk using DiskMaker X so I am a little puzzled as to what I might be doing incorrectly.
Any guidance would be appreciated
Thanks
Posted on Feb 10, 2019 11:23 AM
4 способа решить код ошибки 100006 на Mac (06.05.23)
В последнее время пользователи жаловались на получение кода ошибки 100006 на своих компьютерах Mac. Что ж, это определенно плохие новости, особенно то, что многие из них серьезно не знают, как предотвратить появление кода ошибки. Мы создали эту статью, чтобы облегчить разочарование пользователей. Мы попытаемся обсудить, почему Mac получает код ошибки 100006, что это такое и как его исправить.
Что такое код ошибки 100006 на Mac?
Код ошибки 100006 на Mac обычно указывает на проблему или проблему с определенной функцией Mac, программой или операцией. Он продолжает появляться на вашем экране, пока вы не примете меры для его устранения. Чтобы обойти это, вы должны выяснить, что вызывает появление кода ошибки.
Распространенные причины появления кода ошибки Mac 100006
Ваш Mac часто выполняет сразу несколько процессов и операций. Это означает, что мы не можем напрямую связать код ошибки с одной конкретной проблемой или проблемой. Но, основываясь на отчетах и наблюдениях пользователей Mac, которые столкнулись с кодом ошибки, мы можем сделать вывод, что общие причины могут быть следующими:
- Mac заражен вредоносными объектами или вирусов.
- Недостаточно места на диске.
- Неправильная деинсталляция или удаление файла привели к появлению кода ошибки.
- Слишком много мусора и ненужные файлы скопились на жестком диске.
Неудобства, которые приносит код ошибки 100006
Да, код ошибки 10006 на самом деле не очень хорошая новость для пользователей Mac, потому что он доставляет много проблем и неудобства, такие как:
- Уведомление об ошибке всегда появляется при запуске или завершении работы Mac.
- Некоторые программы, особенно те, которые связаны с кодом ошибки, не могут открываться и работать без сбоев.
- Программы и приложения не могут быть установлены или удалены должным образом.
- Некоторые возможности и функции на Mac не может работать плавно.
Помимо перечисленных выше неудобств, код ошибки 100006 может также вызвать другие серьезные проблемы, которые не могут быть устранены с помощью базового устранения неполадок.
Итак, что вы должны сделать, чтобы устранить код ошибки 100006 и предотвратить его появление в будущем?
Как исправить код ошибки 100006 на вашем Mac
Ниже приведены некоторые рекомендуемые исправления для проблемы с кодом ошибки 100006:
Исправление №1: просканируйте свой Mac с помощью надежного инструмента или приложения для очистки.
Большинство кодов ошибок, с которыми вы можете столкнуться на своем Mac, в основном вызваны вредоносными объектами или вирусными инфекциями. Они атакуют и уничтожают различные настройки, файлы и конфигурации на вашем Mac, что приводит к повреждению или недействительности функций.
Хорошая новость заключается в том, что Apple уже установила на ваш Mac невидимые фоновые средства защиты: Карантин файлов / Привратник и Xprotect . Однако последние версии вирусов могут остаться незамеченными этими приложениями.
Если вы подозреваете, что код ошибки отображается на вашем Mac из-за заражения вирусом, рекомендуется выполнить быстрое сканирование вашего компьютера. Mac. Используйте любую надежную антивирусную программу для удаления любых вирусов и угроз, присутствующих на вашем Mac.
Вот полезный совет: перед запуском сканирования системы убедитесь, что вы уже обновили свою вирусную базу. В противном случае вам не удастся удалить вирус.
ИСПРАВЛЕНИЕ №2: очистите свой Mac.
Как правило, для запуска программ, которые вы устанавливаете на Mac, требуется определенный файл. Когда ваш Mac обнаружит дубликаты таких файлов, он запутается. Если это произойдет, могут появиться коды ошибок, такие как код ошибки 100006. Вот почему так важно очистить ваш Mac, чтобы избавиться от повторяющихся и ненужных файлов.
Конечно, вы можете вручную проверять и находить повторяющиеся файлы на вашем Mac. Однако это не рекомендуется, так как это займет у вас много времени. Вместо этого рекомендуется сканировать и очищать ваш Mac с помощью надежного инструмента для очистки, такого как приложение для ремонта Mac. Всего за несколько щелчков мышью он может найти, идентифицировать и очистить все ненужные файлы на вашем Mac.
Исправление №3: удалите все проблемные приложения.
Со всеми новыми популярными приложениями можно было бы быстро соблазнить их установить на свои компьютеры. Они не понимают, что проблемы возникнут, когда будет установлено много приложений.
После успешной установки проблемных приложений или программ на Mac они существенно повлияют на общую производительность других приложений, программ или даже на функции вашей системы. Они также могут вызвать отображение кода ошибки 100006. В этом случае вам действительно нужно тщательно проверить все программы и приложения, установленные на вашем Mac.
Чтобы удалить программу, которая, по вашему мнению, вызывает проблемы, выполните следующие действия:
Если удаление проблемных приложений слишком сложно для вас, не волнуйтесь, потому что вы можете рассчитывать на профессиональные инструменты для выполнения этой работы. Вы можете выполнить быстрый поиск в Google, чтобы получить список лучших программ удаления или приложений для Mac.
Исправление №4: Управляйте использованием вашего диска.
Из-за недостатка места на диске ваш Mac не может работать бесперебойно и эффективно. В некоторых случаях это также приводит к появлению кода ошибки 100006. Итак, если на вашем жестком диске мало места, найдите время, чтобы освободить место. Не позволяйте ненужным файлам и данным занимать место в вашем хранилище.
Вы всегда можете начать с ручной проверки диска, чтобы узнать, какие файлы занимают место. Используйте программу анализа жесткого диска, чтобы просканировать жесткий диск вашего Mac и определить, какие папки занимают большую часть вашего дискового пространства. Оттуда вы можете начать удалять лишнее пространство и освобождать ценное пространство.
Если вам все еще нужны файлы, вы можете перенести их на другой носитель. Только убедитесь, что вы не удалили важные системные файлы.
Заключение
Это правда, что коды ошибок на Mac неизбежны. Они появляются тогда, когда их меньше всего ожидаешь. Однако, если вы будете заботиться только о своем Mac и правильно им пользоваться, вы сможете предотвратить появление каких-либо проблем. Регулярно выполняйте сканирование, удаляйте ненужные файлы и управляйте дисковым пространством.
Знаете ли вы другие способы исправить код ошибки 10006 на Mac? Делитесь ими с нами в комментариях!
YouTube видео: 4 способа решить код ошибки 100006 на Mac
06, 2023
-
#1
Hello all, hopefully this is in the right section. First and foremost have Yosemite. if that matters. I seem to have a problem. I recently brought an 8gb flash drive in order to install the Mountain Lion OS. I brought it through the store few months ago. I’m trying to use DiskMaker X. Everything starts out fine and it starts copying the needed files or what have you. When all the sudden I get this «The disk could not be created because of an error: An error occured: -10006. Finder got an error: Can’t set folder «Utilities» of disk «OS X Mountain Lion Install Disk» to {413, 264}.» Does anyone know of a fix or what this actually means? Thanks in advance.
-
#2
There are other methods for creating a bootable Mountain Lion disk. if DiskMaker X is giving you problems let’s just move on to the next method.
Method 1: createinsallmedia
(You can use this method within 10.10 (Yosemite) but you will not be able to use this method once you are running 10.8 (Mountain Lion) as this software was not introduced until 10.9 (Mavericks). At which point you will need to use Method 2 detailed below)
- Rename your desired flash drive «MLInstaller«
- Launch the Terminal application, found in /Applications/Utilities/ and enter the following command
Code:
sudo /Applications/Install OS X Yosemite.app/Contents/Resources/createinstallmedia --volume /Volumes/MLInstaller --applicationpath /Applications/Install OS X Mountain Lion.app --nointeraction - You’ll then see the following screen text in the Terminal:
Code:
Erasing Disk: 0%… 10%… 20%… 30%…100%…
Copying installer files to disk…
Copy complete.
Making disk bootable…
Copying boot files…
Copy complete.
Done.
That’s it you’re done.
Method 2: Disk Utility
- Secondary click on the installer and click ‘Show Package Contents’.
- Open ‘Contents’ folder, open ‘SharedSupport’ folder next.
- You will now see a disk image called ‘InstallESD.dmg’. (Move this finder window to the side)
- Open the Disk Utility App which will be found in /Application/Utilities
- Insert you flash drive and make sure it’s formatted to ‘Mac OS Extended (Journaled)‘
- Now you are going to drag ‘InstallESD.dmg‘ into the white pane on the left side of Disk Utility
- Select your Flash Drive, than click ‘Restore‘ on the main window.
- Drag the ‘InstallESD.dmg‘ into the source field and select your flash drive as the destination drive.
If you get the «Could not restore – Invalid argument» error at the end of the restore process, you can safely ignore it and move on.
Last edited: May 28, 2016
-
#3
There are other methods for creating a bootable Mountain Lion disk. if DiskMaker X is giving you problems let’s just move on to the next method.
Method 1: createinsallmedia
(You can use this method within 10.10 (Yosemite) but you will not be able to use this method once you are running 10.8 (Mountain Lion) as this software was not introduced until 10.9 (Mavericks). At which point you will need to use Method 2 detailed below)
- Rename your desired flash drive «MLInstaller«
- Launch the Terminal application, found in /Applications/Utilities/ and enter the following command
Code:
sudo /Applications/Install OS X Yosemite.app/Contents/Resources/createinstallmedia --volume /Volumes/MLInstaller --applicationpath /Applications/Install OS X Mountain Lion.app --nointeraction- You’ll then see the following screen text in the Terminal:
Code:
Erasing Disk: 0%… 10%… 20%… 30%…100%…
Copying installer files to disk…
Copy complete.
Making disk bootable…
Copying boot files…
Copy complete.
Done.
That’s it you’re done.
Method 2: Disk Utility
- Secondary click on the installer and click ‘Show Package Contents’.
- Open ‘Contents’ folder, open ‘SharedSupport’ folder next.
- You will now see a disk image called ‘InstallESD.dmg’. (Move this finder window to the side)
- Open the Disk Utility App which will be found in /Application/Utilities
- Insert you flash drive and make sure it’s formatted to ‘Mac OS Extended (Journaled)‘
- Now you are going to drag ‘InstallESD.dmg‘ into the white pane on the left side of Disk Utility
- Select your Flash Drive, than click ‘Restore‘ on the main window.
- Drag the ‘InstallESD.dmg‘ into the source field and select your flash drive as the destination drive.
If you get the «Could not restore – Invalid argument» error at the end of the restore process, you can safely ignore it and move on.
Thank you for replying but after I dragged InstallESD.dmg‘ as the source it won’t let me click restore. It’s greyed out. What do I select next? Never mind I missed the part about the destination. It’s doing it’s thing now. I’ll report back once I finish it.
-
#4
You’re welcome. Glad you got it all sorted.
4 способа решить код ошибки 100006 на Mac (02.09.23)
В последнее время пользователи жаловались на получение кода ошибки 100006 на своих компьютерах Mac. Что ж, это определенно плохие новости, особенно то, что многие из них серьезно не знают, как предотвратить появление кода ошибки. Мы создали эту статью, чтобы облегчить разочарование пользователей. Мы попытаемся обсудить, почему Mac получает код ошибки 100006, что это такое и как его исправить.
Что такое код ошибки 100006 на Mac?
Код ошибки 100006 на Mac обычно указывает на проблему или проблему с определенной функцией Mac, программой или операцией. Он продолжает появляться на вашем экране, пока вы не примете меры для его устранения. Чтобы обойти это, вы должны выяснить, что вызывает появление кода ошибки.
Распространенные причины появления кода ошибки Mac 100006
Ваш Mac часто выполняет сразу несколько процессов и операций. Это означает, что мы не можем напрямую связать код ошибки с одной конкретной проблемой или проблемой. Но, основываясь на отчетах и наблюдениях пользователей Mac, которые столкнулись с кодом ошибки, мы можем сделать вывод, что общие причины могут быть следующими:
- Mac заражен вредоносными объектами или вирусов.
- Недостаточно места на диске.
- Неправильная деинсталляция или удаление файла привели к появлению кода ошибки.
- Слишком много мусора и ненужные файлы скопились на жестком диске.
Неудобства, которые приносит код ошибки 100006
Да, код ошибки 10006 на самом деле не очень хорошая новость для пользователей Mac, потому что он доставляет много проблем и неудобства, такие как:
- Уведомление об ошибке всегда появляется при запуске или завершении работы Mac.
- Некоторые программы, особенно те, которые связаны с кодом ошибки, не могут открываться и работать без сбоев.
- Программы и приложения не могут быть установлены или удалены должным образом.
- Некоторые возможности и функции на Mac не может работать плавно.
Помимо перечисленных выше неудобств, код ошибки 100006 может также вызвать другие серьезные проблемы, которые не могут быть устранены с помощью базового устранения неполадок.
Итак, что вы должны сделать, чтобы устранить код ошибки 100006 и предотвратить его появление в будущем?
Как исправить код ошибки 100006 на вашем Mac
Ниже приведены некоторые рекомендуемые исправления для проблемы с кодом ошибки 100006:
Исправление №1: просканируйте свой Mac с помощью надежного инструмента или приложения для очистки.
Большинство кодов ошибок, с которыми вы можете столкнуться на своем Mac, в основном вызваны вредоносными объектами или вирусными инфекциями. Они атакуют и уничтожают различные настройки, файлы и конфигурации на вашем Mac, что приводит к повреждению или недействительности функций.
Хорошая новость заключается в том, что Apple уже установила на ваш Mac невидимые фоновые средства защиты: Карантин файлов / Привратник и Xprotect . Однако последние версии вирусов могут остаться незамеченными этими приложениями.
Если вы подозреваете, что код ошибки отображается на вашем Mac из-за заражения вирусом, рекомендуется выполнить быстрое сканирование вашего компьютера. Mac. Используйте любую надежную антивирусную программу для удаления любых вирусов и угроз, присутствующих на вашем Mac.
Вот полезный совет: перед запуском сканирования системы убедитесь, что вы уже обновили свою вирусную базу. В противном случае вам не удастся удалить вирус.
ИСПРАВЛЕНИЕ №2: очистите свой Mac.
Как правило, для запуска программ, которые вы устанавливаете на Mac, требуется определенный файл. Когда ваш Mac обнаружит дубликаты таких файлов, он запутается. Если это произойдет, могут появиться коды ошибок, такие как код ошибки 100006. Вот почему так важно очистить ваш Mac, чтобы избавиться от повторяющихся и ненужных файлов.
Конечно, вы можете вручную проверять и находить повторяющиеся файлы на вашем Mac. Однако это не рекомендуется, так как это займет у вас много времени. Вместо этого рекомендуется сканировать и очищать ваш Mac с помощью надежного инструмента для очистки, такого как приложение для ремонта Mac. Всего за несколько щелчков мышью он может найти, идентифицировать и очистить все ненужные файлы на вашем Mac.
Исправление №3: удалите все проблемные приложения.
Со всеми новыми популярными приложениями можно было бы быстро соблазнить их установить на свои компьютеры. Они не понимают, что проблемы возникнут, когда будет установлено много приложений.
После успешной установки проблемных приложений или программ на Mac они существенно повлияют на общую производительность других приложений, программ или даже на функции вашей системы. Они также могут вызвать отображение кода ошибки 100006. В этом случае вам действительно нужно тщательно проверить все программы и приложения, установленные на вашем Mac.
Чтобы удалить программу, которая, по вашему мнению, вызывает проблемы, выполните следующие действия:
Если удаление проблемных приложений слишком сложно для вас, не волнуйтесь, потому что вы можете рассчитывать на профессиональные инструменты для выполнения этой работы. Вы можете выполнить быстрый поиск в Google, чтобы получить список лучших программ удаления или приложений для Mac.
Исправление №4: Управляйте использованием вашего диска.
Из-за недостатка места на диске ваш Mac не может работать бесперебойно и эффективно. В некоторых случаях это также приводит к появлению кода ошибки 100006. Итак, если на вашем жестком диске мало места, найдите время, чтобы освободить место. Не позволяйте ненужным файлам и данным занимать место в вашем хранилище.
Вы всегда можете начать с ручной проверки диска, чтобы узнать, какие файлы занимают место. Используйте программу анализа жесткого диска, чтобы просканировать жесткий диск вашего Mac и определить, какие папки занимают большую часть вашего дискового пространства. Оттуда вы можете начать удалять лишнее пространство и освобождать ценное пространство.
Если вам все еще нужны файлы, вы можете перенести их на другой носитель. Только убедитесь, что вы не удалили важные системные файлы.
Заключение
Это правда, что коды ошибок на Mac неизбежны. Они появляются тогда, когда их меньше всего ожидаешь. Однако, если вы будете заботиться только о своем Mac и правильно им пользоваться, вы сможете предотвратить появление каких-либо проблем. Регулярно выполняйте сканирование, удаляйте ненужные файлы и управляйте дисковым пространством.
Знаете ли вы другие способы исправить код ошибки 10006 на Mac? Делитесь ими с нами в комментариях!
YouTube видео: 4 способа решить код ошибки 100006 на Mac
02, 2023
In my line of work, I’ve found it useful to have a USB drive with installers for each version of macOS on separate partitions. Mine was originally stocked with installers for Lion through Catalina, and it worked well.
But then came the Great Certificate Expiration of 2019 which caused them all to simply stop working after October 24. (They would still boot, but the installer would claim it was damaged and refuse to proceed unless the system’s clock was backdated beforehand… and even then it wouldn’t always work for me.) But as Apple has since deigned to re-sign and post installers for Yosemite and later, I figured it was time to rebuild my universal installation drive from scratch, and record the process.
I’ve left the installers for 10.7, 10.8, and 10.9 off of this second iteration as re-signed versions of those weren’t posted, and because I like round numbers. I’ll probably dedicate an older hard drive to those later for my vintage Mac futzing.
Ingredients
- a 64GB USB 3.0 flash drive. An SSD with more capacity and/or a USB-C plug would be ideal, but this works for me right now.
- Disk Utility on a clean macOS High Sierra installation. Although I’ve fought with the new Disk Utility before, I used it for this as it’s what most everyone else is likely to use as well.
- several releases of DiskMaker X, a program I’ve used from the beginning (and even contributed to). This uses Apple’s createinstallmedia command under the hood.
- installers for Yosemite through to the latest macOS in your Applications folder. The most recent three are downloaded via the App Store; the rest are actually disk images containing installers that you run manually.
Creating the drive
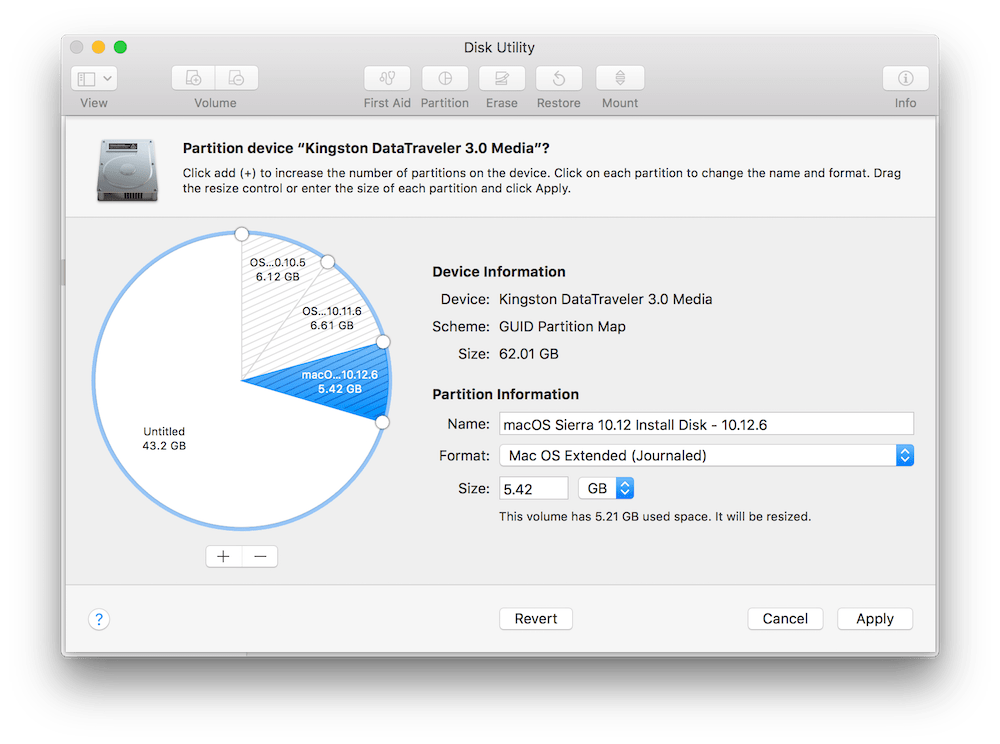
It’s possible to minimize the unused space on the drive by shrinking each partition after its installer has been loaded. I started by opening Disk Utility, selecting View > Show All Devices, selecting the inserted drive, and erasing it as “Mac OS Extended (Journaled)” using “GUID Partition Map”. Then for each OS X/macOS version, I would:
- run DiskMaker X (version 6 for Yosemite through Sierra; each subsequent release has its own dedicated app) to load the installer to the largest “Untitled” partition, remembering to select “Another kind of disk” so as not to wipe the entire drive.
- with the drive selected in Disk Utility:
- click [Partition]
- select the largest partition
- click [+] to split the partition
- select the other half of the newly-split partition (instead of “Untitled”)
- reduce it to its smallest possible size
- in the Size box, increase its value by 0.2GB to leave around 200MB of free space (although I doubt it’s actually needed)
- click [Apply] and wait for the shrinking to complete.
This was my drive after a few rounds:
I did find DiskMaker X 6 would occasionally skip setting a partition’s Finder window background, but this can easily be rectified by locating the appropriate background image within the app’s Contents/Resources/ directory and applying it via Finder’s View > Show View Options.
Sierra’s installer bug
With the Sierra installer, I ran into an issue where DiskMaker X would fail with the following error:
The disk could not be created because of an error: An error occured: -10006.
Finder got an error: Can’t set alias "Install macOS Sierra:Install macOS Sierra.app" to {425, 76}.
Using its createinstallmedia command also failed:
$ sudo /Applications/Install macOS Sierra.app/Contents/Resources/createinstallmedia --volume /Volumes/Untitled --applicationpath /Applications/Install macOS Sierra.app
/Volumes/Untitled is not a valid volume mount point.
Reports from others suggested that the issue was with the reissued installer itself, so I pulled the original Sierra installer out of my Time Machine backups and compared the two using FileMerge. The original’s version is 12.6.03, while the reissued installer’s version is 12.6.06. It turns out that to get the reissued installer working, all you have to do is open its Info.plist file and change the value for CFBundleShortVersionString from 12.6.06 to 12.6.03. This can be done with a single command using plutil:
sudo plutil -replace CFBundleShortVersionString -string "12.6.03" /Applications/Install macOS Sierra.app/Contents/Info.plist
after which DiskMaker X should run without issue.
Evidently, something within the reissued installer wasn’t updated to account for the new version number. As of this writing, this Apple support page is still serving the affected installer from this URL. I’ve used their feedback form to raise the issue with a link back to this post. (Update 2022-03: Looking at this Apple support article, it appears they’ve fixed the problem the Apple Way™ by removing all references to the Sierra installer.)
Custom icons in Startup Manager
Holding the Option key when powering on an Intel Mac brings up the EFI-based Startup Manager interface, which shows icons and names for all attached bootable volumes. When testing my completed drive, Startup Manager was showing all six partitions, but the ones for macOS 10.13 and later were only showing generic icons. I did some investigation, and what did I find? Yep, more macOS bugs.
A volume with a custom icon will have a hidden .VolumeIcon.icns file at its root. This file is in the ICNS format, which defines this list of image size specifications that such a file can contain any number of. Finder will display the largest size available in the file, but Startup Manager on a Mac with a non-Retina screen will display only the it32 size (128 x 128 @ 72ppi), while a Mac with a Retina screen will prefer the ic08 size (256 x 256 @ 72ppi) if available, falling back to the it32 size if not.
Opening each file in Preview (e.g. open "/Volumes/<volume name>/.VolumeIcon.icns" in Terminal) will show those files don’t contain Startup Manager’s required sizes. To fix, you could retrieve the custom volume icon from a ZIP archive contained within each DiskMaker X application’s Contents/Resources/ folder, open it in Preview, copy, and paste into the icon of each volume’s Get Info window. This will automatically generate a .VolumeIcon.icns file containing several sizes. (It also enables the custom icon flag for the volume, which you can set yourself with SetFile -a C /Volumes/<volume name>.)
But! You’ll get different results depending on which macOS version you’re running:
- macOS 10.12 and earlier generates these sizes:
ic10,ic09,ic08,it32,ih32,icsd(blank for some reason),il32,icsb(with wrong colours),is32 - macOS 10.13 generates only
ic10andic09 - macOS 10.14 generates
ic12,ic05,ic11,ic04(blank for some reason) - macOS 10.15 generates
ic10,ic14,ic09,ic13,ic08,ic07,ic12,ic11,ic05,ic04
This is why a custom volume icon pasted from an image using macOS 10.13 or 10.14 will not show in Startup Manager on any Mac, and if macOS 10.15 is used, it will show only on Retina display Macs. (Note that if you’ve copied a custom icon from another file using Finder, it will transfer all sizes of the original icon when pasting, rather then generating a new set of sizes.)
So, if you want to create your own volume icon file with the proper sizes and don’t have a pre-High-Sierra Mac on hand, you can still do so with iconutil.
Changing the name of a partition
If you change a boot partition’s name in Finder, you might notice that this change isn’t automatically reflected in Startup Manager. This is because the name it shows is actually an image that’s pre-generated by the bless command. You can customize the text by running bless manually, but to have it simply mirror the volume’s name in Finder, it’s quicker to:
- open System Preferences > Startup Disk
- select the modified partition
- click Back, Lock, or the Show All Preferences button to apply the change.
Doing so updates the .disk_label and (for Retina displays) .disk_label_2x files in the partition’s /System/Library/CoreServices/ directory.
It’s worth noting that a firmware update that shipped with macOS High Sierra added /.IABootFiles as a location for those files, but my testing didn’t find any cases where that posed an issue.
Preventing partitions from auto-mounting
Because it can take a while for macOS to properly unmount all the drive’s partitions when ejecting, I’ve prevented them from automatically mounting on my Mac by adding their UUID values to /etc/fstab. Using each partition’s Volume UUID from diskutil info "/Volumes/<volume name>" | grep "Volume UUID" or System Information’s Hardware > Storage, I added several lines of UUID=<UUID> none hfs rw,noauto to /etc/fstab and then ran sudo automount -vc to make the edits take effect.
Вышла новая версия macOS, которая привнесла некоторые изменения, в частности новую файловую систему. Для этого, как мне кажется, следует установить систему с нуля, а не обновлять ее с предыдущей macOS Sierra.
Дистрибутив macOS High Sierra
Для начала скачиваем свежий дистрибутив версии 10.13 из официального магазина Apple App Store, баннер будет прямо на главной странице:

После клика по баннеру, откроется страница с описанием новой операционной системы, кликайте Загрузить, начнется скачивание образа:

Пока идет загрузка образа ОС, нужно скачать и установить программу DiskMaker X, она уже поддерживает MacOS 10.13.
Подготовка флешки
Следующий шаг — запись образа скачанной операционной системы на USB носитель.
Не забудьте подписаться на наш Дзен
- запускаем Дисковую утилиту и форматируем флешку, так как у меня она на 8Гб, так ее и назову:
Ошибка, флешка была на 16Гб 🙂

- запускаем DiskMaker X 7 и выбираем «Use this copy» (при условии, что у вас нет других образов МакОС, если же есть, выбирайте «Use another copy…» и указывайте путь к нужному):

- далее кликаете на «An имя_флешки USB thumb drive»:

- подтверждаете очистку флешки кнопкой «Erase then create the disk»:

- еще раз указываете диск для очистки:

- соглашаететесь кнопкой «Continue»:

- вводите пароль учетной записи:

- ждете появления данного уведомления и нажимаете «Quit»:

Все, загрузочная флешка готова, далее следует процесс установки.
Установка MacOS High Sierra с флешки
Далее будет описан способ чистой установки системы, с форматированием диска, а значит и потерей всех данных. Поэтому заблаговременно сохраните важные данные на внешнем жестком диске или в облаке!
- вставляйте флешку в нужный macbook/iMac, перезагружайтесь и при включении зажимайте клавишу Alt, если все сделали правильно, выйдет окно:

- выбираете Install macOS High Sierra, выйдет следующее окно:

- выбираете «Дисковую утилиту» и форматируете свой диск (не флешку!) в новую файловую систему APFS:


- после чего, закрыв Дисковую утилиту, возвращаетесь на начальный экран и выбираете Установка macOS:

- кликаете продолжить:

- принимаете условия лицензионного соглашения:

- снова принимаете:

- выбираете целевой диск, на который будет установлена система:

- жмете продолжить:

- дожидаетесь окончания установки, при которой компьютер несколько раз будет перезагружен:

- по итогу на экране вы увидите это:

Выбрав язык, раскладку клавиатуры, подключившись к интернету и привязав компьютер к учетной записи Apple, загрузится рабочий стол.
На этом все, система установлена!
0
0
голоса
Рейтинг статьи

Через некоторое время после прошлогоднего дебюта OS X Lion, многие пользователи задавались вопросом, как проще всего можно создать загрузочный DVD-диск или флешку для этой операционной системы.
Тогда разные сайты в интернете предлагали несколько вариантов их создания, но самый простой и удобный способ предложил один из независимых разработчиков по имени Гульем Гете, создав бесплатную утилиту Lion DiskMaker, с помощью которой можно создать загрузочный диск или флешку в один клик.
Lion DiskMaker представляет собой приложение, написанное на AppleScript, которое можно использовать на Mac OS X 10.6 и OS X 10.7, 10.8 для записи загрузочного DVD-диска или флешки с OS X Lion/OS X Mountain Lion. Как только вы запустите эту утилиту, она попробует найти установщик OS X с помощью Spotlight, а затем предложит создать загрузочный DVD-диск или флешку.
Для записи загрузочного DVD-диска вам понадобится привод SuperDrive и DVD-R — однослойный 4,7 Гб (для OS X Lion) или двухслойный 8,5 Гб (для OS X Mountain Lion). Для создания загрузочной флешки вам понадобится USB-флешка с не менее 8 Гб свободного места.
ВНИМАНИЕ! Независимо от выбранных параметров, Lion DiskMaker сотрет том или диск, который вы выбрали, поэтому в первую очередь не забудьте создать резервную копию ваших данных!
-> Инструкция по созданию загрузочной USB флешки OS X 10.8 Mountain Lion с помощью Lion DiskMaker <-
Скачать Lion DiskMaker 2.0rc2 (ZIP файл, около 4 Мб).
Примечание: Если вы хотите создать загрузочную флешку с OS X Lion на 4 Гб, вам необходимо скачать версию 1.7.
Скачать Lion DiskMaker 1.7 (ZIP файл, 800 Кб).
FAQ
Q. Что мне делать, если Lion DiskMaker не может найти установщик OS X Lion/OS X Mountain Lion на моём Mac?
A. После установки OS X, её установщик автоматически удаляется с Mac. Чтобы скачать его снова, зайдите в Mac App Store, перейдите на страницу с ранее приобретенной OS X и снова загрузите её дистрибутив, нажав на «Download». После того, как он скачается, вы легко и просто создадите загрузочный диск.
Q. У меня нет установщика OS X, но есть файл InstallESD.dmg. Нужно ли мне повторно загружать OS X?
A. Не волнуйтесь, если Lion DiskMaker не найдет ваш установщик OS X, вы сможет вручную выбрать файл InstallESD.dmg для создания загрузочного диска.
Q. Lion DiskMaker выдаёт такое сообщение: The disk could not be created because of an error: An error occurred: 1. hdiutil: attach failed – No such file or directory. Что мне делать?
A. Это происходит потому, что вы выбрали неверный установщик OS X или не правильно вручную смонтировали файл InstallESD.dmg. Утилита Lion DiskMaker достаточно умна, чтобы распознать вашу копию OS X, да и образ DMG она может смонтировать сама.
Q. Могу ли я использовать FireWire или SD-карты?
A. Да, можете, но USB флешка имеет большое преимущество в том, что она «универсальна» и работает на любом Mac.
Q. Установка OS X с загрузочного DVD-диска происходит очень медленно. Почему?
A. Передача данных с DVD-диска всегда происходит медленнее, чем с USB флешки. К тому же, установщики OS X Lion/OS X Mountain Lion не оптимизированы для работы с оптическими дисками. Лучше воспользуйтесь USB флешкой.
Q. Почему утилита называется Lion DiskMaker, хотя она работает и с OS X Mountain Lion?
A. Её разработчику больше нравится это название, чем, например, «OS X Diskmaker».

s7ranger
Основатель, главный редактор и автор проекта Newapples.ru.
Делюсь с вами самой последней информацией обо всём, что связано с Apple и другими крупнейшими IT-компаниями мира.
How to fix the Runtime Code 10006 Filemaker Error 10006
This article features error number Code 10006, commonly known as Filemaker Error 10006 described as Error 10006: FileMaker has encountered a problem and needs to close. We are sorry for the inconvenience.
About Runtime Code 10006
Runtime Code 10006 happens when FileMaker fails or crashes whilst it’s running, hence its name. It doesn’t necessarily mean that the code was corrupt in some way, but just that it did not work during its run-time. This kind of error will appear as an annoying notification on your screen unless handled and corrected. Here are symptoms, causes and ways to troubleshoot the problem.
Definitions (Beta)
Here we list some definitions for the words contained in your error, in an attempt to help you understand your problem. This is a work in progress, so sometimes we might define the word incorrectly, so feel free to skip this section!
- Filemaker — FileMaker is a cross-platform OS X and Windows database development environment.
Symptoms of Code 10006 — Filemaker Error 10006
Runtime errors happen without warning. The error message can come up the screen anytime FileMaker is run. In fact, the error message or some other dialogue box can come up again and again if not addressed early on.
There may be instances of files deletion or new files appearing. Though this symptom is largely due to virus infection, it can be attributed as a symptom for runtime error, as virus infection is one of the causes for runtime error. User may also experience a sudden drop in internet connection speed, yet again, this is not always the case.
 Repair Tool")
(For illustrative purposes only)
Causes of Filemaker Error 10006 — Code 10006
During software design, programmers code anticipating the occurrence of errors. However, there are no perfect designs, as errors can be expected even with the best program design. Glitches can happen during runtime if a certain error is not experienced and addressed during design and testing.
Runtime errors are generally caused by incompatible programs running at the same time. It may also occur because of memory problem, a bad graphics driver or virus infection. Whatever the case may be, the problem must be resolved immediately to avoid further problems. Here are ways to remedy the error.
Repair Methods
Runtime errors may be annoying and persistent, but it is not totally hopeless, repairs are available. Here are ways to do it.
If a repair method works for you, please click the upvote button to the left of the answer, this will let other users know which repair method is currently working the best.
Please note: Neither ErrorVault.com nor it’s writers claim responsibility for the results of the actions taken from employing any of the repair methods listed on this page — you complete these steps at your own risk.
Method 1 — Close Conflicting Programs
When you get a runtime error, keep in mind that it is happening due to programs that are conflicting with each other. The first thing you can do to resolve the problem is to stop these conflicting programs.
- Open Task Manager by clicking Ctrl-Alt-Del at the same time. This will let you see the list of programs currently running.
- Go to the Processes tab and stop the programs one by one by highlighting each program and clicking the End Process buttom.
- You will need to observe if the error message will reoccur each time you stop a process.
- Once you get to identify which program is causing the error, you may go ahead with the next troubleshooting step, reinstalling the application.
Method 2 — Update / Reinstall Conflicting Programs
Using Control Panel
- For Windows 7, click the Start Button, then click Control panel, then Uninstall a program
- For Windows 8, click the Start Button, then scroll down and click More Settings, then click Control panel > Uninstall a program.
- For Windows 10, just type Control Panel on the search box and click the result, then click Uninstall a program
- Once inside Programs and Features, click the problem program and click Update or Uninstall.
- If you chose to update, then you will just need to follow the prompt to complete the process, however if you chose to Uninstall, you will follow the prompt to uninstall and then re-download or use the application’s installation disk to reinstall the program.
Using Other Methods
- For Windows 7, you may find the list of all installed programs when you click Start and scroll your mouse over the list that appear on the tab. You may see on that list utility for uninstalling the program. You may go ahead and uninstall using utilities available in this tab.
- For Windows 10, you may click Start, then Settings, then choose Apps.
- Scroll down to see the list of Apps and features installed in your computer.
- Click the Program which is causing the runtime error, then you may choose to uninstall or click Advanced options to reset the application.
Method 3 — Update your Virus protection program or download and install the latest Windows Update
Virus infection causing runtime error on your computer must immediately be prevented, quarantined or deleted. Make sure you update your virus program and run a thorough scan of the computer or, run Windows update so you can get the latest virus definition and fix.
Method 4 — Re-install Runtime Libraries
You might be getting the error because of an update, like the MS Visual C++ package which might not be installed properly or completely. What you can do then is to uninstall the current package and install a fresh copy.
- Uninstall the package by going to Programs and Features, find and highlight the Microsoft Visual C++ Redistributable Package.
- Click Uninstall on top of the list, and when it is done, reboot your computer.
- Download the latest redistributable package from Microsoft then install it.
Method 5 — Run Disk Cleanup
You might also be experiencing runtime error because of a very low free space on your computer.
- You should consider backing up your files and freeing up space on your hard drive
- You can also clear your cache and reboot your computer
- You can also run Disk Cleanup, open your explorer window and right click your main directory (this is usually C: )
- Click Properties and then click Disk Cleanup
Method 6 — Reinstall Your Graphics Driver
If the error is related to a bad graphics driver, then you may do the following:
- Open your Device Manager, locate the graphics driver
- Right click the video card driver then click uninstall, then restart your computer
Method 7 — IE related Runtime Error
If the error you are getting is related to the Internet Explorer, you may do the following:
- Reset your browser.
- For Windows 7, you may click Start, go to Control Panel, then click Internet Options on the left side. Then you can click Advanced tab then click the Reset button.
- For Windows 8 and 10, you may click search and type Internet Options, then go to Advanced tab and click Reset.
- Disable script debugging and error notifications.
- On the same Internet Options window, you may go to Advanced tab and look for Disable script debugging
- Put a check mark on the radio button
- At the same time, uncheck the «Display a Notification about every Script Error» item and then click Apply and OK, then reboot your computer.
If these quick fixes do not work, you can always backup files and run repair reinstall on your computer. However, you can do that later when the solutions listed here did not do the job.
Other languages:
Wie beheben Fehler 10006 (Filemaker-Fehler 10006) — Fehler 10006: FileMaker hat ein Problem festgestellt und muss geschlossen werden. Wir entschuldigen uns für die Unannehmlichkeiten.
Come fissare Errore 10006 (Errore del creatore di file 10006) — Errore 10006: FileMaker ha riscontrato un problema e deve essere chiuso. Ci scusiamo per l’inconveniente.
Hoe maak je Fout 10006 (Filemaker-fout 10006) — Fout 10006: FileMaker heeft een probleem ondervonden en moet worden afgesloten. Excuses voor het ongemak.
Comment réparer Erreur 10006 (Erreur Filemaker 10006) — Erreur 10006 : FileMaker a rencontré un problème et doit se fermer. Nous sommes désolés du dérangement.
어떻게 고치는 지 오류 10006 (파일 메이커 오류 10006) — 오류 10006: FileMaker에 문제가 발생해 닫아야 합니다. 불편을 끼쳐드려 죄송합니다.
Como corrigir o Erro 10006 (Filemaker Error 10006) — Erro 10006: O FileMaker encontrou um problema e precisa fechar. Lamentamos o inconveniente.
Hur man åtgärdar Fel 10006 (Filemaker Error 10006) — Fel 10006: FileMaker har stött på ett problem och måste avslutas. Vi är ledsna för besväret.
Как исправить Ошибка 10006 (Ошибка Filemaker 10006) — Ошибка 10006: Возникла ошибка в приложении FileMaker. Приложение будет закрыто. Приносим свои извинения за неудобства.
Jak naprawić Błąd 10006 (Błąd Filemakera 10006) — Błąd 10006: FileMaker napotkał problem i musi zostać zamknięty. Przepraszamy za niedogodności.
Cómo arreglar Error 10006 (Error 10006 de Filemaker) — Error 10006: FileMaker ha detectado un problema y debe cerrarse. Lamentamos las molestias.
![]() About The Author: Phil Hart has been a Microsoft Community Contributor since 2010. With a current point score over 100,000, they’ve contributed more than 3000 answers in the Microsoft Support forums and have created almost 200 new help articles in the Technet Wiki.
About The Author: Phil Hart has been a Microsoft Community Contributor since 2010. With a current point score over 100,000, they’ve contributed more than 3000 answers in the Microsoft Support forums and have created almost 200 new help articles in the Technet Wiki.
Follow Us: ![]()
![]()
![]()
Recommended Repair Tool:

This repair tool can fix common computer problems such as blue screens, crashes and freezes, missing DLL files, as well as repair malware/virus damage and more by replacing damaged and missing system files.
STEP 1:
Click Here to Download and install the Windows repair tool.
STEP 2:
Click on Start Scan and let it analyze your device.
STEP 3:
Click on Repair All to fix all of the issues it detected.
DOWNLOAD NOW
Compatibility
![]()
Requirements
1 Ghz CPU, 512 MB RAM, 40 GB HDD
This download offers unlimited scans of your Windows PC for free. Full system repairs start at $19.95.
Article ID: ACX04559EN
Applies To: Windows 10, Windows 8.1, Windows 7, Windows Vista, Windows XP, Windows 2000
Speed Up Tip #94
Creating A New User Account:
Creating a new user account can be worth the hassle if you have been using your local account for some time. It will give you a fresh and clean profile which is more secure. You can always delete the old account at a later time to ensure a smooth transition between accounts.
Click Here for another way to speed up your Windows PC
Microsoft & Windows® logos are registered trademarks of Microsoft. Disclaimer: ErrorVault.com is not affiliated with Microsoft, nor does it claim such affiliation. This page may contain definitions from https://stackoverflow.com/tags under the CC-BY-SA license. The information on this page is provided for informational purposes only. © Copyright 2018
4 способа решить код ошибки 100006 на Mac (09.04.22)
В последнее время пользователи жаловались на получение кода ошибки 100006 на своих компьютерах Mac. Что ж, это определенно плохие новости, особенно то, что многие из них серьезно не знают, как предотвратить появление кода ошибки. Мы создали эту статью, чтобы облегчить разочарование пользователей. Мы попытаемся обсудить, почему Mac получает код ошибки 100006, что это такое и как его исправить.
Что такое код ошибки 100006 на Mac?
Код ошибки 100006 на Mac обычно указывает на проблему или проблему с определенной функцией Mac, программой или операцией. Он продолжает появляться на вашем экране, пока вы не примете меры для его устранения. Чтобы обойти это, вы должны выяснить, что вызывает появление кода ошибки.
Распространенные причины появления кода ошибки Mac 100006
Ваш Mac часто выполняет сразу несколько процессов и операций. Это означает, что мы не можем напрямую связать код ошибки с одной конкретной проблемой или проблемой. Но, основываясь на отчетах и наблюдениях пользователей Mac, которые столкнулись с кодом ошибки, мы можем сделать вывод, что общие причины могут быть следующими:
- Mac заражен вредоносными объектами или вирусов.
- Недостаточно места на диске.
- Неправильная деинсталляция или удаление файла привели к появлению кода ошибки.
- Слишком много мусора и ненужные файлы скопились на жестком диске.
Да, код ошибки 10006 на самом деле не очень хорошая новость для пользователей Mac, потому что он доставляет много проблем и неудобства, такие как:
- Уведомление об ошибке всегда появляется при запуске или завершении работы Mac.
- Некоторые программы, особенно те, которые связаны с кодом ошибки, не могут открываться и работать без сбоев.
- Программы и приложения не могут быть установлены или удалены должным образом.
- Некоторые возможности и функции на Mac не может работать плавно.
Помимо перечисленных выше неудобств, код ошибки 100006 может также вызвать другие серьезные проблемы, которые не могут быть устранены с помощью базового устранения неполадок.
Итак, что вы должны сделать, чтобы устранить код ошибки 100006 и предотвратить его появление в будущем?
Как исправить код ошибки 100006 на вашем Mac
Ниже приведены некоторые рекомендуемые исправления для проблемы с кодом ошибки 100006:
Исправление №1: просканируйте свой Mac с помощью надежного инструмента или приложения для очистки.
Большинство кодов ошибок, с которыми вы можете столкнуться на своем Mac, в основном вызваны вредоносными объектами или вирусными инфекциями. Они атакуют и уничтожают различные настройки, файлы и конфигурации на вашем Mac, что приводит к повреждению или недействительности функций.
Хорошая новость заключается в том, что Apple уже установила на ваш Mac невидимые фоновые средства защиты: Карантин файлов / Привратник и Xprotect . Однако последние версии вирусов могут остаться незамеченными этими приложениями.
Если вы подозреваете, что код ошибки отображается на вашем Mac из-за заражения вирусом, рекомендуется выполнить быстрое сканирование вашего компьютера. Mac. Используйте любую надежную антивирусную программу для удаления любых вирусов и угроз, присутствующих на вашем Mac.
Вот полезный совет: перед запуском сканирования системы убедитесь, что вы уже обновили свою вирусную базу. В противном случае вам не удастся удалить вирус.
ИСПРАВЛЕНИЕ №2: очистите свой Mac.
Как правило, для запуска программ, которые вы устанавливаете на Mac, требуется определенный файл. Когда ваш Mac обнаружит дубликаты таких файлов, он запутается. Если это произойдет, могут появиться коды ошибок, такие как код ошибки 100006. Вот почему так важно очистить ваш Mac, чтобы избавиться от повторяющихся и ненужных файлов.
Конечно, вы можете вручную проверять и находить повторяющиеся файлы на вашем Mac. Однако это не рекомендуется, так как это займет у вас много времени. Вместо этого рекомендуется сканировать и очищать ваш Mac с помощью надежного инструмента для очистки, такого как приложение для ремонта Mac. Всего за несколько щелчков мышью он может найти, идентифицировать и очистить все ненужные файлы на вашем Mac.
Исправление №3: удалите все проблемные приложения.
Со всеми новыми популярными приложениями можно было бы быстро соблазнить их установить на свои компьютеры. Они не понимают, что проблемы возникнут, когда будет установлено много приложений.
После успешной установки проблемных приложений или программ на Mac они существенно повлияют на общую производительность других приложений, программ или даже на функции вашей системы. Они также могут вызвать отображение кода ошибки 100006. В этом случае вам действительно нужно тщательно проверить все программы и приложения, установленные на вашем Mac.
Чтобы удалить программу, которая, по вашему мнению, вызывает проблемы, выполните следующие действия:
В Server 2008 r2, установленн AD+DHCP+DNS возникают такие ошибки как :
«Ошибка DCOM «2147746132» с компьютера computer.domen.lan при попытке активации сервера:
»
Код События: 10006 , Закономерность возникновения выявить не получается .
- Changed type Vinokurov Yuriy Thursday, July 12, 2012 9:13 AM
All replies
Есть же статья в базе знаний майкрософт по этому поводу и даже исправление доступно для скачивания
- Edited by Saqwel Tuesday, June 19, 2012 3:28 AM
нашол ещё это руководство, в реестре все ошибки ссылаются вот на это приложения «%SystemRoot%system32plasrv.exe»
В «Cлужбах компонентов» Компьютеры Мой компьютер Настройка DCOM — не могу найти это программу !
Может есть ещё какие то варианты решения проблемы! Т.к. ошибка вылезает часто !(особенно с новыми компьютерами вводимыми в домен !
Мнения, высказанные здесь, являются отражением моих личных взглядов, а не позиции корпорации Microsoft. Вся информация предоставляется «как есть» без каких-либо гарантий
Ошибку можно увидеть на сервере «Просмотр событий>настраиваемые представления>События управления». На компьютерах пользователей установлена windows 7, под Xp такой проблемы не наблюдается !Ещё на этих компьютерах при обновление политики пишет ошибку обновления ! «Ошибка при обработке групповой политики из-за внутренней ошибки системы. Конкретное сообщение об ошибке можно найти в операционном журнале групповой политики. Попытка обработки групповой политики будет предпринята при следующем цикле обновления. Код события :1125″. Если смотреть логи GroupPolicy, хоть на сервере,хоть на рабочей станции пишет ошибку : Завершена обработка расширения Реестр за 926100 мс. код события 7016.» ,»Завершена обработка расширения Реестр за 1982 мс.» через каждые 90 минут обновляется по дефолту политика же . но применяются криво обновления! и разная время обработки реестра как видите !
2) Включите журналирование групповых политик и посмотрите по журналам, что конкретно вызывает ошибку 7016. Возможно, применяется некое специфическое изменение реестра?
Мнения, высказанные здесь, являются отражением моих личных взглядов, а не позиции корпорации Microsoft. Вся информация предоставляется «как есть» без каких-либо гарантий
Follow us on Twitter
- Edited by Vinokurov Yuriy Friday, June 29, 2012 4:38 PM
вот эти данные в ошибка Событие 10006 DistributedCOM на сервере к одному и тому же компу?
Мнения, высказанные здесь, являются отражением моих личных взглядов, а не позиции корпорации Microsoft. Вся информация предоставляется «как есть» без каких-либо гарантий
Follow us on Twitter
- Edited by Vinokurov Yuriy Friday, June 29, 2012 4:44 PM
В вашей теме отсутствует активность в течение последних 5 дней. При отсутствии каких-либо действий в течение 2 последующих дней, тема будет переведена в разряд обсуждений. Вы можете возобновить дискуссию, просто оставив сообщение в данной теме
Мнения, высказанные здесь, являются отражением моих личных взглядов, а не позиции корпорации Microsoft. Вся информация предоставляется «как есть» без каких-либо гарантий
Follow us on Twitter
Тема переведена в разряд обсуждений по причине отсутствия активности
Мнения, высказанные здесь, являются отражением моих личных взглядов, а не позиции корпорации Microsoft. Вся информация предоставляется «как есть» без каких-либо гарантий
Follow us on Twitter
Цитата из http://msdn.microsoft.com/en-us/library/windows/desktop/aa372634%28v=vs.85%29.aspx:
To use PLA, the client computer must run in an elevated state or the user must be in the Performance Log Users group.
Может в этом проблема
Про elevated state
To run in an elevated state, the user can right-click the client and select Run as administrator.
Как устранить проблемы с синхронизацией аккаунта
Если на вашем телефоне возникают проблемы при синхронизации с аккаунтом Google, появляется сообщение об ошибке или значок .
В большинстве случаев такие неполадки исчезают через несколько минут. Если этого не произошло, выполните перечисленные ниже действия.
Как синхронизировать аккаунт Google вручную
- Откройте настройки телефона.
- Выберите О телефонеАккаунт GoogleСинхронизация аккаунта.
- Если у вас несколько аккаунтов, выберите нужный.
- Коснитесь значка «Ещё» Синхронизировать.
Исключите самые распространенные проблемы
После каждого из перечисленных ниже шагов проверяйте, удается ли выполнить синхронизацию вручную.
Основные способы устранения неполадок
Чтобы синхронизация выполнялась автоматически, не отключайте эту функцию. Подробнее о том, как синхронизировать приложения с аккаунтом Google….
Попробуйте открыть в браузере (например, Chrome или Firefox) любую веб-страницу. Если сайт не загружается или вам не удается подключиться, прочитайте о том, как настроить Wi-Fi или мобильную сеть.
Внимание! Чтобы синхронизация выполнялась, у вас должен быть доступ к аккаунту Google.
Попробуйте войти в аккаунт Google другим способом(например, проверить почту Gmail в браузере на компьютере).

Download and try Outbyte MacRepair right now to see what it can do for your Mac.
Developed for macOS
Recently, users have complained about getting the error code 100006 on their Macs. Well, it’s definitely not good news, especially that a lot of them seriously don’t have any idea on how to stop the error code from occurring. In an effort to ease the frustration on the part of users, we have created this article. We’ll try to discuss why a Mac is getting the error code 100006, what it is all about, and how to fix it.
What Is the Error Code 100006 on a Mac?
The error code 100006 on a Mac is usually an indication of a problem or issue with a specific Mac feature, program, or operation. It keeps on popping up on your screen, unless you take action to resolve it. To be able to get around it, you have to find out what is causing the error code to show up.
The Common Causes of the Mac Error Code 100006
Your Mac often performs a number of processes and operations at once. This means we cannot directly attribute the error code to one certain issue or problem. But based on the reports and observations of Mac users who have come across the error code, we can conclude that the common causes could be any of the following:
- A Mac is infected by malware entities or viruses.
- There is no sufficient disk drive space.
- The improper uninstallation or removal of a file has triggered the error code to appear.
- Too many junk and unnecessary files have accumulated on the hard drive.
The Inconveniences That the Error Code 100006 Brings
Yes, the error code 10006 isn’t really good news for Mac users because it brings about many troubles and inconveniences, such as:
Pro Tip: Scan your Mac for performance issues, junk files, harmful apps, and security threats
that can cause system issues or slow performance.
- The error notification always appears when starting up or shutting down a Mac.
- Some programs, especially those that are associated with the error code, cannot open and run smoothly.
- Programs and apps cannot be installed or uninstalled properly.
- Some features and functions on a Mac cannot perform smoothly.
Other than the above inconveniences, the error code 100006 may also trigger other serious problems that may not be fixed with basic troubleshooting.
So, what should you do to resolve the 100006 error code and prevent it from appearing in the future?
How to Fix the Error Code 100006 on Your Mac
Below are some recommended fixes to the 100006 error code problem:
Fix #1: Scan Your Mac with a Reliable Cleaning Tool or App.
The majority of the error codes you may encounter on your Mac are mostly caused by malware entities or virus infections. They attack and destroy different settings, files, and configurations you have on your Mac, resulting in corrupted or invalid features.
The good news is that Apple has already installed invisible background protections on your Mac: File Quarantine/Gatekeeper and Xprotect. However, the latest strain of viruses might go undetected by these apps.
If you suspect that the error code is showing on your Mac due to a virus infection, it is recommended that you perform a quick scan on your Mac. Use any reliable antivirus program to delete any viruses and threats that are present on your Mac.
Here’s a handy tip: Before starting a system scan, make sure that you have already updated your virus database. Otherwise, you won’t be successful with your virus removal.
FIX #2: Clean Up Your Mac.
In general, the programs you install on your Mac would need a particular file for them to run. When your Mac detects duplicates of such files, it will be confused. If this happens, error codes, such as the error code 100006, could be triggered. This is why it is important to clean up your Mac to get rid of duplicate and unnecessary files .
Sure, you can manually check and find duplicate files on your Mac. However, it is not recommended as it will take much of your time. Instead, it is advised to scan and clean your Mac with a reliable cleaning tool like Outbyte MacRepair. In just a few clicks, it can locate, identify, and clean up all the unnecessary files on your Mac.
Fix #3: Uninstall Any Problematic App.
With all the new trending apps out there, one would be quickly enticed to have them installed on their computers. They don’t realize that problems will come out when a lot of apps have been installed.
Once problematic apps or programs are successfully installed on a Mac, they will significantly affect the overall performance of other apps, programs, or even your system’s features. They can also trigger the error code 100006 to show. In this case, you really have to thoroughly check all the programs and apps installed on your Mac.
To uninstall a program that you suspect is problematic, follow these steps:
- Go to Finder.
- Select Applications.
- Find the icon of the program that you want to uninstall.
- Drag it to Trash.
- Finally, right-click on Trash and select Empty Trash.
If uninstalling problematic apps is too challenging for you, fret not because you can count on professional tools to do the job. You can do a quick search on Google to get a list of the best uninstall programs or apps for Mac.
Fix #4: Manage Your Disk Usage.
With insufficient disk space, it is impossible for your Mac to perform smoothly and effectively. In some cases, it also causes the error code 100006 to appear. So, if your hard disk space is running low, take the time to free up space. Do not let any unnecessary files and data take up your storage space.
You can always start by manually checking your disk to find out what files are taking up space. Use a hard disk analysis program to scan your Mac’s hard disk and identify what folders are consuming most of your storage space. From there, you can start deleting the space hogs and freeing up valuable space.
If you still need the files, you might want to transfer them to other storage media. Just make sure you don’t delete any important system files.
Wrapping Up
It is true that error codes on Macs are inevitable. They show up when you least expect them. However, if you only take care of your Mac and use it the right way, you can prevent any problem from surfacing. Perform regular scans, delete unnecessary files, and manage your disk space.
Do you know other ways to fix the error code 10006 on a Mac? Share them with us in the comments!

If you’re running into errors and your system is suspiciously slow, your computer needs some maintenance work. Download Outbyte PC Repair for Windows, Outbyte Antivirus for Windows, or Outbyte MacRepair for macOS to resolve common computer performance issues. Fix computer troubles by downloading the compatible tool for your device.
See more information about Outbyte and uninstall instructions . Please review EULA and Privacy Policy .
DiskMaker X

Basically, there is something in the pathname of your macOS Install app that DiskMaker X does not like, and most of the time the issue is parenthesis because you renamed the app or included it in a folder that has the version or build number between parenthesis, i. e. (18F132). Parenthesis are difficult to deal with when integrating shell script code in AppleScript, so the best way to avoid this bug at this time is to just remove the parenthesis from the path of the app.
Where can I get a previous macOS Install app ?
Charles Edge nicely compiled the list of download links for previous versions of macOS installer apps. Beware that some of these versions must be purchased (basically, all macOS versions before 10.9).
When using DiskMaker X 7 for High Sierra, I encounter this error message : “The disk could not be created because of an error: An error occured: -10006. Finder got an error: Can’t set alias ”Install macOS High Sierra:Install macOS High Sierra. app” to <425, 76>.”
When using DiskMaker X 8 for Mojave, I encounter this error message : “The disk could not be created because of an error: An error occured: -10006. Finder got an error: Can’t set alias ”Install macOS Mojave:Install macOS Mojave. app” to <425, 76>.”
First, please update to DiskMaker X 7.0.1 or DiskMaker X 8.0.1. It should fix this bug and some.
Second, it may happen that your macOS Install app (either High Sierra or Mojave) is not complete. Check its size : if the installer is about 20 MB large, it’s a stub which can’t be used with DiskMaker X. You need the FULL installer. To be sure to download the full macOS installer, have a look here for macOS High Sierra or here for macOS Mojave. The idea is to use an app that will force download of the full macOS install app.
I plan to add a feature to check the size of the installer before trying to build an install disk in the not-too-distant future.
When creating the Install disk with DiskMaker X, I encounter this error message : “The disk could not be created because of an error: An error occured: -10006.”
This happens sometimes when creating the install disk because a false mount is created as some point. Basically, a false mount is a folder created with the same name as your Install drive, and that makes the Install disk adopt the same name with “1” at the end, i. e. “Install Mac OS Sierra 1”.
If this error happens:
- in Finder, click on Go > Go to Folder menu ;
- Type /Volumes/
- If a folder (not a disk !) is named “Install macOS Sierra”, “Install OS X Yosemite”, or “Install OS X El Capitan”, delete the folder (you may need admin rights, thus type your admin name and password).
- Reboot your Mac
- Try again.
That should do it. I will try to fix it in a future version (if I manage to get why this happens sometimes in some configurations…
“This copy of the Install OS X [OS X Name] application can’t be verified. It may have been corrupted or tampered with during downloading.”
Due to an expiration of OS X App Store certificates, installers of OS X downloaded prior to February 14th of 2016 can’t be used to re-install OS X without encoutering this error. This is not a problem with DiskMaker X per se, but with the installers provided by Apple.
I encounter this message:
“This copy of the Install OS X [OS X Name] application can’t be verified. It may have been corrupted or tampered with during downloading.”
Due to an expiration of OS X App Store certificates, installers of OS X downloaded prior to February 14th of 2016 can’t be used to re-install OS X without encoutering this error. This is not a problem with DiskMaker X per se, but with the installers provided by Apple.
There are three ways to avoid this problem :
- If you did not erase your Mac and its OS is still working fine, reboot on its hard drive, open System Preferences > Date and Time, uncheck Automatically set up date and time and set the date 13th of February 2016, then disconnect from network and reboot;
- If you don’t have an OS installed anymore, reboot on your OS X install disk built with DiskMaker X, open Terminal and type:
Which will set the date and time on the 10th of October 2015 at 10:10 (it’s just easier for me to remember, but any date in the five last years or so should work).
The last solution (and the best) is to re-download the OS X installers from the App Store. Which is OK for El Capitan if you currently run it, but what if you want to re-download older OS? Sadly, Apple does not allow to re-download say, Lion or Mountain Lion, if your Mac already runs a more recent version of OS X (which sucks REALLY badly). There are two solutions here :
- Re-install at least Lion on a drive, boot on it, open App Store and re-download the apps…
- If your Mac does not support older versions of OS X to reboot on, use a virtual machine with Parallels Desktop or VMWare Fusion to re-install Lion in it, then re-download the installers from Lion’s App Store.
Also, beware that if you have OS X installers on any volume mounted on your Mac: the first copy of the installer the App Store will find will be updated if you decide to download a new version, wherever this copy of the installer is on your boot drive or not.
I bought a recent Mac, I built a disk with DiskMaker X but I can’t boot on it !
This one is tricky to explain. Please take a drink first.
When a new model of Mac is available, it usually ships with an “almost” standard version of OS X. I wrote “almost” as it is a special build of OS X, designed only for this specific kind of new Mac.
The problem is quite well explained here:
The following points are especially important:
- Some Macs may include a slightly later build version (but same numbered version) of Mac OS X on the Install or Restore discs than was preinstalled on your computer.
- Do not use a Mac OS X version earlier than the one included with the computer.
- Retail copies of Mac OS X may not always work properly with new Macs. Even if the retail version has been updated via Software Update to a later version of Mac OS X than originally came with a Mac, you may have unexpected issues. Always confirm operating system functionality by using the install disc that shipped with your particular Mac.
So ? If you get a new Mac, you won’t be able to use the installer downloaded from the App Store. The only solution to fully re-install your OS is to use OS X Internet Recovery.
However, there is also another way.
Basically: please be patient. When Apple will release a new version of OS X (say, 10.9.2), you will be able to download from the App Store the full OS X 10.9.2 installer which will provide a new “universal” build of OS X, allowing full install and allowing to build a new boot disk with DiskMaker X on your brand new Mac.
And please, wait before buying a new Mac the next time.
I stumble on a message: “An error occured: -2753. The variable OSX_App is not defined”
This happens if you use the 10.9.x DMG file instead of the full OS X Mavericks Installer app. It just won’t work. Please use the installer app.
When installing, I stumble on this error message: “This copy of the Install OS X Mavericks application can’t be verified. It may have been corrupted or tampered with during downloading.”
Known bug from Apple, your Mac’s clock is set to a wrong date/time. Check this KB article for a solution.
An error -1782 occurs after DiskMaker X copies files: “Can’t get disk “OS X Mountain Lion Install Disk” or similar.
Bug in version 3.0.1, corrected with 3.0.2 and later. The USB boot disk will work however.
An “Error -10660” happens in the building process.
Run DiskMaker X in an admin session (not a standard user session). It should work much better.
I built a disk with Lion DiskMaker 3.0 but can’t boot on it! It does not appear at startup or in the Startup disk Preference.
This has been fixed with DiskMaker X 3.0.1 and later. Give it a try. The (funny) explaination for this bug is here.
Can DiskMaker X build a drive with different versions of OS X ? Say, one partition with Lion Install, another one with Mountain Lion, and another one with Mavericks ?
Sure! Just format your removable drive with a few 8 GB partitions, and launch DiskMaker X. Then choose the “another kind of disk” option and select the right volume each time.
I can’t use DiskMaker X with Mac OS X 10.6.x if I try to use it with my Mavericks installer!
Because of a bug (or a feature?) in Apple’s built-in command createinstallmedia with 10.6.X, DiskMaker X is not compatible with versions of OS X prior to 10.7. I’m working on a fix, but it may take some time to make it available as it means using another completely different method. Check the blog regularly for updates.
I get an error: “The domain/default pair of (/Volumes/OS X Base System/System/Library/CoreServices/SystemVersion, Production Version) does not exist.”
This happens mostly because your OS X Install App is damaged. To check if this theory is correct :
- Right-click or Ctrl+Cllick on the Installer OS X Mavericks application;
- Go to Contents/SharedSupport;
- Double-click InstallESD. dmg.
If an error message appears, you’ll have to download again the Installer app from the App Store. If it mounts properly, get in touch with me.
Note that Lion DiskMaker 3.0.1 should better handle this case.
I keep encountering an ASObjC Runner error (Error -43. File ASObjC Runner wasn’t found)!
This one is quite tricky. It’s a bug which happens randomly with Lion DiskMaker and has no real explaination, except some coding error.
The only way I found that could remove the problem would be to :
- Use Activity Monitor (in /Applicationsl/Utilities) to quit any instance of ASObjC Runner ;
- Reboot your Mac ;
- Check again if ASObjC Runner is still running in the Activity Monitor ;
- Then launch Lion DiskMaker again and try to build your disk.
Also sometimes, using a different, clean session may help.
If you have any insight in this problem, please get in touch with me.
After choosing the OS, Lion DiskMaker seems to hang.
This is related to some issues with Spotlight. To workaround this, open Terminal and type :
then type Enter key. Lion DiskMaker should resume automatically.
I am told I have no copy of OS X Install available.
The OS X Install application is automatically erased after you upgrade to the new version of OS X. If you need to download it again, open the Mac App Store, then open the Purchase page. You’ll be able to download Mac OS X Lion Install again.
The best time to use Lion DiskMaker is when you just finish downloading OS X from the Mac App Store. Create your disk with Lion Disk Maker , then install OS X.
I got my version of OS X pre-installed with my Mac. How can I get the OS X installer ?
There are two ways to do it.
– If you already purchased OS X on the Mac App Store (and therefore have a valid copy of OS X Install application), you can download the latest installer from Mac App Store first. This installer is compatible with Macs pre-equiped with your version of OS X.
– If you did not purchase OS X, but want to get an Install disc, there is a way to get the InstallESD. dmg file for your Mac. The method is not really easy though. Check Macworld for the full story. After you got the InstallESD. dmg file, use it to build your key or DVD with Lion DiskMaker.
I encountered the following message: The disk could not be created because of an error: An error occurred: 1. hdiutil: attach failed – No such file or directory
This happens if you chose the wrong Mac OS X Lion Install application, or if you mounted manually the InstallESD. dmg file first.
The simple answer is: don’t do this ? Lion DiskMaker is clever enough to detect your copy of OS X Install itself. Then it will mount the DMG file itself.
Yes, that’s cool, but I don’t have the complete OS X Install app and I just kept the InstallESD. dmg file. So do I have to re-download Lion again?
Don’t worry, if it does not find your OS X Install app, Lion DiskMaker will allow to select manually an InstallESD. dmg file.
Can I use a FireWire or SD-Card?
Yes, you can, though the USB drive has the advantage of being « universal » and works on any Mac.
My drive was completely erased!
DiskMaker X proposes two different ways to make a bootable disk:
– You can choose to use a dedicated 8 GB thumb drive ;
– Or you can choose a volume from any drive.
If you choose the 8 GB thumb drive option, the WHOLE disk will be erased. If you choose the second option, ONLY the dedicated volume will be erased, leaving any other volume on your disk intact.
However, if you chose the wrong option, Lion DiskMaker will list every volume that may be erased at the end of the process. Read slowly ?
And of course, backup any file on your drive before using the software if necessary. And use a dedicated, small drive (a 8 GB USB key is incredibly cheap these days).
Why did you remove the option to use a 4 GB USB Thumb drive?
The OS X install apps tend to be bigger and bigger with each new release. I used to remove some less essential package in the previous versions of Lion DiskMaker, but this could create some issues (many people complained that the installer then failed when installing OS X).
Also, the price of 8 GB USB thumb stick drives fell , as you can get an 8 GB drive for less than $7 now. So please do yourself a favor, and get one. This drive should be « future-proof » (until Apple makes OS X installer larger than 8 GB…).
Can I redistribute this software ?
Sure, as long as you mention the author and don’t suppress any comment or change anything in its package.
Booting from the DVD is slooooow as hell…
A DVD will always be slower than a USB key, and it seems Lion’s disk image is not optimized for use with optical disks. Avoid it, and use a USB key.
Why did you not rename Lion Diskmaker now that Mountain Lion is available ?
Well, I like this name better than « OS X Diskmaker ». That’s it.
(also: « Lion Diskmaker » should make Apple’s lawyers go less ballistic than « OS X Diskmaker ».
Источники:
https://softwaretested. com/mac/4-ways-to-solve-the-error-code-100006-on-a-mac/
https://diskmakerx. com/faq/
ПК работает медленно?
Улучшите скорость своего компьютера сегодня, загрузив это программное обеспечение — оно решит проблемы с вашим ПК. г.
Сегодняшнее руководство пользователя разработано, чтобы помочь вам, если вы получаете системную ошибку 10006 filemaker.
Ожидается исправление проблем OS X Mavericks 10.9 с FileMaker FMS 12v6
Я обсудил инструкции, включая удаление наиболее близких к существующим установкам FM12, перезапуск и переустановку.
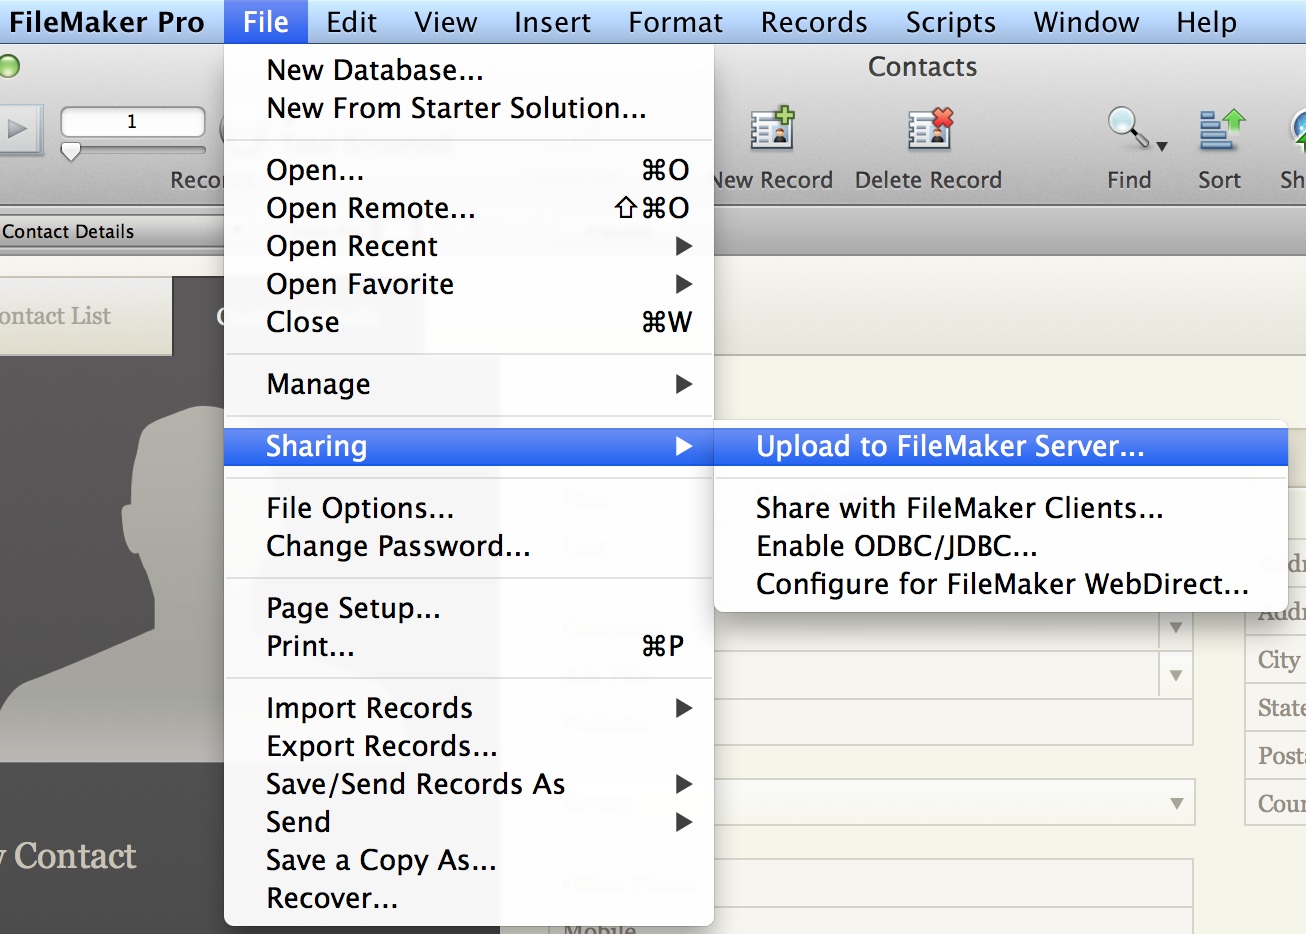
Теперь все может работать (работает сам FileMaker, Web Publishing Engine и IWP).
Однако после загруженного перезапуска я не могу получить доступ к консоли администратора, связанной с вашей консолью: когда я пытаюсь запустить:
4. admin_console_webstart.jnlp не открывается с двойным переходом (предупреждение определено неопознанным пользователем). Однако, когда я щелкаю правой кнопкой мыши и выбираю “Открыть”, Java запускается
* то есть, но я понимаю, ошибка «Admin Server Manager недоступен»
2. когда я обычно использую команды fmsadmin только в терминале, например:
Сложность: я всегда использовал OS X 10.9.1 и OS X Server 3.0.2
ПК работает медленно?
ASR Pro — идеальное решение для ремонта вашего ПК! Он не только быстро и безопасно диагностирует и устраняет различные проблемы с Windows, но также повышает производительность системы, оптимизирует память, повышает безопасность и точно настраивает ваш компьютер для максимальной надежности. Так зачем ждать? Начните сегодня!

Щелкните здесь и следуйте инструкциям Адаптация к ошибке 10006 официанта Filemaker и аналогичным ошибкам.
<легенда> Инструкции
Содержание
- iBarcoder Lite 4+
- Dmitry Kozlov
- Снимки экрана
- Описание
- DiskMaker X
iBarcoder Lite 4+
Dmitry Kozlov
-
- 1,0 • 1 оценка
-
- Бесплатно
- Включает встроенные покупки
Снимки экрана
![]()
![]()
![]()
![]()
Описание
Генератор штрихкодов. Просто, удобно, профессионально.
Если Вы частный предприниматель или большая корпорация — наша программа поможет Вам создать любое количество штрихкодов и этикеток с уникальным авторским дизайном. Теперь нет надобности покупать готовые штрихкоды, используй iBarcoder для дизайна и печати этикеток со штрихкодом или стикерсов на вашем принтере.
Можно использовать iBarcoder как Datamatrix and QR Code генератор. Создавайте штрихкод графику для коммерческих упаковок, книг и пр.
Печатайте на струйных, лазерных, термических или специализированных принтерах из нашей программы. Все созданные штрихкоды на 100% сканируются всеми доступными на рынке сканерами.
Вот краткий список возможностей iBarcoder:
— Создание профессиональных этикеток со штрихкодами,
— Полноценное превью,
— Динамическое изменение параметров штрихкода,
— Вращение объектов,
— Печать на стандартных Avery форматах,
— Сохранение документа,
— Экспорт штрихкода в картинку высокого разрешения (до 4800 dpi) , или векторную графику,
—- PDF (вектор)
—- EPS (вектор)
—- BMP
—- TIFF
—- JPEG
—- PNG
—- GIF and more.
— Изменение установок Фонта и Цвета,
— Добавление текста, окантовки, картинки на этикетку и более.
Работа с последовательными данными:
Мощный инструмент по работе с последовательными данными позволяет создавать последовательные штрихкоды как с использованием счетчика, так и задавать в качестве источника данных файл или Excel документ
iBarcoder поддерживает такие форматы штрихкодов как:
— Postnet
— Japanpost
— FIM Codes (3 types)
— Horizontal bars
— UPC barcode
—- UPC A (2 or 5 цифровой)
—- UPC E (2 or 5 цифровой)
— EAN barcode
—- EAN 13 (2 or 5 цифровой)
—- EAN 8 (2 or 5 цифровой)
— ISBN barcode
—- ISBN-13
—- ISBN-10
—- ISBN 2 цифровой)
—- ISBN 5 цифровой)
— ISMN
— ISSN (2 or 5 цифровой)
— GS1-128
— Code 128
—- Code 128 A
—- Code 128 B
—- Code 128 C
— Codabar
— ITF14
— Code 39
— Code 11
— Code 93
— MSI
— Interleaved 2 of 5
— Datamatrix
— Intelligent Mail Barcode
— Pharmacode
— QR Code
— Databar
— Databar Stacked
— Databar Staked Omni
— Databar Limited
— PLANET
Источник
DiskMaker X


I encounter this error :
syntax error near unexpected token `(‘
Or this error :
error “sh: -c: line 0: unexpected EOF while looking for matching `”
sh: -c: line 1: syntax error: unexpected end of file” number
Basically, there is something in the pathname of your macOS Install app that DiskMaker X does not like, and most of the time the issue is parenthesis because you renamed the app or included it in a folder that has the version or build number between parenthesis, i.e. (18F132). Parenthesis are difficult to deal with when integrating shell script code in AppleScript, so the best way to avoid this bug at this time is to just remove the parenthesis from the path of the app.
Where can I get a previous macOS Install app ?
Charles Edge nicely compiled the list of download links for previous versions of macOS installer apps. Beware that some of these versions must be purchased (basically, all macOS versions before 10.9).
When using DiskMaker X 7 for High Sierra, I encounter this error message : “The disk could not be created because of an error: An error occured: -10006. Finder got an error: Can’t set alias ”Install macOS High Sierra:Install macOS High Sierra.app” to <425, 76>.”
When using DiskMaker X 8 for Mojave, I encounter this error message : “The disk could not be created because of an error: An error occured: -10006. Finder got an error: Can’t set alias ”Install macOS Mojave:Install macOS Mojave.app” to <425, 76>.”
First, please update to DiskMaker X 7.0.1 or DiskMaker X 8.0.1. It should fix this bug and some.
Second, it may happen that your macOS Install app (either High Sierra or Mojave) is not complete. Check its size : if the installer is about 20 MB large, it’s a stub which can’t be used with DiskMaker X. You need the FULL installer. To be sure to download the full macOS installer, have a look here for macOS High Sierra or here for macOS Mojave. The idea is to use an app that will force download of the full macOS install app.
I plan to add a feature to check the size of the installer before trying to build an install disk in the not-too-distant future.
When creating the Install disk with DiskMaker X, I encounter this error message : “The disk could not be created because of an error: An error occured: -10006.”
This happens sometimes when creating the install disk because a false mount is created as some point. Basically, a false mount is a folder created with the same name as your Install drive, and that makes the Install disk adopt the same name with “1” at the end, i.e. “Install Mac OS Sierra 1”.
If this error happens:
- in Finder, click on Go > Go to Folder menu ;
- Type /Volumes/
- If a folder (not a disk !) is named “Install macOS Sierra”, “Install OS X Yosemite”, or “Install OS X El Capitan”, delete the folder (you may need admin rights, thus type your admin name and password).
- Reboot your Mac
- Try again.
That should do it. I will try to fix it in a future version (if I manage to get why this happens sometimes in some configurations…
“This copy of the Install OS X [OS X Name] application can’t be verified. It may have been corrupted or tampered with during downloading.”
Due to an expiration of OS X App Store certificates, installers of OS X downloaded prior to February 14th of 2016 can’t be used to re-install OS X without encoutering this error. This is not a problem with DiskMaker X per se, but with the installers provided by Apple.
I encounter this message:
“This copy of the Install OS X [OS X Name] application can’t be verified. It may have been corrupted or tampered with during downloading.”
Due to an expiration of OS X App Store certificates, installers of OS X downloaded prior to February 14th of 2016 can’t be used to re-install OS X without encoutering this error. This is not a problem with DiskMaker X per se, but with the installers provided by Apple.
There are three ways to avoid this problem :
- If you did not erase your Mac and its OS is still working fine, reboot on its hard drive, open System Preferences > Date and Time, uncheck Automatically set up date and time and set the date 13th of February 2016, then disconnect from network and reboot;
- If you don’t have an OS installed anymore, reboot on your OS X install disk built with DiskMaker X, open Terminal and type:
Which will set the date and time on the 10th of October 2015 at 10:10 (it’s just easier for me to remember, but any date in the five last years or so should work).
The last solution (and the best) is to re-download the OS X installers from the App Store. Which is OK for El Capitan if you currently run it, but what if you want to re-download older OS? Sadly, Apple does not allow to re-download say, Lion or Mountain Lion, if your Mac already runs a more recent version of OS X (which sucks REALLY badly). There are two solutions here :
- Re-install at least Lion on a drive, boot on it, open App Store and re-download the apps…
- If your Mac does not support older versions of OS X to reboot on, use a virtual machine with Parallels Desktop or VMWare Fusion to re-install Lion in it, then re-download the installers from Lion’s App Store.
Also, beware that if you have OS X installers on any volume mounted on your Mac: the first copy of the installer the App Store will find will be updated if you decide to download a new version, wherever this copy of the installer is on your boot drive or not.
I bought a recent Mac, I built a disk with DiskMaker X but I can’t boot on it !
This one is tricky to explain. Please take a drink first.
When a new model of Mac is available, it usually ships with an “almost” standard version of OS X. I wrote “almost” as it is a special build of OS X, designed only for this specific kind of new Mac.
The problem is quite well explained here:
The following points are especially important:
- Some Macs may include a slightly later build version (but same numbered version) of Mac OS X on the Install or Restore discs than was preinstalled on your computer.
- Do not use a Mac OS X version earlier than the one included with the computer.
- Retail copies of Mac OS X may not always work properly with new Macs. Even if the retail version has been updated via Software Update to a later version of Mac OS X than originally came with a Mac, you may have unexpected issues. Always confirm operating system functionality by using the install disc that shipped with your particular Mac.
So ? If you get a new Mac, you won’t be able to use the installer downloaded from the App Store. The only solution to fully re-install your OS is to use OS X Internet Recovery.
However, there is also another way.
Basically: please be patient. When Apple will release a new version of OS X (say, 10.9.2), you will be able to download from the App Store the full OS X 10.9.2 installer which will provide a new “universal” build of OS X, allowing full install and allowing to build a new boot disk with DiskMaker X on your brand new Mac.
And please, wait before buying a new Mac the next time.
I stumble on a message: “An error occured: -2753. The variable OSX_App is not defined”
This happens if you use the 10.9.x DMG file instead of the full OS X Mavericks Installer app. It just won’t work. Please use the installer app.
When installing, I stumble on this error message: “This copy of the Install OS X Mavericks application can’t be verified. It may have been corrupted or tampered with during downloading.”
Known bug from Apple, your Mac’s clock is set to a wrong date/time. Check this KB article for a solution.
An error -1782 occurs after DiskMaker X copies files: “Can’t get disk “OS X Mountain Lion Install Disk” or similar.
Bug in version 3.0.1, corrected with 3.0.2 and later. The USB boot disk will work however.
An “Error -10660” happens in the building process.
Run DiskMaker X in an admin session (not a standard user session). It should work much better.
I built a disk with Lion DiskMaker 3.0 but can’t boot on it! It does not appear at startup or in the Startup disk Preference.
This has been fixed with DiskMaker X 3.0.1 and later. Give it a try. The (funny) explaination for this bug is here.
Can DiskMaker X build a drive with different versions of OS X ? Say, one partition with Lion Install, another one with Mountain Lion, and another one with Mavericks ?
Sure! Just format your removable drive with a few 8 GB partitions, and launch DiskMaker X. Then choose the “another kind of disk” option and select the right volume each time.
I can’t use DiskMaker X with Mac OS X 10.6.x if I try to use it with my Mavericks installer!
Because of a bug (or a feature?) in Apple’s built-in command createinstallmedia with 10.6.X, DiskMaker X is not compatible with versions of OS X prior to 10.7. I’m working on a fix, but it may take some time to make it available as it means using another completely different method. Check the blog regularly for updates.
I get an error: “The domain/default pair of (/Volumes/OS X Base System/System/Library/CoreServices/SystemVersion, Production Version) does not exist.”
This happens mostly because your OS X Install App is damaged. To check if this theory is correct :
- Right-click or Ctrl+Cllick on the Installer OS X Mavericks application;
- Go to Contents/SharedSupport;
- Double-click InstallESD.dmg.
If an error message appears, you’ll have to download again the Installer app from the App Store. If it mounts properly, get in touch with me.
Note that Lion DiskMaker 3.0.1 should better handle this case.
I keep encountering an ASObjC Runner error (Error -43. File ASObjC Runner wasn’t found)!
This one is quite tricky. It’s a bug which happens randomly with Lion DiskMaker and has no real explaination, except some coding error.
The only way I found that could remove the problem would be to :
- Use Activity Monitor (in /Applicationsl/Utilities) to quit any instance of ASObjC Runner ;
- Reboot your Mac ;
- Check again if ASObjC Runner is still running in the Activity Monitor ;
- Then launch Lion DiskMaker again and try to build your disk.
Also sometimes, using a different, clean session may help.
If you have any insight in this problem, please get in touch with me.
After choosing the OS, Lion DiskMaker seems to hang.
This is related to some issues with Spotlight. To workaround this, open Terminal and type :
killall -9 mdfind
then type Enter key. Lion DiskMaker should resume automatically.
I am told I have no copy of OS X Install available.
The OS X Install application is automatically erased after you upgrade to the new version of OS X. If you need to download it again, open the Mac App Store, then open the Purchase page. You’ll be able to download Mac OS X Lion Install again.
The best time to use Lion DiskMaker is when you just finish downloading OS X from the Mac App Store. Create your disk with Lion Disk Maker , then install OS X.
I got my version of OS X pre-installed with my Mac. How can I get the OS X installer ?
There are two ways to do it.
– If you already purchased OS X on the Mac App Store (and therefore have a valid copy of OS X Install application), you can download the latest installer from Mac App Store first. This installer is compatible with Macs pre-equiped with your version of OS X.
– If you did not purchase OS X, but want to get an Install disc, there is a way to get the InstallESD.dmg file for your Mac. The method is not really easy though. Check Macworld for the full story. After you got the InstallESD.dmg file, use it to build your key or DVD with Lion DiskMaker.
I encountered the following message: The disk could not be created because of an error: An error occurred: 1. hdiutil: attach failed – No such file or directory
This happens if you chose the wrong Mac OS X Lion Install application, or if you mounted manually the InstallESD.dmg file first.
The simple answer is: don’t do this 🙂 Lion DiskMaker is clever enough to detect your copy of OS X Install itself. Then it will mount the DMG file itself.
Yes, that’s cool, but I don’t have the complete OS X Install app and I just kept the InstallESD.dmg file. So do I have to re-download Lion again?
Don’t worry, if it does not find your OS X Install app, Lion DiskMaker will allow to select manually an InstallESD.dmg file.
Can I use a FireWire or SD-Card?
Yes, you can, though the USB drive has the advantage of being « universal » and works on any Mac.
My drive was completely erased!
DiskMaker X proposes two different ways to make a bootable disk:
– You can choose to use a dedicated 8 GB thumb drive ;
– Or you can choose a volume from any drive.
If you choose the 8 GB thumb drive option, the WHOLE disk will be erased. If you choose the second option, ONLY the dedicated volume will be erased, leaving any other volume on your disk intact.
However, if you chose the wrong option, Lion DiskMaker will list every volume that may be erased at the end of the process. Read slowly 🙂
And of course, backup any file on your drive before using the software if necessary. And use a dedicated, small drive (a 8 GB USB key is incredibly cheap these days).
Why did you remove the option to use a 4 GB USB Thumb drive?
The OS X install apps tend to be bigger and bigger with each new release. I used to remove some less essential package in the previous versions of Lion DiskMaker, but this could create some issues (many people complained that the installer then failed when installing OS X).
Also, the price of 8 GB USB thumb stick drives fell , as you can get an 8 GB drive for less than $7 now. So please do yourself a favor, and get one. This drive should be « future-proof » (until Apple makes OS X installer larger than 8 GB…).
Can I redistribute this software ?
Sure, as long as you mention the author and don’t suppress any comment or change anything in its package.
Booting from the DVD is slooooow as hell…
A DVD will always be slower than a USB key, and it seems Lion’s disk image is not optimized for use with optical disks. Avoid it, and use a USB key.
Why did you not rename Lion Diskmaker now that Mountain Lion is available ?
Well, I like this name better than « OS X Diskmaker ». That’s it.
(also: « Lion Diskmaker » should make Apple’s lawyers go less ballistic than « OS X Diskmaker ».
So yes I changed my mind on the last one 🙂
Источник
Вышла новая версия macOS, которая привнесла некоторые изменения, в частности новую файловую систему. Для этого, как мне кажется, следует установить систему с нуля, а не обновлять ее с предыдущей macOS Sierra.
Дистрибутив macOS High Sierra
Для начала скачиваем свежий дистрибутив версии 10.13 из официального магазина Apple App Store, баннер будет прямо на главной странице:
После клика по баннеру, откроется страница с описанием новой операционной системы, кликайте Загрузить, начнется скачивание образа:
Пока идет загрузка образа ОС, нужно скачать и установить программу DiskMaker X, она уже поддерживает MacOS 10.13.
Подготовка флешки
Следующий шаг — запись образа скачанной операционной системы на USB носитель.
Не забудьте подписаться на наш Дзен
- запускаем Дисковую утилиту и форматируем флешку, так как у меня она на 8Гб, так ее и назову:
Ошибка, флешка была на 16Гб 🙂
- запускаем DiskMaker X 7 и выбираем «Use this copy» (при условии, что у вас нет других образов МакОС, если же есть, выбирайте «Use another copy…» и указывайте путь к нужному):
- далее кликаете на «An имя_флешки USB thumb drive»:
- подтверждаете очистку флешки кнопкой «Erase then create the disk»:
- еще раз указываете диск для очистки:
- соглашаететесь кнопкой «Continue»:
- вводите пароль учетной записи:
- ждете появления данного уведомления и нажимаете «Quit»:
Все, загрузочная флешка готова, далее следует процесс установки.
Установка MacOS High Sierra с флешки
Далее будет описан способ чистой установки системы, с форматированием диска, а значит и потерей всех данных. Поэтому заблаговременно сохраните важные данные на внешнем жестком диске или в облаке!
- вставляйте флешку в нужный macbook/iMac, перезагружайтесь и при включении зажимайте клавишу Alt, если все сделали правильно, выйдет окно:
- выбираете Install macOS High Sierra, выйдет следующее окно:
- выбираете «Дисковую утилиту» и форматируете свой диск (не флешку!) в новую файловую систему APFS:
- после чего, закрыв Дисковую утилиту, возвращаетесь на начальный экран и выбираете Установка macOS:
- кликаете продолжить:
- принимаете условия лицензионного соглашения:
- снова принимаете:
- выбираете целевой диск, на который будет установлена система:
- жмете продолжить:
- дожидаетесь окончания установки, при которой компьютер несколько раз будет перезагружен:
- по итогу на экране вы увидите это:
Выбрав язык, раскладку клавиатуры, подключившись к интернету и привязав компьютер к учетной записи Apple, загрузится рабочий стол.
На этом все, система установлена!