
4 способа решить код ошибки 100006 на Mac (06.05.23)
В последнее время пользователи жаловались на получение кода ошибки 100006 на своих компьютерах Mac. Что ж, это определенно плохие новости, особенно то, что многие из них серьезно не знают, как предотвратить появление кода ошибки. Мы создали эту статью, чтобы облегчить разочарование пользователей. Мы попытаемся обсудить, почему Mac получает код ошибки 100006, что это такое и как его исправить.
Что такое код ошибки 100006 на Mac?
Код ошибки 100006 на Mac обычно указывает на проблему или проблему с определенной функцией Mac, программой или операцией. Он продолжает появляться на вашем экране, пока вы не примете меры для его устранения. Чтобы обойти это, вы должны выяснить, что вызывает появление кода ошибки.
Распространенные причины появления кода ошибки Mac 100006
Ваш Mac часто выполняет сразу несколько процессов и операций. Это означает, что мы не можем напрямую связать код ошибки с одной конкретной проблемой или проблемой. Но, основываясь на отчетах и наблюдениях пользователей Mac, которые столкнулись с кодом ошибки, мы можем сделать вывод, что общие причины могут быть следующими:
- Mac заражен вредоносными объектами или вирусов.
- Недостаточно места на диске.
- Неправильная деинсталляция или удаление файла привели к появлению кода ошибки.
- Слишком много мусора и ненужные файлы скопились на жестком диске.
Неудобства, которые приносит код ошибки 100006
Да, код ошибки 10006 на самом деле не очень хорошая новость для пользователей Mac, потому что он доставляет много проблем и неудобства, такие как:
- Уведомление об ошибке всегда появляется при запуске или завершении работы Mac.
- Некоторые программы, особенно те, которые связаны с кодом ошибки, не могут открываться и работать без сбоев.
- Программы и приложения не могут быть установлены или удалены должным образом.
- Некоторые возможности и функции на Mac не может работать плавно.
Помимо перечисленных выше неудобств, код ошибки 100006 может также вызвать другие серьезные проблемы, которые не могут быть устранены с помощью базового устранения неполадок.
Итак, что вы должны сделать, чтобы устранить код ошибки 100006 и предотвратить его появление в будущем?
Как исправить код ошибки 100006 на вашем Mac
Ниже приведены некоторые рекомендуемые исправления для проблемы с кодом ошибки 100006:
Исправление №1: просканируйте свой Mac с помощью надежного инструмента или приложения для очистки.
Большинство кодов ошибок, с которыми вы можете столкнуться на своем Mac, в основном вызваны вредоносными объектами или вирусными инфекциями. Они атакуют и уничтожают различные настройки, файлы и конфигурации на вашем Mac, что приводит к повреждению или недействительности функций.
Хорошая новость заключается в том, что Apple уже установила на ваш Mac невидимые фоновые средства защиты: Карантин файлов / Привратник и Xprotect . Однако последние версии вирусов могут остаться незамеченными этими приложениями.
Если вы подозреваете, что код ошибки отображается на вашем Mac из-за заражения вирусом, рекомендуется выполнить быстрое сканирование вашего компьютера. Mac. Используйте любую надежную антивирусную программу для удаления любых вирусов и угроз, присутствующих на вашем Mac.
Вот полезный совет: перед запуском сканирования системы убедитесь, что вы уже обновили свою вирусную базу. В противном случае вам не удастся удалить вирус.
ИСПРАВЛЕНИЕ №2: очистите свой Mac.
Как правило, для запуска программ, которые вы устанавливаете на Mac, требуется определенный файл. Когда ваш Mac обнаружит дубликаты таких файлов, он запутается. Если это произойдет, могут появиться коды ошибок, такие как код ошибки 100006. Вот почему так важно очистить ваш Mac, чтобы избавиться от повторяющихся и ненужных файлов.
Конечно, вы можете вручную проверять и находить повторяющиеся файлы на вашем Mac. Однако это не рекомендуется, так как это займет у вас много времени. Вместо этого рекомендуется сканировать и очищать ваш Mac с помощью надежного инструмента для очистки, такого как приложение для ремонта Mac. Всего за несколько щелчков мышью он может найти, идентифицировать и очистить все ненужные файлы на вашем Mac.
Исправление №3: удалите все проблемные приложения.
Со всеми новыми популярными приложениями можно было бы быстро соблазнить их установить на свои компьютеры. Они не понимают, что проблемы возникнут, когда будет установлено много приложений.
После успешной установки проблемных приложений или программ на Mac они существенно повлияют на общую производительность других приложений, программ или даже на функции вашей системы. Они также могут вызвать отображение кода ошибки 100006. В этом случае вам действительно нужно тщательно проверить все программы и приложения, установленные на вашем Mac.
Чтобы удалить программу, которая, по вашему мнению, вызывает проблемы, выполните следующие действия:
Если удаление проблемных приложений слишком сложно для вас, не волнуйтесь, потому что вы можете рассчитывать на профессиональные инструменты для выполнения этой работы. Вы можете выполнить быстрый поиск в Google, чтобы получить список лучших программ удаления или приложений для Mac.
Исправление №4: Управляйте использованием вашего диска.
Из-за недостатка места на диске ваш Mac не может работать бесперебойно и эффективно. В некоторых случаях это также приводит к появлению кода ошибки 100006. Итак, если на вашем жестком диске мало места, найдите время, чтобы освободить место. Не позволяйте ненужным файлам и данным занимать место в вашем хранилище.
Вы всегда можете начать с ручной проверки диска, чтобы узнать, какие файлы занимают место. Используйте программу анализа жесткого диска, чтобы просканировать жесткий диск вашего Mac и определить, какие папки занимают большую часть вашего дискового пространства. Оттуда вы можете начать удалять лишнее пространство и освобождать ценное пространство.
Если вам все еще нужны файлы, вы можете перенести их на другой носитель. Только убедитесь, что вы не удалили важные системные файлы.
Заключение
Это правда, что коды ошибок на Mac неизбежны. Они появляются тогда, когда их меньше всего ожидаешь. Однако, если вы будете заботиться только о своем Mac и правильно им пользоваться, вы сможете предотвратить появление каких-либо проблем. Регулярно выполняйте сканирование, удаляйте ненужные файлы и управляйте дисковым пространством.
Знаете ли вы другие способы исправить код ошибки 10006 на Mac? Делитесь ими с нами в комментариях!
YouTube видео: 4 способа решить код ошибки 100006 на Mac
06, 2023
4 способа решить код ошибки 100006 на Mac (01.29.23)
В последнее время пользователи жаловались на получение кода ошибки 100006 на своих компьютерах Mac. Что ж, это определенно плохие новости, особенно то, что многие из них серьезно не знают, как предотвратить появление кода ошибки. Мы создали эту статью, чтобы облегчить разочарование пользователей. Мы попытаемся обсудить, почему Mac получает код ошибки 100006, что это такое и как его исправить.
Что такое код ошибки 100006 на Mac?
Код ошибки 100006 на Mac обычно указывает на проблему или проблему с определенной функцией Mac, программой или операцией. Он продолжает появляться на вашем экране, пока вы не примете меры для его устранения. Чтобы обойти это, вы должны выяснить, что вызывает появление кода ошибки.
Распространенные причины появления кода ошибки Mac 100006
Ваш Mac часто выполняет сразу несколько процессов и операций. Это означает, что мы не можем напрямую связать код ошибки с одной конкретной проблемой или проблемой. Но, основываясь на отчетах и наблюдениях пользователей Mac, которые столкнулись с кодом ошибки, мы можем сделать вывод, что общие причины могут быть следующими:
- Mac заражен вредоносными объектами или вирусов.
- Недостаточно места на диске.
- Неправильная деинсталляция или удаление файла привели к появлению кода ошибки.
- Слишком много мусора и ненужные файлы скопились на жестком диске.
Неудобства, которые приносит код ошибки 100006
Да, код ошибки 10006 на самом деле не очень хорошая новость для пользователей Mac, потому что он доставляет много проблем и неудобства, такие как:
- Уведомление об ошибке всегда появляется при запуске или завершении работы Mac.
- Некоторые программы, особенно те, которые связаны с кодом ошибки, не могут открываться и работать без сбоев.
- Программы и приложения не могут быть установлены или удалены должным образом.
- Некоторые возможности и функции на Mac не может работать плавно.
Помимо перечисленных выше неудобств, код ошибки 100006 может также вызвать другие серьезные проблемы, которые не могут быть устранены с помощью базового устранения неполадок.
Итак, что вы должны сделать, чтобы устранить код ошибки 100006 и предотвратить его появление в будущем?
Как исправить код ошибки 100006 на вашем Mac
Ниже приведены некоторые рекомендуемые исправления для проблемы с кодом ошибки 100006:
Исправление №1: просканируйте свой Mac с помощью надежного инструмента или приложения для очистки.
Большинство кодов ошибок, с которыми вы можете столкнуться на своем Mac, в основном вызваны вредоносными объектами или вирусными инфекциями. Они атакуют и уничтожают различные настройки, файлы и конфигурации на вашем Mac, что приводит к повреждению или недействительности функций.
Хорошая новость заключается в том, что Apple уже установила на ваш Mac невидимые фоновые средства защиты: Карантин файлов / Привратник и Xprotect . Однако последние версии вирусов могут остаться незамеченными этими приложениями.
Если вы подозреваете, что код ошибки отображается на вашем Mac из-за заражения вирусом, рекомендуется выполнить быстрое сканирование вашего компьютера. Mac. Используйте любую надежную антивирусную программу для удаления любых вирусов и угроз, присутствующих на вашем Mac.
Вот полезный совет: перед запуском сканирования системы убедитесь, что вы уже обновили свою вирусную базу. В противном случае вам не удастся удалить вирус.
ИСПРАВЛЕНИЕ №2: очистите свой Mac.
Как правило, для запуска программ, которые вы устанавливаете на Mac, требуется определенный файл. Когда ваш Mac обнаружит дубликаты таких файлов, он запутается. Если это произойдет, могут появиться коды ошибок, такие как код ошибки 100006. Вот почему так важно очистить ваш Mac, чтобы избавиться от повторяющихся и ненужных файлов.
Конечно, вы можете вручную проверять и находить повторяющиеся файлы на вашем Mac. Однако это не рекомендуется, так как это займет у вас много времени. Вместо этого рекомендуется сканировать и очищать ваш Mac с помощью надежного инструмента для очистки, такого как приложение для ремонта Mac. Всего за несколько щелчков мышью он может найти, идентифицировать и очистить все ненужные файлы на вашем Mac.
Исправление №3: удалите все проблемные приложения.
Со всеми новыми популярными приложениями можно было бы быстро соблазнить их установить на свои компьютеры. Они не понимают, что проблемы возникнут, когда будет установлено много приложений.
После успешной установки проблемных приложений или программ на Mac они существенно повлияют на общую производительность других приложений, программ или даже на функции вашей системы. Они также могут вызвать отображение кода ошибки 100006. В этом случае вам действительно нужно тщательно проверить все программы и приложения, установленные на вашем Mac.
Чтобы удалить программу, которая, по вашему мнению, вызывает проблемы, выполните следующие действия:
Если удаление проблемных приложений слишком сложно для вас, не волнуйтесь, потому что вы можете рассчитывать на профессиональные инструменты для выполнения этой работы. Вы можете выполнить быстрый поиск в Google, чтобы получить список лучших программ удаления или приложений для Mac.
Исправление №4: Управляйте использованием вашего диска.
Из-за недостатка места на диске ваш Mac не может работать бесперебойно и эффективно. В некоторых случаях это также приводит к появлению кода ошибки 100006. Итак, если на вашем жестком диске мало места, найдите время, чтобы освободить место. Не позволяйте ненужным файлам и данным занимать место в вашем хранилище.
Вы всегда можете начать с ручной проверки диска, чтобы узнать, какие файлы занимают место. Используйте программу анализа жесткого диска, чтобы просканировать жесткий диск вашего Mac и определить, какие папки занимают большую часть вашего дискового пространства. Оттуда вы можете начать удалять лишнее пространство и освобождать ценное пространство.
Если вам все еще нужны файлы, вы можете перенести их на другой носитель. Только убедитесь, что вы не удалили важные системные файлы.
Заключение
Это правда, что коды ошибок на Mac неизбежны. Они появляются тогда, когда их меньше всего ожидаешь. Однако, если вы будете заботиться только о своем Mac и правильно им пользоваться, вы сможете предотвратить появление каких-либо проблем. Регулярно выполняйте сканирование, удаляйте ненужные файлы и управляйте дисковым пространством.
Знаете ли вы другие способы исправить код ошибки 10006 на Mac? Делитесь ими с нами в комментариях!
YouTube видео: 4 способа решить код ошибки 100006 на Mac
01, 2023
Recently, users have complained about getting the error code 100006 on their Macs. Well, it’s definitely not good news, especially that a lot of them seriously don’t have any idea on how to stop the error code from occurring. In an effort to ease the frustration on the part of users, we have created this article. We’ll try to discuss why a Mac is getting the error code 100006, what it is all about, and how to fix it.
What Is the Error Code 100006 on a Mac?
The error code 100006 on a Mac is usually an indication of a problem or issue with a specific Mac feature, program, or operation. It keeps on popping up on your screen, unless you take action to resolve it. To be able to get around it, you have to find out what is causing the error code to show up.
The Common Causes of the Mac Error Code 100006
Your Mac often performs a number of processes and operations at once. This means we cannot directly attribute the error code to one certain issue or problem. But based on the reports and observations of Mac users who have come across the error code, we can conclude that the common causes could be any of the following:
- A Mac is infected by malware entities or viruses.
- There is no sufficient disk drive space.
- The improper uninstallation or removal of a file has triggered the error code to appear.
- Too many junk and unnecessary files have accumulated on the hard drive.
The Inconveniences That the Error Code 100006 Brings
Yes, the error code 10006 isn’t really good news for Mac users because it brings about many troubles and inconveniences, such as:
- The error notification always appears when starting up or shutting down a Mac.
- Some programs, especially those that are associated with the error code, cannot open and run smoothly.
- Programs and apps cannot be installed or uninstalled properly.
- Some features and functions on a Mac cannot perform smoothly.
Other than the above inconveniences, the error code 100006 may also trigger other serious problems that may not be fixed with basic troubleshooting.
So, what should you do to resolve the 100006 error code and prevent it from appearing in the future?
How to Fix the Error Code 100006 on Your Mac
Below are some recommended fixes to the 100006 error code problem:
Fix #1: Scan Your Mac with a Reliable Cleaning Tool or App.
The majority of the error codes you may encounter on your Mac are mostly caused by malware entities or virus infections. They attack and destroy different settings, files, and configurations you have on your Mac, resulting in corrupted or invalid features.
The good news is that Apple has already installed invisible background protections on your Mac: File Quarantine/Gatekeeper and Xprotect. However, the latest strain of viruses might go undetected by these apps.
If you suspect that the error code is showing on your Mac due to a virus infection, it is recommended that you perform a quick scan on your Mac. Use any reliable antivirus program to delete any viruses and threats that are present on your Mac.
Here’s a handy tip: Before starting a system scan, make sure that you have already updated your virus database. Otherwise, you won’t be successful with your virus removal.
FIX #2: Clean Up Your Mac.
In general, the programs you install on your Mac would need a particular file for them to run. When your Mac detects duplicates of such files, it will be confused. If this happens, error codes, such as the error code 100006, could be triggered. This is why it is important to clean up your Mac to get rid of duplicate and unnecessary files.
Sure, you can manually check and find duplicate files on your Mac. However, it is not recommended as it will take much of your time. Instead, it is advised to scan and clean your Mac with a reliable cleaning tool like Mac repair app. In just a few clicks, it can locate, identify, and clean up all the unnecessary files on your Mac.
Fix #3: Uninstall Any Problematic App.
With all the new trending apps out there, one would be quickly enticed to have them installed on their computers. They don’t realize that problems will come out when a lot of apps have been installed.
Once problematic apps or programs are successfully installed on a Mac, they will significantly affect the overall performance of other apps, programs, or even your system’s features. They can also trigger the error code 100006 to show. In this case, you really have to thoroughly check all the programs and apps installed on your Mac.
To uninstall a program that you suspect is problematic, follow these steps:
- Go to Finder.
- Select Applications.
- Find the icon of the program that you want to uninstall.
- Drag it to Trash.
- Finally, right-click on Trash and select Empty Trash.
If uninstalling problematic apps is too challenging for you, fret not because you can count on professional tools to do the job. You can do a quick search on Google to get a list of the best uninstall programs or apps for Mac.
Fix #4: Manage Your Disk Usage.
With insufficient disk space, it is impossible for your Mac to perform smoothly and effectively. In some cases, it also causes the error code 100006 to appear. So, if your hard disk space is running low, take the time to free up space. Do not let any unnecessary files and data take up your storage space.
You can always start by manually checking your disk to find out what files are taking up space. Use a hard disk analysis program to scan your Mac’s hard disk and identify what folders are consuming most of your storage space. From there, you can start deleting the space hogs and freeing up valuable space.
If you still need the files, you might want to transfer them to other storage media. Just make sure you don’t delete any important system files.
Wrapping Up
It is true that error codes on Macs are inevitable. They show up when you least expect them. However, if you only take care of your Mac and use it the right way, you can prevent any problem from surfacing. Perform regular scans, delete unnecessary files, and manage your disk space.
Do you know other ways to fix the error code 10006 on a Mac? Share them with us in the comments!

Vic is a certified gadget freak who feels the need to surround himself with cutting-edge technology. And this passion has helped him a lot in creating content that informs and guides users on using and troubleshooting the latest technology. He is an avid researcher who is always hungry for the latest news and updates on the most cutting-edge technology.
Vic is the one in charge of keeping our website running smoothly and efficiently, to make sure that our readers have a wonderful experience while visiting the website. He’s good at troubleshooting errors and fixing Windows issues that come up either when playing games or working on the computer.
It is not a good news for the Mac user getting an 100006 error code on their PCs, and more seriously many of them don’t know how to stop the error and get it fixed well, frustrated about this error on your Mac? Take the following instructions to fix 100006 error code and take good care of your computer well.
100006 error code on Mac usually indicates a problem with a specific program, feature or other kinds of operation. The error message will not stop appearing on the machine unless you take an effective resolution to figure it out, so you should try to find the specific cause of the error issue, and solve the problem on the Mac computer.

Содержание
- What cause the error on Mac
- Negative impacts of the problem
- Instructions to stop and fix 100006 error code
- Steps to remove viruses and junk files
- Steps to uninstall an application
- Steps to remove duplicate files
- Steps to manage log-in items
- Steps to manage disk usage
- Video Guides to Fix 100006 error code on Mac
- Код ошибки 100006 mac os
- Как проверить и исправить ошибки жесткого диска (HDD, SDD) на Mac
- Загрузка в Безопасном режиме (Safe Mode) на Mac
- 2. Режим восстановления и Первая помощь на Mac
- Проверка fsck
- Apple Diagnostics
- Восстановление файлов с поврежденного диска
- 1008F — или как раскирпичить свой Mac
- Предыстория
- Поехали!
- 1008F
- 2003F, 2004F
- Заключение
- 4 Ways to Solve the Error Code 100006 on a Mac
- What Is the Error Code 100006 on a Mac?
- The Common Causes of the Mac Error Code 100006
- The Inconveniences That the Error Code 100006 Brings
- How to Fix the Error Code 100006 on Your Mac
- Fix #1: Scan Your Mac with a Reliable Cleaning Tool or App.
- FIX #2: Clean Up Your Mac.
- Fix #3: Uninstall Any Problematic App.
- Fix #4: Manage Your Disk Usage.
- Wrapping Up
What cause the error on Mac
Since the Mac computer always contains many operations and performances, we cannot attribute the 100006 error code to a certain problem on the PC, but we can analyze this common problem on many Mac computers and conclude the common causes of the error issue as following, which are very good for taking proper way to fix 100006 error code well:
Negative impacts of the problem
Just like we had talked about the problem on above that getting 100006 error code is not a good news for the Mac computer, because it will creates many troubles and inconveniences for your use of the computer, for instances:
Besides these possible impacts, you might also encounter other problems on your Mac after getting the 100006 error code, so it will be very necessary and important to fix 100006 error code when you unfortunately get this trouble on your Mac. So, what should we do to resolve 100006 error code? Here are some common resolutions according to the common causes of the error.
Instructions to stop and fix 100006 error code
Unknown error issue on a Mac computer is in all probability caused by the virus infection, this is because the infected viruses could damage or destroy many files, settings and configurations on the computer, and the error issue will come from such a corrupted or invalid feature on the devices. So the 100006 error code is also very probably caused by the virus attack on the Mac computer, especially you do not have any modification or removal before the error occurs.
To fix 100006 error code with the virus infection issue, you should perform a thoroughly check for your computer system with a reliable antivirus program, and then delete all of detected viruses and threat immediately on the Mac.
Warm tips: before launch the security to scan and remove viruses, please make sure you have already got the latest virus database of the program, or you will need to do a virus database upgrade before virus removal.
Generally, installed programs and OS X would identify a particular file for supporting the associated performances on the computer, when there is a duplicate file appears, it will easily mislead the computer system and related programs, and finally cause an error issue on the PC. 100006 error code also could be triggered in such a situation, and you should think about scanning the computer for duplicate files, and delete the unnecessary one on your computer.
Manually checking the duplicate file on computer is an unadvisable resolution and it will take you much of time to complete, instead, it is more advised to scan and clean the duplicate file on Mac will a particular cleaning tool, its automatic performance will help you to clean up all the duplicate file on your computer very quickly and thoroughly.
With the use of a Mac, we would gradually install many kinds of programs on the computer, but the problems will just come out when too many apps gathered in one machine, especially the problematic or incompatible program usually cause many kinds of problems on a Mac, they will affect the effective performance of many programs and system’s features, this is also a reason for the 100006 error code, in this case, you should do a check for the installed programs on your Mac computer, and choose to download those unwanted or incompatible programs thoroughly.
In turns of the program removal, taking a professional uninstall tool will be a best choice, this is also the most popular way in nowadays for the program uninstallation, this is because the drag-and-clean on the trash in Mac is not a very effective way to remove the program’s support files and caches, by contraries, a good uninstall tool can remove the program’s package and other associated data completely with an automatic removal, which is much easier and more effective to complete the program removal.
Traditional way to uninstall a program on Mac


Invalid or problematic logo-in items usually cause the Mac OS X cannot successfully start the related applications as required, and the error code will just display to notify you about the problem, including the 100006 error code, in order to stop the problem and fix 100006 error code well, you should manage your log-in items: delete the items which have been uninstalled on your Mac, and disable the one which does not need to be started automatically.
Smooth and effective computer performance cannot accomplished without an enough disk space on Mac, if there is no enough space on your Mac, many running problems will be triggered and cause you cannot use the computer effectively. When you find the hard disk space is nearly out of space, you should consider to fix 100006 error code via freeing up your hard disk space, and do not allow the useless and unnecessary data and files taking up too many space, in this case, a disk usage management is very needed.
Never think about the junk files also can cause 100006 error code on your Mac? Many people may easily neglect this problem on their Mac computers, but this is really a common cause for many computers getting the 100006 error code. Therefore, to fix 100006 error code, you also need to clean up junk files on your Mac, and a specific clean tool will be a good assistant for you.
After referring to the above resolution to fix 100006 error code, do you think it is too redundant to completed? Or it will spend a lot of time to accomplish it. Here is an idea that can help you fix 100006 error code more effectively.
MacKeeper is an advanced utility that contains a lot of features that allow you to manage and optimize your Mac computer in many aspects, such as virus removal, duplicate file removal, program uninstallation, date back-up, junk files cleaning, and disk usage management, through which it can help you to avoid many problems and error issues on the computer, including fix 100006 error code, so that you can complete all the above jobs with this optimized utility.
Steps to remove viruses and junk files


Steps to uninstall an application


Steps to remove duplicate files

Steps to manage log-in items


Steps to manage disk usage


According to thorough check and fix for your Mac computer, I believe that you will be able to fix 100006 error code and avoid many troublesome error issues effectively.
Video Guides to Fix 100006 error code on Mac
To keep your Mac far away from any error message, you should gain good habit when using the computer. Never visit untrustworthy website and clean up the rubbish remained on the Mac OS X system regularly. Beside, do not download suspicious files from unknown sources which helps you avoid potential system problems. It is highly suggested you always run security software on the backstage to fight against any risk attempting to bring troubles on the Mac whenever you are online or offline. Taking good care of your Mac would absolutely save your money because once it get problems, you have to pay much fee in the Apple support station.
Источник
Как проверить и исправить ошибки жесткого диска (HDD, SDD) на Mac
Ваш Mac не включается? Без паники! Не спешите бросать всё и нести любимый компьютер в ближайший сервис. Вполне возможно, что для «реанимации» хватит и встроенных средств macOS, воспользоваться которыми может каждый желающий.
Загрузка в Безопасном режиме (Safe Mode) на Mac
При активации Safe Mode macOS просканирует жесткий диск и исправит все ошибки, которые найдет.
«Безопасная» загрузка запускает только жизненно необходимые компоненты (т. е. только то, что необходимо для запуска компьютера). В результате не будут запущены сторонние расширения, элементы входа в систему (логины-пароли), а также будет очищен кэш в определенных разделах.
Чтобы запустить Mac в режиме Safe Mode, выключите его, затем включите и одновременно со стартовым звуком зажмите на клавиатуре клавишу ⇧Shift. Если ваш Mac завис при включении, сначала выключите его (для этого удерживайте физическую кнопку питания на корпусе или клавиатуре в течение 10 секунд).
Если Mac загрузил систему, перезагрузите его и включайте уже как обычно. Если же компьютер вновь завис, переведите его в Verbose Mode — для этого необходимо выключить Mac, включить его и после стартового сигнала одновременно нажать и удерживать ⌘Cmd + V. Так вы сможете узнать, какой именно системный компонент приводит к проблеме. Когда источник будет выявлен, можно перезагрузиться в Safe Mode (с зажатой клавишей ⇧Shift) и удалить проблемное расширение, после чего попробовать уже обычную перезагрузку.
2. Режим восстановления и Первая помощь на Mac
Если безопасный режим не решил вашу проблему, переходим к следующей опции под названием Режим восстановления (Recovery Mode). Он «живёт» в отдельной части загрузочного диска и позволяет восстанавливать систему, получать доступ к Терминалу и возможность переустановить операционную систему вашего Mac — macOS.
Для перехода в Режим восстановления:
1. Выключите компьютер;
3. Сразу же после стартового сигнала нажмите и удерживайте сочетание клавиш ⌘Cmd + R.
Если перейти в Recovery Mode не удается (при проблемах с диском такое бывает), можно запустить режим восстановления через интернет. Сочетание клавиш будет уже несколько другим — ⌘Cmd + ⌥Option (Alt) + R. Этот способ требует интернет-подключения и займет гораздо больше времени, т. к. macOS будет загружать из Сети образ системы весом в несколько гигабайт.
Если загрузка в Режим восстановления прошла успешно, вы увидите несколько вариантов действий. Запустите Дисковую утилиту и найдите загрузочный диск, который является источником проблем — скорее всего, он называется Macintosh HD. Выберите его в окне слева, а затем нажмите Первая помощь → Запустить.
Проверка fsck
File system consistency check (fsck, «проверка целостности файловой системы») — старый добрый Unix-инструмент для проверки и решения проблем с дисками.
В зависимости от объема жесткого диска, его типа и серьезности проблемы fsck-проверка может занять довольно много времени. Просто наберитесь терпения.
Для запуска fsck необходим переход в однопользовательский режим (Single User Mode). Он позволяет вносить изменения в общие пользовательские ресурсы на компьютере. Single User Mode не запускает macOS; он просто дает доступ к командной строке Unix.
Для перехода в Single User Mode:
3. Сразу после стартового сигнала нажмите и удерживайте сочетание клавиш ⌘Cmd + S.
Примечание: если ваш диск зашифрован, выберите подходящий пользовательский аккаунт и введите пароль для дешифровки. Если у вас установлен пароль на прошивку Mac, запустить Single User Mode не получится.
Важно дождаться окончания fsck-проверки — если процесс будет прерван, возможна потеря данных. После окончания проверки вы увидите одно из следующих сообщений:
** The volume Macintosh HD could not be repaired.
*****The volume was modified *****
** The volume Macintosh HD was repaired successfully.
*****The volume was modified *****
Уже намного лучше… но расслабляться рано. Опять-таки, запустите проверку еще раз.
** The volume Macintosh HD appears to be OK.
А вот это — то, что нам нужно. fsck проверила весь диск и не нашла ничего, что требовало бы исправлений.
Теперь из Single User Mode можно выходить. Команда для выхода: exit.
Apple Diagnostics
Если описанные выше способы вам не помогли, то проблема почти наверняка очень серьезная. А это значит, что пришло время воспользоваться Apple Diagnostics!
Это специальный тест для компьютеров Mac от компании-производителя. По его итогам вы получите код ошибки и сможете понять, что именно не так с вашим Mac.
Для запуска теста Apple Diagnostics:
1. Выключите ваш Mac;
2. Отключите от него все подключенные устройства, за исключение клавиатуры, мышки, монитора, Ethernet-кабеля (если есть) и кабеля питания. Иными словами, отключите флешки, внешние жесткие диски, принтеры, сканеры и т. п.
4. Сразу же после стартового сигнала нажмите и удерживайте на клавиатуре D.
5. Выберите свой язык
Как уже упоминалось выше, после прохождения теста вы получите в свое распоряжение код ошибки. Расшифровка кодов:
Как видим, проблемы делятся на две категории — те, которые легко устранит и рядовой пользователь (например, ошибки, связанные с USB), и те, с которыми надо сразу идти в сервис (к примеру, неполадки с видео — и аудиокартами, процессором, памятью и т. д.).
Восстановление файлов с поврежденного диска
Повреждение жесткого диска среди прочего означает и возможную потерю данных (или их части). Для того, чтобы избежать этого, попробуйте создать образ «сломавшегося» диска. Для этого потребуется внешний жесткий диск как минимум того же объема.
1. Подключите его к Mac, перезагрузите компьютер,
2. Войдите в Recovery Mode (⌘Cmd + R),
3. Запустите Дисковую утилиту,
4. В строке меню вверху выберите Файл → Новый образ → Образ «Macintosh HD» и запустите процесс. На создание образа уйдет какое-то время, но в конце вы получите копию старого диска в формате DMG и сможете его смонтировать уже в новой системе.
Не забудьте сменить [username] на свое имя пользователя в системе.
Давайте разберем команду: cp — это команда на копирование, —r означает, что эта команда выполняется рекурсивно, т. е. сначала копируются директории внутри указанной вами директории, а затем директории, которые входят в их состав, и так далее.
Первый путь — это указание на местонахождение файлов, которые вы хотите скопировать. Второй путь указывает местоположение внешнего накопителя, он всегда будет в /Volumes/, какое бы название вы ему ни дали.
Единственная сложность этого способа — вы должны вспомнить, где именно находились ваши файлы, и соответствующим образом прописать путь. Также вам остается только надеяться на то, что файлы не находятся на поврежденной части диска.
Когда копирование данных будет завершено, вы можете с чистой совестью отдать Mac в ремонт или переустановить macOS.
… Именно в такие моменты люди начинают понимать важность резервного копирования данных. И действительно — при настроенном копировании Time Machine проблемы с потерей данных не страшны. Настройте копирование данных прямо сейчас — и сэкономьте себе много времени, нервов и денег в будущем!
1008F — или как раскирпичить свой Mac
Всем привет! В этом посте речь пойдет о бесконечном режиме восстановления macOS, ошибках 1008F, 2003F, 2004F и о том как их побороть.
Предыстория
Тут стоить отметить, что далее речь идет о MacBook pro 2018 с чипом безопасности T2, опыт работы с macOS с точки зрения откатов, переустановок, загрузочных дисков и т. п. имелся богатый, а потому. ничто не предвещало беды.
Поехали!
Мне было лениво делать загрузочную флешку, поэтому идея с Internet Recovery показалась заманчивой (более того эту процедуру я уже обкатывал ранее на MacBook pro 2013). Далее список действий, которые повторять НЕ НАДО:
1. загрузка в рекавери (cmd + R);
2. форматирование жесткого диска;
3. запуск Internet Recovery на версию, которая поставлялась при продаже MacBook (или близкую к ней (Shift-Option-Command-R при загрузке Mac).
**более подробно о сочетаниях клавиш можно прочитать тут
После всех этих нехитрых манипуляций мы получаем не Mac, а кирпич, который игнорит все подряд и валится в вечный Internet Recovery с ошибкой 1008F.
1008F
Дальше у вас, как говорится, два путя:
Путь простой:
1. Зайти в учетную запись icloud;
2. Выбрать «Найти iPhone«;
3. Переключить дроп-лист на пункт «Все устройства«:
4. Выбрать проблемный MacBook и нажать «удалить из Найти айфон«;
6. Покинуть программу:
7. (Опционально) Удалить проблемный Mac из учетной записи Apple (Из списка устройств).
После этого можно попробовать восстановиться еще раз. К сожалению, данный способ мне не помог.
Путь сложный:
Далее возникла идея: поскольку жесткий диск несъёмный, слишком дорого было бы для Apple решать такие вопросы заменой материнских плат. Должна была быть какая-то лазейка, типа DFU режима, который был очень популярен на айфонах 3gs и 3g. Легкий гуглинг навел меня на несколько интересных статей: тут и тут. Дублировать содержимое статей смысла не вижу, в целом, они о том как вводить Mac в DFU режим и как с ним работать.
1. Нам нужен еще один Mac (к счастью такой нашелся);
3. Скачиваем на Mac (сервер) утилиту Apple Configurator 2 и запускаем ее;
4. Вводим Mac (клиент) в DFU;
5. В утилите Apple Configurator 2: Правая кнопка мыши > Actions > Advanced > Revive Device:
а на Mac (клиент) произойдет вот это:
нужно попробовать запустить процедуру восстановления через Shift-Option-Command-R.
8. Требуется повторить действия с п.1 по п.4. После чего выбрать Apple Configurator 2 пункт Restore.
9. У вас надеюсь все будет хорошо, а вот я получил сообщение об ошибке:
что-то типа такого, только код был другой.
10. Далее я вывел Mac (клиент) из DFU режима и загрузил его через Shift-Option-Command-R.
11. Начался заветный процесс восстановления, который периодически падал в ошибки 2003F и 2004F.
2003F, 2004F
Тут стоить отметить, что интернет-провайдер у меня полное расстройство, поэтому решение было следующим:
На роутере я прописал DNS: основной сервер 8.8.8.8, альтернативный 8.8.4.4;
Также могут помочь сброс NVRAM или PRAM;
Запускать Mac через Shift-Option-Command-R, можно даже после того, как вы получили ошибку 200+F. Бывают случаи, когда загрузка происходит не с первого раза;
Дальше у меня загрузился Recovery macOS Mojave, т. к. именно с ней поставлялся MacBook. В дисковой утилите жесткий диск определялся как неизвестное устройство, после форматирования его со схемой разделов GUID, установка macOS продолжается в обычном режиме.
Заключение
Желаю вам легких апдейтов, даунгрейдов и вообще поменьше багов и лагов.
По результатам опроса, написал о том как откатиться с macOS Big Sur до macOS Catalina. Прочитать об этом можно тут. Спасибо за проявленный интерес!
Источник
4 Ways to Solve the Error Code 100006 on a Mac

Download and try Outbyte MacAries right now to see what it can do for your Mac.
Developed for macOS
Recently, users have complained about getting the error code 100006 on their Macs. Well, it’s definitely not good news, especially that a lot of them seriously don’t have any idea on how to stop the error code from occurring. In an effort to ease the frustration on the part of users, we have created this article. We’ll try to discuss why a Mac is getting the error code 100006, what it is all about, and how to fix it.
What Is the Error Code 100006 on a Mac?
The error code 100006 on a Mac is usually an indication of a problem or issue with a specific Mac feature, program, or operation. It keeps on popping up on your screen, unless you take action to resolve it. To be able to get around it, you have to find out what is causing the error code to show up.
The Common Causes of the Mac Error Code 100006
Your Mac often performs a number of processes and operations at once. This means we cannot directly attribute the error code to one certain issue or problem. But based on the reports and observations of Mac users who have come across the error code, we can conclude that the common causes could be any of the following:
The Inconveniences That the Error Code 100006 Brings
Yes, the error code 10006 isn’t really good news for Mac users because it brings about many troubles and inconveniences, such as:
Pro Tip: Scan your Mac for performance issues, junk files, harmful apps, and security threats
that can cause system issues or slow performance.
Other than the above inconveniences, the error code 100006 may also trigger other serious problems that may not be fixed with basic troubleshooting.
So, what should you do to resolve the 100006 error code and prevent it from appearing in the future?
How to Fix the Error Code 100006 on Your Mac
Below are some recommended fixes to the 100006 error code problem:
Fix #1: Scan Your Mac with a Reliable Cleaning Tool or App.
The majority of the error codes you may encounter on your Mac are mostly caused by malware entities or virus infections. They attack and destroy different settings, files, and configurations you have on your Mac, resulting in corrupted or invalid features.
The good news is that Apple has already installed invisible background protections on your Mac: File Quarantine/Gatekeeper and Xprotect. However, the latest strain of viruses might go undetected by these apps.
If you suspect that the error code is showing on your Mac due to a virus infection, it is recommended that you perform a quick scan on your Mac. Use any reliable antivirus program to delete any viruses and threats that are present on your Mac.
Here’s a handy tip: Before starting a system scan, make sure that you have already updated your virus database. Otherwise, you won’t be successful with your virus removal.
FIX #2: Clean Up Your Mac.
Sure, you can manually check and find duplicate files on your Mac. However, it is not recommended as it will take much of your time. Instead, it is advised to scan and clean your Mac with a reliable cleaning tool like Mac repair app. In just a few clicks, it can locate, identify, and clean up all the unnecessary files on your Mac.
Fix #3: Uninstall Any Problematic App.
With all the new trending apps out there, one would be quickly enticed to have them installed on their computers. They don’t realize that problems will come out when a lot of apps have been installed.
Once problematic apps or programs are successfully installed on a Mac, they will significantly affect the overall performance of other apps, programs, or even your system’s features. They can also trigger the error code 100006 to show. In this case, you really have to thoroughly check all the programs and apps installed on your Mac.
To uninstall a program that you suspect is problematic, follow these steps:
If uninstalling problematic apps is too challenging for you, fret not because you can count on professional tools to do the job. You can do a quick search on Google to get a list of the best uninstall programs or apps for Mac.
Fix #4: Manage Your Disk Usage.
With insufficient disk space, it is impossible for your Mac to perform smoothly and effectively. In some cases, it also causes the error code 100006 to appear. So, if your hard disk space is running low, take the time to free up space. Do not let any unnecessary files and data take up your storage space.
You can always start by manually checking your disk to find out what files are taking up space. Use a hard disk analysis program to scan your Mac’s hard disk and identify what folders are consuming most of your storage space. From there, you can start deleting the space hogs and freeing up valuable space.
If you still need the files, you might want to transfer them to other storage media. Just make sure you don’t delete any important system files.
Wrapping Up
It is true that error codes on Macs are inevitable. They show up when you least expect them. However, if you only take care of your Mac and use it the right way, you can prevent any problem from surfacing. Perform regular scans, delete unnecessary files, and manage your disk space.
Do you know other ways to fix the error code 10006 on a Mac? Share them with us in the comments!
Источник
Hi everyone —
I am trying to use DiskMaker X to create a High Sierra bootable disk with a USB drive. I have followed all the steps but at the very end I get the following message:
The disk could not be created because of an error: An error occured: -10006. Finder got an error: Can’t set alias «Install macOS High Sierra:Install macOS High Sierra.app» to {425, 76}.
I have read in several other places how easy it is to create a bootable disk using DiskMaker X so I am a little puzzled as to what I might be doing incorrectly.
Any guidance would be appreciated
Thanks
Posted on Feb 10, 2019 11:23 AM
Reading time: 5 Minutes
Recently, users have complained about getting the error code 100006 on their Macs. Well, it’s definitely not good news, especially that a lot of them seriously don’t have any idea on how to stop the error code from occurring. In an effort to ease the frustration on the part of users, we have created this article. We’ll try to discuss why a Mac is getting the error code 100006, what it is all about, and how to fix it.
What Is the Error Code 100006 on a Mac?
The error code 100006 on a Mac is usually an indication of a problem or issue with a specific Mac feature, program, or operation. It keeps on popping up on your screen, unless you take action to resolve it. To be able to get around it, you have to find out what is causing the error code to show up.
The Common Causes of the Mac Error Code 100006
Your Mac often performs a number of processes and operations at once. This means we cannot directly attribute the error code to one certain issue or problem. But based on the reports and observations of Mac users who have come across the error code, we can conclude that the common causes could be any of the following:
- A Mac is infected by malware entities or viruses.
- There is no sufficient disk drive space.
- The improper uninstallation or removal of a file has triggered the error code to appear.
- Too many junk and unnecessary files have accumulated on the hard drive.
The Inconveniences That the Error Code 100006 Brings
Yes, the error code 10006 isn’t really good news for Mac users because it brings about many troubles and inconveniences, such as:
- The error notification always appears when starting up or shutting down a Mac.
- Some programs, especially those that are associated with the error code, cannot open and run smoothly.
- Programs and apps cannot be installed or uninstalled properly.
- Some features and functions on a Mac cannot perform smoothly.
Other than the above inconveniences, the error code 100006 may also trigger other serious problems that may not be fixed with basic troubleshooting.
So, what should you do to resolve the 100006 error code and prevent it from appearing in the future?
How to Fix the Error Code 100006 on Your Mac
Below are some recommended fixes to the 100006 error code problem:
Fix #1: Scan Your Mac with a Reliable Cleaning Tool or App.
The majority of the error codes you may encounter on your Mac are mostly caused by malware entities or virus infections. They attack and destroy different settings, files, and configurations you have on your Mac, resulting in corrupted or invalid features.
The good news is that Apple has already installed invisible background protections on your Mac: File Quarantine/Gatekeeper and Xprotect. However, the latest strain of viruses might go undetected by these apps.
If you suspect that the error code is showing on your Mac due to a virus infection, it is recommended that you perform a quick scan on your Mac. Use any reliable antivirus program to delete any viruses and threats that are present on your Mac.
Here’s a handy tip: Before starting a system scan, make sure that you have already updated your virus database. Otherwise, you won’t be successful with your virus removal.
FIX #2: Clean Up Your Mac.
In general, the programs you install on your Mac would need a particular file for them to run. When your Mac detects duplicates of such files, it will be confused. If this happens, error codes, such as the error code 100006, could be triggered. This is why it is important to clean up your Mac to get rid of duplicate and unnecessary files.
Sure, you can manually check and find duplicate files on your Mac. However, it is not recommended as it will take much of your time. Instead, it is advised to scan and clean your Mac with a reliable cleaning tool like Mac repair app. In just a few clicks, it can locate, identify, and clean up all the unnecessary files on your Mac.
Fix #3: Uninstall Any Problematic App.
With all the new trending apps out there, one would be quickly enticed to have them installed on their computers. They don’t realize that problems will come out when a lot of apps have been installed.
Once problematic apps or programs are successfully installed on a Mac, they will significantly affect the overall performance of other apps, programs, or even your system’s features. They can also trigger the error code 100006 to show. In this case, you really have to thoroughly check all the programs and apps installed on your Mac.
To uninstall a program that you suspect is problematic, follow these steps:
- Go to Finder.
- Select Applications.
- Find the icon of the program that you want to uninstall.
- Drag it to Trash.
- Finally, right-click on Trash and select Empty Trash.
If uninstalling problematic apps is too challenging for you, fret not because you can count on professional tools to do the job. You can do a quick search on Google to get a list of the best uninstall programs or apps for Mac.
Fix #4: Manage Your Disk Usage.
With insufficient disk space, it is impossible for your Mac to perform smoothly and effectively. In some cases, it also causes the error code 100006 to appear. So, if your hard disk space is running low, take the time to free up space. Do not let any unnecessary files and data take up your storage space.
You can always start by manually checking your disk to find out what files are taking up space. Use a hard disk analysis program to scan your Mac’s hard disk and identify what folders are consuming most of your storage space. From there, you can start deleting the space hogs and freeing up valuable space.
If you still need the files, you might want to transfer them to other storage media. Just make sure you don’t delete any important system files.
Wrapping Up
It is true that error codes on Macs are inevitable. They show up when you least expect them. However, if you only take care of your Mac and use it the right way, you can prevent any problem from surfacing. Perform regular scans, delete unnecessary files, and manage your disk space.
Do you know other ways to fix the error code 10006 on a Mac? Share them with us in the comments!
Give us some love and rate our post!

Vicrey Makapagal
Vic is a tech enthusiast who loves to be up-to-date with the latest and greatest technology in the world. He creates content that educates and helps users with their tech-related questions. Vic manages our website to ensure that our readers have a seamless experience while browsing. He excels in troubleshooting errors and resolving Windows issues for gaming and work purposes.
Summary:
Are you getting error code 100006 popping up on your Mac? Don’t know what this error means and how to fix it? This article is just for you.
Contents
- What Does the Error Code 100006 Mean?
- What Causes Error Code 100006?
- How to Solve the Error Code 100006 on your Mac?
- Wrap Up
What Does the Error Code 100006 Mean?
The error code 100006 on a Mac means an issue occurred with some Mac feature, apps, or operations in general. This error will keep appearing on your screen unless you fix it.
What Causes Error Code 100006?
Error code 100006 is usually a result of the following:
- Inappropriate processes on the system, application, or service.
- Damaged system files.
- Malware or spyware attacks, suspicious file download.
- Incompatible or outdated software/hardware installed on your Mac.
- The startup drive is filled with junk files.
How to Solve the Error Code 100006 on your Mac?
1. Run an Antivirus Scan
Apple has built-in protection tools working in the background on Mac: File Quarantine/Gatekeeper and Xprotect. If you have an antivirus on your Mac — run a full scan. If not — you can always download one by choosing a trustworthy antivirus app.
2. Delete Suspicious Apps
Unwanted apps are often bundled with other software that you download and install. This way you may end up having apps you were not intending to use.
To locate the apps on your Mac, use any of these two methods:
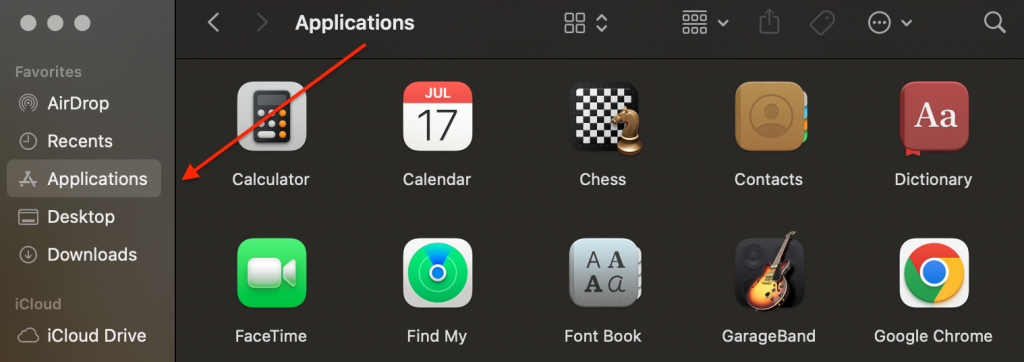
A. Go to the Finder → Applications folder > look at the apps you don’t remember installing. These apps can potentially be harmful. Delete the ones you don’t recall downloading.
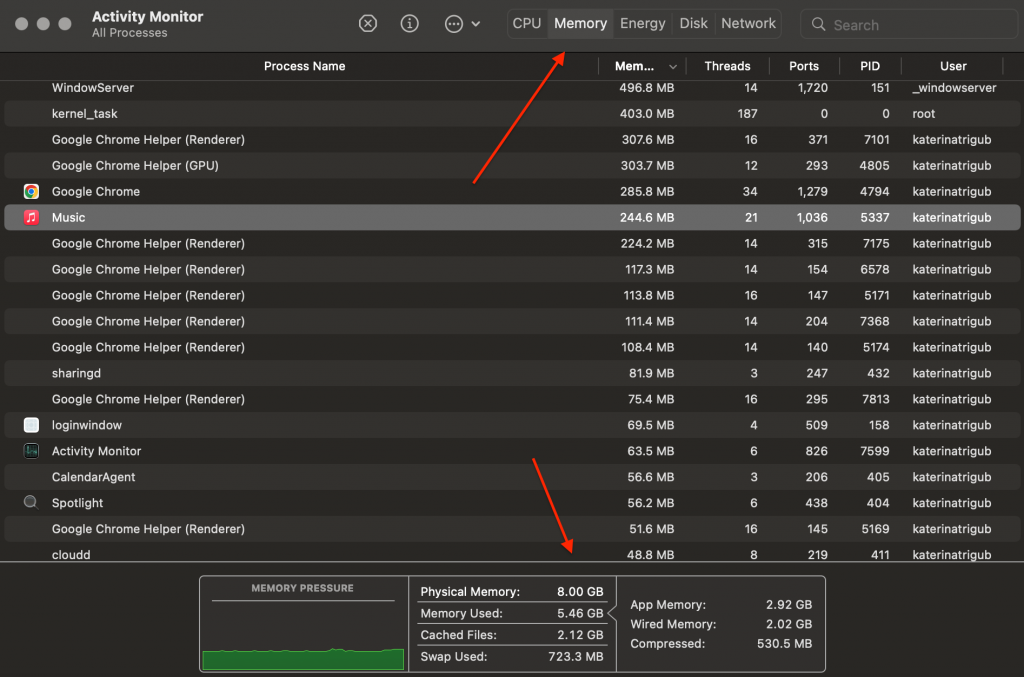
B. Open Activity Monitor using Spotlight. When in the Activity Monitor app, click the Memory tab. Check which apps use the most significant amount of memory, and make sure these apps are trustworthy. If not, consider deleting them.
3. Free Up Disk Space on Your Mac
Lack of disk space on the Mac can cause Error Code 100006 as well. Here are simple steps on how to optimize storage space:
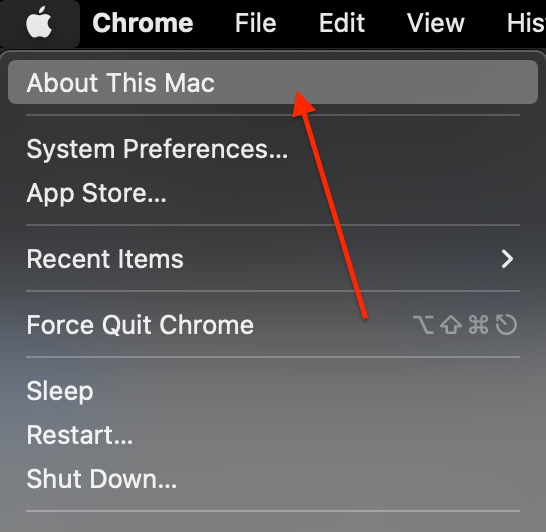
A. From the Apple menu in the left-up corner of your screen click About This Mac.
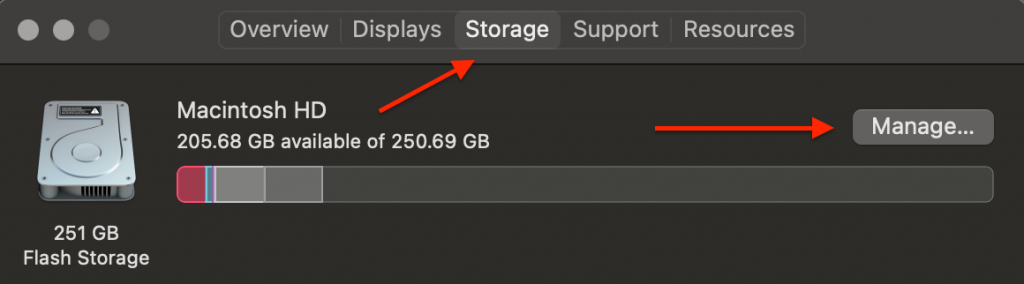
B. Click Storage. The storage bar calculates the amount of used and free storage space. After this analysis, it will show several categories of files.
C. Click the Manage button to open the storage control window.
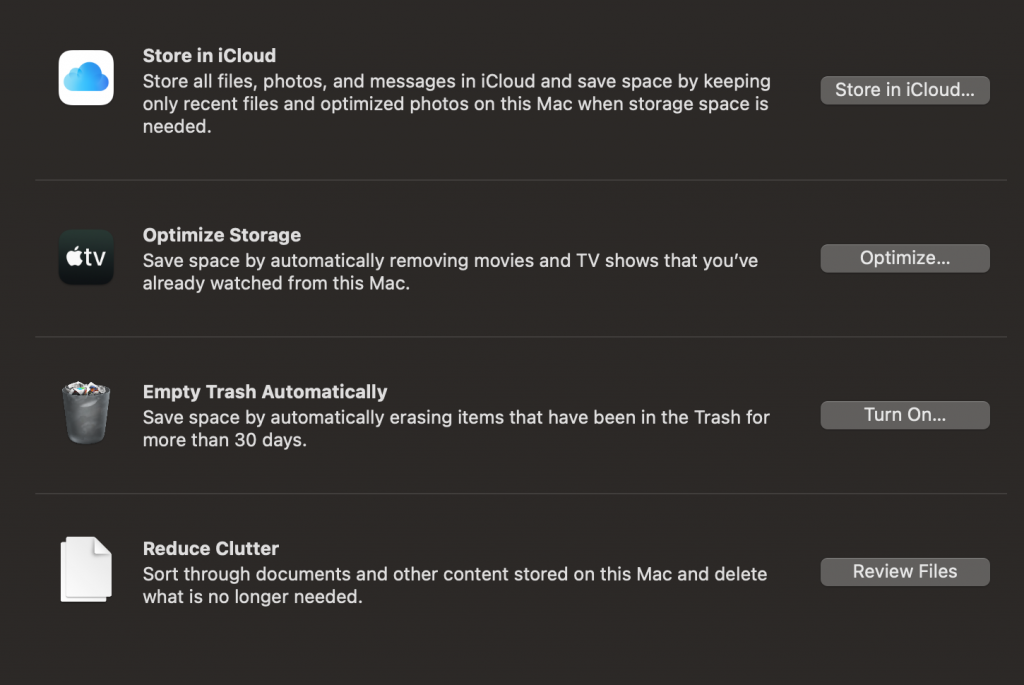
D. To start the optimization process, choose from the listed features (Store in iCloud, Optimize Storage, and Reduce Clutter) and delete the files you don’t need. Learn more about these features.
E. Check the available space shown to see the improvements made. Also, you can check it in the About This Mac window.
4. Run Disk Utility First Aid
The Disk Utility tool checks your Mac’s disk status. It has tools that locate and fix errors for you. After the analysis, the First Aid function will detect and resolve the issue causing error code 100006.
Follow the instructions below to run Disk Utility First Aid:
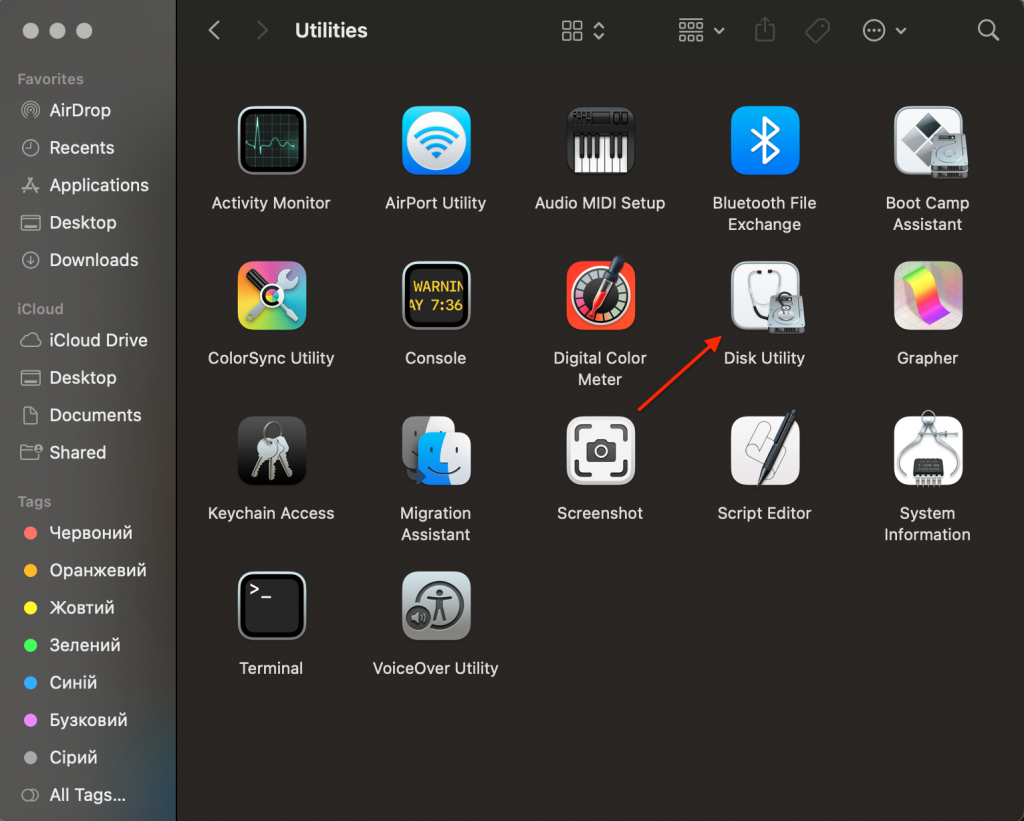
A. Go to Finder > Applications > Utilities and open Disk Utility.
B. In the left sidebar, select the disk you want to check.
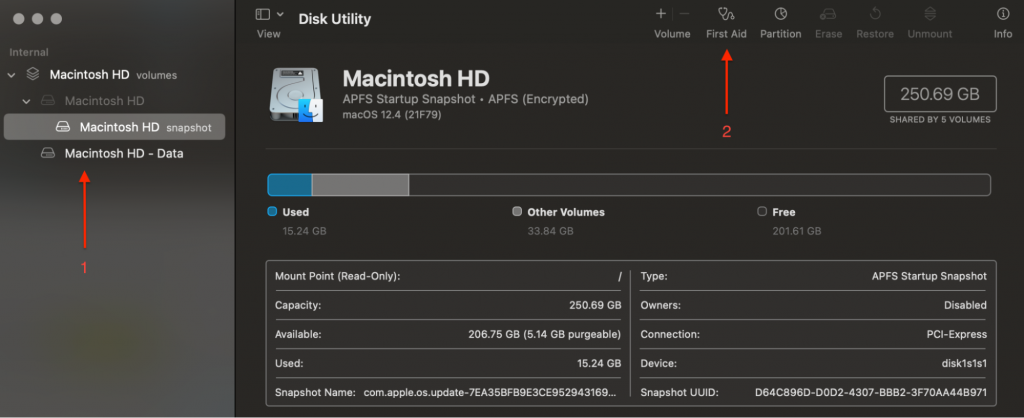
C. Click the First Aid icon at the top > hit Run.
D. After the scan, you’ll see a menu showing the status > click on it to find out the details. The Disk Utility tools will fix the errors and alert you about the issues it can’t repair.
5. Update Your Mac
Checking for and installing software updates on your Mac is essential. Updates to macOS add new features to your Mac, improve the power efficiency, or fix problematic software bugs.
Don’t forget to back up your Mac. After that, follow the instructions below to find and install the software available.
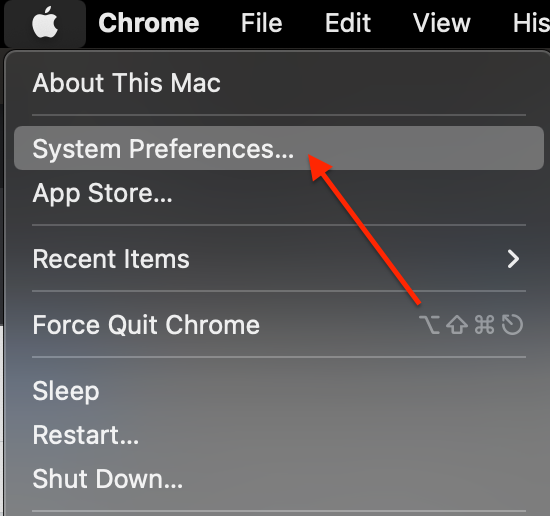
A. Tap on the Apple menu in the upright corner of your screen, and click System Preferences.
B. In System Preferences, choose Software Update.
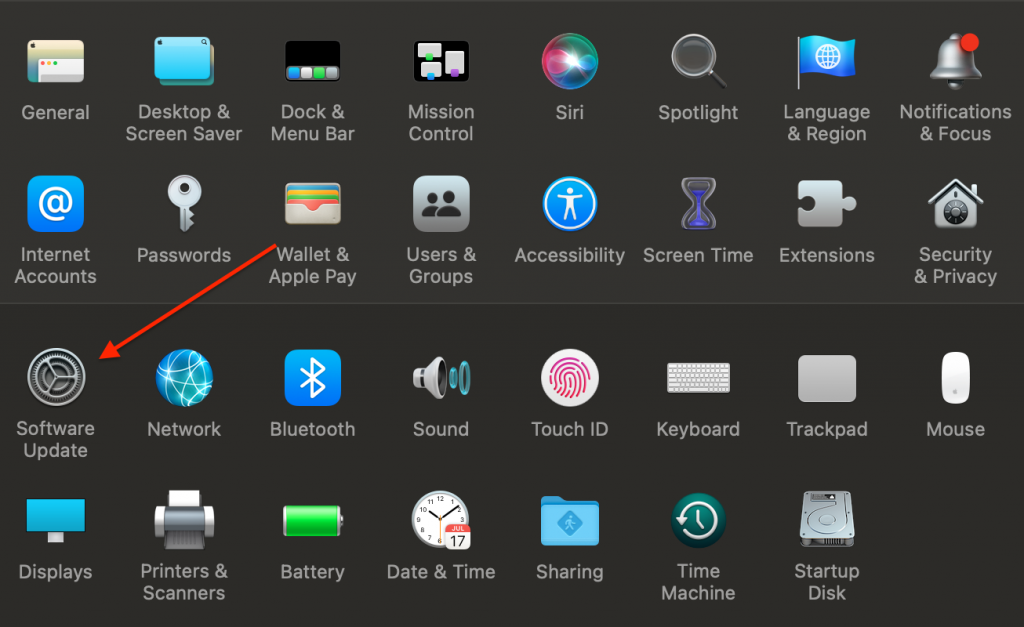
C. Tap Update Now or Upgrade Now:
- Update now installs the newest updates of the current macOS available, from macOS Big Sur 11.5 to macOS Big Sur 11.6, for example.
- Upgrade Now installs a significant new version with a new name, like a macOS Monterey.
Related: macOS Monterey Update: Recent Problems And Fixes
6. Reinstall macOS
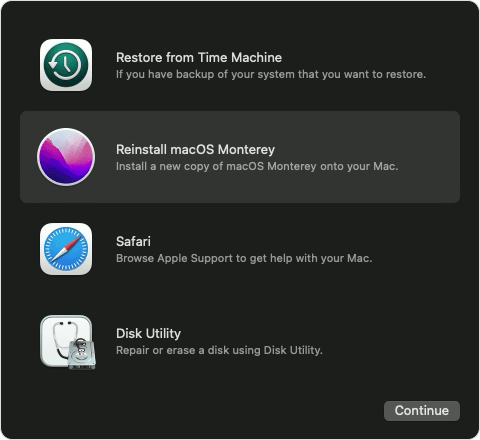
Reinstalling macOS is a practical troubleshooting step applicable when fixing error code 100006 on your Mac. First, find out whether you’re using Mac with Apple silicon or an Intel-based Mac (the instructions will be different for each one). Next, follow the steps suitably to go into the Recovery Mode:
Apple silicon
- Turn on the Mac > press and hold the power button. You should see the startup window.
- Click the Options button (gear icon).
- Tap Continue.
Intel processor
- Turn on your computer and instantly press and hold Command (⌘) + R until you see an Apple emblem or another image.
- Choose a user > click Next and fill in the administrator password if prompted.
- To begin the installation process, you’ll need to choose the Reinstall macOS option. Then, click Continue and follow the instructions you see. After reinstalling macOS, your data will remain on your Mac. It won’t be deleted after this process.
Wrap Up
It’s always confusing and annoying to get errors popping up when you are working, playing, or just browsing social media on your Mac. And it’s always pleasing to know that you fixed the issue on your own like a proper technician! We hope one of these solutions helped you fix error code 100006.
Related reading:
[Explained] macOS Recovery Mode and How to Use it
What is Other Storage on Mac and How to Clean it up
About The Author

Ruslana Lishchuk
Ruslana is a tech content writer whose true passion is finding out about everything Mac-related. She specializes in creating macOS guides and tips & tricks. In her spare time, you’ll find her doing yoga or discovering local coffee shops in search of the best filter coffee.
I encounter this error :
syntax error near unexpected token `(‘
Or this error :
error “sh: -c: line 0: unexpected EOF while looking for matching `”
sh: -c: line 1: syntax error: unexpected end of file” number
Basically, there is something in the pathname of your macOS Install app that DiskMaker X does not like, and most of the time the issue is parenthesis because you renamed the app or included it in a folder that has the version or build number between parenthesis, i.e. (18F132). Parenthesis are difficult to deal with when integrating shell script code in AppleScript, so the best way to avoid this bug at this time is to just remove the parenthesis from the path of the app.
Where can I get a previous macOS Install app ?
Charles Edge nicely compiled the list of download links for previous versions of macOS installer apps. Beware that some of these versions must be purchased (basically, all macOS versions before 10.9).
When using DiskMaker X 7 for High Sierra, I encounter this error message : “The disk could not be created because of an error: An error occured: -10006. Finder got an error: Can’t set alias ”Install macOS High Sierra:Install macOS High Sierra.app” to {425, 76}.”
When using DiskMaker X 8 for Mojave, I encounter this error message : “The disk could not be created because of an error: An error occured: -10006. Finder got an error: Can’t set alias ”Install macOS Mojave:Install macOS Mojave.app” to {425, 76}.”
First, please update to DiskMaker X 7.0.1 or DiskMaker X 8.0.1. It should fix this bug and some.
Second, it may happen that your macOS Install app (either High Sierra or Mojave) is not complete. Check its size : if the installer is about 20 MB large, it’s a stub which can’t be used with DiskMaker X. You need the FULL installer. To be sure to download the full macOS installer, have a look here for macOS High Sierra or here for macOS Mojave. The idea is to use an app that will force download of the full macOS install app.
I plan to add a feature to check the size of the installer before trying to build an install disk in the not-too-distant future.
When creating the Install disk with DiskMaker X, I encounter this error message : “The disk could not be created because of an error: An error occured: -10006.”
This happens sometimes when creating the install disk because a false mount is created as some point. Basically, a false mount is a folder created with the same name as your Install drive, and that makes the Install disk adopt the same name with “1” at the end, i.e. “Install Mac OS Sierra 1”.
If this error happens:
- in Finder, click on Go > Go to Folder menu ;
- Type /Volumes/
- If a folder (not a disk !) is named “Install macOS Sierra”, “Install OS X Yosemite”, or “Install OS X El Capitan”, delete the folder (you may need admin rights, thus type your admin name and password).
- Reboot your Mac
- Try again.
That should do it. I will try to fix it in a future version (if I manage to get why this happens sometimes in some configurations…
“This copy of the Install OS X [OS X Name] application can’t be verified. It may have been corrupted or tampered with during downloading.”
Due to an expiration of OS X App Store certificates, installers of OS X downloaded prior to February 14th of 2016 can’t be used to re-install OS X without encoutering this error. This is not a problem with DiskMaker X per se, but with the installers provided by Apple.
I encounter this message:
“This copy of the Install OS X [OS X Name] application can’t be verified. It may have been corrupted or tampered with during downloading.”
Due to an expiration of OS X App Store certificates, installers of OS X downloaded prior to February 14th of 2016 can’t be used to re-install OS X without encoutering this error. This is not a problem with DiskMaker X per se, but with the installers provided by Apple.
There are three ways to avoid this problem :
- If you did not erase your Mac and its OS is still working fine, reboot on its hard drive, open System Preferences > Date and Time, uncheck Automatically set up date and time and set the date 13th of February 2016, then disconnect from network and reboot;
- If you don’t have an OS installed anymore, reboot on your OS X install disk built with DiskMaker X, open Terminal and type:
date 1010101015
Which will set the date and time on the 10th of October 2015 at 10:10 (it’s just easier for me to remember, but any date in the five last years or so should work).
The last solution (and the best) is to re-download the OS X installers from the App Store. Which is OK for El Capitan if you currently run it, but what if you want to re-download older OS? Sadly, Apple does not allow to re-download say, Lion or Mountain Lion, if your Mac already runs a more recent version of OS X (which sucks REALLY badly). There are two solutions here :
- Re-install at least Lion on a drive, boot on it, open App Store and re-download the apps…
- If your Mac does not support older versions of OS X to reboot on, use a virtual machine with Parallels Desktop or VMWare Fusion to re-install Lion in it, then re-download the installers from Lion’s App Store.
Also, beware that if you have OS X installers on any volume mounted on your Mac: the first copy of the installer the App Store will find will be updated if you decide to download a new version, wherever this copy of the installer is on your boot drive or not.
I bought a recent Mac, I built a disk with DiskMaker X but I can’t boot on it !
This one is tricky to explain. Please take a drink first.
When a new model of Mac is available, it usually ships with an “almost” standard version of OS X. I wrote “almost” as it is a special build of OS X, designed only for this specific kind of new Mac.
The problem is quite well explained here:
http://support.apple.com/kb/ht1159
The following points are especially important:
- Some Macs may include a slightly later build version (but same numbered version) of Mac OS X on the Install or Restore discs than was preinstalled on your computer.
- Do not use a Mac OS X version earlier than the one included with the computer.
- Retail copies of Mac OS X may not always work properly with new Macs. Even if the retail version has been updated via Software Update to a later version of Mac OS X than originally came with a Mac, you may have unexpected issues. Always confirm operating system functionality by using the install disc that shipped with your particular Mac.
So ? If you get a new Mac, you won’t be able to use the installer downloaded from the App Store. The only solution to fully re-install your OS is to use OS X Internet Recovery.
However, there is also another way.
Basically: please be patient. When Apple will release a new version of OS X (say, 10.9.2), you will be able to download from the App Store the full OS X 10.9.2 installer which will provide a new “universal” build of OS X, allowing full install and allowing to build a new boot disk with DiskMaker X on your brand new Mac.
And please, wait before buying a new Mac the next time.
I stumble on a message: “An error occured: -2753. The variable OSX_App is not defined”
This happens if you use the 10.9.x DMG file instead of the full OS X Mavericks Installer app. It just won’t work. Please use the installer app.
When installing, I stumble on this error message: “This copy of the Install OS X Mavericks application can’t be verified. It may have been corrupted or tampered with during downloading.”
Known bug from Apple, your Mac’s clock is set to a wrong date/time. Check this KB article for a solution.
An error -1782 occurs after DiskMaker X copies files: “Can’t get disk “OS X Mountain Lion Install Disk” or similar.
Bug in version 3.0.1, corrected with 3.0.2 and later. The USB boot disk will work however.
An “Error -10660” happens in the building process.
Run DiskMaker X in an admin session (not a standard user session). It should work much better.
I built a disk with Lion DiskMaker 3.0 but can’t boot on it! It does not appear at startup or in the Startup disk Preference.
This has been fixed with DiskMaker X 3.0.1 and later. Give it a try. The (funny) explaination for this bug is here.
Can DiskMaker X build a drive with different versions of OS X ? Say, one partition with Lion Install, another one with Mountain Lion, and another one with Mavericks ?
Sure! Just format your removable drive with a few 8 GB partitions, and launch DiskMaker X. Then choose the “another kind of disk” option and select the right volume each time.
I can’t use DiskMaker X with Mac OS X 10.6.x if I try to use it with my Mavericks installer!
Because of a bug (or a feature?) in Apple’s built-in command createinstallmedia with 10.6.X, DiskMaker X is not compatible with versions of OS X prior to 10.7. I’m working on a fix, but it may take some time to make it available as it means using another completely different method. Check the blog regularly for updates.
I get an error: “The domain/default pair of (/Volumes/OS X Base System/System/Library/CoreServices/SystemVersion, Production Version) does not exist.”
This happens mostly because your OS X Install App is damaged. To check if this theory is correct :
- Right-click or Ctrl+Cllick on the Installer OS X Mavericks application;
- Go to Contents/SharedSupport;
- Double-click InstallESD.dmg.
If an error message appears, you’ll have to download again the Installer app from the App Store. If it mounts properly, get in touch with me.
Note that Lion DiskMaker 3.0.1 should better handle this case.
I keep encountering an ASObjC Runner error (Error -43. File ASObjC Runner wasn’t found)!
This one is quite tricky. It’s a bug which happens randomly with Lion DiskMaker and has no real explaination, except some coding error.
The only way I found that could remove the problem would be to :
- Use Activity Monitor (in /Applicationsl/Utilities) to quit any instance of ASObjC Runner ;
- Reboot your Mac ;
- Check again if ASObjC Runner is still running in the Activity Monitor ;
- Then launch Lion DiskMaker again and try to build your disk.
Also sometimes, using a different, clean session may help.
If you have any insight in this problem, please get in touch with me.
After choosing the OS, Lion DiskMaker seems to hang.
This is related to some issues with Spotlight. To workaround this, open Terminal and type :
killall -9 mdfind
then type Enter key. Lion DiskMaker should resume automatically.
I am told I have no copy of OS X Install available.
The OS X Install application is automatically erased after you upgrade to the new version of OS X. If you need to download it again, open the Mac App Store, then open the Purchase page. You’ll be able to download Mac OS X Lion Install again.
The best time to use Lion DiskMaker is when you just finish downloading OS X from the Mac App Store. Create your disk with Lion Disk Maker , then install OS X.
I got my version of OS X pre-installed with my Mac. How can I get the OS X installer ?
There are two ways to do it.
– If you already purchased OS X on the Mac App Store (and therefore have a valid copy of OS X Install application), you can download the latest installer from Mac App Store first. This installer is compatible with Macs pre-equiped with your version of OS X.
– If you did not purchase OS X, but want to get an Install disc, there is a way to get the InstallESD.dmg file for your Mac. The method is not really easy though. Check Macworld for the full story. After you got the InstallESD.dmg file, use it to build your key or DVD with Lion DiskMaker.
I encountered the following message: The disk could not be created because of an error: An error occurred: 1. hdiutil: attach failed – No such file or directory
This happens if you chose the wrong Mac OS X Lion Install application, or if you mounted manually the InstallESD.dmg file first.
The simple answer is: don’t do this 🙂 Lion DiskMaker is clever enough to detect your copy of OS X Install itself. Then it will mount the DMG file itself.
Yes, that’s cool, but I don’t have the complete OS X Install app and I just kept the InstallESD.dmg file. So do I have to re-download Lion again?
Don’t worry, if it does not find your OS X Install app, Lion DiskMaker will allow to select manually an InstallESD.dmg file.
Can I use a FireWire or SD-Card?
Yes, you can, though the USB drive has the advantage of being « universal » and works on any Mac.
My drive was completely erased!
DiskMaker X proposes two different ways to make a bootable disk:
– You can choose to use a dedicated 8 GB thumb drive ;
– Or you can choose a volume from any drive.
If you choose the 8 GB thumb drive option, the WHOLE disk will be erased. If you choose the second option, ONLY the dedicated volume will be erased, leaving any other volume on your disk intact.
However, if you chose the wrong option, Lion DiskMaker will list every volume that may be erased at the end of the process. Read slowly 🙂
And of course, backup any file on your drive before using the software if necessary. And use a dedicated, small drive (a 8 GB USB key is incredibly cheap these days).
Why did you remove the option to use a 4 GB USB Thumb drive?
The OS X install apps tend to be bigger and bigger with each new release. I used to remove some less essential package in the previous versions of Lion DiskMaker, but this could create some issues (many people complained that the installer then failed when installing OS X).
Also, the price of 8 GB USB thumb stick drives fell , as you can get an 8 GB drive for less than $7 now. So please do yourself a favor, and get one. This drive should be « future-proof » (until Apple makes OS X installer larger than 8 GB…).
Can I redistribute this software ?
Sure, as long as you mention the author and don’t suppress any comment or change anything in its package.
Booting from the DVD is slooooow as hell…
A DVD will always be slower than a USB key, and it seems Lion’s disk image is not optimized for use with optical disks. Avoid it, and use a USB key.
Why did you not rename Lion Diskmaker now that Mountain Lion is available ?
Well, I like this name better than « OS X Diskmaker ». That’s it.
(also: « Lion Diskmaker » should make Apple’s lawyers go less ballistic than « OS X Diskmaker ».
So yes I changed my mind on the last one 🙂
Когда система OS X начинает работать нестабильно, первое, что рекомендуют делать специалисты — проверить диск на наличие ошибок, исправить их и восстановить права доступа к диску. В этом материале мы расскажем как это сделать.
Внимание! Перед началом проверки и исправления ошибок на системном диске (где установлена OS X), а также восстановлением прав доступа, настоятельно рекомендуем закрыть все программы (Command (⌘) + Q) и не запускать никакие процессы.
Компьютерам, как и людям, свойственно ошибаться. Главное в случае ухудшения работы системы OS X вовремя исправлять эти ошибки. Сделать это достаточно просто, благо, инженеры Apple позаботились об этом и встроили «Дисковую утилиту», которая в несколько кликов выявит проблему и позволит её исправить.
1. Откройте Finder → Программы → Утилиты → Дисковая утилита или воспользуйтесь поиском Spotlight.

2. В левой боковой колонке выберите необходимый жёсткий диск.
3. В рабочей области перейдите во вкладку «Первая помощь».

4. Выберите пункт «Проверить диск» и дождитесь окончания проверки, длительность которой будет варьироваться в зависимости от объёма накопителя, его наполненности и мощности самого Mac.
5. Если Дисковая утилита найдёт ошибки, то нажмите кнопку «Исправить диск».
Как восстановить права доступа к диску на Mac OS X через Дисковую утилиту?
Иногда случается так, что права доступа в системе могут быть исправлены на некорректные. В большинстве случаев это происходит по вине неправильно работающих установщиков программ. Из-за этого система может не получить доступ к важным системным настройкам, компонентам и расширениям.
1. Откройте Finder → Программы → Утилиты → Дисковая утилита или воспользуйтесь поиском Spotlight.
2. В левой боковой колонке выберите необходимый жёсткий диск.
3. В рабочей области перейдите во вкладку «Первая помощь».
4. Выберите пункт «Проверить права доступа» и дождитесь окончания проверки.
5. Нажмите кнопку «Исправить права доступа».
Как восстановить права доступа к диску на Mac OS X через Терминал?
1. Откройте Finder → Программы → Утилиты → Терминал или воспользуйтесь поиском Spotlight.
2. Введите следующую команду:
sudo diskutil repairPermissions /

Когда начнётся процесс, вы увидите сообщение типа:
Started verify/repair permissions on disk0s2 Macintosh HD
Чтобы исправить права доступа к другому (несистемному) диску, замените «/» на имя другого диска, например:
Диагностика Mac. Как проверить Mac? Коды ошибок и решение проблем
Перед походом в сервисный центр со своим Mac любой пользователь может самостоятельно проверить свой компьютер на наличие проблем. Возможно, зная в чём проблема, пользователю удастся провести несложный ремонт самостоятельно.
Так как от инструкций от Apple в данном случае толку мало – они направляют исключительно в сервисный центр, то я составил собственный гайд по решению проблем с Mac.
Независимо от названия, работают утилиты практически идентично.
Как запустить Диагностику Apple?
Шаг 1. Отключите все устройства кроме мыши, клавиатуры, сетевого кабеля и монитора.
Шаг 2. Выключите компьютер.
Шаг 3. Включайте компьютер и жмите кнопку D. Держите её до появления специального экрана с выбором языка.
Шаг 4. Выбирайте русский язык и проверка начнётся автоматически. Длится она не очень долго – 2-3 минуты.
Если у вас не запускается обычная диагностика, то при загрузке нажмите Option+D и диагностика начнётся с использованием интернета. Например, мне так и пришлось сделать, ибо я давно поменял в Макбуке жесткие диски и раздела восстановления у меня, естественно, уже нет. Такая картинка может провисеть 5 минут. Если зависло, то перезагрузите компьютер.

Вот как выглядит диагностика на MacBook Pro 2011. В начале находим и выбираем строку “Выбрать русский как главный язык”:

После этого жмём “Тест”:

Коды ошибок Apple на MacBook
Что ещё нужно знать?
Не всегда тест выводит ошибки. Вот у меня какие-то проблемы с SD слотом, но тест ошибок не выявил. Возможно, требуется расширенное тестирование.
Многие проблемы, особенно у старых моделей, можно решить самостоятельно, но если вы не уверены в своих силах, то несите в сервисный центр Apple. Чем старее модель, тем проще её разбирать, а значит проще починить нужный модуль.
Источники:
https://yablyk. com/824575-kak-vosstanovit-prava-dostupa-k-disku-i-ispravit-oshibki-na-mac-os-x/
https://ipadstory. ru/diagnostika-mac-kak-proverit-mac-kody-oshibok-i-reshenie-problem. html