
by Teodor Nechita
Eager to help those in need, Teodor writes articles daily on subjects regarding Windows, Xbox, and all things tech-related. When not working, you may usually find him either… read more
Updated on December 14, 2021
XINSTALL BY CLICKING THE DOWNLOAD FILE
This software will keep your drivers up and running, thus keeping you safe from common computer errors and hardware failure. Check all your drivers now in 3 easy steps:
- Download DriverFix (verified download file).
- Click Start Scan to find all problematic drivers.
- Click Update Drivers to get new versions and avoid system malfunctionings.
- DriverFix has been downloaded by 0 readers this month.
Several users have been reporting on the official Microsoft forums that they are having issues with the XPS printer:
I was unable to print from software using the XPS writer. I attempted to reinstall the printer but the installation fails reporting “printer driver not installed. Element not found”
Apparently, they are getting an error 1168: Element not found can have a wide variety of causes.
This article will guide you step-by-step on how to fix this error with the XPS printer.
How do you fix a generic error 1168?
1. Update your drivers
- Click on the Start button, then go to Settings
- Select Update & Security
- Click on Check for updates
- Allow Windows Update to download and install the updated driver
Follow these steps to install the latest printer drivers using Windows Update.
Alternatively, you can use a professional third-party tool that performs this process automatically and aims to keep your printer drivers updated and healthy.
More so, by choosing this automated method of managing drivers you also stay secure from potential damages caused by devices incompatibility.
Thus if you need reliable support to install or update any driver, the following software will accomplish this mission with no exception.
⇒ Get DriverFix
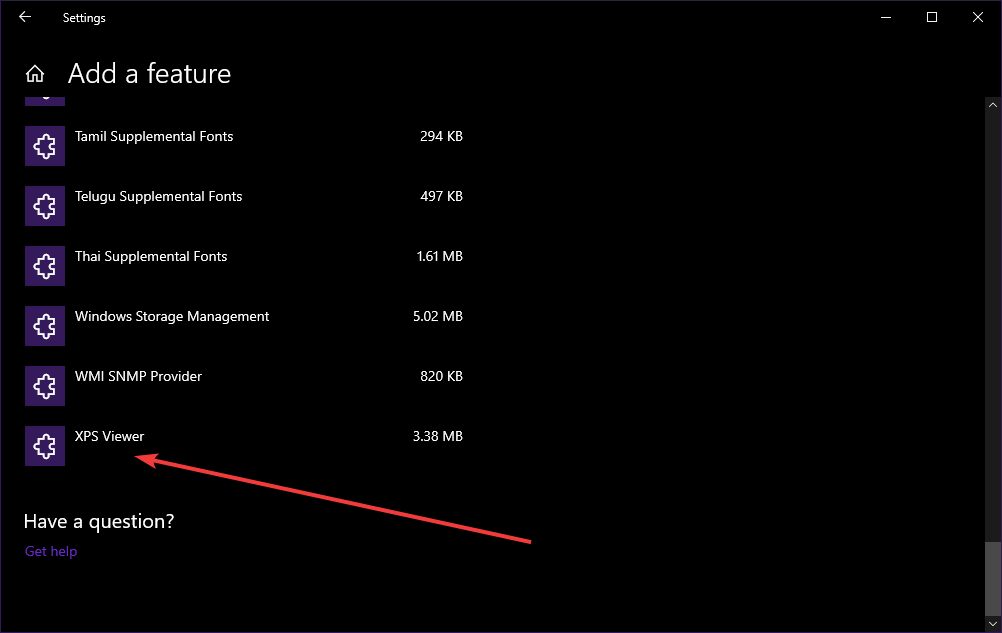
2. Try reinstalling the Windows XPS feature
- Press Windows
- Click on Settings (the cogwheel-shaped button)
- Select Apps
- Go to Apps & features
- Click Optional features
- Look for XPS feature if it is present
- If it is, right-click it and select uninstall
- Restart your PC
- After the restart or if your PC didn’t have the feature, go to the Manage optional features screen, and select Add a new feature
- When on the Add a new feature screen, select the XPS Viewer
- Restart your PC
3. Manually search for the location of your XPS Writer
Depending on which version of Windows 10 you have installed, the location of the XPS Writer may vary.
As such, if the solution listed above didn’t work, try this:
- Press Windows + R
- Type in control.exe
- Click Programs
- Select Programs and Features
- Click Turn Windows features on or off
- See if XPS Services and XPS Viewer are listed
- If the services are marked in their checkbox, unmark them and restart the PC
- If the services are unmarked in their checkbox, mark them and restart the PC
- Press Windows + R
- Type in control.exe
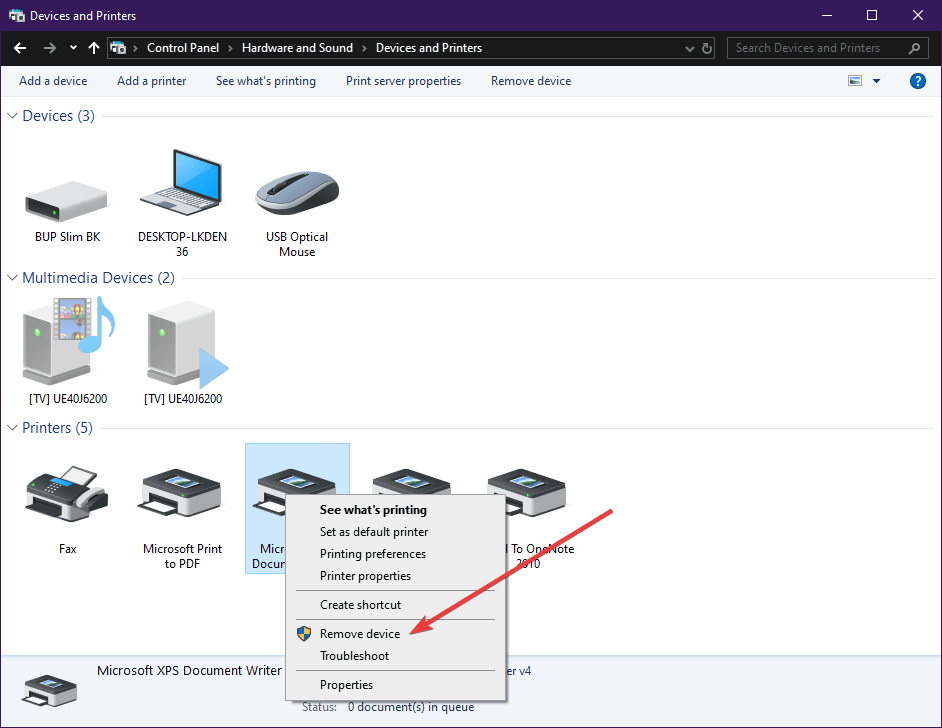
- Go to Hardware and Sound
- Click Devices and Printers
- See if Microsoft XPS Document Writer is installed as a printer.
- If it is, right-click it and choose Remove device
- Restart your PC
- Go back to Devices and Printers and select Add a printer
- Select The printer that I want isn’t listed
- Click Add a local printer or network printer with manual setting
- In the Choose a printer port screen, select Use an existing port and PORTPROMPT: (Local Port)
- In the Install a printer driver screen, select Microsoft on the left pane and Microsoft XPS Document Writer on the right
- When asked Which version of the driver do you want to use? select Use the driver that is currently installed (recommended)
If these particular steps didn’t help, you could also try to:
- Uninstall Recent Windows Updates
- Reset Your PC
![]()
Newsletter
by Teodor Nechita
Eager to help those in need, Teodor writes articles daily on subjects regarding Windows, Xbox, and all things tech-related. When not working, you may usually find him either… read more
Updated on December 14, 2021
XINSTALL BY CLICKING THE DOWNLOAD FILE
This software will keep your drivers up and running, thus keeping you safe from common computer errors and hardware failure. Check all your drivers now in 3 easy steps:
- Download DriverFix (verified download file).
- Click Start Scan to find all problematic drivers.
- Click Update Drivers to get new versions and avoid system malfunctionings.
- DriverFix has been downloaded by 0 readers this month.
Several users have been reporting on the official Microsoft forums that they are having issues with the XPS printer:
I was unable to print from software using the XPS writer. I attempted to reinstall the printer but the installation fails reporting “printer driver not installed. Element not found”
Apparently, they are getting an error 1168: Element not found can have a wide variety of causes.
This article will guide you step-by-step on how to fix this error with the XPS printer.
How do you fix a generic error 1168?
1. Update your drivers
- Click on the Start button, then go to Settings
- Select Update & Security
- Click on Check for updates
- Allow Windows Update to download and install the updated driver
Follow these steps to install the latest printer drivers using Windows Update.
Alternatively, you can use a professional third-party tool that performs this process automatically and aims to keep your printer drivers updated and healthy.
More so, by choosing this automated method of managing drivers you also stay secure from potential damages caused by devices incompatibility.
Thus if you need reliable support to install or update any driver, the following software will accomplish this mission with no exception.
⇒ Get DriverFix
2. Try reinstalling the Windows XPS feature
- Press Windows
- Click on Settings (the cogwheel-shaped button)
- Select Apps
- Go to Apps & features
- Click Optional features
- Look for XPS feature if it is present
- If it is, right-click it and select uninstall
- Restart your PC
- After the restart or if your PC didn’t have the feature, go to the Manage optional features screen, and select Add a new feature
- When on the Add a new feature screen, select the XPS Viewer
- Restart your PC
3. Manually search for the location of your XPS Writer
Depending on which version of Windows 10 you have installed, the location of the XPS Writer may vary.
As such, if the solution listed above didn’t work, try this:
- Press Windows + R
- Type in control.exe
- Click Programs
- Select Programs and Features
- Click Turn Windows features on or off
- See if XPS Services and XPS Viewer are listed
- If the services are marked in their checkbox, unmark them and restart the PC
- If the services are unmarked in their checkbox, mark them and restart the PC
- Press Windows + R
- Type in control.exe
- Go to Hardware and Sound
- Click Devices and Printers
- See if Microsoft XPS Document Writer is installed as a printer.
- If it is, right-click it and choose Remove device
- Restart your PC
- Go back to Devices and Printers and select Add a printer
- Select The printer that I want isn’t listed
- Click Add a local printer or network printer with manual setting
- In the Choose a printer port screen, select Use an existing port and PORTPROMPT: (Local Port)
- In the Install a printer driver screen, select Microsoft on the left pane and Microsoft XPS Document Writer on the right
- When asked Which version of the driver do you want to use? select Use the driver that is currently installed (recommended)
If these particular steps didn’t help, you could also try to:
- Uninstall Recent Windows Updates
- Reset Your PC
![]()
Newsletter
C++, windows-application, wlanapi, qt
Здравствуйте!
Я хочу подключатся к сетям WiFi Enterprise через свою программу. Настроил Radius Server, поключение к сети через Windows работает. Но при подключении через программу пишет: ошибка 1168 (ERROR_NOT_FOUND). Если быть точнее, то такую ошибку возращает функция: WlanSetProfileEapXmlUserData.
Разрабатываю эту программу на Qt 5.9.8 (Windows 10).
Пример кода:
QString xmlProfile = "<?xml version="1.0"?><WLANProfile xmlns="http://www.microsoft.com/networking/WLAN/profile/v1"><name>" + profileName + "</name><SSIDConfig><SSID>" "<name>" + apName + "</name></SSID><nonBroadcast>" + checkHiddenAP(hiddenAP) + "</nonBroadcast></SSIDConfig><connectionType>ESS</connectionType><connectionMode>" + checkAutoConnection(isAutoConnection) + "</connectionMode><MSM><security><authEncryption><authentication>" + checkAuthentication(authAlgorithm) + "</authentication><encryption>" + checkEncryption(encryption) + "</encryption><useOneX>true</useOneX></authEncryption><PMKCacheMode>enabled</PMKCacheMode><PMKCacheTTL>720</PMKCacheTTL><PMKCacheSize>128</PMKCacheSize>" "<preAuthMode>disabled</preAuthMode><OneX xmlns="http://www.microsoft.com/networking/OneX/v1"><authMode>user</authMode><EAPConfig><EapHostConfig " "xmlns="http://www.microsoft.com/provisioning/EapHostConfig"><EapMethod><Type xmlns="http://www.microsoft.com/provisioning/EapCommon">25</Type><VendorId " "xmlns="http://www.microsoft.com/provisioning/EapCommon">0</VendorId><VendorType xmlns="http://www.microsoft.com/provisioning/EapCommon">0</VendorType>" "<AuthorId xmlns="http://www.microsoft.com/provisioning/EapCommon">0</AuthorId></EapMethod>" "<Config xmlns="http://www.microsoft.com/provisioning/EapHostConfig"><Eap xmlns="http://www.microsoft.com/provisioning/BaseEapConnectionPropertiesV1"><Type>25</Type>" "<EapType xmlns="http://www.microsoft.com/provisioning/MsPeapConnectionPropertiesV1"><ServerValidation>" "<DisableUserPromptForServerValidation>false</DisableUserPromptForServerValidation><ServerNames></ServerNames></ServerValidation>" "<FastReconnect>true</FastReconnect><InnerEapOptional>false</InnerEapOptional><Eap xmlns="http://www.microsoft.com/provisioning/BaseEapConnectionPropertiesV1"><Type>26</Type>" "<EapType xmlns="http://www.microsoft.com/provisioning/MsChapV2ConnectionPropertiesV1"><UseWinLogonCredentials>false</UseWinLogonCredentials></EapType></Eap>" "<EnableQuarantineChecks>false</EnableQuarantineChecks><RequireCryptoBinding>false</RequireCryptoBinding><PeapExtensions><PerformServerValidation " "xmlns="http://www.microsoft.com/provisioning/MsPeapConnectionPropertiesV2">true</PerformServerValidation><AcceptServerName " "xmlns="http://www.microsoft.com/provisioning/MsPeapConnectionPropertiesV2">true</AcceptServerName><PeapExtensionsV2 " "xmlns="http://www.microsoft.com/provisioning/MsPeapConnectionPropertiesV2"><AllowPromptingWhenServerCANotFound " "xmlns="http://www.microsoft.com/provisioning/MsPeapConnectionPropertiesV3">true</AllowPromptingWhenServerCANotFound></PeapExtensionsV2></PeapExtensions></EapType></Eap></Config>" "</EapHostConfig></EAPConfig></OneX><EapHostUserCredentials xmlns="http://www.microsoft.com/provisioning/EapHostUserCredentials" " "xmlns:eapCommon="http://www.microsoft.com/provisioning/EapCommon" xmlns:baseEap="http://www.microsoft.com/provisioning/BaseEapMethodUserCredentials"><EapMethod>" "<eapCommon:Type>25</eapCommon:Type><eapCommon:AuthorId>0</eapCommon:AuthorId></EapMethod><Credentials xmlns:eapUser="http://www.microsoft.com/provisioning/EapUserPropertiesV1" " "xmlns:xsi="http://www.w3.org/2001/XMLSchema-instance" xmlns:baseEap="http://www.microsoft.com/provisioning/BaseEapUserPropertiesV1" " "xmlns:MsPeap="http://www.microsoft.com/provisioning/MsPeapUserPropertiesV1" xmlns:MsChapV2="http://www.microsoft.com/provisioning/MsChapV2UserPropertiesV1"><baseEap:Eap>" "<baseEap:Type>25</baseEap:Type><MsPeap:EapType><MsPeap:RoutingIdentity>" + apName + "</MsPeap:RoutingIdentity><baseEap:Eap><baseEap:Type>26</baseEap:Type><MsChapV2:EapType>" "<MsChapV2:Username>" + username + "</MsChapV2:Username><MsChapV2:Password>" + password + "</MsChapV2:Password></MsChapV2:EapType></baseEap:Eap></MsPeap:EapType></baseEap:Eap>" "</Credentials></EapHostUserCredentials></security></MSM></WLANProfile>"; LPCWSTR wlanProfile = reinterpret_cast<LPCWSTR>(profileName.utf16()); // profileName - это название Точки Доступа которую получаю через параметр функции. DWORD dwResult = WlanSetProfileEapXmlUserData(hClient, &adapterGUID, wlanProfile, WLAN_SET_EAPHOST_DATA_ALL_USERS, reinterpret_cast<LPCWSTR(xmlProfile).utf16()), nullptr); qDebug() << dwResult;Подключения к персональной сети работают, там использую WlanSetProfile функцию. Проблема только если подключатся к корпоративной сети. Я думаю что проблема с неверным XML профилем. На сайте Microsoft, есть много примеров профилей, к примеру:
https://docs.microsoft.com/en-us/windows/win32/nativewifi/wpa2-enterprise-with-peap-mschapv2-profile-sample
и
https://docs.microsoft.com/en-us/windows/win32/eaphost/peap-ms-chapv2-user-properties
Как думаете в чем может быть проблема? Или где можно узнать какой профиль нужен? Спасибо за помощь.
| Номер ошибки: | Ошибка 1168 | |
| Название ошибки: | Windows Defender Error Code 1168 | |
| Описание ошибки: | Ошибка 1168: Возникла ошибка в приложении Windows Defender. Приложение будет закрыто. Приносим извинения за неудобства. | |
| Разработчик: | Microsoft Corporation | |
| Программное обеспечение: | Windows Defender | |
| Относится к: | Windows XP, Vista, 7, 8, 10, 11 |
Фон «Windows Defender Error Code 1168»
Эксперты обычно называют «Windows Defender Error Code 1168» «ошибкой времени выполнения». Программисты, такие как Microsoft Corporation, стремятся создавать программное обеспечение, свободное от этих сбоев, пока оно не будет публично выпущено. Как и во всем в жизни, иногда такие проблемы, как ошибка 1168, упускаются из виду.
После первоначального выпуска пользователи Windows Defender могут столкнуться с сообщением «Windows Defender Error Code 1168» во время запуска программы. Когда это происходит, конечные пользователи могут сообщить Microsoft Corporation о наличии ошибок «Windows Defender Error Code 1168». Microsoft Corporation может устранить обнаруженные проблемы, а затем загрузить измененный файл исходного кода, позволяя пользователям обновлять свою версию. Поэтому, когда вы сталкиваетесь с запросом на обновление Windows Defender, это обычно связано с тем, что это решение для исправления ошибки 1168 и других ошибок.
Вполне вероятно, что при загрузке Windows Defender вы столкнетесь с «Windows Defender Error Code 1168». Проанализируем некоторые из наиболее распространенных причин ошибок ошибки 1168 во время выполнения:
Ошибка 1168 Crash — это распространенная ошибка 1168 во время выполнения ошибки, которая приводит к полному завершению работы программы. Обычно это происходит, когда Windows Defender не может обработать данные в удовлетворительной форме и поэтому не может получить ожидаемый результат.
Утечка памяти «Windows Defender Error Code 1168» — ошибка 1168 утечка памяти приводит к тому, что Windows Defender постоянно использует все больше и больше памяти, увяская систему. Возможные причины включают сбой Microsoft Corporation для девыделения памяти в программе или когда плохой код выполняет «бесконечный цикл».
Error 1168 Logic Error — Ошибка программной логики возникает, когда, несмотря на точный ввод от пользователя, производится неверный вывод. Это связано с ошибками в исходном коде Microsoft Corporation, обрабатывающих ввод неправильно.
Повреждение, отсутствие или удаление файлов Windows Defender Error Code 1168 может привести к ошибкам Windows Defender. Как правило, решить проблему можно заменой файла Microsoft Corporation. В некоторых случаях реестр Windows пытается загрузить файл Windows Defender Error Code 1168, который больше не существует; в таких ситуациях рекомендуется запустить сканирование реестра, чтобы исправить любые недопустимые ссылки на пути к файлам.
Распространенные проблемы Windows Defender Error Code 1168
Усложнения Windows Defender с Windows Defender Error Code 1168 состоят из:
- «Ошибка программного обеспечения Windows Defender Error Code 1168. «
- «Недопустимая программа Win32: Windows Defender Error Code 1168»
- «Windows Defender Error Code 1168 должен быть закрыт. «
- «Файл Windows Defender Error Code 1168 не найден.»
- «Windows Defender Error Code 1168 не может быть найден. «
- «Проблема при запуске приложения: Windows Defender Error Code 1168. «
- «Windows Defender Error Code 1168 не выполняется. «
- «Windows Defender Error Code 1168 выйти. «
- «Windows Defender Error Code 1168: путь приложения является ошибкой. «
Проблемы Windows Defender Error Code 1168 с участием Windows Defenders возникают во время установки, при запуске или завершении работы программного обеспечения, связанного с Windows Defender Error Code 1168, или во время процесса установки Windows. При появлении ошибки Windows Defender Error Code 1168 запишите вхождения для устранения неполадок Windows Defender и чтобы HelpMicrosoft Corporation найти причину.
Причины проблем Windows Defender Error Code 1168
Проблемы Windows Defender Error Code 1168 могут быть отнесены к поврежденным или отсутствующим файлам, содержащим ошибки записям реестра, связанным с Windows Defender Error Code 1168, или к вирусам / вредоносному ПО.
В первую очередь, проблемы Windows Defender Error Code 1168 создаются:
- Недопустимая или поврежденная запись Windows Defender Error Code 1168.
- Вирус или вредоносное ПО, которые повредили файл Windows Defender Error Code 1168 или связанные с Windows Defender программные файлы.
- Windows Defender Error Code 1168 злонамеренно удален (или ошибочно) другим изгоем или действительной программой.
- Другая программа, конфликтующая с Windows Defender Error Code 1168 или другой общей ссылкой Windows Defender.
- Windows Defender (Windows Defender Error Code 1168) поврежден во время загрузки или установки.
Продукт Solvusoft
Загрузка
WinThruster 2022 — Проверьте свой компьютер на наличие ошибок.
Совместима с Windows 2000, XP, Vista, 7, 8, 10 и 11
Установить необязательные продукты — WinThruster (Solvusoft) | Лицензия | Политика защиты личных сведений | Условия | Удаление
Как исправить ошибку принтера XPS 1168: элемент не найден
На официальных форумах Microsoft несколько пользователей сообщали о проблемах с принтером XPS:
Мне не удалось распечатать из программного обеспечения с помощью XPS Writer. Я попытался переустановить принтер, но при установке произошел сбой с сообщением «драйвер принтера не установлен. Элемент не найден »
Видимо, они получают ошибку 1168: элемент не найден может иметь самые разные причины.
В этой статье вы узнаете, как исправить эту ошибку с помощью принтера XPS.
Как исправить общую ошибку 1168?
1. Попробуйте переустановить функцию Windows XPS
- Нажмите Windows
- Нажмите на настройки (кнопка в форме зубчатого колеса)
- Выберите приложения
- Перейти к приложениям и функциям
- Нажмите Дополнительные функции
- Ищите функцию XPS, если она присутствует
- Если это так, щелкните его правой кнопкой мыши и выберите «Удалить».
- Перезагрузите компьютер
- После перезагрузки или, если на вашем компьютере не было этой функции, перейдите на экран « Управление дополнительными функциями» и выберите « Добавить новую функцию».
- На экране « Добавить новую функцию» выберите « Средство просмотра XPS».
- Перезагрузите компьютер

2. Вручную найдите местоположение вашего XPS Writer
В зависимости от установленной версии Windows 10 расположение XPS Writer может отличаться.
Таким образом, если решение, указанное выше, не работает, попробуйте это:
- Нажмите Windows + R
- Введите control.exe
- Нажмите Программы
- Выберите программы и функции
- Нажмите Включить или отключить функции Windows.
- Посмотрите, есть ли в списке службы XPS и программа просмотра XPS
- Если службы отмечены в их флажке, снимите их и перезагрузите компьютер
- Если сервисы не помечены галочками, отметьте их и перезагрузите компьютер
- Нажмите Windows + R
- Введите control.exe
- Перейти к оборудованию и звуку
- Нажмите Устройства и принтеры
- Посмотрите, установлен ли Microsoft XPS Document Writer в качестве принтера.
- Если это так, щелкните правой кнопкой мыши и выберите « Удалить устройство».
- Перезагрузите компьютер
- Вернитесь в раздел «Устройства и принтеры» и выберите « Добавить принтер».
- Выберите нужный принтер, которого нет в списке
- Нажмите Добавить локальный принтер или сетевой принтер с ручной настройкой.
- На экране выбора порта принтера выберите Использовать существующий порт и PORTPROMPT: (Локальный порт)
- На экране установки драйвера принтера выберите Microsoft на левой панели и Microsoft XPS Document Writer на правой
- На вопрос, какую версию драйвера вы хотите использовать? выберите Использовать драйвер, который установлен в данный момент (рекомендуется)

Если эти конкретные шаги не помогли, вы также можете попробовать:
- Обновите свои драйверы
- Удалить последние обновления Windows
- Перезагрузить компьютер
- Remove From My Forums

SOLVED: Writing RPi2 image to SD Card: dism Error: 1168 — cannot find element
-
Question
-
Hello all,
I have installed Windows 10 build 10074 (Dutch language) on a PC, no VM.
I have downloaded and extracted Windows_IoT_Core_RPI2_BUILD.zip
One of the files extracted is Flash.ffu
I have established that my SD card is a class 10 and 16 GB
I open an Administrator command prompt.
I have established the SD card is seen as «Disk 1» 14 GB size
I change directory to the directory containing Flash.ffu
I execute the command: «dism.exe /Apply-Image /ImageFile:flash.ffu /ApplyDrive:.PhysicalDrive1 /SkipPlatformCheck»
I receive follwing error:
Deployment Image Servicing and Management tool
Version: 10.0.10074.0Kan element niet vinden.
The DISM log file can be found at C:WindowsLogsDISMdism.log
> «Kan element niet vinden» translates as : «Cannot find element»
I notice a difference in filename between the extracted «Flash.ffu» and the «flash.ffu» (capital F) so I retry the command as:
«dism.exe /Apply-Image /ImageFile:Flash.ffu /ApplyDrive:.PhysicalDrive1 /SkipPlatformCheck»
but with same error 1168
The DISM log entry follows below.
Anyone encountering the same issue, and better still, have found a solution?
Many thanks!
Ralph
DISM log file entry:
2015-05-02 13:36:06, Info DISM PID=4348 TID=4092 Scratch directory set to ‘C:UsersralphAppDataLocalTemp’. — CDISMManager::put_ScratchDir
2015-05-02 13:36:06, Info DISM PID=4348 TID=4092 DismCore.dll version: 10.0.10074.0 — CDISMManager::FinalConstruct
2015-05-02 13:36:06, Info DISM PID=4348 TID=4092 Successfully loaded the ImageSession at «C:WindowsSystem32Dism» — CDISMManager::LoadLocalImageSession
2015-05-02 13:36:06, Info DISM DISM Provider Store: PID=4348 TID=4092 Found and Initialized the DISM Logger. — CDISMProviderStore::Internal_InitializeLogger
2015-05-02 13:36:06, Info DISM DISM Provider Store: PID=4348 TID=4092 Failed to get and initialize the PE Provider. Continuing by assuming
that it is not a WinPE image. — CDISMProviderStore::Final_OnConnect
2015-05-02 13:36:06, Info DISM DISM Provider Store: PID=4348 TID=4092 Finished initializing the Provider Map. — CDISMProviderStore::Final_OnConnect
2015-05-02 13:36:06, Info DISM DISM Provider Store: PID=4348 TID=4092 Getting Provider DISMLogger — CDISMProviderStore::GetProvider
2015-05-02 13:36:06, Info DISM DISM Provider Store: PID=4348 TID=4092 Provider has previously been initialized. Returning the existing instance.
— CDISMProviderStore::Internal_GetProvider
2015-05-02 13:36:06, Info DISM DISM Manager: PID=4348 TID=4092 Successfully created the local image session and provider store. — CDISMManager::CreateLocalImageSession
2015-05-02 13:36:06, Info DISM DISM Provider Store: PID=4348 TID=4092 Getting Provider DISMLogger — CDISMProviderStore::GetProvider
2015-05-02 13:36:06, Info DISM DISM Provider Store: PID=4348 TID=4092 Provider has previously been initialized. Returning the existing instance.
— CDISMProviderStore::Internal_GetProvider
2015-05-02 13:36:06, Info DISM DISM.EXE:2015-05-02 13:36:06, Info DISM DISM.EXE: <—— Starting Dism.exe session ——>
2015-05-02 13:36:06, Info DISM DISM.EXE:2015-05-02 13:36:06, Info DISM DISM.EXE: Host machine information: OS Version=10.0.10074, Running architecture=amd64, Number of processors=2
2015-05-02 13:36:06, Info DISM DISM.EXE: Dism.exe version: 10.0.10074.0
2015-05-02 13:36:06, Info DISM DISM.EXE: Executing command line: dism.exe /Apply-Image /ImageFile:flash.ffu /ApplyDrive:.PhysicalDrive1
/SkipPlatformCheck
2015-05-02 13:36:06, Info DISM DISM Provider Store: PID=4348 TID=4092 Getting the collection of providers from a local provider store type. — CDISMProviderStore::GetProviderCollection
2015-05-02 13:36:06, Info DISM DISM Provider Store: PID=4348 TID=4092 Provider has not previously been encountered. Attempting to initialize
the provider. — CDISMProviderStore::Internal_GetProvider
2015-05-02 13:36:06, Info DISM DISM Provider Store: PID=4348 TID=4092 Loading Provider from location C:WindowsSystem32DismFolderProvider.dll
— CDISMProviderStore::Internal_GetProvider
2015-05-02 13:36:06, Info DISM DISM Provider Store: PID=4348 TID=4092 Connecting to the provider located at C:WindowsSystem32DismFolderProvider.dll.
— CDISMProviderStore::Internal_LoadProvider
2015-05-02 13:36:06, Info DISM DISM Provider Store: PID=4348 TID=4092 Provider has not previously been encountered. Attempting to initialize
the provider. — CDISMProviderStore::Internal_GetProvider
2015-05-02 13:36:06, Info DISM DISM Provider Store: PID=4348 TID=4092 Loading Provider from location C:WindowsSystem32DismWimProvider.dll —
CDISMProviderStore::Internal_GetProvider
2015-05-02 13:36:06, Info DISM DISM Provider Store: PID=4348 TID=4092 Connecting to the provider located at C:WindowsSystem32DismWimProvider.dll.
— CDISMProviderStore::Internal_LoadProvider
2015-05-02 13:36:06, Info DISM DISM Provider Store: PID=4348 TID=4092 Provider has not previously been encountered. Attempting to initialize
the provider. — CDISMProviderStore::Internal_GetProvider
2015-05-02 13:36:06, Info DISM DISM Provider Store: PID=4348 TID=4092 Loading Provider from location C:WindowsSystem32DismVHDProvider.dll —
CDISMProviderStore::Internal_GetProvider
2015-05-02 13:36:06, Info DISM DISM Provider Store: PID=4348 TID=4092 Connecting to the provider located at C:WindowsSystem32DismVHDProvider.dll.
— CDISMProviderStore::Internal_LoadProvider
2015-05-02 13:36:06, Info DISM DISM Provider Store: PID=4348 TID=4092 Provider has not previously been encountered. Attempting to initialize
the provider. — CDISMProviderStore::Internal_GetProvider
2015-05-02 13:36:06, Info DISM DISM Provider Store: PID=4348 TID=4092 Loading Provider from location C:WindowsSystem32DismImagingProvider.dll
— CDISMProviderStore::Internal_GetProvider
2015-05-02 13:36:06, Info DISM DISM Provider Store: PID=4348 TID=4092 Connecting to the provider located at C:WindowsSystem32DismImagingProvider.dll.
— CDISMProviderStore::Internal_LoadProvider
2015-05-02 13:36:06, Info DISM DISM Provider Store: PID=4348 TID=4092 Provider has not previously been encountered. Attempting to initialize
the provider. — CDISMProviderStore::Internal_GetProvider
2015-05-02 13:36:06, Info DISM DISM Provider Store: PID=4348 TID=4092 Loading Provider from location C:WindowsSystem32DismCompatProvider.dll
— CDISMProviderStore::Internal_GetProvider
2015-05-02 13:36:06, Info DISM DISM Provider Store: PID=4348 TID=4092 Connecting to the provider located at C:WindowsSystem32DismCompatProvider.dll.
— CDISMProviderStore::Internal_LoadProvider
2015-05-02 13:36:06, Info DISM DISM Provider Store: PID=4348 TID=4092 Provider has not previously been encountered. Attempting to initialize
the provider. — CDISMProviderStore::Internal_GetProvider
2015-05-02 13:36:06, Info DISM DISM Provider Store: PID=4348 TID=4092 Loading Provider from location C:WindowsSystem32DismFfuProvider.dll —
CDISMProviderStore::Internal_GetProvider
2015-05-02 13:36:06, Info DISM DISM Provider Store: PID=4348 TID=4092 Connecting to the provider located at C:WindowsSystem32DismFfuProvider.dll.
— CDISMProviderStore::Internal_LoadProvider
2015-05-02 13:36:06, Info DISM DISM.EXE: Got the collection of providers. Now enumerating them to build the command table.
2015-05-02 13:36:06, Info DISM DISM.EXE: Attempting to add the commands from provider: DISM Log Provider
2015-05-02 13:36:06, Info DISM DISM.EXE: Attempting to add the commands from provider: FolderManager
2015-05-02 13:36:06, Info DISM DISM.EXE: Attempting to add the commands from provider: WimManager
2015-05-02 13:36:06, Info DISM DISM.EXE: Succesfully registered commands for the provider: WimManager.
2015-05-02 13:36:06, Info DISM DISM.EXE: Attempting to add the commands from provider: VHDManager
2015-05-02 13:36:06, Info DISM DISM.EXE: Attempting to add the commands from provider: GenericImagingManager
2015-05-02 13:36:06, Info DISM DISM.EXE: Succesfully registered commands for the provider: GenericImagingManager.
2015-05-02 13:36:06, Info DISM DISM.EXE: Attempting to add the commands from provider: Compatibility Manager
2015-05-02 13:36:06, Info DISM DISM.EXE: Succesfully registered commands for the provider: Compatibility Manager.
2015-05-02 13:36:06, Info DISM DISM.EXE: Attempting to add the commands from provider: FfuManager
2015-05-02 13:36:06, Info DISM DISM Provider Store: PID=4348 TID=4092 Getting Provider GenericImagingManager — CDISMProviderStore::GetProvider
2015-05-02 13:36:06, Info DISM DISM Provider Store: PID=4348 TID=4092 Provider has previously been initialized. Returning the existing instance.
— CDISMProviderStore::Internal_GetProvider
2015-05-02 13:36:06, Info DISM DISM Provider Store: PID=4348 TID=4092 Getting Provider FfuManager — CDISMProviderStore::GetProvider
2015-05-02 13:36:06, Info DISM DISM Provider Store: PID=4348 TID=4092 Provider has previously been initialized. Returning the existing instance.
— CDISMProviderStore::Internal_GetProvider
2015-05-02 13:36:06, Error DISM DISM Imaging Provider: PID=4348 TID=4092 basentsetupopktoolsdismprovidersimagingproviderdllgenericimagingmanager.cpp:2546
— CGenericImagingManager::InternalCmdFFUApply(hr:0x80070490)
2015-05-02 13:36:06, Error DISM DISM Imaging Provider: PID=4348 TID=4092 basentsetupopktoolsdismprovidersimagingproviderdllgenericimagingmanager.cpp:535
— CGenericImagingManager::ExecuteCmdLine(hr:0x80070490)
2015-05-02 13:36:06, Info DISM DISM.EXE: Image session has been closed. Reboot required=no.
2015-05-02 13:36:06, Info DISM DISM.EXE:2015-05-02 13:36:06, Info DISM DISM.EXE: <—— Ending Dism.exe session ——>
2015-05-02 13:36:06, Info DISM DISM.EXE:2015-05-02 13:36:06, Info DISM DISM Provider Store: PID=4348 TID=4092 Found the OSServices. Waiting to finalize it until all other providers
are unloaded. — CDISMProviderStore::Final_OnDisconnect
2015-05-02 13:36:06, Info DISM DISM Provider Store: PID=4348 TID=4092 Disconnecting Provider: FolderManager — CDISMProviderStore::Internal_DisconnectProvider
2015-05-02 13:36:06, Info DISM DISM Provider Store: PID=4348 TID=4092 Disconnecting Provider: WimManager — CDISMProviderStore::Internal_DisconnectProvider
2015-05-02 13:36:06, Info DISM DISM Provider Store: PID=4348 TID=4092 Disconnecting Provider: VHDManager — CDISMProviderStore::Internal_DisconnectProvider
2015-05-02 13:36:06, Info DISM DISM Provider Store: PID=4348 TID=4092 Disconnecting Provider: GenericImagingManager — CDISMProviderStore::Internal_DisconnectProvider
2015-05-02 13:36:06, Info DISM DISM Provider Store: PID=4348 TID=4092 Disconnecting Provider: Compatibility Manager — CDISMProviderStore::Internal_DisconnectProvider
2015-05-02 13:36:06, Info DISM DISM Provider Store: PID=4348 TID=4092 Disconnecting Provider: FfuManager — CDISMProviderStore::Internal_DisconnectProvider
2015-05-02 13:36:06, Info DISM DISM Provider Store: PID=4348 TID=4092 Releasing the local reference to DISMLogger. Stop logging. — CDISMProviderStore::Internal_DisconnectProvider- Edited by
Thursday, May 14, 2015 6:16 PM
- Edited by
Answers
-
According to my research FfuProvider.dll checks this values and fails if one of them is empty.
This is the only reason why dism fails with 1168 error on a Hyper-V virtual machine.You can patch x86 version of FfuProvider.dll with HEX editor.
File offset 0x7312, replace B8 90 04 07 80 with B8 00 00 00 00 (valid for 10074 and 10075)Be sure you are patch and use an appropriate version of x86 dism:
10074
C:windowsSysWOW64Dism.exe
C:windowsSysWOW64dismFfuProvider.dll
To replace this file you have to become his owner and modify access rights.10075
C:Program Files (x86)Windows Kits10Assessment and Deployment KitDeployment Toolsx86DISMdism.exe
C:Program Files (x86)Windows Kits10Assessment and Deployment KitDeployment Toolsx86DISMffuprovider.dllPaths is for x64 windows system.
Be careful: dism can rewrite any drive, including the system drive of running system if you specify its number in .PhysicalDriveN
- Edited by
komarov.biz
Thursday, May 14, 2015 9:20 AM - Marked as answer by
PA1RB
Thursday, May 14, 2015 6:14 PM
- Edited by
-
I’m very sorry to hear that you are still experiencing this issue. Please know that we are looking into it and hope to have a solution or work-around available for you soon.
The only other suggestion I can think of at the moment is if you could borrow a friends laptop that has a SD card reader built in you might get better results that way.
Jonathan Tanner | Microsoft | Windows 10 IoT Core Insider Preview Support | This posting is provided ‘as is’ with no warranties and confers no rights.
- Marked as answer by
PA1RB
Saturday, May 9, 2015 9:04 AM
- Marked as answer by
-
OK, today I copied the Flash.ffu file to a Surface PRO 3 running Windows 10 build 10074.
I have succesfully flashed two SD cards (SanDisk Ultra microSDHC UHS-1 cards with 8 GB, class 10) with the dism.exe on that Surface (dism version 10.0.10074.0).
The first card I flashed using the build-in micro SD-card reader of the Surface. The second card I flashed using the exact same USB cardreader that does not work on my other computer (recognized by wmic as ChipBank SD/MM Reader USB Device).
So the USB reader works on the Surface, but does not work on my other computer.
The Windows 10 builds are both 10074, but the Surface runs the English language, the other computer runs the Dutch language.
The computer on which the USB stick does not work is based on an ASUS P5LD2-VM motherboard (using the build in USB ports).
So I will be off playing with the RPI-2 this weekend, but I will keep an eye out for the solution to the issue in this forum.
Happy to provide more details if required by the engineers!
- Proposed as answer by
Jonathan TannerMicrosoft employee
Friday, May 8, 2015 11:54 PM - Edited by
PA1RB
Saturday, May 9, 2015 9:02 AM - Marked as answer by
PA1RB
Saturday, May 9, 2015 9:04 AM
- Proposed as answer by
-
Hi,
I had a similar problem with the above mentioned error. I tested all recomended methods/solutions with two USB card readers and three SD cards (class 10) but with no success. Now I installed Windows on the laptop that has SD card reader built
in, as recomended above, and it works fine. Thanks for the tip!- Marked as answer by
PA1RB
Saturday, May 9, 2015 9:04 AM
- Marked as answer by
-
Hello MiPiGamer,
The page with instructions is here: http://ms-iot.github.io/content/win10/SetupRPI.htm
The package including the image can be downloaded in step 3:
Download the package «Windows 10 IoT Core Insider Preview Image for Raspberry Pi 2» from Microsoft Connect (you must be signed in to Microsoft Connect).Aside from the issue above writing the image, all went according to the description, and «Blinky» made the LED blink!
- Marked as answer by
PA1RB
Sunday, May 10, 2015 8:49 PM
- Marked as answer by
-
Wow — that did the trick allright:
Deployment Image Servicing and Management tool
Version: 10.0.10074.0Applying image
[==========================100.0%==========================]
The operation completed successfully.I confirm this patch absolutely fixed the issue, well done and many thanks indeed !!!
Hope this finds its way into the next release of Windows 10.
Ralph
- Marked as answer by
PA1RB
Thursday, May 14, 2015 6:14 PM
- Marked as answer by
Have you ever tried to use your VPN app only to be slapped by an error message saying error 1168 element not found? It is not only annoying but frustrating.
As an avid VPN user, it is normal to encounter one of these errors because VPNs are not as fail-proof as one might think.
But you are in the right place if you have experienced this error, so read till the end to know how to clear VPN error 1168 element not found for good.
What is the element not found error?
The element not found error is usually a network connection problem that appears on Windows versions 7 and 8.
Oftentimes, this error message pops up when launching your VPN app.
However, it can also happen with apps like File Explorer, Microsoft Edge, Command Prompt, or even the Settings app in Windows.
It usually appears either as a result of a bad Windows update, corrupt drivers, or interference from third-party applications.
Below are some fixes you can try:
- Install pending Windows updates
- Reload Explorer.exe
- Uninstall any recently installed apps
- Run the DSM tool
- Reset your PC
- Use a modern VPN
1. Install pending updates
This error may occur if one of your computer’s software components is outdated.
Therefore, ensure that you update your software to the latest version. Follow the steps below to achieve this:
- Open Windows settings.
- Click Update and Security.
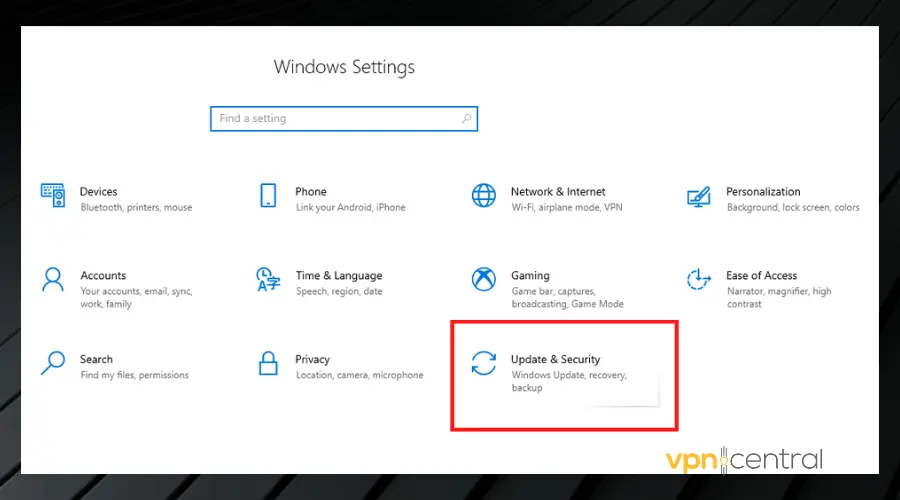
- Click Check for updates.
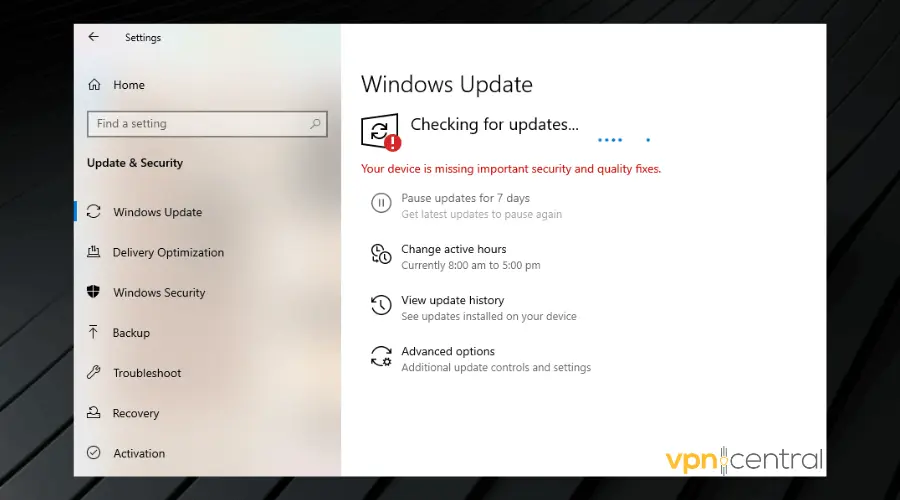
Your PC will search the internet for any relevant updates. Click the Update button to download and install any available updates.
2. Reload Explorer.exe
If you get the element not found error whenever you start up your VPN, you may need to reload your File Explorer. Here is how to do that:
- Press the Ctrl + Shift + Esc keys on your keyboard to launch the Task Manager.
- Click on the Details tab.
- Right-click Explorer.exe and select End Task. This will close all Windows Explorer processes so you can reload it.
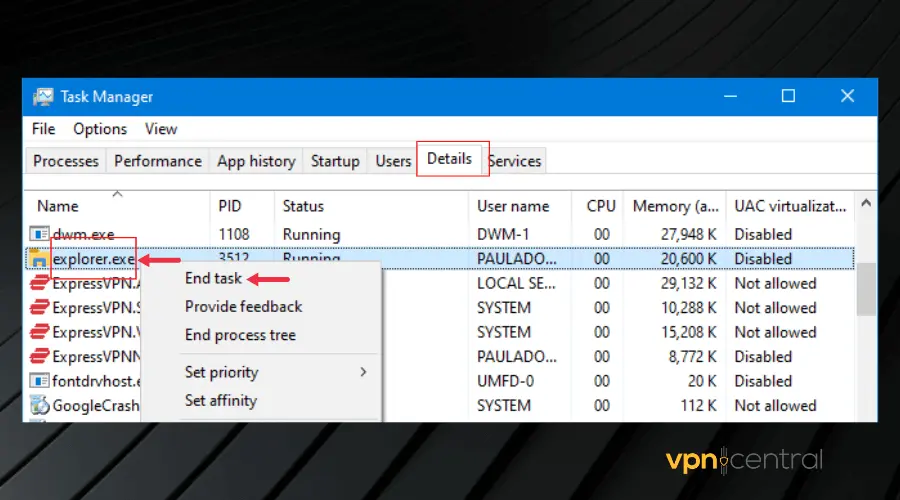
- Click on File and select Create new task.
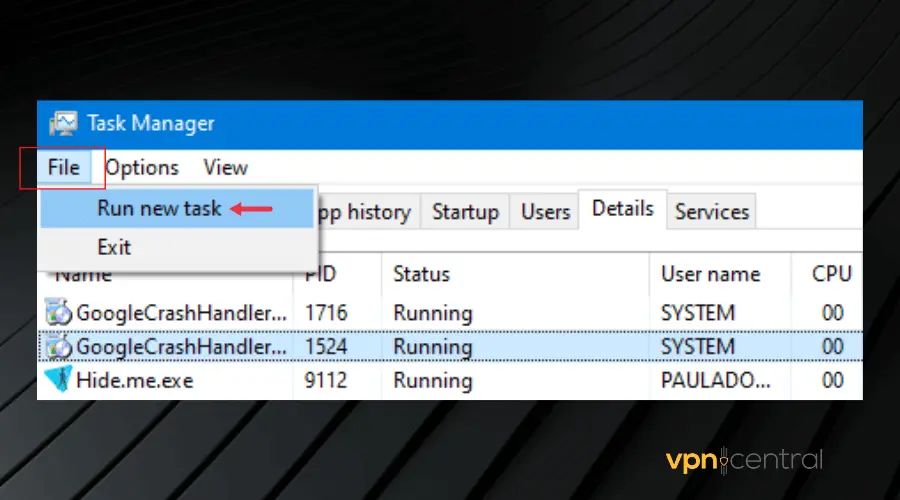
- Type explorer.exe into the text box.
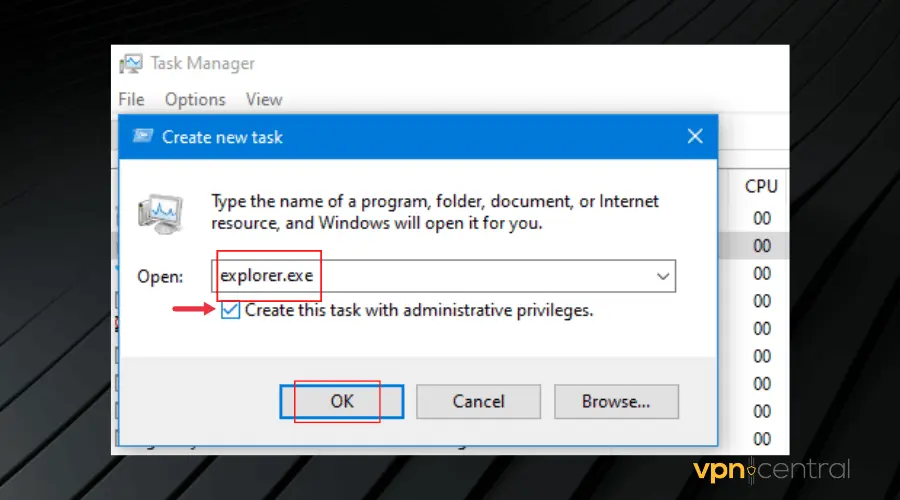
- Tick the Create this task with administrative privileges box and click OK.
Doing this refreshes your computer so that the Windows Explorer process can start afresh.
3. Uninstall any recently installed apps
If you started getting the error message after installing an app, then it’s only logical to uninstall it and check if it fixes the issue.
This is because the new app may have installed a driver that doesn’t support the VPN application. This has worked in many cases, so you should try it if you have any recently installed apps.
To uninstall apps on your computer, follow these steps:
- Press the Windows + R keys on your keyboard.
- Type Control Panel and press Enter to launch the Control Panel.

- Click on Programs.
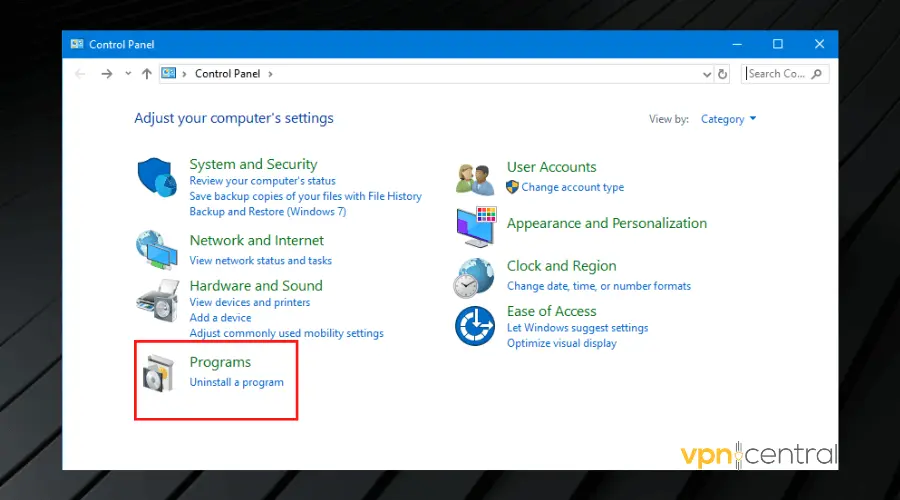
- Click on Uninstall a program.
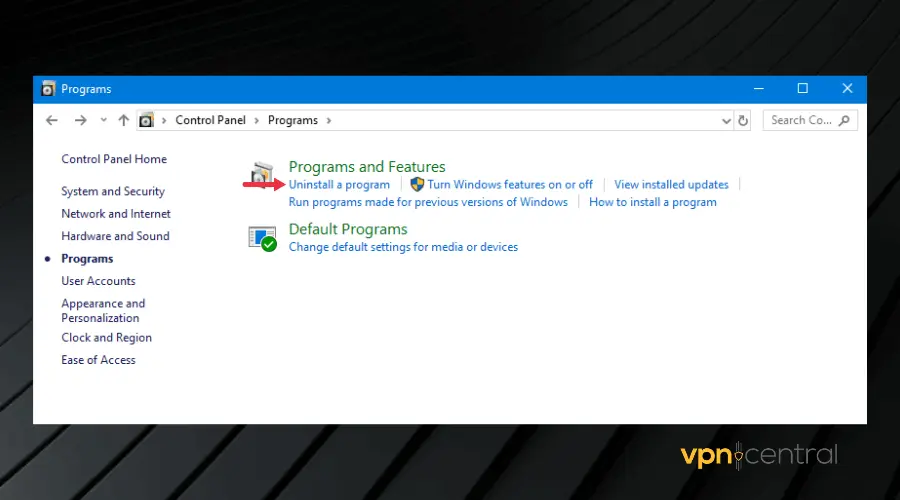
- Search for the recently installed app, right-click on it, and click Uninstall.
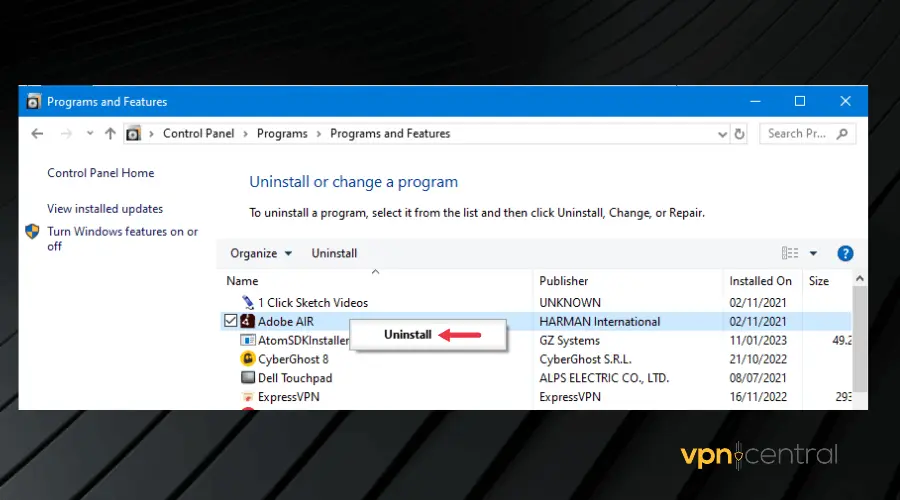
Now check to see if your VPN works properly.
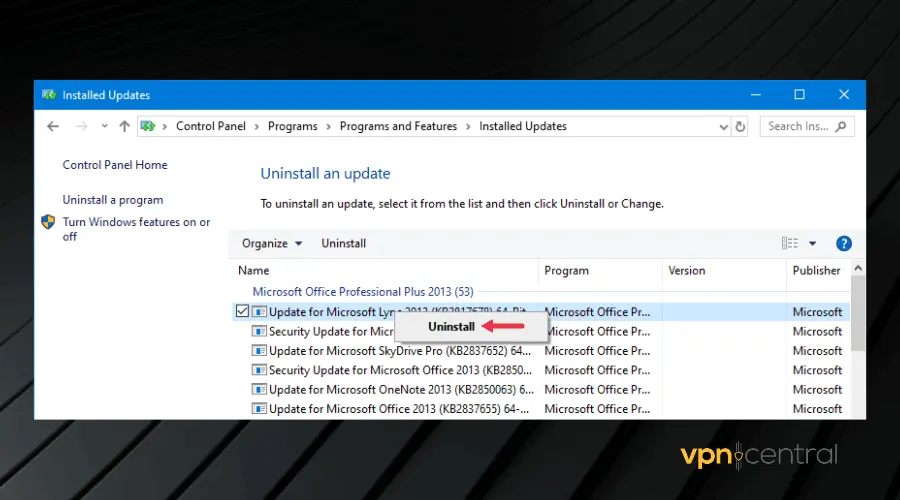
Alternatively, some windows updates can cause this error to happen. Therefore, you may need to uninstall recent updates. The process is similar to the one above. However, instead of clicking on Uninstall a program,
- Click on View installed updates.
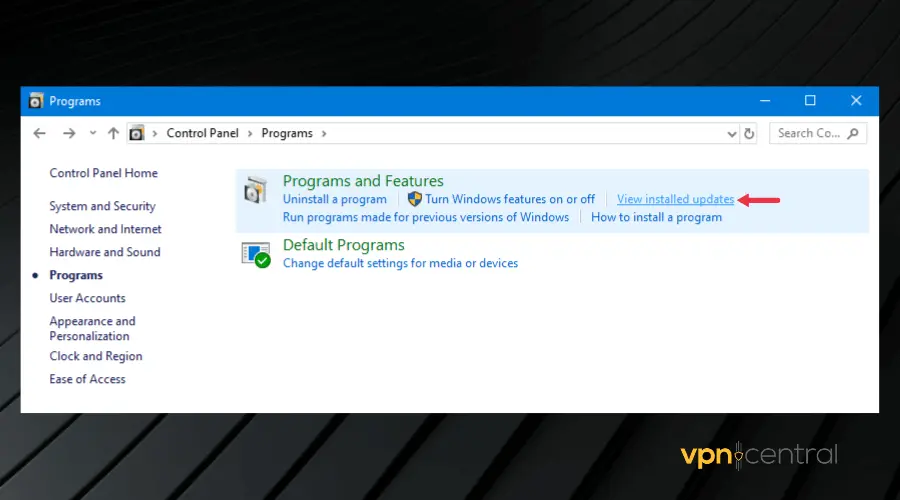
- Then right-click on the affected updates and click Uninstall.
Check back to see if the error message is now clear.
4. Run the DISM tool
Running the Deployment Image Servicing and Management tool is another fix for the element not found error.
The purpose of the tool is to scan your PC for problems that can lead to errors and repair them for you.
To run this tool:
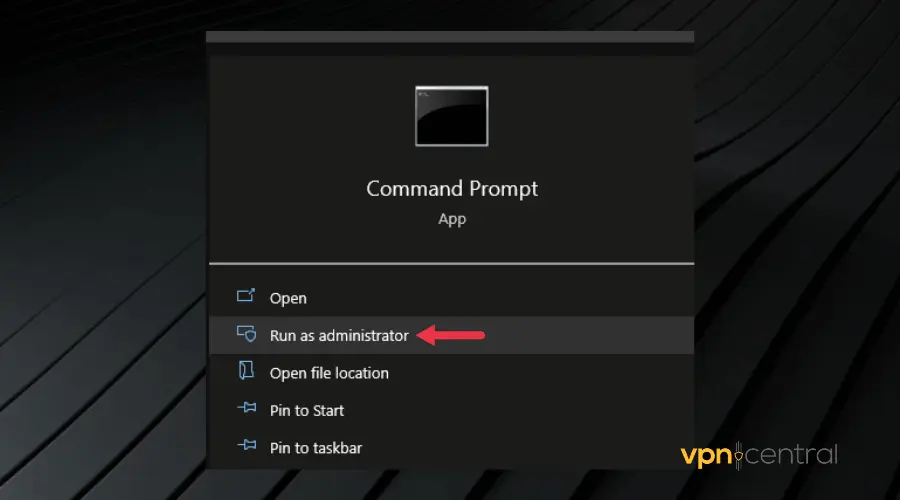
- Search for Command Prompt from your Start Menu.
- Right-click on its icon and select Run as administrator. After this, a black rectangular window will pop up, asking for a command.

- Type in the following command: DISM.exe /Online /Cleanup-image /Scanhealth and press the Enter key.
- After the scan is complete, type this second command: DISM.exe /Online /Cleanup-image /Restorehealth and press Enter to run it.
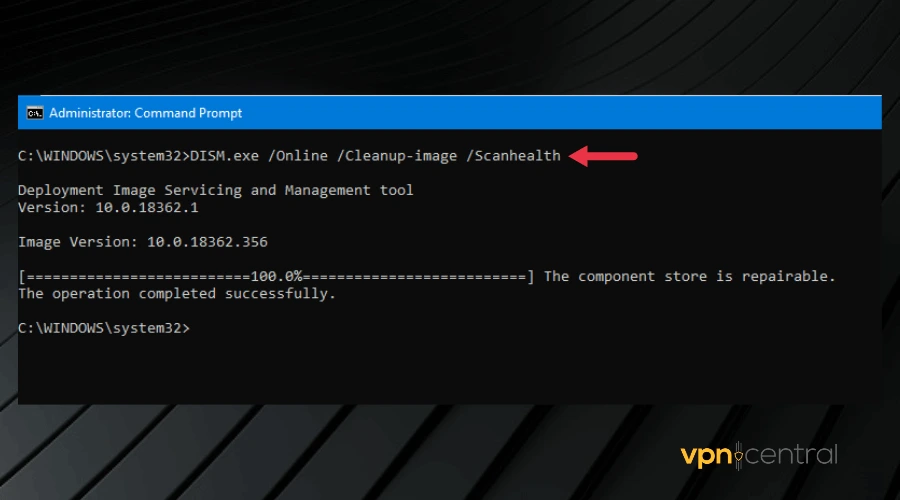
This fix requires a little bit of patience if there are serious or multiple issues with your configuration.
The good news is that it can get rid of a lot of errors and there’s not a lot of work on your end, you just have to make sure you enter the correct commands.
5. Reset Your PC
Resetting your PC should be the last fix to try if you have tried fixes 1- 4 and none worked. Although intense, performing a full reset on your PC is definitely going to clear this error from your computer.
Follow these steps to reset your PC:
- Open Computer Settings and click Update and Security.
- Click Recovery.
- Then click on Get Started below the Reset PC menu.
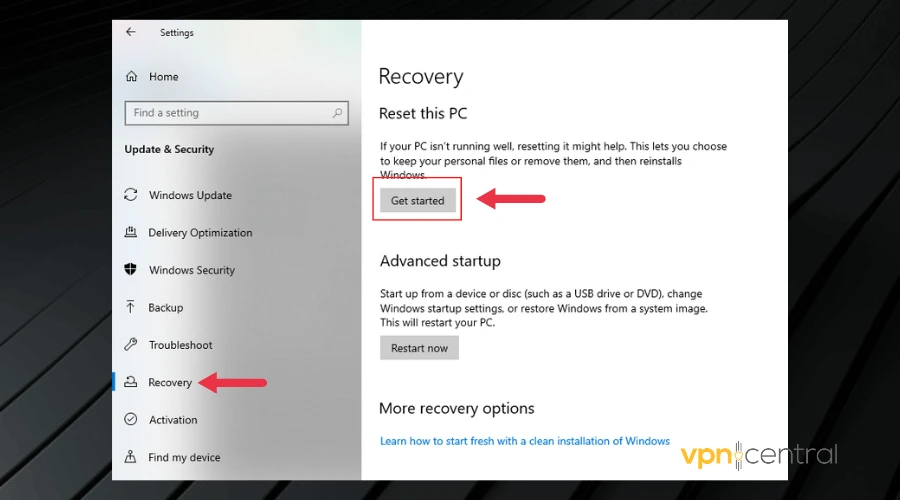
- Select an option from the menu that appears and follow the instructions to reset your PC.
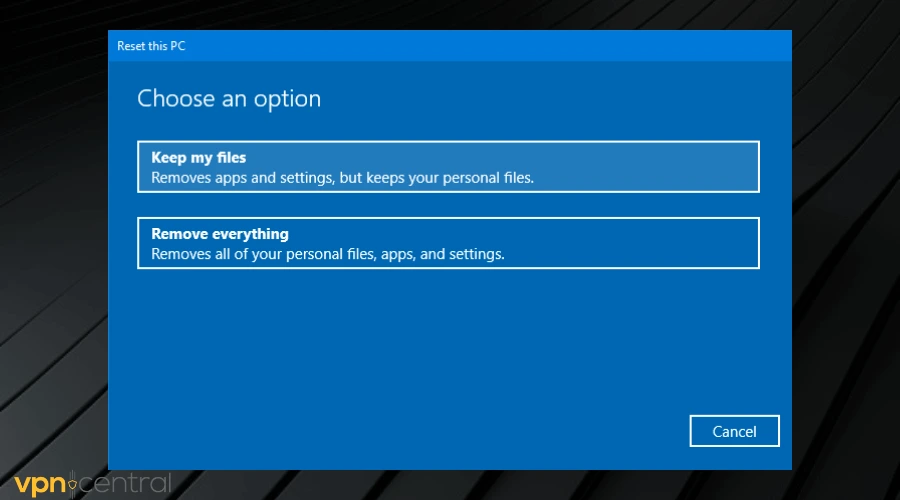
Resetting your PC returns the Windows OS to its original condition – as it was when you first installed it without all the installed programs so it is important to back up your personal files.
6. Use a modern VPN
This element not found error is most pronounced on VPNs with old tunneling protocols, especially L2TP and PPTP.
Therefore, switching to a provider with modern protocols such as OpenVPN and Wireguard is a sure way to fix the issue permanently.
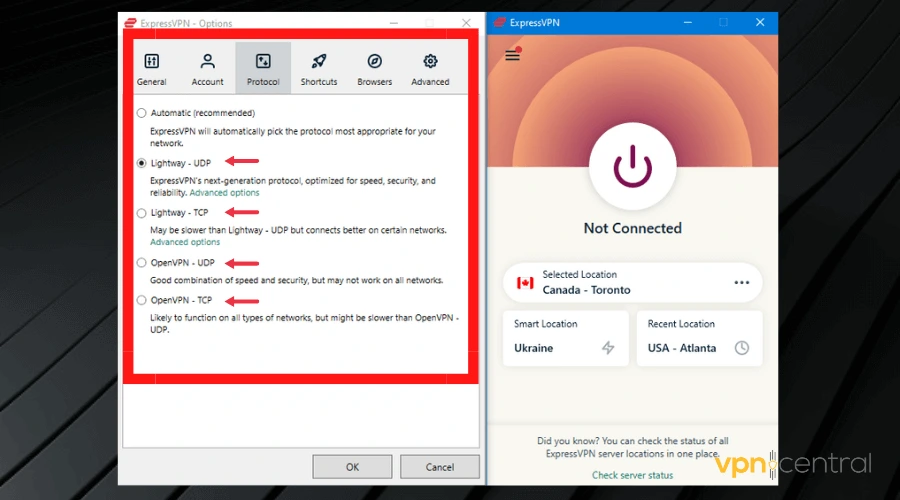
If you want an error-free experience and very fast connections, consider ExpressVPN.
The tool is frequently updated to avoid errors. On top of that, as you can see in the screenshot, it gives you the possibility to pick from multiple VPN protocols.
We must also mention that the VPN has a large network of 3000+ servers located in 94 countries. This is great for anyone who uses VPNs for a better connection or to bypass geo-blocking.

ExpressVPN
Use this up-to-date VPN to prevent any errors and enjoy all the benefits of private browsing!
Conclusion
We tested all the fixes in this article. Therefore, we hope that one of them works for you and helps you get rid of the VPN error 1168 element not found on your PC.
by Teodor Nechita
Eager to help those in need, Teodor writes articles daily on subjects regarding Windows, Xbox, and all things tech-related. When not working, you may usually find him either… read more
Updated on December 14, 2021
XINSTALL BY CLICKING THE DOWNLOAD FILE
This software will keep your drivers up and running, thus keeping you safe from common computer errors and hardware failure. Check all your drivers now in 3 easy steps:
- Download DriverFix (verified download file).
- Click Start Scan to find all problematic drivers.
- Click Update Drivers to get new versions and avoid system malfunctionings.
- DriverFix has been downloaded by 0 readers this month.
Several users have been reporting on the official Microsoft forums that they are having issues with the XPS printer:
I was unable to print from software using the XPS writer. I attempted to reinstall the printer but the installation fails reporting “printer driver not installed. Element not found”
Apparently, they are getting an error 1168: Element not found can have a wide variety of causes.
This article will guide you step-by-step on how to fix this error with the XPS printer.
How do you fix a generic error 1168?
1. Update your drivers
- Click on the Start button, then go to Settings
- Select Update & Security
- Click on Check for updates
- Allow Windows Update to download and install the updated driver
Follow these steps to install the latest printer drivers using Windows Update.
Alternatively, you can use a professional third-party tool that performs this process automatically and aims to keep your printer drivers updated and healthy.
More so, by choosing this automated method of managing drivers you also stay secure from potential damages caused by devices incompatibility.
Thus if you need reliable support to install or update any driver, the following software will accomplish this mission with no exception.
⇒ Get DriverFix
2. Try reinstalling the Windows XPS feature
- Press Windows
- Click on Settings (the cogwheel-shaped button)
- Select Apps
- Go to Apps & features
- Click Optional features
- Look for XPS feature if it is present
- If it is, right-click it and select uninstall
- Restart your PC
- After the restart or if your PC didn’t have the feature, go to the Manage optional features screen, and select Add a new feature
- When on the Add a new feature screen, select the XPS Viewer
- Restart your PC
3. Manually search for the location of your XPS Writer
Depending on which version of Windows 10 you have installed, the location of the XPS Writer may vary.
As such, if the solution listed above didn’t work, try this:
- Press Windows + R
- Type in control.exe
- Click Programs
- Select Programs and Features
- Click Turn Windows features on or off
- See if XPS Services and XPS Viewer are listed
- If the services are marked in their checkbox, unmark them and restart the PC
- If the services are unmarked in their checkbox, mark them and restart the PC
- Press Windows + R
- Type in control.exe
- Go to Hardware and Sound
- Click Devices and Printers
- See if Microsoft XPS Document Writer is installed as a printer.
- If it is, right-click it and choose Remove device
- Restart your PC
- Go back to Devices and Printers and select Add a printer
- Select The printer that I want isn’t listed
- Click Add a local printer or network printer with manual setting
- In the Choose a printer port screen, select Use an existing port and PORTPROMPT: (Local Port)
- In the Install a printer driver screen, select Microsoft on the left pane and Microsoft XPS Document Writer on the right
- When asked Which version of the driver do you want to use? select Use the driver that is currently installed (recommended)
If these particular steps didn’t help, you could also try to:
- Uninstall Recent Windows Updates
- Reset Your PC
![]()
Newsletter
SUPPORT COMMUNICATION- CUSTOMER ADVISORY
Document ID: c06417547
Version: 1
Notice: The information in this document, including products and software versions, is current as of the release date.The document is subject to change without notice.
Release date : 22-Jul-2019
Last updated : 22-Jul-2019
DESCRIPTION
When using Microsoft System Center Configuration Manager (SCCM) to configure systems in the SCOPE, the following DISM error occurs:
Error: 1168.
Element Not Found.
This occurs when the Microsoft Deployment Image Servicing and Management (DISM) command tool executes commands to configure the Realtek HD Audio driver (SoftPaq SP95193). The issue occurs because the driver includes a Universal Windows Platform (UWP) component that is not being handled properly.
SCOPE
Information in this document applies to the following:
Computers:
HP EliteBook 830 G5 Notebook PC
Operating Systems:
Microsoft Windows 10 RS5 (Version 1809)
RESOLUTION
Below are the steps necessary to install this component with SCCM.
-
Extract SoftPaq .
-
Add a batch file to install the UWP component with DISM. Here is the DISM command to insert into the batch file:
@echo ON dism.exe /image:%OSD_System% /add-Driver /Driver:%~dp0HSAcb68d18decd44cd44c94bec5cd2a2c354180.appxbundle /Region=»all» /LicensePath:%~dp0HSAcb68d18decd44cd44c94bec5cd2a2c354180_License1.xml /DependencyPackagePath:%~dp0HSA Micrsooft.VCLibs.140.00_14.0.26706.0_x64_8wekyb3d8bbwe.appx
note:
The variable
%OSD_System%, used in the command above, is set by the partitioning step previous in the task sequence. -
Create a package and add a command line step to execute the batch file right after windows image, and before Apply Windows Settings.
-
Deploy the task sequence and use Device Manager to verify that the Realtek Audio driver is installed.
Hardware platforms affected :
HP EliteBook 830 G5 Notebook PC
Operating systems affected : Not applicable
Software affected : Not applicable
Support Communication Cross Reference ID : IA06417547
© Copyright 2023 HP Development Company, L.P.
HP Inc. shall not be liable for technical or editorial errors or omissions contained herein. The information provided is provided «as is» without warranty of any kind. To the extent permitted by law, neither HP or its affiliates, subcontractors or suppliers will be liable for incidental, special or consequential damages including downtime cost; lost profits; damages relating to the procurement of substitute products or services; or damages for loss of data, or software restoration. The information in this document is subject to change without notice. HP Inc. and the names of HP products referenced herein are trademarks of HP Inc. in the United States and other countries. Other product and company names mentioned herein may be trademarks of their respective owners.
- Remove From My Forums
-
Question
-
I am trying to install printer drivers on two Windows 2012R2 servers and I am getting the error: Printer driver was not installed ‘Element not found’. In the setupapi.dev.log file it shows ‘
Class installer: failed(0x00000490)!
Error 1168: Element not found
I have tried using the pnputil to add the driver, but nothing has worked.
Answers
-
This sounds like the print drivers are not package aware print drivers.
I assume other printer drivers install without any issue, just some drivers that you have not mentioned where they were obtained.
If the print driver does install on one 2012R2 machine, use the print backup utility c:windowssystem32spooltoolsprintbrm.exe to backup the driver and then restore the driver to the machine with the issue adding the driver to the driverstore.
printbrm -b -f backup.printerexport
printbrm -r -s printserver -f backup.printerexport
Alan Morris formerly with Windows Printing Team
- Proposed as answer by
Wednesday, June 17, 2015 9:36 AM
- Marked as answer by
Vivian_Wang
Monday, June 22, 2015 5:19 AM
- Proposed as answer by
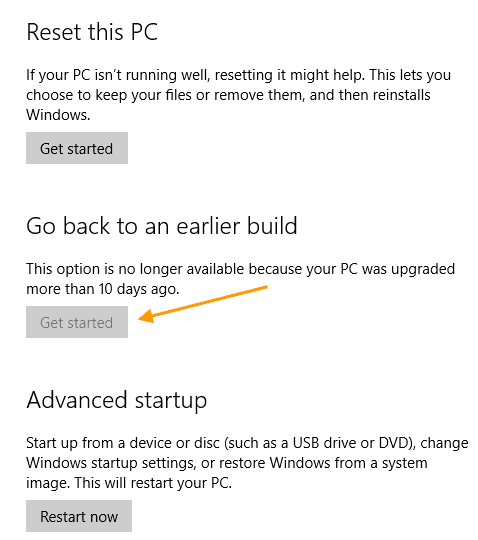
After you upgrade to Windows 10 or install a Windows 10 Feature update, you’ll be able to go back to your previous version of Windows within a limited time of 10 days. This can be done by opening Settings → Update & Security → Recovery → Go back to the previous version of Windows 10.
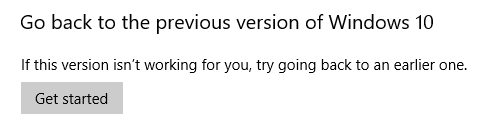
(If you have upgraded from Windows 7, you’ll see Go back to Windows 7 instead.)
Rolling back to the previous version using this method keeps your personal files, but it’ll remove your customizations, apps, and drivers installed after the upgrade. By default, you have ten days, before which you can roll back to the previous version of Windows.
Uninstalling the current version and going back to the previous version of Windows also frees up gigabytes of data on your hard disk, as the Windows.old folder is deleted.
After the 10-day window, the previous Windows installation files under the Windows.old directory would be automatically erased (maybe using Disk Cleanup) by the Operating System. The Get started button would then be grayed out.
In Windows 10 versions before the Anniversary Update (v1607), the rollback timeframe was 30 days. Since the Anniversary Update, Microsoft has reduced the uninstall window to 10 days. As per Microsoft, it was a data-driven decision (based on telemetry) to change the rollback timeframe from 30 to just 10 days. Quoting the source:
Based on our user research, we noticed most users who choose to go back to a previous version of Windows do it within the first several days. As such, we changed the setting to 10 days to free storage space used by previous copies.
Evaluating an Operating System may need more time for end-users, and a 10-day window is insufficient for most people. The good news is that you can increase the Go back to the previous version of Windows to a maximum of 60 days manually.
This article tells you how to extend the 10-day rollback window on your Windows 10 computer.
Using the DISM utility, you can do the following:
- Find out how many days after an upgrade that an OS can be uninstalled.
- Initiate an uninstall or roll back to the previous OS or version.
- Remove the ability to uninstall a Windows upgrade.
- Set the number of days that a user has to uninstall a Windows upgrade.
(Reference: DISM Operating System uninstall Command-Line Options.)
Find the rollback timeframe (number of days)
To determine the uninstall window timeframe (days) of your existing Windows installation, run this command from admin Command Prompt:
DISM /Online /Get-OSUninstallWindow
You’ll see the following output:
Deployment Image Servicing and Management tool
Version: 10.0.19041.572

Image Version: 10.0.19042.661

Uninstall Window : 10
The operation completed successfully.
Increase the rollback timeframe (number of days)
Run this command to set the number of days after an upgrade that an uninstall can be initiated.
Syntax:
DISM /Online /Set-OSUninstallWindow /Value:<days>
The value (i.e., number of days) must be in the range of 2 to 60. If the value you input doesn’t fall in that range, the default value of 10 will be set.
Example:
DISM /Online /Set-OSUninstallWindow /Value:30
You should see the message “The operation completed successfully” in the output.
The above command-line sets the rollback window to 30 days. Windows won’t erase the Windows.old folder before 30 days.
Set the Rollback timeframe via the Registry
You can set the rollback window timeframe by editing the registry, as well.
- Start the Registry Editor, and go to the following branch:
HKEY_LOCAL_MACHINESYSTEMSetup
- Create a new DWORD value named
UninstallWindowif it doesn’t already exist. - Double-click
UninstallWindow, select Decimal, and type in the desired value (>2to<60), and click OK.
Note that if the above registry value doesn’t exist, “10” days will be the default threshold limit used by Windows. - Exit the Registry Editor.
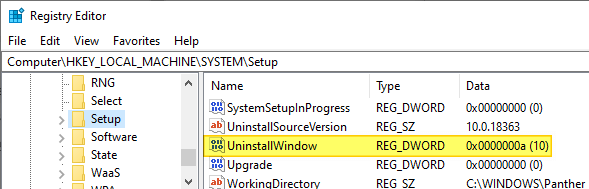
After the registry modification, it’s better that you restart Windows, though the DISM Get-OSUninstallWindow command would reflect the registry change even if you don’t reboot.
Additional Tip
There are two more DISM switches namely, Initiate-OSUninstall and Remove-OSUninstall that you may like to know about. The former is to initiate a rollback using command-line, and the latter is to remove the ability to rollback by users.
The Remove-OSUninstall switch would gray out the Get Started button under the Go back to the previous… section. The command deletes the following registry values from the abovesaid branch. It may also remove the corresponding BCD data and the Windows Recovery Environment entry named “Go back to the previous build.”
Registry values:
- UninstallActive
- UninstallGUID
- UninstallMark
- UninstallScenario
Error: 1168 – Element not found
In some cases, the error 1168 (‘element not found’) may occur when running the DISM Get-OSUninstallWindow or Set-OSUninstallWindow command.
Deployment Image Servicing and Management tool
Version: 10.0.19041.572

Image Version:

Error: 1168

Element not found.

The DISM log file can be found at C:WINDOWSLogsDISMdism.log
The DISM.log file would show the following entries:
Error pGetUninstallInterfaceCommon: Failed loading the setupplatform, hr = 0x80070490 [gle=0x00000003]
Error DISM DISM SetupPlatform Provider: PID=3944 TID=9192 Failed getting UninstallInterface Online. - CSetupPlatformManager::GetUninstallWindow(hr:0x80070490)
Error DISM DISM SetupPlatform Provider: PID=3944 TID=9192 Failed to get the uninstall window. - CSetupPlatformManager::ProcessCmdLine_GetUninstallWindow(hr:0x80070490)
Error DISM DISM SetupPlatform Provider: PID=3944 TID=9192 Failed while processing command get-osuninstallwindow. - CSetupPlatformManager::ExecuteCmdLine(hr:0x80070490)
Error 1168 (0x80070490), which denotes “Element not found”, occurs if the Windows.old folder (especially the subfolder $WINDOWS.~BT) has been deleted by Windows after the rollback window has expired.
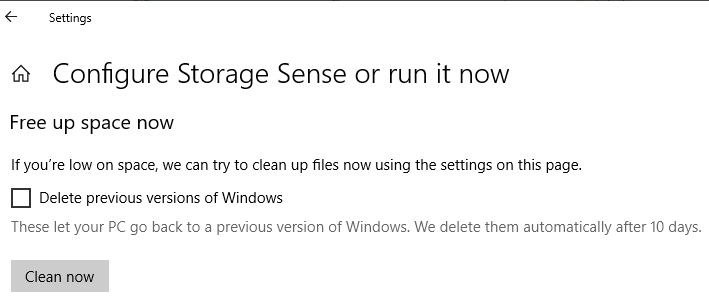
It’s also possible that you’ve manually cleared the “Previous Windows installation(s)” files using Disk Cleanup or Storage settings to recover the disk space.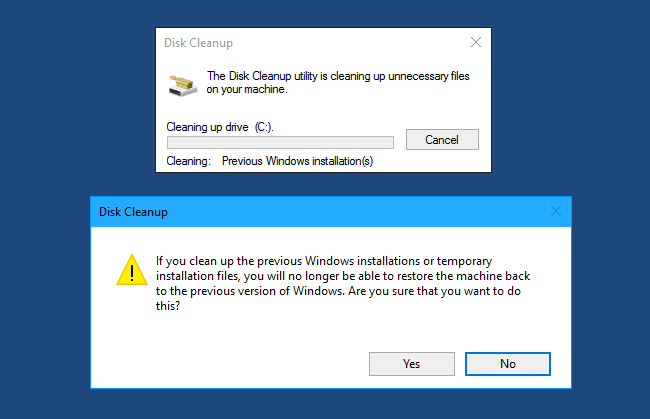
The DISM DISM Get-OSUninstallWindow and Set-OSUninstallWindow commands would need the following files in order to work correctly:
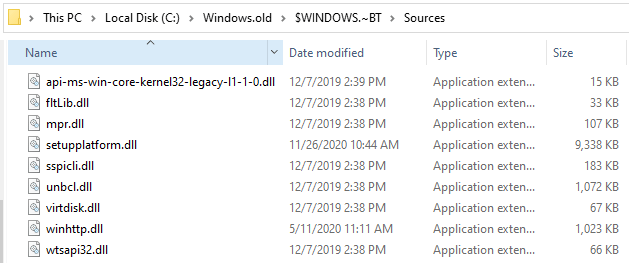
C:windows.old$WINDOWS.~BTSourcesapi-ms-win-core-kernel32-legacy-l1-1-0.dll
C:windows.old$WINDOWS.~BTSourcesfltLib.dll
C:windows.old$WINDOWS.~BTSourcesmpr.dll
C:windows.old$WINDOWS.~BTSourcessetupplatform.dll
C:windows.old$WINDOWS.~BTSourcessspicli.dll
C:windows.old$WINDOWS.~BTSourcesunbcl.dll
C:windows.old$WINDOWS.~BTSourcesvirtdisk.dll
C:windows.old$WINDOWS.~BTSourceswinhttp.dll
C:windows.old$WINDOWS.~BTSourceswtsapi32.dll
If Windows.old or its subfolder $WINDOWS.~BT is missing, or if some of the DLLs are missing in that location, you’ll get one of the following errors:
Error: 1168

Element not found.

The DISM log file can be found at C:WINDOWSLogsDISMdism.log
Error: 126

The specified module could not be found.

The DISM log file can be found at C:WINDOWSLogsDISMdism.log
Error 3: The system cannot find the path specified
![]() Despite this, you should be able to set the uninstall threshold or timeframe using the registry method described above.
Despite this, you should be able to set the uninstall threshold or timeframe using the registry method described above.
Closing words
It’s unclear whether the uninstall window you set using DISM or the registry will the preserved or not if you install an update (Feature Update) in the future.
Of course, the ultimate trick of renaming C:Windows.old and C:$Windows~BT would prevent Windows 10 from erasing them automatically. By renaming the folders, you get unlimited time to go back to the chosen version.
One small request: If you liked this post, please share this?
One «tiny» share from you would seriously help a lot with the growth of this blog.
Some great suggestions:
- Pin it!
- Share it to your favorite blog + Facebook, Reddit
- Tweet it!
So thank you so much for your support. It won’t take more than 10 seconds of your time. The share buttons are right below.
Содержание
- Ошибка. Вызывающая функция: RTDRV. Код : 1168: Элемент не найден.
- Сообщений 5
- #1 Тема от DimonRambo 2012-02-23 00:23:36
- Ошибка. Вызывающая функция: RTDRV. Код : 1168: Элемент не найден.
- #2 Ответ от Ирина Богданова 2012-02-24 10:22:39
- Re: Ошибка. Вызывающая функция: RTDRV. Код : 1168: Элемент не найден.
- #3 Ответ от Алексей Несененко 2012-02-27 09:25:17
- Re: Ошибка. Вызывающая функция: RTDRV. Код : 1168: Элемент не найден.
- #4 Ответ от dim3shturm 2012-09-28 13:15:34 (2012-09-28 13:16:08 отредактировано dim3shturm)
- Re: Ошибка. Вызывающая функция: RTDRV. Код : 1168: Элемент не найден.
- #5 Ответ от Алексей Несененко 2012-09-28 13:29:54
- Re: Ошибка. Вызывающая функция: RTDRV. Код : 1168: Элемент не найден.
- Сообщений 5
- Ошибка 1168 при подключении к Enteprise сети WiFi
- Подписчики
- Комментарии
- Причины возникновения и способы решения ошибки «Элемент не найден»
- Причины и решение
- Заключение
- Как исправить ошибку “элемент не найден” в Windows 10.
- Как исправить ошибку “элемент не найден” в Windows 10
- Заключение
Ошибка. Вызывающая функция: RTDRV. Код : 1168: Элемент не найден.
Форум Рутокен → Техническая поддержка пользователей → Ошибка. Вызывающая функция: RTDRV. Код : 1168: Элемент не найден.
Сообщений 5
#1 Тема от DimonRambo 2012-02-23 00:23:36
- DimonRambo
- Посетитель
- Неактивен
Ошибка. Вызывающая функция: RTDRV. Код : 1168: Элемент не найден.
Ошибка. Вызывающая функция: RTDRVS_Install_Rutoken_Reader_Driver. Вызываемая функция: SetupDiCallClassInstaller. Код ошибки: 1168: Элемент не найден. 
SmartCard всё нормально, настроен авто, работает, вкл/выкл и пр. Вин ХР пак 3.
#2 Ответ от Ирина Богданова 2012-02-24 10:22:39
- Ирина Богданова
- Посетитель
- Неактивен
Re: Ошибка. Вызывающая функция: RTDRV. Код : 1168: Элемент не найден.
Добрый день.
Проверьте, пожалуйста, не стоит ли у папки SYSTEM32 атрибут «только для чтения». Если да, то снимите его.
После этого попробуйте установить драйверы заново.
Если не поможет, то пришлите нам, пожалуйста, логи, как я указала в письме.
#3 Ответ от Алексей Несененко 2012-02-27 09:25:17
- Алексей Несененко
- Посетитель
- Неактивен
Re: Ошибка. Вызывающая функция: RTDRV. Код : 1168: Элемент не найден.
DimonRambo — обновил Windows и у него все успешно установилось
#4 Ответ от dim3shturm 2012-09-28 13:15:34 (2012-09-28 13:16:08 отредактировано dim3shturm)
- dim3shturm
- Посетитель
- Неактивен
Re: Ошибка. Вызывающая функция: RTDRV. Код : 1168: Элемент не найден.

А в данном случае что можно предпринять?
Переустановили SP3, не помогло.
#5 Ответ от Алексей Несененко 2012-09-28 13:29:54
- Алексей Несененко
- Посетитель
- Неактивен
Re: Ошибка. Вызывающая функция: RTDRV. Код : 1168: Элемент не найден.
Сообщений 5
Форум Рутокен → Техническая поддержка пользователей → Ошибка. Вызывающая функция: RTDRV. Код : 1168: Элемент не найден.
Ошибка 1168 при подключении к Enteprise сети WiFi
Я хочу подключатся к сетям WiFi Enterprise через свою программу. Настроил Radius Server, поключение к сети через Windows работает. Но при подключении через программу пишет: ошибка 1168 (ERROR_NOT_FOUND). Если быть точнее, то такую ошибку возращает функция: WlanSetProfileEapXmlUserData.
Разрабатываю эту программу на Qt 5.9.8 (Windows 10).
Подключения к персональной сети работают, там использую WlanSetProfile функцию. Проблема только если подключатся к корпоративной сети. Я думаю что проблема с неверным XML профилем. На сайте Microsoft, есть много примеров профилей, к примеру: https://docs.microsoft.com/en-us/windows/win32/nativewifi/wpa2-enterprise-with-peap-mschapv2-profile-sample и https://docs.microsoft.com/en-us/windows/win32/eaphost/peap-ms-chapv2-user-properties Как думаете в чем может быть проблема? Или где можно узнать какой профиль нужен? Спасибо за помощь.

Рекомендуем хостинг TIMEWEB
Подписчики
![]()
Единственное, что приходит на ум, так то, что конткатенация строк может что-то попортить. Лучше собирать строку с использованием arg()
Попробуйте ещё через wirshark посмотреть, что вообще в пакетах ходит для вашей программы и для какой-нибудь сторонней, может чего не хватает.
Хорошо. Я это проверю. Спасибо.
Я уже решил эту проблему:
- Установите профиль без учетных данных, используя WlanSetProfile (я использовал импортированный профиль из netsh с некоторыми изменениями)
- Затем установите ниже профиль xml с вашим именем пользователя и паролем WlanSetProfileEapXmlUserData:
- Затем используйте функцию WlanConnect и функцию callback вызова для проверки соединения.
Это все хорошо, но я получаю еще одну проблему: 229377 («Операция была отменена.»)
Это был код причины (reason code), который сообщает о коде ошибки 229377. Я думаю, что он вернул такой код, потому что я открыл Windows WiFi Manager из панели задач. Фактически NotificationCode возвращает код 8 (wlan_notification_acm_scan_fail), а затем 11 (wlan_notification_acm_connection_attempt_fail). Я все еще исследую эту проблему. Спасибо.
- Cobra91151
- #
- 1 октября 2019 г. 18:54
- Ответ был помечен как решение.
Я исправил эту проблему. Проблема заключалась в том, что для PerformServerValidation было задано значение true, и в ОС отображалось диалоговое окно уведомлений для проверки сертификата в Windows, поэтому он вернул wlan_notification_acm_scan_fail «Операция прошла успешно».
Установка значения параметра PerformServerValidation в значение false устранила проблему (функция WlanSetProfile).
Также для функции WlanSetProfileEapXmlUserData я предоставил этот профиль:
Теперь программа успешно подключается к корпоративной сети. Проблема решена. Спасибо.
Комментарии
Timeweb
Позвольте мне порекомендовать вам отличный хостинг, на котором расположен EVILEG.
В течение многих лет Timeweb доказывает свою стабильность.
Для проектов на Django рекомендую VDS хостинг
- Результат: 64 баллов,
- Очки рейтинга -1
- Результат: 70 баллов,
- Очки рейтинга 1
- Результат: 50 баллов,
- Очки рейтинга -4
Причины возникновения и способы решения ошибки «Элемент не найден»
Залогом стабильной работы операционной системы, в числе прочих, является постоянное поддержание её «чистоты». Под этим термином можно понимать многое, но одним из ключевых элементов выступает своевременное удаление файлов и папок, попросту засоряющих операционную систему. Но достаточно часто попытка пользователей удалить какой-либо файл или папку может сопровождаться целым рядом различных ошибок, которые могут отнять много сил и нервных клеток. В настоящей статье речь пойдёт об одном из представителей названых выше проблем, который сопровождается текстовым сообщением в виде «Не удалось найти этот элемент» или «Элемент не найден», а также о существующих способах его исправления.

Исправление ошибки «Элемент не найден в Windows».
Причины и решение
Не каждый пользователь может самостоятельно разобраться в том, почему не удалось найти этот элемент и как удалить его со своего компьютера. Для ответа на этот вопрос нужно сначала разобраться в причинах появления подобной ошибки. Из этого во многом следует путь решения проблемы.
При работе с Windows 10, столкнувшись с ошибкой «Элемент не найден», от слов нужно переходить к действиям.
Итак, причины могут быть достаточно прозаичными, например, проблемного файла или папки попросту нет, о чём и свидетельствует операционная система. При этом стоит отметить, что рассматриваемая ошибка может возникать не только при попытках удаления, но и при желании открыть, скопировать или перенести что-то. И если проблематика заключается в этом, то первое, что необходимо сделать, это просто обновиться, нажав кнопку F5, или перезайти в место расположения файла и проверить его доступность.
Поскольку элемент не найден, нужно искать решения, как удалить файл и очистить компьютер от разного мусора и ненужных программ, папок и пр. Как оказалось, проблема не такая банальная, как хотелось бы. Если ситуация осталась прежней, тогда следует попробовать воспользоваться следующими возможными вариантами. Они актуальны в ситуациях, когда не удаляется папка, а попытка деинсталляции сопровождается сообщением о том, что элемент не найден. Итак, выполняем действия:
- Сохраните все необходимые данные и перезагрузите компьютер. Обратите внимание, что речь идёт именно о перезагрузке, а не о завершении работы. После повторного входа в систему проверьте, не исчез ли проблемный элемент.
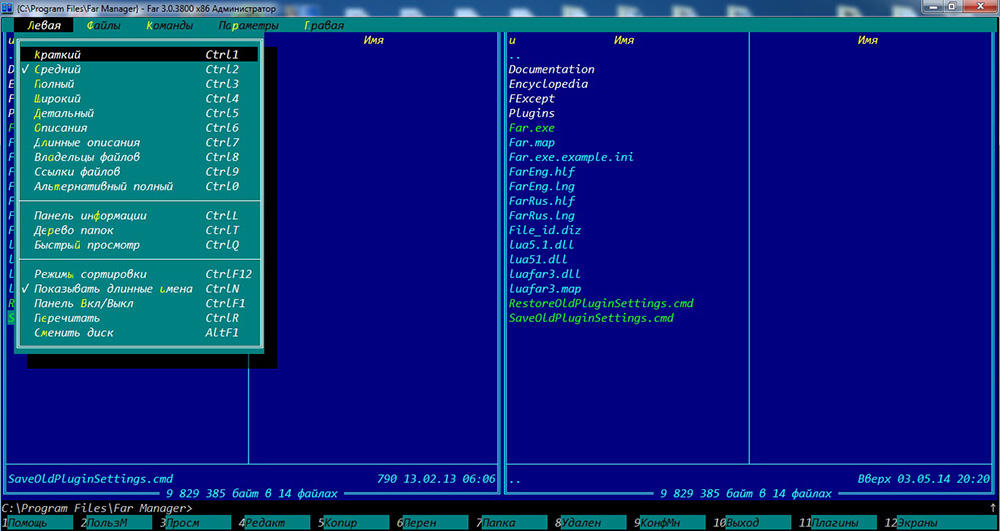
- Проверьте корректность используемого имени. Например, рассматривая ошибка возможна, если в имени по какой-то причине имеются некорректные символы, например, многоточие. Для того чтобы удостовериться в этом, воспользуйтесь менеджером «Far Manager». В консоли управления найдите проблемную папку и нажмите на кнопку «8», которая и отвечает за функцию «delete».

- Если файл или папка остались, то, используя любой доступный архиватор, поместите его или их в архив и в окне выбора параметров архива поставьте флажок «Удалять файлы после сжатия». Соответственно, если вариант сработал, впоследствии удалите и новоиспечённый архив;
- Для любых манипуляций попробуйте воспользоваться сторонним файловым менеджером, например, архиватором «7-zip», который также может работать и в этом амплуа, или более привычным «Total Commander»;
- Переместите проблемный элемент (если это позволяет сделать операционная система) на любой имеющийся носитель и попробуйте удалить его именно оттуда;
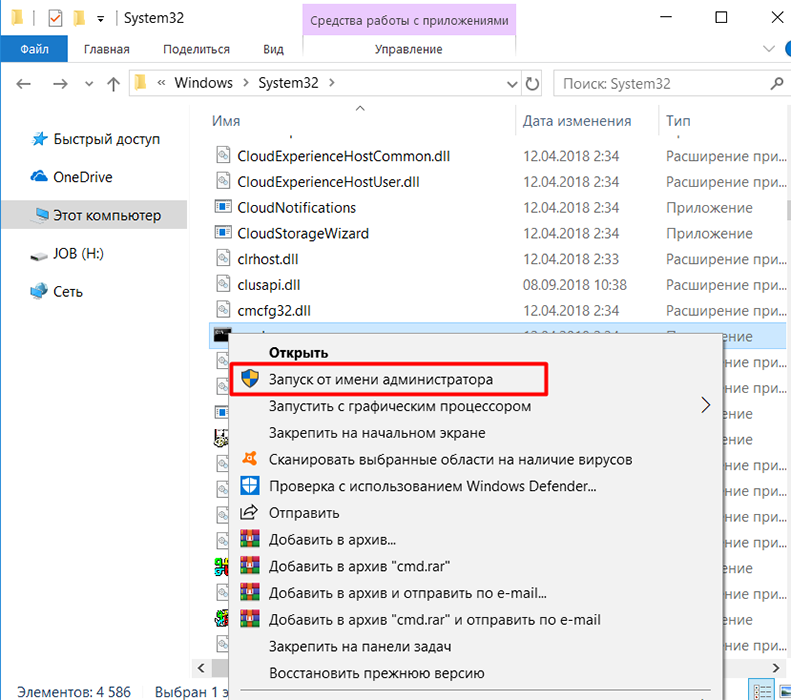
- Откройте «C:WindowsSystem32» и найдите в списке файл «cmd», кликните по нему правой кнопкой мышки и выберите «Запуск от имени администратора». В открывшейся консоли «Командной строки» введите и выполните команду «sfc/scannow» и дождитесь завершения сканирования операционной системы на наличие повреждённых системных компонентов.
- Откройте «Диспетчер задач» с помощью нажатия комбинации клавиш «CTRL+ALT+DELETE»/ «CTRL+SHIFT+ESC» и на вкладке «Процессы» найдите строку «Проводник», кликом по нему правой кнопкой мышки вызовите меню и выберите «Перезапустить».
- Скачайте и установите специализированное программное обеспечение-killer под названием «Unlocker».
 В открывшейся консоли «Командной строки» введите и выполните команду «sfc/scannow» и дождитесь завершения сканирования операционной системы на наличие повреждённых системных компонентов.
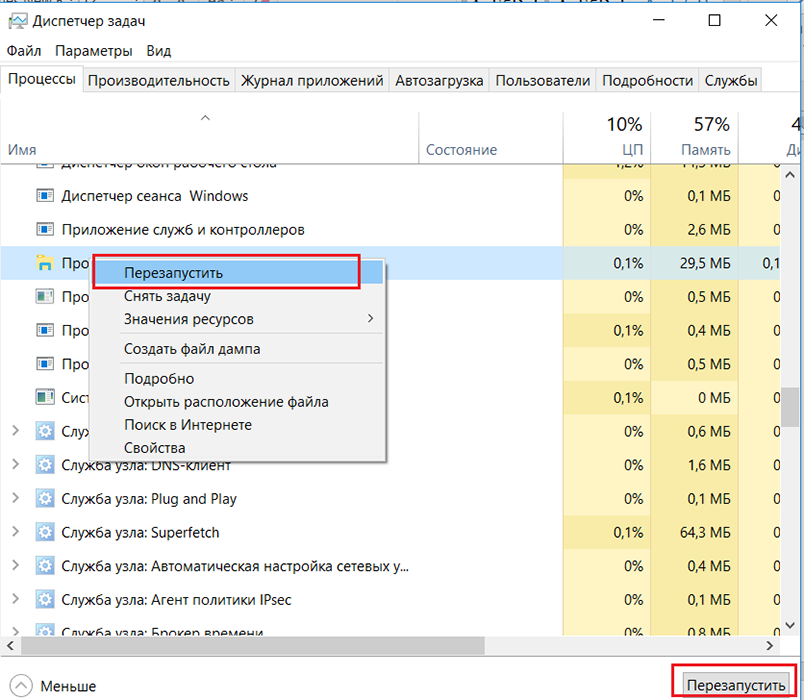
Для его использования не требуется наличие каких-то определённых специфичных познаний, и вариант её применения заключается в следующем:
- кликните правой кнопкой мышки по проблемному файлу или папке и в контекстном меню выберите появившийся пункт «Unlocker»;
- в открывшемся окне выберите кнопку «Разблокировать всё»;
- используя стандартные средства, попробуйте удалить упомянутые элементы.
Зачастую предпринятые меры позволяют справиться с проблемой, когда при удалении папки или файла операционная система сообщает, что ей не удалось найти этот элемент.
Заключение
К сожалению, гарантированного способа устранения рассматриваемой ошибки нет, всё очень индивидуально, так как неизвестно как, кто и для каких целей создал и использовал проблемный элемент, а также у кого имеются соответствующие права. Поэтому возможны ситуации, в которых ни один из 8 приведённых способов решения не поможет. В таком случае наиболее оптимальным вариантом будет обратиться на тематические форумы и привести подробный перечень всех имеющихся данных и предпринятых мер.
Как исправить ошибку “элемент не найден” в Windows 10.
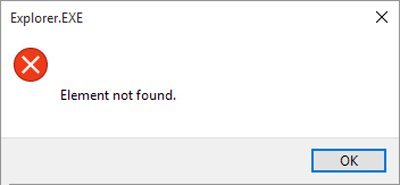
Ваша ОС Windows 10 выдаёт ошибку “элемент не найден”? Если ваш ответ да, то попробуйте ниже перечисленные исправления. Пользователи Windows 10 очень часто получают ошибку этот элемент не найден, так как в те времена, когда операционная система Windows 10 только вышла, ситуация не изменилась и по-прежнему есть отчёты пользователей которые получают то же самое сообщение об ошибке с заголовком Explorer.EXE, в то время как другие пользователи сообщают о проблеме с универсальными приложениями и магазином приложений.
Как исправить ошибку “элемент не найден” в Windows 10
Ошибка элемент не найден может отрицательно сказаться на функциональности ОС Windows 10. Вы не сможете получить доступ к настройкам, универсальным приложениям и магазину приложений. Эта ошибка может возникнуть при попытке открыть файлы изображений: jpg. Это может стать большой головной болью для пользователей Windows 10, но, к счастью для Вас мы привели несколько советов, которые могут оказаться полезными.
Совет 1 – Общий совет по устранению неполадок
Вы могли бы получить это сообщение об ошибке при установке Windows 10 когда что-то пропустили или программное обеспечение третьей стороны, которое вы установили, возможно, изменили свои родные системные файлы или Ваша учётная запись была повреждена.
В такой ситуации, вы должны удалить все сторонние программы и запустить восстановление системных файлов утилитой. Если sfc не поможет исправить эту ошибку, то попробуйте другие советы.
Совет 2 – удалить программного обеспечения с Вашего компьютера
Если вы владеете ПК или ноутбуком Acer, тогда вы должны знать, что определенное программное обеспечение компании Lenovo может привести к этой ошибке и самое лучшее решение, чтобы исправить эту ошибку – это удалить эту программу. Программное обеспечение, которое отвечает за ошибку элемент не найден является Lenovo OneKey Theater, паззлы и CAPSOD. Просто удалите эту программу с вашего ПК/ноутбука, и ваша проблема будет исправлена.
Совет 3 – Удалить обновления Windows 10
Согласно некоторым отчётам пользователей, они смогли исправить ошибку элемент не найден, когда они удалили все Windows 10 обновления. Но, удалить абсолютно все обновления не лучшее исправление, потому что только одно обновление может создавать проблемы. Поэтому, если вы решили удалить все обновления, то вы должны держать закрытыми глаза на то, какое обновление вызывает эту проблему.
Совет 4 – возврат компьютера в исходное состояние
Для сброса ПК, вам понадобится помощь установочного диска или USB флэш-диска с установленными файлами ОС Windows 10. Этот процесс будет переустанавливать Windows 10, но этот процесс не будет удалять Ваши личные файлы, так как этот процесс удалит только установленные приложения. Поэтому, рекомендуется, что вы должны использовать этот совет как последнее решение, если другие советы не работают.
Следуйте инструкциям, чтобы вернуть компьютер в исходное состояние
Нажмите на кнопку Пуск, а затем нажмите на вариант Параметры питания – Power Option.
Теперь удерживайте клавишу “Shift” нажмите на кнопку перезагрузить.
Сейчас вы будете перемещены на экран дополнительные варианты загрузки. Также убедитесь, что ваш установочный диск или флэш-накопитель с Windows 10 подключен к компьютеру.
Теперь нажмите на устранение неполадок и затем выберите сброс этого ПК.
Теперь на экране появится возможность сохранить ваши файлы или нет. Выберите параметр сохранить Мои файлы.
Далее вам будет задан вопрос, какую версию Windows вы хотите сбросить. Поскольку там должен быть один вариант, поэтому нажимаем на него.
После этого вы должны просто следовать инструкциям и дождитесь завершения процесса.
Совет 5 – Перезагрузка Explorer.exe
Это простой способ и успешно работал в решении ошибки элемент не найден. Ниже вы узнаете, что вам нужно сделать, чтобы перезагрузить explorer.exe
Перезагрузите компьютер и при загрузке Windows 10 нажмите сочетание клавиш CTRL+Shift+Esc, чтобы открыть Диспетчер задач.
В вкладке процессы, ищите explorer.exe (проводник Windows).
Просто выберите и щёлкните правой кнопкой мыши и выберите “завершить задачу”.
Далее перейдите в файл>Новая задача.
Откроется окно Выполнить. Теперь вам нужно просто ввести explorer.exe в него и нажмите Enter, чтобы запустить его.
Заключение
Я надеюсь, что хотя бы одно решение из этих пяти советов, возможно, поможет Вам решить проблему с этой ошибкой. Если какой-либо из советов не помог вам, то вы можете попробовать рекомендованное средство восстановления Windows – Windows Repair Software, чтобы просканировать ваш компьютер и проверить решили вы проблему или нет.