
В этом руководстве мы покажем вам два разных метода исправления ошибки TWRP createTarFork Error 255 Backup Failed. Когда дело доходит до пользовательской разработки, нельзя отрицать тот факт, что пользовательское восстановление, пожалуй, лучший инструмент, который может быть в распоряжении технического энтузиаста. И когда мы говорим о пользовательских восстановлениях, TWRP находится на самом верху. Он имеет довольно много примечательных функций, но две из его наиболее полезных — это возможность прошивать файлы ZIP / IMG и делать резервные копии всех разделов на вашем устройстве.
Последний также известен как Nandroid Backup, и обычно это первое необходимое условие, которое вы должны сразу же отметить в списке. Однако не все умеют это делать. От заинтересованных пользователей поступило множество жалоб на то, что они не могут создать резервную копию Nandroid через TWRP. При попытке сделать это их встречает следующее сообщение об ошибке:
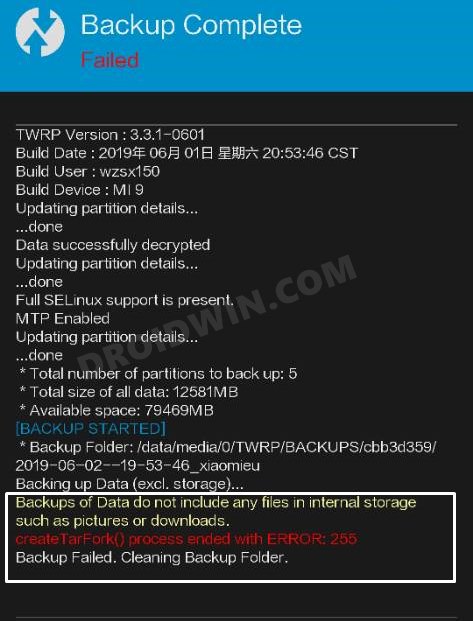
Процесс createTarFork() завершился с ошибкой: 255.
Ошибка резервного копирования. Очистка папки резервного копирования
Так в чем причина этой ошибки? Ну, это обычно происходит, когда вы используете параллельные приложения. Эта функция позволяет вам создать два разных экземпляра приложения, оба из которых будут полностью изолированы друг от друга. Например, вы можете создать две копии WhatsApp и войти в систему с двух разных номеров.
Однако эта функциональность параллельных приложений может конфликтовать с созданием Nandroid Backup. К счастью, существует два разных метода, с помощью которых вы можете исправить ошибку TWRP createTarFork Error 255 Backup Failed. И это руководство познакомит вас именно с этим. Итак, без лишних слов, давайте проверим их.
Как исправить ошибку TWRP createTarFork 255 Backup Failed
Существует два разных метода выполнения вышеупомянутой задачи: с помощью TWRP Recovery или через File Explorer с возможностями root. Мы поделились обоими методами ниже, вы можете попробовать тот, с которым вам удобнее иметь дело.
Способ 1: через проводник
- Загрузите и установите приложение File Explorer, поддерживающее root, например Solid Explorer.
- Затем запустите приложение, коснитесь меню гамбургера, расположенного в левом верхнем углу, и выберите Root.
- Теперь появится запрос Magisk, нажмите «Предоставить».
- Теперь, когда вы находитесь в корневом каталоге, перейдите к следующим папкам и проверьте, есть ли в какой-либо из них папка с именем 999 или нет. Если вы найдете такую папку, то сразу удалите ее.
/storage/emulated /data/system/ data/system_ce/ data/system_de/ data/misc/ data/misc_ce/ data/misc_de/ data/user/ data/user_ce/ data/user_de/
Вот и все. Это должно исправить ошибку TWRP createTarFork Error 255 Backup Failed через файловый менеджер. Давайте теперь познакомим вас со вторым способом выполнения этой задачи.
Способ 2: через рекавери TWRP
- Для начала загрузите свое устройство в TWRP Recovery. Вы можете использовать комбинации аппаратных клавиш или команду восстановления adb reboot.
- После загрузки в TWRP перейдите в «Дополнительно»> «Терминал». Теперь введите следующие команды в окне терминала: (объяснение приведено ниже, прочтите его):
cd /data/system/ rm -r 999 cd data/system_ce/ rm -r 999 cd data/system_de/ rm -r 999 cd data/misc/ rm -r 999 cd data/misc_ce/ rm -r 999 cd data/misc_de /rm -r 999 cd data/user/ rm -r 999 cd data/user_ce/ rm -r 999 cd data/user_de/ rm -r 999
- Что мы делаем: во-первых, вам нужно ввести команду ‘change directory’ (начинается с cd). Затем введите команду «удалить» (начиная с rm).
- Первая команда перенесет вас в определенный каталог, тогда как вторая команда удалит папку с именем 999 внутри этого каталога.
- Если вы получаете сообщение «не существует» или любую другую подобную ошибку, это просто означает, что в этом месте нет папки с именем 999. Следовательно, вам следует перейти к следующему набору команд и так далее, пока вы не выполнил последний.
Как только все 999 папок будут удалены, проблема будет устранена. Кстати, метод TWRP точно такой же, как и в File Explorer. Просто мы получаем доступ к каждой папке и удаляем папку с именем 999 с помощью команд в методе TWRP, тогда как мы делали это, перемещаясь по папкам в методе проводника.
Итак, на этом мы завершаем руководство о том, как исправить ошибку TWRP createTarFork Error 255 Backup Failed. Если у вас есть какие-либо вопросы относительно вышеупомянутых шагов, сообщите нам об этом в разделе комментариев ниже.
Содержание
- [2 Methods] Исправить TWRP createTarFork Ошибка 255 Ошибка резервного копирования
- Как исправить ошибку TWRP createTarFork 255 Backup Failed
- Способ 1: через проводник
- Способ 2: через рекавери TWRP
- Восстановление Nandroid Backup завершается с ошибкой 255
- TWRP и с чем его «едят»
- Алгоритм работы с TWRP для Xiaomi устройств
- Расшифровка и устранение ошибок TWRP
- 2 ответа
- Похожие вопросы
- Популярные теги
- extractTarFork() process ended with ERROR: 255 #1452
- Comments
- WHAT STEPS WILL REPRODUCE THE PROBLEM?
- WHAT IS THE EXPECTED RESULT?
- WHAT HAPPENS INSTEAD?
- ADDITIONAL INFORMATION
[2 Methods] Исправить TWRP createTarFork Ошибка 255 Ошибка резервного копирования
В этом руководстве мы покажем вам два разных метода исправления ошибки TWRP createTarFork Error 255 Backup Failed. Когда дело доходит до пользовательской разработки, нельзя отрицать тот факт, что пользовательское восстановление, пожалуй, лучший инструмент, который может быть в распоряжении технического энтузиаста. И когда мы говорим о пользовательских восстановлениях, TWRP находится на самом верху. Он имеет довольно много примечательных функций, но две из его наиболее полезных — это возможность прошивать файлы ZIP / IMG и делать резервные копии всех разделов на вашем устройстве.
Последний также известен как Nandroid Backup, и обычно это первое необходимое условие, которое вы должны сразу же отметить в списке. Однако не все умеют это делать. От заинтересованных пользователей поступило множество жалоб на то, что они не могут создать резервную копию Nandroid через TWRP. При попытке сделать это их встречает следующее сообщение об ошибке:
Процесс createTarFork() завершился с ошибкой: 255.
Ошибка резервного копирования. Очистка папки резервного копирования
Так в чем причина этой ошибки? Ну, это обычно происходит, когда вы используете параллельные приложения. Эта функция позволяет вам создать два разных экземпляра приложения, оба из которых будут полностью изолированы друг от друга. Например, вы можете создать две копии WhatsApp и войти в систему с двух разных номеров.
Однако эта функциональность параллельных приложений может конфликтовать с созданием Nandroid Backup. К счастью, существует два разных метода, с помощью которых вы можете исправить ошибку TWRP createTarFork Error 255 Backup Failed. И это руководство познакомит вас именно с этим. Итак, без лишних слов, давайте проверим их.
Как исправить ошибку TWRP createTarFork 255 Backup Failed
Существует два разных метода выполнения вышеупомянутой задачи: с помощью TWRP Recovery или через File Explorer с возможностями root. Мы поделились обоими методами ниже, вы можете попробовать тот, с которым вам удобнее иметь дело.
Способ 1: через проводник
- Загрузите и установите приложение File Explorer, поддерживающее root, например Solid Explorer.
- Затем запустите приложение, коснитесь меню гамбургера, расположенного в левом верхнем углу, и выберите Root.
- Теперь появится запрос Magisk, нажмите «Предоставить».
- Теперь, когда вы находитесь в корневом каталоге, перейдите к следующим папкам и проверьте, есть ли в какой-либо из них папка с именем 999 или нет. Если вы найдете такую папку, то сразу удалите ее.
 /storage/emulated /data/system/ data/system_ce/ data/system_de/ data/misc/ data/misc_ce/ data/misc_de/ data/user/ data/user_ce/ data/user_de/
 /storage/emulated /data/system/ data/system_ce/ data/system_de/ data/misc/ data/misc_ce/ data/misc_de/ data/user/ data/user_ce/ data/user_de/
Вот и все. Это должно исправить ошибку TWRP createTarFork Error 255 Backup Failed через файловый менеджер. Давайте теперь познакомим вас со вторым способом выполнения этой задачи.
Способ 2: через рекавери TWRP
- Для начала загрузите свое устройство в TWRP Recovery. Вы можете использовать комбинации аппаратных клавиш или команду восстановления adb reboot.
- После загрузки в TWRP перейдите в «Дополнительно»> «Терминал». Теперь введите следующие команды в окне терминала: (объяснение приведено ниже, прочтите его):cd /data/system/ rm -r 999 cd data/system_ce/ rm -r 999 cd data/system_de/ rm -r 999 cd data/misc/ rm -r 999 cd data/misc_ce/ rm -r 999 cd data/misc_de /rm -r 999 cd data/user/ rm -r 999 cd data/user_ce/ rm -r 999 cd data/user_de/ rm -r 999
- Что мы делаем: во-первых, вам нужно ввести команду ‘change directory’ (начинается с cd). Затем введите команду «удалить» (начиная с rm).
- Первая команда перенесет вас в определенный каталог, тогда как вторая команда удалит папку с именем 999 внутри этого каталога.
- Если вы получаете сообщение «не существует» или любую другую подобную ошибку, это просто означает, что в этом месте нет папки с именем 999. Следовательно, вам следует перейти к следующему набору команд и так далее, пока вы не выполнил последний.
 cd /data/system/ rm -r 999 cd data/system_ce/ rm -r 999 cd data/system_de/ rm -r 999 cd data/misc/ rm -r 999 cd data/misc_ce/ rm -r 999 cd data/misc_de /rm -r 999 cd data/user/ rm -r 999 cd data/user_ce/ rm -r 999 cd data/user_de/ rm -r 999
Как только все 999 папок будут удалены, проблема будет устранена. Кстати, метод TWRP точно такой же, как и в File Explorer. Просто мы получаем доступ к каждой папке и удаляем папку с именем 999 с помощью команд в методе TWRP, тогда как мы делали это, перемещаясь по папкам в методе проводника.
Итак, на этом мы завершаем руководство о том, как исправить ошибку TWRP createTarFork Error 255 Backup Failed. Если у вас есть какие-либо вопросы относительно вышеупомянутых шагов, сообщите нам об этом в разделе комментариев ниже.
Источник
Восстановление Nandroid Backup завершается с ошибкой 255
В некоторых случаях устройства Xiaomi начинают давать сбои, подглючивать или вовсе некоторые из основных функций выходят из строя, что делает невозможным их нормальную эксплуатацию. Для устранения любых проблем кардинальным, но при этом эффективным способом, всегда можно перепрошить устройство. В статье речь пойдет о том, как производится прошивка через TWRP и чем данный способ лучше альтернативных ему (с подробной инструкцией по реализации).
Изначально стоит понять, что такое TWRP, а потом уже говорить о том, как установить нужную прошивку, используя его. На самом деле все достаточно просто, если прочитать расшифровку данной аббревиатуры: TeamWin recovery. Фактически это неофициальный рекавери, которым можно заменить стандартное ПО любого смартфона, работающего на платформе Android. Еще TWRP называют кастомным и большинство пользователей, которые имели дело с ним и со стандартным рекавери, считают, что TWRP более эффективен, функционален и удобен в эксплуатации, к тому же он позволяет устанавливать помимо кастомных прошивок еще и ядра, модемы и прочие системные составляющие прошивки.
Далее будет представлена более подробная для TWRP recovery инструкция, при помощи которой можно будет установить прошивку на любое устройство от Xiaomi (инструкция имеет общий вид, поскольку системные файлы для разных моделей часто различаются).

Сразу стоит сказать, что для установки кастомной прошивки рекомендуется удалить все данные с телефона, а значит нужно сделать их резервную копию для последующего восстановления на устройстве с чистой системой. Также важно разблокировать загрузчик смартфона (bootloader). О том, как мы устанавливаем TWRP, уже говорилось в одной из статей, а потому сразу перейдем к информации о том, как перепрошить устройство с помощью TWRP своими руками.

Алгоритм работы с TWRP для Xiaomi устройств
Итак, когда TWRP уже установлен на устройстве Xiaomi, а также, естественно, разблокирован загрузчик, можно приступать к процедуре. Важно при этом еще иметь и файл прошивки в .zip формате, который под каждое конкретное устройство скачивается на официальном сайте производителя или на тематических форумах, если пользователю больше приглянулась неофициальная сборка.
Выполняется установка прошивки через TWRP recovery следующим образом:
- Смартфон перезагружается со входом в TWRP recovery mode. Для этого нужно его выключить, а затем запустить посредством зажатия «качельки» громкости в положении вверх и кнопки включения смартфона. Результатом зажатия данной комбинации станет надпись «recovery» на экране и, как результат, вход в нужное меню.

- Теперь нужно выполнить сброс всех данных за исключением SD и OTG. Для этого переходим по разделам Wipe – Advanced Wipe и отмечаем следующие пункты: Dalvik Cache, System, Data, Internal Storage, Cache. Устройство будет полностью очищено!
- Затем нажимаем назад, выбираем Reboot recovery и подтверждаем действие (обычно нужно протянуть переключатель по экрану вправо).
- Предварительно на устройстве должен быть размещен файл прошивки.
Рекомендуется размещать .zip файл на SD|OTG карте памяти, поскольку в этом случае системная информация на устройстве будет занимать значительно меньше места, но не менее 200 мегабайт. Подобным образом стоит размещать и резервные копии, создаваемые через TWRP.
- Если нужные файлы загружены и все предыдущие этапы выполнены правильно, то можно нажимать «Install» и подтвердить действие (также по стандарту свайп вправо). Процедура прошивки может никак не отображаться на экране: нужно просто долго ждать.
- Когда прошивка через TWRP будет завершена, нужно выбрать раздел Wipe cache/dalvik, а затем Reboot System.
- Успешное проведение процедуры приведет к тому, что при первой перезагрузке три точки под логотипом производителя (Xiaomi) будут «перемигиваться» около 10 минут, а потом устройство запустится.
Расшифровка и устранение ошибок TWRP
Нередко при работе с TWRP у пользователей возникают различные ошибки. Все они сведены в таблицу ниже и для каждой ошибки предложен вариант устранения.
| Код ошибки | Причины возникновения | Устранение |
| Error 6 | Файл updater-script в архиве с прошивкой создан в неправильном формате. | Необходимо открыть указанный файл через стандартный «Блокнот» или «NotePad++», сменить его формат на Unix и пересохранить. |
| Error 7 | Прошивка подобрана неправильно и не соответствует устройству, на которое должна производиться установка. | 1. Скачать правильный файл прошивки с официального сайта. Важно при этом проверить версию устройства, поскольку, к примеру, Xiaomi Redmi Note 3 имеет модификацию Pro, что делает прошивку от первого устройства несовместимой со вторым.
2. Если же прошивка точно правильная, то нужно открыть в режиме редактирования файл updater-script и удалить в нем первые строки со списком устройств, для которых предназначена данная прошивка. |
| Error 0 | В архиве с прошивкой отсутствует один из файлов. | Нужно перезагрузить архив или добавить нужные файлы. |
| Error 255 | Неподходящим является файл updater-binary. | По аналогии с предыдущим пунктом: нужно заменить указанный файл. |
Проведя процедуру прошивки можно приступать к изменению настроек смартфона. Стоит аккуратнее относиться к настройкам устройства, поскольку большинство проблем, приводящих к необходимости прошивки, возникают именно из-за некорректной эксплуатации телефона.
После настройки прошивки и установки только самых нужных программ, советуем сделать полный бэкап прошивки, таким образом вы всегда сможете произвести восстановление смартфона.
Я недавно уничтожил экран своего OnePlus One и должен был отправить его на ремонт. Я использовал TWRP, чтобы сделать Nandroid Backup перед упаковкой устройства. Вчера я получил новое устройство, явно не имеющее приложений и данных. Поэтому я перенес свою резервную копию на устройство, но при попытке восстановить ее я получаю ошибки.
При восстановлении раздела данных он достигнет 79%, а затем произнесет E:extractTarFork() process ended with ERROR=255 . Я пробовал это несколько раз с тем же результатом. К сожалению, я явно не могу попытаться создать новую резервную копию. Все остальные разделы восстанавливаются без проблем.
Согласно файлам журнала, причиной проблемы является //data/dalvik-cache/arm/[email protected]@[email protected]@classes.dex .
Что я могу сделать? Я думал, что это может помочь удалить файл, так как Dalvik Cache — это просто кэш, который будет воссоздан, но как мне удалить файлы или папки из Nandroid Backup?
2 ответа
У меня была похожая проблема, оказалось, что мне не хватило места на телефоне.
Итак, backup_file_size * 2 19 июля 2016, 05:49:04
«» При восстановлении раздела данных он достигнет 79%, а затем произнесет E: процесс extractTarFork () завершился с ОШИБКОЙ = 255 , Я пробовал это несколько раз с тем же результатом. К сожалению, я явно не могу попытаться создать новую резервную копию. Все остальные разделы восстанавливаются без проблем. «»
Я думаю, что самое простое решение этой проблемы, если оно падает на данные. Попробуйте стереть dalvic и кеш, затем отформатировать память после восстановления резервной копии с SD-карты. Если у вас есть резервная копия TWRP во внутренней памяти телефона, переместите ее на внешнюю карту памяти, чтобы не потерять ее.
ответил Nick 1 августа 2018, 19:15:15
Похожие вопросы
5 Резервное копирование /восстановление NANDroid зашифрованного устройства CM11 после очистки 4 Восстановление .bz2 Mysql Backup? 4 Может ли Titanium Backup успешно выполнять резервное копирование и восстановление Google Authenticator между ПЗУ? 4 BACKUP не удалось выполнить команду BACKUP DATABASE 17 Восстановление данных — восстановление поврежденных /форматированных файлов на карте HD Micro SD 7 Пользовательское восстановление Cyanogenmod не может выполнять резервное копирование, восстановление или применение обновления! 7 Как NANDroid для телефона без ClockWorkMod? 5 Извлечение данных приложения из резервной копии Nandroid /CWM 8 Любая разница между резервами, сделанными Titanium и Nandroid? 29 Какова связь между ROM Manager, ClockworkMod и Nandroid? Какие мне нужны? 9 Нужно ли мне что-то стереть, прежде чем восстанавливать полную резервную копию nandroid? 18 Есть ли способ сделать резервную копию Nandroid непосредственно на ПК, а затем восстановить ее прямо с ПК? 5 MySQL Server Backup 4 Akeeba BackUp: Безопасно ли использовать? 5 Titanium Backup Dropbox синхронизация 7 Бесплатные альтернативы «Titanium Backup Pro» 16 Windows 7 Backup Disk Full 8 Удаление файлов из rdiff-backup 4 Как установить каталог Drush Backup 7 Как сделать резервную копию Titanium Backup?
Популярные теги
security × 330 linux × 316 macos × 282 7 × 268 performance × 244 command-line × 241 sql-server × 235 joomla-3.x × 222 java × 189 c++ × 186 windows × 180 cisco × 168 bash × 158 c# × 142 gmail × 139 arduino-uno × 139 javascript × 134 ssh × 133 seo × 132 mysql × 132 Используемые источники:
Источник
- [ x] I am running an official build of TWRP, downloaded from https://twrp.me/Devices/
- [ x] I am running the latest version of TWRP
- [ x] I have read the FAQ (https://twrp.me/FAQ/)
- [ x] I have searched for my issue and it does not already exist
Device codename: Beryllium
TWRP version: 3.3
WHAT STEPS WILL REPRODUCE THE PROBLEM?
Backup System, Data, Vendor, Boot
Restore Backup
WHAT IS THE EXPECTED RESULT?
Expected result while restoring should have no such error of course
WHAT HAPPENS INSTEAD?
The error mentioned comes while restoring
ADDITIONAL INFORMATION
The text was updated successfully, but these errors were encountered:
Post /tmp/recovery.log for debugging.
Post /tmp/recovery.log for debugging.
Here’s mine, I’m suffering from the exact same error when it comes to my Data partition. My device is Mi Mix 2/chiron and TWRP is 3.3.1-0
I believe the relevant part is:
tar_extract_file(): failed to extract //data/misc/recovery/ro.build.fingerprint .
Looks like the backup file was corrupted. Did you store the digest to compare manually?
Unfortunately not, I’m not too technically inclinded when it comes to custom recovery and ROMs. This has happened multiple times to me on the same device, different versions of TWRP, and I always resort to just a fresh install of everything, as that’s the only solution.
If adb is working try adb shell dmesg > dmesg.log
im having a similar issue on some unofficial build for crownlte devices( note 9, more specifically a n960n).
ODM partition( carrier settings) size changes uppon partition restore/preparation.
in 3.2.3.0 the partition before and after restore is the same size.
on 3.3.1, the minute the backup is restored, theb partition is shrunk. giving the extracttarfork 255 error. so if a partition in 99% full and upon restore it is reduced, contents will fail at the end when the quantity exceeds the new partition size.
here is a thread i posted in concerning the issue where the OP has no idea what’s going on:
This error just bricked my Oneplus 7 Pro. Official build of twrp, did a backup before upgrading to newest Oxygen OS (Android 10). When trying to restore backup multiple of the 255 errors and in the end I had to restore everything to stock to get the device to boot.
Источник
I haven’t been very active since being in college and studying engineering happens to be very time consuming, but I wanted to comment and reiterate a few details to clarify the specific issue and case that venerjoel99 and I wrote our tools to address.
TL;DR — Error 255 can mean any number of things. Our programs specifically solve the problem of extra junk data being inserted into the backup files. My program is crap now, and venerjoel99’s is good -> (https://github.com/venerjoel99/TarProject)
I’ll be writing off the top of my head, so sorry if I make any mistakes. Anything related to how TWRP works itself is pretty much going to be more speculation than not since I haven’t checked.
As far as I have been able to tell, backups of different partitions/locations result in one of two different types of files being created. Either tar files are created, or binary images are created. When creating a system image, boot, or recovery backup, TWRP creates a bit-by-bit copy of those partitions. When creating a data or system backup, TWRP creates either one or a set of tar archive files depending on how large the backup needs to be. The specific problem we aimed to solve was the issue of extra data being inserted into the tar-based backup files. More details on the data inserted and possibly why in this specific comment and some following.
Tar as a file format works with files following a 512-byte block size. It expects everything to abide by this 512-byte block size, which means that headers containing metadata for each file, and the data for each file must start some multiple of 512-bytes, which also means that the data for each file will have null bytes appended to the end to bring it to a size that is some multiple of 512 if needed (The actual size of the file is stored in the header). And to mark the end of a file, two consecutive empty blocks are used to signal the to the extracting program that there are no more files in the archive.
The problem here is that with these strings being leaked occasionally, data within the file gets offset and whatever extracting program is trying to read the file suddenly gets lost and throws an error. In the minor amounts of testing we did, we found that data never gets lost; it’s just that data gets added into the file, and specifically in-between these data blocks. Thus, roughly speaking, the programs we wrote skim along these boundaries and look for specific strings that we know were leaked and then deletes them to realign the files. If the programs manage to complete without error and the restore without errors, then the backups have almost certainly been cleaned.
Important to note is that at the time, MD5 hashes were generated after the files were created. Thus the MD5 hash only worked to tell if the files became corrupted over time. If the files were created corrupted, which is the issue that venerjoel99 and I set out to automate a solution to, the MD5 hashes were effectively useless for restore purposes. Of course knowing if the corrupted file was further corrupted is important, because if it becomes any further corrupted, then our programs mostly likely won’t help either.
For files that have become corrupted over time due to SD/eMMC corruption, there is unfortunately not much that can be done after the fact. While it may be possible to manually extract specific files, not only would it be hard to determine if the integrity of those files were maintained, but it would also take a ridiculous amount of time given the number of files.
Since I haven’t had as much leeway to maintain and improve on my program as much as I would like, I fully recommended venerjoel99’s TarCleaner instead. I currently have an issue on my program which I unfortunately have yet to fully finish addressing (though I will get to it someday).
When this first happened to me, I was so stressed by that fact I couldn’t restore from the backup I had just made before factory resetting my phone, I eventually ended up exploring the backup files in HxD which led to effectively the same discovery as was shared way up at the top of this issue. I manually cleaned the files then, but it was running into that problem and having literally no other existing solutions work that led venerjoel99 and me to create our programs. So while I totally feel the «TWRP — PTSD,» knowing more about the problem and how it happened makes me a lot less worried.

Are you trying to restore your TWRP ROM backup and it ended with CreateTarFork() Process Ended With Error: 255 while trying to restore data backup and no matter what you tried, it just won’t restore your complete TWRP backup? If you’ve found yourself in this situation, then this post is for you. In this post, we’ll be looking at how to fix CreateTarFork() Process Ended With Error: 255 in TWRP backup restore.
Recently while trying to fix Bless Android 10 ROM for Tecno LA7, I encountered the TWRP CreateTarFork() Error. I had faced this same error about 3 weeks ago and the only option I had was to let go of my data backup and factory reset my device and lost all my files. But when I encounter this error for the second time, I just couldn’t let go of my data, there should be a way around this, I said.
After some digging, I finally found a solution to the TWRP error: 255 and was finally able to restore my TWRP backup completely without any error. So, without any further ado, let’s get straight to how to fix TWRP TWRP CreateTarFork() Error (Error: 255).
To fix TWRP data restore error 255, simply follow the simple step by step guide below.
Step 1. In TWRP recovery, go to settings and tick the following option under the general tab.
- Tick use rm -rf instead of formatting and
- Skip digest generation during backup
 Process Ended With Error: 255 During TWRP Backup Restore 1")
 Process Ended With Error: 255 During TWRP Backup Restore 2")
Step 2. Return to TWRP main menu and navigate to the wipe section. In the wipe, section tap on advance wipe and wipe the following partitions.
- Dalvik art/cahce
- Cache
- System
- Data
 Process Ended With Error: 255 During TWRP Backup Restore 3")
 Process Ended With Error: 255 During TWRP Backup Restore 4")
 Process Ended With Error: 255 During TWRP Backup Restore 5")
Step 3. Once you’re done wiping the above-selected partitions, return to TWRP main menu and go to advanced. In advanced, go to file manager. Once you’re in the file manager, you’ll see a list of folders, look for data folder and open it.
 Process Ended With Error: 255 During TWRP Backup Restore 6")
 Process Ended With Error: 255 During TWRP Backup Restore 7")
 Process Ended With Error: 255 During TWRP Backup Restore 8")
Step 4. In the data folder, you’ll find some other subfolders including a folder named media. Delete all other folders in the data folder except media folder.
 Process Ended With Error: 255 During TWRP Backup Restore 9")
To Delete a folder, simply tap on it, in the folder tap on the small box at the bottom right corner and tap on delete.
 Process Ended With Error: 255 During TWRP Backup Restore 10")
 Process Ended With Error: 255 During TWRP Backup Restore 11")
Step 5. Open media folder, you’ll find another two subfolders, one name (0) and the other named (OBB). Delete the OBB folder
 Process Ended With Error: 255 During TWRP Backup Restore 12")
Step 6. Now, Open (0) folder and locate the Android folder in it. Once found, delete it as well.
 Process Ended With Error: 255 During TWRP Backup Restore 13")
Step 7. Return to TWRP main menu, tap on the restore option and restore ROM Backup. Your backup will now restore without any further errors.
That’s it, you’ve successfully fixed TWRP CreateTarFork() Process Ended With Error: 255 restore error. If any of the above steps are not quite clear, kindly drop a comment below and I’ll get back to you ASAP!.
В некоторых случаях устройства Xiaomi начинают давать сбои, подглючивать или вовсе некоторые из основных функций выходят из строя, что делает невозможным их нормальную эксплуатацию. Для устранения любых проблем кардинальным, но при этом эффективным способом, всегда можно перепрошить устройство. В статье речь пойдет о том, как производится прошивка через TWRP и чем данный способ лучше альтернативных ему (с подробной инструкцией по реализации).
Содержание
- TWRP и с чем его «едят»
- Алгоритм работы с TWRP для Xiaomi устройств
- Расшифровка и устранение ошибок TWRP
- Итог
- 2 ответа
Изначально стоит понять, что такое TWRP, а потом уже говорить о том, как установить нужную прошивку, используя его. На самом деле все достаточно просто, если прочитать расшифровку данной аббревиатуры: TeamWin recovery. Фактически это неофициальный рекавери, которым можно заменить стандартное ПО любого смартфона, работающего на платформе Android. Еще TWRP называют кастомным и большинство пользователей, которые имели дело с ним и со стандартным рекавери, считают, что TWRP более эффективен, функционален и удобен в эксплуатации, к тому же он позволяет устанавливать помимо кастомных прошивок еще и ядра, модемы и прочие системные составляющие прошивки.
Далее будет представлена более подробная для TWRP recovery инструкция, при помощи которой можно будет установить прошивку на любое устройство от Xiaomi (инструкция имеет общий вид, поскольку системные файлы для разных моделей часто различаются).
Сразу стоит сказать, что для установки кастомной прошивки рекомендуется удалить все данные с телефона, а значит нужно сделать их резервную копию для последующего восстановления на устройстве с чистой системой. Также важно разблокировать загрузчик смартфона (bootloader). О том, как мы устанавливаем TWRP, уже говорилось в одной из статей, а потому сразу перейдем к информации о том, как перепрошить устройство с помощью TWRP своими руками.
Алгоритм работы с TWRP для Xiaomi устройств
Итак, когда TWRP уже установлен на устройстве Xiaomi, а также, естественно, разблокирован загрузчик, можно приступать к процедуре. Важно при этом еще иметь и файл прошивки в .zip формате, который под каждое конкретное устройство скачивается на официальном сайте производителя или на тематических форумах, если пользователю больше приглянулась неофициальная сборка.
Выполняется установка прошивки через TWRP recovery следующим образом:
- Смартфон перезагружается со входом в TWRP recovery mode. Для этого нужно его выключить, а затем запустить посредством зажатия «качельки» громкости в положении вверх и кнопки включения смартфона. Результатом зажатия данной комбинации станет надпись «recovery» на экране и, как результат, вход в нужное меню.
- Теперь нужно выполнить сброс всех данных за исключением SD и OTG. Для этого переходим по разделам Wipe – Advanced Wipe и отмечаем следующие пункты: Dalvik Cache, System, Data, Internal Storage, Cache. Устройство будет полностью очищено!
Сброс данных
- Затем нажимаем назад, выбираем Reboot recovery и подтверждаем действие (обычно нужно протянуть переключатель по экрану вправо).
- Предварительно на устройстве должен быть размещен файл прошивки.
Рекомендуется размещать .zip файл на SD|OTG карте памяти, поскольку в этом случае системная информация на устройстве будет занимать значительно меньше места, но не менее 200 мегабайт. Подобным образом стоит размещать и резервные копии, создаваемые через TWRP.
- Если нужные файлы загружены и все предыдущие этапы выполнены правильно, то можно нажимать «Install» и подтвердить действие (также по стандарту свайп вправо). Процедура прошивки может никак не отображаться на экране: нужно просто долго ждать.
- Когда прошивка через TWRP будет завершена, нужно выбрать раздел Wipe cache/dalvik, а затем Reboot System.
- Успешное проведение процедуры приведет к тому, что при первой перезагрузке три точки под логотипом производителя (Xiaomi) будут «перемигиваться» около 10 минут, а потом устройство запустится.
Расшифровка и устранение ошибок TWRP
Нередко при работе с TWRP у пользователей возникают различные ошибки. Все они сведены в таблицу ниже и для каждой ошибки предложен вариант устранения.
| Код ошибки | Причины возникновения | Устранение |
| Error 6 | Файл updater-script в архиве с прошивкой создан в неправильном формате. | Необходимо открыть указанный файл через стандартный «Блокнот» или «NotePad++», сменить его формат на Unix и пересохранить. |
| Error 7 | Прошивка подобрана неправильно и не соответствует устройству, на которое должна производиться установка. | 1. Скачать правильный файл прошивки с официального сайта. Важно при этом проверить версию устройства, поскольку, к примеру, Xiaomi Redmi Note 3 имеет модификацию Pro, что делает прошивку от первого устройства несовместимой со вторым.
2. Если же прошивка точно правильная, то нужно открыть в режиме редактирования файл updater-script и удалить в нем первые строки со списком устройств, для которых предназначена данная прошивка. |
| Error 0 | В архиве с прошивкой отсутствует один из файлов. | Нужно перезагрузить архив или добавить нужные файлы. |
| Error 255 | Неподходящим является файл updater-binary. | По аналогии с предыдущим пунктом: нужно заменить указанный файл. |
Итог
Проведя процедуру прошивки можно приступать к изменению настроек смартфона. Стоит аккуратнее относиться к настройкам устройства, поскольку большинство проблем, приводящих к необходимости прошивки, возникают именно из-за некорректной эксплуатации телефона.
После настройки прошивки и установки только самых нужных программ, советуем сделать полный бэкап прошивки, таким образом вы всегда сможете произвести восстановление смартфона.
Я недавно уничтожил экран своего OnePlus One и должен был отправить его на ремонт. Я использовал TWRP, чтобы сделать Nandroid Backup перед упаковкой устройства. Вчера я получил новое устройство, явно не имеющее приложений и данных. Поэтому я перенес свою резервную копию на устройство, но при попытке восстановить ее я получаю ошибки.
При восстановлении раздела данных он достигнет 79%, а затем произнесет E:extractTarFork() process ended with ERROR=255. Я пробовал это несколько раз с тем же результатом. К сожалению, я явно не могу попытаться создать новую резервную копию. Все остальные разделы восстанавливаются без проблем.
Согласно файлам журнала, причиной проблемы является //data/dalvik-cache/arm/[email protected]@[email protected]@classes.dex.
Что я могу сделать? Я думал, что это может помочь удалить файл, так как Dalvik Cache — это просто кэш, который будет воссоздан, но как мне удалить файлы или папки из Nandroid Backup?
оригинал
2 ответа
У меня была похожая проблема, оказалось, что мне не хватило места на телефоне.
Итак, backup_file_size * 2 <me Раздел данных в основном большой, поэтому он может превышать емкость.
Хорошей альтернативой может быть восстановление с USB-устройства или SD-карты.
ответил maximus19 июля 2016, 05:49:04
«» При восстановлении раздела данных он достигнет 79%, а затем произнесет E: процесс extractTarFork () завершился с ОШИБКОЙ = 255 , Я пробовал это несколько раз с тем же результатом. К сожалению, я явно не могу попытаться создать новую резервную копию. Все остальные разделы восстанавливаются без проблем. «»
Я думаю, что самое простое решение этой проблемы, если оно падает на данные. Попробуйте стереть dalvic и кеш, затем отформатировать память после восстановления резервной копии с SD-карты. Если у вас есть резервная копия TWRP во внутренней памяти телефона, переместите ее на внешнюю карту памяти, чтобы не потерять ее.
ответил Nick1 августа 2018, 19:15:15
Похожие вопросы
5Резервное копирование /восстановление NANDroid зашифрованного устройства CM11 после очистки4Восстановление .bz2 Mysql Backup?4Может ли Titanium Backup успешно выполнять резервное копирование и восстановление Google Authenticator между ПЗУ?4BACKUP не удалось выполнить команду BACKUP DATABASE17Восстановление данных — восстановление поврежденных /форматированных файлов на карте HD Micro SD7Пользовательское восстановление Cyanogenmod не может выполнять резервное копирование, восстановление или применение обновления!7Как NANDroid для телефона без ClockWorkMod?5Извлечение данных приложения из резервной копии Nandroid /CWM8Любая разница между резервами, сделанными Titanium и Nandroid?29Какова связь между ROM Manager, ClockworkMod и Nandroid? Какие мне нужны?9Нужно ли мне что-то стереть, прежде чем восстанавливать полную резервную копию nandroid?18Есть ли способ сделать резервную копию Nandroid непосредственно на ПК, а затем восстановить ее прямо с ПК?5MySQL Server Backup4Akeeba BackUp: Безопасно ли использовать?5Titanium Backup Dropbox синхронизация7Бесплатные альтернативы «Titanium Backup Pro»16Windows 7 Backup Disk Full8Удаление файлов из rdiff-backup4Как установить каталог Drush Backup7Как сделать резервную копию Titanium Backup?
Популярные теги
security × 330linux × 316macos × 2827 × 268performance × 244command-line × 241sql-server × 235joomla-3.x × 222java × 189c++ × 186windows × 180cisco × 168bash × 158c# × 142gmail × 139arduino-uno × 139javascript × 134ssh × 133seo × 132mysql × 132Используемые источники:
- https://migeek.ru/settings/proshivka-cherez-twrp
- https://sprosi.pro/questions/318067/vosstanovlenie-nandroid-backup-zavershaetsya-s-oshibkoy-255
![]()
![]()
This issue is also present when no encryption is used.
I’m using official twrp 3.2.3-1 and can reproduce the error with several builds of Liquid Remix and Lineageos after a fresh install with the following procedure:
- factory wipe
- install rom & twrp
- reboot system
- add user (whether or not the new user is configured does not make a difference)
- reboot recovery
- try to backup
Rebooting into system and removing the added user lets backups from within twrp be created normally.
![]()
I experience the same problem with my device (Chiron) using both the latest and previous TWRP versions.
When I decrypt the device in TWRP there are still some encrypted folders:
- /data/user/10
- /data/misc_ce/10
- /data/system_ce/10
These folders belong to a second user profile (in my case created by the app cloner ‘Island’)
![]()
Besides deleting the second user with pm remove-user [user_id], is there any other workaround for this issue? This affects any phone/ROM that uses android’s FBE when creating a new profile (pretty much all of them), and has been ongoing for quite some time (almost an year that I remember).
Is it too hard to just skip all the other profile’s directories (or everything that’s file-based encrypted for that matter) when using TWRP to backup and restore?
![]()
this happens on harpia as well, with old and most recent twrp, with no additional users.
looking at the recovery.log revealed this error message:
Error opening: ‘/system/addon.d’ (Not a directory)
so i fixed this issue by simply creating that directory:
- boot into recovery twrp
- go to advanced > terminal
- in terminal, type:
cd /system
rm addon.d
exit - go back to the main menu and try backup again. it should work.
![]()
So what is actually the issue that’s holding back TWRP from supporting multiple user profiles?
![]()
Time. Time for the TWRP devs to review the relevant patch on Gerrit. Be patient.
![]()
The problem still exists in Android 10 with multiple users.
![]()
I have FBE and only a single user.
I had this error (ERROR: 255) when trying to restore the data partition from a TWRP backup. After trying it several times, the data partition got corrupted: TWRP couldn’t decrypt it anymore.
This meant that the internal storage was gone and the backup was gone because TWRP stores it on the internal storage. Therefore it’s important to manually backup the internal storage beforehand. This can be done via adb pull /sdcard my-sdcard-backup (where my-sdcard-backup is a folder that doesn’t exist yet) and must be done before such a bug happens.
I had such a backup of my internal storage and was finally able to restore the TWRP backup (without ERROR: 255) like so:
- Boot into TWRP.
- Format the data partition (which was corrupted anyways).
- Reboot into system and set up the device.
- Reboot into TWRP.
adb shell rm -rf /sdcard/*adb push my-sdcard-backup/* /sdcard/- Restore the TWRP backup.
During the last step, the backup was restored without error.
![]()
same here: i have twrp 3.3.1-2 & 3.3.1-14 with los/microg tested.
shelter is installed for the second profile.
would be great if this could work!
failed to lookup tar policy for '/data/vendor_ce/10' - '7856242092fbe42a' I:Error adding file '/data/vendor_ce/10' to '/data/media/0/TWRP/BACKUPS/7b55eca1/2019-12-14--07-30-01_lineage_enchilada-userdebug_9_PQ3A190801002/data.ext4.win000' Error creating backup. I:ERROR tarList for thread ID 0 Error creating backup. I:InfoManager saving '/data/media/0/TWRP/BACKUPS/7b55eca1/2019-12-14--07-30-01_lineage_enchilada-userdebug_9_PQ3A190801002/data.info' createTarFork() process ended with ERROR: 255failed to lookup tar policy for '/data/vendor_ce/10' - '7856242092fbe42a' I:Error adding file '/data/vendor_ce/10' to '/data/media/0/TWRP/BACKUPS/7b55eca1/2019-12-14--07-30-01_lineage_enchilada-userdebug_9_PQ3A190801002/data.ext4.win000' Error creating backup. I:ERROR tarList for thread ID 0 Error creating backup. I:InfoManager saving '/data/media/0/TWRP/BACKUPS/7b55eca1/2019-12-14--07-30-01_lineage_enchilada-userdebug_9_PQ3A190801002/data.info' createTarFork() process ended with ERROR: 255
![]()
Well, if you’re fine with the data being removed for your dual apps, please try flashing this before trying a backup and/or a restore: RMDAD_v0.0.1.zip
That will remove any 999/10 folders, flashable in TWRP. Please report back.
![]()
It is happening also with a single user (only ID 0 user), using TWRP 3.3.1.2 in a Motorola G7, Android 9, trying to do a backup (through USB OTG). External SD is formatted as internal space.
![]()
Well, if you’re fine with the data being removed for your dual apps, please try flashing this before trying a backup and/or a restore: RMDAD_v0.0.1.zip
That will remove any 999/10 folders, flashable in TWRP. Please report back.
Removed all work profiles and parallel apps in the OS, but that didn’t work. Flashing the zip worked for me, this is the solution to the thread.
![]()
RMDAD_v0.0.1.zip . . . That will remove any 999/10 folders, flashable in TWRP.
This worked for me as well.
I looked at several of those folders and they were all empty. So I assumed they were all empty (and figured the worst that would happen if they weren’t, is all the apps in the dual account, whatever that was, would have their data cleared/reset).
Thanks.
![]()
Well, if you’re fine with the data being removed for your dual apps, please try flashing this before trying a backup and/or a restore: RMDAD_v0.0.1.zip
That will remove any 999/10 folders, flashable in TWRP. Please report back.
Did not work for me. Removing users is not the solution for my 255 error because I only have one user (pm list users).
![]()
I don’t see why removing users would work. This also happened to me with a single user.
As I posted above:
this happens on harpia as well, with old and most recent twrp, with no additional users.
looking at the recovery.log revealed this error message:
Error opening: ‘/system/addon.d’ (Not a directory)
so i fixed this issue by simply creating that directory:
boot into recovery twrp
go to advanced > terminal
in terminal, type:
cd /system
rm addon.d
exit
go back to the main menu and try backup again. it should work.
![]()
@btarazona rm addon.d is not exactly «creating a directory».
![]()
In my case, it also happens with no additional users.
It is happening also with a single user (only ID 0 user), using TWRP 3.3.1.2 in a Motorola G7, Android 9, trying to do a backup (through USB OTG). External SD is formatted as internal space.
I think the issue is related to the encryption of the SD: TWRP seems unable to decrypt it; although it says the is it successfully decrypted once I put the correct pattern. Thinking that the problem could be the length of the pattern, I have simplified it to four points, but again, with no success.
My suspicion with the encription comes because the last error I see in the log is:
failed to lookup tar policy for ‘/external_sd/user/0’ — ‘fca0edbb67a976a3’
I:Error adding file ‘/external_sd/user/0’ to ‘/usb_otg/TWRP/BACKUPS/……/2020-01-03—12-47-13/external_sd.f2fs.win000’
That directory exists, but having a look at /sdcard, I notice that data is encripted.
An browsing through the SD, it seems directories and files are encripted.
So, is TWRP unencripting the external SD correctly? I am using the right pattern when asked by TWRP (obviously, I am pretty sure of that, because I am using it continuously), and so TWRP says confirming unencription.
![]()
Well, if you’re fine with the data being removed for your dual apps, please try flashing this before trying a backup and/or a restore: RMDAD_v0.0.1.zip
That will remove any 999/10 folders, flashable in TWRP. Please report back.
Thanks a lot! This worked for me. (fajita)
![]()
Please stop cluttering the thread by discussing «solutions» that involve removing additional users, profiles, dual apps and/or their data. Issue #1373 specifically concerns multi-user setups.
Thank you.
![]()
![]()
Not sure if this will work for other people. I noticed that I was getting this error (createTarFork() process ended with ERROR: 255) while creating the backup right after the screen locked. I disabled the screen locking in settings and then my backup completed.
NOTE: I have an encrypted device with work profile using shelter.
![]()
Happens for me with Xiaomi MI6 sagit TWRP 3.3.1-2, same error after message
«Backups of data do not include any files in internal storage such as pictures or downloads.» in case that’s relevant
![]()
Enabling backup encryption worked, yet I belive it’s using different compression method.
![]()
Not sure if this will work for other people. I noticed that I was getting this error (
createTarFork() process ended with ERROR: 255) while creating the backup right after the screen locked. I disabled the screen locking in settings and then my backup completed.NOTE: I have an encrypted device with work profile using shelter.
worked on huawei mate 8 twrp 3.0.1 /no errors after your solution /thank you
![]()
Well, if you’re fine with the data being removed for your dual apps, please try flashing this before trying a backup and/or a restore: RMDAD_v0.0.1.zip
That will remove any 999/10 folders, flashable in TWRP. Please report back.
I used this one on my OnePlus 6 after having the 255 error while trying to back up in TWRP. This occured probably, because I once used the parallel apps option but reverded that.
Then I could back up, but had a recovery boot loop afterwards. I used the option of twrp to repair this recovery boot loop problem and could boot into the system again.
Going back into TWRP I had the 255 error again and also it seems that I can’t flash magisk. Tried twice — didn’t stick.
Any help is appreciated. I need a back up of my phone.
![]()
I had success by using the terminal:
SU
PM remove-user 999
![]()
People, I kindly ask you all to stop suggesting removing other user’s data. This issue is specifically to address multi-user backup not working. Removing a user has been mentioned multiple times already and is not a real solution. Please respect all the people that follow this issue. The people who follow it, do it to know when it’s FIXED.
![]()
![]()
Nothing from above has actually helped to solve the issue. I have a Mi 9 Pro 5G.
The issues seems to occur when TWRP tries to access and copy the /data/app folder. Immediately it does, error 255 pops-up.
Any suggestions how to solve it all would be greatly appreciated.
![]()
I had the same exact error message but finally resolved it when I enabled backup encryption just like @Misiur mentioned. Thanks.
![]()
Solved by removing Work Profile (Shelter).
![]()
Solved by removing Work Profile (Shelter).
Please explain how the issue at hand is solved by deleting the work profile??
![]()
Solved by removing Work Profile (Shelter).
Please explain how the issue at hand is solved by deleting the work profile??
I have no idea why, but i got this advice from OnePlus community.
![]()
@linjan
Removing the work profile (or multiple users, etc.) does not solve this issue. The issue explicitly concerns use cases with (!!!) multiple users, work profiles, etc.
It’s like moving a car that won’t start at cold temperatures into a heated garage and claiming that the problem (of the car not starting in the cold) is solved.
![]()
@linjan
It’s like moving a car that won’t start at cold temperatures into a heated garage and claiming that the problem (of the car not starting in the cold) is solved.
Yes, but from reading at [https://gerrit.twrp.me/c/android_bootable_recovery/+/1724] it is not clear to me if this patch is working and when it will be released.
Every reasonable modding instruction starts with the advise to make backups before preceding.
Right not I am having a brand-new phone that I cannot setup any further, because i cannot make a backup of my existing configuration.
So I am actually thinking of moving my car to the garage for heating up and equally removing my shelter/work profile. So that i can continue.
It got another phone i did not even start, because i will not be able to backup … Before installing Magisk, before installing XPosed etc.
Not using my phone is not a solution. I will rather discard any additional profiles I made.
I looked at the TWRP source code but i do not know enough to figure out how to blacklist or exclude directories from backup.
And by the way, TWRP maintainer mauronofrio officially tells you there to go to a thread which tells you to delete your work profiles!
![]()
@ is-this-a-comma-or-period
This is all very fine and mostly agreeable. However, what people do not seem to realize is that this place is for reporting bugs and discussing actual solutions to them. It is NOT a user forum where workarounds can (and should) be discussed.
Put it in terms of the car:
What is the use of (btw. repeatedly!) reading about how to start the engine in a warm garage when you are the engineer tasked with solving the issue (so that cars can continue to be sold to buyers without heated garages who still have to be able to depend on them starting in the cold)?
![]()
Had same issue today trying to backup Data, I have a Xiaomi Mi 9T Pro, making use of the Second Space feature, which creates a user with number 10.
![]()
Fix for this has been merged and will be included in the next official TWRP release.
![]()
Fix for this has been merged and will be included in the next official TWRP release.
Hello,
When is planned the next release ?
Thanks
![]()
Fix for this has been merged and will be included in the next official TWRP release.
Hello,
When is planned the next release ?
Thanks
Soon™
![]()
@CaptainThrowback Hello, just to be sure — the new 3.4.0-0 release from June 24 has fixed this issue, correct? When I make a backup with work profiles using this version, there will be no problem restoring them?
If that’s the case, maybe this issue can be marked as fixed.
![]()
@CaptainThrowback Hello, just to be sure — the new 3.4.0-0 release from June 24 has fixed this issue, correct? When I make a backup with work profiles using this version, there will be no problem restoring them?
If that’s the case, maybe this issue can be marked as fixed.
TWRP 3.4.0 is able to decrypt secondary user accounts (including work profiles), yes. However, that is dependent on knowing what the password is for such profiles, and we’ve seen a few cases where those profiles were created by a specific application and won’t decrypt automatically. The option to decrypt additional users is under Advanced -> Decrypt Users, but if the password for the work profile is unknown, it will still be unable to properly backup and restore.
This latter case is still being worked on. The idea would be to skip backing up any profiles that aren’t decrypted, but first providing a notification to the user that there is a user account that is still encrypted and will be skipped unless the user chooses to decrypt it at that time. This will prevent the issues with restoring since the work profile will remain unaffected. I believe @noahajac and @chaosmaster were looking into this.
So for now, this issue can remain open until it’s completely fixed.
EDIT: Same applies to this issue, where this is a bit more information: #1256
![]()
@CaptainThrowback
TWRP 3.4.0 is able to decrypt secondary user accounts (including work profiles), yes. However, that is dependent on knowing what the password is for such profiles, and we’ve seen a few cases where those profiles were created by a specific application and won’t decrypt automatically. The option to decrypt additional users is under Advanced -> Decrypt Users, but if the password for the work profile is unknown, it will still be unable to properly backup and restore.
Thank you. Does anyone know if the Shelter app is known to put passwords or cause other issues when decrypting?
I have no idea about any of those apps. You’d have to boot up TWRP and see if it decrypts the secondary user automatically or not.
![]()
I’ve just tried to restore a backup that was created using TWRP 3.4.0-0 which contained a work profile and a «dual app» profile (Xiaomi). The «dual app» profile gets properly decrypted, the work profile gets ignored when backing up.
However when restoring the backup I’m getting a 255 error when restoring Data (extractTarFork() process ended with ERROR: 255); is there any way to remedy this? Thank you!
Edit: It seems like «offending» folders aren’t ignored (misc/user/non-0; vendor_ce/10; vendor_de/10,11 etc.) inside the backup.
![]()
@pannal Please provide the recovery log. It contains the offending files/folders which will be helpful in creating a fix.
![]()
![]()
https://gerrit.twrp.me/c/android_bootable_recovery/+/2698 will at least warn the user upon doing backups and restores if they have undecrypted users.
Next I’ll look into actually ignoring certain files/directories based on what is and isn’t decrypted. Due to many differences between devices however, a general warning seems necessary.
![]()
Restoring Data (excl. storage)... Invalid encryption mode file /data/unencrypted/mode I:InfoManager loading from '/data/media/2021-03-12--09-52-46_PQ3A190801002/data.info'. I:Read info file, restore size is 22596419072 I:Multiple archives Invalid encryption mode file /data/unencrypted/mode Invalid encryption mode file /data/unencrypted/mode Invalid encryption mode file /data/unencrypted/mode Invalid encryption mode file /data/unencrypted/mode Invalid encryption mode file /data/unencrypted/mode Invalid encryption mode file /data/unencrypted/mode Invalid encryption mode file /data/unencrypted/mode Invalid encryption mode file /data/unencrypted/mode Invalid encryption mode file /data/unencrypted/mode I:First tar file '/data/media/2021-03-12--09-52-46_PQ3A190801002/data.f2fs.win000' not encrypted I:Setting archive type I:Extracting uncompressed tar ==> extracting: //data/bootchart/ (mode 40755, directory) restoring policy 1DK > '80c25f2d77000000' to '//data/bootchart/' ==> extracting: //data/misc/ (mode 41771, directory) restoring policy 1DK > '80c25f2d77000000' to '//data/misc/' ==> extracting: //data/misc/recovery/ (mode 40770, directory) tar_extract_file(): failed to extract //data/misc/recovery/ !!! I:Unable to extract tar archive '/data/media/2021-03-12--09-52-46_PQ3A190801002/data.f2fs.win000' Error during restore process. I:Error extracting '/data/media/2021-03-12--09-52-46_PQ3A190801002/data.f2fs.win000' in thread ID 0 I:Error extracting split archive. Error during restore process. extractTarFork() process ended with ERROR: 255
Any idea how to fix this?
Full log https://www.dropbox.com/s/sbqwrko3yoop0wg/recovery.zip?dl=0
![]()
I’ve tried multiple suggestions:
- remove all users other than 0
- remove /system/addon.d
- Disable screen lock
They didn’t work. One plausible solution is to format data (and restore it from backup) but it is not corrupted. I’m wondering if I can do something less drastic. The error log might give some hints:
Backing up Data (excl. storage)...
Backups of Data do not include any files in internal storage such as pictures or downloads.
Invalid encryption mode 'ice:aes-256-cts'
I:Creating backup...
I:Creating tar file '/usb_otg/TWRP/BACKUPS/xxxxxx/data.ext4.win'
failed to lookup tar policy for '/data/extm' - 'ffffff'
I:Error adding file '/data/extm' to '/usb_otg/TWRP/BACKUPS/xxxxxx/data.ext4.win'
Error creating backup.
Looks like multiple encryption policies were used because I did not format data when flashing MIUI 12.5 over 12.0.
The directory /data/extm was empty so I removed it. Now the error is gone. 👍
I believe the error message is extremely ambiguous and everyone has a slightly different variation. You really need to look at the recovery.log to get to the problem.
![]()
I:Data backup size is 14796MB, free: 88576MB.
...done
I:Backup Name is: '2021-11-04--23-03-31_RP1A200720011'
I:Backup_Folder is: '/external_sd/TWRP/BACKUPS/ifsc7pvk4hmrp7mv/2021-11-04--23-03-31_RP1A200720011'
I:Calculating backup details...
I:Backup_List: /data;
I:backup_path: /data
 * Total number of partitions to back up: 1
 * Total size of all data: 14796MB
 * Available space: 93257MB
[BACKUP STARTED]
 * Backup Folder: /external_sd/TWRP/BACKUPS/ifsc7pvk4hmrp7mv/2021-11-04--23-03-31_RP1A200720011
Invalid encryption mode 'aes-256-xts:aes-256-cts:v1'
Backing up Data (excl. storage)...
Backups of Data do not include any files in internal storage such as pictures or downloads.
Invalid encryption mode 'aes-256-xts:aes-256-cts:v1'
Breaking backup file into multiple archives...
I:Creating backup...
I:Creating tar file '/external_sd/TWRP/BACKUPS/ifsc7pvk4hmrp7mv/2021-11-04--23-03-31_RP1A200720011/data.f2fs.win000'
I:addFile '/data/bootchart' including root: 1
  ==> set selinux context: u:object_r:bootchart_data_file:s0
failed to lookup fscrypt tar policy for '/data/bootchart' - '5d9d3047000000000000000000000000'
I:Error adding file '/data/bootchart' to '/external_sd/TWRP/BACKUPS/ifsc7pvk4hmrp7mv/2021-11-04--23-03-31_RP1A200720011/data.f2fs.win000'
Error creating backup.
I:ERROR tarList for thread ID 0
Error creating backup.
I:InfoManager saving '/external_sd/TWRP/BACKUPS/ifsc7pvk4hmrp7mv/2021-11-04--23-03-31_RP1A200720011/data.info'
createTarFork() process ended with ERROR: 255
![]()
I was able to backup after the same error.
- Run the backup, make it fail
- Go to advanced menu in TWRP and save log file
- Restart your phone, open the log (it will be in the internal SD root) and scroll to the end of the log. There will be an error for «failed to look up tar policy for /path»
For me it was the ‘perboot’ and ‘extm’ folder. Keep in mind twrp stops at the first error and you may need to run backup multiple times to find all these folders. Both the folders were empty so I just deleted them as is. Also keep in mind both of the mentioned folders are recreated upon booting the phone so you have to remove every time you want to do backup. - Restart into TWRP and do the backup as usual
I did this on Xiaomi Mi9T Pro (K20 Pro), MIUI 12.6
![]()
please try flashing this: RMDAD_v0.0.1.zip
That will remove any 999/10 folders, flashable in TWRP. Please report back.
Thanks a bunch. Tried multiple recoveries (let’s ignore for a moment, that they’re all based on TWRP), 32bit/64bit recovery variants. Didn’t even realize I had multiple users since I was already in fresh install of stock MIUI and custom ROM, and the TWRP log didn’t denote multiple user issue.
From the log:
Error adding file '/data/vendor/DAtS2XqVikNRygA0gBMJdD/hhgYsoZ4iNOjMBOquxuOuD/cPewyqrkf6WPKvfGP0elIB' to '/external_sd/TWRP/BACKUPS/Redmi_8A_DualPro/ELIXIR-2022-06-03--00-50-41/data.ext4.win'
Error creating backup.
Flashing RMDAD_v0.0.1.zip solved the createTarFork() process ended with ERROR: 255