
«403 Forbidden» — наиболее распространенная ошибка при работе с NGINX. В этой статье мы расскажем о причинах возникновения 403 forbidden NGINX, а также о том, как найти ее причину и исправить основную проблему.
- Об ошибке
- Поиск файла конфигурации NGINX
- Некорректный индексный файл
- Автоиндекс
- Права доступа к файлам
- Идентификация пользователя NGINX
- Установите права собственности на файл
- Установите права доступа
«403 Forbidden» — это универсальная ошибка NGINX, которая указывает на то, что вы запросили что-то, а NGINX (по ряду причин) не может это предоставить. «403» является кодом состояния HTTP, который означает, что веб-сервер получил и понял ваш запрос, но не может предпринять никаких дальнейших действий.
По умолчанию файлы конфигурации NGINX находятся в папке /etc/nginx. Если вы просмотрите этот каталог, то найдете несколько конфигурационных файлов для различных модулей сервера.
Главный файл конфигурации — /etc/nginx/nginx.conf. Он содержит основные директивы для NGINX и является аналогом файла httpd.conf для Apache.
Чтобы отредактировать этот файл, используйте команду:
CentOS 7: sudo nano /etc/nginx/conf.d/test.example.com.conf
Ubuntu 16.04: sudo nano /etc/nginx/sites-available/test.example.com.conf
Одна из наиболее распространенных причин ошибки 403 forbidden NGINX — некорректная настройка индексного файла.
nginx.conf указывает, какие индексные файлы должны загружаться, и в каком порядке. Например, приведенная ниже строка указывает NGINX искать index.html, затем index.htm, затем index.php:
index index.html index.htm index.php;
Если ни один из этих трех файлов не будет найден в каталоге, NGINX вернет ошибку «403 Forbidden».
Примечание. Имена файлов чувствительны к регистру. Если nginx.conf указывает index.html, а файл называется Index.html, это приведет к ошибке «403 Forbidden».
Если вы хотите использовать имя индексного файла, которое ваш веб-сервер NGINX не распознает, отредактируйте nginx.conf и добавьте имя файла в строку конфигурации индекса.
Например, чтобы добавить index.py в список распознаваемых индексных файлов, отредактируйте эту строку следующим образом:
index index.html index.htm index.php index.py;
Сохраните изменения, а затем перезапустите NGINX командой:
Альтернативным решением является разрешение индекса директории. Индекс директории означает, что если индексный файл не найден, сервер отобразит все содержимое директории.
По соображениям безопасности индекс директории в NGINX по умолчанию отключен.
При «403 forbidden NGINX», если вы хотите показать индекс директории в ситуациях, когда NGINX не может найти (идентифицировать) файл, отредактируйте nginx.conf, как описано выше, и добавьте в него две следующие директивы:
Autoindex on;
Autoindex_exact_size off;
Эти директивы должны быть добавлены в блок location. Можно либо добавить их в существующий блок location/, либо добавить новый. Окончательный результат должен выглядеть так:
location / {
  [pre-existing configurations, if applicable]
  autoindex on;
  autoindex_exact_size off;
  }
Также можно активировать индексирование директории в определенной папке, если не хотите, чтобы она была доступна для всего сайта:
location /myfiles {
  autoindex on;
  autoindex_exact_size off;
  }
Сохраните изменения в файле, затем перезапустите NGINX командой:
Некорректные права доступа к файлам являются еще одной причиной ошибки «403 Forbidden NGINX». Для использования с NGINX рекомендуется стандартная настройка: для каталогов — 755 и для файлов — 644. Пользователь NGINX также должен быть владельцем файлов.
Для начала нужно определить, от имени какого пользователя запущен NGINX. Для этого используйте команду:
В этом примере рабочий процесс NGINX работает от имени пользователя nginx.
Перейдите на уровень выше корневой директории документа сайта. Например, если корневая директория вашего сайта /usr/share/nginx/example.com, перейдите в /usr/share/nginx с помощью команды:
Измените права собственности на все файлы в директориях нижних уровней на пользователя nginx с помощью команды:
sudo chown -R nginx:nginx *
403 forbidden NGINX — как исправить: установите права доступа для каждой директории на 755 с помощью команды:
sudo chmod 755 [имя директории]
Например, чтобы установить права доступа для директории example.com, используется команда:
sudo chmod 755 example.com
Затем перейдите в корневой каталог веб-документа:
sudo chmod 755 example.com
Измените права доступа для всех файлов в этой директории с помощью команды:
При работе с серверами и веб-ресурсами мы сталкиваемся с ошибками, которые вызываем при обслуживании и настройке. Когда вы сталкиваетесь с такими ошибками, вам необходимо как можно быстрее диагностировать и устранить проблему, чтобы избежать простоев и потери данных.
В этой краткой статье рассматривается типичная ошибка при работе с серверами (403 Forbidden), ее причины и способы ее устранения.
Ошибка Nginx 403 Forbidden — это код состояния, сгенерированный и отображаемый пользователю, когда клиент пытается получить доступ к части веб-сервера с недостаточными разрешениями. Например, NGINX защищает список каталогов и приведет к ошибке 403.
Причины ошибки Nginx 403 на стороне сервера
Прежде чем мы начнем, стоит отметить, что ошибка может исходить от клиента, а не от самого сервера. Сначала мы рассмотрим ошибки на стороне сервера, а затем ошибки на стороне клиента.
Причина 1: неправильный индексный файл
Самая первая и частая причина ошибки NGINX 403 Forbidden — это неправильная конфигурация индексного файла.
Файл конфигурации Nginx указывает, какие индексные файлы загружать и в каком порядке их загружать. Однако, если указанные индексные файлы отсутствуют в каталоге, Nginx вернет ошибку 403 Forbidden.
Например, конфигурация ниже определяет индексные файлы и способ их загрузки.
location / {
index index.html index.htm index.html inde.php;
}
Один из способов решения этой проблемы — добавить индексный файл, указанный в файле конфигурации, или добавить доступный индексный файл в файл конфигурации.
Другой способ решить эту проблему — разрешить Nginx отображать каталоги, если индексный файл недоступен. Включите этот модуль, добавив следующую запись в файл конфигурации.
location / {
autoindex on;
autoindex_exact_size on;
}
Примечание
Мы не рекомендуем этот метод на общедоступных серверах.
Для получения дополнительной информации о том, как обслуживать статический контент, рассмотрите ресурс документации Nginx, представленный ниже:
https://docs.nginx.com/nginx/admin-guide/web-server/serving-static-content/
Причина 2: неправильно настроенные разрешения
ошибка Nginx 403Forbidden также может возникать из-за неверно установленных разрешений для файлов и каталогов. Чтобы Nginx мог успешно передать клиенту определенный файл и ресурс, Nginx должен иметь разрешения RWX — чтение, запись и выполнение — на всем пути.
Чтобы устранить эту ошибку, измените разрешение каталогов на 755 и разрешение файла на 644. Убедитесь, что пользователь, запускающий процесс Nginx, владеет файлами. Например, установите пользователя на www-data:
sudo chown -R www-data:www-data *
Наконец, установите права доступа к каталогу и файлу как:
sudo chmod 755 {dir}
sudo chmod 644 {files}
Причина ошибки на стороне клиента 403
Как уже упоминалось, в других случаях ошибка 403 может быть вызвана пользователем, а не на стороне сервера. Чтобы решить такие проблемы на стороне клиента, выполните следующие операции.
- Убедитесь, что вы получаете доступ к правильному веб-адресу
- Очистить кеш браузера
- Убедитесь, что брандмауэр или прокси-сервер разрешает вам доступ к веб-ресурсу.
Заключение
В этой краткой статье обсуждаются причины ошибки NGIX 403 Forbidden и различные способы ее устранения. Прежде чем пытаться использовать какие-либо методы устранения неполадок, рекомендуется просмотреть журналы сервера.
Если вы нашли ошибку, пожалуйста, выделите фрагмент текста и нажмите Ctrl+Enter.
Nginx – очень популярный веб-сервер в наши дни.
В этой статье мы расскажем вам о некоторых распространенных ошибках при работе веб-сервера Nginx и возможных решениях.
Это не полный список.
Если вы все еще не можете устранить ошибку, попробовав предложенные решения, пожалуйста, проверьте логи сервера Nginx в каталоге /var/log/nginx/ и поищите в Google, чтобы отладить проблему.
Содержание
- Unable to connect/Refused to Connect
- The Connection Has Timed Out
- 404 Not Found
- 403 Forbidden
- 500 Internal Server Error
- Nginx показывает страницу по умолчанию
- 504 Gateway time-out
- Размер памяти исчерпан
- PR_END_OF_FILE_ERROR
- Resource temporarily unavailable
- Два файла виртуального хоста для одного и того же сайта
- PHP-FPM Connection reset by peer
- Утечки сокетов Nginx
- Заключение
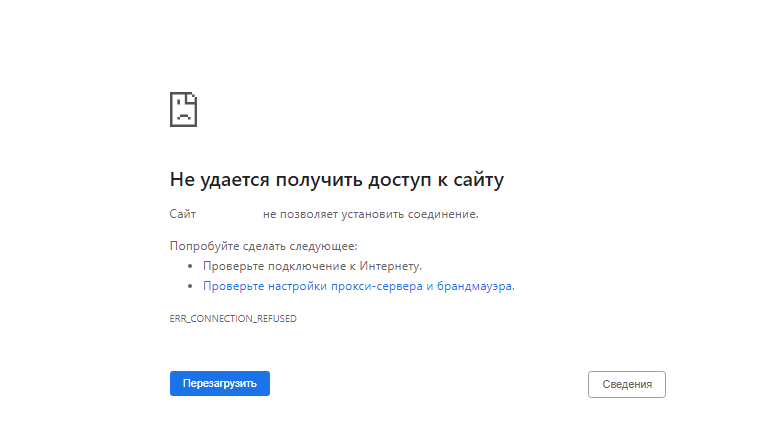
Unable to connect/Refused to Connect
Если при попытке получить доступ к вашему сайту вы видите следующую ошибку:
Firefox can’t establish a connection to the server at www.example.com
или
www.example.com refused to connect
или
The site can't be reached, www.example.com unexpectedly closed the connection.
Это может быть потому, что:
- Nginx не запущен. Вы можете проверить состояние Nginx с помощью sudo systemctl status nginx. Запустите Nginx с помощью sudo systemctl start nginx. Если Nginx не удается запустить, запустите sudo nginx -t, чтобы выяснить, нет ли ошибок в вашем конфигурационном файле. И проверьте логи (sudo journalctl -eu nginx), чтобы выяснить, почему он не запускается.
- Брандмауэр блокирует порты 80 и 443. Если вы используете брандмауэр UFW на Debian/Ubuntu, выполните sudo ufw allow 80,443/tcp, чтобы открыть TCP порты 80 и 443. Если вы используете Firewalld на RHEL/CentOS/Rocky Linux/AlmaLinux, выполните sudo firewall-cmd –permanent –add-service={http,https}, затем sudo systemctl reload firewalld, чтобы открыть TCP порты 80 и 443.
- Fail2ban. Если ваш сервер использует fail2ban для блокировки вредоносных запросов, возможно, fail2ban запретил ваш IP-адрес. Выполните команду sudo journalctl -eu fail2ban, чтобы проверить, не заблокирован ли ваш IP-адрес. Вы можете добавить свой IP-адрес в список fail2ban ignoreip, чтобы он больше не был забанен.
- Nginx не прослушивает нужный сетевой интерфейс. Например, Nginx не прослушивает публичный IP-адрес сервера.
The Connection Has Timed Out
Это может означать, что ваш сервер находится в автономном режиме или Nginx работает неправильно.
Однажды у меня возникла проблема нехватки памяти, из-за чего Nginx не смог запустить рабочие процессы.
Если вы увидите следующее сообщение об ошибке в файле /var/log/nginx/error.log, вашему серверу не хватает памяти:
fork() failed while spawning "worker process" (12: Cannot allocate memory)
404 Not Found
404 not found означает, что Nginx не может найти ресурсы, которые запрашивает ваш веб-браузер.
🌐 Как создать пользовательскую страницу ошибки 404 в NGINX
Причина может быть следующей:
- Корневой каталог web не существует на вашем сервере. В Nginx корневой веб-каталог настраивается с помощью директивы root, например, так: root /usr/share/nginx/linuxbabe.com/;. Убедитесь, что файлы вашего сайта (HTML, CSS, JavaScript, PHP) хранятся в правильном каталоге.
- PHP-FPM не запущен. Вы можете проверить статус PHP-FPM с помощью sudo systemctl status php7.4-fpm (Debian/Ubuntu) или sudo systemctl status php-fpm.
- Вы забыли включить директиву try_files $uri /index.php$is_args$args; в конфигурационный файл сервера Nginx. Эта директива необходима для обработки PHP-кода.
- На вашем сервере нет свободного дискового пространства. Попробуйте освободить немного дискового пространства. Вы можете использовать утилиту ncdu (sudo apt install ncdu или sudo dnf install ncdu), чтобы узнать, какие каталоги занимают огромное количество дискового пространства.
403 Forbidden
Эта ошибка означает, что вам не разрешен доступ к ресурсам запроса.
Возможный сценарий включает:
- Администратор сайта блокирует публичный доступ к запрашиваемым ресурсам с помощью белого списка IP-адресов или других методов.
- На сайте может использоваться брандмауэр веб-приложения, например ModSecurity, который обнаружил атаку вторжения, поэтому заблокировал запрос.
Некоторые веб-приложения могут показывать другое сообщение об ошибке, когда происходит запрет 403. Оно может сказать вам, что “secure connection failed, хотя причина та же.
500 Internal Server Error
Это означает, что в веб-приложении произошла какая-то ошибка.
Это может быть следующее
- Сервер базы данных не работает. Проверьте состояние MySQL/MariaDB с помощью sudo systemctl status mysql. Запустите его с помощью sudo systemctl start mysql. Запустите sudo journalctl -eu mysql, чтобы выяснить, почему он не запускается. Процесс MySQL/MariaDB может быть завершен из-за проблем с нехваткой памяти.
- Вы не настроили Nginx на использование PHP-FPM, поэтому Nginx не знает, как выполнять PHP-код.
- Если ваше веб-приложение имеет встроенный кэш, вы можете попробовать очистить кэш приложения, чтобы исправить эту ошибку.
- Ваше веб-приложение может создавать свой собственный журнал ошибок. Проверьте этот файл журнала, чтобы отладить эту ошибку.
- Возможно, в вашем веб-приложении есть режим отладки. Включите его, и вы увидите более подробные сообщения об ошибках на веб-странице. Например, вы можете включить режим отладки в почтовом сервере хостинг-платформы Modoboa, установив DEBUG = True в файле /srv/modoboa/instance/instance/settings.py.
- PHP-FPM может быть перегружен. Проверьте журнал PHP-FPM (например, /var/log/php7.4-fpm.log). Если вы обнаружили предупреждение [pool www] seems busy (возможно, вам нужно увеличить pm.start_servers, или pm.min/max_spare_servers), вам нужно выделить больше ресурсов для PHP-FPM.
- Иногда перезагрузка PHP-FPM (sudo systemctl reload php7.4-fpm) может исправить ошибку.
Nginx показывает страницу по умолчанию
Если вы пытаетесь настроить виртуальный хост Nginx и при вводе доменного имени в веб-браузере отображается страница Nginx по умолчанию, это может быть следующее
- Вы не использовали реальное доменное имя для директивы server_name в виртуальном хосте Nginx.
- Вы забыли перезагрузить Nginx.
504 Gateway time-out
Это означает, что апстрим, такой как PHP-FPM/MySQL/MariaDB, не может обработать запрос достаточно быстро.
Вы можете попробовать перезапустить PHP-FPM, чтобы временно исправить ошибку, но лучше начать настраивать PHP-FPM/MySQL/MariaDB для более быстрой работы.
Вот конфигурация InnoDB в моем файле /etc/mysql/mariadb.conf.d/50-server.cnf.
Это очень простая настройка производительности.
innodb_buffer_pool_size = 1024M
innodb_buffer_pool_dump_at_shutdown = ON
innodb_buffer_pool_load_at_startup  = ON
innodb_log_file_size = 512M
innodb_log_buffer_size = 8M

#Improving disk I/O performance
innodb_file_per_table = 1
innodb_open_files = 400
innodb_io_capacity = 400
innodb_flush_method = O_DIRECT
innodb_read_io_threads = 64
innodb_write_io_threads = 64
innodb_buffer_pool_instances = 3
Где:
- InnoDB buffer pool size должен быть не менее половины вашей оперативной памяти. (Для VPS с небольшим объемом оперативной памяти я рекомендую установить размер буферного пула на меньшее значение, например 400M, иначе ваш VPS будет работать без оперативной памяти).
- InnoDB log file size должен составлять 25% от размера буферного пула.
- Установите потоки ввода-вывода для чтения и записи на максимум (64).
- Заставьте MariaDB использовать 3 экземпляра буферного пула InnoDB. Количество экземпляров должно соответствовать количеству ядер процессора в вашей системе.
- После сохранения изменений перезапустите MariaDB.
После сохранения изменений перезапустите MariaDB.
sudo systemctl restart mariadb
Вы также можете установить более длительное значение тайм-аута в Nginx, чтобы уменьшить вероятность тайм-аута шлюза.
Отредактируйте файл виртуального хоста Nginx и добавьте следующие строки в блок server {…}.
  proxy_connect_timeout       600;
  proxy_send_timeout          600;
  proxy_read_timeout          600;
  send_timeout                600;
Если вы используете Nginx с PHP-FPM, то установите для параметра fastcgi_read_timeout большее значение, например 300 секунд.
По умолчанию это 60 секунд.
 location ~ .php$ {
     try_files $uri /index.php$is_args$args;
     include snippets/fastcgi-php.conf;
     fastcgi_split_path_info ^(.+.php)(/.+)$;

     fastcgi_pass unix:/var/run/php/php7.4-fpm.sock;
     fastcgi_param SCRIPT_FILENAME $document_root$fastcgi_script_name;
     include fastcgi_params;
     fastcgi_read_timeout 300;
 }
Затем перезагрузите Nginx.
sudo systemctl reload nginx
PHP-FPM также имеет максимальное время выполнения для каждого скрипта.
Отредактируйте файл php.ini.
sudo nano /etc/php/7.4/fpm/php.ini
Вы можете увеличить это значение до 300 секунд.
max_execution_time = 300
Затем перезапустите PHP-FPM
sudo systemctl restart php7.4-fpm
Размер памяти исчерпан
Если вы видите следующую строку в журнале ошибок Nginx, это означает, что PHP достиг лимита памяти в 128 МБ.
PHP Fatal error: Allowed memory size of 134217728 bytes exhausted (tried to allocate 57134520 bytes)
Вы можете отредактировать файл php.ini (/etc/php/7.4/fpm/php.ini) и увеличить лимит памяти PHP.
memory_limit = 512M
Затем перезапустите PHP7.4-FPM.
sudo systemctl restart php7.4-fpm
Если ошибка все еще существует, скорее всего, в вашем веб-приложении плохой PHP-код, который потребляет много оперативной памяти.
PR_END_OF_FILE_ERROR
- Вы настроили Nginx на перенаправление HTTP-запросов на HTTPS, но в Nginx нет блока сервера, обслуживающего HTTPS-запросы.
- Может быть, Nginx не запущен?
- Иногда основной бинарник Nginx запущен, но рабочий процесс может не работать и завершиться по разным причинам. Для отладки проверьте логи ошибок Nginx (/var/log/nginx/error.log).
Resource temporarily unavailable
Некоторые пользователи могут найти следующую ошибку в файле логов ошибок Nginx (в разделе /var/log/nginx/).
connect() to unix:/run/php/php7.4-fpm.sock failed (11: Resource temporarily unavailable)
Обычно это означает, что на вашем сайте много посетителей и PHP-FPM не справляется с обработкой огромного количества запросов.
Вы можете изменить количество дочерних процессов PHP-FPM, чтобы он мог обрабатывать больше запросов.
Отредактируйте файл PHP-FPM www.conf.
(Путь к файлу зависит от дистрибутива Linux).
sudo /etc/php/7.4/fpm/pool.d/www.conf
По умолчанию конфигурация дочернего процесса выглядит следующим образом:
pm = dynamic
pm.max_children = 5
pm.start_servers = 2
pm.min_spare_servers = 1
pm.max_spare_servers = 3
Приведенная выше конфигурация означает.
- PHP-FPM динамически создает дочерние процессы. Нет фиксированного количества дочерних процессов.
- Создается не более 5 дочерних процессов.
- При запуске PHP-FPM запускаются 2 дочерних процесса.
- Есть как минимум 1 незанятый процесс.
- Максимум 3 неработающих процесса.
pm = dynamic
pm.max_children = 20
pm.start_servers = 8
pm.min_spare_servers = 4
pm.max_spare_servers = 12
Убедитесь, что у вас достаточно оперативной памяти для запуска дополнительных дочерних процессов.
Сохраните и закройте файл.
Затем перезапустите PHP-FPM. (Возможно, вам потребуется изменить номер версии).
sudo systemctl restart php7.4-fpm
Чтобы следить за состоянием PHP-FPM, вы можете включить страницу status .
Найдите следующую строку в файле PHP-FPM www.conf.
Обратите внимание, что
;pm.status_path = /status
Уберите точку с запятой, чтобы включить страницу состояния PHP-FPM.
Затем перезапустите PHP-FPM.
sudo systemctl restart php7.4-fpm
Затем отредактируйте файл виртуального хоста Nginx.
Добавьте следующие строки.
Директивы allow и deny используются для ограничения доступа.
Только IP-адреса из “белого списка” могут получить доступ к странице состояния.
location ~ ^/(status|ping)$ {
        allow 127.0.0.1;
        allow your_other_IP_Address;
        deny all;

        fastcgi_param SCRIPT_FILENAME $document_root$fastcgi_script_name;
        fastcgi_index index.php;
        include fastcgi_params;
        #fastcgi_pass 127.0.0.1:9000;
        fastcgi_pass   unix:/run/php/php7.4-fpm.sock;
}
Сохраните и закройте файл. Затем протестируйте конфигурацию Nginx.
sudo nginx -t
Если проверка прошла успешно, перезагрузите Nginx, чтобы изменения вступили в силу.
sudo systemctl reload nginx
В файле PHP-FPM www.conf дается хорошее объяснение того, что означает каждый параметр.
Если PHP-FPM очень занят и не может обслужить запрос немедленно, он поставит его в очередь.
По умолчанию может быть не более 511 ожидающих запросов, определяемых параметром listen.backlog.
listen.backlog = 511
Если вы видите следующее значение на странице состояния PHP-FPM, это означает, что в очереди еще не было ни одного запроса, т.е. ваш PHP-FPM может быстро обрабатывать запросы.
listen queue:         0
max listen queue:     0
Если в очереди 511 ожидающих запросов, это означает, что ваш PHP-FPM очень загружен, поэтому вам следует увеличить количество дочерних процессов.
Вам также может понадобиться изменить параметр ядра Linux net.core.somaxconn, который определяет максимальное количество соединений, разрешенных к файлу сокетов в Linux, например, к файлу сокетов PHP-FPM Unix.
По умолчанию его значение равно 128 до ядра 5.4 и 4096 начиная с ядра 5.4.
$ sysctl net.core.somaxconn
net.core.somaxconn = 128
Если у вас сайт с высокой посещаемостью, вы можете использовать большое значение.
Отредактируйте файл /etc/sysctl.conf.
sudo nano /etc/sysctl.cnf
Добавьте следующие две строки.
net.core.somaxconn = 20000
net.core.netdev_max_backlog = 65535
Сохраните и закройте файл. Затем примените настройки.
sudo sysctl -p
Примечание: Если ваш сервер имеет достаточно оперативной памяти, вы можете выделить фиксированное количество дочерних процессов для PHP-FPM, как показано ниже.
Два файла виртуального хоста для одного и того же сайта
Если вы запустите sudo nginx -t и увидите следующее предупреждение.
nginx: [warn] conflicting server name "example.com" on [::]:443, ignored
nginx: [warn] conflicting server name "example.com" on 0.0.0.0:443, ignored
Это означает, что есть два файла виртуальных хостов, содержащих одну и ту же конфигурацию server_name.
Не создавайте два файла виртуальных хостов для одного сайта.
PHP-FPM Connection reset by peer
В файле логов ошибок Nginx отображается следующее сообщение.
recv() failed (104: Connection reset by peer) while reading response header from upstream
Это может быть вызвано перезапуском PHP-FPM.
Если он перезапущен вручную самостоятельно, то вы можете игнорировать эту ошибку.
Утечки сокетов Nginx
Если вы обнаружили следующее сообщение об ошибке в файле /var/log/nginx/error.log, значит, у вашего Nginx проблема с утечкой сокетов.
2021/09/28 13:27:41 [alert] 321#321: *120606 open socket #16 left in connection 163
2021/09/28 13:27:41 [alert] 321#321: *120629 open socket #34 left in connection 188
2021/09/28 13:27:41 [alert] 321#321: *120622 open socket #9 left in connection 213
2021/09/28 13:27:41 [alert] 321#321: *120628 open socket #25 left in connection 217
2021/09/28 13:27:41 [alert] 321#321: *120605 open socket #15 left in connection 244
2021/09/28 13:27:41 [alert] 321#321: *120614 open socket #41 left in connection 245
2021/09/28 13:27:41 [alert] 321#321: *120631 open socket #24 left in connection 255
2021/09/28 13:27:41 [alert] 321#321: *120616 open socket #23 left in connection 258
2021/09/28 13:27:41 [alert] 321#321: *120615 open socket #42 left in connection 269
2021/09/28 13:27:41 [alert] 321#321: aborting
Вы можете перезапустить ОС, чтобы решить эту проблему.
Если это не помогает, вам нужно скомпилировать отладочную версию Nginx, которая покажет вам отладочную информацию в логах.
Заключение
Надеюсь, эта статья помогла вам исправить распространенные ошибки веб-сервера Nginx.
см. также:
- 🌐 Как контролировать доступ на основе IP-адреса клиента в NGINX
- 🐉 Настройка http-сервера Kali Linux
- 🌐 Как парсить логи доступа nginx
- 🌐 Ограничение скорости определенных URL-адресов с Nginx
- 🛡️ Как использовать обратный прокси Nginx для ограничения внешних вызовов внутри веб-браузера
- 🔏 Как настроить Nginx с Let’s Encrypt с помощью ACME на Ubuntu
- 🌐 Как собрать NGINX с ModSecurity на Ubuntu сервере
Introduction to Nginx Forbidden
We are facing the Nginx forbidden error many times in our application; we are facing this error while using the nginx server. Also, most time, this is not related to the nginx server. Nginx forbidden error contains error code 403, which means we have no permission to access specified web parts. So this error will cause many reasons in our application; investigating the error cause is very important.

What is Nginx Forbidden 403?
For debugging and fixing the error of 403 nginx forbidden, we need to check the correct error logs and take proper action. The nginx forbidden 403 error is the nginx server’s way of telling the user that we are requesting for resource, but we cannot give it to us. Nginx forbidden 403 is technically not an error, but it contains the status code of http. Response code of 403 headers is intentionally returned in multiple cases, like the user is blocked from requesting the page, resource, or whole site of the application.
How to Fix Nginx 403 Forbidden Error?
When dealing with web resources and servers, we encounter errors that cause at the time of performing configurations and maintenance. At the time of meeting this error, we need to fix the same as soon as possible.
Nginx 403 forbidden error is nothing but will generate the status code and display it on the user’s screen when a client tries to access part of the web server with insufficient permission.
The figure below shows the error message that will occur on the user’s screen when this error occurs.

Below is the cause of the nginx 403 forbidden error and how we can fix the same user-specified action. To improve the issue of nginx forbidden 403, first, we need to install the nginx server in our system.
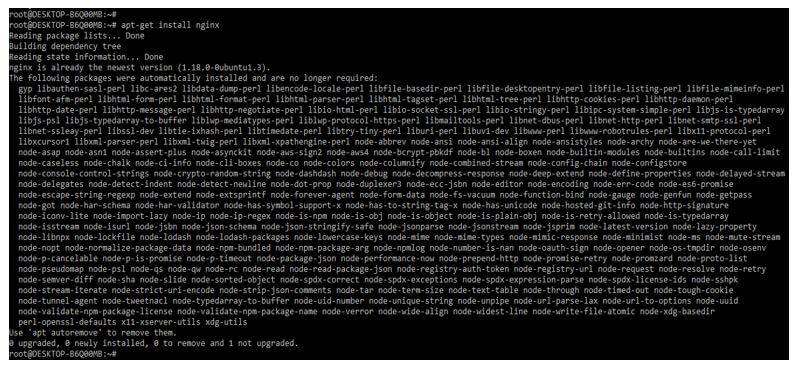
Below we are installing the nginx server on the ubuntu system. We are installing the nginx server by using the apt-get command as follows.
Code:
apt-get install nginxOutput:
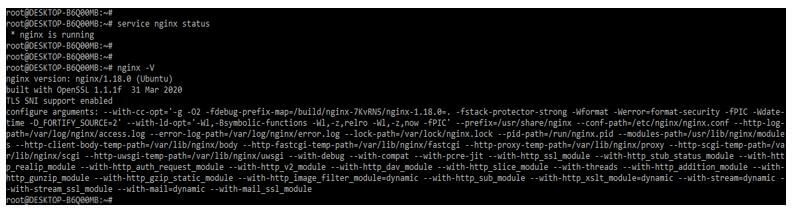
After installing the nginx server, we check the nginx installed version by using the following command. We can check the nginx version and the running status of the nginx server.
Code:
nginx –VOutput:
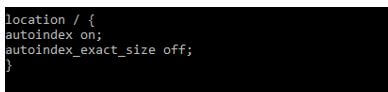
The common cause of this error is an incorrect configuration file of the index section. The nginx will specify which index file we need to load and the order in which we are loading; it determines that the index file is not in the directory. So we need to define the below index file and load it; we need to define the index files into the location directive as follows.
Code:
location / {
 index index.html index.htm index.html inde.php;
}
Output:

The index page was located in the directory from which the auto index parameter was off. Therefore, we can on the auto index parameter of the index by using the following way as follows.
Code:
location / {
  autoindex on;
  autoindex_exact_size off;
}
Output:
After changing the configuration, we need to reboot the nginx server to take the effect of the changed port. Before restarting the nginx server, we execute the nginx –t command to check whether the nginx configuration file contains any error or not.
Code:
nginx –t
service nginx restart
Output:

Nginx 403 Forbidden HTTP
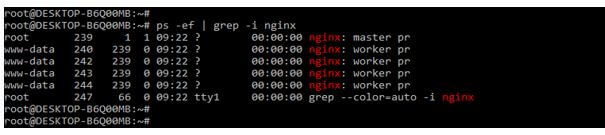
It http contains the different causes of these errors. First, we check the process ID of our nginx server to check the server state it is running or not; we can use the following command to find the process ID.
Code:
ps –ef | grep –i nginxOutput:
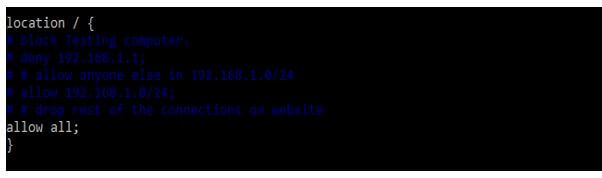
The error of nginx 403 forbidden also occurs due to directory restrictions by using IP. We need to check; we need to check the config file in case we have to allow or deny the rule of blocking the network. We must comment that line into the configuration file if we deny any IP. Or we can let all the network traffic of our website by allowing all rules as follows. We need to define this rule in the location directive of the nginx configuration file.
Code:
location / {
  # deny 192.168.1.1;
  # allow 192.168.1.0/24;
  allow all;
}
Output:
Http 403 forbidden error will occur by using multiple reasons, but all the errors are the same, like we have no access to the data directory or file we are accessing. So when we encounter an nginx forbidden error, we need to try debugging the mistake using the suggested suggestions.
Incorrect Setting Nginx Forbidden
The nginx 403 forbidden will also result in setting incorrect permission of folders and files. Nginx will successfully serve specific resources and files to the client; nginx will contain the read, write and execute permissions on the entire path. To resolve this error, we need to change the permission of the data directory to 755 and file permission to 644. In addition, we need to ensure that the user who was running owns the nginx files.
Code:
chown -R www-data:www-data *
chmod 755 /var/lib/nginx/
Output:

This error may occur from the server side as well as the client side.
To resolve the client-side issue, we need to perform the following client-side operations as follows:
- First, we must ensure that we are accessing the correct location on the web.
- We need to clear the browser cache when this type of issue occurs.
- We must ensure that a proxy or firewall will allow us to access the web resources.
If suppose we are unsure how to fix the issue of nginx forbidden, then we can investigate the same by using the error log.
Conclusion
The nginx forbidden 403 error is the nginx server’s way of telling the user that we are requesting for resource, but we cannot give it to us. Nginx forbidden error contains error code 403, which means we have no permission to access specified web parts.
Recommended Articles
This is a guide to Nginx Forbidden. Here we discuss the introduction and how to fix the nginx 403 forbidden error with an incorrect setting. You may also have a look at the following articles to learn more –
- Nginx Add_header
- Nginx Location Directive
- Nginx WAF
- Nginx FastCGI
Ошибка 403 forbidden nginx означает что вы запросили ресурс у сервера, который он не может отправить, потому что у вас недостаточно прав для его просмотра. Фактически, это даже не ошибка, это сообщение HTTP 4xx, которое всего лишь сообщает, что у вас нет доступа к определенному контенту.
Достаточно часто такие сообщения показывается пользователям, потому что они были заблокированы на сайте или попытались получить доступ к файлу, который доступен только локально. В этой статье мы попытаемся разобраться со случаями, когда появление 403 forbidden nginx 1.4 6 Ubuntu не желательно и представляет из себя ошибку, которую веб-мастер или системный администратор должен решить. Но сначала рассмотрим основные причины почему вы можете видеть это сообщение.
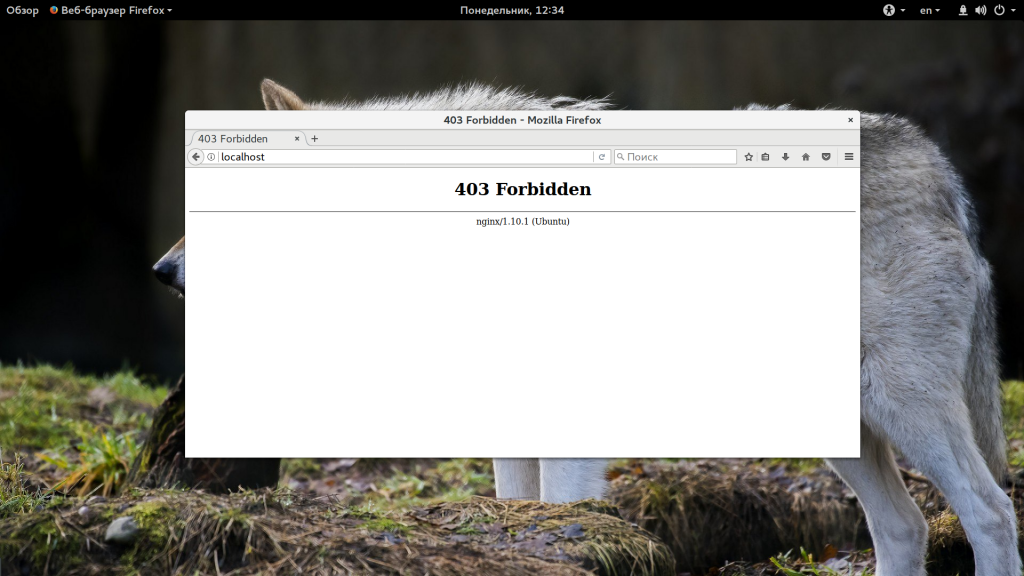
Итак, ошибка 403 forbidden nginx 1.4 6 Ubuntu может возникать в таких случаях:
- Пользователь заблокирован на сервере с помощью директивы deny в конфигурации nginx;
- Доступ к данному ресурсу разрешен только с определенного IP адреса;
- Пользователь пытается получить доступ к папке, отображение содержимого которой запрещено;
- Nginx не может прочитать содержимое запрашиваемого файла в файловой системе;
- Файл index не найден в каталоге.
Это основные причины, которые встречаются наиболее часто. Как видите, две последние из них представляют из себя проблему. Рассмотрим как ее решить.
Неверно выставлены права
Если права на файл, который пытается получить пользователь выставлены неправильно, то будет выдана такая ошибка. Необходимо, чтобы у Nginx были права не только на чтение этого файла, но и на чтение все родительских каталогов. Это можно проверить командой:
namei -l /var/www/public_html/index.html

Для всех элементов пути должен быть установлен флаг «r», чаще всего лучше подходят права 644, то есть, владелец может все, а группа и остальные только читать. Если права не соответствуют, то вы нашли проблему и осталось только исправить права с помощью chmod. Например:
chmod 644 /var/www/public_html/index.html
Вот так должно быть:
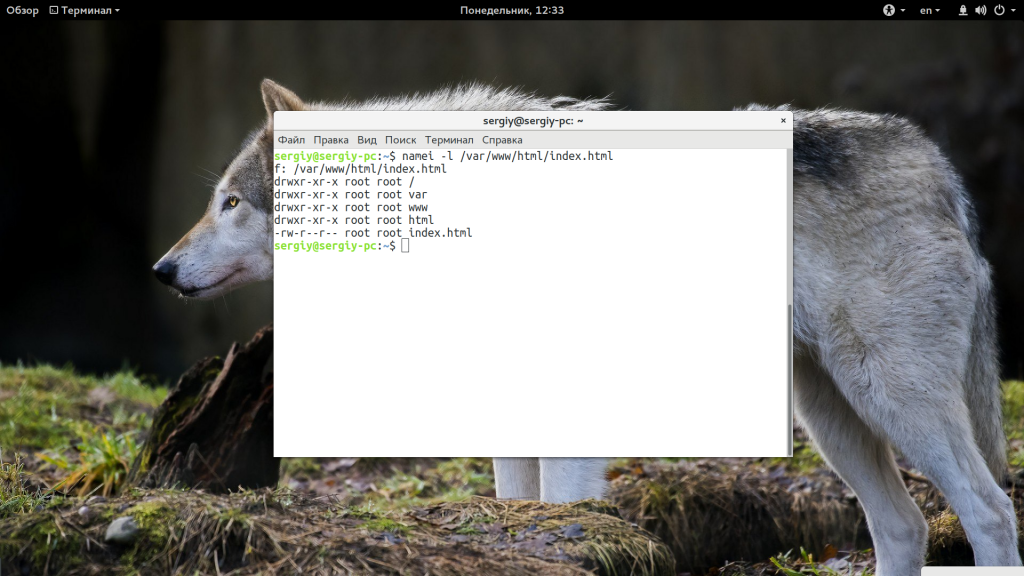
Также обратите внимание на владельца файлов и папок. Если nginx должен иметь возможность выполнять туда запись, то, возможно есть смысл сделать владельцем пользователя nginx или позже получите другую ошибку. Также, если с правами все хорошо, но ошибка не решена попробуйте отключить SELinux, возможно, эта служба мешает Nginx получить доступ к файлам.
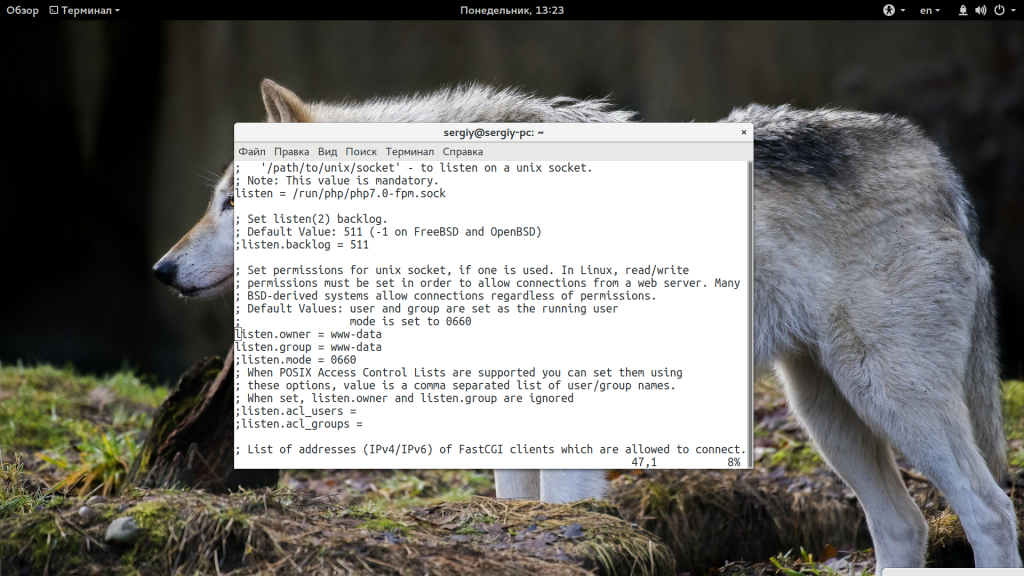
Если вы используете PHP и получаете такую ошибку, то еще нужно проверить может ли Nginx получить доступ к сокету обработчика PHP. Желательно, чтобы php-fpm запускался с той же группой, что и nginx, потому что права, по умолчанию, для доступа к сокету 660 (для группы и для владельца). Поэтому проверьте поля listen.owner и listen.group в файле /etc/php5/fpm/php-fpm.conf.

Также можно попытаться использовать сетевой сокет и подключаться к порту, а не файлу.
Неверно настроен index
Файл index открывается по умолчанию при запросе папки на сервере, в которой он находится. Если такого файла в папке нет или он настроен неправильно в конфигурационном файле nginx, то программа попытается отобразить содержимое папки, а это по умолчанию запрещено, поэтому вы получите 403 Foribden.
Чтобы решить проблему убедитесь, что файл index.html, index.php или как он у вас называется, находится в нужно папке, в той, которую вы запрашиваете. Проверьте конфигурационный файл и убедитесь, что в нем указана директива Index с правильным именем и расширением файла:
Если в директиве указаны только файлы html, а вы используете php, то уже понятно почему программа не может найти то, что нужно. Просто добавьте имя файла в директиву:
index index.html index.htm index.php;
Точно так же, если вы использовали python скрипт, то нужно добавить его расширение.
Выводы
В этой статье мы рассмотрели почему возникает ошибка 403 forbidden nginx 1.4 6 Ubuntu и пути ее решения. Это наиболее частые причины, с которыми сталкиваются пользователи и попробовав все это, скорее всего, вы решите свою проблему. Если у вас остались вопросы, спрашивайте в комментариях!
Обнаружили ошибку в тексте? Сообщите мне об этом. Выделите текст с ошибкой и нажмите Ctrl+Enter.

Статья распространяется под лицензией Creative Commons ShareAlike 4.0 при копировании материала ссылка на источник обязательна .
Об авторе
![]()
Основатель и администратор сайта losst.ru, увлекаюсь открытым программным обеспечением и операционной системой Linux. В качестве основной ОС сейчас использую Ubuntu. Кроме Linux, интересуюсь всем, что связано с информационными технологиями и современной наукой.
- Private Cloud
- Public Cloud
-
- Cloud Servers
- Cloud Networks
- Cloud Load Balancers
- DNS
-
- Object Storage
- Cloud Block Storage
- Cloud File Sharing
-
- Identity Authentication
- Cloud Image Service
- Key Management
-
- Certified Kubernetes
-
- Orchestration
-
- Big Data Services
-
- Solutions
-
- OpenStack Consulting
- OpenStack Upgrades
-
- Kubernetes Enablement
- Managed Zuul
-
- Resources
-
- Blog
- Ebooks & White Papers
- Tutorials
-
- Success Stories
- FAQs
- Videos
-
- VEXXHOST
-
- Company
- Data Center Locations
- Brand Guide
-
- Newsroom
- Events
- Careers
-
HTTP errors are pesky and typically hard to resolve without the right tools. However, with proper investigation and tools, you can easily identify the source of a problem and fix it just as fast. In order to debug or fix 403 Forbidden Nginx errors, all you have to do is check the correct error logs and take the proper action to resolve it. We’ll go over how to check the error logs and the possible scenarios that typically cause these errors.
Finding Error Logs
If you know exactly where the error logs of your Nginx server are, you can skip onto the next section. If you’re not sure where to find the error logs of your Nginx server, then be sure to continue this section.
The path for error logs can change a lot depending on how Nginx was installed on the server and the Linux distribution. If you do not know where your error logs are and you have a hard time going through Nginx configuration, we can use a very small and useful Linux tool with the name of lsof which gives us all the open files associated to a specific process. This will help us find the error log for your web server.
The first step of this is to check for the process ID of the main Nginx process, you can run the following command and except output somewhat similar to the one indicated below:
$ ps x | grep nginx
29229 ?        S      0:00 nginx: master process /usr/sbin/nginx
The first column of each row is the process ID, as we can see, the main/master process ID is 29229 in this case, however this will change in every system. Once you have the process ID, you will be able to use the lsof too to get all open files associated to this process by running the following. We’ve trimmed the output to the part you should be looking for, as there might be a lot more data when you run that command:
$ lsof -p 29229
COMMAND   PID USER   FD   TYPE             DEVICE SIZE/OFF     NODE NAME
nginx   29229 root  cwd    DIR              202,1     4096        2 /
nginx   29229 root  rtd    DIR              202,1     4096        2 /
nginx   29229 root  txt    REG              202,1   843656     1182 /usr/sbin/nginx
...
nginx   29229 root    2w   REG              202,1        0   262748 /var/log/nginx/error.log
...
As you can see from the above output, we can see that one of the files that are open by this Nginx installation is /var/log/nginx/error.log which (by the file name) does look like an error log. We’ve now identified the path of our Nginx error log and we can move onto finding the reason behind our pesky HTTP error.
Fixing Nginx HTTP errors
Once you have the correct error log file, it’s time to watch for errors. In our experience, the best way to do this is by running a continuous stream of the error log in your shell screen using the tail utility.
$ tail -f /var/log/nginx/error.log
Once you’ve ran this command, tail will continuously output any newly appended content to the error.log as it comes in until you hit Control + C. We recommend that you clear the entire shell screen to make it easy to identify newly appended content. You can do this in Windows (PuTTY) by right clicking the PuTTY menu bar and clicking on “Clear Scrollback” or on Mac OS X by clicking Command + K.
Now, you will need to replicate the issue that you are getting. The error should be printed out right away after you replicate the issue. For example, if you have a 403 Forbidden error, then you should refresh the page that is causing the problem so that a new error log entry can be appended. Once that is done, you’ll see a new line in the error log which should hopefully lead you to the right path to fixing the issue. We’re going to cover a few of the most common issues below.
Incorrect Directory Settings
The error below can be caused by two different reasons: incorrect directory index or disallowed directory listing.
2013/08/31 15:03:43 [error] 29231#0: *2098806 directory index of "/usr/share/nginx/static/" is forbidden, client: 1.1.1.1, server: domain.com, request: "GET / HTTP/1.1", host: "domain.com"
If you are trying to list all the files in a folder, you will get that error if the directory does not have directory listing enabled. You can enable directory listing by adding the following line to your Nginx configuration, you can read more about this option here: http://nginx.org/en/docs/http/ngx_http_autoindex_module.html
autoindex on;
The other possibility for that error to come up is if your index setting is incorrect, so for example, you have a index.php file in that folder, however, your index setting is setup to index.htm and index.html. This means that only these files are checked if no specific file is provided. If you alter it to something like the following, your index.php file should work:
index index.htm index.html index.php;
Incorrect Permissions
The error below is generally caused by incorrect Unix permissions, you will need to make sure you have the correct permissions for the entire path.
2013/09/01 00:31:57 [error] 29231#0: *2115270 open() "/usr/share/nginx/static/forbidden" failed (13: Permission denied), client: 1.1.1.1, server: domain.com, request: "GET /forbidden HTTP/1.1", host: "domain.com"
As you see, the file that we are trying to access is /usr/share/nginx/static/forbidden. In order for Nginx to access it with no problems at all, Nginx must have read permissions for that specific file as well as execute for all the folders above it. This means that /, /usr, /usr/share, /usr/share/nginx and /usr/share/nginx/static must be executable by Nginx and the file /usr/share/nginx/static/forbidden must be readable by Nginx in this case.
Conclusion
We’ve gone through quite a few tools such as tail and lsof. These are just one of the tools which are offered by Linux which allow system administrators to resolve and debug issues much faster and easier. The most important factor in resolving system issues is being able to identify the issue properly, resolution is usually the easiest part once the problem is identified. The larger the toolset of the system administrator, the faster they can identify and fix those problems.
Would you like to know about Zuul, a CI/CD project gating tool? Download our white paper and get reading!

If you have experience working with web servers, then you know that certain situations can lead to errors. One of the most frustrating errors that you may encounter is a 403 Forbidden Nginx Error.
Encountering a 403 Forbidden Nginx Error can prevent you from accessing the resources you need, and it can be a challenge to diagnose and fix. If you happen to encounter this error, it’s important to address it promptly to avoid any potential data loss or website downtime.
It can be difficult to understand what’s causing a 403 Forbidden error in Nginx, and even more challenging to figure out how to resolve it.
However, there’s no need to worry – in this article, we’ll cover everything you need to know about 403 Forbidden errors in Nginx. We’ll provide comprehensive information on what these errors are, how to fix them, and how to prevent them from occurring in the future.
Let us get started then!
The 403 Forbidden Nginx Error is a status code that is typically triggered and displayed to the user when a client, usually a web browser, attempts to access web server resources without sufficient permissions.
In simple terms, this means that the server has denied the request made by the client, and the client is not permitted to access the requested resource.
Read: 🚩 How to Fix WordPress 403 Forbidden Error? [9 Quick Fixes]
Understanding the Basics of HTTP Status Codes
To really understand the 403 Forbidden Nginx error, it’s helpful to have a basic understanding of HTTP status codes. These are three-digit numbers that indicate the status of the request-response cycle between the client and the server.
There are five main categories of HTTP status codes, ranging from informational (100-199) to server errors (500-599). To learn more, you can check out our dedicated blog by clicking on the link below:
Read: 🚩 A Complete Guide to Understanding HTTP Status Codes
How Does Nginx Handle 403 Forbidden Errors?
Now that we know what a 403 Forbidden Nginx error is, let’s talk about how Nginx handles it. When Nginx encounters a 403 Forbidden error, it will typically display a simple message to the user that says “403 Forbidden” or “Access Denied.” This message is generated by the server and can be customized by the website owner if desired.
What are the common Causes of 403 Forbidden Nginx Error?
Let’s take a closer look at the common causes of 403 Forbidden Errors in Nginx. Identifying the culprit can help you proceed with fixing the issue accordingly. These errors can be a real hassle to deal with and they always seem to happen at the most inconvenient times.
Additionally, before we proceed further, it is important to clarify that, this error can be caused by either the client side or the server side. It is not always the case that the server is the culprit.
Server-side errors
- Incorrect file Permissions
- Misconfigured Server Settings
- URL or directory structure
- Server and Firewall issue
Client-side errors
- Server and Firewall issues
- Browser issues
- Accessing the wrong web location
Now, let us check them out in detail,
Incorrect file Permissions
Incorrect file permissions can be a common issue that leads to a 403 Forbidden Nginx error. This can happen when the server doesn’t have the necessary permissions to access a file or directory. It could be that the server user doesn’t have the right ownership or group permissions to access the file, or that the file permissions themselves are set incorrectly.
Misconfigured Server Settings
Issues with the Nginx configuration files can also lead to a 403 Forbidden Nginx error. This could happen if the configuration files are missing, incomplete, or have incorrect settings, such as security settings that prevent access to certain resources. This is often the case if you have recently made changes to your Nginx configuration or if you have recently migrated to a new server.
Incorrect URL or Directory Structure
Another cause of a 403 Forbidden Nginx error is related to problems with the URL or directory structure. This could happen if the user is trying to access a resource that no longer exists or has been moved to a different location. It could also be due to a misconfiguration of the server that causes it to look in the wrong location for the resource.
Server and Firewall issues
Finally, server and firewall issues can sometimes cause a 403 Forbidden Nginx error. For instance, the server could be experiencing high traffic volumes, leading to errors or it could be due to firewall settings that block access to certain resources. In such cases, it’s important to check the server logs to determine the root cause of the issue.
How to Fix 403 Forbidden Nginx Error on Your Site?
If you’re experiencing a 403 Forbidden error in Nginx, there are several steps you can take to troubleshoot the issue. Let us chem them out one by one.
Here is the list of troubleshooting methods:
- Incorrect configuration for the index file
- Check File Permissions
- Verify Nginx configuration
- Restart Nginx
- Check for IP-based restrictions
- Check Your Firewalls and Proxy
- Clear your Browser’s Cache
- Check web location
- Contact the website admin
1. Incorrect configuration for the index file
One of the most common reasons that cause 403 Forbidden Nginx errors is the incorrect configuration for the index file.
The index file is the file that Nginx serves to the client when the client requests the root URL of a website or directory. This file follows specific rules that determine which index file to load and in what order. By default, Nginx looks for files named “index.html”, “index.htm”, “index.php”, or “index.cgi” to serve as the index file.
So, you need to define index files into the location directive as shown below:
location / {
index index.html index.htm index.html inde.php;
}
If none of the mentioned files are found in the directory, the Nginx will return a 403 forbidden error.
2. Check File Permissions
The first thing you should check is the file permissions for the resource you are trying to access. If the file or directory doesn’t have the correct permissions, Nginx won’t be able to serve it to you.
To ensure that Nginx can serve specific files and resources to clients, it is necessary to have the appropriate read, write, and execute (RWX) permissions on the entire path. If the permissions are incorrect, it can result in a 403 Forbidden Nginx error.
To fix this issue, you have to change the directory Permissions to 755 and change the file Permissions to 644. In addition to it make sure if you are running Nginx must own the files as well.
sudo chown -R www-data:www-data *
sudo chmod 755 {dir}
sudo chmod 644 {files}
3. Verify Nginx configuration
The Nginx configuration file can contain errors that cause the 403 Forbidden Nginx error. To check the configuration file, run the command:
sudo nginx -t
This command tests the configuration file and reports any errors. If there are errors, fix them before restarting Nginx.
4. Restart Nginx
If you have made any changes to the Nginx configuration file, you need to restart Nginx to apply the changes. Use the command following command to restart Nginx.
sudo systemctl restart nginx
5. Check for IP-based restrictions
Nginx can block requests from certain IP addresses. To check if your IP address is being blocked, use the command
sudo tail -f /var/log/nginx/error.log
This command shows the Nginx error log in real-time. If your IP address is being blocked, you can add it to the “allow” list in the Nginx configuration file. For example,
location / {
deny 124.33.126.127;
allow 55.159.63.90/24;
deny all;
}
6. Check Your Firewalls and Proxy
To access a web resource, ensure the firewall or proxy isn’t blocking it. Configure settings to allow traffic, add exceptions, or adjust security settings as needed. This way, users can access the resources they need without any restrictions.
7. Clear your Browser’s Cache
Clearing the browser cache can fix a 403 Forbidden Nginx error caused by an outdated or corrupted cache. It forces the browser to download fresh resources from the website, resolving the issue.
If this error is triggered due to a cache-related issue, clearing your browser’s cookies and cache memory can help. Here are the steps you can follow:
Note: Since Chrome has a major Browser market share, here we will be using Chrome for this tutorial.
Step 1: Depending on your browser, navigate to the settings menu. In Google Chrome, you can click on the three vertical dots in the upper right corner of the window.
Step 2: Select “More tools” and Click on “Clear browsing data“.

Step 3: A pop-up window will open on which, you can select all three options under the “Basic” section as shown in the picture below. These options are “Browsing history“, “Cookies and other site data“, and “Cached images and files“.
Step 4: Click on “Clear data” to initiate the process.

8. Check web location
When attempting to access a website or web resource, it’s essential to ensure that you are accessing the correct location on the web. This can involve double-checking the URL or web address to ensure that it is spelled correctly and accurately reflects the desired resource.
If the URL or web address is incorrect, You may be directed to a different location on the web, which can result in errors or prevent us from accessing the desired resource altogether
9. Contact the website admin
If none of the above solutions work, contact the website administrator to see if there are any server-side issues that are causing the error. The website administrator may be able to provide more information about the cause of the error and how to fix it.
How to prevent 403 Forbidden Nginx Error?
The best way to deal with 403 Forbidden Nginx errors is to prevent them from occurring in the first place. Some of the best ways to do this include,
- Using access controls and authentication
- Setting appropriate file and directory permissions
- Implementing SSL/TLS certificates
- Monitoring Server health and performance
- Staying up to date with Nginx Updates and patches.
Conclusion
Encountering a 403 Forbidden Nginx error can be frustrating, but with the right approach, it can be easily fixed. This error can happen due to numerous reasons, but they all mean the same thing – that you have been denied access to the resource you requested.
So whenever you encounter this error, try to understand what’s causing it first. To make things easier, it would be great if you check the error logs first before attempting any troubleshooting methods.
Read: 🚩 You can also read our complete guide on How to access and set up WordPress error logs?
If you have any queries or would like to add any valuable points to it, please do let us know in the comment section below.
Frequently Asked Questions
How do I fix 403 Forbidden Nginx?
Here is the list of complete troubleshooting methods:
1. Incorrect configuration for the index file
2. Check File Permissions
3. Verify Nginx configuration
4. Restart Nginx
5. Check for IP-based restrictions
6. Check Your Firewalls and Proxy
7. Clear your Browser’s Cache
8. Check the web location
9. Contact the website admin
What is error 403 in nginx?
Error 403 in Nginx refers to a “Forbidden” error, which occurs when a user attempts to access a web page or resource that they do not have permission to access. This can happen due to various reasons, such as an incorrect file or directory permissions, IP blocking, or authentication issues.
What causes 403 Forbidden?
The 403 Forbidden can happen due to a variety of reasons, some of the most common causes are listed below:
1. Incorrect File Permissions
2. No Index file or Empty Folder
Are you stuck with Nginx 403 forbidden error? We can help you in fixing it.
This error occurs mainly due to incorrect set up of index file and wrong file permissions.
At Bobcares, we often receive requests to fix this error as part of our Server Management Services.
Today, let’s discuss how our Support Engineers fix this error easily for our customers.
Why does Nginx 403 forbidden error occur?
Before discussing how to fix the error, let’s have a look at the error.
Usually, it is quite common to find the 403 forbidden error when dealing with Nginx.
And, this error occurs when Nginx cannot deliver the requested process.
Also, the location of the Nginx configuration files is by default /etc/nginx.
The major causes of this error are incorrect settings in the index file and wrong file permissions.
How we fix the forbidden error?
Now, let’s check the major causes in detail and discuss their respective fixes by our Support Engineers.
Wrong file permissions
One major cause of Nginx 403 error is the incorrect file permissions.
By default, the standard permission for the directory is 755 and that of the file is 644.
And, any error with these permissions will result in 403 forbidden.
Also, it is necessary that the Nginx user must be the owner of the files.
We change the ownership of all the files to the Nginx user with the command,
sudo chown -R nginx:nginx *Also, we change the permissions of each directory to 755 using the command,
sudo chmod 755 [directory name]Similarly, we go to the directory and change the permissions of all the files using the following command.
sudo chmod 644 *Incorrect setting up of index file
The Nginx configuration file will specify the index files to load and the order in which they should load.
And, incorrect set up of the index file will cause this error. For instance, we will give it as follows,

The above line shows that the index.html will load first and then the index.php file.
If these files are not found in the directory, it will result in a 403 forbidden error.
Similarly, if we want to load another index file, we will add it along with the list of recognized index files.
[Need more assistance to fix this error?- We’re available 24/7.]
Conclusion
In short, Nginx 403 forbidden error occurs due to incorrect set up of index file and wrong file permissions. In today’s writeup, we discussed how our Support Engineers fix this error for our customers.
PREVENT YOUR SERVER FROM CRASHING!
Never again lose customers to poor server speed! Let us help you.
Our server experts will monitor & maintain your server 24/7 so that it remains lightning fast and secure.
GET STARTED
var google_conversion_label = «owonCMyG5nEQ0aD71QM»;