
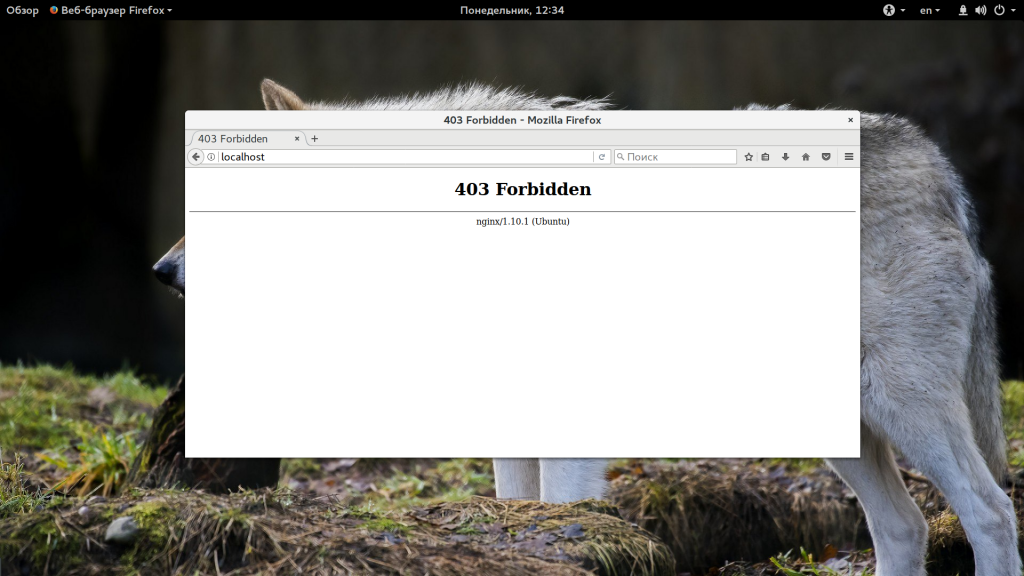
Ошибка 403 forbidden nginx означает что вы запросили ресурс у сервера, который он не может отправить, потому что у вас недостаточно прав для его просмотра. Фактически, это даже не ошибка, это сообщение HTTP 4xx, которое всего лишь сообщает, что у вас нет доступа к определенному контенту.
Достаточно часто такие сообщения показывается пользователям, потому что они были заблокированы на сайте или попытались получить доступ к файлу, который доступен только локально. В этой статье мы попытаемся разобраться со случаями, когда появление 403 forbidden nginx 1.4 6 Ubuntu не желательно и представляет из себя ошибку, которую веб-мастер или системный администратор должен решить. Но сначала рассмотрим основные причины почему вы можете видеть это сообщение.
Итак, ошибка 403 forbidden nginx 1.4 6 Ubuntu может возникать в таких случаях:
- Пользователь заблокирован на сервере с помощью директивы deny в конфигурации nginx;
- Доступ к данному ресурсу разрешен только с определенного IP адреса;
- Пользователь пытается получить доступ к папке, отображение содержимого которой запрещено;
- Nginx не может прочитать содержимое запрашиваемого файла в файловой системе;
- Файл index не найден в каталоге.
Это основные причины, которые встречаются наиболее часто. Как видите, две последние из них представляют из себя проблему. Рассмотрим как ее решить.
Неверно выставлены права
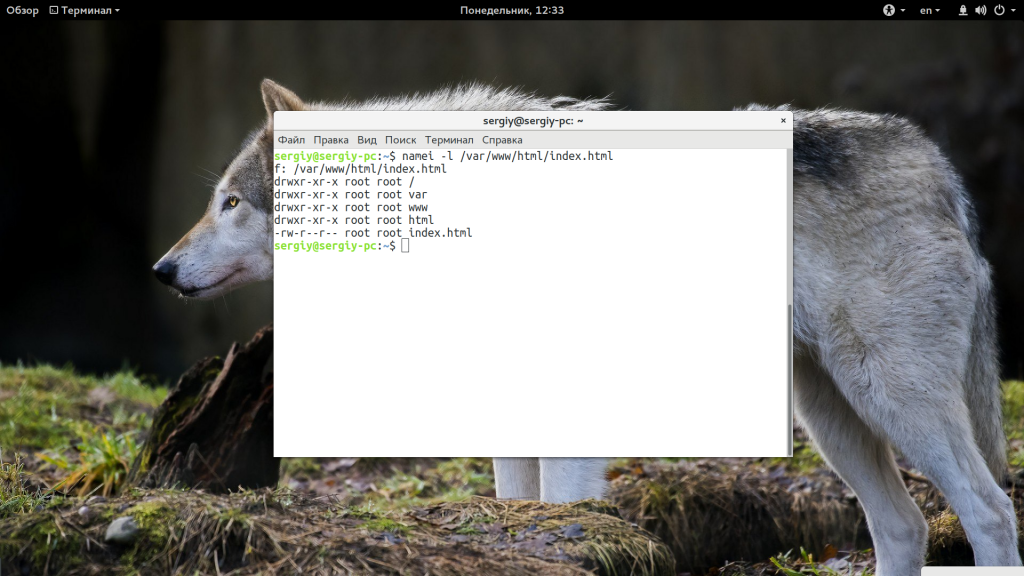
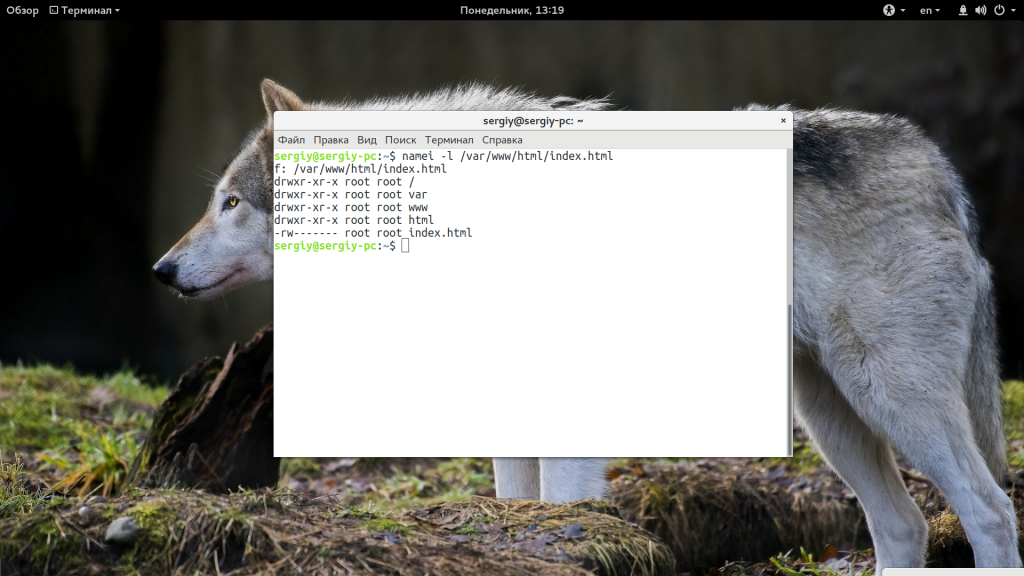
Если права на файл, который пытается получить пользователь выставлены неправильно, то будет выдана такая ошибка. Необходимо, чтобы у Nginx были права не только на чтение этого файла, но и на чтение все родительских каталогов. Это можно проверить командой:
namei -l /var/www/public_html/index.html

Для всех элементов пути должен быть установлен флаг «r», чаще всего лучше подходят права 644, то есть, владелец может все, а группа и остальные только читать. Если права не соответствуют, то вы нашли проблему и осталось только исправить права с помощью chmod. Например:
chmod 644 /var/www/public_html/index.html
Вот так должно быть:
Также обратите внимание на владельца файлов и папок. Если nginx должен иметь возможность выполнять туда запись, то, возможно есть смысл сделать владельцем пользователя nginx или позже получите другую ошибку. Также, если с правами все хорошо, но ошибка не решена попробуйте отключить SELinux, возможно, эта служба мешает Nginx получить доступ к файлам.
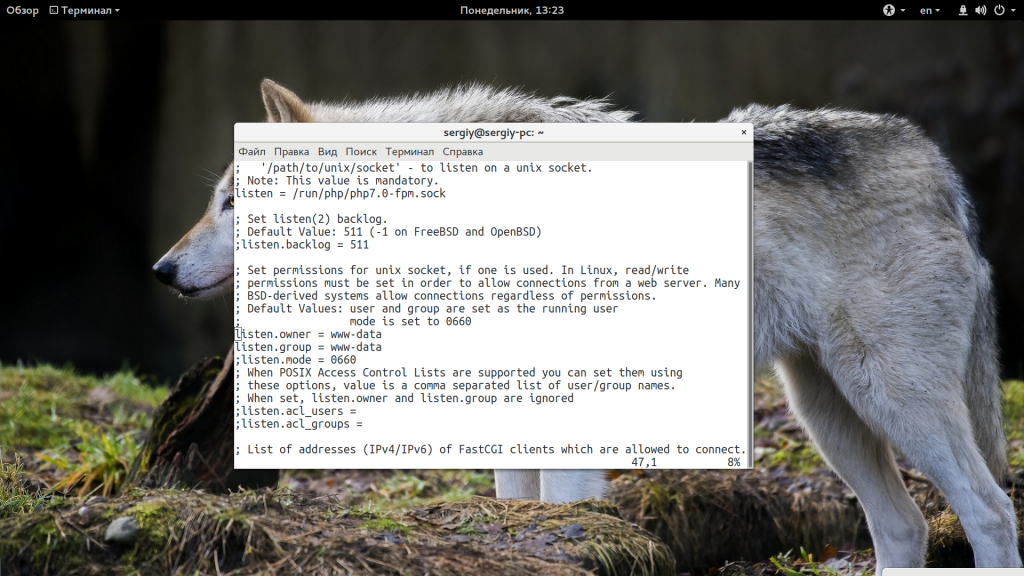
Если вы используете PHP и получаете такую ошибку, то еще нужно проверить может ли Nginx получить доступ к сокету обработчика PHP. Желательно, чтобы php-fpm запускался с той же группой, что и nginx, потому что права, по умолчанию, для доступа к сокету 660 (для группы и для владельца). Поэтому проверьте поля listen.owner и listen.group в файле /etc/php5/fpm/php-fpm.conf.


Также можно попытаться использовать сетевой сокет и подключаться к порту, а не файлу.
Неверно настроен index
Файл index открывается по умолчанию при запросе папки на сервере, в которой он находится. Если такого файла в папке нет или он настроен неправильно в конфигурационном файле nginx, то программа попытается отобразить содержимое папки, а это по умолчанию запрещено, поэтому вы получите 403 Foribden.
Чтобы решить проблему убедитесь, что файл index.html, index.php или как он у вас называется, находится в нужно папке, в той, которую вы запрашиваете. Проверьте конфигурационный файл и убедитесь, что в нем указана директива Index с правильным именем и расширением файла:
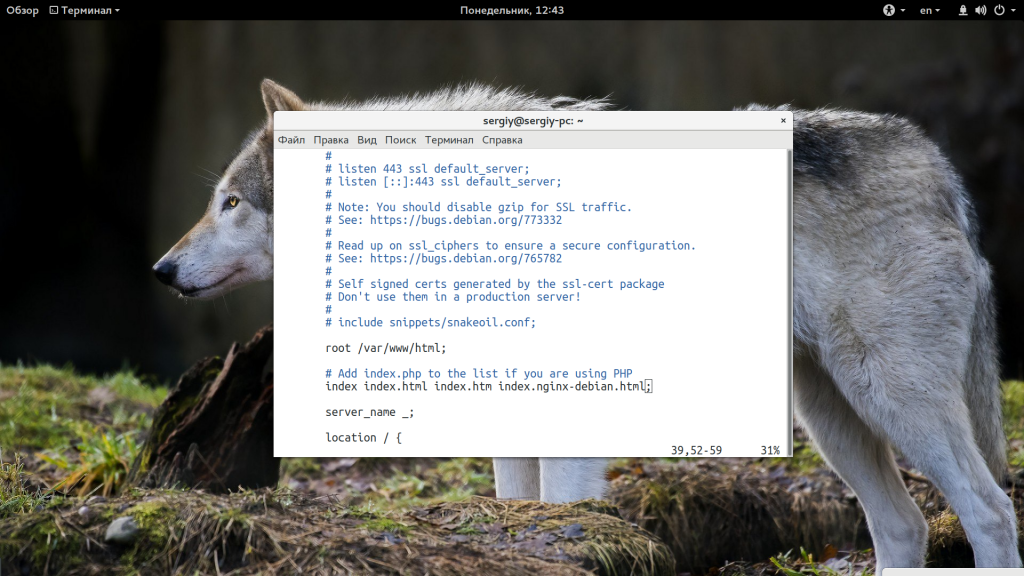
Если в директиве указаны только файлы html, а вы используете php, то уже понятно почему программа не может найти то, что нужно. Просто добавьте имя файла в директиву:
index index.html index.htm index.php;
Точно так же, если вы использовали python скрипт, то нужно добавить его расширение.
Выводы
В этой статье мы рассмотрели почему возникает ошибка 403 forbidden nginx 1.4 6 Ubuntu и пути ее решения. Это наиболее частые причины, с которыми сталкиваются пользователи и попробовав все это, скорее всего, вы решите свою проблему. Если у вас остались вопросы, спрашивайте в комментариях!
Обнаружили ошибку в тексте? Сообщите мне об этом. Выделите текст с ошибкой и нажмите Ctrl+Enter.

Статья распространяется под лицензией Creative Commons ShareAlike 4.0 при копировании материала ссылка на источник обязательна .
Об авторе
![]()
Основатель и администратор сайта losst.ru, увлекаюсь открытым программным обеспечением и операционной системой Linux. В качестве основной ОС сейчас использую Ubuntu. Кроме Linux, интересуюсь всем, что связано с информационными технологиями и современной наукой.
The 403 Forbidden error is the most common error encountered while working on Nginx web server. But most of the time, it is not related to Nginx itself. 403 Forbidden error means that you don’t have permission to access certain directory or a web page. This error can be caused due to many reason. And in this article we will identify the source of the error and then we will learn how to Fix it.
About 403 Error
Let’s understand “403 Forbidden” error in details.
“403 Forbidden” is an error which indicates that you have requested for something that NGINX cannot deliver. This error is actually an HTTP status code which simply means that the web server has received and understood the request which is made, but cannot process further.
1. Wrong Directory or File permissions
Incorrect file permissions are one of the most common cause of this “403 Forbidden” error. In case of NGINX, the standard permission settings for directories and and file are 755 and 644 respectively. Moreover, the NGINX user also needs to be the owner of the directory and files.
Identify the NGINX User
To begin, we first need to identify the NGINX user. To check the user, run:
ps -ef | grep nginx
Output:
userwv+  6016 26683  0 19:28 ttyS0    00:00:00 grep --color=auto nginx
root     26734     1  0 Mar20 ?        00:00:00 nginx: master process /usr/sbin;
www-data 26739 26734  0 Mar20 ?        00:01:53 nginx: worker process
In our case, we can identify the NGINX worker processe in the third row of the first column.
We can see that the NGINX worker process is running as the user www-data.
Set File Ownership
Since we already know that the standard permission for the directory in case of Nginx is 755 and that of the file is 644. We need to set the file ownership.
For example, if the root folder of your website is /var/www/html/example.com/public_html/, run:
sudo chown -R www-data:www-data /var/www/html/example.com/public_html/
Set Directory Permissions
Now we need to set 755 permissions on each directory in this location.
sudo chmod 755 [directory name]
In our case, we need to set permission on example.com directory. To achieve that, run:
sudo chmod 755 example.com
Now, navigate to the root directory of the website by running:
cd example.com
Now change the file permission to 644 by running:
sudo chmod 644 *
2. Incorrect Index File
The “403 Forbidden” error can appear if the index file is not set properly.
Navigate to the NGINX configuration file and check whether you have updated correct index file or not. To do that, open our NGINX configuration file for example.com, by running:
sudo vim /etc/nginx/sites-available/example.com
For example, if you’re running a WordPress based website, inside the server block your index should be:
index index.php;
If you’re running an HTML based website, your default file must contain .html extension. e.g.,
index index.html;
Chances are there that you might have forgotten to add this line inside the server block. If you have included this line of code, you must check whether you have spelled it correctly or not.
Moreover, you also must keep in mind that these file names are case-sensitive. If the default file name is index.html but the file is named mentioned in NGINX configuration is Index.html, this will throw “403 Forbidden” error.
If you are running some web application that NGINX is not able to recognize, you can edit configuration file and add the file extension.
For example, if you’re running a python based application, you can add index.py to the list of recognized index files:
index index.py;
In case you’re running a web application that uses multiple programming languages, you can add:
index index.php index.html index.py;
Now, update the changes in the configuration file and restart NGINX by running:
sudo nginx -s reload
or
sudo service nginx restart
Autoindex
It is an alternative solution which is useful if you don’t have any index file or no index file is found by NGINX.
The the server will scan and list all of the contents of your website’s root directory by autoindex method. But for security reasons, the directory index is turned off in NGINX by default.
You can turn on this feature by just adjusting a few lines of code. You just need to turn on and turn of the autoindex and autoindex_exact_size respectively.
autoindex on;
autoindex_exact_size off;
Now you can add these configurations to the location block. The final result will look like:
location / {
   [pre-existing configurations, if applicable]
   autoindex on;
   autoindex_exact_size off;
   }
To activate the directory indexing for some other directories, you can add the forward slash (/) and then the name of the directory. For example:
location /some_directory {
   autoindex on;
   autoindex_exact_size off;
   }
Now, save the changes and reload the NGINX.
sudo nginx -s reload
3. Directory restrictions by IP
Inside your nginx.conf file, check if you have applied allow/deny rule that may be blocking your network. For example:
location / {
 # block Oxygen's Computer.
   deny    192.168.1.1;
 # allow anyone else in 192.168.1.0/24
   allow   192.168.1.0/24;
 # drop rest of the connections
   deny    all;
 }
4. No index files
This could be a silliest mistake if you don’t have any file name as ‘index (index.php, index.html, index.py)’ inside the root directory of your website. This could also be a reason that your website is throwing a 403 Forbidden Error.
Additional Resources
- HTTP Status Codes on W3C
You might also want to check some other fixes:
- Error Establishing a Database Connection in WordPress Fix
- Fix 502 Bad Gateway Nginx Error in Ubuntu
- Fix: 504 Gateway Timeout Nginx Error
- PHP5-FPM 502 Bad Gateway Error (connect() to unix:/var/run/php5-fpm.sock failed (2: No such file or directory)
- Your PHP installation appears to be missing the MySQL extension which is required by WordPress
I hope you these 4 ways will help you to Fix 403 Forbidden Error.
Which of these ways helped you get rid of this error? Let us know in the comment section below.
1. You should configure your /etc/hosts file like that:
127.0.0.1   localhost
127.0.0.1   test-site
127.0.1.1   my-hostname
# The following lines are desirable for IPv6 capable hosts. etc...
Where test-site is the second «localhost». And my-hostname is the «System hostname» defined in /etc/hostname.
2. You should define and enable a Virtual Host (VH):
There is a default HTTP VH. It’s placed in /etc/apache2/sites-available/. The filename is 000-default.conf. You have to edit it (you can rename it, if you want, or make some other .conf files, based on it) and after that you have to enable it.
You can enable it manually through creation of «soft, symbolic link»:
sudo ln -s /etc/apache2/sites-available/000-default.conf /etc/apache2/sites-enabled/
Or you can use Apache2 tool called a2ensite, which make the same:
sudo a2ensite 000-default.conf
Let’s assume there has 3 Virtual Hosts, enabled SSL, and registered private domain (SOS.info for an example):
/etc/apache2/sites-available/http.SOS.info.conf
/etc/apache2/sites-available/https.SOS.info.conf
And one which is created for the purposes of this topic:
/etc/apache2/sites-available/http.test-site.conf
The content of First 2 VHs is:
$ cat /etc/apache2/sites-available/http.SOS.info.conf
<VirtualHost *:80>
    ServerName SOS.info
    ServerAlias www.SOS.info
    ServerAdmin admin@SOS.info

    # Redirect Requests to SSL
    Redirect permanent "/" "https://SOS.info/"

    ErrorLog ${APACHE_LOG_DIR}/http.SOS.info.error.log
    CustomLog ${APACHE_LOG_DIR}/http.SOS.info.access.log combined
</VirtualHost>
This one redirects all HTTP requests to HTTPS.
$ cat /etc/apache2/sites-available/https.SOS.info.conf
<IfModule mod_ssl.c>
    <VirtualHost _default_:443>
        ServerName SOS.info
        ServerAlias www.SOS.info
        ServerAdmin admin@SOS.info

        DocumentRoot /var/www/html

        SSLEngine on
        SSLCertificateFile /etc/ssl/certs/SOS.info.crt
        SSLCertificateKeyFile /etc/ssl/private/SOS.info.key
        SSLCertificateChainFile /etc/ssl/certs/SOS.info.root-bundle.crt
        #etc..
    </VirtualHost>
</IfModule>
This is the HTTPS VH.
The content of these two files can be posted in one file, but in this case their management (a2ensite/a2dissite)will be more difficult.
The third Virtual Host is that, which is created for our purposes:
$ cat /etc/apache2/sites-available/http.test-site.conf
<VirtualHost *:80>
    ServerName test-site
    ServerAlias test-site.SOS.info

    DocumentRoot /var/www/test-site
    DirectoryIndex index.html

    ErrorLog ${APACHE_LOG_DIR}/test-site.error.log
    CustomLog ${APACHE_LOG_DIR}/test-site.access.log combined

    <Directory /var/www/test-site>
        # Allow .htaccess
        AllowOverride All
        Allow from All
    </Directory>
</VirtualHost>
3. With this configuration you should access:
http://localhost     # pointed to the directory of the mine Domain
https://localhost    # iin our case: /var/www/html (SOS.info), but you should get an error, because the SSL certificate

http://SOS.info      # which redirects to https://SOS.info
https://SOS.info     # you should have valid SSL certificate

http://www.SOS.info  # which is allied to http://SOS.info and redirects to https://SOS.info
https://www.SOS.info # which is allied to https://SOS.info
On the main example you should access and:
http://test-site           # pointed to the directory /var/www/test-site
http://test-site.SOS.info  # which is allied to http://test-site
Try to open the site in the web browser or just try (in the terminal) with next commands:
$ curl -L http://test-site/index.html
$ curl -L http://test-site.SOS.info/index.html
Of course, you need to have some index.html pages in their DocumentRoot 
I will leave next notes by reason of pedantry

4. You need properly configured `/etc/apache2/apache2.conf`.
Ii is good idea to spend some time to improve your server’s security. These manuals are about the security configuration: 1st and 2nd. Here you can get free SSL certificate. These sites will help you to check your progress: 1st and 2nd.
According to above security manuals /etc/apache2/apache2.conf file must looks like:
Mutex file:${APACHE_LOCK_DIR} default

PidFile ${APACHE_PID_FILE}

Timeout 60

#KeepAlive Off
KeepAlive On
MaxKeepAliveRequests 100
KeepAliveTimeout 5

HostnameLookups Off

ErrorLog ${APACHE_LOG_DIR}/error.log
LogLevel warn

IncludeOptional mods-enabled/*.load
IncludeOptional mods-enabled/*.conf

Include ports.conf

<Directory />
    Options None FollowSymLinks
    AllowOverride None
    Require all denied
</Directory>

<Directory /var/www/>
    Options None FollowSymLinks
    AllowOverride None
    Require all granted
</Directory>

AccessFileName .htaccess
<FilesMatch "^.ht">
    Require all denied
</FilesMatch>

LogFormat "%v:%p %h %l %u %t "%r" %>s %O "%{Referer}i" "%{User-Agent}i"" vhost_combined
LogFormat "%h %l %u %t "%r" %>s %O "%{Referer}i" "%{User-Agent}i"" combined
LogFormat "%h %l %u %t "%r" %>s %O" common
LogFormat "%{Referer}i -> %U" referer
LogFormat "%{User-agent}i" agent

IncludeOptional conf-enabled/*.conf
IncludeOptional sites-enabled/*.conf

# Hide Server type in the http error-pages
ServerSignature Off
ServerTokens Prod

# Etag allows remote attackers to obtain sensitive information
FileETag None

# Disable Trace HTTP Request
TraceEnable off

# Set cookie with HttpOnly and Secure flag.
# a2enmod headers
Header edit Set-Cookie ^(.*)$ $1;HttpOnly;Secure

# Clickjacking Attack
Header always append X-Frame-Options SAMEORIGIN

# CX-XSS Protection
Header set X-XSS-Protection "1; mode=block"

# Disable HTTP 1.0 Protocol
RewriteEngine On
RewriteCond %{THE_REQUEST} !HTTP/1.1$
RewriteRule .* - [F]

# Change the server banner @ ModSecurity
# Send full server signature so ModSecurity can alter it
ServerTokens Full
# Alter the web server signature sent by Apache
<IfModule security2_module>
    SecServerSignature "Apache 1.3.26"
</IfModule>
Header set Server "Apache 1.3.26"
Header unset X-Powered-By

# Hde TCP Timestamp
#   gksu gedit /etc/sysctl.conf
#   >> net.ipv4.tcp_timestamps = 0
# Test: sudo hping3 SOS.info -p 443 -S --tcp-timestamp -c 1

# Disable -SSLv2 -SSLv3 and weak Ciphers
SSLProtocol all -SSLv2 -SSLv3
SSLHonorCipherOrder on
SSLCipherSuite "EECDH+ECDSA+AESGCM EECDH+aRSA+AESGCM EECDH+ECDSA+SHA384 EECDH+ECDSA+SHA256 EECDH+aRSA+SHA384 EECDH+aRSA+SHA256 EECDH+aRSA EECDH EDH+aRSA !aNULL !eNULL !LOW !3DES !MD5 !EXP !PSK !SRP !DSS !RC4"
5. Set up the Firewall.
To allow/deny external access to your web server you can use UFW (Uncomplicated Firewall):
sudo ufw allow http
sudo ufw allow https
To allow only tcp protocol use:
sudo ufw allow http/tcp
sudo ufw allow https/tcp
You can use and the port number directly:
sudo ufw allow 80/tcp
sudo ufw allow 443/tcp
Just in case you can reload the «rules table»:
sudo ufw reload
You can use and UFW’s GUI interface, called gufw.
sudo apt update
sudo apt install gufw
gufw &
Choice the Office profile. It will set: Status:ON, Incoming:Deny and Outgoing:Allow and add your rules.
6. If you have a router don’t forget to forward some ports:
If you have a router and you want your web server to be accessible from Internet, don’t forget to add some port forwarding. Something like this.
«403 Forbidden» — наиболее распространенная ошибка при работе с NGINX. В этой статье мы расскажем о причинах возникновения 403 forbidden NGINX, а также о том, как найти ее причину и исправить основную проблему.
- Об ошибке
- Поиск файла конфигурации NGINX
- Некорректный индексный файл
- Автоиндекс
- Права доступа к файлам
- Идентификация пользователя NGINX
- Установите права собственности на файл
- Установите права доступа
«403 Forbidden» — это универсальная ошибка NGINX, которая указывает на то, что вы запросили что-то, а NGINX (по ряду причин) не может это предоставить. «403» является кодом состояния HTTP, который означает, что веб-сервер получил и понял ваш запрос, но не может предпринять никаких дальнейших действий.
По умолчанию файлы конфигурации NGINX находятся в папке /etc/nginx. Если вы просмотрите этот каталог, то найдете несколько конфигурационных файлов для различных модулей сервера.
Главный файл конфигурации — /etc/nginx/nginx.conf. Он содержит основные директивы для NGINX и является аналогом файла httpd.conf для Apache.
Чтобы отредактировать этот файл, используйте команду:
CentOS 7: sudo nano /etc/nginx/conf.d/test.example.com.conf
Ubuntu 16.04: sudo nano /etc/nginx/sites-available/test.example.com.conf
Одна из наиболее распространенных причин ошибки 403 forbidden NGINX — некорректная настройка индексного файла.
nginx.conf указывает, какие индексные файлы должны загружаться, и в каком порядке. Например, приведенная ниже строка указывает NGINX искать index.html, затем index.htm, затем index.php:
index index.html index.htm index.php;
Если ни один из этих трех файлов не будет найден в каталоге, NGINX вернет ошибку «403 Forbidden».
Примечание. Имена файлов чувствительны к регистру. Если nginx.conf указывает index.html, а файл называется Index.html, это приведет к ошибке «403 Forbidden».
Если вы хотите использовать имя индексного файла, которое ваш веб-сервер NGINX не распознает, отредактируйте nginx.conf и добавьте имя файла в строку конфигурации индекса.
Например, чтобы добавить index.py в список распознаваемых индексных файлов, отредактируйте эту строку следующим образом:
index index.html index.htm index.php index.py;
Сохраните изменения, а затем перезапустите NGINX командой:
Альтернативным решением является разрешение индекса директории. Индекс директории означает, что если индексный файл не найден, сервер отобразит все содержимое директории.
По соображениям безопасности индекс директории в NGINX по умолчанию отключен.
При «403 forbidden NGINX», если вы хотите показать индекс директории в ситуациях, когда NGINX не может найти (идентифицировать) файл, отредактируйте nginx.conf, как описано выше, и добавьте в него две следующие директивы:
Autoindex on;
Autoindex_exact_size off;
Эти директивы должны быть добавлены в блок location. Можно либо добавить их в существующий блок location/, либо добавить новый. Окончательный результат должен выглядеть так:
location / {
  [pre-existing configurations, if applicable]
  autoindex on;
  autoindex_exact_size off;
  }
Также можно активировать индексирование директории в определенной папке, если не хотите, чтобы она была доступна для всего сайта:
location /myfiles {
  autoindex on;
  autoindex_exact_size off;
  }
Сохраните изменения в файле, затем перезапустите NGINX командой:
Некорректные права доступа к файлам являются еще одной причиной ошибки «403 Forbidden NGINX». Для использования с NGINX рекомендуется стандартная настройка: для каталогов — 755 и для файлов — 644. Пользователь NGINX также должен быть владельцем файлов.
Для начала нужно определить, от имени какого пользователя запущен NGINX. Для этого используйте команду:
В этом примере рабочий процесс NGINX работает от имени пользователя nginx.
Перейдите на уровень выше корневой директории документа сайта. Например, если корневая директория вашего сайта /usr/share/nginx/example.com, перейдите в /usr/share/nginx с помощью команды:
Измените права собственности на все файлы в директориях нижних уровней на пользователя nginx с помощью команды:
sudo chown -R nginx:nginx *
403 forbidden NGINX — как исправить: установите права доступа для каждой директории на 755 с помощью команды:
sudo chmod 755 [имя директории]
Например, чтобы установить права доступа для директории example.com, используется команда:
sudo chmod 755 example.com
Затем перейдите в корневой каталог веб-документа:
sudo chmod 755 example.com
Измените права доступа для всех файлов в этой директории с помощью команды:
I’m running ubuntu 13.04 64bit on my desktop, I installed Apache2, MySQL and PHP etc.
I wanted to have my web root in /home/afflicto/public_html instead of /var/www.
So I went along with this guide:
http://www.maketecheasier.com/install-and-configure-apache-in-ubuntu/2011/03/09
(I did everything from «configuring different sites») as I like the solution more.
Here’s what I did:
Installed Apache2, MySQL etc..
copied /etc/apache2/sites-avaliable/default to /etc/apache2/sites-available/afflicto. Then edited it, it now looks like the following:
/etc/apache2/sites-available/afflicto
<VirtualHost *:80>
ServerAdmin webmaster@localhost

DocumentRoot /home/afflicto/public_html
<Directory />
    Options FollowSymLinks
    AllowOverride None
</Directory>
<Directory /home/afflicto/public_html/>
    Options Indexes FollowSymLinks MultiViews
    AllowOverride All
    Order allow,deny
    allow from all
</Directory>

ScriptAlias /cgi-bin/ /usr/lib/cgi-bin/
<Directory "/usr/lib/cgi-bin">
    AllowOverride None
    Options +ExecCGI -MultiViews +SymLinksIfOwnerMatch
    Order allow,deny
    Allow from all
</Directory>

ErrorLog ${APACHE_LOG_DIR}/error.log

# Possible values include: debug, info, notice, warn, error, crit,
# alert, emerg.
LogLevel warn

CustomLog ${APACHE_LOG_DIR}/access.log combined
</VirtualHost>
I did sudo a2dissite default && sudo a2ensite afflicto && sudo service apache2 restart
I created a index.php and index.html in /home/afflicto/public_html/test/
when accessing localhost/test or localhost/test/index.html etc, I get 403 forbidden error.
What am I doing wrong?
update 1
I have set the owner of the public_html directory to www-data.
Also sudo chmod -R +x public_html && sudo chmod -R 777 public_html
Still same 403 error.
Here’s the output of the apache error log:
[Sun Jul 14 06:10:32 2013] [error] [client 127.0.0.1] (13)Permission denied: access to / denied

[Sun Jul 14 06:10:32 2013] [error] [client 127.0.0.1] (13)Permission denied: access to /favicon.ico denied
«403 Forbidden» — наиболее распространенная ошибка при работе с NGINX. В этой статье мы расскажем о причинах возникновения 403 forbidden NGINX, а также о том, как найти ее причину и исправить основную проблему.
- Об ошибке
- Поиск файла конфигурации NGINX
- Некорректный индексный файл
- Автоиндекс
- Права доступа к файлам
- Идентификация пользователя NGINX
- Установите права собственности на файл
- Установите права доступа
«403 Forbidden» — это универсальная ошибка NGINX, которая указывает на то, что вы запросили что-то, а NGINX (по ряду причин) не может это предоставить. «403» является кодом состояния HTTP, который означает, что веб-сервер получил и понял ваш запрос, но не может предпринять никаких дальнейших действий.
По умолчанию файлы конфигурации NGINX находятся в папке /etc/nginx. Если вы просмотрите этот каталог, то найдете несколько конфигурационных файлов для различных модулей сервера.
Главный файл конфигурации — /etc/nginx/nginx.conf. Он содержит основные директивы для NGINX и является аналогом файла httpd.conf для Apache.
Чтобы отредактировать этот файл, используйте команду:
CentOS 7: sudo nano /etc/nginx/conf.d/test.example.com.conf
Ubuntu 16.04: sudo nano /etc/nginx/sites-available/test.example.com.conf
Одна из наиболее распространенных причин ошибки 403 forbidden NGINX — некорректная настройка индексного файла.
nginx.conf указывает, какие индексные файлы должны загружаться, и в каком порядке. Например, приведенная ниже строка указывает NGINX искать index.html, затем index.htm, затем index.php:
index index.html index.htm index.php;
Если ни один из этих трех файлов не будет найден в каталоге, NGINX вернет ошибку «403 Forbidden».
Примечание. Имена файлов чувствительны к регистру. Если nginx.conf указывает index.html, а файл называется Index.html, это приведет к ошибке «403 Forbidden».
Если вы хотите использовать имя индексного файла, которое ваш веб-сервер NGINX не распознает, отредактируйте nginx.conf и добавьте имя файла в строку конфигурации индекса.
Например, чтобы добавить index.py в список распознаваемых индексных файлов, отредактируйте эту строку следующим образом:
index index.html index.htm index.php index.py;
Сохраните изменения, а затем перезапустите NGINX командой:
Альтернативным решением является разрешение индекса директории. Индекс директории означает, что если индексный файл не найден, сервер отобразит все содержимое директории.
По соображениям безопасности индекс директории в NGINX по умолчанию отключен.
При «403 forbidden NGINX», если вы хотите показать индекс директории в ситуациях, когда NGINX не может найти (идентифицировать) файл, отредактируйте nginx.conf, как описано выше, и добавьте в него две следующие директивы:
Autoindex on;
Autoindex_exact_size off;
Эти директивы должны быть добавлены в блок location. Можно либо добавить их в существующий блок location/, либо добавить новый. Окончательный результат должен выглядеть так:
location / {
  [pre-existing configurations, if applicable]
  autoindex on;
  autoindex_exact_size off;
  }
Также можно активировать индексирование директории в определенной папке, если не хотите, чтобы она была доступна для всего сайта:
location /myfiles {
  autoindex on;
  autoindex_exact_size off;
  }
Сохраните изменения в файле, затем перезапустите NGINX командой:
Некорректные права доступа к файлам являются еще одной причиной ошибки «403 Forbidden NGINX». Для использования с NGINX рекомендуется стандартная настройка: для каталогов — 755 и для файлов — 644. Пользователь NGINX также должен быть владельцем файлов.
Для начала нужно определить, от имени какого пользователя запущен NGINX. Для этого используйте команду:
В этом примере рабочий процесс NGINX работает от имени пользователя nginx.
Перейдите на уровень выше корневой директории документа сайта. Например, если корневая директория вашего сайта /usr/share/nginx/example.com, перейдите в /usr/share/nginx с помощью команды:
Измените права собственности на все файлы в директориях нижних уровней на пользователя nginx с помощью команды:
sudo chown -R nginx:nginx *
403 forbidden NGINX — как исправить: установите права доступа для каждой директории на 755 с помощью команды:
sudo chmod 755 [имя директории]
Например, чтобы установить права доступа для директории example.com, используется команда:
sudo chmod 755 example.com
Затем перейдите в корневой каталог веб-документа:
sudo chmod 755 example.com
Измените права доступа для всех файлов в этой директории с помощью команды:
Ошибка 403 forbidden nginx означает что вы запросили ресурс у сервера, который он не может отправить, потому что у вас недостаточно прав для его просмотра. Фактически, это даже не ошибка, это сообщение HTTP 4xx, которое всего лишь сообщает, что у вас нет доступа к определенному контенту.
Достаточно часто такие сообщения показывается пользователям, потому что они были заблокированы на сайте или попытались получить доступ к файлу, который доступен только локально. В этой статье мы попытаемся разобраться со случаями, когда появление 403 forbidden nginx 1.4 6 Ubuntu не желательно и представляет из себя ошибку, которую веб-мастер или системный администратор должен решить. Но сначала рассмотрим основные причины почему вы можете видеть это сообщение.
Итак, ошибка 403 forbidden nginx 1.4 6 Ubuntu может возникать в таких случаях:
- Пользователь заблокирован на сервере с помощью директивы deny в конфигурации nginx;
- Доступ к данному ресурсу разрешен только с определенного IP адреса;
- Пользователь пытается получить доступ к папке, отображение содержимого которой запрещено;
- Nginx не может прочитать содержимое запрашиваемого файла в файловой системе;
- Файл index не найден в каталоге.
Это основные причины, которые встречаются наиболее часто. Как видите, две последние из них представляют из себя проблему. Рассмотрим как ее решить.
Неверно выставлены права
Если права на файл, который пытается получить пользователь выставлены неправильно, то будет выдана такая ошибка. Необходимо, чтобы у Nginx были права не только на чтение этого файла, но и на чтение все родительских каталогов. Это можно проверить командой:
namei -l /var/www/public_html/index.html
Для всех элементов пути должен быть установлен флаг «r», чаще всего лучше подходят права 644, то есть, владелец может все, а группа и остальные только читать. Если права не соответствуют, то вы нашли проблему и осталось только исправить права с помощью chmod. Например:
chmod 644 /var/www/public_html/index.html
Вот так должно быть:
Также обратите внимание на владельца файлов и папок. Если nginx должен иметь возможность выполнять туда запись, то, возможно есть смысл сделать владельцем пользователя nginx или позже получите другую ошибку. Также, если с правами все хорошо, но ошибка не решена попробуйте отключить SELinux, возможно, эта служба мешает Nginx получить доступ к файлам.
Если вы используете PHP и получаете такую ошибку, то еще нужно проверить может ли Nginx получить доступ к сокету обработчика PHP. Желательно, чтобы php-fpm запускался с той же группой, что и nginx, потому что права, по умолчанию, для доступа к сокету 660 (для группы и для владельца). Поэтому проверьте поля listen.owner и listen.group в файле /etc/php5/fpm/php-fpm.conf.
Также можно попытаться использовать сетевой сокет и подключаться к порту, а не файлу.
Неверно настроен index
Файл index открывается по умолчанию при запросе папки на сервере, в которой он находится. Если такого файла в папке нет или он настроен неправильно в конфигурационном файле nginx, то программа попытается отобразить содержимое папки, а это по умолчанию запрещено, поэтому вы получите 403 Foribden.
Чтобы решить проблему убедитесь, что файл index.html, index.php или как он у вас называется, находится в нужно папке, в той, которую вы запрашиваете. Проверьте конфигурационный файл и убедитесь, что в нем указана директива Index с правильным именем и расширением файла:
Если в директиве указаны только файлы html, а вы используете php, то уже понятно почему программа не может найти то, что нужно. Просто добавьте имя файла в директиву:
index index.html index.htm index.php;
Точно так же, если вы использовали python скрипт, то нужно добавить его расширение.
Выводы
В этой статье мы рассмотрели почему возникает ошибка 403 forbidden nginx 1.4 6 Ubuntu и пути ее решения. Это наиболее частые причины, с которыми сталкиваются пользователи и попробовав все это, скорее всего, вы решите свою проблему. Если у вас остались вопросы, спрашивайте в комментариях!
Статья распространяется под лицензией Creative Commons ShareAlike 4.0 при копировании материала ссылка на источник обязательна .
Об авторе
![]()
Основатель и администратор сайта losst.ru, увлекаюсь открытым программным обеспечением и операционной системой Linux. В качестве основной ОС сейчас использую Ubuntu. Кроме Linux, интересуюсь всем, что связано с информационными технологиями и современной наукой.
The 403 Forbidden error is the most common error encountered while working on Nginx web server. But most of the time, it is not related to Nginx itself. 403 Forbidden error means that you don’t have permission to access certain directory or a web page. This error can be caused due to many reason. And in this article we will identify the source of the error and then we will learn how to Fix it.
+
About 403 Error
Let’s understand “403 Forbidden” error in details.
“403 Forbidden” is an error which indicates that you have requested for something that NGINX cannot deliver. This error is actually an HTTP status code which simply means that the web server has received and understood the request which is made, but cannot process further.
1. Wrong Directory or File permissions
Incorrect file permissions are one of the most common cause of this “403 Forbidden” error. In case of NGINX, the standard permission settings for directories and and file are 755 and 644 respectively. Moreover, the NGINX user also needs to be the owner of the directory and files.
Identify the NGINX User
To begin, we first need to identify the NGINX user. To check the user, run:
ps -ef | grep nginx
Output:
userwv+  6016 26683  0 19:28 ttyS0    00:00:00 grep --color=auto nginx
root     26734     1  0 Mar20 ?        00:00:00 nginx: master process /usr/sbin;
www-data 26739 26734  0 Mar20 ?        00:01:53 nginx: worker process
In our case, we can identify the NGINX worker processe in the third row of the first column.
We can see that the NGINX worker process is running as the user www-data.
Set File Ownership
Since we already know that the standard permission for the directory in case of Nginx is 755 and that of the file is 644. We need to set the file ownership.
For example, if the root folder of your website is /var/www/html/example.com/public_html/, run:
+
sudo chown -R www-data:www-data /var/www/html/example.com/public_html/
Set Directory Permissions
Now we need to set 755 permissions on each directory in this location.
sudo chmod 755 [directory name]
In our case, we need to set permission on example.com directory. To achieve that, run:
sudo chmod 755 example.com
Now, navigate to the root directory of the website by running:
cd example.com
Now change the file permission to 644 by running:
sudo chmod 644 *
2. Incorrect Index File
The “403 Forbidden” error can appear if the index file is not set properly.
+
Navigate to the NGINX configuration file and check whether you have updated correct index file or not. To do that, open our NGINX configuration file for example.com, by running:
sudo vim /etc/nginx/sites-available/example.com
For example, if you’re running a WordPress based website, inside the server block your index should be:
index index.php;
If you’re running an HTML based website, your default file must contain .html extension. e.g.,
index index.html;
Chances are there that you might have forgotten to add this line inside the server block. If you have included this line of code, you must check whether you have spelled it correctly or not.
Moreover, you also must keep in mind that these file names are case-sensitive. If the default file name is index.html but the file is named mentioned in NGINX configuration is Index.html, this will throw “403 Forbidden” error.
If you are running some web application that NGINX is not able to recognize, you can edit configuration file and add the file extension.
For example, if you’re running a python based application, you can add index.py to the list of recognized index files:
index index.py;
In case you’re running a web application that uses multiple programming languages, you can add:
index index.php index.html index.py;
Now, update the changes in the configuration file and restart NGINX by running:
sudo nginx -s reload
or
sudo service nginx restart
Autoindex
It is an alternative solution which is useful if you don’t have any index file or no index file is found by NGINX.
The the server will scan and list all of the contents of your website’s root directory by autoindex method. But for security reasons, the directory index is turned off in NGINX by default.
You can turn on this feature by just adjusting a few lines of code. You just need to turn on and turn of the autoindex and autoindex_exact_size respectively.
autoindex on;
autoindex_exact_size off;
Now you can add these configurations to the location block. The final result will look like:
location / {
   [pre-existing configurations, if applicable]
   autoindex on;
   autoindex_exact_size off;
   }
To activate the directory indexing for some other directories, you can add the forward slash (/) and then the name of the directory. For example:
location /some_directory {
   autoindex on;
   autoindex_exact_size off;
   }
Now, save the changes and reload the NGINX.
sudo nginx -s reload
3. Directory restrictions by IP
Inside your nginx.conf file, check if you have applied allow/deny rule that may be blocking your network. For example:
location / {
 # block Oxygen's Computer.
   deny    192.168.1.1;
 # allow anyone else in 192.168.1.0/24
   allow   192.168.1.0/24;
 # drop rest of the connections
   deny    all;
 }
4. No index files
This could be a silliest mistake if you don’t have any file name as ‘index (index.php, index.html, index.py)’ inside the root directory of your website. This could also be a reason that your website is throwing a 403 Forbidden Error.
Additional Resources
- HTTP Status Codes on W3C
You might also want to check some other fixes:
- Error Establishing a Database Connection in WordPress Fix
- Fix 502 Bad Gateway Nginx Error in Ubuntu
- Fix: 504 Gateway Timeout Nginx Error
- PHP5-FPM 502 Bad Gateway Error (connect() to unix:/var/run/php5-fpm.sock failed (2: No such file or directory)
- Your PHP installation appears to be missing the MySQL extension which is required by WordPress
I hope you these 4 ways will help you to Fix 403 Forbidden Error.
Which of these ways helped you get rid of this error? Let us know in the comment section below.
1. You should configure your /etc/hosts file like that:
127.0.0.1   localhost
127.0.0.1   test-site
127.0.1.1   my-hostname
# The following lines are desirable for IPv6 capable hosts. etc...
Where test-site is the second «localhost». And my-hostname is the «System hostname» defined in /etc/hostname.
2. You should define and enable a Virtual Host (VH):
There is a default HTTP VH. It’s placed in /etc/apache2/sites-available/. The filename is 000-default.conf. You have to edit it (you can rename it, if you want, or make some other .conf files, based on it) and after that you have to enable it.
You can enable it manually through creation of «soft, symbolic link»:
sudo ln -s /etc/apache2/sites-available/000-default.conf /etc/apache2/sites-enabled/
Or you can use Apache2 tool called a2ensite, which make the same:
sudo a2ensite 000-default.conf
Let’s assume there has 3 Virtual Hosts, enabled SSL, and registered private domain (SOS.info for an example):
/etc/apache2/sites-available/http.SOS.info.conf
/etc/apache2/sites-available/https.SOS.info.conf
And one which is created for the purposes of this topic:
/etc/apache2/sites-available/http.test-site.conf
The content of First 2 VHs is:
$ cat /etc/apache2/sites-available/http.SOS.info.conf
<VirtualHost *:80>
    ServerName SOS.info
    ServerAlias www.SOS.info
    ServerAdmin admin@SOS.info

    # Redirect Requests to SSL
    Redirect permanent "/" "https://SOS.info/"

    ErrorLog ${APACHE_LOG_DIR}/http.SOS.info.error.log
    CustomLog ${APACHE_LOG_DIR}/http.SOS.info.access.log combined
</VirtualHost>
This one redirects all HTTP requests to HTTPS.
$ cat /etc/apache2/sites-available/https.SOS.info.conf
<IfModule mod_ssl.c>
    <VirtualHost _default_:443>
        ServerName SOS.info
        ServerAlias www.SOS.info
        ServerAdmin admin@SOS.info

        DocumentRoot /var/www/html

        SSLEngine on
        SSLCertificateFile /etc/ssl/certs/SOS.info.crt
        SSLCertificateKeyFile /etc/ssl/private/SOS.info.key
        SSLCertificateChainFile /etc/ssl/certs/SOS.info.root-bundle.crt
        #etc..
    </VirtualHost>
</IfModule>
This is the HTTPS VH.
The content of these two files can be posted in one file, but in this case their management (a2ensite/a2dissite)will be more difficult.
The third Virtual Host is that, which is created for our purposes:
$ cat /etc/apache2/sites-available/http.test-site.conf
<VirtualHost *:80>
    ServerName test-site
    ServerAlias test-site.SOS.info

    DocumentRoot /var/www/test-site
    DirectoryIndex index.html

    ErrorLog ${APACHE_LOG_DIR}/test-site.error.log
    CustomLog ${APACHE_LOG_DIR}/test-site.access.log combined

    <Directory /var/www/test-site>
        # Allow .htaccess
        AllowOverride All
        Allow from All
    </Directory>
</VirtualHost>
3. With this configuration you should access:
http://localhost     # pointed to the directory of the mine Domain
https://localhost    # iin our case: /var/www/html (SOS.info), but you should get an error, because the SSL certificate

http://SOS.info      # which redirects to https://SOS.info
https://SOS.info     # you should have valid SSL certificate

http://www.SOS.info  # which is allied to http://SOS.info and redirects to https://SOS.info
https://www.SOS.info # which is allied to https://SOS.info
On the main example you should access and:
http://test-site           # pointed to the directory /var/www/test-site
http://test-site.SOS.info  # which is allied to http://test-site
Try to open the site in the web browser or just try (in the terminal) with next commands:
$ curl -L http://test-site/index.html
$ curl -L http://test-site.SOS.info/index.html
Of course, you need to have some index.html pages in their DocumentRoot
I will leave next notes by reason of pedantry
![:)]()
4. You need properly configured `/etc/apache2/apache2.conf`.
Ii is good idea to spend some time to improve your server’s security. These manuals are about the security configuration: 1st and 2nd. Here you can get free SSL certificate. These sites will help you to check your progress: 1st and 2nd.
According to above security manuals /etc/apache2/apache2.conf file must looks like:
Mutex file:${APACHE_LOCK_DIR} default

PidFile ${APACHE_PID_FILE}

Timeout 60

#KeepAlive Off
KeepAlive On
MaxKeepAliveRequests 100
KeepAliveTimeout 5

HostnameLookups Off

ErrorLog ${APACHE_LOG_DIR}/error.log
LogLevel warn

IncludeOptional mods-enabled/*.load
IncludeOptional mods-enabled/*.conf

Include ports.conf

<Directory />
    Options None FollowSymLinks
    AllowOverride None
    Require all denied
</Directory>

<Directory /var/www/>
    Options None FollowSymLinks
    AllowOverride None
    Require all granted
</Directory>

AccessFileName .htaccess
<FilesMatch "^.ht">
    Require all denied
</FilesMatch>

LogFormat "%v:%p %h %l %u %t "%r" %>s %O "%{Referer}i" "%{User-Agent}i"" vhost_combined
LogFormat "%h %l %u %t "%r" %>s %O "%{Referer}i" "%{User-Agent}i"" combined
LogFormat "%h %l %u %t "%r" %>s %O" common
LogFormat "%{Referer}i -> %U" referer
LogFormat "%{User-agent}i" agent

IncludeOptional conf-enabled/*.conf
IncludeOptional sites-enabled/*.conf

# Hide Server type in the http error-pages
ServerSignature Off
ServerTokens Prod

# Etag allows remote attackers to obtain sensitive information
FileETag None

# Disable Trace HTTP Request
TraceEnable off

# Set cookie with HttpOnly and Secure flag.
# a2enmod headers
Header edit Set-Cookie ^(.*)$ $1;HttpOnly;Secure

# Clickjacking Attack
Header always append X-Frame-Options SAMEORIGIN

# CX-XSS Protection
Header set X-XSS-Protection "1; mode=block"

# Disable HTTP 1.0 Protocol
RewriteEngine On
RewriteCond %{THE_REQUEST} !HTTP/1.1$
RewriteRule .* - [F]

# Change the server banner @ ModSecurity
# Send full server signature so ModSecurity can alter it
ServerTokens Full
# Alter the web server signature sent by Apache
<IfModule security2_module>
    SecServerSignature "Apache 1.3.26"
</IfModule>
Header set Server "Apache 1.3.26"
Header unset X-Powered-By

# Hde TCP Timestamp
#   gksu gedit /etc/sysctl.conf
#   >> net.ipv4.tcp_timestamps = 0
# Test: sudo hping3 SOS.info -p 443 -S --tcp-timestamp -c 1

# Disable -SSLv2 -SSLv3 and weak Ciphers
SSLProtocol all -SSLv2 -SSLv3
SSLHonorCipherOrder on
SSLCipherSuite "EECDH+ECDSA+AESGCM EECDH+aRSA+AESGCM EECDH+ECDSA+SHA384 EECDH+ECDSA+SHA256 EECDH+aRSA+SHA384 EECDH+aRSA+SHA256 EECDH+aRSA EECDH EDH+aRSA !aNULL !eNULL !LOW !3DES !MD5 !EXP !PSK !SRP !DSS !RC4"
5. Set up the Firewall.
To allow/deny external access to your web server you can use UFW (Uncomplicated Firewall):
sudo ufw allow http
sudo ufw allow https
To allow only tcp protocol use:
sudo ufw allow http/tcp
sudo ufw allow https/tcp
You can use and the port number directly:
sudo ufw allow 80/tcp
sudo ufw allow 443/tcp
Just in case you can reload the «rules table»:
sudo ufw reload
You can use and UFW’s GUI interface, called gufw.
sudo apt update
sudo apt install gufw
gufw &
Choice the Office profile. It will set: Status:ON, Incoming:Deny and Outgoing:Allow and add your rules.
6. If you have a router don’t forget to forward some ports:
If you have a router and you want your web server to be accessible from Internet, don’t forget to add some port forwarding. Something like this.
При работе с серверами и веб-ресурсами мы сталкиваемся с ошибками, которые вызываем при обслуживании и настройке. Когда вы сталкиваетесь с такими ошибками, вам необходимо как можно быстрее диагностировать и устранить проблему, чтобы избежать простоев и потери данных.
В этой краткой статье рассматривается типичная ошибка при работе с серверами (403 Forbidden), ее причины и способы ее устранения.
Ошибка Nginx 403 Forbidden – это код состояния, сгенерированный и отображаемый пользователю, когда клиент пытается получить доступ к части веб-сервера с недостаточными разрешениями. Например, NGINX защищает список каталогов и приведет к ошибке 403.
Причины ошибки Nginx 403 на стороне сервера
Прежде чем мы начнем, стоит отметить, что ошибка может исходить от клиента, а не от самого сервера. Сначала мы рассмотрим ошибки на стороне сервера, а затем ошибки на стороне клиента.
Причина 1: неправильный индексный файл
Самая первая и частая причина ошибки NGINX 403 Forbidden – это неправильная конфигурация индексного файла.
Файл конфигурации Nginx указывает, какие индексные файлы загружать и в каком порядке их загружать. Однако, если указанные индексные файлы отсутствуют в каталоге, Nginx вернет ошибку 403 Forbidden.
Например, конфигурация ниже определяет индексные файлы и способ их загрузки.
location / {
index index.html index.htm index.html inde.php;
}
Один из способов решения этой проблемы – добавить индексный файл, указанный в файле конфигурации, или добавить доступный индексный файл в файл конфигурации.
Другой способ решить эту проблему – разрешить Nginx отображать каталоги, если индексный файл недоступен. Включите этот модуль, добавив следующую запись в файл конфигурации.
location / {
autoindex on;
autoindex_exact_size on;
}
Примечание
Мы не рекомендуем этот метод на общедоступных серверах.
Для получения дополнительной информации о том, как обслуживать статический контент, рассмотрите ресурс документации Nginx, представленный ниже:
https://docs.nginx.com/nginx/admin-guide/web-server/serving-static-content/
Причина 2: неправильно настроенные разрешения
ошибка Nginx 403Forbidden также может возникать из-за неверно установленных разрешений для файлов и каталогов. Чтобы Nginx мог успешно передать клиенту определенный файл и ресурс, Nginx должен иметь разрешения RWX – чтение, запись и выполнение – на всем пути.
Чтобы устранить эту ошибку, измените разрешение каталогов на 755 и разрешение файла на 644. Убедитесь, что пользователь, запускающий процесс Nginx, владеет файлами. Например, установите пользователя на www-data:
sudo chown -R www-data:www-data *
Наконец, установите права доступа к каталогу и файлу как:
sudo chmod 755 {dir}
sudo chmod 644 {files}
Как уже упоминалось, в других случаях ошибка 403 может быть вызвана пользователем, а не на стороне сервера. Чтобы решить такие проблемы на стороне клиента, выполните следующие операции.
- Убедитесь, что вы получаете доступ к правильному веб-адресу
- Очистить кеш браузера
- Убедитесь, что брандмауэр или прокси-сервер разрешает вам доступ к веб-ресурсу.
Заключение
В этой краткой статье обсуждаются причины ошибки NGIX 403 Forbidden и различные способы ее устранения. Прежде чем пытаться использовать какие-либо методы устранения неполадок, рекомендуется просмотреть журналы сервера.
Если вы нашли ошибку, пожалуйста, выделите фрагмент текста и нажмите Ctrl+Enter.
I have 3 domain names and am trying to host all 3 sites on one server (a Digital Ocean droplet) using Nginx.
mysite1.name
mysite2.name
mysite3.name
Only 1 of them works. The other two result in 403 errors (in the same way).
In my nginx error log, I see: [error] 13108#0: *1 directory index of "/usr/share/nginx/mysite2.name/live/" is forbidden.
My sites-enabled config is:
server {
        server_name www.mysite2.name;
        return 301 $scheme://mysite2.name$request_uri;
}
server {
        server_name     mysite2.name;

        root /usr/share/nginx/mysite2.name/live/;
        index index.html index.htm index.php;

        location / {
                try_files $uri $uri/ /index.html index.php;
        }

        location ~ .php$ {
                fastcgi_split_path_info ^(.+.php)(/.+)$;
                fastcgi_pass unix:/var/run/php5-fpm.sock;
                fastcgi_index index.php;
                include fastcgi_params;
        }
}
All 3 sites have nearly identical config files.
Each site’s files are in folders like /usr/share/nginx/mysite1.name/someFolder, and then /usr/share/nginx/mysite1.name/live is a symlink to that. (Same for mysite2 and mysite3.)
I’ve looked at Nginx 403 forbidden for all files but that didn’t help.
Any ideas on what might be wrong?
![]()
asked Oct 10, 2013 at 1:00
![]()
5
If you have directory indexing off, and is having this problem, it’s probably because the try_files you are using has a directory option:
location / {
  try_files $uri $uri/ /index.html index.php;
}                 ^ that is the issue
Remove it and it should work:
location / {
  try_files $uri /index.html index.php;
}
Why this happens
TL;DR: This is caused because nginx will try to index the directory, and be blocked by itself. Throwing the error mentioned by OP.
try_files $uri $uri/ means, from the root directory, try the file pointed by the uri, if that does not exists, try a directory instead (hence the /). When nginx access a directory, it tries to index it and return the list of files inside it to the browser/client, however by default directory indexing is disabled, and so it returns the error «Nginx 403 error: directory index of [folder] is forbidden».
Directory indexing is controlled by the autoindex option: https://nginx.org/en/docs/http/ngx_http_autoindex_module.html
answered Jun 27, 2016 at 4:49
![]()
jonathancardosojonathancardoso
11.3k7 gold badges54 silver badges71 bronze badges
10
Here is the config that works:
server {
    server_name www.mysite2.name;
    return 301 $scheme://mysite2.name$request_uri;
}
server {
    #This config is based on https://github.com/daylerees/laravel-website-configs/blob/6db24701073dbe34d2d58fea3a3c6b3c0cd5685b/nginx.conf
    server_name mysite2.name;

     # The location of our project's public directory.
    root /usr/share/nginx/mysite2/live/public/;

     # Point index to the Laravel front controller.
    index           index.php;

    location / {
        # URLs to attempt, including pretty ones.
        try_files   $uri $uri/ /index.php?$query_string;
    }

    # Remove trailing slash to please routing system.
    if (!-d $request_filename) {
            rewrite     ^/(.+)/$ /$1 permanent;
    }

    # pass the PHP scripts to FastCGI server listening on 127.0.0.1:9000
    location ~ .php$ {
        fastcgi_split_path_info ^(.+.php)(/.+)$;
    #   # NOTE: You should have "cgi.fix_pathinfo = 0;" in php.ini
    #   # With php5-fpm:
        fastcgi_pass unix:/var/run/php5-fpm.sock;
        fastcgi_index index.php;
        include fastcgi_params;
        fastcgi_param                   SCRIPT_FILENAME $document_root$fastcgi_script_name;
    }

}
Then the only output in the browser was a Laravel error: “Whoops, looks like something went wrong.”
Do NOT run chmod -R 777 app/storage (note). Making something world-writable is bad security.
chmod -R 755 app/storage works and is more secure.
answered Oct 10, 2013 at 17:46
![]()
RyanRyan
21.5k29 gold badges171 silver badges340 bronze badges
4
If you’re simply trying to list directory contents use autoindex on; like:
location /somedir {
       autoindex on;
}
server {
        listen   80;
        server_name  example.com www.example.com;
        access_log  /var/...........................;
        root   /path/to/root;
        location / {
                index  index.php index.html index.htm;
        }
        location /somedir {
               autoindex on;
        }
}
![]()
answered Nov 15, 2013 at 18:11
![]()
mazmaz
7,8244 gold badges24 silver badges25 bronze badges
4
I encountered similar error
— «403 Forbidden» in the webpage
— «13: Permission denied» in the error log at /var/log/nginx/error.log
Below 3 Steps worked for me:
1: Open Terminal, saw something like below
user1@comp1:/home/www/
So, my user name is «user1» (from above)
2: Changed user in /etc/nginx/nginx.conf
# user www-data;
user user1;
3: Reloaded the nginx
sudo nginx -s reload
Additionally, I have applied file/folder permissions (before I did above 3 steps)
(755 to my directory, say /dir1/) & (644 for files under that directory):
(I am not sure, if this additional step is really required, just above 3 steps might be enough):
chmod 755 ./dir1/
chmod 644 ./dir1/*.*
Hope this helps quick someone. Best of luck.
![]()
Matt
43.8k8 gold badges73 silver badges109 bronze badges
answered Aug 19, 2015 at 7:22
![]()
2
In fact there are several things you need to check.
1. check your nginx’s running status
ps -ef|grep nginx

ps aux|grep nginx|grep -v grep
Here we need to check who is running nginx. please remember the user and group
-
check folder’s access status
ls -alt
-
compare with the folder’s status with nginx’s
(1) if folder’s access status is not right
sudo chmod 755 /your_folder_path
(2) if folder’s user and group are not the same with nginx’s running’s
sudo chown your_user_name:your_group_name /your_folder_path
and change nginx’s running username and group
nginx -h
to find where is nginx configuration file
sudo vi /your_nginx_configuration_file

//in the file change its user and group
user your_user_name your_group_name;

//restart your nginx
sudo nginx -s reload
Because nginx default running’s user is nobody and group is nobody. if we haven’t notice this user and group, 403 will be introduced.
answered Feb 24, 2015 at 4:23
![]()
HaimeiHaimei
12.3k3 gold badges49 silver badges35 bronze badges
I had the same problem, the logfile showed me this error:
2016/03/30 14:35:51 [error] 11915#0: *3 directory index of "path_scripts/viewerjs/" is forbidden, client: IP.IP.IP.IP, server: domain.com, request: "GET /scripts/viewerjs/ HTTP/1.1", host: "domain", referrer: "domain.com/new_project/do_update"
I am hosting a PHP app with codeignitor framework. When i wanted to view uploaded files i received a 403 Error.
The problem was, that the nginx.conf was not properly defined. Instead of
index index.html index.htm index.php
i only included
index index.php
I have an index.php in my root and i thought that was enough, i was wrong
The hint gave me NginxLibrary
answered Mar 30, 2016 at 13:21
![]()
theDriftertheDrifter
1,5495 gold badges22 silver badges40 bronze badges
1
You might get this because of Nginx policy (eg. «deny»), or you might get this because of Nginx misconfiguration, or you might get this because of filesystem restrictions.
You can determine if its the later (and possibly see evidence of a misconfiguration by using strace (except, the OP won’t have access to that):
# pidof nginx
11853 11852

# strace -p 11853 -p 11852 -e trace=file -f
Process 11853 attached - interrupt to quit
Process 11852 attached - interrupt to quit
[pid 11853] stat("/var/www/html/kibanaindex.html", 0x7ffe04e93000) = -1 ENOENT (No such file or directory)
[pid 11853] stat("/var/www/html/kibana", {st_mode=S_IFDIR|0755, st_size=4096, ...}) = 0
^CProcess 11853 detached
Process 11852 detached
Here I’m inspecting the filesystem activity done by nginx while a ran a test (I had the same error as you).
Here’s a selected part of my config at the time
    location /kibana/3/ {
        alias /var/www/html/kibana;
        index index.html;
    }
In my case, as strace quite clearly shows, the joining of in the «alias» to the «index» was not what I had expected, and it seems I need to get into the habit of always appending directory names with a /, so in my case, the following worked:
    location /kibana/3/ {
        alias /var/www/html/kibana/;
        index index.html;
    }
answered Sep 26, 2015 at 19:06
![]()
Cameron KerrCameron Kerr
1,64514 silver badges23 bronze badges
3
Here’s how I managed to fix it on my Kali machine:
-
Locate to the directory:
cd /etc/nginx/sites-enabled/ -
Edit the ‘default’ configuration file:
sudo nano default -
Add the following lines in the
locationblock:location /yourdirectory { autoindex on; autoindex_exact_size off; } -
Note that I have activated auto-indexing in a specific directory
/yourdirectoryonly. Otherwise, it will be enabled for all of your folders on your computer and you don’t want it. -
Now restart your server and it should be working now:
sudo service nginx restart
answered Dec 29, 2020 at 12:27
![]()
RAZ0229RAZ0229
1743 silver badges13 bronze badges
It look’s like some permissions problem.
Try to set all permisions like you did in mysite1 to the others site.
By default file permissions should be 644 and dirs 755.
Also check if the user that runs nginx have permission to read that files and dirs.
answered Oct 10, 2013 at 1:21
![]()
TomahockTomahock
4703 silver badges11 bronze badges
change the try_files to point to the index.php path, in the «Laravel» that you mentioned it should be something like this
location / {
    try_files $uri $uri/ /public/index.php$request_uri;
}
And in the «codeigniter» project try it like this
location / {
    try_files $uri $uri/ /public_web/index.php$request_uri;
}
answered Oct 10, 2013 at 8:13
![]()
Mohammad AbuShadyMohammad AbuShady
39.7k10 gold badges76 silver badges89 bronze badges
For me the problem was that any routes other than the base route were working, adding this line fixed my problem:
index index.php;
Full thing:
server {

    server_name example.dev;
    root /var/www/example/public;
    index           index.php;

    location / {
        try_files $uri $uri/ /index.php?$query_string;
    }

    location ~ .php$ {
        include /etc/nginx/fastcgi_params;
        fastcgi_pass  127.0.0.1:9000;
        fastcgi_index index.php;
        fastcgi_param SCRIPT_FILENAME $document_root$fastcgi_script_name;
    }
}
answered Feb 12, 2018 at 5:50
![]()
zeros-and-oneszeros-and-ones
4,0736 gold badges34 silver badges54 bronze badges
Because you’re using php-fpm, you should make sure that php-fpm user is the same as nginx user.
Check /etc/php-fpm.d/www.conf and set php user and group to nginx if it’s not.
The php-fpm user needs write permission.
answered Apr 8, 2017 at 19:58
![]()
Ali HashemiAli Hashemi
3,0183 gold badges33 silver badges47 bronze badges
You need execute permission on your static files directory. Also they need to be chown’ed by your nginx user and group.
answered Oct 11, 2013 at 7:44
![]()
RhysRhys
2,7897 gold badges45 silver badges68 bronze badges
1
location ~* .php$ {
    ...
    fastcgi_param SCRIPT_FILENAME $document_root$fastcgi_script_name;
}
Change default
fastcgi_param SCRIPT_FILENAME /scripts$fastcgi_script_name;
to
fastcgi_param SCRIPT_FILENAME $document_root$fastcgi_script_name;
solved my problem.
![]()
m0nhawk
22.5k9 gold badges44 silver badges72 bronze badges
answered Mar 12, 2015 at 12:49
![]()
In my case I was using hhvm listening on port 9000 and the fastcgi_pass line in nginx config was incorrect.
Also, if you are using mysql and the connections from hhvm to the database don’t work check if you have apparmor installed.
answered Jun 22, 2019 at 11:18
![]()
user9869932user9869932
6,0933 gold badges54 silver badges47 bronze badges
6833#0: *1 directory index of "/path/to/your/app" is forbidden, client: 127.0.0.1, server: lol.com, request: "GET / HTTP/1.1", host: "localhost"
I was running Ubuntu 15.10 and encountered the 403 Forbidden error due to a simple reason.
In the nginx.conf(configuration file for nginx), the user was ‘www-data’.
Once I changed the username to [my username], it worked fine assuming the necessary permissions were given to my username.
Steps followed by me:
chmod 755 /path/to/your/app
My configuration file looks like this:
**user [my username]**;#I made the change here.
worker_processes auto;
pid /run/nginx.pid;
events {
worker_connections 768;
# multi_accept on;
}

http {

##
# Basic Settings
##

sendfile on;
tcp_nopush on;
tcp_nodelay on;
keepalive_timeout 65;
types_hash_max_size 2048;
# server_tokens off;

# server_names_hash_bucket_size 64;
# server_name_in_redirect off;

include /etc/nginx/mime.types;
default_type application/octet-stream;

##
# SSL Settings
##

ssl_protocols TLSv1 TLSv1.1 TLSv1.2; # Dropping SSLv3, ref: POODLE
ssl_prefer_server_ciphers on;

##
# Logging Settings
##

access_log /var/log/nginx/access.log;
error_log /var/log/nginx/error.log;

##
# Gzip Settings
##

gzip on;
gzip_disable "msie6";

# gzip_vary on;
# gzip_proxied any;
# gzip_comp_level 6;
# gzip_buffers 16 8k;
# gzip_http_version 1.1;
# gzip_types text/plain text/css application/json application/javascript text/xml application/xml application/xml+rss text/javascript;

##
# Virtual Host Configs
##

include /etc/nginx/conf.d/*.conf;
include /etc/nginx/sites-enabled/*;


server {
    listen 80;

    server_name My_Server;

    access_log  /var/log/nginx/access.log;
    error_log  /var/log/nginx/error.log;

    location / {
        proxy_pass         http://127.0.0.1:8000;
        proxy_redirect     off;

        proxy_set_header   Host             $host;
        proxy_set_header   X-Real-IP        $remote_addr;
        proxy_set_header   X-Forwarded-For  $proxy_add_x_forwarded_for;
    }
}
}
answered Feb 17, 2016 at 12:45
![]()
Raunaq KocharRaunaq Kochar
1,0243 gold badges15 silver badges24 bronze badges
I resolved my problem, if i configure like follow:
location = /login {
    index  login2.html;
}
It’ll show the 403 error.
[error] 4212#2916: *2 directory index of "D:path/to/login/" is forbidden
I’ve tried autoindex on, but not working.
If i change my configure like this, it works.
location = /login/ {
    index  login2.html;
}
I think the exact matching, if it’s a path should be a directory.
answered Mar 18, 2019 at 3:58
![]()
In my case it was related to SELinux in CentOS 7:
You can check if it is enabled running the following command:
cat /etc/selinux/config
Sample outputs:
SELINUX=enforcing
SELINUXTYPE=targeted
Disabling SELinux permanently
Edit the /etc/selinux/config file, run:
sudo vi /etc/selinux/config
Set SELINUX to disabled:
SELINUX=disabled
Save and close the file in vi/vim. Reboot the Linux system:
sudo reboot
answered Sep 22, 2020 at 14:34
![]()
-
Check that index.html or index.php is not missing in the directory
-
See the error log file which is located in /var/log/nginx and then open
vim error.log
answered Aug 10, 2020 at 17:59
![]()
Ahmad SharifAhmad Sharif
4,0535 gold badges36 silver badges48 bronze badges
when you want to keep the directory option,you can put the index.php ahead of $uri like this.
try_files /index.php $uri $uri/
answered Jun 17, 2019 at 14:02
![]()
xoyabcxoyabc
1271 silver badge10 bronze badges
1
In my case I didn’t run this command
sudo apt-get install php7.4-fpm
answered Nov 15, 2020 at 8:09
![]()
ekponoekpono
1644 bronze badges
Ошибка 403 forbidden nginx означает что вы запросили ресурс у сервера, который он не может отправить, потому что у вас недостаточно прав для его просмотра. Фактически, это даже не ошибка, это сообщение HTTP 4xx, которое всего лишь сообщает, что у вас нет доступа к определенному контенту.
Достаточно часто такие сообщения показывается пользователям, потому что они были заблокированы на сайте или попытались получить доступ к файлу, который доступен только локально. В этой статье мы попытаемся разобраться со случаями, когда появление 403 forbidden nginx 1.4 6 Ubuntu не желательно и представляет из себя ошибку, которую веб-мастер или системный администратор должен решить. Но сначала рассмотрим основные причины почему вы можете видеть это сообщение.

Итак, ошибка 403 forbidden nginx 1.4 6 Ubuntu может возникать в таких случаях:
- Пользователь заблокирован на сервере с помощью директивы deny в конфигурации nginx;
- Доступ к данному ресурсу разрешен только с определенного IP адреса;
- Пользователь пытается получить доступ к папке, отображение содержимого которой запрещено;
- Nginx не может прочитать содержимое запрашиваемого файла в файловой системе;
- Файл index не найден в каталоге.
Это основные причины, которые встречаются наиболее часто. Как видите, две последние из них представляют из себя проблему. Рассмотрим как ее решить.
Неверно выставлены права
Если права на файл, который пытается получить пользователь выставлены неправильно, то будет выдана такая ошибка. Необходимо, чтобы у Nginx были права не только на чтение этого файла, но и на чтение все родительских каталогов. Это можно проверить командой:
$ namei -l /var/www/public_html/index.html
Для всех элементов пути должен быть установлен флаг «r», чаще всего лучше подходят права 644, то есть, владелец может все, а группа и остальные только читать. Если права не соответствуют, то вы нашли проблему и осталось только исправить права с помощью chmod. Например:
$ chmod 644 /var/www/public_html/index.html
Вот так должно быть:

Также обратите внимание на владельца файлов и папок. Если nginx должен иметь возможность выполнять туда запись, то, возможно есть смысл сделать владельцем пользователя nginx или позже получите другую ошибку. Также, если с правами все хорошо, но ошибка не решена попробуйте отключить SELinux, возможно, эта служба мешает Nginx получить доступ к файлам.
Если вы используете PHP и получаете такую ошибку, то еще нужно проверить может ли Nginx получить доступ к сокету обработчика PHP. Желательно, чтобы php-fpm запускался с той же группой, что и nginx, потому что права, по умолчанию, для доступа к сокету 660 (для группы и для владельца). Поэтому проверьте поля listen.owner и listen.group в файле /etc/php5/fpm/php-fpm.conf.

Также можно попытаться использовать сетевой сокет и подключаться к порту, а не файлу.
Неверно настроен index
Файл index открывается по умолчанию при запросе папки на сервере, в которой он находится. Если такого файла в папке нет или он настроен неправильно в конфигурационном файле nginx, то программа попытается отобразить содержимое папки, а это по умолчанию запрещено, поэтому вы получите 403 Foribden.
Чтобы решить проблему убедитесь, что файл index.html, index.php или как он у вас называется, находится в нужно папке, в той, которую вы запрашиваете. Проверьте конфигурационный файл и убедитесь, что в нем указана директива Index с правильным именем и расширением файла:

Если в директиве указаны только файлы html, а вы используете php, то уже понятно почему программа не может найти то, что нужно. Просто добавьте имя файла в директиву:
index index.html index.htm index.php;
Точно так же, если вы использовали python скрипт, то нужно добавить его расширение.
Источник
I’m running Ubuntu 14.04 and havent run sudo apt-get update for many months.
When I try to update local /etc/apt/sources.list apt-get can connect to many repos no problem, but many (maybe 15% of total) return errors like this
W: Failed to fetch http://nz.archive.ubuntu.com/ubuntu/dists/trusty-backports/multiverse/binary-i386/Packages  403  Forbidden

W: Some index files failed to download. They have been ignored, or old ones used instead.
I’m wondering if the repo addresses or configurations have changed since my machine last made contact, and therefore I need to go through some process to completely flush and then re-establish the /etc/apt/sources.list?
I’m thinking something like
sudo apt-cache clean
But I don’t want to bork my system any more than it already is.
How can I resolve this 403 Forbidden error?
Current state of /etc/apt/sources.list
# deb cdrom:[Ubuntu 14.04 LTS _Trusty Tahr_ - Release amd64 (20140417)]/ trusty main restricted

# See http://help.ubuntu.com/community/UpgradeNotes for how to upgrade to
# newer versions of the distribution.
deb http://nz.archive.ubuntu.com/ubuntu/ trusty main restricted
deb-src http://nz.archive.ubuntu.com/ubuntu/ trusty main restricted

## Major bug fix updates produced after the final release of the
## distribution.
deb http://nz.archive.ubuntu.com/ubuntu/ trusty-updates main restricted
deb-src http://nz.archive.ubuntu.com/ubuntu/ trusty-updates main restricted

## N.B. software from this repository is ENTIRELY UNSUPPORTED by the Ubuntu
## team. Also, please note that software in universe WILL NOT receive any
## review or updates from the Ubuntu security team.
deb http://nz.archive.ubuntu.com/ubuntu/ trusty universe
deb-src http://nz.archive.ubuntu.com/ubuntu/ trusty universe
deb http://nz.archive.ubuntu.com/ubuntu/ trusty-updates universe
deb-src http://nz.archive.ubuntu.com/ubuntu/ trusty-updates universe

## N.B. software from this repository is ENTIRELY UNSUPPORTED by the Ubuntu
## team, and may not be under a free licence. Please satisfy yourself as to
## your rights to use the software. Also, please note that software in
## multiverse WILL NOT receive any review or updates from the Ubuntu
## security team.
deb http://nz.archive.ubuntu.com/ubuntu/ trusty multiverse
deb-src http://nz.archive.ubuntu.com/ubuntu/ trusty multiverse
deb http://nz.archive.ubuntu.com/ubuntu/ trusty-updates multiverse
deb-src http://nz.archive.ubuntu.com/ubuntu/ trusty-updates multiverse

## N.B. software from this repository may not have been tested as
## extensively as that contained in the main release, although it includes
## newer versions of some applications which may provide useful features.
## Also, please note that software in backports WILL NOT receive any review
## or updates from the Ubuntu security team.
deb http://nz.archive.ubuntu.com/ubuntu/ trusty-backports main restricted universe multiverse
deb-src http://nz.archive.ubuntu.com/ubuntu/ trusty-backports main restricted universe multiverse

deb http://security.ubuntu.com/ubuntu trusty-security main restricted
deb-src http://security.ubuntu.com/ubuntu trusty-security main restricted
deb http://security.ubuntu.com/ubuntu trusty-security universe
deb-src http://security.ubuntu.com/ubuntu trusty-security universe
deb http://security.ubuntu.com/ubuntu trusty-security multiverse
deb-src http://security.ubuntu.com/ubuntu trusty-security multiverse

## Uncomment the following two lines to add software from Canonical's
## 'partner' repository.
## This software is not part of Ubuntu, but is offered by Canonical and the
## respective vendors as a service to Ubuntu users.
# deb http://archive.canonical.com/ubuntu trusty partner
# deb-src http://archive.canonical.com/ubuntu trusty partner

## This software is not part of Ubuntu, but is offered by third-party
## developers who want to ship their latest software.
deb http://extras.ubuntu.com/ubuntu trusty main
deb-src http://extras.ubuntu.com/ubuntu trusty main
Are you stuck with Nginx 403 forbidden error? We can help you in fixing it.
This error occurs mainly due to incorrect set up of index file and wrong file permissions.
At Bobcares, we often receive requests to fix this error as part of our Server Management Services.
Today, let’s discuss how our Support Engineers fix this error easily for our customers.
Why does Nginx 403 forbidden error occur?
Before discussing how to fix the error, let’s have a look at the error.
Usually, it is quite common to find the 403 forbidden error when dealing with Nginx.
And, this error occurs when Nginx cannot deliver the requested process.
Also, the location of the Nginx configuration files is by default /etc/nginx.
The major causes of this error are incorrect settings in the index file and wrong file permissions.
How we fix the forbidden error?
Now, let’s check the major causes in detail and discuss their respective fixes by our Support Engineers.
Wrong file permissions
One major cause of Nginx 403 error is the incorrect file permissions.
By default, the standard permission for the directory is 755 and that of the file is 644.
And, any error with these permissions will result in 403 forbidden.
Also, it is necessary that the Nginx user must be the owner of the files.
We change the ownership of all the files to the Nginx user with the command,
sudo chown -R nginx:nginx *Also, we change the permissions of each directory to 755 using the command,
sudo chmod 755 [directory name]Similarly, we go to the directory and change the permissions of all the files using the following command.
sudo chmod 644 *Incorrect setting up of index file
The Nginx configuration file will specify the index files to load and the order in which they should load.
And, incorrect set up of the index file will cause this error. For instance, we will give it as follows,

The above line shows that the index.html will load first and then the index.php file.
If these files are not found in the directory, it will result in a 403 forbidden error.
Similarly, if we want to load another index file, we will add it along with the list of recognized index files.
[Need more assistance to fix this error?- We’re available 24/7.]
Conclusion
In short, Nginx 403 forbidden error occurs due to incorrect set up of index file and wrong file permissions. In today’s writeup, we discussed how our Support Engineers fix this error for our customers.
PREVENT YOUR SERVER FROM CRASHING!
Never again lose customers to poor server speed! Let us help you.
Our server experts will monitor & maintain your server 24/7 so that it remains lightning fast and secure.
GET STARTED
var google_conversion_label = «owonCMyG5nEQ0aD71QM»;
Introduction
Apache is a popular open-source app for running web servers, owing to its reliability and stability. Despite its ease of use, it’s not uncommon to encounter a ‘403 Forbidden’ error after setting up a website using Apache.
In this tutorial, we will go over potential causes of the Apache ‘403 Forbidden’ error and different ways you can fix it.

Prerequisites
- A user account with root or sudo privileges
- Access to the command line terminal
- An installed version of Apache web server
Apache 403 Forbidden: Effects and Possible Causes
The Apache ‘403 Forbidden’ error appears when you try to load a web page with restricted access. Depending on your browser and the website in question, there are different versions of the 403 error message:
- Forbidden
- Error 403
- HTTP Error 403.14 – Forbidden
- 403 Forbidden
- HTTP 403
- Forbidden: You don’t have permission to access the site using this server
- Error 403 – Forbidden
- HTTP Error 403 – Forbidden
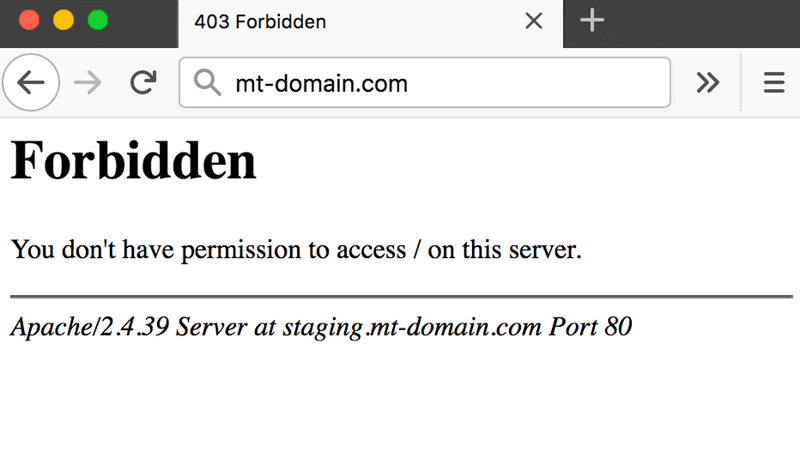
There are several potential reasons why the Apache 403 error occurs:
- The first option is a permission error in the webroot directory, where users don’t have access to website files.
- The second possible reason for a 403 error is missing or incorrect settings in the Apache configuration files.
- Finally, failing to set up a default directory index also triggers a 403 error message in Apache.
How to Fix ‘403 Forbidden’ in Apache
If you have come across an Apache ‘403 Forbidden’ message, there are several ways to fix it:
Method 1: Setting File Permissions and Ownership
If you suspect the cause of the 403 error to be incorrect file permissions, use:
sudo chmod -R 775 /path/to/webroot/directoryThe chmod command sets the execute permission for the webroot directory and read permission for the index.html file.
To change directory ownership, use:
sudo chown -R user:group /path/to/webroot/directoryWhere:
useris the user account with root privileges on your web server.groupiswww-dataorapache.
Restart the Apache web server for the changes to take effect.
If you are working with Ubuntu, use the following command to restart Apache:
sudo systemctl restart apache2If you are working with Centos, use:
sudo systemctl restart httpdMethod 2: Setting Apache Directives
It is possible that the proper require directive is not configured and restricts access to resources. To fix it:
1. Access Apache’s main configuration file. For Ubuntu, use:
sudo nano /etc/apache2/apache2.confFor Centos, use:
sudo nano /etc/httpd/httpd.conf2. Once you open the configuration file, scroll down to the following section:
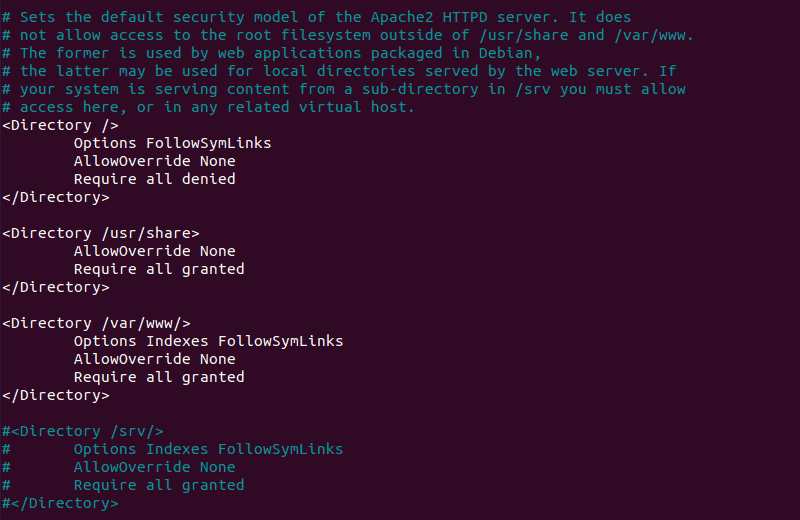
3. If the final line in the <Directory /var/www/> section contains Require all denied, change it to Require all granted.
4. Press Ctrl+X and then Y to save changes to the Apache configuration file.
5. Restart the Apache web server for the changes to take effect. For Ubuntu, use:
sudo systemctl restart apache2For Centos, use:
sudo systemctl restart httpdMethod 3: Adding a Default Directory Index
When a user visits a URL that requests a directory, the web server looks for a file in the given directory. If the file or any similar files are not found, and directory index listings are disabled, the web server displays the ‘403 Forbidden’ error message.
To fix the issue, add a default directory index.
1. Access Apache’s main configuration file by using:
sudo nano /etc/apache2/apache2.conf2. Scroll down to find out the default index file name:
DirectoryIndex index.html index.cgi index.pl index.php index.xhtml3. Make sure there is a file in the webroot folder with this name and upload it if it’s missing.
Conclusion
After following this tutorial, you should be able to determine the cause of an Apache ‘403 Forbidden’ error and fix any issues you may find.
If you want to find out more about 403 forbidden error, read our article 403 forbidden error — what is it and how to fix it.