
I had this exact problem with typedocs. The README.md worked but none of the actual docs generated by my doc strings displayed, I just got a 404 Github Pages screen.
To fix this, just place a empty file in your /docs directory (or wherever you generate your docs) & call it .nojekyll
To confirm, your file structure should now look like:
./docs/.nojekyll # plus all your generated docs
Push this up to your remote Github repo and your links etc should work now.
Also make sure you have selected in your Github settings:
Settings -> Github Pages -> Source -> master brach /docs folder
Depending on your doc framework, you probably have to recreate this file each time you update your docs, this is an example of using typedocs & creating the .nojekyll file each time in a package.json file:
# package.json

      "scripts": {
        "typedoc": "typedoc --out docs src && touch docs/.nojekyll"
      },
You can display a custom 404 error page when people try to access nonexistent pages on your site.
GitHub Pages is available in public repositories with GitHub Free and GitHub Free for organizations, and in public and private repositories with GitHub Pro, GitHub Team, GitHub Enterprise Cloud, and GitHub Enterprise Server. For more information, see «GitHub’s products.»
-
On GitHub, navigate to your site’s repository.
-
Navigate to the publishing source for your site. For more information, see «Configuring a publishing source for your GitHub Pages site.»
-
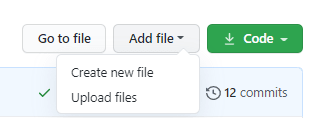
Above the list of files, select the Add file dropdown menu, then click Create new file.
Alternatively, you can click in the file tree view on the left.

-
In the file name field, type
404.htmlor404.md. -
If you named your file
404.md, add the following YAML front matter to the beginning of the file:--- permalink: /404.html --- -
Below the YAML front matter, if present, add the content you want to display on your 404 page.
-
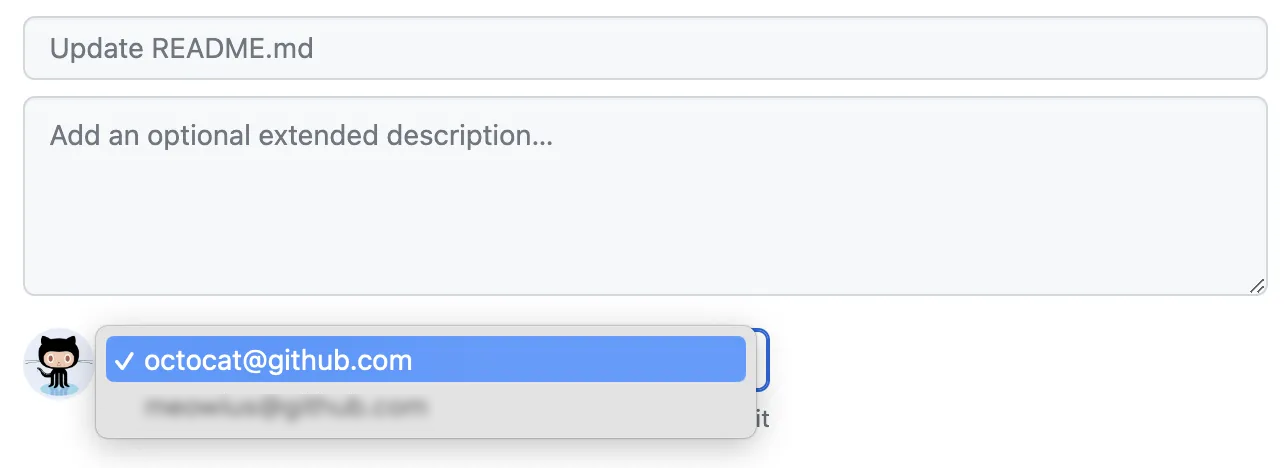
Click Commit changes…
-
In the «Commit message» field, type a short, meaningful commit message that describes the change you made to the file. You can attribute the commit to more than one author in the commit message. For more information, see «Creating a commit with multiple authors.»
-
If you have more than one email address associated with your account on GitHub.com, click the email address drop-down menu and select the email address to use as the Git author email address. Only verified email addresses appear in this drop-down menu. If you enabled email address privacy, then
<username>@users.noreply.github.comis the default commit author email address. For more information, see «Setting your commit email address.» -
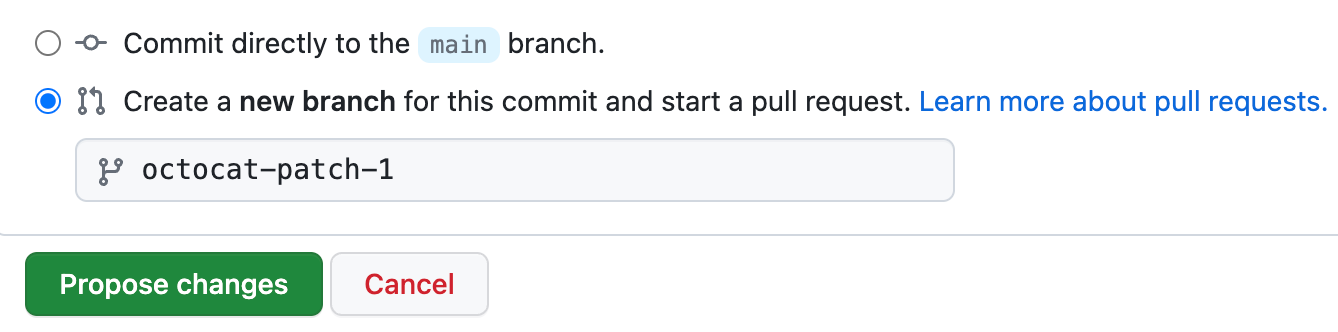
Below the commit message fields, decide whether to add your commit to the current branch or to a new branch. If your current branch is the default branch, you should choose to create a new branch for your commit and then create a pull request. For more information, see «Creating a pull request.»
-
Click Commit changes or Propose changes.

Further reading
- Front matter in the Jekyll documentation
Если вы получили 404 Page not Found
Когда вы публикуете свой сайт на GitHub Pages, то GitHub даёт вам ссылку вида https://USERNAME.github.io/REPONAME, где USERNAME — ваш ник на GitHub, а REPONAME — название репозитория на GitHub, куда вы залили свой сайт.
Это ссылка только на сам репозиторий, в котором много файлов и GitHub не знает, какой из них нужно показать. Если бы в репозитории в корне лежал файл index.html, то GitHub бы догадался и этот файл открылся бы по ссылке https://USERNAME.github.io/REPONAME. Но если ваш index.html где-то спрятан, например, в папке pages/ — Гитхабу нужно явно показать, где искать нужный .html файл: https://USERNAME.github.io/REPONAME/pages/index.html
index.html — это особое название для файла и GitHub Pages догадается показать его, даже если в ссылке его не указать: https://USERNAME.github.io/REPONAME/pages.
GitHub обновляет сайт раз в 10 минут
Ответ об этом на SO. Если вы допустили какую-то ошибку и что-то поправили в файлах — придётся ждать целых 10 минут, чтобы подгрузилась исправленная версия 
После каждого изменения в коде сайта ждите минимум 10 минут, прежде чем заходить на сайт и тестировать эти изменения. А лучше всего всё делать на своём компьютере и заливать на GitHub Pages уже готовую версию.
Если ссылки на сайте не открываются
Вам поможет статья про относительный адрес. Делайте ссылки относительными, а не абсолютными, чтобы сайту было всё равно где он хостится: хоть на 127.0.0.1, хоть на GitHub Pages. Если всё равно ошибка — и не получается написать правильный путь до файла — вот статья как это чинить
Попробуйте бесплатные уроки по Python
Получите крутое код-ревью от практикующих программистов с разбором ошибок и рекомендациями, на что обратить внимание — бесплатно.
Переходите на страницу учебных модулей «Девмана» и выбирайте тему.


Роутинг spa приложений предполагает что сервер на любые аадреса будет отдавать index.html запускающего приложение роутинг которого уже будет рендерить страницу соответствующую маршруту. gh-pages такое не умеет поскольку является хостингом статики. Для разрешения проблемыd в корне вашего приложения создайте файл с именем 404.html и поместите в него следующий код —
<!DOCTYPE html>
<html>
<head>
    <meta charset="utf-8">
    <title>Single Page Apps for GitHub Pages</title>
    <script type="text/javascript">
        // Single Page Apps for GitHub Pages
        // https://github.com/rafrex/spa-github-pages
        // Copyright (c) 2016 Rafael Pedicini, licensed under the MIT License
        // ----------------------------------------------------------------------
        // This script takes the current url and converts the path and query
        // string into just a query string, and then redirects the browser
        // to the new url with only a query string and hash fragment,
        // e.g. http://www.foo.tld/one/two?a=b&c=d#qwe, becomes
        // http://www.foo.tld/?p=/one/two&q=a=b~and~c=d#qwe
        // Note: this 404.html file must be at least 512 bytes for it to work
        // with Internet Explorer (it is currently > 512 bytes)
        // If you're creating a Project Pages site and NOT using a custom domain,
        // then set segmentCount to 1 (enterprise users may need to set it to > 1).
        // This way the code will only replace the route part of the path, and not
        // the real directory in which the app resides, for example:
        // https://username.github.io/repo-name/one/two?a=b&c=d#qwe becomes
        // https://username.github.io/repo-name/?p=/one/two&q=a=b~and~c=d#qwe
        // Otherwise, leave segmentCount as 0.
        var segmentCount = 1;
        var l = window.location;
        l.replace(
            l.protocol + '//' + l.hostname + ( l.port ? ':' + l.port : '' ) +
            l.pathname.split( '/' ).slice( 0, 1 + segmentCount ).join( '/' ) + '/?p=/' +
            l.pathname.slice( 1 ).split( '/' ).slice( segmentCount ).join( '/' ).replace( /&/g, '~and~' ) +
            ( l.search ? '&q=' + l.search.slice( 1 ).replace( /&/g, '~and~' ) : '' ) +
            l.hash
        );
    </script>
</head>
<body>
</body>
</html>
Кроме того помнине что в случаи отсутствия домена все внутренние ссылки (переходыкартинки и т.п.) должны включать имя вашего репозитория.
![]()

In this article, I’ll be showing you how to create a custom error 404 page in GitHub Pages, a static site hosting service that allows you to publish and host your web pages through GitHub.
To break that down quickly: a static site is a website made up entirely of HTML, CSS, and JavaScript files. Everything the site needs to render is contained within these files, so there’s no need for server technology like PHP, Node.js, or Python. If the static site needs extra data from a server, it makes an asynchronous HTTP request with tools like fetch api or axios. And you’ll probably want to make sure that static site has a 404 page.
Displaying a 404 error page on your site is sort of like delivering bad news—the tone and manner of your delivery can determine if the person receiving the news will either be upset or be ready to agreeably look for another solution. Fortunately, GitHub Pages makes creating one a walk in the park.
How Does GitHub Pages Work?
Hosting your site on GitHub Pages is as easy as signing into GitHub and creating a new repository.
Your repo name should have the following format: <your github username>.github.io.

Add files to your repo. You can do this either by creating the files locally and pushing to remote or by creating the files directly on GitHub.
Go to the Settings tab of your newly created repository.

Scroll down to the GitHub Pages section.
Here, you can choose the branch you want to serve your pages from, the root directory, and even select a Jekyll theme. If you already have a custom domain name, you can add it here.
By adding a custom domain name, you can access your site using yourdomainname instead of your github.io domain.

That’s all! Your site is now ready to be published. Visit <your github username>.github.io to see your new website.
You can make changes to your site whenever you choose. They become available immediately after you push/merge to the branch you’ve chosen to serve your pages from.
Using GitHub Pages for your static site gives you some nice benefits:
- GitHub Pages is free to use. No coughing up extra cash just to host some basic web pages.
- You can use it to host websites like single-page applications or blogs.
- You can add a custom domain name to your site.
- You can enable HTTPS for your domain in just one click.
- You get the added advantage of managing your site with Git. Version-controlling your website becomes a piece of cake.
Why Is a 404 Page Important?
The 404 page is a famously dreaded sight across the internet. It’s a page that neither website users nor owners like to see, but it’s an unavoidable one. Its purpose is to inform a user that the page they’re looking for doesn’t exist.
Think about it: it isn’t every time you go into a store that you find everything you’re looking for. Certain items may be sold out or perhaps the store never sold them to begin with. That’s exactly what happens on the web. Perhaps the page’s URL changed, breaking an old link, or maybe the page was removed altogether. A user could have manually input the wrong URL to begin with. However a user has arrived at a particular URL, the requested web page doesn’t exist.
Specifically, 404 is an HTTP status code for a “Resource Not Found” or simply “Not Found” error. It applies to all kinds of resources on the web, including HTML files, CSS files, JavaScript files, documents, images, and just about any other file that could be requested from a server.
How you as the webmaster choose to convey a 404 error is very important. It can either improve your user’s experience on your site or make it worse.
What Makes a Good 404 Page?
At the end of the day, what’s on your 404 page is up to you, but I can give you a few tips to make it as palatable as possible for your users:
- First and foremost, a 404 page should return with an actual 404 HTTP status code. This is important so web crawlers like Google’s bot don’t incorrectly index an erroneous page as a valid page, as this can negatively impact your SEO.
- The 404 page should make it clear to the user that there’s a problem. This can be achieved by making the 404 or Not Found message prominent on the page.
- The page should offer a way out to the user. Unless you want the user stuck on your error page or want them to close your site immediately, your 404 page should provide them with a means to navigate away from the page. Add an obvious link to your site’s homepage to somewhere on the error page, or you can suggest links to pages that might be similar to what the user was looking for in the first place.
- You can provide a way for users to report a broken page, enabling you to quickly fix any issues.
- Add a search bar for users to find other things they might be looking for.
- Make the design pleasing to the eye. A 404 page is still a part of your website, so you should put as much thought into its design as you have for other valid pages. The page should carry elements of your brand, and not look like a desert island.
GitHub’s very own 404 page is a good example of what a 404 page should look like. The error code and message are both prominent on the page, and there’s a search bar to help you find other content.

If you don’t add a custom 404 page to your GitHub Pages site, then by default GitHub displays the following 404 page:

Not bad, eh? But not good enough for your brand.
How to Create a Custom 404 Page in GitHub Pages
Fortunately, GitHub also understands the importance of a 404 error page, and provides developers an easy way to add one to their GitHub-hosted pages. Let’s look at how you can add your own custom 404 page.
Create a new file in the root of your repository and name it 404.html.

Then go on to add content for the 404 page as follows:
<!DOCTYPEhtml><htmllang="en"><head><metacharset="UTF-8"><metaname="viewport"content="width=device-width, initial-scale=1.0"><title>Page Not Found</title><linkrel="preconnect"href="https://fonts.gstatic.com"><linkhref="https://fonts.googleapis.com/css2?family=Chango&family=Roboto:[email protected]&display=swap"rel="stylesheet"><style> body{background-image:url("https://images.unsplash.com/photo-1616235132417-99f443954d2e?ixid=MXwxMjA3fDB8MHxwaG90by1wYWdlfHx8fGVufDB8fHw%3D&ixlib=rb-1.2.1&auto=format&fit=crop&w=334&q=80");background-size:cover;font-family:'Roboto','sans-serif';} main{display:flex;height:100vh;justify-content:center;align-items:center;flex-direction:column;} .header404{font-family:'Chango',cursive;font-size:48px;} .content404{text-align:center;}</style></head><body><main><h4class="header404">404</h4><divclass="content-404"> Uh-oh! We couldn't find the page you are looking for. </div><p><ahref="/">Check our home page</a></p></main></body></html>
Enter fullscreen mode
Exit fullscreen mode
Commit your changes, then try to visit a page that doesn’t exist on your site, eg,username.github.io/a-random-page-that-doesn't exist. A page like this should appear:

Conclusion
Hopefully, this article has shed some light on the importance of a 404 page and why you should put some effort into branding it as you would other pages of your website. When properly done, a 404 error page can be a good way to increase your website’s conversion rate.
Unlike many other host servers where you have to tinker with .htaccess or other kinds of configuration settings to handle 404 error pages, GitHub Pages makes it incredibly easy. All you need to do is add a single file, and you’re good to go.
If you’re stuck for ideas on what your 404 error page can look like, you can always look around for some 404 inspiration.
By Sodeeq Elusoji