
- Code: 0100
- Description: Backup memory device error Outputs an abnormal status from the flash memory.
- Remedy: Flash memory Replace the main/engine PWB.
Main/Engine PWB Replace the main/engine PWB.
- Code: 0120
- Description: MAC address data error In case MAC address is invalid data
- Remedy: Flash memory Replace the main/engine PWB.
- Code: 0130
- Description: Backup memory Read/write error Read/write to the NAND memory cannot be executed.
- Remedy: Flash memory Replace the main/engine PWB.
Main/Engine PWB Replace the main/engine PWB.
- Code: 0140
- Description: Backup memory data error At power up, the data that was read from the NAND memory has been determined to be a error.
- Remedy: Flash memory Replace the main/engine PWB.
Main/Engine PWB Replace the main/engine PWB.
- Code: 0150
- Description: EEPROM read/write error (Main/ Engine PWB) Mismatch of reading data from two locations occurs 8 times successively. Mismatch between writing data and reading data occurs 8 times successively.
- Remedy: EEPROM(YS1) Confirm that the EEPROM has been properly installed and repair if failed.
Main/Engine PWB Replace the main/engine PWB.
EEPROM(YS1) Contact the service support.
- Code: 0160
- Description: Backup memory data error Illegal data is detected in the EEPROM Counter data checksum does not match in all buffers
- Remedy: EEPROM(YS1) Check that the EEPROM (YS1) is firmly installed and repair it if failed.
Main/Engine PWB Replace the main/engine PWB.
EEPROM(YS1) Contact the service support.
- Code: 0170
- Description: Billing counting error Checksum error was detected both in the billing counter and IPU backup memory
- Remedy: Main/Engine PWB Replace the main/engine PWB.
EEPROM(YS1) Contact the service support.
- Code: 0190
- Description: Backup memory device error Unable to read out data from the EEPROM. The above remains at 3 times of retries
- Remedy: Main/Engine PWB Replace the main/engine PWB.
EEPROM(YS1) Contact the service support.
- Code: 0500
- Description: Drive lock detection by engine firmware The main motor was left rotating when monitoring it in the regular interval. (monitored also during the maintenance mode)
- Remedy: Main/Engine PWB Turn the power switch off and on If not corrected, replace the main/ engine PWB.
- Code: 0510
- Description: High voltage remote control error detection It was detected that the high voltage remote signal (synchronized with the feed motor remote) is on while the drum is not driven
- Remedy: Main/Engine PWB Turn the power switch off and on If not corrected, replace the main/ engine PWB.
- Code: 0530
- Description: Backup task error detection The time for the backup task not being in operation is 30s or more
- Remedy: Main/Engine PWB Turn the power switch off and on If not corrected, replace the main/ engine PWB.
- Code: 0540
- Description: Unexpected engine firmware control detection? (Preventing the solenoid from continuously being on) The solenoid was continuously on for the specified time or more
- Remedy: Main/Engine PWB Turn the power switch off and on If not corrected, replace the main/ engine PWB.
- Code: 0800
- Description: Print sequence error The printing sequence jam (JAM010X) occurred twice consecutively.
- Remedy: Main/Engine PWB Turn the power switch off and on If not corrected, replace the main/ engine PWB.
- Code: 0840
- Description: RTC error Communication with the RTC has failed The RTC data mismatch such as dead battery
- Remedy: Battery on the main/engine PWB Check it and repair it if it is faulty.
Main/Engine PWB Replace the main/engine PWB.
- Code: 0970
- Description: 24V power down detect The power shutoff was detected by the controller
- Remedy: Interlock switch Check that the interlock switch is turned on properly by the front cove.
Low voltage power supply PWB Check if there is defective connection in the connector of the low voltage power supply PWB, and then check the 24V output from the main/engine PWB (YC20-1, 2,3). If not, replace the low voltage power supply PWB.
Main/Engine PWB Replace the main/engine PWB and check the operation.
- Code: 1810
- Description: Communication error with the paper feeder (1st PF) No paper feeder was detected after the paper feeder connection was detected at power-up
- Remedy: Paper feeder Check the wiring connection status with the main unit, and if necessary, reconnect it.
PF main PWB 1. Confirm that the wiring connector is firmly connected, and if necessary, connect the connector all the way in. PF main PWB — Main/engine PWB (YC17) 2. If the wiring is disconnected, shortcircuited or has a ground fault, replace the wire. 3. Replace the PF main PWB.
Main/ Engine PWB 1. Check the engine firmware and upgrade to the latest version if necessary. 2. Replace the main/engine PWB.
- Code: 1820
- Description: Communication error with the paper feeder (2nd PF) No paper feeder was detected after the paper feeder connection was detected at power-up
- Remedy: Paper feeder Check the wiring connection status with the main unit, and if necessary, reconnect it.
PF main PWB 1. Confirm that the wiring connector is firmly connected, and if necessary, connect the connector all the way in. PF main PWB and Main/engine PWB (YC47) 2. If the wiring is disconnected, shortcircuited or has a ground fault, replace the wire. 3. Replace the PF main PWB.
Main/ Engine PWB 1. Check the engine firmware and upgrade to the latest version if necessary. 2. Replace the main/engine PWB.
- Code: 2000
- Description: Main motor steady-state error After the main motor was stabilized, the ready signal was not detected for consecutive 1s.
- Remedy: Wire and connector between the main motor and main/engine PWB (YC9) If the connector is not inserted enough, reinsert it. Or check the wire’s continuity, and repair or replace the wire if there is no continuity.
Main motor drive transmission system Check if each roller and gear rotate smoothly. Apply grease to the bushings and gears if they are faulty. Check each gear if it is damaged and replace it if there is damage.
Main motor Replace the main motor.
Main/Engine PWB Replace the main/engine PWB.
- Code: 2010
- Description: Main motor start-up error The ready signal was not detected when passing 2s after the main motor is started up.
- Remedy: Wire and connector between the main motor and main/engine PWB (YC9) If the connector is not inserted enough, reinsert it. Or check the wire’s continuity, and repair or replace the wire if there is no continuity.
Main motor drive transmission system Check if each roller and gear rotate smoothly. Apply grease to the bushings and gears if they are faulty. Check each gear if it is damaged and replace it if there is damage.
Main motor Replace the main motor.
Main/Engine PWB Replace the main/engine PWB.
- Code: 2600
- Description: PF conveying motor error (Paper feeder) The ready signal is not detected within 2s after the PF conveying motor of the cassette 2 turns on.
- Remedy: Connection of the wire and connector PF conveying motor — PF main PWB If the connecor is not inserted enough, reinsert it. Or check the wire’s continuity, and repair or replace the wire if there is no continuity.
PF conveying motor drive transmission system Check if each roller and gear rotate smoothly. Apply grease to the bushings and gears if they are faulty. Check each gear if it is damaged and replace it if there is damage.
PF conveying motor Replace the PF conveying motor.
- Code: 2610
- Description: PF conveying motor error (Paper feeder) The ready signal is not detected within 2s after the PF conveying motor of the cassette 3 turns on.
- Remedy: Connection of the wire and connector PF conveying motor — PF main PWB If the connector is not inserted enough, reinsert it. Or check the wire’s continuity, and repair or replace the wire if there is no continuity.
PF conveying motor drive transmission system Check if each roller and gear rotate smoothly. Apply grease to the bushings and gears if they are faulty. Check each gear if it is damaged and replace it if there is damage.
PF conveying motor Replace the PF conveying motor.
- Code: 4000
- Description: Polygon motor initial error (LSU) The polygon motor ready signal is not detected when passing 10s after starting up the polygon motor
- Remedy: Laser scanner unit (LSU) 1. Confirm that the wiring connector is firmly connected, and if necessary, connect the connector all the way in. Polygon motor — Main/engine PWB (YC3) If the wiring is disconnected, short-circuited or has a ground fault, replace the wire. 2. Replace the LSU.
Main/Engine PWB 1. Check the engine firmware and upgrade to the latest version if necessary. 2. Replace the main/engine PWB.
- Code: 4010
- Description: Polygon motor steady-state error (LSU) The polygon motor ready signal is not for consecutive 1s after the polygon motor is stabilized
- Remedy: Laser scanner unit (LSU) 1. Confirm that the wiring connector is firmly connected, and if necessary, connect the connector all the way in. Polygon motor — Main/engine PWB (YC3) If the wiring is disconnected, short-circuited or has a ground fault, replace the wire. 2. Replace the LSU.
Main/Engine PWB 1. Check the engine firmware and upgrade to the latest version if necessary. 2. Replace the main/engine PWB.
- Code: 4201
- Description: BD steady-state error (LSU) BD was not obtained during the steady rotation
- Remedy: Laser scanner unit (LSU) 1. Confirm that the wiring connector is firmly connected, and if necessary, connect the connector all the way in. LSU — Main/Engine PWB (YC505) 2. If the wiring is disconnected, shortcircuited or has a ground fault, replace the wire. 3. Replace the LSU.
Main/Engine PWB Replace the main/engine PWB.
- Code: 6000
- Description: Broken fuser heater wire (main) During warm-up, the temperature detected by the thermopile does not reach 100°C/212.0 °F when turning the heater on for consecutive 10s. During warm up, the temperature detected by the thermopile does not reach the ready temperature when passing 30s after reaching 60°C/ 212°F.
- Remedy: Fuser unit 1. Make sure there is no paper jam. 2. Confirm that the wiring connector is firmly connected, and if necessary, connect the connector all the way in. Fuser unit — Main/Engine PWB(YC19) 3. If the wiring is disconnected, shortcircuited or has a ground fault, replace the wire. 4. If the fuser heater is not turned on (broken thermostat wire), replace the fuser unit.
Low voltage power supply PWB 1. Confirm that the wiring connector is firmly connected, and if necessary, connect the connector all the way in. Heater — Low voltage power supply PWB (YC102) Low voltage power supply PWB — Main/ Engine PWB(YC20) 2. Replace the low voltage power supply PWB.
Main/Engine PWB Replace the main/engine PWB.
- Code: 6020
- Description: Fuser thermopile high temperature error (main) During drive, the thermopile detected 200°C/392 °F for 5s The temperature detected by the thermopile rose 18°C/65 °F or more when passing 1s or more after the drive is stopped Detected temperature at that time is 200°C/392 °or more
- Remedy: Thermopile 1. Reconnect the wire connector Replace the wire if there is no continuity. Thermopile — Main/engine PWB (YC2) 2. Check how the thermopile is attached. If not attached to the holder, correct it 3. Replace the thermopile if not repaired.
Fuser unit 1. Make sure there is no paper jam. 2. If the fuser heater is not turned on (broken thermostat wire), replace the fuser unit.
Low voltage power supply PWB 1. Confirm that the wiring connector is firmly connected, and if necessary, connect the connector all the way in. Low voltage power supply PWB — Main/ Engine PWB(YC20) 2. Replace the low voltage power supply PWB.
Main/Engine PWB Replace the main/engine PWB.
- Code: 6030
- Description: Broken fuser thermopile wire (main) The thermopile detected an abnormal value
- Remedy: Thermopile 1. Reconnect the wire connector Replace the wire if there is no continuity. Thermopile — Main/engine PWB (YC2) 2. Replace the thermopile if not repaired
Main/Engine PWB Replace the main/engine PWB.
- Code: 6050
- Description: Fuser thermopile low temperature error (main) During printing, the temperature detected by the thermopile is less than 100°C/212°F for consecutive 3s
- Remedy: Power supply voltage 1. Check no voltage drop exceeding 10% of the rated during printing. 2. If the power is overloaded, change the AC outlet that supplies power.
Thermopile 1. Reconnect the wire connector Replace the wire if there is no continuity. Thermopile — Main/engine PWB (YC2) 2. Check how the thermopile is attached. If not attached to the holder, correct it 3. Replace the thermopile if not repaired
Fuser unit 1. Make sure there is no paper jam. 2. Confirm that the wiring connector is firmly connected, and if necessary, connect the connector all the way in. Fuser unit — Main/Engine PWB(YC19) 3. If the wiring is disconnected, shortcircuited or has a ground fault, replace the wire. 4. If the fuser heater is not turned on (broken thermostat wire), replace the fuser unit.
Low voltage power supply PWB 1. Confirm that the wiring connector is firmly connected, and if necessary, connect the connector all the way in. Heater — Low voltage power supply PWB (YC102) Low voltage power supply PWB — Main/ Engine PWB(YC20) 2. Replace the low voltage power supply PWB.
Main/Engine PWB Replace the main/engine PWB.
- Code: 6200
- Description: Fuser heater error (sub) During warm-up, the temperature detected by the thermistor does not reach 60°C/212.0 °F when turning the heater on for consecutive 30s. During warm-up, the temperature detected by the thermistor does not reach the ready temperature when passing 20s after it reaches 60°C/ 212°F.
- Remedy: Thermopile 1. Reconnect the wire connector Replace the wire if there is no continuity. Thermopile — Main/engine PWB (YC2) 2. Replace the thermopile if not repaired
Fuser unit 1. Make sure there is no paper jam. 2. Confirm that the wiring connector is firmly connected, and if necessary, connect the connector all the way in. Fuser unit — Main/Engine PWB(YC19) 3. If the wiring is disconnected, shortcircuited or has a ground fault, replace the wire. 4. If the fuser heater is not turned on (broken thermostat wire), replace the fuser unit.
Low voltage power supply PWB 1. Confirm that the wiring connector is firmly connected, and if necessary, connect the connector all the way in. Heater — Low voltage power supply PWB (YC102) Low voltage power supply PWB — Main/ Engine PWB(YC20) 2. Replace the low voltage power supply PWB.
Main/Engine PWB Replace the main/engine PWB.
- Code: 6220
- Description: Fuser heater high temperature error (sub) The temperature detected by the thermopile is 240°C/464 °F while the drive is stopped The temperature detected by the thermopile is 255°C/491 °F during drive
- Remedy: Thermopile 1. Reconnect the wire connector Replace the wire if there is no continuity. Thermopile — Main/engine PWB (YC2) 2. Check how the thermopile is attached. If not attached to the holder, correct it 3. Replace the thermopile if not repaired.
Fuser unit 1. Make sure there is no paper jam. 2. Confirm that the wiring connector is firmly connected, and if necessary, connect the connector all the way in. Fuser unit — Main/Engine PWB(YC19) 3. If the wiring is disconnected, shortcircuited or has a ground fault, replace the wire. 4. Replace the fuser unit.
Low voltage power supply PWB 1. Confirm that the wiring connector is firmly connected, and if necessary, connect the connector all the way in. Low voltage power supply PWB — Main/ Engine PWB(YC20) 2. Replace the low voltage power supply PWB.
Main/Engine PWB Replace the main/engine PWB.
- Code: 6230
- Description: Fuser thermistor wire break (sub) The thermistor’s AD value was abnormal
- Remedy: Fuser unit 1. Confirm that the wiring connector is firmly connected, and if necessary, connect the connector all the way in. Fuser unit — Main/Engine PWB(YC19) 2. If the wiring is disconnected, shortcircuited or has a ground fault, replace the wire. 3. If the fuser heater is not turned on (broken thermostat wire), replace the fuser unit.
Main/Engine PWB Replace the main/engine PWB.
- Code: 6250
- Description: Fuser heater low temperature error (sub) During printing, the temperature detected by the thermistor is less than 60°C/140°F for consecutive 3s
- Remedy: Thermopile 1. Reconnect the wire connector Replace the wire if there is no continuity. Thermopile — Main/engine PWB (YC2) 2. Check how the thermopile is attached. If not attached to the holder, correct it 3. Replace the thermopile if not repaired
Fuser unit 1. Make sure there is no paper jam. 2. Confirm that the wiring connector is firmly connected, and if necessary, connect the connector all the way in. Fuser unit — Main/Engine PWB(YC19) 3. If the wiring is disconnected, shortcircuited or has a ground fault, replace the wire. 4. Replace the fuser unit.
Low voltage power supply PWB 1. Confirm that the wiring connector is firmly connected, and if necessary, connect the connector all the way in. Heater — Low voltage power supply PWB (YC102) Low voltage power supply PWB — Main/ Engine PWB(YC20) 2. Replace the low voltage power supply PWB.
Main/Engine PWB Replace the main/engine PWB.
- Code: 6400
- Description: Zero-cross signal error During the heater turned on, the zero-cross signal disappears for consecutive 1s
- Remedy: Low voltage power supply PWB Replace the low voltage power supply PWB.
Main/Engine PWB Replace the main/engine PWB.
- Code: 6600
- Description: Fuser rotation error The fuser roller rotation detection is not input for consecutive 2s while the motor’s steady signal is input
- Remedy: Fuser unit 1. Make sure there is no paper jam. 2. Confirm that the wiring connector is firmly connected, and if necessary, connect the connector all the way in. Fuser unit — Main/Engine PWB(YC19) 3. If the wiring is disconnected, shortcircuited or has a ground fault, replace the wire. 4. Replace the fuser unit.
Main/Engine PWB Replace the main/engine PWB.
- Code: 6610
- Description: The fuser pressure release error The fuser pressure change is not complete within 10s after the instruction
- Remedy: Fuser unit 1. Make sure there is no paper jam. 2. Confirm that the wiring connector is firmly connected, and if necessary, connect the connector all the way in. Fuser unit — Main/engine PWB (YC19) 3. If the wiring is disconnected, shortcircuited or has a ground fault, replace the wire. 4. Replace the fuser unit.
Fuser pressure release error 1. Reverse-rotate the fuser gear manually to check if the fuser pressure can be released. 2. When releasing the pressure, check the fuser pressure release sensor is interrupted by the actuator Reattach it if the light is not interrupted 3. Reconnect the wire connector Replace the wire if there is no continuity. Fuser pressure release sensor — Main/ engine PWB (YC19) Fuser pressure release motor — Main/ engine PWB (YC1) 4. Replace the fuser pressure release motor.
Main/Engine PWB Replace the main/engine PWB.
- Code: 6650
- Description: Fuser thermopile EEPROM error 1. The thermopile EEPROM is not accessed 2. No response from the device at read was detected five time consecutively Data read at two points was unmatched eight times consecutively 3. Thermopile data checksum error
- Remedy: Thermopile 1. Reconnect the wire connector Replace the wire if there is no continuity. 2. Thermopile — Main/engine PWB (YC2) 3. Replace the thermopile if not repaired
Main/Engine PWB Replace the main/engine PWB.
- Code: 7220
- Description: Broken in-machine thermistor wire The sensor input sampling value is greater than the reference value.
- Remedy: In-machine temperature sensor 1. Confirm that the wiring connector is firmly connected, Insert the connector all the way in. In-machine temperature sensor — Main/engine PWB (YC1) 2. If the wiring is disconnected, shortcircuited or has a ground fault, replace the wire. Replace the in-machine temperature sensor PWB.
Main/Engine PWB Replace the main/engine PWB.
- Code: 7800
- Description: Broken outer thermistor wire The sensor input sampling value is abnormal. (After detecting an error, it is controlled at 23°C/77 °F and 50%RH)
- Remedy: Temperature and humidity Sensor 1. Confirm that the wiring connector is firmly connected, and if necessary, connect the connector all the way in. Temperature and humidity sensor — Main/engine PWB (YC2) 2. If the wiring is disconnected, shortcircuited or has a ground fault, replace the wire. 3. Replace the Temperature and humidity sensor PWB.
Main/Engine PWB Replace the main/engine PWB.
- Code: 7990
- Description: Waste toner full The waste toner sensor detected the waste toner reservoir in the drum unit is full
- Remedy: Drum unit Turn the power switch off and on Replace the drum unit if not repaired.
Waste toner sensor Replace the waste toner sensor.
Main/Engine PWB Replace the main/engine PWB.
- Code: F000
- Description: Communication error between Main/Engine PWB — Operation panel PWB
- Remedy: Connection of the wires and connectors between the main/engine PWB — the operation panel PWB. If the connector is not inserted enough, reinsert it. Or check the wire’s continuity, and repair or replace the wire if there is no continuity.
Operation panel PWB Replace the operation panel PWB.
Main/Engine PWB Replace the main/engine PWB.
- Code: F000
- Description: CF000 will be displayed if * notes progress is carried out for a definite period of time with a Welcome screen.The communication fault between Panel-Main/Engine PWBsCommunication fault between Panel Core-Main Core
- Remedy: (1) Check the harness of the connection state of a connector between Panel<=>Main/Engine PWBs, and perform an operation check. (2) Check contact of a DDR memory (extracting) and perform an operation check. If exchangeable, it will exchange and will perform an operation check. (3) Exchange a Main/Engine PWB and perform an operation check. (4) Exchange a Panel PWB and perform an operation check. (5) It will get, if USBLOG is obtainable, and contact service headquarters.
- Code: F010
- Description: Main/Engine PWB Checksum error
- Remedy: Main/Engine PWB Unplug the power cord from the wall outlet, and wait five seconds. Then plug in the power cord and then turn on the power switch. If not corrected, replace the main/ engine PWB.
- Code: F020
- Description: Main/engine PWB RAM checksum error
- Remedy: Main/engine PWB memory (RAM) Turn the power switch off and on If not corrected, replace the main/ engine PWB.
- Code: F040
- Description: Main/engine PWB engine communication error
- Remedy: Main/Engine PWB Turn the power switch off and on If not repaired, replace the EEPROM on the main/engine PWB or main/engine PWB.
- Code: F050
- Description: Main/engine PWB engine checksum error
- Remedy: Main/Engine PWB Download the engine firmware again ( LCD:see page 5-1, LED:see page 5-5)
Main/Engine PWB Turn the power switch off and on If not repaired, replace the EEPROM on the main/engine PWB or main/engine PWB.
- Code: F15X
- Description: Abnormality detecting in an authentication device control section
- Remedy: (1) Check the harness between authentication device <=>Main/ Engine PWBs, and the connection situation of a connector, and perform an operation check. (2) Exchange a Main/Engine PWB and perform an operation check. (3) Get USBLOG and contact service headquarters
- Code: F18X
- Description: Abnormality detecting in a Video control section
- Remedy: (1) Check the harness between Engine<=>Main/Engine PWBs, and the connection state of a connector, and perform an operation check. (2) Exchange an Engine board and perform an operation check. (3) Exchange a Main/Engine PWB and perform an operation check. (4) Get USBLOG and contact service headquarters.
- Code: F1DX
- Description: Abnormality detecting of the image memory Management Department
- Remedy: (1) Exchange a Main/Engine PWB and perform an operation check. (2) Get USBLOG and contact service headquarters.
- Code: F21X, F22X, F23X
- Description: Abnormality detecting in an image-processing part
- Remedy: (1) Check contact of a DDR memory and perform an operation check. (2) Exchange a Main/Engine PWB and perform an operation check. (3) Get USBLOG and contact service headquarters.
- Code: F24X
- Description: Abnormality detecting in the system Management Department
- Remedy: (1) Check contact of a DDR memory and perform an operation check. (2) Exchange a Main/Engine PWB and perform an operation check. (3) Get USBLOG and contact service headquarters.
- Code: F25X
- Description: Abnormality detecting in a network management department
- Remedy: (1) Exchange a Main/Engine PWB and perform an operation check. (2) Get USBLOG and packet capture and contact service headquarters.
- Code: F26X, F27X, F28X
- Description: Abnormality detecting in the system Management Department
- Remedy: (1) Exchange a Main/Engine PWB and perform an operation check. (2) Get USBLOG and contact service headquarters.
- Code: F29X, F2AX
- Description: Abnormality detecting in the system Management Department
- Remedy: (1) Exchange a Main/Engine PWB and perform an operation check. (2) Get USBLOG and contact service headquarters.
- Code: F2BX, F2CX, F2DX
- Description: Abnormality detecting in a network control part
- Remedy: (1) Exchange a Main/Engine PWB and perform an operation check. (2) Get USBLOG and contact service headquarters.(Depending on an analysis result, it is packet capture acquisition)
- Code: F2EX, F2FX, F30X
- Description: Abnormality detecting in a network control part
- Remedy: (1) Exchange a Main/Engine PWB and perform an operation check. (2) Get USBLOG and contact service headquarters.(Depending on an analysis result, it is packet capture acquisition)
- Code: F31X, F32X
- Description: Abnormality detecting in a network control part
- Remedy: (1) Exchange a Main/Engine PWB and perform an operation check. (2) Get USBLOG and contact service headquarters.(Depending on an analysis result, it is packet capture acquisition)
- Code: F35X
- Description: Abnormality detecting in the printing controlling Management Department
- Remedy: (1) Exchange a Main/Engine PWB and perform an operation check. (2) Get USBLOG and contact service headquarters.
- Code: F38X
- Description: Abnormality detecting in the authentication authorized Management Department
- Remedy: (1) Exchange a Main/Engine PWB and perform an operation check. (2) Get USBLOG and contact service headquarters.
- Code: F3AX, F3BX, F3CX
- Description: Abnormality detecting in the Entity Management Department
- Remedy: (1) Exchange a Main/Engine PWB and perform an operation check. (2) Get USBLOG and contact service headquarters
- Code: F3DX, F3EX, F3FX
- Description: Abnormality detecting in the Entity Management Department
- Remedy: (1) Exchange a Main/Engine PWB and perform an operation check. (2) Get USBLOG and contact service headquarters
- Code: F40X, F41X, F42X
- Description: Abnormality detecting in the Entity Management Department
- Remedy: (1) Exchange a Main/Engine PWB and perform an operation check. (2) Get USBLOG and contact service headquarters
- Code: F43X, F44X, F45X
- Description: Abnormality detecting in the Entity Management Department
- Remedy: (1) Exchange a Main/Engine PWB and perform an operation check. (2) Get USBLOG and contact service headquarters
- Code: F46X
- Description: Abnormality detecting of a printer rendering part
- Remedy: (1) Exchange boards and perform an operation check. (2) the acquisition wish of USBLOG — carry out (Depending on the (2) case, it is print capture data acquisition)
- Code: F47X
- Description: Abnormality detecting of an image editing processing part
- Remedy: (1) Exchange a Main/Engine PWB and perform an operation check. (2) Get USBLOG and contact service headquarters.
- Code: F4DX, F4EX
- Description: Abnormality detecting in the Entity Management Department
- Remedy: (1) Exchange a Main/Engine PWB and perform an operation check. (2) Get USBLOG and contact service headquarters
- Code: F4FX
- Description: Abnormality detecting in the JOB Management Department
- Remedy: (1) Exchange a Main/Engine PWB and perform an operation check. (2) Get USBLOG and contact service headquarters.
- Code: F51X, F52X, F53X
- Description: Abnormality detecting in a JOB execution part
- Remedy: (1) Exchange a Main/Engine PWB and perform an operation check. (2) Get USBLOG and contact service headquarters
- Code: F55X, F56X, F57X
- Description: Abnormality detecting in a JOB execution part
- Remedy: (1) Exchange a Main/Engine PWB and perform an operation check. (2) Get USBLOG and contact service headquarters
- Code: F5FX
- Description: Abnormality detecting in a service execution part
- Remedy: (1) Exchange a Main/Engine PWB and perform an operation check. (2) Get USBLOG and contact service headquarters.
- Code: F62X
- Description: Abnormality detecting in a service execution part
- Remedy: (1) Exchange a Main/Engine PWB and perform an operation check. (2) Get USBLOG and contact service headquarters.
- Code: F63X
- Description: Abnormality detecting in a device control section
- Remedy: (1) Exchange a Main/Engine PWB and perform an operation check. (2) Get USBLOG and contact service headquarters.
Ошибки Kyocera ECOSYS M2030dn
Ошибки Kyocera ECOSYS M2030pn
Ошибки Kyocera ECOSYS M2035dn
Ошибки Kyocera ECOSYS M2040dn
Ошибки Kyocera ECOSYS M2135dn
Ошибки Kyocera ECOSYS M2530dn
Ошибки Kyocera ECOSYS M2535dn
Ошибки Kyocera ECOSYS M2540dn
Ошибки Kyocera ECOSYS M2540dw
Ошибки Kyocera ECOSYS M2635dn
Ошибки Kyocera ECOSYS M2635dw
Ошибки Kyocera ECOSYS M2640idw
Ошибки Kyocera ECOSYS M3040dn
Ошибки Kyocera ECOSYS M3040idn
Ошибки Kyocera ECOSYS M3145dn
Ошибки Kyocera ECOSYS M3145idn
Ошибки Kyocera ECOSYS M2735dw
Ошибки Kyocera ECOSYS M3540dn
Ошибки Kyocera ECOSYS M3540idn
Ошибки Kyocera ECOSYS M3550idn
Ошибки Kyocera ECOSYS M3560idn
Ошибки Kyocera ECOSYS M3645dn
Ошибки Kyocera ECOSYS M3645idn
Ошибки Kyocera ECOSYS M3655idn
Ошибки Kyocera ECOSYS M3660idn
Ошибки Kyocera ECOSYS M3860idn
Ошибки Kyocera ECOSYS M3860idn
Ошибки Kyocera ECOSYS M4125idn
Ошибки Kyocera ECOSYS M4132idn
Ошибки Kyocera ECOSYS M5521cdn
Ошибки Kyocera ECOSYS M5521cdw
Ошибки Kyocera ECOSYS M5526cdn
Ошибки Kyocera ECOSYS M5526cdw
Ошибки Kyocera ECOSYS M6026cdn
Ошибки Kyocera ECOSYS M6026cidn
Ошибки Kyocera ECOSYS M6030cdn
Ошибки Kyocera ECOSYS M6035cidn
Ошибки Kyocera ECOSYS M6230cidn
Ошибки Kyocera ECOSYS M6235cidn
Ошибки Kyocera ECOSYS M6526cdn
Ошибки Kyocera ECOSYS M6526cidn
Ошибки Kyocera ECOSYS M6530cdn
Ошибки Kyocera ECOSYS M6535cidn
Ошибки Kyocera ECOSYS M6630cidn
Ошибки Kyocera ECOSYS M6635cidn
Ошибки Kyocera ECOSYS M8124cidn
Ошибки Kyocera ECOSYS M8130cidn
Ошибки Kyocera ECOSYS P2035d
Ошибки Kyocera ECOSYS P2040dn
Ошибки Kyocera ECOSYS P2040dw
Ошибки Kyocera ECOSYS P2135d
Ошибки Kyocera ECOSYS P2135dn
Ошибки Kyocera ECOSYS P2235dn
Ошибки Kyocera ECOSYS P2235dw
Ошибки Kyocera ECOSYS P3045dn
Ошибки Kyocera ECOSYS P3050dn
Ошибки Kyocera ECOSYS P3055dn
Ошибки Kyocera ECOSYS P3060dn
Ошибки Kyocera ECOSYS P3145dn
Ошибки Kyocera ECOSYS P3150dn
Ошибки Kyocera ECOSYS P3155dn
Ошибки Kyocera ECOSYS P3160dn
Ошибки Kyocera ECOSYS P3260dn
Ошибки Kyocera ECOSYS P4035dn
Ошибки Kyocera ECOSYS P4040dn
Ошибки Kyocera ECOSYS P5021cdn
Ошибки Kyocera ECOSYS P5021cdw
Ошибки Kyocera ECOSYS P5026cdn
Ошибки Kyocera ECOSYS P5026cdw
Ошибки Kyocera ECOSYS P6021cdn
Ошибки Kyocera ECOSYS P6026cdn
Ошибки Kyocera ECOSYS P6030cdn
Ошибки Kyocera ECOSYS P6035cdn
Ошибки Kyocera ECOSYS P6130cdn
Ошибки Kyocera ECOSYS P6230cdn
Ошибки Kyocera ECOSYS P6235cdn
Ошибки Kyocera ECOSYS P7035cdn
Ошибки Kyocera ECOSYS P7040cdn
Ошибки Kyocera ECOSYS P7240cdn
Ошибки Kyocera ECOSYS P8060cdn
Ошибки Kyocera FS-C8600DN
Ошибки Kyocera FS-C8650DN
Ошибки Kyocera FS1016MFP
Ошибки Kyocera FS1018MFP
Ошибки Kyocera FS1020MFP
Ошибки Kyocera FS1024MFP
Ошибки Kyocera FS1025MFP
Ошибки Kyocera FS1028MFP
Ошибки Kyocera FS1030MFP
Ошибки Kyocera FS1035MFP
Ошибки Kyocera FS1040
Ошибки Kyocera FS1050
Ошибки Kyocera FS1060DN
Ошибки Kyocera FS1100
Ошибки Kyocera FS1110
Ошибки Kyocera FS1116MFP
Ошибки Kyocera FS1118MFP
Ошибки Kyocera FS1120
Ошибки Kyocera FS1120MFP
Ошибки Kyocera FS1124MFP
Ошибки Kyocera FS1125MFP
Ошибки Kyocera FS1128MFP
Ошибки Kyocera FS1130MFP
Ошибки Kyocera FS1135MFP
Ошибки Kyocera FS1200
Ошибки Kyocera FS1220MFP
Ошибки Kyocera FS1300D
Ошибки Kyocera FS1320D
Ошибки Kyocera FS1320MFP
Ошибки Kyocera FS1325MFP
Ошибки Kyocera FS1350DN
Ошибки Kyocera FS1370DN
Ошибки Kyocera FS1500
Ошибки Kyocera FS6020
Ошибки Kyocera FS6025MFP
Ошибки Kyocera FS6025MFPB
Ошибки Kyocera FS6030MFP
Ошибки Kyocera FS6500
Ошибки Kyocera FS6525MFP
Ошибки Kyocera FS6530MFP
Ошибки Kyocera FS6700
Ошибки Kyocera FS6900
Ошибки Kyocera FS6950DN
Ошибки Kyocera FS8000CD
Ошибки Kyocera FS8000CN
Ошибки Kyocera FS8100DN
Ошибки Kyocera TASKalfa 180
Ошибки Kyocera TASKalfa 1800
Ошибки Kyocera TASKalfa 1801
Ошибки Kyocera TASKalfa 181
Ошибки Kyocera TASKalfa 205c
Ошибки Kyocera TASKalfa 220
Ошибки Kyocera TASKalfa 2200
Ошибки Kyocera TASKalfa 2201
Ошибки Kyocera TASKalfa 221
Ошибки Kyocera TASKalfa 2420w
Ошибки Kyocera TASKalfa 2460ci
Ошибки Kyocera TASKalfa 2470ci
Ошибки Kyocera TASKalfa 250ci
Ошибки Kyocera TASKalfa 2510i
Ошибки Kyocera TASKalfa 2520i
Ошибки Kyocera TASKalfa 255
Ошибки Kyocera TASKalfa 2550ci
Ошибки Kyocera TASKalfa 2551ci
Ошибки Kyocera TASKalfa 2552ci
Ошибки Kyocera TASKalfa 2553ci
Ошибки Kyocera TASKalfa 255b
Ошибки Kyocera TASKalfa 255c
Ошибки Kyocera TASKalfa 265ci
Ошибки Kyocera TASKalfa 300ci
Ошибки Kyocera TASKalfa 300i
Ошибки Kyocera TASKalfa 3010i
Ошибки Kyocera TASKalfa 3011i
Ошибки Kyocera TASKalfa 305
Ошибки Kyocera TASKalfa 3050ci
Ошибки Kyocera TASKalfa 3051ci
Ошибки Kyocera TASKalfa 306ci
Ошибки Kyocera TASKalfa 307ci
Ошибки Kyocera TASKalfa 308ci
Ошибки Kyocera TASKalfa 3212i
Ошибки Kyocera TASKalfa 3252ci
Ошибки Kyocera TASKalfa 3253ci
Ошибки Kyocera TASKalfa 3500i
Ошибки Kyocera TASKalfa 3501i
Ошибки Kyocera TASKalfa 350ci
Ошибки Kyocera TASKalfa 3510i
Ошибки Kyocera TASKalfa 3511i
Ошибки Kyocera TASKalfa 3550ci
Ошибки Kyocera TASKalfa 3551ci
Ошибки Kyocera TASKalfa 3552ci
Ошибки Kyocera TASKalfa 3553ci
Ошибки Kyocera TASKalfa 356ci
Ошибки Kyocera TASKalfa 358ci
Ошибки Kyocera TASKalfa 4002i
Ошибки Kyocera TASKalfa 4003i
Ошибки Kyocera TASKalfa 400ci
Ошибки Kyocera TASKalfa 4012i
Ошибки Kyocera TASKalfa 4052ci
Ошибки Kyocera TASKalfa 4053ci
Ошибки Kyocera TASKalfa 406ci
Ошибки Kyocera TASKalfa 408ci
Ошибки Kyocera TASKalfa 420i
Ошибки Kyocera TASKalfa 4500i
Ошибки Kyocera TASKalfa 4501i
Ошибки Kyocera TASKalfa 4550ci
Ошибки Kyocera TASKalfa 4551ci
Ошибки Kyocera TASKalfa 4820w
Ошибки Kyocera TASKalfa 5002i
Ошибки Kyocera TASKalfa 5003i
Ошибки Kyocera TASKalfa 500ci
Ошибки Kyocera TASKalfa 5052ci
Ошибки Kyocera TASKalfa 5053ci
Ошибки Kyocera TASKalfa 508ci
Ошибки Kyocera TASKalfa 520i
Ошибки Kyocera TASKalfa 5500i
Ошибки Kyocera TASKalfa 5501i
Ошибки Kyocera TASKalfa 550c
Ошибки Kyocera TASKalfa 552ci
Ошибки Kyocera TASKalfa 5550ci
Ошибки Kyocera TASKalfa 5551ci
Ошибки Kyocera TASKalfa 6002i
Ошибки Kyocera TASKalfa 6003i
Ошибки Kyocera TASKalfa 6052ci
Ошибки Kyocera TASKalfa 6053ci
Ошибки Kyocera TASKalfa 620
Ошибки Kyocera TASKalfa 6500i
Ошибки Kyocera TASKalfa 6501i
Ошибки Kyocera TASKalfa 650c
Ошибки Kyocera TASKalfa 6550ci
Ошибки Kyocera TASKalfa 6551ci
Ошибки Kyocera TASKalfa 7002i
Ошибки Kyocera TASKalfa 7003i
Ошибки Kyocera TASKalfa 7052ci
Ошибки Kyocera TASKalfa 7353ci
Ошибки Kyocera TASKalfa 750c
Ошибки Kyocera TASKalfa 7550ci
Ошибки Kyocera TASKalfa 7551ci
Ошибки Kyocera TASKalfa 8000i
Ошибки Kyocera TASKalfa 8001i
Ошибки Kyocera TASKalfa 8002i
Ошибки Kyocera TASKalfa 8003i
Ошибки Kyocera TASKalfa 8052ci
Ошибки Kyocera TASKalfa 820
Ошибки Kyocera TASKalfa 8353ci
Ошибки Kyocera TASKalfa 9002i
Ошибки Kyocera TASKalfa 9003i
Японская компания Kyocera производит высококачественные лазерные принтеры и МФУ для офисной печати. Их продукция одна из самых востребованных на сегодняшний день. Ведь печатающие устройства Kyocera характеризуются высокой надежностью, износостойкостью и большим сроком эксплуатации. Однако даже их изделия не являются вечными. Со временем принтеры Kyocera начинают сбоить.
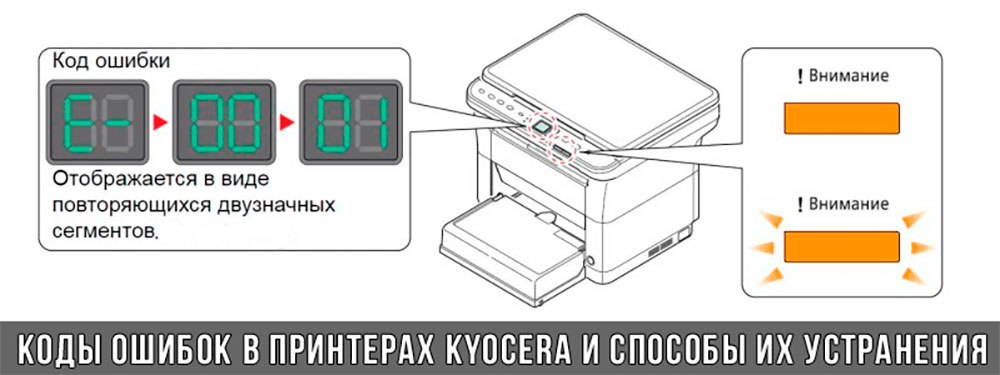
К счастью, оргтехника Kyocera оснащена системой самодиагностики (так же, как и струйные принтеры Canon). Поэтому, в случае возникновения проблемы, устройство самостоятельно выявит уязвимое место и сообщит Вам об этом миганием соответствующего индикатора на панели управления либо кодом ошибки, выведенным на дисплей принтера.
Если Вы не являетесь мастером по обслуживанию принтеров и МФУ Kyocera, то, чтобы понять, о чем сообщает печатающее устройство, Вам потребуется расшифровать указанный им код. Для этого мы добавили в статью таблицу кодов ошибок лазерных принтеров Kyocera серии FS и не только.
Коды ошибок принтеров и МФУ Kyocera, которые можно исправить самостоятельно
|
Код ошибки |
Значение ошибки |
Решение проблемы |
|
E-0001 (E1) |
Поврежден чип картриджа либо установлен неоригинальный картридж. |
Замените установленный картридж оригинальной версией изделия. Если хотите сэкономить, тогда купите и установите новый чип на картридж или перепрошейте принтер Kyocera. Однако предварительно не помешает попробовать сбросить ошибку соответствующей комбинацией клавиш (как это сделать, читайте в статье «Сброс ошибки установки неоригинального картриджа в принтерах Kyocera»). |
|
E-0002 (E2) |
Регион использования картриджа и принтера не совпадают. |
Замените чип или прошейте принтер Kyocera. |
|
E-0003 (E3) |
Заполнена память принтера или МФУ Kyocera. |
Отпечатайте ранее отсканированные листы или очистите очередь печати нажатием кнопки Стоп/Сброс (ранее отсканированные листы также удалятся из памяти принтера, даже если они еще не были распечатаны). |
|
E-0007 (E7) |
Тонер-картридж Kyocera израсходовал ресурс красящего вещества. |
Замените или заправьте картридж Kyocera (если используете совместимый или перезаправленный расходник, то после установки его в принтер не забудьте сбросить ошибку зажатием на 3-5 секунды кнопок [Ок] и [Сброс/Стоп]). |
|
E-0008 (E8) |
Открыта крышка принтера либо не работает датчик закрытия крышек устройства. |
Откройте и еще раз закройте переднюю и заднюю крышку принтера. Во время закрытия Вы должны услышать характерный щелчок. Если не помогло, то причина в неисправности датчика. |
|
E-0009 (E9) |
Лоток приема бумаги полон. |
Уберите все отпечатанные листы бумаги из выходящего лотка. Чтобы возобновить печать, нажмите кнопку [Старт]. |
|
E-0012 (E12) |
Ошибка памяти принтера Kyocera. |
Попробуйте уменьшить разрешение печати. Скорее всего, формат создаваемого отпечатка не соответствует возможностям принтера. |
|
E-0014 (E14) |
Установлен неверный формат бумаги (неподдерживаемый принтером Kyocera). |
Поменяйте бумагу на поддерживаемую принтером либо смените ее формат в настройках печати. Попробуйте обновить программное обеспечение. Возможно, это расширит поддерживаемые принтером Kyocera форматы. |
|
E-0015 (E15) |
Устройство не подключено к электрической сети либо на компьютере нет (не работает) драйвера принтера Kyocera. |
Проверьте подключение печатающего аппарата к электрической сети, а также целостность кабеля. Если ошибка не исчезает, скачайте драйвер принтера Kyocera и установите его на компьютер. |
|
E-0017 (E17) |
Ошибка передачи данных. |
Проверьте подключение принтера к компьютеру. Кабель не должен быть длиннее 5 метров, а также обязан поддерживать стандарт USB 2.0. Кроме того, переустановите драйвер принтера и утилиту Kyocera Client Tool. |
|
E-0018 (E18) |
Очередь печати заполнена. |
Очистите очередь печати нажатием кнопки [Сброс] либо через драйвер принтера. |
|
E-0019 (E19) |
Неверный формат печати. |
Отмените печать нажатием кнопки [Стоп/Сброс]. Выберите в настройках принтера соответствующий режим печати, а также установите в лоток поддерживаемый принтером формат бумаги. |
|
J-0000 (jam0000) |
Замятие бумаги за задней крышкой. |
Откройте крышку и извлеките бумагу. Проверьте надежность крепления бумаги в лотке, а также принтер на наличие посторонних предметов. Еще причина может быть в пружине выходного флажка. Если она растянулась, то может плохо работать фиксатор. Также проблема может быть из-за печки, сделайте ее ревизию, переборку и смазку. |
|
J-0501 (jam0501) |
Бумага застряла в принтере Kyocera |
Извлеките замятую бумагу. Проверьте надежность установки бумаги во входной лоток. Проверьте целостность роликов протяжки бумаги, а также принтер на наличие посторонних предметов. Если не помогло, стоит внимательно осмотреть ребра на направляющей пластине. На них могут образоваться сколы, трещины и заусенцы. Их можно слегка подчистить наждачной бумагой (нулевкой). |
|
J-0511 (jam0511) |
Принтер Kyocera замял бумагу. |
Извлеките замятую бумагу и повторите печать. Если проблема не исчезла, несите принтер в сервис. Скорее всего, изношен ролик протяжки бумаги. |
|
C7990 |
Бункер драм-картриджа (блока фотобарабана) заполнен отработанным тонером либо неисправен счетчик отработки красящего вещества. Еще проблема может быть в главной плате PWB. |
Осуществите чистку драм-картриджа (блока фотобарабана). Если проблема в датчике или плате, то нужно отнести принтер в СЦ на диагностику. |
|
F248 |
Ошибка обработки отпечатываемого материала. |
Перезагрузите принтер. Уберите неподдерживаемые спецсимволы из отпечатка. Обновите ПО принтера Kyocera. Смените режим работы принтера с PDL на GDI (Пуск -> Принтеры -> Свойства -> Параметры устройства). |
|
PF |
Отсутствует бумага в лотке подачи. |
Загрузите листы бумаги во входной лоток. Если принтер по-прежнему не печатает, значит нужно искать проблему в чем-то другом. |
|
1101 |
Ошибка сканирования через сеть из-за неправильного имени SMTP сервера. |
Пропишите DNS-адреса помимо прочих настроек печати по сети. |
|
1102 |
Некорректная настройка сканера для работы через сеть |
Зайдите в Web-панель управления принтером (нужно в адресную строку браузера ввести iP принтера Kyocera). Далее в зависимости от модели введите логин и пароль (Admin/Admin или просто admin00 без логина). Далее следуйте инструкции:
Логин и пароль нужны обязательно, если их нет, то следует создать. |
|
2101 |
Ошибка передачи данных при сканировании через сеть. |
Правильно настройте параметры (как для ошибки 1102), только предварительно отключите на ПК антивирус и брандмауэр. |
Если Вы испытали все способы, но не смогли убрать ошибку, то следует нести печатающее устройство в сервисный центр. Кроме того, есть ряд ошибок (высвечиваемых на дисплее принтера), которые нельзя устранить в домашних условиях. Соответствующие коды ошибок принтеров Kyocera представляем в очередной таблице.
Коды ошибок принтеров и МФУ Kyocera, которые нужно устранять в сервисном центре
|
Код ошибки |
Значение ошибки |
Решение проблемы |
|
0030 |
Неисправность платы управления факсом принтера. |
Замена платы. |
|
0100 |
Неисправность платы управления или флеш-памяти принтера. |
Замена платы. |
|
0120 |
Ошибка чтения mac-адреса из-за неисправности флеш-памяти принтера. |
Замена платы. |
|
0190 |
Неисправность платы управления или флеш-памяти принтера. |
Замена платы. |
|
0630 |
Неисправность платы управления принтера. |
Замена платы. |
|
1020 |
Неисправность мотора, привода или отсутствие контакта. |
Разборка принтера и замена изношенных частей. Проверка надежности подключений, замена разорванных (прогоревших) кабелей. Ремонт или замена привода мотора. |
|
1040 |
Неисправность мотора, привода или отсутствие контакта. |
Разборка принтера и замена изношенных частей. Проверка надежности подключений, замена разорванных (прогоревших) кабелей. Ремонт или замена привода мотора. |
|
2000 |
Неисправность главной платы управления, соединительного кабеля или привода принтера. |
Проверить ремни, шестерни и ролики привода. Смазать или заменить, если есть дефекты. Заменить привод или главную плату. |
|
3100 (C3100) |
Неисправность главной платы, привода сканера, датчика положения или нарушение целостности соединений. |
Проверить наличие разрывов и отсутствия контакта. Смазать или заменить изношенные элементы привода. Заменить привод, главную плату, датчик или соединительный кабель. Если Вам повезло, то возможно забыли отключить фиксатор блока сканера. |
|
3101 |
Сетевой кабель не подсоединен, или нарушена работа концентратора. Еще может быть из-за наличия вирусов в системе или неправильно заданным параметрам сервера SMTP. |
Проверить соединения, правильно настроить параметры сети. |
|
3300 |
Неисправность главной платы, датчика CIS или соединительного кабеля. |
Проверить контакты, заменить плату или датчик. |
|
3500 |
Неисправность главной платы или нарушение соединения контактов. |
Проверить контакты, заменить плату. |
|
4000 (C4000) |
Неисправность главной платы, привода сканера или нарушение соединений. Однако чаще всего ошибка лазера. |
Проверить контакты, заменить плату или привод блока сканера. Почистить лазер, смазать ось полигон-мотора, либо полностью заменить блок лазера. |
|
4200 |
Неисправность главной платы, блока сканера или датчика BD. |
Отключить питание принтера на 30 минут. Если не помогло, то следует заменить привод сканера или главную плату принтера. |
|
6000 (С6000) |
Неисправность главной платы, термостата, печки или нарушение соединения контактов. |
Проверить и поправить контакты. Заменить фьюзер. Ремонт или замена печки, термодатчика, термопредохранителя и т.д. |
|
6020 |
Сгорание термистора или главной платы. |
Замена термистора или главной платы. |
|
6030 |
Неисправность главной платы, термостата или термистора. Возможно, причина в отсутствии контакта. |
Проверить соединения. Заменить плату, термостат или термистор. |
|
6400 |
Неисправность главной платы, отсутствие питания или контакта. |
Заменить плату или источник питания. |
|
F000 |
Неисправность главной платы или отсутствие контакта. |
Проверить соединение ремня безопасности. Заменить ремень или плату управления. |
|
F020 |
Неисправность элементов памяти принтера. |
Перезагрузить принтер. Если ошибка не устранилась – заменить плату управления. |
|
F040 |
Неисправность главной платы принтера. |
Перезагрузить принтер. Если ошибка не устранилась – заменить плату управления. |
|
F05D |
Неисправность главной платы. Сбой программного оборудования привода. Проблемы с прошивкой принтера Kyocera. |
Перезагрузить принтер. Если ошибка не устранилась – заменить плату управления. Перепрошить принтер Kyocera. |
|
F245 F246 F247 F375 |
Принтер Kyocera заблокирован из-за проблемы, вызванной отказом источника питания. |
Нужно перепрошить принтер специальной сервисной микропрограммой. |
Обратите внимание: Если у печатающего устройства нет дисплея, то определить проблему можно по светодиодным индикаторам, встроенным в панель управления принтером. Например, у Kyocera Ecosys P2135D нужно сосчитать количество миганий индикаторов красного цвета и таким образом определить число, указывающее на ту или иную ошибку. В свою очередь, у модели Kyocera FS-1040 все зависит от темпа мигания светодиода с надписью «Внимание!» («Attention!»):
- Мигает медленно – указывает на отсутствие бумаги в лотке или тонера в картридже.
- Мигает быстро – оповещает о проблеме с памятью устройства, переполненном лотке или замятии бумаги, а также об использовании неоригинальных расходных материалов.
- Горит постоянно – говорит о проблемах с картриджем или фотобарабаном либо указывает на открытые крышки принтера.

Чтобы потребитель мог наверняка определить проблему, рекомендуем использовать утилиту Kyocera Client Tool, которая идет в комплекте с драйверами принтера.
Ваше Имя:
Ваш вопрос:
Внимание: HTML не поддерживается! Используйте обычный текст.
Оценка:
Плохо
Хорошо
Введите код, указанный на картинке:


Информация, приведенная в этой статье, актуальна для аппаратов Kyocera: P2035d, P2135d, P2135dn, M2030dn, M2030dn, M2530dn, M2035dn, M2035dn, M2535dn, M2535dn, FS-1300D, FS-1350DN, FS-1120D, FS-1320D, FS-1370DN, FS-1030MFP, FS-1030MFP, FS-1130MFP, FS-1130MFP, FS-1035MFP, FS-1035MFP, FS-1035MFP, FS-1135MFP, FS-1135MFP, FS-1135MFP.
Первое, с чего начинается любой ремонт принтера Kyocera – выявление неисправности. Процесс диагностики современным мастерам существенно упрощают специальные коды ошибок, которые появляются на дисплее МФУ при его неисправности. Впрочем, эти коды могут быть полезны не только профессиональному мастеру, которого отправил к вам сервисный центр Kyocera. Опытный пользователь, глядя на код, сможет сам диагностировать проблему и даже исправить ее. Хороший пример этого – ошибки J4201/J4202/J4203/J4208/J4209, которые аппарат выдает при замятии в зоне узла термофиксации в процессе двухсторонней печати.
Главный специалист Антон Суджиков

Задать вопрос
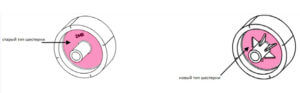
В аппаратах Kyocera данных серий до февраля 2015 года устанавливалась шестерня без ребер жесткости, что и провоцировало ее частое повреждение.
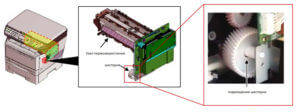
В Феврале 2015 года выпустили модификацию данной шестерни.
При должной сноровке заменить данную шестерню можно за 30-40 минут самостоятельно. Но если вы не уверены в своих силах на все 100%, то лучше доверить работу профессиональному мастеру из сервисного центра Kyocera. Еще один повод сделать так – при ремонте МФУ вне сервисного центра на аппарат перестает действовать гарантия. Будьте внимательны к своей технике и доверяйте ее ремонт и обслуживание только профессионалам – и тогда она прослужит вам долгие годы!
Модератор: vetal

![]() Andreyak777 » Пн дек 05, 2016 7:04 pm
Andreyak777 » Пн дек 05, 2016 7:04 pm
То, что другие люди говорят обо мне, никак не характеризует меня. Зато отлично характеризует их.
-

Andreyak777
- Избран тонером
-

![]()
![]() GreeNLighT » Пн дек 05, 2016 8:19 pm
GreeNLighT » Пн дек 05, 2016 8:19 pm


Andreyak777 писал(а):а сам тракт обрабатывали от заусенцев??
Иногда один лист проходит, полностью, нормально, то-есть тракт без препятствий, когда лист останавливается на нём нет следов уперания во что либо
Добавлено спустя 6 минут 8 секунд:
Emperor RmPS писал(а):Дефект постоянный или периодический?
С ручной подачи нормально проходит?
Кассеты ставились с заведомо исправных аппаратов?
Очень редко один лист пройдёт, и на выходе остановится не выйдя на пару сантиметров. При этом следующие листы останавливаются внутри тракта — это когда ставишь задание на несколько копий. А так в основном то замятие внутри, то замятие в кассете. Кассеты ставил и с рабочих и с аппаратов с похожей проблемой, ранжировал как мог(всего с 15 аппаратов имеется, в числе которых рабочие). С ручного лотка писал что всё идеально
-
GreeNLighT
- Добрался до абсорбера
-

- Сайт
- Персональный альбом
![]()
![]() dviz » Пн дек 05, 2016 8:45 pm
dviz » Пн дек 05, 2016 8:45 pm
Буквально пару дней назад был 1030 с почти такой же проблемой — либо 0501 либо 4201 и с бокового лотка — всё идеально. Долго ковырялся, много чего перепробовал, в итоге — муфты почистил (одну заменил), почистил-смазал втулки роликов регистрации, заменил ролики подачи, и самое главное, что помогло — растянул пружинку ролика отделения в кассете — фишка в том, что бумага протягивается между роликом отделения и роликом протяжки, и, если они слабо друг к другу прижимаются, то и бумагу слабо протягивают — она еле-еле доходит датчика регистрации, он срабатывает, валы регистрации начинают крутиться, механизм формирования изображения запускается, но бумага ещё в паре мм от валов регистрации. Чтобы её туда затянуло, вместе с ними снова начинают вращаться ролики отделения и протяжки, которые должны подтолкнуть бумагу к валам регистрации, а если они слабо прижаты друг к другу или муфта подачи проскальзывает, или есть помехи в тракте подачи, то всё это происходит с запозданием и имеем в итоге либо смещение изображения вверх, либо замятие 4201 с опять же смещением изображения вверх. Ещё конкретные причины плохой протяжки из лотка — изношенные пластиковые направляющие на самом лотке, или раздолбаны направляющие лотка и он болтается на своём месте.
- За это сообщение автора dviz поблагодарил:
- Akari
-
dviz
- Эксперт по тонеру
-
- Персональный альбом

![]()
![]() Emperor RmPS » Пн дек 05, 2016 8:56 pm
Emperor RmPS » Пн дек 05, 2016 8:56 pm
dviz писал(а):Буквально пару дней назад был 1030 с почти такой же проблемой — либо 0501 либо 4201 и с бокового лотка — всё идеально. Долго ковырялся, много чего перепробовал, в итоге — муфты почистил (одну заменил), почистил-смазал втулки роликов регистрации, заменил ролики подачи, и самое главное, что помогло — растянул пружинку ролика отделения в кассете — фишка в том, что бумага протягивается между роликом отделения и роликом протяжки, и, если они слабо друг к другу прижимаются, то и бумагу слабо протягивают — она еле-еле доходит датчика регистрации, он срабатывает, валы регистрации начинают крутиться, механизм формирования изображения запускается, но бумага ещё в паре мм от валов регистрации. Чтобы её туда затянуло, вместе с ними снова начинают вращаться ролики отделения и протяжки, которые должны подтолкнуть бумагу к валам регистрации, а если они слабо прижаты друг к другу или муфта подачи проскальзывает, или есть помехи в тракте подачи, то всё это происходит с запозданием и имеем в итоге либо смещение изображения вверх, либо замятие 4201 с опять же смещением изображения вверх. Ещё конкретные причины плохой протяжки из лотка — изношенные пластиковые направляющие на самом лотке, или раздолбаны направляющие лотка и он болтается на своём месте.
Вообще лотки чудны эти, в плане этой ошибки, куча неисправностей — пружина, пластиковая серая защелка над роликом, сам ролик, ограничитель бумаги, и хер пойми что. В одном случае вообще новый лоток так косячил.
-

Emperor RmPS
- Пьет чернила
-
- Персональный альбом

![]()
![]() СТРОНЦИЙ » Вт дек 06, 2016 9:53 am
СТРОНЦИЙ » Вт дек 06, 2016 9:53 am
dviz писал(а):Ещё и морда у него отрывается постоянно

О какой конкретно «морде» идет речь. Я чет не наблюдал ничего подобного.
GreeNLighT писал(а):попробую поотгибаю пружины…
И как это по влияет на погоду ?
-

СТРОНЦИЙ
- Починил копир!
-
- ICQ
- Персональный альбом

![]()
![]() GreeNLighT » Вт дек 06, 2016 1:03 pm
GreeNLighT » Вт дек 06, 2016 1:03 pm
В итоге всё решилось очень банально, и очень глупая получилась ситуация — на складе были ролики чёрного цвета(вроде бы оригинал) но оказались они китаися(хотя текстура даже была очень похожа на оригинал), взял другие ролики протяжки и захвата,которые точно оригинал и всё пошло как по маслу(слышно как бумага аж залетает с лотка), ролик отделения оставил китай(вроде не влияет). Очень всё странно это — т.к. ставил в другие аппараты ещё хуже китай, и всё было хорошо. Пружинку ролика отделения на всякий случай растянул, думаю не помешает. Всем спасибо за дельные советы!
СТРОНЦИЙ писал(а):О какой конкретно «морде» идет речь. Я чет не наблюдал ничего подобного.
По непонятным причинам разбалтывается крышка лотка ручной подачи(или отламываются крепления) — уже не раз приходят аппараты с вываливающимся лотком ручной подачи.
СТРОНЦИЙ писал(а):И как это по влияет на погоду ?
Возможно никак. Но поставил лоток со слабой пружиной и разок получил замятие, лучше уж растянуть на всякий.
-
GreeNLighT
- Добрался до абсорбера
-
- Сайт
- Персональный альбом
![]()
-
-
[SCANNER ERROR] Lamp Error Kyocera FS-1016
мастерчип в форуме Принтеры, МФУ, факсы, копиры формата A4
- 3
- 6645
Усатый Полосатый

Вс окт 28, 2018 11:08 pm
-
[SCANNER ERROR] Lamp Error Kyocera FS-1016
-
-
Kyocera 1035 «бледная» печать
srMax в форуме Принтеры, МФУ, факсы, копиры формата A4
- 2
- 13949
srMax
Пт янв 23, 2015 2:49 pm
-
Kyocera 1035 «бледная» печать
-
-
Kyocera FS-1120d индикатор «Нет бумаги»
vs-dos в форуме Принтеры, МФУ, факсы, копиры формата A4
- 11
- 15142
СТРОНЦИЙ
Вт ноя 02, 2021 2:24 pm
-
Kyocera FS-1120d индикатор «Нет бумаги»
-
-
Стирание вала ведущей шестерни в «печке» Kyocera M2035dn
Грецкий орех в форуме Принтеры, МФУ, факсы, копиры формата A4
- 12
- 3468
СТРОНЦИЙ
Пн дек 13, 2021 3:35 pm
-
Стирание вала ведущей шестерни в «печке» Kyocera M2035dn
-
-
Kyocera taskalfa 3501 «открыта крышка основного блока»
Юрий Яраскин в форуме Принтеры, МФУ, копиры формата A3
- 3
- 2892
Goldwater
Пт сен 10, 2021 1:31 pm
-
Kyocera taskalfa 3501 «открыта крышка основного блока»
Вернуться в Принтеры, МФУ, факсы, копиры формата A4
Кто сейчас на форуме
Сейчас этот форум просматривают: нет зарегистрированных пользователей и гости: 165