
Windows 8 Enterprise Windows 8 Pro Windows 8 Windows 7 Enterprise Windows 7 Professional Windows 7 Ultimate Windows 7 Home Premium Windows 7 Home Basic Windows 7 Starter Windows Vista Enterprise Windows Vista Ultimate Windows Vista Business Windows Vista Home Premium Windows Vista Home Basic Windows Vista Starter Microsoft Windows XP Professional Microsoft Windows XP Home Edition Microsoft Windows XP Starter Edition More…Less
Summary
When you try to access or work with files and folders in Windows, you experience one or more of the following issues:
-
Issue 1: You receive an «Access Denied» error message or a similar message.
-
Issue 2: You cannot access, change, save, or delete files and folders.
-
Issue 3: You cannot open a file or folder after you install a new version of Windows.
Resolution
To resolve a particular issue, follow the steps for the issue that best describes your situation. Use the method for your version of Windows.
Note You may not always receive an “Access Denied” error message for these kinds of issues. If particular steps do not resolve the issue, try a different set of steps.
Cause
An «Access Denied» error message can occur for one or more of the following reasons:
-
The folder ownership has changed.
-
You do not have the appropriate permissions.
-
The file is encrypted.
Resolution
Windows 8
You may not have ownership of a file or folder
If you recently upgraded your computer to Windows 8 from an earlier version of Windows, some of your account information may have changed. Therefore, you may no longer have ownership of some files or folders. You might be able to resolve this issue by restoring your ownership of the files and folders.
To take ownership of a file or folder, follow these steps:
-
Press and hold the folder that you want to take ownership of, then tap Properties. (If you are using a mouse, right-click the folder, and then click Properties.)
-
Tap or click the Security tab, tap or click Advanced, then tap or click Change. If you are prompted for an administrator password or for confirmation, type the password or provide confirmation.
-
Type the name of the person that you want to give ownership to, and then click Check Names.
Note The account name for the person that you are assigning ownership to is displayed.
-
Click OK.
-
If you want this person to be the owner of the files and subfolders that are contained in this folder, select the Replace owner on subcontainers and objects check box.
-
Click OK.
You may not have the appropriate permissions
Issues that you experience when you try to access files and folders may be related to permissions. Permissions are rules that determine whether you can access or change files and folders. To check permissions on a file or folder, follow these steps:
-
Press and hold or right-click the file or folder, and then click Properties.
-
Tap or click the Security tab.
-
Under Group or user names, tap or click your name to see the permissions that you have.
To open a file, you have to have the Read permission. To change the permissions of a file or folder, follow these steps.
Important You must be logged on as an administrator to change permissions on files and folders.
-
Press and hold or right-click the file or folder, and then tap or click Properties.
-
Tap or click the Security tab.
-
Under Group or user names, tap or click your name to see the permissions that you have.
-
Tap or click Edit, tap or click your name, select the check boxes for the permissions that you must have, and then click OK.
The file or folder may be encrypted
Encryption can help protect files and folders from unwanted access. You cannot open an encrypted file or folder without the certificate that was used to encrypt it. To determine whether a file or folder is encrypted, follow these steps:
-
Press and hold or right-click the file or folder, and then tap or click Properties.
-
Tap or click the General tab, and then tap or click Advanced.
If the Encrypt contents to secure data check box is selected, you have to have the certificate that was used to encrypt the file or folder to be able to open it. In this situation, you should obtain the certificate from the person who created or encrypted the file or folder, or have that person decrypt the file or folder.
Windows 7
You may not have ownership of a file or folder
If you recently upgraded your computer to Windows 7 from an earlier version of Windows, some of your account information may have changed. Therefore, you may no longer have ownership of some files or folders. You might be able to resolve this issue by restoring your ownership of the files and folders.
To take ownership of a file or a folder, follow these steps:
-
Right-click the folder that you want to take ownership of, then click Properties.
-
Click the Security tab, click Advanced, then click the Owner tab.
-
Click Edit.
Note If you are prompted for an administrator password or for confirmation, type the password or provide confirmation.
-
Click the name of the person that you want to give ownership to.
-
If you want this person to be the owner of files and subfolders in this folder, select the Replace owner on subcontainers and objects check box.
-
Click OK.
You may not have the appropriate permissions
Issues that you experience when you try to access files and folders may be related to permissions. Permissions are rules that determine whether you can access or change files and folders. To determine the permissions of the file or folder, follow these steps:
-
Right-click the file or folder, then click Properties.
-
Click the Security tab.
-
Under Group or user names, click your name to see the permissions that you have.
To open a file, you have to have the Read permission. To change permissions on a file or folder, follow these steps.
Important You must be logged on as an administrator to change permissions on files and folders.
-
Right-click the file or folder, and then click Properties.
-
Click the Security tab.
-
Under Group or user names, click your name to see the permissions that you have.
-
Click Edit, click your name, select the check boxes for the permissions that you must have, and then click OK.
For more information about permissions, see What are permissions?.
The file or folder may be encrypted
Encryption can help protect files and folders from unwanted access. You cannot open an encrypted file or folder without the certificate that was used to encrypt it. To determine whether a file or folder is encrypted, follow these steps:
-
Right-click the file or folder, and then click Properties.
-
Click the General tab, then click Advanced.
If the Encrypt contents to secure data check box is selected, you have to have the certificate that was used to encrypt the file or folder to be able to open it.
You should obtain the certificate from the person who created or encrypted the file or folder, or have that person decrypt the file or folder.
For more information, see Import or export certificates and private keys.
Cause
A problem that prevents you from accessing or working with files and folders can occur for one or more of the following reasons:
-
The folder ownership has changed
-
You do not have the appropriate permissions
-
The file is encrypted
-
The file is corrupted
-
The user profile is corrupted
Resolution
Windows 8
You may not have ownership of a file or folder
If you recently upgraded your computer to Windows 8 from an earlier version of Windows, some of your account information may have changed. Therefore, you may no longer have ownership of some files or folders. You might be able to resolve this issue by restoring your ownership of the files and folders.
To take ownership of a file or folder, follow these steps:
-
Press and hold the folder that you want to take ownership of, then tap Properties. (If you are using a mouse, right-click the folder, and then click Properties.)
-
Tap or click the Security tab, tap or click Advanced, then tap or click Change. If you are prompted for an administrator password or for confirmation, type the password or provide confirmation.
-
Type the name of the person that you want to give ownership to, and then click Check Names.
Note The account name for the person that you are assigning ownership to is displayed.
-
Click OK.
-
If you want this person to be the owner of the files and subfolders that are contained in this folder, select the Replace owner on subcontainers and objects check box.
-
Click OK.
You may not have the appropriate permissions
Issues that you experience when you try to access files and folders may be related to permissions. Permissions are rules that determine whether you can access or change files and folders. To check permissions on a file or a folder, follow these steps:
-
Press and hold or right-click the file or folder, and then click Properties.
-
Tap or click the Security tab.
-
Under Group or user names, tap or click your name to see the permissions that you have.
To open a file, you have to have the Read permission. To change the permissions of a file or folder, follow these steps.
Important You must be logged on as an administrator to change permissions on files and folders.
-
Press and hold or right-click the file or folder, and then tap or click Properties.
-
Tap or click the Security tab.
-
Under Group or user names, tap or click your name to see the permissions that you have.
-
Tap or click Edit, tap or click your name, select the check boxes for the permissions that you must have, and then click OK.
For more information about permissions, see What are permissions?.
The file or folder may be encrypted
Encryption can help protect files and folders from unwanted access. You cannot open an encrypted file or folder without the certificate that was used to encrypt it. To determine whether a file or folder is encrypted, follow these steps:
-
Press and hold or right-click the file or folder, and then tap or click Properties.
-
Tap or click the General tab, and then tap or click Advanced.
If the Encrypt contents to secure data check box is selected, you have to have the certificate that was used to encrypt the file or folder to be able to open it. In this situation, you should obtain the certificate from the person who created or encrypted the file or folder, or have that person decrypt the file or folder.
The file or folder may be corrupted
Files can become corrupted for several reasons. The most common reason is that you have a file open when your computer crashes or loses power. Most corrupted files cannot be repaired. In this situation, you should either delete the file or restore the file from a backup copy.
For more information about corrupted files and how to fix them, see Corrupted files: frequently asked questions.
Your local user profile may be corrupted
Occasionally, Windows might not read your local user profile correctly. This may prevent you from accessing files and folders. In this situation, you may have to use a new local user profile. To create the profile, you must first create a local user account. When the new account is created, the profile is also created. To create a local user account, follow these steps:
-
Swipe from the right edge of the screen, tap Settings, and then tap Change PC settings. (If you are using a mouse, point to the upper-right corner of the screen, move the mouse pointer down, click Settings, and then click Change PC settings)
-
In the navigation pane, tap or click Users.
-
Tap or Click Add a User, then tap or click Can they sign in without a Microsoft account?
-
Tap or click Local account.
-
Enter your new account name.
-
If you want to use a password, enter and verify the password that you want to use. If you decide not to use a password, tap or click Next without entering a password.
-
Tap or click Finish.
Windows 7
You may not have ownership of a file or folder
If you recently upgraded your computer to Windows 7 from an earlier version of Windows, some of your account information may have changed. Therefore, you may no longer have ownership of some files or folders. You might be able to resolve this issue by restoring your ownership of the files and folders.
To take ownership of a file or a folder, follow these steps:
-
Right-click the folder that you want to take ownership of, and then click Properties.
-
Click the Security tab, click Advanced, and then click the Owner tab.
-
Click Edit. If you are prompted for an administrator password or for confirmation, type the password or provide confirmation.
-
Click the name of the person that you want to give ownership to.
-
If you want that person to be the owner of files and subfolders in this folder, select the Replace owner on subcontainers and objects check box.
-
Click OK.
You may not have the appropriate permissions
Issues that you experience when you try to access files and folders may be related to permissions. Permissions are rules that determine whether you can access or change files and folders. To check permissions on a file or a folder, follow these steps:
-
Press and hold or right-click the file or folder, and then click Properties.
-
Tap or click the Security tab.
-
Under Group or user names, tap or click your name to see the permissions that you have.
To open a file, you have to have the Read permission. To change permissions on a file or folder, follow these steps.
Important You must be logged on as an administrator to change permissions on files and folders.
-
Right-click the file or folder, and then click Properties.
-
Click the Security tab.
-
Under Group or user names, click your name to see the permissions you have.
-
Click Edit, click your name, select the check boxes for the permissions that you must have, and then click OK.
For more information about permissions, see What are permissions?.
The file or folder may be encrypted
Encryption can help protect files and folders from unwanted access. You cannot open an encrypted file or folder without the certificate that was used to encrypt it. To determine whether a file or folder is encrypted, follow these steps:
-
Right-click the file, then click Properties.
-
Click the General tab, and then click Advanced.
If the Encrypt contents to secure data check box is selected, you have to have the certificate that was used to encrypt the file or folder to be able to open it.
You should obtain the certificate from the person who created the file. For more information, see Import or export certificates and private keys.
The file or folder may be corrupted
Files can become corrupted for several reasons. The most common reason is that you have a file open when your computer crashes or loses power. Most corrupted files cannot be repaired. In this situation, you should either delete the file or restore the file from a backup copy.
For more information about corrupted files and how to fix them, see Corrupted files: frequently asked questions.
Your user profile may be corrupted
Occasionally, Windows might not read your local user profile correctly. This may prevent you from accessing files and folders. In this situation, you may have to use a new local user profile. To create the profile, you must first create a local user account. When the new account is created, the profile is also created.
For more information about how to create user profiles, see Fix a corrupted user profile. After the new user profile is created, you can copy your existing user files to the new profile so that you can access them.
Cause
Problems that prevent you from accessing files and folders after you upgrade to a new version of Windows can occur for one or more of the following reasons:
-
The folder ownership has changed.
-
The files are being stored in a Windows.old folder from your previous system.
Resolution
Windows 8
You may not have ownership of a file or folder
If you recently upgraded your computer to Windows 8 from an earlier version of Windows, some of your account information may have changed. Therefore, you may no longer have ownership of some files and folders. You might be able to resolve this issue by restoring your ownership of the files and folders.
To take ownership of a file or a folder, follow these steps:
-
Press and hold the folder that you want to take ownership of, then tap Properties. (If you are using a mouse, right-click the folder, and then click Properties.)
-
Tap or click the Security tab, tap or click Advanced, then tap or click Change. If you are prompted for an administrator password or for confirmation, type the password or provide confirmation.
-
Type the name of the person that you want to give ownership to, and then click Check Names.
Note The account name for the person that you are assigning ownership to is displayed.
-
Click OK.
-
If you want this person to be the owner of the files and subfolders that are contained in this folder, select the Replace owner on subcontainers and objects check box.
-
Click OK.
You have to recover files from the Windows.old folder
If you recently upgraded your computer to Windows 8 from an earlier version of Windows, and you did not reformat the hard disk, you might still be able to access your old files from the Windows.old folder.
To fix this problem automatically, click the Fix it button or link. In the File Download dialog box, click Run, and then follow the steps in the Fix it Wizard. If you prefer to fix this problem yourself, go to the «Let me fix it myself» section.
Fix it for me
Notes
-
This wizard may be in English only. However, the automatic fix also works for other language versions of Windows.
-
If you are not on the computer that has the problem, save the Fix it solution to a flash drive or a CD, and then run it on the computer that has the problem.
Let me fix it myself
To manually retrieve the files, follow these steps:
-
Open the desktop, tap the folder icon, and then click Computer. Or, press the Windows logo key+E.
-
Double-tap or double-click the drive that Windows is installed on (typically, drive C).
-
Double-tap or double-click the Windows.old folder.
-
Double-tap or double-click the Users folder.
-
Double-tap or double-click your user name.
-
Open the folders that contain the files that you want to retrieve. For example, to retrieve files in the Documents folder, double-tap or double-click Documents.
-
Copy the files that you want from each folder and paste them to a folder in Windows 8. For example, if you want to retrieve everything from the Documents folder, copy all the files and folders from the Documents folder in the Windows.old folder, and then paste them to the Documents library in Windows 8.
-
Repeat steps 5-7 for each user account on your computer.
For more information about how to recover data from an earlier version of Windows, see Recover lost or deleted files.
Windows 7
You may not have ownership of a file or folder
If you recently upgraded your computer to Windows 7 from an earlier version of Windows, some of your account information may have changed. Therefore, you may no longer have ownership of some files and folders. You might be able to resolve this issue by restoring your ownership of the files and folders.
To take ownership of a file or a folder, follow these steps:
-
Right-click the folder that you want to take ownership of, and then click Properties.
-
Click the Security tab, click Advanced, and then click the Owner tab.
-
Click Edit. If you are prompted for an administrator password or confirmation, type the password or provide confirmation.
-
Click the name of the person that you want to give ownership to.
-
If you want that person to be the owner of files and subfolders in this folder, select the Replace owner on subcontainers and objects check box.
-
Click OK.
You may have to recover files from the Windows.old folder
If you recently upgraded your computer to Windows 7 from an earlier version of Windows, and you did not reformat your hard disk, you might still be able to access your old files from the Windows.old folder.
To fix this problem automatically, click the Fix it button or link. In the File Download dialog box, click Run, and then follow the steps in the Fix it Wizard.If you prefer to fix this problem yourself, go to the «Let me fix it myself» section.
Fix it for me
Notes
-
This wizard may be in English only. However, the automatic fix also works for other language versions of Windows.
-
If you are not on the computer that has the problem, save the Fix it solution to a flash drive or a CD, and then run it on the computer that has the problem.
Let me fix it myself
To manually retrieve the files, follow these steps:
-
Click Start, then click Computer.
-
Double-click the drive that Windows is installed on (typically, drive C).
-
Double-click the Windows.old folder.
-
Double-click the Users folder.
-
Double-click your user name.
-
Open the folders that contain the files that you want to retrieve. For example, to retrieve files in the Documents folder, double-click Documents.
-
Copy the files that you want from each folder and paste them to a folder in Windows 7. For example, if you want to retrieve everything from the Documents folder, copy all the files and folders from the Documents folder in the Windows.old folder, and then paste them to the Documents library in Windows 7.
-
Repeat steps 5-7 for each user account on your computer.
For more information about how to recover data from an earlier version of Windows, see Recover lost or deleted files.
Need more help?
Want more options?
Explore subscription benefits, browse training courses, learn how to secure your device, and more.
Communities help you ask and answer questions, give feedback, and hear from experts with rich knowledge.
Linux is a community of open-source Unix-like operating systems that are based on the Linux Kernel. Linux distributions are constructed in such a secured way that a user cannot make changes unless he/she has administration access. Users who are first time exploring Linux encounter the problem of Permission being Denied. In this article, we will learn how to fix them with the following methods.
- Sudo command missing
- Insufficient permissions to access the files
- Change ownership of the file
Let’s explore all the methods one by one.
Method 1: Sudo command missing
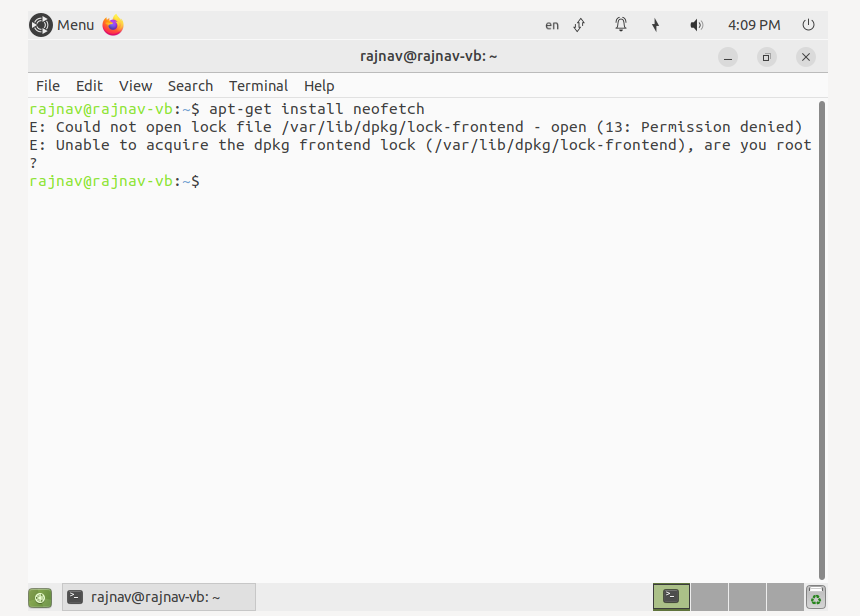
Step 1: This is one of the very common mistakes that experienced Linux users also make and has nothing wrong with your system or files. The sudo command allows you to access the files, and folders, and change settings that are accessible to only a root user. For example, here we are installing a new application and the user who is installing should be a root user.
First, we enter the command
apt-get install neofetch
And we get the following error.
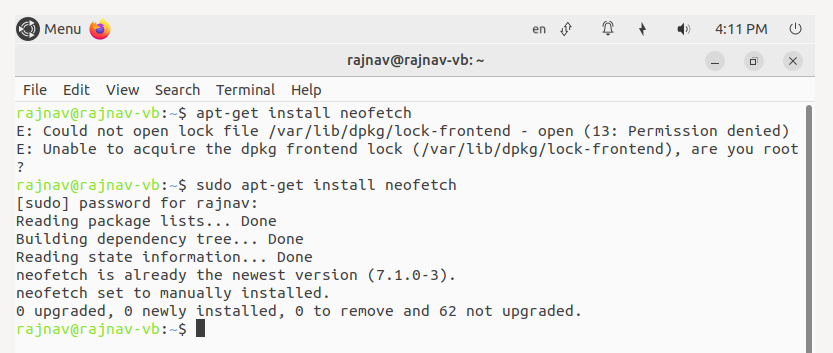
Step 2: Now add the sudo command, after entering the following command, you are required to enter the password.
sudo apt-get install neofetch
The output is as follows:
Method 2: Insufficient permissions to access the files
Step 1: Some files don’t have the required permission for accessing. In the following example, we want to read a file but we don’t have sufficient permissions.
$ cat geeks.txt
The output is

Step 2: Now we will change the access permission using the chmod command. The +rwx adds the read-write access.
$ chmod +rwx geeks.txt
$ cat geeks.txt
The output is as follows

The chmod has the following commands:
- r: It means the read permission.
- w: It means write permissions
- x: It means execution permissions.
- +: It provides permission.
- –: It removes the permission.
Method 3: Change ownership of the file
This also gives a Permission Denied error to a user in a mixed system when the user doesn’t have the access to a particular file. We can add users using the chown command.
Step 1: First, check the users who have access using the following command.
ls -l
Only a single user and a single group have access to read, write and execute as can be seen in the output.

Step 2; Now add the user geeks using the following command.
sudo chown geeks geeks.txt
Now check the owners of the file. The output is as follows:

So the user geeks now has the access to the text file.
Last Updated :
03 Jun, 2022
Like Article
Save Article
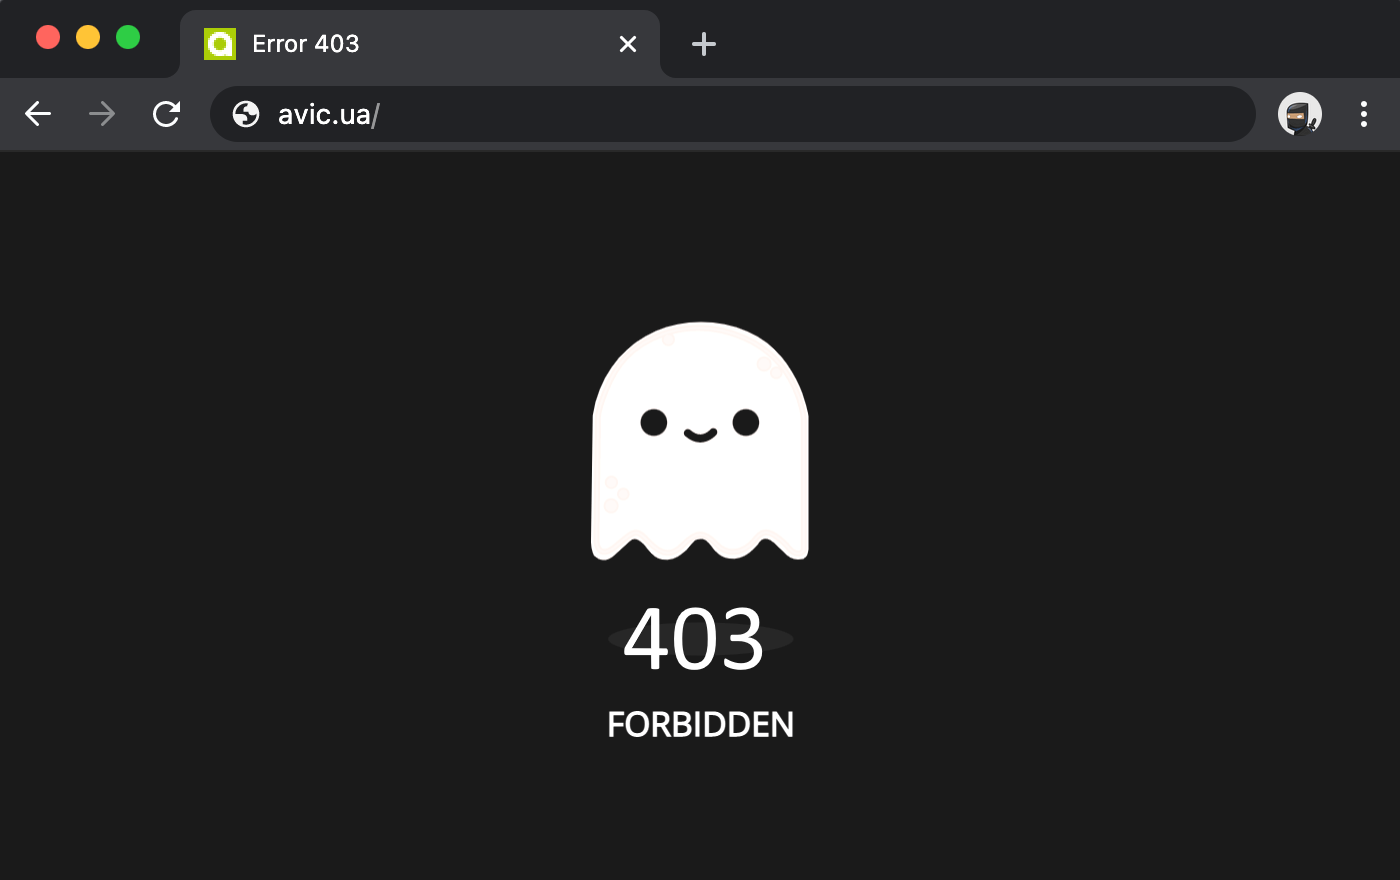
Ошибка 403 (error 403 Forbidden) — это ответ сервера, который отправляется, когда доступ к странице запрещен или ограничен по ряду причин.
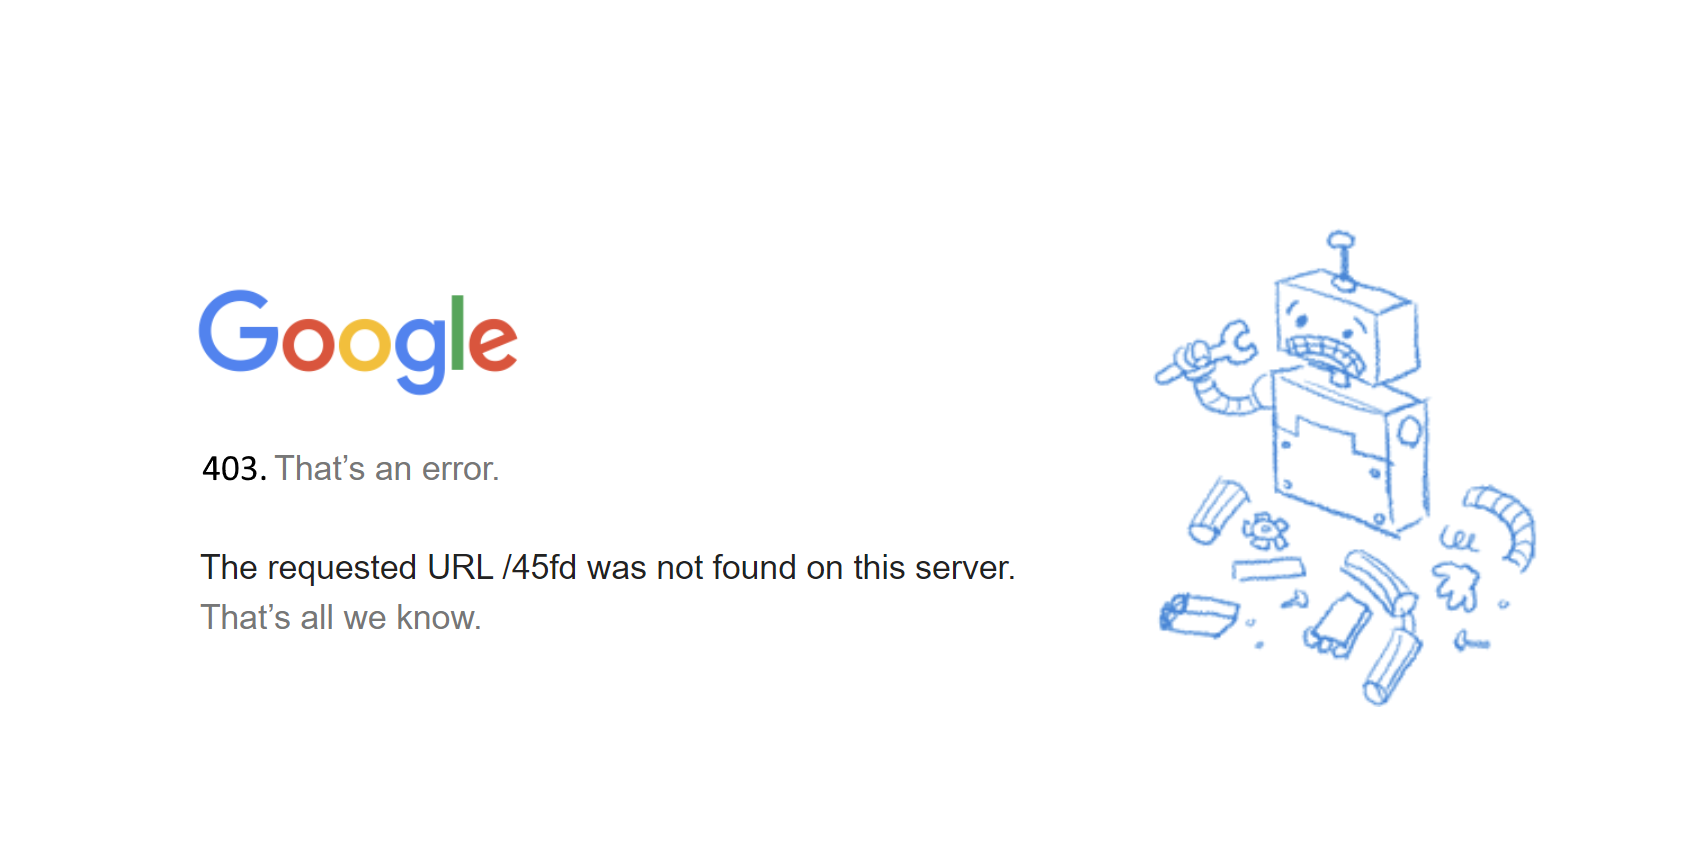
Текстовое описание ошибки может варьироваться. Вот некоторые вариации:
- 403 Forbidden.
- Access denied.
- «В доступе отказано».
- Forbidden.
- You don’t have permission to access.
- Запрещено 403.
Перепутать ошибку с другими сложно, так как на странице обязательно будет указан код ошибки 403.

Как исправить ошибку 403
Почему возникает ошибка? Самый частый вариант — у пользователя недостаточно прав для просмотра страницы или контента на ней. Запрет с кодом 403 может установить администратор сети, администратор сервера, провайдер или разработчик.
Чаще всего причины появления ошибки связаны с проблемами на стороне сайта. Ниже отметим самые распространенные причины ошибки и расскажем, как исправить ситуацию.
Не успел обновиться кэш DNS серверов
Эта проблема часто возникает при переносе домена между разными регистраторами, а также при попытках перенести домен на разные аккаунты у одного регистратора.
Решение: подождать. Обновление DNS записей, как правило, может занимать от 4 до 24 часов.
Ошибку вызывает плагин
Вспомните, какие плагины вы устанавливали в последнюю неделю. Если найти виновника таким образом не удается, можно начать отключать каждый плагин по отдельности, поочередно проверяя доступность проблемной страницы.
Решение: найти проблемное расширение и отключить его.
Доступ к сайтам ограничен для пользователей из определенного местоположения
Одна из самых актуальных причин ошибки 403 в последние месяцы у россиян. Дело в том, что многие английские, украинские и европейские сайты начали блокировать доступ по географическому признаку. В итоге при попытке открыть любую страницу такого сайта вы увидите ошибку.
Решение: воспользоваться VPN-сервисом.
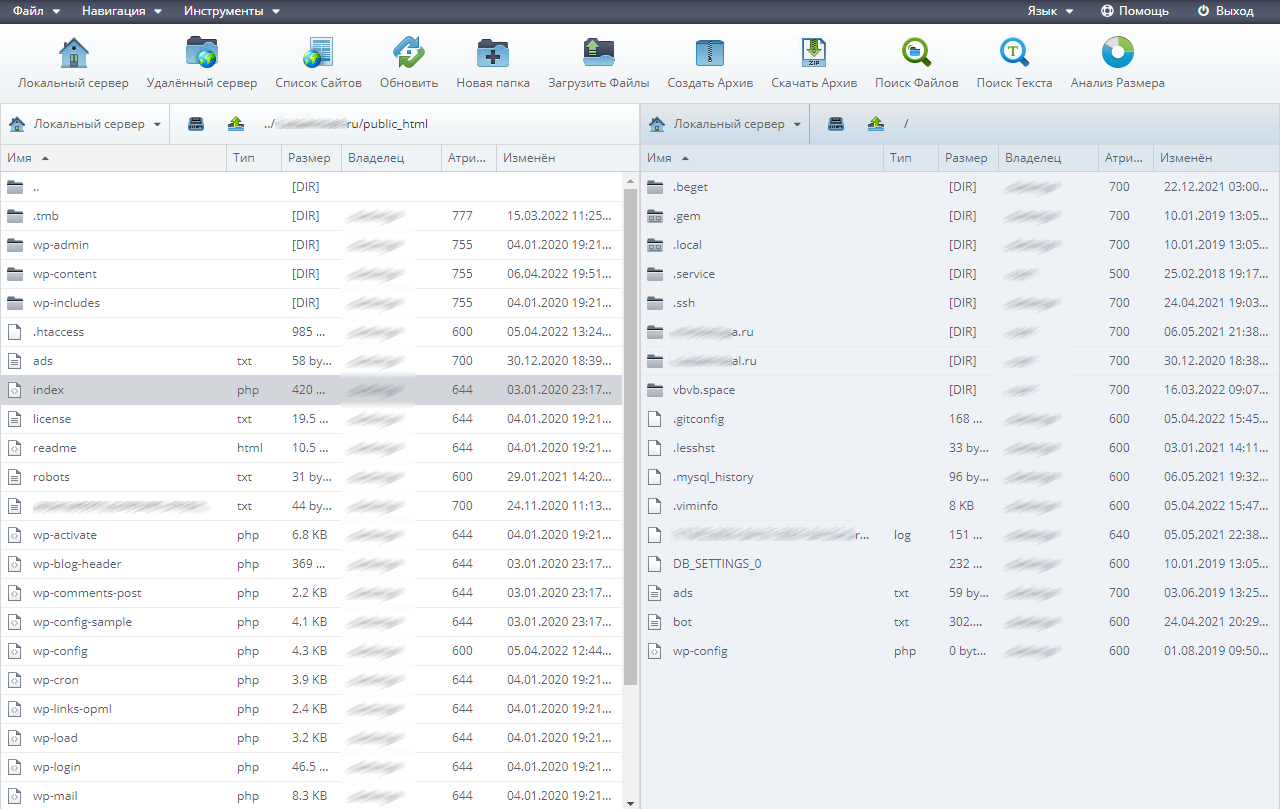
Некорректный файл индекса сайта
Одна из самых частых причин ошибки на всех страницах сайта. Суть в том, что индексный файл располагается в некорректной директории, вовсе отсутствует или имеет неправильный формат.
Индексный файл — это index.html, который используется, чтобы указать главную страницу сайта. Этот файл всегда должен находиться в корневой папке сайта.
Решение: проверить индексный файл своего сайта. Для этого откройте файловый менеджер используемого хостинга и найдите файл со словом index.
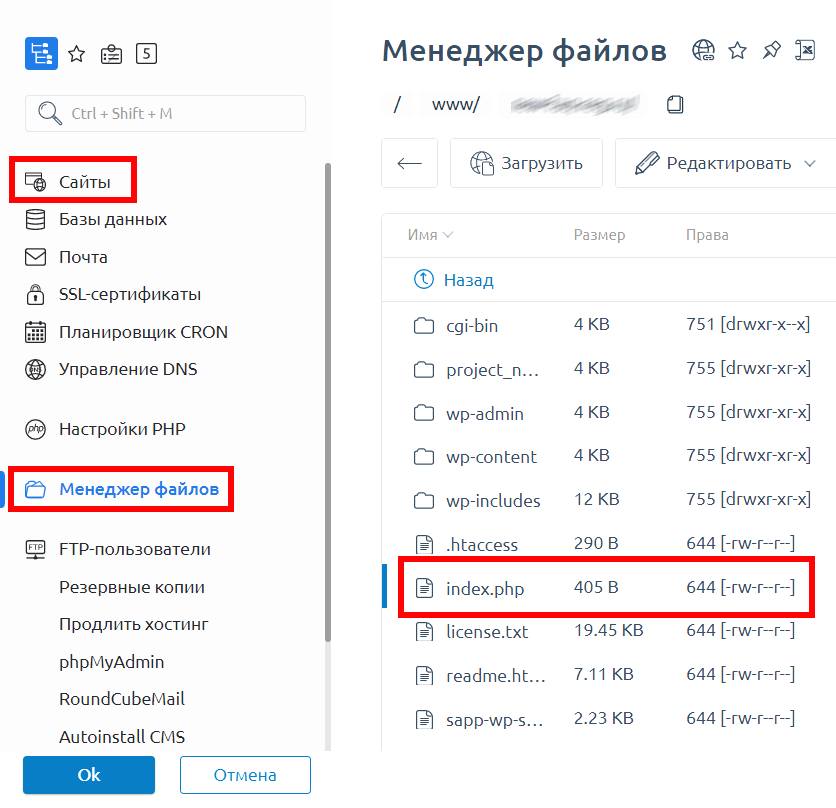
Если вы пользуетесь услугами REG.RU, там также есть встроенный файловый менеджер. Чтобы получить к нему доступ, выполните следующие действия:
- В левом навигационном меню выберите пункт «Сайты».
- Выберите проблемный домен.
- Кликните по кнопке «Менеджер файлов» (в новой версии «Файлы сайта»).
- Найдите индексный файл в корневой директории сайта.
Важно: индексный файл должен обязательно располагаться в папке, которая называется public_html.
Обязательно проверьте необходимый формат индексного файла: далеко не всегда он должен иметь расширение .HTML.
В зависимости от используемой системы управления контентом и конфигурации сайта индексный формат файла может отличаться: возможные варианты расширения — HTML, PHP, HTM.
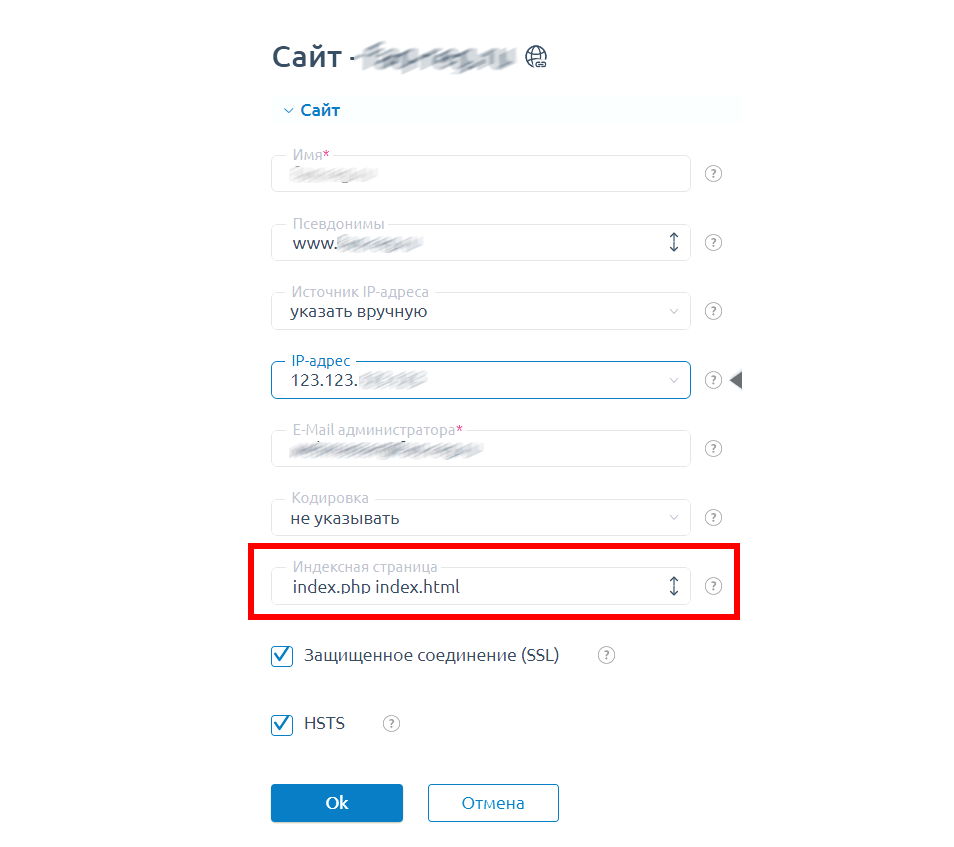
В разных панелях управления проверка индексного файла происходит по-разному. Посмотрим, как проверить индексный файл в ISPmanager — однойиз самых популярных панелей управления сегодня.
- В навигационном меню слева нажимаем кнопку «Сайты».
- Выбираем проблемный домен, нажимаем кнопку «Изменить».
- В самом низу находим строку «Индексная страница»:
Приостановлено обслуживание сайта на конкретном хостинге
Если вебмастер вовремя не оплатил услуги хостинга, возможно появление ошибки 403 при открытии любых страниц сайта. Сайт так и останется недоступным, пока не будет погашен долг в соответствии с договором обслуживания.
Решение: оплатить услуги хостинга.
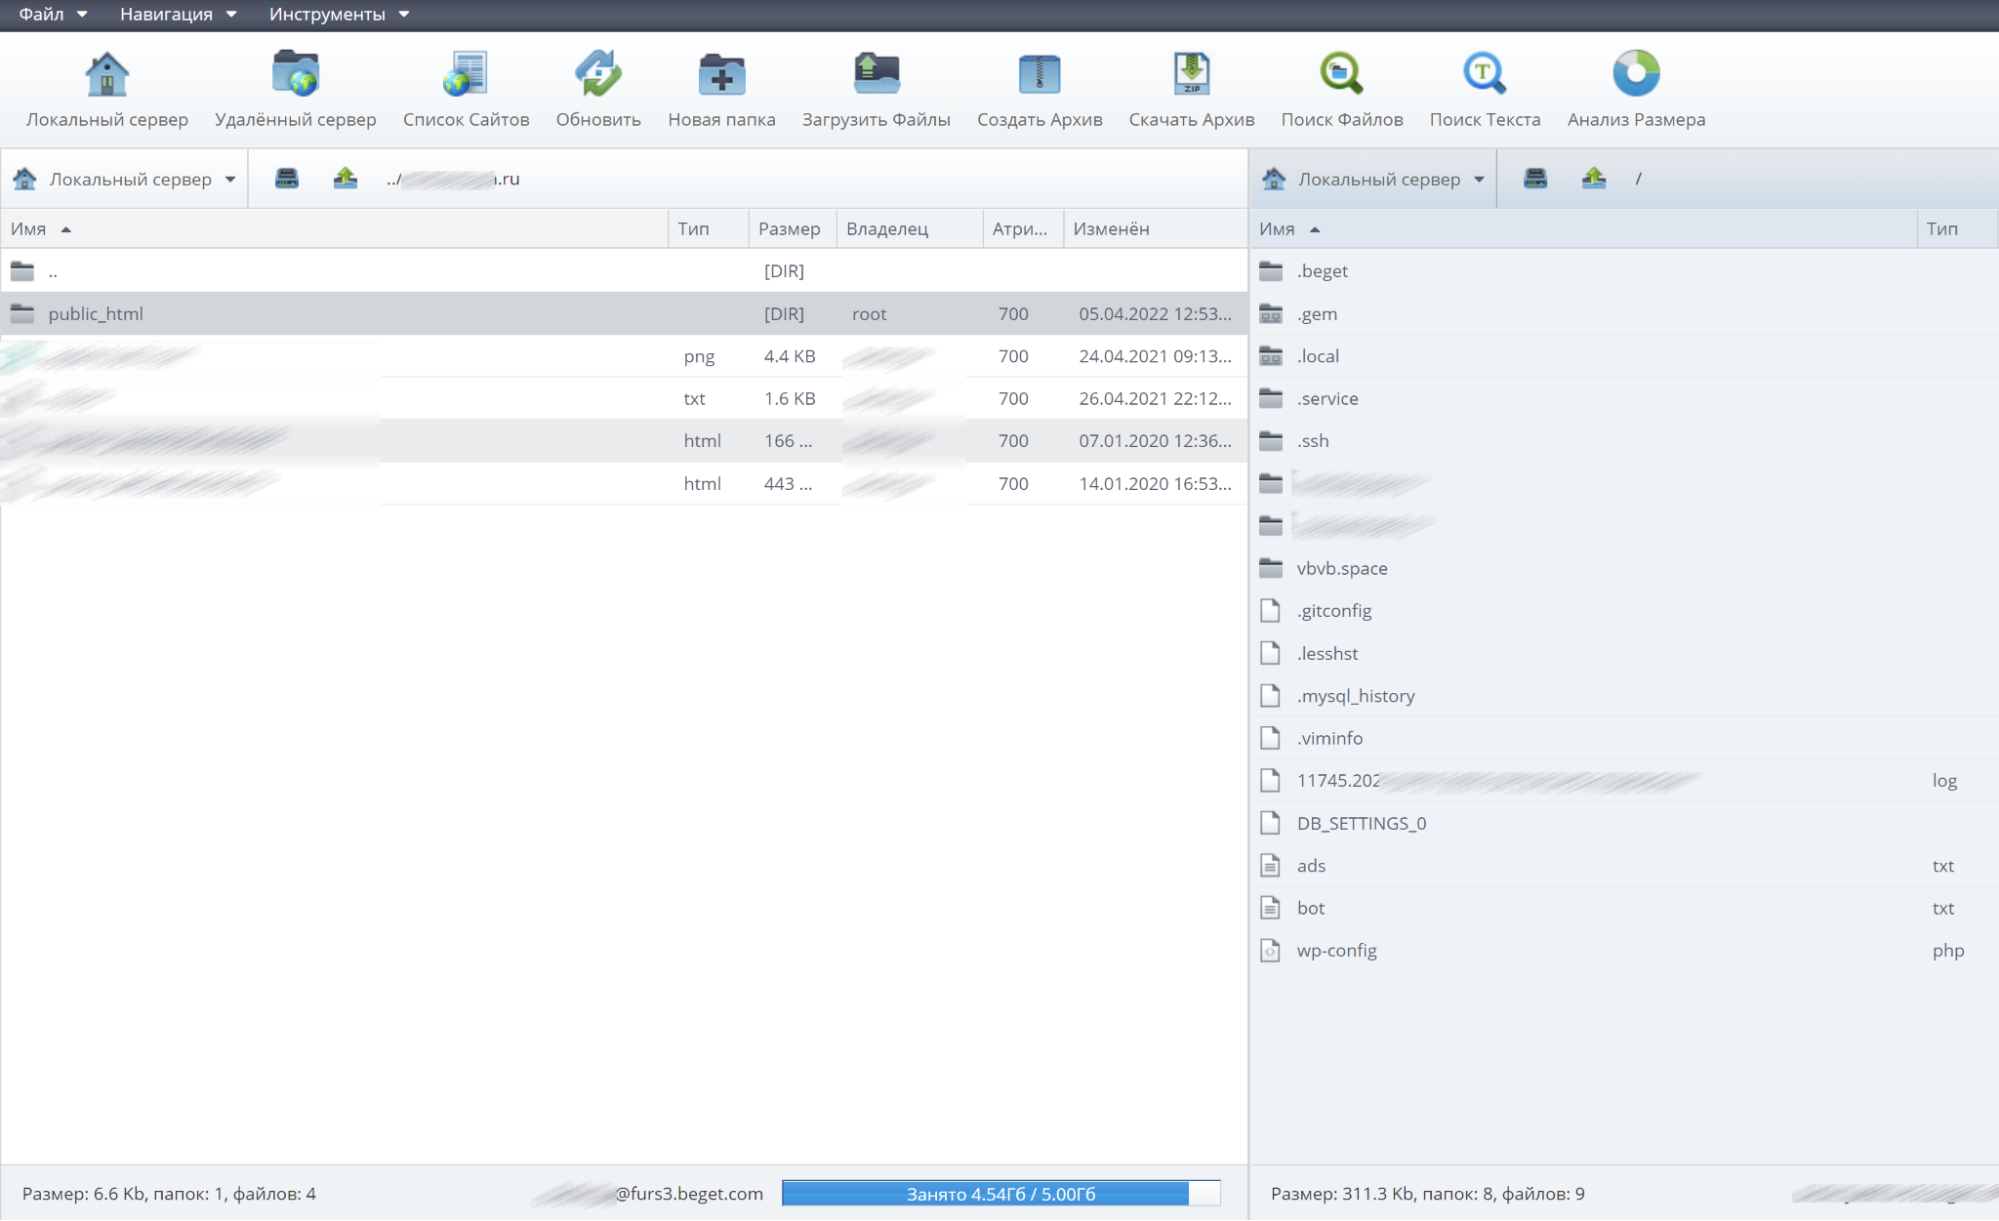
Некорректное месторасположение файлов сайта
Частая проблема, возникающая при ручном переносе файлов сайта. Здесь правило простое: файлы сайта располагаются в корневой директории.
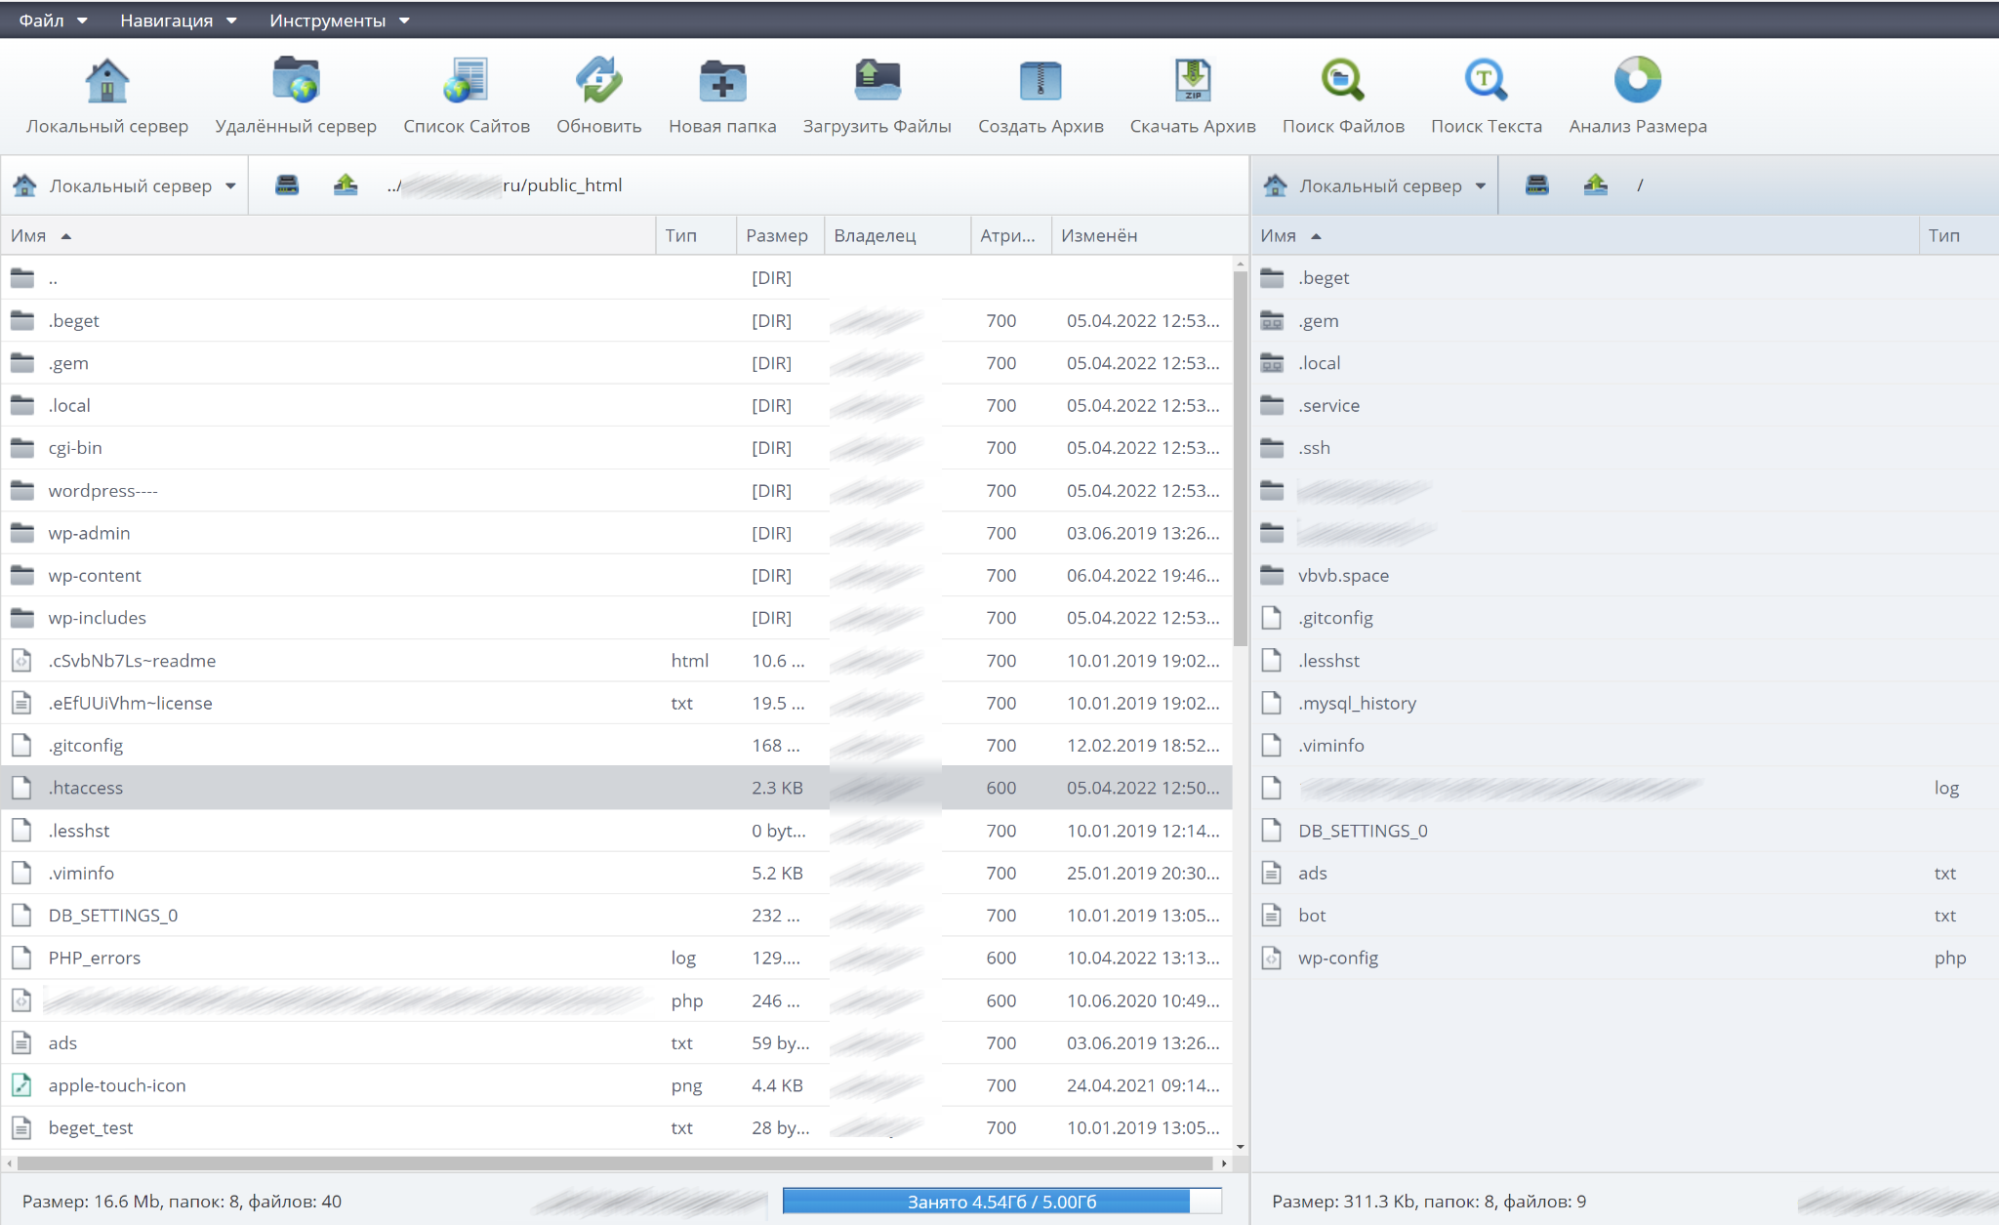
Решение: убедиться, что папка с файлами сайта находится в правильной папке. Корневая папка сайта по управлением WordPress на хостинге Beget может выглядеть так:
Указаны некорректные права на файл или папку
Существует три вида прав доступа к файлам: чтение, редактирование, выполнение. В свою очередь, всех пользователей также можно разделить на три категории: администраторы, модераторы и обычные пользователи.
Для задания самих прав используются трехзначные коды:
- Для папок — код 755 или код 750;
- Для файлов — код 644 или код 640.
Вы можете установить любой из этих вариантов.
У разных CMS могут быть свои коды для указания прав папок и файлов. Например, в WordPress на системный файл wp-config.php должны быть настроены права с кодом 440 (или с кодом 400).
Решение: проанализировать права всех папок и изменить их при необходимости. Проверьте, какие файлы и папки загружаются при открытии страницы с 403-м ответом. Чтобы уточнить этот момент, вы можете обратиться в техподдержку хостинга.
Некорректные указания в конфигурационном файле htaccess
.htaccess — это файл конфигурации для использования на веб-серверах с программным обеспечением Apache Web Server. Когда .htaccess помещается в каталог (который, в свою очередь, загружается через веб-сервер Apache), он обнаруживается и выполняется программным обеспечением веб-сервера Apache.
Рассмотрим пример директивы, которая запрещает доступ к сайту всем пользователям, кроме одного IP-адреса:
Order Deny.Allow
Deny from all
Allow from 123.456.789.000
С такой директивой сайт будет недоступен для пользователей, так как просмотр разрешен только с одного IP-адреса.
Решение: найти файл .htaccess в папке сайта и проанализировать команды, которые были прописаны недавно.
Прежде чем редактировать файл, обязательно сделайте его резервную копию. Указанное ниже решение актуально только для хостингов на базе Linux.
Особое внимание обратите на команды со словами deny, redirect, require:
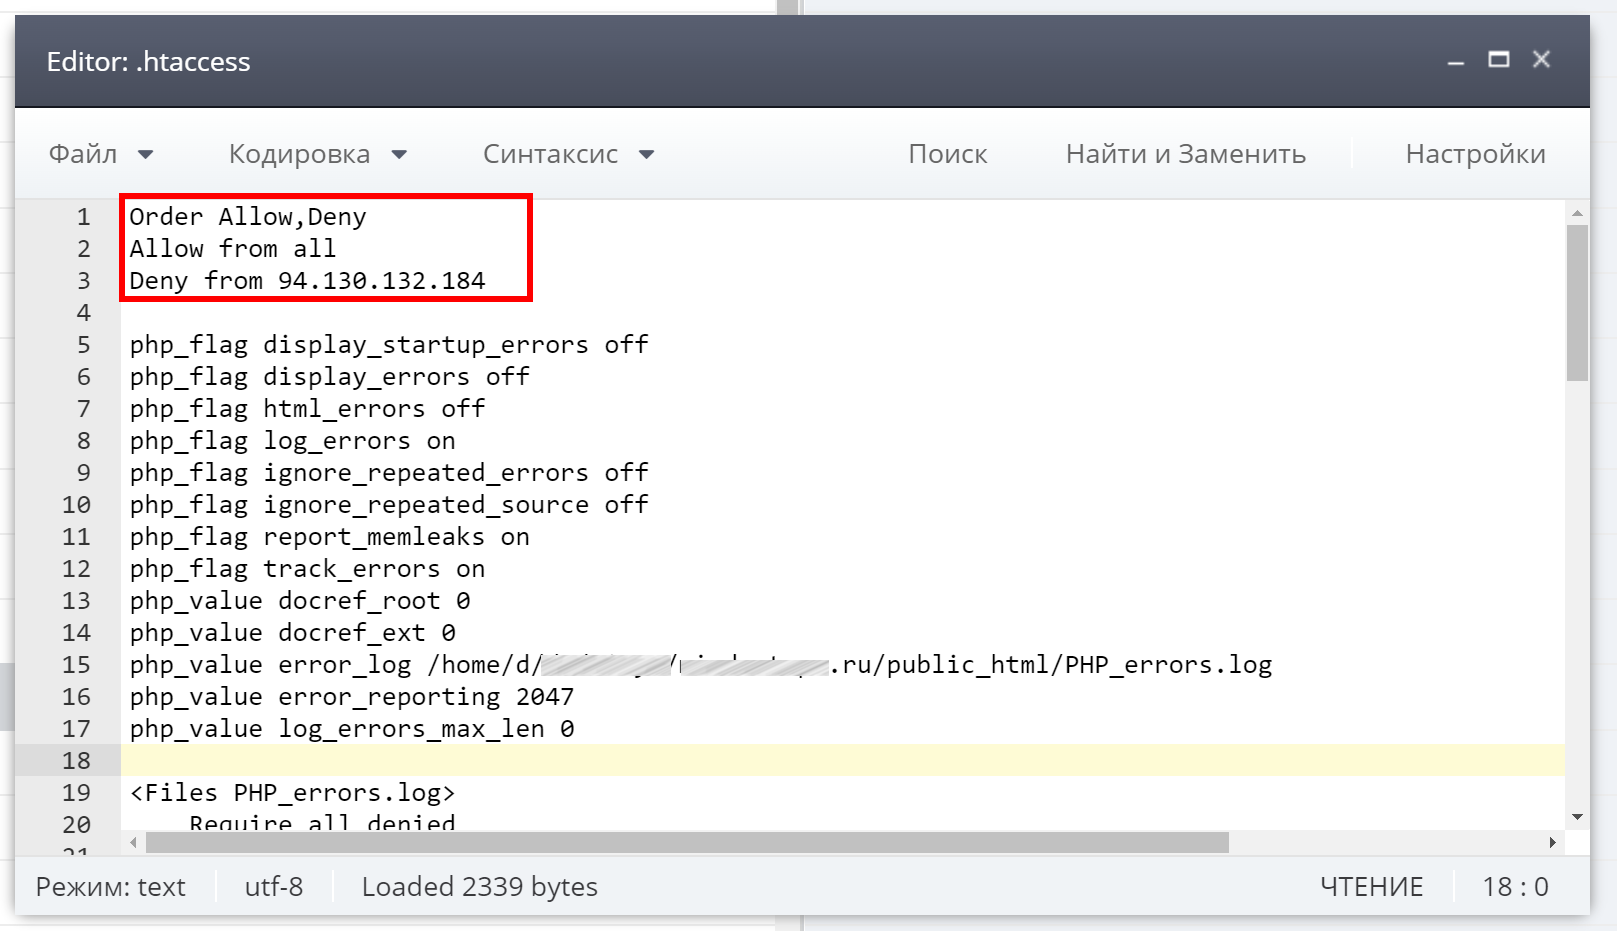
Удалите все соответствующие строки (со словами deny, redirect, require) и сохраните файл. Отключите кэширование данных на сайте и проверьте доступность страницы, которая отдавала 403-й код. Если все работает, значит причина была именно в .htaccess. Снова включите кэширование данных.
Если страница все равно не открывается, измените название файла htaccess на old_htaccess. Убедитесь, что кэширование данных на сайте отключено и снова откройте проблемную страницу. Если страница по-прежнему отдает код 403, дело точно не в htaccess и проверять нужно другие причины, которые мы описали выше.
Если ни один из вышеуказанных способов так и не помог оживить страницу, очистите кэш и удалите cookies-файлы в используемом браузере.
Иные причины 403 ошибки
- Работодатель ограничивает доступ ко всем публичным сайтам, кроме тех, которые нужны для работы.
- Доступ к сайту временно ограничен вебмастером по определенному признаку, например, по используемому браузеру.
- Допущена опечатка в URL страницы (при ручном вводе).
- Пользователь пытается открыть страницу сайта, предназначенную для служебного использования.
- Пользователь пытается открыть страницу сайта, предназначенную для использования только зарегистрированными пользователями.
- Пользователь был заблокирован по какому-либо параметру, например по IP-адресу (за нарушение правил пользования сайтом).
- Доступ к сайту временно приостановлен для всех пользователей, так как проводится его техническое обслуживание.
Резюме
Используйте чек-лист, который поможет исправить ошибку 403 вебмастеру и пользователю.
Вебмастеру
- Убедитесь, что указан корректный адрес страницы.
- Проверьте директивы в системном файле htaccess.
- Убедитесь, что все файлы сайта находятся в корневом каталоге.
- Проверьте наличие всех необходимых файлов, которые загружаются при обращении к проблемной странице.
- Свяжитесь с хостингом и уточните, имеются ли какие-либо ограничения, наложенные на ваш сайт или домен.
- Убедитесь, что выставлены корректные права доступа на папки и файлы.
Обязательно проверить логи сервера. Если 403 ответ в них упоминается, вы сможете узнать точную причину появления этой ошибки. Если же такой ошибки в логах нет, причину следует искать в скриптах, которые используются на сайте.
Пользователю
У пользователя возможности исправить ошибку гораздо меньше, так как причина, чаще всего, находится не на его стороне. Что вы можете сделать:
- Дважды проверьте URL, если указываете его вручную.
- Пройдите авторизацию, если такая возможность предусмотрена конфигурацией сайта.
- Свяжитесь с администратором сайта и сообщите об ошибке.
- Попробуйте открыть ссылку спустя 2-3 дня. Во многих случаях ошибка носит временный характер.
Часто адрес страницы меняется дважды после публикации и поисковые системы просто не успевают обработать новую версию адреса. Следует подождать хотя бы один день. Страница с некорректным URL покинет индекс, исчезнет из результатов поиска, а на ее место придет страница с правильным адресом.
This article talks about «access denied» error which may appear in a variety of situations, and provides step-by-step solutions for each Access Denied scenarios. This error is explained in 5 cases, including most situations you may encounter. If you are experiencing same error message, keep reading to check solutions.
Overview on access denied error
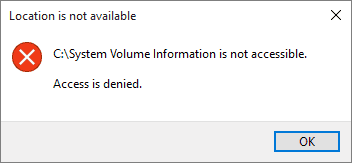
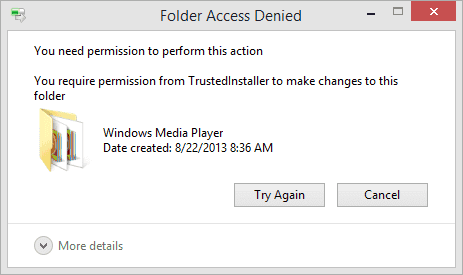
If you are getting Access Denied error in Windows, then you are not alone. This is a quite common problem related to permission, file system, etc. It occurs when you are unable to open a file or folder, a service on your computer fails to start, cannot open file on a network, unable to access web site, etc. Error messages differ from issue to issue, for example, it can be «Folder Access Denied. You need permission to perform this action. You require permission from TrustedInstaller to make changes to this folder» or «Location is not available. E: is not accessible. Access is denied.»

Let’s see two real world cases on this error:
«I got problem in deleting a folder. Here is the story: I attempted to delete a folder using Shift + Del, but the Access Denied error occurred. The folder cannot be deleted and so did files in the folder. Also, I tried deleting as an Administrator, but it says I do not have that privileges. However, I’m the only user and it is the very administrator account. The error message is: <file path> is not accessible. Access is denied. I checked solutions online, and tried some, but none worked. Any suggestions?»
» couple of day ago I downloaded DOTA from STEAM I got an update error when I tried to launch the game. I looked to solutions and found one which asks to delete ‘downloading’ folder located in Steamapps. Unfortunately, I couldn’t delete it, as it requires Administrator permission. I clicked Continue and got Access Denied error. I restarted PC and logged in as Administrator and still cannot delete it! Any idea to fix this?»
Issue 1: You cannot open a file or folder
Symptom
When you try to open a file or folder in Microsoft Windows, you are unable to access is and receive error message like:
«Folder is not accessible. Access is denied.» (Folder here represents the name of the folder you cannot open.)
«You don’t currently have permission to access this folder. Click Continue to permanently get access to this folder.»
«You have been denied permission to access this folder. To gain access to this folder you will need to use the security tab.»
Causes
An «Access Denied» error can occur for one or more of the following reasons:
Resolution
Solution 1: Take ownership of the file or folder in Windows
Step 1 Select the file or folder you want to take ownership and right-click it to select Properties from context menu.
Step 2 Select the Security tab and click Advanced button. Then click Change. If you are asked to give confirmation or administrator password, then provide confirmation or type the password.
Step 3 Type the name of the person whom you want to give ownership to, and click Check Names.
Step 4 Click OK. If you want this person to be the owner of the folders and files that are stored in this folder, select check box of Replace owner on subcontainers and objects.
Step 5 Click OK.
Solution 2: Change permission
It is common that the access denied error you experience is related to permission. Permissions rules whether you can access or change files and folders. If you do not gain permission, you are not able to access specified location. If you are logging in as administrator and still cannot access a folder, you can try changing permissions. Note: to change permission you should log on as an administrator.
Step 1 Select the file or folder and right-click it to select Properties. Then click Security tab.
Step 2 Click your name under Group or user names, and you can see permissions you have.
Step 3 Select all boxes under Allow and click OK and Apply. Then you’ll get full control of the file or folder, such as modify, read & execute, list folder contents, etc.
Solution 3: The file or folder is encrypted
Data encryption is one of the best solutions to protect data again any unwanted access. You are unable to access encrypt file or folder without proper certificate. You can have a check whether the folder is encrypted or not.
Step 1 Select and right-click the file or folder to click Properties.
Step 2 Select General tab, and then click Advanced button. If the Encrypt contents to secure data is selected, then file is encrypted, and you’ll have to get the certificate to open it.
Issue 2: File / Folder access denied, error changing or deleting file or folder
Symptom
When you try to delete, copy, move or change a file or folder on your computer, you might be blocked by Accedd denied error which prompts you donot have permission to do so. The error message could be:
«Folder Access Denied. You need permission to perform this action. You require permission from TrustedInstaller to make changes to this folder.»
«Destination Folder Access Denied. You need permission to perform this action.»
Causes
This error might be caused by following reasons:
Resolution
Solution 1: Take ownership using Command Prompt
There are a couple of methods to take ownership of a file or folder, and this solution modifies ownership in Command Prompt. It’s OK if you follow steps in previous part to take ownership.
Step 1 Right-click on Start menu and select Command Prompt (Admin). If you are prompted for password or conformation, provide password or give confirmation.
Step 2 Confirm the path of the folder you want to take ownership. Here, say you want to take ownership of the folder Photos of E drive and the address is : E:Photos
Step 3 Type command takeown /f «full path of the file or folder», which, in this case, should be takeown /f «E:Photos«. Then press Enter.
Step 4 Once the process completes, restart computer and check if the problem is removed.
Solution 2: Delete corrupt files with third-party software
Corrupted files cannot work properly and these files can be of any file type like pictures, documents, system files, etc. Many corrupted files cannot be repaired or even cannot be deleted. Here is an easier solution to delete corrupt files.
Step 1 Download, install and launch Eassos DiskGenius.
Step 2 Select the corrupt file or folder you want to delete, right-click it and select Delete Files Directly.
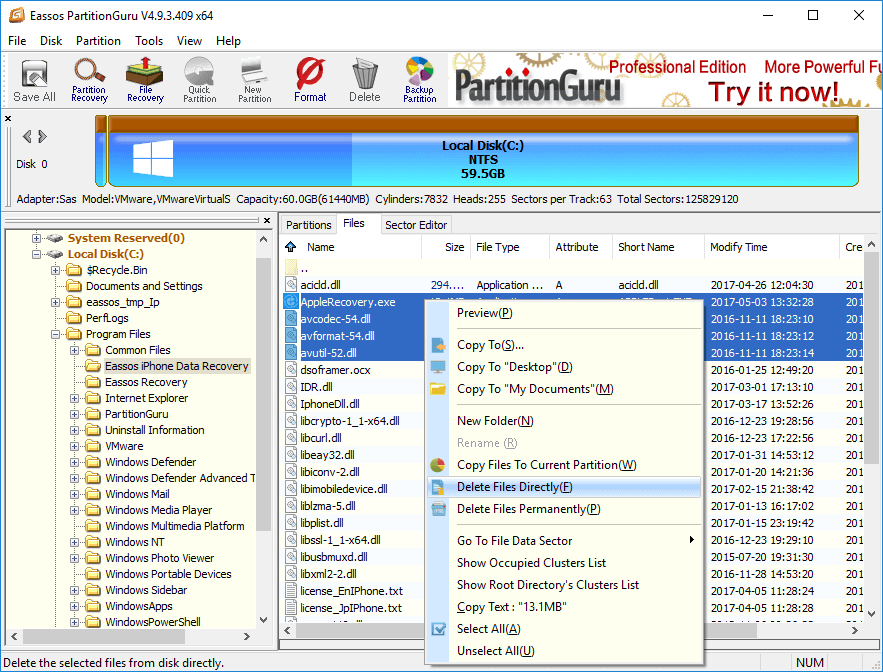
Step 3 Click Delete button to delete selected file. Note: files deleted in this way won’t be put into Recycle Bin, please make sure these files are no longer important to you.
Tips on preventing files from getting corrupted:
Solution 3: Create a new local user account
If the access denied issue is caused by a corrupt account, you can resolve it by creating a new local user profile / account. To do that, follow these steps:
Step 1 Click Start menu and select Settings. Click Accounts on the Windows Settings pane.
Step 2 Select «Family & other people» on the left side and then click «Add someone else to this PC».
Step 3 Click link «I don’t have this person’s sign-in information» and click Next. On next screen, click «Add a user account without a Microsoft» account and click Next. Then you can enter user name, password and password hint, and then select Next.
Issue 3:Receive «Location is not available. Access is denied.» error message
Symptom
When you are trying to open a partition on local hard drive or USB devices, you cannot open it and receive error message:
Location is not available. E: is not accessible. Access is denied.
Causes
Resolution
Solution 1: Change permission for the drive
Step 1 In Windows Explorer, right-click the partition that you cannot access and click Properties. Continue clicking Security -> Advanced.
Step 2 Click Add in Advanced Security Settings and on next screen click Select a principal.
Step 3 Enter the username to select and click OK. Then you should select follow information:
Type: Allow
Applies to: This Folder, subfolder and files
Basic Permissions: Full Control
Step 4 Click OK and Apply to save changes.
Solution 2: Recover data from inaccessible drive and format it.
If changing permission does not help, you can recover data from the inaccessible drive and format the disk to repair the error. It’s easy to retrieve data when location is not available and access is denied. Here is the guide to recover data from corrupt drive.
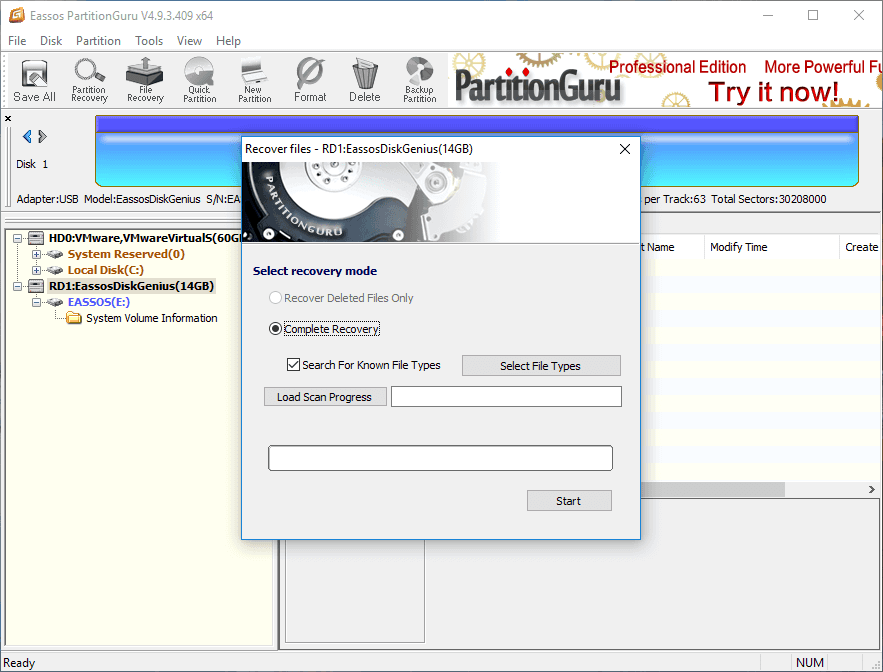
Step 1 Install and launch Eassos DiskGenius, then check if files in this partition can be displayed directly. If not, go to next step.
Step 2 Select the inaccessible drive and click File Recovery button from the toolbar. Make sure you are selecting the correct partition.
Step 3 Select Complete Recovery mode and click Start button. The full scan will start to search for files and folders in selected partition.
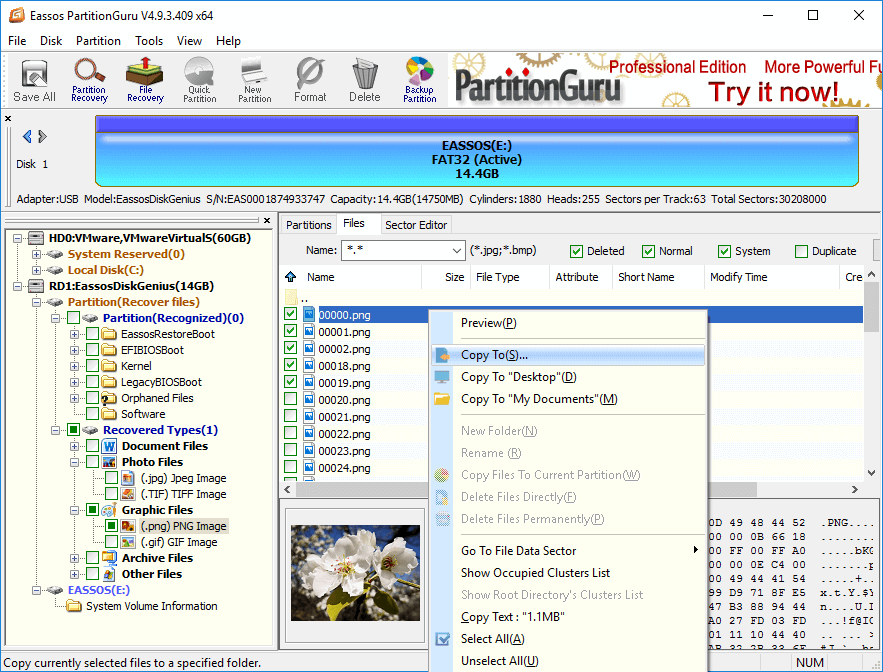
Step 4 Preview files. File found by Eassos DiskGenius will be displayed automatically during scanning, and you can preview listed files and folders to check whether they are correct or damaged.
Step 5 Recover data. Select files and folders you want to recover and right-click them to select «Copy to». Then you can set a location to save recovered data.
Issue 4: Error 5: Access Denied
Symptom
When you install application or game on your computer, you are prevented from accessing certain location or modifying files; also, you attempt to start certain service or software but fails. Error messages you may receive as follows:
«Windows could not start the sshd service on local computer. Error 5: Access is denied.»
«Setup was unable to create the directory «full file path». Error 5: Access is denied.»
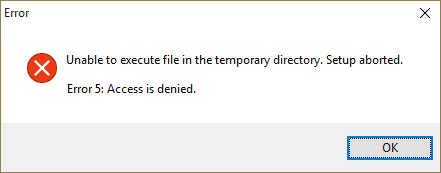
«Unable to execute file in the temporary directory. Setup aborted. Error 5: Access is denied.»
Cause
The main reason of this error is permission issue. If you do not have the Administrator privileges or the account you logged in is not administrator account, the access denied error is tend to appear.
Resolution
Solution 1: Fix permission issue in temp folder
Step 1 Double click Computer icon to open Windows Explorer. Then type %appdata%..local in the address bar and press Enter.
Step 2 Select and right-click on Temp folder and click Properties. Click Security tab and click Advanced button.
Step 3 Make sure the option «Replace all child object permission with inheritable permissions from this object» is selected.
Step 4 Select entries that are not inherited from «C:Users[Username]» folder and click Remove. Click Apply and OK.
Solution 2: Make your account administrator
Step 1 Press key combination Windows + R to open Run dialogue where you should type netplwiz and press Enter.
Step 2 Select the user account that you want to change it to administrator and click Properties.
Step 3 Click «Group Membership» tab and select Administrator, then click Apply and OK.
Issue 5: DiskPart has encountered an error: Access is denied
Symptom
When you use DiskPart to clean a disk, you cannot complete the task and receive error message:
DISKPART> clean
DiskPart has encountered an error: Access is denied.
See the System Event Log for more information.
Causes
Resolution
Solution 1: Run Command Prompt as Administrator
Step 1 Make sure you are logging on your computer as the Administrator account. If not, restart your PC and log on Administrator account.
Step 2 Click Start menu and enter cmd in search box.
Step 3 Right-click «cmd.exe» and choose Run as administrator. If you are prompted for password or confirmation, then enter password or give confirmation.
Solution 2: Remove write protection
Step 1 Click Windows + R to open Run. Type regedit in Run dialog and click OK to open Registry Editor.
Step 2 In Registry Editor browse path HKEY_LOCAL_MACHINESYSTEMCurrentControlSetControlStorageDevicePolicies
Step 3 Right click key WriteProtect and change the value to 0.
Summary
In this article we discuss Access Denied error in 5 scenarios and provide step-by-step solutions to each issue. We hope these solutions are useful to you. If they are proved to be useful, please share it to help more people. If you have any questions or better solutions, please feel free to share or contact us.
Все операционные системы семейства Linux имеют четко разграниченные права доступа. В своей домашней директории пользователь может делать все, что ему угодно, до тех пор, пока укладывается в отведенные рамки. Попытка выйти за них приводит к появлению ошибки «Permission Denied».
Изменение прав в терминале
Рассмотрим вариант, в котором необходимо прочесть текстовый документ, созданный другим пользователем. Файлы TXT в Linux можно просматривать непосредственно в терминале с помощью команды «cat».
- Заходим в каталог с интересующим нас документом. Набираем команду «cat filename», подставляя вместо «filename» имя нужного файла. На скриншоте показана ошибка «Permission Denied», выглядящая в русской локализации как «Отказано в доступе».

Получаем ошибку «Permission Denied» при попытке просмотреть содержимое файла
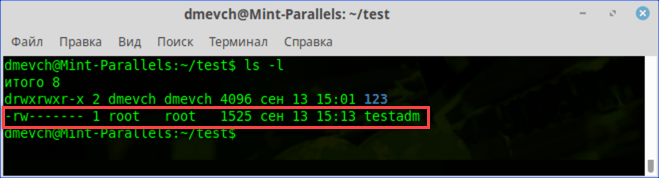
- Проверяем права доступа к содержимому каталога, набрав «ls -l». Результат, полученный для текстового документа, выделен рамкой. Разрешение на чтение и запись имеет только его владелец.

Проверяем права доступа к документу используя команду «ls -l»
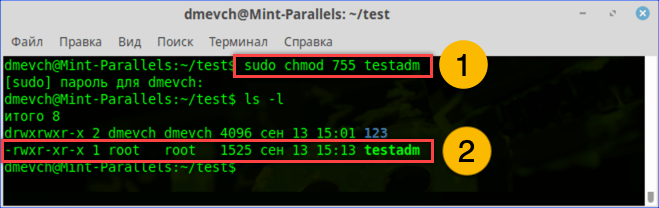
- Набираем команду «sudo chmod 755 filename». С ее помощью мы от имени администратора системы даем разрешение на чтение документа себе и любому другому пользователю. Проверяем результат выполнения и убеждаемся, что права доступа изменились нужным образом.

Используем команду «chmod» и административные права для получения доступа
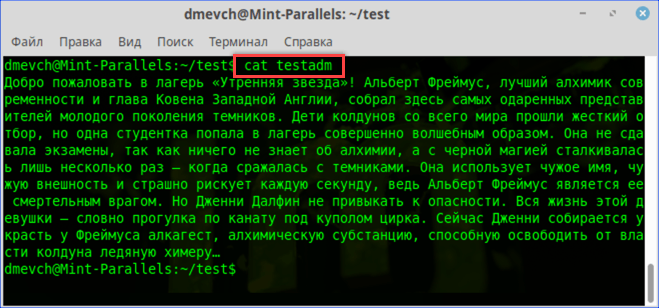
- Повторно используем «cat» и читаем ранее недоступное содержимое.

Просматриваем содержимое текстового документа командой «cat»

![]() Загрузка …
Загрузка …
Изменение прав в файловом менеджере
Разберемся, как выполнить рассмотренную выше операцию в графическом интерфейсе, используя файловый менеджер из дистрибутива.
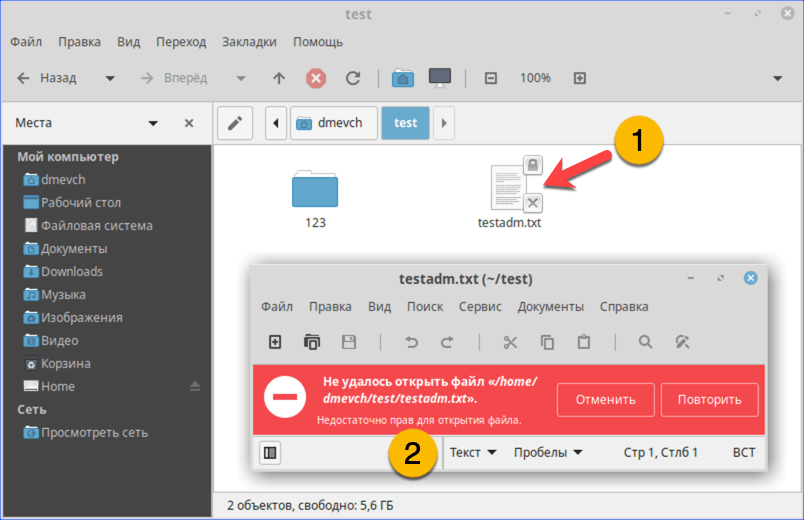
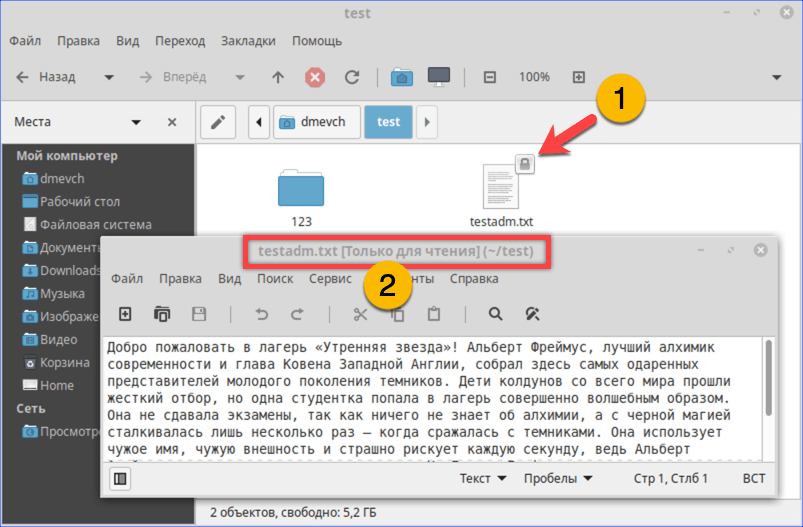
- Как видно на скриншоте, значок файла изначально имеет дополнительные символы, указывающие на то, что доступ у нему ограничен. При попытке посмотреть содержимое получаем графический вариант ошибки «Permission Denied».

При попытке открыть текстовый документ получаем ошибку «Permission Denied»
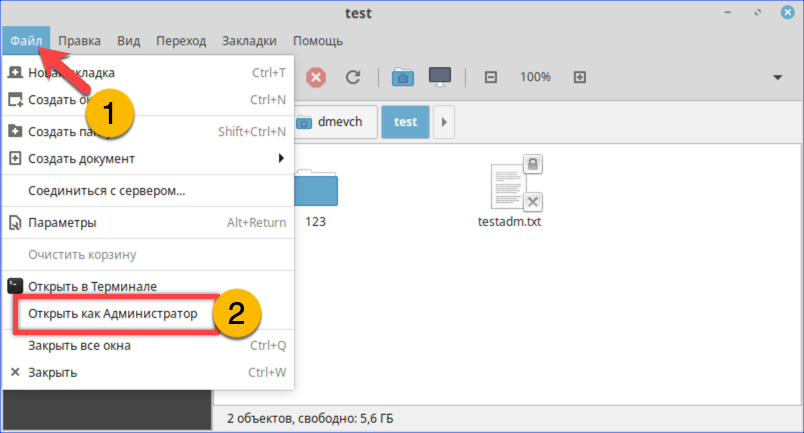
- Разворачиваем меню «Файл». Выбираем в списке действий «Открыть как Администратор».

Открываем меню «Файл» и перезапускаем файловый менеджер от имени root
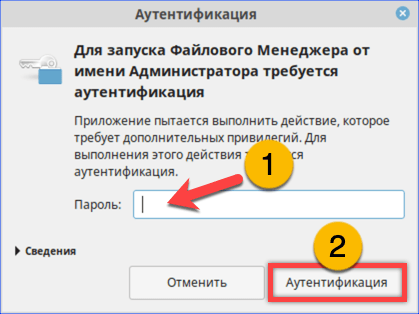
- Вводим в отмеченное стрелкой поле пароль root. Нажимаем кнопку «Аутентификация» или клавишу Enter.

Набираем пароль root в окне аутентификации
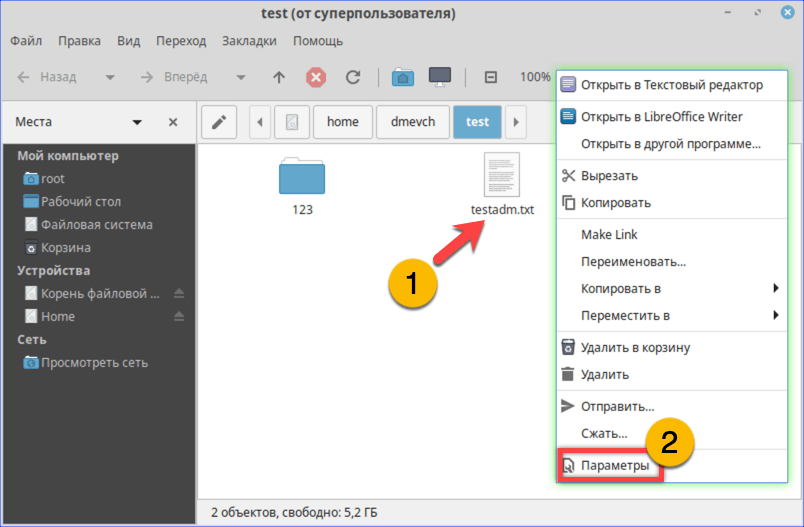
- В новом окне файлового менеджера вызываем контекстное меню для нужного файла. Выбираем в нем пункт «Параметры».

Открываем параметры файла с помощью контекстного меню
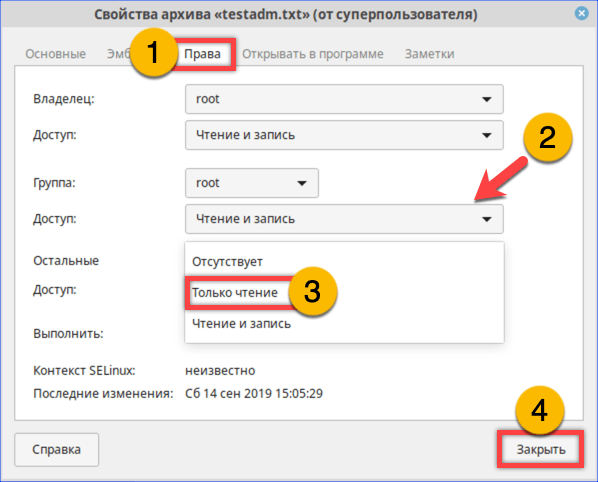
- Переключаемся на вкладку «Права». Меняем разрешения для группы и остальных пользователей. Для последних выберем в качестве примера «Только чтение». Внеся изменения, закрываем окно параметров.

На вкладке «Права» разрешаем доступ для группы root и остальных пользователей
- Теперь текстовый документ будет открываться в выбранном нами режиме «Только чтение», без возможности редактировать содержимое.

Открываем ранее недоступный файл в режиме чтения и изучаем содержимое
![]() Загрузка …
Загрузка …
В заключение
Как видим, избавиться от ошибки Permission Denied достаточно просто. Решив изменить правда доступа к системным файлам, лишний раз убедитесь, что полностью уверены в своих действиях и понимаете последствия вносимых изменений.
![]() Загрузка …
Загрузка …
Post Views: 29 204