![Идентификатор события 157: диск был неожиданно удален [исправлено]](https://clickthis.blog/wp-content/uploads/2022/05/disk-has-been-surprise-removed-656x288.webp)
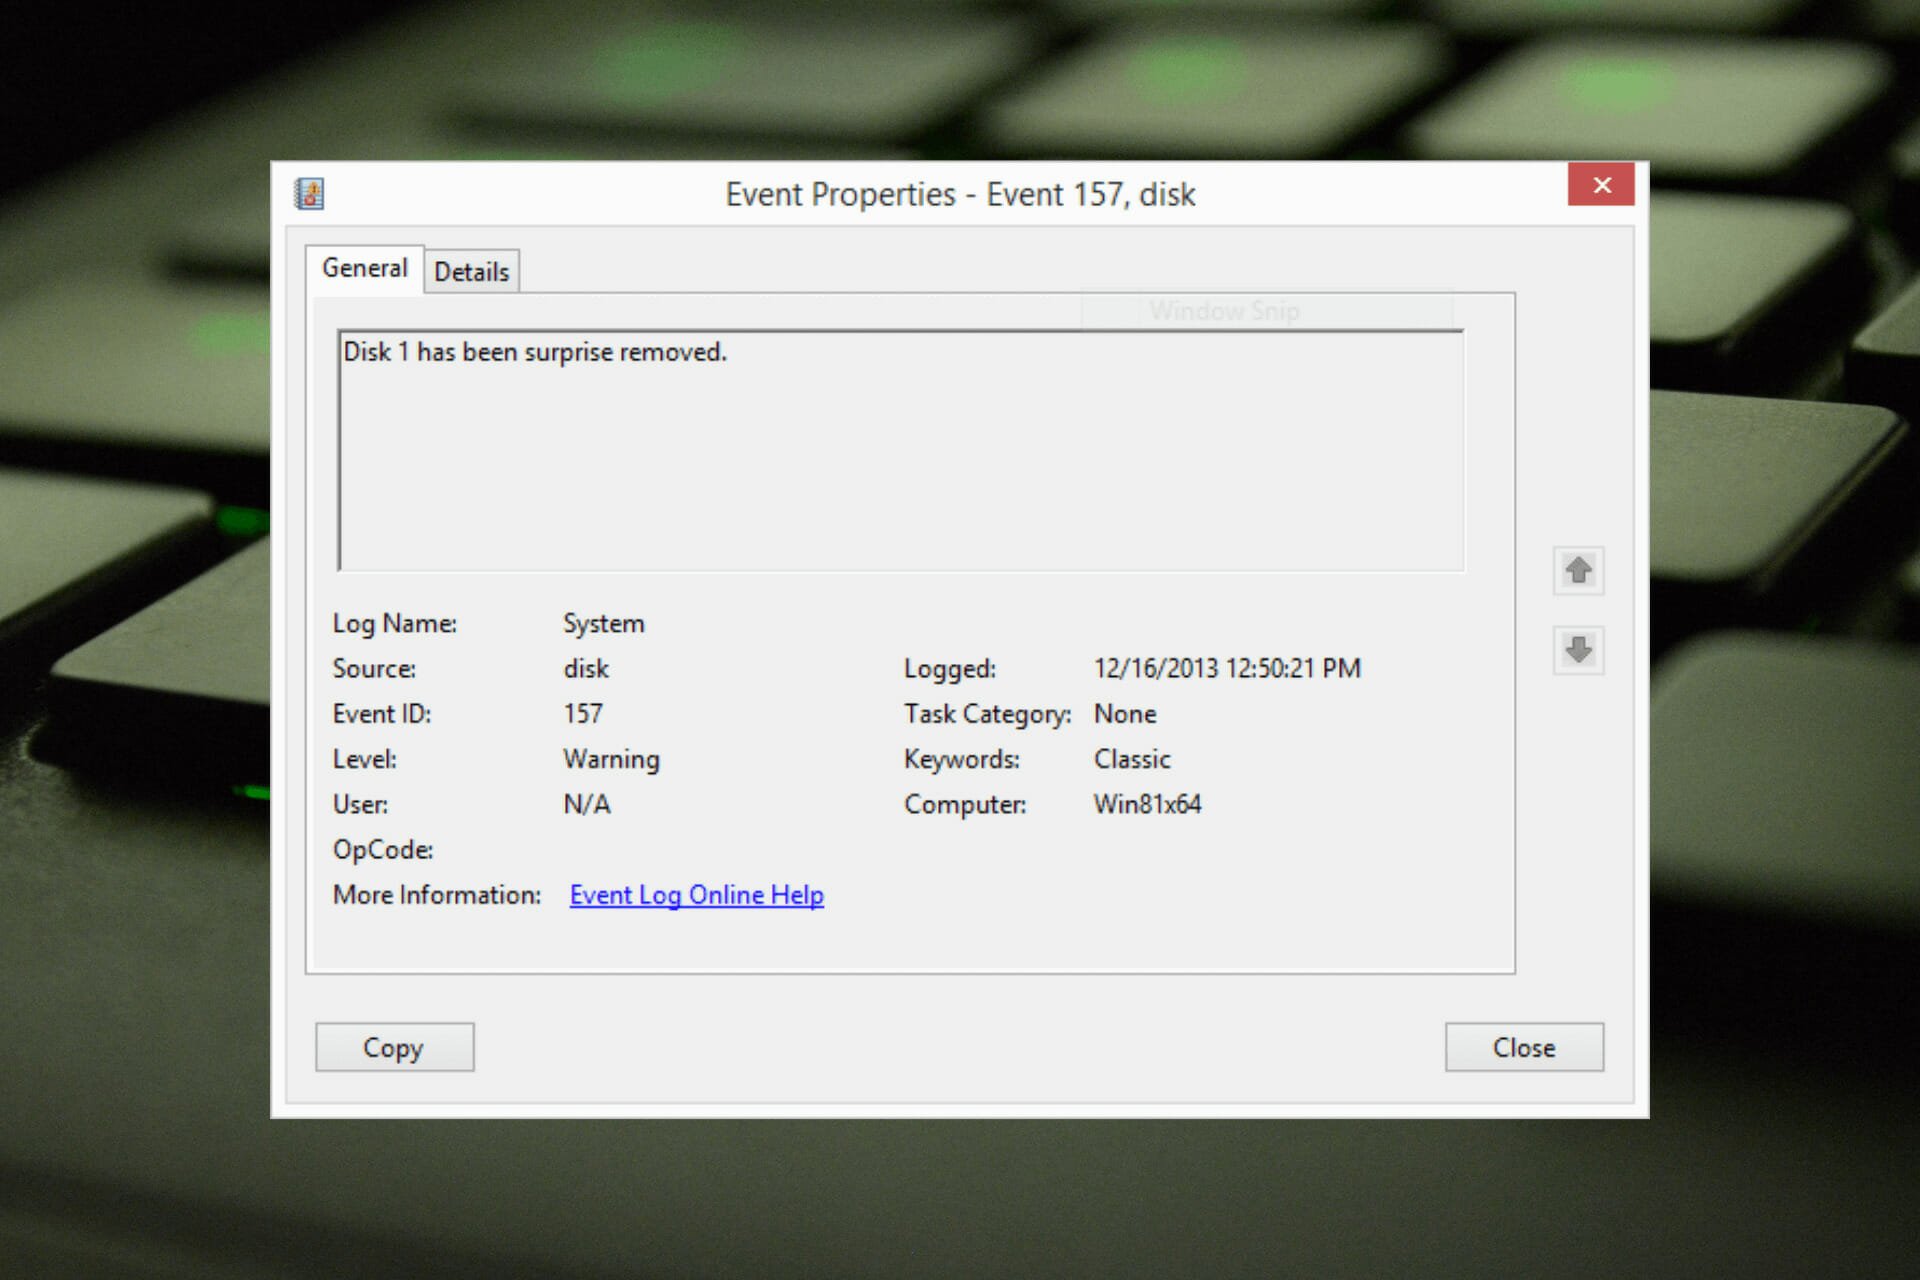
Диск был неожиданно удален — это ошибка в системном журнале событий на устройствах Windows. Это необычная проблема с виртуальным диском, от которого зависят все установки XBOX Live PC и Microsoft PC.
Обычно эта проблема возникает, когда что-то нарушает связь системы с диском.
Диск Event ID 157 был неожиданно удален в средстве просмотра событий, что лишает пользователя возможности использовать назначенный виртуальный диск для установки игр. Этот виртуальный диск не будет отображаться в проводнике, как другие диски.
Вы также можете столкнуться с тем, что диск был неожиданно удален VMWare. И приведенные ниже решения решат проблему, но вам придется вносить изменения непосредственно в эмулируемую ОС из VMWare.
Поскольку это вызывает беспокойство, это должно быть исправлено немедленно. В этом руководстве мы рассмотрим некоторые методы устранения неполадок, которые наверняка вам помогут.
Что означает Диск был неожиданно удален?
Менеджер PNP выполняет нечто, называемое перечислением. Перечисление можно понимать как запрос, отправляемый на диск, управляющий шиной, такой как PCI.
Они проводят инвентаризацию устройств на шине и сообщают список всех. Подобные перечисления происходят по нескольким причинам.
При получении запроса на перечисление драйверы шины подключаются к шине для всех устройств. Затем он будет выдавать команды существующим устройствам в поисках новых.
Когда эти команды не работают на существующем устройстве, драйвер помечает устройство как отсутствующее. Тогда об этом не будет сообщено PNP в инвентаре.
Как только PNP определяет, что устройство недоступно в контрольном списке, драйверу шины будет отправлен неожиданный запрос на удаление объекта устройства.
Поскольку драйвер CLASSPNP управляет тегом устройства и получает запрос на диски, он видит неожиданный запрос на удаление и регистрирует событие, если диск несъемный.
В результате диск пропадет из системы без каких-либо признаков, и появится сообщение Диск неожиданно удален.
Как исправить ошибку «Диск был неожиданно удален»?
1. Обновите драйвер контроллера дисковых пространств.
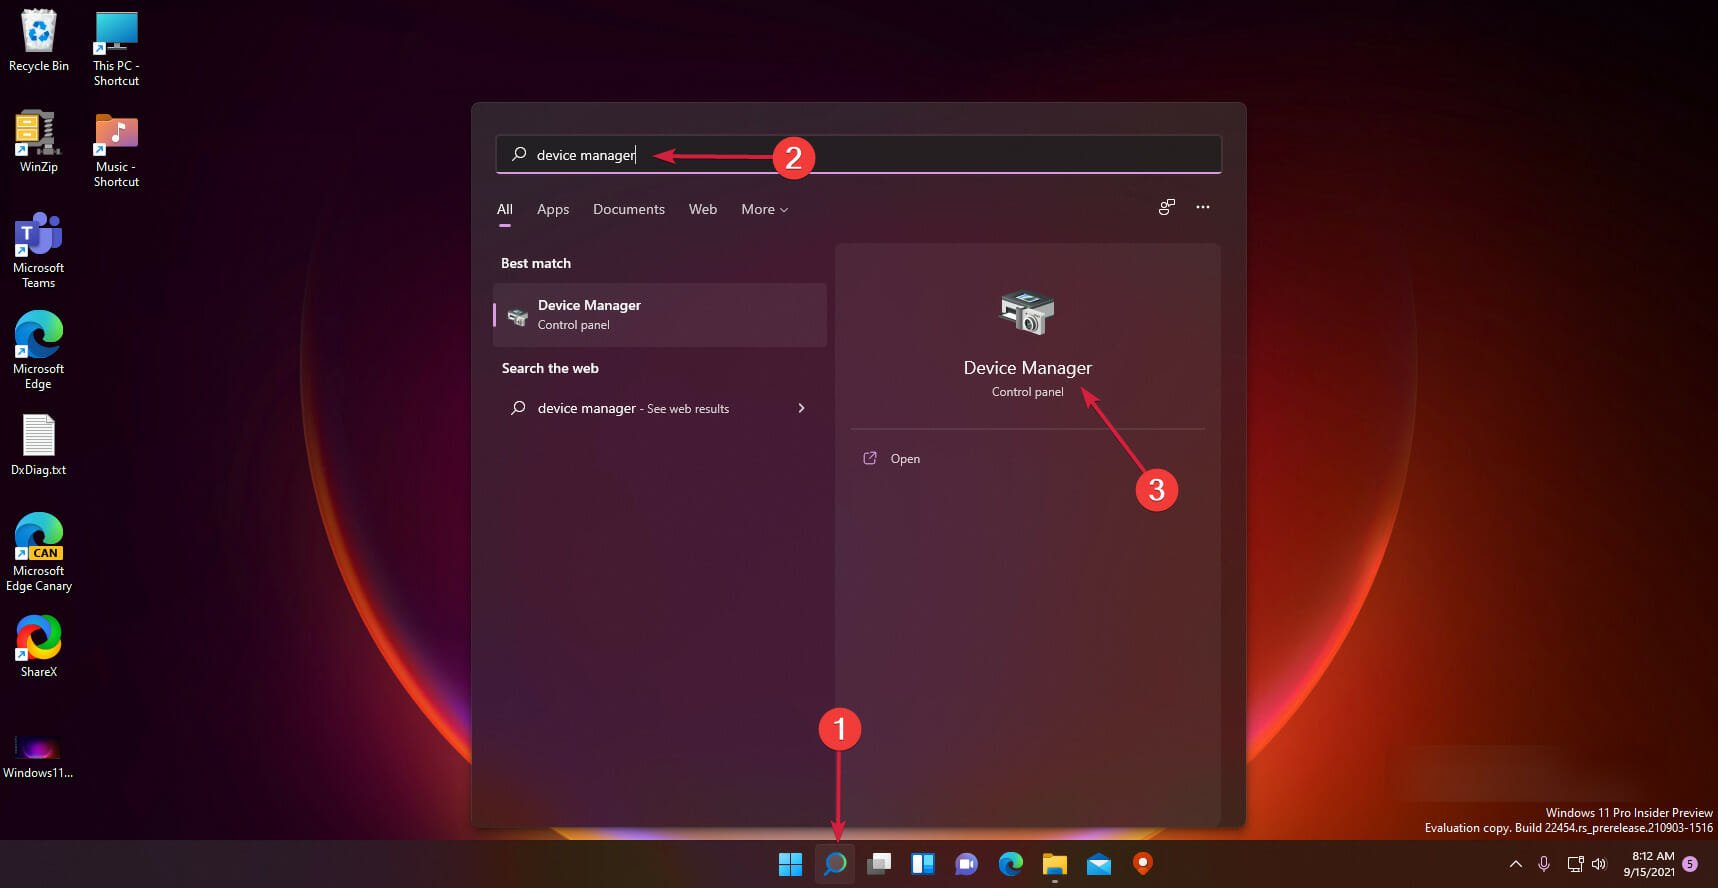
- Нажмите «Пуск», введите «Диспетчер устройств» и выберите приложение из результатов.
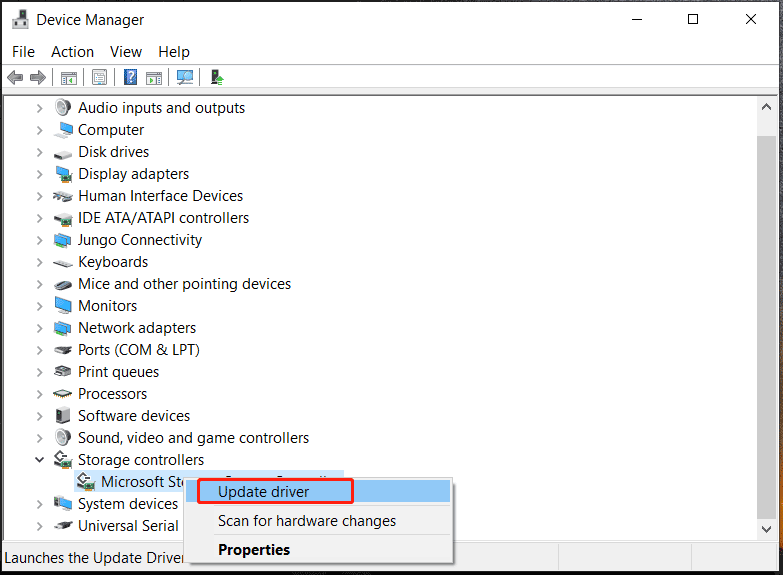
- Разверните раздел «Контроллеры хранилища».
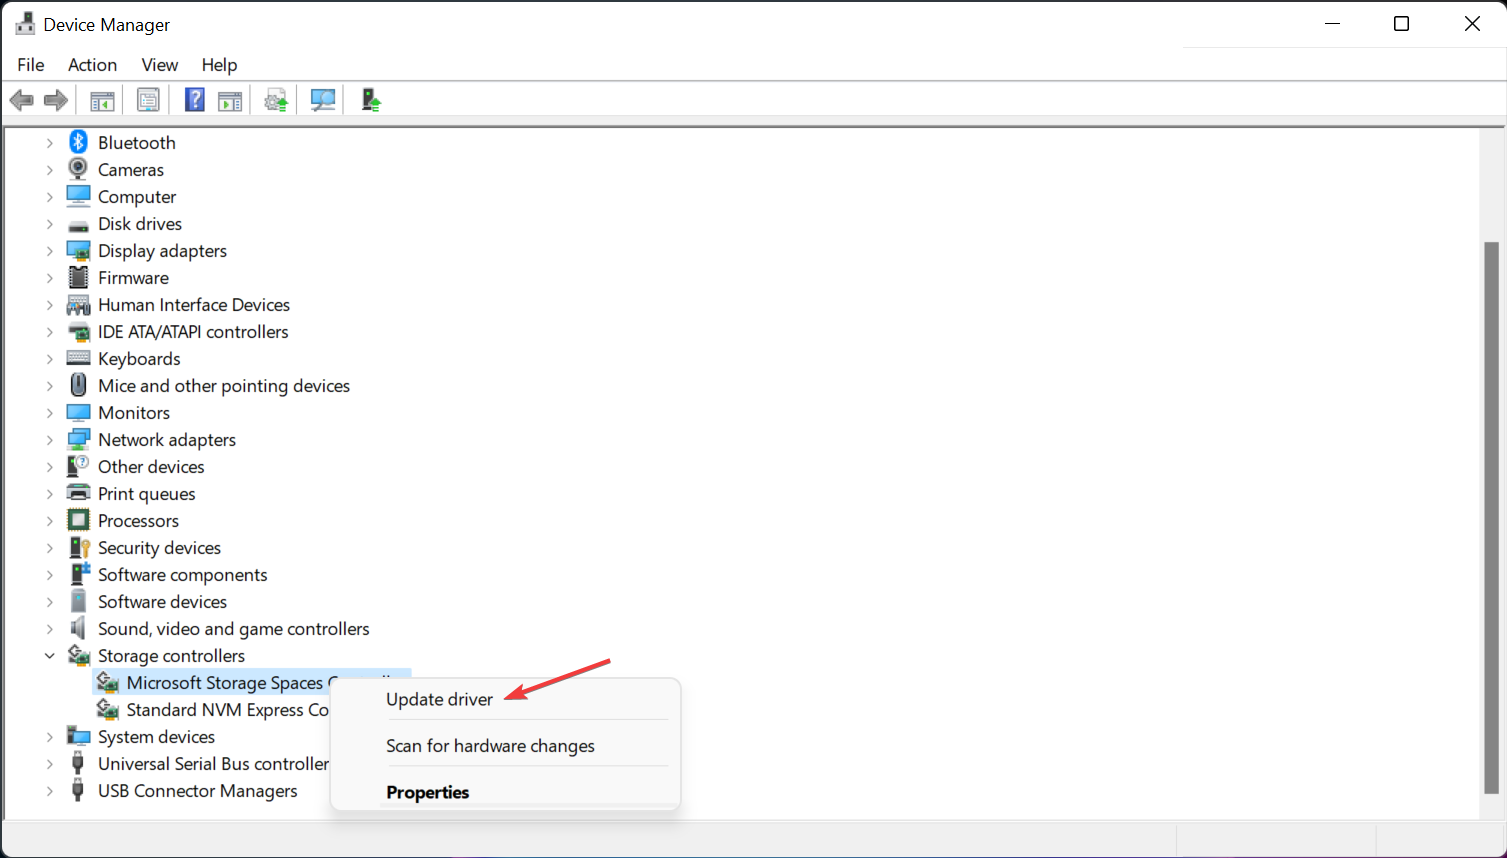
- Щелкните правой кнопкой мыши Microsoft Storage Spaces Controller и выберите «Обновить драйвер».
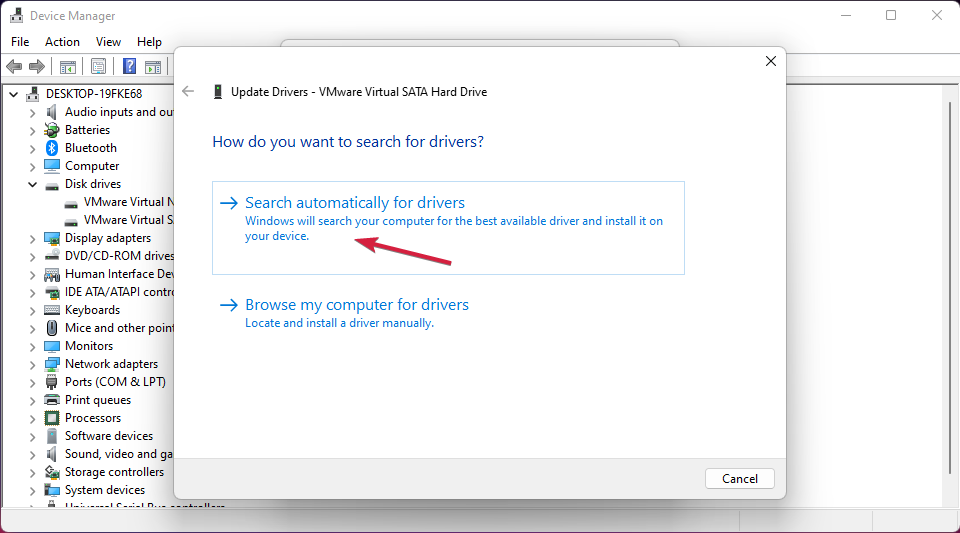
- В следующем появившемся всплывающем окне нажмите «Автоматический поиск драйверов».
- После этого Windows теперь будет автоматически искать и устанавливать любые обновления драйверов на ваше устройство.
Контроллеры хранения отвечают за порты накопителей, т. е. порты SATA. Если ваши драйверы контроллера хранилища устарели или повреждены, вы можете столкнуться с проблемой Event ID Disk был неожиданно удален Xbox.
Большинство проблем с драйверами устройств в Windows вызваны отсутствующими, поврежденными или устаревшими драйверами. Это лишь одна из многих причин, по которым вам следует обновлять драйверы устройств.
Компьютер не может работать с видеокартами, контроллерами XBox, звуковыми картами или другим оборудованием; они должны управляться водителем. Вы можете обновить драйверы вручную, если вы полностью знакомы с драйверами, которые требуются для вашего ПК.
Идеальным вариантом является программа обновления драйверов, такая как DriverFix, которая не только заменяет, но и создает резервную копию неисправных драйверов.
Ошибка будет устранена после загрузки и установки самых последних драйверов. Вы также заметите улучшение производительности вашего устройства, и ошибка «Диск был неожиданно удален» будет устранена.
2. Запустите сканирование CHKDSK
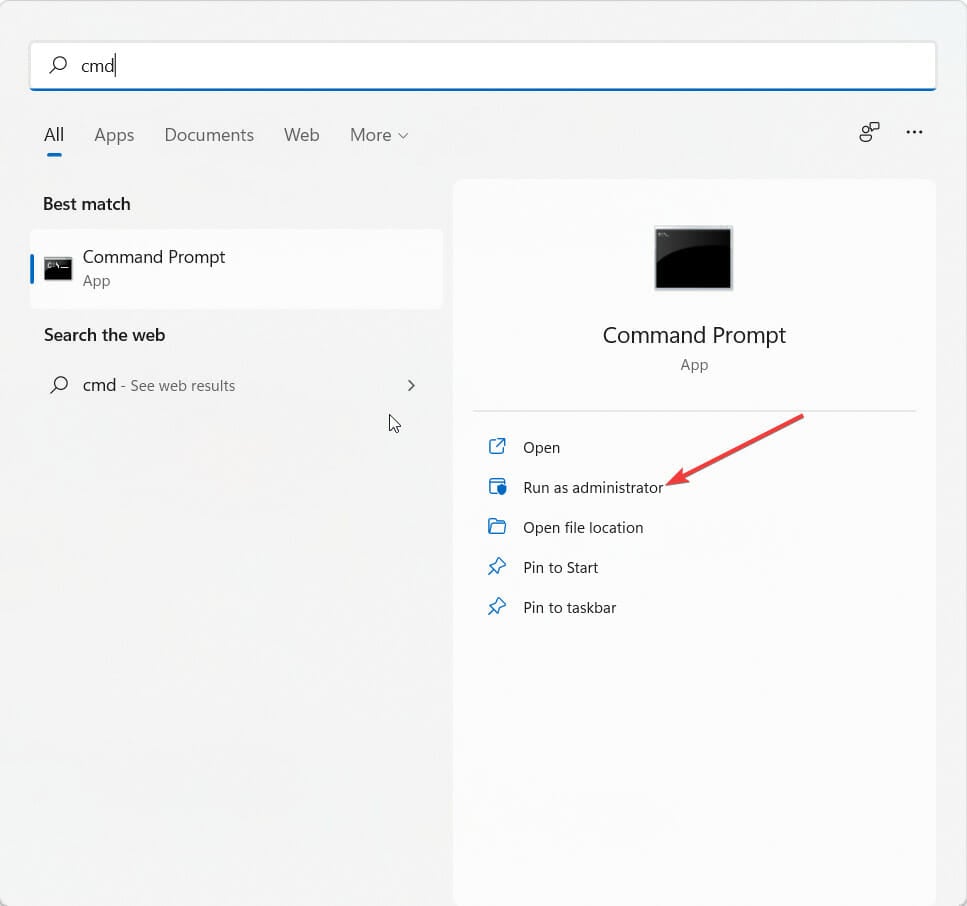
- Нажмите «Пуск» и найдите cmd, затем нажмите « Запуск от имени администратора».
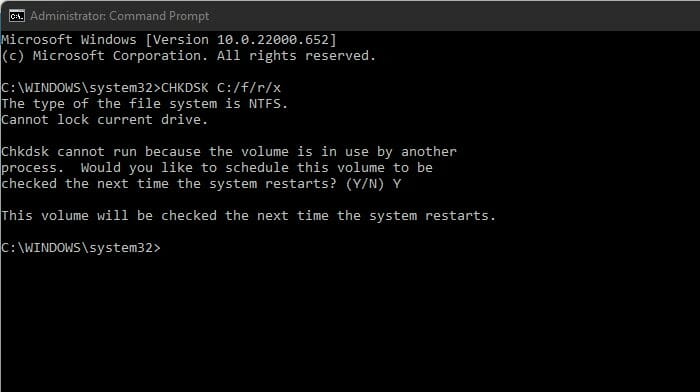
- Введите следующую команду и нажмите Enter.
CHKDSK C:/f/r/x - Команда не запустится, так как корневой диск вашего устройства уже используется. Вместо этого он попросит вас начать сканирование при перезагрузке компьютера.
- Введите Y, нажмите Enter, затем перезагрузите Windows и дождитесь завершения процедуры.
Эта проблема также может возникнуть, если какие-либо части жесткого диска повреждены, и запуск CHKDSK может помочь решить эту проблему. CHKDSK — это встроенная утилита Windows, которая сканирует и исправляет ошибки системного диска.
Несколько пользователей жалуются на то, что CHKDSK иногда зависает в Windows. Будьте уверены, что наш гид покажет вам, что делать в этом случае.
3. Настройте реестр
- Нажмите Windows + R, чтобы открыть диалоговое окно «Выполнить».
- Введите regedit и нажмите Enter.
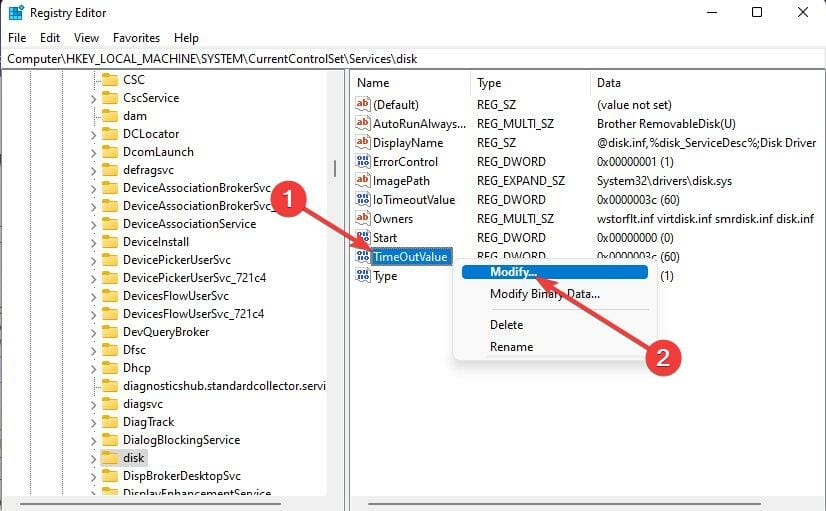
- Когда откроется редактор реестра, перейдите по следующему пути:
ComputerHKEY_LOCAL_MACHINESYSTEMCurrentControlSetServicesdisk - Щелкните правой кнопкой мыши TimeOutValue на правой панели и выберите «Изменить».
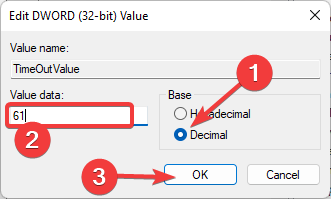
- Установите для базы значение «Десятичное число».
- Теперь вы увидите значение по умолчанию в данных «Значение» как 60, поэтому вместо этого установите его на 61.
- После этого нажмите OK, чтобы сохранить изменения и закрыть редактор реестра.
- Перезагрузите устройство и проверьте, устранена ли проблема.
4. Чистая загрузка вашего ПК
- Нажмите «Пуск», найдите конфигурацию системы и откройте ее из результатов поиска.
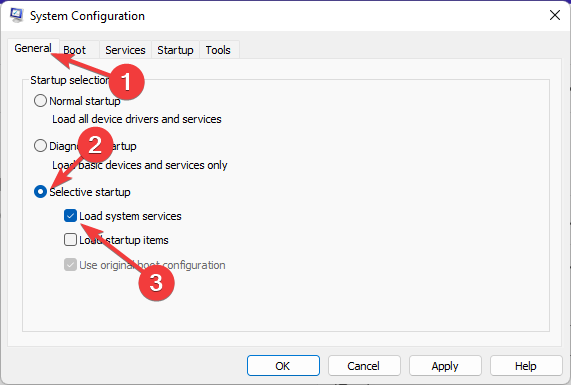
- Перейдите на вкладку «Общие», проверьте параметры «Выборочный запуск» и «Загрузить системные службы».
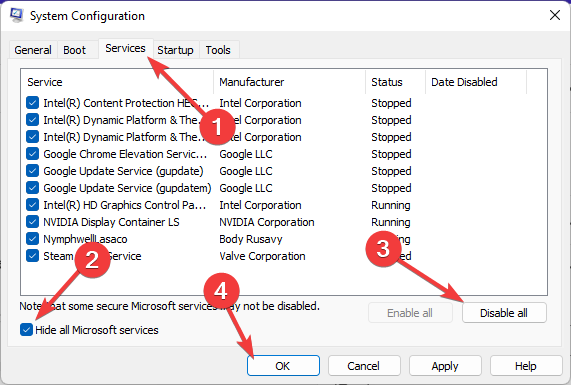
- Теперь перейдите на вкладку «Службы» и установите флажок «Скрыть все службы Microsoft».
- Теперь нажмите «Отключить все» в правом нижнем углу и нажмите «ОК», чтобы сохранить изменения.
Windows запустится с минимальным набором необходимых драйверов и программ, выполнив чистую загрузку. Это гарантирует, что сторонняя или фоновая программа вызывает ошибку.
Диск был неожиданно удален Windows также может возникнуть, когда диск поврежден или когда пользователь отключает диск во время работы системы. Чтобы исправить это, вам нужно будет проверить работоспособность дисковой подсистемы.
Что ж, это все с нашей стороны о том, как исправить, что Диск был неожиданно удален, и мы надеемся, что наши решения помогли вам решить эту проблему.
Если методы устранения неполадок не помогли устранить эту ошибку, попробуйте переустановить Windows. Но это должно быть только крайним средством.
Если у вас все еще есть какие-либо проблемы, не стесняйтесь оставлять комментарии ниже. Мы хотим услышать от вас.
by Vladimir Popescu
Being an artist his entire life while also playing handball at a professional level, Vladimir has also developed a passion for all things computer-related. With an innate fascination… read more
Updated on February 6, 2023
- The Disk has been surprise removed error occurs when something disrupts the system’s communication with the disk.
- This error disables the user from using the designated virtual drive and renders the system unusable.
- One of our recommendations includes running a CHKDSK scan. Do not hesitate to apply the steps detailed below.
XINSTALL BY CLICKING THE DOWNLOAD FILE
This software will keep your drivers up and running, thus keeping you safe from common computer errors and hardware failure. Check all your drivers now in 3 easy steps:
- Download DriverFix (verified download file).
- Click Start Scan to find all problematic drivers.
- Click Update Drivers to get new versions and avoid system malfunctionings.
- DriverFix has been downloaded by 0 readers this month.
The disk has been surprise removed is an error in the system event log on Windows devices. It’s an unusual issue on the virtual disk that all XBOX Live PC and Microsoft PC installations depend upon.
Usually, this issue occurs when something disrupts the system’s communication with a disk.
The Event ID 157 disk has been surprise removed in Event Viewer disables the user from using the designated virtual drive to install the games. This virtual drive won’t be visible in File Explorer like other drives.
You could also encounter the Disk has been surprise removed VMWare issue. And the solutions below will fix the problem but you will have to do the changes directly in the emulated OS from VMWare.
As it’s an issue of concern, it should be fixed right away. In this guide, we will be looking at some troubleshooting methods that will surely help you.
What does the Disk has been surprise removed mean?
The PNP manager does something called enumerations. An enumeration could be understood as a request sent to the drive that controls a bus, such as PCI.
These take an inventory of the devices on the bus and report back a list of all. Enumerations like these occur for several reasons.
When an enumeration request is received, the bus drivers will reach the bus for all devices. It will then issue commands to the existing devices as looking for new ones.
When these commands fail on an existing unit, the driver will mark the device as missing. Then it won’t be reported back to the PNP in the inventory.
Once the PNP determines the device isn’t available in the checklist, a surprise removal request will be sent to the bus driver to remove the device object.
As the CLASSPNP driver controls the device tag and receives a request for the disks, it sees the surprise removal request and logs an event if the disk is non-removable.
As a result, the disk would disappear from the system with no indication, and the message Disk has been surprise removed will appear.
How do I fix the Disk has been surprise removed error?
1. Update Storage Spaces Controller Driver
- Click on Start, type device manager, and select the app from the results.
- Expand the Storage Controllers section.
- Right-click on Microsoft Storage Spaces Controller and choose Update driver.
- In the next popup screen that appears, click on Search automatically for drivers.
- Once done, Windows will now automatically search and install any driver updates on your device.
Outdated drivers are the main reason for errors & system issues. If some of your files are missing or crashing, an automated solution like DriverFix can solve these problems in just a couple of clicks. And it’s also lightweight on your system!
The storage controllers are in charge of your storage drive ports, i.e., the SATA ports. If your storage controller drivers are out of date or corrupted, you may encounter the Event ID Disk has been surprise removed Xbox issue.
The majority of device driver issues on Windows are caused by missing, corrupted, or out-of-date drivers. This is just one of many reasons why you should maintain your device drivers up to date.
A computer cannot handle video cards, XBox controllers, sound cards, or other hardware; they must be managed by a driver. You can update drivers manually if you are completely familiar with the drivers your PC requires.
The ideal option is a driver updater program like DriverFix, which not only replaces but also backs up broken drivers.
The error will be resolved once you have downloaded and installed the most recent drivers. You will also notice an improvement in the performance of your device, and The disk has been surprise removed error will be eradicated.
- How to fix any Windows 11 disk error
- Windows was unable to repair the drive: How can I fix that?
- Restart to repair drive errors on Windows 10/11
2. Run a CHKDSK scan
- Click on Start and search for cmd, then click on Run as Administrator.
- Type the following command and press Enter.
CHKDSK C:/f/r/x - The command won’t start running as your device’s root drive is already in use. Instead, it will ask you to begin scanning when you restart your PC.
- Type Y, press Enter, then reboot Windows and wait for the procedure to complete.
This issue can also occur if any hard drive parts are corrupted and running a CHKDSK can help fix this issue. CHKDSK is an inbuilt Windows Utility that scans and repairs system disk errors.
Several users complain about the fact that CHKDSK sometimes gets stuck in Windows. Rest assured that our guide shows you what to do in case that happens.
3. Tweak the Registry
NOTE
Before getting started with this method, create a System Restore Point or back up your Registry. So, if in case anything goes wrong you can restore it and your Windows system will be back to normal.
- Click Windows key + R to open the Run dialog box.
- Type regedit and hit Enter.
- Once the Registry Editor opens, navigate to the following path:
ComputerHKEY_LOCAL_MACHINESYSTEMCurrentControlSetServicesdisk - Right-click on TimeOutValue in the right pane and select Modify.
- Set Base to Decimal.
- You will now see the default value in the Value data as 60, so set it to 61 instead.
- Once done, click on OK to save the changes and close the Registry Editor.
- Restart your device and check if the issue is fixed.
4. Clean boot your PC
- Click on Start, search for system configuration and open it from the search results.
- Navigate to the General tab, check the Selective Startup and Load System Services options under it.
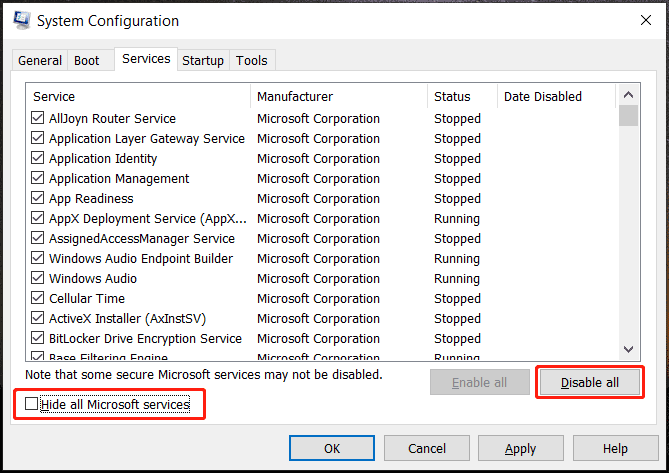
- Now navigate to the Services tab and check the option Hide all Microsoft services.
- Now click on Disable all at the bottom right corner and click on OK to save the changes.
Windows will start with a minimum set of required drivers and programs by performing a clean boot. It will ensure if a third party or background program is causing an error.
The disk has been surprise removed Windows may also arise when a drive is damaged or when a user unplugs a disk while the system is running. To correct this, you will need to verify the health of the disk subsystem.
Well, that’s all from our side on how to fix the Disk has been surprise removed and we hope that our solutions helped you solve this issue.
If the troubleshooting methods didn’t solve this error, try reinstalling Windows. But this should be only a last resort.
If you still have any issues, feel free to drop a comment below. We’re eager to hear from you.
-
MiniTool
-
MiniTool News Center
- Event ID 157 Disk Has Been Surprise Removed – Fix It Now
By Vera | Follow |
Last Updated June 22, 2022
Get an error saying disk 1/2/3/4/N has been surprise removed when you check Event Viewer in Windows 11/10? The event ID is 157. What should do to fix this issue? Take it easy and go to find solutions from the post written by MiniTool.
Event ID 157 Disk Has Been Surprise Removed
Event Viewer is a component of the Windows operating system. Via it, administrators and users can view the event logs of applications and system messages including errors, warnings, and information messages.
Event ID 157 is a common issue. When you check your Event Viewer, you may receive a warning that says “Disk X has been surprise removed” and the event ID is 157. The disk can be disk 1, 2, 3, 4, or anyone else.
Usually, the issue appears in Windows 11/10 when the communication between the system and that disk is disrupted. Fortunately, you can take some measures to remove “disk 1 has been surprise removed” or the event ID 157 on another disk. Let’s look through some ways from the following part now.
Fixes for Disk Has Been Surprise Removed Windows 11/10
Check the Disk Physically
On your computer, there may be a loose port/cable or faulty hard disk, leading to event ID 157 disk has been surprise removed. You can go to physically check the connection of the hard drive. If it is not the issue, try other ways.
Update Storage Spaces Controller Driver
The storage spaces controller driver is responsible for your storage drive ports like the SATA ports. If the controller driver is corrupt or outdated, an error like disk has been surprise removed may appear on Windows 10/11. Try to update the driver now.
Step 1: Press Win + X to choose Device Manager.
Step 2: Expand Storage controllers, right-click the storage spaces controller and choose Update driver.
Step 3: Click the first option called Search automatically for drivers. Then, Windows will search for the updated driver and install it on your machine by itself.
Run a CHKDSK Scan
If the hard disk has some internal issues, the warning of disk has been surprise removed may happen on Windows 11/10. You can run a CHKDSK scan to solve the issue.
Step 1: Type cmd to the search box, right-click Command Prompt, and select Run as administrator.
Step 2: In the CMD window, type CHKDSK N:/f/r/x and press Enter. Here N means the driver letter of the problematic hard drive.
Modify Registry
In Windows Registry, there is an item called TimeOutValue that may trigger the warning — disk 1 has been surprise removed. You can modify it to fix the issue.
Step 1: Type regedit to the search box and Registry Editor to open the app.
Step 2: Navigate to this path: ComputerHKEY_LOCAL_MACHINESYSTEMCurrentControlSetServicesdisk.
Step 3: Double-click on TimeOutValue from the right pane and set the value data to 61. Also, set Base to Decimal.
Change Drive Letter
If you have installed Windows 11 or 10 recently and you see the error of disk 2 has been surprise removed in Event Viewer, you can try to change the drive letter. Sometimes the drive letter may be lost after a clean install. This may be helpful to fix the issue.
Step 1: Choose Disk Management after pressing Win + X.
Step 2: Right-click the drive that has an issue and choose Change Driver Letter and Paths.
Step 3: Click Change or Add (if there is no driver) to assign a driver to the partition.
Clean Boot the PC
In a clean boot, Windows can run with a minimum set of required programs and drivers. This can help to find the third-party app that causes the error.
Step 1: Type system configuration to the search box and click the app to open it.
Step 2: In the General tab, check Selective startup and Load system services.
Step 3: In Services, check Hide all Microsoft services and click Disable all.
Step 4: Click Apply > OK.
Bottom Line
These are almost solutions to fix event ID 157 disk has been surprise removed from Windows 11/10. Try them now. If you find some other useful workarounds, leave a comment below to let us know.
About The Author
Position: Columnist
Vera is an editor of the MiniTool Team since 2016 who has more than 5 years’ writing experiences in the field of technical articles. Her articles mainly focus on disk & partition management, PC data recovery, video conversion, as well as PC backup & restore, helping users to solve some errors and issues when using their computers. In her spare times, she likes shopping, playing games and reading some articles.
- Remove From My Forums
-
Вопрос
-
Добрый день. Есть две хостовые машины на Windows server 2012 r2, на них крутятся виртуалки на разных ОС(2008 r2, 2012 r2, 2003 r2, cenOS).
На всех установлена роль windows server backup и настроено расписание архивирования на NAS. На всех 2008 r2 отрабатывает нормально. На одном их хостов с 2012 r2 бекап делается но в логах предупреждение disk 157
Диск # был неожиданно извлечен.
на другом хосте 2012 r2 бекап тоже делается но в логах предупреждение disk 157
Диск # был неожиданно извлечен.
и ошибка FilterManager 3
Диспетчеру фильтров не удалось подключиться к тому "DeviceHarddiskVolume21". Этот том будет недоступен для фильтрации до выполнения перезагрузки. Конечное состояние было 0xC03A001C.
На виртуальных машинах ситуация такая же, на некоторых server 2012 r2 только предупреждения disk 157, а на некоторых и предупреждения disk 157 и ошибка FilterManager 3.
подскажите, пожалуйста, в чем может быть проблему
Ответы
-
-
Предложено в качестве ответа
21 марта 2014 г. 13:45
-
Помечено в качестве ответа
Petko KrushevMicrosoft contingent staff, Moderator
24 марта 2014 г. 7:36
-
Предложено в качестве ответа
Every time we try and backup with Windows Server Backup on a 2012 R2 server to a 1Tb SATA disk it fails with:
- Eventid: 157 — Disk n has been surprise removed.
Which is then followed by many:
- Eventid: 153 — The IO operation at logical block address d90 for Disk 1 (PDO name: Device0000044) was retried.
We have tried enabling ‘Disk’ event logging but no events are written into the ‘Disk’
event log at all. How do we get events written
into the disk log?
This disk is fine apart from this problem, full chkdsk /r runs with no problem and running a speed/verify test on it for 12 hrs runs fine so not a fault disk problem just something triggered by VSS.
Any ideas what we should do next to diagnose
this further? This issue has now become quite urgent, this server
should have gone into live production by now.
Further event detail below:
Log Name: System
Source: disk
Event ID: 157
Task Category: None
Level: Warning
Keywords: Classic
User: N/A
Description:
Disk 2 has been surprise removed.
Event Xml:
<Event xmlns=»http://schemas.microsoft.com/win/2004/08/events/event»> Opens a new window;
<System>
<Provider Name=»disk» />
<EventID Qualifiers=»32772″>157</EventID>
<Level>3</Level>
<Task>0</Task>
<Keywords>0x80000000000000</Keywords>
<TimeCreated SystemTime=»2014-03-25T14:59:51.106657500Z» />
<EventRecordID>20275</EventRecordID>
<Channel>System</Channel>
<Security />
</System>
<EventData>
<Data>DeviceHarddisk2DR4</Data>
<Data>2</Data>
<Binary>0000000002003000000000009D000480000000000000000000000000000000000000000000000000</Binary>
</EventData>
</Event>
Log Name: System
Source: disk
Event ID: 153
Task Category: None
Level: Warning
Keywords: Classic
User: N/A
Description:
The IO operation at logical block address d90 for Disk 1 (PDO name: Device0000044) was retried.
Event Xml:
<Event xmlns=»http://schemas.microsoft.com/win/2004/08/events/event»> Opens a new window;
<System>
<Provider Name=»disk» />
<EventID Qualifiers=»32772″>153</EventID>
<Level>3</Level>
<Task>0</Task>
<Keywords>0x80000000000000</Keywords>
<TimeCreated SystemTime=»2014-03-25T14:59:57.505200300Z» />
<EventRecordID>20276</EventRecordID>
<Channel>System</Channel>
<Security />
</System>
<EventData>
<Data>DeviceHarddisk1DR1</Data>
<Data>d90</Data>
<Data>1</Data>
<Data>Device0000044</Data>
<Binary>0F0104000400340000000000990004800000000000000000000000000000000000000000000000000028042A</Binary>
</EventData>
</Event>


