
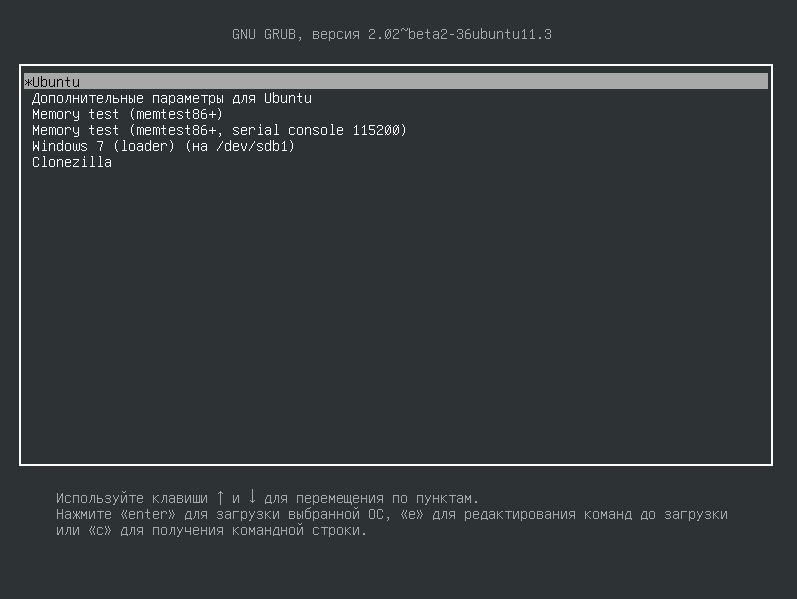
Нередко возникает необходимость в установке двух принципиально разных операционных систем на один компьютер: Windows и Linux. Разумеется, подобное «соседство» будет связано с некоторыми неудобствами. Для установки, как правило, используют специальную программу GRUB. Но к сожалению, при её использовании можно столкнуться с рядом ошибок. В этой статье разберёмся с тем, как исправить ошибки загрузчика GRUB. Давайте же начнём. Поехали!

Для начала давайте определимся с тем, что из себя представляет эта программа. GRUB — представляет собой системный загрузчик, устанавливающийся непосредственно с Линукса и записывающий все данные на первый раздел диска (MBR).
Сам rescue mode является отличительной чертой GRUB 2 от его предыдущей версии. Этот режим запускается, если программе-загрузчику не удалось найти файл «grub.cfg» либо не удалось передать управление в kernel (ядро). В итоге не удаётся найти загрузочные файлы и запустить операционную систему. Именно тогда и возникает ошибка.

Следуйте инструкциям ниже, чтобы узнать, как решить проблему с GRUB
Способ 1
Что делать в случае ошибки unknown filesystem grub-rescue? Перед вами окно, в котором можно использовать только 4 команды, их вполне достаточно, чтобы исправить все проблемы и успешно загрузиться:
- ls — позволяет вывести всё содержимое;
- set — применяется для установки переменных;
- unset — очищает переменную;
- insmod — необходима для загрузки модулей.
Также можно сделать доступным ряд других команд. Сделать их доступными можно, загрузив модуль «normal». Для этого пропишите:
insmod normal
После этого станут доступны:
- dump — для очистки памяти;
- exit — команда выхода из загрузчика;
- chainloader — необходима, чтобы указать последующей команде boot передать управление цепочечному загрузчику;
- kfreebsd — несколько команд, позволяющих загрузить ядро FreeBSD, его модули;
- rmmod — позволяет выгрузить указанный модуль ядра;
- multiboot.
Первым делом нужно отыскать модули, чтобы загрузить их. Для этого введите:
ls
Результатом выполнения команды будет следующее:
(hd0) (hd0,msdos3) (hd0,msdos2) (hd0,msdos1) (hd1) (hd1,msdos2) (hd1,msdos1)
Из этого можно сделать вывод, что загрузчик не может определить файловые системы дисков, поэтому определяет их как msdos. Теперь необходимо угадать видимые диски. В конкретном примере перед вами два диска: hd0 (с тремя разделами) и hd1 (с двумя разделами). Допустим, вы знаете, что Linux инсталлирован на диск, который имеет три раздела. В таком случае вам нужен диск с индексом «0».
GRUB даёт названия разделам в обратном порядке. В связи с этим, неясно как трактовать запись: «(hd0,msdos3)». Ведь можно посчитать это как первым разделом, так и третьим. К счастью, из этой ситуации можно выйти при помощи такого синтаксиса команды: «(hd0,1)». Обратите внимание, что в программе-загрузчике GRUB отсчёт дисков идёт с 0, а разделов с 1.
Допустим, что Линукс хранится в первом разделе, тогда он будет обозначаться (hd0,1). В этом случае команда, которую необходимо прописать, будет иметь вид:
set prefix=(hd0,1)/boot/grub
set root=(hd0,1)
Теперь модули могут быть загружены. Использовать их можно только после загрузки.
После того как вы выбрали нужный диск, проверьте содержится ли там то, что нужно. Для этого пропишите:
ls /boot/grub
В результате выполнения на экране появится список md файлов.
Далее, пропишите:
insmod ext2
insmod normal
normal
После этого загрузчик будет переведён в режим полной функциональности. Затем автоматически будут найдены разделы с операционной системой, и откроется меню программы.
Теперь остаётся загрузить Linux. Делается это при помощи команды:
grub-install /dev/sda

Способ 2
Всё сильно упрощается, если использовать Live CD – загрузочный диск с системой Linux. Он может быть записан на флешке, на внешнем винчестере или на обычном диске – это неважно, главное, чтобы с него можно было загрузить компьютер.
После загрузки Linux стандартным способом устанавливается бесплатная утилита Boot Repair. Она предназначена именно для устранения ошибок загрузки с помощью загрузчика Grub и очень проста в использовании – достаточно кликнуть по кнопке.
Заметим, что иметь Live CD для линуксоида всегда полезно и даже необходимо. Это зачастую избавляет от множества проблем, так как позволяет загрузить полноценную систему с внешнего носителя и использовать весь её инструментарий. Скачать такой диск с любой версией Linux не представляет сложностей, в комплекте обычно идёт инструкция по записи его на флешку.
После выполнения всех этих действий ошибка будет устранена. Пишите в комментариях была ли полезна для вас эта статья и задавайте любые интересующие вопросы по рассмотренной теме.
Contents
- Overview
-
GRUB 2 Terminal Commands
- Normal
- grub>
- grub rescue>
-
General Troubleshooting Preparation
- Boot-Repair
-
Search & Set
- How & Where to Search
-
Specific Troubleshooting
- grub>
- grub rescue>
- GRUB
-
Editing the GRUB 2 Menu During Boot
- Key Points About Terminal Menu Editing:
- Menu Editing Examples
- Post Boot Follow Up
- Fallback mode
-
GRUB 2 Errors
-
Selected Problems and Bugs
- External Drive Installs and »grub-pc» Updates
- External Drive Installs and MBR Selection
- Boot Partition is in Logical Volume whose Volume Group contains a snapshot
- insmod fails with «error: no such disk»
-
Selected Problems and Bugs
- Links
This page provides the user with information on options available for repairing GRUB 2 boot issues and specific instructions on how to use the GRUB 2 terminal. The instructions are written for GRUB 1.99, which is the version of GRUB 2 which is included on Ubuntu 11.04, Natty Narwhal, and later. Differences for version 1.98 (Ubuntu 10.4, Lucid Lynx) are noted when the procedures differ.

GRUB 2’s ability to fix boot problems is greatly improved over the original GRUB bootloader. In addition to an automatic fallback mode if booting from a menuentry in a submenu, GRUB 2 allows the user to edit its menu before the operating system is loaded. The rescue mode GRUB 2 terminal can help boot an operating system so that permanent repairs to system files can be made.
The instructions on this page are written for a fully-installed Ubuntu operating system. WUBI boot problems are not covered in detail although they are addressed in several sections.
Overview
GRUB 2 boot problems can leave the system in several states. The user may see one of the following displays on the monitor when a boot fails. The display provides the first indication of what might be causing the failure to boot. Here are the failure prompts and displays, and the possible cause of each:
-
grub> prompt: GRUB 2 loaded modules but was unable to find the grub.cfg file.
-
grub rescue> prompt: GRUB 2 failed to find its grub folder, or failed to load the normal module.
-
grub>: — The grub prompt on a blank screen.
-
GRUB 2 has found the boot information but has been either unable to locate or unable to use an existing GRUB 2 configuration file (usually grub.cfg).
-
-
grub rescue>: — The rescue mode.
-
GRUB 2 is unable to find the grub folder or its contents are missing/corrupted. The grub folder contains the GRUB 2 menu, modules and stored environmental data.
-
-
GRUB — a single word at the top left of the screen, with no prompt and no cursor.
- GRUB has failed to find even the most basic information, usually contained in the MBR or boot sector.
-
Busybox or Initramfs: GRUB 2 began the boot process but there was a problem passing control to the operating system. Possible causes include an incorrect UUID or root= designation in the ‘linux’ line or a corrupted kernel.
-
Frozen splash screen, blinking cursor with no grub> or grub rescue prompt. Possible video issues with the kernel. While these failures are not of GRUB 2’s making, it may still be able to help. GRUB 2 allows pre-boot editing of its menu and the user may restore functionality by adding and/or removing kernel options in a menuentry before booting.
Each of the GRUB 2 failure modes can normally be corrected either from the GRUB 2 terminal or by using an Ubuntu LiveCD. Additionally, there are compatible 3rd party bootable «rescue» CD/USB options which may also work. If using an Ubuntu LiveCD, it is recommended, but not always necessary, to use the same version CD as the system you are trying to repair. This ensures compatability of any modules and configuration files that may be loaded while attempting to repair the system.
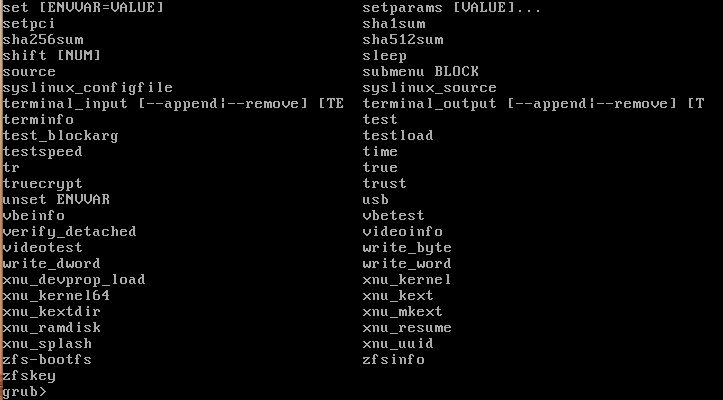
GRUB 2 Terminal Commands
 Here are some useful tips and features for use with the GRUB 2 terminal:
-
Turning off the splash image. This may make viewing the terminal easier. Press c at the GRUB 2 menu to get to the command line and then type: set color_normal=white/blue or the color combination you wish to use. «black» as the second entry retains the menu’s transparency and should be avoided as a selection if the user wants to work with a solid background color.
-
TAB completion. This feature is very handy. At any point, pressing the TAB key may complete an entry, if the element is unique, or display available options. Typing a few additional characters and pressing TAB again may allow tab completion to finish the entry.
-
set pager=1 To prevent text from scrolling off the screen, type set pager=1.
-
Help. Type help to view a list of all the commands. Type help x to view help commands beginning with the letter «x». Tab completion and using the up arrow to repeat commands work the same as in a normal terminal.
Normal
When GRUB 2 is fully functional, the GRUB 2 terminal is accessed by pressing c. If the menu is not displayed during boot, hold down the SHIFT key until it appears. If it still does not appear, try pressing the ESC key repeatedly.
From a GRUB 2 terminal with the grub> prompt, a wide variety of commands are available.
- A few of the more important commands:
Command
Result / Example
boot
Initiate the boot sequence, also F10 or CTRL-x
cat
Display the contents of readable files; cat (hd0,1)/boot/grub/grub.cfg
configfile
Load a GRUB 2 configuration file such as grub.cfg; configfile (hd0,5)/boot/grub/grub.cfg
initrd
Loads the initrd.img, necessary for booting; initrd (hd0,5)/initrd.img
insmod
Loads a module; insmod (hd0,5)/boot/grub/normal.mod, or insmod normal
linux
Loads the kernel; insmod /vmlinuz root=(hd0,5) ro
loop
Mount a file as a device; loopback loop (hd0,2)/iso/my.iso
ls
Lists the contents of a partition/folder; ls, ls /boot/grub, ls (hd0,5)/, ls (hd0,5)/boot
lsmod
List loaded modules
normal
Activate the normal module, if loaded
search
Search for a device. Type help search for the available options.
set
Review current settings, or set XXX to set a variable such as colors, prefix, root
vbeinfo
Display GRUB 2 available resolutions
To view the complete command list, type help. For details on a particular command, type help [command]
grub>
When GRUB 2 is unable to boot or display the GRUB 2 menu the system will be left at a GRUB 2 terminal if possible. If the system boots to the grub> prompt, the usual modules and commands are normally available. The user may need to manually load modules using the insmod [module] command before some commands will work.
grub rescue>
In the grub rescue mode, only a limited set of commands are available. These commands are sufficient to investigate the contents of the drives, set prefix (path to the grub folder) and root (partition), load modules and boot.
The rescue mode provides fewer commands than the normal GRUB prompt line, but also provides these additional commands:
-
Command
Result / Example
dump
Clears memory
exit
Exit GRUB 2
normal
Return to the standard «grub>» mode if possible.
Among the commands which can be used in the grub rescue mode:
-
boot
cat
chain
help
insmod
linux
ls
multiboot
normal
search
set
unset
General Troubleshooting Preparation
Boot-Repair
The majority of this guide is devoted to working with the GRUB 2 terminal, which is used to enter commands to attempt to repair a broken bootloader. Boot-Repair is a GUI application which can automatically analyze boot problems and select the proper course of action to repair them. Its simple interface provides beginners as well as experienced Linux users an easy method of repairing the majority of GRUB 2 problems.
Additionally, Boot-Repair contains an automated method to run a boot info script which performs a series of tests and provides a file containing much valuable information regarding the status of the computer’s operating and boot systems. This file can be inspected by community helpers on forums or IRC channels to help diagnose boot problems.
Boot-Repair can be run from a LiveCD or an operating Linux system. To download the package run the following commands:
-
sudo add-apt-repository ppa:yannubuntu/boot-repair && sudo apt-get update
sudo apt-get install -y boot-repair && boot-repair
Visit the Boot-Repair community document for more information.
Boot-Repair is available from the Launchpad repositories and can be run from a CD or a working Linux OS.
Search & Set
A great many boot problems are due to incorrect paths to required files. The GRUB 2 terminal, in either ‘failure’ mode, provides a robust ability to search hard drive(s) and partitions and to inspect their contents.
In order to boot successfully, the root, prefix, linux and initrd variables must be correct. The user must verify the paths and names of these items. If they are incorrect, use the commands below to find and fix them. GRUB 2 variable settings can be viewed with the set command.
In the following examples, X is a hard drive number; Y is a partition number. If a command example includes either of these replace them with the appropriate value.
How & Where to Search
In the graphic below, the text in red are commands to be entered by the user, and text in green is the output of the command on an operating system (i.e. what you would like to see if your Ubuntu installation is on sda1).

-
The first hard drive is 0. The first partition is 1. Thus sda1 becomes (hd0,1), sdb5 is (hd1,5).
-
Use the ls command in the follow manner
- «Tab completion» may work — enter part of the filename and press the TAB key.
|
Command |
Purpose |
|
ls |
Search the entire computer for devices and partitions: (hd0) (hd1) (hd0,1) (hd0,5) (hd1,1) |
|
ls / |
Search the root directory of the device designated as root (use the set command to check root). |
|
ls (hdX,Y) |
View information about a partition — format, size, UUID, etc. |
|
ls (hdX,Y)/ |
View the root contents of a partition. Use this command to look for the presence of vmlinuz and initrd.img symlinks |
|
ls (hdX,Y)/boot/ |
View the contents of a folder |
|
ls (hdX,Y)/boot/ |
Inspect the /boot folder. It should contain the actual kernel (linux-3.2…) and initrd image (initrd.img-3.2….) |
|
ls (hdX,Y)/boot/grub/ |
Inspect the /boot/grub folder. It should contain grub.cfg and many *.mod files. If looking for a specific file, include the name in the search to limit the number of returns. If available, the command set pager=1 will also limit returns to a single screen. |
|
What to Look For |
Where It Should Be (Default Installation) |
Specific / General Search Example |
|
grub.cfg |
(hdX,Y)/boot/grub/ or /boot/grub/ |
ls (hdX,Y)/boot/grub/grub.cfg or ls /boot/grub/ |
|
vmlinuz |
(hdX,Y)/ or / |
ls (hdX,Y)/vmlinuz or ls /vmlinuz or ls / |
|
linux-3.2.0-14* |
(hdX,Y)/boot/ or /boot/ |
ls (hdX,Y)/boot/vmlinuz-3.2.0-14 |
|
initrd |
(hdX,Y)/ or / |
ls (hdX,Y)/ or ls /initrd |
|
initrd.img-3.20-14 |
(hdX,Y)/ or /boot/ |
ls (hdX,Y)/boot/initrd.img-3.20-14 or ls (hdX,Y)/boot/ |
* Note: Use the full kernel name, including -generic, when searching or setting a kernel variable. Using the «TAB completion» technique may eliminate some typing and be more accurate if available.
Use the following commands to set these parameters (if incorrect). Substitute the correct value for X and Y. (Example: set root=(hdX,Y) becomes set root=(hd0,5) )
|
Task |
Command |
Notes |
|
Set the prefix |
set prefix=(hdX,Y)/boot/grub |
Use the actual location of the grub folder |
|
Set root |
set root=(hdX,Y) |
|
|
Set the kernel |
linux /vmlinuz root=/dev/sda1 ro |
Set the kernel if the symlink vmlinuz exists in / |
|
Set the kernel |
linux (hdX,Y)/boot/vmlinuz-3.0.2-14 root=/dev/sda1 ro |
Set the kernel itself |
|
Set the initrd image |
initrd /initrd.img |
Set the initrd image if the symlink exists in / |
|
Set the initrd image |
initrd (hdX,Y)/boot/initrd.img-3.0.2-14 |
Set the initrd image itself |
Specific Troubleshooting
Use the section below based on the type of GRUB 2 terminal prompt displayed on the monitor.
 The commands which follow assume you have determined the proper parameters for prefix, root, linux, and initrd. Review the Search & Set section of this page for guidance .
grub>
Terminal Display: The GRUB 2 header/version information and a grub> prompt.

If GRUB 2 leaves you at the grub> prompt, it has normally found the grub folder and loaded at least some basic modules. The configuration file (grub.cfg) may be missing, misnamed, or corrupted.
Quick Fix:
-
Use the Search & Set section to confirm the correct paths are set. Inspect the contents of the /boot/grub folder. Look for the grub.cfg file. It could be misnamed or missing. If not located in /boot/grub, use the ls command look for another .cfg file or look in /boot or other locations. If you locate the correct .cfg file:
-
configfile /boot/grub/grub.cfg or configfile (hdX,Y)/boot/grub/grub.cfg
If a .cfg with another name is located, substitute its path/filename in the command.
If the configuration file is loaded and not corrupt, when the above command is executed the GRUB 2 menu should appear and the user can make a selection to boot. Once booted into the system, correct the filename or move the configuration file to its proper location. Run update-grub. If the configuration file is not found, a message will be generated and the user must enter the boot commands manually.
Extended Fix:
The following commands should set the root and prefix paths and load the kernel and initrd image. With this information, GRUB 2 does not need a configuration file and should be able to boot the system if the only problem was a corrupted or missing menu.
-
Press ENTER after completing each line. Some entries will not provide feedback. This is normal.
-
If a «file not found» or similar error message is displayed while running these commands, ensure you are using the correct X,Y values and the correct paths are set.
|
1. set root=(hdX,Y) |
Confirm the correct X,Y values and press ENTER. |
|
Example: If the Ubuntu system is on sda5, enter: set root=(hd0,5) |
|
|
2. linux /vmlinuz root=/dev/sdXY ro |
Example: linux /vmlinuz root=/dev/sda5 ro |
|
If the vmlinuz symlink does not exist, use the full path to the kernel in /boot |
|
|
Example: linux /boot/vmlinuz-3.2.0-14-generic root=/dev/sda1 ro |
|
|
If successful, after ENTER there will be a slight delay and no messages. |
-
Wubi users only — substitute these commands in Steps 1 and 2:
-
1.set root=(loop0)
2. linux /vmlinuz root=/dev/sdXY loop=/ubuntu/disks/root.disk ro
|
3. initrd /initrd.img |
Selects the latest initrd image. |
|
If the vmlinuz symlink does not exist, use the full path to the initrd image in /boot |
|
|
If successful, after ENTER there will be a slight delay and no messages. |
|
|
4. boot |
Boot to the latest kernel on the selected partition. |
If the system fails to boot:
-
Attempt to find the GRUB 2 configuration file. The normal name is grub.cfg file. If not found, look for a misnamed .cfg file or in alternate locations. The menu configuration file may contain settings required for a successful boot (such as non-standard kernel options) even if the paths/filenames are correct.
-
Use the set command to confirm the correct root and prefix settngs. Also inspect the folders’ actual contents with the ls command. The grub prompt normally means the GRUB 2 folder is intact but doesn’t guarantee the integrity of other system files.
-
root= should point to the drive and partition on which Ubuntu is installed. If you use the ls / command you should see the main Ubuntu system folders.
-
If the system boots, please refer to the [[#Post-Boot Follow Up|Post Boot Follow Up] section
If the system fails to boot, proceed to the [#grub rescue|grub rescue]] section for more detailed troubleshooting options.
grub rescue>
The GRUB 2 rescue mode is a major enhancement to the GRUB bootloader. The presence of the grub rescue> prompt signifies that GRUB 2 has failed to find the grub folder, the grub.cfg file, and/or the associated modules. The rescue prompt is presented so the user can provide the path to the grub folder, load the necessary modules, and provide the proper boot commands.

A common reason for the grub rescue> prompt is an incorrect path to the grub folder. Reasons for the prompt also include a failure to update GRUB 2 after certain system or partition operations, improper designation of the grub folder location, missing linux or initrd.img symlinks in /, or a failed installation.
To successfully boot from the grub rescue> prompt:
-
The grub folder must exist and contain the necessary GRUB 2 files and modules.
-
The proper paths must be set via the set prefix command.
- Many GRUB 2 commands will not work until the correct path is set.
If the path to the grub folder (normally /boot/grub) is not correct, an unknown command or file not found message is likely.
- Many GRUB 2 commands will not work until the correct path is set.
- The necessary modules must be loaded.
- The kernel cannot be loaded until the ‘linux’ module is loaded.
- A Linux kernel and initrd.img must be located and loaded.
Use the General Troubleshooting Preparation section to locate the correct partitions and file locations. Once the user has confirmed the paths and existence of the proper folders using the Search & Set section, run the following commands:
|
1. set prefix=(hdX,Y)/boot/grub |
Use the values determined earlier. |
|
Example: If the Ubuntu system is on sda5, enter: set prefix=(hd0,5)/boot/grub |
|
|
2.* set root=(hdX,Y) |
Confirm the correct X,Y values and press ENTER. |
|
Example: If the Ubuntu system is on sda5, enter: set root=(hd0,5) |
|
|
3. insmod normal |
Load the normal module. |
|
If the module loads there will be no message. |
|
|
If the module fails to load, try the full path: insmod (hdX,Y)/boot/grub/normal.mod |
|
|
4. normal |
Transition to the normal GRUB 2 mode with increased functionality. |
|
If the module loads there will be no message. |
|
|
If the module loads, HELP, TAB completion and command recall using the UP/DN keys should be available. |
|
|
5. set |
(Optional) Review the current settings. |
|
6. insmod linux |
Load the linux module. An error message usually means the path is incorrect. |
|
7.* linux /vmlinuz root=/dev/sdXY ro |
Selects the latest kernel. |
|
Example: linux /vmlinuz root=/dev/sda5 ro |
|
|
If the vmlinuz symlink does not exist in /, use the full path to the kernel in /boot |
|
|
Example: linux /boot/vmlinuz-3.2.0-14-generic root=/dev/sda1 ro |
|
|
8. initrd /initrd.img |
Selects the latest initrd image. |
|
If the initrd symlink does not exist in /, use the full path to the initrd image in /boot |
|
|
If successful, after ENTER there will be a slight delay and no messages. |
|
|
9. boot |
Boot to the latest kernel on the selected partition. |
-
* Wubi users only — substitute these commands in Steps 2 and 7:
-
1.set root=(loop0)
2. linux /vmlinuz root=/dev/sdXY loop=/ubuntu/disks/root.disk ro
Some additional considerations:
-
The current prefix and root settings may be checked at any time with the set command. To remove a setting, use the unset command.
-
Example: unset prefix
-
-
Modules must be loaded before they can be used. If a module has not been loaded a unknown command error is displayed. If an incorrect path is specified, a file not found error message may be displayed.
-
The linux module must be loaded to be able to load both the kernel and the initrd image unless the normal module is loaded first.
-
If the modules cannot be found in the /boot/grub folder, the user may be able to load them from the /usr/lib/grub/i386-pc folder. The address if Ubuntu was installed on sda1 would be (hd0,1)/usr/lib/grub/i386-pc and the command would be:
-
insmod (hd0,1)/usr/lib/grub/i386-pc/normal.mod
-
Refer to the Post Boot Follow Up section if the system successfully boots.
GRUB
Presence of the word GRUB at the top left of the monitor with no blinking cursor indicates that GRUB 2 can not even find the Master Boot Record (or equivalent) information. Thus, the core.img file, the /boot and /grub folder locations and contents are completely unknown to GRUB 2.

The seriousness of the problem cannot be assessed without the use of another operating system or an Ubuntu LiveCD or equivalent. The Ubuntu partition should be mounted for inspection and the user can then check to see if the system files are intact. If so, the user can use the »ChRoot» procedure from the LiveCD to reinstall GRUB 2 and rewrite the information to the MBR.
Details on this procedure are contained in the Grub2/Installing community documentation.
Following a failed boot, GRUB 2 is designed to display the GRUB 2 menu on the next boot and await user input. This will happen even if the user has set the system to boot without displaying the GRUB 2 menu. This provides the user the opportunity to select a different menu option or edit a menuentry to change boot parameters. While this can cause problems on a server, for most users it is a benefit which will prevent constant rebooting during unmonitored operations.

In addition to its troubleshooting benefits, pre-boot editing of the GRUB 2 menu also allows users to add or remove kernel options, change operating modes, and accomplish other tasks such as testing fonts and splash images. For users who like to experiment, the settings altered via the GRUB 2 terminal are non-persistent and won’t affect future boots.
- If the menu is displayed, the automatic countdown may be stopped by pressing any key other than the ENTER key.
- If the menu is not normally displayed during boot, hold down the SHIFT key as the computer attempts to boot to display the GRUB 2 menu.
- In certain circumstances, if holding the SHIFT key method does not display the menu pressing the ESC key repeatedly may display the menu.
- Press the ‘e’ key to reveal the selection’s settings.
- Use the UP/DN/Left/Right cursor keys to navigate to the desired point for editing.
-
Make a single or numerous changes at any spot in the menu. Do not use ENTER to move between lines.
-
TAB completion is available, which is useful in entering kernel and initrd entries.
- After starting to type the kernel or initrd name, press TAB.
- If additional characters are not added, look at the bottom of the menu as there may be multiple choices. Add characters until only one entry is visible at the bottom, then TAB again.
- When editing is complete:
-
CTRL-x or F10 — boot with the changed settings (highlighted for emphasis).
-
CTRL-c or F2 — jump to the command line to perform diagnostics, load modules, change settings, etc.
-
If an edit is incomplete and GRUB 2 detects an error in the kernel or initrd line it will return to the line when exiting this mode.
-
-
ESC — Discard all changes and return to the main menu.
- The choices are listed at the bottom of the screen as a reminder.
-
- Edits made to the menu in this manner are non-persistent. They remain in effect only for the current boot.
-
Once successfully booted, the changes can be made permanent by editing the appropriate file, saving the file, and running update-grub as ‘root’.
-
- Change a kernel version if one is available but not listed on the GRUB 2 menu.
-
Use the TAB key after entering part of the kernel or initrd version to see which ones are available.
-
-
Add or remove kernel options from the linux line.
-
Remove quiet to display system messages during boot.
-
Remove existing options and add nomodeset to avoid module loading, especially if having video issues.
-
- Boot to the recovery mode even if it is not listed on the menu.
-
Remove existing kernel options from the linux line and add single
-
- Remove references to UUIDs
-
Remove the entire search line
-
On the linux line, replace «root=UUID=<some alphanumeric>» with «root=/dev/sdXY»
-
Post Boot Follow Up
Any changes made from the GRUB 2 terminal are not permanent. After successfully booting into the system the user must take several steps to ensure the problem is permanently fixed.
- Update the GRUB 2 configuration file
-
sudo update-grub
-
-
Reinstall GRUB 2 to the drive’s MBR or equivalent
-
Install to the drive, not to the partition. Example: sda, not sda1
sudo grub-install /dev/sdX
-
-
Inspect the GRUB 2 configuration file. The default is /boot/grub/grub.cfg
-
For problems with booting the main linux kernel, verify the search, linux, and initrd lines in the [### BEGIN /etc/grub.d/10_linux ###] section of the file.
- Ensure the paths and kernel/initrd image versions are correct.
- Confirm the UUID numbers.
-
UUIDs can be checked with the sudo blkid command.
-
- Verify the existence and contents of the system boot folders.
-
/ should contain the symlinks vmlinuz and initrd.img
-
/boot/ should contain the actual kernel (vmlinuz-X.X.X-XX…) and initrd image (initrd.img-X.X.X-XX…)
-
/boot/grub should contain grub.cfg and numerous module files (*.mod)
-
For a corrupted GRUB 2 installation, purging and reinstalling GRUB 2 is very easy if the user has a working Internet connection. Refer to Grub2/Installing#Purging & Reinstalling GRUB 2 for guidance.
Fallback mode
It is possible to configure Grub2 to fall back to a known good menu-entry if the default menu-entry for some reason fails to boot. An example script that can be used for this is available at this webpage (in German).
GRUB 2 Errors
GRUB 2 does not report error numbers. If a number is associated with an error, it is a problem with the transition from GRUB legacy to GRUB 2.
A GRUB 2 error will leave the user at the grub> or grub rescue> prompt, the word GRUB with no cursor, or a hung boot caused by improper system path designations or a corrupted operating system. These issues are addressed earlier on this page — go to the General Troubleshooting Preparation section to start the recovery process.
Selected Problems and Bugs
External Drive Installs and »grub-pc» Updates
Launchpad Bug 496435 Installs of Ubuntu on external drives can cause problems as grub-install uses device names (e.g. sda, sdb) rather than UUIDs in certain circumstances. If connected to another machine when an update of grub-pc is made, the upgrade may be written to the incorrect device and make the computer unbootable.
A workaround is posted on the bug link above.
External Drive Installs and MBR Selection
Launchpad Bug 414996
When installing Ubuntu to a USB drive, the potential exists for GRUB 2 to write to the hard drive’s MBR or split the installation between the hard drive and the USB drive (rather than completely on the USB device). This can render the main drive unbootable.
Workaround: During the final stages of the install there is an «Advanced» button which allows the user to select the install location. See the bug report for more details.
Boot Partition is in Logical Volume whose Volume Group contains a snapshot
Launchpad Bug 563895
When your boot partition (the one providing /boot) is a LV, make sure not to have any LVM snapshots inside the containing VG. At reboot this will render your system unbootable, dropping you in a «grub rescue>«-shell with the following message: «error: no such disk.»
The grub-rescue-shell provided does not help you, because all modules (esp. lvm) are unreachable. You’ll have to boot from a install medium and remove all snapshots that are in the same VG as your boot partition by hand.
This issue is extremely annoying if your server is in a remote datacenter since the origin of the problem cannot be spotted easily and repairing the system may be hard.
While this will be fixed in the upcoming Maverick Meerkat 10.10 release, the current Lucid Lynx LTS 10.04 is affected.
A workaround would be to install ubuntu using a separated non-LVM partition for /boot if you are using LVM snapshots regularly.
There’s some kind of irony that if you’re careful and take a LVM snapshot before upgrading (and possibly rebooting) your system, this will trigger the bug.
insmod fails with «error: no such disk»
Several grub2 modules, such as the linux-module depends on other modules, which is attempted to be auto-loaded. For this to work, the variable $prefix, must be set to where the grub2 modules can be found. Usually, this is accomplished with the command «set prefix=/boot/grub«.
Links
Grub2
Grub2/Displays
Grub2/Installing
Grub2/Submenus
Grub2/Upgrading
Boot-Repair
CategoryBootAndPartition
Grub — это универсальный загрузчик, который используется для загрузки операционной системы Linux и других ОС, в случае, если на компьютере установлен Linux. Но когда вы выполняете какие-либо действия с разделами на диске, например, восстанавливаете их с помощью Clonezilla, изменяете размер или что-то другое, что Grub может быть поврежден.
Часто такие повреждения приводят к ошибке grub rescue unknown filesystem. Тогда перед вами не появляется меню, а только сообщение про ошибку и консоль восстановления для ввода команд. В этой небольшой статье мы рассмотрим как исправить эту ошибку.
Ошибка grub rescue unknown filesystem может возникать по разным причинам вот самые распространенные причины:
- Вы восстанавливали диск из Clonezilla и были изменены метрики раздела /boot;
- Раздел /boot был отформатирован и больше не существует;
Дело в том, что Grub устанавливается в два места. Первое — место в таблице разделов MBR. Там очень мало места, около 512 байт, а следовательно, весь загрузчик туда поместиться не может. Поэтому Grub имеет модульную структуру и все основные модули, конфигурационные файлы и ресурсы располагаются на обычном разделе, который монтируется после загрузки в /boot. Причем программа в MBR помнит где находится раздел /boot, но если с этим разделом что-то произойдет и программа не сможет загрузить привычные модули, то выдаст ошибку uncnown filesystem. Если раздела больше нет, то вам останется только брать LiveCD диск и переустанавливать загрузчик, если же раздел просто немного изменен, то еще можно все исправить.
Как исправить Grub unknown error
У вас есть простейший терминал с самой простой командной оболочкой. Чтобы знать какие команды можно там вводить наберите:
help
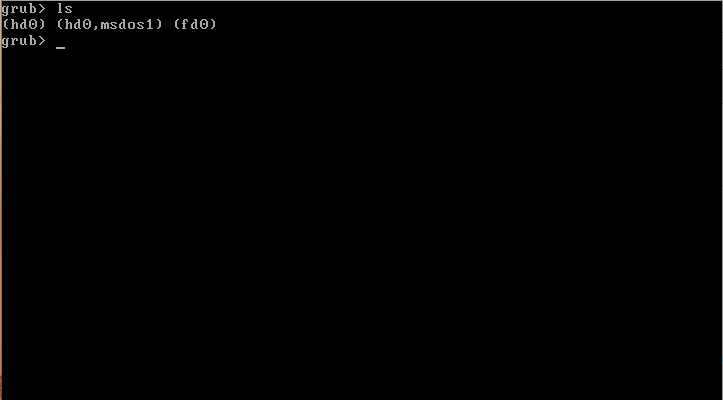
Дальше нам нужно посмотреть список доступных разделов, для этого используется команда ls, как в bash:
ls
Без модулей grub поддерживает только ту файловую систему, которая была на /boot. Вы можете попытаться просмотреть содержимое каждого раздела чтобы определить где находятся файлы модулей. Например:
ls (hd0,1)/
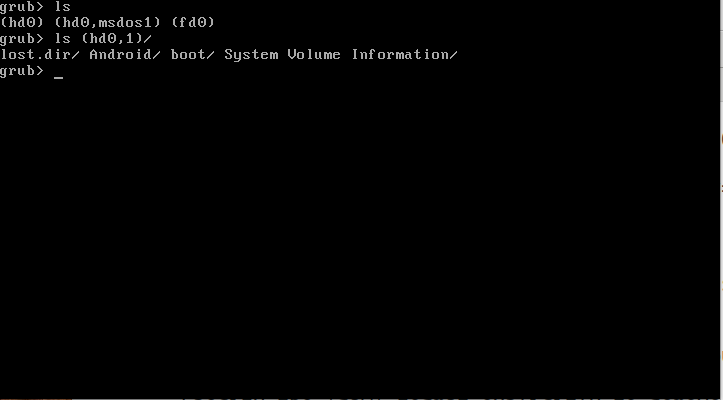
Если вы увидели папку boot, значит это наш раздел. Дальше устанавливаем этот раздел значением переменной root с помощью команды set:
set root=(hd0,1)
set prefix=(hd0,1)/boot/grub
Загружаем и запускаем модуль normal, который должен загрузить все, что нам необходимо:
insmod normal
normal
Если раздел /boot не был поврежден, то загрузчик нормально определит все файлы, а потом запустит привычное для вас меню. Конечно, после того, как система загрузится, вам будет необходимо восстановить загрузчик Grub чтобы не вводить эти команды при каждой загрузке системы.
Выводы
В этой статье мы рассмотрели почему возникает ошибка error unknown filesystem grub rescue и что делать grub rescue, когда вы видите это сообщение. Да, во многих случаях у вас уже не получится загрузить систему без LiveCD диска. Но иногда все можно спасти. Надеюсь, эта информация была полезной для вас.
Обнаружили ошибку в тексте? Сообщите мне об этом. Выделите текст с ошибкой и нажмите Ctrl+Enter.

Статья распространяется под лицензией Creative Commons ShareAlike 4.0 при копировании материала ссылка на источник обязательна .
Об авторе
![]()
Основатель и администратор сайта losst.ru, увлекаюсь открытым программным обеспечением и операционной системой Linux. В качестве основной ОС сейчас использую Ubuntu. Кроме Linux, интересуюсь всем, что связано с информационными технологиями и современной наукой.
Любите экспериментировать? Наверняка вы когда-либо пытались произвести какие-то действия со своей Linux-системой, причем не так важно какие были цели: изучение и познание новых возможностей или же какая-то более конкретная цель, в виде исправления той или иной ошибки. В любом случае, при работе с дистрибутивами Linux, для загрузки которых, в большинстве случаев, и используется Grub, с последним могут возникать неприятные проблемы, ввиду которых дальнейшая эксплуатация системы просто-напросто невозможна. В этой статье вы узнаете, что делать, если не загружается Linux. Как вести себя в подобной ситуации и какие действия производить, чтобы починить загрузчик Grub. Пожалуй, начнем.
Grub (или GRand Unified Bootloader) — загрузчик операционных систем с открытым исходным кодом. Распространяется он под лицензией GNU GPL, в полностью свободном виде. С помощью этого замечательного лоадера можно сделать много всего — основная же функция не ограничивается загрузкой лишь одной операционной системы. Вы можете иметь куда больше операционных систем на своем ПК, загружая любую из них с помощью Grub. На скриншоте выше вы можете видеть как примерно Grub выглядит. Кстати говоря, если вы захотите установить Ubuntu 18.04 рядом с Windows, вам определенно понадобится помощь Grub.
Grub используется в большинстве дистрибутивов Linux в качестве загрузчика по-умолчанию. Разумеется и с ним иногда возникают проблемы. Этим самые проблемы чреваты полным отказом операционной системы. Поэтому для починки Grub нам понадобятся дополнительные инструменты. Какие именно — узнаете далее.
От чего могут возникнуть проблемы
Одна из самых распространенных причин — это неправильный порядок установки двух операционных систем (Linux и Windows). Допустим, если вы захотите установить две этих операционных системы на свой ПК — вам непременно стоит знать правильную последовательность:
- Сначала устанавливаем Windows
- И только потом уже Linux
Если, например, сделать наоборот, то как раз-таки Grub будет поврежден; система будет грузиться напрямую в Windows, а дистрибутив Linux останется недоступным.
Grub может сломаться и по другим причинам. Например, из-за попыток ручного изменения параметров запуска (при недостатке опыта), в таком случае нужно будет либо вручную убирать лишнее, либо полностью переустанавливать Grub.
Восстановление Grub с помощью LiveCD/USB
Для этого способа нам понадобится флешка с дистрибутивом Linux на борту. Подойдет любой: от Ubuntu, Arch или даже Linux Mint. Здесь нужен только терминал, поэтому подойдет даже версия без графической оболочки.
Как создать LiveCD/USB
Само собой, нам понадобится носитель, на который мы временно (а может и нет) запишем систему. Сохраните все важные файлы, которые были на этом носителе, после чего (имеется ввиду на другом ПК, желательно под управлением Windows) запишите загруженный образ дистрибутива на носитель. В качестве примера мы будем использовать дистрибутив Ubuntu.
Идем на официальную страницу загрузки. Загружаем любую понравившуюся версию (лучше взять новейшую для десктопа), после чего записываем ее на USB/CD.
С помощью Rufus:
Последняя версия приложения доступна на официальном сайте. Сразу после загрузки и запуска/установки мы увидим такое окно:
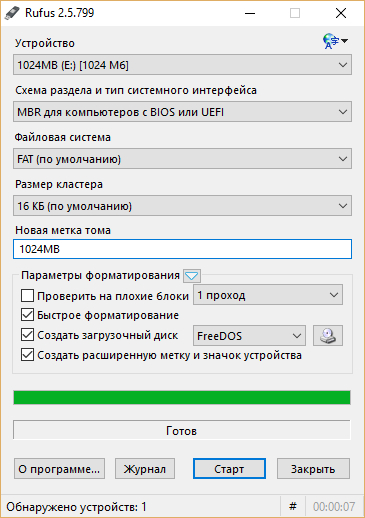
Вставляем носитель, выбираем его в соответствующем меню. Далее выбираем нужную схему раздела и тип системного интерфейса, и после уже открываем файловый менеджер с помощью этой кнопки:
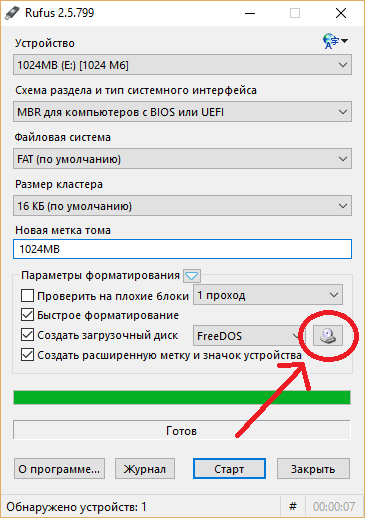
Находим загруженный образ через менеджер, после чего жмем «Старт».
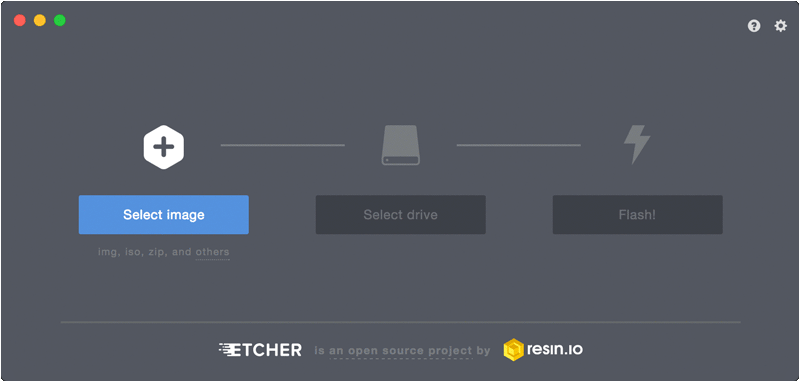
С помощью Etcher:
Опять же, идем на официальный сайт, где скачиваем последнюю версию утилиты. Далее делаем все так, как показано на этой гифке:
Ну а теперь, собственно, можно переходить к восстановлению Grub. Вставляем флешку в наш ПК (где сломан загрузчик), после чего перезагружаем его с этой самой флешки. Как только мы войдем в лайв-систему, сразу открываем терминал, после чего проделываем следующие действия:
Открываем таблицу разделов с помощью команды:
sudo fdisk -l
Примерно такая таблица будет выведена на экран:
/dev/sda1 27 7683 66999082+ 83 Linux
/dev/sda2 * 8450 13995 45430855 7 HPFS/NTFS
/dev/sda3 11885 16574 6503497 5 Extended
По этой таблице мы видим, что Linux, в нашем случае, расположен на разделе /dev/sda1.
С помощью следующей команды мы смонтируем этот раздел в /mnt:
sudo mount /dev/sda1 /mnt
Теперь, для записи grub в MBR, нужно ввести следующую команду:
sudo grub-install --root-directory=/mnt /dev/sda
Если нужно только восстановить MBR диска (после переустановки Windows, к примеру), то этих действий будет вполне достаточно.
Если же необходимо обновить и меню grub (после установки Windows), то нужно выполнить еще и эту команду:
sudo update-grub --output=/mnt/boot/grub/grub.cfg
Вот и все, восстановление закончено!
Восстановление с помощью chroot
Помимо вышеописанного способа, при восстановлении Grub с помощью LiveCD можно использовать и этот. Тут мы будем использовать утилиту chroot.
Здесь нам, опять же, понадобится таблица разделов. Вводим уже известную команду:
sudo fdisk -l
В выводе снова будет эта таблица. Теперь нам надо присмотреться к ней еще внимательнее.
/dev/sda1 27 7683 66999082+ 83 Linux
/dev/sda2 * 8450 13995 45430855 7 HPFS/NTFS
/dev/sda3 11885 16574 6503497 5 Extended
В этом способе нам необходимо примонтировать системный, а также нескольких других важных разделов. Для этого вводим эти команды:
sudo mount /dev/sda1 /mnt
sudo mount --bind /dev /mnt/dev
sudo mount --bind /proc /mnt/proc
sudo mount --bind /sys  /mnt/sys
Обратите внимание, что если если разделы /boot или /var находятся отдельно, то Вам нужно будет примонтировать их в /mnt/boot и /mnt/var.
Далее мы переходим в окружающую среду chroot с помощью команды:
sudo chroot /mnt
И теперь, наконец-таки переустанавливаем Grub с помощью следующей команды:
grub-install /dev/sda
Если вы на этом этапе получаете какие-то сообщения об ошибках, то попробуйте использовать эти команды:
grub-install --recheck /dev/sda
или:
grub-install --recheck --no-floppy /dev/sda
Если все прошло успешно, выходим из chroot, используя команду:
exit
Далее нужно отмонтировать все разделы. Для этого вводим в терминал:
sudo umount /mnt/dev
sudo umount /mnt/proc
sudo umount /mnt/sys
sudo umount /mnt
В случае, если вы монтировали раздел /boot введите команду:
sudo umount /mnt/boot
Теперь перезагружаем систему с помощью:
sudo reboot
Можно также обновить меню Grub, используя команду:
sudo update-grub
Восстановление Grub в rescue mode
Если по каким-то причинам у вас нет доступа к LiveCD/USB-носителю, а также к компьютеру, с помощью которого этот самый носитель можно было бы сделать, то этот способ для вас.
Само восстановление проходит таким образом: сначала мы подгружаем все модули, чтобы открыть доступ ко всей функциональной части Grub, после чего запуститься с нужного раздела. Надо понимать, что Grub состоит из двух частей:
Одна из этих частей (первая) записана в MBR диска. В ней присутствует базовый функционал и ничего больше (консоль в rescue mode).
Стало быть, нам нужно определить, в каком разделе находится вторая часть Grub (находится в каталоге /boot/grub), и после чего подгрузить все недостающие модули. А вот уже после этого мы сможем запустить загрузчик с нужного раздела. В rescue mode есть всего четыре команды:
 ls
set
unset
insmod
Для начала вводим следующую команду:
ls
В выводе будет что-то подобное:
(hd0) (hd0,msdos3) (hd0,msdos2) (hd0,msdos1) (hd1) (hd1,msdos2) (hd1,msdos1)
В некоторых случаях Grub неправильно опеределяет файловые системы находящиеся на разделах дисков. В данном примере загрузчик показывает их как msdos. Мы должны попытаться угадать диски, которые видим. В примере доступно два диска. Диск с индексом 0 содержащий три раздела, и диск с индексом 1 содержащий два раздела. Если вы знаете структуру своих дисков, определить нужный труда не составит.
В загрузчике Grub разделы нумеруются в обратном исчислении. Не очень ясно какой именно из разделов назван, к примеру (hd0,msdos3). Чтобы было более понятно, можно использовать вид (hd0,1). Если в грабе отсчет дисков идет с 0, а разделов с 1, то можно определить, что операционная система установлена в первый раздел первого раздела — (hd0,1). Используем следующую команду:
set prefix=(hd0,1)/boot/grub
set root=(hd0,1)
С помощью этих команд мы приказываем системе использовать какой-то конкретный диск, для выполнения всех остальных операций (в нашем случае, это диск (hd0,1)). Чтобы проверить есть ли на данном диске загрузчик, введем эту команду:
ls /boot/grub
Если в выводе будет список файлов и папок, значит мы все сделали правильно. Теперь можно загрузить все необходимые модули. Для этого выполним команды:
insmod ext2
insmod normal
normal
После выполнения команд Grub загрузится в полнофункциональном режиме. Будут найдены все операционные системы, которые установлены на компьютере, после чего будет показано стандартное меню загрузки.
Чтобы закрепить результат (и не проделывать все то же самое после перезапуска ПК), нужно зайти в терминал своего дистрибутива Linux, где с root правами выполнить следующую команду:
grub-install /dev/sdX
sdX — диск, на который должен быть установлен Grub.
Если операционная система расположена на разделе с файловой системой btrfs, то нам необходимо выполнить следующие команды:
set prefix=(hd0,1)/@/boot/grub
set root=(hd0,1)
И подгрузить модули:
insmod btrfs
insmod normal
Ну и теперь запустить GRUB:
normal
Восстановление Grub с помощью утилиты Boot repair
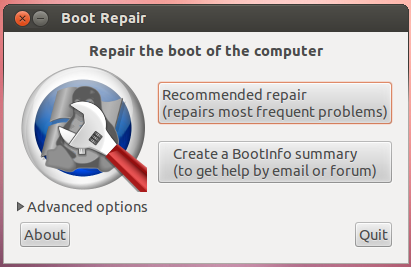
С помощью этой замечательной утилиты вы сможете восстановить загрузчик всего в пару кликов. Как видно из скриншота, утилита имеет собственный GUI, ее использование не вызовет трудностей.
Чтобы установить boot repair, вы можете воспользоваться одним из приведенных способов:
- Запись и установка специального образа диска Boot Repair (и дальнейшая загрузка с него)
- Установка Boot repair из PPA-репозитория в LiveCD/USB дистрибутиве.
Если с первым способом все понятно: нужно просто скачать и записать образ с помощью соответствующих инструментов. То во втором уже нужно знать конкретные команды, которые выглядят следующим образом:
sudo add-apt-repository ppa:yannubuntu/boot-repair
sudo apt-get update && sudo apt-get install -y boot-repair
В утилите будет доступно два варианта на выбор:
Recommended repair исправляет большую часть известных ошибок, которые могли бы возникнуть при запуске. С его помощью вы сможете пофиксить и загрузчик Grub.
Create a BootInfo summary создает Boot-Info-Script – скрипт, который позволяет диагностировать большинство проблем при загрузке.
Здесь же есть и Advanced options. Он включает в себя варианты для восстановления и настройки загрузчика Grub2 (загрузка по-умолчанию, опции загрузки ядра, отображение или скрытие GRUB при загрузке, удаление GRUB). С помощью этих же инструментов, вы можете восстановить MBR и т.д.
Вам обязательно стоит заглянуть на официальный сайт Boot Repair. Там вы сможете найти более подробную информацию обо всех возможностях и особенностях программы. Там же будет доступна информация о выходе новых версий: фиксах и улучшениях самой утилиты, а также многом и многом другом.
Выводы
Вот мы и рассмотрели несколько вариантов исправления загрузчика Grub. Стоит сказать, что некоторые из них могут показаться сложными или даже невыполнимыми. Это не так, каждый из рассмотренных способов нашел подтверждение в виде сотен и тысяч актов исправления загрузчика Grub в опенсорсном сообществе. Кстати говоря, какой из способов выбрать — решать только вам, любой из них достаточно эффективен, чтобы попасть в этот материал.
Возможно вас заинтересуют и другие похожие материалы про починку загрузчика Grub2. Например, в этом материале вы узнаете, как починить GRUB2 если Ubuntu не хочет загружаться. Там более подробно рассказывается, как фиксить груб с помощью утилиты Boot Repair, возможно вам стоит заглянуть туда, если вы не поняли что-то из этого материала. Что же, ну а на сегодня это все. Надеюсь, что данный материал помог вам разобраться в ошибках. Что, в свою очередь, поможет вам их решить.
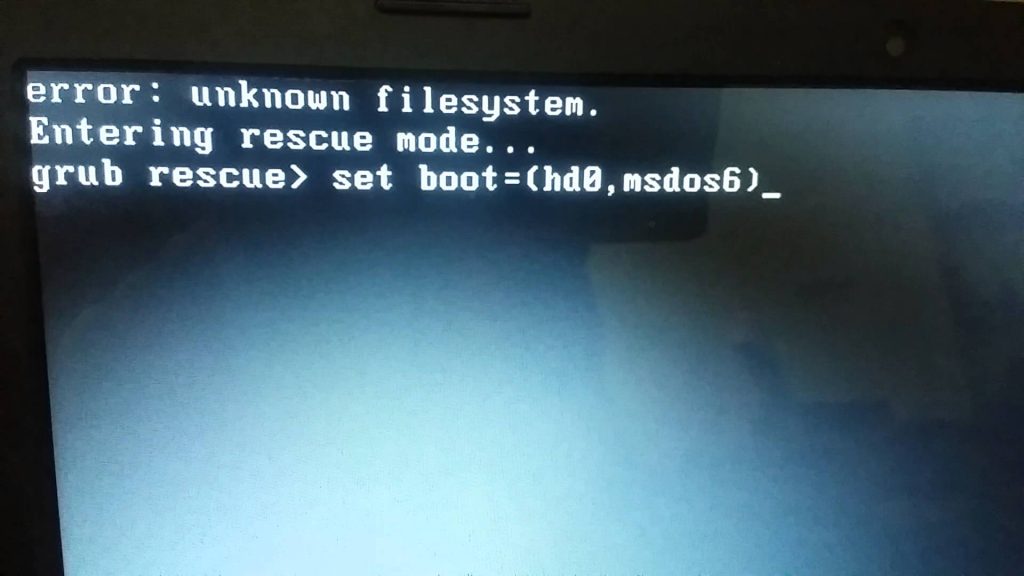
Ошибка Grub Rescue чаще всего встречается на компьютерах с двойной загрузкой, когда на компьютер установлен сначала Linux, а потом Windows.
Windows при установке может стереть загрузчик Linux и при загрузке вместо меню с выборов ОС для загрузки появляется ошибка:
Error: unknown filesystem
Entering rescue mode
Или
Error: no such partition
И перед вами открывается консоль Grub rescue.
Консоль загрузчика grub поддерживает ряд простейших команд. Их список можно вывести, набрав:
help
Выведите список разделов на диске:
ls

В нашем примере есть один диск hd0 с разделом msdos1.
Проверьте есть ли файлы загрузчика grub на этом разделе:
ls (hd0,msdos1)/boot/grub/
Проверьте, что в указанном каталоге есть файл grub.cfg. Если у вас больше разделов и дисков, проверьте их все.
![]()
Создайте префикс для каталога загрузчика:
set prefix=(hd0, msdos1)/boot/grub
Сделайте раздел основным:
set root=(hd0, msdos1)/boot/grub
Загрузите дополнительные модули и загрузите Linux:
insmod ext2
insmod normal
normal
После загрузки Linux нужно переустановить загрузчик:
sudo grub-install /dev/sda
Используйте свою букву загрузочного диска вместо sda.
Обновите конфигурацию загрузчика grub2 в файле grub.cfg:
sudo update-grub
Grub должен автоматически обнаружить установленные операционные системы и добавить их в автозагрузку.
Если вы не смогли восстановить загрузчик описанным выше способом, можно исправить grub с помощью загрузочной флешки.
Я загрузил компьютер с LiveCD образа Ubuntu.
Откройте терминал и выполните команду:
sudo su -
Выведите список дисков и разделов:
fdisk -l
Найдите раздел с установленной Linux (sda1 в моем случае).
Смонтируйте этот раздел в каталог /mnt:
mount /dev/sda1 /mnt
Проверьте, что на этом разделе есть каталог /boot/:
ls -l /mnt/boot/
Если каталога boot нет, смонтируйте его отдельно:
mount /dev/sdaX /mnt/boot
Смонтируйте следующие разделы с Live образа:
mount --bind /dev /mnt/dev
mount --bind /proc /mnt/proc
mount --bind /sys /mnt/sys
Войдите в локальную систему на диске с помощью chroot:
chroot /mnt
Теперь можно переписать конфигурацию загрузчика на диске:
grub-install /dev/sda
update-grub
Отмонтируйте разделы и перезагрузите компьютер.
umount –R /mnt
reboot
Теперь ваш заручик grub исправен и должен вывести меню выбора загрузки операционных систем.