
MayaNash, в твоем сообщении об ошибке есть полезная информация:
«Normal block» — это блок памяти, выделенный new, malloc или calloc.
«application wrote to memory after end of heap buffer» — это значит, что
приложение при записи вылезло за пределы буфера.
Ловить такую ошибку можно по-разному.
Во-первых, для начала можно врубить на максимум все возможности отладочной CRT
(debug CRT) и понаставить проверок через каждые 5 строчек кода, статья по теме есть на RSDN:
Обнаружение и локализация утечек памяти
http://rsdn.org/article/vcpp/leaks.xml
Во-вторых, можно временно заменить new/malloc/calloc на VirtualAlloc, сделав «забор»:
первая страница (страницы) памяти под буфер выделяются с атрибутами PAGE_READWRITE
(чтение + запись), а защита самой последней страницы меняется (через VirtualProtect)
на PAGE_NOACCESS (нет доступа). Причем адрес буфера делается таким, чтобы конец
буфера упирался сразу же в страницу с PAGE_NOACCESS. В этом случае при попытке
что-то записать или прочитать за пределами буфера сразу вылетит исключение
STATUS_ACCESS_VIOLATION, ну а далее можно подключать отладчик и смотреть,
где вылезли за границу.
Есть специальные аллокаторы, которые делают всю эту работу (и еще много чего),
конкретные не посоветую, ибо сам пользуюсь такими вещами редко.
Динамический массив в языке C++ имеет два значения: массив переменного размера(т.е. способным к добавлению и удалению в нём элементов) и массив, который мы разместили в куче(heap). В данном случае вы используете второй вид динамического массива, который сам по себе не меняет своих размеров.
Когда мы хотим считать и записать элементы массива, то у нас стоит выбор какой использовать: статический или динамический(1 или 2). Если количество элементов фиксировано(т.е. мы изначально знаем), то под это отлично подойдёт обычный статический массив, а если же количество элементов вводится с клавиатуры, то мы используем динамический, т.к. по стандарту в языке C++ количество элементов в статическом массиве должно быть известно в момент компиляции, никак не исполнения.
В вашем случае, как я понял, количество элементов фиксировано и равно 10. Тогда и вовсе динамический массив никак не обязателен.
Распишу решение в 3-х видах: с использованием статического и динамического 1-го и 2-го вида.
Статический(неспособный к растягиванию массив, выделенный в stack):
int main()
{
    constexpr int ARR_SIZE = 10;
     arr[ARR_SIZE];
    for(int i = 0; i < ARR_SIZE; ++i)
        std::cin >> arr[i];

    //обрабатываем элементы массива
    ...
    return 0;
}
Динамический(неспособный к растягиванию массив в heap):
#include <iostream>
#include <vector>

int main()
{
    int numbersInArray;
    std::cout << "Enter number of elements: ";
    std::cin >> numbersInArray;
    double *arr = new double[numbersInArray];
    for(int i = 0; i < numbersInArray; ++i)
        cin >> arr[i];
    //обрабатываем элементы массива
    ...
    return 0;
}
Динамический(cпособный к растягиванию массив, внутри сам выделен в heap):
#include <iostream>
#include <vector>

int main()
{
    std::vector < double > arr;
    int numbersInArray;
    std::cout << "Enter number of elements: ";
    std::cin >> numbersInArray;
    for(int i = 0; i < numbersInArray; ++i)
    {
        double temp_variable;
        cin >> temp_variable;
        arr.push_back(temp_variable);
    }
    //обрабатываем элементы массива
    ...
    return 0;
}
- Remove From My Forums
-
Question
-
Hi,
I wouldn’t be asking this but this problem sometimes occurs directly after the line..
int main(int argc, char **argv[])
{
PWCHAR var = (PWCHAR) malloc ((sizeof(«some\string») * sizeof(WCHAR)) + sizeof(WCHAR));«HEAP CORRUPTION DETECTED after normal block (#60) at 0x00000000xxxxxxxx.»
«CRT detected the application wrote to memory after the end of the heap buffer.»The problem never always occurs the same line and sometimes — usually — when I run through the code step by step (F10) lines are executed but the arrow jumps past lines unless I set a specific breakpoint on the line.
Previously another error that has occurred has been a write to invalid memory. (Error — 0x00000005, ACCESS_DENIED)
The code seems fine when compiled as 32bit (no problems have ever occurred.) but the problems certainly occur when compiled as 64bit.
I would like to know if it is possible that code that has been compiled has somehow been corrupted and is causing this error. I ask this only because I have had the HEAP CORRUPTION error occurred directly after the first run statement.
Thankyou, I really need the help.
Answers
-
Heap corruptions are caused by writing too much to a memory buffer, and that is never a compiler error.
Heap corruptions only manifest the next time you try to do something with the heap itself, like allocate more memory or free a block of memory, so it wouldn’t occur after you overwrite the end of the buffer.
As for the debugger jumping past lines, is your configuration set to release? When it optimises code, it may remove lines completely. The debugger will just not go onto those lines. If you want the best possible debug experience, make sure it is set to the
debug configuration.For a simple way of causing a heap corruption, try the following code. It will always trigger on the free line.
int wmain()
{
	wchar_t *mystr = (wchar_t*)malloc(24);

	wcscpy(mystr, L"a longer string");

	free(mystr); //will break here
	mystr = nullptr;

	return 0;
}
This causes a heap corruption because obviously the buffer can only store 12 characters (including the null terminator) and you copy more than that to the buffer. The obvious way to fix this is to increase the size of the buffer.
If you want more help though, provide code. Either your actual code or a small sample that reproduces the same issue.
This is a signature
Any samples given are not meant to have error checking or show best practices. They are meant to just illustrate a point. I may also give inefficient code or introduce some problems to discourage copy/paste coding. This is because the major point of my posts
is to aid in the learning process.Do you want Visual Studio 11 Express to be freely installable on Windows 7 and able to write regular C++ applications? Please vote for
this.
-
Marked as answer by
Friday, May 11, 2012 5:38 AM
-
Unmarked as answer by
Helen Zhao
Friday, May 11, 2012 5:39 AM -
Marked as answer by
Helen Zhao
Thursday, May 17, 2012 3:25 AM
-
Marked as answer by
-
HEAP CORRUPTION DETECTED is usually caused by using bad pointers or indexes in some previously executed code. I.e., not by the line of code that produces the message. Your malloc call just gives the heap checker an opportunity to check for heap damage
caused by previous operations.If you have constructors of global objects they run before main(). So that would be a good place to look for trouble.
-
Marked as answer by
Helen Zhao
Friday, May 11, 2012 5:38 AM -
Unmarked as answer by
Helen Zhao
Friday, May 11, 2012 5:39 AM -
Marked as answer by
Helen Zhao
Thursday, May 17, 2012 3:25 AM
-
Marked as answer by
-
Hi,
I wouldn’t be asking this but this problem sometimes occurs directly after the line..
int main(int argc, char **argv[])
It is probably not related to your problem but this is not a legal definition for main. Your second parameter can be char **argv or char *argv[] but not what you have posted.
{
PWCHAR var = (PWCHAR) malloc ((sizeof(«some\string») * sizeof(WCHAR)) + sizeof(WCHAR));«HEAP CORRUPTION DETECTED after normal block (#60) at 0x00000000xxxxxxxx.»
«CRT detected the application wrote to memory after the end of the heap buffer.»<snip>
Previously another error that has occurred has been a write to invalid memory. (Error — 0x00000005, ACCESS_DENIED)
This inidcates you already have used a bad pointer.
You need to show your actual code since it is obviouls the call to malloc is not that early.
-
Marked as answer by
Helen Zhao
Friday, May 11, 2012 5:38 AM -
Unmarked as answer by
Helen Zhao
Friday, May 11, 2012 5:39 AM -
Marked as answer by
Helen Zhao
Thursday, May 17, 2012 3:25 AM
-
Marked as answer by
-
You’re not helping yourself by mixing narrow string literals in your sizeof() expressions with wide string literals in your wcscpy() calls. However, it doesn’t seem to be the underlying problem — unless your WCHAR
is not a two byte type like wchar_t.You can safely replace
PWCHAR var = (PWCHAR) malloc ((sizeof("some\string") * sizeof(WCHAR)) + sizeof(WCHAR));
wcscpy(var, L"some\string");
with the equivalent
PWCHAR var = (PWCHAR) _wcsdup(L"some\string");
Of course, you should always check for a NULL pointer from malloc() and _wcsdup().
Answering policy: see profile.
-
Marked as answer by
Helen Zhao
Friday, May 11, 2012 5:38 AM -
Unmarked as answer by
Helen Zhao
Friday, May 11, 2012 5:39 AM -
Marked as answer by
Helen Zhao
Thursday, May 17, 2012 3:25 AM
-
Marked as answer by
-
I suggest you to use the _vsnwprintf
function, where you specify the maximum number of characters to write. Also check if you use the “( )” parentheses correctly in
malloc, and your msg is always compatible with arguments.-
Marked as answer by
Helen Zhao
Friday, May 11, 2012 5:39 AM -
Unmarked as answer by
Helen Zhao
Friday, May 11, 2012 5:39 AM -
Marked as answer by
Helen Zhao
Thursday, May 17, 2012 3:25 AM
-
Marked as answer by
MayaNash, в твоем сообщении об ошибке есть полезная информация:
«Normal block» — это блок памяти, выделенный new, malloc или calloc.
«application wrote to memory after end of heap buffer» — это значит, что
приложение при записи вылезло за пределы буфера.
Ловить такую ошибку можно по-разному.
Во-первых, для начала можно врубить на максимум все возможности отладочной CRT
(debug CRT) и понаставить проверок через каждые 5 строчек кода, статья по теме есть на RSDN:
Обнаружение и локализация утечек памяти
http://rsdn.org/article/vcpp/leaks.xml
Во-вторых, можно временно заменить new/malloc/calloc на VirtualAlloc, сделав «забор»:
первая страница (страницы) памяти под буфер выделяются с атрибутами PAGE_READWRITE
(чтение + запись), а защита самой последней страницы меняется (через VirtualProtect)
на PAGE_NOACCESS (нет доступа). Причем адрес буфера делается таким, чтобы конец
буфера упирался сразу же в страницу с PAGE_NOACCESS. В этом случае при попытке
что-то записать или прочитать за пределами буфера сразу вылетит исключение
STATUS_ACCESS_VIOLATION, ну а далее можно подключать отладчик и смотреть,
где вылезли за границу.
Есть специальные аллокаторы, которые делают всю эту работу (и еще много чего),
конкретные не посоветую, ибо сам пользуюсь такими вещами редко.
Динамический массив в языке C++ имеет два значения: массив переменного размера(т.е. способным к добавлению и удалению в нём элементов) и массив, который мы разместили в куче(heap). В данном случае вы используете второй вид динамического массива, который сам по себе не меняет своих размеров.
Когда мы хотим считать и записать элементы массива, то у нас стоит выбор какой использовать: статический или динамический(1 или 2). Если количество элементов фиксировано(т.е. мы изначально знаем), то под это отлично подойдёт обычный статический массив, а если же количество элементов вводится с клавиатуры, то мы используем динамический, т.к. по стандарту в языке C++ количество элементов в статическом массиве должно быть известно в момент компиляции, никак не исполнения.
В вашем случае, как я понял, количество элементов фиксировано и равно 10. Тогда и вовсе динамический массив никак не обязателен.
Распишу решение в 3-х видах: с использованием статического и динамического 1-го и 2-го вида.
Статический(неспособный к растягиванию массив, выделенный в stack):
int main()
{
    constexpr int ARR_SIZE = 10;
     arr[ARR_SIZE];
    for(int i = 0; i < ARR_SIZE; ++i)
        std::cin >> arr[i];

    //обрабатываем элементы массива
    ...
    return 0;
}
Динамический(неспособный к растягиванию массив в heap):
#include <iostream>
#include <vector>

int main()
{
    int numbersInArray;
    std::cout << "Enter number of elements: ";
    std::cin >> numbersInArray;
    double *arr = new double[numbersInArray];
    for(int i = 0; i < numbersInArray; ++i)
        cin >> arr[i];
    //обрабатываем элементы массива
    ...
    return 0;
}
Динамический(cпособный к растягиванию массив, внутри сам выделен в heap):
#include <iostream>
#include <vector>

int main()
{
    std::vector < double > arr;
    int numbersInArray;
    std::cout << "Enter number of elements: ";
    std::cin >> numbersInArray;
    for(int i = 0; i < numbersInArray; ++i)
    {
        double temp_variable;
        cin >> temp_variable;
        arr.push_back(temp_variable);
    }
    //обрабатываем элементы массива
    ...
    return 0;
}
Синий экран с кодом остановки «Kernel Mode Heap Corruption» в Windows 10 может возникнуть при запуске игр и приложений, которые начинают интенсивно использовать ресурсы процессора. Ошибка очень распространена и не указывает на серьезные проблемы с операционной системой. Но в последнее время возникают случаи, когда синий экран BSOD возникает снова и снова при выполнении одного и того же действия, которое первоначально вызвало ошибку.

Содержание
- 1 Причины ошибки
- 2 Удаление несовместимых приложений
- 3 Проверка драйверов на наличие ошибок
- 4 Обновление драйверов
- 5 Проверка оперативной памяти
- 6 Запуск восстановления системы
Причины ошибки
Синий экран Kernel_Mode_Heap_Corruption может возникнуть по ряду причин.
Устаревшие драйвера видеокарты. Часто причиной этой ошибки являются поврежденные или устаревшие графические драйвера. Поэтому, когда запускаем игру или «тяжелое» приложение сталкивается с синим экраном.
Поврежденные системные файлы. Для решения проблемы можно запустить утилиту проверки системных файлов sfc /scannow или Dism /Online /Cleanup-Image /RestoreHealth из командной строки, запущенной от имени администратора.
Несовместимое программное обеспечение. После установки несовместимого приложения может возникнуть конфликт с ОС. Если приложение вносит изменения в системные параметры, Windows может аварийно прекратить работу и выбросить синий экран.
Аппаратные ошибки. При возникновении ошибок в работе оперативной памяти или в случае ее неисправности, Windows не сможет правильно взаимодействовать с устройством и аварийно прерывает работу.
Перейдем к решениям, но для начала войдите в систему с учетной записью администратора и проверьте подключение к интернету.
Удаление несовместимых приложений
Очень часто синий экран с кодом Kernel_Mode_Heap_Corruption возникает по причине программного конфликта. Некоторые приложения могут внести изменения в основные параметры, что приведет к нестабильной работе Windows. Поэтому сначала нужно их определить. Это могут быть программы, установленные перед появлением ошибки или при запуске которых, отображается синий экран.
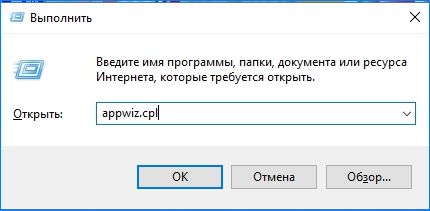
Откройте окно «Выполнить» нажатием на клавиши Windows + R, наберите команду appwiz.cpl и подтвердите ее выполнение на Enter.
Отобразится список всех программ, установленных на компьютере. Если уверены, что ошибка появилась после установки последней программы, отсортируйте список по дате, кликните на ней правой кнопкой мыши и выберите «Удалить».

Когда синий экран возникает при запуске определенной программы, также найдите ее в списке и удалить.
Проверка драйверов на наличие ошибок
Драйвера являются основными компонентами, которые взаимодействуют между операционной системой и оборудованием. Если они повреждены, то будете сталкиваться с многочисленными ошибками, в частности, с Kernel_Mode_Heap_Corruption. Поэтому попробуем их обновить до последней сборки.
Прежде чем перейти к решению, сделайте точку восстановления на случай возникновения ошибок в работе утилиты.
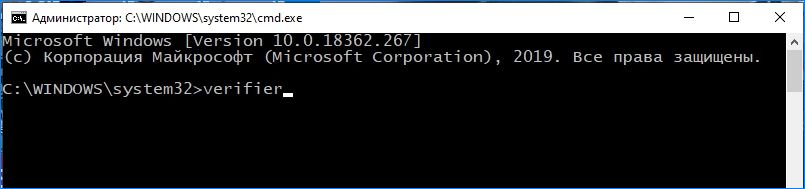
Откройте строку поиска клавишами Windows + S и наберите «командная строка». Кликните на найденный результат правой кнопкой мыши и выберите «Запуск от имени администратора».

В окне командной строки наберите команду:
verifier
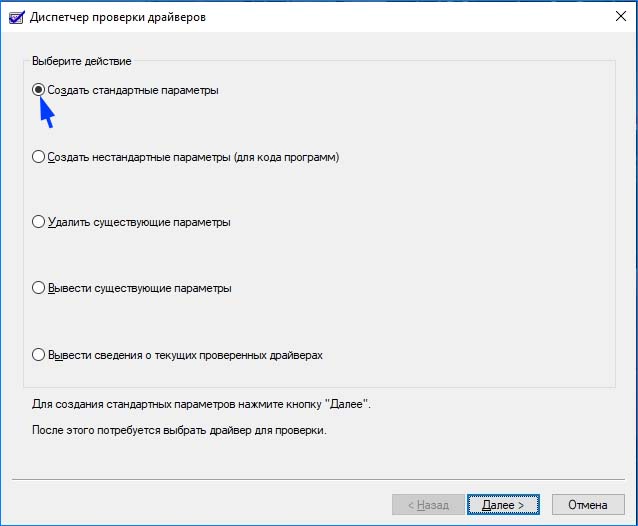
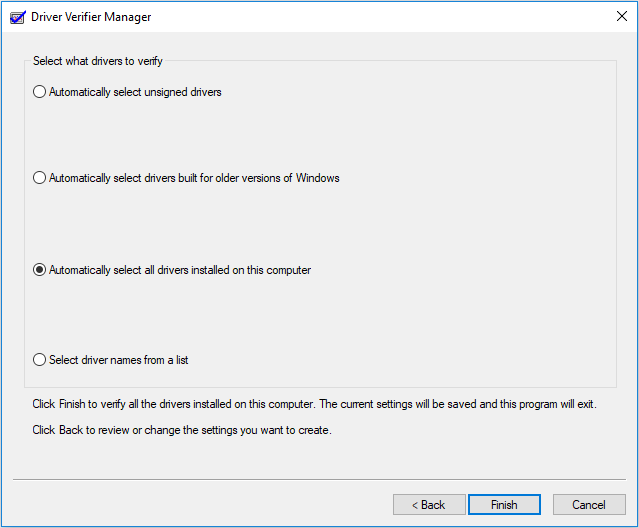
Выберите «Создать стандартные настройки»и нажмите Далее.
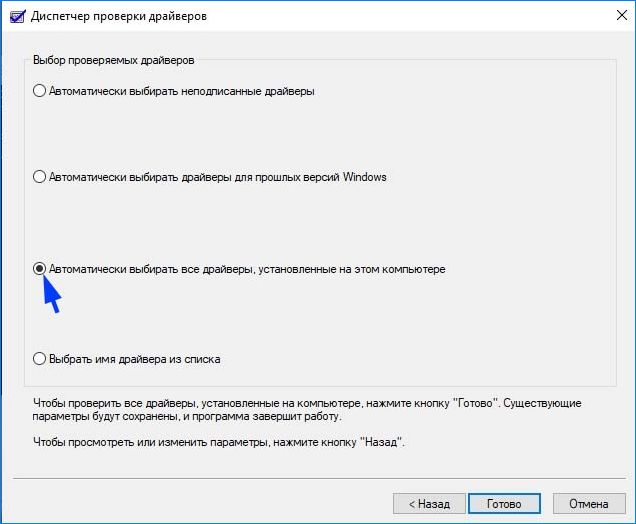
Затем выберите «Автоматически выбирать все драйверы, установленные на этом компьютере» и нажмите «Готово». Подтвердите перезагрузку компьютера.
После перезагрузки сразу начнется проверка. При обнаружении неисправных их нужно обновить, выполнив следующие шаги.
Обновление драйверов
Если какие-то драйвера оказались неисправными в ходе проверки предыдущим решением, обновите их вручную до последней версии.
Первое, что нужно сделать, загрузить требуемые драйвера с официального сайта в указанную папку на диске и запустить их установку.
Откройте окно «Выполнить» (Win + R), впишите команду devmgmt.msc для входа в «Диспетчер устройств». В случае повреждения драйверов видеокарты, разверните вкладку «Видеоадаптеры», кликните правой кнопкой мыши на ней и выберите «Обновить».
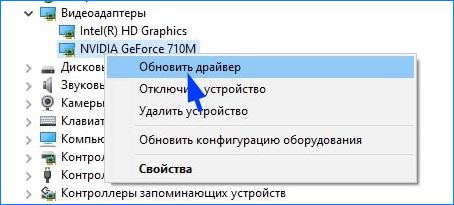
Выберите второй вариант обновления вручную.
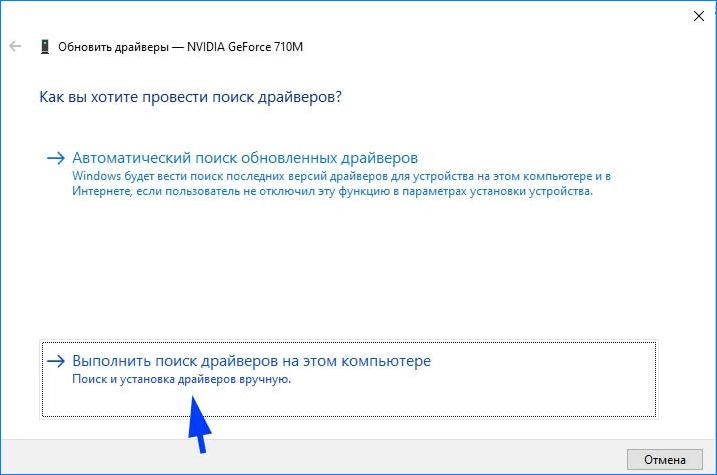
Затем нажмите на кнопку «Обзор», перейдите в папку с загруженными драйверами. Следуйте инструкциям до завершения установки.
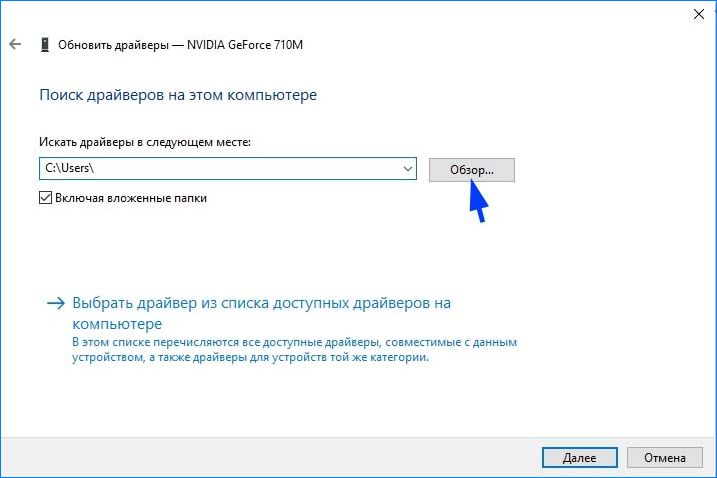
Обновите все устройства, драйверы которых были повреждены и перезагрузите компьютер. Если продолжаете сталкиваться с ошибкой Kernel_Mode_Heap_Corruption перейдите к следующему способу.
Проверка оперативной памяти
Ошибка также может возникнуть из-за неполадок планок памяти. Перед запуском теста ОЗУ, нужно извлечь планки из слотов, и аккуратно протереть контакты ластиком. Затем вернуть их обратно, проверить плотность контакта и фиксацию защелок. Проверьте также размещение планок (например, нужно использовать 1 и 3 слот, если на материнской плате есть 2 модуля оперативной памяти).
Для проверки памяти загрузите программу MemTest86+ с официального сайта. Установите флешку и запустите установку программы. Имейте в виду, что при создании загрузочного диска для memtest все содержимое флешки будет удалено.
Переключите в БИОС приоритет на загрузку системы с USB-накопителя. После загрузки запустите проверку ОЗУ. Модули оперативной памяти будут протестированы в несколько циклов.
Запуск восстановления системы
Если не удалось устранить ошибку Kernel_Mode_Heap_Corruption перечисленными способами, попробуйте вернуть Windows в предыдущее состояние до возникновения синего экрана.
Нажмите Windows + S для вызова строки системного поиска, введите «восстановление» и кликните на найденный результат.

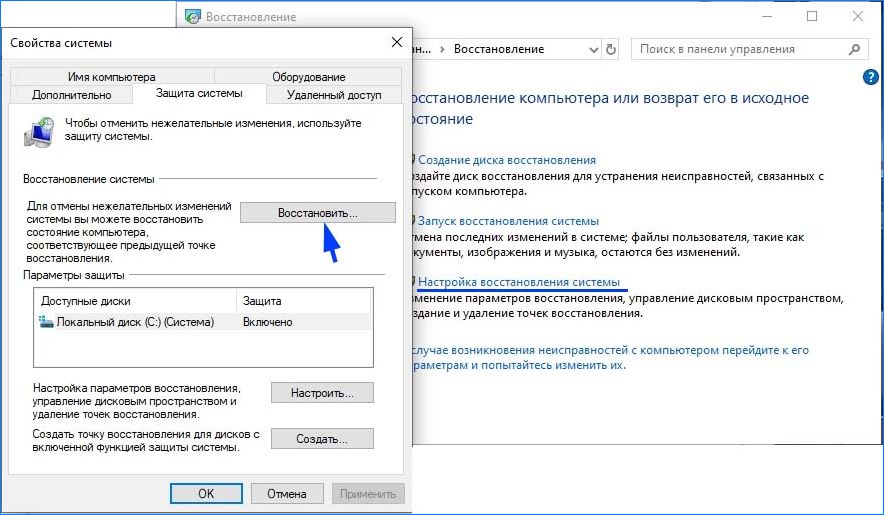
Перейдите в настройки восстановления, затем на вкладке «Защита системы» нажмите кнопку «Восстановить».
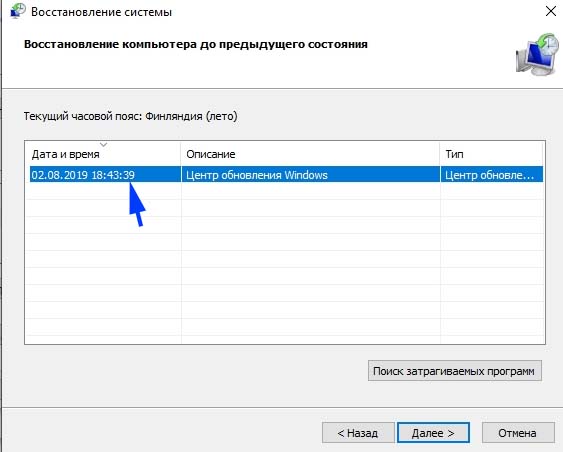
На первом экране нажмите на кнопку «Далее». На следующем отметьте флажком «Показать другие точки». Выберите точку восстановления, которая была создана до появления сбоя системы Kernel_Mode_Heap_Corruption.
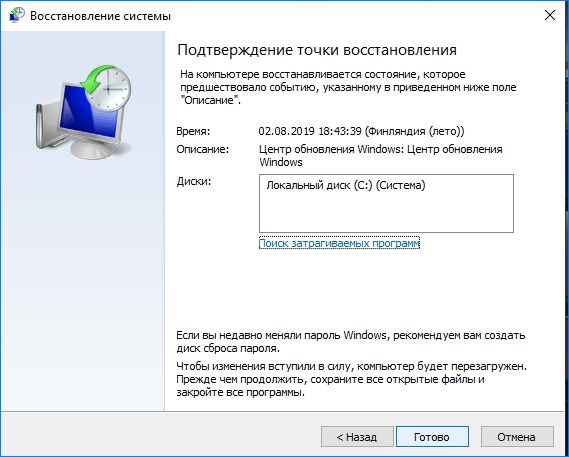
На экране подтверждения нажмите кнопку «Готово».
После начнется процесс восстановления. При успешном завершении проверьте, возникает ли ошибка.
Эта программа о времени пузырьковой сортировки, вставки и сортировки.
Я запустил свою программу и получил ошибку отладки,
HEAP CORRUPTION DETECTED:after Normal block(#152)at 0x006613C0 CRT Detected
чтобы приложение записывало в память после завершения буфера кучи.
Затем я удаляю последние 3 строки кода (delete [] a; delete [] b; delete [] c) в void part_1(int n) чтобы это работало. И мой профессор сказал мне: «Ваша программа должна иметь другие ошибки, эти ошибки вызывают
ошибки в операторах удаления. «и я не должен удалять последние 3 строки кода. Я не могу найти его. Пожалуйста, помогите.
// Part-1 : --------------------------- sorting algorithms

void bubbleSort(double *x, int n)
{
// Implement the sorting function using the bubble sort algorithm.
double temp;
for (int j = 0;j < n;j++) {
for (int i = 0;i < n;i++) {
if (x[i] > x[i + 1]) {
temp = x[i];
x[i + 1] = x[i];
x[i + 1] = temp;
}
}
}
}void insertionSort(double *x, int n)
{
// Implement the sorting function using the insertion sort algorithm.

for (int i = 1;i < n;i++) {
double temp = x[i];
int j = 0;
for (j = i - 1;j >= 0 && x[j]>temp;j--) {
x[j + 1] = x[j];
}
x[j + 1] = temp;
}

}int compare_1(const void *a, const void *b) {
double *X = (double *)a;
double *Y = (double *)b;
if (*X > *Y) {
return 1;
}
else if (*X < *Y)
return -1;
return 0;

}

void part_1(int n)
{
srand((unsigned)time(NULL));  // set the seed of the random number generator

double *a = new double[n];  // create 3 arrays with identical contents
double *b = new double[n];
double *c = new double[n];

for (int i = 0; i < n; i++)
a[i] = b[i] = c[i] = rand() / 10000.0;

clock_t begin, end;
double elapsedTime;

cout << "Bubble sort: sorting an array of size " << n << endl;
begin = clock();
bubbleSort(a, n);
end = clock();

elapsedTime = (double)(end - begin) / CLOCKS_PER_SEC;
cout << "Elapsed time = " << elapsedTime << " seconds" << endl << endl;

for (int i = 0; i < n - 1; i++)
if (a[i] > a[i + 1])
{
cout << "Bubble sort : Incorrect resultsnn";
break;
}

cout << "Insertion sort: sorting an array of size " << n << endl;
begin = clock();
insertionSort(b, n);
end = clock();

elapsedTime = (double)(end - begin) / CLOCKS_PER_SEC;
cout << "Elapsed time = " << elapsedTime << " seconds" << endl << endl;

for (int i = 0; i < n - 1; i++)
if (b[i] > b[i + 1])
{
cout << "Insertion sort : Incorrect resultsnn";
break;
}

cout << "Write your statements to sort array c[] using qsort()n";
cout << "qsort: sorting an array of size " << n << endl;

begin = clock();

// #### write your statements to sort array c[] using qsort().
//      Define your own compare function.
qsort(c, n, sizeof(double), compare_1);

end = clock();

elapsedTime = (double)(end - begin) / CLOCKS_PER_SEC;
cout << "Elapsed time = " << elapsedTime << " seconds" << endl << endl;

for (int i = 0; i < n - 1; i++)
if (c[i] > c[i + 1])
{
cout << "qsort : Incorrect resultsnn";
break;
}
delete[] a;
delete[] b;
delete[] c;
}
int main()
{
part_1(50000);

system("pause");
return 0;
}
-1
Решение
Эта ошибка возникает из-за повреждения памяти. Повреждение памяти произошло из-за того, что вы записали за предел массива.
Например: если есть массив из 5 целых чисел, например
int array[5];
Вы не должны делать такие вещи, как
int n=4;
array[n+1] = 10; //array out of bound memory write operation
C / C ++ не проверяет массив вне связанной операции. Это разрешает такую операцию без ошибки компиляции. В результате, когда вы запускаете программу, может произойти все что угодно. Поэтому ответственность за проверку таких ошибок лежит на программисте.
Один такой экземпляр найден в вашем коде.
void bubbleSort(double *x, int n)
{
// Implement the sorting function using the bubble sort algorithm.
double temp;
for (int j = 0;j < n;j++) {
for (int i = 0;i < n;i++) {
if (x[i] > x[i + 1]) {
temp = x[i];
x[i + 1] = x[i]; // out of bound write when i=n-1.
x[i + 1] = temp;
}
}
}
}
0
Другие решения
В bubbleSort Ваш индекс массива выходит за пределы диапазона. Измените функцию, как показано ниже, и вы увидите, что происходит:
void bubbleSort(double *x, int n)
{
// Implement the sorting function using the bubble sort algorithm.
double temp;
for (int j = 0; j < n; j++) {
for (int i = 0; i < n; i++) {
if (i + 1 >= n)
{ // index is out of range
cout << "Bummern";
exit(1);
}
if (x[i] > x[i + 1]) {
temp = x[i];
x[i + 1] = x[i];
x[i + 1] = temp;
}
}
}
}
Там, скорее всего, аналогичные проблемы в других ваших функций сортировки.
0
- Remove From My Forums
-
Question
-
Hi,
I wouldn’t be asking this but this problem sometimes occurs directly after the line..
int main(int argc, char **argv[])
{
PWCHAR var = (PWCHAR) malloc ((sizeof(«somestring») * sizeof(WCHAR)) + sizeof(WCHAR));«HEAP CORRUPTION DETECTED after normal block (#60) at 0x00000000xxxxxxxx.»
«CRT detected the application wrote to memory after the end of the heap buffer.»The problem never always occurs the same line and sometimes — usually — when I run through the code step by step (F10) lines are executed but the arrow jumps past lines unless I set a specific breakpoint on the line.
Previously another error that has occurred has been a write to invalid memory. (Error — 0x00000005, ACCESS_DENIED)
The code seems fine when compiled as 32bit (no problems have ever occurred.) but the problems certainly occur when compiled as 64bit.
I would like to know if it is possible that code that has been compiled has somehow been corrupted and is causing this error. I ask this only because I have had the HEAP CORRUPTION error occurred directly after the first run statement.
Thankyou, I really need the help.
Answers
-
Heap corruptions are caused by writing too much to a memory buffer, and that is never a compiler error.
Heap corruptions only manifest the next time you try to do something with the heap itself, like allocate more memory or free a block of memory, so it wouldn’t occur after you overwrite the end of the buffer.
As for the debugger jumping past lines, is your configuration set to release? When it optimises code, it may remove lines completely. The debugger will just not go onto those lines. If you want the best possible debug experience, make sure it is set to the
debug configuration.For a simple way of causing a heap corruption, try the following code. It will always trigger on the free line.
int wmain()
{
	wchar_t *mystr = (wchar_t*)malloc(24);

	wcscpy(mystr, L"a longer string");

	free(mystr); //will break here
	mystr = nullptr;

	return 0;
}
This causes a heap corruption because obviously the buffer can only store 12 characters (including the null terminator) and you copy more than that to the buffer. The obvious way to fix this is to increase the size of the buffer.
If you want more help though, provide code. Either your actual code or a small sample that reproduces the same issue.
This is a signature
Any samples given are not meant to have error checking or show best practices. They are meant to just illustrate a point. I may also give inefficient code or introduce some problems to discourage copy/paste coding. This is because the major point of my posts
is to aid in the learning process.Do you want Visual Studio 11 Express to be freely installable on Windows 7 and able to write regular C++ applications? Please vote for
this.
- Marked as answer by
Friday, May 11, 2012 5:38 AM
- Unmarked as answer by
Helen Zhao
Friday, May 11, 2012 5:39 AM - Marked as answer by
Helen Zhao
Thursday, May 17, 2012 3:25 AM
- Marked as answer by
-
HEAP CORRUPTION DETECTED is usually caused by using bad pointers or indexes in some previously executed code. I.e., not by the line of code that produces the message. Your malloc call just gives the heap checker an opportunity to check for heap damage
caused by previous operations.If you have constructors of global objects they run before main(). So that would be a good place to look for trouble.
- Marked as answer by
Helen Zhao
Friday, May 11, 2012 5:38 AM - Unmarked as answer by
Helen Zhao
Friday, May 11, 2012 5:39 AM - Marked as answer by
Helen Zhao
Thursday, May 17, 2012 3:25 AM
- Marked as answer by
-
Hi,
I wouldn’t be asking this but this problem sometimes occurs directly after the line..
int main(int argc, char **argv[])
It is probably not related to your problem but this is not a legal definition for main. Your second parameter can be char **argv or char *argv[] but not what you have posted.
{
PWCHAR var = (PWCHAR) malloc ((sizeof(«somestring») * sizeof(WCHAR)) + sizeof(WCHAR));«HEAP CORRUPTION DETECTED after normal block (#60) at 0x00000000xxxxxxxx.»
«CRT detected the application wrote to memory after the end of the heap buffer.»<snip>
Previously another error that has occurred has been a write to invalid memory. (Error — 0x00000005, ACCESS_DENIED)
This inidcates you already have used a bad pointer.
You need to show your actual code since it is obviouls the call to malloc is not that early.
- Marked as answer by
Helen Zhao
Friday, May 11, 2012 5:38 AM - Unmarked as answer by
Helen Zhao
Friday, May 11, 2012 5:39 AM - Marked as answer by
Helen Zhao
Thursday, May 17, 2012 3:25 AM
- Marked as answer by
-
You’re not helping yourself by mixing narrow string literals in your sizeof() expressions with wide string literals in your wcscpy() calls. However, it doesn’t seem to be the underlying problem — unless your WCHAR
is not a two byte type like wchar_t.You can safely replace
PWCHAR var = (PWCHAR) malloc ((sizeof("somestring") * sizeof(WCHAR)) + sizeof(WCHAR));
wcscpy(var, L"somestring");
with the equivalent
PWCHAR var = (PWCHAR) _wcsdup(L"somestring");
Of course, you should always check for a NULL pointer from malloc() and _wcsdup().
Answering policy: see profile.
- Marked as answer by
Helen Zhao
Friday, May 11, 2012 5:38 AM - Unmarked as answer by
Helen Zhao
Friday, May 11, 2012 5:39 AM - Marked as answer by
Helen Zhao
Thursday, May 17, 2012 3:25 AM
- Marked as answer by
-
I suggest you to use the _vsnwprintf
function, where you specify the maximum number of characters to write. Also check if you use the “( )” parentheses correctly in
malloc, and your msg is always compatible with arguments.- Marked as answer by
Helen Zhao
Friday, May 11, 2012 5:39 AM - Unmarked as answer by
Helen Zhao
Friday, May 11, 2012 5:39 AM - Marked as answer by
Helen Zhao
Thursday, May 17, 2012 3:25 AM
- Marked as answer by
Have you encountered Kernel Mode Heap Corruption Error on your PC? If so, you can read this post, in which MiniTool offers you 8 methods to solve this error. Please read on to get them.
Hello, I get BSOD’s (Kernel mode heap corruption) when playing ark at random times. The last time it happened was at the end of a cave when trying to loot the artifact. I have tried doing a driver rollback, updating various drivers. I’d love any suggestions. — www.reddit.com
Some users reported that they had encountered Kernel Mode Heap Corruption BSOD when they were using their computers normally or performing some CPU or GPU intensive activity.

The causes for the KERNEL_MODE_HEAP-CORRUPTION error are various, including outdated graphics drivers, corrupt system files, conflicts with unstable software, and hardware issues. Then, how to solve Kernel Mode Heap Corruption BSOD? Please read the following content.
Back up or Rescue Data Before Repairing BSOD
If you are facing Kernel Mode Heap Corruption Windows 10, you can take solutions mentioned below to repair your computer. However, before you performing these solutions, I recommend you to back up or rescue data first, in case important data experiences secondary damage during the repairing process.
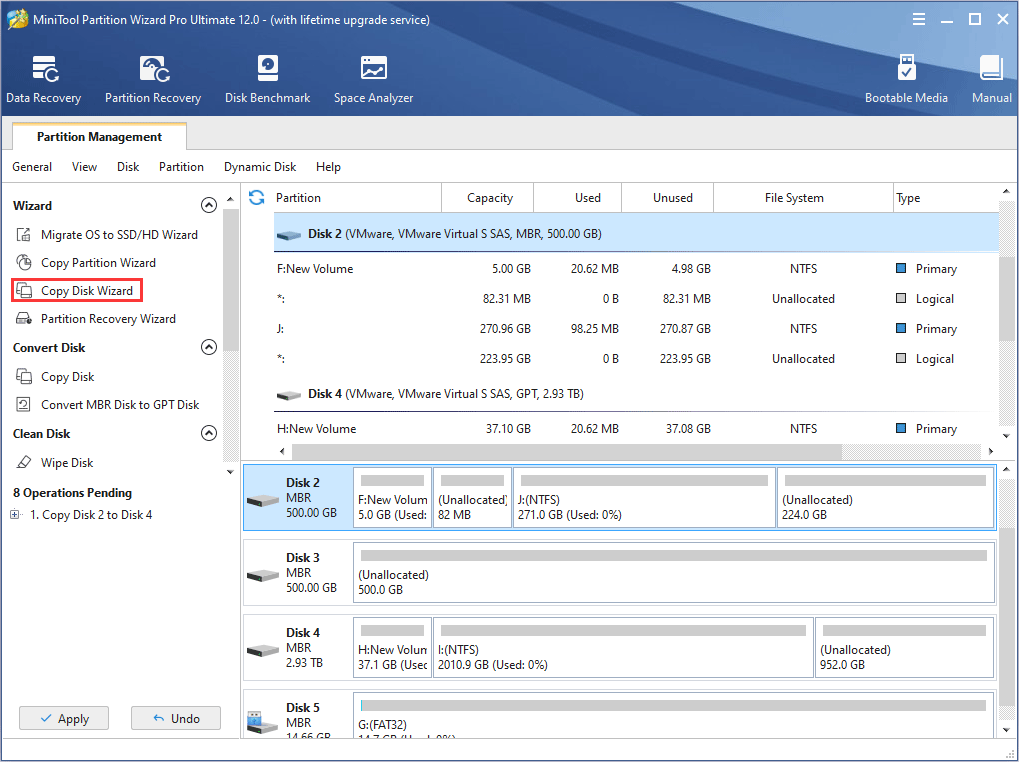
If your computer can boot into Windows normally after this BSOD, you can transfer your important data to a safe place, or back up them through Copy Partition Wizard feature of MiniTool Partition Wizard.
Buy Now
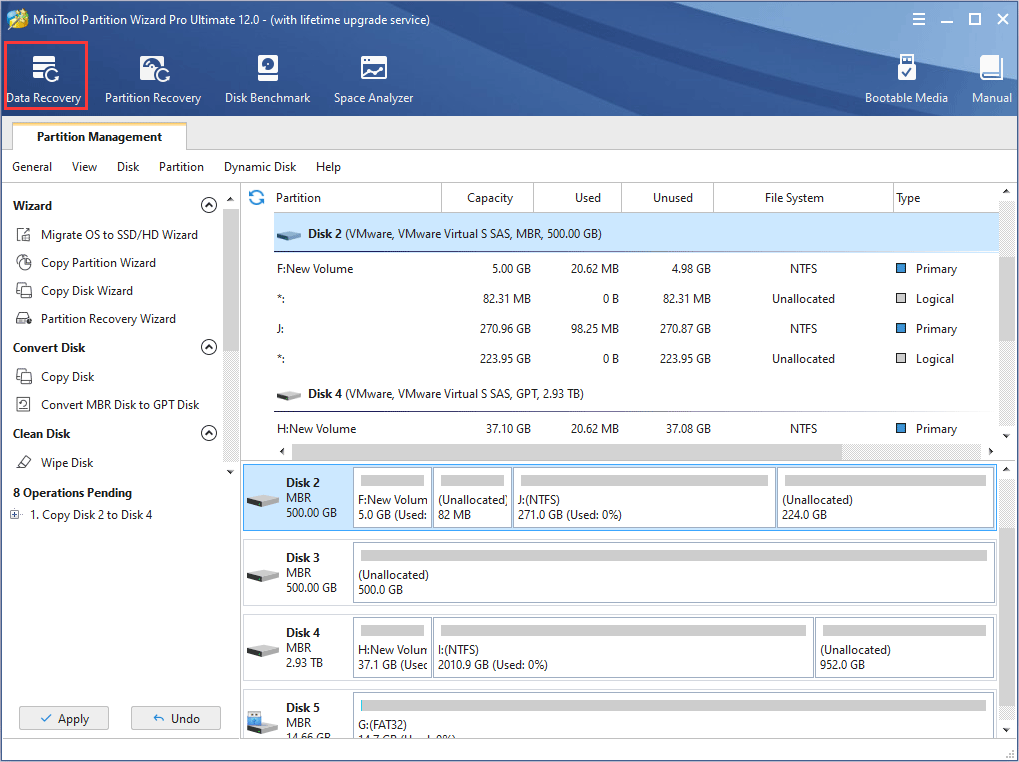
If your computer can’t boot up when encountering this error, you should rescue your important data via a USB flash drive. To do that, I recommend you to use Data Recovery feature of MiniTool Partition Wizard. As for detailed data recovery steps, please refer to this post: A Step-by-Step Tutorial on How to Use a Flash Drive on PC.
Fix 1. Check Event Viewer
When you encounter any error on Windows, the first thing you should do is checking Event Viewer. Event Viewer is a component built into the Microsoft Windows NT operating system that allows you to view all events of your computer as a system administrator. This helps solve computer problems.
However, this method can only be used when the computer can boot into Windows or Safe Mode. If your computer can’t enter Windows normally, please follow the steps below to enter Safe Mode first:
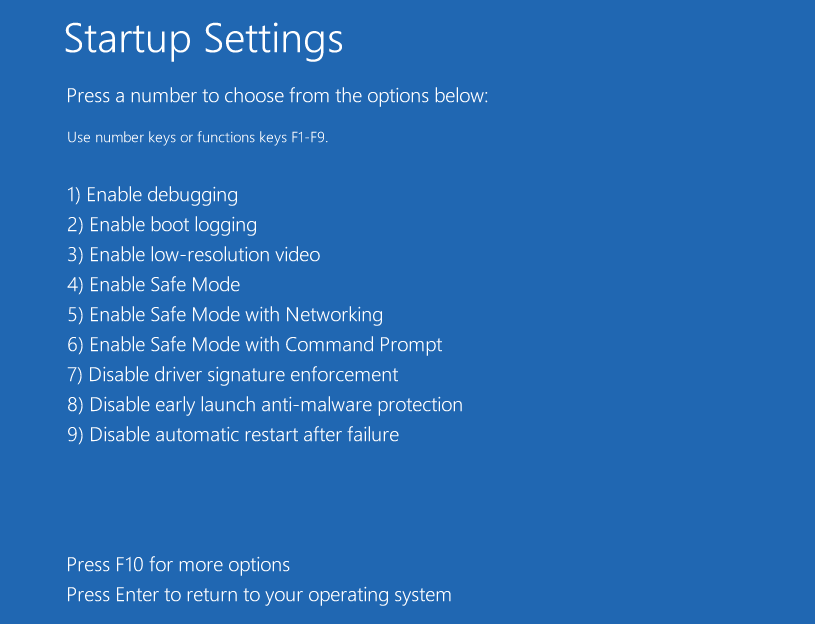
- Boot into WinRE through two consecutive failed attempts to start Windows or an installation media.
- Navigate to Troubleshoot > Advanced options after you enter WinRE.
- Click Startup Settings and press F5 key to choose Enable Safe Mode with Networking option, thus booting into Safe Mode.
After booting into Windows or Safe Mode, please refer to the following steps to check Event Viewer:
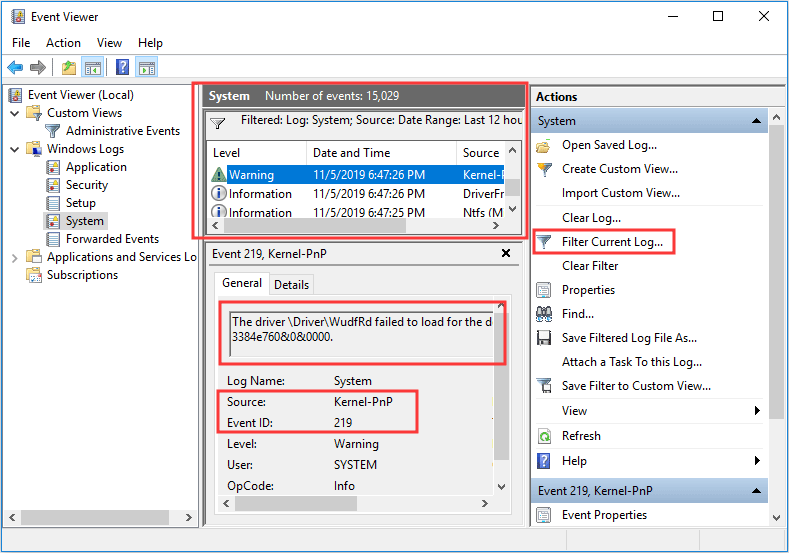
Step 1: Press «Windows + R» keys simultaneously and then type «eventvwr» into the Run box. Then, hit Enter key to open Event Viewer.
Step 2: Navigate to Windows Logs > System to find the log about Kernel Mode Heap Corruption BSOD.
Tip: To find the corresponding log, you can scroll down the System box directly, or use Filter Current Log feature.
Step 3: After finding the log, you should pay attention to the log description because it may indicate the cause of the problem. Additionally, you should also note Source and Event ID information, which may also help you to solve this problem.
After checking Windows log, you can solve the problem accordingly. However, it’s possible that you still don’t know how to solve this problem because the description doesn’t tell you what you should do. If so, you can try the following methods.
Fix 2. Update, Roll Back, or Reinstall the Graphics Card Driver
If you encounter KERNEL_MODE_HEAP-CORRUPTION error while starting the game or any graphic intensive application, the culprit usually should be the outdated or corrupt graphics card driver. For example, some users report that their Crash Dump Analysis files indicate it is nvlddmkm.sys (a graphics card driver) that causes the Kernel Mode Heap Corruption BSOD.
Therefore, you should try updating the graphics card driver. If this method fails, you can then try rolling back it. If this method still fails, you should try reinstalling a new graphics card driver.
Similarly, the above methods can only be used when your computer can enter Windows or Safe Mode. As for how to perform them, please refer to the following steps:
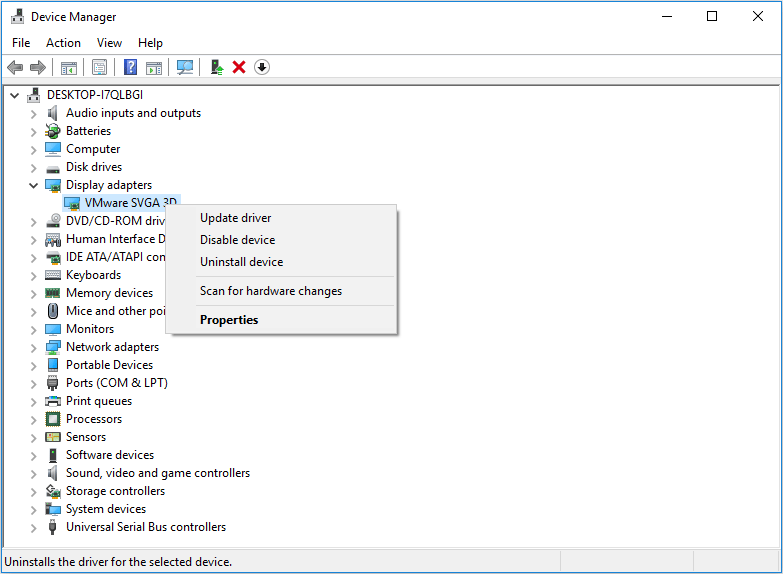
Step 1: Press «Windows + X» keys and then select Device Manager in the pop-up menu.
Step 2: Expand the Display adapters and right-click on the graphics card driver listed under it. Then, follow ways below to update, roll back, or reinstall the graphics card driver:
- To update the driver, you should click Update driver directly and then choose Search automatically for updated driver software.
- To roll back the driver, you should click Properties, skip to the Driver tab, and then click Roll Back Driver and OK button.
- To reinstall a new driver, you should download the newest driver from the manufacturer’s website first, and then you can click Uninstall device to uninstall the current driver. Finally, you should open the newly-downloaded driver folder and double-click the setup file to install it.
Fix 3. Run Driver Verifier Manager
If the above method fails to solve Kernel Mode Heap Corruption Windows 10, you can run Driver Verifier to see whether there are other problematic drivers, because it’s also possible that this BSOD is caused by other problematic drivers.
The Driver Verifier is a tool included with Microsoft Windows, which can monitor and highlight illegal function calls or actions that may cause system corruption due to the driver. With it, you can identify problematic drivers.
Similarly, this method is only available when your computer can enter Windows or Safe Mode. As for how to run it, please refer to the following steps:
Step 1: Open Driver Verifier Manager through the following two ways:
- Press «Windows + X» keys simultaneously, and then choose Windows PowerShell (Admin). Type the command «verifier» and hit Enter key to open Driver Verifier Manager.
- Type «cmd» into the Windows search box and then right-click on Command Prompt app to choose Run as administrator. After that, type the command «verifier» and hit Enter key to open Driver Verifier Manager.
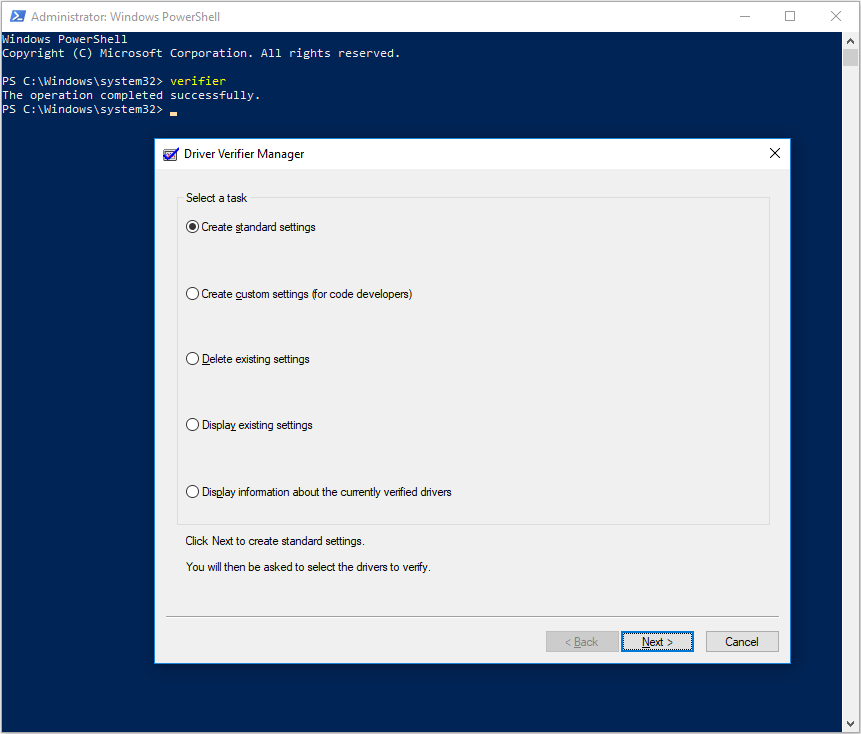
Step 2: Check Create standard settings and click Next button. Then, check Automatically select all drivers installed on this computer and click Finish button. After that, Windows will scan for the errors in the drivers and reboot your computer.
Step 3: After the reboot, Windows will display the drivers that have errors. Then, you need to follow Fix 2 to update, roll back, or reinstall them.
Fix 4. Check for Incompatible Software
If you get the error after installing a new app or when you’re trying to launch a certain program, such as a video game, it’s very possible that the Kernel Mode Heap Corruption BSOD is caused by a software conflict. If your computer can enter Windows or Safe Mode, here are two ways to get rid of the software conflict.
If the software conflict occurs because it’s too old and just compatible with Windows 7/8, you can solve the BSOD by running the program in compatibility mode through the following steps:
- Right-click the software icon on the desktop and then choose Open file location.
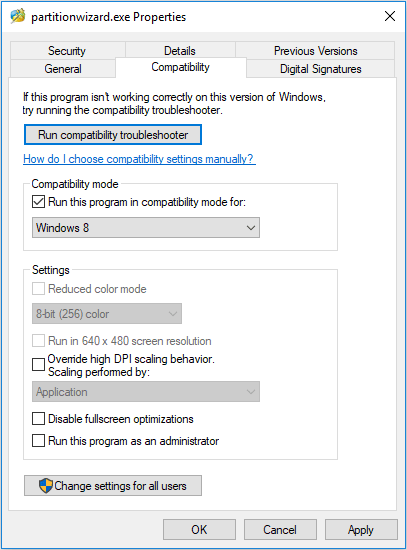
- Right-click on the program executable file and select Properties.
- Skip to Compatibilitytab and check the box next to Run this program in compatibility mode for. Then, click OK button to save changes.
If the software conflict is caused by other factors, you should uninstall the incompatible program through the following steps:
- Press «Windows + R» keys simultaneously to call out Run
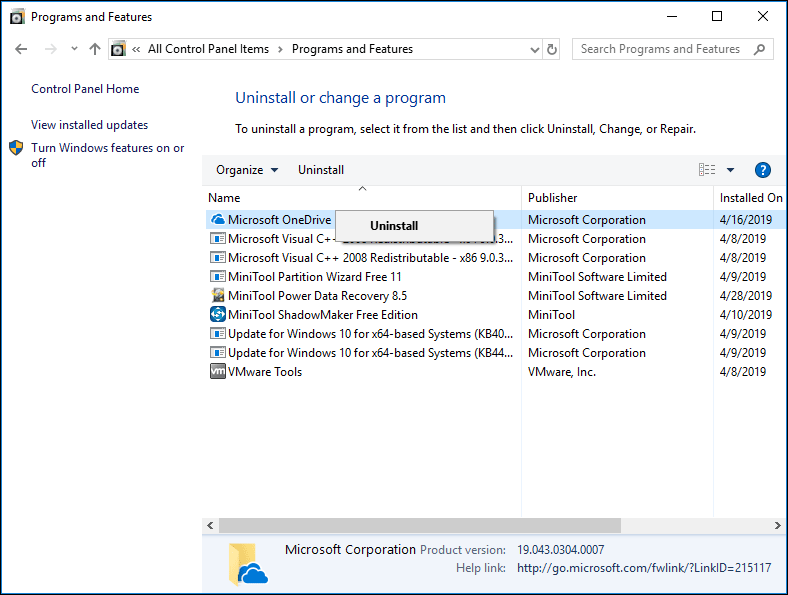
- Type “cpl” into the Run dialogue box and press Enter to open Programs and Features window.
- Right-click the incompatible application and click Uninstall.
Fix 5. Check RAM
Memory problem is another reason behind this stop error. To solve this issue, you should identify and fix RAM problems on your PC through Memory Diagnostic. Similarly, this method is only available when your computer can enter Windows or Safe Mode. Please follow the steps below to check RAM:
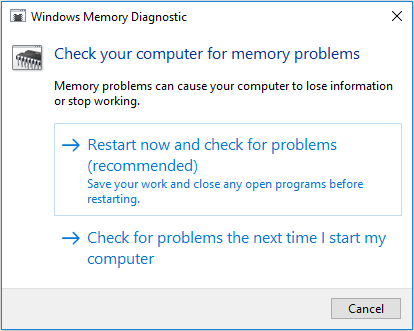
Step 1: Type «memory diagnostic» in the Windows search box. Then, double-click the best-matched icon for Windows Memory Diagnostic.
Step 2: Choose Restart now and check for problems.
Step 3: Your computer will restart and diagnose the memory. Once the diagnosis process is completed, the computer will boot up automatically. Then, you need to view the diagnosis report in Event Viewer through the following steps:
- Open Event Viewer.
- Navigate to Windows Logs > System.
- Click Filter Current Log in the right box.
- In the Event sources box, choose MemoryDiagnostics-Results and then click OK button to display all result logs of the memory test.
- Double-click the latest result log to see whether the diagnosis is passed.
If the diagnosis is not passed, you should take measures according to the diagnosis result description.
Fix 6. Run SFC or DISM
When the Kernel Mode Heap Corruption BSOD occurs, you should run SFC or DISM to check whether it is corrupt system files that cause the BSOD problem.
System File Checker is a tool built in Windows to replace damaged, lost, or changed system files with good system files. In addition, it can be used even if the computer can’t boot into Windows or Safe Mode. Please follow the steps below to run it:
Step 1: Open Command Prompt through the following two ways:
- When your PC can’t enter Windows or Safe Mode: Enter WinRE and then navigate to Troubleshoot > Advanced options > Command Prompt.
- When your PC can enter Windows or Safe Mode: Type «cmd» in Windows search box and right-click the Command Prompt Then, select Run as administrator.
Step 2: Type «sfc /scannow» and press the Enter key. Then, wait until the procedure ends.
DISM is a better tool that can restore corrupt system files. Usually, if SFC fails to repair system files, you can run DISM. However, it is only available when your computer can boot into Windows or Safe Mode. Please follow the steps below to run it:
Step 1: Boot into Windows or Safe Mode and then run Command Prompt as administrator.
Step 2: Type the following commands one by one and hit Enter.
- exe /Online /Cleanup-image /Scanhealth
- exe /Online /Cleanup-image /Restorehealth
Fix 7. Check Slots of the Graphics Card and the Memory
Another cause for the KERNEL_MODE_HEAP-CORRUPTION error is that you have inserted the graphics card or the memory bank into a wrong slot. If so, you should check your motherboard manual and insert it back into the correct lane.
Fix 8. Perform System Restore
If all the above methods don’t work for you, you can try performing System Restore to revert your computer’s state to that of a good point in time. As for how to do that, please refer to the following post:
Here is an article offering you 8 methods to solve Kernel Mode Heap Corruption error. You can try these methods and hope they can help you.Click to Tweet
Bottom Line
Can these methods help you solve the error? Do you have any doubt about these methods? Please leave a comment below or contact us via [email protected]. We will get back to you as soon as possible.
Kernel Mode Heap Corruption FAQ
❄️ How do you fix heap corruption?
- Check Event Viewer.
- Update, Roll Back, or Reinstall the Graphics Card Driver.
- Run Driver Verifier Manager.
- Check for Incompatible Software.
- Check RAM.
- Run SFC or DISM.
- Check Slots of the Graphics Card and the Memory.
- Perform System Restore.
❄️ What is kernel mode heap corruption?
Kernel mode is one of operation modes computer, which allows the computer to have full access to all hardware and make the machine run its any instructions.
Heap corruption occurs when a program damages the allocator’s view of the heap. This error may cause a memory leak where some memory isn’t returned to the heap and is inaccessible to the program afterward, or it may cause a memory fault, usually within the allocator itself.
Have you encountered Kernel Mode Heap Corruption Error on your PC? If so, you can read this post, in which MiniTool offers you 8 methods to solve this error. Please read on to get them.
Hello, I get BSOD’s (Kernel mode heap corruption) when playing ark at random times. The last time it happened was at the end of a cave when trying to loot the artifact. I have tried doing a driver rollback, updating various drivers. I’d love any suggestions. — www.reddit.com
Some users reported that they had encountered Kernel Mode Heap Corruption BSOD when they were using their computers normally or performing some CPU or GPU intensive activity.
The causes for the KERNEL_MODE_HEAP-CORRUPTION error are various, including outdated graphics drivers, corrupt system files, conflicts with unstable software, and hardware issues. Then, how to solve Kernel Mode Heap Corruption BSOD? Please read the following content.
Back up or Rescue Data Before Repairing BSOD
If you are facing Kernel Mode Heap Corruption Windows 10, you can take solutions mentioned below to repair your computer. However, before you performing these solutions, I recommend you to back up or rescue data first, in case important data experiences secondary damage during the repairing process.
If your computer can boot into Windows normally after this BSOD, you can transfer your important data to a safe place, or back up them through Copy Partition Wizard feature of MiniTool Partition Wizard.
Buy Now
If your computer can’t boot up when encountering this error, you should rescue your important data via a USB flash drive. To do that, I recommend you to use Data Recovery feature of MiniTool Partition Wizard. As for detailed data recovery steps, please refer to this post: A Step-by-Step Tutorial on How to Use a Flash Drive on PC.
Fix 1. Check Event Viewer
When you encounter any error on Windows, the first thing you should do is checking Event Viewer. Event Viewer is a component built into the Microsoft Windows NT operating system that allows you to view all events of your computer as a system administrator. This helps solve computer problems.
However, this method can only be used when the computer can boot into Windows or Safe Mode. If your computer can’t enter Windows normally, please follow the steps below to enter Safe Mode first:
- Boot into WinRE through two consecutive failed attempts to start Windows or an installation media.
- Navigate to Troubleshoot > Advanced options after you enter WinRE.
- Click Startup Settings and press F5 key to choose Enable Safe Mode with Networking option, thus booting into Safe Mode.
After booting into Windows or Safe Mode, please refer to the following steps to check Event Viewer:
Step 1: Press «Windows + R» keys simultaneously and then type «eventvwr» into the Run box. Then, hit Enter key to open Event Viewer.
Step 2: Navigate to Windows Logs > System to find the log about Kernel Mode Heap Corruption BSOD.
Tip: To find the corresponding log, you can scroll down the System box directly, or use Filter Current Log feature.
Step 3: After finding the log, you should pay attention to the log description because it may indicate the cause of the problem. Additionally, you should also note Source and Event ID information, which may also help you to solve this problem.
After checking Windows log, you can solve the problem accordingly. However, it’s possible that you still don’t know how to solve this problem because the description doesn’t tell you what you should do. If so, you can try the following methods.
Fix 2. Update, Roll Back, or Reinstall the Graphics Card Driver
If you encounter KERNEL_MODE_HEAP-CORRUPTION error while starting the game or any graphic intensive application, the culprit usually should be the outdated or corrupt graphics card driver. For example, some users report that their Crash Dump Analysis files indicate it is nvlddmkm.sys (a graphics card driver) that causes the Kernel Mode Heap Corruption BSOD.
Therefore, you should try updating the graphics card driver. If this method fails, you can then try rolling back it. If this method still fails, you should try reinstalling a new graphics card driver.
Similarly, the above methods can only be used when your computer can enter Windows or Safe Mode. As for how to perform them, please refer to the following steps:
Step 1: Press «Windows + X» keys and then select Device Manager in the pop-up menu.
Step 2: Expand the Display adapters and right-click on the graphics card driver listed under it. Then, follow ways below to update, roll back, or reinstall the graphics card driver:
- To update the driver, you should click Update driver directly and then choose Search automatically for updated driver software.
- To roll back the driver, you should click Properties, skip to the Driver tab, and then click Roll Back Driver and OK button.
- To reinstall a new driver, you should download the newest driver from the manufacturer’s website first, and then you can click Uninstall device to uninstall the current driver. Finally, you should open the newly-downloaded driver folder and double-click the setup file to install it.
Fix 3. Run Driver Verifier Manager
If the above method fails to solve Kernel Mode Heap Corruption Windows 10, you can run Driver Verifier to see whether there are other problematic drivers, because it’s also possible that this BSOD is caused by other problematic drivers.
The Driver Verifier is a tool included with Microsoft Windows, which can monitor and highlight illegal function calls or actions that may cause system corruption due to the driver. With it, you can identify problematic drivers.
Similarly, this method is only available when your computer can enter Windows or Safe Mode. As for how to run it, please refer to the following steps:
Step 1: Open Driver Verifier Manager through the following two ways:
- Press «Windows + X» keys simultaneously, and then choose Windows PowerShell (Admin). Type the command «verifier» and hit Enter key to open Driver Verifier Manager.
- Type «cmd» into the Windows search box and then right-click on Command Prompt app to choose Run as administrator. After that, type the command «verifier» and hit Enter key to open Driver Verifier Manager.
Step 2: Check Create standard settings and click Next button. Then, check Automatically select all drivers installed on this computer and click Finish button. After that, Windows will scan for the errors in the drivers and reboot your computer.
Step 3: After the reboot, Windows will display the drivers that have errors. Then, you need to follow Fix 2 to update, roll back, or reinstall them.
Fix 4. Check for Incompatible Software
If you get the error after installing a new app or when you’re trying to launch a certain program, such as a video game, it’s very possible that the Kernel Mode Heap Corruption BSOD is caused by a software conflict. If your computer can enter Windows or Safe Mode, here are two ways to get rid of the software conflict.
If the software conflict occurs because it’s too old and just compatible with Windows 7/8, you can solve the BSOD by running the program in compatibility mode through the following steps:
- Right-click the software icon on the desktop and then choose Open file location.
- Right-click on the program executable file and select Properties.
- Skip to Compatibilitytab and check the box next to Run this program in compatibility mode for. Then, click OK button to save changes.
If the software conflict is caused by other factors, you should uninstall the incompatible program through the following steps:
- Press «Windows + R» keys simultaneously to call out Run
- Type “cpl” into the Run dialogue box and press Enter to open Programs and Features window.
- Right-click the incompatible application and click Uninstall.
Fix 5. Check RAM
Memory problem is another reason behind this stop error. To solve this issue, you should identify and fix RAM problems on your PC through Memory Diagnostic. Similarly, this method is only available when your computer can enter Windows or Safe Mode. Please follow the steps below to check RAM:
Step 1: Type «memory diagnostic» in the Windows search box. Then, double-click the best-matched icon for Windows Memory Diagnostic.
Step 2: Choose Restart now and check for problems.
Step 3: Your computer will restart and diagnose the memory. Once the diagnosis process is completed, the computer will boot up automatically. Then, you need to view the diagnosis report in Event Viewer through the following steps:
- Open Event Viewer.
- Navigate to Windows Logs > System.
- Click Filter Current Log in the right box.
- In the Event sources box, choose MemoryDiagnostics-Results and then click OK button to display all result logs of the memory test.
- Double-click the latest result log to see whether the diagnosis is passed.
If the diagnosis is not passed, you should take measures according to the diagnosis result description.
Fix 6. Run SFC or DISM
When the Kernel Mode Heap Corruption BSOD occurs, you should run SFC or DISM to check whether it is corrupt system files that cause the BSOD problem.
System File Checker is a tool built in Windows to replace damaged, lost, or changed system files with good system files. In addition, it can be used even if the computer can’t boot into Windows or Safe Mode. Please follow the steps below to run it:
Step 1: Open Command Prompt through the following two ways:
- When your PC can’t enter Windows or Safe Mode: Enter WinRE and then navigate to Troubleshoot > Advanced options > Command Prompt.
- When your PC can enter Windows or Safe Mode: Type «cmd» in Windows search box and right-click the Command Prompt Then, select Run as administrator.
Step 2: Type «sfc /scannow» and press the Enter key. Then, wait until the procedure ends.
DISM is a better tool that can restore corrupt system files. Usually, if SFC fails to repair system files, you can run DISM. However, it is only available when your computer can boot into Windows or Safe Mode. Please follow the steps below to run it:
Step 1: Boot into Windows or Safe Mode and then run Command Prompt as administrator.
Step 2: Type the following commands one by one and hit Enter.
- exe /Online /Cleanup-image /Scanhealth
- exe /Online /Cleanup-image /Restorehealth
Fix 7. Check Slots of the Graphics Card and the Memory
Another cause for the KERNEL_MODE_HEAP-CORRUPTION error is that you have inserted the graphics card or the memory bank into a wrong slot. If so, you should check your motherboard manual and insert it back into the correct lane.
Fix 8. Perform System Restore
If all the above methods don’t work for you, you can try performing System Restore to revert your computer’s state to that of a good point in time. As for how to do that, please refer to the following post:
Here is an article offering you 8 methods to solve Kernel Mode Heap Corruption error. You can try these methods and hope they can help you.Click to Tweet
Bottom Line
Can these methods help you solve the error? Do you have any doubt about these methods? Please leave a comment below or contact us via [email protected]. We will get back to you as soon as possible.
Kernel Mode Heap Corruption FAQ
❄️ How do you fix heap corruption?
- Check Event Viewer.
- Update, Roll Back, or Reinstall the Graphics Card Driver.
- Run Driver Verifier Manager.
- Check for Incompatible Software.
- Check RAM.
- Run SFC or DISM.
- Check Slots of the Graphics Card and the Memory.
- Perform System Restore.
❄️ What is kernel mode heap corruption?
Kernel mode is one of operation modes computer, which allows the computer to have full access to all hardware and make the machine run its any instructions.
Heap corruption occurs when a program damages the allocator’s view of the heap. This error may cause a memory leak where some memory isn’t returned to the heap and is inaccessible to the program afterward, or it may cause a memory fault, usually within the allocator itself.
Немного расскажу про дебажную кучу, речь пойдет о Visual Studio 2008. В остальных версиях дебажная куча выглядит примерно так же. Про другие компиляторы не знаю.
Основная мысль — дебажная куча отличается от релизной, чтобы облегчить отладку. И, если в дебаге произойдет порча памяти, то ее можно отловить. Visual Studio выдает в таком случае окно с сообщением и пишет в Output что-то вроде
Heap corruption at address.
HEAP[MyProg.exe]: Heap block at 0AC6A400 modified at 0AC6A6EC
past requested size of 2e4
Итак, в чем состоят отличия и каким образом отлавливаются ошибки. Давайте я пример приведу, с примером удобнее.
class CBase
{
public:
int BaseI;
int BaseJ;
};class CDerived : public CBase
{
public:
int DerivedI;
};
int main()
{
CBase *pBase = new CBase;//(1)
pBase->BaseI = 3;
pBase->BaseJ = 4;//(2)
delete pBase;//(3)
return 0;
}
Как будет выглядеть память в точке (1). (Чтобы вывести окно с памятью, выберите Debug->Windows->Memory->Memory1).
0x00984ED8 cd cd cd cd cd cd cd cd fd fd fd fd 00 00 00 00У меня экземпляр класса CBase расположился по адресу 0x00984ED8. Оба int’а, а это восемь байт, заполнены значением 0xCD, Clean Memory. Это значение по умолчанию.
Дальше четыре байта 0XFD, Fence Memory, она же «no mans land». Это такой заборчик, которым обрамляется свежевыделенная память. Перед адресом 0x00984ED8 стоят точно такие же четыре байта.
Точка (2).
0x00984ED8 03 00 00 00 04 00 00 00 fd fd fd fd 00 00 00 00Мы записали значения 3 и 4 и они идут одно за другим. Младший байт идет первым, потому что я работают с little endian платформой.
Точка (3)
0x00984ED8 dd dd dd dd dd dd dd dd dd dd dd dd 00 00 00 00Память после удаления заполняется значениями 0xDD, Dead Memory. После вызова функции HeapFree() будет заполнена значениями 0xFEEEFEEE.
Давайте теперь сымитируем багу и посмотрим как Visual Studio ее поймает. Это реальная бага, я ее упростила до синтетического примера. На самом деле кода было больше и он был размазан по нескольким функциям.
 CBase *pBase = new CBase;//(1)  pBase->BaseI = 3;
 pBase->BaseJ = 4;//(2)  CDerived* pDerived = static_cast<CDerived*>(pBase); pDerived->DerivedI = 7;//(3)
 delete pBase;
Итак, мы стали приводить по иерархии с помощью static_cast’а, вместо dynamic_cast’а. Что в итоге получили. В точках (1) и (2) программа выглядит все также. В точке (3) мы полезли в чужую память и затерли забор.
03 00 00 00 04 00 00 00 07 00 00 00 00 00 00 00После попытки вызвать delete pBase мы получим сообщение об ошибке, потому что забора нет, а это означает, что мы лазили в чужую память.
HEAP CORRUPTION DETECTED: after Normal block (#68) at 0x008D4ED8.
CRT detected that the application wrote to memory after end of heap buffer.
Еще различия между дебажной и релизной кучами приводят к тому, что программа начинает себя вести по-разному в дебаге и в релизе. Простой пример — дебажная «падает», релизная нет. Очень может быть, что «падение» — это не падение вовсе, а как раз сообщение о порче памяти. Почитайте повнимательнее, что там в окне написано.
Также народ жалуется, что дебажная версия работает сильно меденнее релизной. Причиной этого в том числе может быть дебажная куча. В интернетах пишут, что можно ее в дебаге отключить то ли с помощью переменной окружения _NO_DEBUG_HEAP, то ли NO_DEBUG_HEAP, в единицу ее надо выставить. Я пробовала ее отключить, куча осталась дебажной.
Ссылки по теме:
Win32 Debug CRT Heap Internals
Inside CRT: Debug Heap Management
Memory Management and the Debug Heap (MSDN)
Приведение типов в C++
18 сентября 2009 г.
PHP
Segmentation failed
Suhosin

После переустановки PHP 5.2.10 столкнулся я с такой проблемой как «linked list corrupt on efree() — heap corruption detected» при использовании библиотеки phpQuery, а также «Segmentation fault» в CLI версии свежеустановленного PHP.
Ошибка «linked list corrupt on efree() — heap corruption detected» проявлялась только в одном месте, и связана была с DOM модулем, как мне казалось. До переустановки я не юзал phpQuery в продакшене, поэтому не мог сказать однозначно повлияла ли это переустановка, или так и было бы с ошибкой.
При запуске любого скрипта в CLI режиме, было нечто подобное:
php -f /www/script.php Segmentation faultРешение проблемы с Segmentation fault в CLI
Погуглив немного, не нашел ничего путного и запостил на Пыху топик о своей проблеме, пару дней мы думали по этой теме, предлагались разные решения и побороли в первый день «Segmentation fault» в CLI, путем упорядочивания PHP модулей (спасибо пользователю OFF), сейчас у меня так:
extension=mbstring.so extension=simplexml.so extension=spl.so extension=mysqli.so extension=mysql.so extension=session.so extension=mcrypt.so extension=gd.so extension=json.so extension=ctype.so extension=iconv.so extension=hash.so extension=curl.so extension=zlib.so extension=imagick.so extension=ffmpeg.so extension=sphinx.so extension=pcre.so extension=memcache.so extension=memcached.so extension=dom.soС тех пор CLI работал исправно и работает до сих пор.
Решение проблемы с heap corruption detected в phpQuery
Признаюсь, я грешил на PHP-модуль «php5-dom», однако проблема оказалась не в нем. Ошибка была вида:
[Thu Sep 17 01:48:23 2009] [error] [client 93.111.111.111] ALERT — linked list corrupt on efree() — heap corruption detected (attacker ‘93.111.111.111’, file ‘/path/to/kinsburg/path/to/libs/phpquery.php’, line 5689), referer: http://kinsburg.ru/path/to/admin/path/to/parser/
где, 93.111.111.111 — ip-адрес моего локального компьютера (аля клиент)
Решение оказалось совсем для меня не очевидным, во всем оказался виноват «Suhosin Patch», который нужен для обеспечения безопасности. Я просто переустановил PHP, но в этот раз отключил Suhosin.
На эту мысль меня натолкнул пост пользователя OFF с Пыха.ру, за что ему огромное спасибо! Были еще варианты решения этой проблемы, но они не венчались успехом.
В данный момент, я планирую включить снова Suhosin Patch, потому что запускать тот злосчастный скрипт мне необходимо всего раз 3-6 месяцев, а за это время может возникнут патчи бага, либо найдется куда более продуктивное решение.
Вы можете столкнуться с ошибкой на синем экране BSOD «Kernel Mode Heap Corruption» в Windows 10 при обычной работе за компьютере или когда ваш ПК испытывает нагрузку на оборудование как CPU, GPU или RAM. Ошибка может быть вызвана из-за поврежденного или устаревшего драйвера видеокарты, поврежденных системных файлов, проблемы с оборудованием как ОЗУ, или сама программа или игра является конфликтующей с вашей операционной системой. Разберем, как исправить ошибку Kernel_Mode_Heap_Corruption на синем экране в Windows 10.

1. Проверка системных файлов
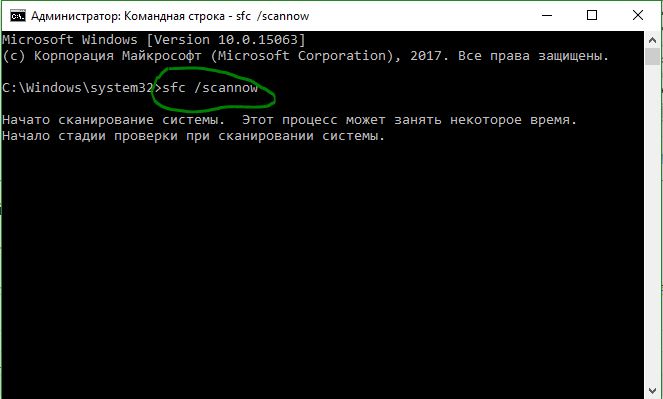
Системные файлы могут вызывать ряд ошибок, в том числе и Kernel Mode Heap Corruption. Откройте командную строку от имени администратора и введите команды по очереди. Эти две команды найдут отсутствующие или поврежденные системные файлы, и автоматически исправят их.
sfc /scannowDISM /ONLINE /CLEANUP-IMAGE /RESTOREHEALTH
2. Проверка драйверов на наличие ошибок
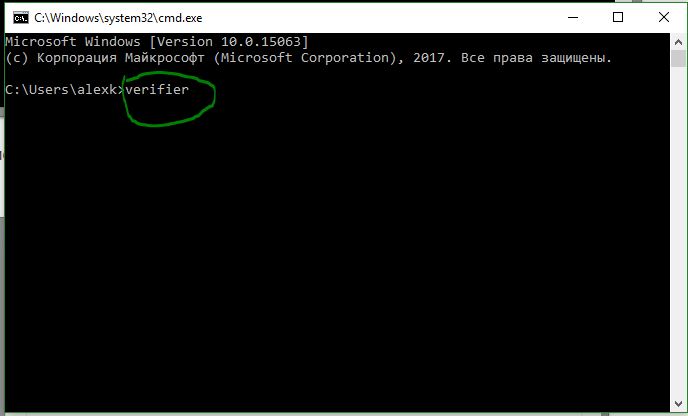
Какой именно драйвер отвечает за ошибку сложно сказать без анализа. Мы же будем анализировать все драйверы оборудования в системе. Запустите командную строку от имени администратора и введите команду:
verifier- В появившимся окне «Создать стандартные параметры«.
- Далее «Автоматически выбирать все драйверы установленные на этом компьютере«.
Когда Windows перезагрузится, она проанализирует все драйверы, установленные на вашем компьютере, на наличие проблем. Если Проблемы будут обнаружены, то вы получите уведомление об этом.
3. Обновить драйверы
Если выше способом обнаружился какой-либо драйвер, то его необходимо обновить до последней версии. Нажмите Win+R и введите devmgmt.msc, чтобы попасть быстро в диспетчер устройств. Определите какое устройство вызывает ошибку Kernel Mode Heap Corruption (выше метод), раздвиньте список и нажмите по нему правой кнопкой мыши, после чего выберите «Обновить драйвер«. Далее следуйте рекомендациям на экране.
Вы также можете зайти на сайт производителя оборудования и скачать вручную последнюю версию драйвера.

4. Диагностика ОЗУ
В первую очередь убедитесь, что оперативная планка у вас вставлена правильно. Также следует достать её из компьютера и продуть слоты от пыли. Еще один момент, если у вас 4 слота на материнской плате для RAM планок, то попробуйте вставить планки в 1 и 3 слот.

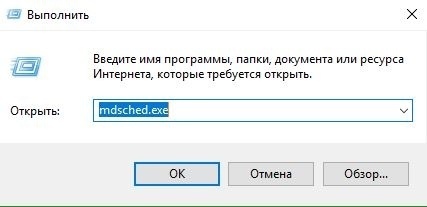
Это сложно сделать в ноутбуке, так как многие боятся его разбирать. По этой причине можно запустить диагностику ОЗУ. Нажмите Win+R и введите mdsched.exe, после чего следуйте рекомендациям на экране. Если будут программные ошибки, то инструмент попытается автоматически исправить их, после чего ошибка Kernel Mode Heap Corruption в Windows 10 устраниться.
Смотрите еще:
- SFC и DISM: Проверка и Восстановление системных файлов в Windows
- Проверка плохих драйверов с Windows Driver Verifier
- Как удалить, отключить, откатить и обновить драйверы устройств в Windows 10/8/7
- Диагностика ошибок синего экрана смерти BSOD Window
- Как проверить оперативную память на ошибки в Windows
[ Telegram | Поддержать ]
Немного расскажу про дебажную кучу, речь пойдет о Visual Studio 2008. В остальных версиях дебажная куча выглядит примерно так же. Про другие компиляторы не знаю.
Основная мысль — дебажная куча отличается от релизной, чтобы облегчить отладку. И, если в дебаге произойдет порча памяти, то ее можно отловить. Visual Studio выдает в таком случае окно с сообщением и пишет в Output что-то вроде
Heap corruption at address.
HEAP[MyProg.exe]: Heap block at 0AC6A400 modified at 0AC6A6EC
past requested size of 2e4
Итак, в чем состоят отличия и каким образом отлавливаются ошибки. Давайте я пример приведу, с примером удобнее.
class CBase
{
public:
int BaseI;
int BaseJ;
};class CDerived : public CBase
{
public:
int DerivedI;
};
int main()
{
CBase *pBase = new CBase;//(1)
pBase->BaseI = 3;
pBase->BaseJ = 4;//(2)
delete pBase;//(3)
return 0;
}
Как будет выглядеть память в точке (1). (Чтобы вывести окно с памятью, выберите Debug->Windows->Memory->Memory1).
0x00984ED8 cd cd cd cd cd cd cd cd fd fd fd fd 00 00 00 00У меня экземпляр класса CBase расположился по адресу 0x00984ED8. Оба int’а, а это восемь байт, заполнены значением 0xCD, Clean Memory. Это значение по умолчанию.
Дальше четыре байта 0XFD, Fence Memory, она же «no mans land». Это такой заборчик, которым обрамляется свежевыделенная память. Перед адресом 0x00984ED8 стоят точно такие же четыре байта.
Точка (2).
0x00984ED8 03 00 00 00 04 00 00 00 fd fd fd fd 00 00 00 00Мы записали значения 3 и 4 и они идут одно за другим. Младший байт идет первым, потому что я работают с little endian платформой.
Точка (3)
0x00984ED8 dd dd dd dd dd dd dd dd dd dd dd dd 00 00 00 00Память после удаления заполняется значениями 0xDD, Dead Memory. После вызова функции HeapFree() будет заполнена значениями 0xFEEEFEEE.
Давайте теперь сымитируем багу и посмотрим как Visual Studio ее поймает. Это реальная бага, я ее упростила до синтетического примера. На самом деле кода было больше и он был размазан по нескольким функциям.
 CBase *pBase = new CBase;//(1)  pBase->BaseI = 3;
 pBase->BaseJ = 4;//(2)  CDerived* pDerived = static_cast<CDerived*>(pBase); pDerived->DerivedI = 7;//(3)
 delete pBase;
Итак, мы стали приводить по иерархии с помощью static_cast’а, вместо dynamic_cast’а. Что в итоге получили. В точках (1) и (2) программа выглядит все также. В точке (3) мы полезли в чужую память и затерли забор.
03 00 00 00 04 00 00 00 07 00 00 00 00 00 00 00После попытки вызвать delete pBase мы получим сообщение об ошибке, потому что забора нет, а это означает, что мы лазили в чужую память.
HEAP CORRUPTION DETECTED: after Normal block (#68) at 0x008D4ED8.
CRT detected that the application wrote to memory after end of heap buffer.
Еще различия между дебажной и релизной кучами приводят к тому, что программа начинает себя вести по-разному в дебаге и в релизе. Простой пример — дебажная «падает», релизная нет. Очень может быть, что «падение» — это не падение вовсе, а как раз сообщение о порче памяти. Почитайте повнимательнее, что там в окне написано.
Также народ жалуется, что дебажная версия работает сильно меденнее релизной. Причиной этого в том числе может быть дебажная куча. В интернетах пишут, что можно ее в дебаге отключить то ли с помощью переменной окружения _NO_DEBUG_HEAP, то ли NO_DEBUG_HEAP, в единицу ее надо выставить. Я пробовала ее отключить, куча осталась дебажной.
Ссылки по теме:
Win32 Debug CRT Heap Internals
Inside CRT: Debug Heap Management
Memory Management and the Debug Heap (MSDN)
Приведение типов в C++