
Появление сообщения об ошибке 401 Unauthorized Error («отказ в доступе») при открытии страницы сайта означает неверную авторизацию или аутентификацию пользователя на стороне сервера при обращении к определенному url-адресу. Чаще всего она возникает при ошибочном вводе имени и/или пароля посетителем ресурса при входе в свой аккаунт. Другой причиной являются неправильные настройки, допущенные при администрировании web-ресурса. Данная ошибка отображается в браузере в виде отдельной страницы с соответствующим описанием. Некоторые разработчики интернет-ресурсов, в особенности крупных порталов, вводят собственную дополнительную кодировку данного сбоя:
- 401 Unauthorized;
- Authorization Required;
- HTTP Error 401 – Ошибка авторизации.
Попробуем разобраться с наиболее распространенными причинами возникновения данной ошибки кода HTTP-соединения и обсудим способы их решения.
Причины появления ошибки сервера 401 и способы ее устранения на стороне пользователя
При доступе к некоторым сайтам (или отдельным страницам этих сайтов), посетитель должен пройти определенные этапы получения прав:
- Идентификация – получение вашей учетной записи («identity») по username/login или email.
- Аутентификация («authentic») – проверка того, что вы знаете пароль от этой учетной записи.
- Авторизация – проверка вашей роли (статуса) в системе и решение о предоставлении доступа к запрошенной странице или ресурсу на определенных условиях.
Большинство пользователей сохраняют свои данные по умолчанию в истории браузеров, что позволяет быстро идентифицироваться на наиболее часто посещаемых страницах и синхронизировать настройки между устройствами. Данный способ удобен для серфинга в интернете, но может привести к проблемам с безопасностью доступа к конфиденциальной информации. При наличии большого количества авторизованных регистрационных данных к различным сайтам используйте надежный мастер-пароль, который закрывает доступ к сохраненной в браузере информации.
Наиболее распространенной причиной появления ошибки с кодом 401 для рядового пользователя является ввод неверных данных при посещении определенного ресурса. В этом и других случаях нужно попробовать сделать следующее:
- Проверьте в адресной строке правильность написания URL. Особенно это касается перехода на подстраницы сайта, требующие авторизации. Введите правильный адрес. Если переход на страницу осуществлялся после входа в аккаунт, разлогинитесь, вернитесь на главную страницу и произведите повторный вход с правильными учетными данными.
- При осуществлении входа с сохраненными данными пользователя и появлении ошибки сервера 401 проверьте их корректность в соответствующих настройках данного браузера. Возможно, авторизационные данные были вами изменены в другом браузере. Также можно очистить кэш, удалить cookies и повторить попытку входа. При удалении истории браузера или очистке кэша потребуется ручное введение логина и пароля для получения доступа. Если вы не помните пароль, пройдите процедуру восстановления, следуя инструкциям.
- Если вы считаете, что вводите правильные регистрационные данные, но не можете получить доступ к сайту, обратитесь к администратору ресурса. В этом случае лучше всего сделать скриншот проблемной страницы.
- Иногда блокировка происходит на стороне провайдера, что тоже приводит к отказу в доступе и появлению сообщения с кодировкой 401. Для проверки можно попробовать авторизоваться на том же ресурсе с альтернативного ip-адреса (например, используя VPN). При подтверждении блокировки трафика свяжитесь с провайдером и следуйте его инструкциям.
Некоторые крупные интернет-ресурсы с большим количеством подписчиков используют дополнительные настройки для обеспечения безопасности доступа. К примеру, ваш аккаунт может быть заблокирован при многократных попытках неудачной авторизации. Слишком частые попытки законнектиться могут быть восприняты как действия бота. В этом случае вы увидите соответствующее сообщение, но можете быть просто переадресованы на страницу с кодом 401. Свяжитесь с администратором сайта и решите проблему.
Иногда простая перезагрузка проблемной страницы, выход из текущей сессии или использование другого веб-браузера полностью решают проблему с 401 ошибкой авторизации.
Устранение ошибки 401 администратором веб-ресурса
Для владельцев сайтов, столкнувшихся с появлением ошибки отказа доступа 401, решить ее порою намного сложнее, чем обычному посетителю ресурса. Есть несколько рекомендаций, которые помогут в этом:
- Обращение в службу поддержки хостинга сайта. Как и в случае возникновения проблем с провайдером, лучше всего подробно описать последовательность действий, приведших к появлению ошибки 401, приложить скриншот.
- При отсутствии проблем на стороне хостинг-провайдера можно внести следующие изменения в настройки сайта с помощью строки Disallow:/адрес проблемной страницы. Запретить индексацию страницам с ошибкой в «rоbоts.txt», после чего добавить в файл «.htассеss» строку такого типа:
Redirect 301 /oldpage.html http://site.com/newpage.html.
Где в поле /oldpage.html прописывается адрес проблемной страницы, а в http://site.com/newpage.html адрес страницы авторизации.
Таким образом вы перенаправите пользователей со всех страниц, которые выдают ошибку 401, на страницу начальной авторизации.
- Если после выполнения предыдущих рекомендаций пользователи при попытках авторизации все равно видят ошибку 401, то найдите на сервере файл «php.ini» и увеличьте время жизни сессии, изменив значения следующих параметров: «session.gc_maxlifetime» и «session.cookie_lifetime» на 1440 и 0 соответственно.
- Разработчики веб-ресурсов могут использовать более сложные методы авторизации и аутентификации доступа для создания дополнительной защиты по протоколу HTTP. Если устранить сбой простыми методами администрирования не удается, следует обратиться к специалистам, создававшим сайт, для внесения соответствующих изменений в код.
Хотя ошибка 401 и является проблемой на стороне клиента, ошибка пользователя на стороне сервера может привести к ложному требованию входа в систему. К примеру, сетевой администратор разрешит аутентификацию входа в систему всем пользователям, даже если это не требуется. В таком случае сообщение о несанкционированном доступе будет отображаться для всех, кто посещает сайт. Баг устраняется внесением соответствующих изменений в настройки.
Дополнительная информация об ошибке с кодом 401
Веб-серверы под управлением Microsoft IIS могут предоставить дополнительные данные об ошибке 401 Unauthorized в виде второго ряда цифр:
- 401, 1 – войти не удалось;
- 401, 2 – ошибка входа в систему из-за конфигурации сервера;
- 401, 3 – несанкционированный доступ из-за ACL на ресурс;
- 401, 501 – доступ запрещен: слишком много запросов с одного и того же клиентского IP; ограничение динамического IP-адреса – достигнут предел одновременных запросов и т.д.
Более подробную информацию об ошибке сервера 401 при использовании обычной проверки подлинности для подключения к веб-узлу, который размещен в службе MS IIS, смотрите здесь.
Следующие сообщения также являются ошибками на стороне клиента и относятся к 401 ошибке:
- 400 Bad Request;
- 403 Forbidden;
- 404 Not Found;
- 408 Request Timeout.
Как видим, появление ошибки авторизации 401 Unauthorized не является критичным для рядового посетителя сайта и чаще всего устраняется самыми простыми способами. В более сложной ситуации оказываются администраторы и владельцы интернет-ресурсов, но и они в 100% случаев разберутся с данным багом путем изменения настроек или корректировки html-кода с привлечением разработчика сайта.
401 – Unauthorized is the internet equivalent of a “Restricted Entry” sign at a posh nightclub. Sure, it may help you keep away some unsavory visitors. But it can also turn away legitimate customers while making you look like a snob.
Worse still, 401 errors are often caused by reasons that have nothing to do with the visitor, making them extra frustrating to encounter. But not to worry! Here are a few simple steps you can take as a website owner to troubleshoot the 401 error before it starts impacting your website’s trust.
What is the 401 Unauthorized Error?
The 401 Unauthorized error is an HTTP status code indicating that the client is not authorized access to the requested resource.
What that actually means: 401 – Unauthorized is an authentication error, which means that the web page you are trying to visit is password-protected, and you don’t have the correct permissions to access it. This can happen when the user enters a wrong password or when there’s a restriction on accessing the web page from the user’s geographic location.
Of course, 401 errors can also be false positives, meaning that the error can occur even when the visitor has the right credentials to log into a website. It may even occur when the web page isn’t supposed to be password-protected at all. For example, it can be caused by a jittery firewall, a troublesome plugin, or an uncooperative extension added to your website.
You may notice the 401 error as one of these messages popping up in your browser window:
- 401 Authorization Required
- 401 Unauthorized
- HTTP 401 Error – Unauthorized
- Access Denied
- HTTP Error 401

401 Unauthorized: Potential Causes of the HTTP Error Code
401 errors occur when a web browser has trouble authenticating the visitor’s login credentials with the website’s server. Here are a few common causes why that might happen:
- Error or typo in the website’s URL.
- Outdated cookies or browser cache.
- IP address restrictions on-site access.
- Errors in server configuration.
- Incompatible plugin or website theme.
- Incorrect login attempts by the user.
401 errors are normally client-side errors, meaning they can often be fixed by clearing your browser’s cookies or inputting the correct password. However, server-side issues like plugins and firewalls can also cause these errors, making it very important for site admins to be aware of potential conflicts.
But these are all surface-level explanations. If you want to know what causes a 401 error, you must understand how authentication works in web development.
When a client (i.e., a web browser) requests access to a protected resource on a website, the website will need the client to provide some form of valid authentication. These credentials could be in the form of API keys, a username and password, digital certificates, or something else — depending on the authentication scheme used by the site.
The website then processes the authentication credentials to verify their validity. This could involve checking the credentials against a stored database of users and passwords, contacting an external authentication provider, or performing some other form of validation.
If the authentication is successful, it returns a 200 status code, and the website will generate a session token for the client. This identifies the authenticated client and tracks the client’s interactions within the website. The session token is often stored in a cookie in the client’s browser or as a header in any subsequent requests.
However, if the authentication is unsuccessful, the website will return an HTTP error message, such as the 401 error code. The 401 error message typically includes a WWW-Authenticate header, which explains how to authenticate with the server in the user’s browser. This header can include more context about the 401 error, such as the type of authentication required (e.g. Basic, Digest, or OAuth).
How to Diagnose the 401 Error as a User or Administrator
401 access control errors are pretty common when logging into a membership site or accessing a protected web page. Luckily, they are also very easy to fix most of the time. Here are a few things you can do to address this error, both as a website visitor and a web administrator:
Client-Side Solutions
401 error pages are sometimes caused by client-side issues like login credentials or even the web browser used to access your website’s password protection system. These can be fixed with a few simple steps from the visitor’s end:
- Check User Credentials: Make sure you entered the correct username and password combination. Double-check your authentication credentials for the slightest typo. Remember, usernames and passwords are case-sensitive.
- Clear Browser Cookies: If the website uses cookies for authentication, the error may be because of invalid or expired cookies. Normally, cookies have an expiration date or just expire when the browser is closed. If you’re having trouble accessing a website, clear browsing data by following the instructions for your specific web browser to help solve the issue.
Cookies
Cookies are pieces of data sent to a user’s computer or mobile device by a web server. They are then stored on the user’s device. Cookies can be used for authentication, identification of a user session, personalization of web content, or collecting information about the use of a website.
Read More
- Verify URL: Make sure the URL you’re trying to access is correct and up-to-date. Otherwise, the DNS server may not be able to find the website and instead return the 401 error. If you’re following a link from another website, it’s quite possible that the link is using the wrong URL.
- Rate Limiting: If the website server is rate limiting requests from the same IP address, this can lead to a 401 Unauthorized Error. Make sure that you don’t exceed the number of login requests allowed by the server. The limit is often indicated in the login form.

DNS Flushing
What is DNS?
The Domain Name System (DNS) protocol keeps records of which domain names correspond to specific IP addresses. This system enables you to browse the web by typing in regular URLs instead of IP addresses.
Read More
DNS Caches help improve loading speed and website performance when browsing the internet, but they can sometimes become corrupted and result in an authorization error when accessing specific web pages. Fixing this is as easy as flushing (clearing) your DNS server, which can be done a few different ways:
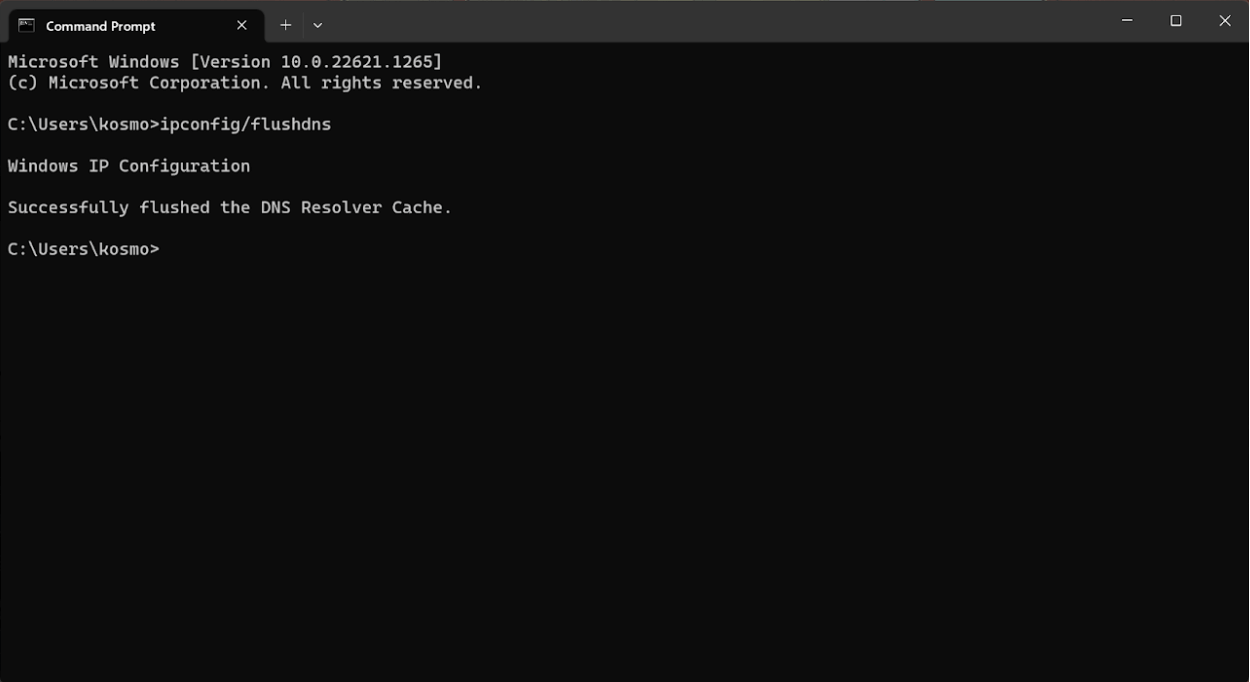
Windows: To flush your DNS on Windows 10/11, follow these steps:
- Open the Command Prompt by pressing Windows+R and typing “̌cmd” (without quotes) into the Run dialog box.
- Now type in the command “ipconfig/flushdns” inside Command Prompt.
- If you are a Windows PowerShell user, you can do this by opening PowerShell and typing in “Clear-DnsClientCache” (without quotes).
- This will flush the DNS and clear all the records from the local DNS cache.
MacOS: If you’re using a Macbook or iMac, you can flush your DNS cache using Terminal.
- Open Terminal on your Mac by using Spotlight Search or pressing Command+Space and typing Terminal into the search box.
- Inside Terminal, type in “sudo dscacheutil -flushcache;sudo killall -HUP mDNSResponder” (without quotes).
- Your DNS cache has now been flushed on your Apple computer.
Google Chrome: If you’re using Google Chrome, the browser has its own DNS cache that’s independent of the Operating System (Windows or Mac). To clear Chrome’s DNS cache:
- Type “chrome://net-internals/#dns” into the address bar.
- Now, click on the “Clear host cache” button to clear your DNS records.
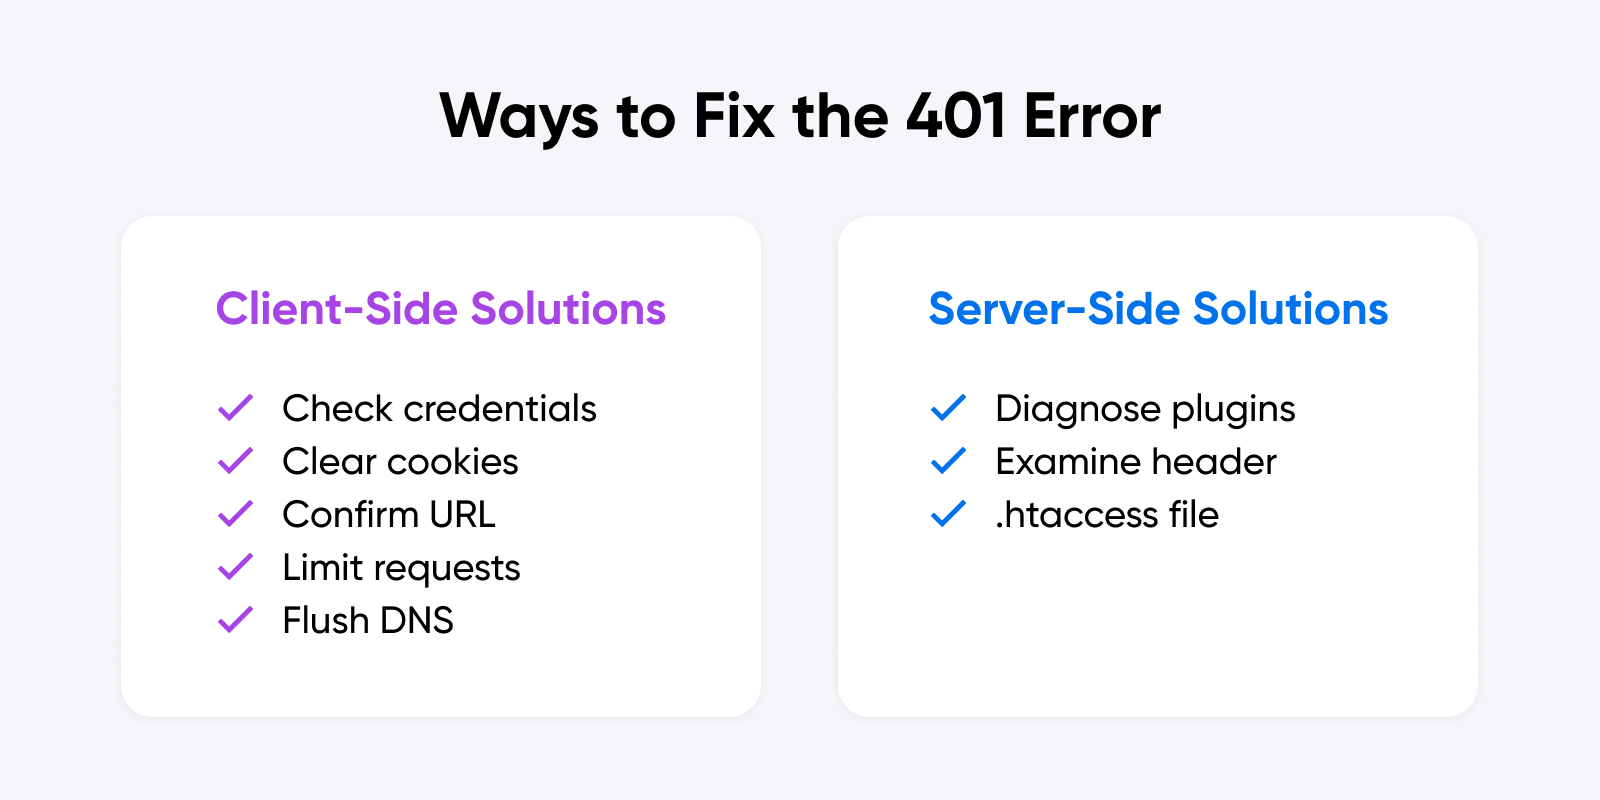
WordPress Plugins
Plugins are a staple for WordPress websites, but they can sometimes also cause errors if configured improperly. This can happen when the plugin contains code that creates a website security issue or conflicts with the platform’s core functionality.
So, what can a site admin do to fix this issue? Well, the first step is to identify which plugin or plugins are causing the issue. Usually, this can be done by disabling each plugin one-by-one and checking if the error still appears. Once the plugin causing the issue is identified, you can either update, reconfigure, or permanently remove it. Common culprits may include:
- CDN services like Cloudflare and KeyCDN.
- Web firewalls like Sucuri and Wordfence.
- Poorly built WordPress themes.
Follow these simple steps to enable or disable plugins on your WordPress site:
- First, log in to your WordPress dashboard.
- Click on the “Plugins” option in the left-hand menu.
- Find the plugin you want to enable or disable and click on the “Activate” or “Deactivate” button below the plugin name.
- If you want to disable multiple plugins at once, check the box next to each plugin and select “Deactivate” from the “Bulk Actions” drop-down menu.
- If you want to enable multiple plugins at once, check the box next to each plugin and select “Activate” from the “Bulk Actions” drop-down menu.
In some cases, it is also possible to fix the issue by disabling or reconfiguring specific settings within a plugin. For example, if your website uses a caching plugin, it’s worth trying to clear the cache and check if the error still appears.
WWW-Authenticate Header
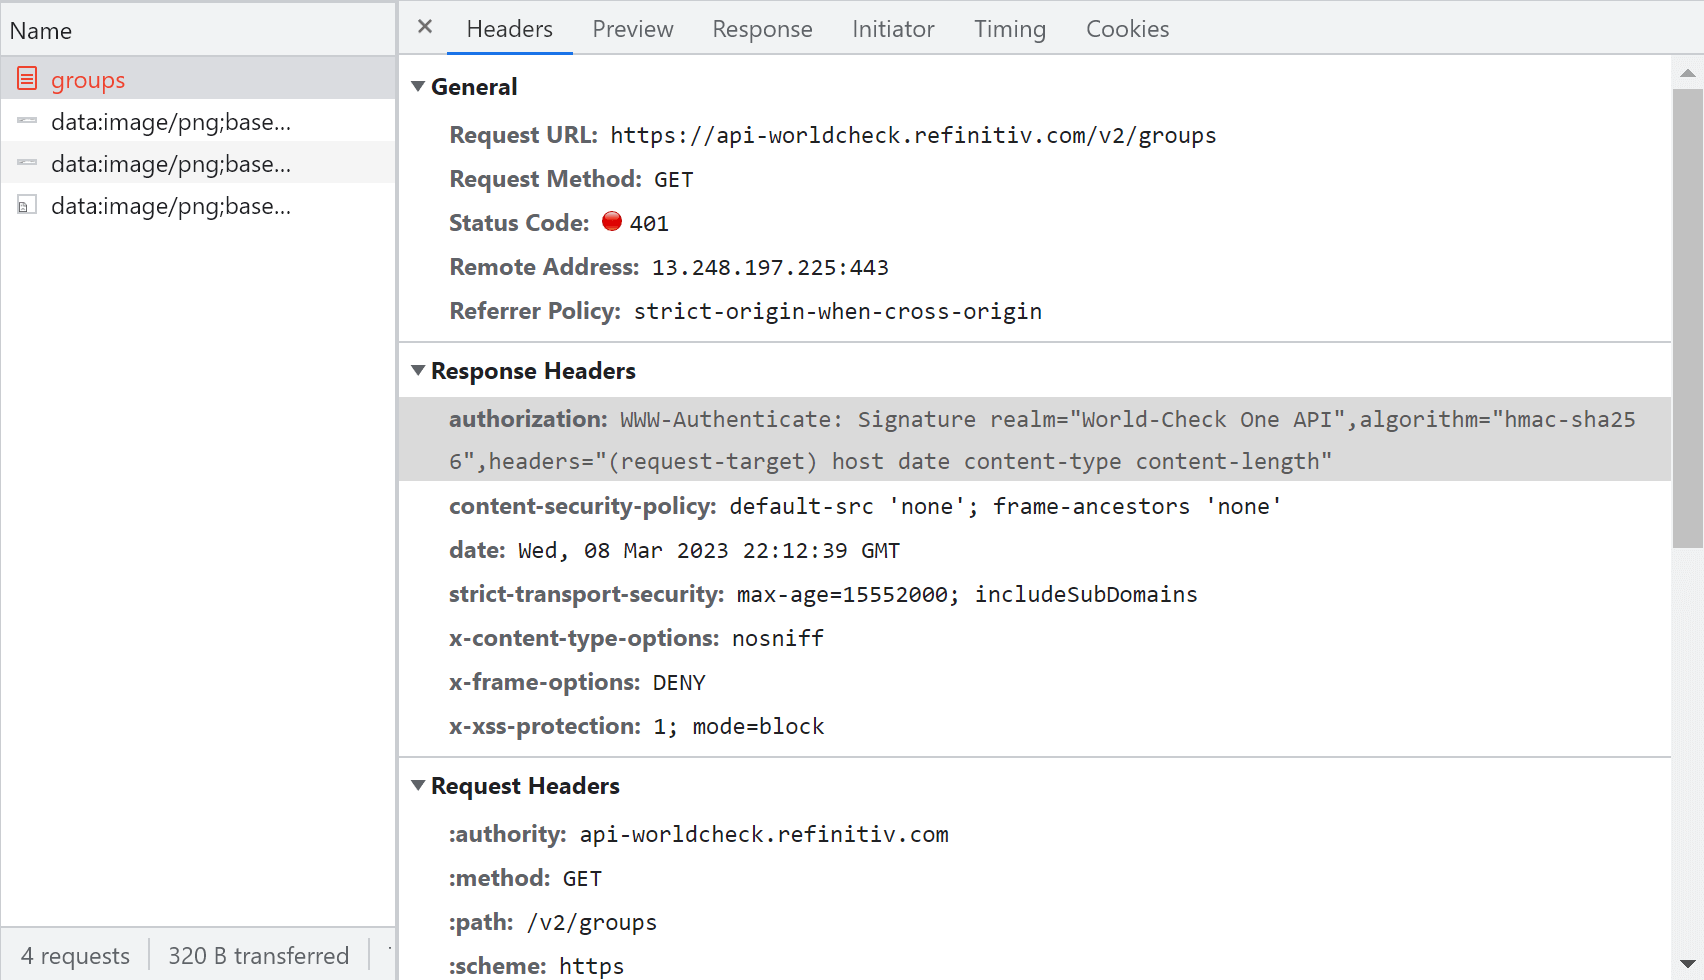
In a few rare cases, 401 errors can result from a server error. You can find out more about this by looking at your WWW-Authenticate Header.
The WWW-Authenticate Header is a response header sent by the server that contains information on the authentication methods supported by the site. This header helps the user’s browser decide which authentication protocol to use when requesting data from the server.
The header is also used to send additional information about the authentication process. This may include the domain being protected by the authentication scheme, or the algorithm used by the server.
To check the WWW-Authenticate Header, open Chrome, navigate to the URL causing the 401 error, and right-click anywhere on the page. From the drop-down menu, select ‘Inspect’. This will bring up the Developer Tools window.
Select the Network tab once inside the Developer Tools window. Here, you’ll see all the requests the browser sends when loading the page. If the response from the server contains a WWW-Authenticate header, it will be visible in this tab.
By inspecting the WWW-Authenticate header, you can get a better understanding of the authentication process used by the server. Next, check that the response was sent and identify what authentication scheme was used to send it. That’ll help you narrow down the problem before looking for a specific solution. Here are a few authentication schemes found in the WWW-Authenticate Header, along with descriptions of how they work, for reference:
- Basic: This scheme uses a base64-encoded username and password separated by a colon. This is considered the least secure authentication method and should only be used over HTTPS.
- Digest: This scheme uses a challenge-response protocol to authenticate clients. The server sends a nonce value to the client, which the client uses to create a response based on the username, password, and request information.
- Bearer: This scheme is used for OAuth 2.0 authentication. The client receives a token from the server, which it uses to authenticate subsequent requests.
- Negotiate: This scheme is used for Kerberos authentication.
- AWS4-HMAC-SHA256: This authentication scheme is used to authenticate requests to Amazon Web Services (AWS) using an AWS access key and a secret access key.
- Token: This scheme is used to authenticate with a token-based system.
.htaccess File
If you’re experiencing a 401 error on your website, one possible cause could be an issue with your .htaccess file. The .htaccess file is a configuration file used by Apache web servers to control access to your website’s directories and files. Here’s how to check your .htaccess file for causes of a 401 error:
- Connect to your website’s server using an FTP client or file manager.
- Navigate to the directory where your .htaccess file is located. This is usually the root directory of your website.
- Download a copy of your .htaccess file to your computer.
- Open the .htaccess file in a text editor (like Notepad++) and look for any lines that specify access controls or authentication requirements. Specifically, you’ll want to look for the following parameters: AuthUserFile, AuthName, AuthType, and Require.
- Check that the access controls or authentication requirements specified in the .htaccess file match the settings you intend to use for your website. For example, if you have recently updated your website’s authentication mechanism (AuthType), you may need to update the corresponding settings in your .htaccess file as well.
- Save the changes to your .htaccess file and upload it back to your website’s server.
- Test your website to see if the 401 error has been resolved.
If You’re Still Having Trouble, It’s Time to Contact an Expert
HTTP response codes offer little context on their own, which makes them troublesome to navigate without the proper technical assistance. It’s part of the reason why DreamHost offers 24/7 support to help you troubleshoot downtime on your website and domain.
If you’re having trouble diagnosing or fixing a 401 error on your website, you can try contacting your hosting provider for support. It’s also possible to contract a technical expert, such as a web developer, for help with the issue.
401 errors can be jarring for the end user, but they are often an easy fix. If you’re contacted by someone unable to access your website due to this error, walk them through the common client-side solutions before looking into any potential server issues, such as WordPress plugins or the WWW-Authenticate header. If you’re still having trouble, you can always bring in some technical help to diagnose the issue.
Get Content Delivered Straight to Your Inbox
Subscribe to our blog and receive great content just like this delivered straight to your inbox.
Occasionally, when you try to access a web page, you may stumble across the “401 Error Unauthorized Access”. Like other HTTP errors, there could be various causes. This article will outline the most common problems and how to fix them.
The HTTP status code “401 Unauthorized Access” is a client-side error, which indicates that the website’s server sends a “WWW-Authenticate” header response back to the visitor with a challenge. Since the visitor failed to provide valid authentication credentials for the target resource, access has been denied, and the error page has been loaded.
In other words, you get this error because you are trying to access a page protected by the server. The server requires the correct login details to grant you access. The exact error message may vary depending on your browser or the website’s hosting server. Other variations of the 401 error are:
- HTTP 401 Error – Unauthorized
- Access Denied
- Error 401 Unauthorized
- 401 Unauthorized
- 401 Authorization Required
Usually, when you visit a protected page, you will first see a login prompt. It will require a username and password.

To view the page, you need to provide the correct logins. If you cancel the prompt or provide incorrect credentials, you will see the message with the error. You can see an example of the error page below.

In many cases, the website owners intentionally protect the page’s URL with a password. They prefer that the page remains inaccessible for the general visitor until fully developed, or they want this page to be available to authorized users only.
What causes the “401 Error Unauthorized Access”?
Although the URL protection may be set by design, there are cases where the restriction is set unintentionally or caused by local issues from the visitor’s side. We will examine the most common causes below.
Expired browser cache or cookies
Modern browsers keep local cache and cookies in your device to improve the loading speed. However, if your browser’s cache is corrupted or expired, it may prevent you from accessing the page correctly, and the error “401 Unauthorized Access” may occur.
Incorrect URL
Another cause of the error page is an incorrect webpage URL. It may be an outdated page address or a misspelled URL.
Protected URL from the server
Many hosting providers offer the functionality to set password protection directly on the server. The login prompt may come from such protection specified in the hosting panel.
Plugin misconfiguration
Another common cause of restricted access is plugin functionality. For example, many security plugins for WordPress provide different options to limit or restrict access. If the plugin is misconfigured, it may prevent access by mistake or detect a legitimate visit as suspicious activity.
Restrictions in the .htaccess file of the site
Password protection may come from Apache directives in the website’s .htaccess file. The website owner may have set them previously and forgotten to remove them. The directives may have been added automatically by a plugin as well.
How to Fix the 401 Unauthorized Access?
Now that we listed the most common causes of the “401 Error Code”, we can explore the solutions.
Clear your browser cache and cookies
Corrupted and outdated browser cache and cookies can lead to unexpected behavior in your internet browsing. The “HTTP Error 401” is one of the possible results. Clearing your browser cache and cookies is recommended for troubleshooting the “401 Unauthorized” error as well as for most of the errors you encounter.
Below, you can see detailed instructions on how to clear the cache for various browsers and devices.
- How to clear cache and cookies in your browser?
- How to clear the cache in your iPhone or other iOS devices?
- How to clear the cache in your Android phone?
Clear your device’s DNS cache
Corrupted or outdated local DNS settings in your device are not a very common cause of the “401 HTTP Error”. Nonetheless, it is worth considering flushing the device’s DNS cache. Depending on the operating system (OS), the process is different.
For detailed instructions, check the following guides:
- How to flush the DNS cache in Windows?
- How to flush the DNS cache in Mac?
- How to flush the DNS cache in Linux?
Inspect the website URL
Carefully check the URL of the page in your browser’s address bar. You may see the “Error code 401” if you try to access an outdated or misspelled URL. It means that the URL is non-existent, and the server may return a server error “401 Unauthorized Access”.
Maybe you saved the page address in your browser, but the page address has been changed, or it has been deleted. To test further, open the website home page and check if there is a link to the page producing the “Unauthorized 401” error. If the page opens this way, check if the URL of the page is the same as the one that triggered the error.
Revise the web hosting’s security settings
If none of the solutions so far helped and you are the website owner, you may need to look closer into the security settings of the website. If you see the login prompt on the page and you don’t recognize it, the URL may be protected by the server.
To examine this possibility, open your hosting panel and check if there is a tool for setting password protection.
SiteGround users have the feature Protected URLs in Site Tools. For more information, read this guide on how to password-protect a URL.
To check its settings, open Site Tools for the website, navigate to the Security section, and open Protected URLs.
If the URL is protected, you will see it listed in the section Manage Protected URLs.

If this protection is not needed, you can delete it. Under the Actions column, select the Delete icon (trash bin). A popup will appear to confirm the action. Select Confirm to delete the URL protection.

If the protection was intended, but the logins are not accepted in the login prompt, you may have the wrong username or password. You can see the existing user for the protected URL in Manage Protection URLs under the column Users.
To make sure you have the correct user password, select the section USERS. In the USERS section, select the kebab menu under the column Actions. Select Change Password to reset the password.

Another possibility is that the protection was set with a user that was later deleted. The protection remains active, but since there is no existing user, the login prompt can not be completed.
When you open the section URLS in Protected URLs, there will be no assigned user.

To add a user to the URL, select the Manage Access button. You will see a popup window that allows you to add one of the existing users to the URL. Select the user from the drop-down menu Users and then press Confirm. If there is no existing user yet, you will be prompted to create one.

Reload the web page after the protection is deleted or the user and password are reset. The page should load properly if the protection is deleted. If you’ve kept the protection, test the user and password. After the logins are entered, you should load the page correctly.
Inspect the website’s .htaccess file
The hosting panel is not the only source of password protection. If it is not set in the hosting panel but the website still prompts a login, it may be forced by directives in its .htaccess file.
Perhaps you set the .htaccess code earlier, and you forgot about it, or it was added by a plugin.
To check if there are such directives, open the website’s folder from FTP or File Manager and inspect the .htaccess file.
SiteGround clients can use the respective Site Tools to review the .htaccess file. Navigate to the section Site and open File Manager.
In Site Tools, the root folder for your website is the website name/public_html. In our example, the website name is sg-testing.com. Hence, the root folder is sg-testing.com/public_html.
In this directory, find the file .htaccess, select it, and then choose Edit.

It will open the file in Editor mode and you can view the code.

In this example, the website’s protection is defined by the highlighted code:
AuthType Basic
AuthName "restricted area"
AuthUserFile /home/customer/www/sg-testing.com/public_html/.htpasswd
require valid-user
The protection’s login credentials are specified in the file .htpasswd. It contains the user name and the encrypted password.
If the protection is not intended, delete the code from the .htaccess file and confirm the changes with Save.
Deactivate the website’s security plugins
Another common cause of the error “401 Not Allowed” for WordPress sites is a misconfigured plugin. A security plugin may block visitors by mistake or force restrictions on specific pages.
To troubleshoot, you may consider disabling the plugins. Open your WordPress site dashboard, go to the Plugins section, then select Installed Plugins.
Look at the plugins’ description to find out which of your plugins provide security features.

Check the box for the plugin you wish to disable, then select Deactivate from the drop-down menu and hit Apply.
Test again if the page showing the “401 Error” message will now load correctly.
Sometimes, an ongoing error may prevent access to the dashboard. In such cases, you can disable all plugins for the website from Site Tools or its database.
Read the guides below for detailed instructions.
- How to disable WordPress plugins from Site Tools?
- How to disable WordPress plugins from the database?
After the plugins are disabled, you should be able to access the dashboard and activate the plugins one by one. When you enable the culprit, the error will most likely return.
If a plugin was the cause of the “Unauthorized Error 401”, contact its support to report the error or replace it with an alternative one.
Summary
Fixing the 401 unauthorized error may require investigation, but it is important to note that it is related to the security and protection settings of the websites.
This guide examined the common causes and how to fix the error “401 Access Denied”.
Another similar error related to restricted access is the HTTP Error 403. Read more about it in the following guide on what is 403 Forbidden Error and how to fix it.
For more information on the various HTTP codes, read this article on HTTP status codes explained.
Methods to fix a 401 Unauthorized error
Updated on September 15, 2022
The 401 Unauthorized error is an HTTP status code that means the page you were trying to access cannot be loaded until you first log in with a valid user ID and password.
If you’ve just logged in and received the 401 Unauthorized error, it means that the credentials you entered were invalid for some reason.
401 Unauthorized error messages are often customized by each website, especially very large ones, so keep in mind that this error may present itself in more ways than these common ones:
- 401 Unauthorized
- Authorization Required
- HTTP Error 401 — Unauthorized
The 401 Unauthorized error displays inside the web browser window, just as web pages do. Like most errors like these, you can find them in all browsers that run on any operating system.
How to Fix the 401 Unauthorized Error
-
Check for errors in the URL. It’s possible that the 401 Unauthorized error appeared because the URL was typed incorrectly or the link that was selected points to the wrong URL—one that is for authorized users only.
-
If you’re sure the URL is valid, visit the website’s main page and look for a link that says Login or Secure Access. Enter your credentials here and then try the page again.
If you don’t have credentials or have forgotten yours, follow the instructions provided on the website for setting up an account or resetting your password.
Do you usually struggle to remember your passwords? Consider keeping them in a password manager so that you only have to remember one password.
-
Reload the page. As simple as it might seem, closing down the page and reopening it might be enough to fix the 401 error, but only if it’s caused by a misloaded page.
-
Delete your browser’s cache. There might be invalid login information stored locally in your browser that’s disrupting the login process and throwing the 401 error. Clearing the cache will remove any problems in those files and give the page an opportunity to download fresh files directly from the server.
-
If you’re sure the page you’re trying to reach shouldn’t need authorization, the 401 Unauthorized error message may be a mistake. At that point, it’s probably best to contact the website owner or other website contact and inform them of the problem.
The web site owner of some websites can be reached via email at webmaster@website.com, replacing website.com with the actual website name. Otherwise, find a Contact page for specific contact instructions.
Other Ways You Might See 401 Errors
Web servers running Microsoft IIS might give more information about the 401 Unauthorized error, such as the following:
| Microsoft IIS 401 Error Codes | |
|---|---|
| Error | Explanation |
| 401.1 | Logon failed. |
| 401.2 | Logon failed due to server configuration. |
| 401.3 | Unauthorized due to ACL on resource. |
| 401.4 | Authorization failed by filter. |
| 401.5 | Authorization failed by ISAPI/CGI application. |
| 401.501 | Access Denied: Too many requests from the same client IP; Dynamic IP Restriction Concurrent request rate limit reached. |
| 401.502 | Forbidden: Too many requests from the same client IP; Dynamic IP Restriction Maximum request rate limit reached. |
| 401.503 | Access Denied: the IP address is included in the Deny list of IP Restriction |
| 401.504 | Access Denied: the host name is included in the Deny list of IP Restriction |
You can learn more about IIS-specific codes on Microsoft’s the HTTP status code in IIS 7 and later versions page.
Errors Like 401 Unauthorized
The following messages are also client-side errors and so are related to the 401 Unauthorized error: 400 Bad Request, 403 Forbidden, 404 Not Found, and 408 Request Timeout.
A number of server-side HTTP status codes also exist, like the often-seen 500 Internal Server Error.
FAQ
-
What do I do if I receive a http 401 error in Zoom?
Double-check the URL to make sure it’s accurate, and if so reload the page. If that doesn’t work, log out and log back in again, and if you’re still having problems try turning off any themes or plugins that may be active. Clearing your browser cache might also fix the issue.
-
What’s the difference between 401 Unauthorized and 403 Forbidden?
A 401 Unauthorized code indicates some sort of issue tied to login credentials for a given web page, while 403 Forbidden errors mean the page has been blocked.
Thanks for letting us know!
Get the Latest Tech News Delivered Every Day
Subscribe
Understand the HTTP 401 Unauthorized error code: What the causes are and how to fix it.
Table of Contents
- What is the 401 Unauthorized Request error?
- Different 401 error messages depending on the server
- 401 Unauthorized vs 403 Forbidden
- How to fix the 401 Unauthorized Request error
- All HTTP Status Codes
What is the 401 Unauthorized Request error?
The 401 HTTP is a client-side standard response status code. This error response indicates that the client request has not been completed because it lacks valid authentication credentials for the requested resource.
For instance, you get this HTTP 401 error code when you are trying to access a password protected page. You can also get this 401 error if your credentials expired.
Different 401 error messages depending on the server
- “401 Unauthorized”
- “401 Authorization Required”
- “Access Denied”
- “HTTP 401 Error – Unauthorized”
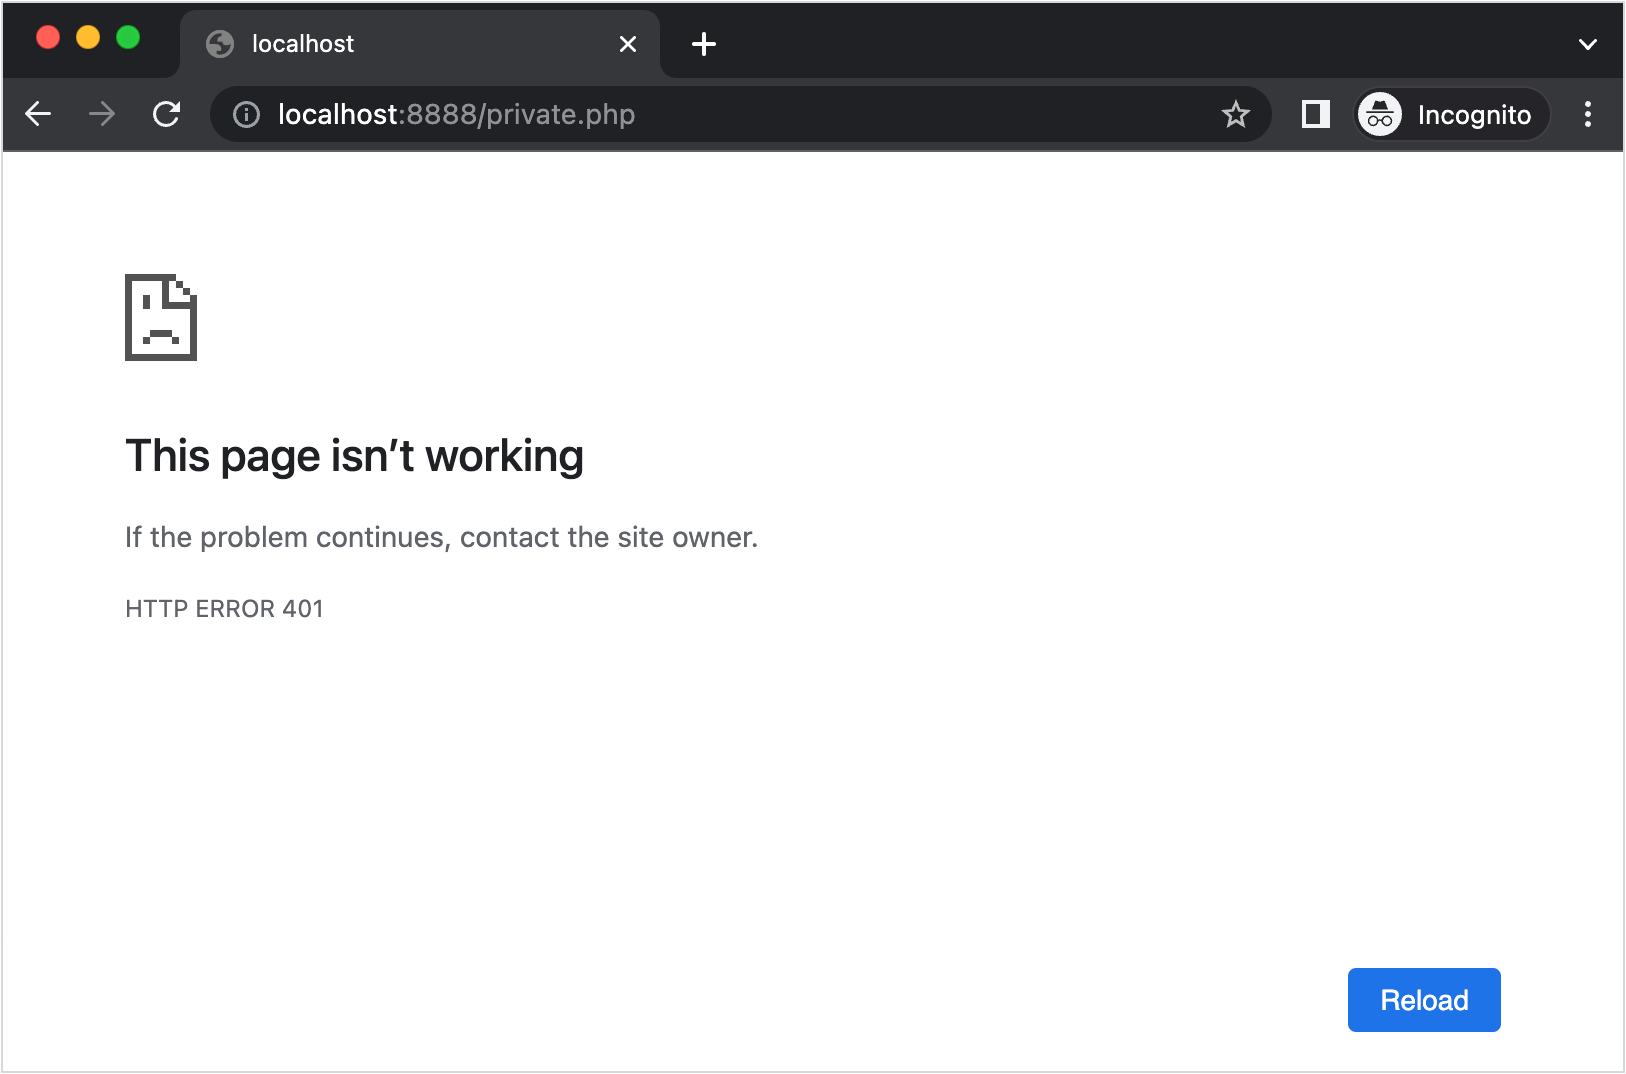
- “This page isn’t working – If the problem continues, contact the site owner. – HTTP ERROR 401”
For example, in Chrome browser, you’ll likely see a simple message telling you that “This page isn’t working”, like this one:
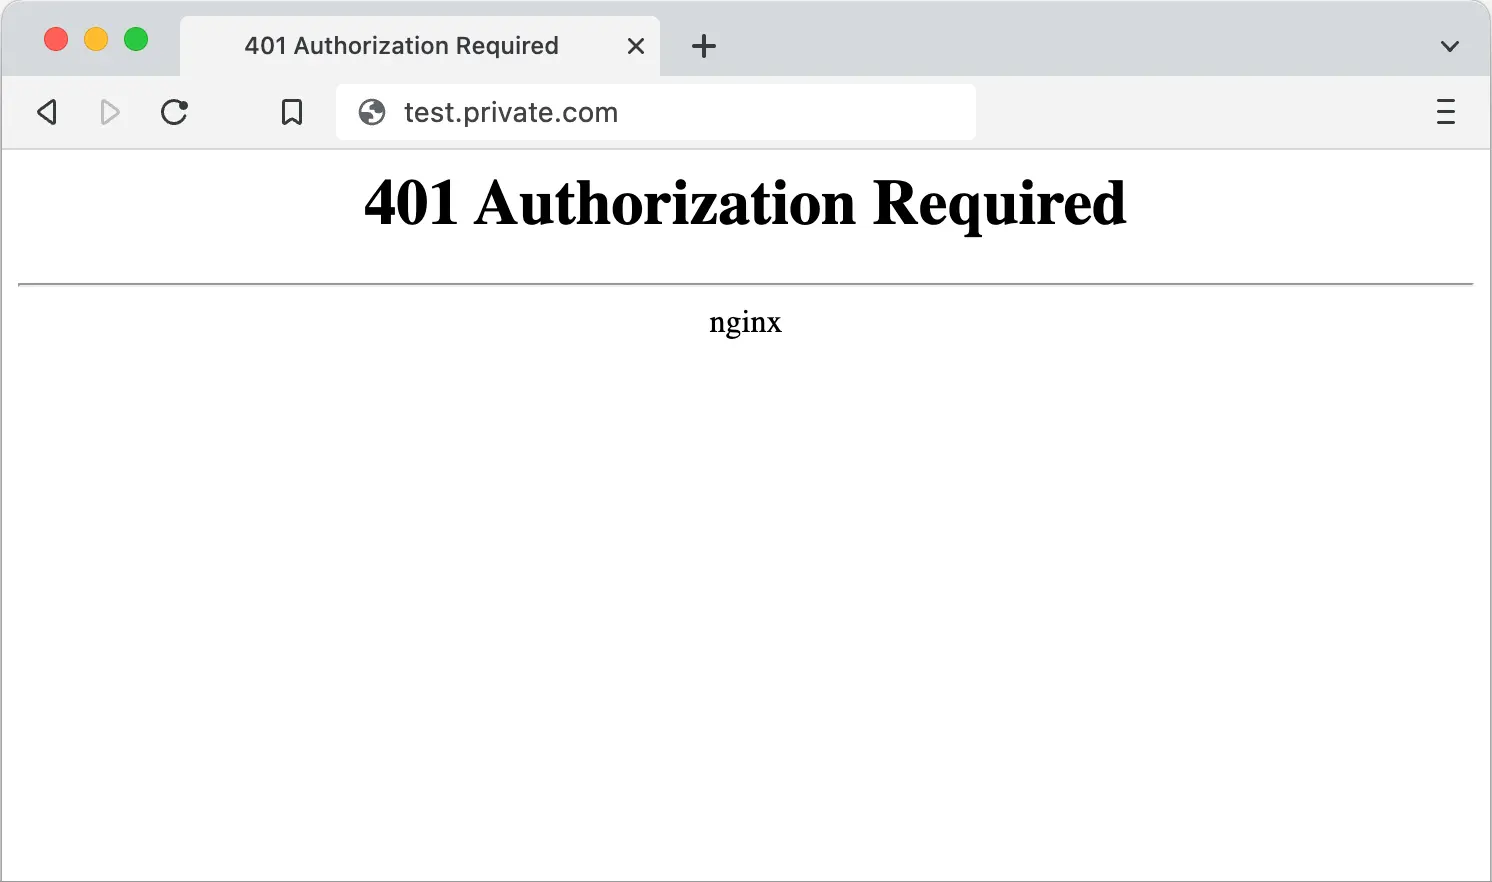
Sometimes, the server replies with a standardized error page, e.g. the Nginx 401 Authorization Required:
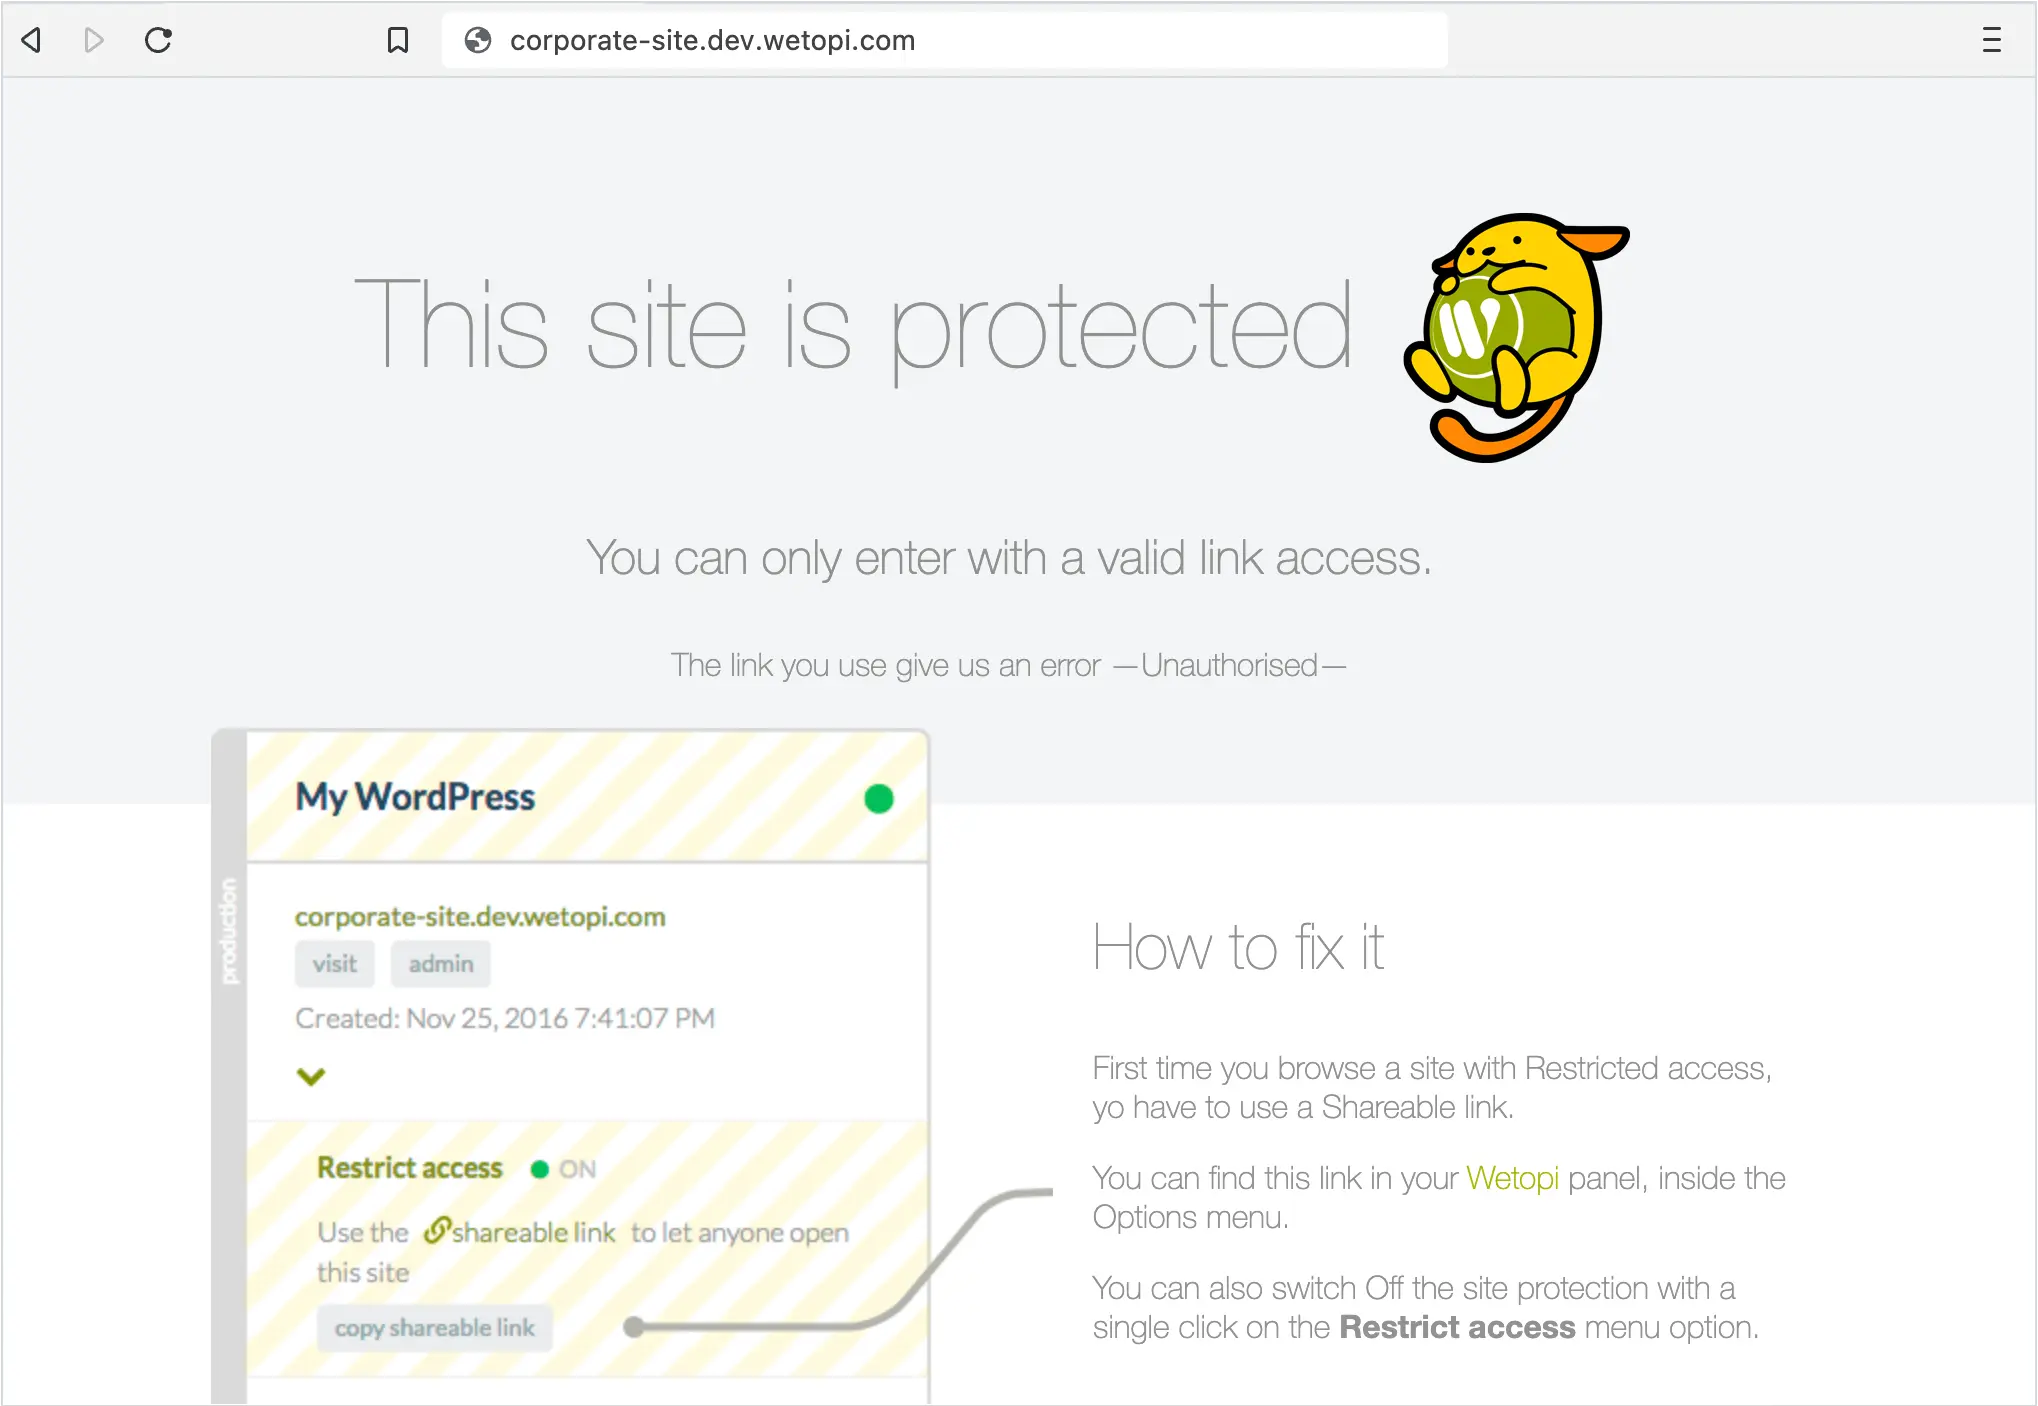
You can also find personalized 401 Error pages. The following is an example of our wetopi customized 401 Unauthorized error response, when accessing a site with “Restrict access” enabled.
401 Unauthorized vs 403 Forbidden
The 401 error is similar to the “HTTP Error 403 Forbidden“. We get the 403 when we have valid credentials (or don’t need them) but access to the resource isn’t permitted (in other words, you are trying to access a private or restricted resource the server will never give you, no matter what).
On the other hand, we get the 401 status code when the resource is available, but we don’t provide, or don’t have, valid credentials.
How to fix the 401 Unauthorized Request error
To identify, and fix the error causing your 401 Unauthorized HTTP error code, we give you a list of causes and their solution. Follow the tips on the list until you find the solution:
- Look for errors in the URL. An incorrectly-typed URL or an outdated link could be the cause.
- If your request is private, a password-protected page. Then double-check whether you’re logged in with a valid username and password. If you’re sure that you have entered the credentials correctly, try Logging out and Logging in again. If the error persists, try changing the password.
- Open the URL in an Incognito Browser Window. If you get access in Incognito, it means that the reason you get a 401 error is that your browser’s cache and cookies are out of date.
- A configuration problem on the website. If you are a webmaster and you are running a WordPress site: try to disable the plugins one by one. Pay special attention to the plugins related to security management and resource protection.
- Some web providers issue the HTTP 401 when a domain is pointing to the wrong server. If you are a webmaster, double-check the DNS Records (also named DNS Zones). The IP addresses of your site’s DNS Records could be pointing to the wrong server.
- Your computer’s DNS cache contains invalid zones. An outdated, or corrupted DNS cache in your computer is not a common cause of the “401 Unauthorized HTTP Error”. Nonetheless, it is worth considering flushing your device’s DNS cache.
We are techies passionate about WordPress. With wetopi, a Managed WordPress Hosting, we want to minimize the friction that every professional faces when working and hosting WordPress projects.
Not a wetopi user?
Free full performance servers for your development and test.
No credit card required.
All HTTP Status Codes
200 OK
201 Created
202 Accepted
203 Non-Authoritative Information
204 No Content
205 Reset Content
206 Partial Content
207 Multi-Status
208 Already Reported
226 IM Used
300 Multiple Choices
301 Moved Permanently
302 Found
303 See Other
304 Not Modified
305 Use Proxy
307 Temporary Redirect
308 Permanent Redirect
400 Bad Request
401 Unauthorized
402 Payment Required
403 Forbidden
404 Not Found
405 Method Not Allowed
406 Not Acceptable
407 Proxy Authentication Required
408 Request Timeout
409 Conflict
410 Gone
411 Length Required
412 Precondition Failed
413 Payload Too Large
414 Request-URI Too Long
415 Unsupported Media Type
416 Requested Range Not Satisfiable
417 Expectation Failed
418 I’m A Teapot
421 Misdirected Request
422 Unprocessable Entity
423 Locked
424 Failed Dependency
426 Upgrade Required
428 Precondition Required
429 Too Many Requests
431 Request Header Fields Too Large
444 Connection Closed Without Response
451 Unavailable For Legal Reasons
499 Client Closed Request