
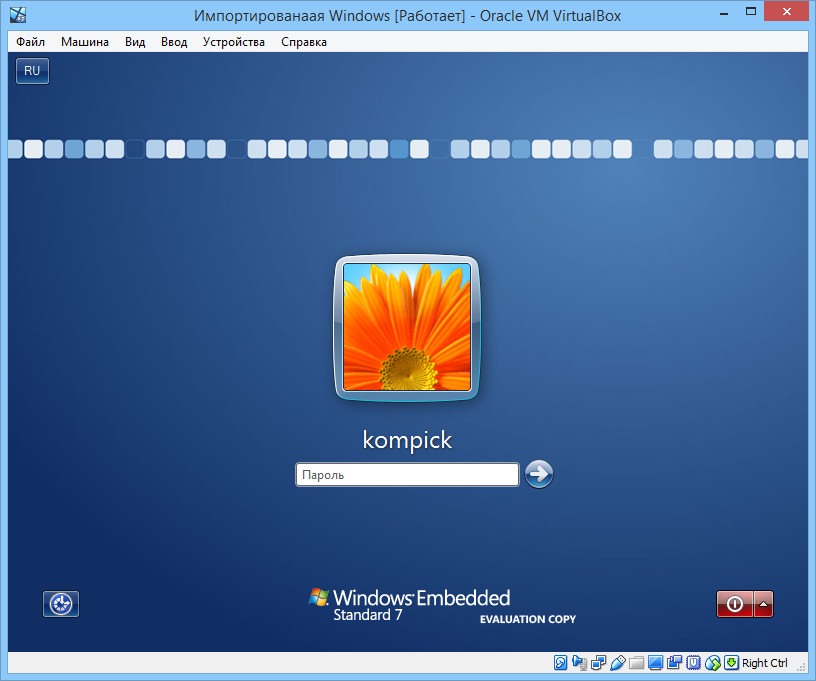
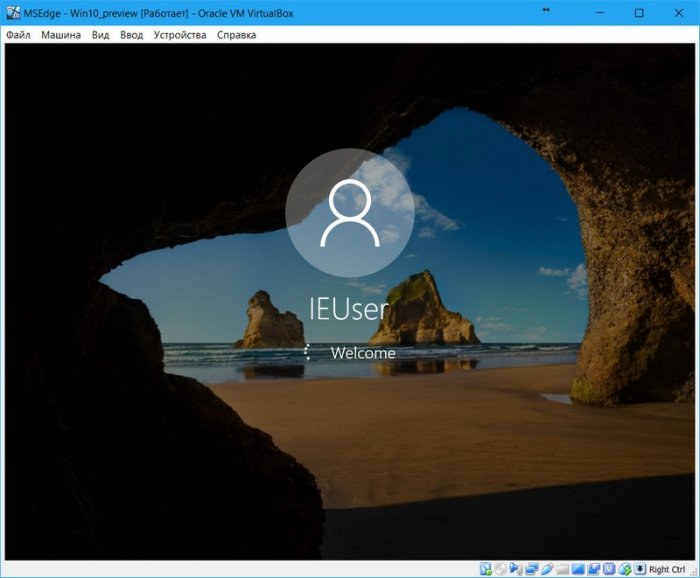
В некоторых ситуациях операционная система Windows может выдавать ошибку VirtualBox. При этом на экране фигурирует код ошибки e invalidarg 0x80070057. Стоит разобраться, по каким причинам может возникать данная проблема и какие существуют наиболее эффективные способы ее устранения.
Содержание статьи
- Что это за ошибка?
- Возможные причины появления
- Как можно исправить
- Установка времени и даты
- Работа с местом для хранения
- Файловая система диска
- Сканирование системы на вирусы
- Восстановление системы
- Установка чистого Windows
- Комментарии пользователей
Что это за ошибка?
В большинстве случаев «код ошибки e invalidarg 0x80070057 virtualbox импорт» возникает при запуске специального средства для визуализации, дающего пользователю возможность запуска ОС внутри другой. Называется данное средство, как понятно из названия, VirtualBox. Дальнейшая работа с системой становится невозможной.
Важно! В английской версии программы система может выдавать сообщение с кодом ошибки, имеющее следующий вид – «Result code: e_invalidarg (0x80070057)».
Возможные причины появления
Существует ряд наиболее частых причин, по которым на экране монитора может демонстрироваться код ошибки 0x80070057:
- наличие на жестком диске неэффективного свободного места;
- использование неправильной файловой системы;
- повреждение одного или нескольких разделов накопителя;
- деятельность вирусных программ;
- на компьютере неверно выставлены дата и время.
Проблема заключается в том, что в самом сообщении об ошибке отсутствуют какие-либо пояснения касаемо причин ее возникновения.
Внимание! Решать проблему придется путем метода подбора, когда последовательно выполняются действия, направленные на исправление возможных текущих ошибок внутри операционной системы.
Как можно исправить
Для решения проблемы рекомендуется воспользоваться способами, подробно описанными ниже.
Установка времени и даты
Первое, что требуется сделать для того, чтобы сообщение с указанным выше кодом ошибки более не появлялось, это настроить дату и время. Сделать это можно, воспользовавшись параметрами системы. Нужно:
- Открыть «Параметры Windows», одновременно нажав клавиши «Win» и «I».
- Перейти в раздел «Время и язык».

- Передвинуть флажок «Установить время автоматически», либо сделать все в ручном режиме.

Параметры позволяют самостоятельно указать часовой пояс, а также формат отображения даты и времени.
Внимание! Данный метод применим для Windows 10. В других версиях ОС порядок действий немного отличается.
Работа с местом для хранения
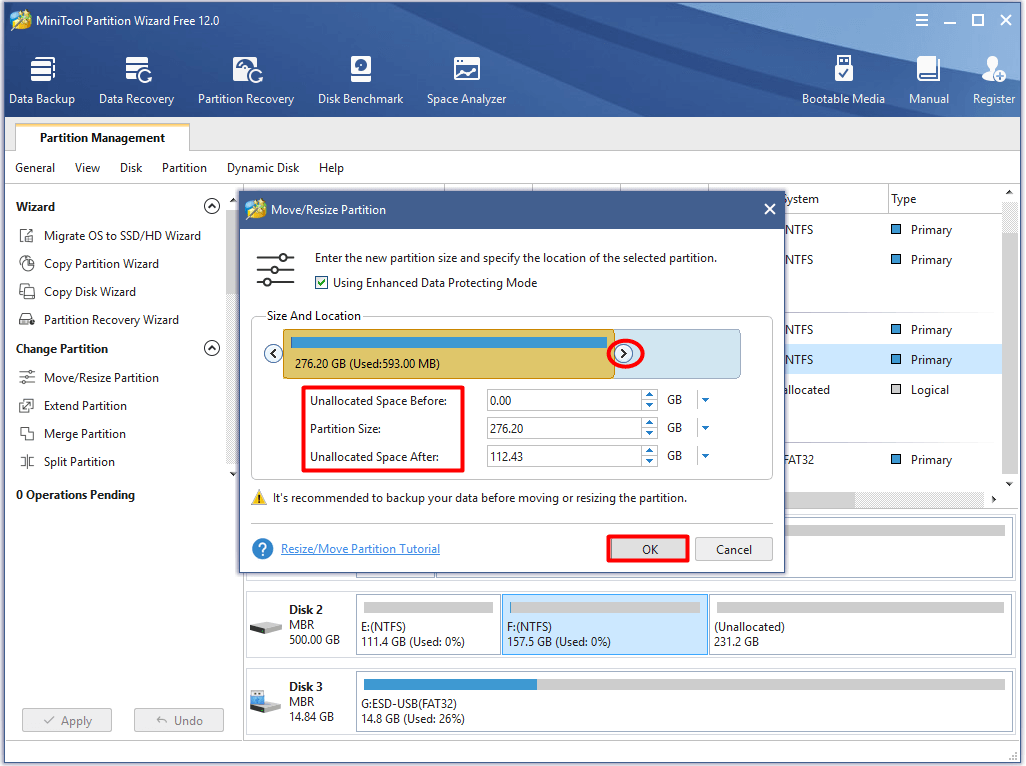
Если изменение даты и времени не помогли, то следует прибегнуть ко второму способу избавиться от сообщения с кодом ошибки 0x80070057 – сформировать достаточно свободного места на жестком диске. Чтобы расширить пространство для хранения данных (или перемещения раздела), можно воспользоваться утилитой MiniTool Partition Wizard. Скачать ее можно, перейдя на официальный сайт компании.
Важно! Для того чтобы исправить размер раздела, предварительно следует убедиться в том, что для этого имеется достаточное пространство. Если его нет, требуется воспользоваться функцией расширения раздела.
Для перемещения (изменения) раздела требуется последовательно выполнить несколько действий:
- Для начала следует правой кнопкой мыши кликнуть по разделу для расширения, после чего выбрать нужный пункт «Move/Resize» (перемещение/изменение раздела).

- Переместить флажок для осуществления операции. При желании, дополнительно можно указать параметра будущего размера.

Важно! При перемещении бегунка влево будет запущен обратный процесс – уменьшения раздела. Поэтому его нужно обязательно двигать вправо.
- После того как будет осуществлено резервное копирование информации в основной интерфейс, пользователь сможет наблюдать информацию о расположении раздела. Остается кликнуть по кнопке «Применить» (Apply).

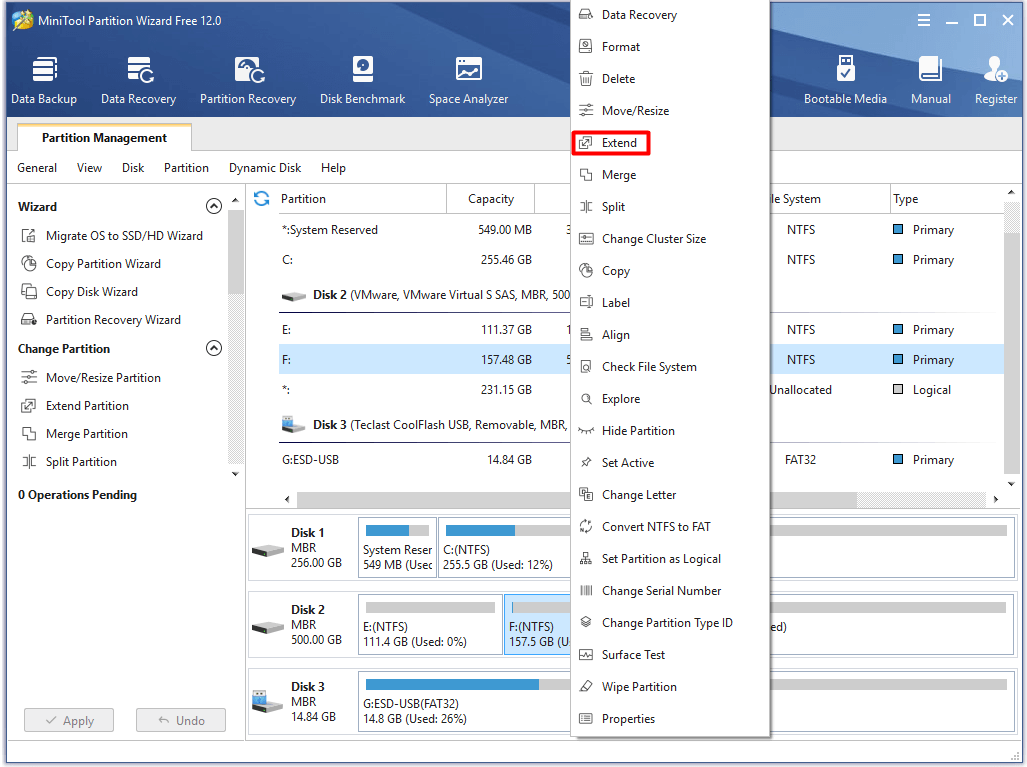
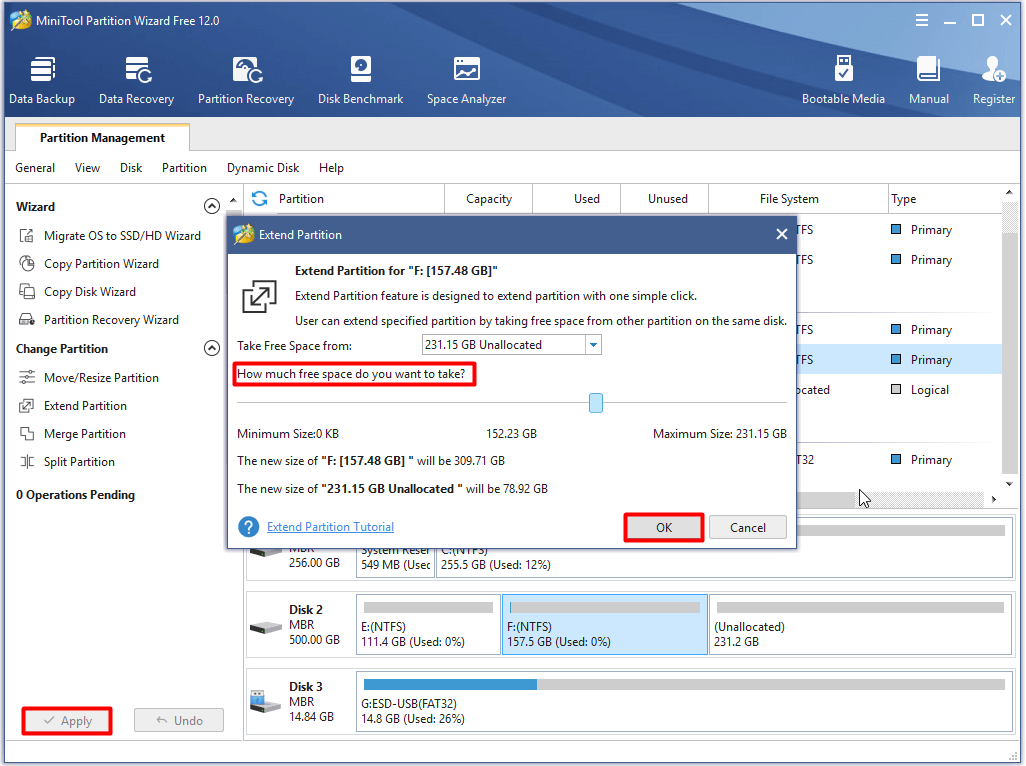
Способствовать увеличению раздела также может его расширение. Для этого потребуется:
- ПКМ кликнуть по целевому разделу, после чего из предложенных вариантов выбрать функцию расширения.

- Открыть меню «Освободить место», переместив флажок к нужному значению.
- Нажать «ОК», после чего подтвердить внесенные изменения, кликнув по «Применить».

Важно! Увеличивать размер определенного раздела через его расширения – хороший способ решения проблемы с описываемым кодом ошибки в случае, когда места на жестком диске критически не хватает.
Файловая система диска
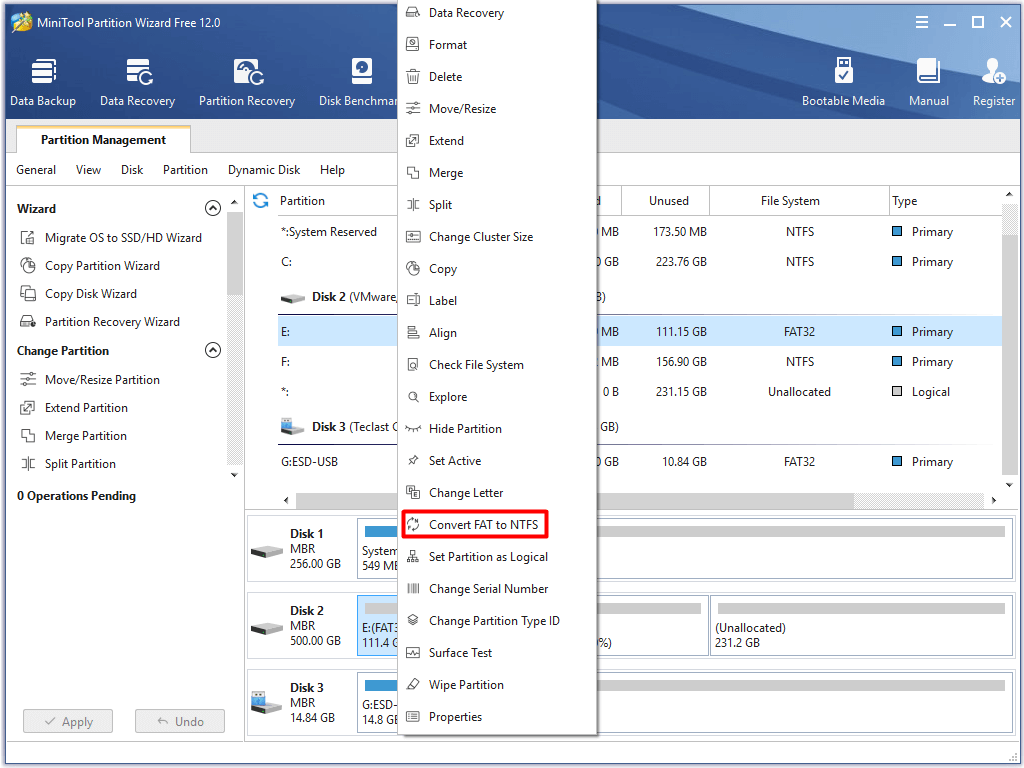
Появление на экране уведомления с кодом ошибки 0x80070057 может быть свидетельством того, что жесткий диск взаимодействует с файловой системой, которая ему не подходит. Решить проблему поможет помочь смена файловой системы – с FAT32 можно попробовать перейти на NTFS. Для этого требуется:
- ПКМ кликнуть по разделу, файловую систему которого требуется изменить.
- Выбрать опцию конвертации.

- Кликнуть по кнопке «Start».

Остается только дождаться окончания процесса. Занимать он может от нескольких минут до часа. После этого с большой долей вероятности сообщение с кодом ошибки 0x80070057 более появляться не будет.
Сканирование системы на вирусы
Демонстрация кода ошибки также может свидетельствовать о наличии в системе вирусов, нарушающих ее работу. Чтобы избавиться от них, следует выполнить сканирование компьютера. Лучше всего себя зарекомендовали антивирусные программы «Kaspersky» (скачать с официального сайта) и «Avast» (скачать с официального сайта).

Восстановление системы
Избавиться от уведомления с кодом ошибки 0x80070057 можно, выполнив восстановление системы. В Windows 10 для этого нужно перейти в меню «Параметры», открыть вкладку «Восстановление» и нажать «Начать», после чего следовать инструкциям на экране.
Установка чистого Windows
Если ни один из способов, описанных выше, не помог избавиться от уведомления с кодом ошибки 0x80070057, значит, следует прибегнуть к самому радикальному методу – полной переустановке ОС. Скачать актуальную версию Windows можно, перейдя на официальный сайт Microsoft.
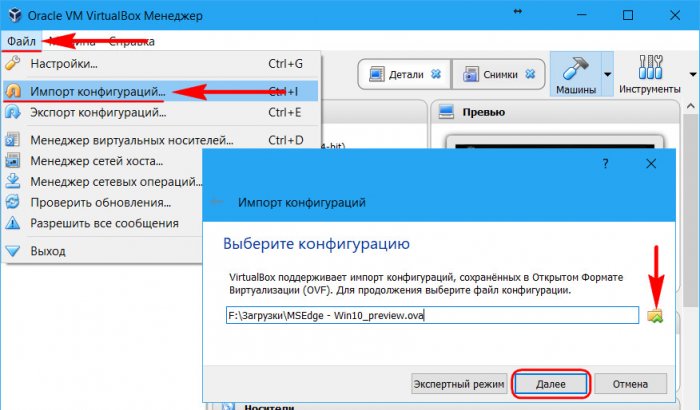
Важно! Посредством программы можно исправить сбой «код ошибки e invalidarg 0x80070057 ova». «Ova» – это формат, в котором в большинстве случаев в сети выкладываются готовые виртуальные машины. Виртуальный жесткий диск, при желании, можно импортировать вместе со всеми настройками в новую ОС Windows. Для этого потребуется перейти в раздел «Импорт конфигураций» и поэтапно выполнить указания, демонстрируемые программой на экране.
Самостоятельно выяснить, по какой причине возникла проблема «virtualbox код ошибки e invalidarg 0x80070057», довольно затруднительно. Именно поэтому для того, чтобы не тратить время зря, рекомендуется последовательно выполнять указания, представленные в статье. На одном из этапов проблема гарантированно будет решена.
Видео по теме:
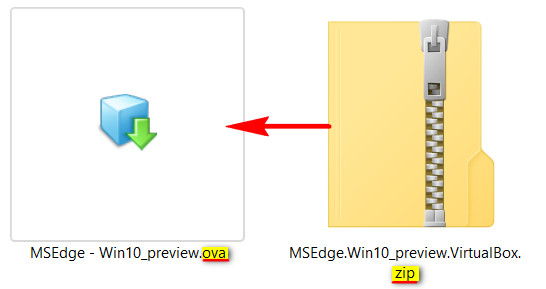
При установке операционных систем на виртуальную машину обычно используются загрузочные образы ISO, но в интернете также можно встретить пакеты OVA, представляющие собой настроенные виртуальные ОС, особым образом подготовленные для использования на популярных гипервизорах. Формат OVA также используется при экспорте установленных на виртуальных машинах систем в файл архива для последующего переноса виртуальной ОС на другой компьютер или совместимый гипервизор.
К сожалению, подключение такой «законсервированной» виртуальной системы не всегда проходит гладко. В ряде случаев при выполнении операции импорта вы можете получить ошибку «Не удалось импортировать конфигурацию виртуальной машины». Причины неполадки могут быть разные, начиная от банального повреждения контейнера OVA и заканчивая несовместимыми параметрами конфигурации импорта.
Если файл OVA был скачан вами в интернете, скажем, на торрент-трекере, получите его контрольную сумму и сверьте ее с той, которая выложена на странице. Несовпадающий хэш будет означать, что файл, скорее всего, поврежден. А еще это будет означать, что импортировать такую систему не получится. Импортировать машину не удастся, если вы попытаетесь развернуть ее на раздел или носитель с файловой системой FAT32 при условии, что подключаемый контейнер весит 4 Гб или больше того.
Иное дело несовместимые параметры конфигурации импорта. Вполне возможно, что выложивший в интернет OVA-файл создавал его на более мощном, чем у вас, компьютере, выбрав слишком большой объем ОЗУ или количество ядер процессора, недопустимое при создании виртуальной машины на вашем ПК. Может быть и такое, что OVA-файл, созданный в одной версии VirtualBox, не подключается в другой версии, старой или новой. В первом случае можно попробовать изменить параметры импорта конфигураций вручную.
Также можно прибегнуть к более универсальному способу — извлечению из OVA-контейнера файла виртуального жесткого диска и создания на его основе новой WM.
Извлечение VMDK-файла и подключение его к WM
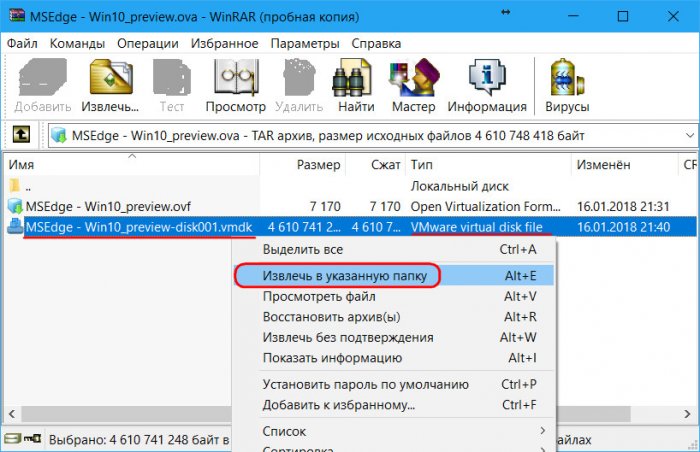
Первым делом вам нужно будет распаковать контейнер OVA. Для этих целей сгодится любой архиватор с поддержкой TAR, хотя бы тот же WinRAR. Откройте в архиваторе каталог с файлом OVA, кликните по нему ПКМ и выберите в меню «Показать содержимое архива».
Затем выделите содержащийся в архиве файл VMDK.
И извлеките его в удобное для вас расположение.
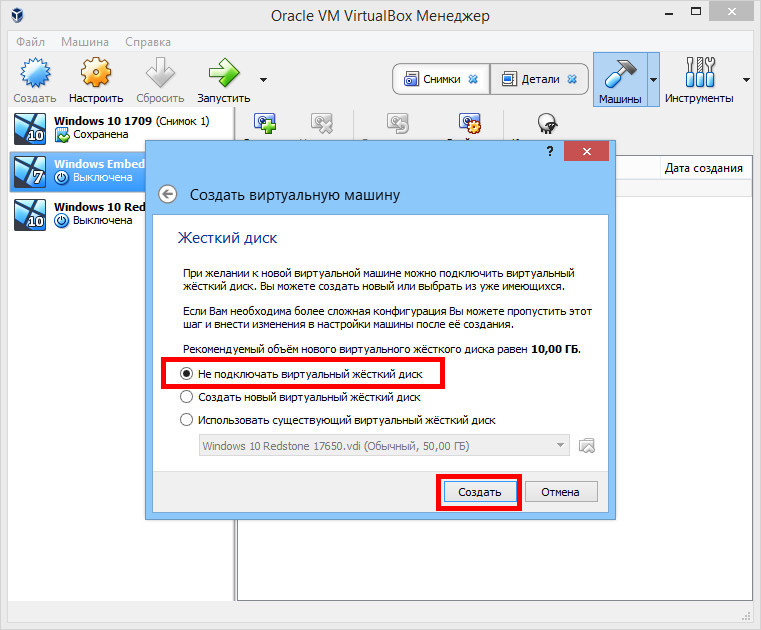
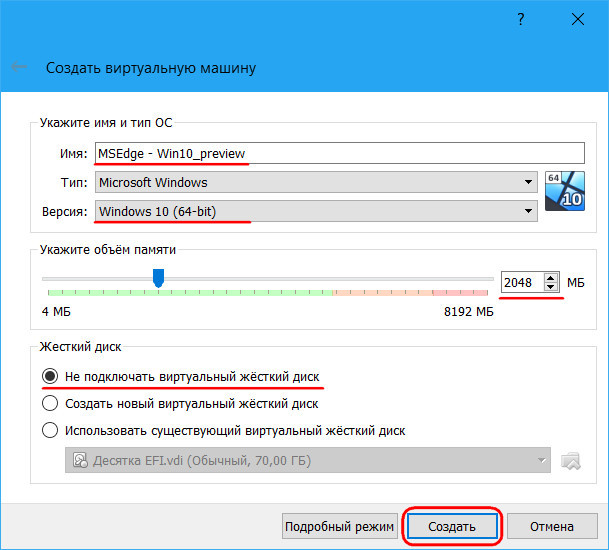
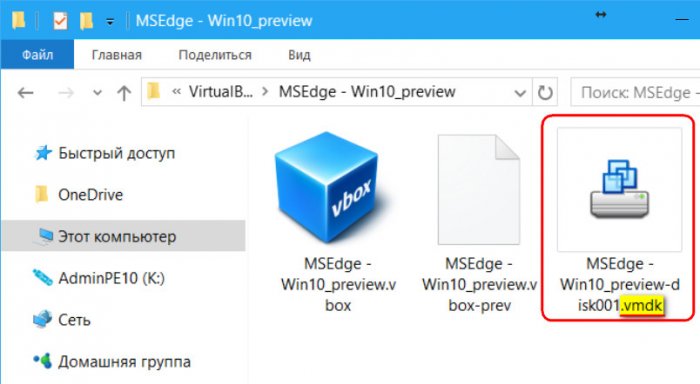
Получив файл виртуального диска, создайте в VirtualBox новую машину, указав, как положено ее имя, разрядность и объем оперативной памяти. Маленькая деталь — в окне «Жесткий диск» нужно включить опцию «Не подключать виртуальный жесткий диск».
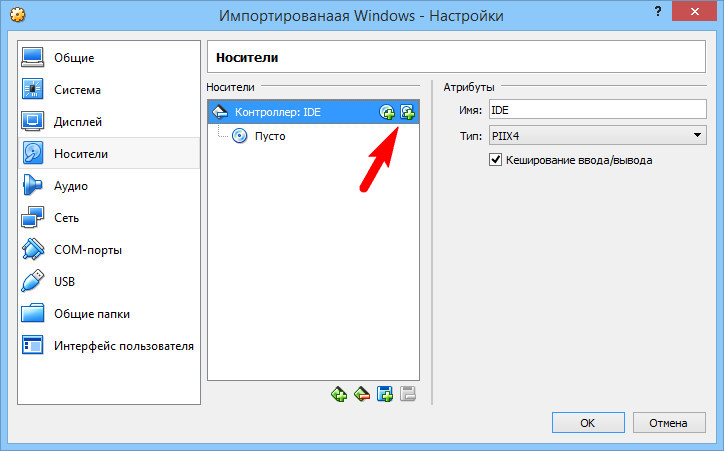
Далее заходим в настройки виртуальной машины, в разделе «Носители» жмем кнопку добавления виртуального диска.
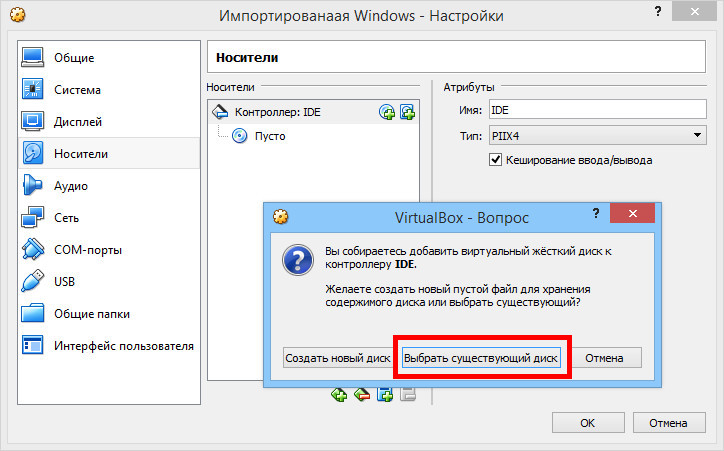
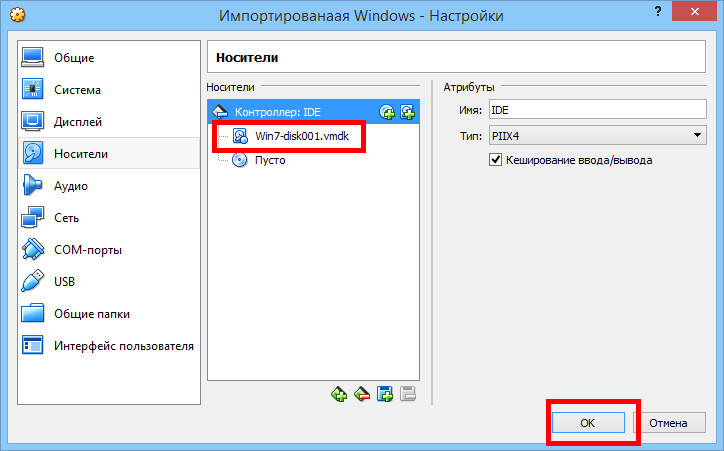
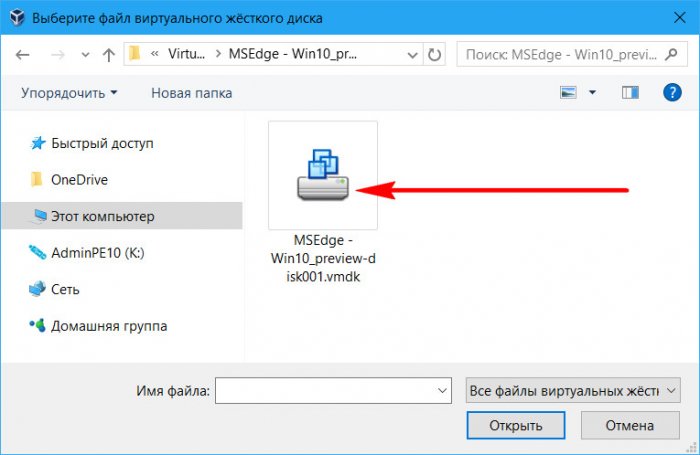
И подключаем к текущему контроллеру ранее извлеченный файл VMDK.
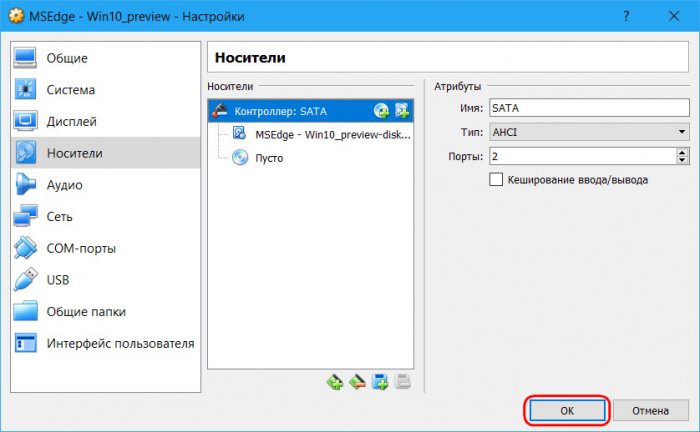
Сохраняем настройки и запускаем виртуальную машину.
Как быть, если WM при запуске падает в BSOD
Есть вероятность, что запуск подключенной виртуальной машины завершится ошибкой с последующим ее вылетом в BSOD.
Такое может быть, если тип контроллера в VirtualBox отличается от того, на котором виртуальный диск висел раньше. Например, он был подключен к SATA, а у вас стоит IDE или наоборот. Отсюда решение — необходимо переподключиться, добавив в разделе «Носители» новый тип контроллера SATA, SCSI или IDE и повесив на него виртуальную ОС.
Нерабочий контроллер удаляем.
На этот раз система должна загрузиться без ошибок.
![]() Загрузка…
Загрузка…
Автор Владимир!
Привет, друзья. В этой статье предлагаю поговорить о проблеме импорта файлов конфигурации виртуальных машин OVA программой VirtualBox. Об этой проблеме вы не единожды упоминали в комментариях к одной из статей сайта, где приводились инструкции по скачиванию готовой машины с Windows 8.1. Процесс импорта программой VirtualBox машин, экспортированных нами ранее или скачанных в Интернете, увы, не всегда проходит успешно. И иногда мы можем столкнуться с ошибкой типа «Не удалось импортировать конфигурацию виртуальной машины». Ниже поговорим о том, что может привести к такой ошибке импорта, а также рассмотрим универсальный способ решения этой проблемы.
Рабочие виртуалки VirtualBox вместе с их настройками и содержимым виртуального жёсткого диска можно экспортировать в универсальный файл конфигурации формата OVA, а затем импортировать его после переустановки основной Windows, на другом компьютере или на другом гипервизоре. С механизмом экспорта-импорта с участием формата OVA работают программы VirtualBox, VMware Workstation, а при дополнительных усилиях — ещё и Hyper-V. Готовые виртуальные машины в Интернете обычно выкладывают именно в формате OVA.
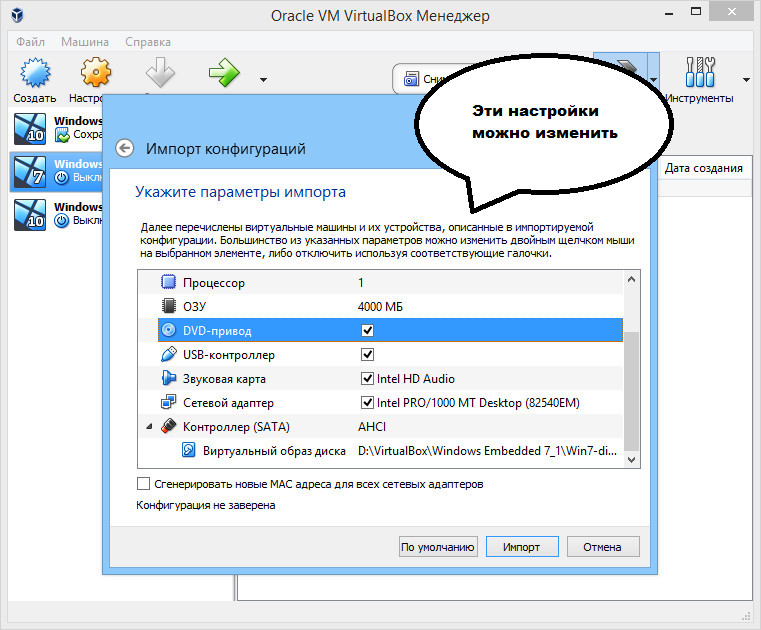
В идеале механизм импорта в программе VirtualBox прост: выбираем «Импорт конфигураций», указываем путь к файлу OVA, жмём «Далее».
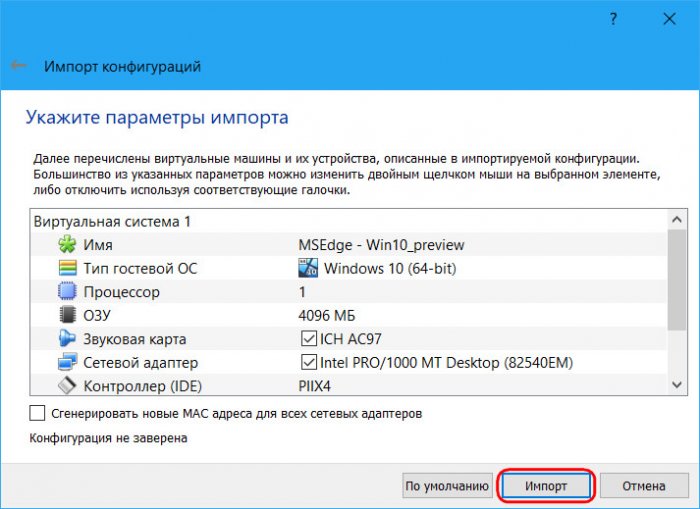
При необходимости меняем кое-какие настройки и жмём «Импорт».
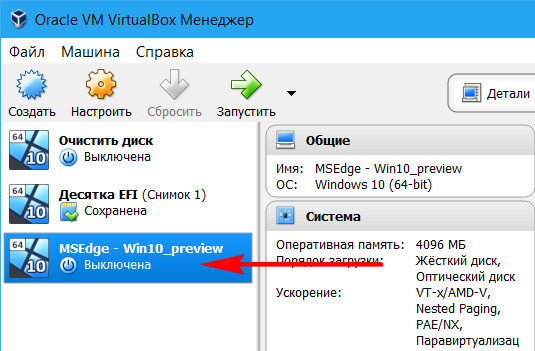
И через какое-то время можем уже запускать виртуалку.
Но это так в идеале. Что может препятствовать этому процессу?
Сообщением типа «Не удалось импортировать конфигурацию виртуальной машины» процесс импорта может завершиться банально из-за проблем с файлом OVA (если он повреждён) или из-за нехватки места на диске, куда распаковывается виртуальная машина. Если с самим OVA всё в порядке, при возникновении такой проблемы можно попытаться извлечь виртуалку на другой раздел диска. Или на исходный, только после очистки системной корзины. Можно даже попробовать дефрагментировать такой раздел (если, конечно же, это раздел HDD).
У раздела диска, куда распаковывается импортируемая машина, естественно, должна быть файловая система NTFS. На раздел с FAT32 не запишется файл виртуального жёсткого диска в составе машины, который обычно весит больше 4 Гб.
Если мы говорим о виртуалке, скачанной с Интернета, нужно тщательно проверить параметры импорта. Возможно, тот, кто её экспортировал, работал на более мощном компьютере и указал большой объём оперативной памяти или слишком много ядер процессора.
Но часто, друзья, бывает так, что в одной версии VirtualBox не хочет осуществлять импорт, а в другой, к примеру, в более старой версии – делает это без каких-либо проблем.
За исключением случаев порченного OVA и раздела с FAT32 решить проблему ошибки импорта виртуальной машины можно путём извлечения из OVA файла виртуального жёсткого диска и формирования на его базе новой машины.
Создание новых машин на базе файлов виртуальных жёстких дисков – это более удобный, чем экспортирование в формат OVA, способ восстановления виртуалок. Особенно, если их много. Кто активно работает с гипервизорами, обычно больше привязан к виртуальным дискам машин, а не к их конфигурации. Такие пользователи прекрасно знают, какие настройки виртуалок они используют. И им проще создать новую машину на базе имеющегося виртуального диска, чем возиться с созданием увесистого файла экспорта OVA.
Но где взять диск виртуальной машины, если последняя, например, в формате OVA скачана с Интернета? Друзья, OVA – это контейнер архива TAR, его содержимое можно увидеть и извлечь какую-то часть данных с помощью программ 7-zip, WinRAR или любого иного архиватора, который поддерживает формат архивов «.tar». Этими частично извлечёнными данными и станет виртуальный жёсткий диск, на базе которого мы создадим новую виртуалку. Что же, поехали.
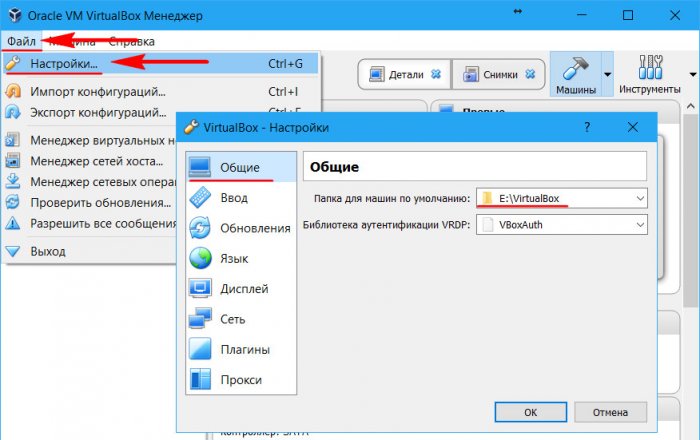
- Примечание: друзья, каталогом хранения содержимого виртуальных машин в программе VirtualBox по умолчанию является папка на системном диске. И чтобы не захламлять диск С, рекомендую вам отвести под работу с виртуалками специальную папку на несистемном каком-нибудь разделе. Или даже выделить под это целый раздел, например, самый быстрый по результатам тестирования скорости чтения и записи данных, если мы говорим об HDD. Путь хранения данных виртуалок можно прописать в общих настройках программы, чтобы каждый раз при создании новой машины не отвлекаться на смену пути по умолчанию.
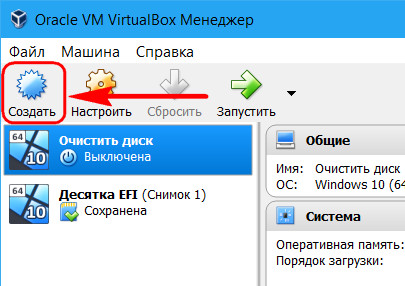
Этап 1. Создание новой машины
В окне VirtualBox создаём новую машину.
Называем её, указываем версию Windows, задаём показатель оперативной памяти. В графе «Жёсткий диск» выставляем пункт «Не подключать виртуальный жёсткий диск». Жмём «Создать».
И пока сворачиваем окно VirtualBox.
Этап 2. Работа с архиватором
Теперь, друзья, с помощью архиватора нам нужно извлечь из OVA виртуальный жёсткий диск.
- Примечание: если вы скачали виртуалку с Интернета в архиве RAR, ZIP и т.п, не забудьте распаковать такой архив путём обычной разархивации, чтобы на выходе получился именно контейнер OVA.
Запускаем архиватор. Я буду использовать классику жанра – программу WinRAR. Открываем наш OVA в окне архиватора с помощью меню «Файл — Открыть». Важно: архиваторы по умолчанию могут отображать не все поддерживаемые типы архивов. Чтобы OVA был виден в меню обзора для открытия, необходимо указать тип отображаемых данных «Все файлы».
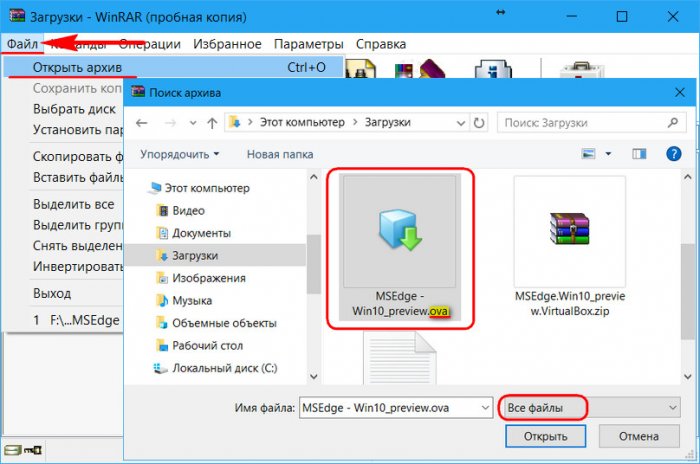
После успешного открытия в окне архиватора увидим содержимое OVA. В моём случае это файл конфигурации виртуальной машины OVF и совместимый с VirtualBox и VMware Workstation файл виртуального жёсткого диска VMDK. Последний нам-то и нужен. Кликаем его, вызываем контекстное меню и в случае с WinRAR выбираем пункт меню «Извлечь в указанную папку». В архиваторе 7-zip используем пункт контекстного меню «Копировать в…».
Файл виртуального диска для удобства можем распаковать в папку хранения созданной нами на предыдущем этапе новой виртуалки.
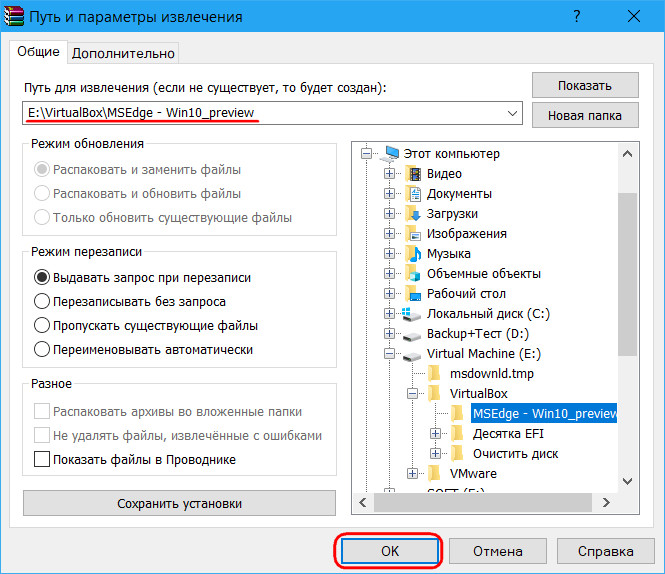
Таким образом все её составляющие будут аккуратненько сосуществовать в одном месте.
Теперь возвращаемся к программе VirtualBox.
Этап 3. Подключение виртуального жёсткого диска
На первом этапе мы создали машину без жёсткого диска. Выделяем её и жмём кнопку настроек.
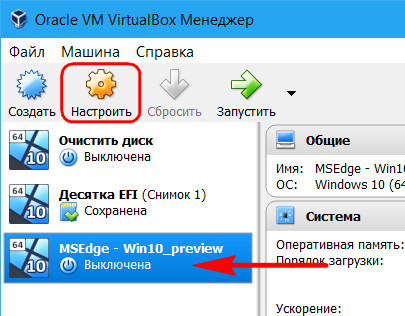
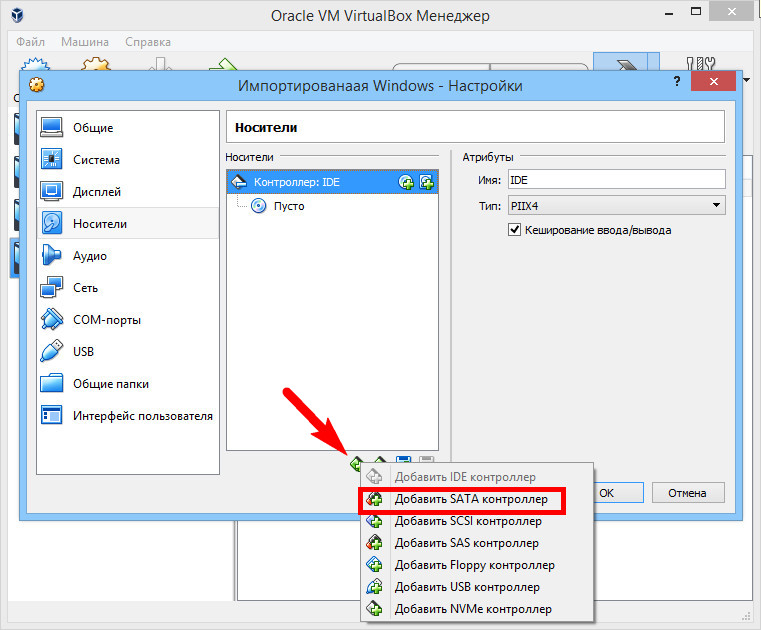
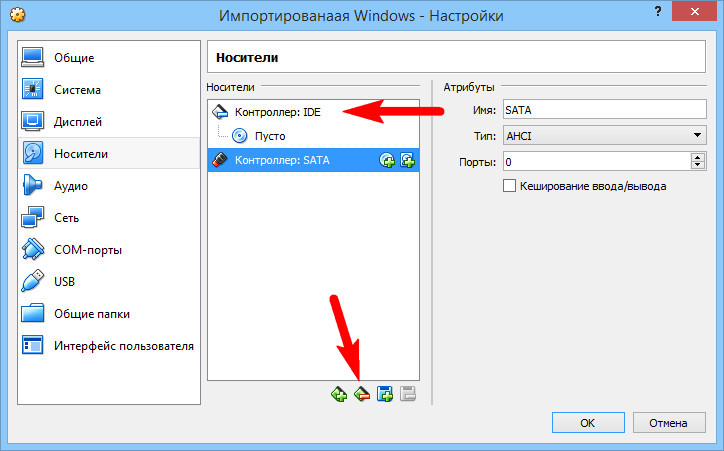
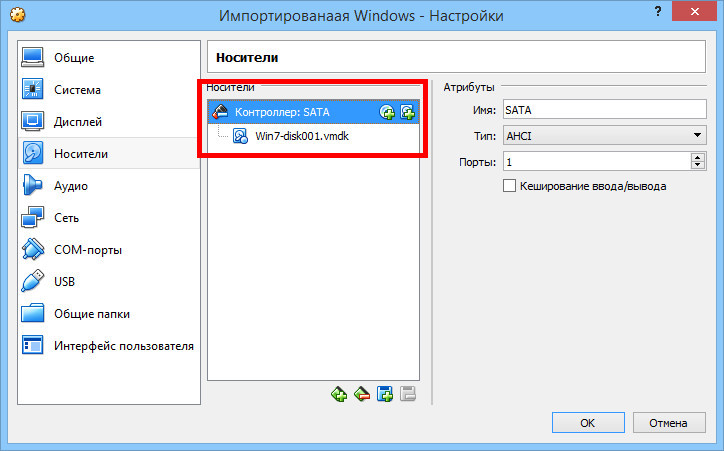
В окошке настроек идём в раздел «Носители», жмём кнопку контроллера SATA и добавляем новый жёсткий диск из числа существующих.
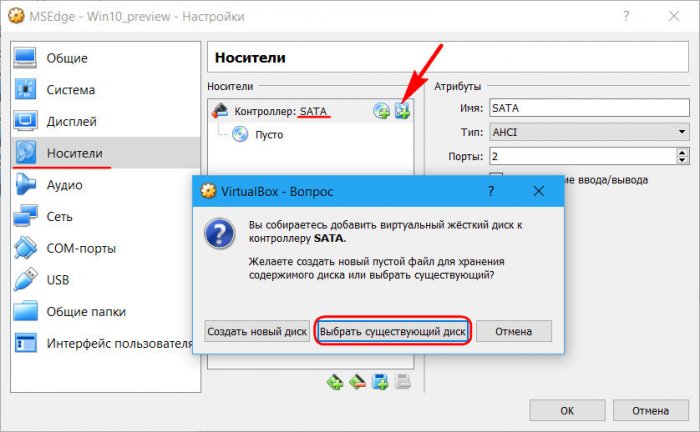
Указываем путь хранения файла, который мы извлекали с помощью архиватора на предыдущем этапе.
Жмём «Ок».
***
Всё – машина настроена. Можем запускать её.
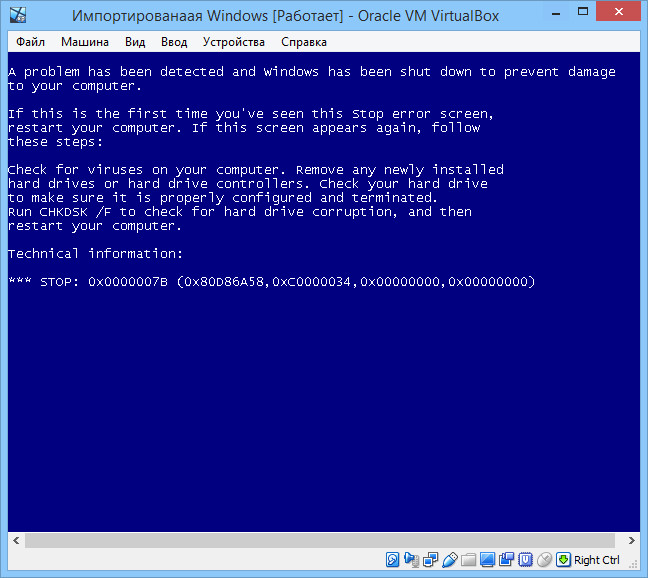
Если запуск виртуалки прошёл успешно, однако на этапе запуска Windows возникли проблемы в виде синего экрана смерти, возможно, друзья, мы имеем дело с проблемой контроллера виртуального жёсткого диска. Это мелкий недостаток способа создания новой машины на базе извлечённого из OVA файла диска. Когда мы импортируем машину вместе с её конфигурацией, в этой конфигурации предусматривается нужный тип контроллера. Когда же эту конфигурацию мы формируем по новой, мы можем указать не тот тип контроллера. А Windows даже в актуальной версии 10 пока ещё не умеет на ходу менять драйверы контроллера носителей. И вот реагирует экраном смерти.
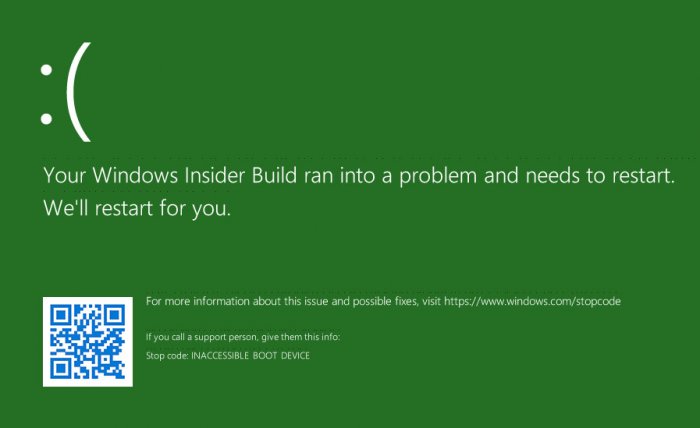
Для скачанных с ресурсов Microsoft готовых виртуальных машин подойдёт установленный по умолчанию в VirtualBox тип контроллера SATA. Если мы скачаем виртуалку с Windows, в среде которой установлены драйверы под тип контроллера IDE, но подключим его через контроллер SATA, операционная система в большинстве случаев запустится. Но вот если мы на каком-нибудь сайте в Интернете скачаем машину, где Windows установлена на виртуальный диск, подключённый через контроллер SCSI, с большой долей вероятности получим BSOD. Или наоборот: BSOD будем лицезреть при подключении через SCSI виртуального диска с Windows, которая устанавливалась на виртуалке с типом контроллера SATA или IDE.
В таком случае просто нужно переподключить виртуальный диск через другой тип контроллера. Необходимо вернуться в раздел настроек машины «Носители», удалить диск из числа устройств текущего контроллера, затем добавить новый тип контроллера (SCSI, SATA или IDE).
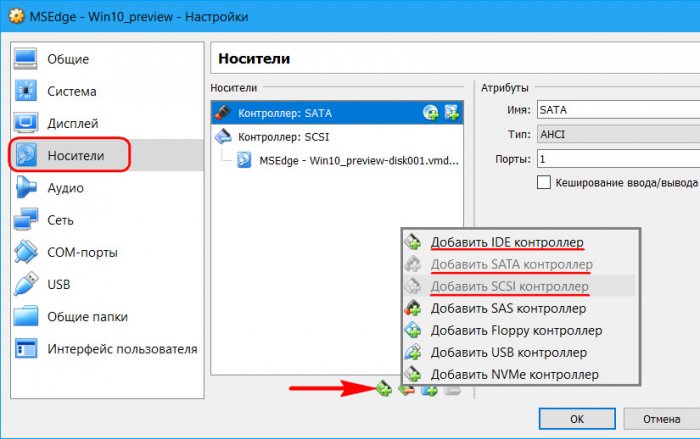
И подключить диск уже через новый контроллер.
Автор Владимир!
Привет, друзья. В этой статье предлагаю поговорить о проблеме импорта файлов конфигурации виртуальных машин OVA программой VirtualBox. Об этой проблеме вы не единожды упоминали в комментариях к одной из статей сайта, где приводились инструкции по скачиванию готовой машины с Windows 8.1. Процесс импорта программой VirtualBox машин, экспортированных нами ранее или скачанных в Интернете, увы, не всегда проходит успешно. И иногда мы можем столкнуться с ошибкой типа «Не удалось импортировать конфигурацию виртуальной машины». Ниже поговорим о том, что может привести к такой ошибке импорта, а также рассмотрим универсальный способ решения этой проблемы.
Рабочие виртуалки VirtualBox вместе с их настройками и содержимым виртуального жёсткого диска можно экспортировать в универсальный файл конфигурации формата OVA, а затем импортировать его после переустановки основной Windows, на другом компьютере или на другом гипервизоре. С механизмом экспорта-импорта с участием формата OVA работают программы VirtualBox, VMware Workstation, а при дополнительных усилиях — ещё и Hyper-V. Готовые виртуальные машины в Интернете обычно выкладывают именно в формате OVA.
В идеале механизм импорта в программе VirtualBox прост: выбираем «Импорт конфигураций», указываем путь к файлу OVA, жмём «Далее».
При необходимости меняем кое-какие настройки и жмём «Импорт».
И через какое-то время можем уже запускать виртуалку.
Но это так в идеале. Что может препятствовать этому процессу?
Сообщением типа «Не удалось импортировать конфигурацию виртуальной машины» процесс импорта может завершиться банально из-за проблем с файлом OVA (если он повреждён) или из-за нехватки места на диске, куда распаковывается виртуальная машина. Если с самим OVA всё в порядке, при возникновении такой проблемы можно попытаться извлечь виртуалку на другой раздел диска. Или на исходный, только после очистки системной корзины. Можно даже попробовать дефрагментировать такой раздел (если, конечно же, это раздел HDD).
У раздела диска, куда распаковывается импортируемая машина, естественно, должна быть файловая система NTFS. На раздел с FAT32 не запишется файл виртуального жёсткого диска в составе машины, который обычно весит больше 4 Гб.
Если мы говорим о виртуалке, скачанной с Интернета, нужно тщательно проверить параметры импорта. Возможно, тот, кто её экспортировал, работал на более мощном компьютере и указал большой объём оперативной памяти или слишком много ядер процессора.
Но часто, друзья, бывает так, что в одной версии VirtualBox не хочет осуществлять импорт, а в другой, к примеру, в более старой версии – делает это без каких-либо проблем.
За исключением случаев порченного OVA и раздела с FAT32 решить проблему ошибки импорта виртуальной машины можно путём извлечения из OVA файла виртуального жёсткого диска и формирования на его базе новой машины.
Создание новых машин на базе файлов виртуальных жёстких дисков – это более удобный, чем экспортирование в формат OVA, способ восстановления виртуалок. Особенно, если их много. Кто активно работает с гипервизорами, обычно больше привязан к виртуальным дискам машин, а не к их конфигурации. Такие пользователи прекрасно знают, какие настройки виртуалок они используют. И им проще создать новую машину на базе имеющегося виртуального диска, чем возиться с созданием увесистого файла экспорта OVA.
Но где взять диск виртуальной машины, если последняя, например, в формате OVA скачана с Интернета? Друзья, OVA – это контейнер архива TAR, его содержимое можно увидеть и извлечь какую-то часть данных с помощью программ 7-zip, WinRAR или любого иного архиватора, который поддерживает формат архивов «.tar». Этими частично извлечёнными данными и станет виртуальный жёсткий диск, на базе которого мы создадим новую виртуалку. Что же, поехали.
- Примечание: друзья, каталогом хранения содержимого виртуальных машин в программе VirtualBox по умолчанию является папка на системном диске. И чтобы не захламлять диск С, рекомендую вам отвести под работу с виртуалками специальную папку на несистемном каком-нибудь разделе. Или даже выделить под это целый раздел, например, самый быстрый по результатам тестирования скорости чтения и записи данных, если мы говорим об HDD. Путь хранения данных виртуалок можно прописать в общих настройках программы, чтобы каждый раз при создании новой машины не отвлекаться на смену пути по умолчанию.
Этап 1. Создание новой машины
В окне VirtualBox создаём новую машину.
Называем её, указываем версию Windows, задаём показатель оперативной памяти. В графе «Жёсткий диск» выставляем пункт «Не подключать виртуальный жёсткий диск». Жмём «Создать».
И пока сворачиваем окно VirtualBox.
Этап 2. Работа с архиватором
Теперь, друзья, с помощью архиватора нам нужно извлечь из OVA виртуальный жёсткий диск.
- Примечание: если вы скачали виртуалку с Интернета в архиве RAR, ZIP и т.п, не забудьте распаковать такой архив путём обычной разархивации, чтобы на выходе получился именно контейнер OVA.
Запускаем архиватор. Я буду использовать классику жанра – программу WinRAR. Открываем наш OVA в окне архиватора с помощью меню «Файл — Открыть». Важно: архиваторы по умолчанию могут отображать не все поддерживаемые типы архивов. Чтобы OVA был виден в меню обзора для открытия, необходимо указать тип отображаемых данных «Все файлы».
После успешного открытия в окне архиватора увидим содержимое OVA. В моём случае это файл конфигурации виртуальной машины OVF и совместимый с VirtualBox и VMware Workstation файл виртуального жёсткого диска VMDK. Последний нам-то и нужен. Кликаем его, вызываем контекстное меню и в случае с WinRAR выбираем пункт меню «Извлечь в указанную папку». В архиваторе 7-zip используем пункт контекстного меню «Копировать в…».
Файл виртуального диска для удобства можем распаковать в папку хранения созданной нами на предыдущем этапе новой виртуалки.
Таким образом все её составляющие будут аккуратненько сосуществовать в одном месте.
Теперь возвращаемся к программе VirtualBox.
Этап 3. Подключение виртуального жёсткого диска
На первом этапе мы создали машину без жёсткого диска. Выделяем её и жмём кнопку настроек.
В окошке настроек идём в раздел «Носители», жмём кнопку контроллера SATA и добавляем новый жёсткий диск из числа существующих.
Указываем путь хранения файла, который мы извлекали с помощью архиватора на предыдущем этапе.
Жмём «Ок».
***
Всё – машина настроена. Можем запускать её.
Если запуск виртуалки прошёл успешно, однако на этапе запуска Windows возникли проблемы в виде синего экрана смерти, возможно, друзья, мы имеем дело с проблемой контроллера виртуального жёсткого диска. Это мелкий недостаток способа создания новой машины на базе извлечённого из OVA файла диска. Когда мы импортируем машину вместе с её конфигурацией, в этой конфигурации предусматривается нужный тип контроллера. Когда же эту конфигурацию мы формируем по новой, мы можем указать не тот тип контроллера. А Windows даже в актуальной версии 10 пока ещё не умеет на ходу менять драйверы контроллера носителей. И вот реагирует экраном смерти.
Для скачанных с ресурсов Microsoft готовых виртуальных машин подойдёт установленный по умолчанию в VirtualBox тип контроллера SATA. Если мы скачаем виртуалку с Windows, в среде которой установлены драйверы под тип контроллера IDE, но подключим его через контроллер SATA, операционная система в большинстве случаев запустится. Но вот если мы на каком-нибудь сайте в Интернете скачаем машину, где Windows установлена на виртуальный диск, подключённый через контроллер SCSI, с большой долей вероятности получим BSOD. Или наоборот: BSOD будем лицезреть при подключении через SCSI виртуального диска с Windows, которая устанавливалась на виртуалке с типом контроллера SATA или IDE.
В таком случае просто нужно переподключить виртуальный диск через другой тип контроллера. Необходимо вернуться в раздел настроек машины «Носители», удалить диск из числа устройств текущего контроллера, затем добавить новый тип контроллера (SCSI, SATA или IDE).
И подключить диск уже через новый контроллер.
При установке операционных систем на виртуальную машину обычно используются загрузочные образы ISO, но в интернете также можно встретить пакеты OVA, представляющие собой настроенные виртуальные ОС, особым образом подготовленные для использования на популярных гипервизорах. Формат OVA также используется при экспорте установленных на виртуальных машинах систем в файл архива для последующего переноса виртуальной ОС на другой компьютер или совместимый гипервизор.
К сожалению, подключение такой «законсервированной» виртуальной системы не всегда проходит гладко. В ряде случаев при выполнении операции импорта вы можете получить ошибку «Не удалось импортировать конфигурацию виртуальной машины». Причины неполадки могут быть разные, начиная от банального повреждения контейнера OVA и заканчивая несовместимыми параметрами конфигурации импорта.
Если файл OVA был скачан вами в интернете, скажем, на торрент-трекере, получите его контрольную сумму и сверьте ее с той, которая выложена на странице. Несовпадающий хэш будет означать, что файл, скорее всего, поврежден. А еще это будет означать, что импортировать такую систему не получится. Импортировать машину не удастся, если вы попытаетесь развернуть ее на раздел или носитель с файловой системой FAT32 при условии, что подключаемый контейнер весит 4 Гб или больше того.
Иное дело несовместимые параметры конфигурации импорта. Вполне возможно, что выложивший в интернет OVA-файл создавал его на более мощном, чем у вас, компьютере, выбрав слишком большой объем ОЗУ или количество ядер процессора, недопустимое при создании виртуальной машины на вашем ПК. Может быть и такое, что OVA-файл, созданный в одной версии VirtualBox, не подключается в другой версии, старой или новой. В первом случае можно попробовать изменить параметры импорта конфигураций вручную.
Также можно прибегнуть к более универсальному способу — извлечению из OVA-контейнера файла виртуального жесткого диска и создания на его основе новой WM.
Извлечение VMDK-файла и подключение его к WM
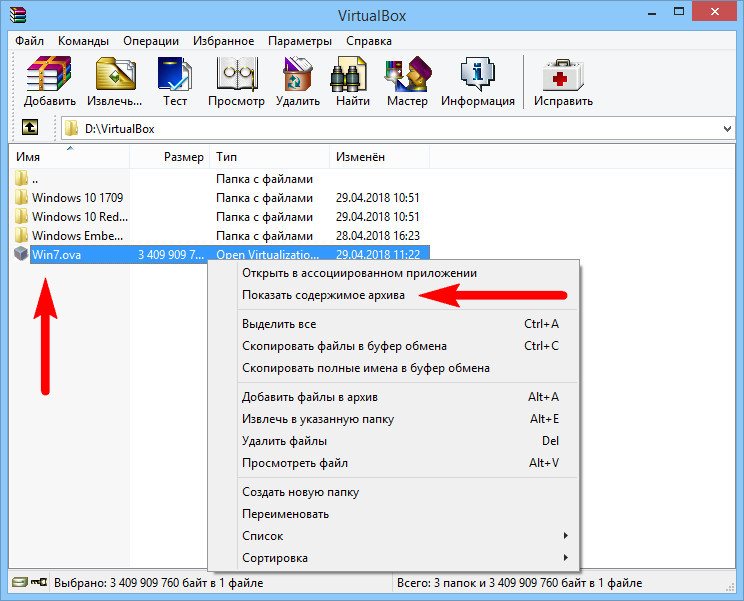
Первым делом вам нужно будет распаковать контейнер OVA. Для этих целей сгодится любой архиватор с поддержкой TAR, хотя бы тот же WinRAR. Откройте в архиваторе каталог с файлом OVA, кликните по нему ПКМ и выберите в меню «Показать содержимое архива».
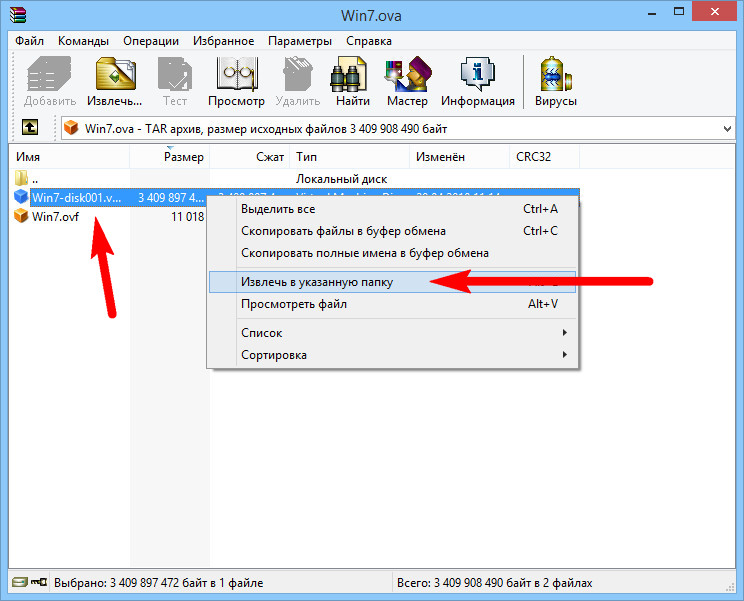
Затем выделите содержащийся в архиве файл VMDK.
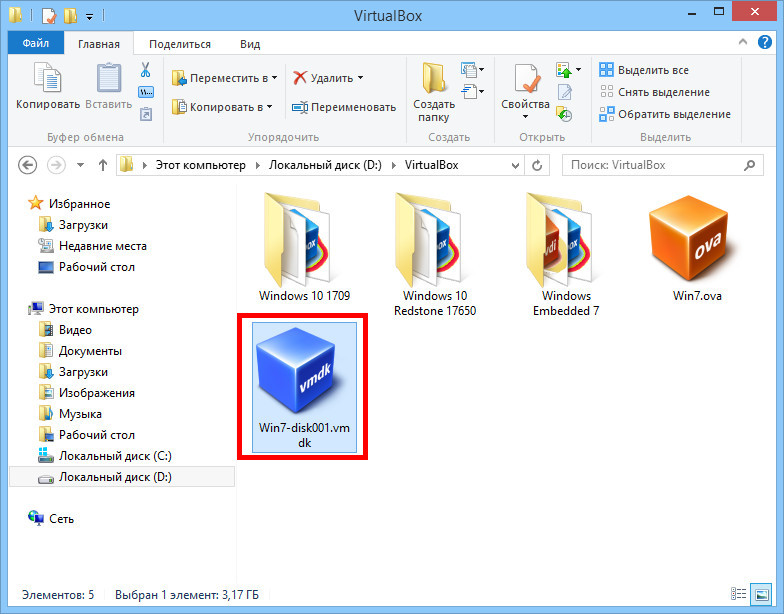
И извлеките его в удобное для вас расположение.
Получив файл виртуального диска, создайте в VirtualBox новую машину, указав, как положено ее имя, разрядность и объем оперативной памяти. Маленькая деталь — в окне «Жесткий диск» нужно включить опцию «Не подключать виртуальный жесткий диск».
Далее заходим в настройки виртуальной машины, в разделе «Носители» жмем кнопку добавления виртуального диска.
И подключаем к текущему контроллеру ранее извлеченный файл VMDK.
Сохраняем настройки и запускаем виртуальную машину.
Как быть, если WM при запуске падает в BSOD
Есть вероятность, что запуск подключенной виртуальной машины завершится ошибкой с последующим ее вылетом в BSOD.
Такое может быть, если тип контроллера в VirtualBox отличается от того, на котором виртуальный диск висел раньше. Например, он был подключен к SATA, а у вас стоит IDE или наоборот. Отсюда решение — необходимо переподключиться, добавив в разделе «Носители» новый тип контроллера SATA, SCSI или IDE и повесив на него виртуальную ОС.
Нерабочий контроллер удаляем.
На этот раз система должна загрузиться без ошибок.
![]() Загрузка…
Загрузка…
Sometimes, Windows operating system may throw the VirtualBox – Error. This error comes along with the detailed error information “failed to import appliance result code: e_invalidarg (0x80070057)” or something like this. This error annoys many users. Here, MiniTool will talk about this error including its causes and fixes.
About Result Code: E_Invalidarg (0x80070057)
You may frequently encounter errors if you run VirtualBox on your Windows device. One of the most common errors is the result code: e_invalidarg (0x80070057). When you look through Windows-based forums or communities on the Internet, you will find that plenty of users ask favors for this issue.
For instance, a user from Reddit forum posts this error and wants to get some help from others. Here is the detailed information of his post.
Hello All, I get the following error: Failed to import appliance C:/Users/MyLaptop/Desktop/PenT/Lab Virtual Machines/kali-linux-2018.3-vbox-amd64.ova. Result Code: E_INVALIDARG (0x80070057)https://www.reddit.com/r/virtualbox/comments/bpzdck/failed_to_import_appliancee_invalidarg_0x80070057/
Why e_invalidarg (0x80070057) occurs to your computer? The next section will analyze the possible causes behind this issue. So, you can pay attention to the following content
Why Result Code: E_Invalidarg (0x80070057) Appears
It is vital to know the possible reasons for the error — e_invalidarg 0x80070057. If you just look at the error message, you will not find any clues. The potential causes are found according to the time that the error happens and other signs of the error.
Given to the fact that the e_invalidarg (0x80070057) error appears when Windows cannot access the storage drive or a standard hard disk or an SSD, we conclude that the leading reason for the error is inefficient free storage space on the hard drive.
The improper file system on your drive can also be the cause for the result code: e_invalidarg (0x80070057). To be specific, the FAT32 doesn’t support a file that is more than 4GB. In this case, you need to convert the file system of your drive from FAT32 to NTFS.
If there are two or three partitions on the hard drive, the error could happen due to one of corrupted partitions on the drive. The drive or partition can get corrupted over time. Besides, the bit rot will also occur after a long time. For this, you can utilize some tools to check the health and performance of your drive.
What’s more, virus and inherent problems on the installed software can also trigger the result code: e_invalidarg (0x80070057). Except the above causes, other elements can also result in the e_invalidarg (0x80070057) error.
All the above causes are possible for the error, but there’s no exact method to know the actual reason for the issue. So, you can try the following methods one by one until you fix the issue successfully.
Top 7 Solutions to Result Code: E_Invalidarg (0x80070057)
- Obtain enough disk storage space
- Modify the file system of your drive
- Check and change time and date on your PC
- Scan for virus
- Find and fix corrupted drive
- Perform system restore
- Perform Windows clean install
Fix 1: Get Enough Disk Storage Space
If you don’t have enough storage space on your drive, you can get this error when carrying out operations on your PC that runs VirtualBox. In fact, issues like 0x80300024 error and runtime error also happen due to insufficient free disk space.
To get more disk space for your drive, you can utilize MiniTool Partition Wizard. The resize/move partition and extend partition features enable you to obtain more space for your drive. Of course, you can also find what is taking up your space with Space Analyzer that this program offers and then delete the corresponding items.
Download and install MiniTool Partition Wizard by clicking the button below, and then begin resizing and extending your storage space. Here, you just need the MiniTool Partition Wizard Free Edition. If you would like to recover missing data or lost partition, you need to pick its Pro Ultimate Edition instead.
Free Download Buy Now
Steps for resizing and moving partition
Before starting to resize/move your partition, you need to check the location of partition on the hard drive. To resize a partition, you have to ensure that there’s unallocated or free space next to the partition that you are going to resize. If there isn’t, you utilize the extend partition feature instead.
Step 1: Right click the partition to extend and choose the Move/Resize feature from the pop-up menu.
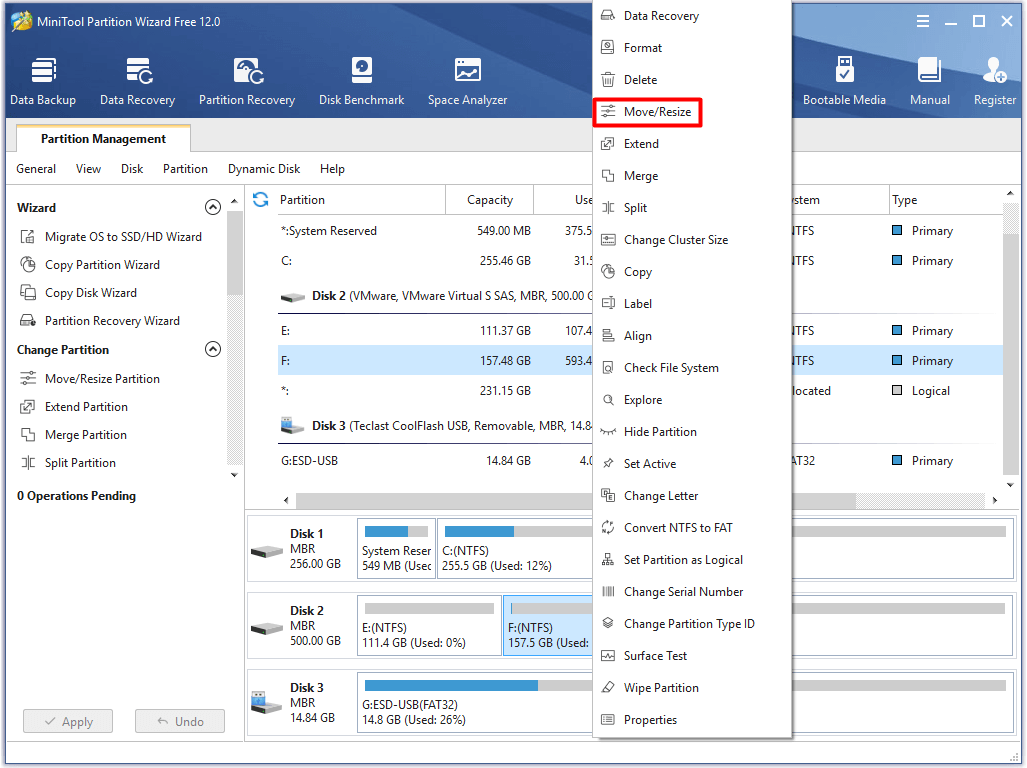
Step 2: In the next window, move the button to resize your partition. Alternatively, you can also enter the exact number behind the Partition Size to resize partition. After that, click OK to save the change.
Tip: You should move the button rightward. If you move leftward, you will shrink the size of your partition.
Step 3: After backing to the main interface, you will view the size and layout of target partition. However, it won’t take effect until you click on Apply to carry out the operation.

Steps for extending partition
Both moving/resizing and extending partition can enlarge your partition. However, extending partition is suggested under the following 2 cases.
- You would like to extend a partition to non-contiguous unallocated or free space.
- There is no unallocated or free space on the hard disk.
Step 1: Right click the target partition, and then select the Extend feature from the elevated menu.
Step 2: Open the drop-down menu behind Take Free Space from to pick a partition or unallocated space that you can take space from. Then, you can move the sliding handle leftwards or rightwards to determine the space volume that you would like to take from the target partition or unallocated space.
Step 3: After that, click OK and then click on Apply on the main interface to execute the operation.
Fix 2: Change the File System of Your Drive
The incorrect file system of the drive can also lead to the virtualbox e_invalidarg error. Hence, one of solutions to the error is to change the file system of your drive. You can do that during the process of formatting your partition, but you may suffer from data loss due to this operation.
What does formatting a hard drive do? You can get the detailed information from this post.
If you use MiniTool Partition Wizard, things are different. It enables you convert FAT32 to NTFS without losing data. How to do? You can follow the steps below after downloading and installing this tool.
Free Download
Step 1: Right click the partition that you want to change the file system and choose Convert FAT to NTFS option.
Step 2: In the next window, click on the Start button. Then, MiniTool Partition will start converting file system automatically.

If you encounter file system error — 2147219196, you can fix it by referring to this guide: 7 Fixes to File System Error – 2147219196 [Fix 3 Works Well]
Fix 3: Check and Modify Time and Date
The wrong date/time combination sometimes will sparkle the e_invalidarg (0x80070057) error. Though this possibility is small, you’d better try to check the time and data on your computer.
For instance, the battery on your motherboard that is used to keep the BIOS working is low on power or cannot work properly, which can make your computer date/time reset to its default value each time you turn off your PC.
There’s no doubt that the default time is a value not matched with the current date/time. And this will lead to issues like result code: e_invalidarg (0x80070057) for you. How to check and change time and date? This post will show you the details.
If there are any viruses or malware on your PC, e_invalidarg (0x80070057) may also happen to you. Here comes the need of running an anti-virus program on your computer. If you have installed one, just run it to scan for virus and other malicious software on your device. If you don’t have, you can choose one piece of antivirus software to do that job.
If you want to make sure that your system is clean, you can use these methods to clean up your computer.
Fix 5: Find and Fix Corrupted Drive
When the drive gets corrupted or damaged, you will also encounter various of issues such as 0x80070017, xlive.dll missing error, SFC Scannow failed to fix error, result code: e_invalidarg (0x80070057), and so forth.
Therefore, it is necessary to check the heath of you hard drive. How to do? Well, MiniTool Partition Wizard helps again. It can scan for bad sectors on your hard drive.
Free Download
If you find any, you are able to fix it. Here’s a full guide for you to check your hard drive and fix the error.
If your hard drive cannot work completely, you can consider replacing it with a new one.
Fix 6: Perform System Restore
The Windows built-in system restore feature is very helpful when you encounter certain types of crashes and some computer problems, because it can help you restore your computer to a previous state. In this way, your PC will run properly again. This is a quick fix.
Top recommendation: Why Does My Computer Keeps Crashing? Here Are Answers and Fixes
However, you will lose the changes that you have made on your computer such as, the newly installed applications, newly created folders, etc. So, you need to back up your important data before performing the system restore. After that, you can follow the steps in this post to restore computer to earlier data in Windows 10/8/7.
Fix 7: Clean Install Windows OS
If you cannot fix the result code: e_invalidarg (0x80070057) error after trying methods above, try performing a clean install of Windows. Similarly, you’d better back up your important data on the hard drive before that.
Then, you can use these detailed steps and instructions to reinstall Windows operating system.
I fixed the result code: e_invalidarg (0x80070057) error with methods offered by this post. Are you still bothered by this issue? You can try the methods in the post to fix it. Click to Tweet
Conclusion
When you receive the error message “failed to import appliance result code: e_invalidarg (0x80070057)” on your computer, you can use the top 7 methods in this post to fix it. It is rather easy to operate as the detailed steps have been offered to you directly or related links.
If you have any questions about MiniTool software, please send us an email via [email protected]. You can also share your thoughts on the topic — virtualbox e_invalidarg, e_invalidarg 0x80070057 in the below comment area.
Sometimes, Windows operating system may throw the VirtualBox – Error. This error comes along with the detailed error information “failed to import appliance result code: e_invalidarg (0x80070057)” or something like this. This error annoys many users. Here, MiniTool will talk about this error including its causes and fixes.
About Result Code: E_Invalidarg (0x80070057)
You may frequently encounter errors if you run VirtualBox on your Windows device. One of the most common errors is the result code: e_invalidarg (0x80070057). When you look through Windows-based forums or communities on the Internet, you will find that plenty of users ask favors for this issue.
For instance, a user from Reddit forum posts this error and wants to get some help from others. Here is the detailed information of his post.
Hello All, I get the following error: Failed to import appliance C:/Users/MyLaptop/Desktop/PenT/Lab Virtual Machines/kali-linux-2018.3-vbox-amd64.ova. Result Code: E_INVALIDARG (0x80070057)https://www.reddit.com/r/virtualbox/comments/bpzdck/failed_to_import_appliancee_invalidarg_0x80070057/
Why e_invalidarg (0x80070057) occurs to your computer? The next section will analyze the possible causes behind this issue. So, you can pay attention to the following content
Why Result Code: E_Invalidarg (0x80070057) Appears
It is vital to know the possible reasons for the error — e_invalidarg 0x80070057. If you just look at the error message, you will not find any clues. The potential causes are found according to the time that the error happens and other signs of the error.
Given to the fact that the e_invalidarg (0x80070057) error appears when Windows cannot access the storage drive or a standard hard disk or an SSD, we conclude that the leading reason for the error is inefficient free storage space on the hard drive.
The improper file system on your drive can also be the cause for the result code: e_invalidarg (0x80070057). To be specific, the FAT32 doesn’t support a file that is more than 4GB. In this case, you need to convert the file system of your drive from FAT32 to NTFS.
If there are two or three partitions on the hard drive, the error could happen due to one of corrupted partitions on the drive. The drive or partition can get corrupted over time. Besides, the bit rot will also occur after a long time. For this, you can utilize some tools to check the health and performance of your drive.
What’s more, virus and inherent problems on the installed software can also trigger the result code: e_invalidarg (0x80070057). Except the above causes, other elements can also result in the e_invalidarg (0x80070057) error.
All the above causes are possible for the error, but there’s no exact method to know the actual reason for the issue. So, you can try the following methods one by one until you fix the issue successfully.
Top 7 Solutions to Result Code: E_Invalidarg (0x80070057)
- Obtain enough disk storage space
- Modify the file system of your drive
- Check and change time and date on your PC
- Scan for virus
- Find and fix corrupted drive
- Perform system restore
- Perform Windows clean install
Fix 1: Get Enough Disk Storage Space
If you don’t have enough storage space on your drive, you can get this error when carrying out operations on your PC that runs VirtualBox. In fact, issues like 0x80300024 error and runtime error also happen due to insufficient free disk space.
To get more disk space for your drive, you can utilize MiniTool Partition Wizard. The resize/move partition and extend partition features enable you to obtain more space for your drive. Of course, you can also find what is taking up your space with Space Analyzer that this program offers and then delete the corresponding items.
Download and install MiniTool Partition Wizard by clicking the button below, and then begin resizing and extending your storage space. Here, you just need the MiniTool Partition Wizard Free Edition. If you would like to recover missing data or lost partition, you need to pick its Pro Ultimate Edition instead.
Free Download Buy Now
Steps for resizing and moving partition
Before starting to resize/move your partition, you need to check the location of partition on the hard drive. To resize a partition, you have to ensure that there’s unallocated or free space next to the partition that you are going to resize. If there isn’t, you utilize the extend partition feature instead.
Step 1: Right click the partition to extend and choose the Move/Resize feature from the pop-up menu.
Step 2: In the next window, move the button to resize your partition. Alternatively, you can also enter the exact number behind the Partition Size to resize partition. After that, click OK to save the change.
Tip: You should move the button rightward. If you move leftward, you will shrink the size of your partition.
Step 3: After backing to the main interface, you will view the size and layout of target partition. However, it won’t take effect until you click on Apply to carry out the operation.
Steps for extending partition
Both moving/resizing and extending partition can enlarge your partition. However, extending partition is suggested under the following 2 cases.
- You would like to extend a partition to non-contiguous unallocated or free space.
- There is no unallocated or free space on the hard disk.
Step 1: Right click the target partition, and then select the Extend feature from the elevated menu.
Step 2: Open the drop-down menu behind Take Free Space from to pick a partition or unallocated space that you can take space from. Then, you can move the sliding handle leftwards or rightwards to determine the space volume that you would like to take from the target partition or unallocated space.
Step 3: After that, click OK and then click on Apply on the main interface to execute the operation.
Fix 2: Change the File System of Your Drive
The incorrect file system of the drive can also lead to the virtualbox e_invalidarg error. Hence, one of solutions to the error is to change the file system of your drive. You can do that during the process of formatting your partition, but you may suffer from data loss due to this operation.
What does formatting a hard drive do? You can get the detailed information from this post.
If you use MiniTool Partition Wizard, things are different. It enables you convert FAT32 to NTFS without losing data. How to do? You can follow the steps below after downloading and installing this tool.
Free Download
Step 1: Right click the partition that you want to change the file system and choose Convert FAT to NTFS option.
Step 2: In the next window, click on the Start button. Then, MiniTool Partition will start converting file system automatically.
If you encounter file system error — 2147219196, you can fix it by referring to this guide: 7 Fixes to File System Error – 2147219196 [Fix 3 Works Well]
Fix 3: Check and Modify Time and Date
The wrong date/time combination sometimes will sparkle the e_invalidarg (0x80070057) error. Though this possibility is small, you’d better try to check the time and data on your computer.
For instance, the battery on your motherboard that is used to keep the BIOS working is low on power or cannot work properly, which can make your computer date/time reset to its default value each time you turn off your PC.
There’s no doubt that the default time is a value not matched with the current date/time. And this will lead to issues like result code: e_invalidarg (0x80070057) for you. How to check and change time and date? This post will show you the details.
If there are any viruses or malware on your PC, e_invalidarg (0x80070057) may also happen to you. Here comes the need of running an anti-virus program on your computer. If you have installed one, just run it to scan for virus and other malicious software on your device. If you don’t have, you can choose one piece of antivirus software to do that job.
If you want to make sure that your system is clean, you can use these methods to clean up your computer.
Fix 5: Find and Fix Corrupted Drive
When the drive gets corrupted or damaged, you will also encounter various of issues such as 0x80070017, xlive.dll missing error, SFC Scannow failed to fix error, result code: e_invalidarg (0x80070057), and so forth.
Therefore, it is necessary to check the heath of you hard drive. How to do? Well, MiniTool Partition Wizard helps again. It can scan for bad sectors on your hard drive.
Free Download
If you find any, you are able to fix it. Here’s a full guide for you to check your hard drive and fix the error.
If your hard drive cannot work completely, you can consider replacing it with a new one.
Fix 6: Perform System Restore
The Windows built-in system restore feature is very helpful when you encounter certain types of crashes and some computer problems, because it can help you restore your computer to a previous state. In this way, your PC will run properly again. This is a quick fix.
Top recommendation: Why Does My Computer Keeps Crashing? Here Are Answers and Fixes
However, you will lose the changes that you have made on your computer such as, the newly installed applications, newly created folders, etc. So, you need to back up your important data before performing the system restore. After that, you can follow the steps in this post to restore computer to earlier data in Windows 10/8/7.
Fix 7: Clean Install Windows OS
If you cannot fix the result code: e_invalidarg (0x80070057) error after trying methods above, try performing a clean install of Windows. Similarly, you’d better back up your important data on the hard drive before that.
Then, you can use these detailed steps and instructions to reinstall Windows operating system.
I fixed the result code: e_invalidarg (0x80070057) error with methods offered by this post. Are you still bothered by this issue? You can try the methods in the post to fix it. Click to Tweet
Conclusion
When you receive the error message “failed to import appliance result code: e_invalidarg (0x80070057)” on your computer, you can use the top 7 methods in this post to fix it. It is rather easy to operate as the detailed steps have been offered to you directly or related links.
If you have any questions about MiniTool software, please send us an email via [email protected]. You can also share your thoughts on the topic — virtualbox e_invalidarg, e_invalidarg 0x80070057 in the below comment area.
Содержание
- Что делать, если при подключении OVA-файла в VirtualBox выдает ошибку «Не удалось импортировать конфигурацию виртуальной машины»
- Извлечение VMDK-файла и подключение его к WM
- Как быть, если WM при запуске падает в BSOD
- virtualbox.org
- Error importing .OVA file
- Error importing .OVA file
- Re: Error importing .OVA file
- Re: Error importing .OVA file
- Re: Error importing .OVA file
- Re: Error importing .OVA file
- Re: Error importing .OVA file
- Re: Error importing .OVA file
- Re: Error importing .OVA file
- Re: Error importing .OVA file
- Re: Error importing .OVA file
- Re: Error importing .OVA file
- Re: Error importing .OVA file
- Re: Error importing .OVA file
- Re: Error importing .OVA file
- Re: Error importing .OVA file
- virtualbox.org
- Importing .ova file error
- Importing .ova file error
- Re: Importing .ova file error
- Re: Importing .ova file error
- Re: Importing .ova file error
- Re: Importing .ova file error
- Re: Importing .ova file error
- Re: Importing .ova file error
- Re: Importing .ova file error
- Re: Importing .ova file error
- Re: Importing .ova file error
- Re: Importing .ova file error
- Re: Importing .ova file error
- Re: Importing .ova file error
- Re: Importing .ova file error
- Re: Importing .ova file error
- virtualbox.org
- [Solved] Error importing .ova file
- [Solved] Error importing .ova file
- Re: [Solved] Error importing .ova file
- Re: [Solved] Error importing .ova file

При установке операционных систем на виртуальную машину обычно используются загрузочные образы ISO , но в интернете также можно встретить пакеты OVA , представляющие собой настроенные виртуальные ОС, особым образом подготовленные для использования на популярных гипервизорах. Формат OVA также используется при экспорте установленных на виртуальных машинах систем в файл архива для последующего переноса виртуальной ОС на другой компьютер или совместимый гипервизор.
К сожалению, подключение такой «законсервированной» виртуальной системы не всегда проходит гладко. В ряде случаев при выполнении операции импорта вы можете получить ошибку «Не удалось импортировать конфигурацию виртуальной машины» . Причины неполадки могут быть разные, начиная от банального повреждения контейнера OVA и заканчивая несовместимыми параметрами конфигурации импорта.
Если файл OVA был скачан вами в интернете, скажем, на торрент-трекере, получите его контрольную сумму и сверьте ее с той, которая выложена на странице. Несовпадающий хэш будет означать, что файл, скорее всего, поврежден. А еще это будет означать, что импортировать такую систему не получится. Импортировать машину не удастся, если вы попытаетесь развернуть ее на раздел или носитель с файловой системой FAT32 при условии, что подключаемый контейнер весит 4 Гб или больше того.
Иное дело несовместимые параметры конфигурации импорта. Вполне возможно, что выложивший в интернет OVA-файл создавал его на более мощном, чем у вас, компьютере, выбрав слишком большой объем ОЗУ или количество ядер процессора, недопустимое при создании виртуальной машины на вашем ПК. Может быть и такое, что OVA-файл, созданный в одной версии VirtualBox, не подключается в другой версии, старой или новой. В первом случае можно попробовать изменить параметры импорта конфигураций вручную.
Также можно прибегнуть к более универсальному способу — извлечению из OVA-контейнера файла виртуального жесткого диска и создания на его основе новой WM.
Извлечение VMDK-файла и подключение его к WM
Первым делом вам нужно будет распаковать контейнер OVA. Для этих целей сгодится любой архиватор с поддержкой TAR , хотя бы тот же WinRAR. Откройте в архиваторе каталог с файлом OVA , кликните по нему ПКМ и выберите в меню «Показать содержимое архива».
Затем выделите содержащийся в архиве файл VMDK .
И извлеките его в удобное для вас расположение.
Получив файл виртуального диска, создайте в VirtualBox новую машину, указав, как положено ее имя, разрядность и объем оперативной памяти. Маленькая деталь — в окне «Жесткий диск» нужно включить опцию «Не подключать виртуальный жесткий диск».
Далее заходим в настройки виртуальной машины, в разделе «Носители» жмем кнопку добавления виртуального диска.
И подключаем к текущему контроллеру ранее извлеченный файл VMDK .
Сохраняем настройки и запускаем виртуальную машину.
Как быть, если WM при запуске падает в BSOD
Есть вероятность, что запуск подключенной виртуальной машины завершится ошибкой с последующим ее вылетом в BSOD .
Такое может быть, если тип контроллера в VirtualBox отличается от того, на котором виртуальный диск висел раньше. Например, он был подключен к SATA, а у вас стоит IDE или наоборот. Отсюда решение — необходимо переподключиться, добавив в разделе «Носители» новый тип контроллера SATA, SCSI или IDE и повесив на него виртуальную ОС.
Нерабочий контроллер удаляем.
На этот раз система должна загрузиться без ошибок.
Источник
virtualbox.org
End user forums for VirtualBox
- Board index‹General‹Using VirtualBox
- Change font size
- Print view
- FAQ
- Login
Error importing .OVA file
Error importing .OVA file
by olibleu » 20. Jul 2013, 21:47
I have searched for a solution to this problem for a while now, but I didn’t find any.
On an Ubuntu 13.04 host, I exported a few VMs in a OVA file. Now I’m trying to import them on a Windows 8 host, and I get this error:
Code: Select all Expand viewCollapse view 0%. 10%.
Progress state: E_FAIL
VBoxManage.exe: error: Appliance import failed
VBoxManage.exe: error: Internal inconsistency looking up disk image ‘vmdisk10’
VBoxManage.exe: error: Details: code E_FAIL (0x80004005), component Appliance, interface IAppliance
VBoxManage.exe: error: Context: «int __cdecl handleImportAppliance(struct HandlerArg *)» at line 781 of file VBoxManageAppliance.cpp
I looked around the web a lot, and there is no solution to this problem apparently. I don’t need to recover all of the VMs, but a few of them are important. Is there a way with VBoxManage to recover a subset of the machines in an OVA package ? VBoxManage official documentation (chapter 8 ) doesn’t say much about this, and it is hard to find information on the structure of OVA files. I don’t mind having to unzip and recover (and eventually, repair) manually vmdk and XML files. As I said, there are 1 or 2 VMs that I really need to recover.
Thanks for your time!
Re: Error importing .OVA file
by loukingjr » 21. Jul 2013, 01:03
Re: Error importing .OVA file
by Perryg » 21. Jul 2013, 01:14
Re: Error importing .OVA file
by loukingjr » 21. Jul 2013, 01:17
Re: Error importing .OVA file
by loukingjr » 21. Jul 2013, 02:07
Re: Error importing .OVA file
by Perryg » 21. Jul 2013, 02:17
Re: Error importing .OVA file
by loukingjr » 21. Jul 2013, 02:22
Re: Error importing .OVA file
by Perryg » 21. Jul 2013, 02:29
Re: Error importing .OVA file
by loukingjr » 21. Jul 2013, 02:31
well I wouldn’t use .ova files myself.
edit: It just seems that since VirtualBox allows you to create an .ova file and with more than one VM, it should be able to import them otherwise why have the function at all? and there is a problem just creating new machines and attaching the .vdmk files. when you create the .ova files it renames the .vdis so you have no idea which .vdmk file went with which guest or what the settings were for each.
Re: Error importing .OVA file
by Perryg » 21. Jul 2013, 03:04
I don’t have any more to add. If the originals are not available this is the best to try to recover the guest if it is important. Otherwise you need to file a ticket at bugtracker
I have not looked at that part of the code since we were able to move guests around easily since they are all self contained and we can just add the critters.
Re: Error importing .OVA file
by loukingjr » 21. Jul 2013, 03:06
Re: Error importing .OVA file
by loukingjr » 21. Jul 2013, 03:10
Re: Error importing .OVA file
by lcl_l10 » 27. Aug 2013, 19:56
I ran into this same exact problem today. It would import the first vmdisk then fail on the second no matter what.
You can extract the ova like mentioned above, then make a separate copy of the ovf for each VM.
Find and remove all the disks that do not got with the VM
Find and remove all the disks that do not got with the VM
Lastly find lcl_l10 Posts: 1 Joined: 27. Aug 2013, 19:49
Re: Error importing .OVA file
by macuisdein » 25. Nov 2013, 18:16
Re: Error importing .OVA file
by andrewcooke » 26. Nov 2013, 14:21
Источник
virtualbox.org
End user forums for VirtualBox
- Board index‹General‹VirtualBox on Windows Hosts
- Change font size
- Print view
- FAQ
- Login
Importing .ova file error
Importing .ova file error
by Charej » 19. Sep 2020, 19:37
I am trying to import an .ova file into a new box. I am using version 6.0.24, and every time I try to import I get an error message that says
Failed to import appliance with the details giving a results code of E_INVALIDARG (0x80070057)
I have tried to import directly from the Oracle VM VirtualBox Manager, I have also tried to import by clicking on the .ova file directly, I have deleted the failed import VMs between the two attempts, and still no joy.
I have edited the appliance on the import dialog to reduce the cores to 1 and memory to 1000 in case the new host box cannot handle the size and still failed.
Please help. I don’t know what I should attempt next.
Edit: Details to add
Host machine Windows 10 pro 64bit
Guest machine Windows 7 pro 64bit
Re: Importing .ova file error
by scottgus1 » 19. Sep 2020, 20:14
Re: Importing .ova file error
by Charej » 19. Sep 2020, 20:31
Re: Importing .ova file error
by scottgus1 » 19. Sep 2020, 20:43
One of those errors, VERR_VD_VMDK_INVALID_FORMAT, implies that Virtualbox cannot make sense of the contents of the OVA, because the file is corrupted.
As a test, install a fresh working guest, then export it and import it. If this process works, it indicates your Virtualbox is working, and the problem is in the OVA.
Re: Importing .ova file error
by Charej » 19. Sep 2020, 20:46
Re: Importing .ova file error
by Charej » 20. Sep 2020, 03:16
That did the trick. Not sure when that file was corrupted, it has been my backup for a while. I have installed from it before, but apparently you were correct and that was the issue.
Thank you so much for your rapid response.
Re: Importing .ova file error
by scottgus1 » 20. Sep 2020, 14:47
Glad you are up and running!
BTW Exporting isn’t recommended for backing up a VM. Export changes some guest settings, and a change in the guest means there’s no way to confirm the backup. UUIDs are changed too, which upends activation.
A simple file-copy of the guest folder, with the guest .vbox file, Snapshots and Logs folders, and the guest virtual disk file(s), is the best way to back up a guest. The copy can be ‘FC’ file-compared on local backup media, or hashed for offsite media, to confirm the copies. The guest OS should be fully shut down, not save-stated.
Re: Importing .ova file error
by Charej » 21. Sep 2020, 18:17
Re: Importing .ova file error
by scottgus1 » 21. Sep 2020, 23:46
A direct file copy keeps the old UUIDs, so activation should remain set. Note that if you ever decide to run these VMs more than one at a time you will need licenses for each simultaneous VM.
Re: Importing .ova file error
by Charej » 24. Sep 2020, 23:26
Re: Importing .ova file error
by scottgus1 » 25. Sep 2020, 00:11
Re: Importing .ova file error
by Charej » 25. Sep 2020, 00:20
Re: Importing .ova file error
by Charej » 28. Sep 2020, 18:19
Re: Importing .ova file error
by scottgus1 » 28. Sep 2020, 18:28
Re: Importing .ova file error
by Charej » 28. Sep 2020, 18:36
Failed to open virtual machine located in . etc.
A differencing image of snapshot could not be found. Could not find an open hard disk with UUID. plus a bunch of other data inside brackets.
Источник
virtualbox.org
End user forums for VirtualBox
- Board index‹General‹VirtualBox on Linux Hosts
- Change font size
- Print view
- FAQ
- Login
[Solved] Error importing .ova file
[Solved] Error importing .ova file
by orhank » 13. Nov 2015, 15:50
I was trying to import a WindozeXP .ova file into VB, but I always encountered an error which effectively said that «element in OVF contains a medium attachment for the disk image but the OVF describes no such image» followed by the UUID of the missing image.
This is what I did:
- Make a backup of the .ova file, just in case
- Rename the .ova extension to .tar
- Open the .tar file, extract the .ovf. and .vmdk files it contains
- Edit the .ovf file in gedit and remove the line that says: , the offending UUID in the error message
- Save the .ovf file
- In VB, File, Import Appliance and browse to the corrected .ovf file
Worked like a charm.
Re: [Solved] Error importing .ova file
by Radaway » 5. Jul 2019, 17:50
Re: [Solved] Error importing .ova file
by socratis » 5. Jul 2019, 18:19
@Radaway
I highly doubt that ‘orhank’ is going to reply to you, hasn’t visited for over a year.
In any event, it’s not a good idea to reply to a 4-year old thread, especially when you have a different problem (from what it seems). Please open a new thread and give a lot more details about your setup/situation, because I’m locking this one.
Источник
Процесс импорта программой VirtualBox машин, экспортированных нами ранее или скачанных в Интернете, увы, не всегда проходит успешно. И иногда мы можем столкнуться с ошибкой типа «Не удалось импортировать конфигурацию виртуальной машины». Ниже поговорим о том, что может привести к такой ошибке импорта, а также рассмотрим универсальный способ решения этой проблемы.
Не удалось импортировать конфигурацию виртуальной машины VirtualBox: решение
Рабочие виртуалки VirtualBox вместе с их настройками и содержимым виртуального жёсткого диска можно экспортировать в универсальный файл конфигурации формата OVA, а затем импортировать его после переустановки основной Windows, на другом компьютере или на другом гипервизоре. С механизмом экспорта-импорта с участием формата OVA работают программы VirtualBox, VMware Workstation, а при дополнительных усилиях — ещё и Hyper-V. Готовые виртуальные машины в Интернете обычно выкладывают именно в формате OVA.
В идеале механизм импорта в программе VirtualBox прост: выбираем «Импорт конфигураций», указываем путь к файлу OVA, жмём «Далее».

При необходимости меняем кое-какие настройки и жмём «Импорт».

И через какое-то время можем уже запускать виртуалку.

Но это так в идеале. Что может препятствовать этому процессу?
Причины ошибки импорта виртуальных машин VirtualBox
Сообщением типа «Не удалось импортировать конфигурацию виртуальной машины» процесс импорта может завершиться банально из-за проблем с файлом OVA (если он повреждён) или из-за нехватки места на диске, куда распаковывается виртуальная машина. Если с самим OVA всё в порядке, при возникновении такой проблемы можно попытаться извлечь виртуалку на другой раздел диска. Или на исходный, только после очистки системной корзины. Можно даже попробовать дефрагментировать такой раздел (если, конечно же, это раздел HDD).
У раздела диска, куда распаковывается импортируемая машина, естественно, должна быть файловая система NTFS. На раздел с FAT32 не запишется файл виртуального жёсткого диска в составе машины, который обычно весит больше 4 Гб.
Если мы говорим о виртуалке, скачанной с Интернета, нужно тщательно проверить параметры импорта. Возможно, тот, кто её экспортировал, работал на более мощном компьютере и указал большой объём оперативной памяти или слишком много ядер процессора.
Но часто, друзья, бывает так, что в одной версии VirtualBox не хочет осуществлять импорт, а в другой, к примеру, в более старой версии – делает это без каких-либо проблем.
За исключением случаев порченного OVA и раздела с FAT32 решить проблему ошибки импорта виртуальной машины можно путём извлечения из OVA файла виртуального жёсткого диска и формирования на его базе новой машины.
Создание новой виртуальной машины VirtualBox на базе виртуального диска из файла OVA
Создание новых машин на базе файлов виртуальных жёстких дисков – это более удобный, чем экспортирование в формат OVA, способ восстановления виртуалок. Особенно, если их много. Кто активно работает с гипервизорами, обычно больше привязан к виртуальным дискам машин, а не к их конфигурации. Такие пользователи прекрасно знают, какие настройки виртуалок они используют. И им проще создать новую машину на базе имеющегося виртуального диска, чем возиться с созданием увесистого файла экспорта OVA.
Но где взять диск виртуальной машины, если последняя, например, в формате OVA скачана с Интернета? Друзья, OVA – это контейнер архива TAR, его содержимое можно увидеть и извлечь какую-то часть данных с помощью программ 7-zip, WinRAR или любого иного архиватора, который поддерживает формат архивов «.tar». Этими частично извлечёнными данными и станет виртуальный жёсткий диск, на базе которого мы создадим новую виртуалку. Что же, поехали.
Примечание: друзья, каталогом хранения содержимого виртуальных машин в программе VirtualBox по умолчанию является папка на системном диске. И чтобы не захламлять диск С, рекомендую вам отвести под работу с виртуалками специальную папку на несистемном каком-нибудь разделе. Или даже выделить под это целый раздел, например, самый быстрый по результатам тестирования скорости чтения и записи данных, если мы говорим об HDD. Путь хранения данных виртуалок можно прописать в общих настройках программы, чтобы каждый раз при создании новой машины не отвлекаться на смену пути по умолчанию.

Этап 1. Создание новой машины
В окне VirtualBox создаём новую машину.

Называем её, указываем версию Windows, задаём показатель оперативной памяти. В графе «Жёсткий диск» выставляем пункт «Не подключать виртуальный жёсткий диск». Жмём «Создать».

И пока сворачиваем окно VirtualBox.
Этап 2. Работа с архиватором
Теперь, друзья, с помощью архиватора нам нужно извлечь из OVA виртуальный жёсткий диск.
Примечание: если вы скачали виртуалку с Интернета в архиве RAR, ZIP и т.п, не забудьте распаковать такой архив путём обычной разархивации, чтобы на выходе получился именно контейнер OVA.

Запускаем архиватор. Я буду использовать классику жанра – программу WinRAR. Открываем наш OVA в окне архиватора с помощью меню «Файл — Открыть». Важно: архиваторы по умолчанию могут отображать не все поддерживаемые типы архивов. Чтобы OVA был виден в меню обзора для открытия, необходимо указать тип отображаемых данных «Все файлы».

После успешного открытия в окне архиватора увидим содержимое OVA. В моём случае это файл конфигурации виртуальной машины OVF и совместимый с VirtualBox и VMware Workstation файл виртуального жёсткого диска VMDK. Последний нам-то и нужен. Кликаем его, вызываем контекстное меню и в случае с WinRAR выбираем пункт меню «Извлечь в указанную папку». В архиваторе 7-zip используем пункт контекстного меню «Копировать в…».

Файл виртуального диска для удобства можем распаковать в папку хранения созданной нами на предыдущем этапе новой виртуалки.

Таким образом все её составляющие будут аккуратненько сосуществовать в одном месте.

Теперь возвращаемся к программе VirtualBox.
Этап 3. Подключение виртуального жёсткого диска
На первом этапе мы создали машину без жёсткого диска. Выделяем её и жмём кнопку настроек.

В окошке настроек идём в раздел «Носители», жмём кнопку контроллера SATA и добавляем новый жёсткий диск из числа существующих.

Указываем путь хранения файла, который мы извлекали с помощью архиватора на предыдущем этапе.

Жмём «Ок».

Всё – машина настроена. Можем запускать её.

Если при запуске Windows появляется BSOD
Если запуск виртуалки прошёл успешно, однако на этапе запуска Windows возникли проблемы в виде синего экрана смерти, возможно, друзья, мы имеем дело с проблемой контроллера виртуального жёсткого диска. Это мелкий недостаток способа создания новой машины на базе извлечённого из OVA файла диска. Когда мы импортируем машину вместе с её конфигурацией, в этой конфигурации предусматривается нужный тип контроллера. Когда же эту конфигурацию мы формируем по новой, мы можем указать не тот тип контроллера. А Windows даже в актуальной версии 10 пока ещё не умеет на ходу менять драйверы контроллера носителей. И вот реагирует экраном смерти.

Для скачанных с ресурсов Microsoft готовых виртуальных машин подойдёт установленный по умолчанию в VirtualBox тип контроллера SATA. Если мы скачаем виртуалку с Windows, в среде которой установлены драйверы под тип контроллера IDE, но подключим его через контроллер SATA, операционная система в большинстве случаев запустится. Но вот если мы на каком-нибудь сайте в Интернете скачаем машину, где Windows установлена на виртуальный диск, подключённый через контроллер SCSI, с большой долей вероятности получим BSOD. Или наоборот: BSOD будем лицезреть при подключении через SCSI виртуального диска с Windows, которая устанавливалась на виртуалке с типом контроллера SATA или IDE.
В таком случае просто нужно переподключить виртуальный диск через другой тип контроллера. Необходимо вернуться в раздел настроек машины «Носители», удалить диск из числа устройств текущего контроллера, затем добавить новый тип контроллера (SCSI, SATA или IDE).

И подключить диск уже через новый контроллер.
Содержание
- virtualbox.org
- Windows 10 — Import E_INVALIDARG 0x80070057
- Windows 10 — Import E_INVALIDARG 0x80070057
- Re: Windows 10 — Import E_INVALIDARG 0x80070057
- Re: Windows 10 — Import E_INVALIDARG 0x80070057
- Re: Windows 10 — Import E_INVALIDARG 0x80070057
- Re: Windows 10 — Import E_INVALIDARG 0x80070057
- Re: Windows 10 — Import E_INVALIDARG 0x80070057
- Re: Windows 10 — Import E_INVALIDARG 0x80070057
- Re: Windows 10 — Import E_INVALIDARG 0x80070057
- Re: Windows 10 — Import E_INVALIDARG 0x80070057
- virtualbox.org
- [Solved] error importing .ova E_INVALIDARG 0x80070057
- [Solved] error importing .ova E_INVALIDARG 0x80070057
- Re: error importing .ova E_INVALIDARG 0x80070057
- Re: error importing .ova E_INVALIDARG 0x80070057
- Re: error importing .ova E_INVALIDARG 0x80070057
- Re: error importing .ova E_INVALIDARG 0x80070057
- VirtualBox — can’t import or export, error rc=0x80070057
- Files
- virtualbox.org
- [Solved] error importing .ova E_INVALIDARG 0x80070057
- [Solved] error importing .ova E_INVALIDARG 0x80070057
- Re: error importing .ova E_INVALIDARG 0x80070057
- Re: error importing .ova E_INVALIDARG 0x80070057
- Re: error importing .ova E_INVALIDARG 0x80070057
- Re: error importing .ova E_INVALIDARG 0x80070057
- Here is everything you need to know about E_Invalidarg (0x80070057) Error
- How To Fix The Error?
- 1. Clean Up Your Disks
- 2. Format Hard Drive And Change Its File System
- 3. Examine Time/Date Preferences
- 4. Check For Virus
- 5. Restore Windows
- 6. Reinstall Windows
- How To Protect or Recover Your Data
virtualbox.org
End user forums for VirtualBox
- Board index‹General‹VirtualBox on Windows Hosts
- Change font size
- Print view
- FAQ
- Login
Windows 10 — Import E_INVALIDARG 0x80070057
Windows 10 — Import E_INVALIDARG 0x80070057
by Gavo_4444 » 6. Jan 2020, 12:16
I am having issue importing an appliance into the Virtual Box and I am using Windows 10 64 Bit, and I keep getting the Error E_INVALIDARG 0x80070057.
I have tried this now on two different Windows 10 Machines with the same result.
Screen shots attached,
Re: Windows 10 — Import E_INVALIDARG 0x80070057
by mpack » 6. Jan 2020, 12:43
Re: Windows 10 — Import E_INVALIDARG 0x80070057
by Gavo_4444 » 12. Jan 2020, 13:02
Re: Windows 10 — Import E_INVALIDARG 0x80070057
by mpack » 12. Jan 2020, 13:45
Re: Windows 10 — Import E_INVALIDARG 0x80070057
by Gavo_4444 » 16. Jan 2020, 08:39
Re: Windows 10 — Import E_INVALIDARG 0x80070057
by mpack » 16. Jan 2020, 12:18
Personally I would just give up at this point and unpack the OVA manually (it’s just a tar archive). Note that the VMDK embedded in an OVA is compressed, so don’t try to use it in a VM — use VBoxManage to clone it to VDI format first. I.e.
Code: Select all Expand viewCollapse view VBoxManage clonemedium —format VDI
Then create a VM around the VDI. The .OVF file unpacked from the OVA should give you a hint about the VM recipe.
Final step would be to move the VDI into the VM folder so that the VM has the expected layout. I see that File|Virtual Media Manager has a Move.. function for VDIs.
Re: Windows 10 — Import E_INVALIDARG 0x80070057
by Gavo_4444 » 17. Jan 2020, 21:54
Please see below, my apologies I am a newbie and trying my best to understand. and thanks for the help.
C:Program FilesOracleVirtualBox>VBoxManage clonemedium «C:UsersgavoVirtualBox VMsPyImageSearch — Practical Python and OpenCV 4th Edition» «Pyimage» —format VDI
VBoxManage.exe: error: Permission problem accessing the file for the medium ‘C:UsersgavoVirtualBox VMsPyImageSearch — Practical Python and OpenCV 4th Edition’ (VERR_ACCESS_DENIED)
VBoxManage.exe: error: Details: code VBOX_E_FILE_ERROR (0x80bb0004), component MediumWrap, interface IMedium, callee IUnknown
VBoxManage.exe: error: Context: «OpenMedium(Bstr(pszFilenameOrUuid).raw(), enmDevType, enmAccessMode, fForceNewUuidOnOpen, pMedium.asOutParam())» at line 191 of file VBoxManageDisk.cpp
Re: Windows 10 — Import E_INVALIDARG 0x80070057
by mpack » 18. Jan 2020, 13:21
Quite obviously, «C:UsersgavoVirtualBox VMsPyImageSearch — Practical Python and OpenCV 4th Edition» is not the name of a VMDK file, and «Pyimage» is not a suitable name for a VDI either (it needs a .vdi extension).
Did you unpack the OVA? As I mentioned, it’s just a tar archive, so rename the .OVA to give it a .tar extension, and then unpack it using whatever your favorite archiving tool is (WinRar, WinZip, 7zip etc (*)). That will give you the individual files from the archive, including the compressed .vmdk which you convert to VDI.
(*) If you need to get an archiving tool then I suggest that it isn’t WinZip. I used WinZip for many years, but Corel bought it and turned it into bloatware with a crappy touch style interface.
Re: Windows 10 — Import E_INVALIDARG 0x80070057
by jc9301 » 22. Oct 2020, 02:21
I am having the same issue, and the same, I have enough space in my disk for this VM, and have 16GB of RAM in my computer
I tried the solution suggested, to unpack the OVA, I follow the following steps:
1) Change the extension .ova to .tar
2) Unzip the .tar
3) I have all the individual files, .mf, .ovf and .vmdk
4) Convert .vmdk to .vdi -> These step fails
I am not able to convert the .vmdk to .vdi, I got this error:
Источник
virtualbox.org
End user forums for VirtualBox
- Board index‹General‹VirtualBox on Windows Hosts
- Change font size
- Print view
- FAQ
- Login
[Solved] error importing .ova E_INVALIDARG 0x80070057
[Solved] error importing .ova E_INVALIDARG 0x80070057
by raymundo.mota » 28. Nov 2019, 19:00
Any ideas how to solve this.
thanks for your help
Re: error importing .ova E_INVALIDARG 0x80070057
by scottgus1 » 28. Nov 2019, 20:07
Seems this OVA was already imported?
If you want a copy of an existing guest, clone the existing guest. Full clone will give you a completely independent guest. You will have to change network names, static IP addresses, etc.
Re: error importing .ova E_INVALIDARG 0x80070057
by raymundo.mota » 28. Nov 2019, 20:53
Hello thanks for replying
I created a new vm using the exported .vdi. When i try to run it this message is displayed
Fallo al abrir una sesión para la máquina virtual OraclePWC.
UUID <35a31028-1308-4492-91e5-1e6da9a30370>of the medium ‘C:Usershhese930VirtualBox VMsOIG_11.1.2.3_OracleLinux5OIG_11.1.2.3_OracleLinux5-disk001.vdi’ does not match the value <88a39eb3-5a3b-4233-9e7d-087850aa974e>stored in the media registry (‘C:Usershhese930.VirtualBoxVirtualBox.xml’).
Código resultado: E_FAIL (0x80004005)
Componente: MediumWrap
Interfaz: IMedium
I attached the VirtualBox.xml
What should I do?
Re: error importing .ova E_INVALIDARG 0x80070057
by raymundo.mota » 28. Nov 2019, 21:05
Ok I manged to make it run.
But on startup it hangs.
Re: error importing .ova E_INVALIDARG 0x80070057
by socratis » 28. Nov 2019, 22:11
Then I’ll mark the thread as [Solved].
That’s another problem and we like to observe the «One issue, one thread» rule.
Please open a new thread with a matching title to describe your new problem. And please read the following: Minimum information needed for assistance.
Источник
VirtualBox — can’t import or export, error rc=0x80070057
I just added the VirtualBox plugin to my OMV 4.1.12 machine in order to run a small Debian x64 VM. It seems ok but I can’t import or export anything.
Initially, I wanted to move a VM over from a VMWare server that I want to shut down, but VirtualBox wouldn’t import the OVF, gave ‘VirtualBox error: rc=0x80070057’. So I created a new VM and installed Debian 9.5 from scratch; that’s up and running fine, but now I want to make a backup copy of it. I shut down the VM and tried to export it, but hit the same error ‘VirtualBox error: rc=0x80070057’. 
I’ve attached the full error output (it’s too big for a forum post); I can’t work out from it what’s causing the problem, but perhaps someone can.
Has anyone run into problems with VBox on OMV 4?
Files
(12.44 kB, downloaded 423 times, last: Sunday, 10:35 pm )
Weird. I just installed VBox 4.2 on my Windows PC and imported that same VM without any problem. It’s up and running fine there. Tried to export it from the Windows PC and load that OVF into the OMV VBox and it failed with the same error message as previously. There’s definitely something odd about the OMV VBox installation. It’s not permissions on the OVF, I checked those, and I can create VMs locally ok just not import or export.
I don’t know how to fix it. 
I’ve found nothing online that helped.
Further testing shows that:
— VMWare VM will import to VBox on Windows but not on the OMV system;
— VBox VM created in Windows won’t import to OMV VBox;
— VBox on OMV can create a VM but can’t export it.
If I get time, I’ll boot up a physical Ubuntu machine and try to run VBox on that, see what happens. Will have to go looking for a VBox forum to ask on, too — seems like the OMV folks just packaged it up.

No idea of OMV’s VB version but a search in relation to the error pulled this
Raid is not a backup! Would you go skydiving without a parachute?
OMV 6x amd64 running on an HP N54L Microserver
Ok, I got around it, at least the import part.
I copied the VM files from VMWare directly into the VBox VMs folder, then rather than ‘import’, I used ‘Add» to include them in VBox. That worked!
I still can’t export them to take a backup, but that’s a different issue and as they’re sitting on a OMV server, I guess I can just copy the raw files as a crude workaround.
«I used ‘Add» to include them in VBox. That worked!»
Источник
virtualbox.org
End user forums for VirtualBox
- Board index‹General‹VirtualBox on Windows Hosts
- Change font size
- Print view
- FAQ
- Login
[Solved] error importing .ova E_INVALIDARG 0x80070057
[Solved] error importing .ova E_INVALIDARG 0x80070057
by raymundo.mota » 28. Nov 2019, 19:00
Any ideas how to solve this.
thanks for your help
Re: error importing .ova E_INVALIDARG 0x80070057
by scottgus1 » 28. Nov 2019, 20:07
Seems this OVA was already imported?
If you want a copy of an existing guest, clone the existing guest. Full clone will give you a completely independent guest. You will have to change network names, static IP addresses, etc.
Re: error importing .ova E_INVALIDARG 0x80070057
by raymundo.mota » 28. Nov 2019, 20:53
Hello thanks for replying
I created a new vm using the exported .vdi. When i try to run it this message is displayed
Fallo al abrir una sesión para la máquina virtual OraclePWC.
UUID <35a31028-1308-4492-91e5-1e6da9a30370>of the medium ‘C:Usershhese930VirtualBox VMsOIG_11.1.2.3_OracleLinux5OIG_11.1.2.3_OracleLinux5-disk001.vdi’ does not match the value <88a39eb3-5a3b-4233-9e7d-087850aa974e>stored in the media registry (‘C:Usershhese930.VirtualBoxVirtualBox.xml’).
Código resultado: E_FAIL (0x80004005)
Componente: MediumWrap
Interfaz: IMedium
I attached the VirtualBox.xml
What should I do?
Re: error importing .ova E_INVALIDARG 0x80070057
by raymundo.mota » 28. Nov 2019, 21:05
Ok I manged to make it run.
But on startup it hangs.
Re: error importing .ova E_INVALIDARG 0x80070057
by socratis » 28. Nov 2019, 22:11
Then I’ll mark the thread as [Solved].
That’s another problem and we like to observe the «One issue, one thread» rule.
Please open a new thread with a matching title to describe your new problem. And please read the following: Minimum information needed for assistance.
Источник
Here is everything you need to know about E_Invalidarg (0x80070057) Error
If you run VirtualBox on a Windows system, chances are that you have, or may still come across this error — failed to import appliance result code: e_invalidarg (0x80070057). This error usually occurs when Windows is unable to access your system’s storage drive (HDD or SSD), or you have insufficient space on the drive. File systems incompatibility can also cause this error, and malware/virus attacks can be contributing factors, too.
Here you will find out:
- about E_Invalidarg (0x80070057) Error
- how to fix it
- how DiskInternals software can help you
Are you ready? Let’s read!
How To Fix The Error?
Here are few methods that can be helpful and any of them can be your solution.
1. Clean Up Your Disks
First things first, clean up your disks.

This means deleting unnecessary or expired files to get more free storage space.
2. Format Hard Drive And Change Its File System
Since file system format incompatibility can cause this error, it is advisable to format your hard drive and change its file system.

However, formatting your drive will delete everything inside; so, you may need to create a backup first.
3. Examine Time/Date Preferences
Check your system’s date and time, are they correct? If they are not correct, simply change them to the current time and date.
4. Check For Virus
Another possible cause of the result code: e_invalidarg (0x80070057) error is malware/virus attacks.

Run your antivirus software and check for viruses — remove any threat you discover.
5. Restore Windows
Run “System Restore” to get your system to a previously “Good” state. This can possibly fix this error code. To do this, follow the steps below:
Press Windows key + X and select “Settings” from the context menu.

Search for “System Restore” and follow the prompts.
6. Reinstall Windows
If the error persists after trying the methods above, you should try reinstalling Windows OS. However, a clean installation of Windows OS is liable to delete most files from your PC, so you need to create a disk image (backup) before doing that.
How To Protect or Recover Your Data
Most of the methods mentioned above are advanced and may lead to data loss. Thus, there’s a need to create a comprehensive backup of your files before proceeding with the steps. In contrast, if you already tried them out and ended deleting some of your important files, there’s still a way to get back the files.
Whether you’re looking to back up your data or restore deleted data from your Virtual Machines, DiskInternals VMFS Recovery software can help in both aspects. It is professional software that helps to recover data lost due to physical drive issues, RAID array corruption, software failure, malware attack, and human errors.
This software is packed with all the features of DiskInternal’s RAID Recovery, and it can also recover data from all VMFS-formatted drives, VMware vSphere, and ESXi/ESX Servers.
Источник
Windows 10 — Import E_INVALIDARG 0x80070057
- Reply with quote
Windows 10 — Import E_INVALIDARG 0x80070057

- Screen Shot
- Clipboard01.jpg (62.9 KiB) Viewed 63867 times
[attachment=0]Hi All,
I am having issue importing an appliance into the Virtual Box and I am using Windows 10 64 Bit, and I keep getting the Error E_INVALIDARG 0x80070057.
I have tried this now on two different Windows 10 Machines with the same result.
Screen shots attached,
Regards,
Gavo
- Gavo_4444
- Posts: 4
- Joined: 6. Jan 2020, 12:05
- Reply with quote
Re: Windows 10 — Import E_INVALIDARG 0x80070057
![]() by mpack » 6. Jan 2020, 12:43
by mpack » 6. Jan 2020, 12:43
Click on the «Details» button and report the details. Also, you could dispense with the red desktop surround, clip the image down to the important dialogs and give me an unobstructed and higher quality version of that, i.e. PNG format.
- mpack
- Site Moderator
- Posts: 37874
- Joined: 4. Sep 2008, 17:09
- Primary OS: MS Windows 10
- VBox Version: PUEL
- Guest OSses: Mostly XP
- Reply with quote
Re: Windows 10 — Import E_INVALIDARG 0x80070057
![]() by mpack » 12. Jan 2020, 13:45
by mpack » 12. Jan 2020, 13:45
According to my quick search, E_INVALIDARG(0x80070057) usually means that the host drive is too small to accomodate the VM. I was hoping that a detailed view of the error message would give the relevant message and statistics, but apparantly not.
- mpack
- Site Moderator
- Posts: 37874
- Joined: 4. Sep 2008, 17:09
- Primary OS: MS Windows 10
- VBox Version: PUEL
- Guest OSses: Mostly XP
- Reply with quote
Re: Windows 10 — Import E_INVALIDARG 0x80070057
![]() by mpack » 16. Jan 2020, 12:18
by mpack » 16. Jan 2020, 12:18
Personally I would just give up at this point and unpack the OVA manually (it’s just a tar archive). Note that the VMDK embedded in an OVA is compressed, so don’t try to use it in a VM — use VBoxManage to clone it to VDI format first. I.e.
- Code: Select all Expand viewCollapse view
VBoxManage clonemedium <vmdk filename> <vdi filename> --format VDI
Then create a VM around the VDI. The .OVF file unpacked from the OVA should give you a hint about the VM recipe.
Final step would be to move the VDI into the VM folder so that the VM has the expected layout. I see that File|Virtual Media Manager has a Move.. function for VDIs.
- mpack
- Site Moderator
- Posts: 37874
- Joined: 4. Sep 2008, 17:09
- Primary OS: MS Windows 10
- VBox Version: PUEL
- Guest OSses: Mostly XP
- Reply with quote
Re: Windows 10 — Import E_INVALIDARG 0x80070057
![]() by Gavo_4444 » 17. Jan 2020, 21:54
by Gavo_4444 » 17. Jan 2020, 21:54
Please see below, my apologies I am a newbie and trying my best to understand…and thanks for the help…![]()
C:Program FilesOracleVirtualBox>VBoxManage clonemedium «C:UsersgavoVirtualBox VMsPyImageSearch — Practical Python and OpenCV 4th Edition» «Pyimage» —format VDI
VBoxManage.exe: error: Permission problem accessing the file for the medium ‘C:UsersgavoVirtualBox VMsPyImageSearch — Practical Python and OpenCV 4th Edition’ (VERR_ACCESS_DENIED)
VBoxManage.exe: error: Details: code VBOX_E_FILE_ERROR (0x80bb0004), component MediumWrap, interface IMedium, callee IUnknown
VBoxManage.exe: error: Context: «OpenMedium(Bstr(pszFilenameOrUuid).raw(), enmDevType, enmAccessMode, fForceNewUuidOnOpen, pMedium.asOutParam())» at line 191 of file VBoxManageDisk.cpp
- Gavo_4444
- Posts: 4
- Joined: 6. Jan 2020, 12:05
- Reply with quote
Re: Windows 10 — Import E_INVALIDARG 0x80070057
![]() by mpack » 18. Jan 2020, 13:21
by mpack » 18. Jan 2020, 13:21
Quite obviously, «C:UsersgavoVirtualBox VMsPyImageSearch — Practical Python and OpenCV 4th Edition» is not the name of a VMDK file, and «Pyimage» is not a suitable name for a VDI either (it needs a .vdi extension).
Did you unpack the OVA? As I mentioned, it’s just a tar archive, so rename the .OVA to give it a .tar extension, and then unpack it using whatever your favorite archiving tool is (WinRar, WinZip, 7zip etc (*)). That will give you the individual files from the archive, including the compressed .vmdk which you convert to VDI.
(*) If you need to get an archiving tool then I suggest that it isn’t WinZip. I used WinZip for many years, but Corel bought it and turned it into bloatware with a crappy touch style interface.
- mpack
- Site Moderator
- Posts: 37874
- Joined: 4. Sep 2008, 17:09
- Primary OS: MS Windows 10
- VBox Version: PUEL
- Guest OSses: Mostly XP
- Reply with quote
Re: Windows 10 — Import E_INVALIDARG 0x80070057
![]() by jc9301 » 22. Oct 2020, 02:21
by jc9301 » 22. Oct 2020, 02:21
Hi,
I am having the same issue, and the same, I have enough space in my disk for this VM, and have 16GB of RAM in my computer
I tried the solution suggested, to unpack the OVA, I follow the following steps:
1) Change the extension .ova to .tar
2) Unzip the .tar
3) I have all the individual files, .mf, .ovf and .vmdk
4) Convert .vmdk to .vdi -> These step fails
I am not able to convert the .vmdk to .vdi, I got this error:
C:UsersJoseOneDriveEscritorioNew folderprofNew folder>»c:program filesoraclevirtualboxvboxmanage» clonehd prof.vmdk prof_new.vdi —format VDI
0%…10%…20%…
Progress state: VBOX_E_FILE_ERROR
VBoxManage.exe: error: Failed to clone medium
VBoxManage.exe: error: Could not create the clone medium ‘C:UsersJoseOneDriveEscritorioNew folderprofNew folderprof_new.vdi’ (VERR_VD_VMDK_INVALID_FORMAT)
VBoxManage.exe: error: Details: code VBOX_E_FILE_ERROR (0x80bb0004), component MediumWrap, interface IMedium
VBoxManage.exe: error: Context: «enum RTEXITCODE __cdecl handleCloneMedium(struct HandlerArg *)» at line 1071 of file VBoxManageDisk.cpp
What can I do?
Regards
- Attachments
-
- convert.PNG (23.59 KiB) Viewed 51713 times
- jc9301
- Posts: 1
- Joined: 22. Oct 2020, 02:01
Return to VirtualBox on Windows Hosts
Who is online
Users browsing this forum: Google [Bot] and 42 guests
Sometimes, Windows operating system may throw the VirtualBox – Error. This error comes along with the detailed error information “failed to import appliance result code: e_invalidarg (0x80070057)” or something like this. This error annoys many users. Here, MiniTool will talk about this error including its causes and fixes.
About Result Code: E_Invalidarg (0x80070057)
You may frequently encounter errors if you run VirtualBox on your Windows device. One of the most common errors is the result code: e_invalidarg (0x80070057). When you look through Windows-based forums or communities on the Internet, you will find that plenty of users ask favors for this issue.
For instance, a user from Reddit forum posts this error and wants to get some help from others. Here is the detailed information of his post.
Hello All, I get the following error: Failed to import appliance C:/Users/MyLaptop/Desktop/PenT/Lab Virtual Machines/kali-linux-2018.3-vbox-amd64.ova. Result Code: E_INVALIDARG (0x80070057)https://www.reddit.com/r/virtualbox/comments/bpzdck/failed_to_import_appliancee_invalidarg_0x80070057/
Why e_invalidarg (0x80070057) occurs to your computer? The next section will analyze the possible causes behind this issue. So, you can pay attention to the following content
Why Result Code: E_Invalidarg (0x80070057) Appears
It is vital to know the possible reasons for the error — e_invalidarg 0x80070057. If you just look at the error message, you will not find any clues. The potential causes are found according to the time that the error happens and other signs of the error.
Given to the fact that the e_invalidarg (0x80070057) error appears when Windows cannot access the storage drive or a standard hard disk or an SSD, we conclude that the leading reason for the error is inefficient free storage space on the hard drive.
The improper file system on your drive can also be the cause for the result code: e_invalidarg (0x80070057). To be specific, the FAT32 doesn’t support a file that is more than 4GB. In this case, you need to convert the file system of your drive from FAT32 to NTFS.
If there are two or three partitions on the hard drive, the error could happen due to one of corrupted partitions on the drive. The drive or partition can get corrupted over time. Besides, the bit rot will also occur after a long time. For this, you can utilize some tools to check the health and performance of your drive.
What’s more, virus and inherent problems on the installed software can also trigger the result code: e_invalidarg (0x80070057). Except the above causes, other elements can also result in the e_invalidarg (0x80070057) error.
All the above causes are possible for the error, but there’s no exact method to know the actual reason for the issue. So, you can try the following methods one by one until you fix the issue successfully.
Top 7 Solutions to Result Code: E_Invalidarg (0x80070057)
- Obtain enough disk storage space
- Modify the file system of your drive
- Check and change time and date on your PC
- Scan for virus
- Find and fix corrupted drive
- Perform system restore
- Perform Windows clean install
Fix 1: Get Enough Disk Storage Space
If you don’t have enough storage space on your drive, you can get this error when carrying out operations on your PC that runs VirtualBox. In fact, issues like 0x80300024 error and runtime error also happen due to insufficient free disk space.
To get more disk space for your drive, you can utilize MiniTool Partition Wizard. The resize/move partition and extend partition features enable you to obtain more space for your drive. Of course, you can also find what is taking up your space with Space Analyzer that this program offers and then delete the corresponding items.
Download and install MiniTool Partition Wizard by clicking the button below, and then begin resizing and extending your storage space. Here, you just need the MiniTool Partition Wizard Free Edition. If you would like to recover missing data or lost partition, you need to pick its Pro Ultimate Edition instead.
Free Download Buy Now
Steps for resizing and moving partition
Before starting to resize/move your partition, you need to check the location of partition on the hard drive. To resize a partition, you have to ensure that there’s unallocated or free space next to the partition that you are going to resize. If there isn’t, you utilize the extend partition feature instead.
Step 1: Right click the partition to extend and choose the Move/Resize feature from the pop-up menu.
Step 2: In the next window, move the button to resize your partition. Alternatively, you can also enter the exact number behind the Partition Size to resize partition. After that, click OK to save the change.
Tip: You should move the button rightward. If you move leftward, you will shrink the size of your partition.
Step 3: After backing to the main interface, you will view the size and layout of target partition. However, it won’t take effect until you click on Apply to carry out the operation.
Steps for extending partition
Both moving/resizing and extending partition can enlarge your partition. However, extending partition is suggested under the following 2 cases.
- You would like to extend a partition to non-contiguous unallocated or free space.
- There is no unallocated or free space on the hard disk.
Step 1: Right click the target partition, and then select the Extend feature from the elevated menu.
Step 2: Open the drop-down menu behind Take Free Space from to pick a partition or unallocated space that you can take space from. Then, you can move the sliding handle leftwards or rightwards to determine the space volume that you would like to take from the target partition or unallocated space.
Step 3: After that, click OK and then click on Apply on the main interface to execute the operation.
Fix 2: Change the File System of Your Drive
The incorrect file system of the drive can also lead to the virtualbox e_invalidarg error. Hence, one of solutions to the error is to change the file system of your drive. You can do that during the process of formatting your partition, but you may suffer from data loss due to this operation.
What does formatting a hard drive do? You can get the detailed information from this post.
If you use MiniTool Partition Wizard, things are different. It enables you convert FAT32 to NTFS without losing data. How to do? You can follow the steps below after downloading and installing this tool.
Free Download
Step 1: Right click the partition that you want to change the file system and choose Convert FAT to NTFS option.
Step 2: In the next window, click on the Start button. Then, MiniTool Partition will start converting file system automatically.
If you encounter file system error — 2147219196, you can fix it by referring to this guide: 7 Fixes to File System Error – 2147219196 [Fix 3 Works Well]
Fix 3: Check and Modify Time and Date
The wrong date/time combination sometimes will sparkle the e_invalidarg (0x80070057) error. Though this possibility is small, you’d better try to check the time and data on your computer.
For instance, the battery on your motherboard that is used to keep the BIOS working is low on power or cannot work properly, which can make your computer date/time reset to its default value each time you turn off your PC.
There’s no doubt that the default time is a value not matched with the current date/time. And this will lead to issues like result code: e_invalidarg (0x80070057) for you. How to check and change time and date? This post will show you the details.
If there are any viruses or malware on your PC, e_invalidarg (0x80070057) may also happen to you. Here comes the need of running an anti-virus program on your computer. If you have installed one, just run it to scan for virus and other malicious software on your device. If you don’t have, you can choose one piece of antivirus software to do that job.
If you want to make sure that your system is clean, you can use these methods to clean up your computer.
Fix 5: Find and Fix Corrupted Drive
When the drive gets corrupted or damaged, you will also encounter various of issues such as 0x80070017, xlive.dll missing error, SFC Scannow failed to fix error, result code: e_invalidarg (0x80070057), and so forth.
Therefore, it is necessary to check the heath of you hard drive. How to do? Well, MiniTool Partition Wizard helps again. It can scan for bad sectors on your hard drive.
Free Download
If you find any, you are able to fix it. Here’s a full guide for you to check your hard drive and fix the error.
If your hard drive cannot work completely, you can consider replacing it with a new one.
Fix 6: Perform System Restore
The Windows built-in system restore feature is very helpful when you encounter certain types of crashes and some computer problems, because it can help you restore your computer to a previous state. In this way, your PC will run properly again. This is a quick fix.
Top recommendation: Why Does My Computer Keeps Crashing? Here Are Answers and Fixes
However, you will lose the changes that you have made on your computer such as, the newly installed applications, newly created folders, etc. So, you need to back up your important data before performing the system restore. After that, you can follow the steps in this post to restore computer to earlier data in Windows 10/8/7.
Fix 7: Clean Install Windows OS
If you cannot fix the result code: e_invalidarg (0x80070057) error after trying methods above, try performing a clean install of Windows. Similarly, you’d better back up your important data on the hard drive before that.
Then, you can use these detailed steps and instructions to reinstall Windows operating system.
I fixed the result code: e_invalidarg (0x80070057) error with methods offered by this post. Are you still bothered by this issue? You can try the methods in the post to fix it. Click to Tweet
Conclusion
When you receive the error message “failed to import appliance result code: e_invalidarg (0x80070057)” on your computer, you can use the top 7 methods in this post to fix it. It is rather easy to operate as the detailed steps have been offered to you directly or related links.
If you have any questions about MiniTool software, please send us an email via [email protected]. You can also share your thoughts on the topic — virtualbox e_invalidarg, e_invalidarg 0x80070057 in the below comment area.