
Were you trying to upload a file or edit a piece of content on your WordPress site only to be met by a scary red message saying something like, «Updating failed. The response is not a valid JSON response?»

The WordPress invalid JSON response error happens in the new Block Editor (AKA Gutenberg) when something goes wrong on your site. Because it appears when you’re working on content, it can be a frustrating error because it can get in the way of whatever task you’re trying to accomplish.
Thankfully, there are some straightforward steps that you can take to fix this problem and get your site working properly again.
In this post, we’ll briefly explain what the invalid JSON response error means. Then, we’ll share a number of troubleshooting steps you can implement to fix the problem.
If you see «Updating failed. The response is not a valid JSON response,» it will typically appear when you’re working on content in the WordPress Block Editor. In some cases, it can also appear when you’re trying to upload a media file to your site, especially if you’re trying to upload the file directly to a block in the Block Editor.
So, why does it happen?
When you’re working in the Block Editor, the editor is in constant communication with your WordPress site’s server. This «communication» happens behind the scenes, but it’s important to the editor.
One of the «languages» of this communication is JSON, short for JavaScript Object Notation. If something goes wrong with this communication, WordPress will show the «The response is not a valid JSON response» message. It means that the editor failed to get a response to the server or the response wasn’t in a valid JSON format.
Basically, if the editor can’t communicate with the server, it will show this error message instead.
To fix the problem, you essentially need to fix whatever is getting in the way of the communication.
How to Fix the WordPress Invalid JSON Response Error
Now that you know what the JSON response error message means, let’s dig into some troubleshooting steps to fix this problem.
We’ll try to put these in a logical order, so that the first troubleshooting steps are the most likely to fix the problem.
For that reason, we recommend trying these processes in the order that we’ve written them.
Fix your site’s permalinks and .htaccess file.
One of the most common causes of the invalid JSON response error is an issue with your site’s .htaccess file and/or WordPress permalinks.
Thankfully, this is also one of the simplest debugging steps. Here’s all you need to do:
- Go to Settings → Permalinks in your WordPress dashboard.
- Verify that the correct permalink structure is selected — If the correct structure is already selected, you don’t need to change anything.
- Click the Save Changes button. Even if you didn’t change anything, you should still click the save changes button because it will force WordPress to regenerate its rewrite rules.

Now, go back to the editor and see if that fixed the invalid JSON response error.
If you’re still experiencing issues, you can guarantee that your .htaccess file is clean by deleting it and forcing WordPress to generate a new one. Here’s how:
- Connect to your server using an FTP client or cPanel File Manager.
- Find your .htaccess file (it should be in the root folder).
- Download a copy of the file to your computer as a backup (just in case).
- Delete the file from your server.
- Go to Settings → Permalinks in your WordPress dashboard and click Save Changes. This will force WordPress to generate a new, clean .htaccess file.
- Check if the problem is fixed.
Finally, there’s one last potential fix, but it really only applies to advanced WordPress users.
If you’re working in a local development environment via a tool such as XAMPP, you’ll also want to make sure that you’ve properly configured the .htaccess file permissions and enabled mod_rewrite in Apache’s settings. Make sure to restart Apache once you’ve made the changes.
Check your WordPress site URL.
Another common cause of the invalid JSON response error is a problem with your WordPress site URLs.
The problem can arise if your site URLs aren’t correct or if you accidentally put HTTP instead of HTTPS (assuming your site is using an SSL certificate).
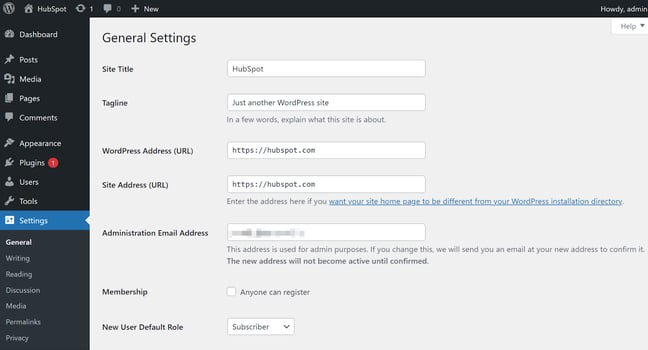
To fix this problem, go to Settings → General in your WordPress dashboard.
You’ll want to verify two things here:
- Make sure that the URLs are correct. On the vast majority of WordPress sites, your WordPress Address and Site Address should be the same.
- Make sure that both URLs start with https if you’re using an SSL certificate on your site.
Then, save your changes.
In very rare cases, your site’s URLs might have been hard-coded into your wp-config.php file. If this is so, any changes that you make via your WordPress dashboard won’t apply because those hard-coded changes will override the dashboard settings.
Again, this is very rare because you need to manually add those hard-coded changes, but it can happen so it might be worth checking. For example, your WordPress developer might have done this for you without letting you know.
Here’s how to check if this is the case:
- Connect to your site’s server using FTP or cPanel File Manager.
- Edit the wp-config.php file.
- Search for define( ‘WP_HOME’ OR define( ‘WP_SITEURL’
Here’s an example of what it might look like:
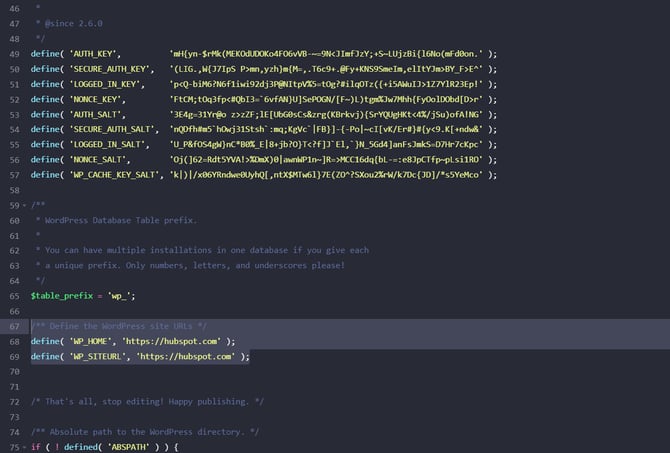
If you do find these code snippets, you can either:
- Verify that both site URLs are correct and leave the code snippets in your wp-config.php file.
- Remove the code snippets, which will tell your site to use the URLs that you set in your WordPress dashboard.
Check for a mixed content warning (HTTPS issue).
If your site is using an SSL certificate (which most sites do nowadays), issues with mixed HTTP and HTTPS content can trigger the invalid JSON response error.
In order for your website to benefit from the security of your SSL certificate, you need to use HTTPS to load every resource on your site. If you still have some resources loading over HTTP, this can trigger something called a mixed content warning and which causes problems with the invalid JSON response error.
In the previous section, you made sure that your WordPress site URLs both start with HTTPS (if you’re using an SSL certificate), which should fix many problems with mixed content already.
However, there could still be issues, especially if you’re using a plugin to handle migrating an older site from HTTP to HTTPS.
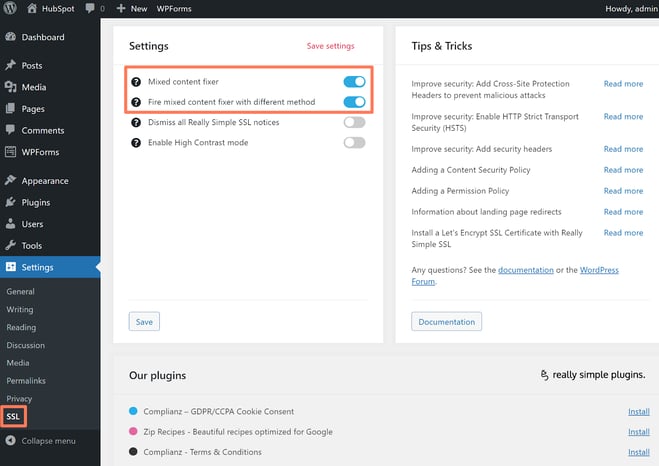
If you’re using a plugin, make sure that you’ve fully enabled its mixed content fixer features. You can do this by going to Settings → SSL and enabling both the Mixed content fixer and the Fire mixed content fixer with different method toggles:
If you’re not using an SSL plugin, many hosts now offer tools to force HTTPS, which you can find in your hosting dashboard or by consulting your host’s documentation.
Finally, if you’re using Cloudflare on your site, make sure that you’ve set its Encryption Mode to Full (Strict) or Full. Try the Strict option first and then switch to just Full if you experience any issues.
Disable your security firewall.
If you use a firewall to protect your WordPress site, this can sometimes interfere with the editor’s connection to your server and trigger the invalid JSON response error.
This is especially common with ModSecurity rules from your web host, though it also might be triggered by popular security plugins.
To troubleshoot this, try deactivating your firewall or security plugin and see if that fixes the problem. If the editor starts working, you know that something is going wrong with your firewall.
Of course, leaving the firewall disabled isn’t a viable long-term strategy, but you at least now know what’s causing the problem and you can start fixing things.
If your firewall is implemented at the hosting level, you can ask your WordPress host to investigate and whitelist the editor to avoid having it trigger the firewall. That way, you can maintain the protection of your site’s firewall while still avoiding the invalid JSON response error.
If you’re using a WordPress security or firewall plugin, you have two options:
- You can replace your existing firewall plugin with a different plugin that protects your site without causing problems.
- You can reach out to the plugin’s developer to ask them about whitelisting to avoid future problems.
If you’re using Wordfence (or another plugin that has a «learning mode»), you can also try reactivating learning mode to reset its firewall rules.
Use a classic editor plugin.
Some people report being able to fix the invalid JSON response error by activating and deactivating the Classic Editor (WordPress’ old, TinyMCE-based editor).
It only takes a couple of minutes, so it’s worth seeing if this trick can fix your problems.
Here’s all you need to do:
- Install the official Classic Editor plugin from WordPress.org.
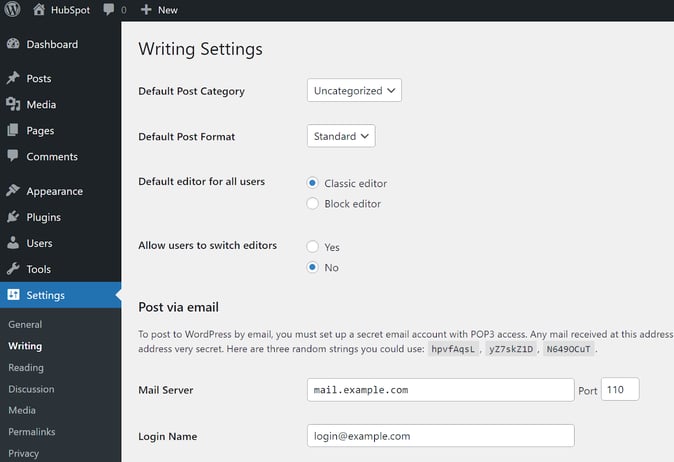
- Go to Settings → Writing and use the drop-down to select the Classic Editor as the default editor for all users.
- Save your changes.
- Use the same drop-down to change the default editor back to the Block Editor.
- Save your changes again.
Now, try creating or editing a new post and see if it works.
Deactivate your WordPress plugins.
Debugging WordPress errors can be tricky because the plugins that you’re using introduce a lot of variables to the equation. With 58,000+ plugins at WordPress.org, that’s a lot of edge cases that could be triggering the invalid JSON response error.
One easy way to figure out if a plugin is causing the problem is to deactivate all of your plugins.
If you’re still seeing the invalid JSON response error after deactivating everything, you can be confident that it’s not an issue with your plugins and you can reactivate them.
On the other hand, if the error goes away after deactivating your plugins, you know that there’s a problem with one of the plugins that you’re using.
To find the problematic plugin, you can reactivate your plugins one by one, making sure to test the editor after each plugin. If you activate a plugin and see the error appear right after that, you’ve found the issue.
From there, you can either replace that plugin with an alternative that doesn’t cause a problem or you can reach out to the plugin’s developer for help and a potential fix.
Upload media files via the Media Library.
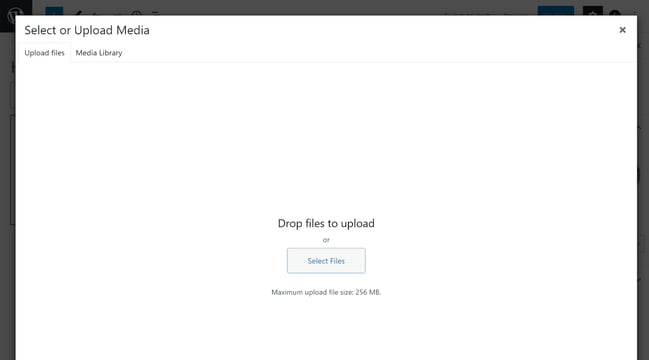
If you’re seeing the «The response is not a valid JSON response» when you try to upload media files via the Block Editor, one fix is to upload these images directly to your Media Library instead of via the block interface.
When you add an image block (or the block for another type of media file), click on the Media Library option and upload files that way instead of just clicking the Upload button.
When you do that, you’ll see the regular WordPress Media Library uploader interface, which should let you bypass the invalid JSON response error.
Check the console and debug log.
For more advanced users, you can try digging into your browser’s console or various debug logs to find a more specific problem. This isn’t really a solution for casual users, though, as you’ll need some technical knowledge to accomplish anything here.
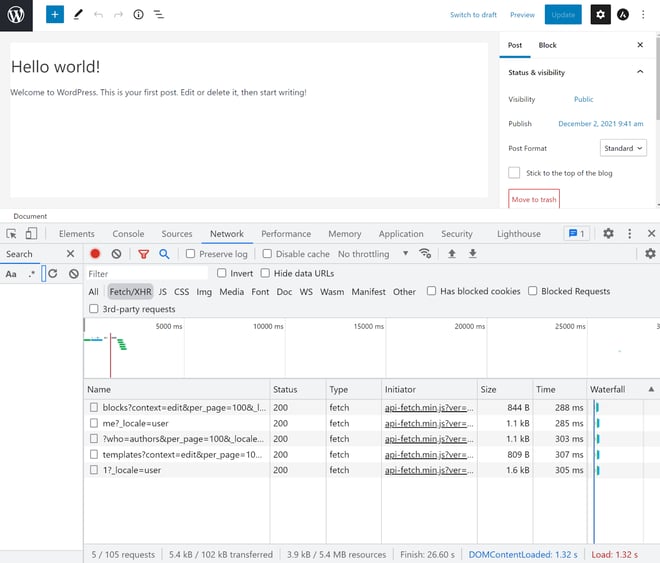
First off, you can use the Network tab in Chrome Developer Tools to find issues with Ajax calls.
In the Network tool, select FETCH/XHR to filter out Ajax calls and debug issues with the REST API.
You can also view some REST API issues from your WordPress dashboard. Go to Tools → Site Health and look for a heading such as «The REST API encountered an unexpected result».
Use the Classic Editor as a short-term fix.
This last method isn’t a permanent fix, but it is a workaround that can help you publish content in a pinch.
Earlier, we told you about the Classic Editor trick where you switch your site to the Classic Editor but then switch back to the Block Editor.
Well, if none of the other tips have worked for you, one way to continue publishing content is to just leave the Classic Editor enabled and use that to create content for the time being.
This isn’t an actual «fix» because you’ll lose all of the functionality that the Block Editor adds. However, it will give you the ability to work on content while you continue debugging the «The response is not a valid JSON response» message.
Additionally, once you get the Block Editor working again, you’ll be able to convert your Classic Editor content into blocks with just a few clicks.
Fixing the WordPress Invalid JSON Response Error
Seeing a «Updating failed. The response is not a valid JSON response» message can be frustrating because it appears while you’re trying to work in the WordPress editor.
Thankfully, for most sites, debugging this error shouldn’t be too painful.
In most situations, simply re-saving your WordPress permalinks should fix the problem. If that doesn’t work, you might need to dig into other fixes such as checking your site URLs, fixing mixed content warnings with HTTPS, adjusting your firewall, and more. Implement these troubleshooting steps and you should have your site functioning properly again in no time.
You may have encountered the “Publishing failed. The response is not a valid JSON response.” issue when attempting to publish or change the pages or articles on your WordPress site. This issue may also have occurred when you uploaded a picture to your WordPress site.
If you do not immediately address this mistake, you may lose all of the modifications you have made over the last several hours. This article will save you from having to deal with it.
There are a lot of different things that might cause these errors to appear on your WordPress site. It may have something to do with your website’s web server, the .htaccess file, an SSL certificate, a plugin, a theme, or anything else to do with it. Therefore, the solution that will work for you will rely on the details of your particular situation.
In this tutorial, you will learn in detail what caused the error on your site and how to remove it. Let’s get started!
What is a Valid JSON Response?
When you request an API, the response should be in JSON format. You will see the “Updating Failed. The Response is Not a Valid JSON Response” error if the answer is not in JSON format.
There are a few reasons why this error can occur!
1. The API you request does not return data in JSON format. You must check the API documentation to see what format it returns data in.
2. There may be an error in the code that is requesting the API. This could be due to a wrong URL being specified or incorrect data being sent in the request body.
3. The server the API is hosted on may be down or not responding correctly. In this case, you must contact the API provider to resolve the issue.
3 Easy Ways to Fix the “Publishing Failed. The Response is Not a Valid JSON Response” Error
Update the Permalink
The .htaccess file or permalinks on your website may be the source of the JSON problem, which is one of the most typical reasons why it occurs.
You will need to refresh the permalinks on your site to eliminate the problem, and there are two different methods to do this. The quickest and most straightforward solution is to use your WordPress dashboard to activate the Force WordPress to Generate a New .htaccess File option.
Navigate to the Settings menu, then Permalink. On the Permalink page, press the Save Changes button after scrolling to the bottom of the page.
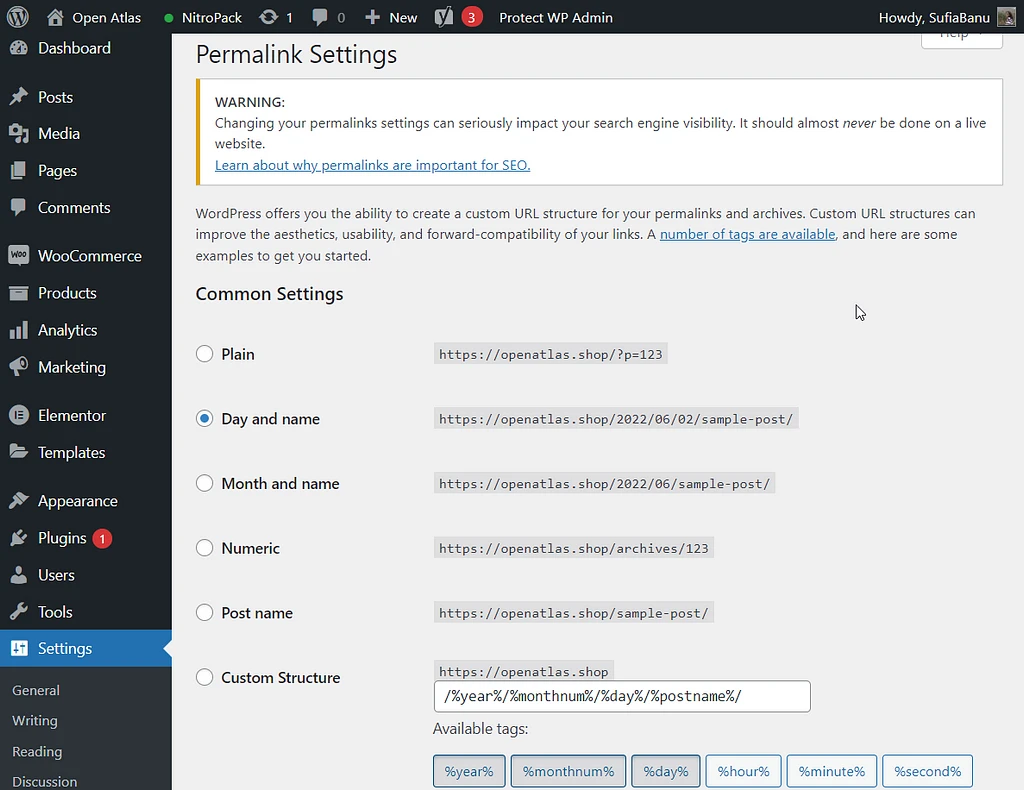
You may save your changes by scrolling to the bottom of the Permalink Settings Page and clicking the Save button.
Please return it to your editor and see whether the mistake still exists; you should no longer see it.
Make use of the Classic Editor
WordPress released an upgrade to its Classic Editor in December 2018, which was known as the Gutenberg/Block Editor. Since that time, many people have been confronted with the phrase “Publishing failed. In this case, the response does not conform to the JSON response standards. And “There was an error updating.” The error message reads, “The response is not a valid JSON response.”
Therefore, many people successfully resolved the issue by switching back to the Classic Editor. To use Classic Editor on your WordPress website, you will need to first download and install the Classic Editor plugin before activating it.
Learn More: How to Fix Slow WordPress Backend?
If you choose to utilize Classic Editor, however, this will cause WordPress’s brand new Block Editor to be replaced with the platform’s more traditional Classic Editor. Editing your posts and pages will not work the same way for you once you make this modification. It may also affect the formatting & layout of your already-existing pages and posts, particularly those that have been updated using the Block editor in the past. Therefore, before you utilize the Classic Editor, you want to protect your website by modifying a setting inside it.
Take out any characters that aren’t valid
If you attempt to upload photos containing characters that are not allowed in the image name, you may also receive an error message stating, “The response is not a valid JSON response.” Thus, you can rename your picture using solely English letters, numbers, and symbols like supported hyphens. After that, you may try uploading the image with the new name to see whether the problem has been resolved.
Use the Default to GD plugin.
A few individuals were also successful in solving the problem. When using the Default to GD plugin, you will get the “The response is not a valid JSON response” problem. Because WordPress does not yet provide this plugin, you will need to download it from the Default to GD GitHub link to use it. To begin the download process for the plugin, use the “Code” button on this page. After that, click the Download ZIP button. It will cause the plugin to be downloaded into your computer.
Afterward, go to the Plugins section of your WordPress dashboard, and click the “Add New” button. Now choose the plugin you downloaded by selecting the Choose File option after clicking the Upload Plugin button. After that, choose the Install Now option. When the installation is finished, you must select the Activate Plugin option. You may immediately check to see whether the JSON response problem occurs when uploading photographs to your WordPress site since it does not involve any configuration on your part. If the issue persists, you may disable and remove the plugin entirely from the system.
Additional Troubleshooting Tips to Fix the Invalid JSON Response Error
- Look for rest API conflicts: This means checking if there are any conflicts or errors in the code related to the REST API. This can be caused by multiple plugins or themes trying to access the same API, leading to an invalid JSON response error.
- Upload images in a different way: This is useful when an error occurs while trying to upload images to a website. Uploading images in another way, such as through FTP or a different image uploader plugin, can help solve the issue.
- Deactivate plugins & themes to find conflicts: By deactivating all plugins and themes and then reactivating them individually, you can determine which one is causing the invalid JSON response error. Once the problematic plugin or theme is identified, it can be fixed or replaced.
Final Words
These solutions for fixing the “The response is not a valid JSON response” error work for most people. Still, if they do not work for you, there may be a particular issue with the way WordPress is configured on your website or your web server is set up. This error may occur due to a problem with the REST API, an incorrect setup in the NGINX server, security plugins like Wordfence, or security policies like Web Application Firewall. In situations like these, one option is to seek solutions unique to the given locations.
Refer to Seahawk Media for more such articles.
A warning from DataTables stating «Invalid JSON response» is one of the most common errors that can occur with DataTables. Fortunately it is fairly easy to diagnose what is going wrong, with the developer tools built into modern web-browsers. This guide shows exactly what the error means, how to diagnose the issue and how to resolve it.
Meaning
When loading data by Ajax (ajax), DataTables by default, expects the data loaded to be valid JSON. JSON is a data-interchange format that has provide to be extremely populate on the web, due to its compatibility with Javascript, its ease of use and the fact that it is easily human readable. However, like all data-interchange formats, it has strict rules about what is valid JSON. Anything that does not meet this criterion is invalid JSON, and will throw an error in DataTables where it expects JSON.
When DataTables shows the message:
DataTables warning: table id=
{id}— Invalid JSON response.
it means exactly what it says. DataTables made an Ajax response to the server for JSON data, but the data that it received back was not valid JSON.
Diagnosis
If the server didn’t reply to the Ajax request with valid JSON data, we need to know what it did reply with, so we can take corrective action. Typically, the response will consist of an error message from the program on the server which is being used to create the JSON, which will be the starting point for resolving the issue fully.
Server data
Modern browsers all come with built in developer tools, which can be used to find out what data the server is responding to the DataTables Ajax request with. Instructions on how to do this with your browser are shown below.
Safari

1. Open preferences

2. Enable developer menu

3. Show page resources

4. Ajax response
- By default Safari hides its built-in developer tools. If you don’t have a Develop menu shown in Safari it needs to be enabled. If you do, jump to step 3.
- Open the Safari menu and select Preferences…
- Enable the developer menu in the Advanced tab
- Click the Advanced tab in the Preferences window
- Check the box for Show Develop menu in menu bar option
- Close the preferences — the Develop menu will now be shown
- View the resources the page has loaded
- Select the Show Page Resources option from the Develop menu.
- The developer console will show at the bottom of the page
- Reload the page so Safari can capture all network requests
- Details about the Ajax request are shown.
- Safari will show a list of all resources (images, scripts etc) which have been loaded for the page. Locate the Ajax request that has been made to the server and click it. Safari will show detailed information about the request.
- Note that on pages with a large number of resources, Safari will group the resources by type into folders. If this happens on your site, look for the «XHRs» folder for the Ajax requests.
Please note that these instructions were written with Safari 7 as the version used. Newer versions might have slightly different steps.
Chrome

1. Open debugger

2. Console displayed

3. Show Network tab

4. Ajax response
- To access the developer tools in Chrome:
- Mac: Access the View > Developer > Developer Tools menu option.
- Windows: Click the Chrome menu (to the right of the address bar) and select Tools > Developer Tools.
- The Developer tools are shown at the bottom of the current browser window. Chrome will show the Javascript console by default.
- Click on the Network tab to view network requests
- Refresh the page to allow Chrome to capture all requests
- The network panel will show all of the requests made by Chrome to load the page.
- Click the XHR option at the bottom of the window to reduce the requests to just the Ajax (XHR) requests.
- Double click the Ajax request made by DataTables
- Details about the Ajax request are shown.
- Click the Response tab in the Ajax view to see the exact data that was returned from the server. This is what we are interested in!
Please note that these instructions were written with Chrome 31 Mac as the version used. Newer versions, or those on different platforms might have slightly different steps.
Firefox

1. Open debugger

2. Network requests

3. Ajax requests

4. Ajax response
- To access the developer tools in Firefox:
- Mac: Access the Tools > Web Developer > Network menu option.
- Windows: Click the Firefox menu (top left of the window) and select Web Developer Network option.
- The Developer tools are shown at the bottom of the current browser window.
- Refresh the page to allow Firefox to capture all requests
- The network panel will show all of the requests made by Firefox to load the page.
- Click the XHR option at the bottom of the window to reduce the requests to just the Ajax (XHR) requests.
- Double click the Ajax request made by DataTables
- Details about the Ajax request are shown.
- Click the Reponse tab in the Ajax view to see the exact data that was returned from the server. This is what we are interested in!
Please note that these instructions were written with Firefox 26 Windows as the version used. Newer versions, or those on different platforms might have slightly different steps.
IE

1. Open debugger

2. Element inspector

3. Show Network tab

4. Ajax response

4. Ajax response
- To access the developer tools in IE:
- Press F12 or,
- Click the tools menu (top right, a cog icon) and select the F12 developer tools option.
- The Developer tools are shown at the bottom of the current browser window. IE will show the document tree by default.
- Click on the Network tab to view network requests
- IE requires that network traffic be specifically tracked, which we want here.
- Click the Start capturing button to capture network requests
- Refresh the page to allow IE to capture all requests
- The network panel will show all of the requests made by IE to load the page.
- Double click the Ajax request made by DataTables — it will likely be at or near the bottom of the request list
- Details about the Ajax request are shown.
- Click the Reponse body tab in the Ajax view to see the exact data that was returned from the server. This is what we are interested in!
Please note that these instructions were written with IE 10 as the version used. Newer versions might have slightly different steps.
Opera

1. Open debugger

2. Element inspector

3. Show Network tab

4. Ajax response
- To access the developer tools in Opera:
- Mac: Right click or ctrl click the document and select the Inspect element option.
- Windows: Right click the document and select the Inspect element option.
- The Developer tools are shown at the bottom of the current browser window. Opera will show information about the element that was clicked on.
- Click on the Network tab to view network requests
- Refresh the page to allow Opera to capture all requests
- The network panel will show all of the requests made by Opera to load the page.
- Click the XHR option at the bottom of the window to reduce the requests to just the Ajax (XHR) requests.
- Double click the Ajax request made by DataTables
- Details about the Ajax request are shown.
- Click the Reponse tab in the Ajax view to see the exact data that was returned from the server. This is what we are interested in!
Please note that these instructions were written with Opera 18 Mac as the version used. Newer versions, or those on different platforms might have slightly different steps.
JSON validation
Once you have the Ajax data response from the server, you can validate the JSON using a tool such as JSON Lint or JSON Parser. Often the error in the JSON response from the server will be very obvious, but a JSON Linter can provide to be very useful for resolve the less obvious issues, such as trailing commas.
Resolution
Once you have followed the instructions above to find out what the data from the server actually is, since it is not JSON, you will be able to modify the data, or the program that creates the data, to return valid JSON only.
Are you trying to fix the invalid JSON error in WordPress?
This error appears when editing WordPress posts or pages on your website. You will see a message saying, ‘The response is not a valid JSON response’, and updating that page will fail.
In this article, we will show you how to easily fix the invalid JSON error in WordPress. We will also talk about why this error occurs and how to avoid it in the future.

What Causes the ‘Not a Valid JSON Response’ Error in WordPress?
Failure to receive an expected response from the server causes the ‘Not a valid JSON response’ error in WordPress.
Basically, WordPress needs to communicate with the server while you are editing a blog post. It relies on getting responses from the web hosting server in the background. This response is usually in JSON format, which is used to quickly transport data using JavaScript.
If, for some reason, WordPress fails to get the response, or the response is not in JSON format, then you will see the ‘Not a valid JSON response’ error.

This error could appear for a number of reasons. However, the most likely cause of it is incorrect URL settings in WordPress or broken permalinks.
That being said, let’s take a look at how to easily fix the invalid JSON error in WordPress.
Important: Please make a complete WordPress backup before making any big changes to your website. This allows you to easily restore your website to its previous state.
1. Check WordPress URLs in Settings
First, you need to make sure that your WordPress Address and Site Address settings are correct.
Simply go to Settings » General page. From here, you need to review the ‘WordPress Address (URL)’ and ‘Site Address (URL)’ fields.

For most websites, this setting must have the same URL in both fields.
However, rarely, some users may have given WordPress its own directory and serve the website on a different address. In that case, they can have different URLs here.
However, if your Site Address is incorrect, then that will trigger the invalid JSON error in WordPress.
If you made any changes to the settings, then don’t forget to click on the ‘Save Changes’ button. You can now edit a blog post and see if adding any new blocks or saving that post triggers the ‘Not valid JSON response’ error.
If you are still seeing the error, then continue reading.
2. Fix WordPress Permalink Structure
WordPress comes with SEO friendly URL structure that allows you to use human-readable URLs for your posts and pages.
However, sometimes a user may mess up the permalink settings. This would make it impossible for the WordPress editor to get a valid JSON response and cause the error to appear.
To fix this, you need to simply visit the Settings » Permalinks page. From here, you must carefully review the permalink options.

If you are unsure whether you are using the right settings, then simply select one of the default formats.
After that, go ahead and click on the ‘Save Changes’ button to store your settings.
You can now try editing a blog post or page to see if the error has disappeared. If it hasn’t, then you can try this next step.
3. Regenerate WordPress .htaccess File
The .htaccess file in WordPress is used as a configuration file to manage SEO-friendly URLs (permalinks).
Normally, WordPress can automatically regenerate and update the file. You can also trigger that update by simply clicking on the ‘Save Changes’ button at the bottom of Settings » Permalinks page.
However, sometimes it may not get updated or has incorrect settings. This will affect your WordPress permalinks and may also cause an invalid JSON response error.
To fix this, you will need to connect to your website using an FTP client or the file manager app in your WordPress hosting account dashboard.
Once connected, you need to locate the .htaccess file in the root folder of your website and download it as a backup to your computer.

Tip: Can’t locate the .htaccess file? See this quick article on how to find .htaccess file.
After that, you need to edit the .htaccess file using an FTP client or the file manager app.

Once the file opens, you need to delete all the code inside it and replace it with the following code:
# BEGIN WordPress

RewriteEngine On
RewriteRule .* - [E=HTTP_AUTHORIZATION:%{HTTP:Authorization}]
RewriteBase /
RewriteRule ^index.php$ - [L]
RewriteCond %{REQUEST_FILENAME} !-f
RewriteCond %{REQUEST_FILENAME} !-d
RewriteRule . /index.php [L]

# END WordPress
Don’t forget to save your changes and upload the file back to your website.
You can now visit your website and edit and post or page to see if you can reproduce the invalid JSON response error.
If you are still seeing the error, then there are a few more steps you can take.
4. View the REST API Debug Log
The invalid JSON response error can also mean that WordPress REST API on your website encountered an error.
The REST API is the set of techniques WordPress uses to communicate with the server as you work on your website.
You can see details of this error in the WordPress Site Health tool. Visit the Tools » Site Health page.

From here, you may see an issue labeled ‘The REST API encountered an unexpected result’.
Clicking on it will show you more details, which may give you some clues about which plugin or third-party service is causing the issue.
If this doesn’t provide any clues, then you can move on to the next step.
5. Deactivate All WordPress Plugins
Occasionally, WordPress plugins may conflict with each other or the WordPress core software. This can result in unexpected behavior and could be a potential reason for the invalid JSON error.
Simply go to the Plugins » Installed Plugins page. From here, select all your WordPress plugins and then choose ‘Deactivate’ from the ‘Bulk Actions’ drop-down menu. Now, click the ‘Apply’ button to continue.

WordPress will now deactivate all your installed plugins.
You can now try again to reproduce the error. If the error disappears, then this means one of the plugins installed on your website was causing it.
To figure out which plugin is the problem, you just need to activate them one by one and try to reproduce the error. Repeat this until you find the culprit.
After that, you can reach out to the plugin author for support or find an alternative plugin.
6. Temporarily Switch to the Classic Editor
If all the above steps fail, then you can temporarily switch to the Classic Editor for WordPress.
This older version of the WordPress editor uses a simpler text editor and doesn’t rely heavily on REST API to get JSON responses.
To use it, you need to install and activate the Classic Editor plugin. For more details, see our step-by-step guide on how to install a WordPress plugin.
The plugin works out of the box, and it will disable the Gutenberg editor upon activation.
You can now continue working on your website and get back to troubleshooting later.
7. Further Troubleshooting
A number of things can block WordPress REST API or make it return an invalid JSON response. We have addressed the most likely culprits above, but if that didn’t fix it for you, then here are some more steps that you can try.
Switching to a Default WordPress Theme
Sometimes a conflict between your WordPress theme and a plugin or the WordPress core may result in unexpected behavior.
You can test this, by simply switching to a default WordPress theme like TwentyTwentyOne or Twenty-TwentyTwo.
Temporarily Turn Off Website Application Firewall
If you are using a WordPress firewall like Sucuri, Cloudflare, or a plugin, then it may sometimes block legitimate requests too.
The easiest way to figure this out is by temporarily disabling your WordPress firewall plugin or service.
Some application-level WordPress firewalls can be disabled by simply deactivating the plugin. For DNS-level firewalls like Sucuri and Cloudflare, you can disable them from your account dashboard.
Turn On Debugging in WordPress
WordPress comes with a built-in feature that allows you to keep a log of errors. However, it is not enabled by default.
To turn it on, you need to add the following code to your wp-config.php file:
define( 'WP_DEBUG', true );
define( 'WP_DEBUG_LOG', true );
After that, WordPress will keep a log of all errors in a debug.log file located inside the /wp-content/ folder. You can access this file by using an FTP client.
The error log may provide you with a clue about what may be causing the invalid JSON error on your website. For more details, see our guide on setting up WordPress error logs and using them for debugging errors.
Seek Expert Help
Finally, if all else fails, then this could be due to a misconfiguration on your WordPress hosting server. Most reliable WordPress hosting companies are able to help users with common WordPress issues.
Simply reach out to them via live chat or support ticket, and they may be able to help you fix it.
We hope this article helped you learn how to fix the invalid JSON error in WordPress. You may also want to see our complete handbook of the most common WordPress errors and how to fix them, along with our top picks for the best email marketing services for small business.
If you liked this article, then please subscribe to our YouTube Channel for WordPress video tutorials. You can also find us on Twitter and Facebook.
Disclosure: Our content is reader-supported. This means if you click on some of our links, then we may earn a commission. See how WPBeginner is funded, why it matters, and how you can support us.
Editorial Staff at WPBeginner is a team of WordPress experts led by Syed Balkhi with over 16 years of experience building WordPress websites. We have been creating WordPress tutorials since 2009, and WPBeginner has become the largest free WordPress resource site in the industry.

Обновление не удалось. Ответ не является допустимым ответом JSON. Как оказалось, с такой ошибкой сталкиваются многие вебмастеры при обновлении или публикации записей в WordPress.
С ней же столкнулся и я при переносе сайта своего клиента с хостинга Beget на Namecheap. Кстати, консоль у меня была на английском языке, и эта ошибка звучала так: Updating failed. The response is not a valid JSON response.
В этом материале я расскажу о всех возможных способах решить эту проблему, и какой помог лично мне.
Навигация по статье
Почему возникает эта ошибка?
Причин возникновения этой ошибки множество, но самая распространенная — отключение событий REST API. Но мы не будем останавливаться только на ней и рассмотрим все возможные способы решения этой проблемы.
Кстати, так выглядит сама ошибка обновления, возникающая при публикации или обновлении записи в WordPress.

Как я решил эту проблему? Изначально я создавал сайт на хостинге Beget, после завершения работы требовалось выгрузить сайт на хостинг Namecheap. И сразу после публикации сайта я обнаружил, что больше могу обновлять или создавать новые записи/страницы. Особо никаких действий предпринимать мне не хотелось, поэтому я просто написал в техподдержку, и там решили мою проблему.
Если же техподдержка вашего хостинга не очень отзывчивая, то я рекомендую перейти на Beget и обязательно указать мой код партнера 1486766 при регистрации! 😀
А если серьезно, то попробуйте каждый из описанных ниже методов, и один из них вам наверняка поможет!
Способ 1. Обновите постоянные ссылки
Перейдите в консоль вашего сайта, затем в Настройки и найдите там пункт Постоянные ссылки.

Здесь вам требуется просто нажать на кнопку Обновить. После этого можно проверить изменения.
Способ 2. Установка классического редактора WordPress
Далеко не самый идеальный способ решения проблемы, потому что вам придется отказаться от удобного современного блочного редактора и начать пользоваться его давно устаревшей версией.

Скачайте плагин Классический редактор с официального репозитория WordPress. Затем перейдите в Настройки — Написание. Здесь вам нужно найти параметр Классический редактор для всех пользователей и выбрать значение Для всех.
Можно проверить изменения. Если не помогло, переходим к следующему способу!
Способ 3. Отсутствие SSL сертификата или его некорректная настройка
Зачастую многие регистраторы и хостинг-провайдеры предлагают слишком дорогие SSL-сертификаты, цена на которые порой превышает 5 000 рублей за год. Далеко не все готовы платить столько денег и ищут возможность подключить бесплатный SSL-сертификат.
Зачастую эти попытки заканчиваются неудачами, некорректными настройками сайта, что приводит к ряду ошибок.
Если вы новичок, то крайне рекомендую использовать хостинг Beget в своей работе. Он не только предоставляет бесплатный пробный период на 30 дней для любого тарифа, но и выдает бесплатные рабочие SSL-сертификаты. Я уже как-то писал обзор на хостинг Beget, рекомендую к прочтению!
Способ 4. Устранение ошибки смешанного содержимого
Данное решение поможет, если ошибка возникла после подключения SSL-сертификата. Для начала перейдите в раздел настроек вашего сайта и проверьте, чтобы URL WordPress Address (Адрес WordPress) и URL Site Address (Адрес сайта) начинались с протокола безопасного соединения https.

Затем перейдите в раздел плагинов, скачайте и установите Really Simple SSL. После активации плагина появится уведомление Almost Ready to migrate SSL. Нажмите на синюю кнопку Activate SSL.

Затем идем в Настройки, находим раздел SSL. Проконтролируйте, чтобы первые три пункта (Mixed content fixer, Enable WordPress 301 Redirection to SSL, Enable 301 .htaccess redirect) были активны. По окончанию настройки проверяем изменения.
Способ 5. Проверка тем и плагинов
Если ошибка «Обновление не удалось. Ответ не является допустимым ответом JSON» появилась после установки какой-то темы или плагина, то не сложно догадаться, в чем может быть причина ее возникновения.
Попробуйте переключиться на другую тему и проверить изменения. Затем отключите все плагины и снова проверьте изменения. Если же проблема решена, то остается только выяснить, какой из плагинов вызывает эту ошибку. Включайте их по очереди и проверяйте, появилась ли снова эта проблема.
Способ 6. Удостоверьтесь, что вы не отключили Rest API и wp-json
В самом начале этого материала я сказал, что это одна из самых частых причин возникновения ошибки обновления записей и страниц.
Перейдите в редактор вашей темы и найдите файл functions.php. А теперь внимательно изучите его содержимое. Если проблема кроется в отключении REST API и wp-json вы найдете примерно следующее:
// Отключаем сам REST API
add_filter('rest_enabled', '__return_false');

// Отключаем фильтры REST API
remove_action( 'xmlrpc_rsd_apis',            'rest_output_rsd' );
remove_action( 'wp_head',                    'rest_output_link_wp_head', 10, 0 );
remove_action( 'template_redirect',          'rest_output_link_header', 11, 0 );
remove_action( 'auth_cookie_malformed',      'rest_cookie_collect_status' );
remove_action( 'auth_cookie_expired',        'rest_cookie_collect_status' );
remove_action( 'auth_cookie_bad_username',   'rest_cookie_collect_status' );
remove_action( 'auth_cookie_bad_hash',       'rest_cookie_collect_status' );
remove_action( 'auth_cookie_valid',          'rest_cookie_collect_status' );
remove_filter( 'rest_authentication_errors', 'rest_cookie_check_errors', 100 );

// Отключаем события REST API
remove_action( 'init',          'rest_api_init' );
remove_action( 'rest_api_init', 'rest_api_default_filters', 10, 1 );
remove_action( 'parse_request', 'rest_api_loaded' );

// Отключаем Embeds связанные с REST API
remove_action( 'rest_api_init',          'wp_oembed_register_route'              );
remove_filter( 'rest_pre_serve_request', '_oembed_rest_pre_serve_request', 10, 4 );
remove_action( 'wp_head', 'wp_oembed_add_discovery_links' );
// Отключаем wp-json
add_filter('rest_enabled', '__return_false');
remove_action( 'xmlrpc_rsd_apis', 'rest_output_rsd' );
remove_action( 'wp_head', 'rest_output_link_wp_head', 10, 0 );
remove_action( 'template_redirect', 'rest_output_link_header', 11, 0 );
remove_action( 'auth_cookie_malformed', 'rest_cookie_collect_status' );
remove_action( 'auth_cookie_expired', 'rest_cookie_collect_status' );
remove_action( 'auth_cookie_bad_username', 'rest_cookie_collect_status' );
remove_action( 'auth_cookie_bad_hash', 'rest_cookie_collect_status' );
remove_action( 'auth_cookie_valid', 'rest_cookie_collect_status' );
remove_filter( 'rest_authentication_errors', 'rest_cookie_check_errors', 100 );
remove_action( 'init', 'rest_api_init' );
remove_action( 'rest_api_init', 'rest_api_default_filters', 10, 1 );
remove_action( 'parse_request', 'rest_api_loaded' );
remove_action( 'rest_api_init', 'wp_oembed_register_route' );
remove_filter( 'rest_pre_serve_request', '_oembed_rest_pre_serve_request', 10, 4 );
remove_action( 'wp_head', 'wp_oembed_add_discovery_links' );
remove_action( 'wp_head', 'wp_oembed_add_host_js' );Если у вас есть похожий код, то удаляем его. Затем переходим в Настройки, находим раздел «Постоянные ссылки» и нажимаем «обновить».
Способ 7. Узнать ответ у техподдержки вашего хостинга
Иногда проблема может возникнуть не из-за вашего сайта, а некорректных настроек сервера. Попробуйте обратиться в техподдержку вашего хостинга с просьбой решить вашу проблему.
Кстати, а вам рассказать, у какого хостинга самая лучшая техподдержка? 😀 Конечно же у Beget! А вы думали, я какой-то другой хостинг здесь посоветую? (Не забывайте при регистрации указывать мой партнерский код 1486766, так я заработаю много денег и больше не буду писать статьи).
Вам понравился материал? Интересует разработка сайтов? Тогда обязательно подпишитесь на нашу группу ВКонтакте! Так вы всегда будете в курсе событий и никогда не пропустите новые материалы. А еще у нас есть беседа с активными участниками, где мы бесплатно помогаем новичкам с решением любых вопросов! 🙂