
Wireless Debug Logs
Debugging wireless problems using Logs.
By default RouterOS wireless log shows that client connects and disconnects as simple entries:
22:32:18 wireless,info 00:80:48:41:AF:2A@wlan1: connected
It is enough for regular users to know that the wireless client with MAC address «00:80:48:41:AF:2A» is connected to wireless interface «wlan1». But actually there are more log entries available than are shown in standard logging. They are called ‘debug’ logs which give more detailed information. In the following Debug Log example you will see the same client connecting to the AP in more detail than found in typical logging:
22:33:20 wireless,debug wlan1: 00:80:48:41:AF:2A attempts to connect
22:33:20 wireless,debug wlan1: 00:80:48:41:AF:2A not in local ACL, by default accept
22:33:20 wireless,info 00:80:48:41:AF:2A@wlan1: connected
Debug Logs will give you more specific information on each step of the Client wireless connection and disconnection. The first line shows that the wireless client tried to connect to the AP. On the second line the AP checked to see if that client is allowed to connect to the AP and the resulting action. And only on the third line do you see that the client is connected. This is merely one example of the debug log messages. The description of all debug entries is written below.
To enable the wireless debug logs you should execute such commands:
[admin@MikroTik] > /system logging
[admin@MikroTik] system logging> add topics=wireless,debug action=memory
This will help you understand and fix wireless problems with ease and with less interaction with the support team.
STATION MODE
<MAC>@<DEV>: lost connection, <REASON>
Station has lost connection to AP because of <REASON>
<MAC>@<DEV>: failed to connect, <REASON>
Station attempted to connect to AP, but failed due to <REASON>
<MAC>@<DEV>: established connection on <FREQ>, SSID <SSID>
Station attempted and succesfully connected to AP with SSID <SSID> on frequency <FREQ>.
<MAC>@<DEV>: MIC failure!!!
TKIP message integrity check failure, somebody must be trying to break into or DOS network, If more than 1 MIC failure is encountered during 60s period, «TKIP countermeasures» state is entered.
<MAC>@<DEV>: enter TKIP countermeasures
Entered TKIP countermeasures state, this means that Station will disconnect from AP and keep silence for 60s.
AP MODE
<DEV>: radar detected on <FREQ>
Radar detected on frequency <FREQ>, AP will look for other channel
<DEV>: data from unknown device <MAC>, sent deauth [(XXX events suppressed, YYY deauths suppressed)]
Data frame from unknown device (read — not registered to this AP) with mac address <MAC> received, AP sent deauthentication frame to it (as per 802.11). XXX is number of events that are not logged so that the log does not become too large (logs are limited to 1 entry per 5s after first 5 entries), YYY is the number of deauthentication frames that should have been sent, but were not sent, so that resources are not wasted sending too many deauthentication frames (only 10 deauth frames per second are allowed).
The likely cause of such a message is that the Station previously connected to the AP, which does not yet know it has been dropped from AP registration table, sending data to AP. Deauthentication message tells the Station that it is no longer connected.
<DEV>: denying assoc to <MAC>, failed to setup compression
Failed to initialize compression on AP, most likely because there are too many clients attempting to connect and use compression.
<DEV>: <MAC> is new WDS master
WDS slave has established connection to WDS master, this means that WDS slave starts accepting clients and acting as AP.
<DEV>: <MAC> was WDS master
This message appears after connection with <MAC> is lost, means that WDS slave will disconnect all clients and start scanning to find new WDS master.
<MAC>@<DEV>: connected [, is AP][, wants WDS]
Station with address <MAC> connected. if «is AP» present — remote device is AP, if «is WDS» presents, remote device wants to establish WDS link.
<MAC>@<DEV>: disconnected, <REASON>
Connection with Station with address <MAC> terminated due to <REASON>
<DEV>: TKIP countermeasures over, resuming
TKIP countermeasures (60s silence period) over, AP resumes acting as AP.
<DEV>: starting TKIP countermeasures
Entering TKIP countermeasures state (60s silence period), all clients will be lost.
<REASON>
«joining failed» — can only happen on Prism cards in station mode, failed to connect to AP due to some reason
«join timeout» — happens on Station, failed to synchronize to AP (receive first beacon frame). Most likely weak signal, remote turned off, strong interference, some other RF related issue that makes communication impossible.
«no beacons» — no beacons received from remote end of WDS link. Most likely weak signal, remote turned off, strong interference, some other RF related issue that makes communication impossible.
«extensive data loss» — local interface decided to drop connection to remote device because of inability to send data to remote after multiple failures at lowest possible rate. Possible causes — too weak signal, remote device turned off, strong interference, some other RF related issue that makes communication impossible.
«decided to deauth, <802.11 reason>» — local interface decided do deauthenticate remote device using 802.11 reason <802.11 reason>.
«inactivity» — remote device was inactive for too long
«device disabled» — local interface got disabled
«got deauth, <802.11 reason>» — received deauthentication frame from remote device, 802.11 reason code is reported in <802.11 reason>
«got disassoc, <802.11 reason>» — received disassociation frame from remote device, 802.11 reason code is reported in <802.11 reason>
«auth frame from AP» — authentication frame from remote device that is known to be AP, most likely mode changes on remote device from AP to Station.
«bad ssid» — bad ssid for WDS link
«beacon from non AP» — received beacon frame from remote device that is known to be non-AP node, most likely mode changes on remote device from Station to AP.
«no WDS support» — does not report WDS support
«failed to confirm SSID» — failed to confirm SSID of other end of WDS link.
«hardware failure» — some hardware failure or unexpected behavior. Not likely to be seen.
«lost connection» — can only happen on Prism cards in station mode, connection to AP lost due to some reason.
«auth failed <802.11 status>» — happens on Station, AP denies authentication, 802.11 status code is reported in <802.11 status>.
«assoc failed <802.11 status>» — happens on Station, AP denies association, 802.11 status code is reported in <802.11 status>.
«auth timeout» — happens on Station, Station does not receive response to authentication frames, either bad link or AP is ignoring this Station for some reason.
«assoc timeout» — happens on Station, Station does not receive response to association frames, either bad link or AP is ignoring this Station for some reason.
«reassociating» — happens on AP: connection assumed to be lost, because Station that is considered already associated attempts to associate again. All connection related information must be deleted, because during association process connection parameters are negotiated (therefore «disconnected»). The reason why Station reassociates must be looked for on Station (most likely cause is that Station for some reason dropped connection without telling AP — e.g. data loss, configuration changes).
«compression setup failure» — connection impossible, because not enough resources to do compression (too many stations that want to use compression already connected)
«control frame timeout» — AP was unable to transmit to the client (similar to error message that you see in the 802.11 protocol — extensive data loss)
<802.11 reason> and <802.11 status>
These are numeric reason/status codes encoded into 802.11 management messages. Log messages include numeric code and textual description from appropriate standard in 802.11 standards group. Although these are intended to be as descriptive as possible, it must be taken into account that actual reason/status code that appears in management frames depends solely on equipment or software manufacturer — where one device sends 802.11 management frame including proper reason/status code for situation that caused the frame, other may send frame with «unspecified» reason/status code. Therefore reason/status code should only be considered informational.
As 802.11 standards evolve, RouterOS may miss textual descriptions for reason/status codes that some devices use. In such case numeric value should be used to lookup meaning in 802.11 standards.
In order to properly interpret reason/status code, good understanding of 802.11 group standards is necessary. Most of the textual descriptions are self-explaining. Explanation for some of most commonly seen reson/status codes follows.
class 2 frame received (6) — device received «class 2» frame (association/reassociation management frame) before completing 802.11 authentication process;
class 3 frame received (7) — device received «class 3» frame (data frame) before completing association process;
Wireless FAQ
Settings
Why I can’t connect to MikroTik 802.11n AP with Apple Mac devices?
This problem is only seen on Mac devices based on Broadcom wireless chipsets. In order to connect with such wireless device to MikroTik 802.11n AP make sure that you don’t use ‘short’ preamble-mode. Use ‘long’ or ‘both’ preamble-mode and Mac wireless devices will be able to connect.
By changing some wireless settings the wireless link works unstable
Sometimes when you change some wireless setting for tuning the links you got so far that the link isn’t establishing any more or works unstable and you don’t remember what settings you had in the beginning. In this case, you can use the reset-configuration command in the wireless menu — it will reset the all the wireless settings for the specific wireless interface and you will be able to configure the interface from the start. Note that executing this command also disables the interface, so please be careful not to execute this command if you are configuring router remotely using that wireless link that you want to reset the configuration.
What are wireless retransmits and where to check them?
Wireless retransmission occur when an interface sends out a frame and doesn’t receive back an acknowledgment (ACK), causing it to try sending the frame again until an acknowledgment is received or the maximum allowed retransmission count for a packet is reached. Wireless retransmits increase the latency and lower the throughput of a wireless link. The number of retransmissions taking place can be determined by subtracting the value of the frames parameter from the value of the ‘hw-frames parameter for a given entry in the registration table. Some number of retransmissions is to be expected, but if the value of frames exceeds the value of frames multiple times, there is an issue with the wireless link that requires troubleshooting.
Can I compare frames with hw-frames also on Nstreme links?
The frames counts only those which contain actual data. In the case of Nstreme, only the ACK can be transmitted in a single frame, if there is no other data to send. These ACK frames will not be added to the frames count, but they will appear at hw-frames. If there is traffic on both directions at maximum speed (eg. there will be no only-ack frames), then you can’t compare frames to hw-frames as in case of regular wireless links.
What TX-power values can I use?
The tx-power default setting is the maximum tx-power that the card can use and is taken from the cards eeprom. If you want to use larger tx-power values, you are able to set them, but do it at your own risk, as it will probably damage your card eventually! Usually, one should use this parameter only to reduce the tx-power.
In general, tx-power controlling properties should be left at the default settings. Changing the default setting may help with some cards in some situations, but without testing, the most common result is the degradation of range and throughput. Some of the problems that may occur are:
- overheating of the power amplifier chip and the card which will cause lower efficiency and more data errors;
- overdriving the amplifier which will cause more data errors;
- excessive power usage for the card and this may overload the 3.3V power supply of the board that the card is located on resulting in voltage drop and reboot or excessive temperatures for the board.
What TX-power-mode is the best?
TX-power-mode tells the wireless card which tx-power values should be used. By default, this setting is set to default.
- default means that the card will use the tx-power values from the cards eeprom and will ignore the setting what is specified by the user in the tx-power field.
- card-rates means that for different data rates the tx-power is calculated according to the cards transmit power algorithm from the cards eeprom and as an argument it takes tx-power value specified by the user.
- all-rates-fixed means that that the card will use one tx-power value for all data rates which is specified by the user in tx-power field.
Note that it is not recommended to use ‘all-rates-fixed’ mode as the wireless card tx-power for the higher data rates is lower and by forcing to use the fixed tx-power rates also for the higher data rates might result in the same problems like in the previous question about tx-power setting. In the case of MikroTik Radio devices, the power will not be higher than the power written in the EEPROM. For most of the cases if you want to change the tx-power settings it is recommended to use the tx-power-mode=card-rates and it is recommended to lower and not to raise tx-power. In case of AR9300 and newer Atheros wireless chipsets «tx-power-mode=all-rate-fixed» is the only option as «card-rates» option isn’t working on those chipsets.
What is CCQ and how are the values determined?
Client Connection Quality (CCQ) is a value in percent that shows how effective the bandwidth is used regarding the theoretically maximum available bandwidth. CCQ is weighted average of values Tmin/Treal, that get calculated for every transmitted frame, where Tmin is time it would take to transmit given frame at highest rate with no retries and Treal is time it took to transmit frame in real life (taking into account necessary retries it took to transmit frame and transmit rate).
What is hw-retries setting?
Number of times sending frame is retried without considering it a transmission failure. The data rate is decreased upon failure and frame is sent again. Three sequential failures on lowest supported rate suspend transmission to this destination for the duration of on-fail-retry-time. After that, the frame is sent again. The frame is being retransmitted until transmission success, or until the client is disconnected after disconnect-timeout. The frame can be discarded during this time if frame-lifetime is exceeded. In case of Nstreme «on-fail-retry-time», «disconnect-timeout» and «frame-lifetime» settings are not used. So after three sequential failures on the lowest supported rate, the wireless link is disconnected with «extensive data loss» message.
What is disconnect-timeout setting?
This interval is measured from the third sending failure on the lowest data rate. At this point 3 * (hw-retries + 1) frame transmits on the lowest data rate had failed. During disconnect-timeout packet transmission will be retried with on-fail-retry-time interval. If no frame can be transmitted successfully during disconnect-timeout, the connection is closed, and this event is logged as «extensive data loss». Successful frame transmission resets this timer.
What is adaptive-noise-immunity setting?
Adaptive Noise Immunity (ANI) adjusts various receiver parameters dynamically to minimize interference and noise effect on the signal quality. This setting is added in the wireless driver for Atheros AR5212 and newer chipset cards
How does wireless device measure signal strength, when access-list or connect-list are used ?
The reported signal level is exponentially weighted moving average with a smoothing factor of 50%.
What error correction methods are supported in the RouterOS wireless?
ARQ method is supported in nstreme protocols. Regular 802.11 standard does not include ARQ — retransmission of corrupt frames is based on acknowledgment protocol. RouterOS supports forward error correction coding (convolutional coding) with coding rates: 1/2, 2/3, or 3/4.
Configuring RouterOS device for 160MHz use
If the RouterOS device supports 4×4 transmission, additionally to setting 160MHz channel width, make sure to set «rate-set=default» on the wireless interface so all streams are available
If the client does not support Extended NSS and can only perform 2×2 transmission, set «vht-supported-mcs=mcs0-9,mcs0-9,none»
Setups
Will an amplifier improve the speed on my link?
It depends on your signal quality and noise. Remember that you can probably get a better link with low output power setting, and a good antenna. An amplifier increases the noise and will only cause problems with the link.
The amplifier gets a boost on both the transmitted and received signal. Thus, in «silent» areas, where you are alone or with very few «noise» or «competition», you might get excellent results. On the other side, in crowded areas, with lots of wireless activity, you will also increase signal received from every other competitor or noise source, which may dramatically lower the overall quality of the link. Also, take in account the EIRP to see if your link remains in legal limits.
You could also get a better signal on «11b only» radios, which see most of 802.11g as «noise», thus filtering better the usable signal.
How to fine-tune the wireless link with hw-retries?
You should understand that for 802.11 devices there is a really limited amount of information (or «feedback» from the environment) that devices can use to tune their behavior:
- signal strength, which could be used to figure out best transmit rate knowing receiver sensitivity. Sill this is not reliable taking into account that sensitivity for different receivers varies (e.g. changes over time), path conditions are not symmetric (and device can only measure signal strength it receives), etc.
- by receiving/not receiving acknowledgment for frame sent.
Taking into account that using signal strength is not reliable, 802.11 devices are essentially left with only one «feedback» to tune its operation — success/failure of transmission. When transmission fails (ACK not received in time), there is no way how sender can figure out why it failed — either because of noise, multipath, direct interference (and whether that disturbed actual data frame or the ACK itself) — frame just did not make it and in general it does not matter «why». All that matters is the packet error rate.
Therefore RouterOS implements an algorithm to try to use medium most efficiently in any environment by using only this limited information, giving users the ability to control how the algorithm works and describing the algorithm. And there are only a few usage guidelines, not a set of values you should use in a particular situation.
In general — the larger hw-retries, the better «feedback» device gets about medium ability to deliver frame at particular rate (e.g. if sending frame with rate 54mbps fails 16 times, it is telling you more than if it fails with 2 retries) and the better it can figure out optimal transmit rate, at the expense of latency it can introduce in network — because during all those failing retries, other devices in this channel cannot send. So bigger hw-retries can be suggested for ptp backbone links — where it is known that link must be always on. Less hw-retries make rate selection adapt faster at the expense of some accuracy (going below 2 is not reasonable in most cases), this can be suggested for ptmp links, where it is normal for links to connect/disconnect and keeping latency down is important.
on-fail-retry-time and disconnect-timeout controls how hard device will try to consider remote party «connected». Larger disconnect-timeout will make the device not «disconnect» other party, even if there are lots of loss at the smallest possible transmission rate. This again is most useful for «weak» links that are known that they «must» be established (e.g. backbone links). In ptmp networks large disconnect-timeout will again increase latency in the network during the time e.g. AP will attempt to send data to some client that has just been disabled (AP will try to do this for the whole disconnect-timeout).
frame-lifetime allows to tune for how long AP is attempting to use frame for transmitting before considering that it is not worth delivering it (for example, if sending frame fails at lowest possible rate, on-fail-retry-time timer is enabled, if during this timer frame-lifetime expires, particular frame is dropped and the next transmission attempt will happen with the next frame. Disabled frame-lifetime means that wireless will ensure in order delivery of «all» data frames, no matter how long it takes, «or» will drop the connection if everything fails). This allows optimizing for different types of traffic e.g. for real-time traffic — if the primary use of the wireless network is e.g. voip, then it can be reasonable to limit frame-lifetime, because voip tolerates small loss better than high latency.
Is it possible to use the wireless repeater only with one radio interface?
This setup it possible by using WDS on the wireless interface which is running in ap-bridge mode. And in newer RouterOS versions it is possible to configure wireless repeater mode.
Nv2 wireless link disconnects very often
When Nv2 wireless link experiences disconnections and in log section most of the messages are ‘control frame timeout’, you can try to lower the transmit output power of the wireless cards if the signal of the link is strong. We suggest using tx-power-mode=card-rates for lowering the tx-power of the wireless card. If the problem continues to try to use a different wireless frequency that might have less interference. If that also didn’t help, please contact support@mikrotik.com with a support output file from the affected AP and the Station which are made after those disconnections.
RouterOS 6.46.1
# model = RB952Ui-5ac2nD
/caps-man channel
add band=2ghz-b/g/n extension-channel=XX frequency=2412,2437,2462,2427,2447 name=channel-2
add band=5ghz-a/n/ac frequency=5180,5240 name=channel-5
add band=2ghz-g/n frequency=2412 name=channel-2-1
add band=2ghz-g/n frequency=2462 name=channel-2-11
add band=2ghz-g/n frequency=2437 name=channel-2-6
/interface bridge
add arp=reply-only comment=guest name=bridge-guest
add admin-mac=C4:AD:***:A1 auto-mac=no comment=LAN name=bridge-lan
/interface ethernet
set [ find default-name=ether1 ] name=ether1-inet
/caps-man datapath
add bridge=bridge-lan client-to-client-forwarding=yes name=datapath
add bridge=bridge-guest client-to-client-forwarding=no name=datapath-guest
/caps-man security
add authentication-types=wpa2-psk encryption=aes-ccm group-encryption=aes-ccm name=security-Work passphrase=»*******»
add authentication-types=wpa2-psk encryption=aes-ccm group-encryption=aes-ccm name=security-Guest passphrase=*******
/caps-man configuration
add channel=channel-2 comment=2.4 datapath=datapath mode=ap name=cfg2 rx-chains=0,1,2,3 security=security-Work ssid=
Ch***Service tx-chains=0,1,2,3
add channel=channel-5 comment=5 datapath=datapath mode=ap name=cfg5 rx-chains=0,1,2,3 security=security-Work ssid=
Ch***Service-5 tx-chains=0,1,2,3
add channel=channel-2 channel.tx-power=17 comment=Guest-2 datapath=datapath-guest hw-protection-mode=rts-cts mode=ap name=cfg2-guest
rx-chains=0,1,2,3 security=security-Guest ssid=GuestCES tx-chains=0,1,2,3
/interface list
add comment=defconf name=WAN
add comment=defconf name=LAN
/interface wireless channels
add band=2ghz-g/n extension-channel=Ce frequency=2412 list=1 name=ch1 width=20
/interface wireless security-profiles
set [ find default=yes ] supplicant-identity=MikroTik
add authentication-types=wpa2-psk eap-methods=»» mode=dynamic-keys name=CES supplicant-identity=»» wpa2-pre-shared-key=»*******»
add authentication-types=wpa2-psk eap-methods=»» mode=dynamic-keys name=GUEST supplicant-identity=»» wpa2-pre-shared-key=*******
/interface wireless
# managed by CAPsMAN
# channel: 2412/20-Ce/gn(30dBm), SSID: Ch***Service, CAPsMAN forwarding
set [ find default-name=wlan1 ] antenna-gain=0 band=2ghz-b/g/n channel-width=20/40mhz-XX comment=wlan country=no_country_set
distance=indoors frequency-mode=manual-txpower hw-protection-mode=rts-cts mode=ap-bridge security-profile=CES ssid=
Ch***Service wireless-protocol=802.11 wps-mode=disabled
# managed by CAPsMAN
# channel: 5180/20-Ceee/ac(17dBm), SSID: Ch***Service-5, CAPsMAN forwarding
set [ find default-name=wlan2 ] antenna-gain=0 band=5ghz-a/n/ac comment=wlan-5 country=no_country_set distance=indoors
frequency-mode=manual-txpower mode=ap-bridge security-profile=CES ssid=Ch***Service-5 wireless-protocol=802.11 wps-mode=
disabled
add keepalive-frames=disabled mac-address=C6:AD:***:A6 master-interface=wlan1 multicast-buffering=disabled name=wlan3
security-profile=GUEST ssid=GuestCES wds-cost-range=0 wds-default-cost=0 wps-mode=disabled
/interface wireless manual-tx-power-table
# managed by CAPsMAN
# channel: 2412/20-Ce/gn(30dBm), SSID: Ch***Service, CAPsMAN forwarding
set wlan1 comment=wlan
# managed by CAPsMAN
# channel: 5180/20-Ceee/ac(17dBm), SSID: Ch***Service-5, CAPsMAN forwarding
set wlan2 comment=wlan-5
/interface wireless nstreme
# managed by CAPsMAN
# channel: 2412/20-Ce/gn(30dBm), SSID: Ch***Service, CAPsMAN forwarding
set wlan1 comment=wlan
# managed by CAPsMAN
# channel: 5180/20-Ceee/ac(17dBm), SSID: Che***Service-5, CAPsMAN forwarding
set wlan2 comment=wlan-5
/ip hotspot profile
set [ find default=yes ] html-directory=flash/hotspot
/ip pool
add name=dhcp ranges=192.168.81.10-192.168.81.200
add name=dhcp-guest ranges=192.168.34.100-192.168.34.150
/ip dhcp-server
add add-arp=yes address-pool=dhcp disabled=no interface=bridge-lan name=LAN
add add-arp=yes address-pool=dhcp-guest disabled=no interface=bridge-guest name=WiFi-Guest
/queue type
add kind=pcq name=pcq-download-3M pcq-classifier=dst-address pcq-dst-address6-mask=64 pcq-rate=3M pcq-src-address6-mask=64
add kind=pcq name=pcq-upload-3M pcq-classifier=src-address pcq-dst-address6-mask=64 pcq-rate=3M pcq-src-address6-mask=64
/queue simple
add limit-at=10M/10M max-limit=10M/10M name=WiFi-Guest-3M queue=pcq-upload-3M/pcq-download-3M target=192.168.34.0/24
/caps-man access-list
add action=reject allow-signal-out-of-range=10s disabled=no mac-address=00:00:00:00:00:00 signal-range=-120..120 ssid-regexp=»»
add action=accept allow-signal-out-of-range=10s disabled=no mac-address=00:00:00:00:00:00 signal-range=-80..120 ssid-regexp=»»
/caps-man manager
set enabled=yes
/caps-man manager interface
add forbid=yes interface=ether1-inet
/caps-man provisioning
add action=create-dynamic-enabled hw-supported-modes=gn master-configuration=cfg2 name-format=identity slave-configurations=
cfg2-guest
add action=create-dynamic-enabled hw-supported-modes=ac,an master-configuration=cfg5 name-format=identity
/interface bridge filter
# no interface
add action=drop chain=forward in-interface=*E
# no interface
add action=drop chain=forward out-interface=*E
# no interface
add action=drop chain=forward in-interface=*F
# no interface
add action=drop chain=forward out-interface=*F
/interface bridge port
add bridge=bridge-lan interface=ether2
add bridge=bridge-lan interface=ether3
add bridge=bridge-lan interface=ether4
add bridge=bridge-lan interface=ether5
add bridge=bridge-lan comment=wlan interface=wlan1
add bridge=bridge-lan comment=wlan-5 interface=wlan2
add bridge=bridge-guest comment=wlan-guest interface=wlan3
/ip neighbor discovery-settings
set discover-interface-list=LAN
/interface list member
add interface=bridge-lan list=LAN
add interface=ether1-inet list=WAN
/interface wireless cap
#
set discovery-interfaces=bridge-lan enabled=yes interfaces=wlan1,wlan2
/ip address
add address=192.168.81.1/24 comment=LAN interface=bridge-lan network=192.168.81.0
add address=192.168.34.1/24 comment=Guest interface=wlan3 network=192.168.34.0
/ip cloud
set update-time=no
/ip dhcp-client
add comment=INET disabled=no interface=ether1-inet
/ip dhcp-server network
add address=192.168.34.0/24 comment=Guest dns-server=8.8.8.8 gateway=192.168.34.1 netmask=24
add address=192.168.81.0/24 comment=LAN dns-server=8.8.8.8 gateway=192.168.81.1 netmask=24
/ip dns
set allow-remote-requests=yes servers=8.8.8.8
/ip dns static
add address=192.168.81.1 comment=defconf name=router.lan
add action=masquerade chain=srcnat comment=»defconf: masquerade» out-interface-list=WAN
-

-
tspascoal
newbie
- Posts: 38
- Joined: Mon Jul 06, 2020 12:08 pm
CaP AC can’t get IP via DHCP
Sun Jan 09, 2022 7:33 pm
I’ve setup a cAP AC in brige mode (in the same switch which an AC3 is already working in bridge mode without any issues) but the cAP AC can’t get an address via DHCP
Connected machines via wired (haven’t tried wireless yet) can connect to the internet and to other machines on the network withouth (I’m writing this with a machine connected to the AC with a CAT cable) any issues, but the AC itself cannot get an IP address via DHCP, route 0.0.0.0 to the default GW shows as unreachable (see attachment) (and I cannot ping the default GW from the tools->ping)
[admin@MikroTik-cap-ac] /ip dhcp-client> print
Flags: X — disabled, I — invalid, D — dynamic
# INTERFACE USE-PEER-DNS ADD-DEFAULT-ROUTE STATUS ADDRESS
0 bridge yes yes searching…
Since the AC itself cannot see the default GW (nor the DNS) it cannot run any updates since it can’t resolve mikrotik.com DNS name
The problem doesn’t seem to be DHCP, since I’ve tried to configured the IP statically and it’s still unreachable.
I haven’t changed anything on the default config, so I’m at a loss what the issue could be.
Is it the firewall? or something very obvious that I’m missing? The router is obviously connected since clients can use the network, but the AC cannot directly reach anything
These are the firewall rules
/ip firewall filter
add action=accept chain=input comment=»defconf: accept established,related,untracked» connection-state=established,related,untracked
add action=drop chain=input comment=»defconf: drop invalid» connection-state=invalid
add action=accept chain=input comment=»defconf: accept ICMP» protocol=icmp
add action=accept chain=input comment=»defconf: accept to local loopback (for CAPsMAN)» dst-address=127.0.0.1
add action=drop chain=input comment=»defconf: drop all not coming from LAN» in-interface-list=!LAN
add action=accept chain=forward comment=»defconf: accept in ipsec policy» ipsec-policy=in,ipsec
add action=accept chain=forward comment=»defconf: accept out ipsec policy» ipsec-policy=out,ipsec
add action=fasttrack-connection chain=forward comment=»defconf: fasttrack» connection-state=established,related
add action=accept chain=forward comment=»defconf: accept established,related, untracked» connection-state=established,related,untracked
add action=drop chain=forward comment=»defconf: drop invalid» connection-state=invalid
add action=drop chain=forward comment=»defconf: drop all from WAN not DSTNATed» connection-nat-state=!dstnat connection-state=new in-interface-list=WAN
/ip firewall nat
add action=masquerade chain=srcnat comment=»defconf: masquerade» ipsec-policy=out,none out-interface-list=WAN
Any tips would be most appreciated, I have been banging my head on the wall for hours…
Thanks in advance
You do not have the required permissions to view the files attached to this post.
-
-
Zacharias
Forum Guru
- Posts: 3468
- Joined: Tue Dec 12, 2017 12:58 am
- Location: Greece

Re: CaP AC can’t get IP via DHCP
Sun Jan 09, 2022 7:40 pm
/export hide-sensitive the configuration of the CAP
-

-
anav
Forum Guru
- Posts: 16263
- Joined: Sun Feb 18, 2018 11:28 pm
- Location: Nova Scotia, Canada
- Contact:
Re: CaP AC can’t get IP via DHCP
Sun Jan 09, 2022 7:54 pm
Bang no further,
There are no firewall rules needed.
Assuming you have some vlans for the WIFI (home, guest, iot devices — so at least three).
One will be the trusted vlan (typically the home vlan).
Give the CAPAC an IP address on this vlan
One bridge
identify vlans with interface bridge
assign bridge ports
ether1 trunk port to switch or router whatever
vlan10 to bridge (pvid=) {home}
vlan20 to bridge (pvid=) {guest}
any virtual wlans to bridge (pvid=) {iot devices}
Ensure there is on interface list entry called manage.
add interface=vlan10 list=manage
ip neighbours discovery list=manage
tools winmacserver list=manage
ip routes
dst-address=0.0.0.0/0 gwy=192.168.20.1
Setup bridge ports and bridge vlan accordingly
Activate bridge vlan filtering.
Details are in this excellent document see example post # 4, after reading and understanding the main pages.
viewtopic.php?t=143620
++++++++++++++++++++++++++++++++++++++++++++++
To add in my own twist.
USE ether 2 as a wired backup (or use virtual wlan as a wireless back up, both OFF Bridge where you can configure the router and less apt to lock yourself out).
As always though make good use of SAFE MODE!!
viewtopic.php?t=181718
-
-
tspascoal
newbie
- Posts: 38
- Joined: Mon Jul 06, 2020 12:08 pm
Topic Author
Re: CaP AC can’t get IP via DHCP
Sun Jan 09, 2022 8:11 pm
/export hide-sensitive the configuration of the CAP
/interface bridge
add admin-mac=2C:C8:1B:B0:CB:AC auto-mac=no comment=defconf name=bridge
/interface wireless
set [ find default-name=wlan1 ] band=2ghz-b/g/n channel-width=20/40mhz-XX disabled=no distance=indoors frequency=auto installation=indoor mode=ap-bridge ssid=MikroTik-B0CBAD wireless-protocol=802.11
set [ find default-name=wlan2 ] band=5ghz-a/n/ac channel-width=20/40/80mhz-XXXX country=portugal disabled=no distance=indoors frequency=auto installation=indoor mode=ap-bridge ssid=MikroTik-B0CBAE wireless-protocol=802.11
/interface list
add comment=defconf name=WAN
add comment=defconf name=LAN
/interface wireless security-profiles
set [ find default=yes ] authentication-types=wpa2-psk group-ciphers=tkip,aes-ccm mode=dynamic-keys supplicant-identity=MikroTik unicast-ciphers=tkip,aes-ccm
/ip dhcp-server
add interface=bridge name=defconf
/interface bridge port
add bridge=bridge comment=defconf interface=ether2
add bridge=bridge comment=defconf interface=wlan1
add bridge=bridge comment=defconf interface=wlan2
add bridge=bridge interface=ether1
/ip neighbor discovery-settings
set discover-interface-list=all
/interface list member
add comment=defconf interface=ether1 list=WAN
add interface=ether2 list=LAN
add interface=wlan2 list=LAN
add interface=wlan1 list=LAN
/ip address
add address=192.168.0.102/24 interface=ether2 network=192.168.0.0
/ip dhcp-client
add interface=bridge
/ip dhcp-server network
add address=0.0.0.0/24 comment=defconf gateway=0.0.0.0 netmask=24
/ip dns
set allow-remote-requests=yes servers=192.168.0.92,192.168.0.101
/ip firewall filter
add action=accept chain=input comment=»defconf: accept established,related,untracked» connection-state=established,related,untracked
add action=drop chain=input comment=»defconf: drop invalid» connection-state=invalid
add action=accept chain=input comment=»defconf: accept ICMP» protocol=icmp
add action=accept chain=input comment=»defconf: accept to local loopback (for CAPsMAN)» dst-address=127.0.0.1
add action=drop chain=input comment=»defconf: drop all not coming from LAN» in-interface-list=!LAN
add action=accept chain=forward comment=»defconf: accept in ipsec policy» ipsec-policy=in,ipsec
add action=accept chain=forward comment=»defconf: accept out ipsec policy» ipsec-policy=out,ipsec
add action=fasttrack-connection chain=forward comment=»defconf: fasttrack» connection-state=established,related
add action=accept chain=forward comment=»defconf: accept established,related, untracked» connection-state=established,related,untracked
add action=drop chain=forward comment=»defconf: drop invalid» connection-state=invalid
add action=drop chain=forward comment=»defconf: drop all from WAN not DSTNATed» connection-nat-state=!dstnat connection-state=new in-interface-list=WAN
/ip firewall nat
add action=masquerade chain=srcnat comment=»defconf: masquerade» ipsec-policy=out,none out-interface-list=WAN
/ip route
add distance=1 gateway=192.168.0.101
/system identity
set name=MikroTik-cap-ac
/system routerboard mode-button
set enabled=yes on-event=dark-mode
/system script
add comment=defconf dont-require-permissions=no name=dark-mode owner=*sys policy=ftp,reboot,read,write,policy,test,password,sniff,sensitive,romon source=
«r
n :if ([system leds settings get all-leds-off] = «never») do={r
n /system leds settings set all-leds-off=immediate r
n } else={r
n /system leds settings set all-leds-off=never r
n }r
n «
/tool mac-server
set allowed-interface-list=LAN
/tool mac-server mac-winbox
set allowed-interface-list=LAN
-
-
tspascoal
newbie
- Posts: 38
- Joined: Mon Jul 06, 2020 12:08 pm
Topic Author
Re: CaP AC can’t get IP via DHCP
Sun Jan 09, 2022 8:13 pm
Bang no further,
There are no firewall rules needed.
Assuming you have some vlans for the WIFI (home, guest, iot devices — so at least three).One will be the trusted vlan (typically the home vlan).
Give the CAPAC an IP address on this vlanOne bridge
identify vlans with interface bridge
assign bridge ports
ether1 trunk port to switch or router whatever
vlan10 to bridge (pvid=) {home}
vlan20 to bridge (pvid=) {guest}
any virtual wlans to bridge (pvid=) {iot devices}Ensure there is on interface list entry called manage.
add interface=vlan10 list=manage
ip neighbours discovery list=manage
tools winmacserver list=manageip routes
dst-address=0.0.0.0/0 gwy=192.168.20.1Setup bridge ports and bridge vlan accordingly
Activate bridge vlan filtering.
Details are in this excellent document see example post # 4, after reading and understanding the main pages.
viewtopic.php?t=143620
++++++++++++++++++++++++++++++++++++++++++++++
To add in my own twist.
USE ether 2 as a wired backup (or use virtual wlan as a wireless back up, both OFF Bridge where you can configure the router and less apt to lock yourself out).
As always though make good use of SAFE MODE!!
viewtopic.php?t=181718
Thanks, lot of great info.
Unfortunately I have no VLANs yet (it’s on the todo list (but it’s been there for a big while. so unlikely to change in the near future), I have bookmarked your answer to tackle it on the future.
-
-
Zacharias
Forum Guru
- Posts: 3468
- Joined: Tue Dec 12, 2017 12:58 am
- Location: Greece
Re: CaP AC can’t get IP via DHCP
Sun Jan 09, 2022 8:21 pm
Most obviously the CAP gets an Address from the DHCP server on the Bridge interface…
However the address 192.168.0.102/24 must be assigned in the Bridge and not on the slave interface…
But if you want to assign a static IP Address then you need no DHCP Client…
There are more parts in the configuration that are wrong…
-
-
anav
Forum Guru
- Posts: 16263
- Joined: Sun Feb 18, 2018 11:28 pm
- Location: Nova Scotia, Canada
-
Contact:
Re: CaP AC can’t get IP via DHCP
Sun Jan 09, 2022 8:35 pm
OKAY so assuming you only have one flat design (only one subnet, and its assigned to the bridge).
So no bridge vlan filtering.
When you do switch over, then the bridge will have no subnet and all subnets will be on vlans.
Also one should modify LAN to MANAGE for interface as that will identify which subnet is the trusted vlan (usually the home one or the one the admin resides on/uses)
Now to the CONFIG
Grossest error was this one………..
add address=192.168.0.102/24 interface=ether2 network=192.168.0.0 (should be bridge)!
Based on flat one subnet then……..
/export hide-sensitive the configuration of the CAP/interface bridge
add admin-mac=2auto-mac=no comment=defconf name=bridge
/interface wireless
set [ find default-name=wlan1 ] band=2ghz-b/g/n channel-width=20/40mhz-XX disabled=no distance=indoors frequency=auto installation=indoor mode=ap-bridge ssid=MikroTik-B0CBAD wireless-protocol=802.11
set [ find default-name=wlan2 ] band=5ghz-a/n/ac channel-width=20/40/80mhz-XXXX country=portugal disabled=no distance=indoors frequency=auto installation=indoor mode=ap-bridge ssid=MikroTik-B0CBAE wireless-protocol=802.11
/interface list
add comment=defconf name=LAN
/interface wireless security-profiles
set [ find default=yes ] authentication-types=wpa2-psk group-ciphers=tkip,aes-ccm mode=dynamic-keys supplicant-identity=MikroTik unicast-ciphers=tkip,aes-ccm
/interface bridge port
add bridge=bridge comment=defconf interface=ether2
add bridge=bridge comment=defconf interface=wlan1
add bridge=bridge comment=defconf interface=wlan2
add bridge=bridge interface=ether1
/ip neighbor discovery-settings
set discover-interface-list=LAN
/interface list member
add interface=bridge list=LAN
/ip address
add address=192.168.0.102/24 interface=bridge network=192.168.0.0 {WHY USE 102 and not 1 or 254??}
/ip dns
set allow-remote-requests=yes servers=192.168.0.92,192.168.0.101
/ip route
add distance=1 gateway=192.168.0.101 {if your going to use 102 then this should match and also be .102 }
/system identity
set name=MikroTik-cap-ac
/system routerboard mode-button
set enabled=yes on-event=dark-mode
/system script
add comment=defconf dont-require-permissions=no name=dark-mode owner=*sys policy=ftp,reboot,read,write,policy,test,password,sniff,sensitive,romon source=
«r
n :if ([system leds settings get all-leds-off] = «never») do={r
n /system leds settings set all-leds-off=immediate r
n } else={r
n /system leds settings set all-leds-off=never r
n }r
n «
/tool mac-server
set allowed-interface-list=NONE {not secure and thus set to none)
/tool mac-server mac-winbox
set allowed-interface-list=LAN
-
-
anav
Forum Guru
- Posts: 16263
- Joined: Sun Feb 18, 2018 11:28 pm
- Location: Nova Scotia, Canada
- Contact:
Re: CaP AC can’t get IP via DHCP
Sun Jan 09, 2022 8:38 pm
I see you have ether2 attached to the bridge, any special reason?
If none, then suggest you use ETHER2 or perhaps another virtual WLAN both OFF the bridge, to be able to reach the router or configure the router separately from the bridge (safer in my opinion).
Check it out.
viewtopic.php?t=181718
-
-
sindy
Forum Guru
- Posts: 9968
- Joined: Mon Dec 04, 2017 9:19 pm
Re: CaP AC can’t get IP via DHCP
Sun Jan 09, 2022 8:43 pm
The dhcp client is disabled by default, so as your export doesn’t show disabled=no, it must have been disabled at the time you did the export. But previously you’ve shown it to be in searching state, which means it wasn’t disabled at that time.
In the same export, the dhcp server attached to the same (bridge) interface doesn’t show disabled=no either. So make sure the server is disabled (or removed), and the client is enabled, these two cannot coexist on the same interface.
No switch chip rules there either so that also cannot be the reason.
I’d try sniffing — first, /interface bridge port set [find interface~»ether»] hw=no, then /tool sniffer quick port=67, and watch whether the DHCP requests are being sent and whether any responses come.
If you can see the responses to come, /system logging add topics=dhcp and then /log print follow-only should tell you why the cAP ac doesn’t like the responses.
-
-
tspascoal
newbie
- Posts: 38
- Joined: Mon Jul 06, 2020 12:08 pm
Topic Author
Re: CaP AC can’t get IP via DHCP
Sun Jan 09, 2022 10:00 pm
OKAY so assuming you only have one flat design (only one subnet, and its assigned to the bridge).
So no bridge vlan filtering.
When you do switch over, then the bridge will have no subnet and all subnets will be on vlans.
Also one should modify LAN to MANAGE for interface as that will identify which subnet is the trusted vlan (usually the home one or the one the admin resides on/uses)Now to the CONFIG
Grossest error was this one………..
add address=192.168.0.102/24 interface=ether2 network=192.168.0.0 (should be bridge)!
that was a very stupid one indeed, don’t know it ended up there though, I think it was the quickset ![]() (but setting it to bridge doesn’t fixes the issue though)
(but setting it to bridge doesn’t fixes the issue though)
Based on flat one subnet then……..
/export hide-sensitive the configuration of the CAP/interface bridge
add admin-mac=2auto-mac=no comment=defconf name=bridge
/interface wireless
set [ find default-name=wlan1 ] band=2ghz-b/g/n channel-width=20/40mhz-XX disabled=no distance=indoors frequency=auto installation=indoor mode=ap-bridge ssid=MikroTik-B0CBAD wireless-protocol=802.11
set [ find default-name=wlan2 ] band=5ghz-a/n/ac channel-width=20/40/80mhz-XXXX country=portugal disabled=no distance=indoors frequency=auto installation=indoor mode=ap-bridge ssid=MikroTik-B0CBAE wireless-protocol=802.11
/interface list
add comment=defconf name=LAN
/interface wireless security-profiles
set [ find default=yes ] authentication-types=wpa2-psk group-ciphers=tkip,aes-ccm mode=dynamic-keys supplicant-identity=MikroTik unicast-ciphers=tkip,aes-ccm
/interface bridge port
add bridge=bridge comment=defconf interface=ether2
add bridge=bridge comment=defconf interface=wlan1
add bridge=bridge comment=defconf interface=wlan2
add bridge=bridge interface=ether1
/ip neighbor discovery-settings
set discover-interface-list=LAN
/interface list member
add interface=bridge list=LAN
/ip address
add address=192.168.0.102/24 interface=bridge network=192.168.0.0 {WHY USE 102 and not 1 or 254??}
Well this is a very old story, for (very) historical reasons my default GW has always been 101, so all APs, switches and such are in the range 102-110
/ip dns
set allow-remote-requests=yes servers=192.168.0.92,192.168.0.101/ip route
add distance=1 gateway=192.168.0.101 {if your going to use 102 then this should match and also be .102 }
/system identity
set name=MikroTik-cap-ac
/system routerboard mode-button
set enabled=yes on-event=dark-mode
/system script
add comment=defconf dont-require-permissions=no name=dark-mode owner=*sys policy=ftp,reboot,read,write,policy,test,password,sniff,sensitive,romon source=
«r
n :if ([system leds settings get all-leds-off] = «never») do={r
n /system leds settings set all-leds-off=immediate r
n } else={r
n /system leds settings set all-leds-off=never r
n }r
n «
/tool mac-server
set allowed-interface-list=NONE {not secure and thus set to none)
/tool mac-server mac-winbox
set allowed-interface-list=LAN
I think I have configured (disregard wireless, haven’t configured that yet) and yet the problem persists.
In fact i tried something else, I did a reset, used the default configuration (router) without changing anything and yet no IP is obtained via DHCP.
Either this unit is defective, or there is a problem with the cables (I’ve already switched them).
The funny thing is that I can this this on the router
/ip dhcp-server lease> print
192.168.0.102 2C:C8:1B:B0:CB:AC MikroTik-cap-ac internal offered 1s
[admin@MikroTik-cap-ac] > ping 192.168.0.101
SEQ HOST SIZE TTL TIME STATUS
0 192.168.0.101 timeout
1 192.168.0.101 timeout
2 192.168.0.101 timeout
3 192.168.0.101 timeout
4 192.168.0.101 timeout
This is the current config
/interface bridge
add admin-mac=2C:C8:1B:B0:CB:AC auto-mac=no comment=defconf name=bridge
/interface wireless
set [ find default-name=wlan1 ] band=2ghz-b/g/n channel-width=20/40mhz-XX disabled=no distance=indoors frequency=auto installation=indoor mode=ap-bridge ssid=MikroTik-B0CBAD wireless-protocol=802.11
set [ find default-name=wlan2 ] band=5ghz-a/n/ac channel-width=20/40/80mhz-XXXX country=portugal disabled=no distance=indoors frequency=auto installation=indoor mode=ap-bridge ssid=MikroTik-B0CBAE wireless-protocol=802.11
/interface list
add comment=defconf name=LAN
/interface wireless security-profiles
set [ find default=yes ] supplicant-identity=MikroTik
/interface bridge port
add bridge=bridge comment=defconf interface=ether2
add bridge=bridge comment=defconf interface=wlan1
add bridge=bridge comment=defconf interface=wlan2
add bridge=bridge interface=ether1
/ip neighbor discovery-settings
set discover-interface-list=LAN
/interface list member
add interface=bridge list=LAN
/ip address
add address=192.168.0.102/24 interface=bridge network=192.168.0.0
/ip dhcp-client
add disabled=no interface=bridge
/ip dns
set allow-remote-requests=yes servers=192.168.0.92,192.168.0.101
/ip route
add distance=1 gateway=192.168.0.101
/system identity
set name=MikroTik-cap-ac
/system routerboard mode-button
set enabled=yes on-event=dark-mode
/system script
add comment=defconf dont-require-permissions=no name=dark-mode owner=*sys policy=ftp,reboot,read,write,policy,test,password,sniff,sensitive,romon source=
«r
n :if ([system leds settings get all-leds-off] = «never») do={r
n /system leds settings set all-leds-off=immediate r
n } else={r
n /system leds settings set all-leds-off=never r
n }r
n «
/tool mac-server
set allowed-interface-list=none
/tool mac-server mac-winbox
set allowed-interface-list=LAN
MAYBE this is the problem
[admin@MikroTik-cap-ac] /system> check-installation
damaged routeros-arm package: bad image
-
-
tspascoal
newbie
- Posts: 38
- Joined: Mon Jul 06, 2020 12:08 pm
Topic Author
Re: CaP AC can’t get IP via DHCP
Sun Jan 09, 2022 10:13 pm
MAYBE this is the problem
[admin@MikroTik-cap-ac] /system> check-installation
damaged routeros-arm package: bad image
This was not the problem. I’ve now upgraded to 6.49.2, the packages no longer show as bad but still not able to ping the default GW
[admin@MikroTik-cap-ac] /system> check-installation
status: installation is ok
-
-
sindy
Forum Guru
- Posts: 9968
- Joined: Mon Dec 04, 2017 9:19 pm
Re: CaP AC can’t get IP via DHCP
Sun Jan 09, 2022 10:14 pm
What does sniffing (as suggested above) show?
-
-
anav
Forum Guru
- Posts: 16263
- Joined: Sun Feb 18, 2018 11:28 pm
- Location: Nova Scotia, Canada
- Contact:
Re: CaP AC can’t get IP via DHCP
Sun Jan 09, 2022 10:33 pm
This needs to be removed/disabled!! Other than that do not see anything particularly wrong.
/ip dhcp-client
add disabled=no interface=bridge
one question can you tell us what the capac plugs into and how that unit may be configured??
-
-
tspascoal
newbie
- Posts: 38
- Joined: Mon Jul 06, 2020 12:08 pm
Topic Author
Re: CaP AC can’t get IP via DHCP
Sun Jan 09, 2022 10:33 pm
What does sniffing (as suggested above) show?
Can’t really understand why it’s failling… The logs print this over and over….
00:53:18 dhcp,debug,packet dhcp-client on bridge sending discover with id 1198716654 to 255.255.255.255
00:53:18 dhcp,debug,packet secs = 19
00:53:18 dhcp,debug,packet ciaddr = 0.0.0.0
00:53:18 dhcp,debug,packet chaddr = 2C:C8:1B:B0:CB:AC
00:53:18 dhcp,debug,packet Msg-Type = discover
00:53:18 dhcp,debug,packet Parameter-List = Subnet-Mask,Classless-Route,Router,Static-Route,Domain-Server,NTP-Server,CAPWAP-Server,Vendor-Specific
00:53:18 dhcp,debug,packet Host-Name = «MikroTik-cap-ac»
00:53:18 dhcp,debug,packet Client-Id = 01-2C-C8-1B-B0-CB-AC
Could it be the time/date? Since NTP is not working….
NOPE it’s not the clock.
The thing that bothers this, is that I only have mikrotik devices on the network.
Anyway, DHCP is probably just a simptom, this is most likely the trouble…..
[admin@MikroTik-cap-ac] > ping 192.168.0.101
SEQ HOST SIZE TTL TIME STATUS
0 192.168.0.101 timeout
1 192.168.0.101 timeout
-
-
tspascoal
newbie
- Posts: 38
- Joined: Mon Jul 06, 2020 12:08 pm
Topic Author
Re: CaP AC can’t get IP via DHCP
Sun Jan 09, 2022 11:00 pm
This needs to be removed/disabled!! Other than that do not see anything particularly wrong.
/ip dhcp-client
add disabled=no interface=bridgeone question can you tell us what the capac plugs into and how that unit may be configured??
The cap is connected to a CSS106-1G-4P-1S switch (https://mikrotik.com/product/CRS106-1C-5S) which powers the AC with PoE and the switch is connected to a RB951G-2HnD which is my main router
I CAN’T BELIEVE What the problem was.
the AC was connected to port 4 of the switch. I have now connected it to port 5 and IT WORKS.
This means I disabled the HAP ac3 that was on port 5.
Now that I have connected the AC3 to the port where the CAP was, the AC3 can no longer acquire an IP Address !@!#$%$&$^^$%%$
192.168.0.104 48:8F:5A:A5:70:30 MikroTik-ac3 internal offered 2s
Could it be the port is defective? could it be that if fails when more power is drawn from PoE? (the switch is powering 3 devices)
It is probably the former. I disconnected the AC3 and connected only the AC (on port 4) and it fails
I don’t see anything on swos which could be the cause of this….
-
-
tspascoal
newbie
- Posts: 38
- Joined: Mon Jul 06, 2020 12:08 pm
Topic Author
Re: CaP AC can’t get IP via DHCP
Sun Jan 09, 2022 11:09 pm
This needs to be removed/disabled!! Other than that do not see anything particularly wrong.
/ip dhcp-client
add disabled=no interface=bridgeone question can you tell us what the capac plugs into and how that unit may be configured??
The cap is connected to a CSS106-1G-4P-1S switch (https://mikrotik.com/product/CRS106-1C-5S) which powers the AC with PoE and the switch is connected to a RB951G-2HnD which is my main router
I CAN’T BELIEVE What the problem was.
the AC was connected to port 4 of the switch. I have now connected it to port 5 and IT WORKS.
This means I disabled the HAP ac3 that was on port 5.
Now that I have connected the AC3 to the port where the CAP was, the AC3 can no longer acquire an IP Address !@!#$%$&$^^$%%$
192.168.0.104 48:8F:5A:A5:70:30 MikroTik-ac3 internal offered 2s
Could it be the port is defective? could it be that if fails when more power is drawn from PoE? (the switch is powering 3 devices)
It is probably the former. I disconnected the AC3 and connected only the AC (on port 4) and it fails
I don’t see anything on swos which could be the cause of this….
Humm port 4 of the switch had a different setting on egress VLAN header. It was set to «Add if missing» whereas the other ports had «leave as is»
I set it to «leave as is» and it’s now working… I wonder if it was luck or that was the problem. (can’t see why this would affect DHCP and ICMP though).
The logs now say there was an error with DHCP (but it works)
21:11:32 dhcp,debug,packet dhcp-client on bridge received ack with id 1368314587 from 192.168.0.101
21:11:32 dhcp,debug,packet flags = broadcast
21:11:32 dhcp,debug,packet ciaddr = 0.0.0.0
21:11:32 dhcp,debug,packet yiaddr = 192.168.0.102
21:11:32 dhcp,debug,packet siaddr = 192.168.0.101
21:11:32 dhcp,debug,packet chaddr = 2C:C8:1B:B0:CB:AC
21:11:32 dhcp,debug,packet Msg-Type = ack
21:11:32 dhcp,debug,packet Server-Id = 192.168.0.101
21:11:32 dhcp,debug,packet Address-Time = 14400
21:11:32 dhcp,debug,packet Subnet-Mask = 255.255.255.0
21:11:32 dhcp,debug,packet Router = 192.168.0.101
21:11:32 dhcp,debug,packet Domain-Server = 192.168.0.92,192.168.0.101
21:11:32 dhcp,debug,packet CAPWAP-Server = 192.168.0.101
21:11:32 dhcp,debug,state dhcp-client on bridge entering <error> state
-
-
sindy
Forum Guru
- Posts: 9968
- Joined: Mon Dec 04, 2017 9:19 pm
Re: CaP AC can’t get IP via DHCP
Sun Jan 09, 2022 11:14 pm
I wonder if it was luck or that was the problem. (can’t see why this would affect DHCP and ICMP though).
Of course it was the problem. The switch was adding VLAN tags to frames it was sending to the connected device, which expects tagless frames, so it was ignoring the tagged ones. Sniffing would have shown you that.
-
-
anav
Forum Guru
- Posts: 16263
- Joined: Sun Feb 18, 2018 11:28 pm
- Location: Nova Scotia, Canada
- Contact:
Re: CaP AC can’t get IP via DHCP
Sun Jan 09, 2022 11:32 pm
What this demonstrates that only providing us with one piece of the puzzle was confusing.
Suggest a network diagram for future posts to show what is connected which may always be part of the problem.
-
-
tspascoal
newbie
- Posts: 38
- Joined: Mon Jul 06, 2020 12:08 pm
Topic Author
Re: CaP AC can’t get IP via DHCP
Sun Jan 09, 2022 11:57 pm
I wonder if it was luck or that was the problem. (can’t see why this would affect DHCP and ICMP though).
Of course it was the problem. The switch was adding VLAN tags to frames it was sending to the connected device, which expects tagless frames, so it was ignoring the tagged ones. Sniffing would have shown you that.
But I did sniff ![]()
Maybe I’ve missed something, but I don’t think it showed that
-
-
tspascoal
newbie
- Posts: 38
- Joined: Mon Jul 06, 2020 12:08 pm
Topic Author
Re: CaP AC can’t get IP via DHCP
Sun Jan 09, 2022 11:58 pm
What this demonstrates that only providing us with one piece of the puzzle was confusing.
Suggest a network diagram for future posts to show what is connected which may always be part of the problem.
Agreed. Although in this case one of the ports had a different config (for now apparent reason)
Thanks to everybody who chimed in
-
-
Zacharias
Forum Guru
- Posts: 3468
- Joined: Tue Dec 12, 2017 12:58 am
- Location: Greece
Re: CaP AC can’t get IP via DHCP
Mon Jan 10, 2022 12:05 am
Add if missing, what it does is it adds a VLAN tag on egress, and is used on Trunk ports… So you were adding a VLAN tag…
The leave as is on the other hand, it does not add but it does not remove as well a VLAN tag on egress, it is used for hybrid ports… It is the default value…
Always strip, removes the VLAN tag from egress and is used on access ports…
Read here https://wiki.mikrotik.com/wiki/Manual:S … s#Features
Отвечу Вам в целом и обобщённо.
1) порт куда подключается провайдер — обычно этот порт не должен быть
нигде с другими портами как-то связан и не должен быть членом бриджа
локального.
1.1) если адрес даётся статично — устанавливаем на порту1 сразу
1.2) если адрес даётся динамический — прописываем порт1 в DHCP Client сразу и получаем
1.3) если подключение по РРРоЕ/L2TP — то физически порт1 нужен нам для связи с сервером
авторизации провайдера, но всё равно, такой порт (порт1) нельзя никуда смешивать.
И интерфейс рррое или l2tp — это те интерфейсы через которые Вы будете выходить в сторону
провайдера и через этот интерфейс и надо делать маршрутизацию/НАТ(маскарайдинг).
2) локальная сеть:
а) простейший вариант: создаёте бридж (это логический интерфейс), в него прописываете
порты для локальной сети (скажем порт2 и порт3), даёте адрес бриджу, на бридже (подчёркиваю)
создаёте/настраиваете DHCP сервер. И уже те компьютеры которые будут входить в состав
бриджа и будут получать от его DHCP нужную(правильную) адресацию.
Хотите, добавьте в бридж и wlan интерфейсы.
б) не простейший вариант:
создаёте второй локальный бридж, в него прописываете интерфейс wlan1, на этом
бридже поднимаете отдельный DHCP с отдельным пулом и адресацией.
И соответственно, кто подключиться во ВиФИ — тот получит адресацию со второго DHCP.
Защита:
а) защищать надо сеть от вторжения/атак на внешнем интерфейсе,
он у Вас или порт1 и/или если есть рррое/l2tp = то этот интерфейс является
внешним.
б) прежде чем защищать от кучи портов, на микротике надо «лишнее» отключить,
то что явно не нужно.
в) золотое правило — то что по-умолчанию не включено/не стоит галочка — лучше и не включать.
г) при настройки DHCP сервера(ов) — аренду адреса(ов) делать 10-15 минут, для тестирования,
уже в работе можно сделать 3-4 часа или даже 10-12 часов. Делать 1-2 дня или 7-10 дней
я со своей стороны Строго НЕ рекомендую.
Почитайте тут на форуме как надо учиться дружить с микротиками, набейте руку, пока что
Вы не понимаете некоторые сетевые сущности и логику.
На работе(ах): 2xCCR1016-12G, RB3011UiAS и hAP lite (RB941)
Дома: CCR1016-12G, RBcAP2n (standalone), RB wAP LTE kit
Для тестов(под рукой): RB3011UiAS, hAP mini (RB931) и что-то ещё по мелочи
MTCNA
MTCRE
Вот вы пытаетесь подключиться к Wi-Fi с телефона или планшета. Но видите «ошибку конфигурации IP», когда происходит бесконечное получение IP адреса или адрес вовсе не доступен. Чаще такие проблемы можно увидеть на операционной системе «Android». И я сразу отвечу, почему это происходит. Смартфон отправляет запрос на роутер, чтобы тот предоставил ему IP, маску и DNS. Маршрутизатор так и работает. Без установленного адреса, роутер не будет знать куда слать пакеты информации.
Это как жить в глухом лесу и заказывать посылки. Почтальон просто не будет знать куда их доставлять. По умолчанию, на всех интернет-центрах включена функция DHCP. Вот как раз она и раздаёт все эти адреса. Но иногда бывает, что функция отключена или она сломана. А у Андроид в настройках сети стоит автономное получение айпи адреса.
В таком случаи у нас есть три варианта, если не удалось подключиться к роутеру:
- Подойдите и перезагрузите ваш роутер – просто выдерните его из розетки и через 2 минуты вставьте обратно. Если не поможет – и читаем инструкции ниже.
- Прописать IP адрес вручную на телефоне;
- Включить DHCP на роутере.
Об этом мы и будем говорить сегодня. Я подробно расскажу вам про все, с картинками и пояснениями. Но начнём, наверное, с телефона.
Содержание
- Установка сетевых настроек на смартфоне или планшете
- Как включить DHCP на роутере?
- TP-Link
- D-Link
- ASUS
- Zyxel Keenetic
- Более редкое решение
- Всё равно не подключается к WiFi
- Задать вопрос автору статьи
Установка сетевых настроек на смартфоне или планшете
Минус данного метода в том, что, прописав вручную настройки на одном телефоне – он будет работать. Но вот если вы попытаетесь подключить другие устройства – на них также придётся прописывать IP, маску и т.д.
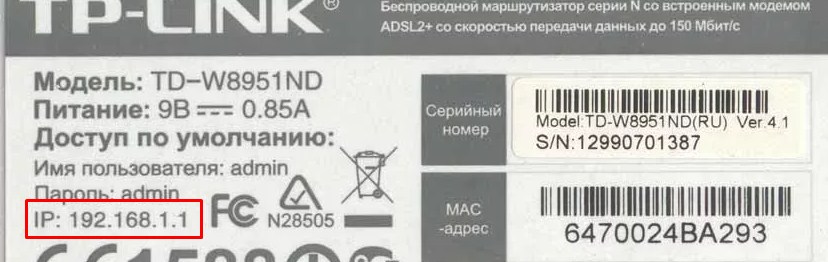
- Сначала нам надо узнать IP адрес нашего роутера. Для этого можно заглянуть под корпус аппарата и посмотреть на этикетку.
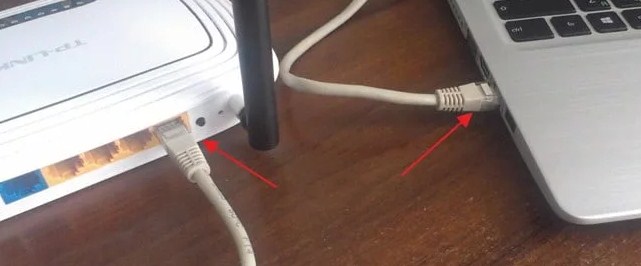
- Если там указан DNS адрес, а не IP, то узнать можно через компьютер или ноутбук. Подключитесь к роутеру по проводу, который надо будет воткнуть в LAN порт.
- Нажимаем на ноуте или компе сочетание клавиш + R.
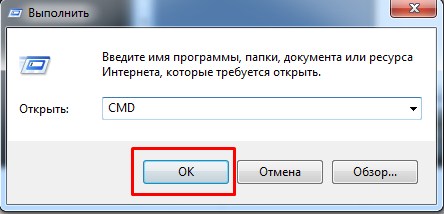
- Прописываем команду «CMD».

- В консоли вводим «ipconfig» и жмём Enter. Запоминаем IP из строки «Основной шлюз». В моём случае это 192.168.1.1, но у вас может быть и другой.

- Зайдите в «Настройки».
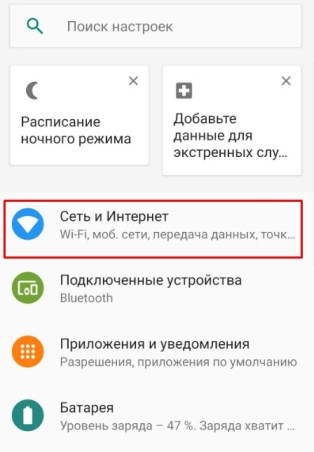
- Теперь переходим в раздел, где у вас находится Wi-Fi подключения. Нажмите на ваше подключение и удалите его.

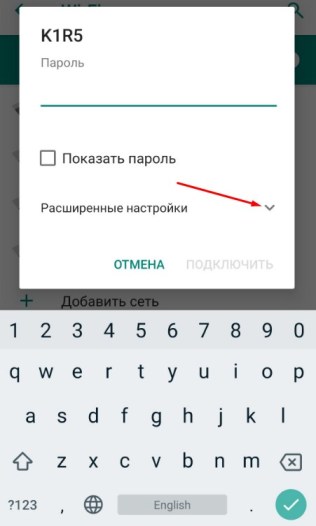
- Теперь, как обычно нажмите на вашу сеть, чтобы подключиться. Но не торопитесь вводить пароль. Сначала нажмите на стрелочку раздела «Расширенные настройки».
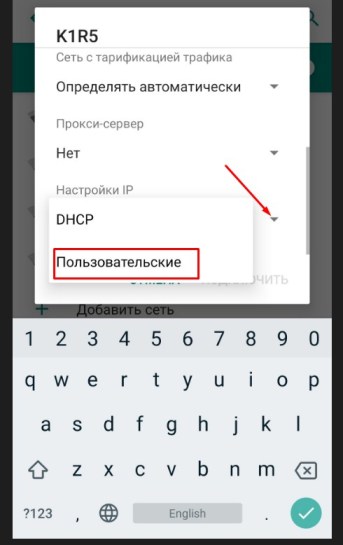
- Нажмите на «Настройки IP» и выберите «Пользовательские», чтобы ввести настройки вручную.
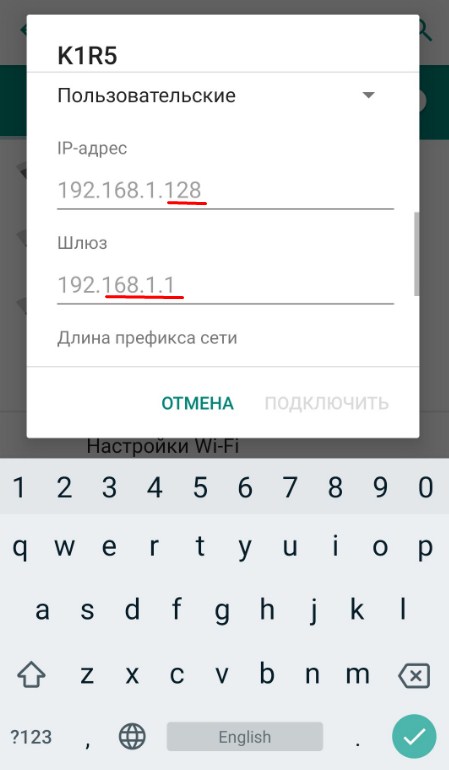
- Сначала введите в поле шлюз IP вашего роутер. У меня это 192.168.1.1. А потом IP-адрес телефона. Но нужно вписать такой же значение как у шлюза, только поменять последнюю цифру на любую другую, но не на 255. Я установил 128, но можно поставить и 16, 18, 28 и т.д. Если, к примеру у вас шлюз (айпи роутера) 192.168.0.1, то IP адрес телефона надо поставить как 192.168.0.*любая цифра* – например 192.168.0.124.
- Теперь пролистываем в самый низ.
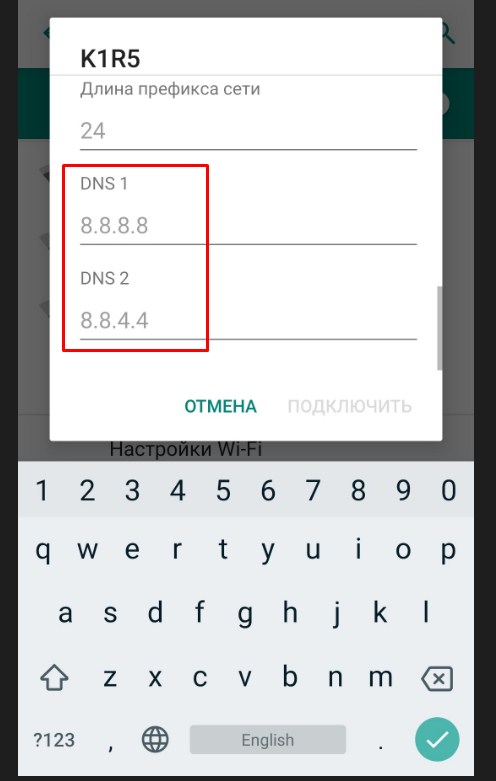
- В качестве DNS ставим в первую строку 8.8.8.8, а во вторую 8.8.4.4 — это ДНС адреса от Google. Они позволяют корректно работать всем приложениям на смартфоне и правильно открывать сайты.
- В самом конце листаем вверх, вписываем пароль и подключаемся.
Как включить DHCP на роутере?
Это самый надёжный способ, так как после этого любое устройство сможет без проблем работать в беспроводной сети. Для начала нам надо подключиться к роутеру по проводу. Как это сделать я уже писал выше. Далее открываем браузер на компьютере или ноутбуке и в адресной строке прописываем IP или DNS адрес роутера.
Напомню, что он находится под корпусом маршрутизатора на этикетке. Вас попросят ввести логин и пароль от «Админки», он находится там же. Далее инструкции будут немного отличаться от компании, выпустившей интернет-центр.
TP-Link
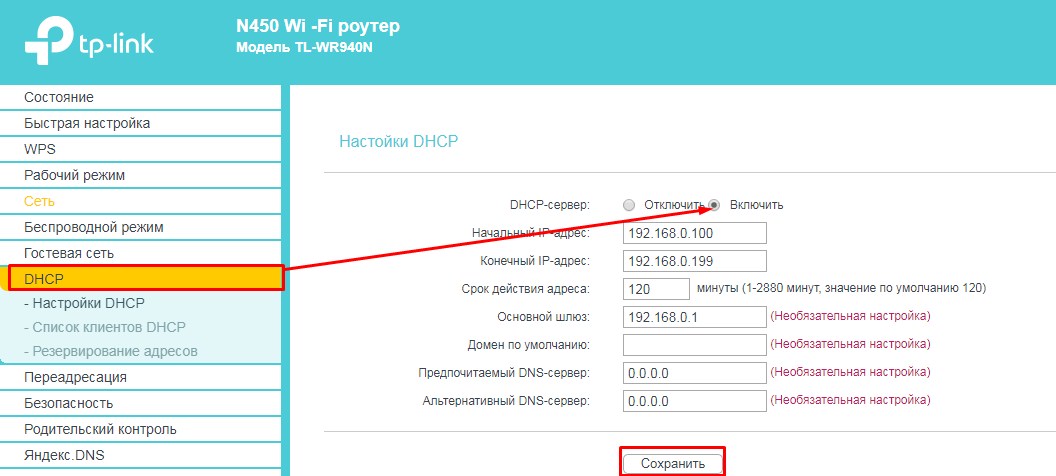
На старых моделях: слева выберите «DHCP» и включите режим. Далее «Сохранить».
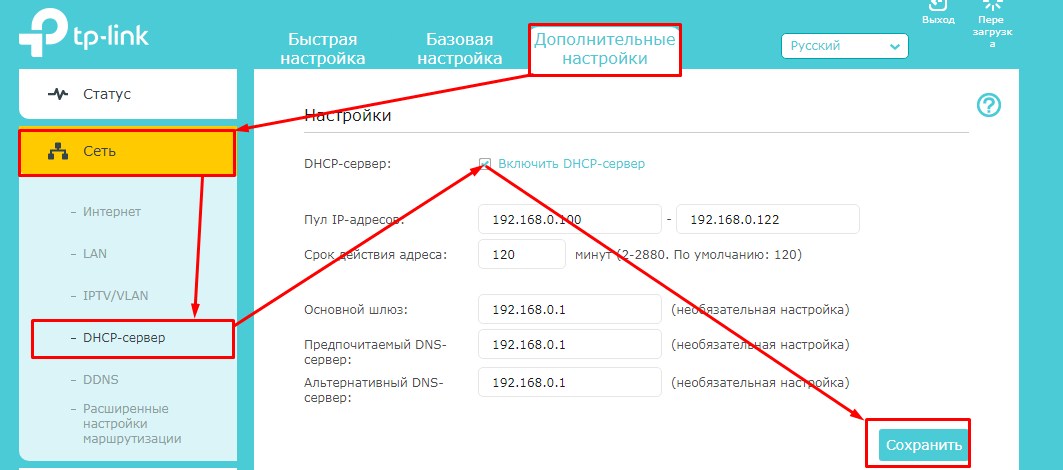
На новых моделях – «Дополнительные настройки» – «Сеть» – «DHCP-сервер». Активируем и сохраняемся.
D-Link
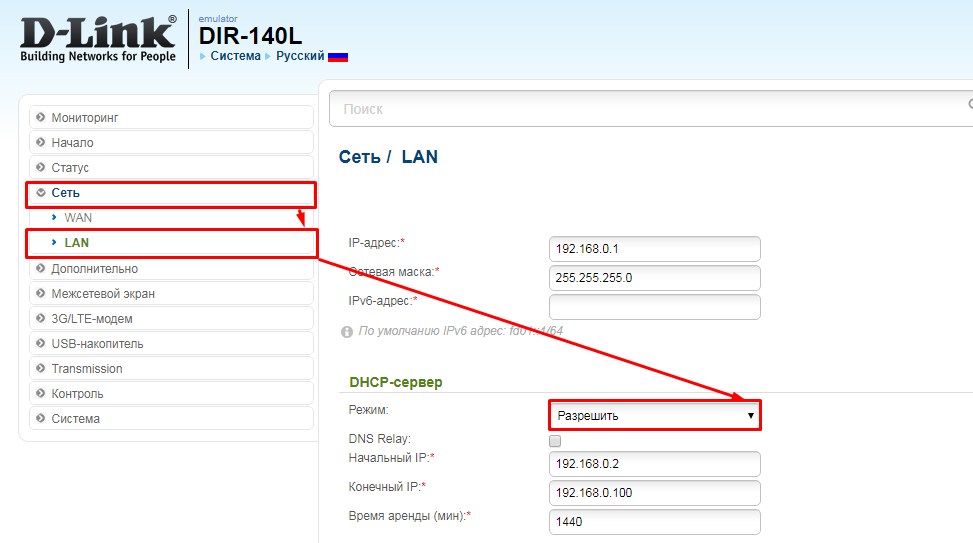
На более старых моделях выбираем «Сеть». Далее «LAN» и переводим в разделе «DHCP-сервер» в состояние «Разрешить». Не забудьте нажать кнопку «Применить». На новых прошивках всё тоже самое, только сначала надо зайти в раздел «Расширенные настройки».
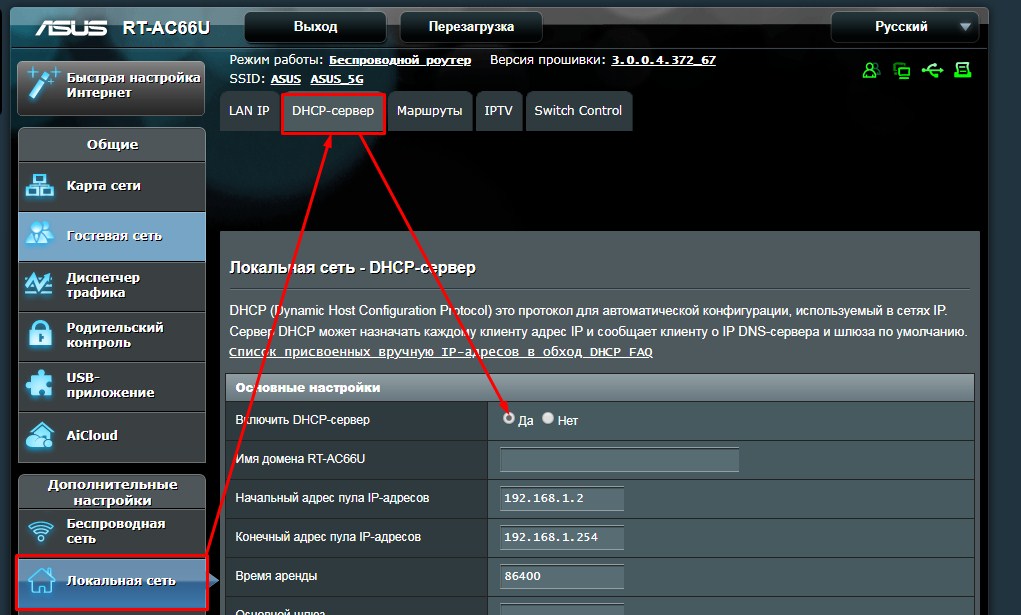
ASUS
«Локальная сеть» – «DHCP-сервер» – ставим «Да». В левом нижнем углу нажимаем «Применить».
Zyxel Keenetic
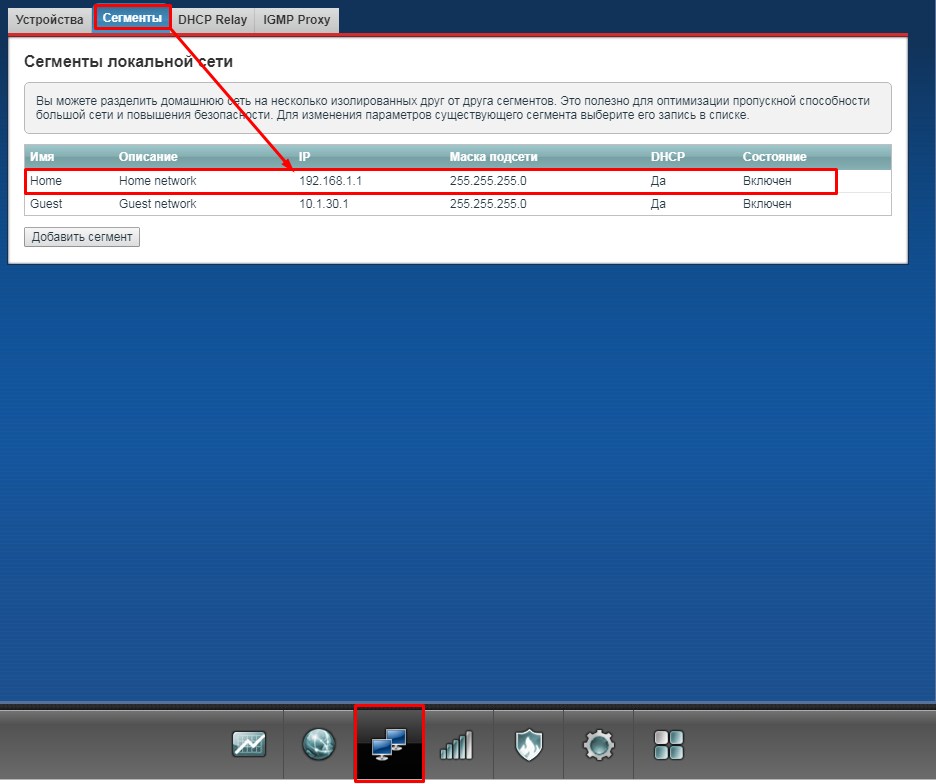
В самом низу выберите второй раздел с двумя компьютерами. Далее переходим на вторую вкладку «Сегменты». Нажимаем на первую группу «Home».
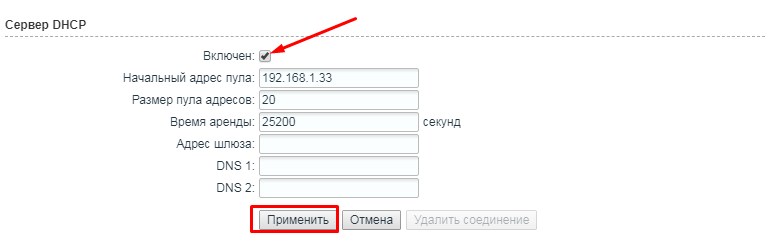
В разделе «Сервер DHCP» включаем функцию и применяем настройки.
Более редкое решение
Расскажу из собственного опыта. У меня такая проблема была, когда я перепрошил свой роутер. При этом интернет на компе, который был подключен по проводу был. Но вот подключиться к беспроводной сети, мне так и не удалось. Я залез в настройки, скачал новую прошивку, и она также не работала. Хотя устанавливал я её с официального сайта.
Так что если вы ранее обновляли прошивку вручную или через систему Web-интерфейса аппарата, то стоит сбросить настройки до заводских. Просто зажимаем кнопку «Reset» на 15 секунд. Ждём пять минут и настраиваем его заново. Не все прошивки ровно встают на маршрутизатор.
Всё равно не подключается к WiFi
Если ИП не работает и долго подключается, после выполнения всех вышестоящих инструкций – то такое может быть в случаи системной поломки телефона на Андроид. Система начинает криво работать из-за вирусов или сторонних программ. Особенно это показательно, когда все устройства и другие телефоны и планшеты подключаются, а ваш нет. Тогда стоит сбросить некоторые настройки. Зайдите в «Настройки» – «Система» – «Сброс настроек».
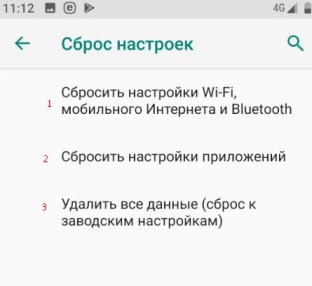
Теперь поочередно сделайте сброс по каждому пункту. Сначала сбрасываем настройки «Wi-Fi, мобильного интернет и Bluetooth». Перезагружаем телефон и вновь пытаемся подключиться к сети роутера. Потом делаем сброс по второму пункту – ну и так далее. В конце если ничего не поможет, сбросьте до заводских настроек.