Всем привет! В этой статье мы рассмотрим, наверное, самую популярную проблему – когда не открывается какой-то из сайтов в браузере, и вы видите ошибку с текстом: Не удается получить доступ к сайту. Превышено время ожидания ответа от сайта. Код ошибки: NET_ERR_CONNECTION_TIMED_OUT.
Если перевести на русский – ошибка возникает в тот момент, когда браузер посылает запрос на Web-сервер (и определенную страницу), но не получает от неё ответ в течение установленного времени. Вот ряд причин, из-за чего это может происходить:
- У вас есть проблема с доступом к интернету.
- Проблема лежит на стороне сайта – возможно, на сервере проходят технические работы или он повис. Нужно будет просто подождать.
- Из-за одной очень «классной» организации в РФ данный сайт может быть заблокирован. В более редких случаях он может не работать аналогично из-за блокировки, но не быть в списке запрещенных или заблокированных. Все дело в том, что «профессионалы», который там работают, при тестировании новых возможностей блокировки – блокируют и сторонние сайты.
- Переадресация со стороны файла hosts – что может свидетельствовать о наличии вирусов на компе.
- Если у вас включен Proxy или VPN – а они не работают.
- Проблема со стороны провайдера или оборудования, к которому вы подключены.
- Неправильная работа домашнего роутера.
- Неправильно введен адрес в адресную строку – просто проверьте, чтобы URL был верным.
- Есть проблема с операционной системой, некоторыми модулями и службами, отвечающими за подключение к интернету.
В итоге вылезает ошибка. Ниже в статье мы рассмотрим все варианты решения, которые могут вам помочь при возникновении проблемы (NET_ERR_CONNECTION_TIMED_OUT).
Содержание
- ШАГ 1: Проверка физического подключения
- ШАГ 3: Проверка сайта и DNS
- ШАГ 4: Проверка файла Hosts
- ШАГ 5: Отключение прокси и VPN
- ШАГ 6: Переустановка браузера
- ШАГ 7: Восстановление работоспособности системы
- ШАГ 8: Ручная установка драйверов
- Ничего не помогло
- Задать вопрос автору статьи
ШАГ 1: Проверка физического подключения
Итак, в первую очередь проверьте, чтобы интернет-кабель, который идет от провайдера, был плотно подключен к компьютеру или вашему домашнему роутеру. Иногда контакты окисляются и интернет просто пропадает. Возьмите интернет кабель, вытащите его и подключите его снова. То же самое касается и кабелей, которые идут от роутера к ПК или ноутбуку. Просто переподключите их.
Далее перезагрузите сам компьютер и роутер. На роутере достаточно два раза нажать по кнопке «Питания». Если такой кнопки нет, то просто выдергиваем его из розетки и вставляем обратно.
После того как роутер полностью загрузится, посмотрите на индикаторы и найдите лампочку «WAN» – она может иметь название «Интернет» или логотип маленькой планетки. Этот индикатор должен гореть. Если он не горит, то значит, скорее всего, проблема у провайдера – стоит ему позвонить в службу технической поддержки. Телефон службы тех. поддержки можно найти в интернете или в договоре.
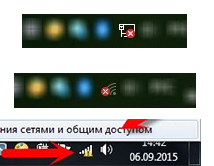
Роутер можно проверить еще другим способом – подключите к нему телефон или планшет по Wi-Fi и попробуйте выйти через него в интернет. Если с роутером все в порядке, проверьте на компьютере, нет ли рядом со значком подключения к Wi-Fi или LAN каких-то знаков (крестика или желтого треугольника).
Если вы наблюдаете что-то подобное, то уже читаем отдельные инструкции ниже:
- Красный крестик сверху подключения.
- Желтый треугольник сверху подключения.
ШАГ 3: Проверка сайта и DNS
Проверьте, подключаетесь ли вы к другим сайтам. И если да, то можно проверить подключение к этому сайту на телефоне через мобильный интернет. Если подключения нет, то тут есть два варианта:
- Сайт пока не работает и нужно подождать.
- Этот сайт каким-то образом заблокирован, но на него можно попробовать зайти через VPN. Иногда бывает, что сайт не работает только в данной стране.
Если же на другом устройстве на сайт зайти можно, то есть вероятность, что у вас есть проблемы с DNS. Давайте попробуем это решить.
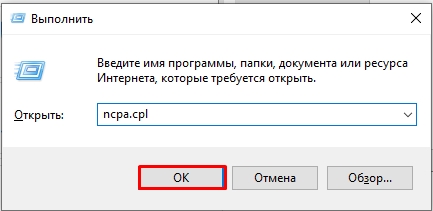
- Одновременно жмем по клавишам:
+ R
- Вводим команду:
ncpa.cpl
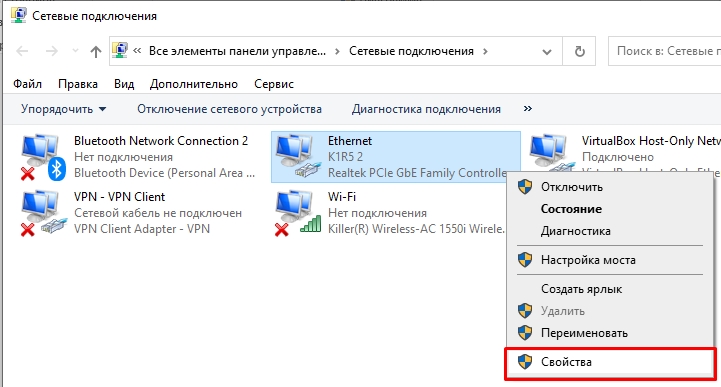
- Вы должны увидеть все подключения вашего компьютера. Выберите то, через которое вы подключены к интернету. Если это проводное подключение, то выбираем «Ethernet», если беспроводное, то «Wi-Fi». Жмем правой кнопкой мыши (ПКМ) и заходим в «Свойства».
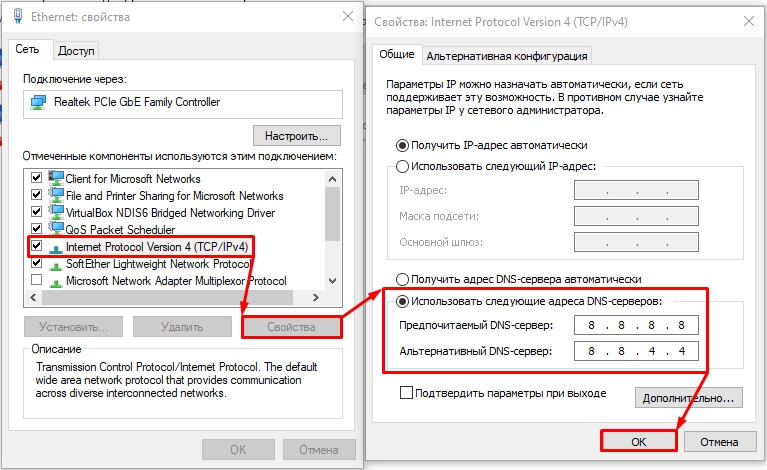
- Выделите «Интернет протокол 4», зайдите в «Свойства» и установите DNS от Google:
8.8.8.8
8.8.4.4
- Два раза нажмите «ОК».
ШАГ 4: Проверка файла Hosts
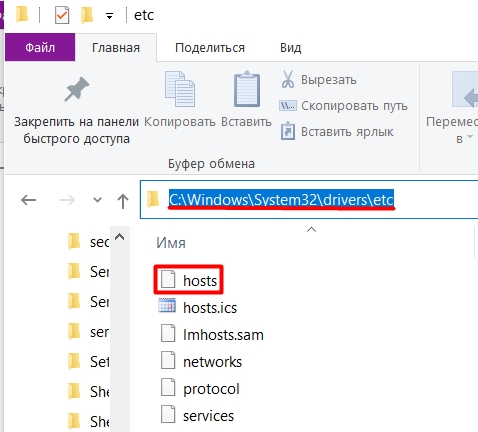
- Перейдите по пути:
C:WindowsSystem32driversetc
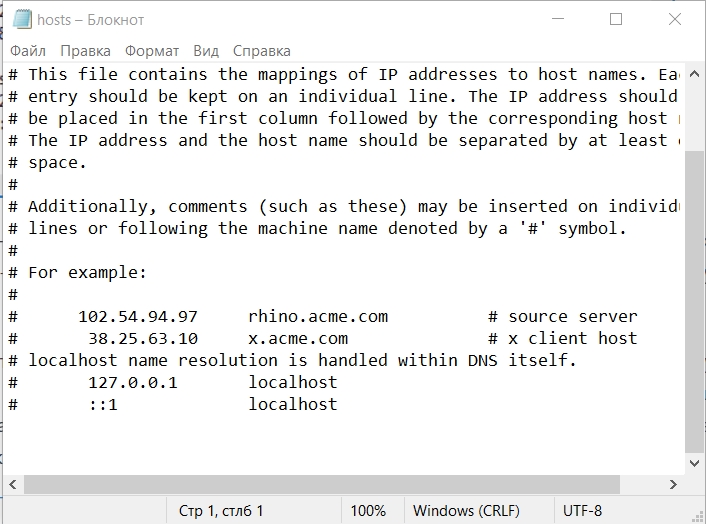
- После этого откройте файл «hosts» с помощью блокнота.
- Если там есть какие-то подозрительные строчки без знака (#) в начале – выделите их и удалите. Можно даже выделить все (Ctrl + A) и удалить (Del). После этого сохраните файл (Ctrl + S).
Если в файле было что-то подозрительное – проверьте ваш компьютер антивирусной программой со свежими базами.
ШАГ 5: Отключение прокси и VPN
Если вы используете Proxy или ВПН, то отключите их. Читаем подробно инструкции:
- Как отключить прокси.
- Как отключить VPN.
ШАГ 6: Переустановка браузера
Возможно, браузер побит или заражен вредоносным ПО. Причем даже после проверки антивирусной программой, он будет работать неправильно. Поэтому проще всего его полностью удалить и установить заново.
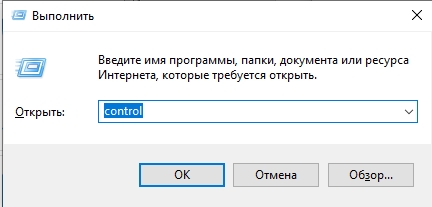
- Жмем:
Ctrl + R
- Вводим:
control
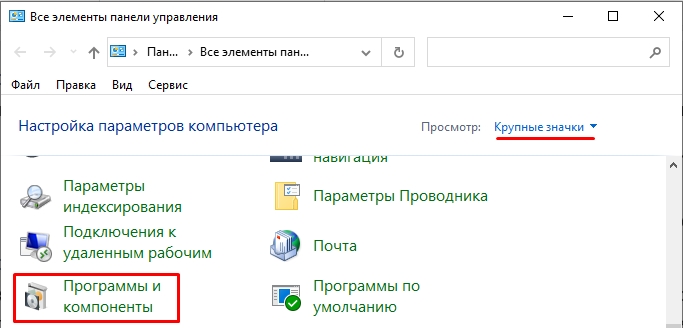
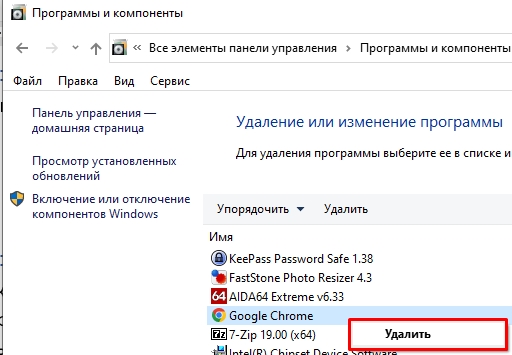
- Открываем «Программы и компоненты».
- В списке найдите ваш браузер, нажмите ПКМ и удалите.
- После удаления откройте Microsoft Edge или любой другой браузер и через поиск найдите официальный сайт браузера. После этого скачайте и установите его повторно.
ШАГ 7: Восстановление работоспособности системы
Если проблема появилась недавно после установки каких-то программ или драйверов, или просто очень резко без каких-либо явных причин, то вам должен помочь откат системы до точки восстановления.
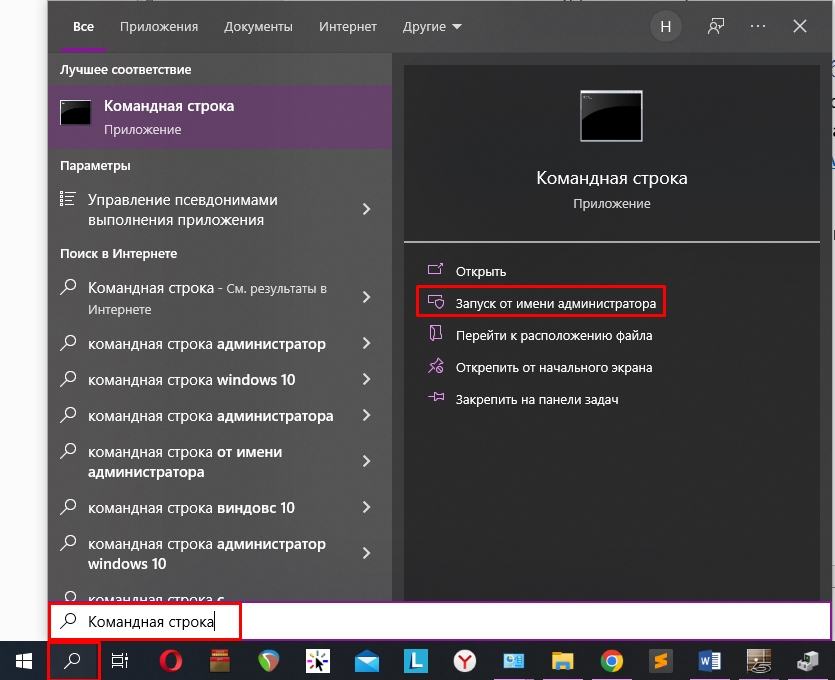
Если это не поможет, можно воспользоваться командной строкой – запускаем консоль с правами администратора (для этого можно воспользоваться поиском).
После этого вводим ряд команд (после каждой жмем «Enter», чтобы её применить):
netsh int ip reset c:resetlog.txt
Перезагружаем комп и вводим еще две команды:
netsh winsock reset
ipconfig /flushdns
Мы только что сбросили настройки сети. Дополнительно вы можете запустить восстановление целостности системных файлов:
sfc /scannow
И проверяем жесткий диск на наличие битых секторов. Также команда исправляет некоторые ошибки системы:
chkdsk C: /F /R
ШАГ 8: Ручная установка драйверов
Очень часто проблема связана с драйвером сетевой карты или Wi-Fi адаптера. Причем он может делать вид, что работает – то есть он нормально отображается в трее и даже подключается. Но вот при коннекте к интернету могут возникать проблемы.
В таком случае вам нужно вручную скачать и установить драйвера с официального сайта производителя. Очень важно сделать это самому и не доверять «Диспетчеру устройств» – именно он устанавливает дрова автоматически. Я понимаю, что у вас сейчас нет интернета, поэтому придется поискать знакомого, друга или скачать их с интернета на работе.
Подробную инструкцию по установке драйверов – читаем тут.
Ничего не помогло
Все возможные решения мы уже рассмотрели в статье выше. Это значит, что с компьютером у вас точно все в порядке. Остается только два варианта:
- Сайт просто «Лежит» – то есть сервер сломался или не работает в данное время.
- Есть проблемы у провайдера – поэтому стоит им позвонить. У меня такое один раз было, когда сгорел порт маршрутизатора, к которому был подключен весь подъезд.
В любом случае вы всегда можете обратиться ко мне за помощью в комментариях. Опишите свою ситуацию и обязательно напишите, что вы уже сделали из статьи. Чем подробнее будет ваш рассказ, тем больше шансов, что я смогу вам помочь. До новых встреч на портале WiFiGiD.RU.
Как устранить ошибки, возникающие при загрузке страницы
Если вы видите сообщение об ошибке (например, «Опаньки…»), значит, у Chrome возникли проблемы при загрузке страницы. Сайт может работать медленно или не открываться совсем.
Если при загрузке страницы произошла ошибка, следуйте инструкциям ниже. Для начала попробуйте обновить страницу.
Обновите страницу
Как правило, достаточно обновить страницу.
Нажмите на значок «Ещё»
«Обновить»
.
Если проблему не удалось устранить
Шаг 1. Проверьте подключение к интернету
Убедитесь, что устройство подключено к Wi-Fi или мобильному Интернету.
Затем обновите вкладку с ошибкой.
Шаг 2. Очистите кеш
Загрузке веб-страниц могут препятствовать данные, хранящиеся в Chrome.
Откройте страницу в режиме инкогнито
- Откройте приложение Chrome
на телефоне или планшете Android.
- Нажмите на значок с тремя точками
Новая вкладка инкогнито.
- На вкладке инкогнито перейдите на нужную веб-страницу. Если она открывается, очистите кеш и удалите файлы cookie.
Очистите кеш и удалите файлы cookie
- Нажмите на значок «Ещё»
Настройки.
- Выберите Конфиденциальность и безопасность
Очистить историю.
- В меню «Временной диапазон» выберите Все время.
- Отметьте Файлы cookie и данные сайтов и Изображения и другие файлы, сохраненные в кеше. Снимите остальные флажки.
- Нажмите Удалить данные.
- Обновите вкладку с ошибкой.
3. Закройте другие вкладки и приложения
Возможно, они заняли много места в памяти устройства, поэтому загрузить сайт не удается.
- Освободите память:
- Закройте все вкладки кроме той, в которой вы получили сообщение об ошибке.
- Закройте работающие приложения и остановите скачивание контента.
- Обновите вкладку с ошибкой.
Не удалось устранить проблему?
Шаг 4. Перезапустите телефон или планшет
Иногда другие приложения мешают загрузке страницы.
- Перезапустите телефон или планшет.
- Попробуйте загрузить страницу ещё раз.
Шаг 5. Обновите Chrome
Коды ошибок, возникающих при загрузке страницы
Следующие коды ошибок означают, что при загрузке веб-страницы возникла проблема:
- «Опаньки…» Chrome не может загрузить веб-страницу.
- ERR_NAME_NOT_RESOLVED. Несуществующий веб-адрес.
- ERR_INTERNET_DISCONNECTED. Устройство не подключено к интернету.
- ERR_CONNECTION_TIMED_OUT или ERR_TIMED_OUT. Для подключения к веб-странице потребовалось слишком много времени. Возможные причины: либо скорость соединения слишком низкая, либо страницу пытается открыть слишком много пользователей.
- ERR_CONNECTION_RESET. Соединение со страницей было прервано.
- ERR_NETWORK_CHANGED. При загрузке страницы устройство отключилось от сети или подключилось к новой.
- ERR_CONNECTION_REFUSED. Страница не позволила Chrome подключиться к ней.
- ERR_CACHE_MISS. Страница просит повторно отправить ранее введенные данные.
- ERR_EMPTY_RESPONSE. Сайт не отправил данные и, возможно, недоступен.
- ERR_SSL_PROTOCOL_ERROR. Страница отправила данные, непонятные для Chrome.
- ERR_BAD_SSL_CLIENT_AUTH_CERT. Не удается войти на сайт (например, банка или организации) из-за ошибки в сертификате клиента.
Все коды ошибок можно найти на странице chrome://network-errors/.
Могут также возникать следующие проблемы:
- Невозможно найти сайт.
- Сайт не открывается.
- HTTPS-сайт не открывается.
- Фотография не загружается.
- Новая вкладка не загружается.
Обратитесь за помощью
- Если открываются все сайты, кроме одного, скорее всего, ошибка возникла в работе именно этого сайта.
- Обновите страницу. Если она не откроется, напишите нам, нажав Отправить отзыв.
- Включите автоматическую отправку отчетов об ошибках, чтобы помочь нам быстрее справляться со сбоями, или сообщите о проблеме в Chrome.
- Свяжитесь с владельцем сайта и сообщите о проблеме.
- Получите совет от экспертов на справочном форуме Chrome.
If you are using Google Chrome, you may have already encountered the error message “Err_Connection_Timed_Out.” This usually appears at the same time as a note explaining that the webpage cannot be loaded. It just means that the target server takes too long to send a response (usually if it takes longer than 30 seconds, then the browser displays the error). The error message therefore indicates a communication problem.
Contents
- What does “Err_Connection_Timed_Out” mean?
- How can I fix the “Err_Connection_Timed_Out” message?
- Repairing the hosts file (Windows)
- Delete your browser data
- Check your LAN settings
- Clean up or renew DNS and IP address
- Check security software and firewalls
- Check with your provider
- How can I prevent “Err_Connection_Timed_Out” from happening in the future?
What does “Err_Connection_Timed_Out” mean?
“Err_Connection_Timed_Out” means that the connection has taken too long when calling a website. When a query is sent to the target server, and it does not respond within 30 seconds, then the browser terminates the communication attempt. The consequence of this is that no content can be loaded, so the browser ends up displaying this standard error message. However, don’t worry: it is an absolutely harmless error message. With a few simple tricks, you can fix the “Err_Connection_Timed_Out” error message yourself.
How can I fix the “Err_Connection_Timed_Out” message?
First, make sure that you have a) a working internet connection, b) a web browser which is up to date, and c) a computer which is free of malware. It can also often be helpful when searching for problems if you try to reach the unsuccessfully accessed website with another browser. If the corresponding page works with Firefox or Edge, for example, but not in Chrome, this indicates a technical problem with the Google browser. Here are some tips you can use to correct the Err_Connection_Timed_Out yourself.
Repairing the hosts file (Windows)
The hosts file is responsible for controlling servers properly on Windows, depending on the IP address. In the past, this file was indispensable for using the internet, but now you only really need it to block certain web addresses. However, a faulty hosts file can also cause problems and end a connection attempt with an Err_Connection_Timed_Out. To find and repair the host file in Windows:
- Open “Editor” as an administrator.
- Open the hosts file in the editor. With Windows operating systems, you can usually find them by following the path file “C:WindowsSystem32driversetchosts.”
- Delete all entries that don’t begin with “#.” Usually, this means that you need to delete all lines that begin with numbers, like “0.0.0.0 www.google.com.”
- Save “hosts” and close the editor. Then check whether the Err_Connection_Timed_Out still occurs.
Delete your browser data
Browser data like cookies, browser history, and the cache can often stand in the way of smooth communication with the target server. If you delete your browser data at regular intervals, you can correct any problems like Err_Connection_Timed_Out and prevent them in the future. Note: Deleting browser data may change some of your internet habits. For example, when you start typing an address, websites will no longer appear as suggestions. If you are permanently logged into web portals, you may be logged out.
The Err_Connection_Timed_Out error message mostly occurs on Google Chrome. To delete your browser data in Chrome:
- Click on the button in the upper-right corner of the browser frame, which is marked with three dots
- Click on “Settings”
- Scroll down in the new window and click on “Advanced”
- In the first section “Security and Privacy,” click on the final item “Delete browser data”
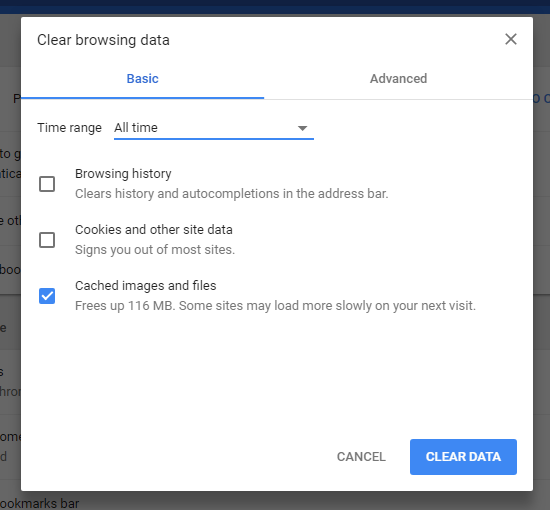
- In the pop-up window, you then control exactly which browser data you want to delete depending on the time frame (if you want to solve a problem like Err_Connection_Timed_Out, we recommend deleting the data for “total time”)
- Then check whether the Err_Connection_Timed_Out is still appearing.
Check your LAN settings
An Err_Connection_Timed_Out can sometimes be fixed by disabling some automatic processes in the LAN settings.
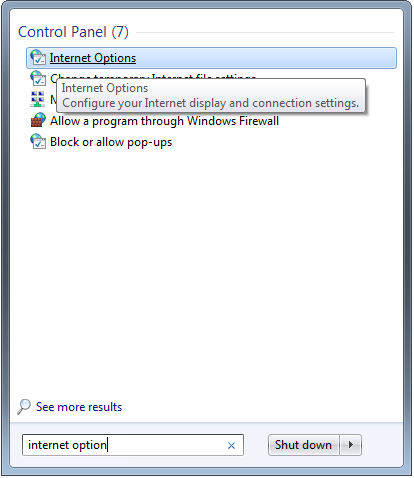
- Enter “Internet Options” in the search bar in the start menu and open it
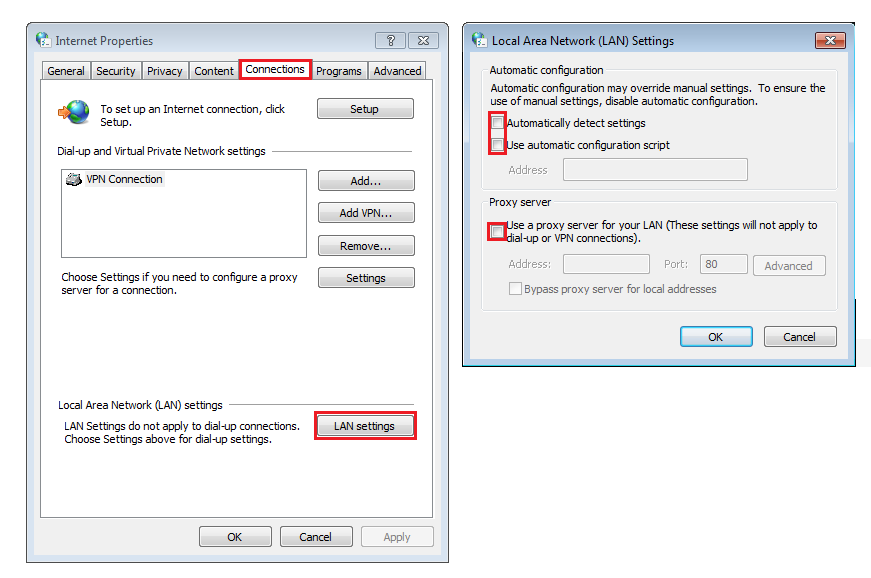
- Click on the “LAN settings” button below the “Connections” tab
- In the new dialog box, remove the check marks from all options, if there are any
- Click on “OK” and close all windows
- Check whether the Err_Connection_Timed_Out error message is still appearing
Clean up or renew DNS and IP address
An overfilled DNS cache sometimes causes webpages not to load correctly. Then, an Err_Connection_Timed_Out can occur. Renewing the IP address is often also a helpful tool.
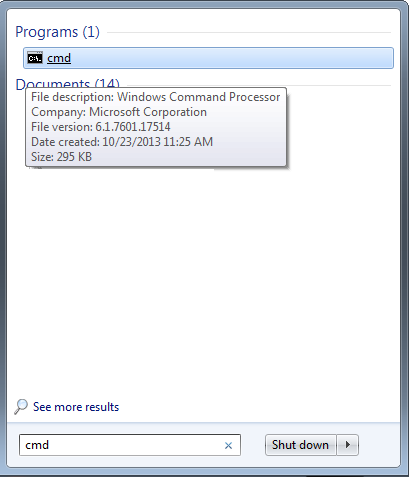
- In the Start menu, search for “cmd” in the search bar and open the tool.
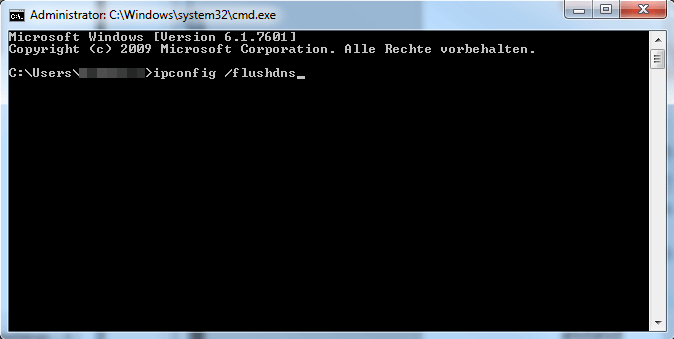
- Enter the command ipconfig /flushdns and confirm with enter. The tool implements the order and informs you about it with a short message.
- Also use the following commands: ipconfig /registerdns, ipconfig /release, ipconfig /renew, netsh winsock reset.
- Restart your computer and check whether the Err_Connection_Timed_Out error message still occurs.
Check security software and firewalls
Security programs like antivirus programs and firewalls sometimes unintentionally block connections, which results in an Err_Connection_Timed_Out. You should make sure to check all settings of the software used, especially browser configurations. Also check if your security software and browser have known compatibility problems.
Tip
You are at risk if you temporarily disable the security software. However, you can check out as fast as possible whether Err_Connection_Timed_Out is related to this software.
Check with your provider
If the solution options described above do not help to correct Err_Connection_Timed_Out, in very rare cases, the error is on the provider side. This happens when the provider blocks certain websites. Therefore please inquire as to whether the website you are visiting is being blocked by the provider or if there is a connection problem.
If the provider denies that there is a problem and you have exhausted the other solution options for Err_Connection_Timed_Out, you must assume a server-side error. In this case, you have no choice but to wait for the website operator to correct the error.
How can I prevent “Err_Connection_Timed_Out” from happening in the future?
The Err_Connection_Timed_Out occurs most frequently if there is a short-term problem with the accessed web address. It usually disappears within a few minutes. However, sometimes user factors sometimes play a role. The following tips will reduce the chance that the error will occur in the future.
- Keep your browser and security software up to date. Obsolete software often leads to compatibility problems that end in an Err_Connection_Timed_Out. Most of the time, however, the programs update themselves.
- Regularly delete unnecessary browser data. This is not just important in order to provide less breeding ground for future connection errors. This is also recommended to keep your internet browsing experience comfortable. It is also recommended to delete browser data at regular intervals for data protection and privacy reasons.
- Clean the DNS cache regularly and renew your IP address. As described, an erroneous DNS cache sometimes leads to Err_Connection_Timed_Out. Prevent this by clearing the cache from time to time. Renew your IP address at the same time.
Related articles

ERR_CONNECTION_CLOSED: How to fix the connection error
If Chrome displays the message «ERR_CONNECTION_CLOSED» instead of the website you want to access, it means that the contacted server has interrupted the connection. Reloading the URL is often not enough to fix the problem. Unfortunately, determining the source of the error is anything but a simple task. To fix the «ERR_CONNECTION_CLOSED» error, you need a good amount of patience.
ERR_CONNECTION_CLOSED: How to fix the connection error

How to fix the ERR_CONNECTION_RESET 101 error in Chrome, etc.
The message “ERR_CONNECTION_RESET” reveals that the connection has not been carried out as usual, or that is has been reset. However, the reason for these issues and possible solutions are not given. We explain why the error occurs, why it happens particularly frequently in Google Chrome and how to fix ERR_CONNECTION_RESET.
How to fix the ERR_CONNECTION_RESET 101 error in Chrome, etc.

ERR_SSL_PROTOCOL_ERROR: how to fix the Chrome bug
Chrome is the world’s most widely-used internet browser. The application scores points not only when it comes to security and speed, but also with its features such as cross-device synchronization of user data. But errors can occur even when surfing with Google’s wonder weapon. These can lead to the browser crashing or prevent certain pages from being accessed. The error message…
ERR_SSL_PROTOCOL_ERROR: how to fix the Chrome bug

INET_E_RESOURCE_NOT_FOUND: How to fix the Microsoft Edge error
Via the Windows Update feature, Microsoft provides users with the latest features and fixes for Windows or installs Microsoft services and apps. Since the Creators Update V1703, some users have been receiving the message “INET_E_RESOURCE_NOT_FOUND” when they try to access the Microsoft Edge browser. But what exactly does this error mean and how can it be rectified?
INET_E_RESOURCE_NOT_FOUND: How to fix the Microsoft Edge error

ERR_TOO_MANY_REDIRECTS: How to fix the error
Too many redirects! If a redirect or forwarding to a website does not work properly, your browser will inform you of this error, preventing you from getting stuck in an infinite loop. In our article, you will learn exactly what ERR_TOO_MANY_REDIRECTS is, how the problem arises, and what you can do when there are simply too many redirects.
ERR_TOO_MANY_REDIRECTS: How to fix the error
When your internet connection times out and you can’t access a specific webpage, it’s one of the most annoying errors. The message «The webpage not available» ERR_CONNECTION_TIMED_OUT will appear on the screen. This error usually occurs when there is an issue with the internet connection and the website does not load. The name of this error can be seen in the notification on your screen. A browser like chrome provides three options to address the problem when a website or webpage takes too long to respond or the connection times out.
- Checking the network connection
- Checking the proxy and firewall
- Running windows network diagnostics
These are the limited approaches that do not effectively combat these issues. You must take further steps to address this issue. If you don’t know what the other options are, you’ll find them all in this article. We’ve compiled a list of the most effective ways to clear the error from your browser. You also don’t have to be concerned because these solutions don’t need any technical knowledge. You can use these solutions on your own.
We will go over the following:
- What is ERR_CONNECTION_TIMED_OUT Error?
- Causes for ERR_CONNECTION_TIMED_OUT Error
- How to Fix the ERR_CONNECTION_TIMED_OUT Error?
- How to Prevent “ERR_CONNECTION_TIMED_OUT” from Happening in the Future?
What is ERR_CONNECTION_TIMED_OUT Error?
The connection timed out error isn’t a dangerous error, nor is it an infected file that can harm your computer. This message primarily serves as a warning that the system has been unable to establish a network connection with the server.
Let’s start with a basic understanding of how the internet works. When a user types a keyword or the URL of a website into the search box, the system makes a request to the server to provide access to the website’s content. The connection is created once the server checks the request and grants access to the system, and the data packets are shared between the system and the server.
The internet’s working procedure is as follows. When a user asks for access from a website, a countdown or timer begins to run, and if the request is not able to reach the user before the countdown expires, the Err connection timeout happens.
It could also imply that your website is receiving more requests than it can handle. This is especially true if your hosting provider has a RAM cap. When you wait more than 30 seconds for an answer, you know there’s a problem with communication. Your browser such as chrome and internet explorer will then cancel the connection to the unresponsive page and display the error message «ERR_CONNECTION_TIMED_OUT.»
An error page does not provide complete information about the source of the problem; it merely informs you about the issue. Depending on the device you’re using, the error message may have somewhat different phrasing. This includes the following:
- “dns_probe_finished_nxdomain”
- “domain cannot be found”
- “server not found” “err_connection_reset”
- “err_connection_closed”
- “Server DNS address could not be found”
- “unexpectedly closed the connection”
- “err_connection_refused”
- “Server took too long to respond”
In a nutshell, the server, your network connection, your device, or the network equipment could all be to blame.
Causes for ERR_CONNECTION_TIMED_OUT Error
These are the few reasons that cause ERR_CONNECTION_TIMED_OUT Error:
- Service Timeouts
This happens when the device has been waiting for the server to react for a long time. It can occur while your web browser like chrome is attempting to access a website, connect to a game, or work from home on your computer. - Non-existing Server
Server timeout and error messages occur when a program attempts to connect to a non-existent server, either because it is down or because the IP is incorrect. As a result, your browser requests information that the server does not have. - Network Infrastructure Overload
A data request usually passes through numerous checkpoints before reaching the appropriate server. It’s possible that the link will break throughout this process. Your request will be cut off as a result of this. - Inability to Communicate Data
A data request error occurs when a server refuses to send obtained data back to the computer. As a result, the network connection is broken, and your server no longer waits for data. - Disconnection from ISP
When you’ve not inserted the ISP cable into the WAN port of your modem or router, an error message may appear. - Your PC or Router has Blocked a Website
You won’t be able to connect if the host file or firewall/router Access Control settings prohibit the website you’re trying to access. You will find an error message as a result. - Multiple Interferences
When your wireless channel is overburdened by granting too many requests at once, your server will slow down or shut down completely.
How to Fix the ERR_CONNECTION_TIMED_OUT Error?
Depending on the cause of the error, we have a number of options for resolving the problem. Obtaining an appropriate solution is the greatest method to eliminate errors. You can start with the first way and then move on to the second if it doesn’t find and fix the problem. Attempt till your problem is fixed. Also, use caution when using these procedures, and be sure to follow each step.
Here are the 11 ways to consider while solving the ERR_CONNECTION_TIMED_OUT error:
Solution 1: Restart Your Internet Connection
There’s a good chance you’ll run into this issue, especially if there’s a major internet outage. As a result, it is critical to ensure that the network connection is in perfect functioning order. Apart from that, have a look at the subject of properly verifying and connecting the hardware components. Keep a close eye on the situation to see if there is anything that took too long to respond with the internet connection.
If you’re using a wireless network connection or router to connect to the internet, make sure it can connect to many devices. Then check to see if the internet is operating properly on those devices as well. If no such internet difficulties are discovered, there may be other factors at play.
Also, make sure the terrible connection isn’t caused by a slow Wi-Fi connection. Disconnect from public Wi-Fi first to get things in order. Then, to see if you’re linked to poor or insufficient Wi-Fi, purchase a modem for personal usage.
If the internet and other issues are operating well, move on to the next solution.
Solution 2: Disable Your Firewall and Antivirus Software
Antiviruses and firewalls are in charge of keeping your files and systems safe. As a result, they scan your computer for viruses on a regular basis. Installing firewalls and antiviruses has the disadvantage of causing the timed out error. They may restrict or prohibit certain pages that they believe you don’t need, even if they are safe.
If you’re getting the ERR_CONNECTION_TIMED_OUT page or other errors like this, you can turn off your firewall and antivirus. Before disabling these programs, make sure the page you’re trying to access is safe. Remember to turn on your firewall and antivirus software once you’ve finished with the website you were trying to access. Then, to protect against real attacks from malicious sites, reactivate the cybersecurity systems.
If you continue to see the timed out error message and are confident that the websites you’re trying to access are safe, you should alter or update your firewall and antivirus software. Another option is to create a false-proof report and send it to the software developer, who will then fix the problem. These are the false-proof fast links:
- Sophos false positive forms
- AVG false positive forms
- Norton false positive forms
Solution 3: Disable Proxy Server Settings or VPN
Checking the proxy server settings is another typical remedy recommended by web browsers including chrome, internet explorer, and so on.
A proxy server acts as a go-between for your computer and the website you’re looking at. Its goal is to secure the user’s IP address, control which websites can be accessed, and cache site data to speed up page loading.
However, proxy servers may mistakenly block the website you want to visit, resulting in the ERR_CONNECTION_TIMED_OUT message. Reset your proxy settings to see if these servers are the source of the problem.
For Windows:
- By hitting the Windows logo key, go to the Control Panel
- Find and select Network and Internet -> Internet Options from the drop-down menu
- Open the Connections tab -> LAN settings in the Internet Properties window
- Make sure that all of the proxy settings are unticked
For Mac:
- Click Advance in System Preferences Network
- Uncheck each item on the Proxies tab and then click OK
- Refresh the page to see if the error has vanished
- If it has, and you still need to utilize a proxy server for day-to-day work, you should either reconfigure the settings or switch to a different hosting provider
Those who use a VPN service may also experience the ERR_CONNECTION_TIMED_OUT issue. If that’s the case, we recommend switching VPN protocols because your ISP or firewall may have prohibited the one you’re currently using. Alternately, try temporarily disabling the application.
Solution 4: Clear Browser Cache
All browsers including chrome save a cache of information on your computer, which includes your browser cookies, history, and saved login information. This information is saved so that the relevant web pages load faster the next time you visit them.
The cache that is saved is useful and saves you time, but it can also cause a slew of problems. Thankfully, emptying your cache will cure the problem quickly.
For that, you must find that your browser’s cache is the genuine culprit of the “This Site Can’t Be Reached” error. So, to confirm, complete the procedures below.
- Try accessing the same website where you’re getting the «This Site Can’t Be Reached» error in a new tab in your browser in incognito mode, also known as a private mode in chrome and other browsers
- If the issue continues in incognito mode, you’ll need to clear your browser cache by following the steps below
To Clear Cache for Google Chrome:
Click the three dots icon in the top right corner of your Google Chrome browser to open it. From the drop-down option, choose More Tools and then Clear Browsing Data.
Select the one that applies to you:-
- Browsing history
- Cookies and other site data
- Cached images and files
- Click the Clear data button
To Clear Cache For Mozilla Firefox:
To clean the cache in Mozilla Firefox, open the browser and click the Hamburger icon in the upper right corner. Select History from the drop-down menu that opens, and then Clear Recent History from the menu that appears next.
To clear your Mozilla Firefox browser cache data, select Everything from the time period to the clear the drop-down menu and click the Clear Now button.
To Clear Cache for Internet Explorer:
Click the setting button in the top right corner of the Internet Explorer browser to clear the cache. Select Safety from the drop-down menu and then erase browsing history. Make sure the Temporary Internet files and Website files boxes are checked in the delete browsing history window, then click the delete button at the bottom.
To Clear Cache for Microsoft Edge:
To clear the cache in Microsoft Edge, go to the 3 Dots icon in the top right corner of the browser and select the setting at the bottom of the screen. Click the Choose what to clear button under the Privacy, search, and services tab. Make sure the Cached images and files box is checked, then click the Clear button.
Solution 5: Change the DNS Server
A DNS server helps the browser find the website you wish to visit by converting domain names to IP addresses. In most cases, your ISP’s in-house DNS servers will be configured on your internet connection settings. They may, nevertheless, not find and deliver the finest results.
As a result, many users choose to utilize Google Chrome or Cloudflare’s third-party DNS servers, which are both free and dependable for the ordinary user.
Consider switching DNS servers if you believe they are the source of the problem. Using Google Chrome’s Public DNS IP addresses as an example, the tutorials below will show you how to update a network’s DNS settings.
For Windows:
- In the Control Panel, open the Network and Internet -> Network and Sharing Center. On the top left, click Change adapter settings.
- Find and select Properties from the context menu when you right-click on the current connection.
- Choose whether your DNS settings should utilize IPv4 or IPv6 addresses. After that, select Properties.
- Substitute the following IP addresses for the IP addresses:
For IPv4, use 8.8.8.8 and 8.8.8.4
For IPv6, use 2001:4860:4860::8888 and 2001:4860:4860::8844 - Restart the browser by clicking OK.
For Mac:
- Open System Preferences Advanced
- In the DNS Servers section of the DNS tab, click the Plus symbol
- One by one, type in each IP address
- Click the OK button
Solution 6: Flush Out and Renew DNS
The term «flush DNS» refers to the process of clearing your computer’s DNS caches.
The DNS cache saves information about the websites you visit. Each time you visit the website, the computer will not have to translate the domain name to the IP address from the beginning.
The DNS cache, like browser data, can become out of date. It’s possible that the IP addresses are outdated, took too long to respond when trying to access the website.
For Windows:
The Command Prompt in Windows can be used to flush DNS. To activate the Run command, press the Windows logo and R keys at the same time. Then, in the dialogue box, input «cmd» and click OK.
In the Command Prompt window, type:
ipconfig /flushdnsThen, to troubleshoot the network and renew the IP address, add the following lines. Each time you add a new command, make sure you press Enter:
ipconfig /registerdns
ipconfig /release
ipconfig /renew
netsh winsock reset
When you’re done, restart your computer and open your browser to see if the commands worked.
For Mac:
Open the Terminal application on your Mac and type the following command:
dscacheutil -flushcacheSolution 7: Check the Hosts File
All connections between IP addresses and their related domain names are mapped in the hosts’ file. The computer will find and verify this document every time you visit a website to see which IP address matches the website’s domain.
The hosts’ file may have inadvertently blacklisted a specific IP address or URL, rendering the website inaccessible. As a result, it’s a good idea to find if the document has blacklisted the website you want to visit.
For Windows:
To read the Windows hosts file in Windows, you’ll need a text editor like Notepad. Type the application’s name into the taskbar’s search box and right-click it. Select the Run as administrator option.
Navigate to File -> Open in the top-left menu and paste the path below into the File name bar.
C:WindowsSystem32driversetc
After that, choose the hosts file.
Below the last line that begins with the «#» sign, the file will display a list of blacklisted websites. Delete them and save your changes by pressing Ctrl + S.
For Mac:
Users on macOS can open Terminal, type the following line, and press Enter:
sudo nano /private/etc/hostsRemove any URLs that are listed below the “::1” line.
Solution 8: Change the LAN Settings
Some of your internet settings may have been harmed by a virus, or you may have made some changes inadvertently. As a result, it is preferable to alter these settings.
- Using the start menu, access the control panel
- Find and click on Internet settings and change the view by category to a large icon
- Select the LAN settings button from the connections tab
- Remove all of the parameters from the automatic configuration and proxy server sections
- Click OK
- Restart your browser and begin browsing
If the error persists, it is unlikely that proxy or LAN settings are the source of the problem. As a result, switch to a different method.
Solution 9: Check the Maximum Execution Time
A PHP script’s maximum execution time is the maximum amount of time it can execute on a website. This is normally pre-configured by the hosting provider, with a standard timed out setting of 30 seconds.
If the script runs for longer than the specified time, the website will be unable to communicate with the browser, resulting in an ERR_CONNECTION_TIMED_OUT error.
The good news is that the upper limit can be increased. Hosting providers can enable this capability through the user’s control panel, or they can do it for the customer if they ask for it.
Solution 10: Increase PHP Memory Limit
Some PHP scripts may consume more memory than they are permitted, causing the site to take an excessive amount of time to reply to the browser.
The memory limit, like the maximum execution duration, can be increased. However, the quantity should not exceed the amount of memory allotted to your plan by your hosting provider.
Solution 11: Return Your Browser to the Default Setting
If none of the preceding fixes work and you’re still seeing the ERR_CONNECTION_TIMED_OUT message, try restoring your browser’s default settings. The issue could be caused by a setting in your browser, so restore it to its normal state.
You can revert your browser to its default settings by doing the following:
- Select «Settings» from the «Menu» icon
- Scroll down to «Advanced» and look for the «Reset» icon
- You’ll see a confirmation popup that says «Click on Reset» when you click the «Reset» icon
- Confirm and move forward
How to Prevent “ERR_CONNECTION_TIMED_OUT” from Happening in the Future?
The ERR_CONNECTION_TIMED_OUT error is most common when the accessed web address has a temporary difficulty. It normally vanishes after a few minutes. User factors, on the other hand, can sometimes have a role. The following will explain will help you avoid making the same mistake again.
- Update Your Browser and Security Software
Compatibility issues caused by obsolete software frequently result in ERR_CONNECTION_TIMED_OUT. However, most of the time, the programs update themselves. - Delete Browser Data on a Regular Basis
This is critical not only to fix the breeding ground for future connection errors. This is also advised for a pleasant internet browsing experience. For data security and privacy, it’s also a good idea to delete browser data on a regular basis. - Clean Your DNS Cache and Renew Your IP Address Regularly
An incorrect DNS cache can cause ERR_CONNECTION_TIMED_OUT, as previously stated. Clear the cache on a regular basis to avoid this. At the same time, renew your IP address.
And It’s a Wrap!!!
Since it is difficult to trace the source of network connection and timed out errors, they can be exceedingly unpleasant. More importantly, you most likely just want to find and get information quickly. These solutions that we have presented are correct, and you can utilize them without difficulty. Hopefully, the information in this article will assist you in resolving any future timed out issues.
Monitor Your Entire Application with
Atatus
Atatus provides a set of performance measurement tools to monitor and improve the performance of your frontend, backends, logs and infrastructure applications in real-time. Our platform can capture millions of performance data points from your applications, allowing you to quickly fix issues and ensure digital customer experiences.
Atatus can be beneficial to your business, which provides a comprehensive view of your application, including how it works, where performance bottlenecks exist, which users are most impacted, and which errors break your code for your frontend, backend, and infrastructure.
Try your 14-day free trial of Atatus.
ERR_CONNECTION_TIMED_OUT – Explained with Solutions
“This webpage is not available” with the error code “ERR_CONNECTION_TIMED_OUT” is a Chrome browser’s problem and it’s 100% possible that this error can shows-up on any device which having chrome installed in it, whatever you’re using a smartphone, desktop or laptop.
Now the main question is, what actually is this ‘ERR CONNECTION TIMED OUT’?
Mainly this is a ‘server connection timeout’ network error and it only means that the server which you are trying to access is taking too much time to reply the data request made from the end-user;
And that’s where your browser shows you the connection timeout error, just to prevent itself from endlessly waiting for a server to respond.
#So, what are the odds?🤔
The reason behind this error is your computer can’t be able to access the internet connection or maybe it’s possible that something is blocking your network from establishing a connection. Anything’s possible and here’s a list of those reasons for this error to come up on your computer or mobile screen and those are –
- Server Doesn’t Exist – The domain or website server what you wanted to open isn’t exist anymore, or maybe it’s offline for now and you can try to open it later.
- Network Infrastructure Error – It’s also possible that there is some problem with your network connection too.
- Your Device or Browser’s Problem – Most of the time this is the core reason for this problem to occur and the best part is, you can fix it quickly.
Besides that, there are numbers of condition what people are normally suffering from when this issue occurred on their browser’s screen and those are:
- Having this error while opening a particular website, or maybe on your own website.
- Having this problem on a few websites while others load just fine without any error.
- Sometimes this error only stays in chrome but websites do open perfectly on the different browser.
- It’s also possible that your chrome says “ERR_CONNECTION_TIMED_OUT”, and your internet explorer says “page can’t be displayed”, and all the other browser says something like connection timeout and your whole computer can’t be able to use the internet connection.
As I said, anything’s possible. But still, you have a list of troubleshooting steps what you can try. And even if the problem wouldn’t solve with these solutions, then at least I’ll give you some hint about what’s wrong with your device, website, or browser.
Those users who have this problem on their own website, then you can skip all the above solutions and move to the last sub-topic of this tutorial where I wrote about “What to do if the error shows on your own website?”.
Let’s start with;👨🏻💻
Step 1# – Power Cycle
By saying power cycle, I mean that you need to reboot your Router/Modem and everything connected between your ISP and device, like a hub or switch.
Carrying out the power cycle process does help most of the time when our system can’t be able to get online or having some issue to access the internet on any device. It helps your network to re-established the connection through the gateway.
To ‘Power Cycle’ or ‘Reboot’ your network device like Modem/Router, please follow these steps:
- Switch off the router button (if it’s having any) and then unplug the power adapter of your Modem/Router.
- After that, leave it unplugged for a couple of minutes.
- Then plug it back and verify that you are again connected to the Internet or not.
Smartphone Users: If you’re having this problem on your mobile phone then you can try to remove your network SIM card from your mobile phone and insert it back after 2 minutes break. Just move to the next solution if this won’t solve your problem.
Step 2# – DNS Flushing
Most of the operating systems automatically cache IP addresses and other DNS results in order to speed up subsequent requests to the same hostname.
Having the internet error is quite normal if the DNS Cache data got corrupted. Flushing it, is the best option what you can do on your computer to fix all the DNS caching related issues.
Follow these steps to clear out the DNS Cache:
- First, open the Run Commander by pressing the Windows + R key.
- Type“cmd” in the text box and press enter. It will help you to open your Windows Command Prompt to put the ‘DNS Flushing’ command in it.
- Now in the cmd, type the command “ipconfig /flushdns” and then press enter.
- After that, restart your computer and test it; If the problem still stays then again open the command prompt and try this “netsh winsock reset catalog” 2nd command only when the above one won’t work.
Mac users can use these codes in their terminal to flush out the DNS;
- OS X 12 (Sierra) and later: macbook$ sudo killall -HUP mDNSResponder;sudo killall mDNSResponderHelper;sudo dscacheutil -flushcache
- OS X 11 (El Capitan) and OS X 12 (Sierra): macbook$ sudo killall -HUP mDNSResponder
- OS X 10.10 (Yosemite): macbook$ sudo dscacheutil -flushcache;sudo killall -HUP mDNSResponder
Step 3# – Change LAN Setting
Sometimes it’s possible that your computer’s LAN setting gets changed by a virus or some spammy installed software. And it always better to reconcile the internet settings to bring your internet back to work properly.
To change the ‘Internet setting’, first, you’ll need to go to the “Control Panel” in your Windows PC and look for the “Internet Options”.
After finding the ‘Internet Options’, now you need to double-click on it and then select the ‘Connection’ tab on the configuration pop-up window.
Right after that, click on the ‘LAN setting’ and un-tick all the checkbox on the second pop-up window. Click OK to exit the windows and then restart your computer.
Step 4# – Check Hosts File
The Hosts file is a computer file used by an operating system to map hostnames of IP addresses. Hosts file mainly used to override the default DNS information.
And in case, if some virus or malware edited the host file of your computer and made a blacklist contain numbers of the domain in it. Then it’s 100% possible that you won’t be able to access those websites listed under the blocked category.
To check the Hosts File, first, you’ll need to open the notepad and then click on the file button from the upper top menu and select the ‘open’ option to find the host file to open.
Now, go to this directory to find the file; OS Disk C:/Windows/System32/Drivers/etc
Select the ‘hosts’ file and click on open. If the ‘etc folder’ look blank to you, then by selecting the “All Files (*. *)” option from the ‘file type’ drop-down menu can help you to show all the files other than ‘.txt’.
Once the file gets opened, just scroll down and delete all website or IP address who starts from ‘0.0.0.0’ and not # sign. Then press “Ctrl + S” to save that file and after that, you need to restart your computer to see the changes.
Mac Users: Open the mac terminal and put this command in “sudo nano /etc/hosts” and press return. Edit the file as I suggested above and after that hold down the control and O keys to save it.
Step 5# – Turn-Off the Firewall
A Firewall is a network security system which monitors our whole network and controls all the incoming and outgoing traffic to protect us from hacking.
Sometimes that firewall does block our network connection even because of some minor fault and disabling it can help you to fix out the problem.
To turn off the firewall in windows you’ll again need to go back to your windows control panel and select the “Windows Defender Firewall” option in it. You can also search for the ‘Firewall’ in the Starts Menu too.
So, when you get to the firewall menu, click on “Turn Windows Defender Firewall On or Off” option from the left side panel. Then on the second window, select the “Turn off Windows Defender Firewall (not recommended)” for both of the ‘private’ & ‘public’ network and click “OK”.
Mac Users – can go to the ‘System Preferences’ from the Apple menu. Then click on Security and then on the Firewall tab. Now, choose the mode what you would like the firewall to use.
Step 6# – Turn-Off the Antivirus🤐
Recent mail by Denial – My problem is that I can’t able to open any website using my Chrome browser without disabling the firewall feature in my MacAfee antivirus. I do check every setting related to my firewall and there is nothing which blocks my Chrome to have full access. But don’t know why the antivirus is creating a problem with chrome and the fun fact is all my other browsers such as Foxfire and IE9 are working fine but when I do try open any websites on Chrome, it just only displays the timeout error and that’s it.
Most of the latest antivirus has their own built-in ‘online security system’, where they use their own ‘black-list’ data to filter out the bad websites and secure the user’s internet experience.
Still, most of them fail to do the job properly. Or it’s possible that your antivirus online security system is just conflicting with your browser.
Disable your antivirus program is the best way to figure out the misleading security issue. You can turn off your antivirus program for just about 15 minutes and try to test out the web pages again. If everything’s works great, then this is the time where you should need to look for some better security program, or you can try to reinstall the antivirus software.
Suggested link: What’s A Good Antivirus And How To Pick A Best One?
Step 7# – Resetting Profile Settings
Resetting your browser can make things back to normal and most of the times it does fix the problem. The steps given below are the same for all three most popular computer operating systems, whatever you’re using Chrome on Windows, Mac or Linux (but not for the smartphones).
First, you’ll need to type this address “chrome://settings/resetProfileSettings” into your chromes address bar and by pressing the enter key it will directly take you to the reset option. Now, just click on reset and that’s it.
Smartphone Users: To reset your chrome browser’s whole configuration, tap on the Menu key > Settings > Privacy > Clear browsing data > Advanced. Now in this menu, select everything and tap on ‘CLEAR DATA’.
Step 8# – Use Chrome Cleanup Tool
In 2014 Google released a beta version of a cleanup tool that can scan your computer and remove software that may be causing the problem with your Chrome. The beta version has long gone now and the current version of the software works perfectly on any computer. To use this tool, you’ll just need to download it from the given link below and install it afterward.
Link: https://www.google.com/chrome/cleanup-tool/
Step 9# – Update Network Drivers
A driver acts as the bridge between your device software programs and hardware, and if something goes wrong with it. Then there is nothing you can do to make your internet work other than reinstall or updating the drivers.
This link will help you to know more about >> What Is a Network Driver, And How To Install It?
Step 10# – Registry Fix
Registry database mainly helps your Operating System to know which programs are installed, and what the individual setting for each one is. Having a cleaned Windows Registry database is the key to the perfect running computer.
How To Fix Registry Related Issues Using A Registry Cleaner?
Registry contains vital information on all the settings, preferences, etc. on hardware and software installed in your rig. When it comes to programs, the Registry also maintains data like the location of the program, what is required to launch the program, what sort of resources it needs from the computer, and so on and so forth… Read More
Step 11# – Use Chrome Alternatives 😎
A lot of people don’t know but google chrome have two brothers. The first one is ‘Chromium’ and the second one is Google Chrome Canary, both works just like the chrome and you can safely use them to surf the internet.
- Download Chromium
- Download Chrome Canary
#What to Do If This “ERR_CONNECTION_TIMED_OUT” Shows on Your Own Website?😱
If you’re a website owner, then at least once in a while you’ll do suffer from this ‘error connection timeout’ problem. The error fully indicates that your website is down right now, or maybe it’s limited under the server resources.
If you’re using a shared hosting plan for your website, then the first what you have to do is to check the server resources like RAM and I/O is available for the current traffic.
Other than limited resources, it’s quite possible that your server is offline and you can wait for about 15-20 min to get automatically fixed by the host provider.
Another best thing what you can do is to go to your WordPress website’s main root directory and find the plugins folder. After when you find it, just rename the folder to “plugins1” and save the new name. This will disable all the plugins and can make your website work again.
Make sure you don’t forget to rename the folder’s name after testing your websites. Or otherwise, you won’t find any installed plugins in your WordPress dashboard.
If you still have the problem, then maximize the execution time and PHP memory in the .htaccess file, or you can contact your host provider for the better support.
“That’s all for now, thanks for sticking with the article, and you know it will always good to let me know about the article, in the comments down below.” 🙂


