
Содержание
- Ошибка opengl 1286 invalid framebuffer operation майнкрафт
- Истоки проблем Minecraft Error 1286
- Как избавиться от ошибок OpenGL
- Классические проблемы Minecraft Error 1286
- Что вызывает ошибку 1286 во время выполнения?
- How to Fix Minecraft OpenGL Errors
- How to fix Minecraft OpenGL error:
- Method 1: Update your graphics card driver
- Method 2: Turn off OpenGL in Minecraft
- Method 3: Disable Show GL Errors
- Method 4: Temporarily disable Mods
- Method 5: Modify graphics settings in your game
- Method 6: Install the latest Java version
- Как исправить ошибку Minecraft 1286
- Определение «Minecraft Error 1286»
- Что вызывает ошибку 1286 во время выполнения?
- Классические проблемы Minecraft Error 1286
- Истоки проблем Minecraft Error 1286
Ошибка opengl 1286 invalid framebuffer operation майнкрафт
Whenever I try and play minecraft, I get an unresponsive black screen that just hangs until I interact with it. Sometimes it says JavaRuntime Environment stopped working. I’m on Windows 10.
I have updated Java to the latest JDK 8, (I use the JDK for Eclipse) although I believe that minecraft does not depend on a system wide version of java. I also tried on another user account and did a fresh install of minecraft, deleting the appdata folder and uninstalling through the MSI. I also disabled Kaspersky antivirus, but to no avail.
Уже как пол года выходит эта ошибка. А еще игра перестала показывать мою видеокарту.
Автор вопроса считает этот ответ лучшим
Здраствуйте. Я могу вам помочь с решением проблемы:
1) Установите Оптифайн
2) Найдите кнопку по пути: Настройки графики -> Прочие ->Показывать ошибки GL
P.S. Если ошибка ни на что не влияет, то ошибка устранена. А вот если нет, то:
1) Обязательно обновите java и убедитесь что ваш лаунчер использует именно установленную вами версию. Если вы сами установили новую версию, лаунчер по прежнему будет использовать старую, необходимо в настройках указать путь до вашей новой версии.
2) Обновите драйвера вашей видеокарты.
3) Если вы играете с шейдерами и ошибка появляется при их работе, то вероятно, проблема в несовместимости данной версии шейдера и версии вашего Optifine. В таком случае, можно поискать более новую версию шейдера.
Истоки проблем Minecraft Error 1286
Проблемы Minecraft Error 1286 вызваны поврежденным или отсутствующим Minecraft Error 1286, недопустимыми ключами реестра, связанными с Minecraft, или вредоносным ПО.
В данной теме представлены инструкции по исправлению ошибок, связанных с OpenGL
Ошибки 1286 и 1282
Следуем инструкции ниже:
1.Зайдите в папку с игрой и перейдите в сборку сервера, на котором вы получаете данные ошибки.
К примеру возьмём сборку Classic.Путь будет выглядеть так — Том(С/D):Users(Имя Пользователя)AppDataRoaming.minecra ftonlyClassic
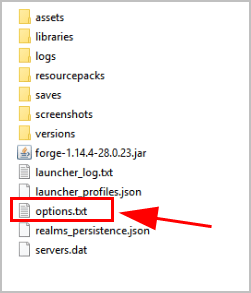
2. Открываем файл options.txt через Notepad++ (можно и через обычный Блокнот)
3. Ищём строку fboEnable.
4. Заменяем true на false.
5. Сохраняем, закрываем.
Последний раз редактировалось cheald; 28.06.2018 в 08:28 .
Akrux (17.06.2017),Cataclysme42 (14.08.2017),DoKe11 (27.06.2017),fresh3 (21.06.2016),Hinter (20.06.2016),KalleAK (16.10.2016),Kotowey10223 (07.09.2019),lifes (19.11.2016),MrDeltoFros (22.03.2017),MrGospo (30.12.2016),Veteran3 (03.06.2016)
Большое спасибо. Исправил как написано выше, а то эта бяка задолбала. Должно помочь.
у меня такой путь C:Documents and Settings (Имя пользователя)Application Data.minecraftonlyTechnoMagic
«Minecraft Error 1286» часто называется ошибкой во время выполнения (ошибка). Разработчики тратят много времени и усилий на написание кода, чтобы убедиться, что Minecraft стабилен до продажи продукта. К сожалению, некоторые критические проблемы, такие как ошибка 1286, часто могут быть упущены из виду.
Классические проблемы Minecraft Error 1286
Minecraft Error 1286 Проблемы, связанные с Minecraft:
Что вызывает ошибку 1286 во время выполнения?
Ошибки выполнения при запуске Minecraft — это когда вы, скорее всего, столкнетесь с «Minecraft Error 1286». Три распространенные причины, по которым ошибки во время выполнения, такие как всплывающее окно ошибки 1286:
Ошибка 1286 Crash — это типичная ошибка «Minecraft Error 1286», которая приводит к полному завершению работы программы. Если данный ввод недействителен или не соответствует ожидаемому формату, Minecraft (или OS) завершается неудачей.
Утечка памяти «Minecraft Error 1286» — когда происходит утечка памяти Minecraft, это приведет к вялой работе операционной системы из-за нехватки системных ресурсов. Повреждение памяти и другие потенциальные ошибки в коде могут произойти, когда память обрабатывается неправильно.
Ошибка 1286 Logic Error — «логическая ошибка», как говорят, генерируется, когда программное обеспечение получает правильный ввод, но генерирует неверный вывод. Неисправный исходный код Mojang может привести к этим проблемам с обработкой ввода.
Большинство ошибок Minecraft Error 1286 являются результатом отсутствия или повреждения версии файла, установленного Minecraft. В большинстве случаев скачивание и замена файла Mojang позволяет решить проблему. В качестве дополнительного шага по устранению неполадок мы настоятельно рекомендуем очистить все пути к неверным файлам и ссылки на расширения файлов Mojang, которые могут способствовать возникновению такого рода ошибок, связанных с Minecraft Error 1286.
Источник
How to Fix Minecraft OpenGL Errors
Last Updated: 9 months ago

Run into an OpenGL error when playing Minecraft? You’re not alone. So don’t panic. You can fix Minecraft OpenGL errors easily.
OpenGL accelerates Minecraft running in your computer, so you can play Minecraft faster and smoother. This feature is enabled by default in order to bring the best possible experiences to players.
The Minecraft OpenGL errors can read either:
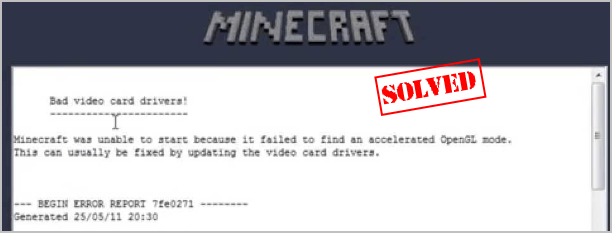
- Minecraft was unable to start because it failed to find an accelerated OpenGL mode.
- OpenGL Error: 1281 (Invalid value)
- OpenGL Error: 1286 (Invalid framebuffer operation)
- …
How to fix Minecraft OpenGL error:
Here are the solutions for you. You shouldn’t have to try them all; just work your way down the list until your error disappears.
Method 1: Update your graphics card driver
The OpenGL errors in Minecraft relates to your graphics card driver. Corrupted or outdated graphics card driver will result in Minecraft not working problem, including the OpenGL error popups. So you should update your graphics card driver to the latest version.
Two options to update your graphics card driver:
- Option 1 – You can manually update your video driver by searching the latest driver on the website of the manufacturer, then download and install it in your computer. This requires time and computer skills.
- Option 2 – If you don’t have the time or patience, you can do it automatically with Driver Easy.
Driver Easy will automatically recognize your system and find the correct drivers for it. You don’t need to know exactly what system your computer is running, you don’t need to be troubled by the wrong driver you would be downloading, and you don’t need to worry about making a mistake when installing.
You can update your drivers automatically with either the FREE or the Pro version of Driver Easy. But with the Pro version it takes just 2 steps (and you get full support and a 30-day money back guarantee):
1) Download and install Driver Easy.
2) Run Driver Easy and click the Scan Now button. Driver Easy will then scan your computer and detect any problem drivers.

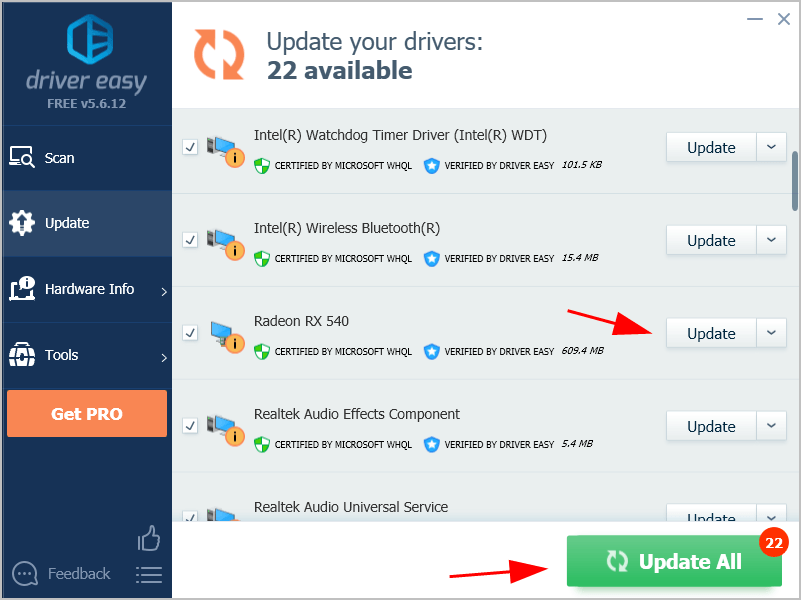
3) Click the Update button next to your flagged graphics card to automatically download the latest correct driver (you can do this with the Free version), then manually install it in your computer.
Or click Update All to automatically download and install the correct version of all the drivers that are missing or out of date on your system (this requires the Pro version – you’ll be prompted to upgrade when you click Update All).

4) Restart Windows to take effect.
Now launch Minecraft and see if it stops popping up the OpenGL error.
Method 2: Turn off OpenGL in Minecraft
OpenGL is enabled by default in your game, so as to provide you with the best gaming experience. However, some graphics cards don’t render the OpenGL feature. In these circumstances, you’ll see the Minecraft OpenGL errors. So you can turn off OpenGL for Minecraft to stop that error.
Here’s what to do:
1) In Minecraft, click Options > Video Settings.
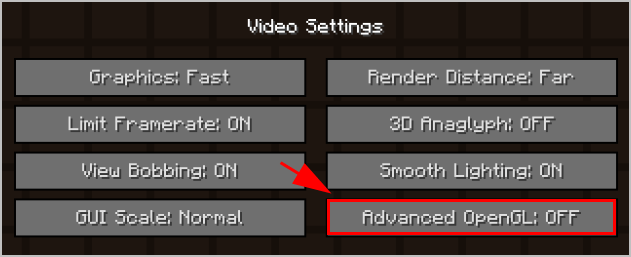
2) Click the Advanced OpenGL setting, and turn it OFF.

3) Save your changes and restart your game.
Now play Minecraft and see if it works.
That’s a no go for you? Don’t worry. There are other solutions to try.
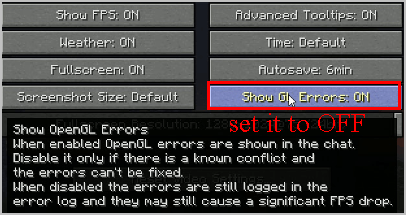
Method 3: Disable Show GL Errors
There is an option in Minecraft that decides whether to show OpenGL errors. It’s ON by default, which shows OpenGL errors in the chat. You can disable that option when there’s a known conflict.
To do so, follow the steps below:
1) In Minecraft, click Options.
2) Go to Video Settings > Others…, then click Show GL Errors to OFF.

3) Save the change and restart Minecraft.
Hopefully OpenGl errors stop happening again.
Method 4: Temporarily disable Mods
Using mods for Minecraft may cause OpenGL errors occuring in your game, as some mods may be incompatible with OpenGL. So you can temporarily disable mods for Minecraft and see if OpenGL errors stop occurring.
If OpenGL errors stop popping up, then you should find the culprit – mods. You can disable your mods one by one to troubleshoot which mod causes your problem.
If OpenGL errors still persist, mods aren’t your problem and ensure to re-enable mods later on.
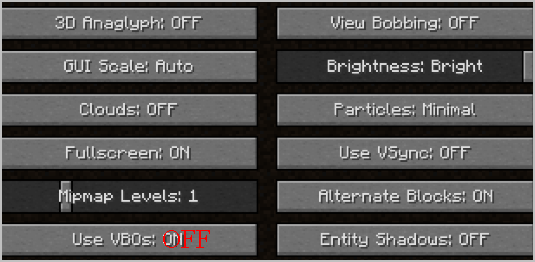
Method 5: Modify graphics settings in your game
As per user reports, some graphics settings can cause OpenGL problems like OpenGL error 1281, so you can temporarily disable some graphics settings in Minecraft. It works like a charm in some cases.
You can modify graphics settings by following steps below:
1) In Minecraft, click Options > Video Settings.
2) Modify settings like VBOs, Render Region, and Clear Water. If the option is already ON, set it to OFF.

3) Modify each setting one by one and check if Minecraft error stops.
If you can’t access Minecraft video settings, you can modify these options in the configuration file under Minrcraft folder.
There is a file named options.txt that’s stored the changeable options in Minecraft. This file is located in the Minecraft folder on your computer. You can edit the settings in this options.txt file and save your changes.
If you’re not sure which option can be edited, check this post on Minecraft for more details.
Still no luck? Don’t give up hope. Move on to the next fix.
Method 6: Install the latest Java version
Minecraft is a game developed from Java, so Java files are critical to play Minecraft. If Java version is outdated in your computer, you’re likely to have the OpenGL error.
Usually Minecraft will include the Java files when downloading Minecraft. So you can uninstall Minecraft then reinstall Minecraft to have the latest compatible Java package files.
Or you can manually download Java files from this page, then follow the on-screen instructions to finish installing.
Once installed, re-launch Minecraft and see if OpenGL errors has been fixed.
So there you have it – six fixes for Minecraft OpenGL errors.
Feel free to share your experience with Minecraft by leaving us a comment below.
Источник
Как исправить ошибку Minecraft 1286
| Номер ошибки: | Ошибка 1286 | |
| Название ошибки: | Minecraft Error 1286 | |
| Описание ошибки: | Ошибка 1286: Возникла ошибка в приложении Minecraft. Приложение будет закрыто. Приносим извинения за неудобства. | |
| Разработчик: | Mojang | |
| Программное обеспечение: | Minecraft | |
| Относится к: | Windows XP, Vista, 7, 8, 10, 11 |
Определение «Minecraft Error 1286»
«Minecraft Error 1286» часто называется ошибкой во время выполнения (ошибка). Разработчики тратят много времени и усилий на написание кода, чтобы убедиться, что Minecraft стабилен до продажи продукта. К сожалению, некоторые критические проблемы, такие как ошибка 1286, часто могут быть упущены из виду.
Ошибка 1286 может столкнуться с пользователями Minecraft, если они регулярно используют программу, также рассматривается как «Minecraft Error 1286». Если происходит «Minecraft Error 1286», разработчикам будет сообщено об этой проблеме, хотя отчеты об ошибках встроены в приложение. Mojang может устранить обнаруженные проблемы, а затем загрузить измененный файл исходного кода, позволяя пользователям обновлять свою версию. Таким образом, когда ваш компьютер выполняет обновления, как это, это, как правило, чтобы исправить проблемы ошибки 1286 и другие ошибки внутри Minecraft.
Что вызывает ошибку 1286 во время выполнения?
Ошибки выполнения при запуске Minecraft — это когда вы, скорее всего, столкнетесь с «Minecraft Error 1286». Три распространенные причины, по которым ошибки во время выполнения, такие как всплывающее окно ошибки 1286:
Ошибка 1286 Crash — это типичная ошибка «Minecraft Error 1286», которая приводит к полному завершению работы программы. Если данный ввод недействителен или не соответствует ожидаемому формату, Minecraft (или OS) завершается неудачей.
Утечка памяти «Minecraft Error 1286» — когда происходит утечка памяти Minecraft, это приведет к вялой работе операционной системы из-за нехватки системных ресурсов. Повреждение памяти и другие потенциальные ошибки в коде могут произойти, когда память обрабатывается неправильно.
Ошибка 1286 Logic Error — «логическая ошибка», как говорят, генерируется, когда программное обеспечение получает правильный ввод, но генерирует неверный вывод. Неисправный исходный код Mojang может привести к этим проблемам с обработкой ввода.
Большинство ошибок Minecraft Error 1286 являются результатом отсутствия или повреждения версии файла, установленного Minecraft. В большинстве случаев скачивание и замена файла Mojang позволяет решить проблему. В качестве дополнительного шага по устранению неполадок мы настоятельно рекомендуем очистить все пути к неверным файлам и ссылки на расширения файлов Mojang, которые могут способствовать возникновению такого рода ошибок, связанных с Minecraft Error 1286.
Классические проблемы Minecraft Error 1286
Minecraft Error 1286 Проблемы, связанные с Minecraft:
- «Ошибка приложения Minecraft Error 1286.»
- «Minecraft Error 1286 не является программой Win32. «
- «Minecraft Error 1286 столкнулся с проблемой и закроется. «
- «Minecraft Error 1286 не может быть найден. «
- «Minecraft Error 1286 не может быть найден. «
- «Проблема при запуске приложения: Minecraft Error 1286. «
- «Minecraft Error 1286 не работает. «
- «Отказ Minecraft Error 1286.»
- «Неверный путь к приложению: Minecraft Error 1286.»
Эти сообщения об ошибках Mojang могут появляться во время установки программы, в то время как программа, связанная с Minecraft Error 1286 (например, Minecraft) работает, во время запуска или завершения работы Windows, или даже во время установки операционной системы Windows. Выделение при возникновении ошибок Minecraft Error 1286 имеет первостепенное значение для поиска причины проблем Minecraft и сообщения о них вMojang за помощью.
Истоки проблем Minecraft Error 1286
Проблемы Minecraft Error 1286 вызваны поврежденным или отсутствующим Minecraft Error 1286, недопустимыми ключами реестра, связанными с Minecraft, или вредоносным ПО.
Особенно ошибки Minecraft Error 1286 проистекают из:
- Недопустимые разделы реестра Minecraft Error 1286/повреждены.
- Вирус или вредоносное ПО, повреждающее Minecraft Error 1286.
- Другая программа (не связанная с Minecraft) удалила Minecraft Error 1286 злонамеренно или по ошибке.
- Minecraft Error 1286 конфликтует с другой программой (общим файлом).
- Неполный или поврежденный Minecraft (Minecraft Error 1286) из загрузки или установки.
Совместима с Windows 2000, XP, Vista, 7, 8, 10 и 11
Источник
-
03.06.2016, 15:36
#1

Мистер MinecraftOnly 2022
Как избавиться от ошибок OpenGL
В данной теме представлены инструкции по исправлению ошибок, связанных с OpenGL
Ошибки 1286 и 1282
Следуем инструкции ниже:
1.Зайдите в папку с игрой и перейдите в сборку сервера, на котором вы получаете данные ошибки.К примеру возьмём сборку Classic.Путь будет выглядеть так — Том(С/D):Users(Имя Пользователя)AppDataRoaming.minecra ftonlyClassic
2. Открываем файл options.txt через Notepad++ (можно и через обычный Блокнот)
3. Ищём строку fboEnable.
4. Заменяем true на false.
5. Сохраняем, закрываем.
Последний раз редактировалось cheald; 28.06.2018 в 09:28.
DC: bezbashn#3688Ваш проводник в мир Minecraft
Дизайнер, квестодел и просто сладкая булочка
-
11 пользователей сказали cпасибо cheald за это полезное сообщение:
Akrux (17.06.2017),Cataclysme42 (14.08.2017),DoKe11 (27.06.2017),fresh3 (21.06.2016),Hinter (20.06.2016),KalleAK (16.10.2016),Kotowey10223 (07.09.2019),lifes (19.11.2016),MrDeltoFros (22.03.2017),MrGospo (30.12.2016),Veteran3 (03.06.2016)
-
17.06.2017, 03:37
#2
Большое спасибо. Исправил как написано выше, а то эта бяка задолбала. Должно помочь.
у меня такой путь C:Documents and Settings (Имя пользователя)Application Data.minecraftonlyTechnoMagic
Windows XP.
строчка 13. В строке 12 стоит: maxFps:120
————————————
Жаль что 1285 не исправляет
Последний раз редактировалось Akrux; 17.06.2017 в 05:01.


Информация о теме
Пользователи, просматривающие эту тему
Эту тему просматривают: 1 (пользователей: 0 , гостей: 1)
Ваши права

- Вы не можете создавать новые темы
- Вы не можете отвечать в темах
- Вы не можете прикреплять вложения
- Вы не можете редактировать свои сообщения
- BB коды Вкл.
- Смайлы Вкл.
- [IMG] код Вкл.
- HTML код Выкл.
Правила форума
Обновлено: 29.01.2023
Whenever I try and play minecraft, I get an unresponsive black screen that just hangs until I interact with it. Sometimes it says JavaRuntime Environment stopped working. I’m on Windows 10.
I have updated Java to the latest JDK 8, (I use the JDK for Eclipse) although I believe that minecraft does not depend on a system wide version of java. I also tried on another user account and did a fresh install of minecraft, deleting the appdata folder and uninstalling through the MSI. I also disabled Kaspersky antivirus, but to no avail.
Уже как пол года выходит эта ошибка. А еще игра перестала показывать мою видеокарту.
Автор вопроса считает этот ответ лучшим
Здраствуйте. Я могу вам помочь с решением проблемы:
1) Установите Оптифайн
2) Найдите кнопку по пути: Настройки графики -> Прочие ->Показывать ошибки GL
P.S. Если ошибка ни на что не влияет, то ошибка устранена. А вот если нет, то:
1) Обязательно обновите java и убедитесь что ваш лаунчер использует именно установленную вами версию. Если вы сами установили новую версию, лаунчер по прежнему будет использовать старую, необходимо в настройках указать путь до вашей новой версии.
2) Обновите драйвера вашей видеокарты.
3) Если вы играете с шейдерами и ошибка появляется при их работе, то вероятно, проблема в несовместимости данной версии шейдера и версии вашего Optifine. В таком случае, можно поискать более новую версию шейдера.
Модератор форума
Истоки проблем Minecraft Error 1286
Проблемы Minecraft Error 1286 вызваны поврежденным или отсутствующим Minecraft Error 1286, недопустимыми ключами реестра, связанными с Minecraft, или вредоносным ПО.
Как избавиться от ошибок OpenGL
В данной теме представлены инструкции по исправлению ошибок, связанных с OpenGL
Ошибки 1286 и 1282
Следуем инструкции ниже:
1.Зайдите в папку с игрой и перейдите в сборку сервера, на котором вы получаете данные ошибки.
К примеру возьмём сборку Classic.Путь будет выглядеть так — Том(С/D):Users(Имя Пользователя)AppDataRoaming.minecra ftonlyClassic
2. Открываем файл options.txt через Notepad++ (можно и через обычный Блокнот)
3. Ищём строку fboEnable.
4. Заменяем true на false.
5. Сохраняем, закрываем.
Последний раз редактировалось cheald; 28.06.2018 в 08:28 .
Akrux (17.06.2017),Cataclysme42 (14.08.2017),DoKe11 (27.06.2017),fresh3 (21.06.2016),Hinter (20.06.2016),KalleAK (16.10.2016),Kotowey10223 (07.09.2019),lifes (19.11.2016),MrDeltoFros (22.03.2017),MrGospo (30.12.2016),Veteran3 (03.06.2016)
Уже освоился
Большое спасибо. Исправил как написано выше, а то эта бяка задолбала. Должно помочь.
у меня такой путь C:Documents and Settings (Имя пользователя)Application Data.minecraftonlyTechnoMagic
«Minecraft Error 1286» часто называется ошибкой во время выполнения (ошибка). Разработчики тратят много времени и усилий на написание кода, чтобы убедиться, что Minecraft стабилен до продажи продукта. К сожалению, некоторые критические проблемы, такие как ошибка 1286, часто могут быть упущены из виду.
Классические проблемы Minecraft Error 1286
Minecraft Error 1286 Проблемы, связанные с Minecraft:
- «Ошибка приложения Minecraft Error 1286.»
- «Minecraft Error 1286 не является программой Win32. «
- «Minecraft Error 1286 столкнулся с проблемой и закроется. «
- «Minecraft Error 1286 не может быть найден. «
- «Minecraft Error 1286 не может быть найден. «
- «Проблема при запуске приложения: Minecraft Error 1286. «
- «Minecraft Error 1286 не работает. «
- «Отказ Minecraft Error 1286.»
- «Неверный путь к приложению: Minecraft Error 1286.»
Что вызывает ошибку 1286 во время выполнения?
Ошибки выполнения при запуске Minecraft — это когда вы, скорее всего, столкнетесь с «Minecraft Error 1286». Три распространенные причины, по которым ошибки во время выполнения, такие как всплывающее окно ошибки 1286:
Ошибка 1286 Crash — это типичная ошибка «Minecraft Error 1286», которая приводит к полному завершению работы программы. Если данный ввод недействителен или не соответствует ожидаемому формату, Minecraft (или OS) завершается неудачей.
Утечка памяти «Minecraft Error 1286» — когда происходит утечка памяти Minecraft, это приведет к вялой работе операционной системы из-за нехватки системных ресурсов. Повреждение памяти и другие потенциальные ошибки в коде могут произойти, когда память обрабатывается неправильно.
Ошибка 1286 Logic Error — «логическая ошибка», как говорят, генерируется, когда программное обеспечение получает правильный ввод, но генерирует неверный вывод. Неисправный исходный код Mojang может привести к этим проблемам с обработкой ввода.
Большинство ошибок Minecraft Error 1286 являются результатом отсутствия или повреждения версии файла, установленного Minecraft. В большинстве случаев скачивание и замена файла Mojang позволяет решить проблему. В качестве дополнительного шага по устранению неполадок мы настоятельно рекомендуем очистить все пути к неверным файлам и ссылки на расширения файлов Mojang, которые могут способствовать возникновению такого рода ошибок, связанных с Minecraft Error 1286.
Читайте также:
- Как включить hdr ведьмак 3
- Как запустить ведьмак 1 на windows 7
- Как включить миникарту в самп
- Герои меча и магии 4 системные требования
- Diablo 2 resurrected как установить
| Номер ошибки: | Ошибка 1286 | |
| Название ошибки: | Minecraft Error 1286 | |
| Описание ошибки: | Ошибка 1286: Возникла ошибка в приложении Minecraft. Приложение будет закрыто. Приносим извинения за неудобства. | |
| Разработчик: | Mojang | |
| Программное обеспечение: | Minecraft | |
| Относится к: | Windows XP, Vista, 7, 8, 10, 11 |
Определение «Minecraft Error 1286»
«Minecraft Error 1286» часто называется ошибкой во время выполнения (ошибка). Разработчики тратят много времени и усилий на написание кода, чтобы убедиться, что Minecraft стабилен до продажи продукта. К сожалению, некоторые критические проблемы, такие как ошибка 1286, часто могут быть упущены из виду.
Ошибка 1286 может столкнуться с пользователями Minecraft, если они регулярно используют программу, также рассматривается как «Minecraft Error 1286». Если происходит «Minecraft Error 1286», разработчикам будет сообщено об этой проблеме, хотя отчеты об ошибках встроены в приложение. Mojang может устранить обнаруженные проблемы, а затем загрузить измененный файл исходного кода, позволяя пользователям обновлять свою версию. Таким образом, когда ваш компьютер выполняет обновления, как это, это, как правило, чтобы исправить проблемы ошибки 1286 и другие ошибки внутри Minecraft.
Что вызывает ошибку 1286 во время выполнения?
Ошибки выполнения при запуске Minecraft — это когда вы, скорее всего, столкнетесь с «Minecraft Error 1286». Три распространенные причины, по которым ошибки во время выполнения, такие как всплывающее окно ошибки 1286:
Ошибка 1286 Crash — это типичная ошибка «Minecraft Error 1286», которая приводит к полному завершению работы программы. Если данный ввод недействителен или не соответствует ожидаемому формату, Minecraft (или OS) завершается неудачей.
Утечка памяти «Minecraft Error 1286» — когда происходит утечка памяти Minecraft, это приведет к вялой работе операционной системы из-за нехватки системных ресурсов. Повреждение памяти и другие потенциальные ошибки в коде могут произойти, когда память обрабатывается неправильно.
Ошибка 1286 Logic Error — «логическая ошибка», как говорят, генерируется, когда программное обеспечение получает правильный ввод, но генерирует неверный вывод. Неисправный исходный код Mojang может привести к этим проблемам с обработкой ввода.
Большинство ошибок Minecraft Error 1286 являются результатом отсутствия или повреждения версии файла, установленного Minecraft. В большинстве случаев скачивание и замена файла Mojang позволяет решить проблему. В качестве дополнительного шага по устранению неполадок мы настоятельно рекомендуем очистить все пути к неверным файлам и ссылки на расширения файлов Mojang, которые могут способствовать возникновению такого рода ошибок, связанных с Minecraft Error 1286.
Классические проблемы Minecraft Error 1286
Minecraft Error 1286 Проблемы, связанные с Minecraft:
- «Ошибка приложения Minecraft Error 1286.»
- «Minecraft Error 1286 не является программой Win32. «
- «Minecraft Error 1286 столкнулся с проблемой и закроется. «
- «Minecraft Error 1286 не может быть найден. «
- «Minecraft Error 1286 не может быть найден. «
- «Проблема при запуске приложения: Minecraft Error 1286. «
- «Minecraft Error 1286 не работает. «
- «Отказ Minecraft Error 1286.»
- «Неверный путь к приложению: Minecraft Error 1286.»
Эти сообщения об ошибках Mojang могут появляться во время установки программы, в то время как программа, связанная с Minecraft Error 1286 (например, Minecraft) работает, во время запуска или завершения работы Windows, или даже во время установки операционной системы Windows. Выделение при возникновении ошибок Minecraft Error 1286 имеет первостепенное значение для поиска причины проблем Minecraft и сообщения о них вMojang за помощью.
Истоки проблем Minecraft Error 1286
Проблемы Minecraft Error 1286 вызваны поврежденным или отсутствующим Minecraft Error 1286, недопустимыми ключами реестра, связанными с Minecraft, или вредоносным ПО.
Особенно ошибки Minecraft Error 1286 проистекают из:
- Недопустимые разделы реестра Minecraft Error 1286/повреждены.
- Вирус или вредоносное ПО, повреждающее Minecraft Error 1286.
- Другая программа (не связанная с Minecraft) удалила Minecraft Error 1286 злонамеренно или по ошибке.
- Minecraft Error 1286 конфликтует с другой программой (общим файлом).
- Неполный или поврежденный Minecraft (Minecraft Error 1286) из загрузки или установки.
Продукт Solvusoft
Загрузка
WinThruster 2022 — Проверьте свой компьютер на наличие ошибок.
Совместима с Windows 2000, XP, Vista, 7, 8, 10 и 11
Установить необязательные продукты — WinThruster (Solvusoft) | Лицензия | Политика защиты личных сведений | Условия | Удаление
Столкнуться с Ошибка OpenGL при игре в Майнкрафт? Ты не одинок. Так что не паникуйте. Вы можете исправить Ошибки Minecraft OpenGL без труда.
OpenGL ускоряет работу Minecraft на вашем компьютере, поэтому вы можете играть в Minecraft быстрее и плавнее. Эта функция включена по умолчанию, чтобы игроки могли получить максимум удовольствия от игры.
Ошибки Minecraft OpenGL могут читаться либо:
- Minecraft не смог запуститься, потому что не смог найти ускоренный режим OpenGL.
- Ошибка OpenGL: 1281 (недопустимое значение)
- Ошибка OpenGL: 1286 (недопустимая операция фреймбуфера)
- …
Вот решения для вас. Необязательно пробовать их все; просто двигайтесь вниз по списку, пока ошибка не исчезнет.
- Обновите драйвер видеокарты
- Отключите Advanced OpenGL в Minecraft
- Отключить отображение ошибок GL
- Временно отключить моды
- Измените настройки графики в вашей игре
- Установите последнюю версию Java
Метод 1. Обновите драйвер видеокарты
Ошибки OpenGL в Minecraft связаны с драйвером вашей видеокарты. Поврежденный или устаревший драйвер видеокарты приведет к тому, что Minecraft не будет работать, включая всплывающие окна с ошибками OpenGL. Поэтому вам следует обновить драйвер видеокарты до последней версии.
Два варианта обновления драйвера видеокарты:
- Опция 1 — Вы можете вручную обновить видеодрайвер, выполнив поиск последней версии драйвера на веб-сайте производителя, а затем загрузив и установив его на свой компьютер. Это требует времени и навыков работы с компьютером.
- Вариант 2 — Если у вас нет времени или терпения, вы можете сделать это автоматически с помощью Водитель Easy .
Driver Easy автоматически распознает вашу систему и найдет для нее подходящие драйверы. Вам не нужно точно знать, в какой системе работает ваш компьютер, вам не нужно беспокоиться о неправильном драйвере, который вы будете загружать, и вам не нужно беспокоиться об ошибке при установке.
Вы можете автоматически обновлять драйверы с помощью СВОБОДНЫЙ или За версия Driver Easy. Но с версией Pro это занимает всего 2 шага (и вы получаете полную поддержку и 30-дневная гарантия возврата денег ):
1) Скачать и установите Driver Easy.
2) Запустите Driver Easy и нажмите Сканировать сейчас кнопка. Driver Easy просканирует ваш компьютер и обнаружит проблемы с драйверами.

3) Щелкните значок Обновить рядом с помеченной видеокартой, чтобы автоматически загрузить последнюю версию правильного драйвера (это можно сделать с помощью Свободный версия ), а затем вручную установите его на свой компьютер.
Или нажмите Обновить все для автоматической загрузки и установки правильной версии всех драйверов, которые отсутствуют или устарели в вашей системе (для этого требуется Pro версия — вам будет предложено выполнить обновление, когда вы нажмете Обновить все ).
4) Перезагрузите Windows, чтобы изменения вступили в силу.
Теперь запустите Minecraft и посмотрите, перестанет ли выскакивать ошибка OpenGL.
Метод 2: отключите OpenGL в Minecraft
OpenGL включен в вашей игре по умолчанию, чтобы обеспечить вам лучший игровой опыт. Однако некоторые видеокарты не поддерживают функцию OpenGL. В таких случаях вы увидите ошибки Minecraft OpenGL. Таким образом, вы можете отключить OpenGL для Minecraft, чтобы остановить эту ошибку.
Вот что нужно делать:
1) В Minecraft нажмите Параметры > Настройки видео .
2) Щелкните значок Расширенный OpenGL установка и поверните его ВЫКЛ. .
3) Сохраните изменения и перезапустите игру.
Теперь поиграйте в Minecraft и посмотрите, работает ли он.
Это тебе не подходит? Не волнуйся. Есть и другие решения, которые стоит попробовать.
Метод 3: отключить отображение ошибок GL
В Minecraft есть опция, которая решает, показывать ли ошибки OpenGL. По умолчанию он включен, что показывает ошибки OpenGL в чате. Вы можете отключить эту опцию, если известен конфликт.
Для этого выполните следующие действия:
1) В Minecraft нажмите Параметры .
2) Перейти к Настройки видео > Другое… , затем щелкните Показать ошибки GL к ВЫКЛ. .
3) Сохраните изменения и перезапустите Minecraft.
Надеюсь, ошибки OpenGl перестанут повторяться.
Метод 4: временно отключить моды
Использование модов для Minecraft может вызвать ошибки OpenGL в вашей игре, поскольку некоторые моды могут быть несовместимы с OpenGL. Таким образом, вы можете временно отключить моды для Minecraft и посмотреть, перестанут ли возникать ошибки OpenGL.
Если ошибки OpenGL перестают выскакивать, значит, виновник стоит найти — моды. Вы можете отключить свои моды один за другим, чтобы определить, какой из них вызывает вашу проблему.
Если ошибки OpenGL по-прежнему не устранены, значит, проблема не в моде, и не забудьте повторно включить моды позже.
Метод 5. Измените настройки графики в игре
Согласно отчетам пользователей, некоторые настройки графики могут вызывать проблемы OpenGL, такие как ошибка OpenGL 1281, поэтому вы можете временно отключить некоторые настройки графики в Minecraft. В некоторых случаях это работает как амулет.
Вы можете изменить настройки графики, выполнив следующие действия:
1) В Minecraft нажмите Параметры > Настройки видео .
2) Измените настройки, например VBOs , Область визуализации , и Чистая вода . Если опция уже есть НА , установите его на ВЫКЛ. .
3) Измените каждую настройку один за другим и проверьте, останавливается ли ошибка Minecraft.
Если у вас нет доступа к настройкам видео Minecraft, вы можете изменить эти параметры в файле конфигурации в папке Minrcraft.
Есть файл с именем options.txt в котором хранятся изменяемые параметры в Minecraft. Этот файл находится в папке Minecraft на вашем компьютере. Вы можете редактировать настройки в этом options.txt файл и сохраните изменения.
Если вы не уверены, какой вариант можно редактировать, отметьте эта почта на Minecraft для получения более подробной информации.

Все еще не повезло? Не теряйте надежды. Переходим к следующему исправлению.
Метод 6: установите последнюю версию Java
Minecraft — это игра, разработанная на основе Java, поэтому файлы Java имеют решающее значение для игры в Minecraft. Если версия Java на вашем компьютере устарела, скорее всего, возникла ошибка OpenGL.
Обычно Minecraft включает файлы Java при загрузке Minecraft. Таким образом, вы можете удалить Minecraft, а затем переустановить Minecraft, чтобы получить последние совместимые файлы пакетов Java.
Или вы можете вручную загрузить файлы Java из эта страница , затем следуйте инструкциям на экране, чтобы завершить установку.
После установки перезапустите Minecraft и посмотрите, исправлены ли ошибки OpenGL.
Итак, у вас есть шесть исправлений для ошибок Minecraft OpenGL.
Не стесняйтесь поделиться своим опытом с Minecraft, оставив нам комментарий ниже.
Run into an OpenGL error when playing Minecraft? You’re not alone. So don’t panic. You can fix Minecraft OpenGL errors easily.
OpenGL accelerates Minecraft running in your computer, so you can play Minecraft faster and smoother. This feature is enabled by default in order to bring the best possible experiences to players.
The Minecraft OpenGL errors can read either:
- Minecraft was unable to start because it failed to find an accelerated OpenGL mode.
- OpenGL Error: 1281 (Invalid value)
- OpenGL Error: 1286 (Invalid framebuffer operation)
- …
How to fix Minecraft OpenGL error:
Here are the solutions for you. You shouldn’t have to try them all; just work your way down the list until your error disappears.
- Update your graphics card driver
- Turn off Advanced OpenGL in Minecraft
- Disable Show GL Errors
- Temporarily disable Mods
- Modify graphics settings in your game
- Install the latest Java version
Method 1: Update your graphics card driver
The OpenGL errors in Minecraft relates to your graphics card driver. Corrupted or outdated graphics card driver will result in Minecraft not working problem, including the OpenGL error popups. So you should update your graphics card driver to the latest version.
Two options to update your graphics card driver:
- Option 1 – You can manually update your video driver by searching the latest driver on the website of the manufacturer, then download and install it in your computer. This requires time and computer skills.
- Option 2 – If you don’t have the time or patience, you can do it automatically with Driver Easy.
Driver Easy will automatically recognize your system and find the correct drivers for it. You don’t need to know exactly what system your computer is running, you don’t need to be troubled by the wrong driver you would be downloading, and you don’t need to worry about making a mistake when installing.
You can update your drivers automatically with either the FREE or the Pro version of Driver Easy. But with the Pro version it takes just 2 steps (and you get full support and a 30-day money back guarantee):
1) Download and install Driver Easy.
2) Run Driver Easy and click the Scan Now button. Driver Easy will then scan your computer and detect any problem drivers.
3) Click the Update button next to your flagged graphics card to automatically download the latest correct driver (you can do this with the Free version), then manually install it in your computer.
Or click Update All to automatically download and install the correct version of all the drivers that are missing or out of date on your system (this requires the Pro version – you’ll be prompted to upgrade when you click Update All).
4) Restart Windows to take effect.
Now launch Minecraft and see if it stops popping up the OpenGL error.
Method 2: Turn off OpenGL in Minecraft
OpenGL is enabled by default in your game, so as to provide you with the best gaming experience. However, some graphics cards don’t render the OpenGL feature. In these circumstances, you’ll see the Minecraft OpenGL errors. So you can turn off OpenGL for Minecraft to stop that error.
Here’s what to do:
1) In Minecraft, click Options > Video Settings.
2) Click the Advanced OpenGL setting, and turn it OFF.
3) Save your changes and restart your game.
Now play Minecraft and see if it works.
That’s a no go for you? Don’t worry. There are other solutions to try.
Method 3: Disable Show GL Errors
There is an option in Minecraft that decides whether to show OpenGL errors. It’s ON by default, which shows OpenGL errors in the chat. You can disable that option when there’s a known conflict.
To do so, follow the steps below:
1) In Minecraft, click Options.
2) Go to Video Settings > Others…, then click Show GL Errors to OFF.
3) Save the change and restart Minecraft.
Hopefully OpenGl errors stop happening again.
Method 4: Temporarily disable Mods
Using mods for Minecraft may cause OpenGL errors occuring in your game, as some mods may be incompatible with OpenGL. So you can temporarily disable mods for Minecraft and see if OpenGL errors stop occurring.
If OpenGL errors stop popping up, then you should find the culprit – mods. You can disable your mods one by one to troubleshoot which mod causes your problem.
If OpenGL errors still persist, mods aren’t your problem and ensure to re-enable mods later on.
Method 5: Modify graphics settings in your game
As per user reports, some graphics settings can cause OpenGL problems like OpenGL error 1281, so you can temporarily disable some graphics settings in Minecraft. It works like a charm in some cases.
You can modify graphics settings by following steps below:
1) In Minecraft, click Options > Video Settings.
2) Modify settings like VBOs, Render Region, and Clear Water. If the option is already ON, set it to OFF.
3) Modify each setting one by one and check if Minecraft error stops.
If you can’t access Minecraft video settings, you can modify these options in the configuration file under Minrcraft folder.
There is a file named options.txt that’s stored the changeable options in Minecraft. This file is located in the Minecraft folder on your computer. You can edit the settings in this options.txt file and save your changes.
If you’re not sure which option can be edited, check this post on Minecraft for more details.
Still no luck? Don’t give up hope. Move on to the next fix.
Method 6: Install the latest Java version
Minecraft is a game developed from Java, so Java files are critical to play Minecraft. If Java version is outdated in your computer, you’re likely to have the OpenGL error.
Usually Minecraft will include the Java files when downloading Minecraft. So you can uninstall Minecraft then reinstall Minecraft to have the latest compatible Java package files.
Or you can manually download Java files from this page, then follow the on-screen instructions to finish installing.
Once installed, re-launch Minecraft and see if OpenGL errors has been fixed.
So there you have it – six fixes for Minecraft OpenGL errors.
Feel free to share your experience with Minecraft by leaving us a comment below.
Minecraft is an exciting sandbox video game with a huge fan base. Despite its popularity, many users have reported running into OpenGL errors while playing Minecraft, especially on Windows PCs. Usually, Minecraft doesn’t occupy a lot of HDD space and isn’t a resource-hungry game, unless you heavily mod it. Nevertheless, you may run into Minecraft OpenGL issues like:
- Minecraft was unable to start because it failed to find an accelerated OpenGL mode.
- OpenGL Error: 1281 (Invalid value).
- OpenGL Error: 1286 (Invalid framebuffer operation).
In today’s Windows 10 tutorial, you’ll learn how to fix the OpenGL error issue so that you can enjoy your games.
What Version of OpenGL Does Minecraft Use?
So, what is OpenGL anyway? OpenGL stands for Open Graphics Library. It’s an application programming interface (API) that can be applied across many applications, such as video games, virtual reality, computer-aided design, and scientific visualization. OpenGL supports the implementation of hardware-acceleration rendering in games like Minecraft. The feature instructs the graphics processor unit (GPU) not to render any other application that is not actively in use by the player. In other words, Minecraft OpenGL enables the game to run faster and smoother.
If you’re running a Windows PC with a dedicated GPU from AMD or NVIDIA, then you should use OpenGL 3.3 and above. Basically, installing the latest drivers for your graphics card gives you the most recent version of OpenGL. This applies if the GPU was released within the last five years. Most of the OpenGL errors are caused by graphics settings, driver problems, incompatibility issues, and mods.
How to Fix OpenGL While Playing Minecraft
Fix 1: Update Your Video Card Driver
OpenGL errors are usually triggered by a faulty, outdated or missing graphics card driver in your system. So, when you first encounter Minecraft OpenGL errors on your Windows 10 device, start by installing the latest version of your graphics card driver.
To do so, there are three approaches that you could take:
- Manually updating the driver
- Using Device Manager
- Automatically updating the driver
Method 1: Manually Updating Your Graphics Card Driver
This option involves going to your graphics card manufacturer’s website and searching for the latest driver version and model corresponding with your system and hardware. You’ll then proceed to download and install the drivers and check if the problem has been resolved. The downside of manually updating your drivers is that you put your PC at high risk since you can install the wrong drivers, causing more complications that could break the normal functioning of some apps.
Method 2: Using Device Manager
This method is safer compared to manually updating the graphics card drivers. Device Manager provides the platform that allows Windows to search online for the latest drivers and automatically install them on your computer. To use Device Manager to update your video card driver, follow these steps:
- Press the Win +X shortcut, and click on “Device Manager”.
- Expand “Display adapters”, and right-click the GPU whose driver you want to update.
- Click on “Update driver”, and select the “Search automatically for updated driver software” link. Wait a few moments while Windows attempts to find the latest driver version and install it on your computer.
Once the process is complete, restart your PC and check whether the OpenGL issue has been fixed.
Is your computer running slow or suffering system glitches? If so, it may need maintenance. Try running a dedicated PC optimization tool to check the health of your PC and apply the necessary fixes.
Using Device Manager does not guarantee you the latest driver version since there is a chance Windows won’t find the latest drivers. That’s where option 3 comes in.
Method 3: Automatically Update Your Graphics Card Driver
To avoid putting your PC at risk by manually trying to update your drivers, we recommend using a trusted third-party tool like Auslogics Driver Updater. The tool performs thorough diagnostics on your machine to determine the system that you’re running, the type of drivers installed, and missing and outdated drivers. Once the program completes the scan, it details the report in the “Overview” tab, where you get to choose whether to update the drivers one by one or apply the fixes with a single click.
As you can see, Auslogics Driver Updater updates not only your outdated graphics card driver but also all of the available device drivers on your PC. This way, you can enjoy playing games like Minecraft or use your apps flawlessly.
Fix 2: Temporarily Disable Mods
Mods improve the experience of playing Minecraft. However, some mods are known to cause problems due to incompatibility issues. Try disabling all mods temporarily to check if it revolves the OpenGL errors. If it does, enable the mods one after the other to find the one responsible for those errors and remove it. However, if the error keeps occurring even after disabling the mods for Minecraft, then it means that the problem lies elsewhere. If that’s the case, keep trying the solutions below.
Fix 3: Disable Show GL Errors
Minecraft has an option that allows players to disable the “Show GL Errors” feature. The feature is turned on by default. Luckily, you can disable it using the following steps:
- Launch Minecraft, and then open “Options”.
- Select Video settings > Others, and then turn off “Show GL Errors”.
- Click “Save” to apply the changes.
- Restart Minecraft and check whether the OpenGL errors will pop up again.
Fix 4: Disable OpenGL in Minecraft
Like we mentioned above, OpenGL improves the user experience when playing Minecraft. The feature is enabled by default to make Minecraft smooth and faster. However, due to incompatibility issues, some graphics cards may fail to render the OpenGL API. If that’s the case, it could explain why you keep encountering the OpenGL errors. Turning off OpenGL in Minecraft can resolve the problem.
Here’s what you need to do:
- Run Minecraft from your desktop and select “Options”.
- Go to “Video Settings”, locate “Advanced OpenGL”, and click on it to turn it off.
- Click “Save” and restart Minecraft.
If the errors don’t seem to go away, move on to the next fix below.
Fix 5: Configure Graphics Settings in Minecraft
Depending on the specs on your system, some graphics settings can give rise to OpenGL errors. To fix this, you need to modify certain graphics settings to correspond to your system’s capabilities.
Here are some of the graphics settings you can disable in Minecraft:
- Open Minecraft, and go to Options > Video Settings.
- Disable the following settings: “Use VBOs:”, Render Region:”, “Clear Water:”, “Clouds:”, and “Entity Shadows:”.
- Save your changes and relaunch Minecraft.
If disabling some graphics settings doesn’t work, try the next fix below.
Fix 6: Reinstall Minecraft
If you’ve tried all the above methods and none seemed to work, try uninstalling Minecraft and installing it again to get the latest compatible Java package files. Remember, reinstalling the game might erase your user data. Therefore, be sure to back up your user data before you begin.
- Press the Win + R keyboard shortcut, type in “appwiz.cpl” (without quotes), and press “Enter”.
- Once the “Programs and Features” window opens up in “Control Panel”, search for “Minecraft” and uninstall it. Alternatively, you can uninstall Minecraft by executing the uninstaller.exe file located in the game’s directory. Be sure to delete all mod files and temporary setting files to remove all traces of the game from your PC.
Once you’re done uninstalling the game, visit the official website of Minecraft, enter your credentials, and download the game afresh. Installing a fresh copy of Minecraft should get rid of the OpenGL errors plaguing many Windows 10 users.
That’s how to get rid of OpenGL errors while playing Minecraft. If you have any suggestions or questions, please feel free to comment below.
![]()
-
#2
Если при запуске клиента в логе запуска у вас возникает ошибка:
[21:05:31] [Client thread/ERROR]: ########## GL ERROR ##########
[21:05:31] [Client thread/ERROR]: @ Post render
[21:05:31] [Client thread/ERROR]: 1286: Invalid framebuffer operation
И крашится клиент, вызывая черный экран, то это решение для вас.
Решение:
- Открываем настройки лаунчера.
- Находим там раздел «Папка загрузок», жмем на путь.
- Попадаем в папку с лаунчером, далее выбираем нужный нам клиент, например HiTech.
- Заходим в папку.
- В корне папки находим файл options.txt и открываем его блокнотом или notepad++’ом.
- Находим там параметр fboEnable:true , меняем его на fboEnable:false
- Сохраняем файл и запускаем игру!
Последнее редактирование модератором: 4 Окт 2018
I am a relative newcomer to OpenGL, which cripples me a bit in tackling the following error.
Here is a minimal code that reproduces the problem:
#include <GL/glew.h>

#include <QtWidgets/QApplication>

#include <QOpenGLWidget>
#include <QSurfaceFormat>

#include <GL/GLU.h>

#include <iostream>

using namespace std;

class OGLErrorTest : public QOpenGLWidget
{
public:
    OGLErrorTest(QWidget *p = nullptr) : QOpenGLWidget(p)
    {
        QSurfaceFormat sformat;
        sformat.setProfile(QSurfaceFormat::CompatibilityProfile);
        sformat.setMajorVersion(2);
        sformat.setMinorVersion(1);
        sformat.setDepthBufferSize(0);
        sformat.setAlphaBufferSize(0);
        sformat.setRedBufferSize(8);
        sformat.setGreenBufferSize(8);
        sformat.setBlueBufferSize(8);
        sformat.setStencilBufferSize(0);
        sformat.setSwapBehavior(QSurfaceFormat::DoubleBuffer);
        sformat.setStereo(false);

        setFormat(sformat);
    }

    ~OGLErrorTest() {}

protected:

    void initializeGL()
    {
        glewExperimental = GL_TRUE;
        GLenum err = glewInit();

        if (err != GLEW_OK) {
            cout << "Failed to initialize GLEW" << endl;
            exit(-1);
        }

        const char *glv = (const char *)glGetString(GL_VERSION);
        glv = glv ? glv : "(unable to get OpenGL version)";
        cout << glv << endl;
    }

    void resizeGL(int w, int h) {}

    void paintGL()
    {
        glMatrixMode(GL_PROJECTION);
        glLoadIdentity();
        gluOrtho2D(0, 100, 0, 100);

        glColor3f(1.0f, 1.0f, 1.0f);
        glBegin(GL_LINES);
        glVertex2d(0, 0);
        glVertex2d(100, 100);
        glEnd();
    }
};

int main(int argc, char *argv[])
{
    QApplication a(argc, argv);

    const char *qt_version = qVersion();
    qt_version = qt_version ? qt_version : "(unable to get qt version)";
    cout << qt_version << endl;

    OGLErrorTest w;
    w.show();
    return a.exec();
}
The console output of the above program is:
5.6.0
2.1.0 - Build 8.15.10.2104
[openglqopenglframebufferobject.cpp line 538] OpenGL Error: 1286
QOpenGLFramebufferObject: Unsupported framebuffer format.
QOpenGLFramebufferObject: Unsupported framebuffer format.
[openglqopenglframebufferobject.cpp line 730] OpenGL Error: 1280
My Qt version is 5.6.0, and OpenGL version is 2.1.0 (which is fairly ancient I understand). I compile the program on Windows 7 through Visual Studio 2015. If you are running the program, you have to link with the console subsystem and compile it in the debug mode for the errors to be visible.
The image gets displayed correctly. Not issues with that.
However, my question: how can I get rid of the two OpenGL errors (1286, 1280) please? Does it look like a Qt problem, or does it look like it can be gotten rid of by (say) properly configuring the OpenGL context? I think Qt is trying to make use of some features that my hardware doesn’t support. If that’s the case, my question is, how can I tell Qt to not expect these features to be available?
I tried looking at the source code (qopenglframebufferobject.cpp), but couldn’t figure out anything that can be done to fix the error.
-
03.06.2016, 14:36
#1
Как избавиться от ошибок OpenGL
В данной теме представлены инструкции по исправлению ошибок, связанных с OpenGL
Ошибки 1286 и 1282
Следуем инструкции ниже:
1.Зайдите в папку с игрой и перейдите в сборку сервера, на котором вы получаете данные ошибки.К примеру возьмём сборку Classic.Путь будет выглядеть так — Том(С/D):Users(Имя Пользователя)AppDataRoaming.minecra ftonlyClassic
2. Открываем файл options.txt через Notepad++ (можно и через обычный Блокнот)
3. Ищём строку fboEnable.
4. Заменяем true на false.
5. Сохраняем, закрываем.
Последний раз редактировалось cheald; 28.06.2018 в 08:28.
DC: bezbashn#3688Ваш проводник в мир Minecraft
Дизайнер, квестодел и просто сладкая булочка
-
11 пользователей сказали cпасибо cheald за это полезное сообщение:
Akrux (17.06.2017),Cataclysme42 (14.08.2017),DoKe11 (27.06.2017),fresh3 (21.06.2016),Hinter (20.06.2016),KalleAK (16.10.2016),Kotowey10223 (07.09.2019),lifes (19.11.2016),MrDeltoFros (22.03.2017),MrGospo (30.12.2016),Veteran3 (03.06.2016)
-
17.06.2017, 02:37
#2
Большое спасибо. Исправил как написано выше, а то эта бяка задолбала. Должно помочь.
у меня такой путь C:Documents and Settings (Имя пользователя)Application Data.minecraftonlyTechnoMagic
Windows XP.
строчка 13. В строке 12 стоит: maxFps:120
————————————
Жаль что 1285 не исправляет
Последний раз редактировалось Akrux; 17.06.2017 в 04:01.
Информация о теме
Пользователи, просматривающие эту тему
Эту тему просматривают: 1 (пользователей: 0 , гостей: 1)
Ваши права
- Вы не можете создавать новые темы
- Вы не можете отвечать в темах
- Вы не можете прикреплять вложения
- Вы не можете редактировать свои сообщения
- BB коды Вкл.
- Смайлы Вкл.
- [IMG] код Вкл.
- HTML код Выкл.
Правила форума
Some information about what I’m using:
- Ancient Potato integrated GPU (Intel(R) HD Graphics Family)
- Windows 7
- OpenGL <=3.1
- Python 3.7.0
Error that I get instantly the moment I simply minimise the window:
$ python main.py
Traceback (most recent call last):
  File "main.py", line 71, in <module>
    main()
  File "main.py", line 60, in main
    renderer.render(mesh)
  File "...myprojectrenderer.py", line 22, in render
    glDrawElements(GL_TRIANGLES, mesh.indices, GL_UNSIGNED_INT, ctypes.c_void_p(0))
  File "...OpenGLlatebind.py", line 41, in __call__
    return self._finalCall( *args, **named )
  File "...OpenGLwrapper.py", line 854, in wrapperCall
    raise err
  File "...OpenGLwrapper.py", line 847, in wrapperCall
    result = wrappedOperation( *cArguments )
  File "...OpenGLerror.py", line 232, in glCheckError
    baseOperation = baseOperation,
OpenGL.error.GLError: GLError(
        err = 1286,
        baseOperation = glDrawElements,
        pyArgs = (
                GL_TRIANGLES,
                6,
                GL_UNSIGNED_INT,
                c_void_p(None),
        ),
        cArgs = (
                GL_TRIANGLES,
                6,
                GL_UNSIGNED_INT,
                c_void_p(None),
        ),
        cArguments = (
                GL_TRIANGLES,
                6,
                GL_UNSIGNED_INT,
                c_void_p(None),
        )
)
When I googled OpenGL errorcode 1286 I found that this happens in OpenGL context when something is wrong with Framebuffer. That really doesn’t tell anything to me…
# renderer.py
class Renderer:
    def __init__(self, colour=(0.0, 0.0, 0.0)):
        self.colour = colour

    @property
    def colour(self):
        return self._colour

    @colour.setter
    def colour(self, new_colour):
        glClearColor(*new_colour, 1.0)
        self._colour = new_colour

    def render(self, mesh):
        glBindVertexArray(mesh.vao_id)
        glBindTexture(GL_TEXTURE_2D, mesh.texture)
        glDrawElements(GL_TRIANGLES, mesh.indices, GL_UNSIGNED_INT, ctypes.c_void_p(0))

    def clear(self):
        glClear(GL_COLOR_BUFFER_BIT)
As I am using Framebuffers, I COULD have done something wrong, but I got everything to work the way I wanted it to (render to texture, then use the texture as source for rendering on quad and also as source for texture that will be rendered next frame, basically using GPU to manipulate grids of arbitrary data), I do it by swapping FBO’s instead of swapping textures if it’s unclear from the code:
# bufferedtexture.py (The place where I use Frame Buffer)
class BufferedTexture:
    def __init__(self, width, height):
        self._width = width
        self._height = height
        self._textures = glGenTextures(2)
        self._buffers = glGenFramebuffers(2)
        self._previous_buffer = 0
        self._current_buffer = 1

        self.init_buffer(0)
        self.init_buffer(1)

    @property
    def width(self):
        return self._width

    @property
    def height(self):
        return self._height

    @property
    def buffer(self):
        return self._buffers[self._current_buffer]

    @property
    def texture(self):
        return self._textures[self._previous_buffer]

    def init_buffer(self, index):
        glBindFramebuffer(GL_FRAMEBUFFER, self._buffers[index])
        glBindTexture(GL_TEXTURE_2D, self._textures[index])
        glTexParameteri(GL_TEXTURE_2D, GL_TEXTURE_MIN_FILTER, GL_NEAREST)
        glTexParameteri(GL_TEXTURE_2D, GL_TEXTURE_MAG_FILTER, GL_NEAREST)
        glTexImage2D(GL_TEXTURE_2D, 0, GL_RGBA, self.width, self.height, 0, GL_RGBA, GL_UNSIGNED_BYTE, ctypes.c_void_p(0))
        glFramebufferTexture2D(GL_FRAMEBUFFER, GL_COLOR_ATTACHMENT0, GL_TEXTURE_2D, self._textures[index], 0)

    def set_texture_data(self, image_data):
        glBindTexture(GL_TEXTURE_2D, self.texture)
        glTexImage2D(GL_TEXTURE_2D, 0, GL_RGBA, self.width, self.height, 0, GL_RGBA, GL_UNSIGNED_BYTE, image_data)

    def swap_buffers(self):
        self._previous_buffer = self._current_buffer
        self._current_buffer = (self._current_buffer + 1) % 2

    def enable(self):
        glBindFramebuffer(GL_FRAMEBUFFER, self.buffer)

    def disable(self):
        glBindFramebuffer(GL_FRAMEBUFFER, 0)

    def destroy(self):
        glDeleteFramebuffers(self._buffers)
        glDeleteTextures(self._textures)
And I use everything like this:
# main loop
while not window.should_close: # glfwWindowShouldClose(self.hwnd)
    shader.enable() # glUseProgram(self._program)

    buff.enable() # BufferedTexture object, source above
    renderer.clear() # Renderer object, source above
    renderer.render(mesh) # By the way, mesh is just a Quad, nothing fancy
    buff.disable() # Tells driver that we will be drawing to screen again

    buff.swap_buffers()
    mesh.texture = buff.texture # give quad the texture that was rendered off-screen
    renderer.clear()
    renderer.render(mesh)

    window.swap_buffers() # glfwSwapBuffers(self.hwnd)
    window.poll_events() # glfwPollEvents()
I don’t even know what could be wrong, again, this only happens when I minimise the window, otherwise I can leave it to run for hours and it’s fine, but the moment I minimise it dies…
I even tried to add
assert(glCheckFramebufferStatus(GL_FRAMEBUFFER) == GL_FRAMEBUFFER_COMPLETE)
assert(glGetError() == GL_NO_ERROR)
at the end of BufferedTexture.init_buffer to quickly check whether it’s a problem with FBO itself, but…
$ python main.py
<no assertion errors to be found>
<same error once I minimise>
TL;DR
- Everything renders properly as intended;
- haven’t noticed any problems performance wise, no errors are being
thrown or swallowed while I initialize glfw and openGL stuff, I
raise RuntimeError myself when PyOpenGL would just be all fine with something going wrong (for some reason), without ever catching it; - Program crashes with OpenGL: 1286 when I minimise the window, losing focus does nothing, only when I minimise it…
Send help.
EDIT:
mesh = Mesh(indices, vertices, uvs)

buff = BufferedTexture(800, 600)

with Image.open("cat.jpg") as image:
    w, h = image.size # the image is 800x600
    img_data = np.asarray(image.convert("RGBA"), np.uint8)
    buff.set_texture_data(img_data[::-1])
    buff.swap_buffers()
    buff.set_texture_data(img_data[::-1])

mesh.texture = buff.texture # this is just GL_TEXTURE_2D object ID
buff.disable()
while not window.should_close:
    shader.enable()

    #buff.enable()
    #renderer.clear()
    #renderer.render(mesh)
    #buff.disable()

    #buff.swap_buffers()
    #mesh.texture = buff.texture
    renderer.clear()
    renderer.render(mesh)

    window.swap_buffers()
    window.poll_events()
Once I stop using buffers completely, it works as intended. So there’s something wrong with my code, I hope.