

Offline
Зарегистрирован: 01.12.2016
Приветствую всех.
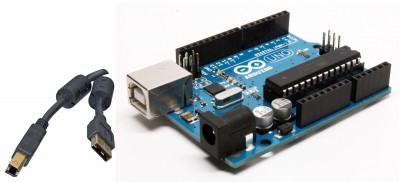
У меня возникла возможно аппаратная неисправность платы Arduino UNO. Я написал программу и собрал на монтажной плате схему управления двигателем постоянного тока, по схеме представленой на рис.
Сначала все нормально работало, но потом возможно случайно каратнул кратковременно один из выводов двигателя на вывод базы транзистора (до или после резистора) потому что я замечал кратковременное срабатывание двигателя в тот момент когда он должен быть выключен. И после этого при попытке открыть «монитор порта» выходит сообщение «Ошибка открытия последовательного порта «COM3″ (Port busy)», и при попытке загрузить другую программу тоже ни чего не работает, выходит сообщение об ошибке. Подскажите что-то произошло с USB портом на плате arduino, хотя в диспечере устройств видно «Arduino Uno (COM3)». Неужели моя плата сломалась окончательно или чтото еще можно сделать и как мне провести проверку и поиск неисправности?
//——Полное сообщение об ошибке———
Arduino: 1.6.9 (Windows 7), Плата:»Arduino/Genuino Uno»
Скетч использует 2 298 байт (7%) памяти устройства. Всего доступно 32 256 байт.
Глобальные переменные используют 232 байт (11%) динамической памяти, оставляя 1 816 байт для локальных переменных. Максимум: 2 048 байт.
Ошибка открытия последовательного порта «COM3» (Port busy)
avrdude: stk500_recv(): programmer is not responding
avrdude: stk500_getsync() attempt 1 of 10: not in sync: resp=0x7b
avrdude: stk500_recv(): programmer is not responding
avrdude: stk500_getsync() attempt 2 of 10: not in sync: resp=0x7b
avrdude: stk500_recv(): programmer is not responding
avrdude: stk500_getsync() attempt 3 of 10: not in sync: resp=0x7b
avrdude: stk500_recv(): programmer is not responding
avrdude: stk500_getsync() attempt 4 of 10: not in sync: resp=0x7b
avrdude: stk500_recv(): programmer is not responding
avrdude: stk500_getsync() attempt 5 of 10: not in sync: resp=0x7b
avrdude: stk500_recv(): programmer is not responding
avrdude: stk500_getsync() attempt 6 of 10: not in sync: resp=0x7b
avrdude: stk500_recv(): programmer is not responding
avrdude: stk500_getsync() attempt 7 of 10: not in sync: resp=0x7b
avrdude: ser_send(): write error: sorry no info avail
processing.app.SerialException: Ошибка открытия последовательного порта «COM3»
at processing.app.Serial.<init>(Serial.java:125)
at processing.app.Serial.<init>(Serial.java:66)
at processing.app.SerialMonitor$3.<init>(SerialMonitor.java:93)
at processing.app.SerialMonitor.open(SerialMonitor.java:93)
at processing.app.AbstractMonitor.resume(AbstractMonitor.java:110)
at processing.app.Editor.resumeOrCloseSerialMonitor(Editor.java:2459)
at processing.app.Editor.access$2900(Editor.java:90)
at processing.app.Editor$DefaultExportHandler.run(Editor.java:2437)
at java.lang.Thread.run(Thread.java:745)
Caused by: jssc.SerialPortException: Port name — COM3; Method name — openPort(); Exception type — Port not found.
at jssc.SerialPort.openPort(SerialPort.java:167)
at processing.app.Serial.<init>(Serial.java:114)
… 8 more
Ошибка открытия последовательного порта «COM3»
//————————————————————————————————-
не могу подключить Arduino Nano 3.0 к Windows 8.1
- Войдите или зарегистрируйтесь, чтобы получить возможность отправлять комментарии
ардуино стала определяться как устройство FT232R USB UART
проверил все ок
3.Скачал дрова с этой страницы как указано в статье http://www.wut.de/e-3wwww-51-inus-000.php
установил их в ручную
4.Теперь вроде видена плата USB Serial Port (COM3)
5.Пытаюсь залить простой скетч выдается сообщение
avrdude: ser_open(): can’t open device «.COM3»: Отказано в доступе.
Проблема загрузки на плату. Для достижения дзен, курить http://www.arduino.cc/en/Guide/Troubleshooting#upload .
Ошибка открытия последовательного порта «COM3» (Port busy)
Подскажите что делать, куда смотреть, что почитать, ничего не могу найти на эту тему.
Во многих темах пишут, что все на винде 8.1 все хорошо само ставится.
- Войдите или зарегистрируйтесь, чтобы получить возможность отправлять комментарии
Попробуй во время прошивки на кнопку reset нажать, на сколько мне известно конверторы от ftdi страдают тем, что автомвтом не сбрасывают МК.
- Войдите или зарегистрируйтесь, чтобы получить возможность отправлять комментарии
Как правило, это говорит о том, что либо устройства нет (а Ваше устройство если и «висит» в системе, то на другом номере), либо прав у пользователя на работу с этим устройством нет.
- Войдите или зарегистрируйтесь, чтобы получить возможность отправлять комментарии
Знаю такую проблему, reset нажимал.
- Войдите или зарегистрируйтесь, чтобы получить возможность отправлять комментарии
А что можно предпренять, если устройство висит на другом номере?
Или если нет прав. Не знаю как проверить два этих предположения
- Войдите или зарегистрируйтесь, чтобы получить возможность отправлять комментарии

Его уже кто-то юзает
Поменяйте вручную номер этому порту на, например, десятый. Поменяется? Появится в системе? ИДЕ увидит этот порт?
- Войдите или зарегистрируйтесь, чтобы получить возможность отправлять комментарии
Порт уже менял, но при смене на любой другой пишет, что он занят другой программой. Я всеравно меняю, но это не помогает
- Войдите или зарегистрируйтесь, чтобы получить возможность отправлять комментарии
Попробуй старый драйвер через диспетчер устройств снести и поставить новый с официального сайта поставить http://www.ftdichip.com/Drivers/VCP.htm
- Войдите или зарегистрируйтесь, чтобы получить возможность отправлять комментарии
Платформу менять надо. Возьмите какой-нибудь liveCD с линуксом и попробуйте там.
- Войдите или зарегистрируйтесь, чтобы получить возможность отправлять комментарии
попробовал на другом ноуте с WinXP, все получилось и поставилось.
НО это не отменяет моего вопроса, мне всеравно хочется на винде 8 чтобы заработало
- Войдите или зарегистрируйтесь, чтобы получить возможность отправлять комментарии
Попробуй преустановить IDE на самую новую, запустить от имени администратора, проверь правильно ли плата в настройках выбрана
- Войдите или зарегистрируйтесь, чтобы получить возможность отправлять комментарии

Я удивляюсь, как у вас так выходит. у меня 8.1 и все нормально автоматом дрова встали. нафига лезть куда то качать всякое непонятное, потом гонять вирусы пару дней. что за мазахизм такой.
Кто то уже использует этот порт. кто?
- Войдите или зарегистрируйтесь, чтобы получить возможность отправлять комментарии
Ну дрова я скачивал с официального сайта, по идее вирусов не должно быть.
А после установки сами дрова не установились и плата определилась как устройство FT232R USB UART. Поэтому пришлось устанавливать вручную. Кто занял сом порт не знаю как определить. По идее если бы плата была поддельная, то PID сбросился бы на 0000 (как в вычитал в этой статье http://did5.ru/arduino/vosstanavlivaem-arduino-nano.html ), но он не сбросился.
Но дрова сами не встали и сом порт занят. Причем все заняты (пробовал менять на другие). Может фаервол все занял? хз. Пока нет идей. На ХР все работает. Причем с теми же дровами.
- Войдите или зарегистрируйтесь, чтобы получить возможность отправлять комментарии
попробовал на другом ноуте с WinXP, все получилось и поставилось. НО это не отменяет моего вопроса, мне всеравно хочется на винде 8 чтобы заработало
Вы не совсем верно трактуете: «хочется чтобы на этом железе и под Win8 заработало». Для этого и надо провести диагностику железа отдельно от операционки. Да хоть XP туда временно поставьте и проверьте. Может оно с Вашим USB не работает.
- Войдите или зарегистрируйтесь, чтобы получить возможность отправлять комментарии
Подниму старую тему, чтобы в кучке лежало.
После обновления Win7 (сделал как раз перед получением проблемы, но до этого комп. стоял две недели невключаемый) словил ser_open(): can’t set com-state for «.COM3». Ардуина (Freeduino) проверенная временем, чип FTDI, кабеля те же, что и были. Другой софт не обновлял и т.п. и т.д. Порт появляется/исчезает при выдергивании кабеля. RX/TX без паразитных присоединений. Вобщем, всё чин-по чину, только ничего не работает. Голову чесал, другой софт запускал — занят порт и хоть тресни. Всякие антивирусы отключал, систему перезагружал, монитор протирал.
С горя полез смотреть в диспетчере задач свойства USB Serial Converter — ничего подозрительного, только версия драйвера лохматая — наверное как автоматом в первое подключение Ардуины три года назад поставилась. По привычке тыкнул в «Обновить драйвер» (с автопоиском) — винда куда-то полезла, что-то от августа 2017-го года скачала и. бинго! Скретчи шьются, скротчи тоже. Лампочки весело моргают, все рады и счастливы.
Источник
Arduino ошибка открытия последовательного порта com6 port busy
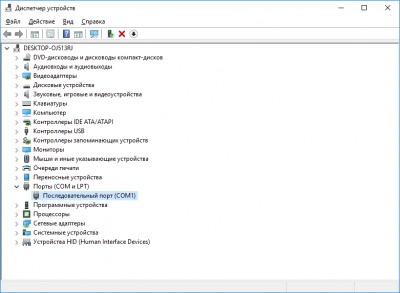
Сначала проверьте последовательные порты. Загрузите Windows, но не подключайте плату Arduino или ESP8266. На рабочем столе щелкните правой кнопкой мыши (ПКМ) по ярлыку Этот компьютер (Компьютер). В меню выберите Свойства. В окне Система щелкните по ссылке Диспетчер устройств. В окне Диспетчер устройств откройте Порты (COM и LPT). Должен присутствовать последовательный порт COM1.
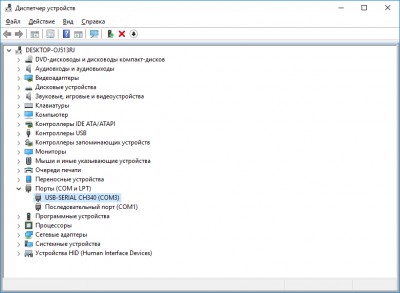
Теперь воткните в USB порт кабель от Arduino или ESP8266. В диспетчере устройств должен появиться дополнительный COM порт. Я подключил NodeMCU v3 и появился дополнительный порт COM3.
Если порт определился, но никаких сообщений в монитор порта не выводится, то проверьте скорость порта. В настройках Arduino IDE выставьте скорость порта ту, которая прописана в скетче. В окне монитора порта нажмите кнопку Очистить вывод. После этого монитор порта должен заработать.
Если ничего не изменилось и присутствует только порт COM1, то значит у вас проблемы с последовательным портом.
В этом случае при запуске скетча в окне выдается сообщение «Порт недоступен», «Ошибка подключения последовательного порта», «Порт не найден» и т.п. После этого начинаются пляски с бубном — отключаются и снова подключаются кабели, перезагружается компьютер. Иногда это помогает, иногда — нет.
Вероятная причина ошибки порта — помехи при передаче данных по USB кабелю. Как это не банально, но чаще всего причина в некачественном кабеле. Не экономьте, купите качественный кабель. Вторая вероятная причина — слаботочный USB порт. Замените ненадёжный кабель и не используйте разбитые USB разъёмы.
По второй причине — недостаточно тока для питания Arduino или ESP8266. USB порт в материнской плате компьютера может быть запитан от источника с малым выходным током. Попробуйте самое простое — подключить Arduino к другому порту в надежде на то, он запитан от более мощного источника. Такое возможно, если USB портов несколько. Кардинальное решение — подключить Arduino или ESP8266 через USB хаб (USB — разветвитель) с внешним блоком питания с выходным током не менее 2 — 3 А.
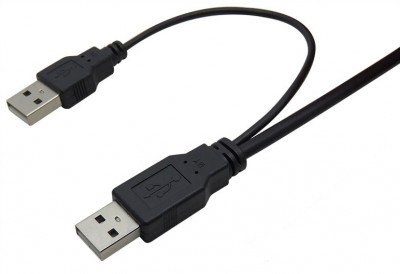
Радиолюбители, умеющие паять, могут поступить проще — подпаять короткими проводами к разъему USB в параллель еще один разъем USB, в который завести от основного разъема два провода питания GND и +5В. Или купите такой кабель, если есть такая возможность. Такой прием используют фирмы, когда питания от одного разъема USB не хватает, например для питания жесткого диска, подключенного к порту USB (USB HDD). Таким образом устройство получит дополнительное питание от другого порта USB.
Ещё одно причина нехватки питания для портов USB — подключение к роутеру по Wi-Fi. Wi-Fi адаптер потребляет значительный ток и нагружает шину питания портов USB. В связи с этим отключите Wi-Fi адаптер и подключите компьютер к роутеру кабелем. Иногда это сразу может решить проблему.
Предпочтительно использовать компьютер с подключением клавиатуры и мыши к портам PS/2. Клавиатура и мышь с подключением по USB будут дополнительно нагружать шину +5В USB и питания для Arduino или Node MCU может не хватить. Отключите на время принтер, подключенный по USB, смартфон, подключенный по USB и другие устройства, подключенные к портам USB, без которых можно обойтись, так как они потребляют ток по шинам USB. Кроме того, они могут просто влиять на порты USB и вызывать сбои системы.
По возможности используйте десктоп с достаточно мощным блоком питания, который обеспечивает с запасом ток по шине +5В. Некоторые дешёвые материнские платы при подключении двух-трёх USB устройств уже начинают давать сбои.
Используйте короткий USB кабель, насколько это возможно. Это уменьшит помехи при передаче данных.
Не используйте USB удлинители, подключайте Arduino или ESP8266 непосредственно к USB портам компьютера на задней стенке системного блока. Не используйте USB разъёмы на передней панели системного блока или USB порты картридера. Они подключаются к материнской плате кабелями. Это увеличивает помехи при передаче данных.
Самый действенный способ снизить помехи это использовать USB кабель с ферритовыми фильтрами — цилиндрическими утолщениями из ферритовых колец на концах кабелей.
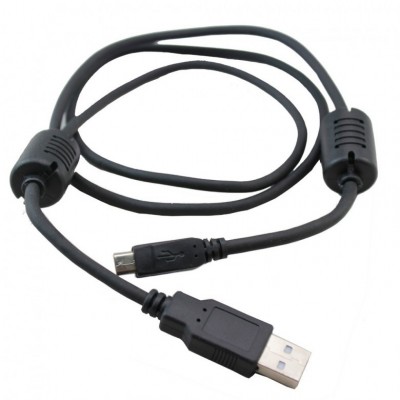
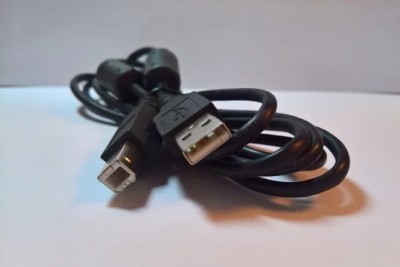
Фильтры бывают съемными, они надеваются на кабель и защелкиваются.
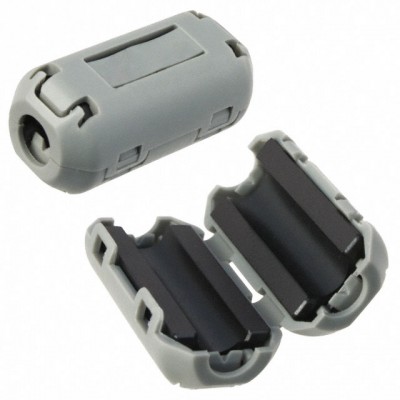
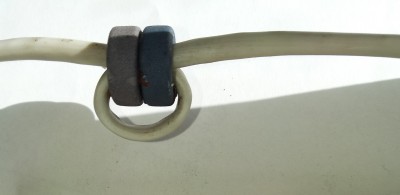
Можно изготовить фильтр самостоятельно. Возьмите ферритовое кольцо диаметром около 20 мм, притупите острые кромки наждачной бумагой, сделайте один виток кабеля вокруг сердечника и зафиксируйте кольцо на кабеле с помощью скотча или термоусадочной трубки.
Если использовать кольца небольшого диаметра, то никакой фиксации не понадобится. Например, я использовал два кольца, снятые с неисправной материнской платы. Только придется разрезать кабель и затем спаять его снова или припаять новый USB разъем.
Бывают ситуации, когда Arduino работает нормально, а при подключении ESP8266 появляются ошибки и скетч не работает. Такое может быть из-за того, что Wi-Fi передатчик модуля потребляет довольно значительный ток и для нормальной работы просто не хватает тока. Подключите ESP8266 через USB хаб с внешним блоком питания с выходным током 2-2.5-3 А. Также используйте для подключения короткие кабели с ферритовыми фильтрами на концах.
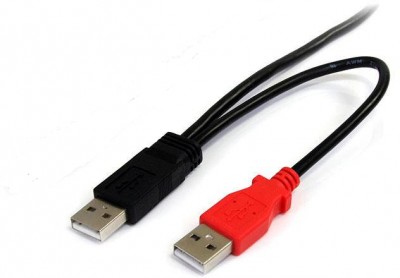
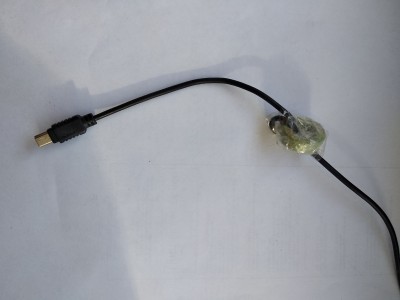
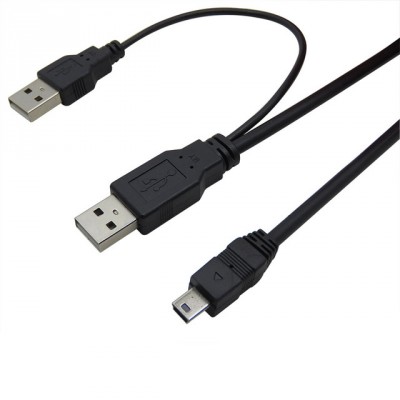
Желательно использовать Micro-USB или Mini-USB кабель с двумя USB разъемами на конце. Отвод с USB разъемом служит для подачи дополнительного питания. Радиолюбители могут без труда подпаять дополнительный USB разъем сами.
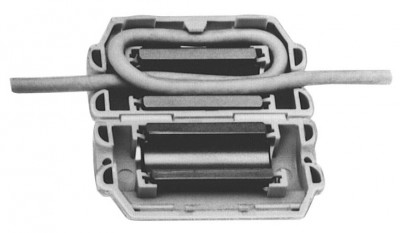
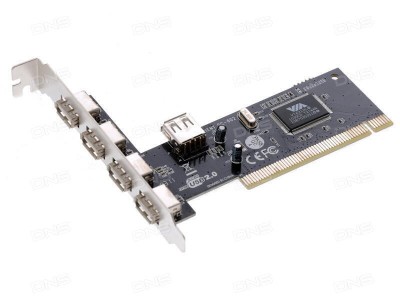
Если USB порты на материнской плате слабы по токам питания, то можно попробовать дополнительно подключить в PCI разъем контроллер USB. Подключите к этому контроллеру USB-мышь и USB-клавиатуру. К USB портам на материнской плате подключайте только Arduino или NodeMCU v3. К PCI разъему подводится более мощное питание. Один из таких контроллеров показан на фото:
Пробуйте подключаться к разным USB разъёмам компьютера, если их несколько, или разным разъёмам USB хаба.
Если ваш компьютер имеет порты USB2.0 и USB3.0, то пробуйте подключаться к тем и другим. Скорее всего лучшие результаты получите при подключении к USB2.0. Драйвер USB3.0 может работать некорректно.
Windows иногда просто не может определить порт. Проверьте контакты блока питания USB хаба в розетке сети. Если блок питания болтается, то о надёжной работе USB портов не может быть и речи.
Подключайте плату Arduino или ESP8266 в USB разъём после полной загрузки Windows.
При переключениях в другие порты номер порта может измениться. Проверяйте номер порта. В верхнем меню Arduino IDE выберите Сервис (Tools) -> Последовательный порт (Serial Port). Рядом с портом COM1 должен быть дополнительный порт. Поставьте галку, чтобы активировать его.
Работу COM порта и загрузку скетча визуально можно проверить по миганию светодиодов RX и TX на плате Arduino или по частому миганию светодиода рядом с Wi-Fi антенной на плате ESP8266 (NodeMCU v3).
Несмотря на все ухищрения, Windows 10 не открывает COM порт для Node MCU v3 (ESP-12E). Иногда подключает порт и тут же сбрасывает его и так без конца.
Подключил Node MCU v3 (ESP8266) через USB хаб с внешним блоком питания к компьютеру с Windows XP SP3. Установил драйвер ch341ser.exe и Arduino IDE 1.6.5. COM порт определяется и работает. В Windows XP COM порты определяются более надёжно. Проверил это на двух компьютерах с Windows XP с Intel и AMD процессорами.
Однако некоторые скетчи уже не используют приложения Win32 и при компиляции выдаётся ошибка. В этом случае потребуется как минимум 64-разрядная Windows 7.
COM порты виртуальные и, как в любой программе, возможен сбой при определении порта.
Семипортовые USB хабы (разветвители), как пишут в интернете, имеют две микросхемы по 4 порта. Последний порт первой микросхемы используется для подключения второй микросхемы. В итоге получается 3+4 порта. Можно попробовать подключать Arduino или Node MCU в разные порты хаба.
В Windows откройте Диспетчер устройств, раскройте Порты (COM и LPT). Не закрывайте это окно. Начинайте пробовать разные кабели, разные порты и разные варианты подключения оборудования и, как только порт надёжно определится в Диспетчере устройств, запомните эту конфигурацию оборудования.
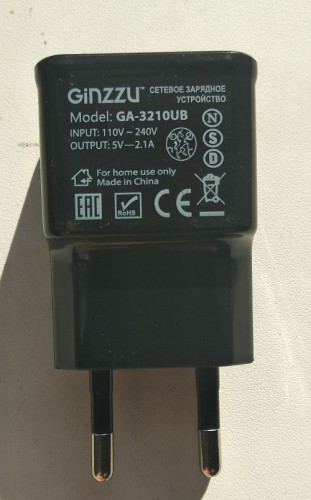
И последнее и, может быть, самое главное. Большинство бестрансформаторных блоков питания (зарядных устройств), выполненных в корпусе-вилке, не обеспечивают заявленных характеристик. Например, у зарядного устройства 5V 2.1А, показанного ниже, при токе 0,9 А напряжение на выходе падает до 3,8 В. Сомневаюсь в том, что такой блок питания вообще может отдать в нагрузку ток 2А.
При подозрениях на проблему с питанием используйте трансформаторный блок питания. По габаритам он будет намного больше, зато надежно обеспечит расчетные ток и напряжение.
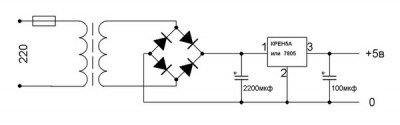
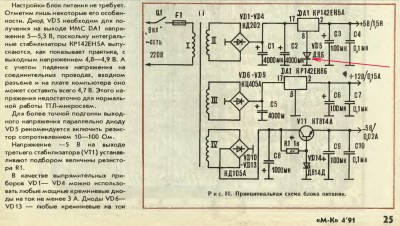
Рекомендации по блоку питания (из книги «Неисправности вашего ZX SPECTRUM» С.-Петербург, 1991):
«Советуем Вам выбрать самую простую, но и самую надежную схему: трансформатор — диодный мост — конденсатор фильтра — микросхема КР142ЕН5А в стандартном включении — блокировочный конденсатор.
Не стремитесь к чрезмерной миниатюризации! Трансформатор должен иметь мощность не менее 15 Вт, провод вторичной обмотки диаметр не менее 0,7 мм и напряжение на вторичной обмотке под нагрузкой 7-8 Ом должно быть 9-10 В.
Диодный мост подойдет любой из серий КЦ402, КЦ405. Конденсатор фильтра должен быть не менее 4000 мкФ, а рабочее напряжение — не ниже 16 В. На выходе ЕН5А поставьте блокировочный конденсатор 100-200 мкФ на 10-16 В. После сборки БП проконтролируйте напряжение на входе ЕН5А при подключенной нагрузке 5 Ом — должно быть 10,5-11 В.
Если это не так — отмотайте или домотайте несколько витков вторичной обмотки трансформатора. Затем проконтролируйте под нагрузкой 5 Ом напряжение на выходном разъеме БП — должно быть 4,9 — 5,1 В. При низком напряжении придется взять более толстый провод для подсоединения разъема.
При окончательной проверке БП посмотрите на осциллографе переменную составляющую напряжения на пределе 10 мВ (под нагрузкой 5 Ом) — заметных отклонений от прямой линии не должно быть.
В случае неудачи емкость фильтрующего конденсатора нужно увеличить.
Наконец, позамыкайте выход БП накоротко и убедитесь, что ЕН5А не выходит из строя.»
Вместо диодного моста КЦ можно применть более компактный диодный мост DB157S.
Некоторые экземпляры ЕН5А имеют на выходе напряжение чуть меньше 5 В. Для регулировки выходного напряжения соберите блок питания по схеме:
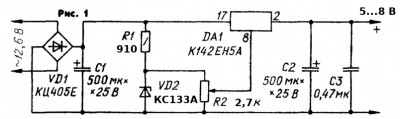
Номиналы резисторов R1 и R2 вы можете рассчитать сами. Например, после мостика на конденсаторе фильтра под нагрузкой у вас получилось напряжение 15 В. Напряжение на стабилитроне составит 3-3,3 В. Значит на резисторе R1 должно упасть 15 — 3 = 12 В. Ток стабилитрона КС133А 10 мА, т. е. 0,01 А. По закону Ома R = V/I. R = 12/0.01= 1200 Ом = 1,2 кОм. Также можно попробовать стабилитрон КС119А (напряжение стабилизации 1,9 В). Резистор R2 можно взять сопротивлением раза в три больше, чем R1, чтобы не так сильно шунтировал стабилитрон. R2 будет 3 — 3,6 кОм. Мощность рассеивания тоже рассчитывается по закону Ома. Резистор 0,25 Вт будет с большим запасом по мощности рассеивания. Для регулировки напряжения удобно использовать подстроечный многооборотный резистор СП5-3 или аналогичный.
Аккуратнее с регулировкой напряжения, а то выведите из строя само устройство. Вначале для проверки блока питания подключите нагрузку — резистор 5 Ом 5 Вт. Ток нагрузки будет 1 А. Резистором R2 установите напряжение на выходе + 5,0 ÷ 5,25 В.
Для повышения напряжения на выходе есть более простой вариант — включить в разрыв между выводом ЕН5А и общим проводом диод Д9Б. Так сделано в блоке питания для компьютера Специалист — М (ж. «Моделист-конструктор» № 4, 1991 г.)
Если есть подозрения на глюки системы, то тогда можно попробовать переустановить систему Windows.
Если все описанные меры не дали надежного результата, то скорее всего ваш системный блок имеет слаботочные порты USB и маломощный блок питания. Тут может помочь замена материнской платы и блока питания на более мощные, т.е по сути нужен новый системный блок.
Резюме
Чтобы устранить ошибки последовательного порта —
► используйте для питания Arduino или ESP8266 USB порты с достаточным выходным током или USB хаб с внешним блоком питания.
► используйте для подключения короткие USB кабели с ферритовыми фильтрами около разъемов.
► попробуйте разные версии драйвера CH340, если не поможет — тогда другую версию Windows.
► используйте качественный кабель со всеми сигнальными жилами, а не кабель от зарядного устройства.
Последнее редактирование 23 сентября 2022 г.
Источник
I have got an Arduino Uno R3 on which I have an accelerometer that I’m playing a bit with. This setup has worked for quite a while now, everything working from uploading to checking the serial output.
Today I started having problems with the com port reporting busy or not connected at all. When I use the default IDE it cant find the arduino at all but when I use a modded IDE (Arduino ERW 1.0.5) seems to find the port to communicate on but it reports it being busy.
I have reinstalled the driver like 5 or 6 times now and searched for any other driver that might work but they wont change anything. I have also checked that my pc actually detects the arduino which it does, it is listed among the COM ports on Device Manager. I also tried changing the Com port from COM3 to COM4 and still it worked for like 3 uploads and then the COM port kinda «disappeared» from the serial port list on the IDE.
EDIT: Weirdly, after closing some programs that seem to have to do with serial communication it works. I have to look into what I close and when.
EDIT2: For now it seems that processing sometimes didnt close properly when not using the stop button on the processing application which then didnt close the connection to the arduino. I havent had any problems since I started to use the Stop button on processing.
Win 8.1
Latest driver and IDE(an modded IDE called Arduino ERW 1.0.5 seem to work a bit better but have the same issues)
One thing I noticed is that if I press the reset button when it starts again it wont send anything through serial, is it defaulting to the Blink program after a reset or what?
I’ve got an idea. Your board isn’t being recognized. Try unplugging the arduino and see if Com 1 is still there. Sometimes it can recognize mice and other devices as Com 1 or 2 instead of your arduino.
On some of my development machines after everything settled out my devices will show up on Com 4 and 5 when I am working on two at a time.
If this is not the case go into the device manager and see if you can see the board listed.
I would also wonder if you have your sensor hooked to digital pins 0 and 1. These pins are used for your serial line on usb. So if you have anything such as a sensor hooked to them it may be generating data keeping the line busy instead of it being able to negotiate.
I had this happen when setting up hc-05 for the first time. I realized I had to keep the chip off while flashing or I would end up with errors or Com busy.
Please provide your pinout and basic information about the Com ports available on the ide. Also consider that you will need to specify the correct board as it will default to an uno.
Programmer not in sync issues generally occur because the board is recognized but cannot be written to for one reason or another.
- the board has something plugged into digital 1 and 0 which are serial i/o pins
- the board programmer is busy running your last batch of code
- usb error
So
- try a different cord
- try unplugging potential wiring issues and see if it can be written to without anything on it
- try holding down reset on the board until the board when you try to write to it until just after it finishes compiling to clear any potential programing issues
In my experience mega have a tendency to suffer from the last one.
I tried your Processing sketch, and it does detect and try to connect to the serial port, but fails for some reason.
Processing «code» can include a try catch block to help you diagnose the issue. Using this modified sketch, you can print the errors to the console window.
import processing.serial.*;

Serial ser_port;                // for serial port
PFont fnt;                      // for font
int num_ports;
boolean device_detected = false;
String[] port_list;
String detected_port = "";

void setup() {
  size(400, 200);                         // size of application window
  background(0);                          // black background
  fnt = createFont("Arial", 16, true);    // font displayed in window

  println(Serial.list());

  // get the number of detected serial ports
  num_ports = Serial.list().length;
  // save the current list of serial ports
  port_list = new String[num_ports];
  for (int i = 0; i < num_ports; i++) {
    port_list[i] = Serial.list()[i];
  }
}

void draw()
{
  background(0);
  // display instructions to user
  textFont(fnt, 14);
  text("1. Arduino or serial device must be unplugged.", 20, 30);
  text("   (unplug device and restart this application if not)", 20, 50);
  text("2. Plug the Arduino or serial device into a USB port.", 20, 80);

  // see if Arduino or serial device was plugged in
  if ((Serial.list().length > num_ports) && !device_detected) {
    device_detected = true;
    // determine which port the device was plugged into
    boolean str_match = false;
    if (num_ports == 0) {
      detected_port = Serial.list()[0];
    } else {
      // go through the current port list
      for (int i = 0; i < Serial.list().length; i++) {
        // go through the saved port list
        for (int j = 0; j < num_ports; j++) {
          if (Serial.list()[i].equals(port_list[j])) {
            break;
          }
          if (j == (num_ports - 1)) {
            str_match = true;
            detected_port = Serial.list()[i];
          }
        }
      }
    }
  }
  else{
    text("else", 20, 110);
  }
  // calculate and display serial port name
  if (device_detected) {
    text("Device detected:", 20, 110);
    textFont(fnt, 18);
    text(detected_port, 20, 150);
    try{
      ser_port = new Serial(this, detected_port, 9600);
    }
    catch(Exception e){
      // Print detailed error information to the console.
      System.err.println(e);
      e.printStackTrace();
    }
  }
  else{
    text("Device NOT detected:", 20, 140);
  }
}
These are the errors I get on my computer using a Arduino Uno.
    at processing.serial.Serial.<init>(Unknown Source)
    at processing.serial.Serial.<init>(Unknown Source)
    at sketch_211210a.draw(sketch_211210a.java:85)
    at processing.core.PApplet.handleDraw(PApplet.java:2475)
    at processing.awt.PSurfaceAWT$12.callDraw(PSurfaceAWT.java:1547)
    at processing.core.PSurfaceNone$AnimationThread.run(PSurfaceNone.java:313)
java.lang.RuntimeException: Error opening serial port /dev/tty.wchusbserial620: Port busy
java.lang.RuntimeException: Error opening serial port /dev/tty.wchusbserial620: Port busy
Another issue is with this part of the code: if (device_detected). The draw() function is like the Arduino loop() function in that it keeps looping through the code. It is repeatedly trying to make a new serial connection to the same port, which MAY explain why the Port busy error message is repeated in the console error messages.
Using Processing IDE 3.5.3, there is a errors tab at the bottom of the console window. I am getting 2 errors there which don’t seem to be involved with the port connection issue.
If you install the controlP5 library in the Processing IDE, you can use this port testing sketch to see the Port ID change every time you create a new connection with it. I suspect your sketch may connect to the Arduino the first time through the draw() function, then it keeps trying to connect to the same port which is busy.
// Serial port(s) connection tester. Processing version 3.5.3.
// For a list of all the ScrollableList Controller methods available,
// use: "ControlP5.printPublicMethodsFor(ScrollableList.class);"
// to print the entire list of the 165 functions to the console.
import controlP5.*;
import java.util.*;
import processing.serial.*;

ControlP5 cp5;
Serial myPort;
Textlabel outputWindowLine1, outputWindowLine2;
String portName;

void setup(){

  size(500, 431);

  // Use a font larger than the default "6px".
  ControlFont font = new ControlFont(createFont("Verdana", 14));

  // ALL CAPS is the default font for the control. Why?
  Label.setUpperCaseDefault(false);

  // Configure a controlP5 ScrollableList.
  cp5 = new ControlP5(this);
  cp5.addScrollableList("dropdown")
    .setPosition(0, 50)
    .setSize(500, 400)
    .setBarHeight(50)
    .setItemHeight(30)
    .setFont(font)
    .addItems(GetSerialPortList())
    .setType(ScrollableList.LIST)
    .setLabel("--- Click on a port name to try and connect to it ---")
    ;

  outputWindowLine1 = cp5.addTextlabel("outputWindowLine1Label")
    .setText("The list of port names is "scrollable".")
    .setPosition(0, 0)
    .setColorValue(0)
    .setFont(font)
    ;

  outputWindowLine2 = cp5.addTextlabel("outputWindowLine2Label")
    .setText("Press any character on the keyboard to reload the list.")
    .setPosition(0, 25)
    .setColorValue(0)
    .setFont(font)
    ;
}

void draw(){
  background(255);
}

// User selects a drop down item. Works like a JavaScript onChange()
// event, except you can click on the same item multiple times, this
// code will execute again on each mouse "click" of the same item.
void dropdown(int n){

  // Create a serial connection and send some
  // chars to the "USB to Serial Converter".
  try{

    // Get the port name.
    portName = Serial.list()[n];

    // If you don't do this, you can't re-connect to the same port again.
    // Re-connecting to the same port gives you a new "myPort ID" and may
    // take a few seconds.
    if(myPort != null){
      myPort.clear();
      myPort.stop();
    }

    // Create a Serial Port connection.
    myPort = new Serial(this, portName, 9600);

    // User message.
    outputWindowLine1.setText("Connected to portName: " + portName);
    outputWindowLine2.setText("myPort = " + myPort);

  }
  catch(Exception e){

    // User message.
    outputWindowLine1.setText("Error connecting to portName: " + portName);
    outputWindowLine2.setText("");

    // Print detailed error information to the console.
    System.err.println(e);
    e.printStackTrace();
  }
}

// Refresh the dropdown list of serial port names.
void keyPressed(){
  cp5.get(ScrollableList.class, "dropdown").setItems(GetSerialPortList());
  outputWindowLine1.setText("Serial port list refreshed!");
  outputWindowLine2.setText("");
}

// Get a List of the serial port names.
List GetSerialPortList(){
  List serialPortList = Arrays.asList(Serial.list());
  return serialPortList;
}
-
#159
Господа здравствуйте. Возникла проблема пытаюсь прошить ESP12F, но выдает вот такую ошибку:
Executable segment sizes:
ICACHE : 32768 — flash instruction cache
IROM : 231820 — code in flash (default or ICACHE_FLASH_ATTR)
IRAM : 27613 / 32768 — code in IRAM (IRAM_ATTR, ISRs…)
DATA : 1496 ) — initialized variables (global, static) in RAM/HEAP
RODATA : 992 ) / 81920 — constants (global, static) in RAM/HEAP
BSS : 25608 ) — zeroed variables (global, static) in RAM/HEAP
Скетч использует 261921 байт (27%) памяти устройства. Всего доступно 958448 байт.
Глобальные переменные используют 28096 байт (34%) динамической памяти, оставляя 53824 байт для локальных переменных. Максимум: 81920 байт.
C:UsersVenusAppDataLocalArduino15packagesesp8266toolspython33.7.2-post1/python3 C:UsersVenusAppDataLocalArduino15packagesesp8266hardwareesp82663.0.0/tools/upload.py —chip esp8266 —port COM7 —baud 115200 —before default_reset —after hard_reset write_flash 0x0 C:UsersVenusAppDataLocalTemparduino_build_166446/Blink.ino.bin
esptool.py v3.0
Serial port COM7
Traceback (most recent call last):
File «C:UsersVenusAppDataLocalArduino15packagesesp8266hardwareesp82663.0.0/tools/upload.py», line 66, in <module>
esptool.main(cmdline)
File «C:/Users/Venus/AppData/Local/Arduino15/packages/esp8266/hardware/esp8266/3.0.0/tools/esptoolesptool.py», line 3551, in main
esp = chip_class(each_port, initial_baud, args.trace)
File «C:/Users/Venus/AppData/Local/Arduino15/packages/esp8266/hardware/esp8266/3.0.0/tools/esptoolesptool.py», line 271, in init
self._port = serial.serial_for_url(port)
File «C:/Users/Venus/AppData/Local/Arduino15/packages/esp8266/hardware/esp8266/3.0.0/tools/pyserialserialinit.py», line 90, in serial_for_url
instance.open()
File «C:/Users/Venus/AppData/Local/Arduino15/packages/esp8266/hardware/esp8266/3.0.0/tools/pyserialserialserialwin32.py», line 64, in open
raise SerialException(«could not open port {!r}: {!r}».format(self.portstr, ctypes.WinError()))
serial.serialutil.SerialException: could not open port ‘COM7’: OSError(22, ‘������� �������������� ����������.’, None, 433)
serial.serialutil.SerialException: could not open port ‘COM7’: OSError(22, ‘������� �������������� ����������.’, None, 433)
Именно последние 3 строчки не понятны. Порт компьютер видит, и в ардуино и в диспетчере устройств. Но если я даже пытаюсь просто открыть Монитор порта, вылезает вот такая ошибка — Ошибка открытия последовательного порта «COM7» (Port busy)
Пытался перезагружать и usb порт менял, все бестолку. Можете подсобить?
-

411.7 KB
Просмотры: 8
Содержание
- Arduino.ru
- Регистрация новых пользователей и создание новых тем теперь только на новом форуме https://forum.arduino.ru
- forum.arduino.ru
- Ошибка открытия последовательного порта «COM3»
- Exception type port busy
- If the serial com port number changes randomly
- If the native com port can’t be detected
- Add a delay at start-up
- Avoid continuously printing
- Uploading to a 32u4 board fails #3910
- Comments
- Updates
- Footer
- Error opening serial port ‘COM1’. (Port busy)
- 3 Answers 3
- Method name — openPort(); Exception type — Port busy. about java-simple-serial-connector HOT 20 CLOSED
- Comments (20)
- Related Issues (20)
- Recommend Projects
- React
- Vue.js
- Typescript
- TensorFlow
- Django
- Laravel
- Recommend Topics
- javascript
- server
- Machine learning
- Visualization
- Recommend Org
- Microsoft
Arduino.ru
Регистрация новых пользователей и создание новых тем теперь только на новом форуме https://forum.arduino.ru
forum.arduino.ru
Ошибка открытия последовательного порта «COM3»
Во первых извените но на схеме допустил одну ошибку, нарисовал, что резистор подключается к Pin9, а на самом деле использовал Pin8.
Ну а во вторых: После того как моя плата (после неудавшейся заливки скетча) простояла подключенная к УСБ порту длительное время я заметил, что микросхема mege328 начала греться, не придется ли тогда менять этот контроллер и если да то как его перепрошить?

Переткни шнур, не поможет — перезагрузись и пропробуй снова
И перетыкал шнур и перезагружался, даже просто выключал комп и немного погодя включал обратно все равно не хочет заливать программу в ардуино и выдает сообщение об ошибке какое я привел выше
Значить, порт падох. Или СН340
Что это CH340 и можно ли его заменить
Вообще на своей плате Arduino UNO я не нашол микросхемы CH340, а к светодиодам TX и RX дорожки подводятся от mega16U2
Вполне может быть.
И что тогда моей плате пришол конец, ее больше нельзя будет востановить
Приветствую всех форумчан!
У моей платы Arduino ONU что то случилось с преобразователем интерфейса USB и теперь на плату я не могу загрузить новый скетчь ардуино. Но вот в книге Джереми Блум «Изучаем ARDUINO» в описании устройства плат я прочитал, цитирую: «Если у вас есть программатор, то можно удалить загрузчик из своего контроллера ATmega и программировать его с помощью внешнего программатора.». Это что можно значит достать из платы микроконтроллер ATmega328 и в другой монтажной плате через разъем внутрисхемного программирования ISP прошить его программой созданной в Arduino_IDE, но только как это можно сделать и какую программу использовать для прошивки.
Источник
Exception type port busy
Uploading sketches to the Arduino Zero (and other related boards) trough the native port is a pain in the ass. It happens quite often that the Arduino board doesn’t respond anymore and that the following error messages are displayed:
- Couldn’t find a Board on the selected port
- Board at COM4 is not available
- Caused by: processing.app.SerialException: Error touching serial port ‘COM4’
- Caused by: jssc.SerialPortException: Port name — COM4; Method name — openPort(); Exception type — Port busy.
The reason is that the sketch disrupts the native port, which will be grayed out as you can see here:
There are two major problems with the native USB port:
- The serial port number changes randomly.
- The native port cannot be detected.
Because these problems get on your nerves after a while, I have several solutions that will help.
If the serial com port number changes randomly
This problem drives you crazy easily; it has to be solved in Windows. For example, if the com port has initially the number 9 and changes spontaneously into number 10, we have to do the following (in Windows 10):
Control panel > Device Manager > Ports > Arduino Zero > RMB > Properties > Port settings > Advanced > Com Port Number set to 10 > OK
If Ports is not listed in the Device Manager than open the View menu and select “Show hidden devices”.
Port 10 may be selected already, ignore any message about that. Note that you must use always use the same USB connector on your laptop now.
If the native com port can’t be detected
This can happen among others when a sketch is continuously printing to the serial monitor. Since the port is busy, it can’t be respond anymore. To fix this do:
- Double-tap the reset button, or
- Unplug and plug in the USB connector when there is no reset button. Sometimes this doesn’t work, so always use a reset button.
Note that the Arduino Zero bootloader has a double-tap on reset button function. By quickly pressing this button two times, the board will reset and stay in bootloader mode, waiting for communication on either USB or USART.
The port should now be available and visible again. Because it is time consuming and annoying to repeat this every time, it is better to avoid it:
Add a delay at start-up
In fact, a reset button is only needed in emergency situations: if an Arduino board no longer responds to the serial port if a new sketch has to be uploaded. However, there are situations where no reset button can be used, here we have to restart the Arduino by unplug and plug in the USB connector (that also powers the Arduino Board). But sometimes this doesn’t work and without a reset button there is a serious problem. I have found out that adding a delay ensures that the Arduino waits some time for communication after start-up:
To carry this out, upload the sketch en while the compiler is running (see the green bar), plug in the USB cable. If the upload fails, try it again.
Avoid continuously printing
When Serial.print() is used inside the main loop(), there will be printed continuously at high speed. This disturbs the uploading of new sketches. To avoid this, print with a time interval, here is an example of how to do this:
If nothing works
If the above solutions still doesn’t bring the port to life, try one of the following solutions:
- Click on the save button first.
- Tools > Port and select the COM port again.
- Often there are duplicate ports, for instance COM5 and COM7, of which only one is the right one.
- Restart the computer.
- Tools > Board > select your board again even if it is clearly already selected.
It would be nice if the above problems can be solved in the Arduino IDE…
Источник
Uploading to a 32u4 board fails #3910
I tried to upload a program to a pololu 32u4 Mini LV board today and I got the following errors.
Used this PR as build, linux 64 bit.
#3896 (comment)
Uploading to a leonardo board works as expected. (with HoodLoader2.0.5 but with leonardo PID/VID)
Currently trying to find the reason for this bug. However the 2nd error should not happen I guess. I will report the progress here, just that you know this bug exists.
First time hitting upload:
2nd Time hitting upload:
Updates
- A Leonardo fails with their bootloader. It could be caused by the Vendor ID or their bootloader itself/ their fuses settings.
- The fuses are not the problem, bootloader or VID+PID left
- Pro micro bootloader has the same problem. can be the bootloader structure or the PID.
The text was updated successfully, but these errors were encountered:
Its an IDE bug. I recompiled my working HoodLoader2 with their VID/PID. changing the PID (+arduino VID) works but changing both gives the error above. This is «poor» 3rd party support and should be fixed.
And sparkfun pro micro16
(Tried in an USB3 Port)
Hello. I’m from Pololu Robotics & Electronics (@pololu), and I don’t think this is a bug in the Arduino IDE. I suspect you just need to follow the instructions from the a-star README, which say:
The «udev-rules» directory contains a file named «a-star.rules» for Linux users.
If you copy this file to /etc/udev/rules.d/, it will tell ModemManager to not
try to access the virtual serial ports of the A-Star. This is necessary on some
systems in order to program the A-Star.
This problem could also be solved by updating ModemManager to a newer verison that includes our patch.
Cant the arduino program catch this error? However the exceptions should be fixed.
I have the same bug exactly with my official Arduino Leonardo. I haven’t been able to upload any sketches on it (I bought it yesterday)
Firstly I get this:
avrdude: ser_open(): can’t open device «/dev/ttyACM2»: Device or resource busy avrdude: ser_send(): write error: Bad file descriptor
And then I get this:
processing.app.debug.RunnerException at cc.arduino.packages.uploaders.SerialUploader.uploadUsingPreferences(SerialUploader.java:132) at processing.app.debug.Compiler.upload(Compiler.java:166) at processing.app.Sketch.upload(Sketch.java:1167) at processing.app.Sketch.exportApplet(Sketch.java:1141) at processing.app.Sketch.exportApplet(Sketch.java:1113) at processing.app.Editor$DefaultExportHandler.run(Editor.java:2380) at java.lang.Thread.run(Thread.java:745) Caused by: processing.app.SerialException: Error touching serial port ‘/dev/ttyACM2’. at processing.app.Serial.touchForCDCReset(Serial.java:92) at cc.arduino.packages.uploaders.SerialUploader.uploadUsingPreferences(SerialUploader.java:121) . 6 more Caused by: jssc.SerialPortException: Port name — /dev/ttyACM2; Method name — openPort(); Exception type — Port busy. at jssc.SerialPort.openPort(SerialPort.java:164) at processing.app.Serial.touchForCDCReset(Serial.java:86) . 7 more
Is it from arduino.org or from arduino.cc? Maybe their vendor ID also cause problems. This should be fixed somehow if possible. Or at least a proper error message should be printed.
It is from Arduino.org
On other thing to try: Try stopping / killing ModemManager if it is running. I’ve seen it cause problems by probing all serial ports that might be a modem. For a normal Uno, this only causes problems when you upload directly after plugging in, but since a Leonardo resets its USB during upload, this might cause this problem, I believe.
You were right!
See this: It fixed my problem 🙂
Ok, closing this then.Thanks for reporting back.
@chrispanag Link is down/redirected. The solution to this problem is missing. What have you seen @chrispanag? Please share!
I managed to get it to work on Linux by running sudo arduino and running it as root.
© 2023 GitHub, Inc.
You can’t perform that action at this time.
You signed in with another tab or window. Reload to refresh your session. You signed out in another tab or window. Reload to refresh your session.
Источник
Error opening serial port ‘COM1’. (Port busy)
Im using the arduino Micro pro to read the data out of a temperature sensor (lm35). The program is compiling and NOT uploading, but when I try and open the serial monitor is says: Error opening serial port ‘COM1’. (Port busy)
3 Answers 3
I’ve got an idea. Your board isn’t being recognized. Try unplugging the arduino and see if Com 1 is still there. Sometimes it can recognize mice and other devices as Com 1 or 2 instead of your arduino.
On some of my development machines after everything settled out my devices will show up on Com 4 and 5 when I am working on two at a time.
If this is not the case go into the device manager and see if you can see the board listed.
I would also wonder if you have your sensor hooked to digital pins 0 and 1. These pins are used for your serial line on usb. So if you have anything such as a sensor hooked to them it may be generating data keeping the line busy instead of it being able to negotiate.
I had this happen when setting up hc-05 for the first time. I realized I had to keep the chip off while flashing or I would end up with errors or Com busy.
Please provide your pinout and basic information about the Com ports available on the ide. Also consider that you will need to specify the correct board as it will default to an uno.
Programmer not in sync issues generally occur because the board is recognized but cannot be written to for one reason or another.
- the board has something plugged into digital 1 and 0 which are serial i/o pins
- the board programmer is busy running your last batch of code
- usb error
- try a different cord
- try unplugging potential wiring issues and see if it can be written to without anything on it
- try holding down reset on the board until the board when you try to write to it until just after it finishes compiling to clear any potential programing issues
In my experience mega have a tendency to suffer from the last one.
Источник
Method name — openPort(); Exception type — Port busy. about java-simple-serial-connector HOT 20 CLOSED
GoogleCodeExporter commented on January 17, 2023
Original comment by [email protected] on 4 Apr 2012 at 4:15
GoogleCodeExporter commented on January 17, 2023
Original comment by [email protected] on 19 Apr 2012 at 4:24
GoogleCodeExporter commented on January 17, 2023
Original comment by [email protected] on 30 May 2012 at 5:40
GoogleCodeExporter commented on January 17, 2023
Original comment by [email protected] on 30 May 2012 at 5:43
GoogleCodeExporter commented on January 17, 2023
Original comment by [email protected] on 30 May 2012 at 5:46
GoogleCodeExporter commented on January 17, 2023
Original comment by [email protected] on 15 Jun 2012 at 8:17
GoogleCodeExporter commented on January 17, 2023
Original comment by [email protected] on 30 Aug 2012 at 1:43
GoogleCodeExporter commented on January 17, 2023
Original comment by [email protected] on 24 Oct 2012 at 9:20
GoogleCodeExporter commented on January 17, 2023
Original comment by [email protected] on 15 Dec 2012 at 6:10
GoogleCodeExporter commented on January 17, 2023
Original comment by [email protected] on 22 Mar 2013 at 3:37
GoogleCodeExporter commented on January 17, 2023
Original comment by [email protected] on 4 Apr 2013 at 12:41
GoogleCodeExporter commented on January 17, 2023
Original comment by [email protected] on 13 Jun 2013 at 12:10
GoogleCodeExporter commented on January 17, 2023
Original comment by [email protected] on 13 Jun 2013 at 12:15
GoogleCodeExporter commented on January 17, 2023
Original comment by [email protected] on 18 Jun 2013 at 12:56
GoogleCodeExporter commented on January 17, 2023
Original comment by [email protected] on 26 Jun 2013 at 2:16
GoogleCodeExporter commented on January 17, 2023
Original comment by [email protected] on 26 Jul 2013 at 2:49
- Changed state: Done
GoogleCodeExporter commented on January 17, 2023
Original comment by [email protected] on 18 Sep 2013 at 3:51
GoogleCodeExporter commented on January 17, 2023
Original comment by [email protected] on 10 Nov 2014 at 11:11
GoogleCodeExporter commented on January 17, 2023
Original comment by [email protected] on 2 Feb 2015 at 12:15
- Open a serial port transmit a char (0xff) on Raspberry
- From 2nd time onwards weight reading not working in linux
- Hundreds of wakeups per second wastes lots of power on small host system even with idle port (no datat flow)
- SerialPort should allow for method that return Inpu/Outputstream HOT 1
- Raspberry Pi serial over usb adapter reads data only once (Watchport/H sensor) using jssc 2.8.0.0
- Two java application is opening the same port
- Always port busy on 32 bit system
- EventThread is never terminated
- Ubuntu return an empty serial list HOT 2
- readBytes() wrong when get second message
- jssc stops working after a while on windows 7 HOT 1
- Driver won’t work with real COM1 port
- High CPU load using jssc HOT 1
- SerialPortTimeoutException trown while result shows it returned correct value and amount of bytes HOT 1
- Unable to load on Minibian, Raspberry Pi 1 B HOT 3
- JVM terminates with signal 6 (abort) after several hours of use
- Stuck on waitEvents() method forever when no data is available
- Set Timeout and Port disconnect throw exception
- Trouble getting reader to return text using readByte() HOT 1
- SerialPortEventListener returns invalid type
Recommend Projects
React
A declarative, efficient, and flexible JavaScript library for building user interfaces.
Vue.js
🖖 Vue.js is a progressive, incrementally-adoptable JavaScript framework for building UI on the web.
Typescript
TypeScript is a superset of JavaScript that compiles to clean JavaScript output.
TensorFlow
An Open Source Machine Learning Framework for Everyone
Django
The Web framework for perfectionists with deadlines.
Laravel
A PHP framework for web artisans
Bring data to life with SVG, Canvas and HTML. 📊📈🎉
Recommend Topics
javascript
JavaScript (JS) is a lightweight interpreted programming language with first-class functions.
Some thing interesting about web. New door for the world.
server
A server is a program made to process requests and deliver data to clients.
Machine learning
Machine learning is a way of modeling and interpreting data that allows a piece of software to respond intelligently.
Visualization
Some thing interesting about visualization, use data art
Some thing interesting about game, make everyone happy.
Recommend Org
We are working to build community through open source technology. NB: members must have two-factor auth.
Microsoft
Open source projects and samples from Microsoft.
Источник
Ардуино перестала прошиваться
Offline
Зарегистрирован: 22.01.2020
Arduino: 1.8.6 (Windows 10), Плата:»Arduino Nano, ATmega328P (Old Bootloader)»
Заливал себе скетчи спокойно, но потом запитал ардуинку от китайского блока 12 вольт (на vin, все как положено), и после этого у нее слетел скетч, просто перестала выполнять запрограммированные функции. Я решил прошить ее заново, но она сначала выдавала :
avrdude: ser_open(): can't open device "\.COM7"
А потом долго грузилась (RX & TX не горели, горела только моя жопа) и писала:
Arduino: 1.8.6 (Windows 10), Плата:»Arduino Nano, ATmega328P (Old Bootloader)»
C:Arduinohardwaretoolsavr -built-in-libraries C:Arduinolibraries -libraries C:Urecv(): programmer is not responding
avrdude: stk500_getsync() attempt 1 of 10: not in sync: resp=0x02
avrdude: stk500_recv(): programmer is not responding
avrdude: stk500_getsync() attempt 2 of 10: not in sync: resp=0x02
avrdude: stk500_recv(): programmer is not responding
avrdude: stk500_getsync() attempt 3 of 10: not in sync: resp=0x02
avrdude: stk500_recv(): programmer is not responding
avrdude: stk500_getsync() attempt 4 of 10: not in sync: resp=0x02
avrdude: stk500_recv(): programmer is not responding
avrdude: stk500_getsync() attempt 5 of 10: not in sync: resp=0x02
avrdude: stk500_recv(): programmer is not responding
avrdude: stk500_getsync() attempt 6 of 10: not in sync: resp=0x02
avrdude: stk500_recv(): programmer is not responding
avrdude: stk500_getsync() attempt 7 of 10: not in sync: resp=0x02
avrdude: stk500_recv(): programmer is not responding
avrdude: stk500_getsync() attempt 8 of 10: not in sync: resp=0x02
avrdude: stk500_recv(): programmer is not responding
avrdude: stk500_getsync() attempt 9 of 10: not in sync: resp=0x02
avrdude: stk500_recv(): programmer is not responding
avrdude: stk500_getsync() attempt 10 of 10: not in sync: resp=0x02
Проблема загрузки в плату. Помощь по загрузке: http://www.arduino.cc/en/Guide/Troublesh
P.S.bootlouder`ы менял, комп перезагружал
Loading
-
1.Скачал дрова http://www.arduino.cc/en/Main/Software
ардуино стала определяться как устройство FT232R USB UART
2.наткнулся на статью http://did5.ru/arduino/vosstanavlivaem-arduino-nano.html думал PID на 0000 поменялся
проверил все ок
3.Скачал дрова с этой страницы как указано в статье http://www.wut.de/e-3wwww-51-inus-000.php
установил их в ручную
4.Теперь вроде видена плата USB Serial Port (COM3)
5.Пытаюсь залить простой скетч выдается сообщение
avrdude: ser_open(): can’t open device «\.COM3»: Отказано в доступе.
Проблема загрузки на плату. Для достижения дзен, курить http://www.arduino.cc/en/Guide/Troubleshooting#upload .
Ошибка открытия последовательного порта «COM3» (Port busy)
Подскажите что делать, куда смотреть, что почитать, ничего не могу найти на эту тему.
Во многих темах пишут, что все на винде 8.1 все хорошо само ставится.
-
Ключевые слова «Port busy», т.е. порт занят
Возможно, в системе крутится какая-то программа, которая блокирует последовательный порт.
Вычислить такую программу бывает весьма сложно, поскольку в виндовс нет нормального средства определить, какая именно программа занимает последовательный порт.В свое время я сталкивался с подобной проблемой, и той самой блокирующей программой оказалась программа синхронизации с телефоном, которая зачем-то открывала все последовательные порты, доступные в системе.
-
У тебя точно оригинальный ардуино?? Если клон, что наверняка, то кури в сторону «ch341ser».
-
попробовал поменять на другой порт, но перед сменой выдается сообщение
«The port has been opened by another application…» , т.е. порт занят другим приложением и так с любым портом на который бы я не хотел поменять. Может можно как-то определить кто все занял? -
А что, работа с оригиналом и клоном отличаются?
-
У клона может быть другой чип преобразования USB-Serial. Причем возможные варианты не исчерпываются чипом CH341. Есть еще несколько.
Только обычно если порт виден, то, скорее всего, драйвер установился корректно. А если драйвер установился, то особых проблем, исходящих о стороны другого USB-Serial преобразователя быть не должно.
Конечно, теоретически возможно, что драйвер кривой, что и проявляется подобными последствиями. Но, как мне кажется, вероятность этого достаточно мала. -
Спасибо! Просто я вспомнил про сервисы eBay, alliexpress. Там же одни копии, но раз покупают значит копии качественные)
-
У меня как раз так и было. Драйвера установлены, никаких ошибок в оборудовании нет, а скетчи не заливаются. Ошибка такая же.
Курил в гугле пару часов пока выяснил что ардуины не оригинальные то же бывают.
-
я уже на другом компе эту плату подключал и заливал туда свой скетч, все нормально работает. Там была Win7. А это ноут с виндой 8.1. На нем никак не получается
-
Посмотри тут и попробуй так же.
-
Оказывается, не все от качества подделок зависит. Почитайте по ссылке в 1-м сообщении, как оригинальные драйвера «убивают» копии, специально прописывая в них неправильный PID. Я вот на такое попал…
-
я в самом начале писал, что такой вариант проверил, и не обнаружил изменения PID, с этим все в порядке.
-
——- простое решение тут ———————
была такая ситуация. отключите на время загрузки что у вас воткнуто в rx и tx
и всё загрузится как надо, после загрузки обратно подключите и работайте
—————————————————————
I’ve got an idea. Your board isn’t being recognized. Try unplugging the arduino and see if Com 1 is still there. Sometimes it can recognize mice and other devices as Com 1 or 2 instead of your arduino.
On some of my development machines after everything settled out my devices will show up on Com 4 and 5 when I am working on two at a time.
If this is not the case go into the device manager and see if you can see the board listed.
I would also wonder if you have your sensor hooked to digital pins 0 and 1. These pins are used for your serial line on usb. So if you have anything such as a sensor hooked to them it may be generating data keeping the line busy instead of it being able to negotiate.
I had this happen when setting up hc-05 for the first time. I realized I had to keep the chip off while flashing or I would end up with errors or Com busy.
Please provide your pinout and basic information about the Com ports available on the ide. Also consider that you will need to specify the correct board as it will default to an uno.
Programmer not in sync issues generally occur because the board is recognized but cannot be written to for one reason or another.
- the board has something plugged into digital 1 and 0 which are serial i/o pins
- the board programmer is busy running your last batch of code
- usb error
So
- try a different cord
- try unplugging potential wiring issues and see if it can be written to without anything on it
- try holding down reset on the board until the board when you try to write to it until just after it finishes compiling to clear any potential programing issues
In my experience mega have a tendency to suffer from the last one.