
Как исправить отказ в разрешении в терминале Mac (06.05.23)
Открыть файл в macOS довольно просто. Вам просто нужно дважды щелкнуть по нему — и вуаля! Открытие файла на Mac не займет много времени. Другой способ открыть файл — через Терминал. Просто запустите команду и укажите каталог, в котором будет сохранен файл, и вы сможете без проблем открыть его.
К сожалению, это не всегда так. Были случаи, когда Терминал получал ошибку «Отказано в разрешении» на Mac при открытии файла. Простая команда не должна выдавать эту ошибку. Это означает только, что что-то не так с вашим файлом или самой macOS.
Вот несколько примеров ошибок типа «Permission Denied»:
- zsh: permission denied: ./ foo.rb
- Bash: bash: ./foo.rb: / usr / local / bin: плохой интерпретатор: отказано в разрешении
- aftheers-MacBook-Air: скрипты root # ./ ArduinoWifiShield_upgrade.sh
- -sh: ./ArduinoWifiShield_upgrade.sh: в доступе отказано
Это распространенная ошибка, которая уже давно преследует пользователей Mac. Это не что-то новое, но в последнее время было несколько сообщений о том, что пользователи Mac получали ошибку «отказано в разрешении» на Mac после обновления до Catalina и Big Sur.
Есть много вещей, которые могут пойти не так, когда вы запускаете команду в Терминале, поэтому появление этой ошибки неудивительно. Но эта ошибка все равно может сильно раздражать, особенно если у вас нет другого способа открыть файл. Например, вы хотите открыть файл без связанной программы или не реагируете на щелчки.
Что такое разрешение на открытие файла в терминале?
Как и в названии, это ошибка разрешения что не позволяет пользователям Mac открывать файл с помощью команд. Это может происходить с командами sudo или даже командами bash. Согласно нескольким сообщениям, ошибка Permission Denied также может произойти, даже когда файл открывается в корневом каталоге.
В большинстве отчетов говорится, что ошибка возникает при попытке открыть установщик файлов через Терминал. Когда файл перетаскивается в окно Терминала, появляется сообщение об ошибке «Permission Denied». Однако это также может произойти с любым другим файлом.
Почему вы получаете ошибку «Permission Denied» на Mac
Скорее всего, вы столкнетесь с ошибкой «Permission Denied», если пытаетесь установить программу или изменить файл, который заблокирован. Причина может быть в том, что у вас нет прав администратора или создатель файла использовал команду chmod для блокировки файла. Эта ошибка указывает на то, что ваша команда пытается выполнить запись в каталог, которым не владеет ваша учетная запись пользователя.
Вы можете проверить права доступа к рассматриваемому файлу, набрав ls -l file .ext в Терминале. «File.ext» представляет собой файл и расширение файла, который вы пытаетесь открыть или изменить. Вы также можете попробовать принудительно выполнить команду, требующую разрешения администратора, с помощью «sudo».
Другая причина, по которой вы получаете эту ошибку, заключается в том, что вы, вероятно, ввели неверную команду. Проверьте синтаксис на наличие ошибок и убедитесь, что вы пытаетесь использовать правильную команду. Если вы пытаетесь запустить приложение, убедитесь, что команда программы действительна и установлена на вашем компьютере.
Как исправить ошибку Permission Denied на Mac
Когда вы получаете эту ошибку, первое, что нужно сделать вам нужно сделать, это попытаться открыть файл обычным способом. Дважды щелкните файл, чтобы проверить, можете ли вы его открыть. Если у вас ничего не получилось, вы можете попробовать некоторые из приведенных ниже решений.
Но прежде чем продолжить, обязательно оптимизируйте свой Mac с помощью приложения для ремонта Mac, чтобы предотвратить появление других проблем. Это также очистит вашу систему, чтобы ваши процессы работали бесперебойно. После этого перезагрузите Mac и ознакомьтесь с нашим руководством по устранению неполадок.
Шаг 1. Проверьте свои разрешения.
Как упоминалось ранее, эта ошибка обычно возникает из-за того, что у вас недостаточно прав для доступа к файлу. Чтобы проверить, так ли это:
Это покажет вам, есть ли у вас разрешение на запись или изменение файла.
Шаг 2. Измените владельца каталога.
Станьте владельцем каталога с помощью команды chown, прежде чем пытаться писать в него.
Вы можете ввести эту команду в Терминале, а затем нажать Enter : chown -R $ USER: $ USER / путь / к / каталогу
Измените $ USER на текущего пользователя, вошедшего в систему, и / path / to / directory на путь, куда вы хотите писать.
Шаг 3 : Предоставить Терминалу полный доступ к диску.
Также возможно, что Терминал не завершил доступ к диску, поэтому вы не можете открыть файл с помощью команд. Чтобы исправить это, перейдите в Системные настройки & gt; Безопасность & amp; Конфиденциальность & gt; Приватность , затем добавьте Терминал в список приложений, которые могут управлять вашим компьютером.
Шаг 4. Используйте команды SUDO.
Команда sudo выполняет команды которые следуют за ним с привилегиями суперпользователя или root. Эта команда должна позволить вам выполнять практически любую команду из Терминала. Для этого просто добавьте sudo перед исходной командой. Вот примеры команд:
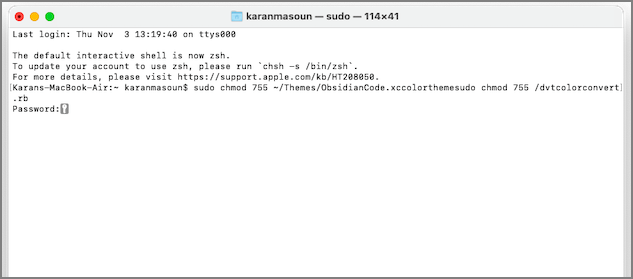
- sudo chmod 755 /dvtcolorconvert.rb
- sudo chmod 755 ~ / Themes / ObsidianCode.xccolortheme
Вам будет предложено ввести пароль, если вы впервые используете команду sudo. Но после этого вам не придется вводить его каждый раз, когда вы используете команду sudo.
Резюме
Получение ошибки «доступ запрещен» на Mac при попытке доступа к файлу не является большой проблемой если вы можете открыть указанный файл двойным щелчком. Однако в большинстве случаев пользователи, которые сталкиваются с этой ошибкой, почти всегда не могут открыть файл обычными методами. Поскольку это ошибка разрешения, вам необходимо убедиться, что у вас достаточно прав для доступа к ней. Приведенные выше шаги должны подсказать вам, что делать. Это очень полезно для пользователей Mac, которые не знакомы с использованием команд или Терминала.
YouTube видео: Как исправить отказ в разрешении в терминале Mac
06, 2023
Открыть файл в macOS очень просто. Просто дважды щелкните по нему, и готово! Другой вариант – использовать Терминал. Просто выполните команду и укажите местоположение файла.
Однако это не всегда так. При открытии файла на Mac через Терминал, вы можете иногда получать сообщение “zsh: разрешение отклонено”. Эта ошибка не может быть вызвана простой командой. Она указывает на то, что что-то не так с файлом или macOS.
В этой статье мы расскажем вам, как исправить проблему “Терминалу отказано в разрешении”.
Прежде чем мы перейдем к деталям проблемы “zsh permission denied” в командной строке macOS, давайте проясним некоторые основные термины.
Что такое Mac Terminal?
Приложение Терминал в Mac часто используется для управления вашим устройством с помощью различных команд. Для его использования вам достаточно знать основные функции и команды, которые вы можете вводить в командную строку.
Например, если вы хотите переместить системный файл из одной папки в другую, необходимо использовать команду move “mv” и указать папку назначения.
Почему люди используют Терминал?
Пользователи Mac предпочитают Терминал по целому ряду причин. Прежде всего, это быстрый способ запуска процессов и задач для тех, кто знаком с командами Unix. Другим важным преимуществом использования Терминала является то, что он позволяет получить доступ к тем частям macOS, которые скрыты и недоступны через System Preferences.
Как его открыть?
Перейдите в Finder > Приложения > папка Утилиты, затем дважды щелкните Terminal.
Вы также можете нажать Command + Пробел, чтобы запустить Spotlight. Затем введите “Terminal” и дважды щелкните по нему в результатах.
Если вы используете iStat Menus для мониторинга функций, вы также можете открыть Terminal оттуда. Он доступен в категории “Диски”.
Почему вы получаете ошибку “Разрешение отклонено” в Terminal?
Если вы видите сообщение об ошибке, подобное этой, это означает, что Terminal не может выполнить команду, которую вы пытаетесь запустить.
Обычно это происходит потому, что:
- Файл заблокирован. Возможно, у вас нет доступа администратора или создатель файла использовал chmod для его блокировки.
- Команда, которую вы пытаетесь запустить, была неправильно отформатирована.
Как исправить ошибку Zsh permission denied на Mac?
Ниже приведены несколько способов, которые вы можете попробовать для устранения проблемы.
Проверьте разрешения
Чтобы проверить разрешения, выполните следующие действия:
шу
Параметры разрешений определяют, кто может просматривать и изменять файлы на компьютере. Далее мы покажем вам, как изменить разрешения.
✕
Изменение разрешений файла
Если проблема с терминалом “отказано в разрешении” вызвана тем, что разрешения, которые вы только что проверили, не позволяют вам писать в файл, попробуйте исправить это. Для этого:
.
Измените права собственности на каталог
Если изменение разрешений не решило проблему, попробуйте изменить права собственности на каталог на ваше имя пользователя. Измените [username] на ваше имя пользователя и [directorypath] на путь к каталогу, владельцем которого вы хотите стать, в следующих шагах – вы можете просто перетащить папку в окно Терминала, как мы делали ранее.
Предоставьте Terminal полный контроль над диском
Также возможно, что Терминал не имеет полного доступа к диску, поэтому вы не можете использовать команды для открытия файла. Чтобы изменить это, перейдите в System Preferences > Security & Privacy > Privacy panel, а затем добавьте Terminal в список приложений, которые могут управлять вашим Mac.
Что еще можно сделать, чтобы решить проблему “zsh: permission denied”?
Другой способ, который вы можете попробовать, это использовать альтернативу Терминалу – Core Shell. Это приложение для эмуляции терминала позволит вам настроить свой терминал так, как вы этого хотите: полезно, минимально и привлекательно.
С его помощью вы сможете выполнять любые команды, как и в родном Mac Terminal. Приложение имеет отличный пользовательский интерфейс, который вам наверняка понравится. Core Shell также поддерживает вход в систему одним щелчком мыши на удаленных компьютерах с возможностью автоматического переподключения. Но больше всего вам понравится возможность изменять внешний вид терминала. Вы можете изменить цветовую схему соединений, используя ваши любимые оттенки.
Мы также предлагаем воспользоваться преимуществами Almighty. Это встроенная программа для Mac, которая призвана повысить вашу производительность, предоставляя простые модификации и дополнительные функции. Например, она позволит вам разбудить Mac, чтобы он не заснул вхолостую, заблокировать клавиатуру, чтобы избежать неясного ввода, скрыть все приложения и элементы строки меню, показать скрытые файлы в Finder и многое другое.
It’s native Mac software, цель которого – повысить вашу производительность, предоставляя простые модификации и дополнительные функции. Например, it позволит вам:
- разбудить ваш Mac, чтобы он не спал вхолостую
- заблокировать клавиатуру, чтобы избежать неясного ввода с клавиатуры
- скрыть все приложения и элементы строки меню
- показывать скрытые файлы в Finder
- и многое другое
Вы можете сделать эти настройки через командную строку, но это утомительно, и вы должны помнить все команды. С Almighty вы сэкономите время для выполнения других важных задач.
“Zsh: разрешение запрещено” ошибка: проблема решена
Проблемы с правами доступа к файлу или каталогу, над которым вы хотите работать, часто являются причиной ошибки “zsh: права запрещены” в Терминале. Обычно это можно исправить, переназначив права собственности или изменив разрешения. Если это не помогает, попробуйте использовать Core Shell и Almighty.
I’m trying to write a command on mac terminal using the root, but it shows me that the permission denied, when I use the sudo it shows that the command not found
can any one please help me
aftheers-MacBook-Air:scripts root# ./ArduinoWifiShield_upgrade.sh
-sh: ./ArduinoWifiShield_upgrade.sh: Permission denied
asked Jan 19, 2016 at 13:37
![]()
1
You have to make the file executable:
chmod +x ArduinoWifiShield_upgrade.sh
![]()
answered Jan 19, 2016 at 13:45
![]()
Arc676Arc676
4,4453 gold badges28 silver badges44 bronze badges
To avoid permission denied prompt, type this command and continue
sudo su
Install the packages in this admin mode,
then go back to normal mode
exit
answered Apr 2, 2019 at 14:08
![]()
1
Mac OS X operating system is Unix-based system for Mac computers. Now Mac runs all types of files and modifies all types of commands from the terminal. When the permission denied Mac error shows, these commands are sent from the terminal. There are many reasons to get these error notifications which are elementary and common. A complete guide has been available on this page to remove permission denied error over this computer. Follow all the steps given below to get access to all files and folders that are inaccessible.
| Workable Solutions | Step-by-step Troubleshooting |
|---|---|
|
1. Restore Inaccessible Files on Mac |
Select the disk location (it can be an…Full steps |
| 2. Fix Permission Denied on Mac |
Method 1. Gain permission for files…Full steps Method 2. Check your permissions…Full steps Method 3. Change the ownership of…Full steps Method 4. Use sudocommands…Full steps Method 5. Assign permission for third…Full steps |
If anyone faces a permission device error, they might see many different types of messages appear on the screen. The error message may be different, but the meaning is the same. Now some examples are given below. Let’s check them out one by one.
1. Permission denied for files, folders, or disks on Mac — The most likely reason for the permission denied error is when you want to open a file or folder is locked. It might be because you don’t have administrator privileges or the file is created to be locked.
2. Terminal permission denied on Mac — Many things come wrong when adding a command in the terminal. With the help of this error, no other file or the directory mentioned in it is not going to open.
3. App permission denied — The Don’t Allow option is chosen, which is rejected at the time of using a feature related to the Application. There are very common things that deliver permission-denied issues such as an app that couldn’t use the camera, or microphone, being unable to save files, can’t share your screen with others, and many more.
Bonus Tip: Restore Inaccessible Files on Mac
The first method you can try is to apply third-party data recovery software. The reason why we recommend it is this kind of software can scan and search deeply in your computer’s disk, and find all the lost data. No matter whether the data is deleted, hidden or turned to RAW.
One such tool you can trust is EaseUS Data Recovery Wizard for Mac. With the help of this software, you can restore any type of file or folder that is lost, invisible, or inaccessible. This is not able to fix all types of denied errors that come directly, but only an option you can try after trying all possible methods.
Download EaseUS Data Recovery Wizard for Mac now, and follow the steps below to find your lost or inaccessible files.
Step 1. Select the location to scan
Launch EaseUS Data Recovery Wizard for Mac and choose the hard drive, SSD, SD card, USB flash drive, or TF card where you lost data. Click «Search for lost files» to start scanning.

Step 2. Filter lost Mac data
The software will automatically scan for lost data on MacBook/iMac. When the scan completes, filter wanted data through the «Type» and «Path» buttons.

Step 3. Recover lost data or files
Double-click a file to preview it. Then, click the «Recover» button to restore the lost data to another place.

Method 1. Gain Permission for Files, Folders, or Disks on Mac
There is a permission setting available on the Mac computer. With the help of that permission, users can assign permission to all files and folders so that they can be viewed and altered. That can be changed according to the requirement. You can change it by reaching the info window. Here are the steps to gain permission for files, folders, or disks on Mac.
Step 1. Choose any file or a folder present on the disk and then get info of that on the selected one.
Step 2. If the selected permission is not visible in the info, click on the Arrow symbol.
Step 3. After that, the user will see a lock symbol to click on and enter the admin password and username to unlock it. After that user will see the assigned permission from the specific file and folder.
Step 4. Click over the name column and choose the privilege option available in the menu.
- Read and Write
- Read Only
- Write Only
- No Access
Method 2. Check Your Permissions
As mentioned above, one possible reason you might see the permission denied error is that you don’t have file access permissions. Follow the steps below to check your permissions.
Step 1. Launch the Terminal in the Mac from the utilities.
Step 2. Type the command: Enter: ls -l. Make sure don’t hit the Enter button but type the word.
Step 3. Drag the file or the folder into the terminal window.
Step 4. Now, hit Enter Button. Specific permission that is accessible to the current user will be visible on the screen.
Method 3. Change the Ownership of the Directory
You need to change the specific file or folder ownership. For that, you need to enter a Chown command into the Terminal and press Enter.
Chown -R $USER:$USER /path/to/directory
* Change /path/to/directory with the path to where you want to write to.
Method 4. Use Sudo Commands
The Sudo command gives you the ability to run commands as an administrator for about five minutes. If you failed to run commands in the Terminal again and again, simply add «sudo» before the original commands.
For example:
- sudo chmod 755 /dvtcolorconvert.rb
- sudo chmod 755 ~/Themes/ObsidianCode.xccolortheme
Method 5. Assign Permission for Third-Party Apps
In most cases, the Mac will issue a notification to remind users to pass all permissions when installing the application. On some rare occasions, you need to give permission to third-party apps on your own. Here are the detailed steps:
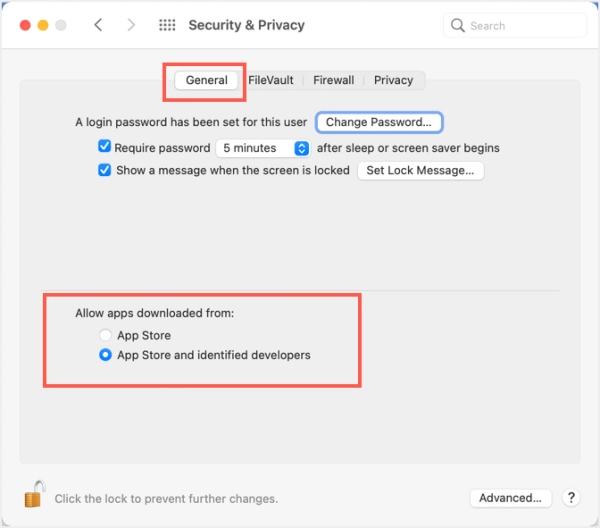
Step 1. Go to Security & privacy, then click on the General section.
Step 2. Enter the user administrator username / Password to unlock the editing screen.
Step 3. Mark all the radio buttons that are showing App Store and identified developers
Step 4. Click on the Lock Button and save the changed settings.
Conclusion
That’s all about how to fix the permission denied error on Mac. Follow the given methods one by one, you can solve the problem by yourself. Or, you can apply EaseUS Data Recovery Wizard for Mac as the last resort to see if it can scan and restore the inaccessible files. If it failed again, it’s also a good choice when you need to recover Trash on Mac or recover unsaved Word documents.
Permission Denied on Mac FAQs
Read the questions below to get additional help on macOS permission.
1. How do I fix Zsh permission denied on Mac?
It’s a piece of cake to fix Zsh permission denied:
- Check the File Permissions
- Give Full Access to the Disk
- Change the Directory’s Ownership
- Use a SUDO Command
2. Why is permission denied on Mac?
The problem you are encountering appears because of the reasons below:
- The file is locked
- The command has been formatted
- The file permission is insufficient
3. How do I resolve the permission denied error?
Follow the steps below to fix the macOS permission denied:
- Gain permission for files
- Check your permissions
- Change the ownership
- Use Sudo commands
- Assign permission for third-party apps
Reading time: 11 Minutes
Zsh Permission Denied Mac
Opening a file on a Mac is a straightforward process — you can either double-click it or use the Terminal to navigate to the file location and open it with a command. However, there may be cases where the Terminal displays the “permission denied” error message when you try to open a file. This could be due to an issue with either the file itself or with the macOS system.
By the way, you can become a Terminal pro and streamline your workflow with these top Mac tricks and shortcuts.
Unpacking Common ‘Permission Denied’ Errors
Mac users often face the frustrating “permission denied” error when running commands in Terminal. This error can take on different forms, such as the examples below:
- zsh: permission denied: ./foo.rb
- Bash: bash: ./foo.rb: /usr/local/bin: bad interpreter: Permission denied
- aftheers-MacBook-Air:scripts root# ./ArduinoWifiShield_upgrade.sh
- sh: ./ArduinoWifiShield_upgrade.sh: Permission denied
Although not a new issue, there have been recent reports of Mac users encountering this error after upgrading to Catalina and Big Sur. It can be especially frustrating if you have no other way to access the file you need, such as when trying to open a file with no associated program or that doesn’t respond to clicks. In this article, we’ll explore the Zsh permission denied error and its possible solutions on your Mac OS device. But first, some definitions – because we don’t want to get lost in a sea of tech jargon, do we?
What Is MacOS Terminal?

Mac’s Terminal app is a the ultimate power tool for those who like to live life on the command line edge. While some may find it challenging to use, others find it incredibly convenient. To get started, all you need is a basic understanding of its functions and commands, which you can enter into the command line. Once you get the hang of it, you can delve into more advanced commands and explore a wide range of features to accomplish more complex tasks, feeling like a hacker in a spy movie.
Opening the Terminal App on Mac
There are two ways to open the Terminal app on your Mac.
via the Applications Folder
This app is located in the Utilities folder under Applications. To launch it, open your Applications folder and select Utilities. After that, double-click on the Terminal app.
via Spotlight
Alternatively, you can press the Command key and the Space bar. This will launch Spotlight. Here, type terminal and double-click on the search result.
Customizing the Terminal App
Now, you will see a small window with a plain white background. You will see your username in the title bar. Also, the word “bash” and the dimensions of the active window in pixels are displayed.
Should you want to make the window bigger, simply click the bottom right corner of the window and drag it outwards.
If you wish to change the colors of the background and the font, open the Shell menu and select New Window. From here, you can select the best option from the list.
Basic Mac Commands You Need to Be Familiar With

The best and quickest way to be familiar with the Terminal app is to start using it. But before you can proceed with that, you have to be familiar with how to enter a command. Well, that is easy because you just have to type the command at the command line and hit Return to execute it.
Each command has three elements: the command, an argument that tells that command what resource/s it should be running on, and an option that allows you to modify the output.
For instance, if you want to move a system file from one folder to another, you have to use the move command “mv” and type the location where you want to move the file.
Some Advanced Commands to Use on the Terminal Command Line
Here are a few examples of more advanced Terminal commands:
Copying Files from One Folder to Another
To copy files from one directory to another directory, follow these steps:
- Type the ditto [folder1] [folder2] command into the command line. Change the value of folder1 to the folder that hosts the current files. Folder2 should be the folder where you want to move them.
- To view the files being copied, type -v after the command.
Downloading Files from the Web
To download files from the web using the Terminal app, do the following:
- Open the Terminal app and type the cd ~/Downloads/ command.
- And then, input this command: curl -O [URL of file you want to download].
Changing the Default Location of Screenshots
If you want to change the default location where you want to save your screenshots, follow these steps:
- Type this command into the command line: defaults write com.apple.screencapture location [path to folder where you want screenshots to be saved].
- Press the Return key.
- Next, type this command: killall SystemUIServer.
- Hit the Return key once again.
Changing the Default File Type of Screenshots
If you want to save your screenshots in .jpg format, here’s what you should do:
- By default, Mac screenshots are saved using the .png file extension. To change this to .jpg, type this command: defaults write com.apple.screencapture type JPG.
- Press the Return key.
- And then, type this command: killall SystemUIServer.
- Press the Return key once again.
Deleting All Files in a Directory
To delete folders and sub-folders in a directory, do this:
- To delete all the files in a directory, type this command: rm -R directoryname.
- Confirm the deletion by using this command: rm -iR directoryname.
What Is Zsh?
The Z shell or the Zsh is a Unix shell that is designed and built on top of bash — macOS’ default shell. Experts recommend using zsh over bash because it is so much easier to use when configuring plugins and themes. Also, its themes look more beautiful and neat. Most importantly, it doesn’t require strict user permissions.
What Is Permission Denied in Terminal to Open a File?
Just like what the name says, this is a permission error that prevents Mac users from opening a file using commands. It can occur with sudo commands or even bash commands. According to several reports, the Permission Denied error can also happen even when the file is being opened in root.
Most of the reports say that the error appears when they are trying to open the file installer via Terminal. When the file is dragged to the Terminal window, the “Permission Denied” error pops up. However, this can also happen with any other file.
Why You’re Getting “Permission Denied” Error in Mac

There are many possible reasons why you’re getting the Zsh permission denied error on your device. The most common ones are as follows:
The File Is Locked
You will most likely encounter the “Permission Denied” error if you are trying to install a program or modify a file that is locked. It could be because you do not have administrator privileges or because the creator of the file used chmod to lock the file.
This error is an indication that your command is attempting to write to a directory that your user account does not own.
Insufficient File Permission
You can check the permissions of the file in question by typing in ls -l file.ext in the Terminal. The “file.ext” represents the file and extension of the file you’re trying to open or modify. You can also try to force a command that requires administrator permission using “sudo”.
Incorrect Chmod X or System Command
Another reason you are getting this error is that you probably entered an incorrect chmod x or other system commands.
Check for errors in your syntax and make sure you’re trying to use the right command. If you’re trying to run an application, make sure that the program command is valid and installed on your computer.
How to Fix Permission Denied Error in Mac

When you’re getting this error, the first thing you need to do is try to open the file using the normal method. Double-click on the file to see if you are able to open it. If you’re not successful, then you can try some of the solutions below.
After that, make copies of any relevant files you have. You might need a backup file later in case anything goes wrong. After all, when you try to force a command to work, there are potential downsides that could mess up your system and result in more problems. It’s better that you come prepared.
Also, ensure to keep your Mac optimized to prevent other issues from emerging. Using a Mac optimization tool, like the one represented by the shortcode Mac repair app, could help clean up your system and enhance the smooth running of your processes. Once done, restart your Mac and refer to our troubleshooting guide.
Step 1: Check your permissions
As mentioned earlier, this error usually happens because you do not have sufficient permissions to access the file. To check whether this is the case:
- Launch Terminal from Utilities.
- Type the following command, and add a space after the final character. DO NOT press Enter: ls -l
- Drag the file you want to open and drop it into the Terminal window. This will automatically append the file’s location to the existing command. However, this will not actually move the file.
- Now click on the Terminal window and press Enter.
This will show you whether you have permission to write or modify the file.
Step 2: Change the ownership of the directory
Take ownership of the directory with the chown command before attempting to write to it.
You can enter this command in Terminal, then press Enter: chown -R $USER:$USER /path/to/directory
Change $USER with the current logged in user and /path/to/directory with the path to where you want to write to.
Step 3: Give Terminal full access to the disk
It is also possible that the Terminal does not complete access to the disk, which is why you can’t open the file using commands. To fix this, go to System Preferences > Security & Privacy > Privacy panel, then add Terminal to the list of apps that are able to control your computer.
Step 4: Use SUDO commands
Sudo may be simple but it is powerful enough to allow you to run commands with administrator privilege. So, if you have encountered denied commands caused by permission issues, then enter sudo.
The sudo command executes the commands that follow its superuser or root privileges. This command should allow you to execute almost any command from the Terminal. To do this, simply add sudo before the original command. Here are sample commands:
- sudo chmod 755 /dvtcolorconvert.rb
- sudo chmod 755 ~/Themes/ObsidianCode.xccolortheme
You will be prompted to enter your password if this is your first time using the sudo command. But after that, you won’t have to enter it every time you use a sudo command.
Other Ways to Resolve the Zsh Permission Denied Error in Mac
If you are still getting the Zsh permission denied error on your Mac while trying to open a file on macOS Catalina or other versions, fret not. Here are other solutions you can try:
Solution #1: Download Oh My Zsh
Sometimes, the Zsh permission denied error can be resolved by trying to improve your existing Terminal app. One way to do so is by using Oh My Zsh.
Oh My Zsh is an open-source, user-friendly, and community-driven framework that can be used to manage Zsh configurations on MacOS Catalina or other macOS versions. It comes bundled with various functions, plugins, themes, and other relevant stuff for your macOS device.
Once you install this framework, you will have access to hundreds of powerful plugins and neat themes. Your new Terminal app will look customized to your preferences.
To download it, visit the ohmyz.sh website. Once the executable file has been downloaded, install it by running this command in your terminal: $ sh -c “$(curl -fsSL https://raw.github.com/ohmyzsh/ohmyzsh/master/tools/install.sh)”.
Solution #2: Configure the .zshrc File
Are you still seeing the Zsh permission denied error? If that is the case, try configuring the .zshrc file. This file contains the script that is needed to run a new zsh shell. So, if you change this file, you need to start a new shell for the changes to take effect.
You can then customize your terminal by running the open ~/.zshrc command. This will open the .zshrc file in your system’s root folder.
Take note that if you are running macOS Catalina or other later versions, you may still get the same Zsh permission denied error. For this, you need to configure permissions by opening the file using the chmod +x ~/.zshrc command.
Solution #3: Change the Theme of the Terminal App
If you installed the Oh My Zsh framework, then you can proceed with this solution. Change your current Terminal app’s theme by using the ZSH_THEME=”theme_name” command.
Solution #4: Change the Default Shell of Your System

Another way to get rid of the Zsh permission denied error is to change the default shell of your system. To do this, follow these steps:
- Go to the Apple menu and select Preferences.
- Navigate to Users and Groups.
- Click the lock icon and input your user account name and password.
- Control+Click your user account name from the list of users.
- Choose Advanced Options.
- Select a shell from the Login Shell menu.
- Hit OK to apply your changes.
How to Avoid Permission Issues on Your Mac
To avoid permission problems in the future, you can always change the permission settings to define who can view and alter files on your device. Below are some ways to do so:
Method #1: Assign Permissions to Users and Groups
You may assign permissions to various users and groups to avoid permission issues on your macOS device. Here’s how:
- On your Mac device, choose a folder or directory.
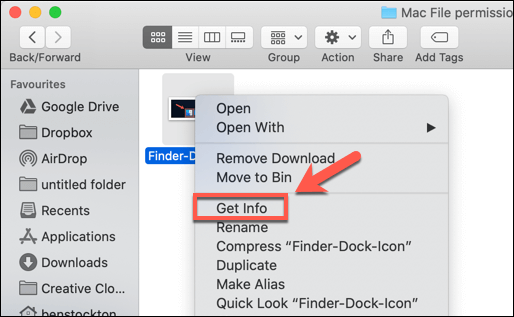
- Go to File and select Get Info.
- If the information is not available, hit the arrow.
- Select a user or group and select a privilege from the pop-up menu.
- Hit OK to save the changes.
Method #2: Apply Permissions to All Items
Apply permissions to all items to ensure they can only be accessed by the right people. Follow these steps:
- Select a directory and go to File.
- Click Get Info.
- Check the Action Pop-Up menu and select Apply to Enclosed Items.
- Hit OK to save the changes.
Method #3: Change the Item’s Owner
If an item is owned by another user, then you will have problems with its permission. Fix it by doing this:
- Select an item and go to File > Get Info.
- If the name of the new owner is not in the list, click the Add button to add a new owner.
- Choose the new owner and click the Action Pop-Up menu.
- Click Make <new owner> the owner.
- Apply and save the changes.
Method #4: Add or Remove a User or Group
Adding or removing a user or group can also resolve permission issues. Here’s how to do so:
- Select an item.
- Go to File and click Get Info.
- Navigate to the Sharing and Permissions section.
- Select Add a User or Group to add a user or group or click Remove a user or group to remove a user or group.
- Save the changes.
Summary
If you get a “permission denied” error on your Mac, it’s likely a permissions issue. First, check your file’s permissions and try changing ownership with the chown command. If that doesn’t work, take a more forceful approach by granting full access to Terminal or using the mighty SUDO command to assert your dominance. If all else fails, try downloading Oh My Zsh or changing the Terminal theme, and if the error persists, change your default shell. If you still can’t fix the issue, seek help from a Mac expert. Have you encountered any other Mac errors? Share your stories in the comments below!
Give us some love and rate our post!

Vicrey Makapagal
Vic is a tech enthusiast who loves to be up-to-date with the latest and greatest technology in the world. He creates content that educates and helps users with their tech-related questions. Vic manages our website to ensure that our readers have a seamless experience while browsing. He excels in troubleshooting errors and resolving Windows issues for gaming and work purposes.