
На чтение 6 мин. Просмотров 21.6k. Опубликовано 03.09.2019
Несмотря на то, что трудно вызвать критические неисправности ПК без физического повреждения, это действительно возможно. Два слова: обновление BIOS. Перепрограммирование BIOS является благодатной почвой для критических системных ошибок, и некоторые из них могут привести к остановке загрузки.
Кроме того, наихудший сценарий включает в себя кирпич вашей материнской платы, что является результатом, которого никто не хочет.
Существует несколько причин, по которым обновление BIOS препятствует загрузке Windows:
- Вы перепрошили BIOS с неподдерживаемой версией.
- Для выполнения этой процедуры вы использовали неподдерживаемое стороннее программное обеспечение.
- Или вы прервали процедуру перепрошивки.
Все 3 могут принести много неприятностей и повлиять на ваш компьютер. Сегодня мы попытаемся предложить вам несколько решений в надежде, что хотя бы одно из них поможет вам сохранить или спасти ваш ПК.
Если вы не уверены, что делать, обязательно ознакомьтесь с приведенными ниже инструкциями, и мы начнем с этого.
Содержание
- Как исправить ошибку загрузки системы после ошибочного обновления BIOS в 6 шагов:
- 1. Сброс CMOS
- 2. Попробуйте загрузиться в безопасном режиме
- 3. Настроить настройки BIOS
- 4. Снова прошить BIOS
- 5. Переустановите систему
- 6. Замените материнскую плату
- Сброс CMOS
- Попробуйте загрузиться в безопасном режиме
- Настроить настройки BIOS
- Прошить BIOS снова
- Переустановите систему
- Замените свою материнскую плату
1. Сброс CMOS
Это серьезная проблема, которая требует осторожного подхода. Кроме того, вам нужно испачкать руки и выполнить простую аппаратную настройку, чтобы вручную сбросить настройки BIOS.
После извлечения батареи CMOS и укорачивания контактов материнской платы настройки BIOS должны быть перезапущены.
Надеюсь, после этого вы сможете загружаться так же, как и раньше. Если вы не уверены, как это сделать, мы подготовили инструкции ниже.
Кроме того, мы советуем вам найти точную материнскую плату и найти подробное объяснение для конкретной модели в Интернете. В любом случае, действуйте осторожно:
- Выключите ваш компьютер полностью.
- Отключите шнур питания и извлеките аккумулятор , если это ноутбук.
- Удерживайте кнопку питания в течение 60 секунд, чтобы полностью разрядить компьютер.
- Откройте корпус ПК и дотроньтесь до металлической поверхности, чтобы снять статическое электричество.
- Извлеките батарею CMOS , которая должна быть стандартной плоской батареей наручных часов на 3 В.

- Подождите несколько минут и аккуратно разместите его снова.
- Включите компьютер и ищите изменения.

С другой стороны, если вы не можете получить доступ к батарее CMOS и получить к ней доступ, вы можете сбросить настройки BIOS, временно удалив перемычки материнской платы и снова подключив их.
Кроме того, после повторной загрузки обязательно установите правильное время BIOS в настройках загрузки. Без этого вы не сможете загрузиться в Windows 10.
2. Попробуйте загрузиться в безопасном режиме
Несмотря на то, что это обходной путь, он может помочь вам, тем не менее. В большинстве случаев вам потребуется выполнить вышеупомянутый сброс настроек BIOS, чтобы в первую очередь получить доступ к безопасному режиму.
После этого перезагрузите компьютер и попробуйте безопасный режим.
К сожалению, получить доступ к безопасному режиму не так просто, как раньше. Для этого вам понадобится загрузочный носитель с системной установкой или какой-нибудь диск восстановления.
В любом случае вам понадобится загрузочный диск для доступа к параметрам восстановления и безопасному режиму соответственно. Вы можете создать его на любом другом компьютере с помощью инструмента «Создание медиа» или создателей дисков восстановления в настройках Windows 10.
Следуйте инструкциям ниже, чтобы попытаться загрузиться в безопасном режиме:
- Подключите или вставьте загрузочный диск (флэш-накопитель USB или DVD) и перезагрузите компьютер.
- Откройте меню загрузки и выберите диск в качестве основного загрузочного устройства . Вы также можете сделать это в настройках BIOS.
- Процесс загрузки установочного файла должен начаться.
- Выберите свои предпочтения и нажмите кнопку Далее .
- В следующем диалоговом окне выберите «Восстановить компьютер» в левом нижнем углу.
- Open Troubleshoot .
- Выберите Дополнительные параметры .
- Выберите Настройки запуска .
- Выберите Перезагрузить.
-
После перезагрузки компьютера нажмите F4, F5 или F6 для загрузки в различных параметрах безопасного режима.
- Безопасный режим – F4
- Безопасный режим с поддержкой сети – F5
- и безопасный режим с командной строкой – F6.
- Когда/если система наконец загрузится в Windows 10, вы можете перезагрузить компьютер и запустить систему стандартным способом.

Многие пользователи сообщали, что каким-то образом безопасный режим «заставлял» систему загружаться и, следовательно, устранял остановку, вызванную ошибкой перепрошивки.
Если вы хотите узнать, как создать установочный носитель Windows 10, выполните действия, описанные в этом простом руководстве.
Безопасный режим не работает в Windows 10? Не паникуйте, это руководство поможет вам преодолеть проблемы с загрузкой.
3. Настроить настройки BIOS
Теперь это сугубо индивидуально и сильно зависит от конфигурации вашего ПК и модели материнской платы. Для этого мы советуем вам заглянуть в вашу материнскую плату и найти нужные настройки.
Излишне объяснять, что вам нужно изменить, поскольку сами варианты довольно разнообразны.
Если вы не уверены на 100%, не вмешивайтесь в настройки BIOS. Вам следует либо обратиться в официальную службу поддержки, либо попытаться объяснить свою проблему знающим людям или любителям ПК.
Это самая безопасная ставка для настройки параметров BIOS и получения полной функциональности.
Доступ к BIOS кажется слишком сложной задачей? Давайте поможем вам с помощью этого удивительного руководства!
4. Снова прошить BIOS
Ты один раз прошил BIOS, и ад вырвался на свободу. Кажется смешным делать это снова, но это может просто решить ваши проблемы. А именно, вы, вероятно, установили неправильную версию или прервали перепрошивку и перевернули вашу материнскую плату.
К счастью, некоторые пользователи, которым удалось преодолеть начальный экран загрузки (и застрял в анимации Windows 10), решили проблему, перепрошив BIOS с верной версией.
Тем не менее, на этот раз мы советуем вам не торопиться и делать каждый шаг осторожно. Чтобы помочь вам решить эту проблему, мы рекомендуем прочитать статью ниже с подробным объяснением перепрошивки.
Обязательно проверьте это, прежде чем перейти к перепрошивке.
Обновление BIOS кажется пугающим? С помощью этого удобного руководства упростите задачу.
5. Переустановите систему
Некоторые пользователи сообщили, что проблема может быть решена путем полной переустановки системы. Кажется, что неудачная процедура перепрошивки влияет на жесткий диск каким-то образом, и, следовательно, заставляет вас начать с нуля.
И в «Плохой шкале» это только «Умеренно плохо», если принять во внимание, что вам может потребоваться замена материнской платы.

Процедура переустановки Windows 10 не так сложна, как на некоторых старых итерациях Windows, в те времена.
Тем не менее, для начинающего пользователя это может привести к длительным трудностям. Чтобы избежать этого, обязательно прочитайте полные инструкции, собранные в статье ниже.
Epic Guide alert! Переустановите Windows 10 с помощью нескольких быстрых шагов. Все, что вам нужно знать, прямо здесь!
6. Замените материнскую плату
Наконец, если ни один из предыдущих шагов не помог вам, извините, но вам понадобится другая материнская плата. Кроме того, вы можете запросить ремонт, который также возможен, но это далеко, и шансы не в вашу пользу.
Это должно завершить это. Если у вас есть какие-либо вопросы или альтернативные решения, обязательно поделитесь ими с нами. Вы можете сделать это в разделе комментариев ниже.
You may be wondering “Do I need to update my BIOS” since it is more dangerous to update motherboard BIOS than updating drive-based software. Sometimes, your PC will refuse to boot after you updated the BIOS. At this time, how can you recover data from the PC not turning on? How to fix the computer that won’t start?
Basically speaking, BIOS update refers to the update of the motherboard BIOS on a computer. Unlike other types of updates, the BIOS update will not bring us the system performance improvement.
Yet, it also causes problems:
- Black screen after BIOS update: computer won’t boot up and shows a black screen after you updated BIOS.
- No display after BIOS update: computer turns on but there is no display on the monitor, so you can’t access the system.
- Infinite loop/Endless loop: PC keeps restarting after BIOS update.
Once something goes wrong during the update process, your PC may become completely unbootable. Therefore, you’ll lose access to your system and all the files stored on the internal hard drive.
So what are you going to do when finding PC not booting after BIOS update?
Actually, you can recover data from hard disk without OS and bring the PC back to life when updated BIOS leads to a black screen. But how? Let’s just dive into this PC boot failure problem.
Issue: PC Not Booting after BIOS Update
Are you stuck with the computer not powering on problem after a BIOS update? manuntd7 said yes to this question.
Laptop Not Boot after BIOS Update
So I noticed that there was a BIOS update on my laptop and thought I’d update it. After flashing, the laptop was no longer booting in the OS and was simply launching the BIOS every time I turned it on. In the BIOS, when I select boot options, it states that there are no bootable devices but it detects my SSD. I tried reverting back to the old BIOS firmware but no luck. My laptop is an Asus F556UAK— manuntd7 posted in Tom’s Hardware Forum, waiting to get help.
The user manuntd7 described his personal experience in this post: he chose to update the BIOS after he had noticed the update push in the system. But after the work had been done, he discovered that his laptop won’t boot after BIOS update.
In fact, PC won’t boot after BIOS update has long been a hot topic on various forums. No matter you’d like to update BIOS in Windows 10 or other operating systems, PC not boot may become your worries.
Why the computer not booting after bios screen draws so much attention?
There are mainly two reasons:
- All the data can’t be accessed when a computer doesn’t boot after BIOS update.
- Ordinary computer users don’t know an effective way to fix when the PC doesn’t boot up.
Taking all these factors into account, I plan to share the practical recovery & repair solutions with you after the update of Windows BIOS failed.
How Can You Recover Lost Files After Windows Update?
Recovery: How to Access Data When BIOS Update Failed
In this part, I’ll tell you how to do the data recovery job when Windows 10 PC won’t boot after BIOS update, from two aspects (if Windows 7 won’t boot after BIOS update, the recovery solutions are roughly the same).
Recover Data from Unbootable Windows 10
Backup is important.
People often say that backup is very important, but very few of them really realize its importance. Only a small number of people form the habit of backing up useful data, let alone keep the backup updating from time to time. This is how you get yourself into the dilemma of data loss.
Data recovery from unbootable PC is possible.
Yet, the good news is PC data recovery is possible.
- If you do have a backup, please resort to it directly.
- If you don’t have one, please rescue your data by using Data Recovery of MiniTool Partition Wizard – a safe and reliable program.
Which version to choose?
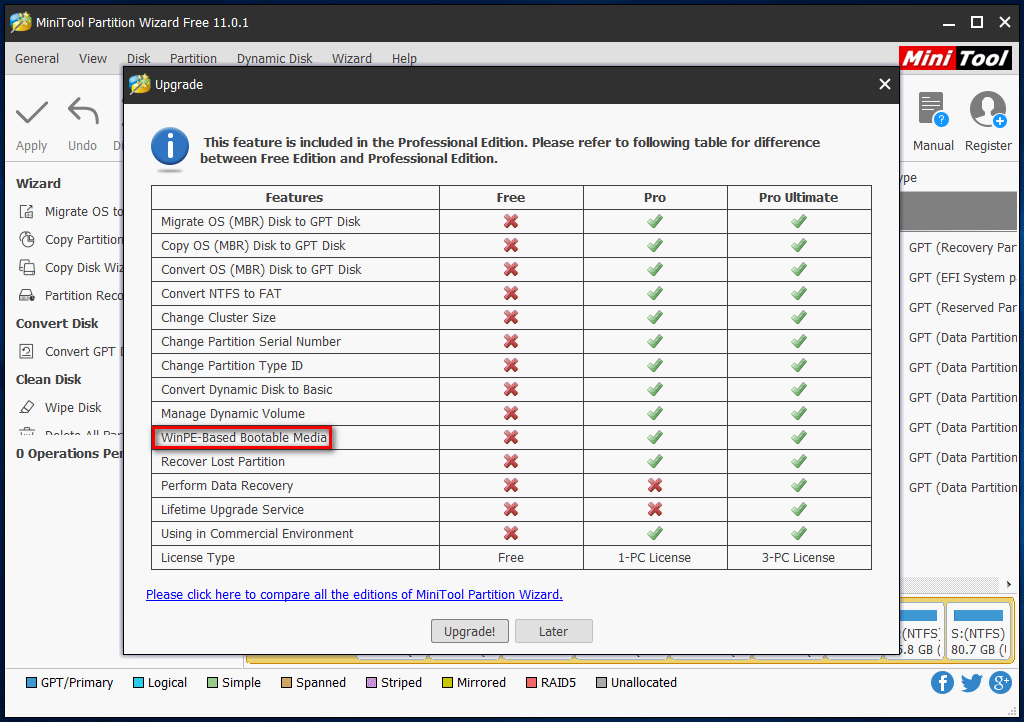
Can all versions help you recover all data from a PC this can’t boot? Of course not! You should choose a version that contains the WinPE-Based Bootable Media (click to know more about the bootable disc). I suggest a Pro Ultimate license since it allows you to recover data.
Buy Now
Tip: You can also get MiniTool Power Data Recovery – the professional data recovery software for Windows 10 – to recover data.
How to recover data from PC not turning on?
Step 1: stop doing anything on the PC that refuses to boot.
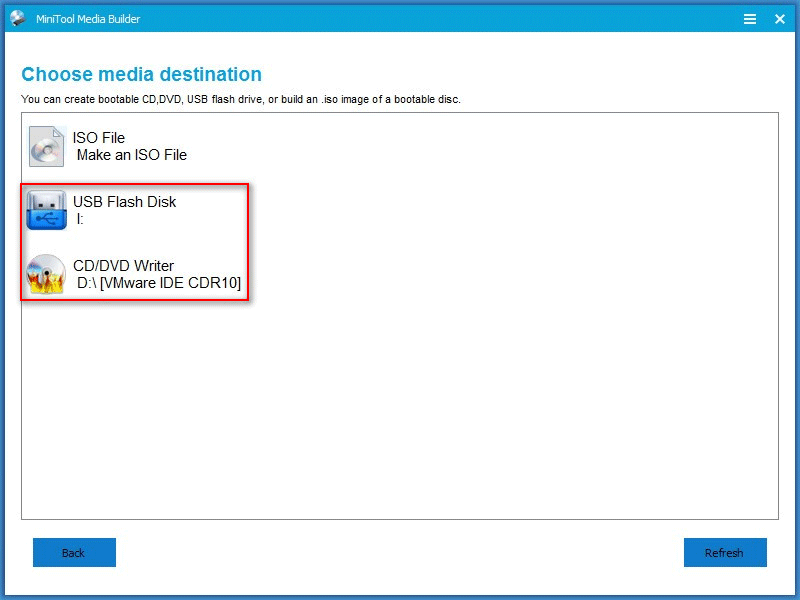
Step 2: find another computer that works fine to build a MiniTool Boot Disk on a USB flash drive or CD/DVD disc.
Tip: Please see How to Build MiniTool Power Data Recovery Boot Disk talked about in part 2 of Operating System Not Found Error Appears, How To Recover Data.
Step 3: remove the boot disk you have made safely from another computer and then connect it properly to your PC that doesn’t boot.
Step 4: restart your computer and enter BIOS by pressing the corresponding button. After that, change the old boot order to make the boot disk the first boot device.
Step 5: exit BIOS and click to save changes.
Step 6: be ready to launch the software.
- Let the computer restart.
- Click on the OK button when you see the screen resolution setting window.
- Click on the OK button when you see the software launching window.

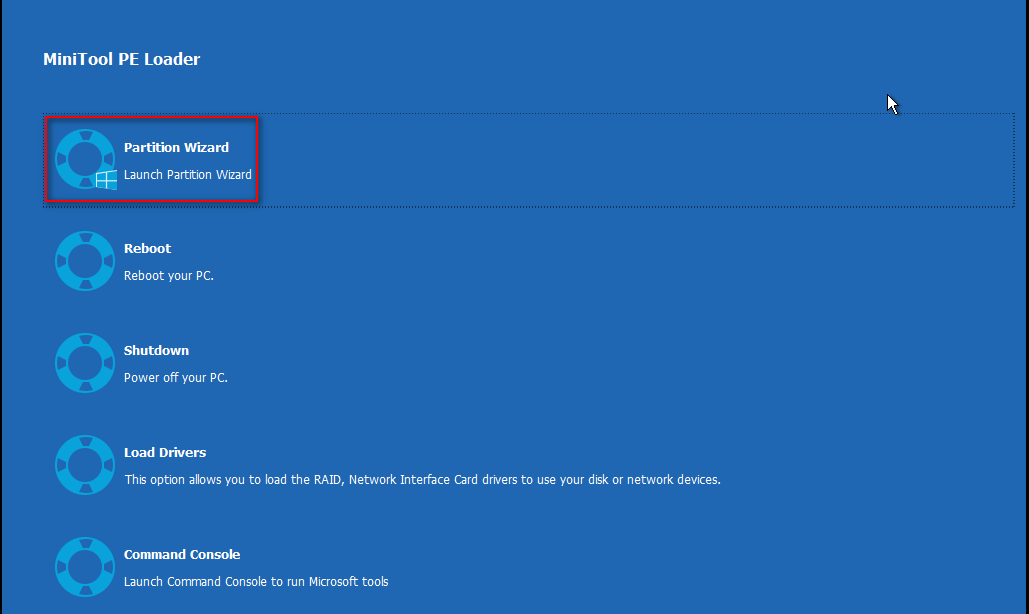
Step 7: afterward, you’ll see the MiniTool PE Loader window, in which you should choose the first option – Partition Wizard.
Step 8: choose Data Recovery from the following software interface.

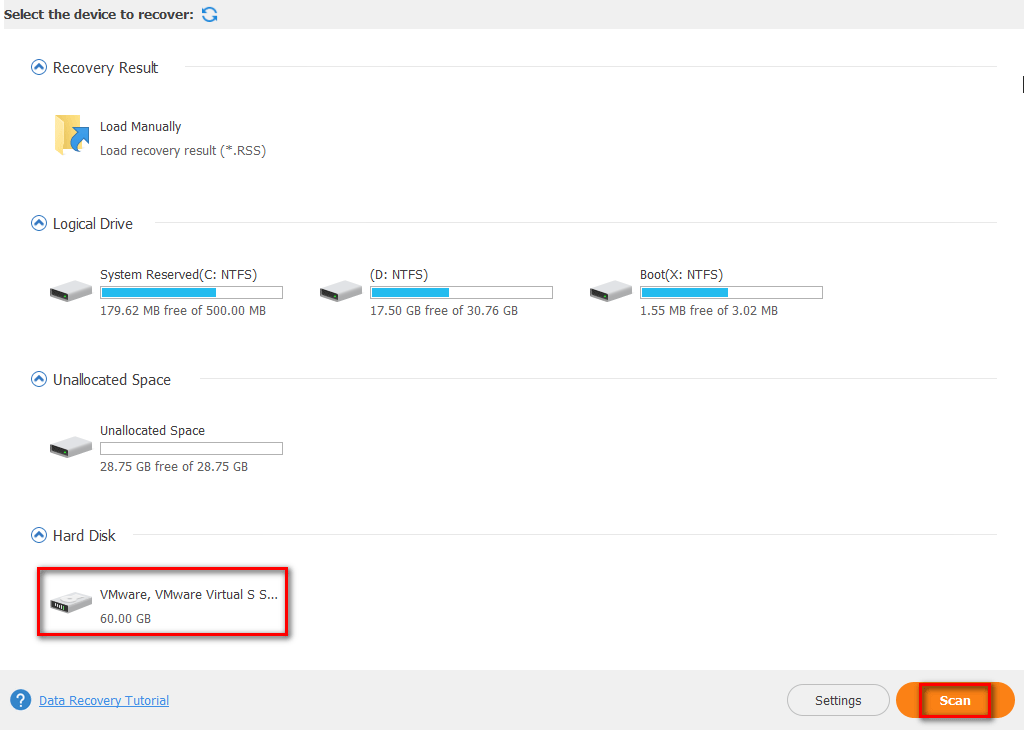
Step 9: scan the disk.
- Choose the disk containing needed files.
- Click on the Scan button in the lower right corner.
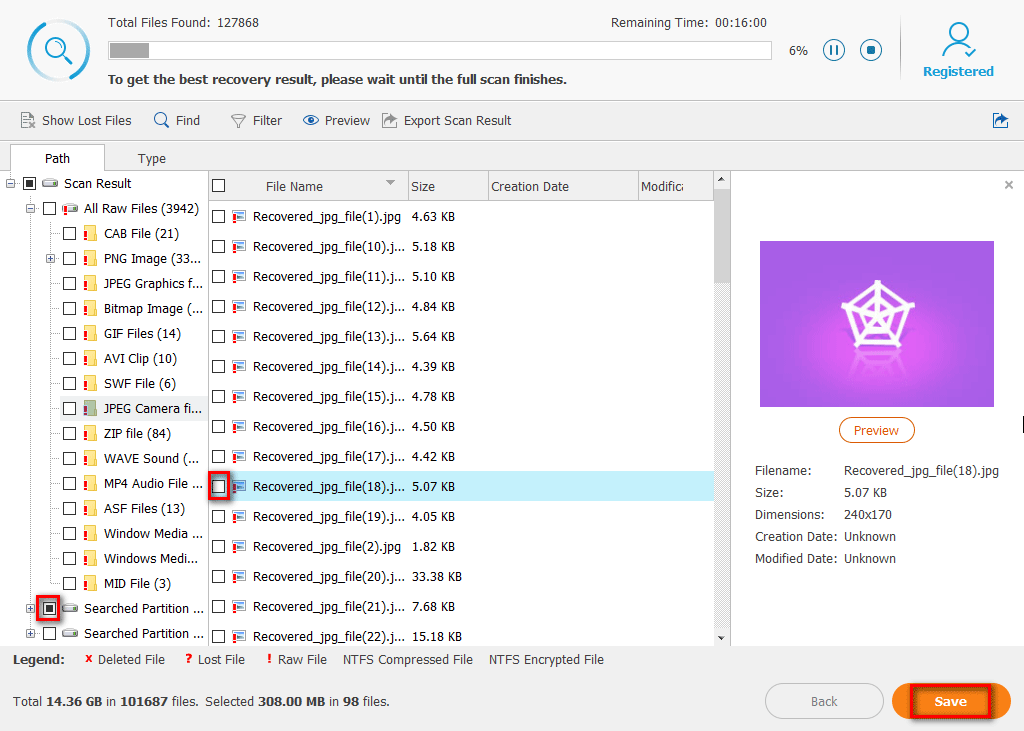
Step 10: choose files to recover.
- Browse the found files.
- Confirm which files are needed.
- Click on the Save button to set a storage location.
- Click on the OK button to confirm your selection.
This is how to perform data recovery when the PC doesn’t boot up.
When you have found back all the files you need, you can do a data backup immediately for security reasons.
Click to Tweet
There’s how to flash BIOS when computer won’t boot
Repair: Computer Won’t Boot Windows 10
As for how to fix the computer startup problems in a Windows 10 system, I’ll give my suggestions in this part.
Method 1: Rebuild MBR
To rebuild MBR, you have 2 choices.
Choice one: rebuild with third-party software.
Step 1: create a bootable disk.
- Also, you need to create a bootable USB/CD/DVD disk on another computer.
- Then, repeat step 3 ~ step 7 mentioned in the Recover Data from Unbootable Windows 10 part.
Step 2: choose Launch Application.
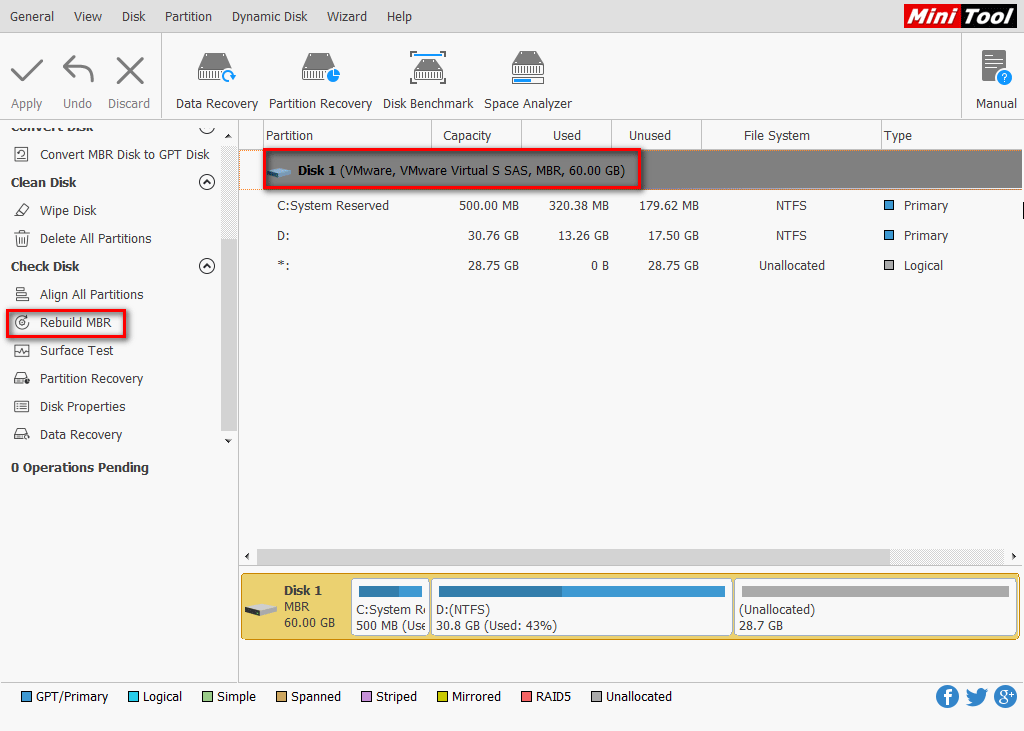
Step 3: select disk to Rebuild MBR.
- Select the boot disk.
- Click on Rebuild MBR from left action panel.
- Click on Apply button to execute the pending operation.
- Choose Yes in the pop-up window to confirm changes.
This is how to use MiniTool Partition Wizard to try to fix the problem when the computer won’t boot up after a BIOS update.
Choice two: repair with Command Prompt.
Also, you can use other tools, like Command Prompt, to repair MBR (Master Boot Record) for your non-bootable computer.
Main steps are:
- Enter the Windows Boot Options menu. If you can’t see this menu, please create a Windows installation disk and then boot your computer from it so as to access the menu.
- Select Troubleshoot, Advanced Options, and Command Prompt one by one.
- Type bootrec /fixmbr and press Enter.
- Type bootrec /fixboot and press Enter.
- Type bootrec /rebuildbcd and press Enter.

Method 2: Check & Fix Hard Drive
You can check and fix a hard drive by using the Command Prompt.
- You should enter the Windows Boot Options menu.
- Select Troubleshoot.
- Select Advanced Options.
- Select Command Prompt.
- Type chkdsk c: /r /x and press Enter in the keyboard.
- Now, just wait for the automatic completion of the operation.
CHKDSK Deletes Your Data? Now Recover Them In Two Ways.
Method 3: Use Startup Repair
Two situations are involved in this method.
Situation one: you have the installation disc.
- Please set your PC to boot from the installation disc firstly and wait for loading files.
- In the Windows Setup interface, you should select the language, time and currency format, keyboard or input method and then click on the Next button.
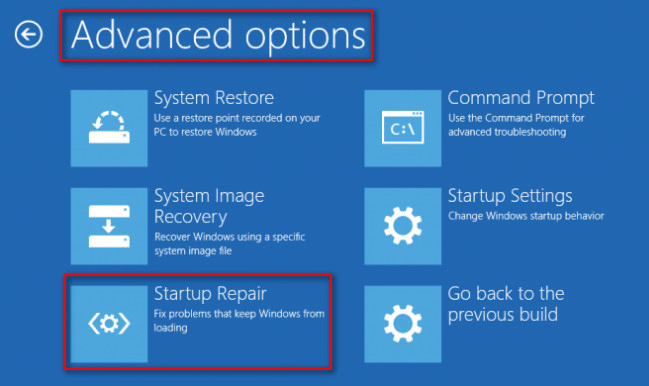
- Then, select Repair your computer, Troubleshoot, Advanced options, and Startup Repair one by one.
- Finally, choose a target operating system to repair and let Windows diagnose & fix the problem for you.
Situation two: you don’t have the installation disc.
- Please access the recovery environment by turning your computer on and off three times.
- After that, Win 10 will boot into the diagnostics mode.
- Now, you should click on Advanced options on the recovery screen.
- Then, choose Troubleshoot, Advanced options and Startup Repair in order.
- Choose the operating system to repair.
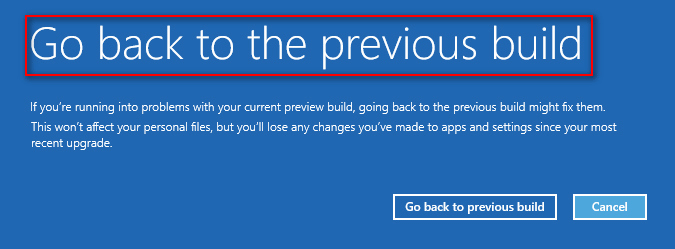
Method 4: Roll Back to the Previous Build
The previous few steps are the same as those mentioned in method 3.
The difference lies in:
After selecting Troubleshoot and Advanced options in order, you should choose Go back to the previous build (instead of Startup Repair).
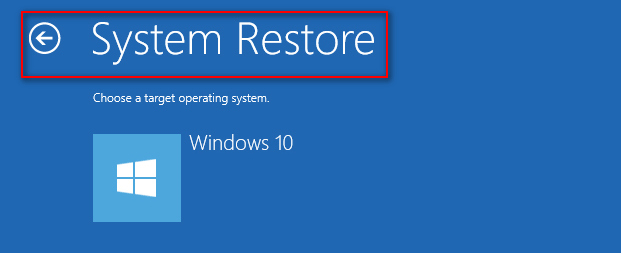
Method 5: Make Use of System Restore
Also, the previous few steps are the same as those mentioned in method 3.
The difference lies in:
After selecting Troubleshoot and Advanced options in order, you should click on System Restore in the Advanced options window.
Method 6: Uninstall the Windows Update
- Start your Windows 10 computer in Safe Mode.
- Navigate to Programs and Features.
- Choose View installed updates from the left pane.
- Select the problematic update from the list carefully and then click on the Uninstall
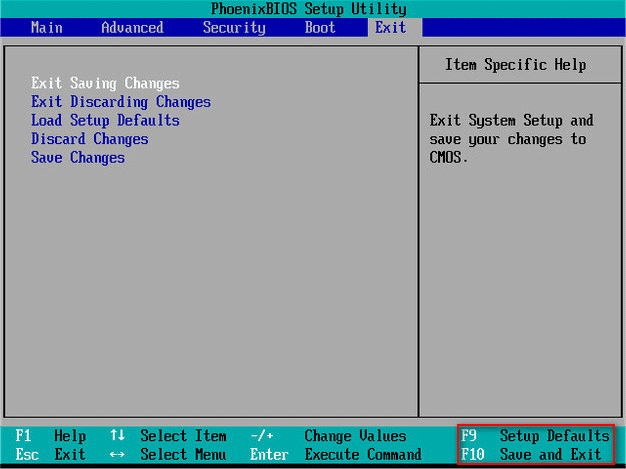
Method 7: Reset BIOS to Default
- As I mentioned in the recovery part, you should restart your computer and press corresponding button (varies from computer to computer) to enter the BIOS at first.
- Then, find the Setup Defaults option (which may also be called Reset to Default, Factory Default, or something else).
- Select this option by using the arrow keys or pressing the corresponding button.
- Finally, save the changes and exit BIOS.
Method 8: Do a Clean Install or Custom Install
If all the above methods failed, you still have another choice which has always been useful – perform a clean install or a custom install.
The difference between them is that:
- The clean install will erase everything saved on your computer.
- The custom install will only erase some of the files.
That’s all the mainstream solutions to fixing Windows 10 not booting after BIOS update.
Click to Tweet
Questions about Updating BIOS
If you’re not so familiar with BIOS and the updating process of it, you tend to make mistakes that will finally result in Windows startup problems. Considering this, I think it’s necessary to explain the functions and preparations of BIOS update.
Do I Need to Update My BIOS
There’re four main reasons to update BIOS:
- Make motherboard recognize and support new types of CPUs.
- Correct the original error or bugs found in BIOS.
- Improve the compatibility of BIOS with internal storage, graphics card, hard drive, and other hardware.
- Obtain new features and functions.
What to Do before Updating Windows BIOS
- Make sure to remove the BIOS write protection.
- Backup the BIOS data in case of update failure. Besides, you can restore the BIOS data easily if you find something wrong in the new BIOS.
- Please make sure the execution programs and BIOS data files used in the update process match the motherboard model. In addition, check the integrity and reliability of the files.
- Confirm that the power is stable and continuous so that there is no power failure that will affect the update.
Note: If the update fails in the real sense, the easiest and most direct way to recover is to contact your motherboard manufacturer or motherboard retailer to get a new BIOS chip. Then, replace the old BIOS chip with the new one by hiring experts or doing it under professional guidance. Besides, if the BIOS chip is attacked by virus, changing a new chip is a better fix than rewriting BIOS.
Conclusion
- As a general rule, BIOS update is an exciting thing since it could bring us some benefits.
- But, on the other hand, people may get into trouble due to wrong operations or unexpected accidents happened during the update.
PC not booting after BIOS update is a common problem. You’d better read the corresponding recovery and repair solutions mentioned here. The content is very useful no matter you’re suffering from PC boot failure caused by BIOS update at this moment or not.
If you still have other doubts or questions, please feel free to leave a message below or contact our Tech Support Team. Thanks for your time!
You may be wondering “Do I need to update my BIOS” since it is more dangerous to update motherboard BIOS than updating drive-based software. Sometimes, your PC will refuse to boot after you updated the BIOS. At this time, how can you recover data from the PC not turning on? How to fix the computer that won’t start?
Basically speaking, BIOS update refers to the update of the motherboard BIOS on a computer. Unlike other types of updates, the BIOS update will not bring us the system performance improvement.
Yet, it also causes problems:
- Black screen after BIOS update: computer won’t boot up and shows a black screen after you updated BIOS.
- No display after BIOS update: computer turns on but there is no display on the monitor, so you can’t access the system.
- Infinite loop/Endless loop: PC keeps restarting after BIOS update.
Once something goes wrong during the update process, your PC may become completely unbootable. Therefore, you’ll lose access to your system and all the files stored on the internal hard drive.
So what are you going to do when finding PC not booting after BIOS update?
Actually, you can recover data from hard disk without OS and bring the PC back to life when updated BIOS leads to a black screen. But how? Let’s just dive into this PC boot failure problem.
Issue: PC Not Booting after BIOS Update
Are you stuck with the computer not powering on problem after a BIOS update? manuntd7 said yes to this question.
Laptop Not Boot after BIOS Update
So I noticed that there was a BIOS update on my laptop and thought I’d update it. After flashing, the laptop was no longer booting in the OS and was simply launching the BIOS every time I turned it on. In the BIOS, when I select boot options, it states that there are no bootable devices but it detects my SSD. I tried reverting back to the old BIOS firmware but no luck. My laptop is an Asus F556UAK— manuntd7 posted in Tom’s Hardware Forum, waiting to get help.
The user manuntd7 described his personal experience in this post: he chose to update the BIOS after he had noticed the update push in the system. But after the work had been done, he discovered that his laptop won’t boot after BIOS update.
In fact, PC won’t boot after BIOS update has long been a hot topic on various forums. No matter you’d like to update BIOS in Windows 10 or other operating systems, PC not boot may become your worries.
Why the computer not booting after bios screen draws so much attention?
There are mainly two reasons:
- All the data can’t be accessed when a computer doesn’t boot after BIOS update.
- Ordinary computer users don’t know an effective way to fix when the PC doesn’t boot up.
Taking all these factors into account, I plan to share the practical recovery & repair solutions with you after the update of Windows BIOS failed.
How Can You Recover Lost Files After Windows Update?
Recovery: How to Access Data When BIOS Update Failed
In this part, I’ll tell you how to do the data recovery job when Windows 10 PC won’t boot after BIOS update, from two aspects (if Windows 7 won’t boot after BIOS update, the recovery solutions are roughly the same).
Recover Data from Unbootable Windows 10
Backup is important.
People often say that backup is very important, but very few of them really realize its importance. Only a small number of people form the habit of backing up useful data, let alone keep the backup updating from time to time. This is how you get yourself into the dilemma of data loss.
Data recovery from unbootable PC is possible.
Yet, the good news is PC data recovery is possible.
- If you do have a backup, please resort to it directly.
- If you don’t have one, please rescue your data by using Data Recovery of MiniTool Partition Wizard – a safe and reliable program.
Which version to choose?
Can all versions help you recover all data from a PC this can’t boot? Of course not! You should choose a version that contains the WinPE-Based Bootable Media (click to know more about the bootable disc). I suggest a Pro Ultimate license since it allows you to recover data.
Buy Now
Tip: You can also get MiniTool Power Data Recovery – the professional data recovery software for Windows 10 – to recover data.
How to recover data from PC not turning on?
Step 1: stop doing anything on the PC that refuses to boot.
Step 2: find another computer that works fine to build a MiniTool Boot Disk on a USB flash drive or CD/DVD disc.
Tip: Please see How to Build MiniTool Power Data Recovery Boot Disk talked about in part 2 of Operating System Not Found Error Appears, How To Recover Data.
Step 3: remove the boot disk you have made safely from another computer and then connect it properly to your PC that doesn’t boot.
Step 4: restart your computer and enter BIOS by pressing the corresponding button. After that, change the old boot order to make the boot disk the first boot device.
Step 5: exit BIOS and click to save changes.
Step 6: be ready to launch the software.
- Let the computer restart.
- Click on the OK button when you see the screen resolution setting window.
- Click on the OK button when you see the software launching window.
Step 7: afterward, you’ll see the MiniTool PE Loader window, in which you should choose the first option – Partition Wizard.
Step 8: choose Data Recovery from the following software interface.
Step 9: scan the disk.
- Choose the disk containing needed files.
- Click on the Scan button in the lower right corner.
Step 10: choose files to recover.
- Browse the found files.
- Confirm which files are needed.
- Click on the Save button to set a storage location.
- Click on the OK button to confirm your selection.
This is how to perform data recovery when the PC doesn’t boot up.
When you have found back all the files you need, you can do a data backup immediately for security reasons.
Click to Tweet
There’s how to flash BIOS when computer won’t boot
Repair: Computer Won’t Boot Windows 10
As for how to fix the computer startup problems in a Windows 10 system, I’ll give my suggestions in this part.
Method 1: Rebuild MBR
To rebuild MBR, you have 2 choices.
Choice one: rebuild with third-party software.
Step 1: create a bootable disk.
- Also, you need to create a bootable USB/CD/DVD disk on another computer.
- Then, repeat step 3 ~ step 7 mentioned in the Recover Data from Unbootable Windows 10 part.
Step 2: choose Launch Application.
Step 3: select disk to Rebuild MBR.
- Select the boot disk.
- Click on Rebuild MBR from left action panel.
- Click on Apply button to execute the pending operation.
- Choose Yes in the pop-up window to confirm changes.
This is how to use MiniTool Partition Wizard to try to fix the problem when the computer won’t boot up after a BIOS update.
Choice two: repair with Command Prompt.
Also, you can use other tools, like Command Prompt, to repair MBR (Master Boot Record) for your non-bootable computer.
Main steps are:
- Enter the Windows Boot Options menu. If you can’t see this menu, please create a Windows installation disk and then boot your computer from it so as to access the menu.
- Select Troubleshoot, Advanced Options, and Command Prompt one by one.
- Type bootrec /fixmbr and press Enter.
- Type bootrec /fixboot and press Enter.
- Type bootrec /rebuildbcd and press Enter.
Method 2: Check & Fix Hard Drive
You can check and fix a hard drive by using the Command Prompt.
- You should enter the Windows Boot Options menu.
- Select Troubleshoot.
- Select Advanced Options.
- Select Command Prompt.
- Type chkdsk c: /r /x and press Enter in the keyboard.
- Now, just wait for the automatic completion of the operation.
CHKDSK Deletes Your Data? Now Recover Them In Two Ways.
Method 3: Use Startup Repair
Two situations are involved in this method.
Situation one: you have the installation disc.
- Please set your PC to boot from the installation disc firstly and wait for loading files.
- In the Windows Setup interface, you should select the language, time and currency format, keyboard or input method and then click on the Next button.
- Then, select Repair your computer, Troubleshoot, Advanced options, and Startup Repair one by one.
- Finally, choose a target operating system to repair and let Windows diagnose & fix the problem for you.
Situation two: you don’t have the installation disc.
- Please access the recovery environment by turning your computer on and off three times.
- After that, Win 10 will boot into the diagnostics mode.
- Now, you should click on Advanced options on the recovery screen.
- Then, choose Troubleshoot, Advanced options and Startup Repair in order.
- Choose the operating system to repair.
Method 4: Roll Back to the Previous Build
The previous few steps are the same as those mentioned in method 3.
The difference lies in:
After selecting Troubleshoot and Advanced options in order, you should choose Go back to the previous build (instead of Startup Repair).
Method 5: Make Use of System Restore
Also, the previous few steps are the same as those mentioned in method 3.
The difference lies in:
After selecting Troubleshoot and Advanced options in order, you should click on System Restore in the Advanced options window.
Method 6: Uninstall the Windows Update
- Start your Windows 10 computer in Safe Mode.
- Navigate to Programs and Features.
- Choose View installed updates from the left pane.
- Select the problematic update from the list carefully and then click on the Uninstall
Method 7: Reset BIOS to Default
- As I mentioned in the recovery part, you should restart your computer and press corresponding button (varies from computer to computer) to enter the BIOS at first.
- Then, find the Setup Defaults option (which may also be called Reset to Default, Factory Default, or something else).
- Select this option by using the arrow keys or pressing the corresponding button.
- Finally, save the changes and exit BIOS.
Method 8: Do a Clean Install or Custom Install
If all the above methods failed, you still have another choice which has always been useful – perform a clean install or a custom install.
The difference between them is that:
- The clean install will erase everything saved on your computer.
- The custom install will only erase some of the files.
That’s all the mainstream solutions to fixing Windows 10 not booting after BIOS update.
Click to Tweet
Questions about Updating BIOS
If you’re not so familiar with BIOS and the updating process of it, you tend to make mistakes that will finally result in Windows startup problems. Considering this, I think it’s necessary to explain the functions and preparations of BIOS update.
Do I Need to Update My BIOS
There’re four main reasons to update BIOS:
- Make motherboard recognize and support new types of CPUs.
- Correct the original error or bugs found in BIOS.
- Improve the compatibility of BIOS with internal storage, graphics card, hard drive, and other hardware.
- Obtain new features and functions.
What to Do before Updating Windows BIOS
- Make sure to remove the BIOS write protection.
- Backup the BIOS data in case of update failure. Besides, you can restore the BIOS data easily if you find something wrong in the new BIOS.
- Please make sure the execution programs and BIOS data files used in the update process match the motherboard model. In addition, check the integrity and reliability of the files.
- Confirm that the power is stable and continuous so that there is no power failure that will affect the update.
Note: If the update fails in the real sense, the easiest and most direct way to recover is to contact your motherboard manufacturer or motherboard retailer to get a new BIOS chip. Then, replace the old BIOS chip with the new one by hiring experts or doing it under professional guidance. Besides, if the BIOS chip is attacked by virus, changing a new chip is a better fix than rewriting BIOS.
Conclusion
- As a general rule, BIOS update is an exciting thing since it could bring us some benefits.
- But, on the other hand, people may get into trouble due to wrong operations or unexpected accidents happened during the update.
PC not booting after BIOS update is a common problem. You’d better read the corresponding recovery and repair solutions mentioned here. The content is very useful no matter you’re suffering from PC boot failure caused by BIOS update at this moment or not.
If you still have other doubts or questions, please feel free to leave a message below or contact our Tech Support Team. Thanks for your time!
Содержание
- Что приводит к слету прошивки BIOS
- Как проявляются повреждения БИОС’а
- Как вернуть работоспособность материнке со слетевшим BIOS’ом
- Asus
- Gigabyte
- MSI и другие
- Особенности восстановления BIOS на ноутбуках
Отгадайте загадку: стоит, как улей гудит. Но дым из трубы не идет, ведь это не родной завод, а компьютер, на котором поврежден BIOS. А гудит он потому, что только на это теперь и способен. Без биоса он просто куча безжизненного железа. Стоит ли из-за этого переживать? Конечно, нет. Ведь теперь у вас есть отличная прикроватная тумбочка!
Системный блок в качестве тумбочки? Ну уж нет! Мы знаем, как заставить его работать. Сегодня поговорим, как восстановить BIOS, если он слетел.
Что приводит к слету прошивки BIOS
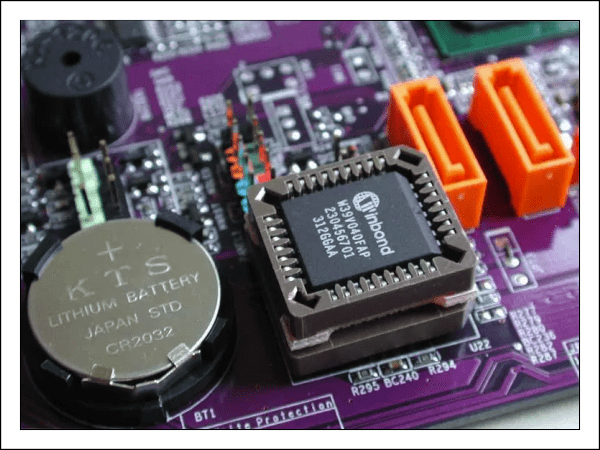
BIOS и его «потомок» UEFI, которым прошиты современные материнки, – это особые компьютерные программы, необходимые для первоначальной настройки и управления устройствами ПК, пока не запустится операционная система. Они хранятся в специальных микросхемах флеш-памяти на материнской плате, одна из которых показана на картинке выше. Вроде бы неплохое место хранения, надежное, но иногда BIOS’у становится там неуютно и он сбегает. Точнее, повреждается и перестает выполнять свои задачи.

Причин повреждения БИОС не слишком много, в одних случаях они очевидны, в других – нет. Вот список наиболее распространенных:
- Во время обновления BIOS произошло отключение электропитания компьютера.
- Программа-прошивальщик (флешер) некорректно взаимодействует с прошивкой или микросхемой флеш-памяти.
- Прошита версия BIOS, не подходящая этой материнской плате. Да, для каждой модели и ревизии «мамки» она своя.
- Если обновление проводится из-под работающей операционной системы – сбой системы или программные помехи, например, блокировка антивирусом.
- Некорректные действия пользователя, например, перезагрузка компьютера до окончания установки обновления.
- Выход из строя микросхемы флеш-памяти.
- Скрытые ошибки микропрограммы БИОС. Иногда этим объясняются спонтанные «слёты», происходящие без видимых причин.
- Электрические неполадки материнской платы.
Как проявляются повреждения БИОС’а
В большинстве случаев микропрограмма BIOS повреждается частично, поэтому симптомы сбоя могут быть разными:
- При нажатии копки питания ПК включается только кулер, который сразу начинает вращаться с максимальной скоростью. Иногда загораются светодиодные индикаторы на корпусе и клавиатуре.
- Спустя одну или несколько секунд после включения начинается циклическая перезагрузка. Внешне это проявляется циклом раскруток и остановок кулера, которые повторяются, пока подается питание.
- При включении загорается индикатор питания, кулер не крутится.
- Компьютер не подает никаких признаков жизни. Подобное бывает при повреждении boot block – начального загрузчика BIOS. Это самый тяжелый случай.
Изображение на экране при этом отсутствует. Не появляется даже заставка производителя.
Встречаются и другие формы повреждения BIOS, точнее, его области, которая хранит конфигурацию контроллера ME (составной части чипсета) на платах, работающих с процессорами Intel – так называемого ME-региона. При неполадках в этой области компьютер или ноутбук может:
- Некорректно загружаться или не включаться вообще.
- Выключаться или перезапускаться через равные промежутки времени.
- Некорректно регулировать скорость вращения кулера, например, крутить его на высоких оборотах независимо от нагрузки.
Устранение подобных сбоев заключается в считывании дампа БИОС’а, замене ME-региона на чистый и повторной прошивке с помощью программатора. Так как этим обычно занимаются ремонтники, а не владельцы компьютеров, не будем на этом останавливаться. Лучше займемся тем, что можно сделать в домашних условиях без специального оборудования и риска окончательно отправить вашего «железного питомца» в царство вечности.
Восстановление BIOS без программатора возможно только при сохранении начального загрузчика. Определить, сохранился он или нет, иногда удается по косвенным признакам: миганию подсветки экрана, звуковым сигналам из системного динамика, реакции материнской платы на включение без оперативной памяти (звуком или миганием индикаторов) и т. п. При сохранности начального загрузчика БИОС первые моменты работы компьютера проходят нормально, сбой проявляется чуть позднее.
Как вернуть работоспособность материнке со слетевшим BIOS’ом
Asus
Многие десктопные материнские платы марки Asus поддерживают технологию USB Flashback, которая предназначена для быстрого обновления и восстановления БИОС’а в случае сбоя. Для этого не требуется ничего, кроме USB-флешки емкостью до 4-16 Гб и самого файла BIOS, который необходимо скачать с сайта производителя из раздела о вашей модели «мамки».
После скачивания прошивку нужно переименовать. Например, файл «Sabertooth X79» (название модели) переименовывают в «SABERX79.ROM», файл «Sabertooth Z77» — в «Z77ST.CAP». Информация, как должен именоваться файл прошивки для вашей модели, скорее всего, есть на сайте Asus, но если вы ее не найдете, уточните на форумах или в поддержке.
Далее сохраните переименованный BIOS на флешке, отформатированной в FAT32, и подключите ее к порту USB с пометкой «Flashback» или «ROG Connect». Компьютер перед этим желательно выключить, это увеличит шанс на успешное восстановление.
После подсоединения флешки включите ПК и нажмите на задней панели кнопку «BIOS». Удерживайте ее нажатой около 3 секунд, пока на плате не начнет мигать световой индикатор. Мигание указывает на то, что файл успешно считался и прошивается в память. Когда процесс прошивки завершится, индикатор погаснет.
Если ваша плата из бюджетного сегмента или не слишком новая, то есть не поддерживает USB Flashback, скорее всего, вы сможете восстановить ее другим способом. Если компьютер оборудован флоппи-дисководом или оптическим приводом, запишите переименованный файл биоса в корневой каталог чистой дискеты или CD, поместите его в привод, выключите, а потом снова включите ПК. Прошивка будет завершена, когда погаснет индикатор привода. Если привода нет, используйте флешку.
Gigabyte
На платах Gigabyte с Dual (двойным) биосом сбои происходят редко, так как в случае повреждения прошивки в основной микросхеме (Main_BIOS) в нее копируется дамп из резервной (Backup_BIOS). Пока основная флеш-память исправна и содержит микропрограмму, даже поврежденную, плата сохраняет работоспособность.
Проблемы с запуском платы с Dual_BIOS возможны в следующих случаях:
- Основная микросхема отсутствует или вышла из строя.
- Микрокод в основной микросхеме полностью стерт.
- Повреждено содержимое обеих микросхем.
Некоторые «мамки» Gigabyte умеют грузиться с резервной флеш-памяти и использовать ее как основную. Другая группа плат этого производителя использует в качестве резервного носителя БИОС выделенную область на жестком диске. Это менее надежный вариант, но тоже лучше, чем ничего.
Восстановление биоса Gigabyte из бэкапа обычно выполняется автоматически, но если этого не происходит, попробуйте выключить компьютер из розетки, немного подождать и еще раз включить.
MSI и другие
На большинстве материнских плат производства Micro-Star используется технология восстановления прошивки, очень похожая на ASUS’овскую – с помощью флешки, дискеты или компакт-диска. Копируете BIOS на чистый носитель, подсоединяете его к ПК, жмете 4 секунды кнопку выключения, зажимаете на клавиатуре комбинацию левый Ctrl + Home (или Alt + Ctrl + Home) и, не отпуская клавиш, включаете компьютер. О начале процесса прошивки можно судить по миганию индикатора флешки или привода.
На материнских платах MSI и некоторых других марок, которым больше 8-10 лет, перепрошивка биоса производится с дискеты. Инструкции для AWARD и AMI BIOS немного различаются.
Чтобы восстановить AMI BIOS, выполните следующее:
- Переименуйте скачанный с сайта производителя материнской платы файл биоса в AMIBOOT.ROM.
- Перенесите его в корень чистой дискеты. Установите дискету в привод выключенного ПК.
- Нажмите на клавиатуре левый Ctrl + Home и включите компьютер.
Для восстановления AWARD BIOS:
- Поместите на дискету файлы прошивальщика и BIOS (обычно скачиваются в одном архиве).
- Создайте на дискете текстовый документ, в котором указано имя файла биоса с расширением bin. Переименуйте документ в autoexec.bat.
- Дальнейшие действия аналогичны приведенным выше.
Кстати, некоторые производители материнок выкладывают на своих сайтах BIOS’ы только в формате exe – в «одном флаконе» с программой-прошивальщиком для обновления из-под Windows. Иногда такой файл удается распаковать как архив, но пользователям часто непонятно, что именно из его содержимого является прошивкой. Для таких задач универсального решения нет. Чтобы не усугублять проблему, лучше проконсультироваться на профильных форумах или в техподдержке производителя.
На некоторых платах перед восстановлением биоса также нужно извлекать из гнезда батарейку питания часов реального времени (RTC) или переставлять (снимать) перемычку очистки CMOS. Это моменты важно выяснить до начала процедуры.
Особенности восстановления BIOS на ноутбуках
На ноутбуках, как и на платах Gigabyte, BIOS тоже часто хранится в двух чипах флеш-памяти. Но это не Dual и резервных копий у него нет. Оба чипа содержат разные части прошивки либо в одном находится основной БИОС, а в другом — программа мультиконтроллера. Чтобы аппарат не включился, достаточно повредить микрокод хотя бы в одном из них.
Методика восстановления слетевшего BIOS’a на ноутбуках примерно та же, что и на десктопах. Скачанный с сайта производителя файл прошивки и программу-прошивальщик (последняя нужна не всегда) помещают на чистую, отформатированную в FAT32/16 флешку, подключают ее к обесточенному аппарату (просто выключить ноутбук иногда недостаточно, нужно отсоединить блок питания и снять батарею), вставляют заряженную батарею на место, включают аппарат и зажимают комбинацию клавиш. На разных лэптопах для этого используются различные клавиатурные сочетания, например:
- Ctrl (только левый или оба) + Home
- Windows + B (эта и другие буквы приведены в латинской раскладке)
- Windows + F
- Windows + M
- Windows + Esc
- Fn + B
- Fn + F
- Fn + M
- Fn + Esc.
Основная работа заключается в распаковке и переименовании файлов биоса. Единого правила здесь, опять же, нет. В большинстве случаев доставать прошивку приходится из exe-шников, но! Многие производители включают в состав программы BIOS’ы для разных ревизий одной платформы или целой серии платформ, и выбрать из них единственный нужный файл бывает очень непросто. Чтобы не ошибиться, читайте инструкции по прошивке именно вашей модели и ревизии платформы на профильных форумах. И не стесняйтесь задавать вопросы.
***
Я намеренно не привожу в статье инструкции по восстановлению BIOS’ов путем прошивки на программаторе с выпаиванием и без, замыканием различных контактов, горячей замены съемной флеш-памяти и т. д., так как все эти методы небезопасны и требуют определенных знаний. Однако среди читателей, вероятно, найдутся те, кто делал нечто подобное на своем ПК и получил хорошие результаты. Будет отлично, если вы подробно опишите ваши действия в комментариях к статье. Также приветствуются рассказы об отрицательном опыте, чтобы другие читатели благодаря вам смогли избежать ошибок. В комментариях обязательно приводите наименование модели и ревизию вашей материнской платы, а также версию BIOS, с которой вы работали.
Понравилась статья? Оцените её:
FAQ
Если Ваш компьютер не может войти в операционную систему Windows из-за сбоя обновления BIOS (например, принудительного выключения) в процессе обновления BIOS, Вы можете выполнить следующие шаги, чтобы процесс обновления BIOS возобновился, и система Windows загрузила Рабочий Стол после завершения обновления BIOS.
Примечание: Убедитесь, что адаптер переменного тока подключен во время процесса обновления BIOS на Вашем устройстве. Кроме того, пожалуйста, не отключайте приложение принудительно во время процесса обновления, чтобы избежать проблем.
Чтобы получить более подробную инструкцию, Вы также можете перейти по ссылке на видео Youtube ниже. Вы сможете узнать больше о решении проблемы, когда на ноутбуке появляется черный экран и процесс обновления BIOS прерывается.
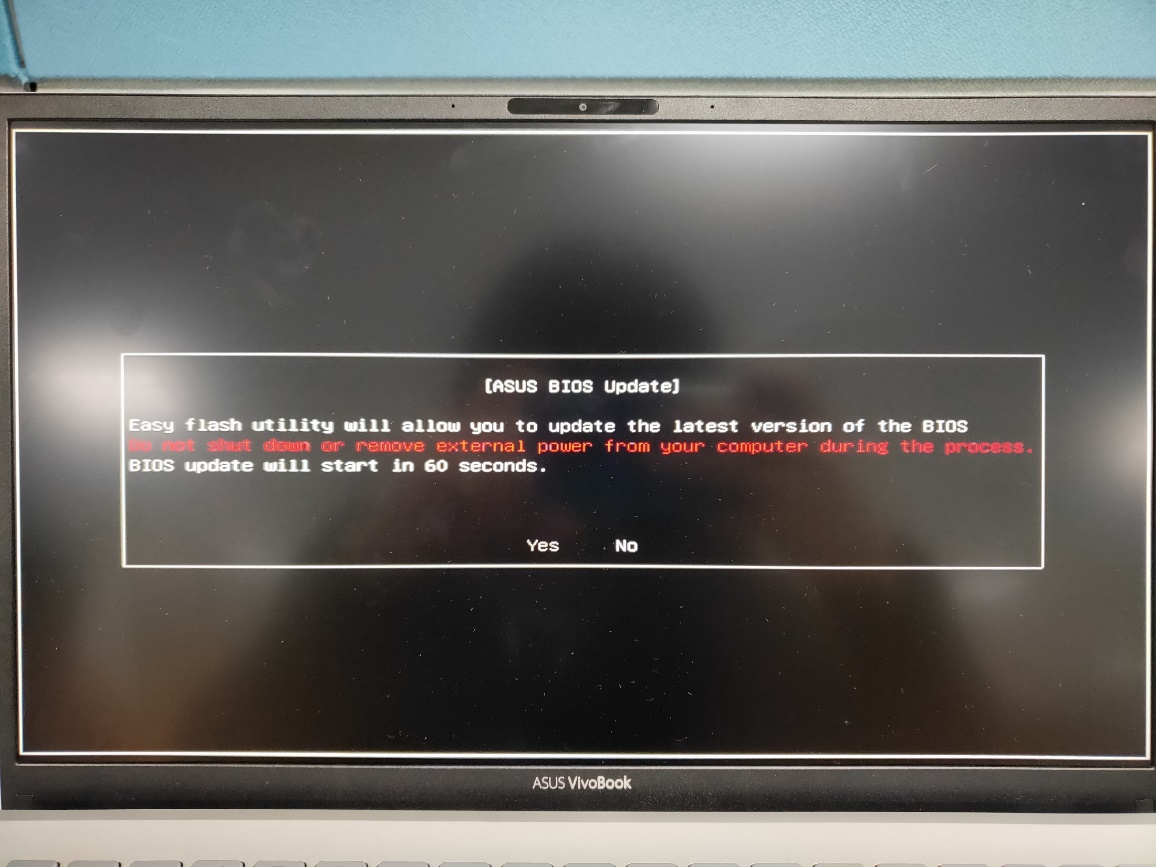
Сценарий 1: Если Вы заметили, что после загрузки ноутбука отображается следующее изображение, подождите 60 секунд или выберите «Да» на экране, после чего Ваш компьютер начнет автоматически возобновлять обновление BIOS (убедитесь, что адаптер переменного тока подключен).
Сценарий 2: Если Вы столкнулись с тем, что ноутбук загружается, а после сбоя процесса обновления BIOS отображается следующее изображение, то выполните указанные ниже действия, чтобы успешно завершить обновление BIOS.
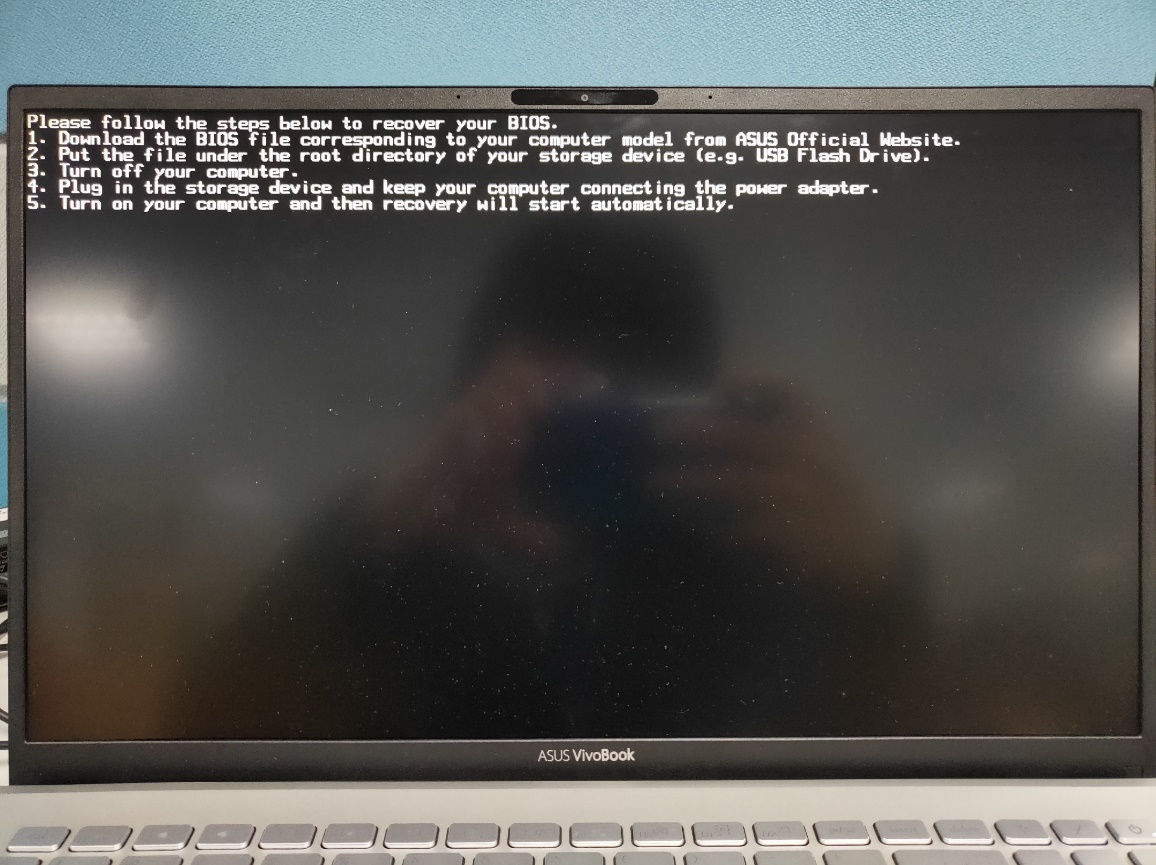
- Обратитесь, пожалуйста, к статье как обновить BIOS с помощью EZ Flash. Далее с помощью другого ПК перейдите на сайт поддержки ASUS, чтобы загрузить файл BIOS, соответствующий модели компьютера с которым возникла проблема обновления, а затем поместите этот файл BIOS в корневой каталог USB-накопителя (тип отформатированного USB-накопителя должен быть FAT32). Эти шаги аналогичны подготовке перед запуском обновления BIOS вручную с помощью EZ Flash. Примечание: если на экране отображается рекомендуемая версия восстановления BIOS, загрузите эту версию. Если нет, загрузите последнюю версию BIOS.
- Выключите компьютер при появлении вышеуказанного симптома, затем нажмите и удерживайте кнопку питания в течение 15 секунд, пока индикатор питания не погаснет.
- Подключите USB-накопитель с файлом BIOS к этому компьютеру и убедитесь, что адаптер переменного тока подключен.
- Включите компьютер, и он автоматически возобновит обновление BIOS.
Сценарий 3: Если после сбоя обновления BIOS ноутбук включается и загружается с черным экраном (индикатор питания горит, но на экране ничего не отображается), попробуйте выполнить следующие действия, чтобы узнать, можно ли решить проблему:
- Сначала извлеките адаптер переменного тока и аккумулятор (для моделей со съемным аккумулятором), затем нажмите и удерживайте кнопку питания в течение 40 секунд.
Примечание: Не отсоединяйте адаптер переменного тока для моделей ноутбуков ASUS TP420IA и UX425IA (для этих моделей необходимо подключить адаптер переменного тока для выполнения процесса аппаратного сброса)
- Снова подключите адаптер переменного тока и аккумулятор, затем включите компьютер. После этого Ваш компьютер должен автоматически запуститься, чтобы возобновить обновление BIOS. Не отключайте адаптер переменного тока и не прерывайте процесс, пока не завершится обновление BIOS, затем компьютер перезагрузится.
- После завершения обновления BIOS мы рекомендуем Вам загрузить настройки BIOS по умолчанию на этом устройстве. Здесь Вы можете узнать больше о том, как сбросить параметры BIOS
Если Ваша проблема не решена с помощью вышеуказанных рекомендаций, обратитесь в центр обслуживания клиентов ASUS для получения дополнительной информации.
- Категория
BIOS/ Прошивка - Тип
Product Knowledge
Эта информация была полезной?
Yes
No
- Приведенная выше информация может быть частично или полностью процитирована с внешних веб-сайтов или источников. Пожалуйста, обратитесь к информации на основе источника, который мы отметили. Пожалуйста, свяжитесь напрямую или спросите у источников, если есть какие-либо дополнительные вопросы, и обратите внимание, что ASUS не имеет отношения к данному контенту / услуге и не несет ответственности за него.
- Эта информация может не подходить для всех продуктов из той же категории / серии. Некоторые снимки экрана и операции могут отличаться от версий программного обеспечения.
- ASUS предоставляет вышеуказанную информацию только для справки. Если у вас есть какие-либо вопросы о содержании, пожалуйста, свяжитесь напрямую с поставщиком вышеуказанного продукта. Обратите внимание, что ASUS не несет ответственности за контент или услуги, предоставляемые вышеуказанным поставщиком продукта.
На чтение 6 мин. Просмотров 24.5k. Опубликовано 03.09.2019
Несмотря на то, что трудно вызвать критические неисправности ПК без физического повреждения, это действительно возможно. Два слова: обновление BIOS. Перепрограммирование BIOS является благодатной почвой для критических системных ошибок, и некоторые из них могут привести к остановке загрузки.
Кроме того, наихудший сценарий включает в себя кирпич вашей материнской платы, что является результатом, которого никто не хочет.
Существует несколько причин, по которым обновление BIOS препятствует загрузке Windows:
- Вы перепрошили BIOS с неподдерживаемой версией.
- Для выполнения этой процедуры вы использовали неподдерживаемое стороннее программное обеспечение.
- Или вы прервали процедуру перепрошивки.
Все 3 могут принести много неприятностей и повлиять на ваш компьютер. Сегодня мы попытаемся предложить вам несколько решений в надежде, что хотя бы одно из них поможет вам сохранить или спасти ваш ПК.
Если вы не уверены, что делать, обязательно ознакомьтесь с приведенными ниже инструкциями, и мы начнем с этого.
Содержание
- Как исправить ошибку загрузки системы после ошибочного обновления BIOS в 6 шагов:
- 1. Сброс CMOS
- 2. Попробуйте загрузиться в безопасном режиме
- 3. Настроить настройки BIOS
- 4. Снова прошить BIOS
- 5. Переустановите систему
- 6. Замените материнскую плату
Как исправить ошибку загрузки системы после ошибочного обновления BIOS в 6 шагов:
- Сброс CMOS
- Попробуйте загрузиться в безопасном режиме
- Настроить настройки BIOS
- Прошить BIOS снова
- Переустановите систему
- Замените свою материнскую плату
1. Сброс CMOS
Это серьезная проблема, которая требует осторожного подхода. Кроме того, вам нужно испачкать руки и выполнить простую аппаратную настройку, чтобы вручную сбросить настройки BIOS.
После извлечения батареи CMOS и укорачивания контактов материнской платы настройки BIOS должны быть перезапущены.
Надеюсь, после этого вы сможете загружаться так же, как и раньше. Если вы не уверены, как это сделать, мы подготовили инструкции ниже.
Кроме того, мы советуем вам найти точную материнскую плату и найти подробное объяснение для конкретной модели в Интернете. В любом случае, действуйте осторожно:
- Выключите ваш компьютер полностью.
- Отключите шнур питания и извлеките аккумулятор , если это ноутбук.
- Удерживайте кнопку питания в течение 60 секунд, чтобы полностью разрядить компьютер.
- Откройте корпус ПК и дотроньтесь до металлической поверхности, чтобы снять статическое электричество.
-
Извлеките батарею CMOS , которая должна быть стандартной плоской батареей наручных часов на 3 В.
- Подождите несколько минут и аккуратно разместите его снова.
- Включите компьютер и ищите изменения.
С другой стороны, если вы не можете получить доступ к батарее CMOS и получить к ней доступ, вы можете сбросить настройки BIOS, временно удалив перемычки материнской платы и снова подключив их.
Кроме того, после повторной загрузки обязательно установите правильное время BIOS в настройках загрузки. Без этого вы не сможете загрузиться в Windows 10.
2. Попробуйте загрузиться в безопасном режиме
Несмотря на то, что это обходной путь, он может помочь вам, тем не менее. В большинстве случаев вам потребуется выполнить вышеупомянутый сброс настроек BIOS, чтобы в первую очередь получить доступ к безопасному режиму.
После этого перезагрузите компьютер и попробуйте безопасный режим.
К сожалению, получить доступ к безопасному режиму не так просто, как раньше. Для этого вам понадобится загрузочный носитель с системной установкой или какой-нибудь диск восстановления.
В любом случае вам понадобится загрузочный диск для доступа к параметрам восстановления и безопасному режиму соответственно. Вы можете создать его на любом другом компьютере с помощью инструмента «Создание медиа» или создателей дисков восстановления в настройках Windows 10.
Следуйте инструкциям ниже, чтобы попытаться загрузиться в безопасном режиме:
- Подключите или вставьте загрузочный диск (флэш-накопитель USB или DVD) и перезагрузите компьютер.
- Откройте меню загрузки и выберите диск в качестве основного загрузочного устройства . Вы также можете сделать это в настройках BIOS.
- Процесс загрузки установочного файла должен начаться.
- Выберите свои предпочтения и нажмите кнопку Далее .
- В следующем диалоговом окне выберите «Восстановить компьютер» в левом нижнем углу.
- Open Troubleshoot .
-
Выберите Дополнительные параметры .
- Выберите Настройки запуска .
- Выберите Перезагрузить.
-
После перезагрузки компьютера нажмите F4, F5 или F6 для загрузки в различных параметрах безопасного режима.
- Безопасный режим – F4
- Безопасный режим с поддержкой сети – F5
- и безопасный режим с командной строкой – F6.
- Когда/если система наконец загрузится в Windows 10, вы можете перезагрузить компьютер и запустить систему стандартным способом.
Многие пользователи сообщали, что каким-то образом безопасный режим «заставлял» систему загружаться и, следовательно, устранял остановку, вызванную ошибкой перепрошивки.
Если вы хотите узнать, как создать установочный носитель Windows 10, выполните действия, описанные в этом простом руководстве.
Безопасный режим не работает в Windows 10? Не паникуйте, это руководство поможет вам преодолеть проблемы с загрузкой.
3. Настроить настройки BIOS
Теперь это сугубо индивидуально и сильно зависит от конфигурации вашего ПК и модели материнской платы. Для этого мы советуем вам заглянуть в вашу материнскую плату и найти нужные настройки.
Излишне объяснять, что вам нужно изменить, поскольку сами варианты довольно разнообразны.
Если вы не уверены на 100%, не вмешивайтесь в настройки BIOS. Вам следует либо обратиться в официальную службу поддержки, либо попытаться объяснить свою проблему знающим людям или любителям ПК.
Это самая безопасная ставка для настройки параметров BIOS и получения полной функциональности.
Доступ к BIOS кажется слишком сложной задачей? Давайте поможем вам с помощью этого удивительного руководства!
4. Снова прошить BIOS
Ты один раз прошил BIOS, и ад вырвался на свободу. Кажется смешным делать это снова, но это может просто решить ваши проблемы. А именно, вы, вероятно, установили неправильную версию или прервали перепрошивку и перевернули вашу материнскую плату.
К счастью, некоторые пользователи, которым удалось преодолеть начальный экран загрузки (и застрял в анимации Windows 10), решили проблему, перепрошив BIOS с верной версией.
Тем не менее, на этот раз мы советуем вам не торопиться и делать каждый шаг осторожно. Чтобы помочь вам решить эту проблему, мы рекомендуем прочитать статью ниже с подробным объяснением перепрошивки.
Обязательно проверьте это, прежде чем перейти к перепрошивке.
Обновление BIOS кажется пугающим? С помощью этого удобного руководства упростите задачу.
5. Переустановите систему
Некоторые пользователи сообщили, что проблема может быть решена путем полной переустановки системы. Кажется, что неудачная процедура перепрошивки влияет на жесткий диск каким-то образом, и, следовательно, заставляет вас начать с нуля.
И в «Плохой шкале» это только «Умеренно плохо», если принять во внимание, что вам может потребоваться замена материнской платы.
Процедура переустановки Windows 10 не так сложна, как на некоторых старых итерациях Windows, в те времена.
Тем не менее, для начинающего пользователя это может привести к длительным трудностям. Чтобы избежать этого, обязательно прочитайте полные инструкции, собранные в статье ниже.
Epic Guide alert! Переустановите Windows 10 с помощью нескольких быстрых шагов. Все, что вам нужно знать, прямо здесь!
6. Замените материнскую плату
Наконец, если ни один из предыдущих шагов не помог вам, извините, но вам понадобится другая материнская плата. Кроме того, вы можете запросить ремонт, который также возможен, но это далеко, и шансы не в вашу пользу.
Это должно завершить это. Если у вас есть какие-либо вопросы или альтернативные решения, обязательно поделитесь ими с нами. Вы можете сделать это в разделе комментариев ниже.
You may be wondering “Do I need to update my BIOS” since it is more dangerous to update motherboard BIOS than updating drive-based software. Sometimes, your PC will refuse to boot after you updated the BIOS. At this time, how can you recover data from the PC not turning on? How to fix the computer that won’t start?
Basically speaking, BIOS update refers to the update of the motherboard BIOS on a computer. Unlike other types of updates, the BIOS update will not bring us the system performance improvement.
Yet, it also causes problems:
- Black screen after BIOS update: computer won’t boot up and shows a black screen after you updated BIOS.
- No display after BIOS update: computer turns on but there is no display on the monitor, so you can’t access the system.
- Infinite loop/Endless loop: PC keeps restarting after BIOS update.
Once something goes wrong during the update process, your PC may become completely unbootable. Therefore, you’ll lose access to your system and all the files stored on the internal hard drive.
So what are you going to do when finding PC not booting after BIOS update?
Actually, you can recover data from hard disk without OS and bring the PC back to life when updated BIOS leads to a black screen. But how? Let’s just dive into this PC boot failure problem.
Issue: PC Not Booting after BIOS Update
Are you stuck with the computer not powering on problem after a BIOS update? manuntd7 said yes to this question.
Laptop Not Boot after BIOS Update
So I noticed that there was a BIOS update on my laptop and thought I’d update it. After flashing, the laptop was no longer booting in the OS and was simply launching the BIOS every time I turned it on. In the BIOS, when I select boot options, it states that there are no bootable devices but it detects my SSD. I tried reverting back to the old BIOS firmware but no luck. My laptop is an Asus F556UAK— manuntd7 posted in Tom’s Hardware Forum, waiting to get help.
The user manuntd7 described his personal experience in this post: he chose to update the BIOS after he had noticed the update push in the system. But after the work had been done, he discovered that his laptop won’t boot after BIOS update.
In fact, PC won’t boot after BIOS update has long been a hot topic on various forums. No matter you’d like to update BIOS in Windows 10 or other operating systems, PC not boot may become your worries.
Why the computer not booting after bios screen draws so much attention?
There are mainly two reasons:
- All the data can’t be accessed when a computer doesn’t boot after BIOS update.
- Ordinary computer users don’t know an effective way to fix when the PC doesn’t boot up.
Taking all these factors into account, I plan to share the practical recovery & repair solutions with you after the update of Windows BIOS failed.
How Can You Recover Lost Files After Windows Update?
Recovery: How to Access Data When BIOS Update Failed
In this part, I’ll tell you how to do the data recovery job when Windows 10 PC won’t boot after BIOS update, from two aspects (if Windows 7 won’t boot after BIOS update, the recovery solutions are roughly the same).
Recover Data from Unbootable Windows 10
Backup is important.
People often say that backup is very important, but very few of them really realize its importance. Only a small number of people form the habit of backing up useful data, let alone keep the backup updating from time to time. This is how you get yourself into the dilemma of data loss.
Data recovery from unbootable PC is possible.
Yet, the good news is PC data recovery is possible.
- If you do have a backup, please resort to it directly.
- If you don’t have one, please rescue your data by using Data Recovery of MiniTool Partition Wizard – a safe and reliable program.
Which version to choose?
Can all versions help you recover all data from a PC this can’t boot? Of course not! You should choose a version that contains the WinPE-Based Bootable Media (click to know more about the bootable disc). I suggest a Pro Ultimate license since it allows you to recover data.
Buy Now
Tip: You can also get MiniTool Power Data Recovery – the professional data recovery software for Windows 10 – to recover data.
How to recover data from PC not turning on?
Step 1: stop doing anything on the PC that refuses to boot.
Step 2: find another computer that works fine to build a MiniTool Boot Disk on a USB flash drive or CD/DVD disc.
Tip: Please see How to Build MiniTool Power Data Recovery Boot Disk talked about in part 2 of Operating System Not Found Error Appears, How To Recover Data.
Step 3: remove the boot disk you have made safely from another computer and then connect it properly to your PC that doesn’t boot.
Step 4: restart your computer and enter BIOS by pressing the corresponding button. After that, change the old boot order to make the boot disk the first boot device.
Step 5: exit BIOS and click to save changes.
Step 6: be ready to launch the software.
- Let the computer restart.
- Click on the OK button when you see the screen resolution setting window.
- Click on the OK button when you see the software launching window.
Step 7: afterward, you’ll see the MiniTool PE Loader window, in which you should choose the first option – Partition Wizard.
Step 8: choose Data Recovery from the following software interface.
Step 9: scan the disk.
- Choose the disk containing needed files.
- Click on the Scan button in the lower right corner.
Step 10: choose files to recover.
- Browse the found files.
- Confirm which files are needed.
- Click on the Save button to set a storage location.
- Click on the OK button to confirm your selection.
This is how to perform data recovery when the PC doesn’t boot up.
When you have found back all the files you need, you can do a data backup immediately for security reasons.
Click to Tweet
There’s how to flash BIOS when computer won’t boot
Repair: Computer Won’t Boot Windows 10
As for how to fix the computer startup problems in a Windows 10 system, I’ll give my suggestions in this part.
Method 1: Rebuild MBR
To rebuild MBR, you have 2 choices.
Choice one: rebuild with third-party software.
Step 1: create a bootable disk.
- Also, you need to create a bootable USB/CD/DVD disk on another computer.
- Then, repeat step 3 ~ step 7 mentioned in the Recover Data from Unbootable Windows 10 part.
Step 2: choose Launch Application.
Step 3: select disk to Rebuild MBR.
- Select the boot disk.
- Click on Rebuild MBR from left action panel.
- Click on Apply button to execute the pending operation.
- Choose Yes in the pop-up window to confirm changes.
This is how to use MiniTool Partition Wizard to try to fix the problem when the computer won’t boot up after a BIOS update.
Choice two: repair with Command Prompt.
Also, you can use other tools, like Command Prompt, to repair MBR (Master Boot Record) for your non-bootable computer.
Main steps are:
- Enter the Windows Boot Options menu. If you can’t see this menu, please create a Windows installation disk and then boot your computer from it so as to access the menu.
- Select Troubleshoot, Advanced Options, and Command Prompt one by one.
- Type bootrec /fixmbr and press Enter.
- Type bootrec /fixboot and press Enter.
- Type bootrec /rebuildbcd and press Enter.
Method 2: Check & Fix Hard Drive
You can check and fix a hard drive by using the Command Prompt.
- You should enter the Windows Boot Options menu.
- Select Troubleshoot.
- Select Advanced Options.
- Select Command Prompt.
- Type chkdsk c: /r /x and press Enter in the keyboard.
- Now, just wait for the automatic completion of the operation.
CHKDSK Deletes Your Data? Now Recover Them In Two Ways.
Method 3: Use Startup Repair
Two situations are involved in this method.
Situation one: you have the installation disc.
- Please set your PC to boot from the installation disc firstly and wait for loading files.
- In the Windows Setup interface, you should select the language, time and currency format, keyboard or input method and then click on the Next button.
- Then, select Repair your computer, Troubleshoot, Advanced options, and Startup Repair one by one.
- Finally, choose a target operating system to repair and let Windows diagnose & fix the problem for you.
Situation two: you don’t have the installation disc.
- Please access the recovery environment by turning your computer on and off three times.
- After that, Win 10 will boot into the diagnostics mode.
- Now, you should click on Advanced options on the recovery screen.
- Then, choose Troubleshoot, Advanced options and Startup Repair in order.
- Choose the operating system to repair.
Method 4: Roll Back to the Previous Build
The previous few steps are the same as those mentioned in method 3.
The difference lies in:
After selecting Troubleshoot and Advanced options in order, you should choose Go back to the previous build (instead of Startup Repair).
Method 5: Make Use of System Restore
Also, the previous few steps are the same as those mentioned in method 3.
The difference lies in:
After selecting Troubleshoot and Advanced options in order, you should click on System Restore in the Advanced options window.
Method 6: Uninstall the Windows Update
- Start your Windows 10 computer in Safe Mode.
- Navigate to Programs and Features.
- Choose View installed updates from the left pane.
- Select the problematic update from the list carefully and then click on the Uninstall
Method 7: Reset BIOS to Default
- As I mentioned in the recovery part, you should restart your computer and press corresponding button (varies from computer to computer) to enter the BIOS at first.
- Then, find the Setup Defaults option (which may also be called Reset to Default, Factory Default, or something else).
- Select this option by using the arrow keys or pressing the corresponding button.
- Finally, save the changes and exit BIOS.
Method 8: Do a Clean Install or Custom Install
If all the above methods failed, you still have another choice which has always been useful – perform a clean install or a custom install.
The difference between them is that:
- The clean install will erase everything saved on your computer.
- The custom install will only erase some of the files.
That’s all the mainstream solutions to fixing Windows 10 not booting after BIOS update.
Click to Tweet
Questions about Updating BIOS
If you’re not so familiar with BIOS and the updating process of it, you tend to make mistakes that will finally result in Windows startup problems. Considering this, I think it’s necessary to explain the functions and preparations of BIOS update.
Do I Need to Update My BIOS
There’re four main reasons to update BIOS:
- Make motherboard recognize and support new types of CPUs.
- Correct the original error or bugs found in BIOS.
- Improve the compatibility of BIOS with internal storage, graphics card, hard drive, and other hardware.
- Obtain new features and functions.
What to Do before Updating Windows BIOS
- Make sure to remove the BIOS write protection.
- Backup the BIOS data in case of update failure. Besides, you can restore the BIOS data easily if you find something wrong in the new BIOS.
- Please make sure the execution programs and BIOS data files used in the update process match the motherboard model. In addition, check the integrity and reliability of the files.
- Confirm that the power is stable and continuous so that there is no power failure that will affect the update.
Note: If the update fails in the real sense, the easiest and most direct way to recover is to contact your motherboard manufacturer or motherboard retailer to get a new BIOS chip. Then, replace the old BIOS chip with the new one by hiring experts or doing it under professional guidance. Besides, if the BIOS chip is attacked by virus, changing a new chip is a better fix than rewriting BIOS.
Conclusion
- As a general rule, BIOS update is an exciting thing since it could bring us some benefits.
- But, on the other hand, people may get into trouble due to wrong operations or unexpected accidents happened during the update.
PC not booting after BIOS update is a common problem. You’d better read the corresponding recovery and repair solutions mentioned here. The content is very useful no matter you’re suffering from PC boot failure caused by BIOS update at this moment or not.
If you still have other doubts or questions, please feel free to leave a message below or contact our Tech Support Team. Thanks for your time!