
Introduction
This troubleshooting guide describes common problems and solutions for instances that fail to boot correctly. This guide applies to:
-
AlmaLinux
-
CentOS 7 and 8
-
Rocky Linux
-
VzLinux
High-level Overview
The boot sequence of events:
-
Power + post.
-
Firmware device search.
-
Firmware reads bootloader.
-
Boot loader loads config (grub2).
-
Boot loader loads kernel and initramfs.
-
Boot loader passes control to the kernel.
-
Kernel initializes hardware + executes
/sbin/initas pid 1. -
Systemd executes all initrd targets (mounts filesystem on
/sysroot). -
Kernel root FS switched from initramfs root (
/sysroot) to system rootfs (/) and systemd re-executes as system version. -
Systemd looks for default target and starts/stops units as configured while automatically solving dependencies and login page appears.
For more information on the boot process, refer to the official OS documentation for your system.
Systemd Targets
Targets are dependency checks. They have a «before» and «after» configuration for exactly what services are required to meet that target. For example: arp.ethernet.service, firewalld.service, and so forth need to be started and working before network.target can be reached. If it is not reached, services such as httpd, nfs, and ldap cannot be started. 4 targets can be set.
-
graphical.target (GUI interface)
-
multi-user.target (multi user mode, text based login)
-
rescue.target (sulogin prompt, basic system initialization)
-
emergency.target (sulogin prompt, initramfs pivot complete and system root mounted on / as read only)
To view the current default boot target, use the following:
systemctl get-default
You can change this at run time by isolating the target. This will start/stop all services associated with the new target, so use caution (see systemctl isolate new.target).
Single User Mode
There are times when you will need to boot into single user mode to fix an issue with the operating system. This example demonstrates how to use the rescue.target which is «single user mode».
-
Interrupt the grub2 menu by pressing «e» to edit when prompted with the grub menu.
-
Find the line that specifies the kernel version (vmlinuz) and append the following to it:
systemd.unit=rescue.target -
Press «Ctrl+x» to start.
-
You will then be prompted with the root password to continue, once you exit the rescue shell, the boot process will continue to load your default target.
Recover the Root Password
If you need to recover credentials, use this method to gaining access to the instance.
-
Reboot the system.
-
Interrupt the grub2 menu by pressing «e» to edit when prompted with the grub menu.
-
Move the cursor to the end of the line that specifies the kernel (vmlinuz). You may want to remove all other consoles other than TTY0, however, this step may not be necessary for your environment.
-
Append
rd.break(no quotes), which will break the boot process just before the control is handed from initramfs to the actual system. -
Ctrl+x to boot.
A root shell is presented with the root filesystem mounted in read-only mode on /sysroot.
Remount it with write privileges as /sysroot.
# mount -oremount,rw /sysroot
Switch to a chroot jail.
# chroot /sysroot
Change the password for the desired user.
# passwd example-username
If you use SELinux, you should consider re-labeling all files before continuing the boot process. Skip this part if you don’t use SELinux.
# touch /.autorelabel
Use the exit to exit the chroot jail. Use exit a second time, and the system will cleanly boot from the point we interrupted it.
Review Boot Logs
It can be useful to view logs of previous failed boot attempts. The journald logs are usually stored in memory and released on boot. If you make the logs persistent, they can be examined with the journalctl tool. Follow these steps if you need to set up persistent boot logging.
As root, create the log file.
# mkdir -p 2775 /var/log/journal && chown :systemd-journal /var/log/journal

# systemctl restart systemd-journald
To inspect the logs of a previous boot, use the -b option with journalctl. Without any arguments, -b will filter output only to messages about the last boot. A negative number for this argument will filter on previous boots. For example:
# journalctl -b-1 -p err
This will show you the error logs from the boot that occurred before the most recent. You should change the numerical value to reflect the boot you need to view.
Repair Filesystem Errors
One of the most common boot time errors is a misconfigured /etc/fstab file. You CANNOT use the rescue.target to fix an /etc/fstab error. Most of these issues will require us to use the emergency.target since «rescue» requires a more functional system.
The following are examples of problems that require the emergency.target:
-
Corrupt file system.
-
Non-existent UUID in
/etc/fstab. -
Non-existent mount point in
/etc/fstab. -
Incorrect mount option in
/etc/fstab.
Important: After editing the /etc/fstab file in emergency mode, you must run the following for safety measures:
# systemctl daemon-reload
Here is a walkthrough example of booting into emergency mode to remove a false entry in /etc/fstab.
-
Interrupt the grub2 menu by pressing «e» to edit when prompted with the grub menu.
-
Find the line that specifies the kernel version (vmlinuz) and append the following to it:
systemd.unit=emergency.target -
Press «Ctrl+x» to boot.
-
You will be prompted with the root password to continue.
-
Remount
/so that we can make changes to thefstabfile:# mount -oremount,rw / -
We can use the
mountcommand to see which entry is causing the error:# mount -a -
Remove the offending entry from the
fstabfile. -
Use
mount -aagain to make sure the error has been resolved. -
Use
systemctl daemon-reloadto reload all unit files, and recreate the entire dependency tree.
Once you exit the emergency shell, the system will finish booting from the emergency target.
Bootloader Issues with Grub 2
The /boot/grub2/grub.cfg file is the main configuration file. DO NOT ever edit this file manually. Instead, use grub2-mkconfig to generate the new grub2 config using a set of different configuration files and the list of the installed kernels. The grub2-mkconfig command will look at /etc/default/grub for options such as the default menu timeout and kernel command line to use, then use a set of scripts in /etc/grub.d/ to generate the resulting configuration file.
Here is an textual diagram of this relationship.
/boot/grub2/grub.cfg

               |

               |__________________

               |                  |

         /etc/default/grub         /etc/grub.d/*
Important: To edit the main grub.cfg file, you will need to make the desired changes to /etc/default/grub and to files in /etc/grub.d/ and then create a new grub.cfg by running:
# grub2-mkconfig > /boot/grub2/grub.cfg
It is important to understand the syntax of the /boot/grub2/grub.cfg file before troubleshooting.
-
First, bootable entries are encoded inside ‘menuentry’ blocks. In these blocks,
linux16andinitrd16lines point to the kernel to be loaded from disk (along with the kernel command line) and the initramfs to be loaded. During interactive editing at boot, tab is used to find these lines. -
The «set root» lines inside those blocks do not point to the root file system, but instead point to the file system from which grub2 should load the kernel and initramfs files. The syntax is
harddrive.partitionwherehd0is the first hard drive in the system andhd1is the second. The partitions are indicated asmsdos1for the first MBR partition orgpt1for the first GPT partition.
Example from /boot/grub2/grub.cfg:
### BEGIN /etc/grub.d/10_linux ###

menuentry 'CentOS Linux (3.10.0-514.26.2.el7.x86_64) 7 (Core)' --class centos --class gnu-linux --class gnu --class os --unrestricted $menuentry_id_option 'gnulinux-3.10.0-514.el7.x86_64-advanced-a2531d12-46f8-4a0f-8a5c-b48d6ef71275' {

    load_video

    set gfxpayload=keep

    insmod gzio

    insmod part_msdos

    insmod ext2

    set root='hd0,msdos1'

    if [ x$feature_platform_search_hint = xy ]; then

      search --no-floppy --fs-uuid --set=root --hint='hd0,msdos1'  123455ae-46f8-4a0f-8a5c-b48d6ef71275

    else

      search --no-floppy --fs-uuid --set=root 123455ae-46f8-4a0f-8a5c-b48d6ef71275

    fi
If you need to re-install the bootloader on a device, use the following command.
# grub2-install <device>
Fix a Broken Grub
Follow these steps when troubleshooting a system that does not boot after reaching the grub2 menu.
- You should start by editing the grub menu and searching for syntax errors. If you find one, correct it and get into the system to make persistent changes to fix the problem.
If you cannot find any errors, refer to the above section to boot into the emergency target. You will need to remount root (/) again.
-
View the current grub2 configuration with the following command:
# grub2-mkconfig -
If you do not see any errors, its likely that someone edited the
/boot/grub2/grub.cfgfile. Do not modify this file. Rebuild the config with the following command:# grub2-mkconfig > /boot/grub2/grub.cfg
Once you have rebuilt the grub config, the system should reboot properly.
The operating systems break and crash. We as sysadmin are always looking for the root cause analysis so as to avoid such failures in the future. In this post, we will look at the basic troubleshooting of booting issues. This is a high-level overview and things can get pretty deep depending on the booting issue.
Inspecting Logs
Looking at the logs of previously failed boots can be useful. If the system journals are persistent across reboots, you can use the journalctl tool to inspect those logs.
Remember that by default, the system journals are kept in the /run/log/journal directory, which means the journals are cleared when the system reboots. To store journals in the /var/log/journal directory, which persists across reboots, set the Storage parameter to persistent in /etc/systemd/journald.conf.
[ro[email protected] ~]# vim /etc/systemd/journald.conf
..
[Journal]
Storage=persistent
...
[[email protected] ~]# systemctl restart systemd-journald.service
To inspect the logs of a previous boot, use the -b option of journalctl. Without any arguments, the -b option only displays messages since the last boot. With a negative number as an argument, it displays the logs of previous boots.
[[email protected] ~]# journalctl -b -1 -p err
This command shows all messages rated as an error or worse from the previous boot.
Repairing systemd boot issue
To troubleshoot service startup issues at boot time, Red Hat Enterprise Linux 8 makes the following tools available.
Enabling the Early Debug Shell
By enabling the debug-shell service with systemctl enable debug-shell.service, the system spawns a root shell on TTY9 (Ctrl+Alt+F9) early during the boot sequence. This shell is automatically logged in as root, so that administrators can debug the system while the operating system is still booting.
WARNING Do not forget to disable the debug-shell.service service when you are done debugging, because it leaves an unauthenticated root shell open to anyone with local console access.
Using the Emergency and Rescue Targets
By appending either systemd.unit=rescue.target or systemd.unit=emergency.target to the kernel command line from the boot loader, the system spawns into a rescue or emergency shell instead of starting normally. Both of these shells require the root password.
The emergency target keeps the root file system mounted read-only, while the rescue target waits for sysinit.target to complete, so that more of the system is initialized, such as the logging service or the file systems. The root user at this point can not make changes to /etc/fstab until the drive is remounted in a read write state mount -o remount,rw /
Administrators can use these shells to fix any issues that prevent the system from booting normally; for example, a dependency loop between services, or an incorrect entry in /etc/fstab. Exiting from these shells continues with the regular boot process.
Identifying Stuck Jobs
During startup, systemd spawns a number of jobs. If some of these jobs cannot complete, they block other jobs from running. To inspect the current job list, administrators can use the systemctl list-jobs command. Any jobs listed as running must complete before the jobs listed as waiting can continue.
В этой статье вы узнаете, что вы можете делать, когда при загрузке сервера возникают общие проблемы. В статье описываются общие подходы, которые помогают исправить некоторые из наиболее распространенных проблем, которые могут возникнуть при загрузке Linux.
Понимание процедуры загрузки в Linux RHEL7/CentOS
Чтобы исправить проблемы с загрузкой, важно хорошо понимать процедуру загрузки. Если проблемы возникают во время загрузки, вы должны понимать, на какой стадии процедуры загрузки возникает проблема, чтобы можно было выбрать соответствующий инструмент для устранения проблемы.
Следующие шаги суммируют, как процедура загрузки происходит в Linux.
1. Выполнение POST: машина включена. Из системного ПО, которым может быть UEFI или классический BIOS, выполняется самотестирование при включении питания (POST) и аппаратное обеспечение, необходимое для запуска инициализации системы.
2. Выбор загрузочного устройства: В загрузочной прошивке UEFI или в основной загрузочной записи находится загрузочное устройство.
3. Загрузка загрузчика: с загрузочного устройства находится загрузчик. На Red Hat/CentOS это обычно GRUB 2.
4. Загрузка ядра: Загрузчик может представить пользователю меню загрузки или может быть настроен на автоматический запуск Linux по умолчанию. Для загрузки Linux ядро загружается вместе с initramfs. Initramfs содержит модули ядра для всего оборудования, которое требуется для загрузки, а также начальные сценарии, необходимые для перехода к следующему этапу загрузки. На RHEL 7/CentOS initramfs содержит полную операционную систему (которая может использоваться для устранения неполадок).
5. Запуск /sbin/init: Как только ядро загружено в память, загружается первый из всех процессов, но все еще из initramfs. Это процесс /sbin/init, который связан с systemd. Демон udev также загружается для дальнейшей инициализации оборудования. Все это все еще происходит из образа initramfs.
6. Обработка initrd.target: процесс systemd выполняет все юниты из initrd.target, который подготавливает минимальную операционную среду, в которой корневая файловая система на диске монтируется в каталог /sysroot. На данный момент загружено достаточно, чтобы перейти к установке системы, которая была записана на жесткий диск.
7. Переключение на корневую файловую систему: система переключается на корневую файловую систему, которая находится на диске, и в этот момент может также загрузить процесс systemd с диска.
8. Запуск цели по умолчанию (default target): Systemd ищет цель по умолчанию для выполнения и запускает все свои юниты. В этом процессе отображается экран входа в систему, и пользователь может проходить аутентификацию. Обратите внимание, что приглашение к входу в систему может быть запрошено до успешной загрузки всех файлов модуля systemd. Таким образом, просмотр приглашения на вход в систему не обязательно означает, что сервер еще полностью функционирует.
На каждом из перечисленных этапов могут возникнуть проблемы из-за неправильной настройки или других проблем. Таблица суммирует, где настроена определенная фаза и что вы можете сделать, чтобы устранить неполадки, если что-то пойдет не так.
| Фаза загрузки | Где настроено | Как попытаться починить |
| POST | Железо (F2, Esc, F10, или другая кнопка) | Замена железа |
| Выбор загрузочного устройства | BIOS/UEFI конфигурация или загрузочное устройство | Замена железа или использовать восстановление системы |
| Загрузка загрузчика (GRUB 2) | grub2-install и редактирует в /etc/defaults/grub | Приглашение GRUB для загрузки и изменения в /etc/defaults/grub, после чего следует выполнить grub2-mkconfig. |
| Загрузка ядра | Редактирует конфигурацию GRUB и /etc/dracut.conf | Приглашение GRUB для загрузки и изменения в /etc/defaults/grub, после чего следует выполнить grub2-mkconfig. |
| Запуск /sbin/init | Компиляция в initramfs | init = kernel аргумент загрузки, rd.break аргумент загрузки ядра |
| Обработка initrd.target | Компиляция в initramfs | Обычно ничего не требуется |
| Переключение на корневую файловую систему | /etc/fstab | /etc/fstab |
| Запуск цели по умолчанию | /etc/systemd/system/default.target | Запустить rescue.target как аргумент при загрузке ядра |
Передача аргементов в GRUB 2 ядру во время загрузки
Если сервер не загружается нормально, приглашение загрузки GRUB предлагает удобный способ остановить процедуру загрузки и передать конкретные параметры ядру во время загрузки. В этой части вы узнаете, как получить доступ к приглашению к загрузке и как передать конкретные аргументы загрузки ядру во время загрузки.
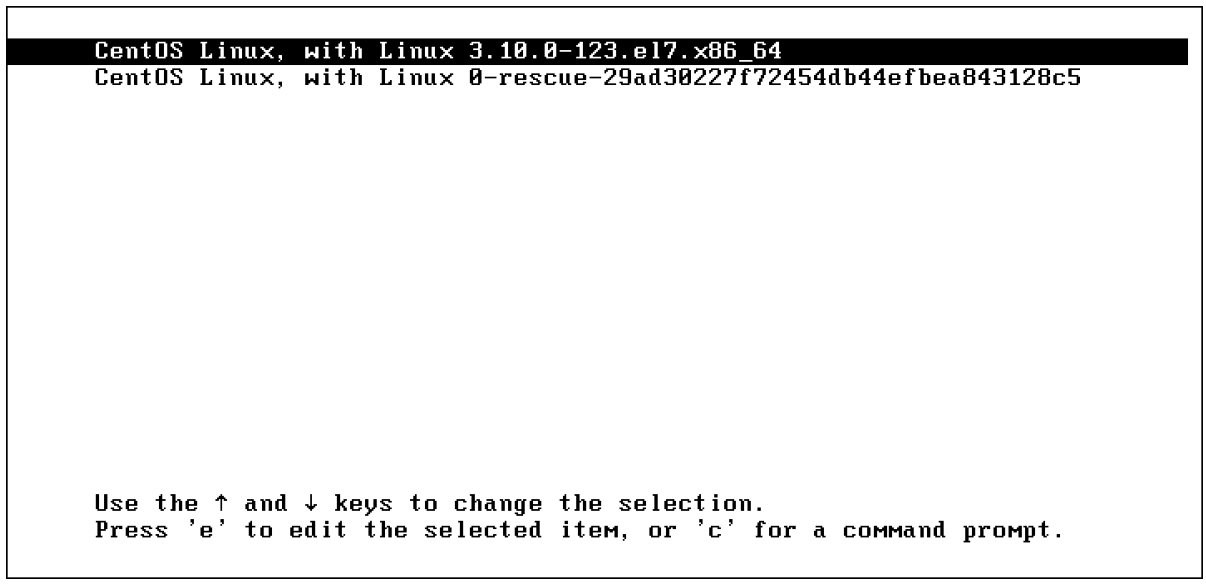
Когда сервер загружается, вы кратко видите меню GRUB 2. Смотри быстро, потому что это будет длиться всего несколько секунд. В этом загрузочном меню вы можете ввести e, чтобы войти в режим, в котором вы можете редактировать команды, или c, чтобы ввести полную командную строку GRUB.
 После передачи e в загрузочное меню GRUB вы увидите интерфейс, показанный на скриншоте ниже. В этом интерфейсе прокрутите вниз, чтобы найти раздел, начинающийся с linux16 /vmlinuz, за которым следует множество аргументов. Это строка, которая сообщает GRUB, как запустить ядро, и по умолчанию это выглядит так:
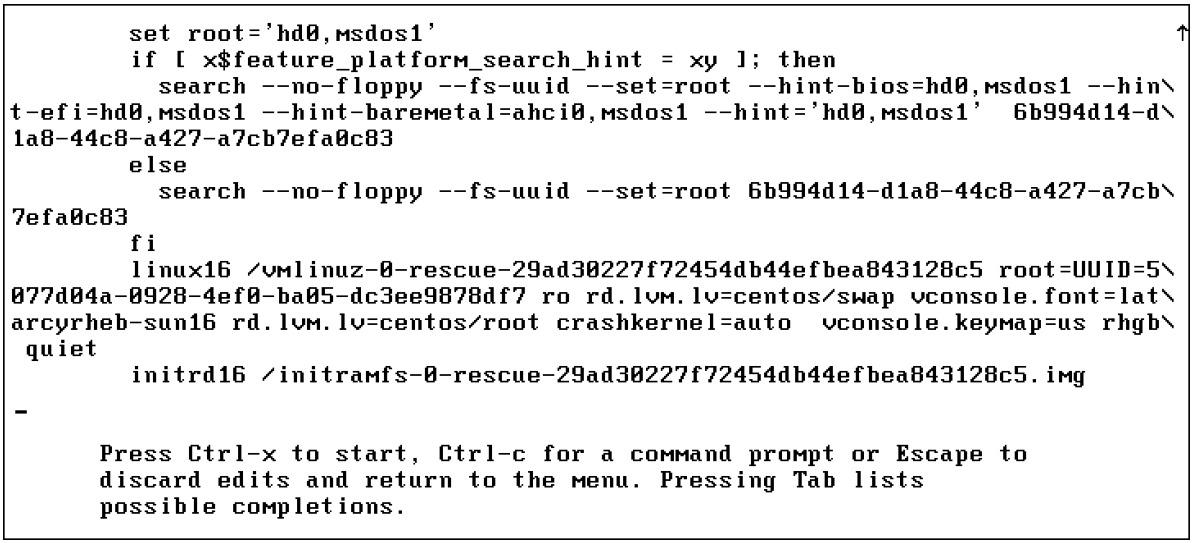
После ввода параметров загрузки, которые вы хотите использовать, нажмите Ctrl + X, чтобы запустить ядро с этими параметрами. Обратите внимание, что эти параметры используются только один раз и не являются постоянными. Чтобы сделать их постоянными, вы должны изменить содержимое файла конфигурации /etc/default/grub и использовать grub2-mkconfig -o /boot/grub2/grub.cfg, чтобы применить изменение.
Когда у вас возникли проблемы, у вас есть несколько вариантов (целей), которые вы можете ввести в приглашении загрузки GRUB:
■ rd.break Это останавливает процедуру загрузки, пока она еще находится в стадии initramfs.
Эта опция полезна, если у вас нет пароля root.
■ init=/bin/sh или init=/bin/bash Указывает, что оболочка должна быть запущена сразу после загрузки ядра и initrd. Это полезный вариант, но не лучший, потому что в некоторых случаях вы потеряете консольный доступ или пропустите другие функции.
■ systemd.unit=emergency.target Входит в минимальный режим, когда загружается минимальное количество системных юнитов.
Требуется пароль root.
Чтобы увидеть, что загружено только очень ограниченное количество файлов юнитов, вы можете ввести команду systemctl list-units.
■ systemd.unit=rescue.target Команда запускает еще несколько системных юнитов, чтобы привести вас в более полный рабочий режим. Требуется пароль root.
Чтобы увидеть, что загружено только очень ограниченное количество юнит-файлов, вы можете ввести команду systemctl list-units.
Запуск целей(targets) устранения неполадок в Linux
1. (Пере)загружаем Linux. Когда отобразиться меню GRUB, нажимаем e;
2. Находим строку, которая начинается на linux16 /vmlinuz. В конце строки вводим systemd.unit=rescue.target и удаляем rhgb quit;
3. Жмем Ctrl+X, чтобы начать загрузку с этими параметрами. Вводим пароль от root;
4. Вводим systemctl list-units и смотрим. Будут показаны все юнит-файлы, которые загружены в данный момент и соответственно загружена базовая системная среда;
5. Вводим systemctl show-environment. Видим переменные окружения в режиме rescue.target;
6. Перезагружаемся reboot;
7. Когда отобразится меню GRUB, нажимаем e. Находим строку, которая начинается на linux16 /vmlinuz. В конце строки вводим systemd.unit=emergency.target и удаляем rhgb quit;
8. Снова вводим пароль от root;
9. Система загрузилась в режиме emergency.target;
10. Вводим systemctl list-units и видим, что загрузился самый минимум из юнит-файлов.
Устранение неполадок с помощью загрузочного диска Linux
Еще один способ восстановления работоспособности Linux использовать образ операционки.
Если вам повезет меньше, вы увидите мигающий курсор в системе, которая вообще не загружается. Если это произойдет, вам нужен аварийный диск. Образ восстановления по умолчанию для Linux находится на установочном диске. При загрузке с установочного диска вы увидите пункт меню «Troubleshooting». Выберите этот пункт, чтобы получить доступ к параметрам, необходимым для ремонта машины.
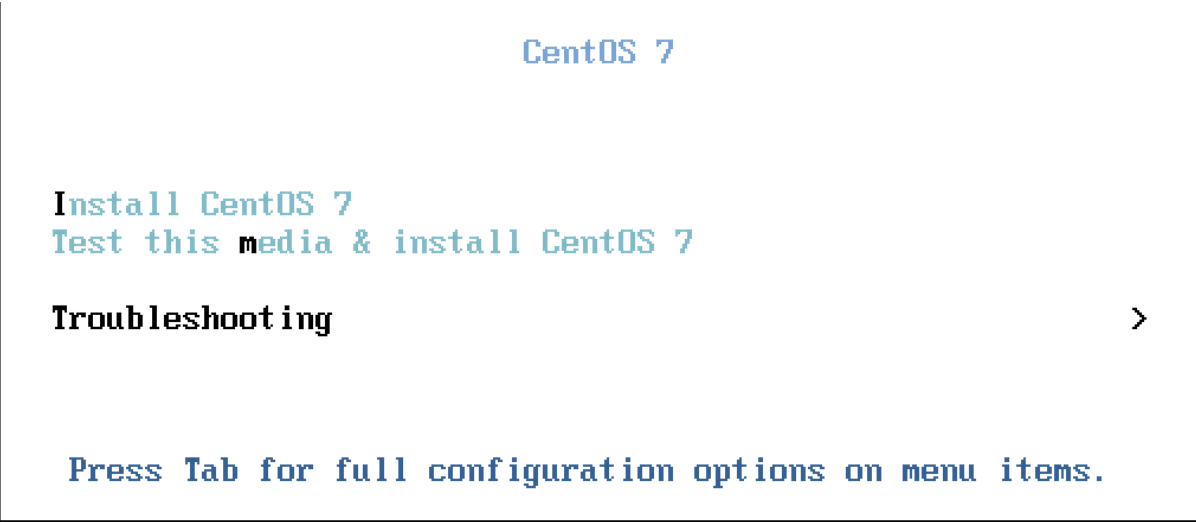
Выбрав «Troubleshooting», появится выбор из 4-х опций.
- Install CentOS 7 in Basic Graphics Mode: эта опция переустанавливает систему. Не используйте её, если не хотите устранить неполадки в ситуации, когда обычная установка не работает и вам необходим базовый графический режим. Как правило, вам никогда не нужно использовать эту опцию для устранения неисправностей при установке.
- Rescue a CentOS System: это самая гибкая система спасения. Это должен быть первый вариант выбора при использовании аварийного диска.
- Run a Memory Test: если вы столкнулись с ошибками памяти, это позволяет пометить плохие микросхемы памяти, чтобы ваша машина могла нормально загружаться.
- Boot from local drive: здесь я думаю всё понятно.
ВНИМАНИЕ!
После запуска «Rescue a CentOS System» обычно требуется включить полный доступ к установке на диске. Обычно аварийный диск обнаруживает вашу установку и монтирует ее в каталог /mnt/sysimage. Чтобы исправить доступ к файлам конфигурации и их расположениям по умолчанию, поскольку они должны быть доступны на диске, используйте команду chroot /mnt/sysimage, чтобы сделать содержимое этого каталога реальной рабочей средой. Если вы не используете команду chroot, многие утилиты не будут работать, потому что, если они записывают в файл конфигурации, это будет версия файла конфигурации, существующего на диске восстановления (и по этой причине только для чтения). Использование команды chroot гарантирует, что все пути к файлам конфигурации верны.
Пример использования «Rescue a CentOS System»
1. Перезагружаем сервер с установочным диском Centos 7. Загружаемся и выбираем «Troubleshooting«.
2. В меню траблшутинга выбираем «Rescue a CentOS System» и загружаемся.
3. Система восстановления теперь предлагает вам найти установленную систему Linux и смонтировать ее в /mnt/sysimage. Выберите номер 1, чтобы продолжить: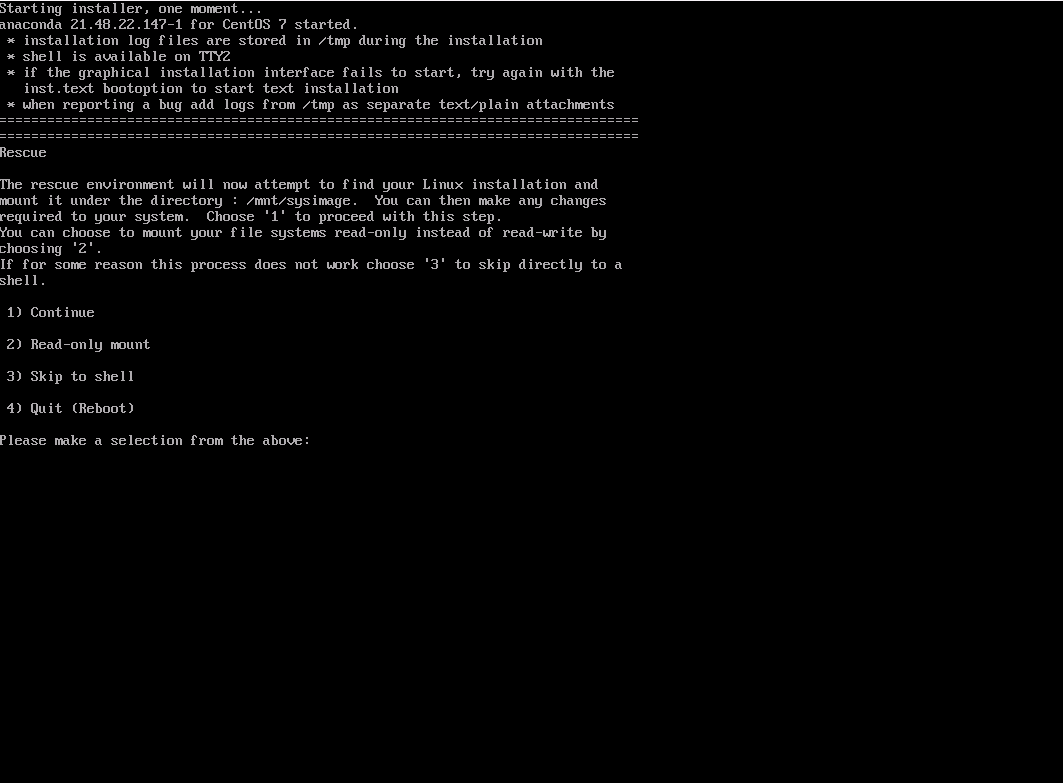
4. Если была найдена правильная установка CentOS, вам будет предложено, чтобы система была смонтирована в /mnt/sysimage. В этот момент вы можете дважды нажать Enter, чтобы получить доступ к оболочке восстановления.
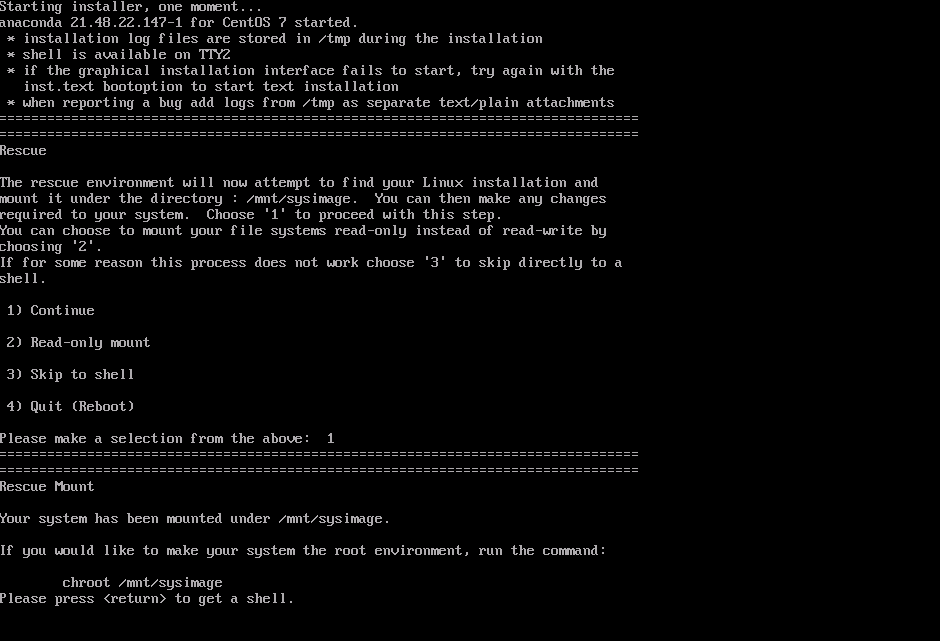
5. Ваша система Linux на данный момент доступна через каталог /mnt/sysimage. Введите chroot /mnt/sysimage. На этом этапе у вас есть доступ к корневой файловой системе, и вы можете получить доступ ко всем инструментам, которые необходимы для восстановления доступа к вашей системе.
Переустановка GRUB с помощью аварийного диска
Одна из распространенных причин, по которой вам нужно запустить аварийный диск, заключается в том, что загрузчик GRUB 2 не работает. Если это произойдет, вам может понадобиться установить его снова. После того, как вы восстановили доступ к своему серверу с помощью аварийного диска, переустановить GRUB 2 несложно, и он состоит из двух этапов:
- Убедитесь, что вы поместили содержимое каталога /mnt/sysimage в текущую рабочую среду.
- Используйте команду grub2-install, а затем имя устройства, на котором вы хотите переустановить GRUB 2. Если это виртуальная машина KVM используйте команду grub2-install /dev/vda и на физическом сервере или виртуальная машина VMware, HyperV или Virtual Box, это grub2-install /dev/sda.
Повторное создание Initramfs с помощью аварийного диска
Иногда initramfs также может быть поврежден. Если это произойдет, вы не сможете загрузить свой сервер в нормальном рабочем режиме. Чтобы восстановить образ initramfs после загрузки в среду восстановления, вы можете использовать команду dracut. Если используется без аргументов, эта команда создает новый initramfs для загруженного в данный момент ядра.
Кроме того, вы можете использовать команду dracut с несколькими опциями для создания initramfs для конкретных сред ядра. Существует также файл конфигурации с именем /etc/dracut.conf, который можно использовать для включения определенных параметров при повторном создании initramfs.
Конфигурация dracut рассредоточена по разным местам:
- /usr/lib/dracut/dracut.conf.d/*.conf содержит системные файлы конфигурации по умолчанию.
- /etc/dracut.conf.d содержит пользовательские файлы конфигурации dracut.
- /etc/dracut.conf используется в качестве основного файла конфигурации.
Вот так выглядит по умолчанию файл /etc/dracut.conf:
[root@server1 ~]# cat /etc/dracut.conf
# PUT YOUR CONFIG HERE OR IN separate files named *.conf
# in /etc/dracut.conf.d
# SEE man dracut.conf(5)
# Sample dracut config file
#logfile=/var/log/dracut.log
#fileloglvl=6
# Exact list of dracut modules to use. Modules not listed here are not going
# to be included. If you only want to add some optional modules use
# add_dracutmodules option instead.
#dracutmodules+=""
# dracut modules to omit
#omit_dracutmodules+=""
# dracut modules to add to the default
#add_dracutmodules+=""
# additional kernel modules to the default
#add_drivers+=""
# list of kernel filesystem modules to be included in the generic
initramfs
#filesystems+=""
# build initrd only to boot current hardware
#hostonly="yes"
#
# install local /etc/mdadm.conf
#mdadmconf="no"
# install local /etc/lvm/lvm.conf
#lvmconf="no"
# A list of fsck tools to install. If it is not specified, module's
hardcoded
# default is used, currently: "umount mount /sbin/fsck* xfs_db xfs_
check
# xfs_repair e2fsck jfs_fsck reiserfsck btrfsck". The installation is
# opportunistic, so non-existing tools are just ignored.
#fscks=""
# inhibit installation of any fsck tools
#nofscks="yes"
# mount / and /usr read-only by default
#ro_mnt="no"
# set the directory for temporary files
# default: /var/tmp
#tmpdir=/tmp
Исправление общих проблем
В пределах статьи, подобной этой, невозможно рассмотреть все возможные проблемы, с которыми можно столкнуться при работе с Linux. Однако есть некоторые проблемы, которые встречаются чаще, чем другие. Ниже некоторые наиболее распространенные проблемы.
Переустановка GRUB 2
Код загрузчика не исчезает просто так, но иногда может случиться, что загрузочный код GRUB 2 будет поврежден. В этом случае вам лучше знать, как переустановить GRUB 2. Точный подход зависит от того, находится ли ваш сервер в загрузочном состоянии. Если это так, то довольно просто переустановить GRUB 2. Просто введите grub2-installи имя устройства, на которое вы хотите его установить. У команды есть много различных опций для точной настройки того, что именно будет установлено, но вам, вероятно, они не понадобятся, потому что по умолчанию команда устанавливает все необходимое, чтобы ваша система снова загрузилась.
Становится немного сложнее, если ваш сервер не загружается.
Если это произойдет, вам сначала нужно запустить систему восстановления и восстановить доступ к вашему серверу из системы восстановления. После монтирования файловых систем вашего сервера в /mnt/sysimage и использования chroot /mnt/sysimage, чтобы сделать смонтированный образ системы вашим корневым образом: Просто запустите grub2-install, чтобы установить GRUB 2 на желаемое установочное устройство. Но если вы находитесь на виртуальной машине KVM, запустите grub2-install /dev/vda, а если вы находитесь на физическом диске, запустите grub2-install /dev/sda.
Исправление Initramfs
В редких случаях может случиться так, что initramfs будет поврежден. Если вы тщательно проанализируете процедуру загрузки, вы узнаете, что у вас есть проблема с initramfs, потому что вы никогда не увидите, как корневая файловая система монтируется в корневой каталог, и при этом вы не увидите запуска каких-либо системных модулей. Если вы подозреваете, что у вас есть проблема с initramfs, ее легко создать заново. Чтобы воссоздать его, используя все настройки по умолчанию (что в большинстве случаев нормально), вы можете просто запустить команду dracut —force. (Без —force команда откажется перезаписать ваши существующие initramfs.)
При запуске команды dracut вы можете использовать файл конфигурации /etc/dracut.conf, чтобы указать, что именно записывается в initramfs. В этом файле конфигурации вы можете увидеть такие параметры, как lvmconf = «no», которые можно использовать для включения или выключения определенных функций. Используйте эти параметры, чтобы убедиться, что у вас есть все необходимые функции в initramfs.
Восстановление после проблем с файловой системой
Если вы неправильно настроили монтирование файловой системы, процедура загрузки может просто закончиться сообщением «Give root password for maintenance.». Это сообщение, в частности, генерируется командой fsck, которая пытается проверить целостность файла системы в /etc/fstab при загрузке. Если fsck терпит неудачу, требуется ручное вмешательство, которое может привести к этому сообщению во время загрузки. Убедитесь, что вы знаете, что делать, когда это происходит с вами!
Если упомянуто устройство, которого нет, или если в UUID, который используется для монтирования устройства, есть ошибка, например, systemd сначала ожидает, вернется ли устройство само по себе. Если этого не происходит, выдается сообщение «Give root password for maintenance.». Если это произойдет, вы должны сначала ввести пароль root. Затем вы можете ввести journalctl -xb, как предлагается, чтобы увидеть, записываются ли в журнал соответствующие сообщения, содержащие информацию о том, что не так. Если проблема ориентирована на файловую систему, введите mount -o remount, rw /, чтобы убедиться, что корневая файловая система смонтирована только для чтения, проанализировать, что не так в файле /etc/fstab, и исправить это.
Если вы видите подобный текст, то у вас есть проблема с /etc/fstab: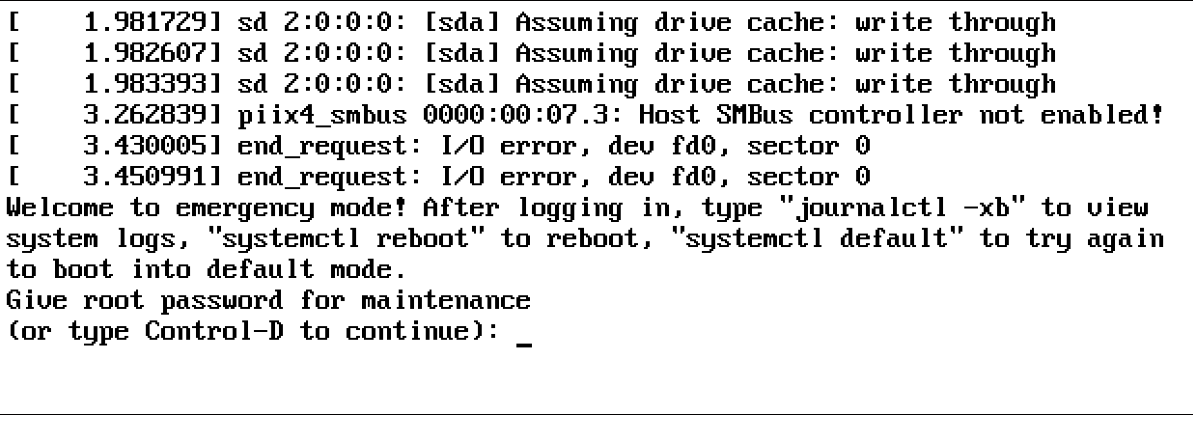
В этой статье вы узнали, как устранить неполадки при загрузке CentOS. Так же вы узнали, что происходит при загрузке сервера и в какие конкретные моменты вы можете вмешиваться, чтобы исправить неисправности. Вы также узнали, что делать в некоторых конкретных случаях.
Are You Unable to Boot With Your RAID Card?
If you have performed an installation and cannot boot your system properly, you might need to reinstall and partition your system’s storage differently.
Some BIOS types do not support booting from RAID cards. After you finish the installation and reboot the system for the first time, a text-based screen showing the boot loader prompt (for example, grub>) and a flashing cursor might be all that appears. If this is the case, you must repartition your system and move your /boot partition and the boot loader outside the RAID array. The /boot partition and the boot loader must be on the same drive.
Once these changes have been made, you should be able to finish your installation and boot the system properly. For more information about partitioning, see Installation Destination (x86).
Trouble With the Graphical Boot Sequence
After you finish the installation and reboot your system for the first time, it is possible that the system stops responding during the graphical boot sequence, requiring a reset. In this case, the boot loader is displayed successfully, but selecting any entry and attempting to boot the system results in a halt. This usually means a problem with the graphical boot sequence; to solve this issue, you must disable graphical boot. To do this, temporarily alter the setting at boot time before changing it permanently.
Disabling Graphical Boot Temporarily
-
Start your computer and wait until the boot loader menu appears. If you set your boot loader timeout period to 0, hold down the Esc key to access it.
-
When the boot loader menu appears, use your cursor keys to highlight the entry you want to boot and press the e key to edit this entry’s options.
-
In the list of options, find the kernel line — that is, the line beginning with the keyword
linux(or, in some cases,linux16orlinuxefi). On this line, locate therhgboption and delete it. The option might not be immediately visible; use the cursor keys to scroll up and down. -
Press F10 or Ctrl+X to boot your system with the edited options.
If the system started successfully, you can log in normally. Then you will need to disable the graphical boot permanently — otherwise you will have to perform the previous procedure every time the system boots. To permanently change boot options, do the following.
Disabling Graphical Boot Permanently
-
Log in to the
rootaccount using thesu -command: -
Use the grubby tool to find the default GRUB2 kernel:
#grubby --default-kernel /boot/vmlinuz-3.10.0-229.4.2.el7.x86_64 -
Use the grubby tool to remove the
rhgbboot option from the default kernel, identified in the last step, in your GRUB2 configuration. For example:#grubby --remove-args="rhgb" --update-kernel /boot/vmlinuz-3.10.0-229.4.2.el7.x86_64
After you finish this procedure, you can reboot your computer. CentOS will not use the graphical boot sequence any more. If you want to enable graphical boot in the future, follow the same procedure, replacing the --remove-args="rhgb" parameter with the --args="rhgb" paramter. This will restore the rhgb boot option to the default kernel in your GRUB2 configuration.
Booting into a Graphical Environment
If you have installed the X Window System but are not seeing a graphical desktop environment once you log into your system, you can start it manually using the startx command. Note, however, that this is just a one-time fix and does not change the log in process for future log ins.
To set up your system so that you can log in at a graphical login screen, you must change the default systemd target to graphical.target. When you are finished, reboot the computer. You will presented with a graphical login prompt after the system restarts.
Setting Graphical Login as Default
-
Open a shell prompt. If you are in your user account, become root by typing the
su -command. -
Change the default target to
graphical.target. To do this, execute the following command:#systemctl set-default graphical.target
Graphical login is now enabled by default — you will be presented with a graphical login prompt after the next reboot. If you want to reverse this change and keep using the text-based login prompt, execute the following command as root:
# systemctl set-default multi-user.targetNo Graphical User Interface Present
If you are having trouble getting X (the X Window System) to start, it is possible that it has not been installed. Some of the preset base environments you can select during the installation, such as Minimal install or Web Server, do not include a graphical interface — it has to be installed manually.
If you want X, you can install the necessary packages afterwards. See the Knowledgebase article at https://access.redhat.com/site/solutions/5238 for information on installing a graphical desktop environment.
X Server Crashing After User Logs In
If you are having trouble with the X server crashing when a user logs in, one or more of your file systems can be full or nearly full. To verify that this is the problem you are experiencing, execute the following command:
The output will help you diagnose which partition is full — in most cases, the problem will be on the /home partition. The following is a sample output of the df command:
Filesystem                                  Size  Used Avail Use% Mounted on
/dev/mapper/vg_centos-root                     20G  6.0G   13G  32% /
devtmpfs                                    1.8G     0  1.8G   0% /dev
tmpfs                                       1.8G  2.7M  1.8G   1% /dev/shm
tmpfs                                       1.8G 1012K  1.8G   1% /run
tmpfs                                       1.8G     0  1.8G   0% /sys/fs/cgroup
tmpfs                                       1.8G  2.6M  1.8G   1% /tmp
/dev/sda1                                   976M  150M  760M  17% /boot
/dev/dm-4                                    90G   90G     0 100% /home
In the above example, you can see that the /home partition is full, which causes the crash. You can make some room on the partition by removing unneeded files. After you free up some disk space, start X using the startx command.
For additional information about df and an explanation of the options available (such as the -h option used in this example), see the df(1) man page.
Is Your RAM Not Being Recognized?
In some cases the kernel does not recognize all of your memory (RAM), which causes the system to use less memory than is installed. You can find out how much RAM is being utilized using the free -m command. If the displayed total amount of memory does not match your expectations, it is likely that at least one of your memory modules is faulty. On BIOS-based systems, you can use the Memtest86+ utility to test your system’s memory — see Loading the Memory Testing Mode for details.
|
Some hardware configurations have a part of the system’s RAM reserved and unavailable to the main system. Notably, laptop computers with integrated graphics cards will reserve some memory for the GPU. For example, a laptop with 4 GiB of RAM and an integrated Intel graphics card will show only roughly 3.7 GiB of available memory. Additionally, the kdump crash kernel dumping mechanism, which is enabled by default on most CentOS systems, reserves some memory for the secondary kernel used in case of the primary kernel crashing. This reserved memory will also not be displayed as available when using the |
If you made sure that your memory does not have any issues, you can try and set the amount of memory manually using the mem= kernel option.
Configuring the Memory Manually
-
Start your computer and wait until the boot loader menu appears. If you set your boot loader timeout period to 0, hold down the Esc key to access it.
-
When the boot loader menu appears, use your cursor keys to highlight the entry you want to boot and press the e key to edit this entry’s options.
-
In the list of options, find the kernel line — that is, the line beginning with the keyword
linux(or, in some cases,linux16). Append the following option to the end of this line:Replace xx with the amount of RAM you have in MiB.
-
Press F10 or Ctrl+X to boot your system with the edited options.
-
Wait for the system to boot and log in. Then, open a command line and execute the
free -mcommand again. If total amount of RAM displayed by the command matches your expectations, append the following to the line beginning withGRUB_CMDLINE_LINUXin the/etc/default/grubfile to make the change permanent:Replace xx with the amount of RAM you have in MiB.
-
After you updated the file and saved it, refresh the boot loader configuration so that the change will take effect. Run the following command with root privileges:
#grub2-mkconfig --output=/boot/grub2/grub.cfg
In /etc/default/grub, the above example would look similar to the following:
GRUB_TIMEOUT=5
GRUB_DISTRIBUTOR="$(sed 's, release.*$,,g' /etc/system-release)"
GRUB_DEFAULT=saved
GRUB_DISABLE_SUBMENU=true
GRUB_TERMINAL_OUTPUT="console"
GRUB_CMDLINE_LINUX="rd.lvm.lv=centos/root vconsole.font=latarcyrheb-sun16 rd.lvm.lv=centos/swap $([ -x /usr/sbin/rhcrashkernel.param ] && /usr/sbin/rhcrashkernel-param || :) vconsole.keymap=us rhgb quiet mem=1024M"
GRUB_DISABLE_RECOVERY="true"
Is Your System Displaying Signal 11 Errors?
A signal 11 error, commonly known as a segmentation fault, means that a program accessed a memory location that was not assigned to it. A signal 11 error can occur due to a bug in one of the software programs that is installed, or faulty hardware.
If you receive a fatal signal 11 error during the installation, first make sure you are using the most recent installation images, and let Anaconda verify them to make sure they are not corrupted. Bad installation media (such as an improperly burned or scratched optical disk) are a common cause of signal 11 errors. Verifying the integrity of the installation media is recommended before every installation.
For information about obtaining the most recent installation media, see Downloading CentOS. To perform a media check before the installation starts, append the rd.live.check boot option at the boot menu. See Verifying Boot Media for details.
If you performed a media check without any errors and you still have issues with segmentation faults, it usually means that your system encountered a hardware error. In this case, the problem is most likely in the system’s memory (RAM). This can be a problem even if you previously used a different operating system on the same computer without any errors. On BIOS-based systems, you can use the Memtest86+ memory testing module included on the installation media to perform a thorough test of your system’s memory. See Loading the Memory Testing Mode for details.
Other possible causes are beyond this document’s scope. Consult your hardware manufacturer’s documentation and also see the Red Hat Hardware Compatibility List, available online at https://hardware.redhat.com.
0
1
Здравствуйте!
Прошу помощи с CentOS 7:
Машина стоит виртуалкой на HyperV. Сегодня утром сервер начал тупить и я его решил ребутнуть.
Долго ждал загрузки пока не подключился удаленно и не посмотрел, а там такой текст:
Welcome to emergency mode! After logging in, type "journalctl -xb" to view system logs, "systemctl reboot" to reboot, "systemctl default" to try again to boot into default mode.
Give root password for maintenance
(or type Control-D to continue):
Сделал по рекомендациям:
- загрузка с LiveCD или LiveUSB (например: GParted, SystemRescueCd)
- заходим под рутом
- просмотр дисков и разделов: fdisk -l
- узнать тип файловой системы: file -s /dev/sda1
- отмонтировать ФС: umount /dev/sda1
- вывести, что можно выполнить для данной ФС: fsck -N /dev/sda1
- проверка целостности ФС с исправлением всех ошибок в автоматическом режиме: fsck.ext4 -y /dev/sda1
- Проверку остальных разделов жесткого диска
- Перезагрузка, проверка.
Из-под HyperV не могу скопировать текст — не дает. Потому прикладываю скрин
Мануал не помог. По-прежнему не грузится.
Подскажите, что можно сделать или может я что-то пропустил?
Есть у кого какие мысли? и нужно ли после проверки с исправлением обратно маунтить sda1?