
4. Troubleshooting
► Error Code
S3–3211
► Error message
► Symptom
DADF board is not connected or communication error occurs between DADF board and Main board.
► Troubleshooting method
1) Turn off the machine then on. If the problem persists, check the following.
2) Turn the machine off again.
3) Remove the scan rear cover. Check if the connector on scan joint board is connected correctly.
4) Remove the rear cover. Check if the connector on the main board is connected correctly.
5) Remove the DADF rear cover. Check if the connector on DADF board is connected correctly.
(Refer to 3.3.21.3 DADF Board.)
6) If the connection is OK, replace the DADF board(JC92–02509A).
7) If the problem persists after replacing the DADF board, replace the main board(JC92–02516A).
4-229
Copyright© 1995-2013 SAMSUNG. All rights reserved.
Введение
На дисплее панели управления отображаются сообщения, указывающие состояние или ошибки устройства. В приведенной ниже таблице приведены общие сведения о сообщениях и их значения, а также действия по устранению проблемы, при необходимости.
Примечание.
Можно устранить ошибку, следуя инструкциям в окне состояния печати на компьютере.
Если сообщение отсутствует в таблице, перезагрузите питание и повторно попробуйте выполнить задание печати. Если устранить проблему не удалось, обратитесь к специалисту службы поддержки.
При обращении в службу поддержки сообщите специалисту содержимое отображаемого сообщения.
Некоторые сообщения могут не отображаться на дисплее, в зависимости от модели или дополнительных принадлежностей.
[номер ошибки] указывает номер ошибки.
[тип лотка] указывает номер лотка.
[тип материала для печати] указывает тип материала для печати.
[формат материала для печати] указывает формат материала для печати.
[тип узла] указывает тип узла.
Сообщения, связанных с замятием бумаги
|
Сообщение |
Значение |
Рекомендуемые решения |
|
Замятие оригинала |
Замятие загруженного оригинала в устройстве подачи документов. |
Устраните замятие. |
|
Замятие бумаги в лотке 2 |
Замятие бумаги в лотке. |
Устраните замятие. |
|
Замятие бумаги в лотке 3 |
Произошло замятие бумаги в дополнительном лотке. |
Устраните замятие. |
|
Замятие бумаги в универсальном лотке 1 |
Замятие бумаги в универсальном лотке. |
Устраните замятие. |
|
Замятие внутри устройства |
Замятие бумаги внутри устройства. |
Устраните замятие. |
|
Замятие внутри модуля двусторонней подачи |
Замятие бумаги внутри модуля двусторонней печати. |
Устраните замятие. |
|
Замятие в области вывода |
Произошло замятие бумаги в области приемного лотка. |
Устраните замятие. |
Сообщения, связанные с тонером
|
Сообщение |
Значение |
Рекомендуемые решения |
|
Картридж с тонером не установлен. |
Установите картридж с тонером на место. |
|
Картридж с тонером не обнаружен. |
Переустановите картридж с тонером два или три раза, чтобы убедиться, что он фиксируется надлежащим образом. Если устранить проблему не удалось, обратитесь к специалисту службы поддержки. |
|
|
Защитная пленка не удалена с картриджа с тонером. |
Снимите защитную пленку с картриджа с тонером. |
|
|
Установленный блок формирования изображения не предназначен для вашего устройства. |
Установите подлинный блок формирования изображения HP, предназначенный для вашего устройства. |
|
Блок формирования изображения не установлен. |
Переустановите блок формирования изображения два или три раза. Если устранить проблему не удалось, обратитесь в службу поддержки. |
|
Истекает расчетный срок службы блока формирования изображения. |
Подготовьте новый блок формирования изображения для замены. |
|
Расчетный срок службы указанного блока формирования изображения почти истек. |
|
|
Указанный картридж с тонером не предназначен для вашего устройства. |
Установите соответствующий картридж с тонером HP. |
|
В указанном картридже осталось мало тонера. Истекает расчетный срок службыa картриджа с тонером. |
Подготовьте новый картридж для замены. Можно временно повысить качество печати, перераспределив оставшийся тонер в картридже. |
|
Расчетный срок службы указанного картриджа с тонером почти истек. |
|
|
Расчетный срок службы указанного картриджа с тонером истек |
Замените картридж с тонером. |
aНа принтере отображается сообщение о низком уровне тонера в картридже. Оставшийся срок службы картриджа может быть различным. Подготовьте новые расходные материалы для замены, когда качество печати станет неприемлемым. Картридж нужно заменить тогда, когда качество печати перестанет быть приемлемым.
Внимание!
Использование в принтерах HP картриджей с тонером сторонних производителей или повторно заправленных картриджей с тонером не влияет на гарантийные обязательства перед клиентом или заключенный с ним контракт на предоставление поддержки HP. При этом, если сбой или повреждение устройства связаны с использованием картриджа с тонером стороннего производителя или повторно заправленного картриджа с тонером, компания HP взимает стандартную плату за работу и материалы при обслуживании устройства для устранения соответствующего сбоя или повреждения.
Сообщения, связанные с лотком
|
Сообщение |
Значение |
Рекомендуемые решения |
|
Во всех лотках закончилась бумага. |
Загрузите бумагу в лоток. |
|
Нет бумаги в лотке. |
Загрузите бумагу в лоток. |
|
Нет бумаги в универсальном лотке. |
Загрузите бумагу в универсальный лоток. |
|
Лоток 3 закрыт неплотно. |
Закройте лоток 3 до щелчка. |
Сообщения, связанные с сетью
|
Сообщение |
Значение |
Рекомендуемые решения |
|
Конфликт IP-адресов Данный IP-адрес конфликтует с IP-адресом другой системы. |
Указанный IP-адрес сети используется кем-то еще. |
Проверьте IP-адрес и выполните его сброс, если необходимо. |
Прочие сообщения
|
Сообщение |
Значение |
Рекомендуемые решения |
|
Передняя или задняя крышка закрыта неплотно. |
Закройте крышку до фиксации с щелчком. |
|
Крышка устройства подачи документов открыта или не зафиксирована. |
Закройте крышку до фиксации с щелчком. |
|
Устройство находится в помещении с несоответствующей комнатной температурой. |
Переместите устройство в помещение с соответствующей комнатной температурой |
|
Истек срок службы реверсивного ролика лотка. |
Замените реверсивный ролик лотка на новый. Обратитесь к специалисту службы поддержки. |
|
Истек срок службы ролика захвата в лотке. |
Замените ролик захвата на новый. Обратитесь к специалисту службы поддержки. |
|
Истекает срок службы ролика захвата лотка 2, лотка 3 или универсального лотка 1. |
Замените ролик захвата на новый. Обратитесь к специалисту службы поддержки. |
|
Сканер заблокирован. |
Перезагрузите питание. Если устранить проблему не удалось, обратитесь в службу поддержки. |
|
Крышка устройства подачи документов открыта или не зафиксирована. |
Закройте крышку до фиксации с щелчком. |
|
Возникла проблема в блоке термофиксатора. |
Перезагрузите питание. Если устранить проблему не удалось, обратитесь в службу поддержки. |
|
Проблема в системе мотора. |
Перезагрузите питание. Если устранить проблему не удалось, обратитесь в службу поддержки. |
|
Возникла проблема в блоке лазерного сканирования. |
Перезагрузите питание. Если устранить проблему не удалось, обратитесь в службу поддержки. |
|
Проблема в лотке 3. |
Проверьте подключение лотка 3. |
|
Возникла проблема в видеосистеме. |
Перезагрузите питание. Если устранить проблему не удалось, обратитесь в службу поддержки. |
Спустя какое-то время любая оргтехника начинает сбоить во время работы. Это также касается лазерных принтеров и МФУ Hawlett-Packard (HP). К счастью, данные устройства оснащены средством самодиагностики, которое информирует потребителя о возникшей проблеме. Вывод информации может осуществляться различными способами: специфическим миганием светодиодных индикаторов, появлением специальных кодов на сегментном дисплее, отображением информационных сообщений с кодом и описанием ошибки, а также вывод кода ошибки на персональный компьютер. В этой статье мы представим самые популярные коды ошибок лазерных принтеров HP с их расшифровкой и рекомендациями по устранению.
Первое, что нужно знать, так это то, что ошибки работы оргтехники делятся на несколько видов. Есть коды ошибок обычного информационного характера, которые просто показывают потребителю, что в данный момент делает печатающее устройство. Например, 00 READY ON LINE с кодом 10001 указывает лишь на то, что печатающее устройство готово к работе. В свою очередь, предупреждающие или сервисные коды ошибок HP, как правило, информируют о скором окончании онера, либо о том, что пора заменить какой-либо расходник. Страшнее всего, когда на дисплее принтера HP, появляется код критической ошибки. Возникновение подобного сообщения, обычно указывает на серьезную проблему с печатающим устройством (к примеру, поломка механизма протяжки бумаги, привода или блока лазера).
Быстрее всего узнать о возникшей проблеме можно по светодиодным индикаторам. В зависимости от их состояния можно приблизительно определить, что произошло с печатающим аппаратом. В частности, речь идет о следующем (пример взят из официального мануала HP LaserJet Pro M1132, M12a, M12w, P1102, P1102s, P1102w, P1106, P1108, P1109 и P1109w):
- Постоянно мигает индикатор Wi-Fi (беспроводной связи или локальной сети). Указывает на то, что принтер не может подключиться к сети. Нужно перенастроить параметры подключения, либо заменить модуль Wi-Fi.
- Постоянно мигает светодиод индикатора ошибки. Таким образом, устройство предупреждает о проблеме с тонер-картриджем. Также может указывать на то, что открыта верхняя крышка или на образования замятия бумаги/постороннего предмета.
- Постоянно горят два индикатора (обычно, это светодиод готовности и ошибки). Указывает на возникновение критической ошибки. Лучше всего не искать причину, а сразу обратиться в сервисный центр.
Кроме того, если после нажатия кнопки включения, ни один светодиод не загорается и принтер также не осуществляет пуск, то, скорее всего, возникли проблемы с блоком питания печатающего устройства. Далее представим таблицы с самыми популярными кодами ошибок принтеров HP.
Основные группы кодов ошибок лазерных принтеров HP
|
Код ошибки принтера HP |
Расшифровка |
Описание |
|
HP 10XXX |
Обычные сообщения информационного характера. |
Такие коды сообщают о готовности работы принтера, об отсутствии подключения (HP 10002) и т.д. |
|
HP 102XX |
Информационные сообщения о том, что устройство нуждается в обслуживании. |
Например, информирует об окончании тонера в картридже, а также о том, что пора заменить расходный материал. |
|
HP 11XXX |
Предупреждающие сообщения, касающиеся загрузки бумаги. |
Выводятся, когда в одном или нескольких лотках отсутствует бумажный носитель. Также может указывать на некорректность выставленного размера бумаги. |
|
HP 12XYY |
Серия кодов для лотков подачи бумаги. |
Указывают на наличие/отсутствие бумаги, а также на различные сбои в работе. |
|
HP 15XXY |
Серия кодов для лотков приема бумаги. |
Указывают на наличие/отсутствие бумаги, а также на различные сбои в работе. |
|
HP 20XXX |
Ошибки синтаксических команд. |
Появляются тогда, когда система обнаруживает нелогические команды, посылаемые печатающему устройству. |
|
HP 25XXX |
Ошибки, вызванные нарушением синтаксиса команд. |
Появляются тогда, когда система обнаруживает нелогические команды, посылаемые печатающему устройству. |
|
HP 27XXX |
Ошибки семантических команд. |
Появляются тогда, когда система обнаруживает нелогические команды, посылаемые печатающему устройству. |
|
HP 30XXX |
Ошибки, которые автоматически могут быть устранены. |
Тип информационных кодов, которые указывают на временные сбои в работе устройства, по типу, память принтера заполнена и т.д. |
|
HP 32XXX |
Ошибки файловой системы PJL. |
Появляются тогда, когда система обнаруживает сбои в работе системы. |
|
HP 35XXX |
Ошибки, которые можно сразу же решить выполнением определенных команд и продолжить работу. |
Такие коды приходят на дисплей принтера вместе с рекомендациями по их устранению. Например, когда нужно увеличить объем памяти. |
|
HP 40XXX |
Ошибки, которые можно решить выполнением определенных команд, но работа устройства прерывается. |
Такие коды приходят на дисплей принтера вместе с рекомендациями по их устранению. Например, когда необходимо перезагрузить печатающий аппарат, по той или иной причине. |
|
HP 41XYY |
Сервисные сообщения, касающиеся загрузки бумаги. |
Выводятся, когда во всех лотках отсутствует бумажный носитель. Указывает на некорректность выставленного размера бумаги, а также проблемы в работе данных частей принтера. |
|
HP 42XYY |
Сообщают о наличии замятия бумаги или постороннего предмета (актуально для HP LaserJet 5Si/ 5SiMx). |
В зависимости от кода можно максимально точно определить причину замятия бумаги. |
|
HP 43XYY |
Предупреждающие сообщения о проблемах с подключенными модулями. |
Многие офисные МФУ способны расширять свой функционал, за счет дополнительно подключенных моделей (лотков, податчиков, ADF и т.д.). Если в них обнаружатся сбои, то именно данные коды об этом проинформируют. |
|
HP 44XYY |
Сообщают о наличии замятия бумаги или постороннего предмета (актуально для HP LaserJet 4000/ 5000). |
В зависимости от кода можно максимально точно определить причину замятия бумаги. |
|
HP 50XXX |
Группа ошибок, указывающих на механические проблемы принтера. |
Если у принтера начал сбоить какой-то узел (печка, система охлаждения, блок лазера и т.д.), то принтер выдаст сообщение с кодом ошибки данной серии. |
|
HP 55XXX |
Ошибки, касающиеся персональных настроек печатающего устройства. |
Обычно можно исправить сбросом и перенастройкой принтера. |
На практике, вместо [X] и [Y] в коде будет указанно уникальное цифровое значение, соответствующее той или иной ошибке.
Коды ошибок принтеров и МФУ HP, выводимые на штатный дисплей устройства
|
Код ошибки принтера HP |
Содержание |
Расшифровка |
|
HP 10001 |
Принтер готов к работе (00). |
Принтер находится в режиме готовности, либо ему требуется незначительное сервисное обслуживание. Можно перезагрузить или очистить память принтера. Еще может помочь сброс настроек до заводских. |
|
Принтеру требуется сервисное обслуживание (68). |
||
|
Память принтера заполнена. Настройки не могут быть сохранены (68). |
||
|
HP 10002 |
Принтер не готов к работе (00). |
Принтер не готов к работе. Включить/разбудить/перезагрузить. |
|
Устройство нуждается в обслуживании (68). |
||
|
HP 10003 |
Осуществляется прогрев принтера (02). |
Печатающее устройство находится в режиме прогрева. Немного подождать, либо перезагрузить МФУ. |
|
HP 10004 |
Проводится самодиагностика печатающего устройства (05). |
Принтер создает тестовый отпечаток. Дождаться окончания процесса печати, либо перезагрузить устройство. |
|
Осуществляется печать страницы диагностики (05). |
||
|
HP 10005 |
Перезагрузка памяти (07). |
Параметры или память принтера были сброшены. Перенастроить печатающее устройство. |
|
Очистка памяти (07). |
||
|
HP 10006 |
Низкий уровень тонера в картридже (16). |
В тонер-картридже заканчивается красящее вещество. Заправить или купить новый картридж. |
|
HP 10007 |
Задание отменено. |
Очистите память принтера и очередь печати. Перезагрузите или перенастройте устройство. |
|
HP 10010 |
Буфер памяти принтера переполнен. |
Очистите память принтера и очередь печати. Перезагрузите или перенастройте устройство. |
|
HP 10011 |
Осуществляется подключение или отсутствует связь с дополнительными модулями принтера (18). |
Переподключить дополнительные лотки и прочие модули. Перезагрузить МФУ. |
|
HP 10013 |
Осуществляется печать тестовой страницы (04). |
Принтер создает тестовый отпечаток. Дождаться окончания процесса печати, либо перезагрузить устройство. |
|
HP 10014 |
Осуществляется печать тестовой страницы или листа конфигурации (06). |
Дождаться окончания процесса печати, либо перезагрузить устройство. |
|
HP 10015 |
Осуществляется печать шрифтов, поддерживаемых принтером (06). |
Дождаться окончания процесса печати, либо перезагрузить устройство. |
|
HP 10016 |
Осуществляется печать теста работы узлов печатающего устройства (15). |
Дождаться окончания процесса печати, либо перезагрузить устройство. |
|
HP 10017 |
Осуществляется демо-печать (06). |
Дождаться окончания процесса печати, либо перезагрузить устройство. |
|
HP 10018 |
Включение режима сброса настроек (09). |
Выйти из режима, перезагрузить принтер, либо выполнить сброс параметров (если устройство нуждается в этом). |
|
HP 10019 |
Включение режима сброса параметров активных портов (09). |
Выйти из режима, перезагрузить принтер, либо выполнить сброс параметров (если устройство нуждается в этом). |
|
HP 10020 |
Включение режима сброса параметров всех портов (09). |
Выйти из режима, перезагрузить принтер, либо выполнить сброс параметров (если устройство нуждается в этом). |
|
HP 10021 |
Осуществление сброса параметров принтера, в том числе очистка NVRAM (08). |
Дождаться окончания процесса, либо перезагрузить устройство. |
|
HP 10022 |
Осуществляется печать листа конфигурации (06). |
Дождаться окончания процесса печати, либо перезагрузить устройство. |
|
HP 10023 |
Осуществляется обработка задания. |
Дождаться окончания процесса, либо перезагрузить устройство. |
|
HP 10024 |
Осуществляется передача данных. |
Нужно принять/отменить задание, дождаться окончания процесса или перезагрузить принтер. |
|
HP 10025 |
Отказ в доступе к той или иной функции МФУ. |
Перезагрузить принтер, обратиться в СЦ за помощью. |
|
HP 10026 |
Невозможно отменить задание. |
Перезагрузить принтер, обратиться в СЦ за помощью. |
|
HP 10027 |
Забился тракт подачи бумаги. |
Следует очистить тракт от посторонних предметов, устранить замятие. |
|
HP 10028 |
Осуществляется печать журнала событий. |
Дождаться окончания процесса печати, либо перезагрузить устройство. |
|
HP 10029 |
Осуществляется подача бумаги. |
Дождаться окончания процесса, перезагрузить принтер, устранить проблему. |
|
HP 10030 |
Ошибки, связанные с системой команд PJL. |
Перезагрузить ноутбук, сбросить настройки принтера. |
|
HP 10031 |
Осуществляется самоочистка устройства. |
Дождаться окончания процесса, перезагрузить принтер, почистить устройство самостоятельно. |
|
HP 10032 |
Принтер не может распознать совместимый картридж. |
Установить оригинальный картридж, прошить принтер, заменить чип картриджа, сменить главную плату. |
|
HP 10033 |
Введен неверный PIN-код. |
Заново ввести код, сбросить настройки принтера. |
|
HP 10034 |
Прерывание задания. |
Очистить очередь печати, перезагрузить принтер, проверить подключение. Если все хорошо, продолжить работу. |
|
HP 10035 |
Можно продолжить выполнение прерванного задания. |
Подтвердить или отменить действие. |
|
HP 10036 |
Осуществление повторного прогрева печатающего устройства. |
Дождаться окончания процесса, перезагрузить принтер. |
|
HP 10200 |
Заканчивается черный тонер, но принтер еще может печатать. |
Временно продолжить работу. После придется перезаправить картридж или купить новый. |
|
HP 10201 |
Заканчивается голубой тонер, но принтер еще может печатать. |
Временно продолжить работу. После придется перезаправить картридж или купить новый. |
|
HP 10202 |
Заканчивается пурпурный тонер, но принтер еще может печатать. |
Временно продолжить работу. После придется перезаправить картридж или купить новый. |
|
HP 10203 |
Заканчивается желтый тонер, но принтер еще может печатать. |
Временно продолжить работу. После придется перезаправить картридж или купить новый. |
|
HP 10204 |
Требуется замена фотобарабана. |
Следует осуществить замену указанного расходника. |
|
HP 10205 |
Требуется замена черного фотобарабана. |
Следует осуществить замену указанного расходника. |
|
HP 10206 |
Требуется замена голубого фотобарабана. |
Следует осуществить замену указанного расходника. |
|
HP 10207 |
Требуется замена пурпурного фотобарабана. |
Следует осуществить замену указанного расходника. |
|
HP 10208 |
Требуется замена желтого фотобарабана. |
Следует осуществить замену указанного расходника. |
|
HP 10209 |
Требуется замена черного картриджа. |
Следует осуществить замену указанного расходника. |
|
HP 10210 |
Требуется замена голубого картриджа. |
Следует осуществить замену указанного расходника. |
|
HP 10211 |
Требуется замена пурпурного картриджа. |
Следует осуществить замену указанного расходника. |
|
HP 10212 |
Требуется замена желтого картриджа. |
Следует осуществить замену указанного расходника. |
|
HP 10213-10403 |
Различные коды сервисного обслуживания принтера, связанные с использованием расходных материалов. |
Заправить/заменить картридж, восстановить/заменить блок фотобарабана и т.д. Все зависит от информации, указанной в описании ошибки. |
Внимание: Не пытайтесь самостоятельно починить печатающий аппарат, если не имеете опыта сервисного обслуживания оргтехники. Лучше доверьте дело специалисту.
Коды ошибок E-серии для лазерных принтеров и МФУ HP
|
Код ошибки принтера HP |
Расшифровка |
Варианты решения |
|
HP E0 |
Указывает на замятие бумаги или наличие постороннего предмета. |
Извлечь замявшийся лист или иной предмет. Почистить или заменить ролик захвата бумаги. Проверить датчик и механизм протяжки бумаги. |
|
HP E1 |
Информирует об отсутствии бумаги в лотке подачи или установленный размер не соответствует. |
Загрузить или поправить бумагу. Проверить ролик захвата. Сменить задание на печать. |
|
HP E2 |
Предупреждает о том, что открыта дверца или датчик вышел из строя. |
Открыть/закрыть все крышки, проверить защелку и датчик. |
|
HP E3 |
Принтер не видит или не может распознать картридж. |
Поправить картридж, снять защитную чеку/пленку, прочистить чип картриджа и принтера и т.д. Подробнее, читайте в статье «Что делать, если принтер не распознает картридж». Почистить контакты и осуществить сервисное обслуживание принтера и картриджа. |
|
HP E4 |
Память печатающего устройства заполнена или ее не хватает. |
Очистить память принтера, сбросить настройки, прошить или сменить главную плату. |
|
HP E5 |
Проблема в работе механизма захвата или протяжки бумаги. |
Проверить наличие бумаги в лотке, поправить листы, пододвинуть флажок, почистить/заменить ролик захвата, проверить механизм протяжки, энкодер и датчик. Заменить или прошить главную плату. |
|
HP E6 |
Неизвестная ошибка работы принтера. |
Провести диагностику и сервисное обслуживание печатающего устройства. |
|
HP E7 |
Неизвестная аппаратная ошибка работы принтера. |
Провести диагностику и сервисное обслуживание печатающего устройства. |
|
HP E8 |
Критическая ошибка в работе сканера. |
Лучше всего отнести МФУ в сервисный центр. Однако можно разобрать и поправить линейку, либо осмотреть шестеренки привода (заменить, отремонтировать). |
|
HP E9 |
Неизвестная критическая ошибка работы принтера. |
Провести диагностику и сервисное обслуживание печатающего устройства. |
|
HP E10 |
Проблема в подключении дополнительных модулей. |
Перезапустить печатающий аппарат, выполнить переподключение проблемного модуля, проверить/заменить шлейф. |
|
HP E20 |
Не хватает памяти принтера для печати материала. |
Перезапустить устройство, очистить память и очередь печати, сменить задачу на печать. |
|
HP E21 |
Заполнена память печатающего устройства. |
Перезапустить устройство, очистить память и очередь печати, сменить задачу на печать, добавить оперативной памяти. |
|
HP E22 |
Сбой LPT-подключения или несоответствия драйвера принтера. |
Переподключить устройство к ПК, заменить кабель, переустановить драйвер. |
Также сюда стоит отнести ошибку HP 13.А, которая указывает на проблему с деталями механизма подачи бумаги (соленоидом, датчиком и т.д.).
Коды ошибок HP LaserJet, указывающие на проблемы аппаратной части устройства
|
Код ошибки принтера HP |
Расшифровка |
|
HP 50000 |
Данный код появляется в случае возникновения неизвестной ошибки, в работе аппаратной части печатающего устройства. |
|
HP 50001 |
Ошибка одного или нескольких модулей памяти, размещенных на плате форматера. |
|
HP 50002 |
Ошибка модуля оперативной памяти главной платы принтера. |
|
HP 50003 |
Код указывает на проблему двигателя печки лазерного принтера. |
|
HP 50004 |
Сработал датчик лазера, указывающий на проблему данной детали. |
|
HP 50005 |
Проблема с приводом сканера (скорее всего связанная с зеркалом). |
|
HP 50006 |
Проблема в приводе кулера. |
|
HP 50007 |
Потеря связи между контроллером и главной платой принтера. |
|
HP 50008 |
Код указывает на низкую температуру термоэлемента печки принтера. |
|
HP 50009 |
Код указывает на долгий период прогрева печки принтера до нужной температуры. |
|
HP 50010 |
Код указывает на высокую температуру прогрева печки принтера (перегрев). |
|
HP 50011 |
Неизвестная проблема, связанная с печкой лазерного МФУ. |
|
HP 50012 |
Проблема в работе датчика луча лазера. |
|
HP 50013 |
Проблема, связанная с блоком лазера принтера. |
|
HP 50014 |
Ошибка старта работы сканера. |
|
HP 50015 |
Ошибка движения линейки сканера. |
|
HP 50016-50019; HP 50030-50036 |
Проблема в слабом вращении или поломке одного из вентиляторов. |
|
HP 50020 |
Проблемы с механизмом подачи бумаги верхнего лотка. |
|
HP 50021 |
Проблемы с механизмом подачи бумаги нижнего лотка. |
|
HP 50022 |
Проблемы с механизмом подачи бумаги универсального лотка. |
|
HP 50023 |
Ошибка пуска основного электромотора принтера. |
|
HP 50024 |
Ошибка работы основного электромотора принтера. |
|
HP 50025 |
Ошибка подключения дополнительных модулей (актуально для больших офисных МФУ). |
|
HP 50026 |
Ошибка работы дополнительных модулей (актуально для больших офисных МФУ). |
|
HP 50027 |
Проблема в работе дуплекса принтера или МФУ (модуля двусторонней печати). |
|
HP 50028 |
Нарушение контакта между форматером и другими частями печатающего аппарата. |
|
HP 50029 |
Проблема в обработке или получении данных платой форматера. |
|
HP 50048-50063 |
Неизвестные ошибки принтера, связанные с распределением питания. |
|
HP 50064 |
Ошибка датчика совмещения желтого цвета. |
|
HP 50065 |
Ошибка датчика совмещения пурпурного цвета. |
|
HP 50066 |
Ошибка датчика совмещения голубого цвета. |
|
HP 50067 |
Ошибка датчика совмещения черного цвета. |
|
HP 50068 |
Несоответствие диапазона плотности желтого цвета. |
|
HP 50069 |
Несоответствие диапазона плотности пурпурного цвета. |
|
HP 50070 |
Несоответствие диапазона плотности голубого цвета. |
|
HP 50071 |
Несоответствие диапазона плотности черного цвета. |
|
HP 50072 |
Ошибка, возникающая из-за несоответствия данных датчика фазовой калибровки фотобарабана для желтого цвета. |
|
HP 50073 |
Ошибка, возникающая из-за несоответствия данных датчика фазовой калибровки фотобарабана для пурпурного цвета. |
|
HP 50074 |
Ошибка, возникающая из-за несоответствия данных датчика фазовой калибровки фотобарабана для голубого цвета. |
|
HP 50075 |
Ошибка, возникающая из-за несоответствия данных датчика фазовой калибровки фотобарабана для черного цвета. |
|
HP 505XX |
Сбой в работе прошивки лазерного принтера HP. |
|
HP 50599 |
Проблема с питанием платы форматера. |
Важно: В данном случае представлена только расшифровка кодов ошибок HP, так как в большинстве случаев устранить проблему очень сложно, даже для квалифицированного специалиста. Поэтому чаще всего приходится просто заменять испорченную деталь принтера.
Прочие коды ошибок лазерной оргтехники HP
|
Код ошибки принтера HP |
Расшифровка |
Варианты решения |
|
HP 10.XX.YY |
Проблема считывания данных с чипа картриджа (часто сопровождается сообщением «SUPPLY MEMORY ERROR»). |
Переустановить картридж, установить оригинальный картридж HP или сбросить ошибку (подробнее, читайте в статье «Как исправить ошибку памяти картриджа HP»). |
|
HP 10.32.XX |
Принтер определил, что установлен неоригинальный картридж. |
Проигнорировать и пользоваться принтером дальше (может перестать отображаться ресурс картриджа, а также будет часто выскакивать информационное окно о необходимости использования оригинальной продукции). Если нет такой возможности, проблему нужно решать уже исходя из особенностей оргтехники (замена чипа картриджа, прошивка принтера и т.д.). |
|
HP 11.01 и HP 11.02 |
Принтер постоянно запрашивает установку дату и времени, либо они отображаются некорректно. |
Необходимо заменить батарею или форматер принтера. |
|
HP 13.XX.YY (13.A, 13.02.00, 13.03.XX, 13.05.XX, 13.06.XX, 13.12.00, 13.20.00, 13.21.00) |
Произошло замятие бумаги. |
Извлеките замятую бумагу или посторонний предмет. Перезагрузите принтер, проверьте датчики бумаги, а также механизм протяжки бумаги. |
|
HP 20 INSUFFICIENT MEMORY |
Перегрузка оперативной памяти принтера. |
Нажмите продолжить печать, но при этом часть данных может быть утеряна. Лучше переделать файл и отправить его заново на печать. Также можно попробовать очистить память принтера или расширить, за счет установки дополнительного модуля. |
|
HP 21 PAGE TOO COMPLEX |
Принтер не может сжать изображение из-за его сложности. |
Нажмите продолжить печать, но при этом часть данных может быть утеряна. Упростите задание для печати. |
|
HP 22 EIO BUFFER OVERFLOW (EMBEDDED, PARALLEL, USB) |
Переполнен буфер памяти принтера или передаются по определенному каналу слишком объемный материал. |
Нажать продолжить, но данные будут утеряны. Проверить соединения, переключить порты или заменить кабели. |
|
HP 40 EMBEDDED I/O BAD TRANSMISSION |
Ошибка передачи данных. |
Нажать продолжить, на данные будут утеряны. Перезагрузить принтер и отправить повторное задание. Переустановить/заменить серверную карту или плату форматера. |
|
HP 41.3 UNEXPECTED PAPER SIZE IN TRAY X |
Формат бумаги не соответствует заданным параметрам. |
Установить бумагу соответствующего формата или сменить настройки печати. Сменить лоток (если их несколько). Проверить работу механизма протяжки и всех датчиков бумаги. Избавить МФУ от наличия посторонних предметов. |
|
HP 41.5 UNEXPECTED TYPE IN TRAY X |
Тип бумаги не соответствует заданным параметрам. |
Установить бумагу соответствующего типа или сменить настройки печати. Сменить лоток (если их несколько). Проверить работу механизма протяжки и всех датчиков бумаги. Избавить МФУ от наличия посторонних предметов. |
|
HP 41.X ERROR |
Неизвестная ошибка, связанная с протягиванием бумаги. |
Можно попробовать перезагрузить МФУ, почистить ролики захвата бумаги, либо разбирать и искать проблему по пути следования бумаги. |
|
HP 49.XXXXX ERROR |
Критическая ошибка, связанная с микропрограммой (прошивкой, firmware) принтера. |
Перезагрузите принтер, после чего отмените все задания печати, очистите очередь, проверьте обновления для принтера (обновите) и снова попытайтесь печатать при помощи фирменного ПО. Не помогло, пробуйте наоборот понизить версию прошивки, либо перепрошить принтер, установив на него дамп с нового устройства. Замените плату форматера. |
|
HP 50.X FUSER ERROR |
Проблема в работе печки лазерного принтера. |
Выключить принтер и дать ему отдохнуть около 30 минут. Проверить блок печки, почистить и заменить термоэлемент (если он в этом нуждается). Заменить весь блок, БП или плату микроконтроллера. |
|
HP 51.1X ERROR |
Проблема в работе датчика синхронизации луча лазера. |
Перезагрузить МФУ, проверить контакты, шлейфы и различные подключения. Заменить блок лазера или плату микроконтроллера. |
|
HP 52.XX.0 PRINTER ERROR |
Проблема в работе драйвера двигателя лазерного блока. |
Перезагрузить МФУ, проверить контакты, шлейфы и различные подключения. Заменить блок лазера или плату микроконтроллера. |
|
HP 53.10.01 PRINTER ERROR |
Принтер не поддерживает модуль памяти DIMM. |
Перезагрузить принтер. Переустановить или заменить модуль памяти. Заменить форматер. |
|
HP 55.XX.YY DC CONTROLLER ERROR |
Ошибка контроллера DC. |
Перезагрузить принтер. Проверить соединения на плате контроллера, либо заменить плату. |
|
HP 56.XX ERROR |
Неизвестная ошибка, возникшая во время печати. |
Перезапустить принтер. Проверить все контакты. Провести диагностику. |
|
HP 57.XX PRINTER ERROR |
Проблема в работе вентилятора лазерного принтера. |
Проверить кулер на работоспособность, почистить, смазать или заменить. |
|
HP 58.XX ERROR |
Неизвестная ошибка, связанная с работой процессора принтера. |
Проверить все контакты платы контроллера или заменить ее. |
|
HP 59.XX ERROR Main Motor |
Проблема в работе главного электромотора принтера. |
Выключить принтер и дать ему немного отдохнуть. Разобрать и проверить подключения и сам электромотор. Заменить в случае неисправности. |
|
HP 62 NO SYSTEM |
Принтер не может обнаружить систему управления. |
Перезапустить печатающее устройство, обновить прошивку, сменить главную плату. |
|
HP 64 ERROR |
Неизвестная ошибка, связанная с буфером хранения данных для лазера. |
Перезапустить печатающее устройство, обновить прошивку, сменить главную плату. |
|
HP 68.X PERMANENT STORAGE FULL |
Ошибка, связанная с переполнением памяти NVRAM. |
Продолжить печать, перезапустить принтер, очистить буфер памяти. |
|
HP 79.XXXX ERROR |
Критическая ошибка, связанная с аппаратной частью принтера или МФУ. |
Здесь может быть все что угодно. Нужно перезагружать принтер, разбирать и искать проблему. Чаще всего, дело заключается в неисправности материнской платы устройства. |
|
HP 8X. XXXX EIO ERROR |
Критическая ошибка подключения дополнительного модуля. |
Перезапустить принтер, переподключить модуль, обновить прошивку. Заменить плату форматера. |
Внимание: Не пытайтесь самостоятельно починить печатающий аппарат, если не имеете опыта сервисного обслуживания оргтехники. Лучше доверьте дело специалисту.
В работе любой оргтехники могут наблюдаться всевозможные неполадки. То же самое относится и к принтерам HP. К счастью, все современные печатающие машины являются компьютеризированными устройствами с собственным программным обеспечением. Именно благодаря этому при возникновении каких-либо неисправностей принтер сразу же «сообщает» это пользователю в виде кода ошибки на экране компьютера и/или на встроенном LCD-дисплее. Рассмотрим наиболее часто встречающиеся ошибки принтеров HP и пути их решения.
Ошибки замятия бумаги
Следующие ошибки возникают при замятии бумаги и/или застревании внутри принтера посторонних предметов.
13.3.хх или CHECK INPUT/OUTPUT DEVICE
Здесь и далее под символами «хх» в коде ошибки следует подразумевать какой-либо набор букв или цифр. Касательно самих ошибок — они означают, что в принтере застряла бумага, т.е. произошло ее замятие. То же самое принтер сообщит в случае механической неисправности ролика подачи бумаги. Если с последним все нормально, то для решения проблемы достаточно извлечь из принтера замятую бумагу. Устранение неисправностей с валиком, возможно, потребует разборки принтера, ремонта или полной замены детали.

13.5.хх
Данная ошибка также сигнализирует о замятии бумаги, а конкретно — в термоблоке принтера. Это одна из важнейших деталей лазерных устройств и МФУ, без которой работа машины не представляется возможной. Здесь также два пути решения проблемы — извлечение застрявшей бумаги либо ремонт/замена термоблока.
13.6.хх
Ошибка возникает по той же причине, что и в предыдущем случае. Разница лишь в том, что ошибка сигнализирует о замятии бумаги не внутри, а на выходе из термоблока. Решение проблемы то же, что и в предыдущем случае.
13.9.хх
Более серьезная ошибка, также связанная с замятием бумаги. Она сигнализирует о наличии неисправности в функционировании валика подачи бумаги и/или термоблока. В данном случае придется проверять работу обеих деталей. Если причина в замятии бумаги, ее достаточно извлечь из принтера. Любые аппаратные/механические неполадки решаются путем разбора, диагностики и ремонта/замены протягивающего ролика и/или термоблока.

13.20.хх (также может выводиться, как 13.A)
Это общая ошибка, возникающая при неисправностях одного или нескольких электронно-механических компонентов принтера, отвечающих за подачу бумаги. Помимо протягивающего ролика и термоблока, причиной ошибки может стать неправильное функционирование датчиков, соленоидов, транспортеров движения и других деталей. В большинстве случаев возникновение данной ошибки сигнализирует о необходимости диагностики и ремонта принтера в целом.
Аппаратно-технические неисправности
Следующие коды ошибок сигнализируют о наличии аппаратно-технических неисправностей принтера.
20 или 21
Одна из этих ошибок возникает при сбое печати, связанном с нехваткой объема встроенной в принтер оперативной памяти (ОЗУ). Обычно такое происходит при переполнении очереди печати, т.е. на принтер поступило слишком большое количество команд на распечатку, но устройство технически не справляется с задачей. Решение — нужно очистить очередь печати на компьютере (или на всех компьютерах, если принтер используется по локальной сети).

Также ошибку может помочь устранить переключение параметра «Page Protect» (в настройках принтера) из положения «On» в «Auto». Некоторые модели принтеров HP поддерживают установку дополнительного объема оперативной памяти. Увеличение ОЗУ в особенности рекомендуется для принтеров, использующихся множеством пользователей по локальной сети.
22 EIO
Данная ошибка возникает только на тех моделях принтеров HP, которые оборудованы модульным интерфейсом MIO или более совершенным — EIO. Данные интерфейсы предназначены для подключения к машине сетевых интерфейсных карт, жестких дисков и т.д. Ошибка 22 EIO может возникнуть при неисправности подключаемого устройства, неправильных настройках либо его занятости протокола MIO другим устройством в сети. Для решения проблемы можно попробовать просто перезагрузить принтер и/или перенастроить параметры локальной сети.
22 PARALLEL I/O, 22 SERIAL I/O
Ошибки возникают только в том случае, если принтер подключен к компьютеру через параллельный порт стандарта IEEE-1284. Неисправность может быть связана со сбоями в работе или несовместимостью установленного драйвера с используемым принтером.
Также ошибка может означать физическое повреждение кабеля или ошибками ввода-вывода информации (поступила нераспознанная команда, компьютер использует неправильный номер порта для связи с принтеров). Решение — переустановка драйвера либо (если не помогает) замена кабеля.

40 BAD SERIAL TRANSSMISION, 40 EIO x BAD TRANSSMISION
Ошибки, возникающие при различных неисправностях сетевой карты принтера. Если проблема не решается путем перезагрузки принтера и/или переустановки его драйвера, остается только заменить сетевую карту.
41.х, 51.х и 52.х
Присутствуют аппаратные неисправности в работе лазер-сканера. Возникновение одной из этих ошибок сигнализирует о необходимости ремонта или замены данной детали либо одного из ее электронных компонентов.
41.3
Возникает при неисправностях электронной платы, отвечающей за управление размером бумаги. Ошибка также может быть связана с неправильно заданными параметрами размера бумаги, загруженной в лоток в данный момент. Решение — попробовать задать правильный размер, что можно сделать с LCD-дисплея принтера либо в приложении на компьютере, из которого осуществляется печать. Если не помогает, придется ремонтировать/заменить плату.
50.х
Возникновение данной ошибки связано с аппаратными неисправностями термоблока. Самым простым решением является извлечение и установка термоблока на свое место. В остальных случаях данную деталь придется ремонтировать или заменять.

53.хх.хх и 62.х
Ошибки, связанные с работой оперативной памяти принтера. Здесь также можно попробовать извлечь ОЗУ из гнезда и установить заново. Если не помогает, остается заменить неисправный модуль памяти. Какая именно из планок ОЗУ не работает, можно узнать по цифре в коде «62.х», где «х» — номер слота, в который установлен нерабочий модуль.
57.х FAN FAILURE
Присутствуют неисправности в работе встроенных вентиляторов (кулеров) охлаждения принтера, что может приводить к перегреву оборудования. Решение — очистить от пыли и смазать кулеры моторным маслом (если вращаются недостаточно быстро) либо заменить их.
58.х
Ошибки, связанные с неполадками в работе механизма поднятия лотка. Возможно, в лотке или самом механизме застрял посторонний предмет. Во всех остальных случаях потребуется ремонт данной детали.
59.х
Неисправности главного мотора печатающей машины. Если перезагрузка принтера не помогает, потребуется ремонт или замена мотора.

69.x
Ошибка характерна только для моделей принтеров HP, оснащенных дуплексом — устройством, позволяющим печатать одновременно на обеих сторонах листа. Аппаратные неисправности дуплекса также потребует произвести ремонт.
79.хххх
Это общие ошибки, связанные с управлением данными печатающей машины. Неполадки в работе могут быть вызваны неправильным функционированием драйвера принтера. Также ошибки возникают при сбоях в работе модулей памяти, сетевой карты, USB-портов, последовательного порта или других электронных компонентов. Сначала следует переустановить драйвер, заменить используемый USB или последовательный кабель. Если не помогает, придется прибегнуть к помощи специалистов.
8х.хххх
Ошибки, сигнализирующие о неисправности сетевой карты. Также может возникать по причине физического повреждения или наличия замыкания в сетевом кабеле. Первым делом нужно попробовать заменить кабель. Если ошибка повторится, замените сетевую карту.
Современные принтеры и многофункциональные устройства имеют систему, позволяющую проводить самодиагностику всех узлов аппарата. При возникновении каких-либо неполадок в оборудовании, микропроцессор подает кодовый сигнал пользователю об обнаружении неисправности. Коды неисправностей могут отображаться на дисплее аппаратов (если он предусмотрен конструкцией), либо попеременным миганием светодиодов на панели управления устройства. Сообщение об ошибке с кодом может появляться и на экране ПК. Несмотря на свою высокую надежность, принтеры и МФУ от производителя HP (Hewlett-Packard) также подвергаются сбоям при работе. Самыми распространенными ошибками при работе аппаратов HP, по отзывам пользователей, являются следующие: ошибка печати и ошибки с кодами Е8, Е3 и 79.
Содержание
- 1 Сбой печати на принтерах HP
- 2 Как устранить ошибку е8
- 3 Устранение проблемы с кодом Е3
- 4 Устранение ошибки 79
- 5 Сброс ошибок на принтерах HP
Сбой печати на принтерах HP
Нередко при попытке напечатать документ пользователь обнаруживает, что процесс блокируется по неизвестной причине. При этом все попытки удалить задание, находящееся в очереди печати, или отменить его оказываются неудачными.
Данный сбой может появиться по ряду причин, к примеру, от внезапного скачка напряжения в электросети, но, в любом случае, устранять проблему придется в программе “Диспетчер печати”. Объясняется этот факт тем, что, когда документ отправляется на распечатку, в системе Windows создается специальный файл. По ряду причин, этот файл может оказаться поврежденным, и вызывать сбой, при котором принтер не печатает. Поэтому, этот файл необходимо удалить следующим способом.
- Отключите печатающее устройство кнопкой и отсоедините электрический кабель от розетки.
- Сделайте сохранение всех результатов работы, чтобы они не были утеряны.
- Далее следует открыть “службы windows”, нажав одновременно клавиши windows + r.
- Откроется окно с пустой строкой, в которую нужно ввести “services.msc” (без кавычек) и нажать ок.
- В появившемся окне найдите строку «диспетчер очереди печати».

- Кликните по этой строке ПКМ и в появившемся меню выберите “Остановить”.
- После остановки службы окно можно закрыть.
- Далее, перейдите по адресу: C:WindowsSystem32SpoolPRINTERS. Сделать это можно, если вставить его в адресную строку проводника Windows, после чего нажать Enter на клавиатуре.
- В открывшейся папке необходимо удалить все файлы, которые находятся в ней.
- Выключите компьютер.
- Перед подключением МФУ (принтера) к электрической сети убедитесь, что он был в отключенном состоянии не менее 60 секунд.
- Произведите включение МФУ (принтера), воспользовавшись клавишей включения.
- Включите компьютер и дождитесь загрузки операционной системы.
- Пошлите документ на распечатку.
Если процесс печати пошел нормально, значит, на этом настройка считается завершенной. Если все же не удалось напечатать документ, проблему можно решить с помощью бесплатного программного обеспечения от фирмы HP. Программа называется “HP Print and Scan Doctor” и применяется она для решения проблем, возникающих при печати, а также для диагностики оборудования. Загрузить ее можно из официального сайта по этой ссылке. Открыв окно программы, выберите автоматический поиск проблем и их устранение. После завершения работы программы повторите попытку распечатать документ.
В некоторых случаях, решить данную проблему, помогают следующие меры.
- Переустановка драйвера принтера. Но сначала его требуется удалить: в “Панели управления” найдите “Устройства и принтеры” и откройте окно. Кликните ПКМ на значке принтера HP и выберите “Удалить”. Данные действия удалят драйвер, который был установлен в системе. После удаления необходимо произвести перезагрузку ПК. Если у вас по какой-либо причине нет драйверов для данной модели МФУ (принтера), то скачать их можно с сайта HP, если перейти по этой ссылке.
- На время отключить брандмауэр и попробовать распечатать документ.
- Войти в систему под другой учетной записью (актуально в случае, когда оборудование настраивалось из другой учетной записи).
Как устранить ошибку е8
Сервисное сообщение с кодом е8 часто встречается на МФУ laserjet 1132. Означает оно, что возникла проблема со сканером. В инструкции к аппарату указывается, что неисправность с кодом е8 является фатальной, то есть не устранимой. Но народные умельцы нашли несколько способов для устранения этой неисправности, которые, в ряде случаев, могут вернуть сканер к работе.
Самый распространенный случай — когда линейка сканера остановилась в крайнем правом положении и не двигается. При этом на дисплее МФУ появляется ошибка Е8.

В данном случае, каретку просто заклинило. Чтобы устранить эту проблему, придется снять стекло сканера и переставить линейку на центр аппарата либо ближе к левому краю. Чтобы снять стекло, необходимо открутить 6 болтов, расположенных по периметру.
Для откручивания винтиков понадобится шестигранник “звездочка”.
После того, как стеклянная крышка будет снята, возьмите каретку, переставьте ее ближе к центру и верните стекло на место. Включите аппарат и дождитесь позиционирования линейки (она должна уйти в крайнее левое положение). Если все произошло именно так, значит вам повезло, поскольку код Е8 может появляться и по другим причинам.
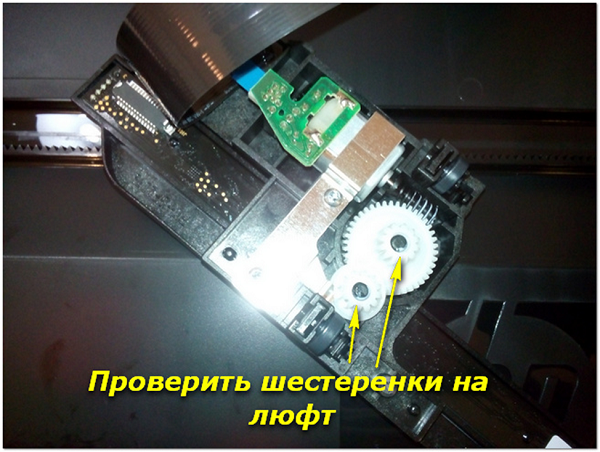
В случае, когда каретка сканера после включения МФУ движется рывками и останавливается, при этом на дисплее появляется код Е8, то придется хорошо проверить все узлы этого блока. Для проверки блока сканера необходимо снять стеклянную крышку, как было сказано выше, после чего нужно достать сам блок и перевернуть его. На нижней стороне блока вы увидите 2 шестеренки и электродвигатель, прижатый пластиной. Далее проделайте следующее.
- Вначале рекомендуется открутить 2 винтика на пластине и проверить шестеренки: нет ли загрязнений или повреждений зубьев, присутствует люфт или нет, не сработанная ли ось, на которой держится шестерня и т.д.

- Удалите загрязнения (если они есть) с оптопары.
- Проверьте на качество соединения шлейф.
- После проверки и замены вышедших из строя деталей нанесите немного смазки (можно применять смазку для термопленки) на втулки шестеренок и на направляющие, по которым движется блок сканера.

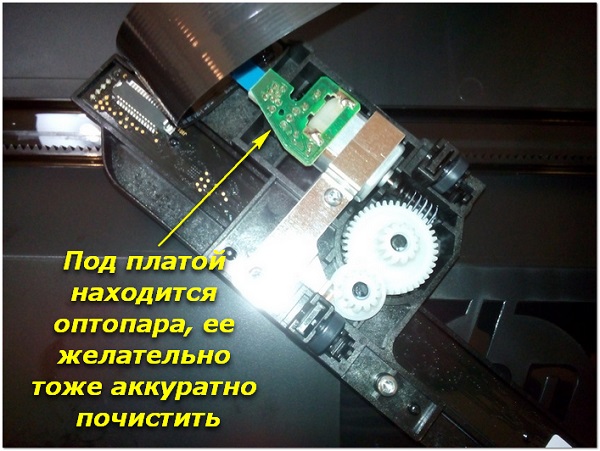
Вышеописанные действия обычно устраняют проблему сканера в МФУ hp m1132. Но в некоторых случаях данную проблему может вызывать слишком плотное прижатие шестеренок или оптопара. Иногда проблема устраняется, если ослабить прижим шестеренок или вообще убрать маленькую шестерню. После этого включите аппарат (при снятом и перевернутом блоке сканера) и понаблюдайте за вращением шестерни. Если она продолжает двигаться рывками, значит, проблема может скрываться в оптопаре.
Если присмотреться к оптопаре внимательно, то вы увидите, что между двумя датчиками находится диск с насечками. Данный диск должен располагаться по центру оптопары. Иногда он смещается в одну сторону, что и вызывает появление кода Е8. Попробуйте установить двигатель так, чтобы диск находился по центру, между датчиками.
Если после всех вышеописанных манипуляций код Е8 снова появляется, то неисправность может крыться в самом двигателе или плате управления. Если моторчик вы сможете заменить самостоятельно, то по поводу платы управления придется обращаться в сервисный центр.
Устранение проблемы с кодом Е3
Часто пользователи МФУ фирмы HP наблюдают на дисплее аппарата появление кода Е3. Если посмотреть в инструкцию к устройству, то в ней расшифровывается данный код, как “Картридж отсутствует или установлен неправильно”. Несомненно, картридж может быть неправильно установлен, под него могут попасть посторонние предметы, или бывает, что он просто сломан. Но иногда возникает ситуация, когда аппарат не видит картридж из-за того, что рычажок, имеющий заслонку, попросту не достает до оптрона. Чтобы добраться к нему, необходимо снять заднюю (металлическую) крышку МФУ. О том, как разблокировать рычажок, после чего ошибка Е3 будет сброшена, наглядно показано в этом видео с иностранного ресурса (знание языка необязательно).
Устранение ошибки 79
Ошибка 79 в принтерах HP обычно означает, что произошел сбой в программном обеспечении аппарата. Чтобы устранить ее, слетайте следующее:
- отключите питание аппарата с помощью клавиши выключения;
- выдержите паузу не меньше, чем 30 секунд;
- снова произведите включение агрегата и дождитесь, пока он инициализируется;
- в случае, когда устройство было подключено через сетевой фильтр, попробуйте включить его в этот раз напрямую, в розетку;
- если кодовое сообщение продолжает появляться, то иногда помогает избавиться от проблемы очистка очереди печати или переустановка драйвера.
Сброс ошибок на принтерах HP
Чтобы произвести сброс ошибки или так называемого сообщения об обслуживании на принтерах HP, существует множество способов, которые подходят только для конкретных моделей. Поскольку моделей печатного оборудования у данного производителя большое количество, то, для сброса сервисных сообщений о проблеме, можно воспользоваться таблицами, приведенными ниже.
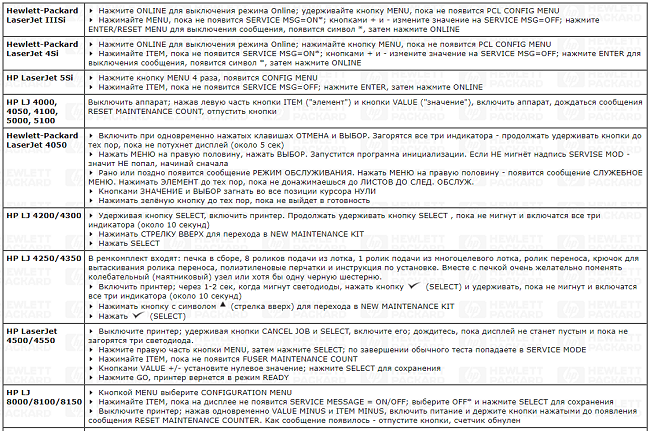
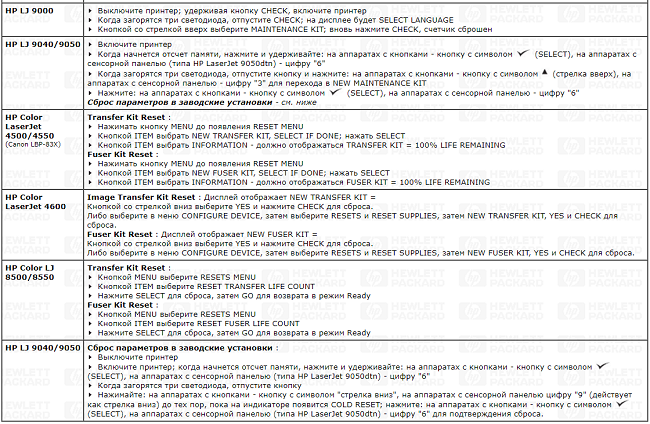
В случаях, когда происходит заправка картриджей (LaserJet 1300, 1320, 4250/4350), содержащих чип, то его необходимо заклеить перед установкой их в аппарат. Устройство, конечно, выдаст сообщение, что вставлен “левый” картридж, но работать будет. Также для обнуления чипов можно воспользоваться рекомендациями из следующей таблицы.
Практически любые сервисные коды, означающие ошибки для печатающих устройств HP серии Photosmart сбрасываются следующим методом.
- Зажмите стрелку влево и, не отпуская ее, нажмите клавишу “Настройка (Setup)”, после чего уберите пальцы с клавиш. В результате этого действия появится меню «Enter Special Key Combo». Зажмите одновременно клавиши «Печать фото (Print Photos)» и «Коррекция фотографии (Red Eye Removal)», и отпустите их. Далее, нажмите по одной клавише и отпустите: «Коррекция фотографии (Red Eye Removal)», «Печать фото (Print Photos)», «Коррекция фотографии (Red Eye Removal)».
- Нажимаем стрелку вправо и переходим на строку «System Configuration». Нажмите ОК.
- Снова нажатием на стрелку вправо дойдите до строки «Hardware failure status: Clear. Press OK to clear» (если работа аппарата до этого была без сбоев, то этой строки вы не найдете). Запомните, в данный момент запускать печать нельзя.
- Произведите выключение устройства, после чего включите его.
Таким образом, код ошибки был сброшен, и аппаратом можно пользоваться в обычном режиме.
Samsung SCX-3205 Ошибка S3-3122
| Сообщение #1
Отправлено 02 апреля 2012 — 12:01
При включении принтер выходит в ошибку SCANNER_SHADING_ERROR.
Нашел кое что в инете:
«…Всем спасибо. Проблема решена.
у сканера под стеклом внутри есть белая полоска с тремя черными прямоугольниками, как она называется я не знаю, но предположил что она там не спроста, так вот между стеклом и этой полоской попал волос, волос убрал сканер заработал. для чистоты эксперимента подсунул туда же полоску черной бумаги и опять сканер не работает и в отчете та же ошибка, бумагу убрал — все ок…»
При разборке блока сканера ничего подобного не обнаружил(в плане мусора).
Может у кого-то есть какие мысли,прошу подсказку…
- Наверх of the page up there ^
-
0
| Сообщение #2
Отправлено 02 апреля 2012 — 17:40
koka
Какие действия были предприняты?
Самый идеальный и надёжный принтер…фломастеры.
- Наверх of the page up there ^
-
0
- ← Предыдущая тема
- Ремонт принтеров и копиров
- Следующая тема →
- Вы не можете создать новую тему
- Вы не можете ответить в тему
1 человек читают эту тему
0 пользователей, 1 гостей, 0 скрытых пользователей
4. Troubleshooting
► Error Code
S3–3211
► Error message
► Symptom
DADF board is not connected or communication error occurs between DADF board and Main board.
► Troubleshooting method
1) Turn off the machine then on. If the problem persists, check the following.
2) Turn the machine off again.
3) Remove the scan rear cover. Check if the connector on scan joint board is connected correctly.
4) Remove the rear cover. Check if the connector on the main board is connected correctly.
5) Remove the DADF rear cover. Check if the connector on DADF board is connected correctly.
(Refer to 3.3.21.3 DADF Board.)
6) If the connection is OK, replace the DADF board(JC92–02509A).
7) If the problem persists after replacing the DADF board, replace the main board(JC92–02516A).
4-229
Copyright© 1995-2013 SAMSUNG. All rights reserved.
hp-concentra-wrapper-portlet
![]()
Actions
This document provides error-code troubleshooting information

Legal information
Copyright and License
© Copyright 2022 HP Development Company, L.P.
Reproduction, adaptation, or translation without prior written permission is prohibited, except as allowed under the copyright
laws.
The information contained herein is subject to change without notice.
The only warranties for HP products and services are set forth in the express warranty statements accompanying such products
and services. Nothing herein should be construed as constituting an additional warranty. HP shall not be liable for technical
or editorial errors or omissions contained herein.
Edition 1.3, 11/2022
Trademark Credits
Adobe®, Adobe Photoshop®, Acrobat®, and PostScript® are trademarks of Adobe Systems Incorporated.
Apple and the Apple logo are trademarks of Apple Inc., registered in the U.S. and other countries.
macOS is a trademark of Apple Inc., registered in the U.S. and other countries.
AirPrint is a trademark of Apple Inc., registered in the U.S. and other countries.
Google™ is a trademark of Google Inc.
Microsoft®, Windows®, and Windows Server® are U.S. registered trademarks of Microsoft Corporation.
UNIX® is a registered trademark of The Open Group.
Document last updated
The following is the last time this document was updated:
Last update: November 11, 2022
About this document
This document provides error-code troubleshooting information. Procedures and part numbers change. For current information,
use the browser-based format.
Choose the format that best meets your needs.
|
Format |
Document title example |
Recommended use |
|---|---|---|
|
Browser-based |
[Product] — Control Panel Message Document (CPMD) |
|
|
|
[Product] — Control Panel Message Document (CPMD) PDF |
Note: Refer to the printer service manual for removal and replacement procedures. Note: For current information, use the browser-based format. |
Control-panel message types
The control-panel messages and error code entries indicate the current product status or situations that might require action.
Note:
The Error Information Report provides more detailed information on the error and does not appear on the control-panel display.
To print and view the Error Information Report perform the following:
-
Enter Tech Mode.
-
Select Information T
-
Select Report
-
Select Error Information
-
Select Print?
-
Then touchYes
A control-panel message displays temporarily and might require the user to acknowledge the message by touching the OK button to resume printing or by touching the Stop button to cancel the job. With certain messages, the job might not finish printing or the print quality might be affected.
If the message is related to printing and the auto-continue feature is on, the product will attempt to resume printing after
the message has appeared for 10 seconds without acknowledgment.
For some messages, restarting the product might fix the problem. If a critical error persists, the product might require service.
Error -code and control-panel-message troubleshooting overview
Learn how to troubleshoot error messages.
Error codes
Error codes and control-panel messages display on the printer control panel to indicate the current printer status or situations
that might require action. Error codes are numerical, or alphanumerical, and have a set structure with six characters (example:
A1-xxxx).
-
The first two characters are numeric and represent the system component that is causing the error. For example, in error code
A1-1211, A1 = Motor for these printers. -
The remaining four digits further define the error.
The CPMD is a comprehensive list of error codes, diagnostic and troubleshooting steps to clear or resolve the error, and other
helpful information such as service mode pins and part numbers.
The CPMD is continually updated and republished with the latest information for the following error codes.
|
Error code |
System Component |
System Error Description |
|---|---|---|
|
11-2Txx |
Tray- Paper |
Tray X paper mismatch |
|
A1-xxxx |
Motors |
Motor failure |
|
A2-xxxx |
Fans |
Fan rotation error |
|
A3-xxxx |
Sensors (non-paper path) |
Temp or humidity sensor error |
|
C1-xxxx |
Toner cartridge |
Toner cartridge relate error |
|
C3-xxxx |
Drum unit |
Drum unit related error |
|
C5-xxxx |
ITB Unit (Color printer) or Transfer roller (Mono printers) |
ITB Unit or Transfer roller life message |
|
C6-xxxx |
Fuser unit |
Fuser unit either not installed, wrong fuser or has been replaced |
|
C7-xxxx |
Waste toner |
Waste toner container error |
|
C8-xxxx |
Developer |
Developer unit error |
|
C9-xxxx |
Transfer roller |
Transfer roller error |
|
H1-xxxx |
Optional tray |
Optional paper tray error |
|
H2-xxxx |
Inner finisher |
Miscellaneous error including general and misprint or mismatch errors typically involving (but not limited to) the fuser, |
|
Mx-xxxx |
Paper Path/Paper Tray |
Paper path or paper tray sensor error (This includes tray empty, tray not installed and bin full |
|
Sx-xxxx |
System |
System error, Clock, Video, HDD MSOK, Supply checking |
|
U1-xxxx |
Fuser error |
Fuser error (Temp, voltage, or pressure control) |
|
U2-xxxx |
Laser/Scanner |
Laser/scanner error |
|
U3-xxxx |
Document feeder |
Document feeder error (Jams, loading or open) |
How to search for printer documentation
The CPMD, error codes, and other support documentation for each printer is found on the internal HP portals.
These portals are on WISE for Channel (please see Accessing WISE for HP channel partners (HP Partner Portal) below for instructions on how to navigate to the site) and WISE. WISE for Channel is available to HP channel partners and WISE is available to call agents, service technicians, and other
HP internal users. The level of detail available will depend on your access credentials. To learn how to find support content
in WISE, watch the video here.
WISE — How to access and use
Learn how to access and use Web-based Interactive Search Engines (WISE) to locate available support information. WISE is a
repository of technical support documentation including service manuals, user guides, videos, and general support information.
Accessing WISE
Learn how to access Web-based Interactive Search Engines (WISE) if you are an HP channel partner or an internal HP user.
Accessing WISE for HP channel partners (HP Partner Portal)
Learn how to access WISE by accessing the HP Partner Portal if you are an HP Channel Partner.
Note:
If this is your first visit to the HP Partner Portal, you will be asked to create an account. Follow the setup directions
using your HP Partner credentials.
-
-
Select the Services & Support tab, and then select Technical Support.
-
Select Technical Documentation.
-
You will be taken to the WISE portal.
Play the video:

Accessing WISE for internal HP users
Using WISE to search for error codes
Learn how to use WISE to look up error codes.
Note:
The model used in the instructional videos is an example. The same steps apply to all printer models.
You will need the printer type (e.g. HP LaserJet), model number (e.g. M607), and bundle option (e.g. dn, dh, z).
Search for error codes using the lookup widget
Learn how to search for a specific error code using the WISE Error Code Lookup widget.
-
Select Products in the navigation bar of the WISE portal home page.
-
Using the type, model number and bundle option of the printer to be repaired, select HP Printers
> Type of Printer >
Model Group > Model Number >
Bundle Option >
Product Number, and then select Launch Product Detail Page. The PDP page will open.
-
Enter the error code in the widget in the Error Code Lookup area at the bottom-right of the screen and click the search icon or press the Enter button.
-
Select the desired topic from the search results.
Search for error codes from the WISE home page
Learn how to search for a specific error code from the WISE home page.
-
Enter the model number in the search field on the WISE home page. The search is predictive, and a drop-down menu will appear
with available selections.Note:
Selecting the series item from the drop-down list is recommended for the most accurate search return.
-
Enter the error code in the search field.
-
Select the desired topic from the search results.
Using WISE to access repair and replace videos for FRUs
Learn how to use WISE to access repair and replace videos for FRUs.
Note:
The model used in the instructional videos is an example. The same steps apply to all printer models.
You will need the printer type (e.g. HP LaserJet), model number (e.g. M607), and bundle option (e.g. dn, dh, z).
Search for a printer’s Product Detail Page (PDP)
Learn how to search WISE for product specific information. Quickly review the steps and then play the video.
-
Select Products in the navigation bar of the WISE portal home page.
-
Using the type, model number and bundle option of the printer to be repaired, select HP Printers > Type of Printer > Model Group > Model Number > Bundle Option > Product Number, and then select Launch Product Detail Page. The PDP page will open.
-
Select the link to Videos in the Other Content menu at the bottom-right of the screen.
-
Select the desired video from the list of videos.
Play the video:
Perform a model number search using the search function
Learn how to search WISE using the model number. Quickly review the steps and then play the video.
-
Enter the model number in the search field on the WISE home page. The search is predictive, and a drop-down menu will appear
with available selections.Note:
Selecting the series item from the drop-down list is recommended for the most accurate search return.
-
Click the search icon to the right.
-
To refine the search results, select the radio button labeled video in the upper-right portion of the screen.
Tip:
To refine video search results, append a part name to the model detail shown in the search bar. For example, adding the word
fuser to the detail in the search bar will return videos related to repair and replacement of the fuser.
Play the video:
Printer service information
Last update: November 11, 2022
Service mode PIN numbers:
-
M433, M436
: 10043616 -
M437, M438, M439, M440, M442, M443, M42523, M42623
: 10043616
To enter tech mode:
-
Touch the following in sequence:
-
When Tech Menu is displayed, touch OK.
Numerical control panel messages
Use the following numerical error message troubleshooting to resolve your issue.
11-XXXX error messages
A1-XXXX error messages
A2-XXXX error messages
A3-XXXX error messages
C1-XXXX error messages
C3-XXXX error messages
C9-XXXX error messages
H1-XXXX error messages
M1-XXXX error messages
M2-XXXX error messages
M3-XXXX error messages
S2-XXXX error messages
S3-XXXX error messages
S6-XXXX error messages
U1-XXXX error messages
U2-XXXX error messages
U3-XXXX error messages
11-2Txx Paper mismatch Tray X
Mismatch paper size in tray X.
Paper in tray is not matched to the printer paper setting.
-
11-2T11 — Tray 2 paper mismatch
-
11-2T21 — Tray 3 paper mismatch
Recommended action for customers
-
If you want to print on the current paper, press «OK«. If not, select «X» and change the paper.
-
Ensure that the tray width guides are set to the correct paper size being installed into the tray. The arrow on the guide
should line up exactly with the line connected to the paper size designation. Ensure that the tray is not filled above the
fill mark on the tray.
-
If the error persists, contact your HP-authorized service or support provider, or contact customer support at www.hp.com/go/contactHP.
11-2T61 Paper mismatch Tray 1 Load [A4] [Plain] Continue ⊙ Cancel X or Load tray 1 with [Letter], [Plain] paper
Paper mismatch error in the MP Tray 1.
Paper in tray is not matched to the machine paper setting.
Recommended action for customers
-
If you want to print on the current paper, press «OK«. If not, select «X» and change the paper.
-
Ensure that the tray guides on the MP Tray are set correctly.
-
Ensure the paper type and size is set correctly for the multipurpose tray 1.
To change the menu options, press the Menu
button. On the display screen, select .
-
If the error persists, contact your HP-authorized service or support provider, or contact customer support at www.hp.com/go/contactHP.
A1-1110 Motor Failure
Main Motor Failure: #A1-1110. Turn off and then on. Call for service if the problem persists.
Harness or main BLDC motor or main board is defective.
Recommended action for customers
Follow these troubleshooting steps in the order presented.
-
Turn the printer off, and then on.
-
If the error persists, contact your HP-authorized service or support provider, or contact customer support at www.hp.com/go/contactHP.
A1-5513 Motor Failure
Supply Motor Failure: #A1-5513. Turn off then on.
The motor related to toner supply has experienced a problem.
Recommended action for customers
Follow these troubleshooting steps in the order presented.
-
Turn the printer off, and then on.
-
If the error persists, contact your HP-authorized service or support provider, or contact customer support at www.hp.com/go/contactHP.
A2-1210 Error: #A2-1210 / Fan Failure
Fan Failure: #A2-1210. Turn off then on. Call for service if the problem persists.
Switching mode power supply (SMPS) fan error.
The fan does not operate or the fan signal is abnormal.
Recommended action for customers
Follow these troubleshooting steps in the order presented.
-
Turn the printer off, and then on.
-
If the error persists, contact your HP-authorized service or support provider, or contact customer support at www.hp.com/go/contactHP.
A2-2110 Error: #A2-2110 / Fan Failure
Fuser Fan Failure: Error: #A2-2110 / Fan Failure: #A2-2110. Turn off then on. Call for service if the problem persists
Fuser fan does not operate.
Recommended action for customers
Follow these troubleshooting steps in the order presented.
-
Turn the printer off, and then on.
-
If the error persists, contact your HP-authorized service or support provider, or contact customer support at www.hp.com/go/contactHP.
A3-3311, A3-3312, A3-3320, A3-3411, A3-3412 Sensor error
Temperature/Humidity sensor is defective.
-
A3-3311, Error: #A3-3311 / Sensor Failure: #A3-3311. Turn off then on. Call for service if the problem persists
-
A3-3312, Error: #A3-3312 / Sensor Failure: #A3-3312. Turn off then on. Call for service if the problem persists
-
A3-3320, Not proper Room Temp / The room temperature is not suitable for this set use. Please adjust room temperature
-
A3-3411, Error: #A3-3411 / Sensor Failure: #A3-3411. Turn off then on. Call for service if the problem persists
-
A3-3412, Error: #A3-3412 / Sensor Failure: #A3-3412. Turn off then on. Call for service if the problem persists
Recommended action for customers
Follow these troubleshooting steps in the order presented.
-
Turn the printer off, and then on.
-
If the error persists, contact your HP-authorized service or support provider, or contact customer support at www.hp.com/go/contactHP.
C1-1110 / C1-111A
Toner remaining is 5 ~ 30% of its life.
The printer indicates when the toner supply level is low. Actual cartridge life might vary. You do not need to replace the
cartridge at this time unless print quality is no longer acceptable. The toner is expected to run short soon because the remaining
toner is reaching 0%.This error occurs every time that you try to use the printer.
-
C1-1110, Prepare new toner / Prepare new toner cartridge
-
C1-111A, Shake toner cart. / Shake toner cartridge and then install. Replace toner cartridge if the problem persists
Recommended action for customers
-
Check the life remaining of the toner cartridge.
-
Select on the control panel.
-
Select the option you want and press OK.
-
Press the Stop button to return to ready mode.
-
-
To shake the toner cartridge and redistribute the toner.
-
Open front door
-
Remove toner cartridge
-
Shake the toner cartridge horizontally to distribute the toner evenly inside the cartridge.
-
Reinstall the toner cartridge.
-
Close the front door.
-
If the toner cartridge yield is expired, replace the toner cartridge.
Note:
After an HP supply has reached the very low threshold, the HP Premium Protection Warranty ends and the customer is responsible
for replacing the supply.Part numbers
Item Description
Cartridge number
Part Number
Black Original LaserJet Toner Cartridge
China (IT Channel)
HP 333A
W1333A
High Yield Black Original LaserJet Toner Cartridge
China (IT Channel)
HP 333X
W1333X
Black Original LaserJet Toner Cartridge
China (OA Channel)
HP 334A
W1334A
High Yield Black Original LaserJet Toner Cartridge
China (OA Channel)
HP 334X
W1334X
Black Original LaserJet Toner Cartridge
Rest of AP and EMEA (IT Channel)
HP 335A
W1335A
High Yield Black Original LaserJet Toner Cartridge
Rest of AP and EMEA (IT Channel)
HP 335X
W1335X
Black Original LaserJet Toner Cartridge
Rest of APJ (OA Channel)
HP 336A
W1336A
High Yield Black Original LaserJet Toner Cartridge
Rest of APJ (OA Channel)
HP 336X
W1336X
C1-1140 / C1-1160 / C1-1160 Toner error
The toner cartridge is at the end of its life.
The black toner cartridge is empty. The printer cannot draw toner from the toner cartridge.
The remaining volume is 0% (cartridge lifespan surpassed). This error occurs every time that you try to use the printer.
-
C1-1140, Replace new toner / End of life, Replace with new toner cartridge
-
C1-1160, Replace new toner / Replace with new toner cartridge
-
C1-1170, Replace new toner / End of life, Replace with new toner cartridge
Recommended action for customers
-
Replace the toner cartridge.
-
Open the front cover.
-
Remove the toner cartridge.
-
Install the new toner cartridge.
-
Close the front cover.
Note:
After an HP supply has reached the very low threshold, the HP Premium Protection Warranty ends and the customer is responsible
for replacing the supply.Part numbers
Item Description
Cartridge number
Part Number
Black Original LaserJet Toner Cartridge
China (IT Channel)
HP 333A
W1333A
High Yield Black Original LaserJet Toner Cartridge
China (IT Channel)
HP 333X
W1333X
Black Original LaserJet Toner Cartridge
China (OA Channel)
HP 334A
W1334A
High Yield Black Original LaserJet Toner Cartridge
China (OA Channel)
HP 334X
W1334X
Black Original LaserJet Toner Cartridge
Rest of AP and EMEA (IT Channel)
HP 335A
W1335A
High Yield Black Original LaserJet Toner Cartridge
Rest of AP and EMEA (IT Channel)
HP 335X
W1335X
Black Original LaserJet Toner Cartridge
Rest of APJ (OA Channel)
HP 336A
W1336A
High Yield Black Original LaserJet Toner Cartridge
Rest of APJ (OA Channel)
HP 336X
W1336X
-
-
If the error persists, please contact customer support.
C1-1313 / C1-1314 Toner error
Shake toner cartridge and then install.
Toner supply is inefficient or abnormal.
The toner supply in the toner cartridge is malfunctioning. The toner sensor indicates that the toner in the development unit
is insufficient.
The toner sensor indicates that the toner in the development unit is insufficient. There is no toner in the toner cartridge
or the toner supply line is blocked. A circuit fault such as a fault in the toner supply motor or the toner sensor occurs.
-
C1-1313, Shake toner cart. / Shake toner cartridge and then install. Call for service if the problem persists
-
C1-1314, Remove seal tape / Did not supply enough toner. Remove seal tape of toner cartridge or shake it. Call for service if the
problem persists
Recommended action for customers
-
To shake the toner cartridge and redistribute the toner.
-
Open front door
-
Remove toner cartridge
-
Shake the toner cartridge horizontally to distribute the toner evenly inside the cartridge.
-
Check if the seal tape is removed. If not, remove it.
-
Reinstall the toner cartridge.
-
Close the front door.
-
If the error persists, contact your HP-authorized service or support provider, or contact customer support at www.hp.com/go/contactHP.
C1–1411 Toner Not Installed / Toner cartridge is not installed. Install it
The toner cartridge is not installed or is installed incorrectly.
The toner cartridge is not installed. / The CRUM data is not detected.
Recommended action for customers
-
Open the front cover. Check if the toner cartridge is installed.
-
Remove and reinstall the toner cartridge.
-
If the error persists, check if the toner cartridge modular jack is contaminated or deformed.
-
Remove the toner cartridge.
-
Check the module jack on the toner cartridge.
-
If it is damaged or deformed, replace the toner cartridge.
Part numbers
Item Description
Cartridge number
Part Number
Black Original LaserJet Toner Cartridge
China (IT Channel)
HP 333A
W1333A
High Yield Black Original LaserJet Toner Cartridge
China (IT Channel)
HP 333X
W1333X
Black Original LaserJet Toner Cartridge
China (OA Channel)
HP 334A
W1334A
High Yield Black Original LaserJet Toner Cartridge
China (OA Channel)
HP 334X
W1334X
Black Original LaserJet Toner Cartridge
Rest of AP and EMEA (IT Channel)
HP 335A
W1335A
High Yield Black Original LaserJet Toner Cartridge
Rest of AP and EMEA (IT Channel)
HP 335X
W1335X
Black Original LaserJet Toner Cartridge
Rest of APJ (OA Channel)
HP 336A
W1336A
High Yield Black Original LaserJet Toner Cartridge
Rest of APJ (OA Channel)
HP 336X
W1336X
-
-
If the error persists, contact your HP-authorized service or support provider, or contact customer support at www.hp.com/go/contactHP.
C1–1512 Toner Not Compatible / Toner cartridge is not compatible. Check guide
The toner cartridge is not compatible with the printer.
Recommended action for customers
-
Open the front cover. Remove the toner cartridge.
-
Replace the toner cartridge with the correct toner cartridge for the printer.
-
If a genuine HP supply is not installed, replace it with a new HP supply.
Part numbers
Item Description
Cartridge number
Part Number
Black Original LaserJet Toner Cartridge
China (IT Channel)
HP 333A
W1333A
High Yield Black Original LaserJet Toner Cartridge
China (IT Channel)
HP 333X
W1333X
Black Original LaserJet Toner Cartridge
China (OA Channel)
HP 334A
W1334A
High Yield Black Original LaserJet Toner Cartridge
China (OA Channel)
HP 334X
W1334X
Black Original LaserJet Toner Cartridge
Rest of AP and EMEA (IT Channel)
HP 335A
W1335A
High Yield Black Original LaserJet Toner Cartridge
Rest of AP and EMEA (IT Channel)
HP 335X
W1335X
Black Original LaserJet Toner Cartridge
Rest of APJ (OA Channel)
HP 336A
W1336A
High Yield Black Original LaserJet Toner Cartridge
Rest of APJ (OA Channel)
HP 336X
W1336X
-
If the toner cartridge is a genuine HP supply and the error persists, contact your HP-authorized service or support provider,
or contact customer support at www.hp.com/go/contactHP. support.
C1-1711 or C1-1712 Error
The toner cartridge is not installed. / The CRUM data is not detected.
-
C1-1711, Error: #C1-1711 / Toner Cart Failure: #C1-1711. Call for service
-
C1-1712, Error: #C1-1712 / Toner Cart Failure: #C1-1712. Call for service
Recommended action for customers
-
Open the front cover. Check if the toner cartridge is installed.
-
Remove and reinstall the toner cartridge.
-
If the error persists, check if the toner cartridge modular jack is contaminated or deformed.
-
Remove the toner cartridge.
-
Check the module jack on the toner cartridge.
-
If it is damaged or deformed, replace the toner cartridge.
Part numbers
Item Description
Cartridge number
Part Number
Black Original LaserJet Toner Cartridge
China (IT Channel)
HP 333A
W1333A
High Yield Black Original LaserJet Toner Cartridge
China (IT Channel)
HP 333X
W1333X
Black Original LaserJet Toner Cartridge
China (OA Channel)
HP 334A
W1334A
High Yield Black Original LaserJet Toner Cartridge
China (OA Channel)
HP 334X
W1334X
Black Original LaserJet Toner Cartridge
Rest of AP and EMEA (IT Channel)
HP 335A
W1335A
High Yield Black Original LaserJet Toner Cartridge
Rest of AP and EMEA (IT Channel)
HP 335X
W1335X
Black Original LaserJet Toner Cartridge
Rest of APJ (OA Channel)
HP 336A
W1336A
High Yield Black Original LaserJet Toner Cartridge
Rest of APJ (OA Channel)
HP 336X
W1336X
-
-
If the error persists, contact your HP-authorized service or support provider, or contact customer support at www.hp.com/go/contactHP.
C3-1110 Prepare IMG. Unit / Prepare new imaging unit
The drum unit is approaching the end of its lifespan.
Imaging unit remained is 5 ~ 30% of its life.
Recommended action for call-center agents and onsite technicians
-
The life of the drum unit will be or is expired. prepare a new drum unit.
Note:
The life of the Imaging Unit is approximately 80k pages.
-
If the print quality is no longer acceptable replace the imaging drum unit.
Part number: CF257A
-
Remove imaging drum unit from shipping bag and place it on a clean flat surface.
-
Loosen shipping tape from the bottom and both sides.
-
Remove orange shipping locks from imaging drum unit.
Note:
There shipping locks on each side of the imaging drum unit.
-
Remove remaining shipping tape and pull protective sheet from imaging drum unit.
CAUTION:
Do not touch exposed drum roller surface.
Note:
Do not expose the imaging unit to light for more than a few minutes.
-
Remove orange plug on back of imaging drum unit.
CAUTION:
Once the plug is removed, the imaging drum unit must remain level. Contents may spill out if the imaging drum unit is tipped.
-
Open the front and right doors.
CAUTION:
Leave front and right door open until all installation steps are complete.
-
With right and front doors fully open, carefully lift imaging unit into position, so the bottom of imaging drum unit aligns
with the raised alignment rails inside printer cabinet as shown
CAUTION:
Do not touch exposed drum roller surface.
-
Install imaging drum unit and ensure it is fully seated.
Note:
If imaging unit binds or does not slide easily into cabinet, verify the right door is fully open, realign imaging drum unit,
and install. -
Route the electrical cable into holder as shown and plug in the connector.
CAUTION:
Make sure the connector is fully seated in the socket.
-
Install two screws as shown.
-
Ensure electrical connector is plugged in and fully seated. Ensure the two screws are securely installed.
-
Close the front and right doors.
C3-1140 or C3-1170 Imaging unit error
The imaging unit has almost reached the end of life.
The drum/imaging unit is past its usable life and needs to be replaced. Replace with new imaging unit
-
C3-1140, Replace IMG. Unit / End of life, Replace with new imaging unit
-
C3-1170, Replace IMG. Unit / End of life, Replace with new imaging unit
Recommended action for call-center agents and onsite technicians
-
Check the life remaining of the imaging drum unit.
Note:
The life of the Imaging Unit is approximately 80k pages.
-
If its life is at the end, have the customer purchase a new imaging drum unit
Part number: CF257A, CF257-67902
-
Remove imaging drum unit from shipping bag and place it on a clean flat surface.
-
Loosen shipping tape from the bottom and both sides.
-
Remove orange shipping locks from imaging drum unit.
Note:
There shipping locks on each side of the imaging drum unit.
-
Remove remaining shipping tape and pull protective sheet from imaging drum unit.
CAUTION:
Do not touch exposed drum roller surface.
Note:
Do not expose the imaging unit to light for more than a few minutes.
-
Remove orange plug on back of imaging drum unit.
CAUTION:
Once the plug is removed, the imaging drum unit must remain level. Contents may spill out if the imaging drum unit is tipped.
-
Open the front and right doors.
CAUTION:
Leave front and right door open until all installation steps are complete.
-
With right and front doors fully open, carefully lift imaging unit into position, so the bottom of imaging drum unit aligns
with the raised alignment rails inside printer cabinet as shown
CAUTION:
Do not touch exposed drum roller surface.
-
Install imaging drum unit and ensure it is fully seated.
Note:
If imaging unit binds or does not slide easily into cabinet, verify the right door is fully open, realign imaging drum unit,
and install. -
Route the electrical cable into holder as shown and plug in the connector.
CAUTION:
Make sure the connector is fully seated in the socket.
-
Install two screws as shown.
-
Ensure electrical connector is plugged in and fully seated. Ensure the two screws are securely installed.
-
Close the front and right doors.
C3-1312, C3-1411, C3-1414
The imaging unit is not installed. / The CRUM data is not detected.
-
C3-1312, Error: #C3-1312 / Imaging Unit Failure: #C3-1312. Install IMG. Unit
-
C3-1411, IMG. Not Installed / Imaging unit is not installed. Install the unit
-
C3-1414, Error: #C3-1414 / Imaging Unit Failure: #C3-1414. Install imaging unit again
C3-1512 IMG. Not compatible / Imaging unit is not compatible. Check guide
Imaging unit is not installed. Install the unit.
The imaging unit has an invalid CRUM.
Recommended action
-
Open the front cover. Remove the toner cartridge.
-
Remove the imaging drum unit.
-
Check the part number of the installed imaging drum unit. (HP part numbers are and
Part numbers: CF257A, CF257-67902
For instructions:
-
If the imaging drum unit is not an HP genuine supply, the customer must purchase a new imaging drum unit.
Part number: CF257A
For instructions:
C3-1711, C3-1712 Imaging unit errors
Imaging unit is not installed. Install the unit.
The imaging/drum unit is not installed. / The data of CRUM is not detected.
-
C3-1711, Error: #C3-1711 / Imaging Unit Failure: #C3-1711. Call for service
-
C3-1712, Error: #C3-1712 / Imaging Unit Failure: #C3-1712. Call for service
C9-2210, C9-2120 Prepare TR. Roller / Prepare with new transfer roller
Transfer roller is at the end of its life.
Replace with new transfer roller
Recommended action for customers
-
Replace the transfer roller.
-
Open the side cover.
-
Replace the transfer roller with a new one.
Part number: W7U01-67901
Note:
After an HP supply has reached the very low threshold, the HP Premium Protection Warranty ends and the customer is responsible
for replacing the supply. -
Close the side cover.
-
C9-2220 Error: #C9-2220 / TR Failure: #C9-2220. Install TR roller again
Transfer roller is at the end of its life.
Recommended action for customers
-
Replace the transfer roller.
-
Open the side cover.
-
Replace the transfer roller with a new one.
Part number: W7U01-67901
Note:
After an HP supply has reached the very low threshold, the HP Premium Protection Warranty ends and the customer is responsible
for replacing the supply. -
Close the side cover.
-
H1-1210 Jam in Tray 3
A paper jam occurred in tray 3.
Paper jam has occurred in tray 3. (Pickup roller is worn out.)
Recommended action for customers
-
Open the lower-right jam cover.
-
Gently pull out any jammed paper.
-
Close the lower-right jam cover.
-
Pull the tray completely out of the printer by pulling and lifting it up slightly.
-
Remove any jammed or damaged sheets of paper. Verify that the tray is not overfilled and that the paper guides are adjusted
correctly.
-
With the tray out, check if the paper pickup roller is worn or contaminated. Clean the roller the a water dampened lint free
cloth.
-
Open the right door.
-
Gently pull out any jammed paper.
-
Close the right door.
-
If the error persists, contact your HP-authorized service or support provider, or contact customer support at www.hp.com/go/contactHP.
H1-1220
Tray 3 cassette is pulled out.
Tray 3 is open. Close it
Recommended action for customers
-
Remove and insert tray 3 correctly.
-
Turn the printer off, and then on.
-
If the error persists, contact your HP-authorized service or support provider, or contact customer support at www.hp.com/go/contactHP.
H1-1230 Input System Failure: #H1-1230. Check tray 3 connection
Communication error has occurred between the copier and SCF.
Recommended action for customers
Follow these troubleshooting steps in the order presented.
-
Turn the printer off, and then on.
-
If the error persists, contact your HP-authorized service or support provider, or contact customer support at www.hp.com/go/contactHP.
H1-1352 / H1-1354 Paper empty in tray 3 / Paper is empty in tray 3. Load paper
Paper is low in Tray 3. Load paper.
Paper in the tray is less than 10% of specification. / The photo sensor is not functioning correctly.
Recommended action for customers
-
Load the correct size paper in the tray.
-
Ensure that the tray is loaded and installed correctly.
-
If the error persists, contact your HP-authorized service or support provider, or contact customer support at www.hp.com/go/contactHP.
M1-1110 Paper jam in tray 2
Paper jam in Tray 2. Please remove the paper
A paper jam has occurred in Tray 2.
Recommended action for customers
-
Pull the tray completely out of the printer by pulling and lifting it up slightly.
-
Remove any jammed or damaged sheets of paper. Verify that the tray is not overfilled and that the paper guides are adjusted
correctly.
-
Gently remove any paper from the feed rollers inside the printer. First pull the paper to the left to release it, and then
pull it forward to remove it.
-
With the tray out, check and clean the paper rollers in the tray with a damp lint free cloth.
-
Install and close the tray.
-
Open the right door.
-
Gently pull out any jammed paper.
-
Close the right door.
-
If the error persists, contact your HP-authorized service or support provider, or contact customer support at www.hp.com/go/contactHP.
M1–1610 Paper jam in MP tray 1
Paper jam in MP tray 1. Please remove the paper
A paper jam has occurred in tray 1.
Recommended action for customers
-
If jammed paper is visible in Tray 1, clear the jam by gently pulling the paper straight out.
-
Open the right door.
-
Gently pull out any jammed paper.
-
Close the right door.
-
If the error persists, contact your HP-authorized service or support provider, or contact customer support at www.hp.com/go/contactHP.
M1-5112, M1-5113 Paper empty in tray 2 / Paper is empty in tray 2. Load paper
Paper is low in Tray 2. Load paper. Paper is empty in Tray 2. Load paper.
Paper in the tray 2 is less than 10%. / The photo sensor is defective.
Recommended action for customers
-
Load the correct size paper in the tray.
-
Ensure that the tray is loaded and installed correctly.
-
If the error persists, contact your HP-authorized service or support provider, or contact customer support at www.hp.com/go/contactHP.
M1–5120 All Trays Empty / Paper is empty in all trays. Load paper
Paper in the all tray is less than 10% of specification. / The photo sensor is defective.
Recommended action for customers
-
Load the correct size paper in the tray.
-
Ensure that the tray is loaded and installed correctly.
-
If the error persists, contact your HP-authorized service or support provider, or contact customer support at www.hp.com/go/contactHP.
M1-5610, Paper Normal in tray 1
Paper on MP tray 1 is normal.
M1-5612 Paper empty in tray 1 / Paper is empty in tray 1. Load paper
Paper is empty in tray 1. Load paper.
Paper in the MP tray is empty. The photo sensor is defective.
Recommended action for customers
-
Load the correct size paper in the tray.
-
Ensure that the tray is loaded and installed correctly.
-
If the error persists, contact your HP-authorized service or support provider, or contact customer support at www.hp.com/go/contactHP.
M2-1110, M2-2210 Paper jam inside of machine.
Paper jam inside of machine. Please remove the paper
-
M2-1110, Jam inside machine
-
M2-2210, Jam inside of duplex
Recommended action for customers
-
Open the right side cover.
-
Open the jam guide and remove the jammed paper.
-
Open the fuser jam cover and remove the jammed paper.
CAUTION:
The fuser area is hot. Take care when removing paper from the printer.
-
Close the right door.
-
If the error persists, contact your HP-authorized service or support provider, or contact customer support at www.hp.com/go/contactHP.
M3–1110 Jam in exit area
Paper jam in exit area. Please remove the paper; Paper jam inside of machine. Please remove the paper
Recommended action for customers
-
Open the right side cover.
-
Open the jam guide and remove the jammed paper.
-
Open the fuser jam cover and remove the jammed paper.
CAUTION:
The fuser area is hot. Take care when removing paper from the printer.
-
Close the right door.
-
If the error persists, contact your HP-authorized service or support provider, or contact customer support at www.hp.com/go/contactHP.
S2-3110 Waiting for low temp / Waiting delay time for lower fixing temperature…
The printer is stopped because the temperature of the fuser unit is in abnormal status.
Recommended action
-
Please wait. This error will disappear.
S2-3321 Supplying Toner / Supplying and mixing toner to developer unit. Please wait…
Toner is being supplied to the developer unit.
Recommended action
-
No action needed. Wait until error disappears.
S2-3421 Calibrating density / Calibrating image density. Please wait…
The printer is calibrating.
Recommended action
-
No action needed. Wait until error disappears.
S2–4210 Front door is open. Close it
Front door is open. Close it.
Front cover is open or the cover open sensor is defective.
Recommended action for customers
-
Close the cover.
-
If the error persists, open and close the cover and ensure it is correctly closed.
-
If the error persists, contact your HP-authorized service or support provider, or contact customer support at www.hp.com/go/contactHP.
S2–4410 Right door is open. Close it
Right door is open. Close it.
Side cover is open or the cover open sensor is defective.
Recommended action for customers
-
Close the cover.
-
If the error persists, open and close the cover and ensure it is correctly closed.
-
If the error persists, contact your HP-authorized service or support provider, or contact customer support at www.hp.com/go/contactHP.
S3-3211
Automatic document feeder communication error.
Communication error occurred between the automatic document feeder and the PBA.
Recommended action for customers
Follow these troubleshooting steps in the order presented.
-
Turn the printer off, and then on.
-
If the error persists, contact your HP-authorized service or support provider, or contact customer support at www.hp.com/go/contactHP.
S3-3122 Scanner Locked / Scanner is locked. Press Stop button
Scanner lock error has occurred. scanner image bar does not move.
Recommended action for customers
Follow these troubleshooting steps in the order presented.
-
Turn the printer off, and then on.
-
If the error persists, contact your HP-authorized service or support provider, or contact customer support at www.hp.com/go/contactHP.
S6-3123 IP Conflict / This IP address conflicts with that of other system
IP address conflicts with that of other system. / There is no response when checking the ping test.
Recommended action
-
Change the printer’s IP address.
-
Set-up the IP address in this order, Network -> TCP/IP (IPv4) -> STATIC.
-
In case of DHCP or Bootp, reboot the printer to receive a new IP address.
-
-
Check the setting-up for 802.1x confirmation server.
U1-2132, U1-2315, U1-2320, U1-2330, U1-2334, U1-2340, U1-234H Fuser unit failure errors
Fuser Unit Failure: #U1-2xxx Turn off then on.
The thermistor can’t measure temperature. The hear-roller will not heat-up. / Temperature of the fuser increases abnormally.
-
U1-2132, Error: #U1-2132 / Fuser Unit Failure: #U1-2132. Turn off then on. Call for service if the problem persists
-
U1-2315, Error: #U1-2315 / Fuser Unit Failure: #U1-2315. Turn off then on. Call for service if the problem persists
-
U1-2320, Error: #U1-2320 / Fuser Unit Failure: #U1-2320. Turn off then on. Call for service if the problem persists
-
U1-2330, Error: #U1-2330 / Fuser Unit Failure: #U1-2330. Turn off then on. Call for service if the problem persists
-
U1-2334, Error: #U1-2334 / Fuser Unit Failure: #U1-2334. Turn off then on. Call for service if the problem persists
-
U1-2340, Error: #U1-2340 / Fuser Unit Failure: #U1-2340. Turn off then on. Call for service if the problem persists
-
U1-234H, Error: #U1-234H / Fuser Unit Failure: #U1-234H. Turn off then on. Call for service if the problem persists
Recommended action for customers
Follow these troubleshooting steps in the order presented.
-
Turn the printer off, and then on.
-
If the error persists, contact your HP-authorized service or support provider, or contact customer support at www.hp.com/go/contactHP.
U2-1111, U2-1112, U2-1113, U2-1114 LSU failure errors
LSU Failure: #U2-111x Turn off then on. Call for service if the problem persists
Hsync signal of the LSU is abnormal.
-
U2-1111, Error: #U2-1111 / LSU Failure: #U2-1111.Turn off then on. Call for service if the problem persists
-
U2-1112, Error: #U2-1112 / LSU Failure: #U2-1112.Turn off then on. Call for service if the problem persists
-
U2-1113, Error: #U2-1113 / LSU Failure: #U2-1113.Turn off then on. Call for service if the problem persists
-
U2-1114, Error: #U2-1114 / LSU Failure: #U2-1114.Turn off then on. Call for service if the problem persists
Recommended action for customers
Follow these troubleshooting steps in the order presented.
-
Turn the printer off, and then on.
-
If the error persists, contact your HP-authorized service or support provider, or contact customer support at www.hp.com/go/contactHP.
U3-3211, U3-3213, U3-3214, U3-3311, U3-3313, U3-3314 Original paper jam / Original paper jam inside of scanner. Remove jam
Original paper jam inside of automatic document feeder.
Jam has occurred inside the automatic document feeder unit.
Recommended action for customers
-
Open the document-feeder cover.
-
Gently remove any jammed paper.
-
Open the duplex/exit access cover and remove any paper present.
-
Lift the input tray and remove any paper found in the exit area.
-
Use a moist, lint-free cloth to wipe both pickup rollers and the separation pad to remove dirt.
CAUTION:
Do not use abrasives, acetone, benzene, ammonia, ethyl alcohol, or carbon tetrachloride on any part of the printer; these
can damage the printer. Do not place liquids directly on the glass or platen. They might seep and damage the printer. -
Close the document-feeder cover.
-
If the error persists, contact your HP-authorized service or support provider, or contact customer support at www.hp.com/go/contactHP.
U3-3411, U3-3413, U3-3414 Original paper jam / Original paper jam inside of scanner. Remove jam
Original paper jam inside of automatic document feeder.
Jam has occurred inside the automatic document feeder unit.
Recommended action for customers
-
Open the document-feeder cover.
-
Gently remove any jammed paper.
-
Open the duplex/exit access cover and remove any paper present.
-
Lift the input tray and remove any paper found in the exit area.
-
Use a moist, lint-free cloth to wipe both pickup rollers and the separation pad to remove dirt.
CAUTION:
Do not use abrasives, acetone, benzene, ammonia, ethyl alcohol, or carbon tetrachloride on any part of the printer; these
can damage the printer. Do not place liquids directly on the glass or platen. They might seep and damage the printer. -
Close the document-feeder cover.
-
If the error persists, contact your HP-authorized service or support provider, or contact customer support at www.hp.com/go/contactHP.
U3-3511, U3-3513, U3-3514 Original paper jam / Original paper jam inside of scanner. Remove jam
Original paper jam inside of scanner.
Jam has occurred inside the automatic document feeder unit.
Recommended action for customers
-
Open the document-feeder cover.
-
Gently remove any jammed paper.
-
Open the duplex/exit access cover and remove any paper present.
-
Lift the input tray and remove any paper found in the exit area.
-
Use a moist, lint-free cloth to wipe both pickup rollers and the separation pad to remove dirt.
CAUTION:
Do not use abrasives, acetone, benzene, ammonia, ethyl alcohol, or carbon tetrachloride on any part of the printer; these
can damage the printer. Do not place liquids directly on the glass or platen. They might seep and damage the printer. -
Close the document-feeder cover.
-
If the error persists, contact your HP-authorized service or support provider, or contact customer support at www.hp.com/go/contactHP.
U3-3711, U3-3713, U3-3714 Original paper jam / Original paper jam inside of scanner. Remove jam
Original paper jam / Original paper jam inside of automatic document feeder. Remove jam
Jam has occurred inside the automatic document feeder unit.
Recommended action for customers
-
Open the document-feeder cover.
-
Gently remove any jammed paper.
-
Open the duplex/exit access cover and remove any paper present.
-
Lift the input tray and remove any paper found in the exit area.
-
Use a moist, lint-free cloth to wipe both pickup rollers and the separation pad to remove dirt.
CAUTION:
Do not use abrasives, acetone, benzene, ammonia, ethyl alcohol, or carbon tetrachloride on any part of the printer; these
can damage the printer. Do not place liquids directly on the glass or platen. They might seep and damage the printer. -
Close the document-feeder cover.
-
If the error persists, contact your HP-authorized service or support provider, or contact customer support at www.hp.com/go/contactHP.
U3–4210 Scanner door open / Top door of scanner is open. Close the door
Automatic document feeder cover is open.
Recommended action for customers
-
Ensure the document-feeder cover is closed correctly.
-
If the error persists, contact your HP-authorized service or support provider, or contact customer support at www.hp.com/go/contactHP.
-
Catalog
-
Sign In
-
Contacts
-
Forum
-
Eng
- Service Mode, Troubleshooting
- HP
- LaserJet M72630 MFP
- #2149
Troubleshooting. 07 Document feeder is not recognized or S3-3211 error occurs
Symptoms
- The document feeder installation is not recognized.
- An S3-3211 error occurs and copying must be performed using the scanner glass.
Cause
The document feeder power cable has failed.
Troubleshooting
- Remove and reinstall the document feeder power cable. If this does not resolve the problem, replace the cable.
- Secure the power cable with a cable tie.

–
–
–
–
–
You are here: Home / error code / HP LaserJet MFP M436dn error codes with quick guide
– Compatible Printer model: HP LaserJet MFP M436dn
– HP LaserJet MFP M436dn Error Codes with instructions guide:
HP LaserJet MFP M436dn
- Code: 11-2T11
- Display: 11-2T11, Paper mismatch Tray 2 Load [A4] [Plain] Continue • Cancel X
- Description: Paper in tray 2 is not proper.
- Remedy: If you want to print the current paper, press “OK”. If not, select “X” and change the paper.
- Code: 11-2T21
- Display: 11-2T21, Paper mismatch Tray 3 Load [A4] [Plain] Continue • Cancel X
- Description: Paper in tray 3 is not proper.
- Remedy: If you want to print the current paper, press “OK”. If not, select “X” and change the paper.
- Code: 11-2T61
- Display: 11-2T61, Paper mismatch Tray 1Load [A4] [Plain] Continue • Cancel X
- Description: Paper in tray 1 is not proper.
- Remedy: If you want to print the current paper, press “OK”. If not, select “X” and change the paper.
- Code: A1-1110
- Display: A1-1110, Error: #A1-1110 / Motor Failure: #A1-1110. Turn off then on. Call for service if the problem persists
- Description: The Main Motor, its harness, or the Main Board PBA is defective.
- Remedy: 1. Turn the printer off then on. 2. If the error persists, send an on-site technician to perform the remaining steps. 3. Turn the printer off. 4. Remove the rear cover. 5. Check the connection the motor connector on main board is connected properly. Reconnect the harness. 6. If the connection is OK, replace the Main Motor (HP Part #: SAM-JC31–00145A).7. If the problem persists, replace the Main Board PBA:M436n/M436dn SAM-JC92–02607G
M436nda SAM-JC92–02607H
- Code: A1-5513
- Display: A1–5513, Error: #A1–5513 / Motor Failure: #A1-1110. Turn off then on. Call for service if the problem persists
- Description: The motor related to toner supply has a problem.
- Remedy: action1. Turn the printer off then on.2. If the error persists, send an on-site technician to perform the remaining steps.3. Open the front cover. If the toner pipe is blocked, open it.4. Check the seal is removed on toner and cartridge drum.5. Turn the printer off then on. If the error persists, check the following steps.6. From the control panel, enter Tech Mode and select the toner supply motor test: Menu > # > 10043616 > Menu > Tech Menu > Diagnostics > Engine Diagnostics > Engine Test Routines > 111–00307. If the motor does not operate, measure the motor power with DVM. a. If 24V power is supplied, replace the Toner Drive Motor (HP Part #: SAM-JC31–00078A).b. If 24V power is not supplied, check the LVPS-SMPS Power Supply and Main Board PBA.c. If 24V power is not generated, replace the LVPS-SMPS Power Supply (HP Part #: SAM-JC44-00223A) AND Main Board PBA: M436n/M436dn SAM-JC92–02607G
M436nda SAM-JC92–02607H d. If the control signal is abnormal, replace the Main Board PBA: M436n/M436dn SAM-JC92–02607G M436nda SAM-JC92–02607H
- Code: A2-1210
- Display: A2-1210, Error: #A2-1210 / Fan Failure: #A2-1210. Turn off then on. Call for service if the problem persists
- Description: SMPS fan does not operate.
- Remedy: 1. Turn the printer off then on.2. If the error persists, send an on-site technician to perform the remaining steps.3. Turn the printer off.4. Check if the SMPS fan connector is connected to the main board correctly.5. If the connection is OK, replace the SMPS Fan (HP Part #: SAM-JC31–00152B).
- Code: A2-2110
- Display: A2-2110, Error: #A2-2110 / Fan Failure: #A2-2110. Turn off then on. Call for service if the problem persists
- Description: Fuser fan does not operate.
- Remedy: 1. Turn the printer off then on.2. If the error persists, send an on-site technician to perform the remaining steps.3. Turn the printer off.4. Remove the rear cover.5. Check if the fuser fan connector is connected to the main board correctly. 6. If the connection is OK, replace the Fuser Fan (HP Part #: SAM-JC31–00160A).
- Code: A3-3311, A3-3312, A3-3320
- Display: A3-3311, A3-3312, A3-3320, A3-3411, A3-3412 Sensor errors
- Description: –A3-3311, Error: #A3-3311 / Sensor Failure: #A3-3311. Turn off then on. Call for service if the problem persists–A3-3312, Error: #A3-3312 / Sensor Failure: #A3-3312. Turn off then on. Call for service if the problem persists–A3-3320, Not proper Room Temp / The room temperature is not suitable for this set use. Please adjust room temperature–A3-3411, Error: #A3-3411 / Sensor Failure: #A3-3411. Turn off then on. Call for service if the problem persists–A3-3412, Error: #A3-3412 / Sensor Failure: #A3-3412. Turn off then on. Call for service if the problem persists
Temperature/Humidity sensor is defective. - Remedy: 1. Turn the printer off then on.2. If the error persists, send an on-site technician to perform the remaining steps.3. Remove the left cover. 4. Measure the resistance value of the connector at both ends.› If the values is not in 10KOm +- 1% (@ 25 C), replace the Temp./humidity Sensor (HP Part #: SAM-JC66.03969A). 5. If the sensor is normal, replace the Main Board PBA: M436n/M436dn SAM-JC92–02607G M436nda SAM-JC92–02607H
- Code: A3-3411, A3-3412
- Display: A3-3311, A3-3312, A3-3320, A3-3411, A3-3412 Sensor errors
- Description: –A3-3311, Error: #A3-3311 / Sensor Failure: #A3-3311. Turn off then on. Call for service if the problem persists–A3-3312, Error: #A3-3312 / Sensor Failure: #A3-3312. Turn off then on. Call for service if the problem persists–A3-3320, Not proper Room Temp / The room temperature is not suitable for this set use. Please adjust room temperature–A3-3411, Error: #A3-3411 / Sensor Failure: #A3-3411. Turn off then on. Call for service if the problem persists–A3-3412, Error: #A3-3412 / Sensor Failure: #A3-3412. Turn off then on. Call for service if the problem persists
Temperature/Humidity sensor is defective. - Remedy: 1. Turn the printer off then on.2. If the error persists, send an on-site technician to perform the remaining steps.3. Remove the left cover. 4. Measure the resistance value of the connector at both ends.› If the values is not in 10KOm +- 1% (@ 25 C), replace the Temp./humidity Sensor (HP Part #: SAM-JC66.03969A). 5. If the sensor is normal, replace the Main Board PBA: M436n/M436dn SAM-JC92–02607G M436nda SAM-JC92–02607H
- Code: C1-1110, C1-111A
- Display: C1-1110, C1-111A Toner error
- Description: –C1-1110, Prepare new toner / Prepare new toner cartridge–C1-111A, Shake toner cart. / Shake toner cartridge and then install. Replace toner cartridge if the problem persists
Toner remaining is 5 ~ 30% of its life. - Remedy: 1. Check the life remaining of the toner cartridge.2. Open the front cover. 3. Take out the toner cartridge. 4. Shake the toner cartridge horizontally to distribute the toner evenly inside the cartridge. 5. Reinstall the toner cartridge. 6. If the toner cartridge yield is expired, have the customer purchase a new toner cartridge (HP Part #: CF-256A).
- Code: C1-1140, C1-1160, C1-1170
- Display: C1-1140, C1-1160, C1-1170 Toner errors
- Description: – C1-1140, Replace new toner / End of life, Replace with new toner cartridge – C1-1160, Replace new toner / Replace with new toner cartridge – C1-1170, Replace new toner / End of life, Replace with new toner cartridge
The toner cartridge is at the end of its life. - Remedy: 1. Check the life remaining of the toner cartridge. 2. If the toner cartridge yield is expired, have the customer purchase a new toner cartridge (HP Part #: CF-256A).
- Code: C1-1313, C1-1314
- Display: C1-1313, C1-1314 Errors
- Description: – C1-1313, Shake toner cart. / Shake toner cartridge and then install. Call for service if the problem persists – C1-1314, Remove seal tape / Did not supply enough toner. Remove seal tape of toner cartridge or shake it. Call for service if the problem persists
Toner supply is inefficient or abnormal. - Remedy: 1. Turn the printer off. 2. Open the front cover. 3. Take out the toner cartridge. 4. Shake the toner cartridge horizontally to distribute the toner evenly inside the cartridge. 5. Check if the seal tape is removed. If not, remove it. 6. If the error persists, send an on-site technician to perform the remaining steps. 7. Remove the rear cover. 8. From the control panel, enter Tech Mode and run the toner drive motor test: Menu > # > 10043616 > Menu > Tech Menu > Diagnostics > Engine > Test Routines > 111.Toner > 0030. Supply Mot K £ If the test fails, replace the Toner Drive Motor (HP Part #: SAM-JC31.00078A). 9. If the problem persists, replace the toner cartridge (HP Part #: CF256A-67901).
- Code: C1-1411
- Display: C1-1411 Toner Not Installed / Toner cartridge is not installed. Install it
- Description: The toner cartridge is not installed or not detected.
- Remedy: 1. Open the front cover. Check if the toner cartridge is installed.2. Remove and reinstall the toner cartridge.3. If the error persists, check if the toner cartridge modular jack is contaminated or deformed.£ If the jack is damaged, replace the cartridge (HP Part #: CF256A-67901). 4. Replace the toner cartridge with a new one (HP Part #: CF256A-67901).
- Code: C1-1512
- Display: C1-1512, Toner Not Compatible / Toner cartridge is not compatible. Check guide
- Description: Toner cartridge is not compatible.
- Remedy: 1. Open the front cover. Check if the toner cartridge is installed.2. Remove the toner cartridge and re-install.3. If the error persists, remove the toner cartridge. 4. If the toner cartridge is not HP genuine, have the customer purchase a new toner cartridge (HP Part #: CF-256A).
- Code: C1-1711, C1-1712
- Display: C1-1711, C1-1712 Errors
- Description: –C1-1711, Error: #C1-1711 / Toner Cart Failure: #C1-1711. Call for service–C1-1712, Error: #C1-1712 / Toner Cart Failure: #C1-1712. Call for service The toner cartridge is not installed or not detected.
- Remedy: 1. Open the front cover. Check if the toner cartridge is installed.2. Remove the toner cartridge and re-install.3. If the error persists, check if the toner cartridge modular jack is contaminated or deformed.£ If the jack is damaged, replace the cartridge (HP Part #: CF256A-67901).
- Code: C3-1110
- Display: C3-1110, Prepare IMG. Unit / Prepare new imaging unit
- Description: Imaging unit remaining is 5 ~ 30% of its life.
- Remedy: 1. Check the life remaining of the drum unit. 2. If its life is at the end, turn the printer off and open the front cover. 3. Remove the toner cartridge. 4. Have the customer purchase a new Imaging Unit (HP Part #: CF257A).
- Code: C3-1140, C3-1150, C3-1170
- Display: C3-1140, C3-1150, C3-1170 Imaging unit errors
- Description: – C3-1140, Replace IMG. Unit / End of life, Replace with new imaging unit – C3-1150, Replace IMG. Unit / Replace with new imaging unit – C3-1170, Replace IMG. Unit / End of life, Replace with new imaging unit
The imaging unit has almost reached the end of its life. - Remedy: 1. Check the life remaining of the Imaging Unit. NOTE: The life of the Imaging Unit is approximately 80k pages. 2. If its life is at the end, have the customer purchase a new Imaging Unit (HP Part #: CF257A).
- Code: C3-1312, C3-1411, C3-1414
- Display: C3-1312, C3-1411, C3-1414 Imaging unit errors
- Description: – C3-1312, Error: #C3-1312 / Imaging Unit Failure: #C3-1312. Install IMG. Unit – C3-1411, IMG. Not Installed / Imaging unit is not installed. Install the unit – C3-1414, Error: #C3-1414 / Imaging Unit Failure: #C3-1414. Install imaging unit again
The imaging unit is not installed or not detected. - Remedy: 1. Open the front cover. Check if the imaging unit is installed. 2. Remove and reinstall the imaging unit. 3. If the error persists, check if the Imaging Unit connector is contaminated or deformed. £ If the connector is damaged, replace the Imaging Unit (HP Part #: CF257.67901). 4. If the error persists, replace the Imaging Unit (HP Part #: CF257.67901).
- Code: C3-1512
- Display: C3-1512, IMG. Not compatible / Imaging unit is not compatible. Check guide
- Description: The imaging unit is not installed or not detected.
- Remedy: 1. Open the front cover. Remove the toner cartridge. 2. Remove and reinstall the Imaging Unit. 3. Install the toner cartridge and close the front cover.. 4. Check the part # of the installed Imaging Unit. (HP part numbers are CF257A and CF257.67901.) £ If the Imaging Unit is not HP genuine, have the customer purchase a new Imaging Unit (HP Part #: CF257A).
- Code: C3-1711, C3-1712
- Display: C3-1711, C3-1712 Imaging unit errors
- Description: – C3-1711, Error: #C3-1711 / Imaging Unit Failure: #C3-1711. Call for service – C3-1712, Error: #C3-1712 / Imaging Unit Failure: #C3-1712. Call for service
The imaging unit is not installed or not detected. - Remedy: 1. Open the front cover. Check if the imaging unit is installed. 2. Remove and reinstall the Imaging Unit. 3. If the error persists, check if the Imaging Unit connector is contaminated or deformed. £ If the connector is damaged, replace the Imaging Unit (HP Part #: CF257.67901). 4. If the error persists, replace the Imaging Unit (HP Part #: CF257.67901).
- Code: C9-2110, C9-2120
- Display: C9-2110, C9-2120, Prepare TR. Roller / Prepare with new transfer roller
- Description: Transfer roller is at the end of its life.
- Remedy: 1. Open the side cover.2. Have the customer purchase a new Transfer Roller Kit (HP Part #: W7401–67901).
- Code: C9-2220
- Display: C9-2220, Error: #C9-2220 / TR Failure: #C9-2220. Install TR roller again
- Description: Transfer roller is at the end of its life.
- Remedy: 1. Open the side cover. 2. Have the customer purchase a new Transfer Roller Kit (HP Part #: W7401–67901). 3. If the error persists, send an on-site technician to replace the HVPS Board (HP Part #: SAM-JC44–00229A).
- Code: H1-1210
- Display: H1-1210, Paper jam in tray 2
- Description: Paper jam has occurred in tray 2. (Pickup roller is worn out.)
- Remedy: 1. Open the SCF right cover. Remove the jammed paper.2. Remove tray 2. Remove the jammed paper.3. Check if the pickup roller is worn out or contaminated.4. Clean the pickup roller with a lint free cloth and water only.5. If the error persists, send an on-site technician to replace the Pickup Roller and Friction Pad Kit (HP Part #: W7U01–67903).
- Code: H1-1220
- Display: H1-1220 Tray 2 door is open. Close it
- Description: Tray 2 cassette is pulled out. Insert it properly.
- Remedy: 1. Remove and insert tray 2 correctly.2. If the message persists, send an on-site technician to perform the remaining steps.3. Replace the tray 2 Photo Sensor (HP Part # SAM-0604–01393).4. If the message persists, replace the PBA Board, Secondary Cassette Feed (HP Part #: SAM-JC92–02511C).

- Code: H1-1230
- Display: H1-1230, Error: #H1-1230 / Input System Failure: #H1-1230. Check tray 3 connection
- Description: Communication error has occurred between the copier and SCF.
- Remedy: 1. Turn the printer off the on.2. If the error persists, send an on-site technician to perform the remaining steps.3. Disassemble the SCF unit.4. Check if the interface cable on SCF main board is connected correctly.5. If the error persists, replace the PBA Board, Secondary Cassette Feed (HP Part #: SAM-JC92–02511C).6. Install the copier on the SCF unit.
- Code: H1-1252, H1-1254
- Display: H1-1252, H1-1254, Paper empty in tray 2 / Paper is empty in tray 3. Load paper
- Description: Paper in tray 2 is empty or near empty. / The photo sensor is defective.
- Remedy: 1. Remove tray 2 and load the paper.2. If the message persists, send an on-site technician to replace the SCF Cassette Tray (HP Part #: SAM-JC90–01226B).
- Code: M1-1110
- Display: M1-1110, Paper jam in tray 1
- Description: Paper jam has occurred in tray 1.
- Remedy: 1. Open the side cover and check if a foreign substance or paper is jammed inside the unit.2. Remove tray 1 and remove the jammed paper. 3. If the jam error occurs frequently, send an on-site technician to replace the Pickup Roller and Friction Pad Kit (HP Part #: W7U01–67903).
- Code: M1-1610
- Display: M1-1610, Paper jam in tray 1
- Description: Paper jam has occurred in tray 1.
- Remedy: 1. Open the side cover and check if a foreign substance or paper is jammed inside the unit.2. Remove the jammed paper from tray 1.3. If the jam error occurs frequently, send an on-site technician to replace the Pickup Roller and Friction Pad Kit (HP Part #: W7U01–67903). 4. If the error persists, replace the Clutch (HP Part #: SAM-JC66–03983A).
- Code: M1-5112, M1-5113
- Display: M1-5112, M1-5113, Paper empty in tray 1 / Paper is empty in tray 1. Load paper
- Description: Paper in tray 1 is empty or almost empty. / The photo sensor is defective.
- Remedy: IMPORTANT: Before following the instruction below, remove the toner cartridge and imaging unit. If not, toner will pour inside the printer. 1. Remove tray 1 and load paper. 2. If the message persists, send an on-site technician to perform the remaining steps. 3. Remove the tray 1 and stand the copier on its left side to see the bottom. 4. Actuate the Empty Sensor to see if it moves freely. Replace the Empty Sensor if needed (HP Part #: SAM-0604–001393). 5. Check if the Empty Actuator is assembled correctly. If the actuator is defective, replace it (HP Part #: SAM-JC61–01350A).
- Code: M1-5120
- Display: M1-5120, All Trays Empty / Paper is empty in all trays. Load paper
- Description: Paper in all trays is empty or near empty. / The photo sensor is defective.
- Remedy: Refer to “H1–1252, M1–5112, M1–5612” troubleshooting.
- Code: M1-5610
- Display: M1-5610, Paper Normal in Tray 1
- Description: Paper in tray 1 is normal.
- Remedy: This message shows the printer can print the page from Tray 1 normally.
- Code: M1-5612
- Display: M1-5612, Paper empty in Tray 1. Load paper
- Description: Paper in tray 1 is empty or almost empty. / The photo sensor is defective.
- Remedy: 1. Load paper in tray 1. 2. If the message persists, send an on-site technician to perform the remaining steps. 3. Remove the toner cartridge and Imaging Unit. 4. Stand the copier on end to see the bottom. IMPORTANT: Before doing this, remove the toner cartridge and imaging unit. If not, toner will pour inside the printer. 5. Check if the Tray 1 Empty Sensor works normally. If needed, replace it (HP Part #: SAM-0604–001393). 6. Check if the Tray 1 Empty Actuator is assembled correctly. If needed, replace it (HP Part #: SAM-JC66– 03979A).
- Code: M2-1110, M2-2210
- Display: M2-1110, M2-2210 Jam inside errors
- Description: –M2-1110, Jam inside printer –M2-2210, Jam inside of duplex
Paper jam has occurred inside the printer. - Remedy: 1. Open the side cover. Remove the jammed paper.2. If the error persists, send an on-site technician to perform the remaining steps.3. If jammed paper occurs continually, check the following.a. Check if there is any obstacle or contamination on paper path. Remove and clean it.b. From the control panel, enter Tech Mode and execute the main motor tests:Menu > # > 10043616 > Menu > Tech Menu > Diagnostics > Engine Diagnostics > Engine Test Routines > 100 – Motor > 0000 – Main Motor & 0001 — Main Slowc. If the motor operation has a problem, turn the printer off.d. Remove the rear cover.e. Check if the main motor cable is connected correctly. Reconnect the cable. f. If the connection is OK, replace the Main Motor (HP Part #: SAM-JC31–00145A).g. Check if the Regi Sensor connector is connected correctly.h. If the error persists, replace the Regi Sensor (HP Part # SAM-0604–001393).
- Code: M3-1110
- Display: M3-1110, Jam in exit area
- Description: Paper jam has occurred in the exit area.
- Remedy: 1. Remove any jammed paper from the output tray.2. If the message persists, send an on-site technician to perform the remaining steps.3. Turn the printer off.4. Remove the Exit Unit. If there are any defective parts, replace the Exit Unit (HP Part #: SAM-JC90.01221A).5. Check if the Exit Motor works normally.£ Unplug and reconnect the motor cable. If the connection is OK, replace the Exit Motor (HP Part #: SAM-JCP3.00452A). 6. If the message continually displays, replace the Fuser Unit (HP Part #: SAM-JC91–01217).
- Code: S2-331D
- Display: S2-331D, Waiting for low temp / Waiting delay time for lower fixing temperature…
- Description: The printer is stopped because the temperature of the Fuser Unit is in an abnormal state.
- Remedy: Please wait. This error will disappear.
- Description: The printer is calibrating.
- Remedy: Please wait. This error will disappear.
- Code: S2-4210
- Display: S2-4210, Front door is open. Close it
- Description: Front cover is open or the cover open sensor is defective.
- Remedy: 1. Check if the front cover is closed correctly.2. If the message persists, send an on-site technician to perform the remaining steps.3. Check if the cover open sensor connector is connected properly. Reconnect it.4. If the sensor is defective, replace it (HP Part #: SAM-0604–01393).
- Code: S2-4410
- Display: S2-4410, Right door is open. Close it
- Description: Side cover is open or the cover open sensor is defective.
- Remedy: 1. Check if the side cover is closed correctly.2. If the message persists, send an on-site technician to perform the remaining steps.3. Check if the cover open sensor connector is connected properly. Reconnect it.4. If the sensor is defective, replace it (HP Part #: SAM-0604–01393).
- Code: S3-3122
- Display: S3-3122, Scanner Locked / Scanner is locked. Press Stop button
- Description: Scanner lock error has occurred. Scanner Imaging Bar (SIB) does not move.
- Remedy: 1. Turn the printer off then on.2. If the error persists, send an on-site technician to perform the remaining steps.3. Check if the Scanner Imaging Bar (SIB) unit is moving when powering on.4. Check if the flat cable is connected to the SIB unit properly. Reconnect or replace the flat flexible cable (HP Part # SAM-JC39.02518A).5. If the SIB is defective, replace it (HP Part #: SAM-0609.001508).6. Check if there is any defective part in the scanner unit. (Belt, Motor etc.)
› Belt
› Scan Motor
Motor7. If the error persists, replace the Main Board PBA: M436n/M436dn SAM-JC92–02607G M436nda SAM-JC92–02607H
- Code: S6-3123
- Display: S6-3123, IP Conflict / This IP address conflicts with that of other system
- Description: IP address conflicts with that of other system. / There is no response when checking the ping test.
- Remedy: Change the printer’s IP address.– Set-up the IP address in this order, Network -> TCP/IP (IPv4) -> STATIC.– In case of DHCP or Bootp, reboot the printer to receive a new IP address.
- Code: U1-2132, U1-2315, U1-2320
- Display: U1-2132, U1-2315, U1-2320, U1-2330, U1-2334, U1-2340, U1-234H Fuser unit failure errors
- Description: –U1-2132, Error: #U1-2132 / Fuser Unit Failure: #U1-2132. Turn off then on. Call for service if the problem persists–U1-2315, Error: #U1-2315 / Fuser Unit Failure: #U1-2315. Turn off then on. Call for service if the problem persists–U1-2320, Error: #U1-2320 / Fuser Unit Failure: #U1-2320. Turn off then on. Call for service if the problem persists–U1-2330, Error: #U1-2330 / Fuser Unit Failure: #U1-2330. Turn off then on. Call for service if the problem persists–U1-2334, Error: #U1-2334 / Fuser Unit Failure: #U1-2334. Turn off then on. Call for service if the problem persists–U1-2340, Error: #U1-2340 / Fuser Unit Failure: #U1-2340. Turn off then on. Call for service if the problem persists–U1-234H, Error: #U1-234H / Fuser Unit Failure: #U1-234H. Turn off then on. Call for service if the problem persists
The temperature control of the Fuser Unit is abnormal. - Remedy: 1. Turn the printer off then on.2. If the error persists, send an on-site technician to perform the remaining steps.3. Turn the printer off, remove, then re-install the Fuser Unit.4. If the error persists. Turn the printer off and remove the Fuser Unit.a. Check the fuser connector for bent or broken pins.b. Check if the input voltage is normal.c. Check if the thermistor is twisted or contaminated; and is in contact with the Heat Roller.5. After confirming continuity in the fuser connector and the error still exists; replace the below parts in order: › Fuser Unit (HP Part #: SAM-JC91.01217A) › LVPS.SMPS Power Supply (HP Part #: SAM-JC44.00223A) › HVPS (HP Part #: SAM-JC44.00229A)
- Code: U1-2330, U1-2334
- Display: U1-2132, U1-2315, U1-2320, U1-2330, U1-2334, U1-2340, U1-234H Fuser unit failure errors
- Description: –U1-2132, Error: #U1-2132 / Fuser Unit Failure: #U1-2132. Turn off then on. Call for service if the problem persists–U1-2315, Error: #U1-2315 / Fuser Unit Failure: #U1-2315. Turn off then on. Call for service if the problem persists–U1-2320, Error: #U1-2320 / Fuser Unit Failure: #U1-2320. Turn off then on. Call for service if the problem persists–U1-2330, Error: #U1-2330 / Fuser Unit Failure: #U1-2330. Turn off then on. Call for service if the problem persists–U1-2334, Error: #U1-2334 / Fuser Unit Failure: #U1-2334. Turn off then on. Call for service if the problem persists–U1-2340, Error: #U1-2340 / Fuser Unit Failure: #U1-2340. Turn off then on. Call for service if the problem persists–U1-234H, Error: #U1-234H / Fuser Unit Failure: #U1-234H. Turn off then on. Call for service if the problem persists
The temperature control of the Fuser Unit is abnormal. - Remedy: 1. Turn the printer off then on.2. If the error persists, send an on-site technician to perform the remaining steps.3. Turn the printer off, remove, then re-install the Fuser Unit.4. If the error persists. Turn the printer off and remove the Fuser Unit.a. Check the fuser connector for bent or broken pins.b. Check if the input voltage is normal.c. Check if the thermistor is twisted or contaminated; and is in contact with the Heat Roller.5. After confirming continuity in the fuser connector and the error still exists; replace the below parts in order: › Fuser Unit (HP Part #: SAM-JC91.01217A) › LVPS.SMPS Power Supply (HP Part #: SAM-JC44.00223A) › HVPS (HP Part #: SAM-JC44.00229A)
- Code: U1-2340, U1-234H
- Display: U1-2132, U1-2315, U1-2320, U1-2330, U1-2334, U1-2340, U1-234H Fuser unit failure errors
- Description: –U1-2132, Error: #U1-2132 / Fuser Unit Failure: #U1-2132. Turn off then on. Call for service if the problem persists–U1-2315, Error: #U1-2315 / Fuser Unit Failure: #U1-2315. Turn off then on. Call for service if the problem persists–U1-2320, Error: #U1-2320 / Fuser Unit Failure: #U1-2320. Turn off then on. Call for service if the problem persists–U1-2330, Error: #U1-2330 / Fuser Unit Failure: #U1-2330. Turn off then on. Call for service if the problem persists–U1-2334, Error: #U1-2334 / Fuser Unit Failure: #U1-2334. Turn off then on. Call for service if the problem persists–U1-2340, Error: #U1-2340 / Fuser Unit Failure: #U1-2340. Turn off then on. Call for service if the problem persists–U1-234H, Error: #U1-234H / Fuser Unit Failure: #U1-234H. Turn off then on. Call for service if the problem persists
The temperature control of the Fuser Unit is abnormal. - Remedy: 1. Turn the printer off then on.2. If the error persists, send an on-site technician to perform the remaining steps.3. Turn the printer off, remove, then re-install the Fuser Unit.4. If the error persists. Turn the printer off and remove the Fuser Unit.a. Check the fuser connector for bent or broken pins.b. Check if the input voltage is normal.c. Check if the thermistor is twisted or contaminated; and is in contact with the Heat Roller.5. After confirming continuity in the fuser connector and the error still exists; replace the below parts in order: › Fuser Unit (HP Part #: SAM-JC91.01217A) › LVPS.SMPS Power Supply (HP Part #: SAM-JC44.00223A) › HVPS (HP Part #: SAM-JC44.00229A)
- Code: U2-1111, U2-1112
- Display: U2-1111, U2-1112, U2-1113, U2-1114 LSU failure errors
- Description: –U2-1111, Error: #U2-1111 / LSU Failure: #U2-1111. Turn off then on. Call for service if the problem persists–U2-1112, Error: #U2-1112 / LSU Failure: #U2-1112. Turn off then on. Call for service if the problem persists–U2-1113, Error: #U2-1113 / LSU Failure: #U2-1113. Turn off then on. Call for service if the problem persists–U2-1114, Error: #U2-1114 / LSU Failure: #U2-1114. Turn off then on. Call for service if the problem persists The Laser Scanner Unit (LSU) has experienced an error.
- Remedy: 1. Turn the printer off then on.2. If the error persists, send an on-site technician to perform the remaining steps.3. From the control panel, enter Tech Mode and execute the LSU motor tests:Menu > # > 10043616 > Menu > Tech Menu > Diagnostics > Engine > Test Routines > 110 – LSU > 0000 – LSU Mot 1Rdy & 00602 – LSU Mot 1Run4. If there is no sound, remove the platen unit. Check if the LSU harness is connected on the main board properly.5. If it is OK, remove the top cover. Check if the LSU harness is connected on the LSU board properly.6. Check if the LSU harness is defective. If needed replace it (HP Part #: SAM-JC39–01996A).7. Reconnect the LSU harness and then execute the LSU motor test again. 8. If the error persists, replace the LSU (HP Part #: SAM-JC97–04301A). 9. If the error persists after replacing the LSU, replace the Main Board PBA: M436n/M436dn SAM-JC92–02607G M436nda SAM-JC92–02607H
- Code: U2-1113, U2-1114
- Display: U2-1111, U2-1112, U2-1113, U2-1114 LSU failure errors
- Description: –U2-1111, Error: #U2-1111 / LSU Failure: #U2-1111. Turn off then on. Call for service if the problem persists–U2-1112, Error: #U2-1112 / LSU Failure: #U2-1112. Turn off then on. Call for service if the problem persists–U2-1113, Error: #U2-1113 / LSU Failure: #U2-1113. Turn off then on. Call for service if the problem persists–U2-1114, Error: #U2-1114 / LSU Failure: #U2-1114. Turn off then on. Call for service if the problem persists The Laser Scanner Unit (LSU) has experienced an error.
- Remedy: 1. Turn the printer off then on.2. If the error persists, send an on-site technician to perform the remaining steps.3. From the control panel, enter Tech Mode and execute the LSU motor tests:Menu > # > 10043616 > Menu > Tech Menu > Diagnostics > Engine > Test Routines > 110 – LSU > 0000 – LSU Mot 1Rdy & 00602 – LSU Mot 1Run4. If there is no sound, remove the platen unit. Check if the LSU harness is connected on the main board properly.5. If it is OK, remove the top cover. Check if the LSU harness is connected on the LSU board properly.6. Check if the LSU harness is defective. If needed replace it (HP Part #: SAM-JC39–01996A).7. Reconnect the LSU harness and then execute the LSU motor test again. 8. If the error persists, replace the LSU (HP Part #: SAM-JC97–04301A). 9. If the error persists after replacing the LSU, replace the Main Board PBA: M436n/M436dn SAM-JC92–02607G M436nda SAM-JC92–02607H
- Code: U3-3211, U3-3213, U3-3214
- Display: U3-3211, U3-3213, U3-3214, U3-3311, U3-3313, U3-3314 Original paper jam / Original paper jam inside of scanner. Remove jam
- Description: Jam has occurred inside the ADF unit.
- Remedy: 1. Open the ADF cover. If there is jammed paper, remove it.2. If the error persists, send an on-site technician to perform the remaining steps.3. If this error continually displays, check the Actuator Registration and ADF Registration Photo Sensor. If their operation is abnormal, replace the defective part. Actuator Registration SAM-JC66–03148A ADF Registration Photo Sensor SAM-0604–001393
4. If the ADF Registration Photo Sensor is OK, check the Scan Actuator and Actuator Scan Photo Sensor . If their operation is abnormal, replace the defective part. Scan Actuator SAM-JC66–03210A Actuator Scan Photo Sensor SAM-0604–001393
5. Check if the Registration Clutch operates normally. Check if the clutch cable is connected correctly. If the clutch is defective, replace it (HP Part #: SAM-JC47–0033G).
- Code: U3-3311, U3-3313, U3-3314
- Display: U3-3211, U3-3213, U3-3214, U3-3311, U3-3313, U3-3314 Original paper jam / Original paper jam inside of scanner. Remove jam
- Description: Jam has occurred inside the ADF unit.
- Remedy: 1. Open the ADF cover. If there is jammed paper, remove it.2. If the error persists, send an on-site technician to perform the remaining steps.3. If this error continually displays, check the Actuator Registration and ADF Registration Photo Sensor. If their operation is abnormal, replace the defective part. Actuator Registration SAM-JC66–03148A ADF Registration Photo Sensor SAM-0604–001393
4. If the ADF Registration Photo Sensor is OK, check the Scan Actuator and Actuator Scan Photo Sensor . If their operation is abnormal, replace the defective part. Scan Actuator SAM-JC66–03210A Actuator Scan Photo Sensor SAM-0604–001393
5. Check if the Registration Clutch operates normally. Check if the clutch cable is connected correctly. If the clutch is defective, replace it (HP Part #: SAM-JC47–0033G).
Solved HP LaserJet MFP M436dn Error codes
- Code: U3-3411, U3-3413, U3-3414
- Display: U3-3411, U3-3413, U3-3414 Original paper jam / Original paper jam inside of scanner. Remove jam
- Description: Jam has occurred inside the ADF unit.
- Remedy: 1. Open the ADF cover. If there is jammed paper, remove it.2. If the error persists, send an on-site technician to perform the remaining steps. 3. Check if the Actuator Registration operates normally. If needed, replace it (HP Part #: SAM-JC66–03148A). 4. Re-seat the Actuator Registration Photo Sensor cable.5. If the error persists, replace the Actuator Registration Photo Sensor (HP Part #: SAM-0604–001393).
- Code: U3-3511, U3-3513, U3-3514
- Display: U3-3511, U3-3513, U3-3514 Original paper jam / Original paper jam inside of scanner. Remove jam
- Description: Jam has occurred inside the ADF unit.
- Remedy: 1. Open the ADF cover. If there is jammed paper, remove it.2. If the error persists, send an on-site technician to perform the remaining steps. 3. Check if the Scan Actuator operates normally. If needed, replace it (HP Part #: SAM-JC66–03210A). 4. Re-seat the San Actuator Photo Sensor cable.5. If the error persists, replace the San Actuator Photo Sensor (HP Part #: SAM-0604–001393).
- Code: U3-3711, U3-3713, U3-3714
- Display: U3-3711, U3-3713, U3-3714 Original paper jam / Original paper jam inside of scanner. Remove jam
- Description: Jam has occurred inside the ADF unit.
- Remedy: 1. Open the ADF cover. If there is jammed paper, remove it.2. If the error persists, send an on-site technician to perform the remaining steps. 3. Check if the Exit Actuator operates normally. If needed, replace it (HP Part #: SAM-JC66–B3184A). 4. Re-seat the Exit Actuator Photo Sensor cable.5. If the error persists, replace the Exit Actuator Photo Sensor (HP Part #: SAM-0604–001393).
- Code: U3-4210
- Display: U3-4210 Scanner door open / Top door of scanner is open. Close the door
- Description: ADF cover is open.
- Remedy: 1. Close the ADF cover properly.2. If the message persists, send an on-site technician to perform the remaining steps.3. Check the ADF Cover Open Photo Sensor and its cable. If needed, replace it (HP Part #: SAM-0604–001393).4. Check for damaged ribs or broken parts on the underside of the ADF Cover. If needed, replace it (HP Part #: SAM-JC97–04754A).
Contact us to get support with HP LaserJet MFP M436dn Error case
Telegram: https://t.me/hyperaktiv
Facebook: https://www.facebook.com/dngnm/
Source:
https://dnasofts.com
https://shop.nguyendangnam.com/
https://nguyendangnam.me/
Модератор: vetal

В меру своего понимания ты работаешь на себя. В меру своего непонимания – на тех, кто понимает больше.
-
Demjan
- Разобрал струйный принтер
-
![]()
![]() Armphantom » Чт май 31, 2012 11:09 pm
Armphantom » Чт май 31, 2012 11:09 pm


Demjan писал(а):Линейка от каких аппаратов может подойти?
по каталогу, и каталожному номеру только SCX-3200/3205/3205W
Познание начинается с удивления. Аристотель
-

Armphantom
- Познал картридж
-

- Персональный альбом

![]()
![]() Shahter » Пт июн 01, 2012 2:55 pm
Shahter » Пт июн 01, 2012 2:55 pm
Из переписки:
-Уважаемый Пётр Васильевич! Ваши тонеры уже заказаны, ждите суки.
— Эээ… Уважаемая Анастасия Валерьевна! Либо вы пропустили букву «т», либо запятую…
-

Shahter
- Увидел тонер
-
- Сайт
- Персональный альбом

![]()
![]() Shahter » Пт июн 01, 2012 3:04 pm
Shahter » Пт июн 01, 2012 3:04 pm
Из переписки:
-Уважаемый Пётр Васильевич! Ваши тонеры уже заказаны, ждите суки.
— Эээ… Уважаемая Анастасия Валерьевна! Либо вы пропустили букву «т», либо запятую…
-
Shahter
- Увидел тонер
-
- Сайт
- Персональный альбом
![]()
![]() Demjan » Пт июн 01, 2012 4:26 pm
Demjan » Пт июн 01, 2012 4:26 pm
В меру своего понимания ты работаешь на себя. В меру своего непонимания – на тех, кто понимает больше.
-
Demjan
- Разобрал струйный принтер
-
![]()
![]() kvg » Пт июн 01, 2012 4:41 pm
kvg » Пт июн 01, 2012 4:41 pm
Shahter писал(а):там все может быть причиной) сначала как минимум шлейф прозвоните.
кстати в какой из тем советы писать, здесь или ТУТ
Объединил я эти две одинаковые темы в эту.
-

kvg
- Администратор сайта и форума
-
- Сайт
- Персональный альбом

![]()
![]() Demjan » Пн июн 04, 2012 1:05 pm
Demjan » Пн июн 04, 2012 1:05 pm
Заменил шлейф, не помогло. Линейку сканера нигде найти не могу. В зипзип ждать 40 дней сказали, кто нибудь знает поставщиков центральном регионе?
На это аппарате есть транспортная блокировка? Если да, то как её проверить?
В меру своего понимания ты работаешь на себя. В меру своего непонимания – на тех, кто понимает больше.
-
Demjan
- Разобрал струйный принтер
-
![]()
![]() Demjan » Пн июн 04, 2012 8:30 pm
Demjan » Пн июн 04, 2012 8:30 pm
В меру своего понимания ты работаешь на себя. В меру своего непонимания – на тех, кто понимает больше.
-
Demjan
- Разобрал струйный принтер
-
![]()
![]() Demjan » Ср июн 06, 2012 12:21 am
Demjan » Ср июн 06, 2012 12:21 am
В меру своего понимания ты работаешь на себя. В меру своего непонимания – на тех, кто понимает больше.
-
Demjan
- Разобрал струйный принтер
-
![]()
![]() Demjan » Ср июн 06, 2012 6:35 pm
Demjan » Ср июн 06, 2012 6:35 pm
В меру своего понимания ты работаешь на себя. В меру своего непонимания – на тех, кто понимает больше.
-
Demjan
- Разобрал струйный принтер
-
![]()
-
-
samsung clx-3305 «замятие 1» HELP
scrcrw в форуме Принтеры, МФУ, факсы, копиры формата A4
- 14
- 15645
scrcrw

Пт сен 08, 2017 2:49 pm
-
samsung clx-3305 «замятие 1» HELP
-
-
Samsung SCX-3400 «Черный фон»
Алишер Рузиев в форуме Принтеры, МФУ, факсы, копиры формата A4
- 13
- 14688
OLIGATOR
Ср фев 24, 2021 5:18 am
-
Samsung SCX-3400 «Черный фон»
-
-
Samsung C460W и разминка для «ума»
Юрий Шипуля в форуме Принтеры, МФУ, факсы, копиры формата A4
- 10
- 11102
sm1100
Вт апр 11, 2017 12:40 pm
-
Samsung C460W и разминка для «ума»
-
-
«Двудулка» Samsung 2015
Greka в форуме Принтеры, МФУ, факсы, копиры формата A4
- 3
- 7034
sm1100
Чт июл 02, 2015 11:00 pm
-
«Двудулка» Samsung 2015
-
-
Samsung CLP-315 «Замятие» Ны выходе
FREIDE в форуме Принтеры, МФУ, факсы, копиры формата A4
- 27
- 25939
Князь
Вт авг 13, 2013 6:20 am
-
Samsung CLP-315 «Замятие» Ны выходе
Вернуться в Принтеры, МФУ, факсы, копиры формата A4
Кто сейчас на форуме
Сейчас этот форум просматривают: zotov121 и гости: 72
| Error |
|---|