
CTX340347
{{tooltipText}}
Article
|
|
{{likeCount}} found this helpful
|
Created:
{{articleFormattedCreatedDate}}
|
Modified:
{{articleFormattedModifiedDate}}
Symptoms or Error
Trying to launch Published Application or Published Desktop fails we see the below behavior
Progress Bar stuck at Connection in Progress
Launch fails with an error: «Unable to connect to the server. Contact your system administrator with the following error: There is no Citrix XenApp server configured on the specified address. (Socket Error 10060)»

Solution
- The network adapter priority of the Team NIC was increased by assigning a lower metric value. (lower metric number means higher priority, and a higher metric number means lower priority)
- Server was rebooted.
- We are able to launch the application as ICA file now shows the proper IP address for the VDA and is able to establish connection with the VDA
Methods to change Network Adapter Metric
You can change the Network Priority via Powershell as well as Control Panel GUI
Powershell
To change the network priority via Powershell follow the below steps.
- Type the following command Get-NetIPInterface to identify the current interface metric and interface index number and press Enter.
- Type the following command Set-NetIPInterface -InterfaceIndex 21 -InterfaceMetric 10 to change the priority order of the network adapter and press Enter
- Type the following command Get-NetIPInterface to see the new metric applied to the network adapter and press Enter.
Note: Change the -InterfaceIndex value to reflect the network adapter you want to prioritize and change the -InterfaceMetric value to assign a priority.
Lower metric number means higher priority, and a higher metric number means lower priority.

Control Panel
To change the network priority via Control Panel GUI follow the below steps.
- Open Control Panel.
- Click on Network and Sharing Center.
- Click Change Adapter settings.
- Right click the network adapter you want to prioritize, and select Properties.
- Select the Internet Protocol Version 4 (TCP/IPv4).
- Click the Properties button.
- In the «General» tab, click the Advanced button.
- Clear the Automatic metric option.
- In the «Interface metric» field assign a priority value for the adapter.
- Click the OK button and close the box.
Note: Lower metric number means higher priority, and a higher metric number means lower priority.


Problem Cause
Incorrect metric configuration of Teamed Nic
- On checking the ICA file it indicated that the VDA IP was reflected as an APIPA IP Address 169.254.
- VDA has NIC teaming setup with 2 ethernet adapters Ethernet 0 and Ethernet 2
- Ethernet 0 is reflecting as network cable unplugged
- Ethernet 2 has the APIPA IP address 169.254 (expected in a teaming setup)
- Checked the NIC metric using command Get-NetIPInterface and we see Ethernet 2 has metric 15 whereas TEAM NIC has 20 (The Lower the metric, higher the priority of the adapter.)
- Since the TEAM NIC was having a higher metric hence Ethernet 2 was given priority and since it has IP address of 169.254 hence connection could not be made.
Additional Resources
Disclaimer
Citrix is not responsible for and does not endorse or accept any responsibility for the contents or your use of these third party Web sites. Citrix is providing these links to you only as a convenience, and the inclusion of any link does not imply endorsement by Citrix of the linked Web site. It is your responsibility to take precautions to ensure that whatever Web site you use is free of viruses or other harmful items.
CTX340347
{{tooltipText}}
Article
|
|
{{likeCount}} found this helpful
|
Created:
{{articleFormattedCreatedDate}}
|
Modified:
{{articleFormattedModifiedDate}}
Symptoms or Error
Trying to launch Published Application or Published Desktop fails we see the below behavior
Progress Bar stuck at Connection in Progress
Launch fails with an error: «Unable to connect to the server. Contact your system administrator with the following error: There is no Citrix XenApp server configured on the specified address. (Socket Error 10060)»
Solution
- The network adapter priority of the Team NIC was increased by assigning a lower metric value. (lower metric number means higher priority, and a higher metric number means lower priority)
- Server was rebooted.
- We are able to launch the application as ICA file now shows the proper IP address for the VDA and is able to establish connection with the VDA
Methods to change Network Adapter Metric
You can change the Network Priority via Powershell as well as Control Panel GUI
Powershell
To change the network priority via Powershell follow the below steps.
- Type the following command Get-NetIPInterface to identify the current interface metric and interface index number and press Enter.
- Type the following command Set-NetIPInterface -InterfaceIndex 21 -InterfaceMetric 10 to change the priority order of the network adapter and press Enter
- Type the following command Get-NetIPInterface to see the new metric applied to the network adapter and press Enter.
Note: Change the -InterfaceIndex value to reflect the network adapter you want to prioritize and change the -InterfaceMetric value to assign a priority.
Lower metric number means higher priority, and a higher metric number means lower priority.
Control Panel
To change the network priority via Control Panel GUI follow the below steps.
- Open Control Panel.
- Click on Network and Sharing Center.
- Click Change Adapter settings.
- Right click the network adapter you want to prioritize, and select Properties.
- Select the Internet Protocol Version 4 (TCP/IPv4).
- Click the Properties button.
- In the «General» tab, click the Advanced button.
- Clear the Automatic metric option.
- In the «Interface metric» field assign a priority value for the adapter.
- Click the OK button and close the box.
Note: Lower metric number means higher priority, and a higher metric number means lower priority.
Problem Cause
Incorrect metric configuration of Teamed Nic
- On checking the ICA file it indicated that the VDA IP was reflected as an APIPA IP Address 169.254.
- VDA has NIC teaming setup with 2 ethernet adapters Ethernet 0 and Ethernet 2
- Ethernet 0 is reflecting as network cable unplugged
- Ethernet 2 has the APIPA IP address 169.254 (expected in a teaming setup)
- Checked the NIC metric using command Get-NetIPInterface and we see Ethernet 2 has metric 15 whereas TEAM NIC has 20 (The Lower the metric, higher the priority of the adapter.)
- Since the TEAM NIC was having a higher metric hence Ethernet 2 was given priority and since it has IP address of 169.254 hence connection could not be made.
Additional Resources
Disclaimer
Citrix is not responsible for and does not endorse or accept any responsibility for the contents or your use of these third party Web sites. Citrix is providing these links to you only as a convenience, and the inclusion of any link does not imply endorsement by Citrix of the linked Web site. It is your responsibility to take precautions to ensure that whatever Web site you use is free of viruses or other harmful items.
Table of Contents
- Case
- Solution
Case #
When trying to launch a Citrix Virtual Apps and Desktops (VAD) resource from either the Storefront for Web interface or direct via Citrix Workspace App (CWA), connection stays in progress for a long time and you eventually encounter the following error message:
Unable to connect to the server. Contact your system administrator with the following error: There is no Citrix XenApp server configured on the specified address. (Socket Error 10060).

Solution #
To perform Root Cause Analysis (RCA) and resolve the above issue, carry out the steps below. This assumes that you have isolated the issue to one of the internal Citrix VAD components, i.e. anything else except for Citrix Gateway or Citrix ADC.
- Run Citrix Quick launch tool to isolate the Citrix Storefront component. The Citrix Quick Launch tool allows you to enumerate the published VAD resources from Citrix Controller and subsequently to launch the published resources (Citrix app or Citrix desktop) directly from the VDA, thus circumventing the Citrix Storefront component. If you cannot launch a resource directly via Storefront but your Citrix Quick Launch tool launch is successful, then your issue is 100% related to the Citrix Storefront component.
- Run the VDA health check tool and check the VDA server OS event logs (application log)
- Run Citrix Scout and check the Controller server OS event logs (application log)
- Check the Citrix Storefront event logs and perform Storefront configuration overview via the Storefront MMC console.
- Enable Storefront server verbose tracing and troubleshoot your configuration as per https://docs.citrix.com/en-us/storefront/1912-ltsr/troubleshoot.html.
- Check the following known root cause: https://support.citrix.com/article/CTX215263
- On your Citrix Storefront server(s) check all IIS bindings. Besides the HTTPS binding for the Citrix Storefront site, all IIS default bindings (including the HTTP-80 and HTTPS-443 bindings) must be intact, otherwise there will be Citrix VAD launch issues.
- On your Citrix servers and on the Citrix client check the status of SSL certificates (with SAN entries required) which must also be imported into your Web browser and to the trusted certificate store of the client computer from which you are initiating a Citrix VAD connection.
- Check your DNS resolution. There are rare occassions in which your private DNS zone entry for Storefront may be the same with a public DNS zone located in an external DNS server. In this case, the DNS resolution mechanism might now work properly and a routing loop or DNS resolution issue may be caused. In this case the Citrix Storefront server may try to connect to the public DNS zone record instead of the private DNS zone record. For this reason, ensure that both your private and public DNS zones are properly configured and their records properly updated to reflect your architecture. This can be typical in split-brain DNS configurations. Refer to this Microsoft article for more details on how to configure a split-brain DNS environment.
- If you have a Storefront server group of two or more servers, then troubleshoot potential Storefront server group (cluster) propagation issues, as per https://support.citrix.com/article/CTX206872.
- If you are using NAT in your Citrix network, check your configuration as per the following:
- If Web Interface, right-click the site, click Secure Access, add a line for the 192.168.2.0 network and select Translated or Alternate. If Alternate, go to each XenApp server and run ALTADDR to set the NAT’d IP. Without Secure Gateway or NetScaler Gateway you’d need a NAT’d IP for each XenApp server.
- If StoreFront, you would need to deploy a NetScaler Gateway appliance to proxy the ICA traffic through one NAT’d IP address. It must be noted that access to Storefront stores from the public Internet is feasible via plain NAT, however you will not be receiving all important security and performance benefits which are provided via Citrix Gateway.
- If all else fails and issue is spotted in Storefront, uninstall Storefront completely and re-install or upgrade Storefront.
For more troubleshooting guidance on a series of known Citrix issues, you can consult my “Citrix Virtual Apps and Desktops Troubleshooting” e-book.
How to change the Citrix Storefront URLHow to troubleshoot Citrix Virtual Apps and Desktops random freezing incidents
Our experts have had an average response time of 9.28 minutes in Mar 2023 to fix urgent issues.
We will keep your servers stable, secure, and fast at all times for one fixed price.
Stuck with XenApp Error 10060? We can help you.
Often users get this XenApp error while trying to launch the desktop enabling the “HDX Adaptive Transport” policy set to Diagnostic.
Here at Bobcares, we often handle requests from our customers to fix similar errors as a part of our Server Management Services. Today we will see how our support engineers fix this for our customers.
What causes XenApp Error 10060
Before going into the steps for fixing this error we will see what causes this error.
A typical error looks like the one given below:
Unable to connect to the server. Contact your system administrator with the following error: There is no Citrix XenApp server configured on the specified address. (Socket Error 10060)
One of the main causes for this error can be UDP Network Ports not being open on the client-side.
How to fix this error
Adaptive transport is a new data transport mechanism for XenApp and XenDesktop and available in Citrix policies. When set to Preferred, it uses data transport over EDT as primary and fallback to TCP.
By default, it uses TCP and adaptive transport is disabled.
However, for testing purposes, we can set Diagnostic mode to only use EDT and disable the fallback.
We can fix this issue using the following steps:
1. Initially, we will test with the policy set to Preferred. [No UDP Ports will be open]
We can do this using the following steps:
- Firstly, launch the Desktop.
- Then from the command prompt browse to “C:Program Files (x86)CitrixSystem32“
- Finally, we have to run ‘CtxSession’
We will see that it uses TCP with CGP and Session Reliability encapsulates the ICA protocol.
2. Now, we have to run CtxSession /v for verbose output. Here we can see that VDA is using port 2598.
3. Next, we will set the policy to ‘Diagnostic mode’.
We must ensure that UDP 1494 and 2598 ports open on the VDA. Now we can run CtxSession /v to get confirmation that we are using UDP 2598.
This means that HDX Enlightened Data Transport is being used with Session Reliability. We can also check Director and see that whether the protocol will be set as UDP.
[Still stuck with the error? We can help you]
Conclusion
In short, we saw how our Support Engineers fix XenApp Error 10060 for our customers.
PREVENT YOUR SERVER FROM CRASHING!
Never again lose customers to poor server speed! Let us help you.
Our server experts will monitor & maintain your server 24/7 so that it remains lightning fast and secure.
GET STARTED
var google_conversion_label = «owonCMyG5nEQ0aD71QM»;
The problem we will discuss here troubles generally when running web proxy connection on Windows 11, 10, any other version, Passive FTP, or server, SMTP, Citrix, Live Mail, and Outlook. Error messages are different for these platforms as given in the screenshot. Some of them are “Can’t connect to the remote server. Socket error = #10060”, “Socket error = #10060 Connection time out”, “There is no Citrix Xenapp server configured on the specified server. (Socket error 10060)” .
When you run a command to request something, and server takes too much time to respond #10060 error appears. This is called time out error and it is common when using a proxy server. Browser sends the command but proxy server does not load webpage or directory within the duration set into Time out setting. As a result, Can’t connect to the remote server. Socket error = #10060 is generated. Time-out error occurs when the requested directory is too large or the connection is much slower. See – Fix: There is Something Wrong with the Proxy Server in Windows 10
Here is How to Fix Socket Error #10060 in Windows, Proxy SMTP, FTP, Citrix –
Way-1: Modify Registry
Commonly #10060 problem is found to occur when using Proxy on a computer. This issue is very annoying but thanks to some experts who solved this using a registry modification. Windows has a registry entry to determine the time out duration to load a page when you request. Changing this will work like a wonder and fix Socket Error 10060. Follow the steps –
- Click on Search from the taskbar.
- Type regedit.
- Press – Enter.
- Click Yes on the User account control dialog.
- Once Registry Editor is open, navigate to the following string –
HKEY_LOCAL_MACHINESYSTEMCurrentControlSetServicesW3ProxyParameters- Double click on RequestTimeoutSecs.
- Select Decimal.
- Change the Request Timeout value to 93 or something more.
- Click on OK.
- Close Registry Editor and restart the computer.
Way-2: Check proxy settings
- Press – Win+R.
- Type – inetcpl.cpl.
- Press – Enter.
- On the Internet Properties window, click on – Connections
- There go to – Lan settings.
- On the Local Area Network Settings pop up, uncheck – “Use a proxy for your Lan (These settings will not apply to Dial up or Connections)”.
- Click – OK.
- The error must be solved now.
Take help from – How to Manage Proxy Settings in Windows 10.
Way 3: Disable Windows Firewall and third party anti-virus
Although Firewall is an important protection tool on Windows and disabling this may leave you in an unsafe internet world, you can try this method temporarily for a short time. Firewall can block the connection of Proxy you are using on your computer and trigger the Socket error 10060 therefore follow the steps –
- Click on – Start.
- Type – Firewall.
- Hit – Enter.
- From the Windows Security app, turn off the Firewall for Domain network, Private network, Public network, or whichever you are using.
- Check if the error does not appear when you try to load a web page. Don’t forget to enable the Firewall again.
- To turn off the anti-virus, go to the System tray on Taskbar and right-click on the icon of the program. Select Disable.
Go to – How to disable Firewall in Windows 11 (Best 5 ways).
Way-3: FTP Socket Error 10060
“Socket error = #10060” is a Connection Time-out error that commonly shows up when a client does not receive a response from the server for a particular command. Here is how to fix when you encounter this problem when trying to connect using Passive FTP mode. In case, you encounter error code similar to
“-COMMAND:> PASV
227 Entering Passive Mode (xxx,xx,xxx,xx,x,xxx).
COMMAND:> LIST
STATUS:> Connecting ftp data socket xxx.xx.xxx.xx:xxxx…
ERROR:> Can’t connect to remote server. Socket error = #10060.
ERROR:> Failed to establish data socket.”
then follow the method –
- Right-click on the problematic site.
- Select – Site Properties.
- Go to the tab TYPE.
- Select Use PORT for the option Data Connection.
Way-4: SMTP Socket Error 10060
If you encounter this error when using Outlook email then this method will provide relief from the error message. Outlook email client gets Socket error = #10060 when trying to send mail.
- Launch Microsoft Outlook.
- Click – Tools
- Open Accounts.
- In the Internet Accounts window, click the Mail.
- From the list of accounts, double-click on your account.
- Select Server from the Account Properties window.
- Check all the options precisely if they are correct.
- Now, make sure that Authentication is enabled. For this, follow steps 1, 2, 3, 4, 5, and 6 again in this method. In the Server tab, check the option – My server requires authentication.
Way-5: Windows Live Mail Socket Error 10060
In case, you use Windows live mail and find #10060 error code this method will work –
1] Configure Windows Live Mail
- Open Windows Live Mail client app Properties.
- Access the Servers tab.
- Enter the below in the boxes –
Incoming Mail [POP3] – pop3.live.com
Outgoing Mail SMTP – smtp.live.com
- Furthermore, check if My Server requires authentification and also disable third-party antivirus program and firewall as explained in the above methods.
- Check the option My server requires authentication for Outgoing mail server.
- Click on Settings.
- Enter Account name and password.
- Check – Logon using secure password authentication.
- Click “OK” on the Outgoing mail server pop-up.
- Select Apply and OK.
2] Correct Date and time settings
- Press – Windows and I.
- On Settings app, select – Time & Language.
- Staying in the ‘Date & time’ settings page, click on – Set the time automatically toggle from the right pane to turn it on.
See – How to Fix Can’t Add Gmail to Mail App in Windows 10
Way-5: Socket error 10060 Citrix
Several users encounter Socket error 10060 Citrix NetApp while trying to open or run a Microsoft Remote Desktop. The error message is – “Unable to connect the server contact your system administrator with following error: there is no Citrix Xenapp server configured on the specified server. (Socket error 10060)”. To solve this issue follow –
Microsoft Remote Desktop app is available on multiple servers and when Citrix finds any problem it will automatically shift the session to another suitable server. So, first of all, you need to wait for some time however If the socket error 10060 on Citrix still shows up then try the below instructions.
1] Disable or uninstall third-party Antivirus program
Right-click on the Antivirus from the System Tray on the Taskbar. Select Disable for a certain period of time. Almost every Antivirus provides options like Disable for 2 hours, 4 hours, 24 hours. If you don’t find an option like this then launch the program and disable it from the interface. If you can afford you can uninstall the Antivirus from your computer.
2] Check your firewall to make sure ports 2598 and 1494 are open
This error is what commonly appears when 1494 and 2598 ports are blocked. To unblock the ports follow the guidelines –
- Click on – Search.
- Type – Firewall.
- Press – Enter.
- Windows Security will open showing a few links; click on – Advanced settings.
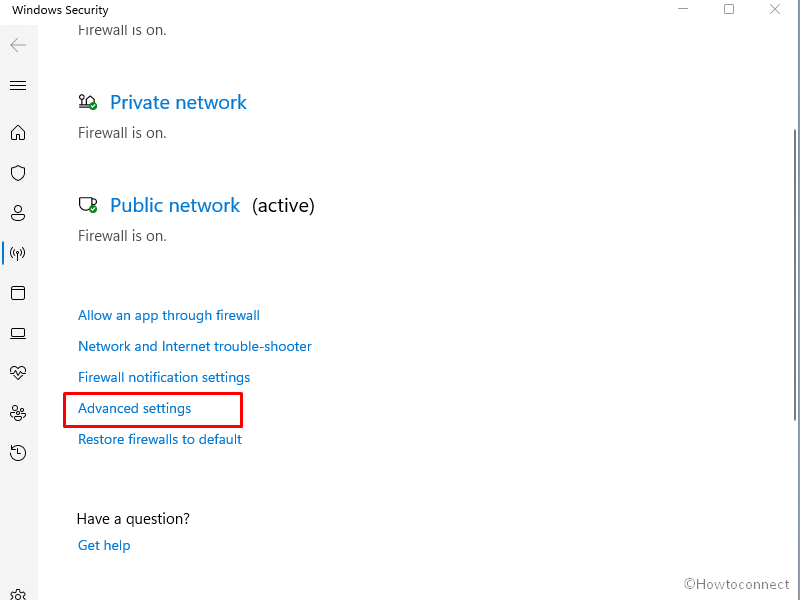
- Select Yes on UAC prompt
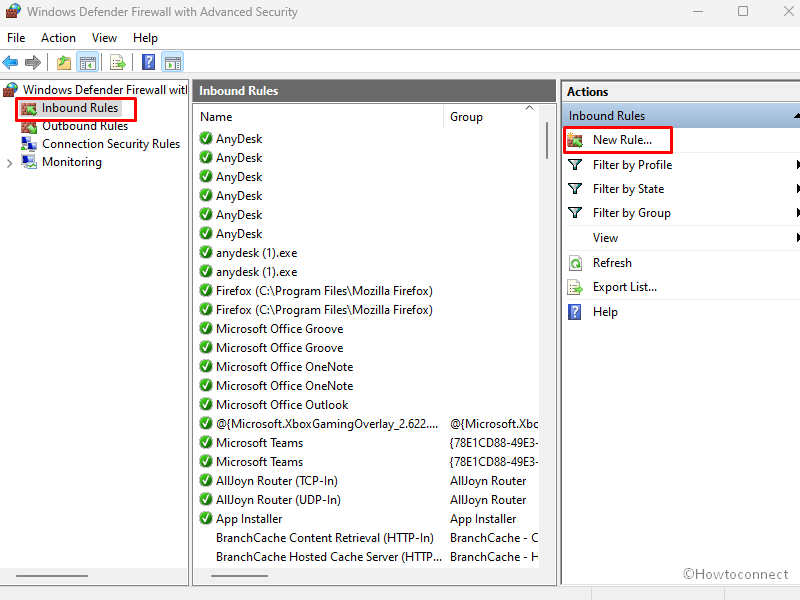
- Windows Defender Firewall with Advanced Security window appears; click on Inbound Rules.
- Select – New Rule….
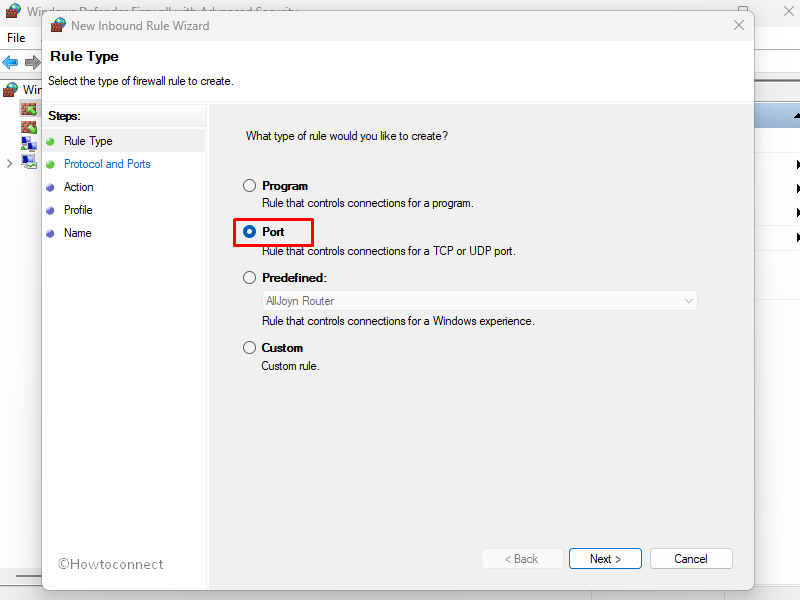
- On the New Inbound Rule Wizard, check Port.
- Click Next.
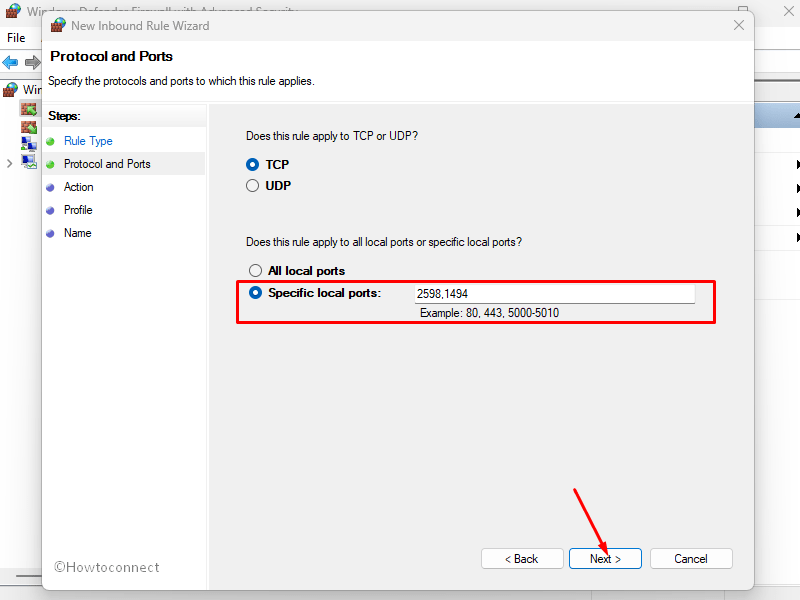
- Select TCP or UDP.
- In the Specific local ports, type 2598,1494 and click on Next.
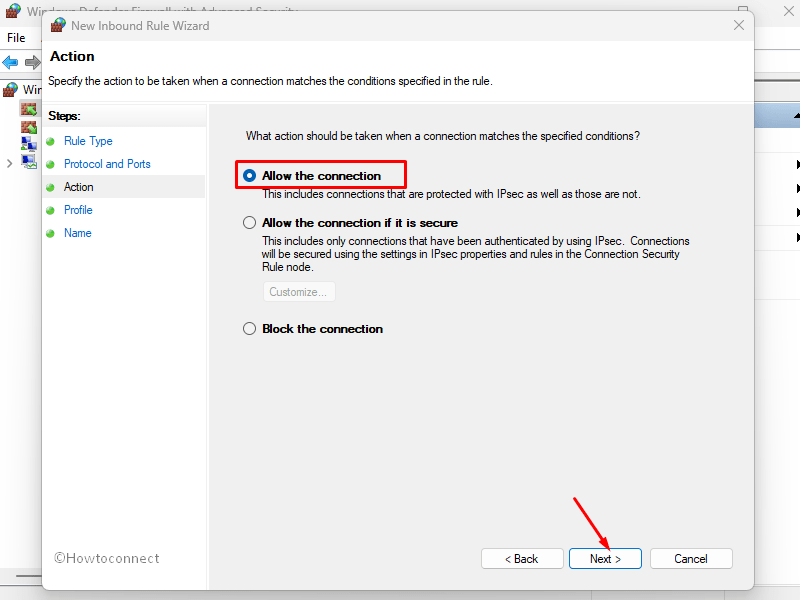
- Make sure that Allow the connection is selected.
- Again click on Next.
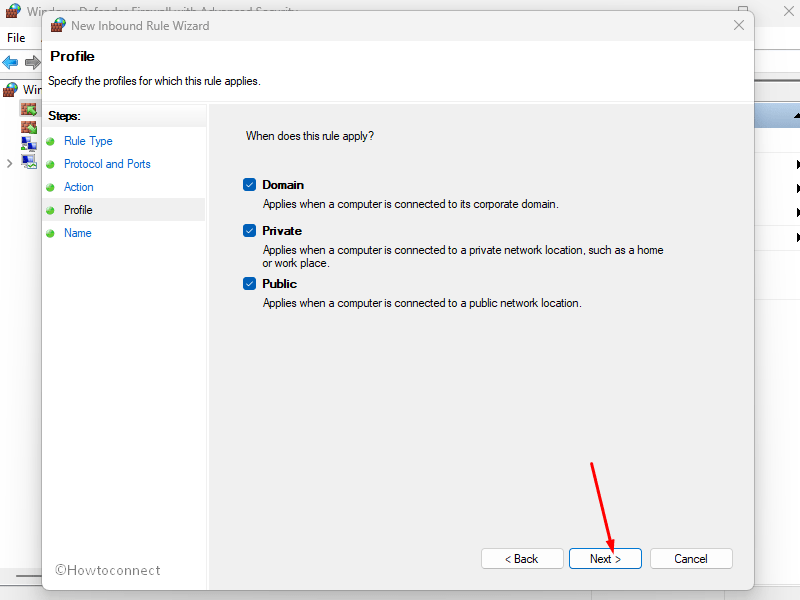
- Check all the options Domain, Private, Public, or whichever you require.
- Select “Next”.
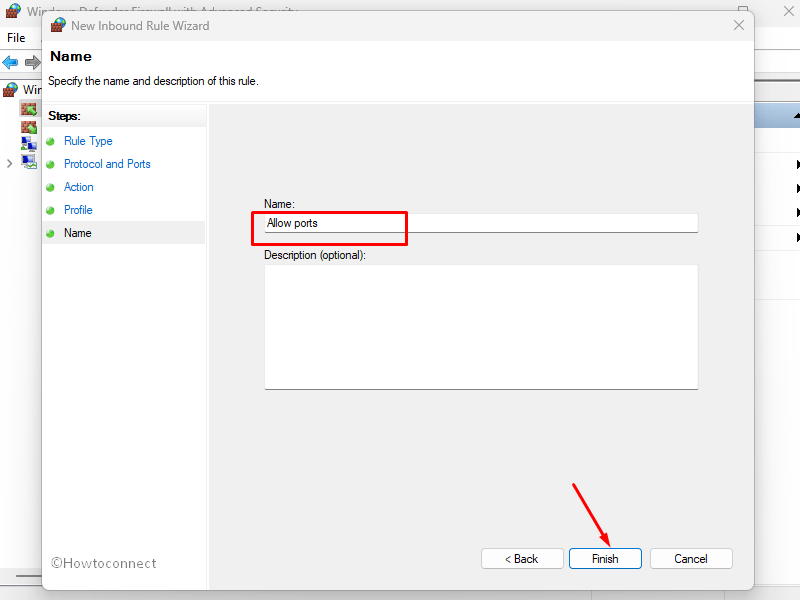
- Name the rule and click on Finish.
Way-6: Socket error 10060 Server
If you are on server and have access to it you can increase the value for time out and wait until the requested directory loads. To change value follow the steps –
- Go to the Server Settings.
- Click on – Tools.
- Select – Global Options.
- Click Transfer.
- You see an option – Reconnect and resume in [n] seconds if nothing received. Change the n to a higher value, for example, 93 or 95 seconds.
- Finally, the error will be fixed.
Several times, Citrix has no servers assigned or is not set correctly. Because this error is related to external Citrix Workspace and so call upon your company IT or Citrix support team to address the problem.
Methods list:
Way-1: Modify Registry
Way-2: Check proxy settings
Way-3: FTP
Way-4: SMTP
Way-5: Citrix
Way-6: Server
That’s all!!
Repair any Windows problems such as Blue/Black Screen, DLL, Exe, application, Regisrty error and quickly recover system from issues using Reimage.
We have an ancient version of XenApp 6.0 for Windows Server 2008 R2 I can’t kick to the curb because it’s the Director of operation’s favorite access method.
We’ve recently upgraded our network and have migrated from AT&T to Spectrum. Once we swapped everything over, Citrix access is just fine from inside, but from the outside the client appears to take my credentials. If you choose to run an app, it eventually comes back with socket error 10060, then presents a fatal error. Prior to this, the last stable version of Workspace this worked with was 2102.
I have
8080, 1494, 80, 2598, 443 ports forwarded to this box. Is there some setting within Citrix that I need to adjust so it will talk to the outside? It’s been a good 10 years since I’ve had to do something like this with Citrix, and my google fu is not bringing things back for this old a version.
We’re running Meraki switchgear, routers and APs.
Any help would be greatly appreciated.
Our experts have had an average response time of 9.78 minutes in Apr 2023 to fix urgent issues.
We will keep your servers stable, secure, and fast at all times for one fixed price.
Stuck with XenApp Error 10060? We can help you.
Often users get this XenApp error while trying to launch the desktop enabling the “HDX Adaptive Transport” policy set to Diagnostic.
Here at Bobcares, we often handle requests from our customers to fix similar errors as a part of our Server Management Services. Today we will see how our support engineers fix this for our customers.
What causes XenApp Error 10060
Before going into the steps for fixing this error we will see what causes this error.
A typical error looks like the one given below:
Unable to connect to the server. Contact your system administrator with the following error: There is no Citrix XenApp server configured on the specified address. (Socket Error 10060)
One of the main causes for this error can be UDP Network Ports not being open on the client-side.
How to fix this error
Adaptive transport is a new data transport mechanism for XenApp and XenDesktop and available in Citrix policies. When set to Preferred, it uses data transport over EDT as primary and fallback to TCP.
By default, it uses TCP and adaptive transport is disabled.
However, for testing purposes, we can set Diagnostic mode to only use EDT and disable the fallback.
We can fix this issue using the following steps:
1. Initially, we will test with the policy set to Preferred. [No UDP Ports will be open]
We can do this using the following steps:
- Firstly, launch the Desktop.
- Then from the command prompt browse to “C:Program Files (x86)CitrixSystem32“
- Finally, we have to run ‘CtxSession’
We will see that it uses TCP with CGP and Session Reliability encapsulates the ICA protocol.
2. Now, we have to run CtxSession /v for verbose output. Here we can see that VDA is using port 2598.
3. Next, we will set the policy to ‘Diagnostic mode’.
We must ensure that UDP 1494 and 2598 ports open on the VDA. Now we can run CtxSession /v to get confirmation that we are using UDP 2598.
This means that HDX Enlightened Data Transport is being used with Session Reliability. We can also check Director and see that whether the protocol will be set as UDP.
[Still stuck with the error? We can help you]
Conclusion
In short, we saw how our Support Engineers fix XenApp Error 10060 for our customers.
PREVENT YOUR SERVER FROM CRASHING!
Never again lose customers to poor server speed! Let us help you.
Our server experts will monitor & maintain your server 24/7 so that it remains lightning fast and secure.
GET STARTED
var google_conversion_label = «owonCMyG5nEQ0aD71QM»;
When few users were trying to connect to a Citrix netscaler internally they were getting an error
socket error 10060
If you use the ICA file to check what server the machine is trying to connect to ( Go in %TEMP% and open up the latest .ica file in Notepad )
Check the machine can ping the server , maybe a networking ussue
Check if the server has been cloned and was using the same ID as another one ( putting it in Maintenance mode fixed the problem )
Loading…
The problem we will discuss here troubles generally when running web proxy connection on Windows 11, 10, any other version, Passive FTP, or server, SMTP, Citrix, Live Mail, and Outlook. Error messages are different for these platforms as given in the screenshot. Some of them are “Can’t connect to the remote server. Socket error = #10060”, “Socket error = #10060 Connection time out”, “There is no Citrix Xenapp server configured on the specified server. (Socket error 10060)” .
When you run a command to request something, and server takes too much time to respond #10060 error appears. This is called time out error and it is common when using a proxy server. Browser sends the command but proxy server does not load webpage or directory within the duration set into Time out setting. As a result, Can’t connect to the remote server. Socket error = #10060 is generated. Time-out error occurs when the requested directory is too large or the connection is much slower. See – Fix: There is Something Wrong with the Proxy Server in Windows 10
Here is How to Fix Socket Error #10060 in Windows, Proxy SMTP, FTP, Citrix –
Way-1: Modify Registry
Commonly #10060 problem is found to occur when using Proxy on a computer. This issue is very annoying but thanks to some experts who solved this using a registry modification. Windows has a registry entry to determine the time out duration to load a page when you request. Changing this will work like a wonder and fix Socket Error 10060. Follow the steps –
- Click on Search from the taskbar.
- Type regedit.
- Press – Enter.
- Click Yes on the User account control dialog.
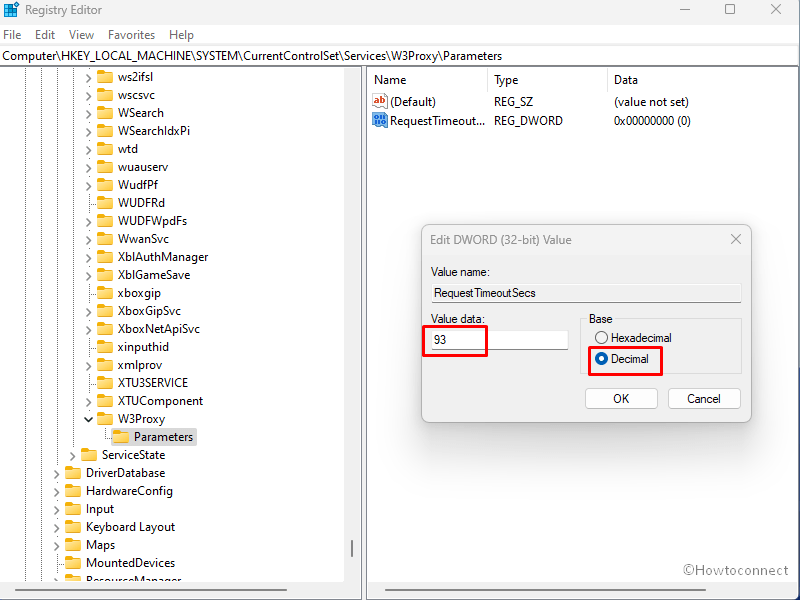
- Once Registry Editor is open, navigate to the following string –
HKEY_LOCAL_MACHINESYSTEMCurrentControlSetServicesW3ProxyParameters- Double click on RequestTimeoutSecs.
- Select Decimal.
- Change the Request Timeout value to 93 or something more.
- Click on OK.
- Close Registry Editor and restart the computer.
Way-2: Check proxy settings
- Press – Win+R.
- Type – inetcpl.cpl.
- Press – Enter.
- On the Internet Properties window, click on – Connections
- There go to – Lan settings.
- On the Local Area Network Settings pop up, uncheck – “Use a proxy for your Lan (These settings will not apply to Dial up or Connections)”.
- Click – OK.
- The error must be solved now.
Take help from – How to Manage Proxy Settings in Windows 10.
Way 3: Disable Windows Firewall and third party anti-virus
Although Firewall is an important protection tool on Windows and disabling this may leave you in an unsafe internet world, you can try this method temporarily for a short time. Firewall can block the connection of Proxy you are using on your computer and trigger the Socket error 10060 therefore follow the steps –
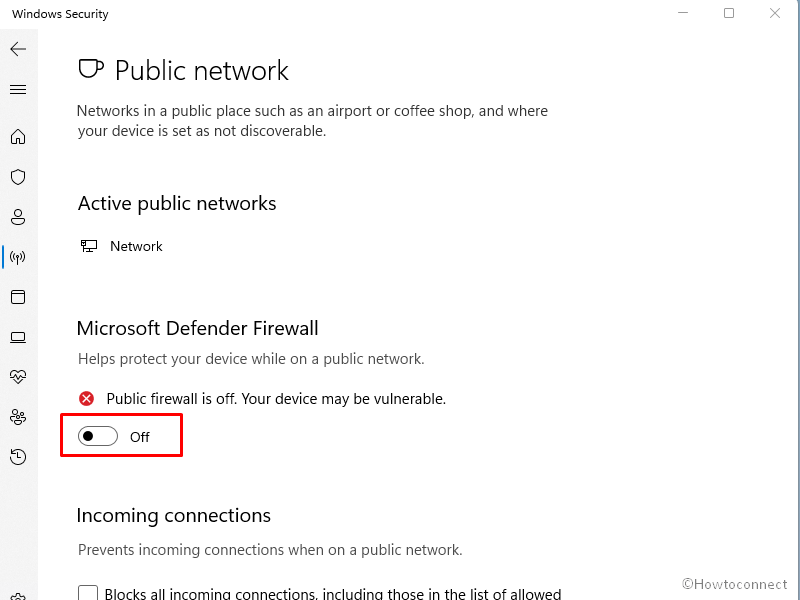
- Click on – Start.
- Type – Firewall.
- Hit – Enter.
- From the Windows Security app, turn off the Firewall for Domain network, Private network, Public network, or whichever you are using.
- Check if the error does not appear when you try to load a web page. Don’t forget to enable the Firewall again.
- To turn off the anti-virus, go to the System tray on Taskbar and right-click on the icon of the program. Select Disable.
Go to – How to disable Firewall in Windows 11 (Best 5 ways).
Way-3: FTP Socket Error 10060
“Socket error = #10060” is a Connection Time-out error that commonly shows up when a client does not receive a response from the server for a particular command. Here is how to fix when you encounter this problem when trying to connect using Passive FTP mode. In case, you encounter error code similar to
“-COMMAND:> PASV
227 Entering Passive Mode (abc,ab,abc,ab,a,abc).
COMMAND:> LIST
STATUS:> Connecting ftp data socket abc.ab.abc.ab:abcd…
ERROR:> Can’t connect to remote server. Socket error = #10060.
ERROR:> Failed to establish data socket.”
then follow the method –
- Right-click on the problematic site.
- Select – Site Properties.
- Go to the tab TYPE.
- Select Use PORT for the option Data Connection.
Way-4: SMTP Socket Error 10060
If you encounter this error when using Outlook email then this method will provide relief from the error message. Outlook email client gets Socket error = #10060 when trying to send mail.
- Launch Microsoft Outlook.
- Click – Tools
- Open Accounts.
- In the Internet Accounts window, click the Mail.
- From the list of accounts, double-click on your account.
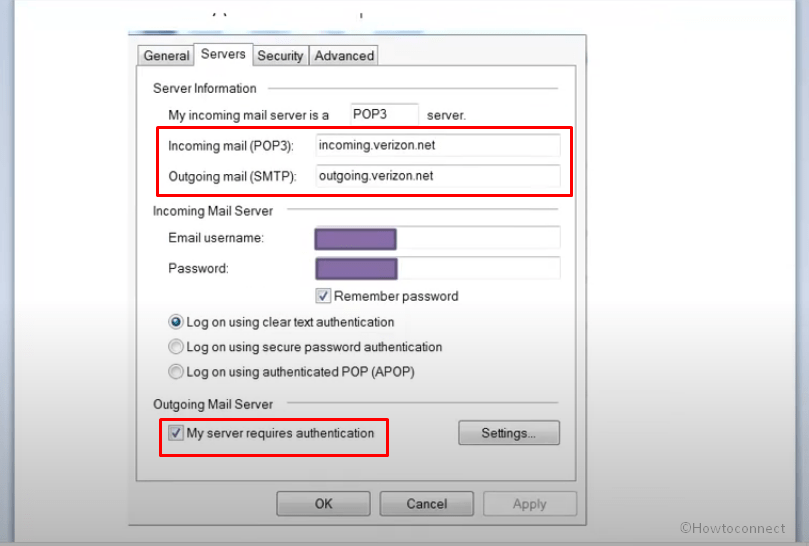
- Select Server from the Account Properties window.
- Check all the options precisely if they are correct.
- Now, make sure that Authentication is enabled. For this, follow steps 1, 2, 3, 4, 5, and 6 again in this method. In the Server tab, check the option – My server requires authentication.
Way-5: Windows Live Mail Socket Error 10060
In case, you use Windows live mail and find #10060 error code this method will work –
1] Configure Windows Live Mail
- Open Windows Live Mail client app Properties.
- Access the Servers tab.
- Enter the below in the boxes –
Incoming Mail [POP3] – pop3.live.com
Outgoing Mail SMTP – smtp.live.com
- Furthermore, check if My Server requires authentification and also disable third-party antivirus program and firewall as explained in the above methods.
- Check the option My server requires authentication for Outgoing mail server.
- Click on Settings.
- Enter Account name and password.
- Check – Logon using secure password authentication.
- Click “OK” on the Outgoing mail server pop-up.
- Select Apply and OK.
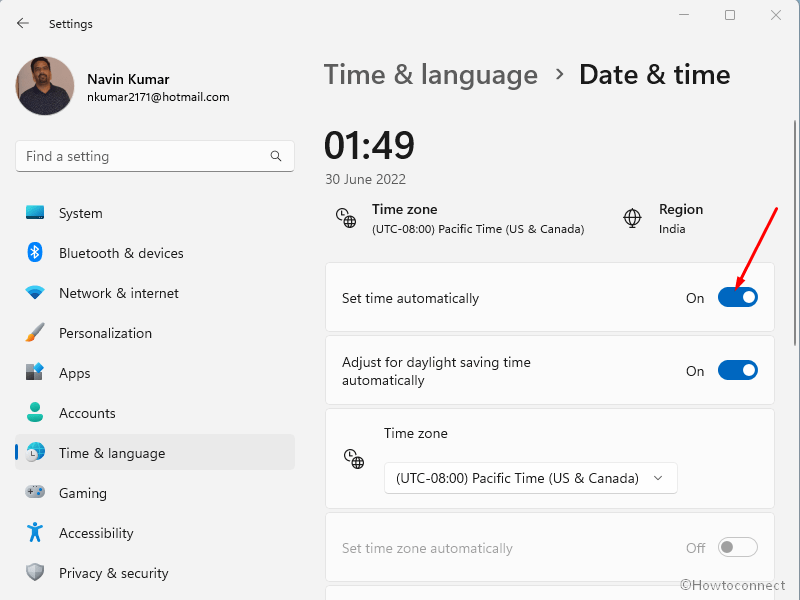
2] Correct Date and time settings
- Press – Windows and I.
- On Settings app, select – Time & Language.
- Staying in the ‘Date & time’ settings page, click on – Set the time automatically toggle from the right pane to turn it on.
See – How to Fix Can’t Add Gmail to Mail App in Windows 10
Way-5: Socket error 10060 Citrix
Several users encounter Socket error 10060 Citrix NetApp while trying to open or run a Microsoft Remote Desktop. The error message is – “Unable to connect the server contact your system administrator with following error: there is no Citrix Xenapp server configured on the specified server. (Socket error 10060)”. To solve this issue follow –
Microsoft Remote Desktop app is available on multiple servers and when Citrix finds any problem it will automatically shift the session to another suitable server. So, first of all, you need to wait for some time however If the socket error 10060 on Citrix still shows up then try the below instructions.
1] Disable or uninstall third-party Antivirus program
Right-click on the Antivirus from the System Tray on the Taskbar. Select Disable for a certain period of time. Almost every Antivirus provides options like Disable for 2 hours, 4 hours, 24 hours. If you don’t find an option like this then launch the program and disable it from the interface. If you can afford you can uninstall the Antivirus from your computer.
2] Check your firewall to make sure ports 2598 and 1494 are open
This error is what commonly appears when 1494 and 2598 ports are blocked. To unblock the ports follow the guidelines –
- Click on – Search.
- Type – Firewall.
- Press – Enter.
- Windows Security will open showing a few links; click on – Advanced settings.
- Select Yes on UAC prompt
- Windows Defender Firewall with Advanced Security window appears; click on Inbound Rules.
- Select – New Rule….
- On the New Inbound Rule Wizard, check Port.
- Click Next.
- Select TCP or UDP.
- In the Specific local ports, type 2598,1494 and click on Next.
- Make sure that Allow the connection is selected.
- Again click on Next.
- Check all the options Domain, Private, Public, or whichever you require.
- Select “Next”.
- Name the rule and click on Finish.
Way-6: Socket error 10060 Server
If you are on server and have access to it you can increase the value for time out and wait until the requested directory loads. To change value follow the steps –
- Go to the Server Settings.
- Click on – Tools.
- Select – Global Options.
- Click Transfer.
- You see an option – Reconnect and resume in [n] seconds if nothing received. Change the n to a higher value, for example, 93 or 95 seconds.
- Finally, the error will be fixed.
Several times, Citrix has no servers assigned or is not set correctly. Because this error is related to external Citrix Workspace and so call upon your company IT or Citrix support team to address the problem.
Methods list:
Way-1: Modify Registry
Way-2: Check proxy settings
Way-3: FTP
Way-4: SMTP
Way-5: Citrix
Way-6: Server
That’s all!!
Repair any Windows problems such as Blue/Black Screen, DLL, Exe, application, Regisrty error and quickly recover system from issues using Reimage.