
- Page 2
Copyright © 2016 YEALINK(XIAMEN) NETWORK TECHNOLOGY CO., LTD Copyright © 2016 Yealink(Xiamen) Network Technology CO., LTD. All rights reserved. No parts of this publication may be reproduced or transmitted in any form or by any means, electronic or mechanical, photocopying, recording, or otherwise, for any purpose, without the express written permission of Yealink(Xiamen) Network Technology CO., LTD. - Page 3
Do not dispose of WEEE as unsorted municipal waste and have to collect such WEEE separately. We are striving to improve our documentation quality and we appreciate your feedback. Email your opinions and comments to DocsFeedback@yealink.com. - Page 4
Yealink SIP-T19(P) E2 IP phone firmware contains third-party software under the GNU General Public License (GPL). Yealink uses software under the specific terms of the GPL. Please refer to the GPL for the exact terms and conditions of the license. -
Page 5: About This Guide
Hold, Call Transfer, Multicast Paging and Conference over an IP network. The difference between the SIP-T19 E2 and SIP-T19P E2 IP phones is that only SIP-T19P E2 supports PoE. This guide provides everything you need to quickly use your new phone. First, verify with your system administrator that the IP network is ready for phone configuration.
- Page 6
User Guide for the SIP-T19(P) E2 IP Phone Programable Keys on page The following section is new: Entering Data and Editing Fields on page Major updates have occurred to the following sections: Icon Instructions on page Optional Accessories on page … -
Page 7: Table Of Contents
Table of Contents About This Guide …………..v In This Guide ……………………. v Summary of Changes ………………….v Changes for Release 80, Guide Version 80.130 …………v Changes for Release 80, Guide Version 80.95 …………. vi Table of Contents …………..vii Overview ………………
- Page 8
User Guide for the SIP-T19(P) E2 IP Phone Audio Settings ……………………28 Volume ……………………..28 Ring Tones ……………………29 Contact Management ………………….. 31 Directory……………………… 31 Local Directory …………………… 33 Blacklist ……………………..43 Remote Phone Book ………………….44 Call History Management ………………..47 System Customizations …………………. -
Page 9: Table Of Contents
Table of Contents Advanced Phone Features …………. 97 Hot Desking ……………………97 Intercom ……………………..99 Multicast Paging ………………….. 100 Sending RTP Stream ………………… 100 Receiving RTP Stream ………………..102 Using Multicast Paging ………………..103 Music on Hold ……………………104 Shared Call Appearance (SCA) ………………105 Configuring SCA Feature on the IP Phone …………..
- Page 10
User Guide for the SIP-T19(P) E2 IP Phone… -
Page 11: Overview
Overview This chapter provides the overview of the SIP-T19(P) E2 IP phone. Topics include: Hardware Component Instructions Icon Instructions LED Instructions User Interfaces Documentations If you require additional information or assistance with your new phone, contact your system administrator.
- Page 12
⑭ Hookswitch Tab Yealink Wall how to adjust the hookswitch tab, refer to Mount Quick Installation Guide for Yealink IP Phones Picking up the handset from the handset cradle, the hookswitch bounces and the phone connects to the line, ⑮… - Page 13
Overview Icons appearing on the LCD screen are described in the following table: Icon Description Network is unavailable The private line registers successfully Register failed Registering The shared/bridged line registers successfully Hands-free speakerphone mode Handset mode Headset mode Voice Mail Text Message Auto Answer Do Not Disturb… - Page 14
User Guide for the SIP-T19(P) E2 IP Phone Icon Description Placed Calls Missed Calls Call Forward/Forwarded Calls The contact icon Power Indicator LED LED Status Description Solid yellow The phone is initializing. Fast flashing yellow (300ms) The phone is ringing. Slow flashing yellow (1s) The phone receives a voice mail or text message. - Page 15
Overview use one or the other interface to operate the phone and change settings. You can customize your phone by pressing the Menu soft key to access the phone user interface. The Advanced Settings option is only accessible to the administrator, and the default administrator password is ―admin‖… - Page 16
User Guide for the SIP-T19(P) E2 IP Phone Options Phone User Interface Web User Interface —Remote Phone Book —Call History Management √ —Logo Customization —Programable Keys —Account Registration √ —Dial Plan —Emergency Number —Live Dialpad —Hotline √ Basic Call Features —Recent Call In Dialing —Auto Answer √… - Page 17
Overview Options Phone User Interface Web User Interface —SIP Server 1/2 √ —Register Port —Outbound Status √ —Outbound Proxy1/2 √ —Proxy Fallback Interval √ —NAT Status √ Note The table above lists most of the feature options. Please refer to the relevant sections for more information. - Page 18
User Guide for the SIP-T19(P) E2 IP Phone… -
Page 19: Getting Started
Getting Started This chapter provides basic installation instructions and information for obtaining the best performance with the SIP-T19(P) E2 IP phone. Topics include: Packaging Contents Phone Installation Phone Initialization Phone Status Basic Network Settings Registration …
- Page 20
User Guide for the SIP-T19(P) E2 IP Phone Phone Stand Handset & Handset Cord Ethernet Cable Quick Start Guide Check the list before installation. If you find anything missing, contact your system administrator. The following items are optional accessories for your SIP-T19(P) E2 IP phone. You need to purchase them separately if required. - Page 21
Headset Note We recommend that you use the accessories provided or approved by Yealink. The use of unapproved third-party accessories may result in reduced performance. If your phone is already installed, proceed to Phone Initialization on page 14. - Page 22
Connect the network and power You have two options for power and network connections. Your system administrator will advise you which one to use. AC power Power over Ethernet (PoE) Note PoE is not applicable to the SIP-T19 E2 IP phone. - Page 23
Note The IP phone should be used with Yealink original power adapter (5V/600mA) only. The use of the third-party power adapter may cause the damage to the phone. - Page 24
User Guide for the SIP-T19(P) E2 IP Phone After your phone is powered on, the system boots up and performs the following steps: Automatic Phone Initialization The phone finishes the initialization by loading the saved configuration. The LCD screen displays ―Welcome Initializing…please wait‖ during this process. DHCP (Dynamic Host Configuration Protocol) The phone attempts to contact a DHCP server in your network to obtain valid IPv4 network settings (e.g., IP address, subnet mask, default gateway address and DNS… - Page 25
Getting Started Enter the user name (admin) and password (admin) in the login page. Click Confirm to login. The phone status is displayed on the first page of the web user interface. If your phone cannot contact a DHCP server for any reason, you need to configure network settings manually. - Page 26
User Guide for the SIP-T19(P) E2 IP Phone Press to select IPv4, IPv6 or IPv4 & IPv6 from the IP Mode field. Press the Save soft key to accept the change or the Back soft key to cancel. You can configure a static IPv4 address for the IP phone. Before configuring it, make sure that the IP mode is configured as IPv4 or IPv4 &… - Page 27
Getting Started Enter the desired value in the IPv6 IP, IPv6 IP Prefix, IPv6 Default Gateway, IPv6 Pri.DNS and IPv6 Sec.DNS field respectively. Press the Save soft key to accept the change or the Back soft key to cancel. If you are using an xDSL modem, you can connect your phone to the Internet via PPPoE mode. - Page 28
User Guide for the SIP-T19(P) E2 IP Phone If the phone has successfully started up, the idle LCD screen will be displayed as below. The idle screen displays the label of current account, time and date, and four soft keys. You can enter data and edit fields using the phone keypad. - Page 29
Getting Started Input Mode Keypad (initials in capitals) 7pqrsPQR pqrs7ßЅ pqrs7ßЅ PQRS7Ѕ TUV8Ù Ú Û 8tuvTUV tuv8ùúûü tuv8ùúûü Ü 9wxyzWX wxyz9ýÞ wxyz9ýÞ WXYZ9ÝÞ space space space *.,’?!-()@/: *.,’?!-()@/: *.,’?!-()@/: *.,’?!-()@/: _;+&%=< _;+&%=< _;+&%=< _;+&%=< > > > > .*:/@[] £$¥¤[]{} £$¥¤[]{} £$¥¤[]{} £$¥¤[]{}… - Page 30
User Guide for the SIP-T19(P) E2 IP Phone If you want to Then you can To enter ―2Ä Æ Å À Á Â Ã Ç ‖, press more than three times quickly. Note: When you are in the uppercase (ABC soft key), uppercase and lowercase (Abc soft key) or lowercase (abc soft key) input mode, is not available. -
Page 31: General Settings
Customizing Your Phone You can customize your SIP-T19(P) E2 IP phone by personally configuring certain settings, for example, contrast, language and time & date. You can add contacts to the phone’s local directory manually or from call history. You can also personalize different ring tones for different callers.
-
Page 32: Language
User Guide for the SIP-T19(P) E2 IP Phone The default language of the phone user interface is English. If the language of your web browser is not supported by the phone, the web user interface will use English by default. You can change the language for the phone user interface and the web user interface respectively.
-
Page 33: Time & Date
Customizing Your Phone The time and date are displayed on the LCD screen when the phone is idle. You can configure the phone to obtain the time and date from the SNTP server automatically, or configure the time and date manually. If the phone cannot obtain the time and date from the Simple Network Time Protocol (SNTP) server, contact your system administrator for more information.
- Page 34
User Guide for the SIP-T19(P) E2 IP Phone Enter the specific time in the Time(HMS) field. Press the Save soft key to accept the change. The date and time displayed on the LCD screen will change accordingly. To configure the time and date format via phone user interface: Press Menu->Settings->Basic Settings->Time &… -
Page 35: Administrator Password
Customizing Your Phone The Advanced Settings option is only accessible to the administrator. The default administrator password is ―admin‖. For security reasons, you should change the default administrator password as soon as possible. To change the administrator password via phone user interface: Press Menu->Settings->Advanced Settings (default password: admin) ->Set Password.
-
Page 36: Phone Lock
User Guide for the SIP-T19(P) E2 IP Phone You can lock your phone temporarily when you are not using it. This feature helps to protect your phone from unauthorized use. Phone lock consists of the following: Menu Key: The Menu soft key is locked. You cannot access the menu of the phone until unlocked.
- Page 37
Customizing Your Phone (Optional.) Enter the desired interval of automatic phone lock in the Lock Time Out field. The default timeout is 0. It means the phone will not be automatically locked. You need to long press to lock it immediately when the phone is idle. If it is set to other values except 0 (e.g., 5), the phone will be locked when the phone is inactive in idle screen for the designated time (in seconds). -
Page 38: Volume
User Guide for the SIP-T19(P) E2 IP Phone To change the phone unlock PIN via phone user interface: Press Menu->Settings->Basic Settings->Change PIN. Enter the desired value in the Current PIN, New PIN and Confirm PIN field respectively. Press the Save soft key to accept the change or the Back soft key to cancel. Note The unlock PIN length must be within 15 digits.
-
Page 39: Ring Tones
Customizing Your Phone To adjust the ringer volume: When the phone is idle: Press to adjust the ringer volume. When the phone is ringing: Press to adjust the ringer volume. You can also press to adjust the ringer volume when selecting a ring tone. For more information, refer to Ring Tones on page 29.
- Page 40
User Guide for the SIP-T19(P) E2 IP Phone Press to select the desired ring tone. (Optional.) Press to adjust the ringer volume. Press the Save soft key to accept the change or the Back soft key to cancel. A ring tone for the phone is configurable via web user interface at the path Settings->Preference->Ring Type. -
Page 41: Directory
Customizing Your Phone In the Upload Ringtone field, click Browse to locate a ring tone (the file format must be *.wav) file from your local system. Click Upload to upload the file. Note The priority of ring tone for an incoming call on the phone is as follows: Contact ring tone (refer to Adding Contacts) >Group ring tone (refer to…
- Page 42
User Guide for the SIP-T19(P) E2 IP Phone In the Directory block, select the desired list from the Disabled column and then click The selected list appears in the Enabled column. Repeat the step 2 to add more lists to the Enabled column. To remove a list from the Enabled column, select the desired list and then click To adjust the display order of enabled lists, select the desired list and then click The LCD screen displays the list(s) in the adjusted order. -
Page 43: Local Directory
Customizing Your Phone The built-in phone directory can store the names and phone numbers of your contacts. You can store up to 1000 contacts and 48 groups in your phone’s local directory. You can add new groups and contacts, edit, delete or search for a contact, or simply dial a contact number from the local directory.
- Page 44
User Guide for the SIP-T19(P) E2 IP Phone To edit a group in the local directory: Press the Dir soft key. The IP phone enters the local directory directly as there is only Local Directory enabled in the directory by default. If Local Directory is removed from the directory refer to Directory… -
Page 45: Adding Contacts Manually
Customizing Your Phone The IP phone enters the local directory directly as there is only Local Directory enabled in the directory by default. If Local Directory is removed from the directory refer to Directory on page press Menu->Directory->Local Directory to enter the local directory. Select the desired group.
- Page 46
User Guide for the SIP-T19(P) E2 IP Phone The IP phone enters the local directory directly as there is only Local Directory enabled in the directory by default. If Local Directory is removed from the directory refer to Directory on page press Menu->Directory->Local Directory to enter the local directory. - Page 47
Customizing Your Phone Press the Option soft key, and then select Add to Contacts. Press the OK soft key, and then edit the contact name. Press the Save soft key to accept the change. The entry is successfully saved to the local directory. Adding Contacts from Remote Phone Book To add a contact to the local directory from remote phone book: Press Menu->Directory->Remote Phone Book. - Page 48
User Guide for the SIP-T19(P) E2 IP Phone press Menu->Directory->Local Directory to enter the local directory. Select the desired contact group and then press the Enter soft key. If the contact is not in any group, select All Contacts and then press the Enter soft key. - Page 49
Customizing Your Phone The LCD screen prompts the following warning: Press the OK soft key to confirm the deletion or the Cancel soft key to cancel. You can also delete all contacts by pressing the Option soft key, and then select Delete All. - Page 50
User Guide for the SIP-T19(P) E2 IP Phone To search for a contact in the local directory: Press the Dir soft key. The IP phone enters the local directory directly as there is only Local Directory enabled in the directory by default. If Local Directory is removed from the directory refer to Directory… - Page 51
Customizing Your Phone The LCD screen will display search results in the adjusted order. Click Confirm to accept the change. Note Search source list in dialing is configurable via web user interface only. To search for a contact in the enabled search source lists: Pick up the handset, press the Speakerphone key. - Page 52
User Guide for the SIP-T19(P) E2 IP Phone Click Browse to locate a contact list file (the file format must be *.xml) from your local system. Click Import XML to import the contact list. The web user interface prompts ―The original contact will be covered, continue?‖. Click OK to complete importing the contact list. -
Page 53: Blacklist
Customizing Your Phone At least one item should be selected to be imported into the local directory. Click Import to complete importing the contact list. To export a contact list via web user interface: Click on Directory->Local Directory. Click Export XML (or Export CSV). Click Save to save the contact list to your local system.
-
Page 54: Remote Phone Book
User Guide for the SIP-T19(P) E2 IP Phone Press the Add soft key to accept the change or the Back soft key to cancel. To add a contact to the blacklist directory from the local directory: Press the Dir soft key. The IP phone enters the local directory directly as there is only Local Directory enabled in the directory by default.
- Page 55
Customizing Your Phone To configure an access URL for a remote phone book via web user interface: Click on Directory->Remote Phone Book. Enter the access URL in the Remote URL field. Enter the name in the Display Name field. Click Confirm to accept the change. Note An access URL for a remote phone book is configurable via web user interface only. - Page 56
User Guide for the SIP-T19(P) E2 IP Phone To place a call from the remote phone book: Press Menu->Directory->Remote Phone Book. If Remote Phone Book is added to the directory refer to Directory on page press Dir->Remote Phone Book to enter the remote phone book. Select the desired remote group, and then press the Enter soft key to load the remote phone book. - Page 57
Customizing Your Phone Enter the desired refresh period in the Update Time Interval(Seconds) field. The default value is 21600. Click Confirm to accept the change. The SIP-T19(P) E2 IP phone maintains call history lists of Placed calls, Received calls, Missed calls and Forwarded calls. Each call history list supports up to 100 entries. You can view call history, place a call, add a contact or delete an entry from the call history list. - Page 58
User Guide for the SIP-T19(P) E2 IP Phone Press to select the desired entry. Press the Option soft key, and then select Detail. The detailed information of the entry appears on the LCD screen. To place a call from the call history list: Press the History soft key. - Page 59
Customizing Your Phone The LCD screen prompts «Delete all the call records?». Press the OK soft key to confirm the deletion or the Cancel soft key to cancel. You can upload your custom logo which will be shown on the idle screen. To upload a custom logo via web user interface: Click on Features->General Information. -
Page 60: Headset Use
User Guide for the SIP-T19(P) E2 IP Phone If you want to use a headset, physically connect your headset and activate the headset mode for use. For more information on physically connecting a headset, refer to Phone Installation on page 11. To activate the headset mode: Press on the phone.
- Page 61
Customizing Your Phone Select Enabled from the pull-down list of Headset Prior. Click Confirm to accept the change. To use headset prior feature, you should activate the headset mode in advance: Physically connect the headset. Press to activate the headset mode. Note If headset prior is enabled, the headset mode will not be deactivated until you press the Headset key again. -
Page 62: Programable Keys
User Guide for the SIP-T19(P) E2 IP Phone Select Enabled from the pull-down list of Dual-Headset. Click Confirm to accept the change. Note Dual headset is configurable via web user interface only. You can customize the soft keys, navigation keys and function keys on the keypad. The SIP-T19(P) E2 IP phone supports 11 programable keys.
- Page 63
Customizing Your Phone Customize specific features for these keys. (Optional.) Enter the string that will appear on the LCD screen in the Label field. Label is configurable only when customizing SoftKey (1-4). Click Confirm to accept the change. You can click Reset to default to reset custom settings to defaults. Note Programable keys are configurable via web user interface only. -
Page 64: Programable Keys On
User Guide for the SIP-T19(P) E2 IP Phone For the features not listed above, refer to Basic Call Features on page Advanced Phone Features on page 97. For more information, contact your system administrator. Speed Dial You can use this key feature to speed up dialing numbers frequently used or hard to remember.
- Page 65
Customizing Your Phone Type (Local Directory) Dependencies: Label (key label displayed on the LCD screen) Usage: Press the programable key to access the local directory quickly. Local Group You can use this key feature to access the group in the local directory quickly. For more information, refer to Local Directory on page 33. - Page 66
User Guide for the SIP-T19(P) E2 IP Phone You can use this key feature to quick access text message. For more information, refer to Short Message Service (SMS) on page 117. Type (SMS) Dependencies: Label (key label displayed on the LCD screen) Usage: Press the programable key when the phone is idle to access the text message. -
Page 67: Account Registration
Customizing Your Phone Type (Directory) Dependencies: Label (key label displayed on the LCD screen) Usage: Press the programable key to immediately access to frequently used lists. You can only register one account on the SIP-T19(P) E2 IP phone. To register an account via phone user interface: Press Menu->Settings->Advanced Settings (default password: admin) ->Accounts.
-
Page 68: Dial Plan
User Guide for the SIP-T19(P) E2 IP Phone Dial plan is a string of characters that governs the way your SIP-T19(P) E2 IP phone processes the inputs received from your phone keypad. The SIP-T19(P) E2 IP phone supports the following dial plan features: Replace Rule …
- Page 69
Customizing Your Phone dial out the number ―1234‖, you just need to enter ―1‖ on the phone and then press the Send soft key. To add a replace rule via web user interface: Click on Settings->Dial Plan->Replace Rule. Enter the string (e.g., 1) in the Prefix field. Enter the string (e.g., 1234) in the Replace field. - Page 70
User Guide for the SIP-T19(P) E2 IP Phone You can configure one or more dial-now rules (up to 100) on your phone. When the dialed number matches the dial-now string, the number will be dialed out automatically. For example, a dial-now rule is configured as «1xx», any entered three-digit string beginning with 1 will then be dialed out automatically on the phone. - Page 71
Customizing Your Phone Enter the time between 0 and 14 (seconds) in the Time-Out for Dial-Now Rule field. Click Confirm to accept the change. Note Delay time for dial-now rule is configurable via web user interface only. Area codes are also known as Numbering Plan Areas (NPAs). They usually indicate geographical areas in a country. - Page 72
User Guide for the SIP-T19(P) E2 IP Phone Enter the desired values in the Code, Min Length (1-15) and Max Length (1-15) fields. Click Confirm to accept the change. Note The default value of minimum and maximum length is 1 and 15 respectively. Area code is configurable via web user interface only. -
Page 73: Emergency Number
Customizing Your Phone Enter the desired value in the BlockOut Number field. Click Confirm to add the block out number. Note Block out number is configurable via web user interface only. Public telephone networks in countries around the world have a single emergency telephone number (emergency services number), that allows a caller to contact local emergency services for assistance when necessary.
-
Page 74: Live Dialpad
User Guide for the SIP-T19(P) E2 IP Phone For multiple numbers, enter a comma between every two emergency numbers. The default emergency numbers are 112, 911, 110. Click Confirm to accept the change. Note Emergency number is configurable via web user interface only. You can enable live dialpad feature on the SIP-T19(P) E2 IP phone, which enables the IP phone to automatically dial out a phone number without pressing the send key.
-
Page 75: Hotline
Customizing Your Phone The default delay time is 4 seconds. Click Confirm to accept the change. Note Live dialpad is configurable via web user interface only. You can dial a hotline number immediately upon lifting the handset, pressing the Speakerphone key. You can also configure a delay, and then the phone will dial out the hotline number automatically after the designated period of time.
- Page 76
User Guide for the SIP-T19(P) E2 IP Phone… -
Page 77: Basic Call Features
Basic Call Features The SIP-T19(P) E2 IP phone is designed to be easily used like a regular phone on a public switched telephone network (PSTN). You can place calls, answer calls, transfer a call to someone else, or conduct a conference call. This chapter provides basic operating instructions for the SIP-T19(P) E2 IP phone.
- Page 78
User Guide for the SIP-T19(P) E2 IP Phone Using the speakerphone Using the headset You can also dial the number first, and then choose the way you want to speak to the other party. You can also search and dial a contact from call history, local directory or remote phone book. - Page 79
Basic Call Features To place a call using the headset: With the optional headset connected, press to activate the headset mode. Enter the desired number using the keypad. Press , or the Send soft key. Note To permanently use the headset mode, refer to Headset Prior on page 50. - Page 80
User Guide for the SIP-T19(P) E2 IP Phone To answer a call using the handset: Pick up the handset. To answer a call using the hands-free speakerphone mode: Do one of the following: Press With the handset on-hook and the headset mode deactivated, press the Answer soft key. -
Page 81: Recent Call In Dialing
Basic Call Features To redial a previously dialed number from your phone: Press when the phone is idle. Press to select the desired entry from the placed calls list, and then press or the Send soft key. To view the placed calls list when the phone is on the dialing screen, you should enable recent call in dialing in advance.
-
Page 82: Auto Answer
User Guide for the SIP-T19(P) E2 IP Phone To view placed calls list when the phone is on the dialing screen: Pick up the handset or press the Speakerphone key. The LCD screen displays the placed calls list. You can also enter a few continuous characters of the contact name or continuous numbers of the contact number (office, mobile or other number) to search from placed calls list.
-
Page 83: Auto Redial
Basic Call Features Press the Save soft key to accept the change or the Back soft key to cancel. icon appears on the LCD screen. Auto answer is configurable via web user interface at the path Account->Basic. Note Auto answer is only applicable when there is no other call in progress on the phone. You can enable auto redial to automatically redial a phone number when the called party is busy.
-
Page 84: Call Completion
User Guide for the SIP-T19(P) E2 IP Phone To use auto redial: When the called party is busy, the following prompt will appear on the LCD screen of the phone: Press the OK soft key to activate auto redial. The following prompt will appear on the LCD screen of the phone: Wait for the designated period of time or press the OK soft key to redial the phone number.
-
Page 85: Recall
Basic Call Features To use call completion: When the called party is busy, the following prompt will appear on the LCD screen of the phone: Press the OK soft key, the phone returns to the idle screen and call completion is activated.
-
Page 86: Call Mute
User Guide for the SIP-T19(P) E2 IP Phone Select ReCall from the pull-down list of Type. Click Confirm to accept the change. Note A recall key is configurable via web user interface only. You can mute the microphone of the active audio device during an active call so that the other party cannot hear you.
- Page 87
Basic Call Features place a call on hold, your IP PBX may play music to the other party while waiting. To place a call on hold: Press the Hold soft key during a call. The LCD screen indicates that the call is on hold. Note The phone will beep softly every 30 seconds to remind you that you still have a call on hold. - Page 88
User Guide for the SIP-T19(P) E2 IP Phone Incoming calls will be rejected automatically and «n New Missed Call(s)» («n» indicates the number of missed calls. e.g., 1 New Missed Call(s)) will appear on the LCD screen. Note When DND and busy forward are enabled at the same time, calls will be sent to the configured destination number. -
Page 89: Call Forward
Basic Call Features You can configure your phone to forward incoming calls to another party through static forwarding. You can also forward calls while your phone is ringing, refer to Dynamic Forwarding. Static Forwarding Three types of static forwarding: Always Forward: Incoming calls are immediately forwarded. …
- Page 90
User Guide for the SIP-T19(P) E2 IP Phone Enter the destination number you want to forward incoming calls to when the phone is busy in the Forward to field. (Optional.) Enter the busy forward on code or off code respectively in the On Code or Off Code field. - Page 91
Basic Call Features For multiple numbers, enter a comma between every two numbers. Click Confirm to accept the change. When call forward is enabled on the phone, the phone cannot forward incoming calls from the numbers specified in the Forward Authorized Numbers field. Note Forward authorized number is configurable via web user interface only. -
Page 92: Call Transfer
User Guide for the SIP-T19(P) E2 IP Phone Enter the number you want to forward the incoming call to. Press , or the Send soft key. The LCD screen prompts a call forward message. Note When the phone forwards a call, a prompt window will pop up by default, if you want to disable the feature, contact your system administrator for more information.
-
Page 93: Call Waiting
Basic Call Features Refer to Directory on page Remote Phone Book on page for more information). Press to dial out. Press or the Tran soft key to complete the transfer when receiving ringback. To perform an attended transfer: Press or the Tran soft key during a call. Do one of the following: Enter the number you want to transfer the call to.
-
Page 94: Conference
User Guide for the SIP-T19(P) E2 IP Phone To configure call waiting via phone user interface: Press Menu->Features->Call Waiting. Press , or the Switch soft key to select Enabled from the Call Waiting field. Press , or the Switch soft key to select Enabled from the Play Tone field. (Optional.) Enter the call waiting on code or off code respectively in the On Code or Off Code field.
-
Page 95: Network Conference
Basic Call Features When the second party answers the call, press the Conf soft key again to join all parties in the conference. You can press to see all parties in the conference. During the conference call, you can do the following actions: Press the Hold soft key to place the conference on hold.
-
Page 96: Call Park
User Guide for the SIP-T19(P) E2 IP Phone Enter the conference URI (e.g., conference@example.com) in the Conference URI field. Click Confirm to accept the change. To set up a network conference call: Place a call to the first party. Press the NewCall soft key to place a new call. The active call is placed on hold.
-
Page 97: Fac Mode
Basic Call Features successfully, there is a voice prompt confirming that the call was parked. You can retrieve the parked call by pressing the Retrieve soft key. If the parked call is not retrieved within a period of time defined by the system, the phone performing call park will receive a call back.
- Page 98
User Guide for the SIP-T19(P) E2 IP Phone It is configured for the Retrieve soft key. Click Confirm to accept the change. Note If the Park or Retrieve soft key doesn’t appear on the LCD screen, please select Disabled from the pull-down list of Custom Softkey via web user interface at path Settings->Softkey Layout. -
Page 99: Transfer Mode
Basic Call Features Press If the call is parked successfully, you will hear a voice prompt confirming that the call is parked. If you want to park the call against desired extension. Enter an extension where you want to park the call. Press If the call is parked successfully, you will hear a voice prompt confirming that the call is parked.
- Page 100
User Guide for the SIP-T19(P) E2 IP Phone (Optional.) Enter the park retrieval number in the Park Retrieve Code field. It is configured for the Retrieve soft key. Click Confirm to accept the change. Note If the Park or Retrieve soft key doesn’t appear on the LCD screen, please select Disabled from the pull-down list of Custom Softkey via web user interface at path Settings->Softkey Layout. -
Page 101: Call Pickup
Basic Call Features To retrieve a parked call in Transfer mode: Do one of the following: If the park retrieval number is not configured, you need to enter the park retrieval number (e.g., *11). Press or the Send soft key. If the park retrieval number is configured, press the Retrieve soft key on the dialing screen.
- Page 102
User Guide for the SIP-T19(P) E2 IP Phone Enter the directed call pickup code in the Directed Call Pickup Code field. Click Confirm to accept the change. To configure the directed call pickup code on a per-line basis via web user interface: Click on Account->Advanced. -
Page 103: Group Call Pickup
Basic Call Features The DPickup soft key appears on the LCD screen. Press the DPickup soft key on your phone when the target phone receives an incoming call. Enter the phone number which is receiving an incoming call. Press the DPickup soft key again. The call is answered on your phone.
-
Page 104: Anonymous Call
User Guide for the SIP-T19(P) E2 IP Phone Enter the group call pickup code in the Group Call Pickup Code field. Click Confirm to accept the change. To pick up a call in the group: Pick up the handset or press the Speakerphone key. The GPickup soft key appears on the LCD screen.
-
Page 105: Anonymous Call Rejection
Basic Call Features some services, but don’t want to be harassed. Anonymous call is configurable on a per-line basis. You can also configure the phone to send anonymous call on/off code to the server to activate/deactivate anonymous call on the server side. Note Anonymous call is not available on all servers.
- Page 106
User Guide for the SIP-T19(P) E2 IP Phone deliberately block their identities and numbers from being displayed. Anonymous call rejection is configurable on a per-line basis. You can also configure the phone to send anonymous call rejection on/off code to the server to activate/deactivate anonymous call rejection on the server side. -
Page 107: Advanced Phone Features
Advanced Phone Features This chapter provides operating instructions for the advanced features of the SIP-T19(P) E2 IP phone. Topics include: Hot Desking Intercom Multicast Paging Music on Hold Shared Call Appearance (SCA) Bridged Line Appearance (BLA) …
- Page 108
User Guide for the SIP-T19(P) E2 IP Phone Select Hot Desking from the pull-down list of Type. Click Confirm to accept the change. Note hot desking key is configurable via web user interface only. To use hot desking: Press the hot desking key when the phone is idle. The LCD screen prompts the following warning: Press the OK soft key, registration configurations of all accounts on the phone will be cleared immediately. -
Page 109: Intercom
Advanced Phone Features Intercom is a useful feature in an office environment to quickly connect with the operator or the secretary. The SIP-T19(P) E2 IP phone supports automatically to answer an incoming intercom call by default. The phone automatically plays a warning tone when it receives an incoming intercom call.
-
Page 110: Multicast Paging
User Guide for the SIP-T19(P) E2 IP Phone Intercom Barge You can enable or disable the phone to automatically answer an incoming intercom call while there is already an active call on the phone. If Intercom Barge is enabled, the phone will automatically answer the intercom call and place the active call on hold.
- Page 111
Advanced Phone Features Select Paging List from the pull-down list of Type. Click Confirm to accept the change. To configure paging list via phone user interface: Press the paging list key when the phone is idle. Press to select a desired paging group. The default tag is Empty if it is not configured before. - Page 112
User Guide for the SIP-T19(P) E2 IP Phone To delete a paging group via phone user interface: Press the paging list key when the phone is idle. Press to select a desired group. Press the Option soft key and then press the Delete soft key. The LCD screen prompts ―Delete selected paging group?‖. - Page 113
Advanced Phone Features To configure multicast listening addresses via web user interface: Click on Directory->Multicast IP. Select the desired value from the pull-down list of Paging Barge. Select the desired value from the pull-down list of Paging Priority Active. Enter the multicast IP address(es) and port number (e.g., 224.5.6.20:10008) which the phone listens to for incoming RTP multicast in the Listening Address field. -
Page 114: Music On Hold
User Guide for the SIP-T19(P) E2 IP Phone The following figure shows a multicast RTP session on the phone: To place the current multicast RTP session on hold, press the Hold soft key. The sender’s phone places the multicast RTP session on hold and receiver’s phone releases the session.
- Page 115
Advanced Phone Features Enter the SIP URI (e.g., sip:moh@sip.com) in the Music Server URI field. Click Confirm to accept the change. When you have placed a call on hold, the held party can hear the music. Note For this feature to function, all involved parties cannot use encrypted RTP (SRTP). Music on hold server is configurable via web user interface only. - Page 116
User Guide for the SIP-T19(P) E2 IP Phone You can configure a primary account on the IP phone and other alternate accounts on the other IP phones. For example, party A, party B share the account 4603, phone A registers the primary account 4603, phone B registers the alternate account 4603_1, phone C registers the account 4604. - Page 117
Advanced Phone Features Click on Advanced, and then select Shared Call Appearance from the pull-down list of Shared Line. Click Confirm to accept the change. To configure the shared line settings on phone B via web user interface: Register the alternate account 4603_1. (Enter the primary account 4603 in the Register Name field.) - Page 118
User Guide for the SIP-T19(P) E2 IP Phone Click on Advanced, and then select Shared Call Appearance from the pull-down list of Shared Line. Click Confirm to accept the change. Configuring call pull feature Call pull feature allows users to retrieve an existing call from another shared phone that is in active or public hold status. - Page 119
Advanced Phone Features Enter the call pull feature access code (e.g., *11) in the Call Pull Feature Access Code field. Click Confirm to accept the change. The phone will dial out ―*11‖ automatically when you press the CallPull soft key. This section provides you with detailed information on using the SIP-T19(P) E2 IP phone in a SCA scenario. - Page 120
An incoming call arrives on the shared line when there is an active call on phone A. You can answer the incoming call on either phone A or phone B. The LCD screen of phone A displays the information of the incoming call (e.g., ‖Incoming call: 4604 Yealink‖). Note Make sure call waiting feature is enabled on phone A. - Page 121
Advanced Phone Features Do one of the following on phone A: Press the Answer soft key. Phone B stops ringing. Press to access the new call. Press or the Answer soft key. Phone B stops ringing. The incoming call is answered and the original call is placed on hold. You can also answer the call on phone B: Press or the Answer soft key. - Page 122
User Guide for the SIP-T19(P) E2 IP Phone If there is a held call between phone A and phone C, do the following: Enter the call pull feature access code (e.g., *11), and then press the Send soft key on the phone B. The held call has been retrieved from the phone A successfully. - Page 123
Advanced Phone Features You can share a BLA number on two or more phones. For example, phone A registers the account 14019833020 and assigns BLA number, phone B registers the account 10462190020 and assigns BLA number, phone C registers the account 14755608020. Phone A and phone B share the BLA number 14084588327. - Page 124
User Guide for the SIP-T19(P) E2 IP Phone Click on Advanced, and then select Draft BLA from the pull-down list of Shared Line. Enter the desired number in the BLA Number field. Click Confirm to accept the change. - Page 125
Advanced Phone Features To register an account and configure BLA feature on phone B via web user interface: Register the account 10462190020. Click on Advanced, and then select Draft BLA from the pull-down list of Shared Line. Enter the desired number in the BLA Number field. - Page 126
User Guide for the SIP-T19(P) E2 IP Phone Click Confirm to accept the change. This section provides you with detailed information on using the SIP-T19(P) E2 IP phone in a BLA scenario. You can do the following using SIP-T19(P) E2 IP phone in a BLA scenario: Placing calls … -
Page 127: Messages
Advanced Phone Features To place a call on hold: Press the Hold soft key on phone A when party A and party C are talking. The bridged line call is placed on hold. If there is a held call between phone A and phone C, you can retrieve a held call on phone A.
- Page 128
User Guide for the SIP-T19(P) E2 IP Phone To read a text message: Press Menu->Message->Text Message->Inbox. Select the desired message and then press the View soft key. Note If the phone prompts receiving new text messages, you can also press the View soft key to read the new messages directly. -
Page 129: Voice Mail
Advanced Phone Features Compose the new text message. You can press the abc soft key to change the input mode. Press the Send soft key after completing the content. Check the From and To fields, and then press the Send soft key. To delete a text message: Press Menu->Message->Text Message->Inbox (Sentbox, Outbox or Draftbox).
- Page 130
User Guide for the SIP-T19(P) E2 IP Phone unread voice messages. e.g., 4 New Voice Mail(s)) and a flashing icon If the voice mail pop-up message box disappears, it won’t pop up again unless the user receives a new voice mail or the user re-registers the account that has unread voice mail(s). -
Page 131: Message Waiting Indicator (Mwi)
Advanced Phone Features Follow the voice prompt to listen to your voice mails. Note Before listening to voice mails, make sure the voice mail access code has been configured. When all new voice mails are retrieved, the power indicator LED will go out. To view the voice mail via phone user interface: Press Menu->Message->Voice Mail->View Voice Mail.
- Page 132
User Guide for the SIP-T19(P) E2 IP Phone Options Description To use this feature, you should also configure the voice mail number. Note The phone will send SUBSCRIBE messages for the MWI service to the account or the voice number MWI service depending on the server. Contact your system administrator for more information. - Page 133
Advanced Phone Features Enter the desired voice mail number in the Voice Mail field. Click Confirm to accept the change. The IP phone will subscribe to the voice mail number for MWI service using Subscribe MWI To Voice Mail. Note MWI subscription is configurable via web user interface only. - Page 134
User Guide for the SIP-T19(P) E2 IP Phone… -
Page 135: Troubleshooting
Troubleshooting This chapter provides general troubleshooting information to help you solve the problems you might encounter when using your SIP-T19(P) E2 IP phone. If you require additional information or assistance with your new phone, contact your system administrator. How can I find the basic information of the IP phone? Press when the IP phone is idle to check the basic information of the IP phone, such as IP address and firmware version.
- Page 136
User Guide for the SIP-T19(P) E2 IP Phone instead. If your SIP-T19P E2 IP phone is powered from PoE, ensure you use a PoE-compliant switch or hub. Why does the phone display «Network unavailable»? Ensure that the Ethernet cable is plugged into the Internet port on the phone and … - Page 137
Troubleshooting Enter the new user password in the New Password field and Confirm Password field. Click Confirm to accept the change. You can also contact your system administrator for help. Note If you are logging into the web user interface of the phone with user credentials, you need to enter the current user password in the Old Password field. - Page 138
User Guide for the SIP-T19(P) E2 IP Phone Check that the headset mode is activated. Refer to Headset Use on page 50. Check that the headset volume is adjusted to an appropriate level. Refer to Volume on page 28. Why can’t I get a dial tone? Check for any loose connections and that the phone has been installed properly. - Page 139
Troubleshooting Enter the desired time in the Play Hold Tone Delay field. Click Confirm to accept the change. How to make a call using SRTP? You can enable SRTP to encrypt the audio stream(s) of phone calls. The parties participating in the call should enable SRTP on a per-line basis. To enable SRTP on a per-line basis via web user interface: Click on Account->Advanced. - Page 140
User Guide for the SIP-T19(P) E2 IP Phone Select the desired value (Optional or Compulsory) from the pull-down list of RTP Encryption(SRTP). Click Confirm to accept the change. Note SRTP is not available on all servers. Contact your system administrator for more information. - Page 141
Troubleshooting Click Export to open file download window, and then save the file to your local system. How to export system log? We may need you to provide a system log to help analyze your problem. To export the system log to a local PC via web user interface: Click on Settings->Configuration. - Page 142
User Guide for the SIP-T19(P) E2 IP Phone Click Export to open the file download window, and then save the file to your local system. You can also export the system log to a syslog server. Contact your system administrator for more information. - Page 143
Troubleshooting Click Export to open file download window, and then save diagnostic files to your local system. Note If the issue cannot be reproduced, just directly click Export to export all diagnostic files. How to reboot the phone? To reboot the phone via web user interface: Click on Settings->Upgrade. - Page 144
User Guide for the SIP-T19(P) E2 IP Phone How to upgrade firmware? To upgrade firmware via web user interface: Click on Settings->Upgrade. Click Browse to locate the required firmware from your local system. Click Upgrade to upgrade the firmware. The web user interface prompts ―Firmware of the SIP Phone will be updated. It will take 5 minutes to complete. - Page 145
Troubleshooting The LCD screen prompts ―Resetting to factory,please wait…‖. The LCD screen prompts ―Welcome Initializing…please wait‖. The phone will be reset to factory settings sucessfully after startup. Note Reset of your phone may take a few minutes. Do not power off until the phone has started up successfully. - Page 146
User Guide for the SIP-T19(P) E2 IP Phone… -
Page 147: Regulatory Notices
Without prior written consent, no organization or individual is permitted to make any change to the structure or the safety design of the device. Yealink is under no circumstance liable to consequences or legal issues caused by such changes.
- Page 148
User Guide for the SIP-T19(P) E2 IP Phone Please place no heavy objects on the device in case of damage and deformation caused by the heavy load. Keep at least 10 cm between the device and the closest object for heat … -
Page 149: Appendix A — Time Zones
Appendix A-Time Zones Time Zone Time Zone Name Samoa United States-Hawaii-Aleutian, United States-Alaska-Aleutian -9:30 French Polynesia United States-Alaska Time Canada(Vancouver,Whitehorse), Mexico(Tijuana,Mexicali), United States-Pacific Time Canada(Edmonton,Calgary), Mexico(Mazatlan,Chihuahua), United States-MST no DST, United States-Mountain Time Canada-Manitoba(Winnipeg), Chile(Easter Islands), Mexico(Mexico City,Acapulco), United States-Central Time Bahamas(Nassau), Canada(Montreal,Ottawa,Quebec), Cuba(Havana), United States-Eastern Time -4:30…
- Page 150
User Guide for the SIP-T19(P) E2 IP Phone Time Zone Time Zone Name +9:30 Australia(Adelaide), Australia(Darwin) Australia(Brisbane), Australia(Hobart), Australia(Sydney,Melboume,Canberra), Russia(Vladivostok) +10:30 Australia(Lord Howe Islands) New Caledonia(Noumea), Russia(Srednekolymsk Time) +11:30 Norfolk Island New Zealand(Wellington,Auckland), Russia(Kamchatka Time) +12:45 New Zealand(Chatham Islands) Tonga(Nukualofa) +13:30 Chatham Islands Kiribati… -
Page 151: Limitations Of Liability
Index Declaration of Conformity About This Guide Deleting Contacts Accessing the Remote Phone Book Deleting Groups Account Registration Dial-now Adding Contacts Dial Plan Adding Groups Directory Administrator password Display Issues Advanced Phone Features Do Not Disturb (DND) Anonymous Call Documentations Anonymous Call Rejection Dual Headset Answering Calls…
-
Page 152: Using Bla Feature On The Ip Phone
User Guide for the SIP-T19(P) E2 IP Phone Live Dialpad Local Conference Table of Contents Local Directory Time & Date Log Issues Troubleshooting Logo Customization User Interfaces Messages Using BLA Features on the IP Phone Message Waiting Indicator Using Multicast Paging Multicast Paging Using SCA Features on the IP Phone Music on Hold…
Outgoing calls fail — Forbidden — TotalNet — 03-31-2020 05:40 AM
My business is closed due to the national lockdown here in NZ and I’m trying to get my business phones working from my home office and it’s not going so well. Any help for a Yealink newcomer is gratefully appreciated!
Essentially, I believe my ISP/VoIP provider is blocking my outgoing calls from off-network, however, they have said no at 1st level support so I need some ammo to get through to level 4 ideally.
I have a W60B with 1 W56H and a T41S with the DD10 DECT adapter.
The line is registered and receives incoming calls on that line. When I attempt an outgoing call if fails quickly with «Forbidden».
There are other accounts registered on the W60B with a cloud PBX and my home ISP/VoIP working perfectly. I have set up the T41S for this account without the DECT adapter and get the same failure.
At the business office I use a CISCO ATA (SPA112) for this line and have used its settings for the registration on the W60B, with the intention of replacing it with the Yealink setup soon. This ATA device does not work from my home office either.
I have setup a syslog server to trace the call process and can attach here but the key entries I see are:
— a new call is established (call staus update [0]==>[2])
— a packet is successfully sent to the SIP server and a reply received
— a couple more exchanges of packets with the SIP server
— call status changes to 19 (call status update [2]==>[19])
— the call is released <<RELEASE-REASON>> (0xe2)
There is no SIP proxy involved, the connection is UDP only.
I’m sure there are many reasons behind a «forbidden» call failure (it’s often as much about what’s not in the log) so please let me know if there’s another area I can look at, perhaps it’s my network setup (NAT?) which is why the ATA I brought home doesn’t work either.
Here’s a highlight of the syslog output (phone# replace with NN):
Code:
DCX <5+notice> 632.873.481:TX[0] HS 2 --> T[55597] {CC-INFO}  P_IT(240)

DCX <5+notice> 632.873.625:  <<Calling Party Number>>  (0x6c)

DCX <5+notice> 632.873.769: Number type:

DCX <5+notice> 632.873.910: Numbering plan: ISDN/telephony plan

DCX <5+notice> 632.874.055: Presentation indicator: , Screening indicator: User-provided, not screened

DCX <5+notice> 632.875.883: Number: 0xNN ("N") 0xNN ("N") 0xNN ("N") 0xNN ("N") 0xNN ("N") 0xNN ("N") 0xNN ("N") 0xNN ("N") 0xNN ("N")

DCX <5+notice> 632.876.071:  <<Calling Party Name>>  (0x6d)

DCX <5+notice> 632.876.227: "NNNNNNNNN

DCX <5+notice> 632.876.373:  <<Call information>>  (0x7e)

DCX <5+notice> 632.876.518: Call ID:  0x0

DCX <5+notice> 632.879.676:

DCX <5+notice> 632.879.872:

APP <5+notice> [SIP] SIP_C2S_CALL_NEW_OUTGOING, lid:0, cid:32795,callmask:0x00000000,callee:NNNNNNNNN

CAL <5+notice> [000] call status update [0]==>[2]

DLG <5+notice> [000] Sending Packet :to dest=119.224.142.182:5060 msglen  = 929

DLG <5+notice> [000] End of Sending Packet :msglen  = 929

NET <5+notice> [000] ===>>>> UDP socket 119.224.142.182:5060: send 929 bytes

NET <5+notice> [255] <<<<=== UDP socket 119.224.142.182:5060: read 246 bytes

DLG <5+notice> [000] Data Received :from src=119.224.142.182:5060 msglen  = 246

DLG <5+notice> [000] End of Data Received :msglen  = 246

NET <5+notice> [255] <<<<=== UDP socket 119.224.142.182:5060: read 277 bytes

DLG <5+notice> [000] Data Received :from src=119.224.142.182:5060 msglen  = 277

DLG <5+notice> [000] End of Data Received :msglen  = 277

DLG <5+notice> [000] Sending Packet :to dest=119.224.142.182:5060 msglen  = 318

DLG <5+notice> [000] End of Sending Packet :msglen  = 318

NET <5+notice> [000] ===>>>> UDP socket 119.224.142.182:5060: send 318 bytes

CAL <5+notice> [000] call status update [2]==>[19]

SS7 <5+notice> 633.047.590:SS7_ReqRelExt instance=0x1003000e, reason=0x75,msg:(null) rel_msg_len=0

SS7 <5+notice> 633.048.034:service_SS7_ReqRel inst=0x1003000e,Reason=117,Call Id:0

APPC<5+notice> 633.048.266:appmedia_CallObjMediaStop inst:0xf,ChannelID:0

APPC<5+notice> 633.048.453:CallObjMediaSet inst:0xf,state:1

APPC<5+notice> 633.050.701:appcall_ReleaseCall CallId:0, Reason:0x75, RelMsgLen:0, CallIns:0xf, Hs:2

DCX <5+notice> 633.261.418:

DCX <5+notice> 633.261.635:FTMLP_ID/0,3,8,0x0,0x0,0,<0>

DCX <5+notice> 633.291.416:

DCX <5+notice> 633.291.633:FTMLP_ID/0,3,7,0x4,0x0,4,<0>

DCX <5+notice> 633.331.383:

DCX <5+notice> 633.331.590:FTMLP_ID/0,3,7,0x5,0x0,5,<0>

DCX <5+notice> 633.351.965:

DCX <5+notice> 633.352.222:FTMLP_ID/0,3,7,0x6,0x0,6,<0>

DCX <5+notice> 633.352.379:

DCX <5+notice> 633.352.528:RX[0] HS 2 <-- T(55645) {CC-RELEASE-COM} [HS-2]  P_IT(140)

DCX <5+notice> 633.352.676:  <<RELEASE-REASON>>  (0xe2)

DCX <5+notice> 633.352.819: Normal
Whether making a call or not I also get the occasional DESV<3+error > 792.450.786:get_ip failed ret= -1
I would port my phone number to the cloud PBX but I get an unbeatable package with unlimited free national and mobile calls on 2 lines 
Cheers for any assistance
Richard
RE: Outgoing calls fail — Forbidden — complex1 — 03-31-2020 08:14 AM
(03-31-2020 05:40 AM)TotalNet Wrote: My business is closed due to the national lockdown here in NZ and I’m trying to get my business phones working from my home office and it’s not going so well. Any help for a Yealink newcomer is gratefully appreciated!
Essentially, I believe my ISP/VoIP provider is blocking my outgoing calls from off-network, however, they have said no at 1st level support so I need some ammo to get through to level 4 ideally.
I have a W60B with 1 W56H and a T41S with the DD10 DECT adapter.
The line is registered and receives incoming calls on that line. When I attempt an outgoing call if fails quickly with «Forbidden».
There are other accounts registered on the W60B with a cloud PBX and my home ISP/VoIP working perfectly. I have set up the T41S for this account without the DECT adapter and get the same failure.
At the business office I use a CISCO ATA (SPA112) for this line and have used its settings for the registration on the W60B, with the intention of replacing it with the Yealink setup soon. This ATA device does not work from my home office either.
I have setup a syslog server to trace the call process and can attach here but the key entries I see are:
— a new call is established (call staus update [0]==>[2])
— a packet is successfully sent to the SIP server and a reply received
— a couple more exchanges of packets with the SIP server
— call status changes to 19 (call status update [2]==>[19])
— the call is released <<RELEASE-REASON>> (0xe2)There is no SIP proxy involved, the connection is UDP only.
I’m sure there are many reasons behind a «forbidden» call failure (it’s often as much about what’s not in the log) so please let me know if there’s another area I can look at, perhaps it’s my network setup (NAT?) which is why the ATA I brought home doesn’t work either.
Here’s a highlight of the syslog output (phone# replace with NN):
Code:
DCX <5+notice> 632.873.481:TX[0] HS 2 --> T[55597] {CC-INFO}  P_IT(240)

DCX <5+notice> 632.873.625:  <<Calling Party Number>>  (0x6c)

DCX <5+notice> 632.873.769: Number type:

DCX <5+notice> 632.873.910: Numbering plan: ISDN/telephony plan

DCX <5+notice> 632.874.055: Presentation indicator: , Screening indicator: User-provided, not screened

DCX <5+notice> 632.875.883: Number: 0xNN ("N") 0xNN ("N") 0xNN ("N") 0xNN ("N") 0xNN ("N") 0xNN ("N") 0xNN ("N") 0xNN ("N") 0xNN ("N")

DCX <5+notice> 632.876.071:  <<Calling Party Name>>  (0x6d)

DCX <5+notice> 632.876.227: "NNNNNNNNN

DCX <5+notice> 632.876.373:  <<Call information>>  (0x7e)

DCX <5+notice> 632.876.518: Call ID:  0x0

DCX <5+notice> 632.879.676:

DCX <5+notice> 632.879.872:

APP <5+notice> [SIP] SIP_C2S_CALL_NEW_OUTGOING, lid:0, cid:32795,callmask:0x00000000,callee:NNNNNNNNN

CAL <5+notice> [000] call status update [0]==>[2]

DLG <5+notice> [000] Sending Packet :to dest=119.224.142.182:5060 msglen  = 929

DLG <5+notice> [000] End of Sending Packet :msglen  = 929

NET <5+notice> [000] ===>>>> UDP socket 119.224.142.182:5060: send 929 bytes

NET <5+notice> [255] <<<<=== UDP socket 119.224.142.182:5060: read 246 bytes

DLG <5+notice> [000] Data Received :from src=119.224.142.182:5060 msglen  = 246

DLG <5+notice> [000] End of Data Received :msglen  = 246

NET <5+notice> [255] <<<<=== UDP socket 119.224.142.182:5060: read 277 bytes

DLG <5+notice> [000] Data Received :from src=119.224.142.182:5060 msglen  = 277

DLG <5+notice> [000] End of Data Received :msglen  = 277

DLG <5+notice> [000] Sending Packet :to dest=119.224.142.182:5060 msglen  = 318

DLG <5+notice> [000] End of Sending Packet :msglen  = 318

NET <5+notice> [000] ===>>>> UDP socket 119.224.142.182:5060: send 318 bytes

CAL <5+notice> [000] call status update [2]==>[19]

SS7 <5+notice> 633.047.590:SS7_ReqRelExt instance=0x1003000e, reason=0x75,msg:(null) rel_msg_len=0

SS7 <5+notice> 633.048.034:service_SS7_ReqRel inst=0x1003000e,Reason=117,Call Id:0

APPC<5+notice> 633.048.266:appmedia_CallObjMediaStop inst:0xf,ChannelID:0

APPC<5+notice> 633.048.453:CallObjMediaSet inst:0xf,state:1

APPC<5+notice> 633.050.701:appcall_ReleaseCall CallId:0, Reason:0x75, RelMsgLen:0, CallIns:0xf, Hs:2

DCX <5+notice> 633.261.418:

DCX <5+notice> 633.261.635:FTMLP_ID/0,3,8,0x0,0x0,0,<0>

DCX <5+notice> 633.291.416:

DCX <5+notice> 633.291.633:FTMLP_ID/0,3,7,0x4,0x0,4,<0>

DCX <5+notice> 633.331.383:

DCX <5+notice> 633.331.590:FTMLP_ID/0,3,7,0x5,0x0,5,<0>

DCX <5+notice> 633.351.965:

DCX <5+notice> 633.352.222:FTMLP_ID/0,3,7,0x6,0x0,6,<0>

DCX <5+notice> 633.352.379:

DCX <5+notice> 633.352.528:RX[0] HS 2 <-- T(55645) {CC-RELEASE-COM} [HS-2]  P_IT(140)

DCX <5+notice> 633.352.676:  <<RELEASE-REASON>>  (0xe2)

DCX <5+notice> 633.352.819: Normal
Whether making a call or not I also get the occasional DESV<3+error > 792.450.786:get_ip failed ret= -1
I would port my phone number to the cloud PBX but I get an unbeatable package with unlimited free national and mobile calls on 2 lines
Cheers for any assistance
Richard
Hi Richard,
Let me sum it up if I understand your issue.
At your business office you use a W60B with two accounts, 1 business and 1 private.
The W56H and T41S are both connected to the W60B.
All work well, no issues.
Because of the lockdown you must work at home, so you take the W60B, W56H and T41S with you and place it in your home office.
Now you have issues… and only with outbound business calls.
No issues with incoming calls, business or private, at all.
I do not think there are issues with you modem/router or other network component at your home, but you can always check if the SIP ALG feature in your modem/router is disabled.
SIP ALG should be a SIP helper but it create more issues than it is doing good.
Also check the port (forward) setting of your business and home router if they are setup different.
Why: SPA112 at the office don’t work… different LAN IP-address and that’s why it cannot communicate with your business VoIP provider?
It is a nasty issue.
RE: Outgoing calls fail — Forbidden — TotalNet — 03-31-2020 11:32 AM
(03-31-2020 08:14 AM)complex1 Wrote: Let me sum it up if I understand your issue.
At your business office you use a W60B with two accounts, 1 business and 1 private.
The W56H and T41S are both connected to the W60B.
All work well, no issues.
Not quite. The Yealink setup is new and not yet deployed so I am trying to get it working from home by registering the main business phone number on the W60B to make/take business calls at home. The Cisco ATA was working at the office and I have brought it home, I can’t make calls from home on this either. Both register and can receive calls with audio working in both directions, they just can’t initiate calls.
I have 4 other personal SIP accounts with 3 different providers that do work at home on the Yealink setup.
Thanks for the tip on SIP ALG, I have disabled this on the Unifi USG in the controller. This hasn’t made a difference yet but I will reboot everything in the morning to see if that changes. This also gives me something to discuss with tech support at my ISP but I don’t expect much, on a business package they set me up with a consumer grade Router/WiFi/modem/Firewall (that got hacked within 2 days of going online) and if you’re not using that then support kind of halts!
RE: Outgoing calls fail — Forbidden — complex1 — 03-31-2020 12:18 PM
(03-31-2020 11:32 AM)TotalNet Wrote: The Yealink setup is new and not yet deployed so I am trying to get it working from home by registering the main business phone number on the W60B to make/take business calls at home. The Cisco ATA was working at the office and I have brought it home, I can’t make calls from home on this either. Both register and can receive calls with audio working in both directions, they just can’t initiate calls.
I guess your provider is blocking unknown IP-addresses to avoid unauthorized calls.
They only validated your main office IP-address.
SOLVED: Outgoing calls fail — Forbidden — TotalNet — 05-07-2020 08:30 PM
(03-31-2020 12:18 PM)complex1 Wrote:
(03-31-2020 11:32 AM)TotalNet Wrote: The Yealink setup is new and not yet deployed so I am trying to get it working from home by registering the main business phone number on the W60B to make/take business calls at home. The Cisco ATA was working at the office and I have brought it home, I can’t make calls from home on this either. Both register and can receive calls with audio working in both directions, they just can’t initiate calls.
I guess your provider is blocking unknown IP-addresses to avoid unauthorized calls.
They only validated your main office IP-address.
Turns out this is the most likely case, the Yealink phones are now in the office with the only change being the internal IP address and working well.
I was hoping the syslog output of the W60B would include more detail on the response from the SIP proxy like a response code, is that encrypted in the packet received from the proxy or does the proxy even give detail?
There’s no support article here to indicate what call status 19 actual means or if it’s just a generic response for call failure.
My home ISP is part of the same group of companies as the office ISP and tech support said it shouldn’t be a problem. The evidence suggests otherwise — that my home connection is considered off-network.
Thanks for all the replies. Disappointed that my ISP couldn’t assist during an event like this but so far liking the Yealink products.
<— SIP read from UDP:195.5.0.83:5060 —>
SIP/2.0 200 OK
Via: SIP/2.0/UDP 10.10.10.110:5060;received=195.88.113.188;branch=z9hG4bK43d6f2c9;rport=60638
From: <sip:380892506511@sip.ukrtel.net>;tag=as4b83d39a
To: <sip:380892506511@195.5.0.83>;tag=aprqcvrsqu2-p2r94110000u6
Call-ID: 7fae610b155ea1e37031b9577cd780e1@127.0.1.1
CSeq: 111 REGISTER
Contact: <sip:380892506511@195.5.0.83>;expires=30
<————->
— (7 headers 0 lines) —
Scheduling destruction of SIP dialog ‘7fae610b155ea1e37031b9577cd780e1@127.0.1.1’ in 32000 ms (Method: REGISTER)
[Jul 30 15:05:31] NOTICE[1767]: chan_sip.c:18399 handle_response_register: Outbound Registration: Expiry for sip.ukrtel.net is 120 sec (Scheduling reregistration in 105 s)
== Using SIP RTP CoS mark 5
— Executing [90800506800@phones:1] Verbose(«SIP/101-00000028», «########## call from the SIP_ALL_OUT ###########») in new stack
########## call from the SIP_ALL_OUT ###########
— Executing [90800506800@phones:2] Dial(«SIP/101-00000028», «SIP/ukrtelecom/0800506800,120») in new stack
== Using SIP RTP CoS mark 5
Audio is at 10.10.10.110 port 15890
Adding codec 0x4 (ulaw) to SDP
Adding codec 0x8 (alaw) to SDP
Adding non-codec 0x1 (telephone-event) to SDP
Reliably Transmitting (NAT) to 195.5.0.83:5060:
INVITE sip:0800506800@sip.ukrtel.net SIP/2.0
Via: SIP/2.0/UDP 10.10.10.110:5060;branch=z9hG4bK671ecf1e;rport
Max-Forwards: 70
From: «101» <sip:380892506511@sip.ukrtel.net>;tag=as6f72688f
To: <sip:0800506800@sip.ukrtel.net>
Contact: <sip:380892506511@10.10.10.110>
Call-ID:
12d9dcd953de7a8f514a05ee6a480ebb@sip.ukrtel.net
CSeq: 102 INVITE
User-Agent: Asterisk PBX 1.6.2.9-2+squeeze6
Date: Mon, 30 Jul 2012 12:05:39 GMT
Allow: INVITE, ACK, CANCEL, OPTIONS, BYE, REFER, SUBSCRIBE, NOTIFY, INFO
Supported: replaces, timer
Content-Type: application/sdp
Content-Length: 271
v=0
o=root 1856866922 1856866922 IN IP4 10.10.10.110
s=Asterisk PBX 1.6.2.9-2+squeeze6
c=IN IP4 10.10.10.110
t=0 0
m=audio 15890 RTP/AVP 0 8 101
a=rtpmap:0 PCMU/8000
a=rtpmap:8 PCMA/8000
a=rtpmap:101 telephone-event/8000
a=fmtp:101 0-16
a=ptime:20
a=sendrecv
—
— Called ukrtelecom/0800506800
<— SIP read from UDP:195.5.0.83:5060 —>
SIP/2.0 100 Trying
Via: SIP/2.0/UDP 10.10.10.110:5060;received=195.88.113.188;branch=z9hG4bK671ecf1e;rport=60638
From: «101» <sip:380892506511@sip.ukrtel.net>;tag=as6f72688f
To: <sip:0800506800@195.5.0.83>
Call-ID:
12d9dcd953de7a8f514a05ee6a480ebb@sip.ukrtel.net
CSeq: 102 INVITE
<————->
— (6 headers 0 lines) —
<— SIP read from UDP:195.5.0.83:5060 —>
SIP/2.0 407 Proxy authentication required
Via: SIP/2.0/UDP 10.10.10.110:5060;received=195.88.113.188;branch=z9hG4bK671ecf1e;rport=60638
From: «101» <sip:380892506511@sip.ukrtel.net>;tag=as6f72688f
To: <sip:0800506800@195.5.0.83>;tag=896FD33D68B66E113617ECF08AC04D4013436499839011779
Call-ID:
12d9dcd953de7a8f514a05ee6a480ebb@sip.ukrtel.net
CSeq: 102 INVITE
Content-Length: 0
Proxy-Authenticate: Digest realm=»sip.ukrtel.net»,domain=»sip.ukrtel.net»,nonce=»MTM0MzY0OTk4MzpTREZTZXJ2ZXJTZWNyZXRLZXk6MTM2NDM0OTE0Mg==»,algorithm=MD5
Organization: Ukrtelecom
<————->
— (9 headers 0 lines) —
Transmitting (NAT) to 195.5.0.83:5060:
ACK sip:0800506800@sip.ukrtel.net SIP/2.0
Via: SIP/2.0/UDP 10.10.10.110:5060;branch=z9hG4bK671ecf1e;rport
Max-Forwards: 70
From: «101» <sip:380892506511@sip.ukrtel.net>;tag=as6f72688f
To: <sip:0800506800@sip.ukrtel.net>;tag=896FD33D68B66E113617ECF08AC04D4013436499839011779
Contact: <sip:380892506511@10.10.10.110>
Call-ID:
12d9dcd953de7a8f514a05ee6a480ebb@sip.ukrtel.net
CSeq: 102 ACK
User-Agent: Asterisk PBX 1.6.2.9-2+squeeze6
Content-Length: 0
—
Audio is at 10.10.10.110 port 15890
Adding codec 0x4 (ulaw) to SDP
Adding codec 0x8 (alaw) to SDP
Adding non-codec 0x1 (telephone-event) to SDP
Reliably Transmitting (NAT) to 195.5.0.83:5060:
INVITE sip:0800506800@sip.ukrtel.net SIP/2.0
Via: SIP/2.0/UDP 10.10.10.110:5060;branch=z9hG4bK69060425;rport
Max-Forwards: 70
From: «101» <sip:380892506511@sip.ukrtel.net>;tag=as6f72688f
To: <sip:0800506800@sip.ukrtel.net>
Contact: <sip:380892506511@10.10.10.110>
Call-ID:
12d9dcd953de7a8f514a05ee6a480ebb@sip.ukrtel.net
CSeq: 103 INVITE
User-Agent: Asterisk PBX 1.6.2.9-2+squeeze6
Proxy-Authorization: Digest username=»380892506511″, realm=»sip.ukrtel.net», algorithm=MD5, uri=»sip.ukrtel.net», nonce=»MTM0MzY0OTk4MzpTREZTZXJ2ZXJTZWNyZXRLZXk6MTM2NDM0OTE0Mg==», response=»ba9ce3cbc3d573ec0fb047860c6b1091″
Date: Mon, 30 Jul 2012 12:05:39 GMT
Allow: INVITE, ACK, CANCEL, OPTIONS, BYE, REFER, SUBSCRIBE, NOTIFY, INFO
Supported: replaces, timer
Content-Type: application/sdp
Content-Length: 271
v=0
o=root 1856866922 1856866923 IN IP4 10.10.10.110
s=Asterisk PBX 1.6.2.9-2+squeeze6
c=IN IP4 10.10.10.110
t=0 0
m=audio 15890 RTP/AVP 0 8 101
a=rtpmap:0 PCMU/8000
a=rtpmap:8 PCMA/8000
a=rtpmap:101 telephone-event/8000
a=fmtp:101 0-16
a=ptime:20
a=sendrecv
—
<— SIP read from UDP:195.5.0.83:5060 —>
SIP/2.0 100 Trying
Via: SIP/2.0/UDP 10.10.10.110:5060;received=195.88.113.188;branch=z9hG4bK69060425;rport=60638
From: «101» <sip:380892506511@sip.ukrtel.net>;tag=as6f72688f
To: <sip:0800506800@195.5.0.83>
Call-ID:
12d9dcd953de7a8f514a05ee6a480ebb@sip.ukrtel.net
CSeq: 103 INVITE
<————->
— (6 headers 0 lines) —
<— SIP read from UDP:195.5.0.83:5060 —>
SIP/2.0 180 Ringing
Via: SIP/2.0/UDP 10.10.10.110:5060;received=195.88.113.188;branch=z9hG4bK69060425;rport=60638
From: «101» <sip:380892506511@sip.ukrtel.net>;tag=as6f72688f
To: <sip:0800506800@195.5.0.83>;tag=113265522
Call-ID:
12d9dcd953de7a8f514a05ee6a480ebb@sip.ukrtel.net
CSeq: 103 INVITE
Contact: <sip:0800506800@195.5.0.83:5060;transport=udp>
Allow: INVITE
Allow: ACK
Allow: PRACK
Allow: SUBSCRIBE
Allow: BYE
Allow: CANCEL
Allow: NOTIFY
Allow: INFO
Allow: REFER
Allow: UPDATE
Content-Type: application/sdp
Content-Length: 151
v=0
o=- 1 2 IN IP4 195.5.0.83
s=-
c=IN IP4 195.5.0.83
t=0 0
m=audio 20854 RTP/AVP 8 101
a=rtpmap:8 PCMA/8000
a=rtpmap:101 telephone-event/8000
<————->
— (19 headers 8 lines) —
Found RTP audio format 8
Found RTP audio format 101
Found audio description format PCMA for ID 8
Found audio description format telephone-event for ID 101
Capabilities: us — 0xc (ulaw|alaw), peer — audio=0x8 (alaw)/video=0x0 (nothing)/text=0x0 (nothing), combined — 0x8 (alaw)
Non-codec capabilities (dtmf): us — 0x1 (telephone-event), peer — 0x1 (telephone-event), combined — 0x1 (telephone-event)
Peer audio RTP is at port 195.5.0.83:20854
— SIP/ukrtelecom-00000029 is ringing
— SIP/ukrtelecom-00000029 is making progress passing it to SIP/101-00000028
<— SIP read from UDP:195.5.0.83:5060 —>
SIP/2.0 180 Ringing
Via: SIP/2.0/UDP 10.10.10.110:5060;received=195.88.113.188;branch=z9hG4bK69060425;rport=60638
From: «101» <sip:380892506511@sip.ukrtel.net>;tag=as6f72688f
To: <sip:0800506800@195.5.0.83>;tag=113265522
Call-ID:
12d9dcd953de7a8f514a05ee6a480ebb@sip.ukrtel.net
CSeq: 103 INVITE
Contact: «Main800506800» <sip:0800506800@195.5.0.83:5060;transport=udp>
Allow: INVITE
Allow: ACK
Allow: PRACK
Allow: SUBSCRIBE
Allow: BYE
Allow: CANCEL
Allow: NOTIFY
Allow: INFO
Allow: REFER
Allow: UPDATE
P-Asserted-Identity: «Main800506800» <sip:380892222600@corp.ukrtelecom.loc:5061>
Content-Type: application/sdp
Content-Length: 151
v=0
o=- 1 2 IN IP4 195.5.0.83
s=-
c=IN IP4 195.5.0.83
t=0 0
m=audio 20854 RTP/AVP 8 101
a=rtpmap:8 PCMA/8000
a=rtpmap:101 telephone-event/8000
<————->
— (20 headers 8 lines) —
— SIP/ukrtelecom-00000029 is ringing
— SIP/ukrtelecom-00000029 is making progress passing it to SIP/101-00000028
<— SIP read from UDP:195.5.0.83:5060 —>
SIP/2.0 200 OK
Via: SIP/2.0/UDP 10.10.10.110:5060;received=195.88.113.188;branch=z9hG4bK69060425;rport=60638
From: «101» <sip:380892506511@sip.ukrtel.net>;tag=as6f72688f
To: <sip:0800506800@195.5.0.83>;tag=113265522
Call-ID:
12d9dcd953de7a8f514a05ee6a480ebb@sip.ukrtel.net
CSeq: 103 INVITE
Contact: «AIC Route to VP» <sip:0800506800@195.5.0.83:5060;transport=udp>
P-Asserted-Identity: «AIC Route to VP» <sip:380892222201@corp.ukrtelecom.loc:5061>
Allow: INVITE
Allow: ACK
Allow: PRACK
Allow: SUBSCRIBE
Allow: BYE
Allow: CANCEL
Allow: NOTIFY
Allow: INFO
Allow: REFER
Allow: UPDATE
Content-Type: application/sdp
Content-Length: 151
v=0
o=- 1 2 IN IP4 195.5.0.83
s=-
c=IN IP4 195.5.0.83
t=0 0
m=audio 20854 RTP/AVP 8 101
a=rtpmap:8 PCMA/8000
a=rtpmap:101 telephone-event/8000
<————->
— (20 headers 8 lines) —
list_route: hop: <sip:0800506800@195.5.0.83:5060;transport=udp>
set_destination: Parsing <sip:0800506800@195.5.0.83:5060;transport=udp> for address/port to send to
set_destination: set destination to 195.5.0.83, port 5060
Transmitting (NAT) to 195.5.0.83:5060:
ACK sip:0800506800@195.5.0.83:5060;transport=udp SIP/2.0
Via: SIP/2.0/UDP 10.10.10.110:5060;branch=z9hG4bK551d3960;rport
Max-Forwards: 70
From: «101» <sip:380892506511@sip.ukrtel.net>;tag=as6f72688f
To: <sip:0800506800@sip.ukrtel.net>;tag=113265522
Contact: <sip:380892506511@10.10.10.110>
Call-ID:
12d9dcd953de7a8f514a05ee6a480ebb@sip.ukrtel.net
CSeq: 103 ACK
User-Agent: Asterisk PBX 1.6.2.9-2+squeeze6
Content-Length: 0
—
— SIP/ukrtelecom-00000029 answered SIP/101-00000028
<— SIP read from UDP:195.5.0.83:5060 —>
UPDATE sip:380892506511@10.10.10.110 SIP/2.0
Via: SIP/2.0/UDP 195.5.0.83:5060;branch=z9hG4bKoqqhfo2088nh8fk4j5k0sm0000g00.1
Call-ID:
12d9dcd953de7a8f514a05ee6a480ebb@sip.ukrtel.net
CSeq: 1 UPDATE
From: <sip:0800506800@sip.ukrtel.net>;tag=113265522
To: «101» <sip:380892506511@195.5.0.83>;tag=as6f72688f
Content-Length: 0
Contact: «AIC Route to VP» <sip:0800506800@195.5.0.83:5060;transport=udp>
Max-Forwards: 8
Session-Expires: 1800
Supported: timer
P-Asserted-Identity: «Main800506800» <sip:892506511@10.254.10.17;user=phone>
<————->
— (12 headers 0 lines) —
<— Transmitting (NAT) to 195.5.0.83:5060 —>
SIP/2.0 501 Method Not Implemented
Via: SIP/2.0/UDP 195.5.0.83:5060;branch=z9hG4bKoqqhfo2088nh8fk4j5k0sm0000g00.1;received=195.5.0.83
From: <sip:0800506800@sip.ukrtel.net>;tag=113265522
To: «101» <sip:380892506511@195.5.0.83>;tag=as6f72688f
Call-ID:
12d9dcd953de7a8f514a05ee6a480ebb@sip.ukrtel.net
CSeq: 1 UPDATE
Server: Asterisk PBX 1.6.2.9-2+squeeze6
Allow: INVITE, ACK, CANCEL, OPTIONS, BYE, REFER, SUBSCRIBE, NOTIFY, INFO
Supported: replaces, timer
Accept: application/sdp
Content-Length: 0
<————>
[Jul 30 15:05:48] NOTICE[1767]: chan_sip.c:22000 handle_incoming: Unknown SIP command ‘UPDATE’ from ‘195.5.0.83’
<— SIP read from UDP:195.5.0.83:5060 —>
UPDATE sip:380892506511@10.10.10.110 SIP/2.0
Via: SIP/2.0/UDP 195.5.0.83:5060;branch=z9hG4bKoqqhfo2088nh8fk4j5k0sm0000010.1
Call-ID:
12d9dcd953de7a8f514a05ee6a480ebb@sip.ukrtel.net
CSeq: 2 UPDATE
From: <sip:0800506800@sip.ukrtel.net>;tag=113265522
To: «101» <sip:380892506511@195.5.0.83>;tag=as6f72688f
Content-Length: 0
Contact: «AIC Route to VP» <sip:0800506800@195.5.0.83:5060;transport=udp>
Max-Forwards: 8
Session-Expires: 1800
Supported: timer
P-Asserted-Identity: «VP0159» <sip:892506511@10.254.10.17;user=phone>
<————->
— (12 headers 0 lines) —
<— Transmitting (NAT) to 195.5.0.83:5060 —>
SIP/2.0 501 Method Not Implemented
Via: SIP/2.0/UDP 195.5.0.83:5060;branch=z9hG4bKoqqhfo2088nh8fk4j5k0sm0000010.1;received=195.5.0.83
From: <sip:0800506800@sip.ukrtel.net>;tag=113265522
To: «101» <sip:380892506511@195.5.0.83>;tag=as6f72688f
Call-ID:
12d9dcd953de7a8f514a05ee6a480ebb@sip.ukrtel.net
CSeq: 2 UPDATE
Server: Asterisk PBX 1.6.2.9-2+squeeze6
Allow: INVITE, ACK, CANCEL, OPTIONS, BYE, REFER, SUBSCRIBE, NOTIFY, INFO
Supported: replaces, timer
Accept: application/sdp
Content-Length: 0
<————>
[Jul 30 15:05:48] NOTICE[1767]: chan_sip.c:22000 handle_incoming: Unknown SIP command ‘UPDATE’ from ‘195.5.0.83’
Scheduling destruction of SIP dialog ’12d9dcd953de7a8f514a05ee6a480ebb@sip.ukrtel.net’ in 6400 ms (Method: UPDATE)
set_destination: Parsing <sip:0800506800@195.5.0.83:5060;transport=udp> for address/port to send to
set_destination: set destination to 195.5.0.83, port 5060
Reliably Transmitting (NAT) to 195.5.0.83:5060:
BYE sip:0800506800@195.5.0.83:5060;transport=udp SIP/2.0
Via: SIP/2.0/UDP 10.10.10.110:5060;branch=z9hG4bK46c7a376;rport
Max-Forwards: 70
From: «101» <sip:380892506511@sip.ukrtel.net>;tag=as6f72688f
To: <sip:0800506800@sip.ukrtel.net>;tag=113265522
Call-ID:
12d9dcd953de7a8f514a05ee6a480ebb@sip.ukrtel.net
CSeq: 104 BYE
User-Agent: Asterisk PBX 1.6.2.9-2+squeeze6
Proxy-Authorization: Digest username=»380892506511″, realm=»sip.ukrtel.net», algorithm=MD5, uri=»sip.ukrtel.net», nonce=»MTM0MzY0OTk4MzpTREZTZXJ2ZXJTZWNyZXRLZXk6MTM2NDM0OTE0Mg==», response=»49cd1e38a8fe27f4a910af7c1b757cc0″
X-Asterisk-HangupCause: Normal Clearing
X-Asterisk-HangupCauseCode: 16
Content-Length: 0
—
== Spawn extension (phones, 90800506800, 2) exited non-zero on ‘SIP/101-00000028’
Retransmitting #1 (NAT) to 195.5.0.83:5060:
BYE sip:0800506800@195.5.0.83:5060;transport=udp SIP/2.0
Via: SIP/2.0/UDP 10.10.10.110:5060;branch=z9hG4bK46c7a376;rport
Max-Forwards: 70
From: «101» <sip:380892506511@sip.ukrtel.net>;tag=as6f72688f
To: <sip:0800506800@sip.ukrtel.net>;tag=113265522
Call-ID:
12d9dcd953de7a8f514a05ee6a480ebb@sip.ukrtel.net
CSeq: 104 BYE
User-Agent: Asterisk PBX 1.6.2.9-2+squeeze6
Proxy-Authorization: Digest username=»380892506511″, realm=»sip.ukrtel.net», algorithm=MD5, uri=»sip.ukrtel.net», nonce=»MTM0MzY0OTk4MzpTREZTZXJ2ZXJTZWNyZXRLZXk6MTM2NDM0OTE0Mg==», response=»49cd1e38a8fe27f4a910af7c1b757cc0″
X-Asterisk-HangupCause: Normal Clearing
X-Asterisk-HangupCauseCode: 16
Content-Length: 0
—
Retransmitting #2 (NAT) to 195.5.0.83:5060:
BYE sip:0800506800@195.5.0.83:5060;transport=udp SIP/2.0
Via: SIP/2.0/UDP 10.10.10.110:5060;branch=z9hG4bK46c7a376;rport
Max-Forwards: 70
From: «101» <sip:380892506511@sip.ukrtel.net>;tag=as6f72688f
To: <sip:0800506800@sip.ukrtel.net>;tag=113265522
Call-ID:
12d9dcd953de7a8f514a05ee6a480ebb@sip.ukrtel.net
CSeq: 104 BYE
User-Agent: Asterisk PBX 1.6.2.9-2+squeeze6
Proxy-Authorization: Digest username=»380892506511″, realm=»sip.ukrtel.net», algorithm=MD5, uri=»sip.ukrtel.net», nonce=»MTM0MzY0OTk4MzpTREZTZXJ2ZXJTZWNyZXRLZXk6MTM2NDM0OTE0Mg==», response=»49cd1e38a8fe27f4a910af7c1b757cc0″
X-Asterisk-HangupCause: Normal Clearing
X-Asterisk-HangupCauseCode: 16
Content-Length: 0
—
<— SIP read from UDP:195.5.0.83:5060 —>
SIP/2.0 200 OK
Via: SIP/2.0/UDP 10.10.10.110:5060;received=195.88.113.188;branch=z9hG4bK46c7a376;rport=60638
From: «101» <sip:380892506511@sip.ukrtel.net>;tag=as6f72688f
To: <sip:0800506800@195.5.0.83>;tag=113265522
Call-ID:
12d9dcd953de7a8f514a05ee6a480ebb@sip.ukrtel.net
CSeq: 104 BYE
Content-Length: 0
<————->
— (7 headers 0 lines) —
Really destroying SIP dialog ’12d9dcd953de7a8f514a05ee6a480ebb@sip.ukrtel.net’ Method: UPDATE
<— SIP read from UDP:195.5.0.83:5060 —>
SIP/2.0 200 OK
Via: SIP/2.0/UDP 10.10.10.110:5060;received=195.88.113.188;branch=z9hG4bK46c7a376;rport=60638
From: «101» <sip:380892506511@sip.ukrtel.net>;tag=as6f72688f
To: <sip:0800506800@195.5.0.83>;tag=113265522
Call-ID:
12d9dcd953de7a8f514a05ee6a480ebb@sip.ukrtel.net
CSeq: 104 BYE
Content-Length: 0
<————->
— (7 headers 0 lines) —
energotourserver*CLI>
Modified on: Wed, 25 Jan, 2023 at 12:29 AM
Q: My VoIP phone line isn’t working when I try to make a call. The message «line forbidden» is written on the screen so I cannot make or receive calls.
A: Reboot the Yealink base unit as at present the phone line is off line and so not getting an internet connection.
By rebooting this should re-establish a connection and the phone should be back online ready to make and receive calls.
Did you find it helpful?
Yes
No
Send feedback
Sorry we couldn’t be helpful. Help us improve this article with your feedback.
Related Articles
You’re currently viewing a stripped down version of our content. View the full version with proper formatting.
We have many W56B/H in use. We are continually receiving complaints that the every month or two, a handset can receive calls but cannot MAKE calls. Display shows «FORBIDDEN via IP line» unless the Handset is rebooted. In locations with more than one W56H in use, one handset will still be able to make calls but the other will not. Incoming calls are fine, we have valid registration to the base. What will stop the handset from being able to make calls when the base is properly configured?
Hello CloudNet Group,
This is Jensen from Yealink technical team, good to know you.
Per this, please help to share more:
1/ Difference handsets registered with difference accounts? or all handset with same account?
2/ How many accounts on this base?
3/ While the issue happened, how about the status of the account?
4/ Please provided the PCAP, config.bin and syslog with level 6.
http://support.yealink.com/faq/faqInfo?id=707
Thank you.
BR
Jensen
(03-30-2018 09:58 AM)Jensen_Yealink Wrote: [ -> ]Hello CloudNet Group,
This is Jensen from Yealink technical team, good to know you.
Per this, please help to share more:
1/ Difference handsets registered with difference accounts? or all handset with same account?
2/ How many accounts on this base?
3/ While the issue happened, how about the status of the account?
4/ Please provided the PCAP, config.bin and syslog with level 6.
http://support.yealink.com/faq/faqInfo?id=707
Thank you.BR
Jensen
Jensen it is a difficult issue to pinpoint. The handset randomly cannot make calls unless rebooted or reset. It is version 61.80.0.18 we have tried updating the handset to 61.81.0.30 but this process fails.
To answer your questions.
1/Different handsets registered with different accounts
2/One Account Per Base
3/ When issue occurs we see valid SIP Binding and registration of Base
4/ When issue occurs handset can receive calls. Handset cannot make calls
Rebooting handset sometimes clears error,
If reboot does not resolve, we ‘reset handset’ through the handset, if that fails
We reboot base.
This process is very inconvenient for the customer
(03-30-2018 02:43 PM)CloudNet Group Wrote: [ -> ]
(03-30-2018 09:58 AM)Jensen_Yealink Wrote: [ -> ]Hello CloudNet Group,
This is Jensen from Yealink technical team, good to know you.
Per this, please help to share more:
1/ Difference handsets registered with difference accounts? or all handset with same account?
2/ How many accounts on this base?
3/ While the issue happened, how about the status of the account?
4/ Please provided the PCAP, config.bin and syslog with level 6.
http://support.yealink.com/faq/faqInfo?id=707
Thank you.BR
JensenJensen it is a difficult issue to pinpoint. The handset randomly cannot make calls unless rebooted or reset. It is version 61.80.0.18 we have tried updating the handset to 61.81.0.30 but this process fails.
To answer your questions.
1/Different handsets registered with different accounts
2/One Account Per Base
3/ When issue occurs we see valid SIP Binding and registration of Base
4/ When issue occurs handset can receive calls. Handset cannot make callsRebooting handset sometimes clears error,
If reboot does not resolve, we ‘reset handset’ through the handset, if that fails
We reboot base.This process is very inconvenient for the customer
Hello CloudNet Group,
May I know who is your service provider? The firmware you used is for Vonage, If you don’t use theri service, please upgrade both handset and base firmware.
If you use their service, please contact Vonage for help. Thank you very much.
BR
Jensen
We have had the same issue. End user has multiple W56 systems on hosted PBX in different geographic locations. Most do not have this trouble. The one who has had the most trouble which is every couple months is on Spectrum Cable ISP.
Reference URL’s
- Yealink Forums: http://forum.yealink.com/forum/index.php
- :
Содержание
- Настройка SIP-ТА Yealink VP-530, T29G, T21E2, Т22Р
- Регистрация TA на сервере
- Настройка Индикации о наличии голосовых сообщений в почтовом ящике (MWI)
- Настройка Индикации занятости линии (BLF)
- Настройка услуги Интерком (Voice page call)
- Настройка услуги Конференц-связь с последовательным сбором участников (Conference Call Add on)
- Настройка сервиса Визуальное оповещение для захвата BLF
- Настройка BLF на панели расширения Yealink EXP39
- Настройка BLF и функция перехвата на Yealink
- Использование функции BLF на телефонах Escene
- Функция BLF необходима в первую очередь для секретарей, перенаправляющих звонки. Она позволяет определить, может ли абонент принять вызов в данный момент и, в случае невозможности, переключить на другого ответственного сотрудника или голосовую почту.
- Как это работает
- Настройка Asterisk
- Настройка телефона
- Перехват вызова
Настройка SIP-ТА Yealink VP-530, T29G, T21E2, Т22Р
Регистрация TA на сервере
Подключимся к WEB-интерфейсу SIP-телефона, набрав в поисковике браузера его IP-адрес. Далее переходим во вкладку «Аккаунты» и выбираем один из доступных аккаунтов.
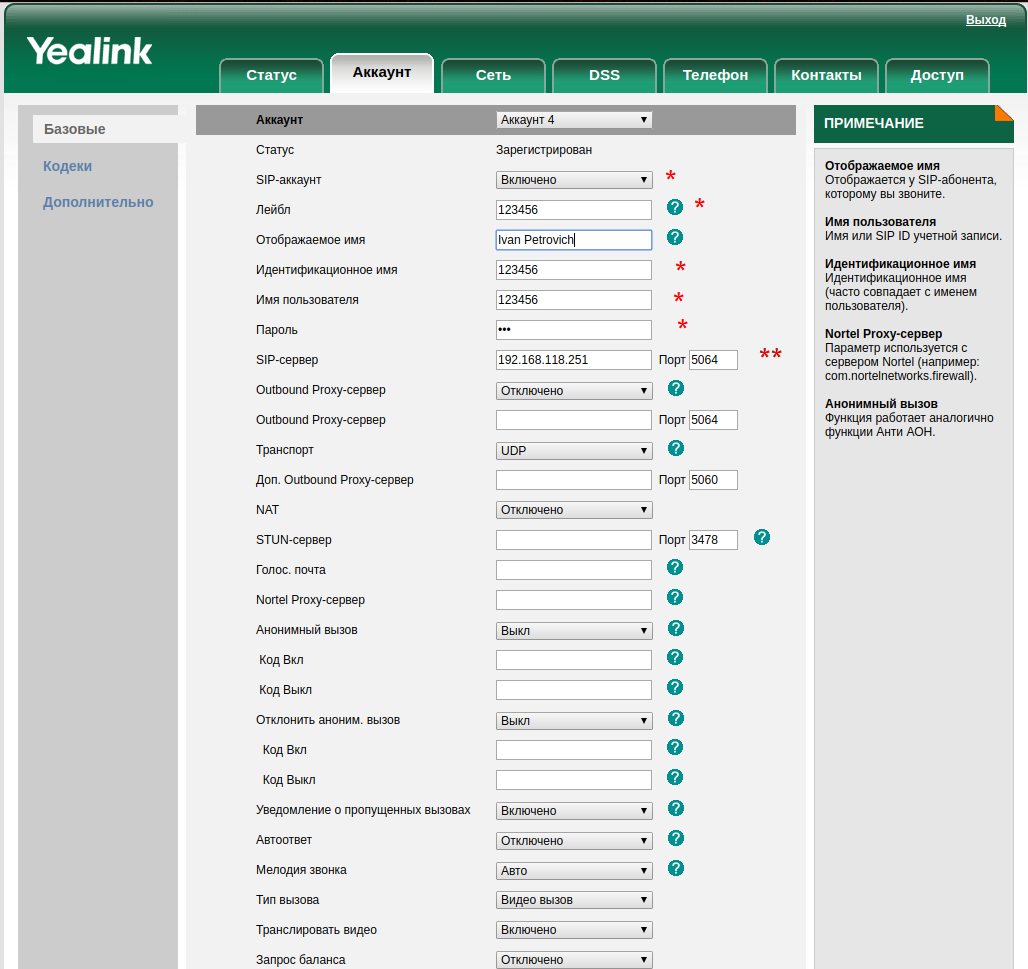
Рисунок 1. Изменение параметров аккаунта
Далее необходимо заполнить следующие поля:
- SIP-аккаунт -флаг включает или выключает SIP-аккаунт;
- Лейбл — имя, отображаемое на экране телефона ;
- Отображаемое имя — имя, отображаемое на дисплее абонента;
- Идентификационное имя — номер телефона, на который регистрируется абонент;
- Имя пользователя — логин для регистрации;
- Пароль — пароль, используемый при регистрации;
- SIP-сервер — сервер регистрации;
- Порт — порт для регистрации;
- Транспорт — TCP/UDP транспорт, соответствующий транспорту домена ECSS-10.
Следующие поля являются не обязательными и заполняются опционально.
После заполнения обязательных полей необходимо сохранить внесенные изменения, после чего в поле «Статус» появится запись «Зарегистрирован».
Настройка Индикации о наличии голосовых сообщений в почтовом ящике (MWI)
Для настройки индикации о наличии голосовых сообщений на сервере на Web-интерфейсе ТА необходимо перейти во вкладку «Аккаунт»->»Дополнительно», найти следующие поля и перевеcи их в состояние включено, период подписки — опциональный параметр.


Рисунок 2. Настройка MWI
После вернемся во вкладку «Аккаунт»->»Базовые» и укажем номер телефона, который подписывается в поле «Голосовая почта».

Рисунок 3. Настройка MWI
Настройка Индикации занятости линии (BLF)
Для настройки услуги Индикация занятости линии (BLF) необходимо перейти во вкладку «DSS»->»Кнопки расширения».
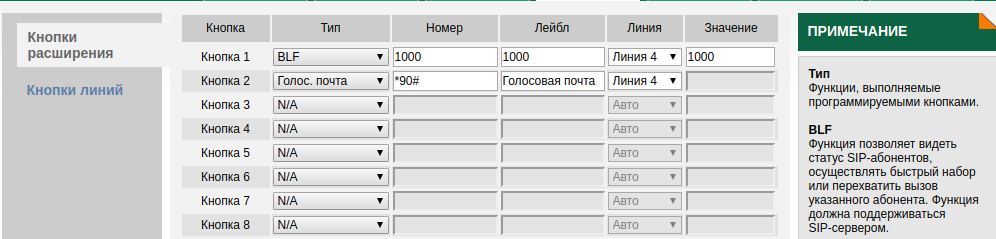
Рисунок 4. Настройка Индикации занятости линии (BLF)
Для каждой кнопки укажите внутренний номер, состояние которого нужно отслеживать. Например для «Кнопка 1»:
- Выберите «Тип» — «BLF»;
- Выберите «Линия» — «Линия 4»;
- Укажите в поле «Номер» номер, абонента которого нужно контролировать (например 1000);
- В поле «Значение» укажите действие с отслеживаемым номером. Например, можно указать код услуги. Если просто указать номер, то клавиша будет использоваться как быстрый набор.
- Нажмите кнопку «Сохранить» в нижней части страницы. Теперь ваш IP-телефон зарегистрирован на ECSS-10 с возможностью мониторинга других абонентов.
Настройка услуги Интерком (Voice page call)
Для настройки услуги Интерком (Voice page call) на ТА Yealink необходимо перейти во вкладку «Телефон»->»Параметры», найти и включить «Интерком (Voice page call)».
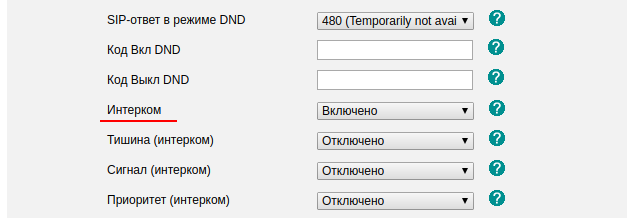
Рисунок 5. Вкладка «Параметры»
После чего, необходимо задать клавишу для услуги Интерком (Voice page call). Перейдем во вкладку «DSS»->»Кнопки расширения», для любой свободной кнопки назначим:
- Тип : Интерком
- Номер : * 80 *
- Лейбл : Название кнопки
- Линия : указывается аккаунт, с которого будет использоваться услуга Интерком.
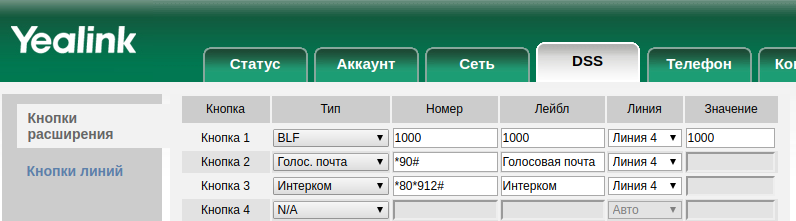
Рисунок 6. Настройка услуги Интерком (Voice page call)
Настройка услуги Конференц-связь с последовательным сбором участников (Conference Call Add on)
Для использования Конференц-связи с последовательным сбором участников (Conference Call Add on) с ТА необходимо во вкладке «Аккаунт»->»Дополнительно» изменить параметр «Конференция» с «Локально» на «Сеть», а в параметре Conference URI указать адрес сервера конференции в формате *71#@SIPdomain, где SIPdomain — SIP домен, используемый в виртуальной АТС.

Рисунок 7. Настройка услуги Конференц-связь с последовательным сбором участников (Conference Call Add on)
Настройка сервиса Визуальное оповещение для захвата BLF
Для использования сервиса требуется активировать услугу BLF на ТА:
В Web-конфигураторе ТА заходим в раздел DSS-кнопки->Кнопки 1-7 (при наличии модуля расширения можно выбрать его). На свободные кнопки настраиваем BLF ТА, на которые требуется оформить подписку: Тип = BLF, Номер = 722, Лейбл = «722», Линия = .
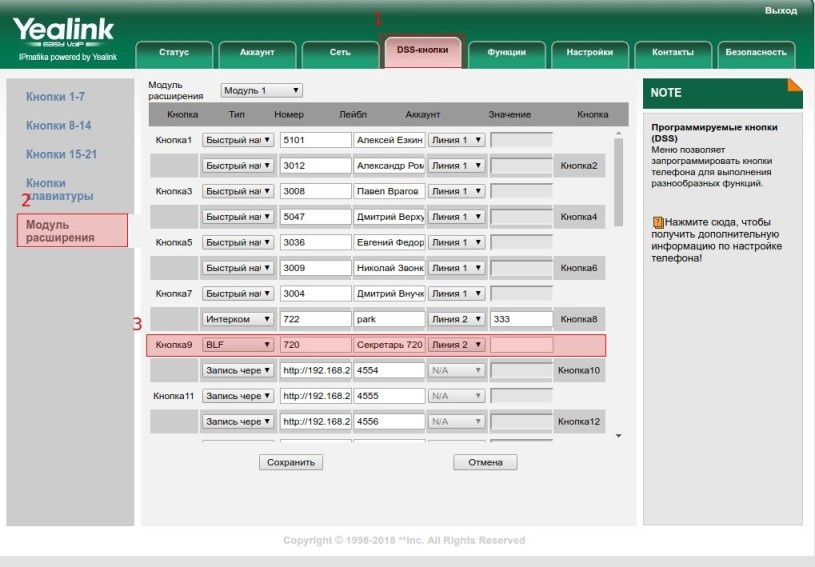
Рисунок 8. Настройка кнопок BLF TA
Для того, чтобы на ТА Yealink можно было видеть состояние линии подписанных ТА, необходимо на включить «Визуальное оповещение для захвата BLF»: Функции -> Захват вызова -> Визуальное оповещение для захвата BLF = Enabled.
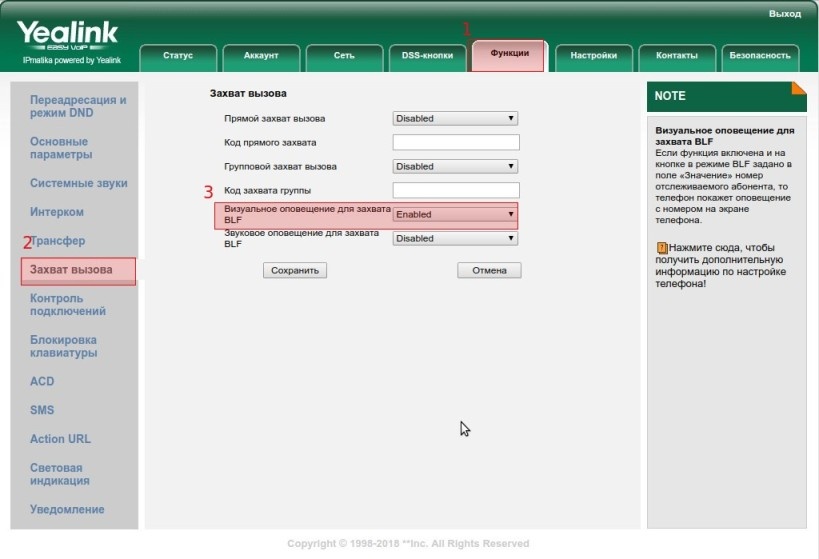
Рисунок 9. Настройка визуального оповещения для захвата BLF
Теперь на Yealink будет работать индикация при совершении подписанными ТА звонков.
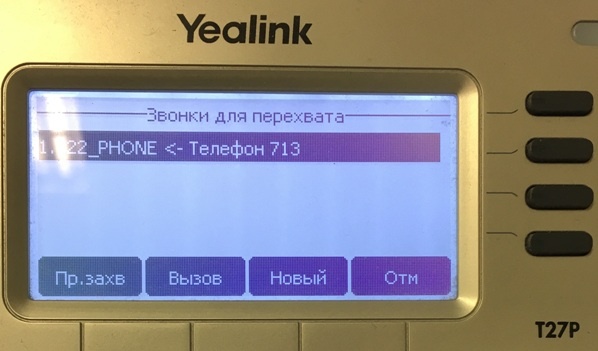
Рисунок 10. Индикация при совершении подписанными ТА звонков
Источник
Настройка BLF на панели расширения Yealink EXP39
В этой статье мы рассмотрим процесс настройки BLF на панели расширения Yealink EXP39.
Yealink EXP39 — 20-кнопочная панель расширения с цифровым дисплеем для телефонных аппаратов Yealink серии SIP-T26P (T28P а также T38P). Дисплей имеет две страницы — таким образом можно завести 38 значений.
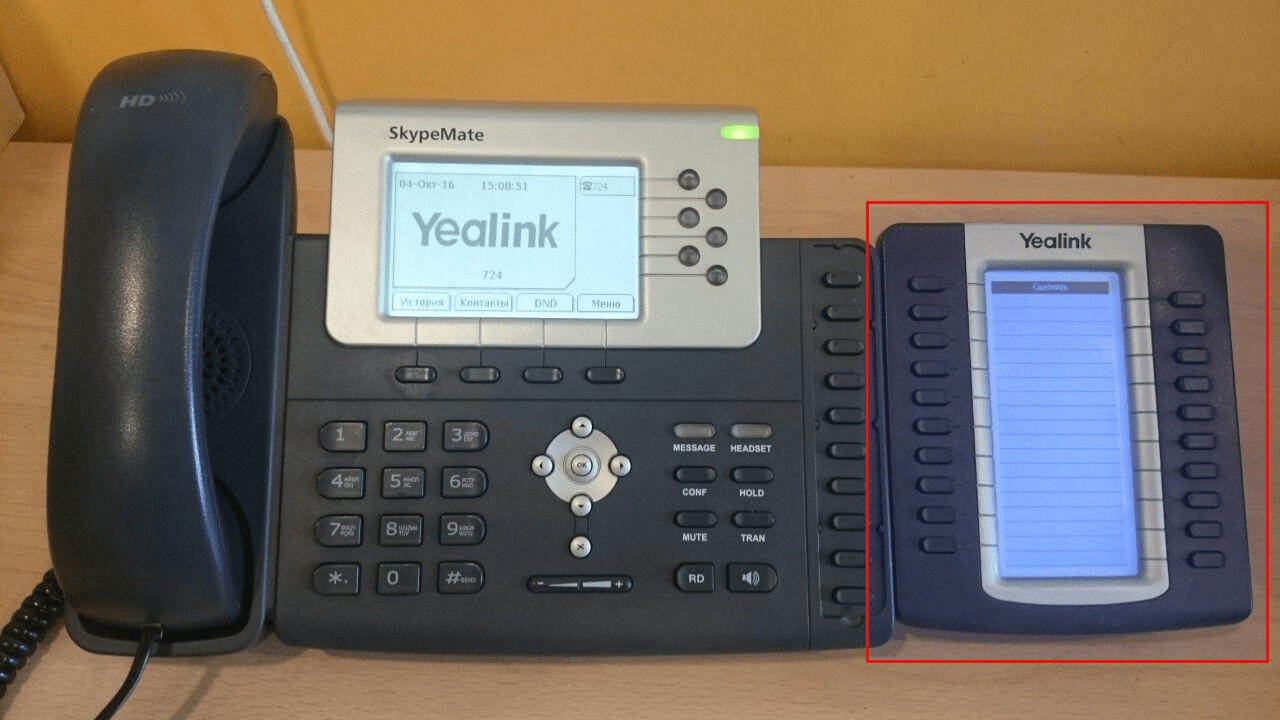
Для настройки модуля достаточно пройти на вкладку DSS-кнопки>Модуль расширения
Первую кнопку нужно выставить значение Exp_Switch — переключение страниц консоли.
В остальных выбрать Тип BLF и прописать параметры:
— Номер — внутренний номер абонента АТС Asterisk
— Лейбл — описание кнопки
— Аккаунт — к какой линии телефонного аппарата подвязывается BLF
— Значение — внутренний номер
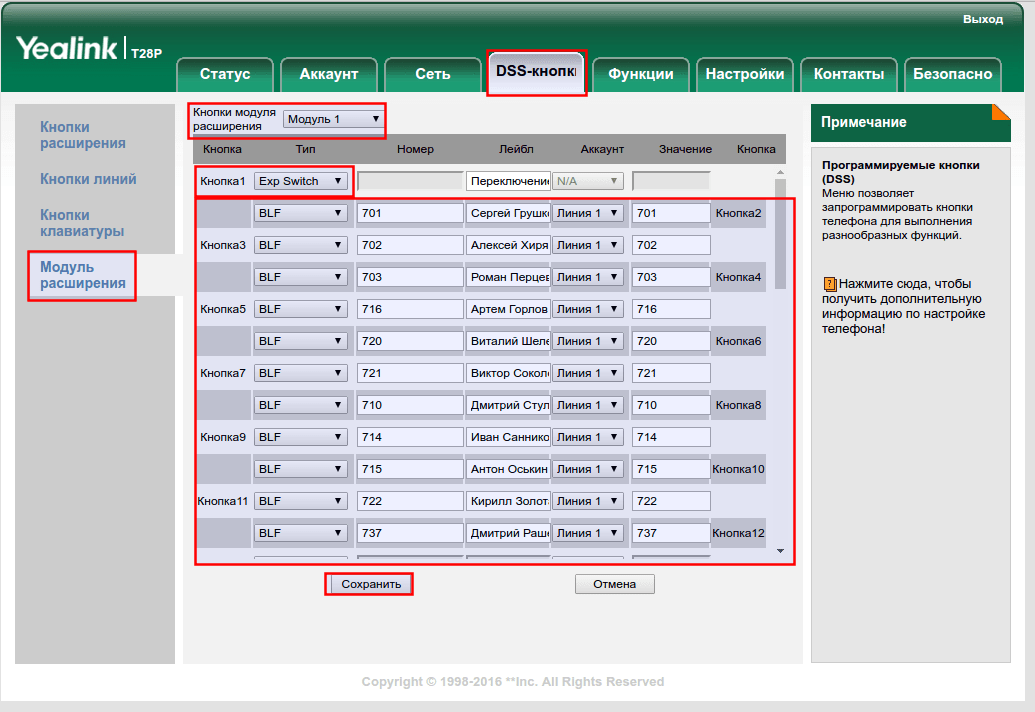
После сохранения на панели отобразятся все номера заведенные подобным образом, а также можно будет отслеживать состояния внутреннего номера по цветовому состоянию диодного индикатора рядом с кнопкой панели (зеленый — абонент свободен, моргающий красный — на абонента поступает вызов, непрерывно горящий красный — абонент разговаривает), а также по нажатию кнопки соответсвующей абоненту заведенному в панел — на него будет инициирован вызов.
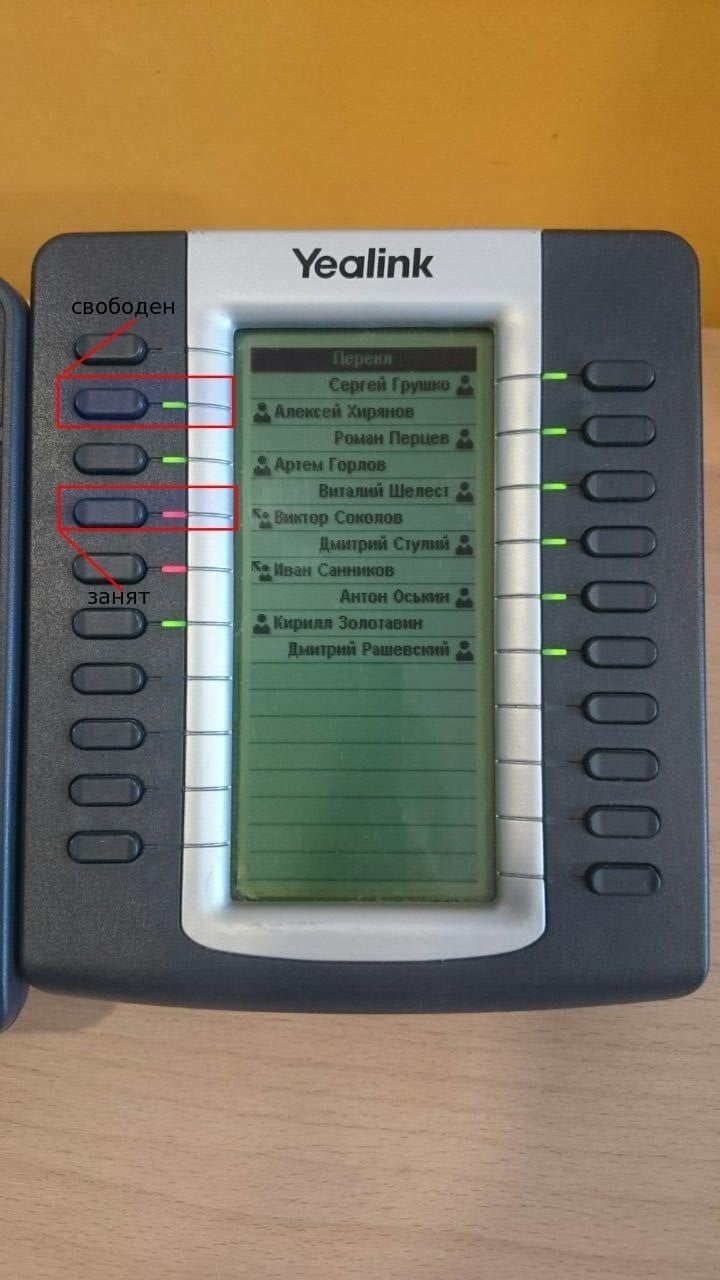
На этом настройку BLF на панели Yealink EXP39 можно считать завершенной
Источник
Настройка BLF и функция перехвата на Yealink
Важно! Для работы функции перехвата вызова необходимо обновить прошивку с официального сайта yealink.com
Некоторые модели телефонов Yealink поддерживают BLF (Отслеживание статуса другого телефона) и функцию перехвата, когда Вы можете перехватить звонок на себя, который поступил другому сотруднику, которого Вы отслеживаете по BLF.
Шаг 1. Зайдите на WEB интерфейс телефона. Для этого, нажмите кнопку «ОК» на Вашем телефоне. На экране Вы увидите IP адрес телефона (пример 192.168.0.2). Этот адрес нужно ввести в вашем браузере (Google Chrome, Yandex браузер, Opera, Mozilla, Safari) на компьютере, который подключен в ту же локальную сеть что и Yealink.
Шаг 2. В WEB интерфейсе откройте вкладку «Аккаунт», далее «Расширенные», прокрутите вниз страницу и найдите функцию «Dialog Info Call Pickup». Ее необходимо включить. В конце не забудьте сохранить изменения кнопкой «Comfirm»

Шаг 3. Откройте вкладку «DSS-кнопки». Выберете кнопку на которой будет индикация статуса сотрудника и функция перехвата (в нашем примере используется кнопка 2 телефона Yealink T42G).
В конце не забудьте сохранить изменения кнопкой «Comfirm»

Важно! Домены SIP учетных записей, которая отслеживает и которая следит должны быть одинаковы.
Например, у Вас в телефоне на 4-ой линии (Line4) настроена учетная SIP запись ivan@test.mangosip.ru.
На телефоне, который мы хотим отслеживать — petr@test.mangosip.ru.
Тут BLF и перехват работать будет, так как домены этих SIP записей одинаковы — test.mangosip.ru
Если они будут разным BLF и перехват работать не будут.
Шаг 4. Перейдите в личный кабинет. В разделе «Настройки АТС» откройте «Безопасность и ограничения».


Готово. Настройка окончена.
Статусы BLF:
1. Функциональная клавиша горит зеленым цветом. — телефон свободен.
2. Функциональная клавиша горит красным цветом. — телефон занят разговором.
3. Функциональная клавиша моргает красным цветом. — на телефон поступил входящий вызов. Его можно перехватить нажав на клавишу BLF, которая моргает.
Источник
Использование функции BLF на телефонах Escene

Функция BLF (Busy Lamp Field) позволяет отслеживать текущее состояние линий других абонентов в реальном времени, а также перехватывать вызовы, предназначенные для других абонентов. Необходимо, чтобы функция BLF поддерживалась и АТС, и телефоном, на котором будет отслеживаться состояние линий.
Доступны следующие состояния линии: свободно (Idle), идёт вызов (Ringing), линия используется (Connected/Busy). Следует упомянуть, что состояние регистрации линии не отслеживается: даже если линия не зарегистрирована, ее состояние будет указано как “свободно”.
Если нажать на кнопку BLF для свободной линии, то туда будет произведен вызов. Если же нажать на кнопку BLF для линии, на которую идёт вызов, то он будет перехвачен.
Функция BLF необходима в первую очередь для секретарей, перенаправляющих звонки. Она позволяет определить, может ли абонент принять вызов в данный момент и, в случае невозможности, переключить на другого ответственного сотрудника или голосовую почту.
Как это работает
Сперва телефон посылает на АТС SIP-сообщение SUBSCRIBE с номером линии, чье состояние он хочет отслеживать. После этого при изменении состояния линии АТС посылает телефону SIP-сообщение NOTIFY, в котором указывается текущее состояние.
Для перехвата вызова телефон посылает на АТС SIP-сообщение INVITE, в котором указан специальный префикс и номер перехватываемой линии. Этот префикс определяется настройками АТС и указывается в настройках телефона.
Настройка Asterisk
Для того, чтобы Asterisk начал поддерживать BLF, необходимо произвести следующие настройки:
В файле sip.conf в секции с настройками для экстеншенов:
allowsubscribe=yes
call-limit=4
limitonpeers=yes
notifyringing=yes
notifyhold=yes
context=phones
subscribecontext=BLF
В файле extensions.conf:
[BLF]
exten => _.,hint,SIP/$
[phones]
exten => _**.,1,Pickup($)
В группе BLF необходимо указать все линии, чье состояние необходимо отслеживать.
При использовании дистрибутивов на основе Asterisk поддержка BLF может быть включена изначально. В случае с FreePBX настройки менять не понадобилось. Никаких дополнительных настроек не требуется и при работе с IP-ATC 3CX.
Для поддержки BLF дистрибутивом Thirdlane понадобилось внести следующие изменения:
Настройка телефона
Наличие встроенной панели расширения с функциональными кнопками, поддерживающими BLF, является важной особенностью корпоративных IP-телефонов Escene. Встроенная панель есть у моделей ES320-N, ES320-PN, ES330-PE, ES410-PE, гигабитной модели GS320-P и Wi-Fi модели WS320-N. Начиная с модели ES330-PE и выше все корпоративные телефоны также поддерживают дополнительную панель расширения на 32 кнопки. Суммарно телефон может поддерживать до 6-и панелей расширения общей ёмкостью до 192 кнопок.

На телефонах Escene функция BLF реализуется с помощью настройки программируемых клавиш: в веб-интерфейсе необходимо указать:
- Режим BLF
- номер акаунта
- имя
- номер линии

Если ваша АТС настроена правильно и телефон на ней зарегистрирован, то он начнет отображать состояние линий по следующей схеме:
- Индикатор подсвечивается зеленым — линия свободна
- Индикатор моргает красным — идёт вызов
- Индикатор подсвечивается красным — линия используется
Перехват вызова
В соответствии с настройками АТС в настройках телефона необходимо указать префикс, используемый для перехвата вызова. В нашем случае используется префикс “**”.
Таким образом, поддержка BLF — одно из важнейших преимуществ корпоративных телефонов перед универсальными. Путем несложных настроек телефон становится частью единой системы унифицированных коммуникаций, позволяя контролировать телефонные линии сотрудников, упрощать коммуникации и, как следствие, существенно экономить рабочее время.
Источник