
In this article, we consider the second-generation Toyota Avensis (T25/T250), produced from 2003 to 2009. Here you will find fuse box diagrams of Toyota Avensis 2003, 2004, 2005, 2006, 2007, 2008 and 2009, get information about the location of the fuse panels inside the car, and learn about the assignment of each fuse (fuse layout) and relay.
See other Toyota Avensis:


Cigar lighter (power outlet) fuses in the Toyota Avensis are the fuses #9 “CIG” (Cigarette Lighter) and #16 “P/POINT” (Power Outlet) in the Instrument panel fuse box #1.
Passenger compartment overview
Left-hand drive vehicles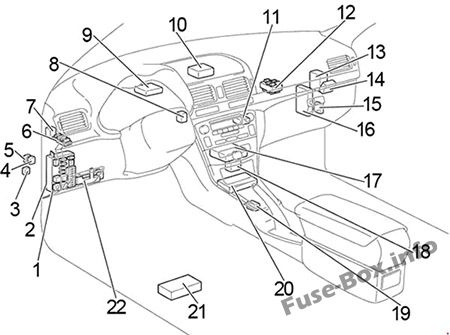
Right-hand drive vehicles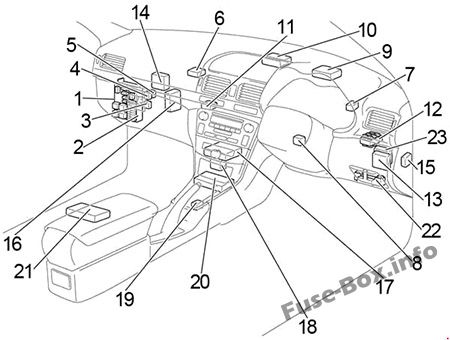
- Fuse Box
- Integration Relay
- Circuit Opening Relay
- Rear Fog Light Relay
- Rear Window Defogger Relay
- Relay Box
- Turn Signal Flasher Relay
- Transponder Key Amplifier
- EPS ECU
- Transponder Key Computer
- Antenna Amplifier
- Junction Block
- Wiper Relay
- Door Control Receiver
- Headlight Beam Level Control ECU
- Engine and ECT ECU (A/T)
Engine ECU (M/T) - A/C Control Assembly
- Option Connector (Navigation ECU)
- Shift Lock Control ECU
- Airbag Sensor Assembly
- Navigation ECU
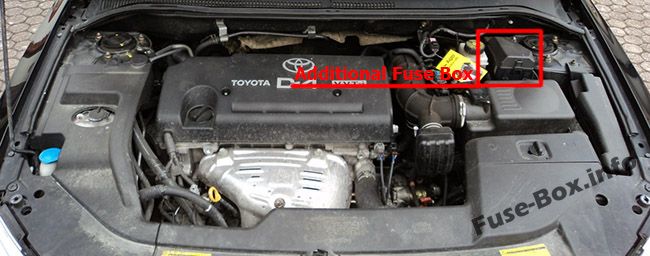
- Additional Fuse Box
- RHD:Theft Deterrent ECU
Sedan
Liftback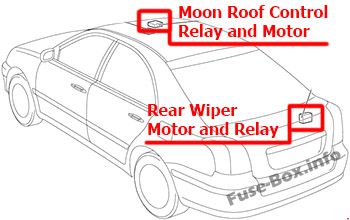
Wagon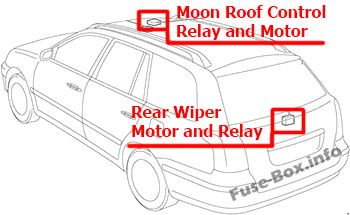
Passenger Compartment Fuse Boxes
Fuse box location
The fuse box is located on the left side of the instrument panel, behind the cover.
The additional fuse box is located under the instrument panel on the driver’s side, under the cover.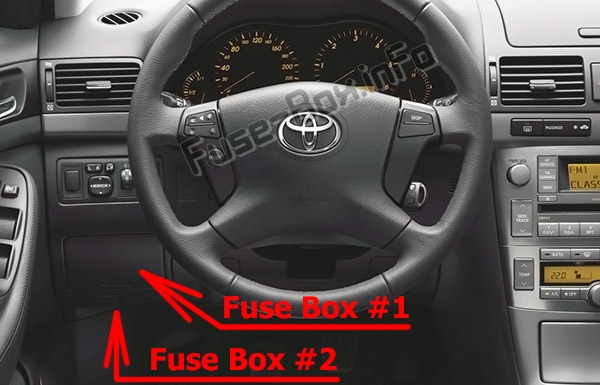
Fuse box #1 diagram
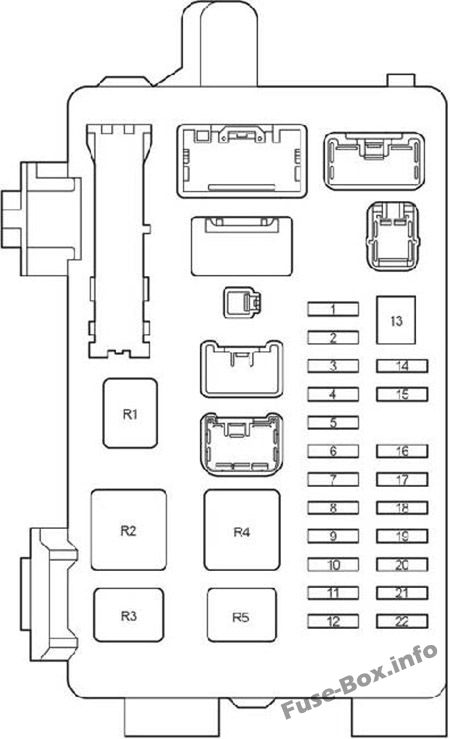
Assignment of the fuses in the Passenger Compartment Fuse Box
| № | Name | Amp | Circuit |
|---|---|---|---|
| 1 | IGN | 10 | SRS airbag system, gauge and meters, starting system, multiport fuel injection system/sequential multiport fuel injection system |
| 2 | S/ROOF | 20 | Sliding roof |
| 3 | RR FOG | 7.5 | Rear fog light |
| 4 | FR FOG | 15 | Front fog light, indicator light |
| 5 | AMI | 25 | Starting system, «CIG», «RAD NO.1» fuses |
| 6 | PANEL | 7.5 | Instrument cluster lights, instrument panel lights, electronic controlled transmission, multi-information display, glove box light, console box light, headlight cleaner, front fog light, TOYOTA parking sssist |
| 7 | RR WIP | 20 | Rear wiper and washer |
| 8 | GAUGE2 | 7.5 | Back-up light, headlight leveling system, turn signal and hazard warning light |
| 9 | CIG | 15 | Cigarette Lighter |
| 10 | HTR | 10 | Seat heaters, air conditioning system |
| 11 | — | — | — |
| 12 | RAD NO.1 | 7.5 | Audio system, multi-information display, power rear view mirrors, gauge and meters, power outlet |
| 13 | PWR SEAT | 30 | Power seat |
| 14 | TAIL | 10 | Tail lights, parking lights, license plate lights, trunk light, automatic light control system, front fog light, rear fog light, combination meter |
| 15 | OBD2 | 7.5 | On-board diagnosis system |
| 16 | P/POINT | 15 | Power Outlet |
| 17 | DOOR | 25 | Power door lock system |
| 18 | WIP | 25 | Front wiper and washer, headlight cleaner |
| 19 | ECU-IG | 7.5 | Electric cooling fans, charging system, ABS, vehicle stability control system, electric power steering |
| 20 | S-HTR | 20 | Seat heaters |
| 21 | GAUGE1 | 10 | Switch illumination, multi-information display, integration relay, gauge and meters, shift lock control system, electronic controlled transmission, auto anti-glare inside rear view mirror, windshield wipers, parking brake |
| 22 | STOP | 15 | Stop light, shift lock control system, ABS, high mounted stoplight, multiport fuel injection system/sequential multiport fuel injection system |
| Relay | |||
| R1 | — | — | |
| R2 | HTR | Heater | |
| R3 | SEAT HTR | Seat Heater | |
| R4 | IG1 | Ignition | |
| R5 | TAIL | Taillight |
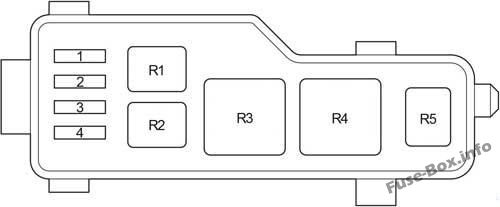
Fuse box #2 diagram
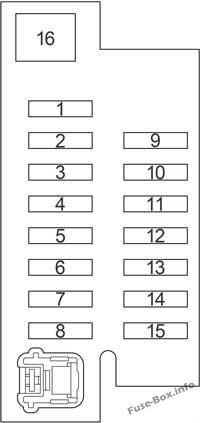
Assignment of the fuses in the Additional Fuse Box
| № | Name | Amp | Circuit |
|---|---|---|---|
| 1 | — | — | — |
| 2 | P-RR P/W | 20 | Power window |
| 3 | P-FR P/W | 20 | Power window |
| 4 | D-RR P/W | 20 | Power window |
| 5 | D-FR P/W | 20 | Power window |
| 6 | ECU-B 1 | 7.5 | Multi-mode manual transmission |
| 7 | FUEL OPN | 10 | Fuel filler door opener |
| 8 | FR DIC | 20 | Front window deicer, «MIR FITR» fuse |
| 9 | — | — | — |
| 10 | DEF I/UP | 7.5 | Air conditioning system |
| 11 | ST | 7.5 | Multiport fuel injection system/sequential multiport fuel injection system, multi-information display, starting system |
| 12 | MIR HTR | 10 | Outside rear view mirror defogger |
| 13 | RAD NO.2 | 15 | Audio system, multi-information display |
| 14 | DOME | 7.5 | Interior light, personal lights, foot lights, door courtesy lights, trunk light, vanity lights |
| 15 | ECU-B 2 | 7.5 | Air conditioning system, wireless door lock control |
| 16 | PWR SEAT | 30 | Power seat |
Relay Box
Left-hand drive vehicles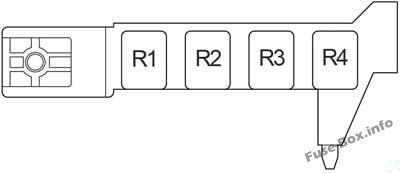
Right-hand drive vehicles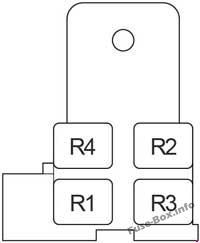
| № | Relay |
|---|---|
| R1 | Front window deicer (FR DEICER) |
| R2 | Power Outlet (P/POINT) |
| R3 | Front Fog Light (FR FOG) |
| R4 | Starter (ST) |
Engine compartment overview
1AZ-FSE, 1AZ-FE, 1ZZ-FE, 3ZZ-FE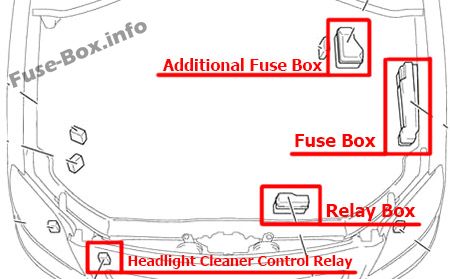
1CD-FTV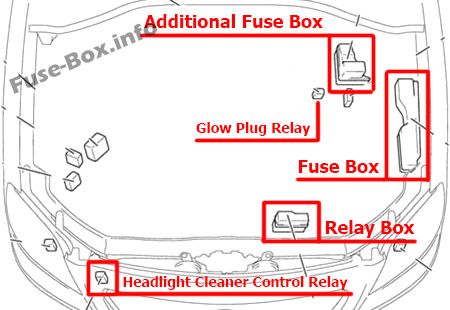
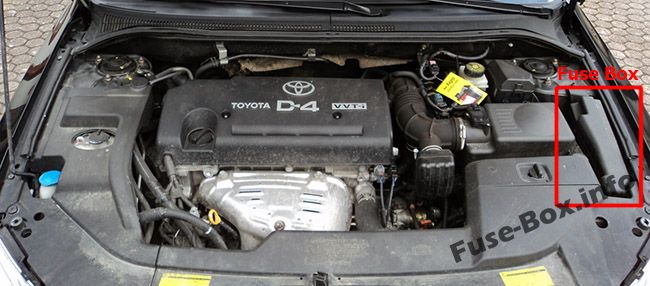
Fuse Box in the Engine Compartment
Fuse box location
Fuse box diagram
1AZ-FSE, 1AZ-FE, 1ZZ-FE, 3ZZ-FE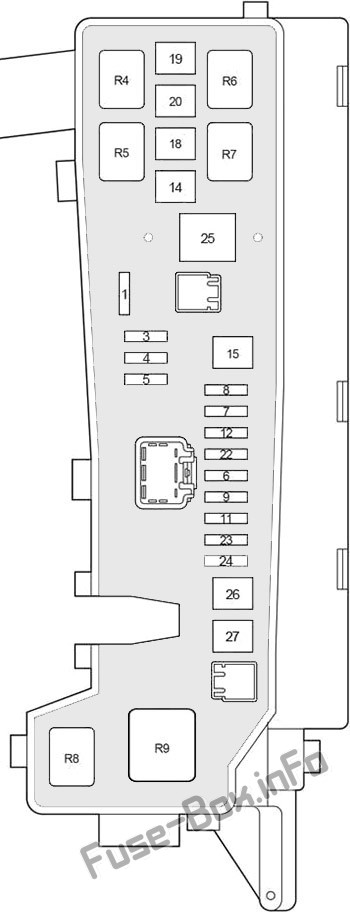
1CD-FTV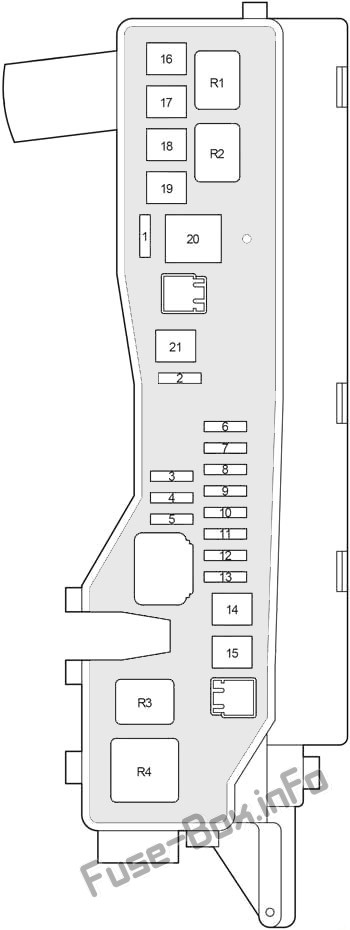
Assignment of the fuses and relay in the Engine Compartment Fuse Box
| № | Name | Amp | Circuit |
|---|---|---|---|
| 1 | — | — | — |
| 2 | VSC | 25 | 1CD-FTV: ABS, VSC |
| 2 | ABS | 25 | 1CD-FTV: ABS |
| 3 | — | — | — |
| 4 | — | — | — |
| 5 | — | — | — |
| 6 | ALT-S | 7.5 | Charging system |
| 7 | DCC | 30 | «ECU-B NO.2», «DOME», «RAD NO.2» fuses |
| 8 | AM2 | 30 | Starting system, «ST», «IGN» fuses |
| 9 | HAZARD | 10 | Turn signal and hazard warning light |
| 10 | F-HTR | 25 | 1CD-FTV: Fuel heater |
| 11 | HORN | 15 | Horn |
| 12 | EFI | 20 | Multiport fuel injection system/sequential multiport fuel injection system, «EFI NO.1», «EFI NO.2» fuses |
| 13 | PWR HTR | 25 | 1CD-FTV: Power heater |
| 14 | RR DEF | 30 | Rear windshield defogger |
| 15 | MAIN | 40 | Headlight cleaner, headlight, «H-LP HI LH», «H-LP HI RH», «H-LP LH», «H-LP RH» fuses |
| 16 | AM1 NO.1 | 50 | 1CD-FTV: «ACC», «CIG», «RAD NO.1», «ECU-B NO.1», «FL P/W», «FR P/W», «RL P/W», «RR P/W» |
| 17 | H/CLN | 30 | Headlight Cleaner |
| 18 | HTR | 40 | Air conditioner, heater |
| 19 | CDS | 30 | Electric cooling fan |
| 20 | RDI | 40 | 1CD-FTV, 1ZZ-FE, 3ZZ-FE: Electric cooling fan |
| 20 | RDI | 30 | 1AZ-FE, 1AZ-FSE: Electric cooling fan |
| 21 | VSC | 50 | 1CD-FTV: ABS, VSC |
| 21 | ABS | 40 | 1CD-FTV: ABS |
| 22 | IG2 | 15 | 1AZ-FSE, 1AZ-FE, 1ZZ-FE, 3ZZ-FE: Starting system, multiport fuel injection system/sequential multiport fuel injection system |
| 23 | THROTTLE | 10 | 1AZ-FSE, 1AZ-FE, 1ZZ-FE, 3ZZ-FE: Electronic throttle control system |
| 23 | ETCS | 10 | 1AZ-FSE, 1AZ-FE, 1ZZ-FE, 3ZZ-FE: Electronic throttle control system |
| 24 | A/F | 20 | 1AZ-FSE, 1AZ-FE: Air fuel ratio sensor |
| 25 | — | — | 1AZ-FSE, 1AZ-FE, 1ZZ-FE, 3ZZ-FE: — |
| 26 | — | — | 1AZ-FSE, 1AZ-FE, 1ZZ-FE, 3ZZ-FE: — |
| 27 | EM PS | 50 | 1ZZ-FE, 3ZZ-FE: Electric power steering |
| Relay | |||
| R1 | EFI MAIN | 1CD-FTV: Engine control unit | |
| R2 | EDU | 1CD-FTV: Engine control unit | |
| R3 | FAN NO.3 | 1CD-FTV: Electric cooling fan | |
| R4 | FAN NO.1 | Electric cooling fan | |
| R5 | FAN NO.2 | 1AZ-FSE, 1AZ-FE, 1ZZ-FE, 3ZZ-FE: Electric cooling fan | |
| R6 | — | 1AZ-FSE/ 1AZ-FE, 1ZZ-FE, 3ZZ-FE: — | |
| R7 | FAN NO.3 | 1AZ-FSE, 1AZ-FE, 1ZZ-FE, 3ZZ-FE: Electric cooling fan | |
| R8 | — | 1AZ-FSE/ 1AZ-FE, 1ZZ-FE, 3ZZ-FE: — | |
| R9 | EM PS | 1ZZ-FE, 3ZZ-FE: Electric power steering |
Additional Fuse Box
(1AZ-FSE, 1AZ-FE, 1ZZ-FE, 3ZZ-FE)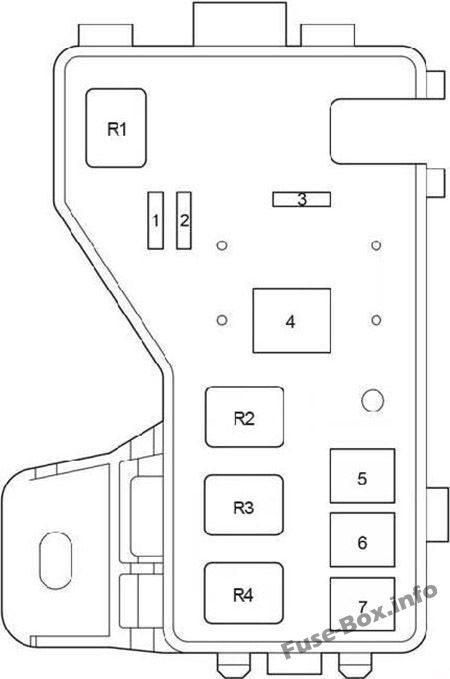
Engine Compartment Additional Fuse Box (1AZ-FSE, 1AZ-FE, 1ZZ-FE, 3ZZ-FE)
| № | Name | Amp | Circuit |
|---|---|---|---|
| 1 | EFI NO.1 | 10 | Multiport fuel injection system/sequential multiport fuel injection system |
| 2 | EFI NO.2 | 7.5 | Emission control system |
| 3 | VSC | 25 | ABS, VSC |
| 3 | ABS | 25 | ABS |
| 4 | ALT | 100 | 1ZZ-FE, 3ZZ-FE: «AM1 NO.1», «H-LP CLN», «ABS» (25A), «VSC» (25A), «ABS» (40A), «VSC» (50 A), «CDS», «RDI», «HTR», «RR DEF», «RR FOG», «FR FOG», «AM1», «DOOR», «STOP», «OBD2», «S/ROOF», «PWR SEAT», «P/POINT», «TAIL», «PANEL», «RR WIP», «ECU-IG», «WIP», «GAUGE2», «GAUGEl», «HTR» ,»S-HTR» fuses |
| 4 | ALT | 120 | 1AZ-FSE, 1AZ-FE: «AM1 NO.1», «H-LP CLN», «ABS» (25A), «VSC» (25A), «ABS» (40A), «VSC» (50 A), «CDS», «RDI», «HTR», «RR DEF», «RR FOG», «FR FOG», «AM1», «DOOR», «STOP», «OBD2», «S/ROOF», «PWR SEAT’, «P/POINT», «TAIL», «PANEL», «RR WIP», «ECU-IG», «WIP», «GAUGE2», «GAUGEl», «HTR» ,»S-HTR» fuses |
| 5 | VSC | 50 | ABS, VSC |
| 5 | ABS | 40 | ABS |
| 6 | AM1 NO.1 | 50 | «PWR SEAT», «FR DIC», «FUEL OPN», «ECU-B 1″, P-RR P/W», «P-FR P/W», «D-RR P/W», «D-FR P/W» fuses |
| 7 | H-LP CLN | 30 | Headlight cleaner |
| Relay | |||
| R1 | INJ | Injector | |
| R2 | EFI | Engine control unit | |
| R3 | IG2 | Ignition | |
| R4 | A/F | Air fuel ratio sensor |
1CD-FTV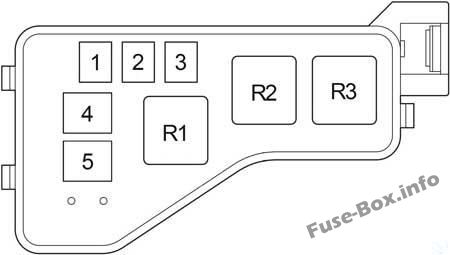
Engine Compartment Additional Fuse Box (1CD-FTV)
| № | Name | Amp | Circuit |
|---|---|---|---|
| 1 | — | — | — |
| 2 | HTR2 | 50 | Power heater |
| 3 | HTR1 | 50 | Power heater |
| 4 | GLOW | 80 | Glow plug |
| 5 | ALT | 140 | IG1 Relay, TAIL Relay, SEAT HTR Relay, «H-LP CLN», «AM1 NO.1», «RDI», «CDS», «VSC» (50A), «VSC» (25A), «ABS» (40A), «ABS» (25A), «H/CLN», «RR DEF», «GLOW», «HTR NO.1», «HTR NO.2», «RFG HTR», «AM1 NO.2», «RR FOG», «S/ROOF», «STOP», «P/POINT», «FR FOG», «OBD2», «DOOR» fuses |
| Relay | |||
| R1 | — | — | |
| R2 | HTR2 | Power heater | |
| R3 | HTR1 | Power heater |
Relay Box
Engine Compartment Relay Box
| № | Name | Amp | Circuit |
|---|---|---|---|
| 1 | H-LP HI LH | 10 | Left-hand headlight (high beam) |
| 2 | H-LP HI RH | 10 | Right-hand headlight (high beam), gauge and meters |
| 3 | H-LP LH | 15 | Left-hand headlight (low beam) |
| 4 | H-LP RH | 15 | Right-hand headlight (low beam) |
| Relay | |||
| R1 | HORN | Horn | |
| R2 | F-HTR | Fuel Heater | |
| R3 | H-LP | Headlight | |
| R4 | DIM | Dimmer | |
| R5 | FAN NO.2 | Electric cooling fan |
Learn more:
-
Reply to this topic
-
Start new topic
Recommended Posts
")
-
- Share
2008 avensis d4d
Headlights are pointing to much down. The initial headlight level test on dashboard seems to be ok, no warning, but the headlights are not leveling/moving. Could it be leveling sensor failure even if it don’t show a warning on the dashboard?
- Quote
Link to comment
Share on other sites

")
-
- Share
Hi Kristian, I take it that you have HID/Xenons if you have auto-levelling?
Does the T25 have the option to disable like my 2012 T27 TSpirit did? & if so could you have done so?
- Quote
Link to comment
Share on other sites
- Author
-
- Share
Hi. Yes it’s xenon. Not sure if it can be disabled. I cant find any switches to enable/disable autoleveling.
- Quote
Link to comment
Share on other sites
- Author
-
- Share
Update.
Turns out that the headlight level sensor can be defective without showing error message on instrument panel. As long as the outer pins on the sensor has connection with about 5Kohm, the system won’t detect failure. The center pin on the sensor/potentiometer was broken because of corosion inside. The sensor price is high, but you can get it at eBay for around $15.
Link to comment
Share on other sites
- 1 year later…
")
-
- Share
Headlight leveling motor for 2006 Toyota Avensis T25
Left side headlight remains up, while the right side able to navigates up and down.
Anyone has a clue how to resolve this problem?
A loose wiring problem or a defective leveling motor? If its the latter, how to replace the leveling motor? Have been searching unsuccessfully for videos on youtube.
Thanks
- Quote
Link to comment
Share on other sites
- 2 years later…
-
- Share
Hi
Could anyone please tell me if the Avensis t25 xenon headlights does an auto level meaning goes up and down everytime you switch on the low beams. I have seen other cars do this but my car does not.
- Quote
Link to comment
Share on other sites
Join the conversation
You can post now and register later.
If you have an account, sign in now to post with your account.
-
Join Toyota Owners Club
Join Europe’s Largest Toyota Community! It’s FREE!
- Sign In
- or
- Sign Up
-
Topics
-
7
By
Pawn33
Started Wednesday at 03:23 PM -
-
-
-

-
-
Our picks

Полный размер
Вчера вечером решила заглянуть на знакомое СТО. Пришло время разобраться со светом, да и проблема с корректором фар сама себя не решит.
Итого. Заменили блок розжига ксенона, туманки теперь работают как часы. И вернули к жизни повторитель поворота на левом зеркале, пришлось кое-что перепаять.
Разбирать сервопривод печки было уже некогда. Зато его закрепили покрепче, т.к. не слишком старательные люди, делавшие шумку, об этом почему-то не подумали. После этого надоедливые звуки исчезли.
Что касается автокорректора… Тяги целые, то есть, дело не в них. Фары светят визуально как надо, не вверх. Сканер ошибок не увидел вообще. Однако на панели я уже полгода вижу Headlight Leveling и периодически слышу звуковой сигнал ошибки. Мастер был в некоторой растерянности… Он тут вообще есть, этот автокорректор?
P.S. Нашла руководство по ТО и ремонту:
vk.com/s/v1/doc/cw2fLZ4Kt…ZoSoZHw55vOr-A-H2OmQ6XoQc
Фото для привлечения внимания, в память о лете)
The Toyota headlight system can malfunction from time to time. When the system malfunctions, don’t mess with the battery or the computer system. First, clean up the sensors, and then take them to a Toyota mechanic.
Why do Toyota headlights malfunction and how can the issues be fixed?
In a car, truck, SUV, etc, the headlight system has several components, including the wiring, the lightbulbs, the lightbulb mounts, the switch that turns the lights on and off, and the wires that connect to the battery, and the headlight sensors.
When the headlight system malfunctions, a message will appear on the dashboard. The message will say, “Headlight System Malfunction. Visit Your Dealer.”
So, what could cause a Toyota headlight system to malfunction?
A headlight is burning out – the headlight system will warn you if a headlight is about to burn out. On average, a headlight should last at least 1000 hours.
Some headlights last much longer than that but 1000 hours of illumination time is standard. After a headlight burns out, you will need to replace it.
Most headlights are sold in pairs, so when you purchase a pair of headlights you might as well replace both of them.
The headlight auto-leveling system is not working – auto-leveling headlights are headlights that adapt to the position of the vehicle and keep the lights coming from the headlights constantly on the road.
These self-adjusting headlights change position on their own. In some cases, headlights are no longer in the right position and the sensors cannot detect what position the headlights should be in.
In order to fix a headlight auto leveling malfunction in a headlight system, you must first look for an automatic headlight leveling system warning light.
If the warning light is flashing, then you can take your Toyota vehicle to a certified mechanic to have them run a Diagnostics test.
If you still have your Toyota vehicles manufactured, you can use the manual to find the fuse that connects the computer to the headlight system.
Sometimes the fuse will burn out and the computer can no longer talk to the headlight system to engage the automatic leveling program.
Water or mud found its way into the headlight – occasionally, sand, mud, or water, can find its way between the crevices of the headlight cover, and dirty the headlights are the censors.
If you see that there are particles picking the inside of the headlight color, you need to take the headlight cover off and clean in and around the headlights. If the area is particularly dirty, you may have to take the headlight out and clean the socket.

Be sure to clean all the sensors too. Sensors can easily short out if they are exposed to dirt or water.
Note: if you live in an area that experiences a lot of rain or is humid all year long, then get into the habit of checking underneath your headlights regularly. Even a few drops of water can ruin a headlight and short out the bulb or the fuse.
The high beams turn on automatically – it is actually a feature of the Toyota headlight system. If you notice that the headlights turn on when you turn on the engine, then you must have the automatic high beam settings turned on.
If you do not want the high beams to turn on automatically, then you can turn the setting off yourself.
First, leave the vehicle on and check to see that the vehicle is in park. Then, locate the headlight lever. Grab the headlight lever and pull it towards the driver’s seat and hold it down for 40 seconds.
After 40 seconds, the auto high beam indicator on the dashboard will blink twice. That is how you know the automatic high beams are now turned off
If you want to turn the automatic high beams back on, pull the headlight lever towards the driver’s seat and hold it for only 30 seconds. This time, the auto high beam indicator will only blink once to show that it is back on.
Should you reset the headlight system yourself? No!
Are you still not sure what the issue is? If the headlight warning signal is still flashing under the dashboard and you do not know what the issue is, then you will have to take your vehicle to a mechanic.
Fixing your vehicle DIY style can only go so far, and you can ruin other parts of your vehicle if you don’t know what you’re doing.
But you may have looked online and saw that some people are disconnecting the headlight system from the battery. They are doing this to reset the system.
However, resetting the headlight system by disconnecting the battery is not a good idea.
First, it will clear none of the data that the computer has gathered. Even if there are issues with the computer, the computer will lose none of its data.
Second, messing with the battery is not a good idea if you have no experience working with it before.
Third, you could bend or break something when you disconnect the headlight system from the battery. Breaking a part of the battery or connection to the battery will cause your repair bill to skyrocket.
Clean all the headlight sensors
Sensors are easily affected by everything in their environment. So, when you see the headlights system malfunction warning on your dashboard, clean the sensors first and then try every other solution we listed above.
There are special sensor cleaning solutions that will not damage the surface of the sensor or the wiring. If you don’t have the solution, use a window cleaner.
Conclusion
There are several reasons why the Toyota headlight system malfunction light will appear on the dashboard or console. Water or mud could be affecting the headlight or its wiring.
The high beams are automatically on when they should not be. A headlight is burning out and needs to be changed. Or the auto-leveling system is no longer functioning as it should.
All these issues are quite fixable; you may be able to fix them by yourself. But do not reset the headlight system by unplugging the system from the battery.
-

I’m the founder of Daily Car Tips. I wrote articles in the automotive industry for more than 10 years, published in USA, Europe and the Asia. I love sharing my knowledge and insights with fellow enthusiasts. Join me on this journey as we explore the exciting world of cars together!
View all posts

Headlight levelling malfunction — никто не сталкивался?
Тема в разделе «9-3 SS 03-«, создана пользователем Dze, 20 июл 2009.

- Статус темы:
-
Закрыта.
-

Dze
Пользователь- Регистрация:
- 26 мар 2008
- Сообщения:
- 758
- Адрес:
- Москва
- Авто:
- 9-3 М03 Aero АКПП BSR Stage 1
Отдал тут машину покраситься. В том числе передние бампер, крыло.
Вроде и человек с саабами знакомый делал, но после того как все он собрал и машину мне вернул вылезла ошибка корректора фар.
Когда фары включаю привычного движения вниз-вверх нет.
Мастер говорит, что подключил все как было, ничего не забыл.Никто с подобным не сталкивался? Откуда копать начинать?
-
VTS
Пользователь- Регистрация:
- 21 янв 2009
- Сообщения:
- 697
- Адрес:
- Москау-сити
- Авто:
- Acura RDX’07 2,3 Turbo 240 HP Mitsubishi Montero III ’00 3,5 202 HP
Таже хня, когда скидывал бампер и полировал фары, 10 раз туда-сюда тягали, снимали, все ок было. Когда все собрали и навесили — бац, ошибка. Корректор не пашет. Пока не заезжал на ТЕХ, так что возможную причину тебе не подскажу. Если заедешь раньше меня — отпишись.
-
klimOFF
Пользователь- Регистрация:
- 10 май 2009
- Сообщения:
- 935
- Пол:
- Мужской
- Адрес:
- Москва
- Авто:
- Volvo xc70 D5 AWD M12
- Авто:
- 9-3 M08 2T АКПП
У меня была подобная проблема, но после ремонта рычагов подвески, в итоге оказалось что выдернули провод идущий к датчику, стоящему на рычаге левом, делал сам, выворачиваешь колеса влево, и туда можно подлезть рукой. Там датчик стоит уровня, к нему подходит три провода!! Проверь их для начала, потяни за провода немножко, вдруг чего выдернули!!
-
klimOFF
Пользователь- Регистрация:
- 10 май 2009
- Сообщения:
- 935
- Пол:
- Мужской
- Адрес:
- Москва
- Авто:
- Volvo xc70 D5 AWD M12
- Авто:
- 9-3 M08 2T АКПП
Проводки там в колодке не очень крепко сидят, могли вылететь!!!
-
Было у подруги после кузовного (меняли фару). Заехал на сервис, прошили Теком, все ок.
-
Rijii123
Пользователь- Регистрация:
- 30 июн 2008
- Сообщения:
- 111
- Адрес:
- Москва
- Авто:
- 9-3-SS 2.0 Aero M04
Была такая же хня. После ремонта подвески. Оказалось что крепление датчика слегка погнули и датчик этот гнал. Все выпрямили и теперь все ОК. (тож на переднем левом рычаге.) Такая же фигня была при попытке установить некоторые комплекты ксенона(от разных фирм, но не все) — ксенон давал наводки на корректори появлялась ошибка.
-
VTS
Пользователь- Регистрация:
- 21 янв 2009
- Сообщения:
- 697
- Адрес:
- Москау-сити
- Авто:
- Acura RDX’07 2,3 Turbo 240 HP Mitsubishi Montero III ’00 3,5 202 HP
Отлично летает)) вчера 200 ложил ночью по минке))ксеноном сгонял всяких та корчвагенов и бумероводов с левого ряда))) Единственный пепелац, что меня обошел и уехал безнаказанным — Кэмри в последней будке. И то, уехал от меня потому, что всякие бумероводы думают, что у них уменьшенная копия макларена. Влез между мной и кэмри. И пока кэмри уезжал от меня, этот тошнил 180 передо мной. Пришлось этого типа напрягать морганием в разы дольше. Сопротивлялся до последнего)))
Люблю ночью притопить) меньше шанцофф быть заснятым на камеру поэтому тапку в пол, пока боевая подруга справа не начинает пищать, что ее укачивает))))
По датчикам положения кузова я в курсе, т.к. в заднем сам делал отгнившую фишку. Просто тема в том, что при скидывании фар и бампера их не трогали, лично проверил разъем на переднем, тем более, что я сам все снимал и ставил. Так что знаю, че и куда отключал)) Надо ТЕХом покопаться. -
Камри вообще чума)) По последним спекам http://www.toyota.ru/cars/new_cars/camry/specs.aspx 3.5 должна квтаромилю за 15 проходить=)) зверь)
А че только 200, дальше не едет??? «Моя» айра 230 вроде едет, дальше че-то никак. Или просто места не было??
-
Dze
Пользователь- Регистрация:
- 26 мар 2008
- Сообщения:
- 758
- Адрес:
- Москва
- Авто:
- 9-3 М03 Aero АКПП BSR Stage 1
За ответы спасибо. Датчик визуально в норме. Всё подключено, провода не вываливаются.
Попробую до теха доехать в ближайшее время. Уж слишком раздражает.По поводу камри — у меня у отца такая. 3,5 v6
Поверь, 200 ей достаточно. На скорости на ней реально стремно после сааба. -
VTS
Пользователь- Регистрация:
- 21 янв 2009
- Сообщения:
- 697
- Адрес:
- Москау-сити
- Авто:
- Acura RDX’07 2,3 Turbo 240 HP Mitsubishi Montero III ’00 3,5 202 HP
-
Никс
Активный- Регистрация:
- 31 окт 2008
- Сообщения:
- 1.776
- Адрес:
- Москва
- Авто:
- 9-3 М08 2,0Т 240хп АКПП Хирш!)
У мну тоже айра. Прошлым летом на МКАДе 250 с горки было. У меня в 240 упирается, а дальше накатом. Но до 240 бодрячком)) В этом году ещё небыло возможности так разогнаться, прошлогоднии проверки))По поводу капри v6 — утром сегодня в 8.40 по звенигородки в левом ряду ехал в строну области. На хвосте камри. 100 км/ч. Нажимаю плавненько — сидит вплотную. Вот так мы с ней до 200)) Я знал что там стоят частенько или СБ с камерами ездиет, но было пох))Ога!
-
Потёмкин
Броненосец- Регистрация:
- 19 авг 2008
- Сообщения:
- 1.352
- Пол:
- Мужской
- Адрес:
- Одинцово
- Авто:
- 9-3SS MY09 2.0T XWD АT
есть еще такая версия, что тем кому машину сдавал — махнули работающий, на неработающий. Был у меня такой казус на одной машинке… Так ведь и не докажешь ничего. Абыдна было.
-
Dze
Пользователь- Регистрация:
- 26 мар 2008
- Сообщения:
- 758
- Адрес:
- Москва
- Авто:
- 9-3 М03 Aero АКПП BSR Stage 1
В итоге, без хирургического вмешательства техотерапиеей ошбку вылечели.
-
VTS
Пользователь- Регистрация:
- 21 янв 2009
- Сообщения:
- 697
- Адрес:
- Москау-сити
- Авто:
- Acura RDX’07 2,3 Turbo 240 HP Mitsubishi Montero III ’00 3,5 202 HP
Дык что? просто сняли ошибку техом и все? Или еще есть нюансы?!
-
klimOFF
Пользователь- Регистрация:
- 10 май 2009
- Сообщения:
- 935
- Пол:
- Мужской
- Адрес:
- Москва
- Авто:
- Volvo xc70 D5 AWD M12
- Авто:
- 9-3 M08 2T АКПП
А если тупо скинуть клемму не помогает???
-
Dze
Пользователь- Регистрация:
- 26 мар 2008
- Сообщения:
- 758
- Адрес:
- Москва
- Авто:
- 9-3 М03 Aero АКПП BSR Stage 1
-
Dze
Пользователь- Регистрация:
- 26 мар 2008
- Сообщения:
- 758
- Адрес:
- Москва
- Авто:
- 9-3 М03 Aero АКПП BSR Stage 1
Что именно сделали не сказали. Был в Отрадном (сколько уже раз уже зарекался туда ездить!), а там электрик молчун неразговорчивый =)
Поколодовал с техом что-то, ошибка исчезла фары вниз-вверх ездить начали. -
VTS
Пользователь- Регистрация:
- 21 янв 2009
- Сообщения:
- 697
- Адрес:
- Москау-сити
- Авто:
- Acura RDX’07 2,3 Turbo 240 HP Mitsubishi Montero III ’00 3,5 202 HP
Последнее редактирование модератором: 22 май 2012


") поэтому тапку в пол, пока боевая подруга справа не начинает пищать, что ее укачивает))))
поэтому тапку в пол, пока боевая подруга справа не начинает пищать, что ее укачивает))))

")
- Статус темы:
-
Закрыта.
Поделиться этой страницей
Пользователи просматривающие тему (Пользователей: 0, Гостей: 0)