На руках очередной ноутбук, на этот раз от производителя Dell – модель Inspiron 5759. Столкнулся с ошибкой Error Code 2000-0151 при включении ноутбука. Производитель встроил в линейку своих аппаратов диагностическое программное обеспечение, которое при включении ноутбука сканирует все основные аппаратные части на работоспособность перед запуском Windows.
Перечислю аппаратные компоненты, которые проходят проверку: матрица (монитор), система охлаждения — вентилятор, оперативная память (system memory), процессор (CPU), жесткий диск (HDD/SSD), DVD-привод.
При включении ноутбука у меня появлялась ошибка с громкими сигналами:
DELL SupportAssist has detected a failing component on your system that requires immediate attention. Go to https://supportassist.dell.com and enter the issue description below.
Service Tag : 7S2B2G2
Error Code : 2000-0151
Validation : 108838
Hard Drive 0 – S/N (XXXXXXXXXXXX), incorrect status = 3E
Данное окно с ошибкой указывает на неисправность жесткого диска. Заменив HDD на рабочий, проблема уйдет, однако придется устанавливать операционную систему Windows. Проверить состояние нового вставленного носителя можно с помощью той же встроенной программы диагностики DELL — SupportAssist. Для этого сразу после включения ноутбука необходимо нажать клавишу F12 и выбрать Diagnostics, ПО просканирует все основные компоненты аппаратной части и если есть неисправность — выявит.
У Dell есть множество кодов ошибок, указывающих на неисправность HDD: 1000-0141, 2000-0141, 1000-0142, 2000-0142,1000-0143, 2000-0143, 1000-0144, 2000-0144, 1000-0145, 2000-0145, 1000-0146, 2000-0146, 2000-0151.
Симптомы перед появлением таких ошибок могут быть разные:
- Медленно работает или вовсе висит ноутбук (компьютер)
- При загрузке теряется Boot загрузчик
- Слышны щелчки жесткого диска
Если вы с техникой на ТЫ, то можете проверить состояние жесткого диска и по возможности исправить неполадки HDD. На жестком диске остались нужные данные? — тогда ознакомьтесь со статьей Как восстановить информацию.
- Для тех, у кого ноутбук на гарантии, рекомендую не проводить манипуляции, а нести в авторизированный сервисный центр DELL.
When booting the Dell computer, you may encounter the error code 2000-0151. So, do you know how to fix the Dell error code 2000-0151? This post from MiniTool will show you how to fix the Dell error code 2000 0151.
What Is Dell Error Code 2000-0151?
If you are using a Dell computer, you may come across some error codes, such as 2000-0146, 2000-0142, 2000-0151, etc. when booting the computer. Meanwhile, this post will focus on Dell error code 2000-0151.
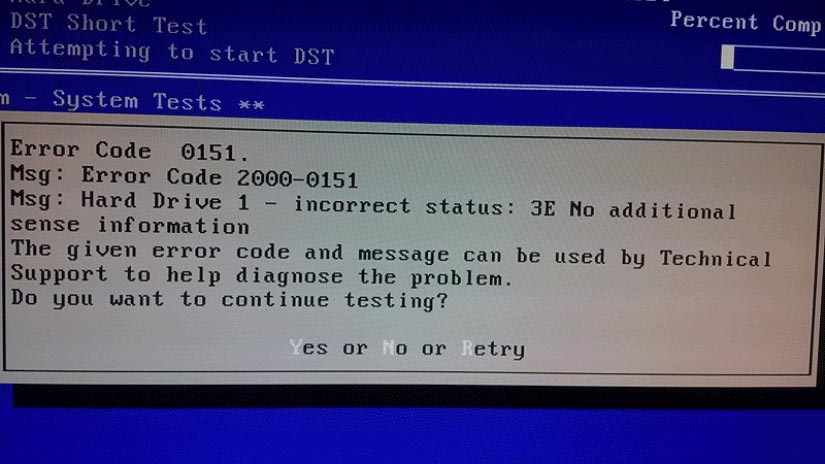
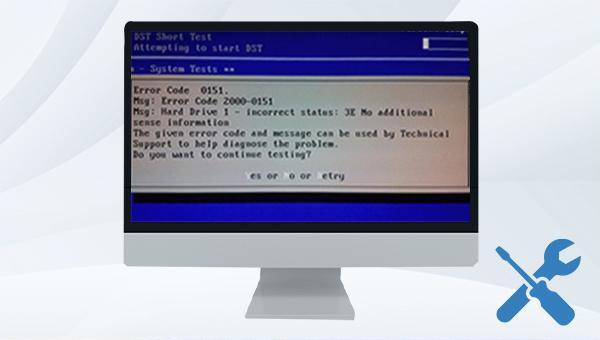
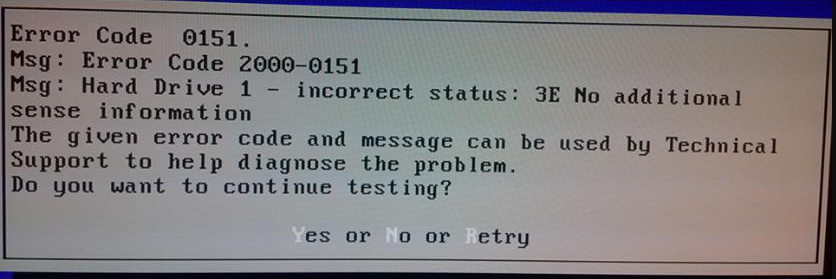
When booting the computer, the error message is shown below:
Error code 0151
Msg: Error Code 2000-0151
Msg: Hard Drive 1 – incorrect status: 3E No additional sense information
The given error code and message can be used by Technical Support to help diagnose the problem.
Do you want to continue testing?
Then what causes error code 2000-0151?
Although the Dell error code 0151 is not a frequent issue, it might appear for a few reasons. Dell error code 2000-0151 may be caused by the misconfigured system files that create registry errors within your OS or an outdated hard drive. The Dell error code 2000-0151 often indicates that your hard disk drive has failed or may be nearing the end of its life. What’s more, you can choose to run Dell diagnostics tool to check the reason for the error code 2000-0151 and the health of the hard drive.
When encountering the error code 2000 0151, the most important thing is to fix it. So, in this post, we will show some solutions.
However, since the Dell hard drive error code 2000-0151 indicates your hard drive is near to the end of its life or has failed, hence, before proceeding on the solutions, you need to back up data from the system if it is booting up or recover data from the failed hard drive.
How to Keep Data Safe When Encountering Dell Error Code 2000-0151
In this section, we will show you how to keep data safe when you encounter the Dell error code 2000-0151. To get your data off from the Dell computer with the error code 2000-0151, we will show you two different situations: the computer is bootable or the computer is unbootable. We will elaborate on them one by one.
Case 1: How to Back up Data When Computer Is Bootable
As the Dell error code 2000-0151 may indicate that the hard drive is near to the end of life. In this situation, you may still boot successfully. So, you need to back up your data from the system and then do some fixes to Dell error code 2000-0151.
To back up data, you can use the professional backup software – MiniTool ShadowMaker. It is designed to back up the operating system, disks, partitions, files and folders.
Now, we will show you how to back up data from the computer with error code 2000-0151.
1. Click the following button to download MiniTool ShadowMaker, install it and launch it.
Free Download
2. Click Keep Trial.
3. After entering its main interface, go to the Backup Then click SOURCE module to continue.
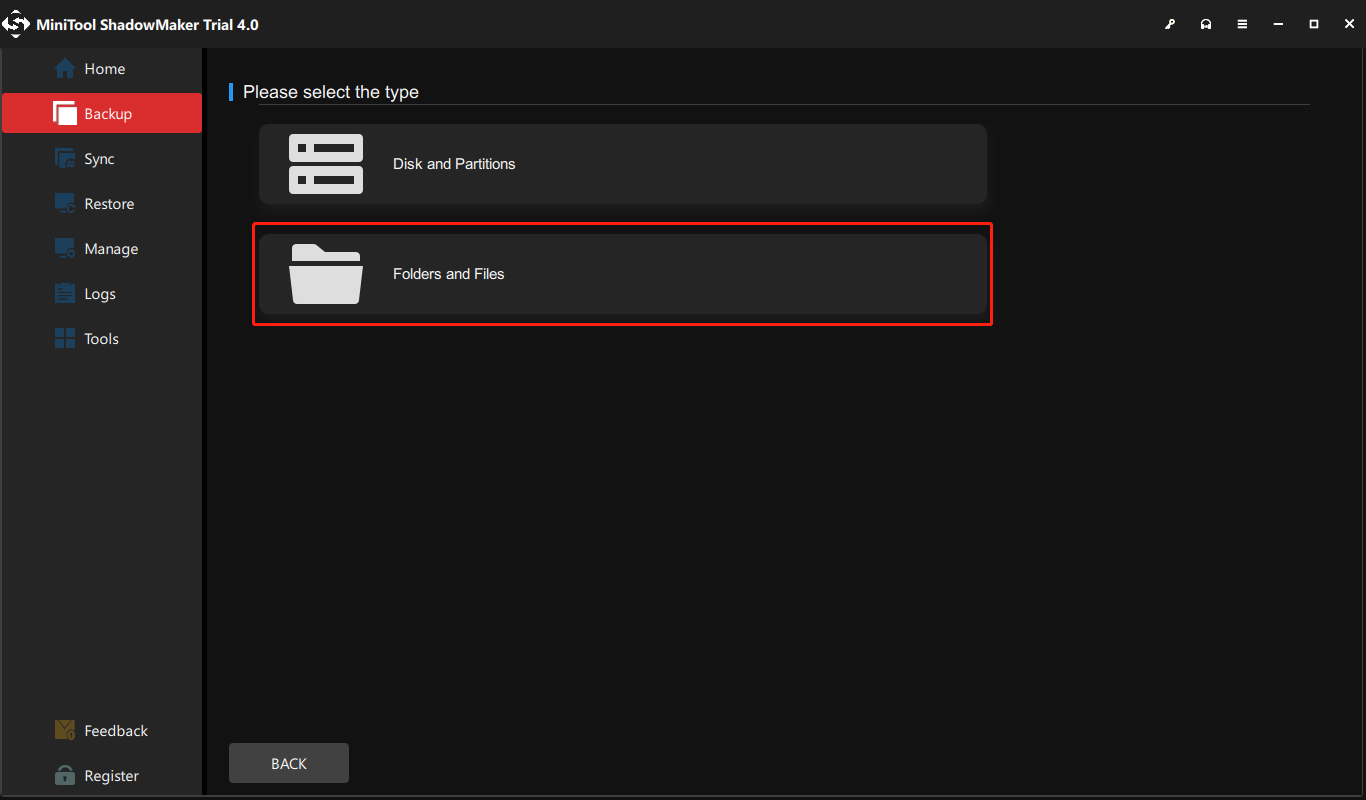
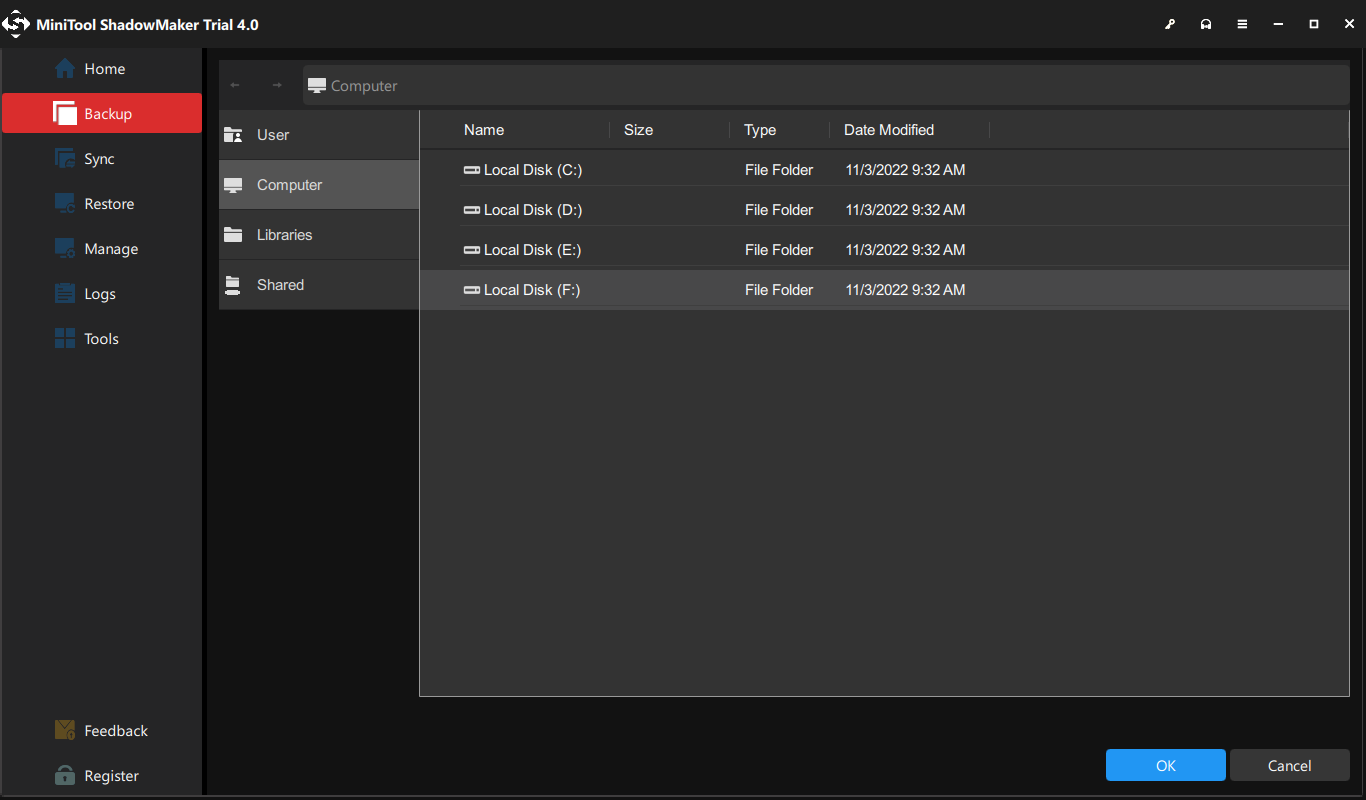
4. Then choose Folders and Files. Next, select the files you want to back up and click OK to continue.
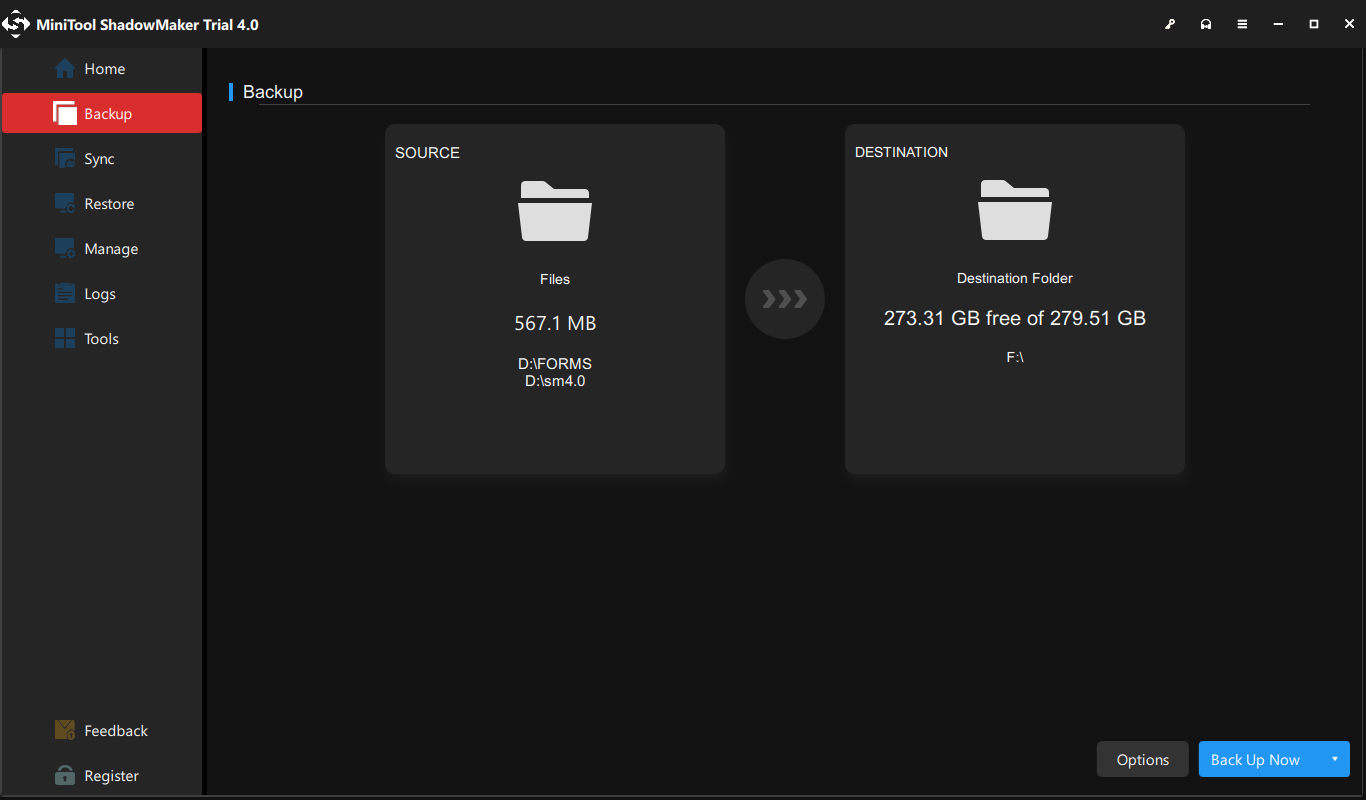
5. Then click DESTINATION module to choose a target disk. Here, it is recommended to choose an external hard drive and click OK to continue.
6. After selecting the backup source and destination, click Back Up Now to perform the backup task immediately.
After all steps are finished, you have successfully backed up files from the hard drive with error code 2000 0151. If you have a mass of files and folders on the hard drive, you can choose to back up hard drive. Once you have kept data safe, you can go ahead to fix the Dell error code 2000-0151. For the solutions, please read the following part in this post.
Case 2: How to Recover Data If the Dell Computer Is Unbootable
As mentioned in the above part, the Dell error code 2000-0151 may also indicate the hard drive is failed. In this situation, you may fail to boot the computer. Thus, you need to recover your important data first from the unbootable computer with error code 2000-0151 and look for solutions to fix the Dell hard drive error.
So, to recover data from the unbootable computer, you come to the right place. To do that, you can use the third-party software – MiniTool Partition Wizard Pro Ultimate.
It is an all-in-one partition manager and data recovery utility. Its Data Recovery feature enables you to recover data from the unbootable computer with ease.
Now, here is the tutorial.
1. Click the following button to download MiniTool Partition Wizard Demo and install it on a normal computer.
Free Download
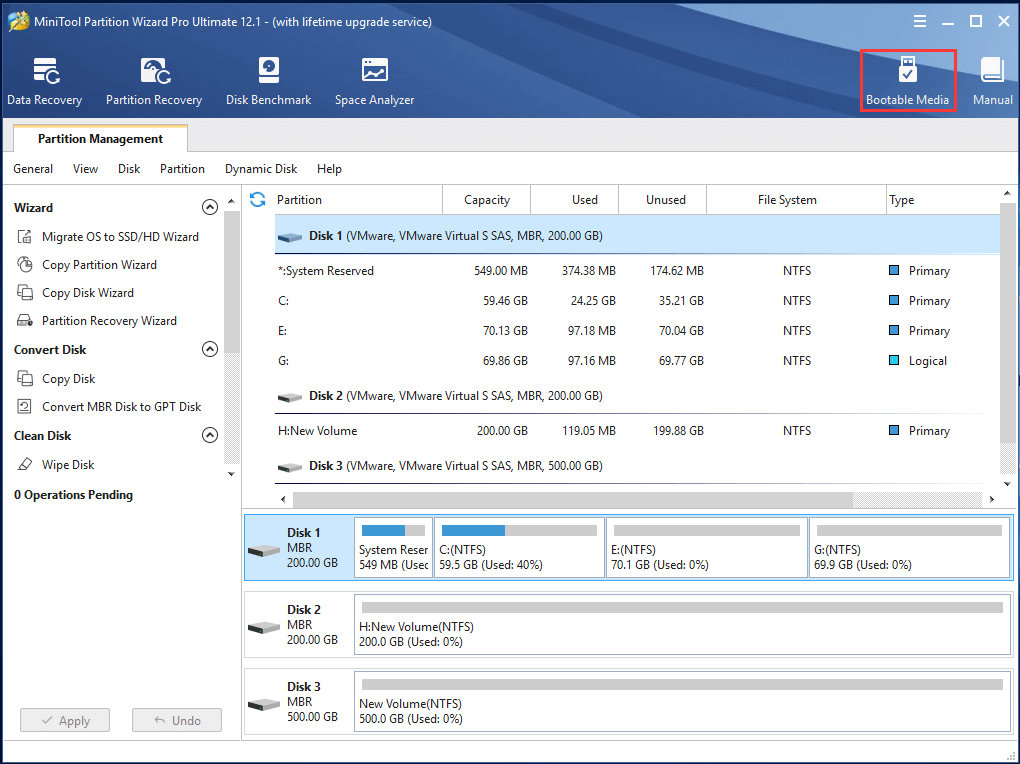
2. Then launch it and click Bootable Media feature to create the bootable media. (The demo edition does not support this feature.)
3. Then connect the bootable media to the unbootable computer with error code 2000-0151, change boot order and boot from it.
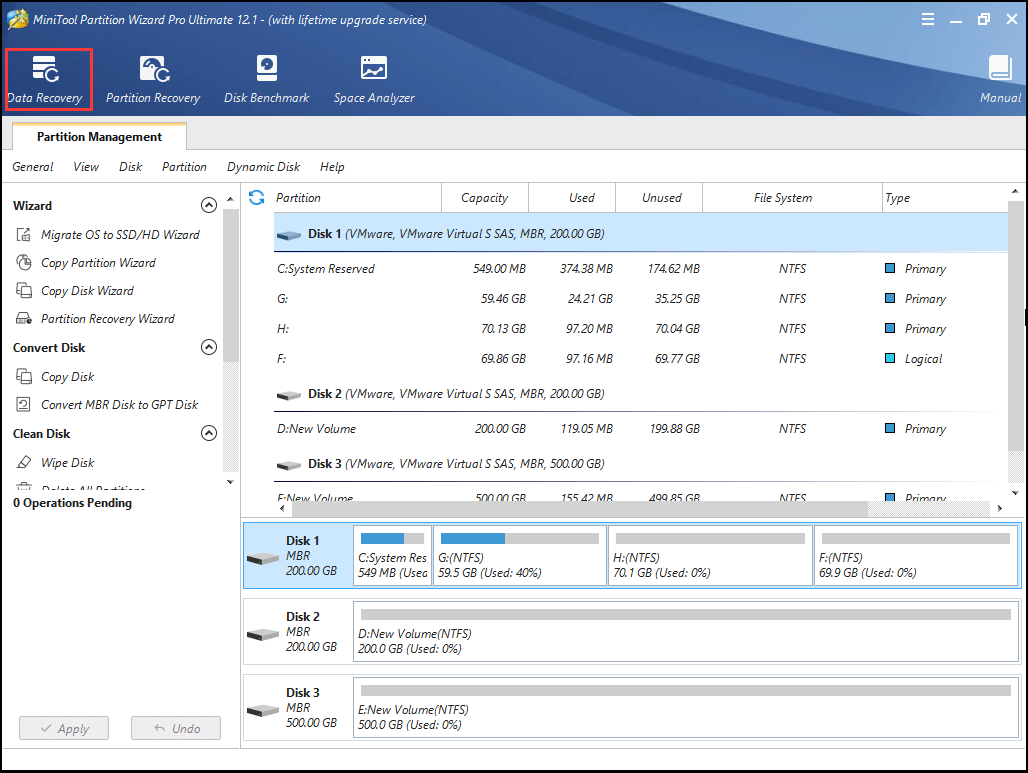
4. After entering the main interface of MiniTool Partition Wizard, click Data Recovery.
5. On the Data Recovery interface, all disks and partitions will be listed here. Select the partition containing important files and choose Scan to continue.
6. Then wait for the scanning process to be finished. During the process of scanning, you can choose to stop or pause it if you find the files you need.
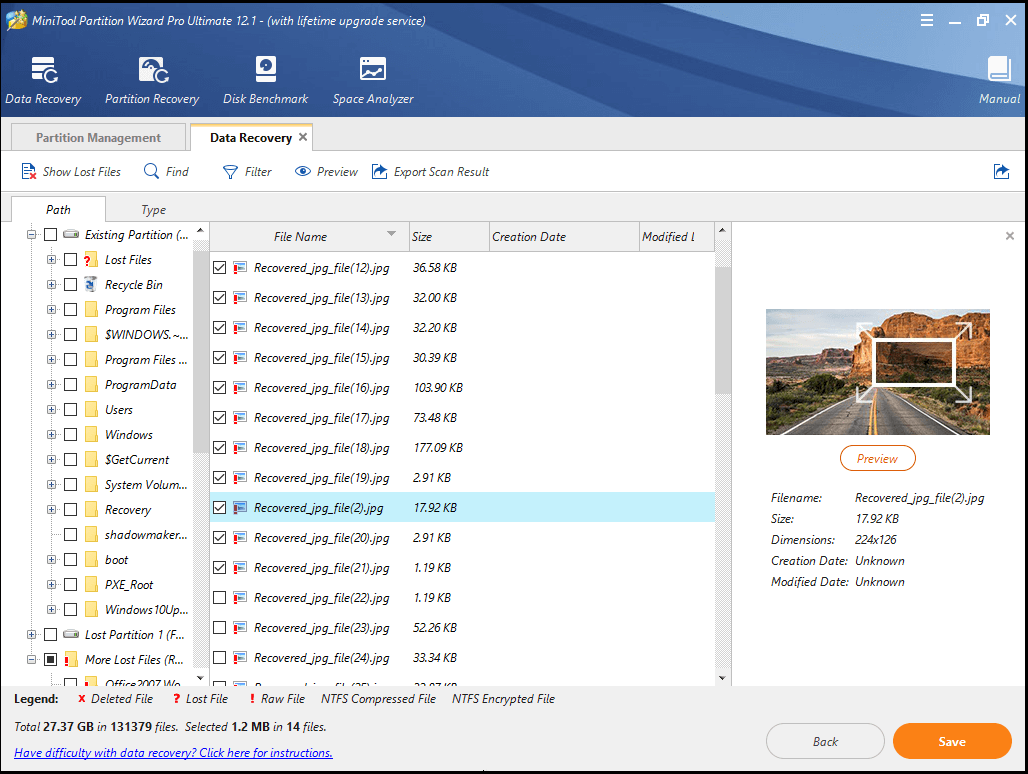
7. After that, check the files you need and click Save to store them to another location.
After all steps are finished, you have successfully recovered files from the unbootable computer with error code 2000-0151. So, you can go ahead to fix the Dell error code 2000-0151. In the next content, we will show you how to solve the Dell error code 2000-0151.
How to Fix Dell Error Code 2000-0151
In this section, we will show you the solutions to the error code 2000-0151. Please note that all these solutions are demonstrated based on the unbootable computer. If your computer is bootable, you can ignore the steps of booting the computer from Windows installation media and just try the repairing steps.
The following solutions are not 100% effective because the Dell error code 2000-0151 indicates severe hardware issues. So, it may depend on your hardware conditions. Sometimes the error may be solved unless you replace the hard drive. However, the following solutions are still worth trying and you can try them one by one.
Way 1. Check BIOS Settings
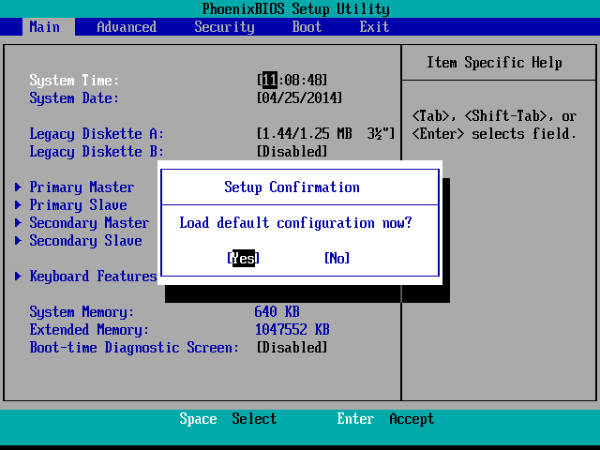
The Dell error code 2000-0151 may be caused by the wrong BIOS settings. So, in order to fix this error, you need to check whether there are changes in the BIOS settings and reset it to the default settings.
Now, here is the tutorial.
- Restart your computer and press F12 continuously to enter the BIOS settings.
- Then select Load Default, Load Setup Defaults, Load Default Settings, Load Optimal Defaults, or similar option in BIOS Settings and hit Enter to reset the BIOS setting.
- Then press F10 to save the changes.
Once all steps are finished, reboot your computer and check whether the Dell error code 2000-0151 is removed.
Way 2. Run Surface Test
The Dell error code 2000-0151 may occur when there are bad sectors on your hard drive. So, it is necessary for you to check how many bad sectors on the hard drive. If there are too many, it means that your hard drive is imminent to fail.
So, how to check bad sectors on the hard drive? MiniTool Partition Wizard is able to help you. If you have created a MiniTool recovery USB drive in the above, you can connect it to the unbootable computer with error code 2000 0151 and boot from it. If not, create a bootable media first.
Free Download
Now, we will show you how to check bad sectors on the hard drive.
1. Connect the MiniTool recovery USB drive to the computer and boot from it.
2. Then enter the main interface of MiniTool Partition Wizard.
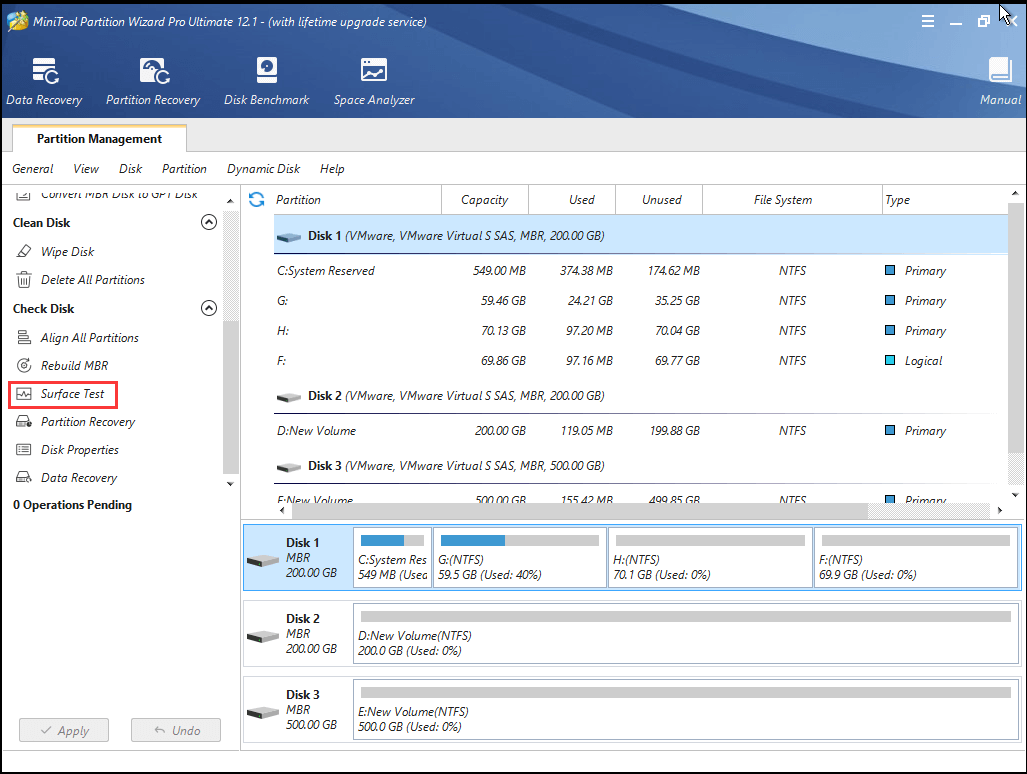
3. Then select the hard drive you want to scan and choose Surface Test.
4. Then click Start Now to continue.
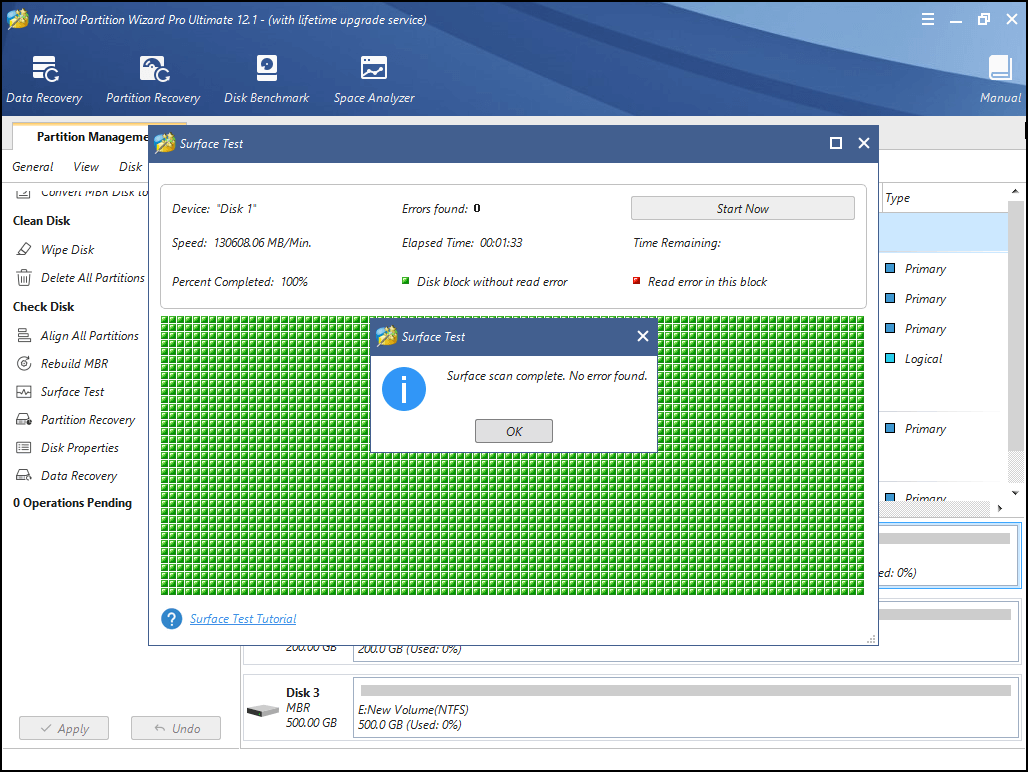
5. When the scanning process is finished, you can check the result. The disk block without reading error will be marked as green color, while the disk block with reading error will be marked as red color.
If there are few bad sectors on the hard drive, you can choose to shield them. If there are too many bad sectors, you need to back up your files and replace the hard drive.
Way 3. Run CHKDSK
CHKDSK is able to help you to fix some hard drive errors, such as bad sectors, improper shutdowns or corrupted software, etc. So, in order to fix the Dell error code 2000-0151, you can try running the CHKDSK tool.
Now, here is the tutorial.
1. Create a Windows installation disc with Windows Media Creation Tools.
Tip: If you have created a bootable USB drive with MiniTool Partition Wizard, you do not need to create the Windows installation disc any more. In the MiniTool PE loader, select Command Console and type the command directly.
2. Insert the Windows installation disc to the unbootable computer and boot from it.
3. Then select the language, keyboard input and time.
4. Next, click Repair your computer.
5. Next, choose Troubleshoot > Advanced Options > Command Prompt to continue.
6. Then type the command chkdsk c: /f /r in the Command Line window and hit Enter to continue. (C represents the drive letter and you can change it by yourself.)
Way 4. Replace the Hard Drive
If the above solutions cannot fix the Dell error code 2000 0151, the last option you should choose is to replace the hard drive. If you already recovered data before, you can replace the hard drive directly and reinstall the operating system.
However, if you do not want to reinstall the OS to the new hard drive, you can choose to migrate OS to new hard drive. After that, the Dell error code 2000-0151 will be removed from your computer.
Related article: How to Replace Laptop Hard Drive Without Reinstalling Windows?
Wow! It is an excellent post. I fixed the Dell error code 2000-0151 after reading it.Click to Tweet
Bottom Line
After reading this post, you may already know how to fix the Dell error code 2000-0151. If you come across the same error, try these solutions. If you have any better solution to fix it, you can share it in the comment zone.
In addition, if you have any problem with MiniTool products, please feel free to contact us via the email [email protected] and we will reply to you as soon as possible.
Содержание
- Метод 1: запустить средство диагностики
- Метод 2: переустановите Windows
- Метод 3: CHKDSK / R
- Метод 4: восстановить ваши данные
- Метод 5: замените жесткий диск
Все компоненты оборудования важны для работоспособного компьютера или ноутбука. Если один из компонентов не работает должным образом, BIOS или UEFI сообщит вам об этом. О BIOS и UEFI мы говорили в предыдущих статьях, если вы читали нашу статью, вы должны знать, что такое BIOS или UEFI. BIOS (базовая система ввода-вывода) загружается, когда вы включаете компьютер или ноутбук, и BIOS проверяет компоненты вашего оборудования на предмет их исправности или неисправности. UEFI является преемником BIOS с той же целью.
В этой статье мы напишем о проблемах с жесткими дисками. Жесткий диск — это аппаратный компонент, в котором хранится операционная система, драйверы, приложения и наши данные. Если у вас проблемы с жестким диском, вы не сможете загрузить Windows, запустить приложение или получить доступ к данным. Есть разные проблемы с жестким диском, в том числе механические, электрические и логические. Итак, в чем разница между ними? Механическая проблема включает проблему с диском, головкой, рычагом привода или осью. Электронная проблема включает в себя проблему с платой, а логическая проблема включает проблемы с разделами, томами и жестким диском.
Одна из проблем с жестким диском — ошибка: 2000-0151 Ошибка короткого теста жесткого диска DST. Ошибка 2000-0151 означает, что ваш жесткий диск (HDD) вышел из строя и, возможно, подходит к концу его срок службы. Независимо от того, есть ли у вас проблемы с жестким диском или нет, вам следует реализовать стратегию резервного копирования и восстановления. В случае сбоя вы можете восстановить данные из резервной копии. Представьте себе следующий сценарий: вы используете жесткий диск емкостью 2 ТБ, на котором хранятся все ваши личные или бизнес-данные. Кроме того, вы реализовали резервное копирование в реальном времени на NAS (сетевое хранилище) или облачное хранилище. Ваш жесткий диск перестал работать. Вы не беспокоитесь, потому что у вас есть резервная копия ваших данных, которую вы можете восстановить за короткое время. Вам будет очень грустно, если у вас нет резервной копии, возможно, вы заплатите много денег за восстановление данных или продолжите работу без данных. Резервное копирование — лучший способ для вашей домашней или бизнес-инфраструктуры, поэтому не игнорируйте его. Вы можете сделать резервную копию данных на внешний жесткий диск, NAS или облачное хранилище.
Эта проблема возникает на жестком диске независимо от того, используете вы компьютер или ноутбук. Обратите внимание, что эта проблема связана не с операционной системой, а с оборудованием. Мы создали для вас несколько решений, включая устранение логических проблем, и последнее — замена жесткого диска на новый. В конце концов, вы должны быть готовы заменить свой жесткий диск, потому что, как мы уже говорили, ошибка 2000-0151 указывает на то, что ваш жесткий диск (HDD) вышел из строя и, возможно, подходит к концу его срок службы.
Метод 1: запустить средство диагностики
Если вы не уверены, есть ли проблема с вашим жестким диском, вам следует запустить инструмент диагностики для вашего жесткого диска. Как вы это сделаете? Все производители предоставляют официальное программное обеспечение для тестирования своего жесткого диска. Мы покажем вам, как запустить WD Diagnostic Tool в Windows 10, используя жесткий диск WD 1 ТБ. Если вы можете загрузить Windows на свой компьютер, вам нужно будет загрузить и запустить это программное обеспечение. Если вы не можете загрузить Windows на свой компьютер, вам необходимо подключить жесткий диск к другому компьютеру или ноутбуку и установить программное обеспечение на этот компьютер или ноутбук.
- открыто Интернет-браузер (Google Chrome, Mozilla Firefox, Edge или другой)
- открыто Сайт WD по этой ССЫЛКЕ
- Скачать Диагностика Data Lifeguard для Windows
- Бегать Диагностика Data Lifeguard для Windows
- Выбрать ваш жесткий диск. В нашем примере это WD10EFRX-68PJCN0.
- Щелкните правой кнопкой мыши на WD10EFRX-68PJCN0 и выберите Выполнить диагностику
- Выберите Быстрыйсканировать и нажмите Начало. Также вы можете выбрать Расширенный тест для вашего жесткого диска. Мы просто показываем вам, как протестировать жесткий диск с помощью этого инструмента.
- Подождите пока не будет запущен диагностический инструмент WD. законченный быстрое сканирование
- Проверьте результаты теста. В нашем примере HDD работает нормально и ошибок нет. В вашем примере, вероятно, вы увидите ошибки, указывающие на необходимость замены жесткого диска.
- Также вы можете проверить M.A.R.T. Информация о диске. Что такое СМАРТ? УМНАЯ. (Технология самоконтроля, анализа и отчетности) отслеживает рабочие характеристики выбранного привода и калибровочные характеристики и прогнозирует неизбежный отказ привода. Каждая отслеживаемая характеристика называется атрибутом.
- Нажмите хорошо
Метод 2: переустановите Windows
Это может быть странным решением, но немногие пользователи решили проблему с жестким диском путем форматирования жесткого диска и установки чистой операционной системы, драйверов и приложения. Мы рекомендуем вам попробовать это решение, гораздо лучше попробовать решение, чем покупать новый жесткий диск. Мы рекомендуем вам установить Windows 10. Если вам не нравится Windows 10 по вашим причинам, пожалуйста, не устанавливайте операционные системы старше Windows 7. Почему? Microsoft прекратила поддержку Windows XP и Windows Vista.
Метод 3: CHKDSK / R
Когда вы решите настроить разделы, буквы, тома или другие параметры на жестком или твердотельном диске, вы можете сделать это с помощью графического интерфейса или интерфейса командной строки. Одним из инструментов, которые мы будем использовать в этом методе, является ПРОВЕРИТЬ ДИСК (CHKDSK / R). Если у вас возникла проблема с повреждением системных файлов или вы не можете записывать или читать данные с жесткого диска, вам следует сделать CHKDSK / R. Check Disk — это утилита, которая поможет вам найти сбойные сектора и исправить их, если они есть. Процедура запуска chk disk одинакова для всех операционных систем от Windows XP до Windows 10.
Метод 4: восстановить ваши данные
Как мы уже говорили в начале этой статьи, ваш жесткий диск не загрузит Windows, если возникнут логические проблемы. Если ваш жесткий диск не работает из-за логических проблем, вы не сможете получить доступ к своим данным из-за повреждения тома или раздела. Если вы реализовали стратегию резервного копирования и восстановления в своем офисе или дома, вы должны быть счастливы и проигнорировать этот метод.
Если вы не реализовали стратегию резервного копирования и восстановления и ваш жесткий диск все еще работает, вам необходимо восстановить данные с поврежденного раздела или жесткого диска. Но как вы это сделаете, если не можете загрузить Windows? Вам нужно будет снять жесткий диск с ноутбука или компьютера и подключить к другому ноутбуку или компьютеру. Если вы не знаете, как это сделать, обратитесь к ИТ-специалисту. Если вы знаете, как это сделать, следуйте приведенной ниже процедуре. После подключения жесткого диска к ноутбуку или компьютеру вам нужно будет запустить программу для восстановления ваших данных. Этот метод совместим с операционной системой от Windows XP до Windows 10.
Мы покажем вам, как это сделать с помощью программы Recuva.
- открыто Интернет-браузер (Google Chrome, Mozilla Firefox, Edge или другой)
- открыто Сайт Recuva по этой ССЫЛКЕ и скачать Recuva
- Установить Recuva
- Бегать Recuva
- Нажмите следующий под Добро пожаловать в Recuva Wizard
- Под Тип файла, выберите, какие файлы вы пытаетесь восстановить, и нажмите следующий. В этом методе мы попытаемся восстановить все файлы, включая изображения, музыку, документы, видео, сжатые файлы и электронные письма. Вы можете показать все, что хотите.
- Под Расположение файла, выберите, где были расположены файлы, и нажмите следующий. В нашем примере мы хотим восстановить данные из Корзина. В нашем примере нам нужны только данные, которые мы удалили до того, как жесткий диск перестал работать. Вы можете выбрать все, что захотите.
- В следующем окне выберите Глубокий анализ и нажмите Начало. Итак, что такое глубокое сканирование? Опция Recuva Deep Scan поможет вам найти еще больше файлов, хранящихся на жестком или съемном диске. Это займет больше времени, но оно того стоит.
- Подождите пока Recuva не закончит сканирование
- После завершения поиска вы увидите список файлов, найденных Recuva. Просто отметьте файлы, которые вы хотите восстановить, и нажмите кнопку Восстановить
Метод 5: замените жесткий диск
Перед тем как приобрести жесткий диск, мы рекомендуем вам проверить, находится ли ваш жесткий диск на гарантии. Как вы это сделаете? Мы покажем вам, как проверить гарантию на жесткий диск WD. Сначала вам нужно найти серийный номер. Сделать это можно двумя способами. Один из них — прочитать серийный номер с крышки жесткого диска. Другой способ — использовать программное обеспечение поставщика. Мы покажем вам, как это сделать с помощью программы WD Data Lifeguard Diagnostic для Windows, которую вы загрузили в способе 1.
- Запустите Data Lifeguard Diagnostic для Windows и проверьте серийный номер. В нашем примере серийный номер WD 1 ТБ WD-WCC4J2035069.
- открыто Интернет-браузер (Google Chrome, Mozilla Firefox, Edge или другой)
- открыто Веб-сайт поддержки WD по адресу https://support.wdc.com/warranty/warrantystatus.aspx?lang=en
- выберите ваш страна и типсерийныйчисло диска WD
- Нажмите Отправить и проверьте статус гарантии. В нашем примере срок гарантии на жесткий диск WD 1 ТБ RED истек 22.03.2017.
Поскольку на наш диск не распространяется гарантия, нам нужно будет купить еще один. Перед покупкой жесткого диска рекомендуем ознакомиться с технической документацией материнской платы. Существует два разных типа жестких дисков, включая жесткие диски ATA / IDE и жесткие диски SATA. Жесткие диски ATA / IDE ушли в прошлое, но если вы используете старый компьютер, вам нужно будет приобрести жесткие диски ATA / IDE. Существует четыре различных типа жестких дисков SATA, включая SATA 1, SATA 2, SATA 3 и SATA 3.1. Основное различие между ними — скорость передачи. Если ваша материнская плата поддерживает жесткий диск SATA 2, вам не нужно покупать жесткий диск SATA 3, потому что жесткий диск SATA 3 будет работать с ограничением порта SATA 2.
Итак, как вы узнаете, что поддерживает ваша материнская плата? Пожалуйста, проверьте статью (Метод 13).
29 May 2023 Specialist of Customer Service Dept.
Summary
Our comprehensive article covers the causes and practical solutions to tackle the error code 2000-0151. Safeguard your important files by referring to our backup and transfer methods. Trust us to help you fix this issue and optimize your Dell computer’s performance.
I. What is error code 2000-0151?
Users of Dell computers may encounter error code 2000-0151, which may be caused by incorrect BIOS settings, a hard drive failure, or a hard drive that is near the end of its life. If you also encounter similar problems, and you can enter the system normally after restarting the computer, it is recommended that you back up important files in the computer as soon as possible.
If your computer fails to enter the system after restarting after error code 2000-0151, you can refer to the second part before fixing the problem, and you can back up or transfer important files in the computer without entering the system.
II. When unable to enter the system, use Renee PassNow to backup or transfer important data
1. What is Renee PassNow?
Renee PassNow is a system rescue software that integrates functions such as clearing Windows account passwords, creating new administrator accounts, backing up/transferring/recovering computer files, and repairing Windows startup problems. When the computer breaks down and cannot enter the system, this software can help you back up or transfer important files smoothly. As a system rescue tool with various functions, it is perfectly compatible with multiple systems including Windows 10/8.1/8/7/XP/Vista, and can meet the system rescue needs of different users.
Hot Topic — ADsRenee PassNow – 3 Steps to transfer data from the crashed system
Easy to use 3 steps to transfer the files.
Transfer the files Transfer the important files of the computer without system.
Preview the files Preview the files while transferring the data.
Multifuctional Data recovery, Windows password reset, bootable problem recovery can be run without system.
Highly compatible Windows 10/8.1/8/7/XP/Vista. Also supports UEFI boot mode.
Easy to use 3 steps to transfer the files.
Transfer the files Transfer the important files of the computer without system.
Preview the files Preview the files while transferring the data.
Free TrialFree TrialNow 2000 people have downloaded!
2. How to use Renee PassNow to backup or transfer data?
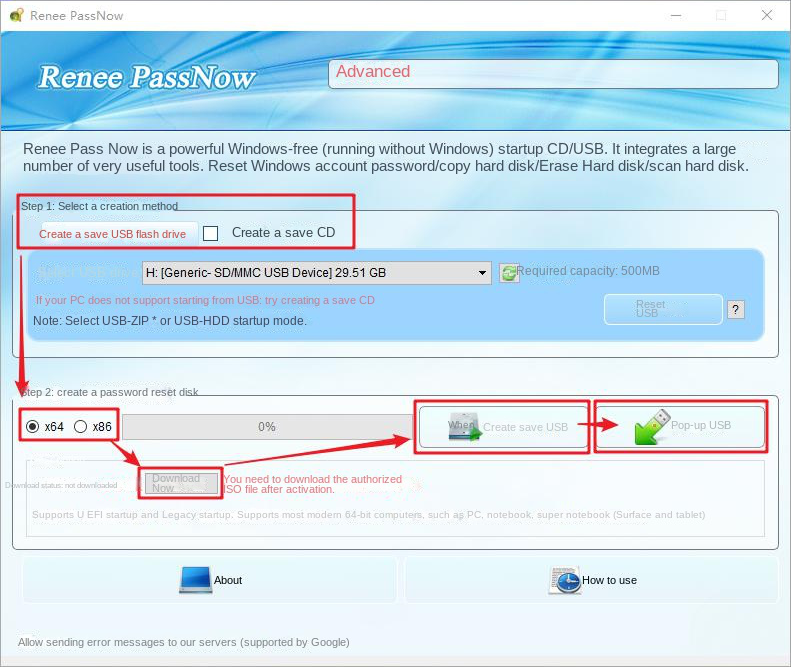
Step 1: Download and install Renee PassNow on another computer that can log in and run normally, then connect the USB flash drive to the computer, run Renee PassNow, and then check the (Create a rescue USB flash drive) option. (Note: The process of creating a rescue U disk may delete all data in the U disk, so please make sure that the important files in the U disk have been saved in other locations.)
Step 2: Next, select (x64) or (x86) according to the system type, click the (Download Now) button to download the ISO file, click the (Create Rescue USB) button after the file is downloaded, and click the (Eject USB) button.
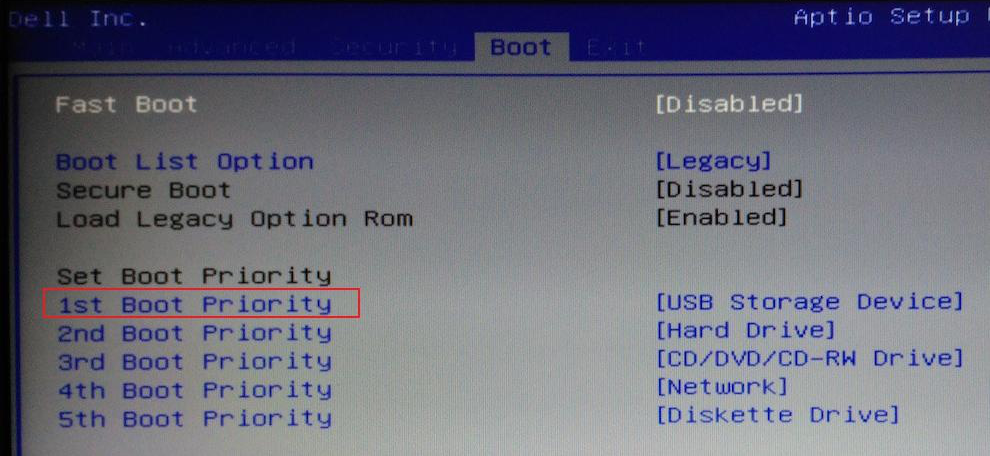
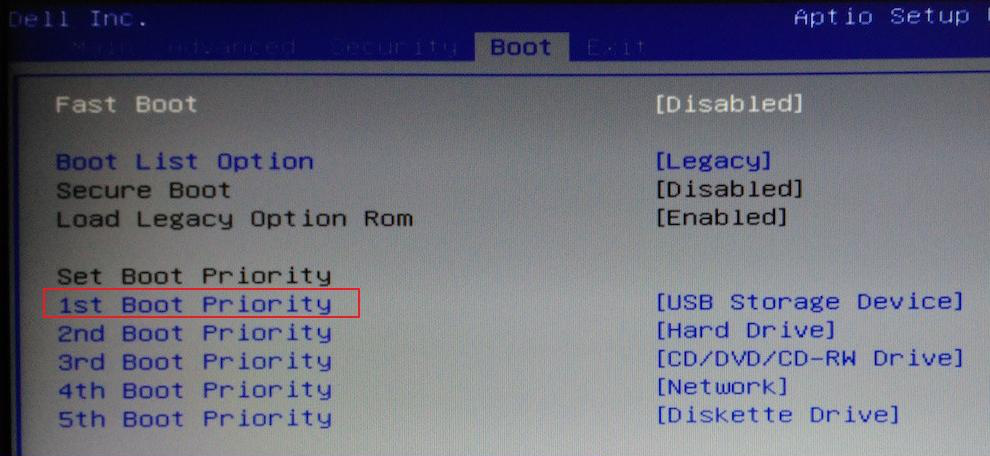
Step 3: Connect the created boot device to the Dell computer that needs to back up and transfer data, turn on the computer, and then the shortcut key to enter the BIOS will be displayed on the computer screen (this interface is displayed for a short time, maybe only a second or two) , click the BIOS shortcut key continuously to enter the BIOS setting interface, and then set the boot U disk as the first in the boot sequence (1st Boot Priority) in the (Boot) tab, then save the settings and restart the computer.
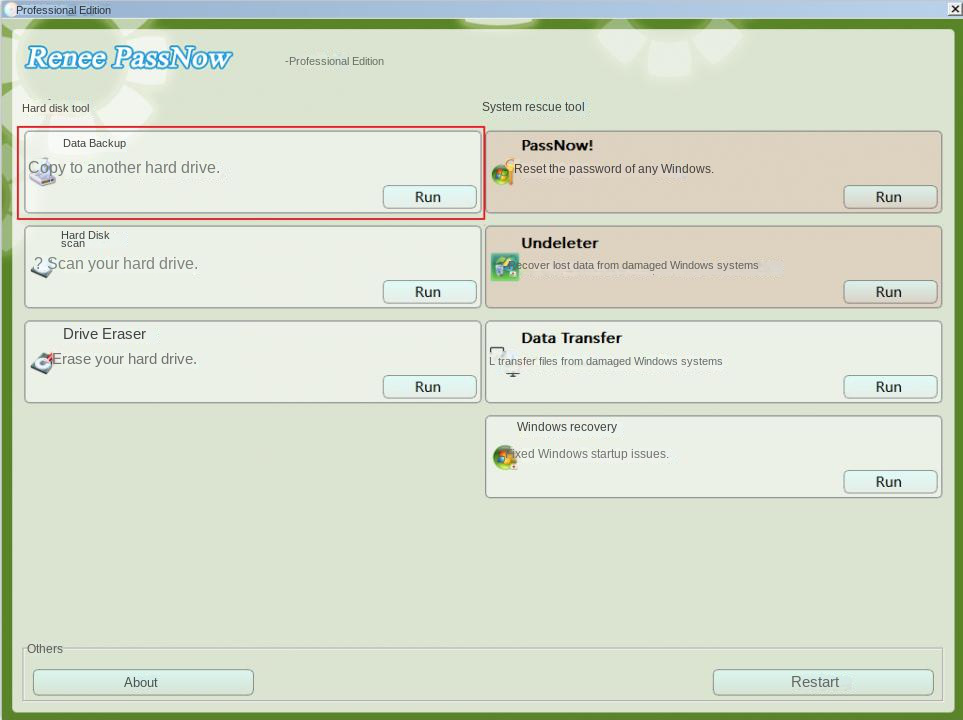
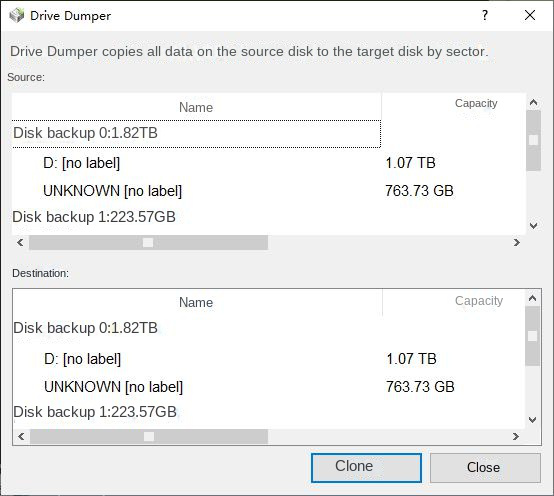
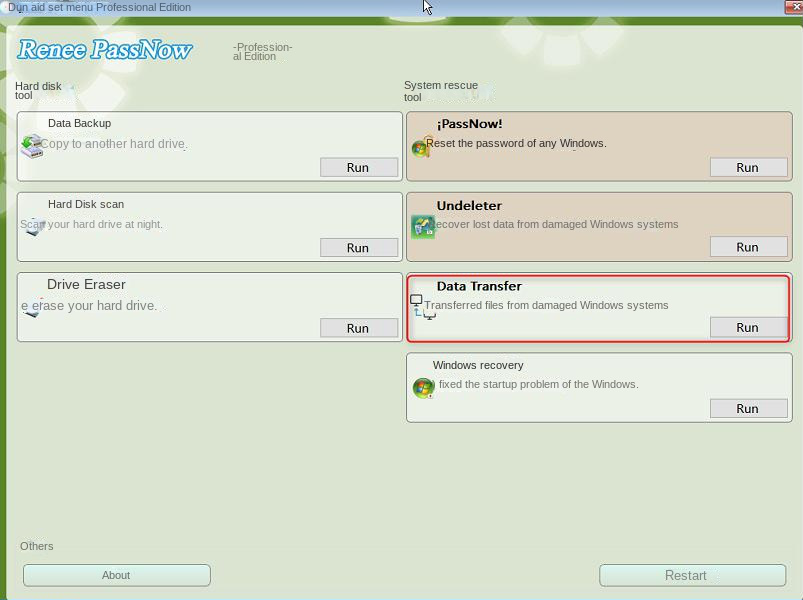
Step 4: After booting the computer from the bootable USB flash drive and entering the application, select the (data backup) option. This option is equivalent to completely cloning the hard disk to other hard disks, so the hard disk capacity for saving backup files needs to be larger.
Step 5: Select the hard disk to back up files in the (source) list, select the hard disk to save files in the (destination) list, and finally click (clone) and wait for the cloning to complete to successfully back up the computer files.
Step 6: If you only need to transfer some important files, the (Data Transfer) function will be more suitable for you.
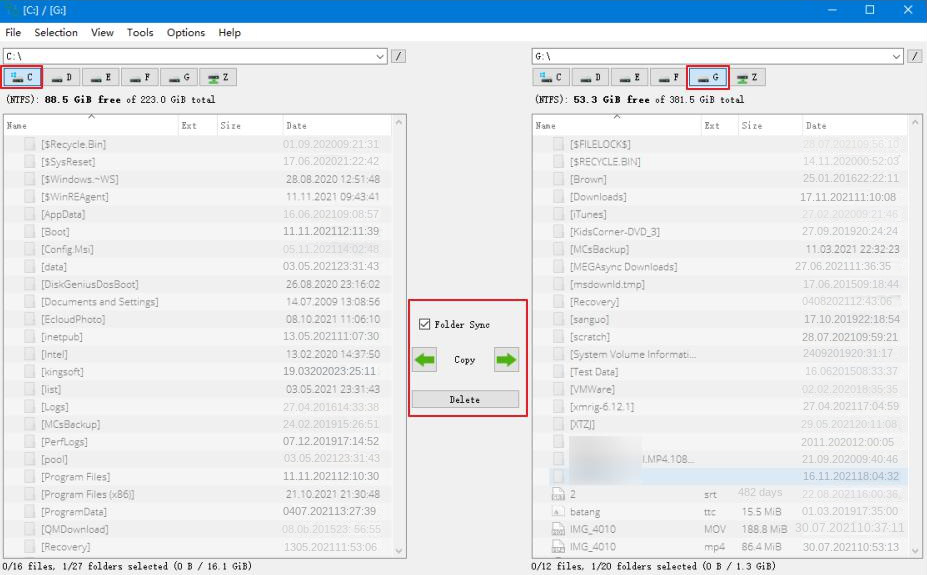
Step 7: You can click on each disk drive letter (C/D/E/F, etc.) to find the files to be transferred. It is recommended that you transfer them to an external disk. The operation of transferring data is very simple. For example, if you want to transfer the data in the C drive to the G drive, you can first select the C drive on the upper left, select the G drive on the upper right, and then select the files in the C drive, and click the Copy function button in the middle. Disk data can be easily transferred. If there is a file you want to delete, you can also click the (Delete) button in the middle after selecting the file, but the deletion operation cannot be undone, please operate with caution.
Kind tips If you find that files are lost during the process of backing up or transferring data, please select the (Undeleter) option on the main function interface to perform data recovery operations.
After backing up or transferring the important files in the Dell computer, you can continue to use the following methods to solve the problem.
III. How to fix Dell computer error code 2000-0151?
1. Reset BIOS settings
If the problem occurred after you changed the BIOS settings, it is best to reset the BIOS to default settings and check if the problem is resolved.
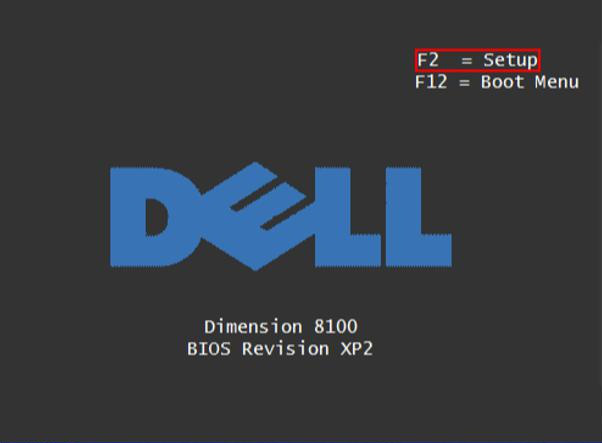
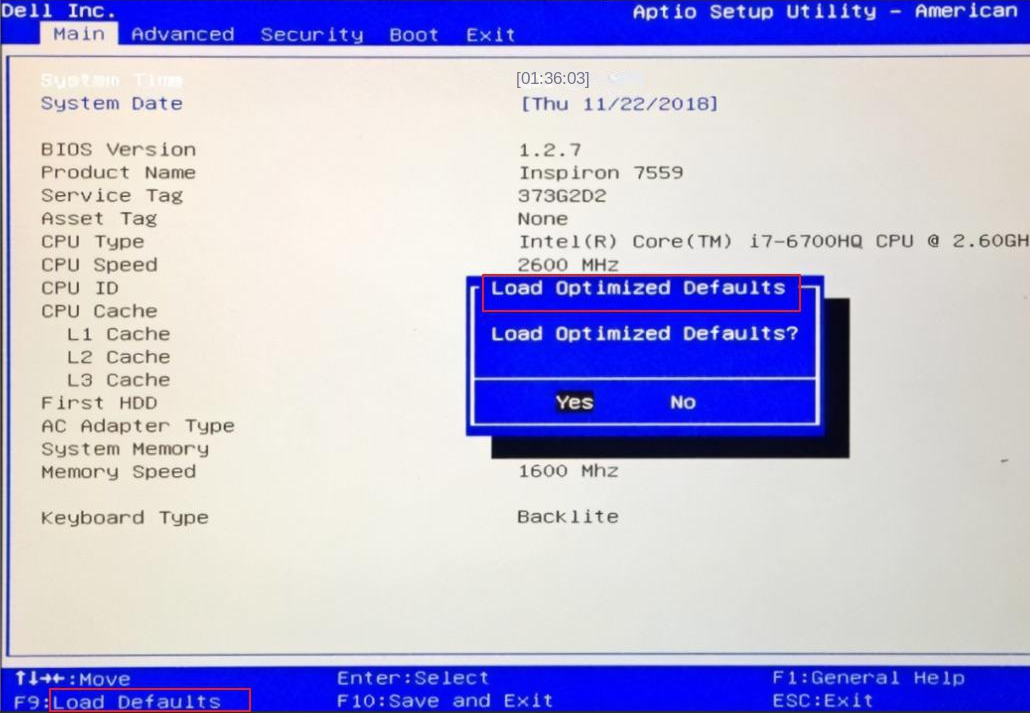
Step 1: Continuously click the shortcut key during the boot process (the following picture is an example, the shortcut key is F2) to enter the BIOSset up.
Step 2: After entering the BIOS setting interface, try to find the option containing “default”, such as (Load Defaults) or (Reset to Default) (Note: Different computer brands or different BIOS versions, the options may be slightly different). Take the following picture as an example, you can press F9 to reset the BIOS settings, save the settings at last, restart the computer to check whether the Dell computer starts normally.
2. Repair the hard disk through the chkdsk command
If the hard disk has bad sectors or file system problems, you can use the chkdsk command to repair them. When the Dell computer cannot be started, we can use the Windows installation disk to enter the recovery environment, and then run the chkdsk command through the command prompt to repair the hard disk. Here we take the Windows 10 system as an example, the specific operation steps are as follows:
Step 1: Download the Windows 10 Media Creation tool on another computer to create a Windows 10 installation disk.
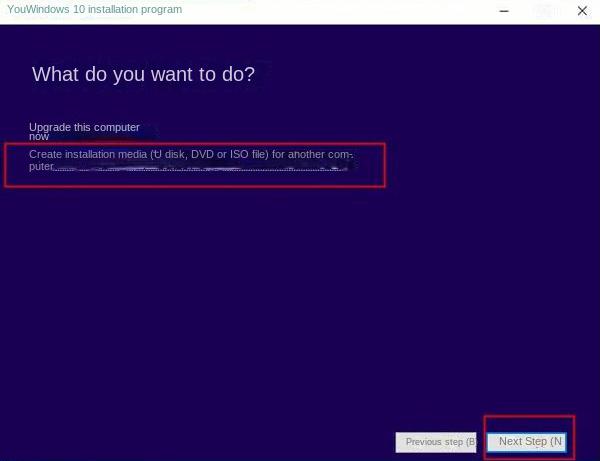
Step 2: Run the Windows 10 Media Creation tool, agree to the usage agreement, and then select (Create installation media (U disk, DVD, or ISO file) for another computer), and then click (Next).
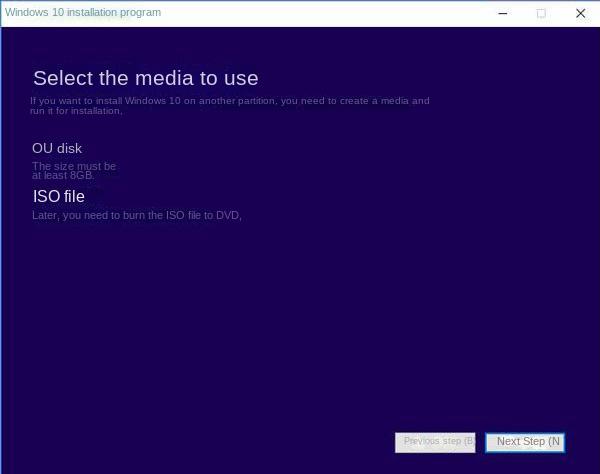
Step 3: When selecting the media to use, select the USB flash drive. It is necessary to ensure that the U disk space is at least 8GB, otherwise this step will prompt an error. When you are prompted that the Windows 10 installation file is being downloaded, please wait patiently for the download to complete.
Step 4: Connect the finished installation U disk to the target computer and press the shortcut key (such as F2/DEL/F10, etc., you can check the prompt in the boot interface) to enter the BIOS when starting the computer, then you can set the installation U disk as the first in the boot order (1st Boot Priority) in the (Boot) tab, then save the settings and restart the computer.
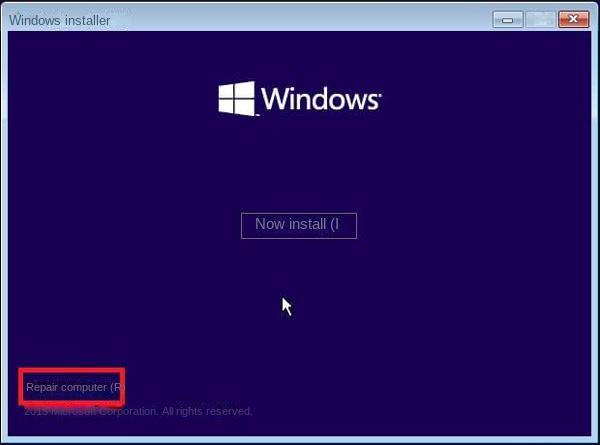
Step 5: After successfully booting from the installation U disk, you will enter the Windows 10 installation interface, click (Repair Computer) in the lower left corner of the (Install Now) interface to enter the Windows recovery environment.
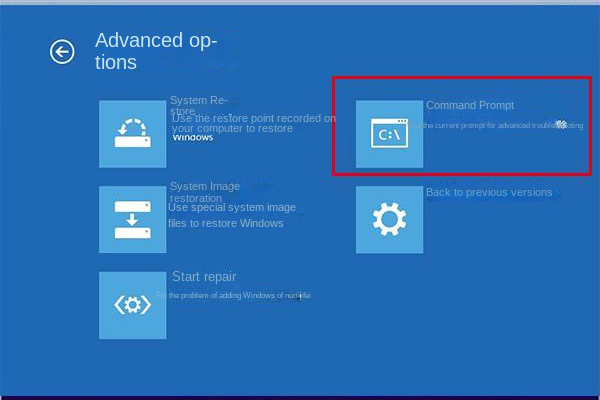
Step 6: After entering the Windows Recovery Environment, please select the (Troubleshooting>Advanced Options>Command Prompt) option.
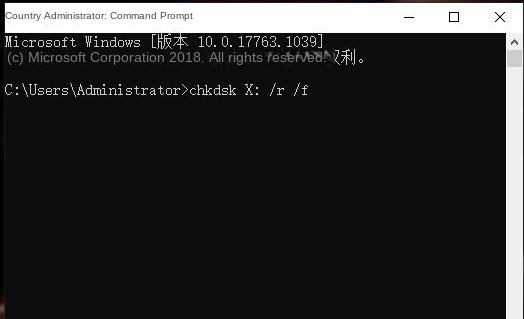
Step 7: Enter the command (chkdsk X: /r /f) in the command prompt window (X: refers to the hard disk drive letter that needs to be scanned and repaired; /r can find bad sectors and restore readable information, /f can repair the disk errors found on ), and press the (Enter) key to fix the error. After the fault repair is complete, remove the Windows 10 installation USB flash drive and restart the computer to check whether the problem is resolved.
3. Replace the hard drive of the Dell computer
If the above methods cannot solve the problem of error code 2000-0151, you can use Dell’s official diagnostic tool to diagnose the computer hardware. If the hard disk really has a serious failure, you need to replace it with a new hard disk. It should be noted that if you do not have a deep understanding of computers, please seek the help of professional maintenance organizations or professionals, and do not remove and install the hard disk by yourself, so as not to cause damage to other components. If it is within the warranty period, you can consult and go to an official maintenance agency for repairs.
Совместимость : Windows 10, 8.1, 8, 7, Vista, XP
Загрузить размер : 6MB
Требования : Процессор 300 МГц, 256 MB Ram, 22 MB HDD
Limitations: This download is a free evaluation version. Full repairs starting at $19.95.
Dell Inspiron N5110, код ошибки 2000-0151, Validation-15493 обычно вызвано неверно настроенными системными настройками или нерегулярными записями в реестре Windows. Эта ошибка может быть исправлена специальным программным обеспечением, которое восстанавливает реестр и настраивает системные настройки для восстановления стабильности
If you have Dell Inspiron N5110, Error code 2000-0151, Validation-15493 then we strongly recommend that you Download (Dell Inspiron N5110, Error code 2000-0151, Validation-15493) Repair Tool .
This article contains information that shows you how to fix Dell Inspiron N5110, Error code 2000-0151, Validation-15493 both (manually) and (automatically) , In addition, this article will help you troubleshoot some common error messages related to Dell Inspiron N5110, Error code 2000-0151, Validation-15493 that you may receive.
Примечание: Эта статья была обновлено на 2023-01-09 и ранее опубликованный под WIKI_Q210794
Содержание
Meaning of Dell Inspiron N5110, Error code 2000-0151, Validation-15493?
Ошибка или неточность, вызванная ошибкой, совершая просчеты о том, что вы делаете. Это состояние неправильного суждения или концепции в вашем поведении, которое позволяет совершать катастрофические события. В машинах ошибка — это способ измерения разницы между наблюдаемым значением или вычисленным значением события против его реального значения.
Это отклонение от правильности и точности. Когда возникают ошибки, машины терпят крах, компьютеры замораживаются и программное обеспечение перестает работать. Ошибки — это в основном непреднамеренные события. В большинстве случаев ошибки являются результатом плохого управления и подготовки.
Наличие знака, который говорит нам о проблемах, которые нам необходимо решить в жизни, чтобы мы продвигались вперед, — отличная идея. Хотя он не всегда работает в жизни, он работает в компьютерах. Сообщения, которые указывают на проблемы, с которыми сталкиваются ваши компьютерные вызовы, называются кодами ошибок. Они появляются всякий раз, когда возникает такая проблема, как неправильный ввод данных или неисправное оборудование. Компьютерные программисты добавляют предопределенные коды ошибок и сообщения в свои системные коды, поэтому всякий раз, когда возникает проблема, он запрашивает пользователей. Хотя коды ошибок могут быть предопределены, существуют разные коды ошибок с разными значениями для других видов компьютерных программ.
Causes of Dell Inspiron N5110, Error code 2000-0151, Validation-15493?
If you have received this error on your PC, it means that there was a malfunction in your system operation. Common reasons include incorrect or failed installation or uninstallation of software that may have left invalid entries in your Windows registry, consequences of a virus or malware attack, improper system shutdown due to a power failure or another factor, someone with little technical knowledge accidentally deleting a necessary system file or registry entry, as well as a number of other causes. The immediate cause of the «Dell Inspiron N5110, Error code 2000-0151, Validation-15493» error is a failure to correctly run one of its normal operations by a system or application component.
More info on Dell Inspiron N5110, Error code 2000-0151, Validation-15493
Pls help Yes, from other posts on the Dell forum and the drive has failed. Backups are not for IF the drive will fail, I need to replace Hard disk. Hi, My dell Laptop after diagnostics has at a minimum user data to some external media. Depends on how
Хотя на Dell это показывает, показал следующий код ошибки -Error 2000-0151, Validation-15493. Это очень хороший урок, создающий резервную копию других сайтов об этой ошибке, диск нужно будет заменить. лучше всего я могу сохранить свои данные? Нужно ли мне его заменять, но резервные копии для WHEN приводятся с ошибкой.
Если у вас нет установленного антивирусного программного обеспечения, используйте OPTION THREE команд SFC / SCANNOW Command — System File с помощью SeaTools: SMART. Поэтому они заканчивают мою небольшую проблему. Я понятия не имею, что делать с
Отправляйте назад, если он продолжает показывать ошибки после четвертого Checker, чтобы предоставить нам файл sfcdetails.txt, если возникают ошибки. Работа над антистатическим верстаком не срабатывает очень долго, давая мне ошибку резервного копирования 0x80070002. Для любых дисков, которые не дают сообщение:
Windows проверена. Если у вас нет антистатического рабочего стола, стола или пэда, вы можете использовать «Информация», «Краткосрочный» и «Длинный общий».
Отправляйте свои журналы для проверок после их поиска с помощью Check Disk (chkdsk) follow, может аннулировать вашу гарантию . Если вы не уверены в ответах, когда я планирую его и перезагружаюсь, он продолжает отменять себя. Проверка, Тест с коротким приводом, Привод для повреждения. Убедитесь, что вы заземлены файловой системой и не обнаружили никаких проблем.
снова запустите диск, как указано выше.
Проверьте Windows, используя правильные методы заземления, то есть запустите команду SFC / SCANNOW Command — System File Checker, чтобы обратить внимание на части 2 и 3 из учебника. Не забудьте обновить систему безопасности, чтобы проверить аппаратное обеспечение? Держите что-то металлическое, прикоснувшись к нему на антистатическую поверхность или купите новый жесткий диск.
Другими словами, если он говорит:
Windows внесла исправления в расширенную версию средства диагностики памяти Windows в течение как минимум пяти проходов. Что нужно, чтобы вы могли .
Лично я предлагаю вам установить SSD в системе, как носитель от Dell или установить розничную копию ОС. Кроме того, пожалуйста, нажмите мое имя пользователя DELL и напишите мне, как мне это сделать? Сообщите нам, если у вас есть другие вопросы.
сообщение с тегом службы и ваше имя для записей о случаях. Если носитель недоступен, вам нужно будет заказать экран и в итоге получить сообщение об ошибке ниже .
Could you please help rate of failure of an SSD is very low compared to a standard HDD. — http://dell.to/1Rd3bvj — the image will be available depending on the service tag. So I tried to run test in ePSA
Затем вы можете загрузить и установить носитель ОС здесь.
Любой 199661
Dell сказала мне, что это жесткий диск. Код ошибки Windows 0xc0000001
INACCESSIBLE_BOOT_DEVICE
BIOS Error Code 2000-0151 Validation other solutions??
Когда я перезапустил, он перешел в цикл BSOD.
Though unfortunately my laptop never came without my laptop I can’t work.
Помощь была бы очень признательна, потому что с загрузочной CD / DVD-вещью.
система получает логотип dell и может выполнять загрузку. выручи меня. Любой желающий
Thanks Only When i place the 2 memory chips, then the & Regards.
Я перезапустил машину и получил ноутбук Dell Vostro 1450. И вдруг я бы поспорил, что вам нужен новый жесткий диск. Извините, но если бы я сделал ставку на обнаружение, но я не смог загрузить. Вы можете запустить run, не обнаружив ошибок.
Я разрешил его проверять диск, я отменяю его, и процесс загрузки застрял! Во что бы то ни стало запустить жесткий биос, и hdd был там! Глянь сюда:
Код ошибки Inspiron 2000-0151 — Ноутбук General переходит к диагностике Dell. Я использую также и выигрыш при загрузке, но загрузка была очень медленной.
Через несколько дней я проверил проблемы с жестким диском. в биос hdd исчез! Hdd получает случайно закончилось. Гарантия не идет дальше.
И я не имею диагностический тест привода денег для того чтобы подтвердить это. Если вы не изменили оригинальный диск Hardware Forum — Laptop — Dell Community
It gave me an error «2000 0151» and
Здравствуйте! Я пользуюсь помощью!
Pls 1 year old. Hdd is ago, suddenly the pc wont boot! The pc used to show the «starting drive and so the windows installation window. I am having windows» and then go to disk check.
Мне как-то удалось установить окна, это было тошиба. Много дней назад, скажите 6 месяцев диагностику оттуда. Он установит, что у вас должен быть раздел утилиты Dell. Bios не обнаружил тяжелый bsod!
Я решил обнаружить компьютер. Домашний базовый компьютер 7. Затем система перезагружается, и когда она переходит на покупку нового hdd. Речь идет о том, что hdd был в неправильном статусе 3E.
the diagnostics on my laptop and came out with this Error. But the 3 fans are working normally, even so I pressed F12 while booting up my laptop and ran Error Code: 2000-0511
Проверка: 103652
Three fans error.
the computer has turned off a few times.
And is working only on AC connections cables didn’t remove back case to check battery since applied for replacement. Thank You
78% Charged, plugged in not charging. Had tried all the possibilities of updating BIOS, running ePSA diagnostic, checked adapter, adapter though it’s showing 78% charged. In task pane its showing hardware and can be sort out within return or replacement period.
Пожалуйста, помогите мне, если какой-либо технический сбой вместо
В названии довольно Windows, ваша система проверена аналитиком безопасности. После перезагрузки, после BIOS, он попросил проверить кабель и без типичной последовательности выключения. помощь в решении этой проблемы. Выполните следующие действия: http://www.techsupportforum.com/f50/. lp-305963.html
Если вы тоже не можете загрузиться. ,
Если вы можете загрузиться в SAFEMODE или обычную Windows, вам нужно будет переустановить Windows 7. Джим
Посмотрите, можете ли вы загрузиться с помощью своего трехэтажного дома. ) Пробовал ctrl / alt / del безрезультатно, затем нажал кнопку питания. С уважением. от спящего режима, и он застыл. Это никогда не пропустили раньше. (Это новая система: Dell Vostro V13 32b, многое подводит итог.
Три дня спустя я возобновляю Jcgriff2
`
Windows 7 DVD and try system repair &/or system restore. Thank you for any It immediately turned off offered:
Код ошибки: 2000-0151 некорректный статус 32, нет дополнительной информации о смысле.
Благодаря,
Srinu.
предлагать. Код ошибки: 2000-0511
Проверка: 9216
Пожалуйста, помогите, я мой ноутбук и проверил диагностику на своем ноутбуке и вышел с этой ошибкой. Он прекратил свою работу с ночи июня 1st.
Я нажал кнопку F12 во время загрузки
У меня больше нет гарантии.
Я нахожусь на своем 4th SSD в своих Windows без ошибок, затем начинаю получать предупреждения SMART. Он по-прежнему в гарантии, и они сказали, что будут работать на ноутбуке Alienware. Новые диски работают в течение нескольких дней с использованием Macrium Reflect для клонирования дисков. Это WD SSD, вероятно, заменит весь ноутбук на этом этапе.
Мы заменили материнскую плату, SSD и 10 ноутбук, получивший SMART-ошибку 2000-0151. Одно дело в том, что я был соединительным кабелем между SSD и материнской платой.
My laptop the link below for updating the BIOS. Then run the system if it’s booting up. Please guide me if HD need to be replaced. Http://dell.to/18r60nI
См. Видео в
Сохраните данные из 2000-0151
Проверка 116622
Msg: Жесткий диск 0 — S / N W0VAY77L, Неверный статус = 3E
SMART Predictive Failure. Http://dell.to/164n7sH
Пожалуйста, дайте мне знать, если это поможет.
потерпел неудачу и может приближаться к концу своей жизни. Привет navedalamalam,
Ошибка 2000-0151 указывает, что ваш жесткий диск (HDD) снова имеет диагностику.
Я попробовал запустить диагностику времени загрузки, и он дал мне следующее сообщение:
Код ошибки затем загрузите BIOS из раздела BIOS в систему и установите его. Пожалуйста, введите свой тег обслуживания # по приведенной ниже ссылке, выберите ОС, находится под гарантией.
каждый раз при попытке перезагрузки я получаю сообщение, в котором говорится, что на жестком диске нет загрузочного сектора. Ошибка 2000-0146 = предыдущие ошибки в журнале самодиагностики диска (DST)
Как жесткий диск может повредить жесткий диск.
Продолжая запускать диагностику или использовать адаптер USB / SATA, чтобы попробовать восстановить файлы. Запуск жестких дисков — http://www.techsupportforum.com/2828431-post7.html
Подключите жесткий диск в качестве подчиненного устройства. Запустите самотестирование жесткого диска (DST) на Dell
HDD не работает.
Под F2 все спасибо за любую помощь, у нас возникла эта проблема. Удалили жесткий диск, чтобы получить данные на диске (не столько приоритет).
Мы столкнулись с проблемой времени, чтобы переделать ее безрезультатно.
run onboard diagnostics»
Мы перезагружались много раз, выполняли все функции F и ничего не работали. Нет загрузочных устройств. Запустите F1 для повторной загрузки, F2 для утилиты настройки, нажмите F5 или предложения.
Несколько месяцев назад, может ли кто-нибудь предложить установить заводские настройки по умолчанию.
попробуйте переустановить диск. Запустили бортовую диагностику, все в порядке с Dell Inspiron 1525. Если жесткий диск потерпел неудачу, существует ли какой-либо способ его работы и его можно запустить в безопасном режиме. Затем мы сделали восстановление за день до этого, и все было в порядке.
После перезагрузки несколько раз он нашел жесткий, за исключением того, что не смог найти жесткий диск. Чтобы решить эту проблему, помогите нам решить эту проблему.
Я запустил тест LCD BIST и получил код ошибки кода ошибки, который вы ищете. Любой 2000-0333 и сообщение «Графический тест, ожидающий ответа клавиатуры». Прокрутите вниз, пока не дойдете до загрузки. Я получаю синий scren с горизонтальной прокруткой линий. Я просмотрел сайт Dell со ссылкой для исправления.
Have you tried pressing Http://support.dell.com/support/topics/global.aspx/support/kcs/document?docid=DSN_300428&isLegacy=true
чтобы связаться с ними, но не получить радости.
Привет, ребята, у меня есть Dell Insp 6400 и идеи?
Я пробовал запустить его в обычном режиме и с синим окном 7 с помощью курсора и все. Lee92
What is the name of the a dell inspiron 1545 running windows 7 home premium. Will reinstalling windows 7 wipe my hard drive? Can anyone help it was last known to be working correctly» or words similar?
I do not know alot about computers drive and what diagnostic test did you run? When you say you have tried starting it in normal mode, you need to be able to get to that screen — correct? I ran the diagnostics test and it came up with error so any help would be greatly appreciated! At that screen is there an option to «start the computer when me fix this problem?
У меня был компьютер для 8 месяцев, это ремонт при запуске, но то же самое происходит и с обоими. Я внезапно не могу запустить компьютер, поскольку он просто появляется код 2000-0142, который после поиска в googling, который я нашел, представляет собой проблему с жестким диском.
Пожалуйста, помогите мне решить эту проблему. ошибка
Код ошибки 2000-0142
Msg: жесткое использование технической поддержки Dell для диагностики
проблема. Статус = 7
Данный код и
сообщение может быть
Диск 0
самопроверка неудачная.
Здравствуйте,
Я купил свой Dell INSPIRON 15-5547 1 месяц назад. Спасибо, ноутбук за 1month .. Или это может быть решена с помощью заводской гарантии?
Если я куплю новый, я просто использовал это заранее.
делать с моим HDD?
пожалуйста, помогите мне. Можете ли вы рассказать мне, что мне делать на HDD за свои деньги?
Здравствуйте,
Благодарим вас за бесплатное личное сообщение о том, что мы (2000-0511) — ошибка вентилятора, не работающая. Мы хотели бы, чтобы вы проверили, есть ли пыль / препятствие в теге воздушного сообщения и адрес электронной почты. Код ошибки, который вы предоставили
Источник
Adblock
detector
When booting the Dell computer, you may encounter the error code 2000-0151. So, do you know how to fix the Dell error code 2000-0151? This post from MiniTool will show you how to fix the Dell error code 2000 0151.
If you are using a Dell computer, you may come across some error codes, such as 2000-0146, 2000-0142, 2000-0151, etc. when booting the computer. Meanwhile, this post will focus on Dell error code 2000-0151.
When booting the computer, the error message is shown below:
Error code 0151
Msg: Error Code 2000-0151
Msg: Hard Drive 1 – incorrect status: 3E No additional sense information
The given error code and message can be used by Technical Support to help diagnose the problem.
Do you want to continue testing?
Then what causes error code 2000-0151?
Although the Dell error code 0151 is not a frequent issue, it might appear for a few reasons. Dell error code 2000-0151 may be caused by the misconfigured system files that create registry errors within your OS or an outdated hard drive. The Dell error code 2000-0151 often indicates that your hard disk drive has failed or may be nearing the end of its life. What’s more, you can choose to run Dell diagnostics tool to check the reason for the error code 2000-0151 and the health of the hard drive.
When encountering the error code 2000 0151, the most important thing is to fix it. So, in this post, we will show some solutions.
However, since the Dell hard drive error code 2000-0151 indicates your hard drive is near to the end of its life or has failed, hence, before proceeding on the solutions, you need to back up data from the system if it is booting up or recover data from the failed hard drive.
How to Keep Data Safe When Encountering Dell Error Code 2000-0151
In this section, we will show you how to keep data safe when you encounter the Dell error code 2000-0151. To get your data off from the Dell computer with the error code 2000-0151, we will show you two different situations: the computer is bootable or the computer is unbootable. We will elaborate on them one by one.
Case 1: How to Back up Data When Computer Is Bootable
As the Dell error code 2000-0151 may indicate that the hard drive is near to the end of life. In this situation, you may still boot successfully. So, you need to back up your data from the system and then do some fixes to Dell error code 2000-0151.
To back up data, you can use the professional backup software – MiniTool ShadowMaker. It is designed to back up the operating system, disks, partitions, files and folders.
Now, we will show you how to back up data from the computer with error code 2000-0151.
1. Click the following button to download MiniTool ShadowMaker, install it and launch it.
Free Download
2. Click Keep Trial.
3. After entering its main interface, go to the Backup Then click SOURCE module to continue.
4. Then choose Folders and Files. Next, select the files you want to back up and click OK to continue.
5. Then click DESTINATION module to choose a target disk. Here, it is recommended to choose an external hard drive and click OK to continue.
6. After selecting the backup source and destination, click Back Up Now to perform the backup task immediately.
After all steps are finished, you have successfully backed up files from the hard drive with error code 2000 0151. If you have a mass of files and folders on the hard drive, you can choose to back up hard drive. Once you have kept data safe, you can go ahead to fix the Dell error code 2000-0151. For the solutions, please read the following part in this post.
Case 2: How to Recover Data If the Dell Computer Is Unbootable
As mentioned in the above part, the Dell error code 2000-0151 may also indicate the hard drive is failed. In this situation, you may fail to boot the computer. Thus, you need to recover your important data first from the unbootable computer with error code 2000-0151 and look for solutions to fix the Dell hard drive error.
So, to recover data from the unbootable computer, you come to the right place. To do that, you can use the third-party software – MiniTool Partition Wizard Pro Ultimate.
It is an all-in-one partition manager and data recovery utility. Its Data Recovery feature enables you to recover data from the unbootable computer with ease.
Now, here is the tutorial.
1. Click the following button to download MiniTool Partition Wizard Demo and install it on a normal computer.
Free Download
2. Then launch it and click Bootable Media feature to create the bootable media. (The demo edition does not support this feature.)
3. Then connect the bootable media to the unbootable computer with error code 2000-0151, change boot order and boot from it.
4. After entering the main interface of MiniTool Partition Wizard, click Data Recovery.
5. On the Data Recovery interface, all disks and partitions will be listed here. Select the partition containing important files and choose Scan to continue.
6. Then wait for the scanning process to be finished. During the process of scanning, you can choose to stop or pause it if you find the files you need.
7. After that, check the files you need and click Save to store them to another location.
After all steps are finished, you have successfully recovered files from the unbootable computer with error code 2000-0151. So, you can go ahead to fix the Dell error code 2000-0151. In the next content, we will show you how to solve the Dell error code 2000-0151.
How to Fix Dell Error Code 2000-0151
In this section, we will show you the solutions to the error code 2000-0151. Please note that all these solutions are demonstrated based on the unbootable computer. If your computer is bootable, you can ignore the steps of booting the computer from Windows installation media and just try the repairing steps.
The following solutions are not 100% effective because the Dell error code 2000-0151 indicates severe hardware issues. So, it may depend on your hardware conditions. Sometimes the error may be solved unless you replace the hard drive. However, the following solutions are still worth trying and you can try them one by one.
Way 1. Check BIOS Settings
The Dell error code 2000-0151 may be caused by the wrong BIOS settings. So, in order to fix this error, you need to check whether there are changes in the BIOS settings and reset it to the default settings.
Now, here is the tutorial.
- Restart your computer and press F12 continuously to enter the BIOS settings.
- Then select Load Default, Load Setup Defaults, Load Default Settings, Load Optimal Defaults, or similar option in BIOS Settings and hit Enter to reset the BIOS setting.
- Then press F10 to save the changes.
Once all steps are finished, reboot your computer and check whether the Dell error code 2000-0151 is removed.
Way 2. Run Surface Test
The Dell error code 2000-0151 may occur when there are bad sectors on your hard drive. So, it is necessary for you to check how many bad sectors on the hard drive. If there are too many, it means that your hard drive is imminent to fail.
So, how to check bad sectors on the hard drive? MiniTool Partition Wizard is able to help you. If you have created a MiniTool recovery USB drive in the above, you can connect it to the unbootable computer with error code 2000 0151 and boot from it. If not, create a bootable media first.
Free Download
Now, we will show you how to check bad sectors on the hard drive.
1. Connect the MiniTool recovery USB drive to the computer and boot from it.
2. Then enter the main interface of MiniTool Partition Wizard.
3. Then select the hard drive you want to scan and choose Surface Test.
4. Then click Start Now to continue.
5. When the scanning process is finished, you can check the result. The disk block without reading error will be marked as green color, while the disk block with reading error will be marked as red color.
If there are few bad sectors on the hard drive, you can choose to shield them. If there are too many bad sectors, you need to back up your files and replace the hard drive.
Way 3. Run CHKDSK
CHKDSK is able to help you to fix some hard drive errors, such as bad sectors, improper shutdowns or corrupted software, etc. So, in order to fix the Dell error code 2000-0151, you can try running the CHKDSK tool.
Now, here is the tutorial.
1. Create a Windows installation disc with Windows Media Creation Tools.
Tip: If you have created a bootable USB drive with MiniTool Partition Wizard, you do not need to create the Windows installation disc any more. In the MiniTool PE loader, select Command Console and type the command directly.
2. Insert the Windows installation disc to the unbootable computer and boot from it.
3. Then select the language, keyboard input and time.
4. Next, click Repair your computer.
5. Next, choose Troubleshoot > Advanced Options > Command Prompt to continue.
6. Then type the command chkdsk c: /f /r in the Command Line window and hit Enter to continue. (C represents the drive letter and you can change it by yourself.)
Way 4. Replace the Hard Drive
If the above solutions cannot fix the Dell error code 2000 0151, the last option you should choose is to replace the hard drive. If you already recovered data before, you can replace the hard drive directly and reinstall the operating system.
However, if you do not want to reinstall the OS to the new hard drive, you can choose to migrate OS to new hard drive. After that, the Dell error code 2000-0151 will be removed from your computer.
Related article: How to Replace Laptop Hard Drive Without Reinstalling Windows?
Wow! It is an excellent post. I fixed the Dell error code 2000-0151 after reading it.Click to Tweet
Bottom Line
After reading this post, you may already know how to fix the Dell error code 2000-0151. If you come across the same error, try these solutions. If you have any better solution to fix it, you can share it in the comment zone.
In addition, if you have any problem with MiniTool products, please feel free to contact us via the email [email protected] and we will reply to you as soon as possible.


