Alianar1
Загрузка
20.03.2023
678
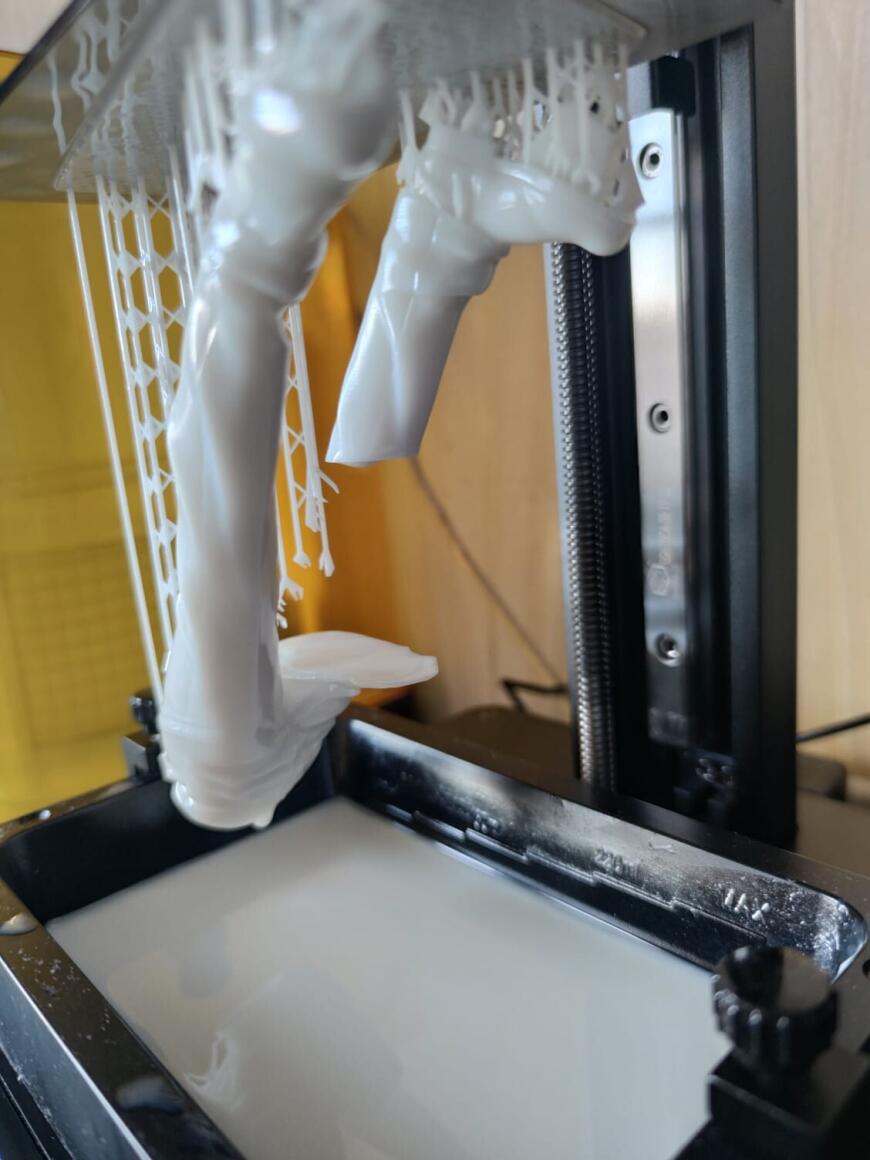
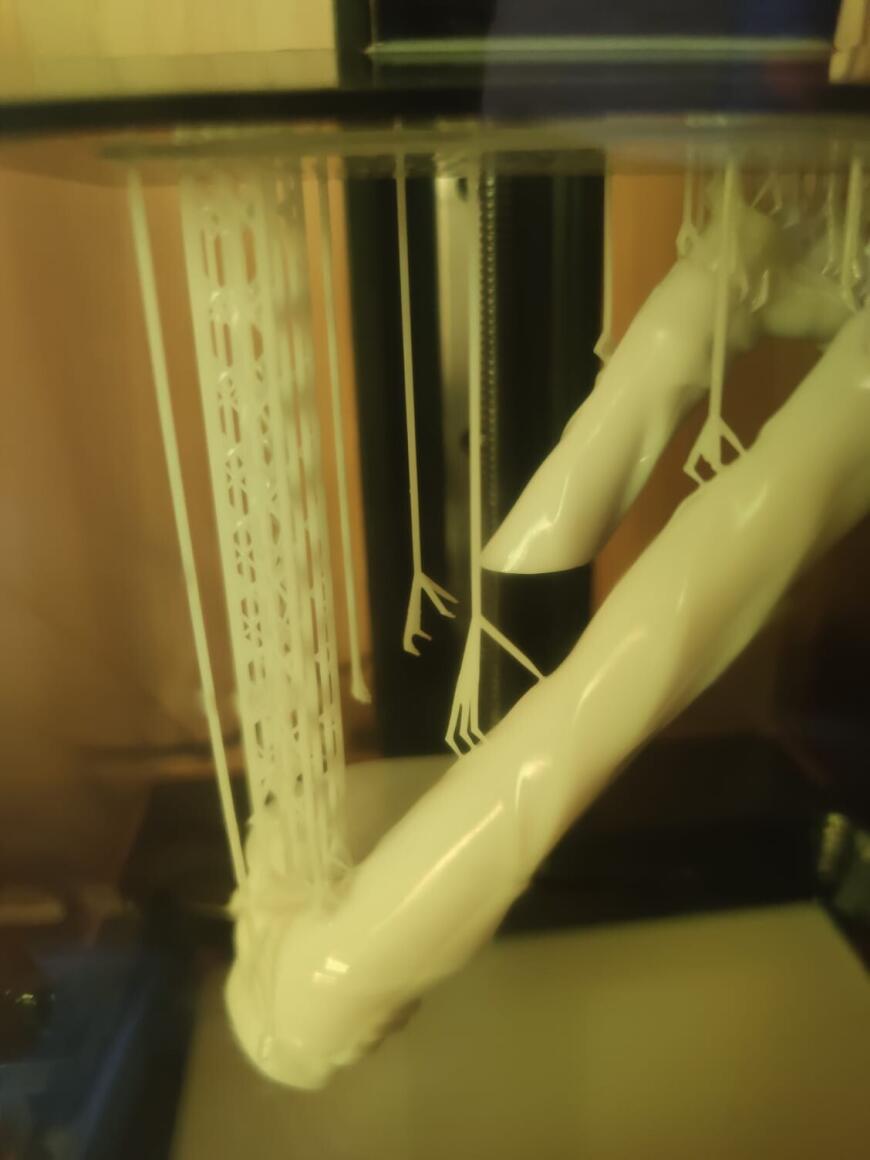
Добрый день, недавно решил пристрастица к фотополимерной печати и заказал Anycubic Photon 4k, вроде печатает хорошо но иногда возникает вот такой вот брак. То есть какая то контретная часть детали в одном месте может не пропечататся. Сейчас особенно обидно, вроде легкая в плане печати часть тела. А такой брак одной ноги.
Пробовал AnycubicPhotonWorkshop и LycheeSlicer, вроде и там и там иногда при разных настройках печати возникали такие проблемы (только до этого момента в меньшем масштабе). Мне просто понять, это я неправильно настройки и поддержки выставляю или же какая то проблема с принтером?
Заранее спасибо!
Ответы на вопросы
Популярные вопросы
Что актуальней на данный момент
vit.ru
Загрузка
27.05.2023
465
Добрый день. Решил подумать заменой своего ендер 6 (реально не оправдал надежды, а допиливать не в моем случае) смотрю в сторону ендер 3 с1 плюс или Н…
Дефект в начале нового слоя
Liukk
Загрузка
14.05.2023
481
Проблема возникает в начале печати наружного слоя, а также в начале новой области на том же слое. Внутренний слой печатается нормально (дефект к…
Вопрос по датчику Auto-leveling Sensor и g code
cinema4d
Загрузка
20.02.2019
8955
Всем добрый вечер!, купил датчик авто уровня , и теперь есть пару вопросов у тех кто таким пользовал, скажите его на горячую не льзя использовать я та…
Читайте в блогах
3) время засветки остальных слоев — от 10 секунд до 16. Сильно зависит от смолы, лампы и состояния пленки в ванночке (эта зараза со временем мутнеет и придется менять)
откуда у вас такие большие времена засветки? ( либо я еще не столкнулся с вашими смОлами) .
Есть у меня Anycubic белая .
Можешь прислать мне твой кубик? — я попробую напечатать со своими настройками, а потом с твоими.
От кубика уже 2 смолы отпечататл — прозрачную и черную , все печатал выдержкой 1 секунда (толщина 50 мкр , мощность 100%, подъём 120 ммсек , ретракт 300мм/сек), ИТО!!!! включаю в разделе «дополнительно» компенсацию паразитной засветки в размере 1 пикселя ( «минус» 0,050 …. «минус» 0,100мм. в зависимости от смолы) , в программе называется » компенсация толерантности(бета)».
За 10 -16 секунд там на модель еще 0,1….0,2 мм «паразитного диаметра» налипнет ! а то и больше..
Далее ..
Вижу, что у тебя «Время отдыха перед подъёмом» = 0 , предположу, что возможно в этом кроется проблема — типо запекаемый слой за это время ( 10 — 16 секунд) успевает разогреться , к примеру, … и как только принтер выклюает засветку, надо дать 1 — 2 секунды на остываение поверхности , она съёжится немного и легче отлипнет от плёнки, наверное…
Я не пробовал ставить тут 0 секунд, у меня стоит 0,5 секунды задержки , при моих 1 секунда засветки , и почемуто нутро шепчет — » оставь так…» )))))
И не печатал ни разу на таких долгих задержках , ибо у меня сразу высокоточная печать пошла , и с первых пробных 3 секунды, сразу понял — что это слишком долго.
Кроме того ! предидущие слои еще дополнительно дозасвечиваются пока печатается следующиие несколько слоёв. особенно на прозрачных смолах.. да все они полупрозрачные по сути, поэтому 2ой и 3 ий слои точно еще получают дополнительную засветку .
Время отдыха после подъёма — ноль, нефиг там тупить, а вот время отдыха после отвода — я бы тут поставил 0,5 — 1 секунду на то, чтоб смола успокоила свои турбулентности и успокоилась перед тем как включать засветку.
Потом — чем «юлозишь» по плёнке ? — пластиковый шпатель — в редких случая, когда надо отковырять что то очень мелкое,
эту пластину, что прилипла к плёнке — ты какими движениями отделял?
Еще печатал серую смолу от Phrozen водорастворимая — слишком большая паразитная засветка у неё, не стал её работать, на какие то коробки пойдёт, проектировать с зазором в 1 мм, и пофиг тогда)) или компенсацию ставить побольше,
Делать время менее 1 секунды уже нет смысла — пробовал на серой смоле этой, модель получается мягкой и растягивается в процессе печати, для серой смолы я бы щас поставил время засветки 1,5 — 2 секунды и компенсацию паразитки 150мкр.
Я купил пвх шпатели чтоб «облизывать» платформу от жидкой смолы и для проверки плёнки если вижу что оторвалось чтото. И для перемешивания смолы прямо в ванночке, перед каждой печатью, если ничего не отрывается , я смолу не сливаю )))
Даже бумажная салфетка , если суховатая — поцарапает ванночку, поэтому лишний раз наводить в ней чистоту такое себе дело, мягкий пвх шпатель отлично делает дело..
Алюминевую основу нацарапай углом железного шпателя, сетку шириной — какую душа пожелает, примерно 5х5 мм, прям посильнее борозды сделай, потом остриём заусенцы побрей маленько. — Лишним точно не будет.
Anycubic Photon stopped printing
I’ve had my anycubic photon for about a year now. Generally prints fine.
I’ve had my fair share of failed prints, but I know the score and can usually work out how to either improve the design or replace the film.
Last week I noticed a print fail half way through a print. Normal process, i pause print move the base plate up to view and note any missing parts/features. This print had failed, but I had expected that the film was on its way out. I stopped the print and started the cleaning process to replace the film. Unfortunately I ran out of time over the weekend and left the job for today.
Finished cleaning up and fitted the new film. Set the job to print and walked away.
When I came back to check the print (about 20 mins later), the base plate is still way above the reservoir. I stop print, turn off the unit, and turn back on again and start the print again. No movement.
I try moving to home position: nothing. I try removing the usb drive. Nothing. Basically the motor seems to have just stopped.
I can physically drive the worm screw, so I know its not jammed.
Has anyone got any advice? I believe the unit is over 12 months anyway, so i doubt I’ll get anything through Amazon/seller.
I’m off with work (why I needed the printed parts) for the next 2 weeks this afternoon, so its totally sods law that this goes now — so anything anyone can recommend in the next few hours 
edit: Checked the reservoir, doesn’t look like the print has started.
What you find on this page:
Anycubic Photon 3D printers are an immensely impressive piece of technology. But like all technology, it doesn’t work perfectly sometimes. If you’re having issues with your resing photo printer, this article offers a variety of causes and solutions to consider and try.
Consider this your complete guide to troubleshooting of Anycubic Photon DLP 3D printer!
The following problems and solutions can apply to different Anycubic Photon printer models. These problems and solutions discussed in this article can work for:
- Anycubic Photon Zero troubleshooting
- Anycubic Photon Mono X troubleshooting
- Anycubic Photon Mono troubleshooting
- Anycubic Photon S troubleshooting
Irregular Resets/Memory Errors/USB Read Problems
A common issue is Anycubic Photon mono not reading USB. If your resets aren’t working, the printer showcases memory problems, or issues reading USBs, the printer will lack focus and flow.
You’ll notice the printer freezes randomly, aimlessly focuses, and resets the home screen for no reason. You may also notice error codes and an empty record program. The USB key lighter may also be off when it should be consistently on.
When your Anycubic Photon printer displays any of these symptoms, you can try one or more of these recommended fixes.
- Replace the stock USB key with a decent marked one formatted for a FAT32.
- Empty your USB and only store one document at a time. Keep document names simple and avoid spaces and special characters.
- Test the USB augmentation link using a different USB link. Or replace the USB Extension link by unscrewing the back vent board.
- Unplug the male connector from the plug and mainboard. Plug in a substitution USB key. This could fix the issue if your printer is just glitching.
- Before printing something, try to eliminate the power link without a USB connection. Wait for one minute, and then force the USB plug back in. This could reset any IC Memory cradle issues.
- Ensure the printer driver reference has a voltage between 1.07 and 1.16. If the voltage does not fall in this range, adjust it, so it does.
- Check that the power supply unit is the correct version and working. If not, you may need to replace it with a newer version of the 12V 6A unit.
Slicer Won’t Display Model/Does Not Work
This problem is not a problem but a function of the photo 3D printer. The Anycubic Photon Slicer is currently not equipped to uphold integrated illustrations on the driver. It also cannot uphold goals above 2k. So it’s expected that the Anycubic Photon slicer will not work for these purposes.
Free Build Plate/Plate Too High
You may be experiencing plate problems if the fabricated plate sits super high above the FEP and won’t move down. The plate may also move from side to side when the mounting screw is in place.
Luckily, plate problems are usually easy to fix. These fixes apply to any Anycubic photon build plate size. Try one of the solutions below to adjust your fabricate plate functions:
- Disassemble the plate. Clean using gentle materials and then perform an Anycubic Photon factory reset.
- Ensure your plate mount screws are secure. Double-check that all screws are tight.
- Check the three additional screws inside the assembled plate to secure the conjecture as it rotates.
- Clear out all resign with IPA or similar solvents.
- Replace or readjust the fabricated plate.
Z Wobble/Non-random Layer Artifacts
A Z wobble problem means the Anycubic Photon troubleshooting Z axis is not working. When this occurs, you can expect the photo resin printer to create irregular layer antiquities making for noticeable print directions on the surface. You may also notice your banding lines separate 2mm, and the predictable prints become distorted.
All of these symptoms point toward a Z wobble or non-random layering artifacts. To solve this, you can try the following solutions:
- Poke at the cleaning lead screw on the Z pole. Use a paper towel to reapply a thick layer of high-quality oil or grease for 3D printers.
- Ensure the FEP film is not loose by removing it and then putting it back. Or just replace the FEP film altogether.
- Ensure the whimsical roller of the sliding block is not loose or damaged.
- Check the metal nut on the lead screw. If it’s loose, remove it, clean the area, then replace the screw, tighten it firmly, and perform a printer reset.
- Check the engine dampener by opening the back vent. Ensure it isn’t bowed or distorted, and replace it if necessary.
- Tighten the two screws holding the engine to ensure they are not askew or opposite the LCD glass. Replacing the two screws can often solve Z wobble issues.
Layer Shifting/Shearing on LCD During Print
Layer shifting and sharing during an LCD print will only happen on specific prints. It will also seem like the prints are cut and pasted on other pieces of the template. Layer pictures on the LCD will also look sheared and distorted and will not match what the touchscreen displays.
These issues typically relate to the Anycubic Photon firmware update. Luckily, this is one of the easier Anycubic Photon troubleshooting with pictures!
- Double-check that your printer has the most reset firmware bug influences.
- Perform a test run using a timelapse camera. Monitor if the picture move or shears during the printing process. If they do, overhaul your Anycubic software to the 4.2.18 update or later.
Anycubic Photon Slicer Does Not Display STL
If the Anycubic Photon slicer does not display STL, only displays half the screen, or only shows a large portion of the screen, this can cause the touchscreen not to work and prints to come out incorrectly.
Try one or more of the fixes mentioned below to troubleshoot these issues:
- Update your show driver.
- Reinstall the slicer program.
- Reinstall the C++ conveyance library.
- Ensure all link associations use the proper situation.
- Update or reflash the firmware, which you can download from the Anycibic site.
Squares Print Rhomboid; Circles Are Skewed
If you’re wondering: why are my resin 3D prints failing? The circle in your photon printer may be skewed. When this happens, you’ll notice the printed ends are not entirely square, and the chambers tend to lean one way.
To fix this, you can try the following approaches:
- Change the four mounting jolts in the section. While doing this, you may need to release and fix the segment, so it is vertical. Try to shim the segment base and get it back in place. This can take some wiggling and work, so be patient!
- Use a specialist’s square to check the plate precisely. If the segment or plate inclines, fix it to level.
- Monitor the rail section. It should be opposite the red base plate. If it inclines any one way, fix it to it’s perfectly flat.
Fabricate Plate Does Not Reach Z0 Bottom
This problem means the wake of leveling and setting resulted in Z=0, causing prints to fall flat. This is another easy fix most of the time! Try one or more of the following solutions:
- Check that the carriage arm hits the highest point in the tank divider. It should stop just before arriving at the Z0 down to the lower part of the tank.
- You can add four washers to act as spacers for the four screws of the construction plate. Adding the washers can fix the rotating conjecture and irregular incline.
- Replace the lethargic Z carriage, LCD inactive, or dead fans if you notice any damage or wear on them.
Anycubic Photon Mono Door Opened Pause to Print
If your Anycubic Photon Mono door opens and pauses to print, you can shut this feature off. It usually isn’t a glitch or malfunction; it’s just a setting.
Go to settings by clicking the gear icon on the screen. Scroll through settings until you see “Machine” settings, then select “Advanced Settings.” On page three of the advanced settings, you can toggle the “Pause printing when the door is opened” option.
Anycubic Photon Mono Not Reading USB
If your Anycubic printer is not reading USBs, this falls under the “Irregular Resets/Memory Errors/USB Read Problems” section. The best solution is to use the simplest USB with simplified documents. Otherwise, you likely have to replace the USB reader if it consistently does not work. A factory reset can also fix this, but it depends on the source of the reading issues.
Anycubic Photon Print Sticking to Vat
The photon print should stick to your build plate rather than the vat. A few factors play into this problem. If your FEP is too tight, it can cause the print to stick because there is not enough to give. This can also happen if the FEP is too loose, but this is less common.
Another issue could be the hardness of your plate. Make sure you use the correct bottom layer and give it time to harden before running a print. You should also apply multiple layers of the spray to the plate. In addition, you can use a PTFE spray to lubricate the FEP and vat.
Anycubic Photon Failed Print
A failed print is a common problem that can have many causes and solutions. The sections above discuss this to some degree. But as a quick troubleshooting guide for failed prints, keep these eight solutions in mind:
- Clean your resin and remove excess residue.
- Clean the 3D printer’s LCD screen.
- Do not overfill the build plate to ensure low-pressure suction.
- Carefully rotate prints at 45º.
- Add the proper support for the software and hardware.
- Ensure the build plate is always perfectly leveled.
- Check and replace the FEP film if prints continue to fail.
- Adjust the exposure time settings and experiment with them.
Some other random issues that users report typically concern the resin and quality of the prints. Below is a list of other random issues you may encounter:
- Polymerized resin
- Blobbed resin on the vat
- Warped/melted prints
- Glitching screen pixels
- Extremely slow printing
- UV light malfunctions
Complete list of onscreen error codes
| Error types | Error code | Possible causes | Solution |
| USB error | M_3e | bad contact | re-insert the USB stick |
| M_800 | USB timeout error | re-insert the USB stick | |
| M_1000 | cannot find memory | re-insert the USB stick | |
| M_2000 | parameters error | re-configure parameters | |
| M_8000 | read and write errors of USB | update firmware or change for a new USB | |
| M_10000 | feedback errors | re-insert the USB stick, and printing | |
| Memory error | M_11800 | timeout errors when read memory | re-insert the USB stick and printing |
| T_08 | 2K LCD signal errors | reboot the mainbaord | |
| T_40 | watchdog timeout | reboot the printer | |
| Signal errors | T_80 | 2K LCD signal errors (TWICE) | reboot the mainboard or re-adjust the wiring connector of the 2k LCD screen to mainboard |
| T_100 | NO TE signal for 2K LCD | reboot the mainboard or re-adjust the wiring connector of the 2k LCD screen to mainboard | |
| T_88 | 2K LCD signal errors (TWICE) | reboot the mainboard or re-adjust the wiring connector of the 2k LCD screen to mainboard |
Why Do Resin 3D Prints Fail Halfway?
As mentioned, a 3D resin print can fail for numerous reasons. The most common causes relate to the following settings and components:
- Wrong exposure time
- Unbalanced built plate
- Lack of support
- Anycubic build volume
- Poor adhesion
- Incorrect part orientation
- Faulty USB reader
- In need of a software update
Conclusion
No matter what issue you’re experiencing with your printer, someone else has likely encountered it. This article has the most common problems and solutions, thanks to people who have encountered these funky issues and left their advice online for others!
While 3D printers can be finicky, they’re worth it. Keep this guide handy in case your printer starts to give you trouble!
FAQs
Why is my resin 3D prints failing?
The prints may be failing because something is amiss with the filament supply or something is wrong with the hot nozzle. Your filament supply may be empty, or the hot nozzle may be blocked or damaged.
Why are my resin prints not sticking?
If your print won’t stick, it may be because the resin’s adhesion is not stronger than the adhesion of the FEP sheet. Check the parameters for exposer and time settings.
Why is my 3D print not sticking to the build plate?
A 3D print won’t stick because a resin print won’t stick. The dust and oil often cause it from your fingers and hands that reducing adhesion when you touch the plate. To fix it, wipe it down and run a Z calibration tool.
How do I stop FEP from sticking to print?
To stop the Anycubic photon print from sticking to the vat, ensure you have plenty of bottom layers and curing time. It needs time to harden, or everything will stick. Use a PTFE spray on the FEP film and give it time to try.
How tight should the FEP be?
This is tough to answer. Most people agree it should be “semi-tight” which can mean many things to different people. Essentially, just make sure it isn’t loose and flimsy, but it shouldn’t be super taut, either. Find a happy medium. You’ll likely have to experiment a bit to find the right amount of tension.
2021-03-11 10:55
Anycubic Photon S
- Возможно, на флешке записан неверный формат файла. 3D принтер Anycubic Photon S читает файлы формата *.pws, но не читает *.stl, *.obj, *.pw0, *.pwl, *.pwm и другие. Пожалуйста, проверьте формат файла, который предлагаете принтеру напечатать. Не лишним будет проверить, видит ли принтер тестовый файл на комплектной флешке.
- Возможно, файл неправильно записан на флешку. Он должен быть записан после нарезки в слайсере (кнопка «slice» или «нарезать» в вашем слайсере), а не способом «сохранить как».
- Возможно, имя файла сложное и принтер просто его не может прочитать. Не забывайте, что принтер — это не компьютер и не все файлы, которые могут быть обработаны на компьютере, под силу вашему принтеру. Избегайте длинных названий файла, не используете килиллицу (русские буквы) в названии, не используйте специальные знаки (тире, !, «, &, ?) и другие символы.
- Возможно, флеш-карта повредилась при ее небезопасном извлечении. Современные компьютеры позволяют извлекать карту без выключения и даже без еще недавно необходимой функции «безопасно извлечь карту», но если извлекать карту из принтера не выключая его, можно ее повредить. В этом случае рекомендуем отформатировать карту в FAT32 или использовать другую карту. При выборе новой карты, старайтесь избегать карт с мигающими диодами или карты большой емкости, 3D принтеру просто может не хватить ресурсов прочитать такую карту. Оптимальный вариант — SD карта на 4-16 Gb, подключенная через USB переходник.
При форматировании флешки, отдельно нужно обращать внимание на выбранную схему разделов в FAT32 (MBR).
Для успешной работы флешки с диском, необходима схема разделов MBR, если форматирование будет произведено с форматом размещения информации GPT (таблица GUID), где BIOS заменен на UEFI, флешка работать не будет с принтером.


