
PhpStorm analyses code in the files that are opened in the editor and highlights problematic code as you type. Additionally, you can run the necessary inspection or a set of inspections on the selected scope of files manually. In this case, you will get a comprehensive report of all problems detected in the files.
Instant analysis of the current file
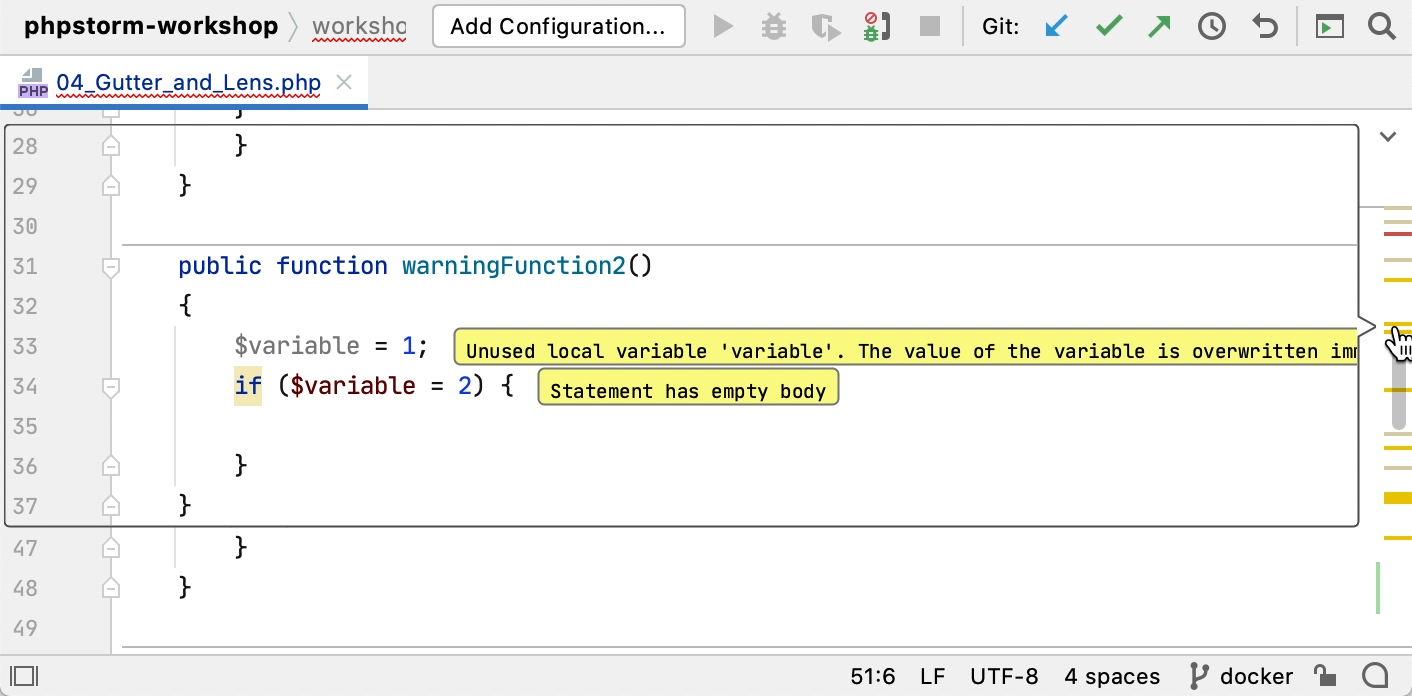
The IDE continuously checks your code and searches for problems. The widget in the top-right corner of the editor displays the number of problems of each severity detected in the current file:
![]()
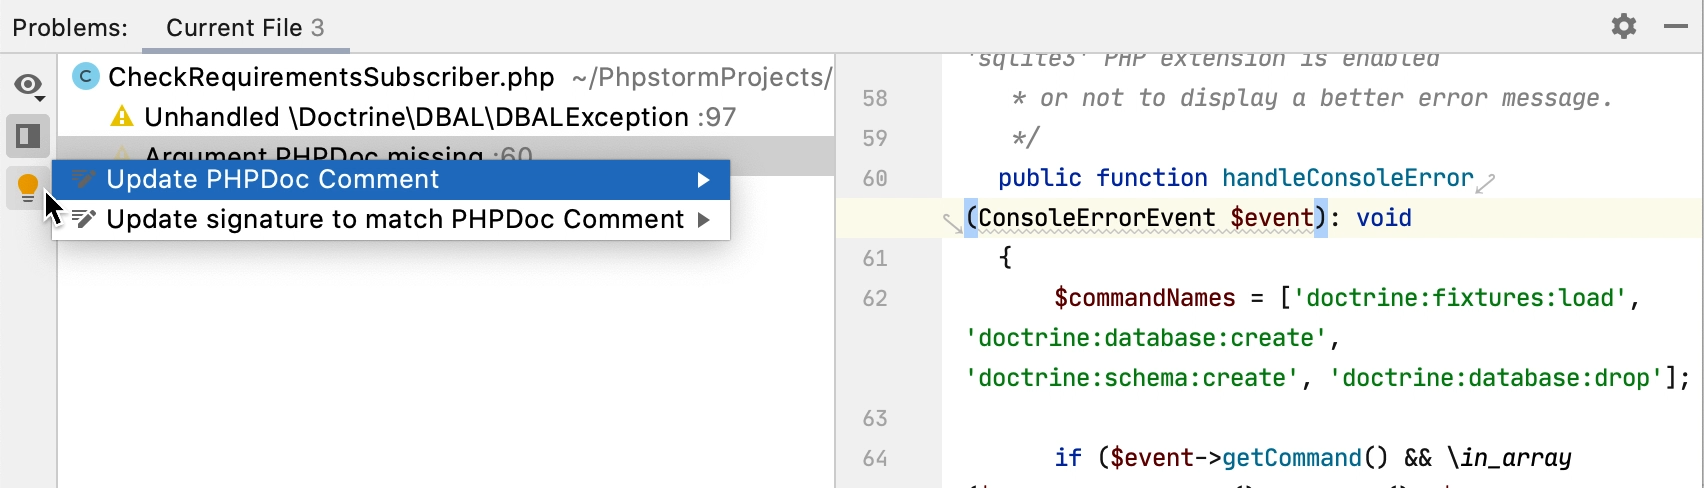
Click the widget to open the list of problems on the Current File tab of the Problems tool window. You can also access the Problems tool window by selecting or by pressing Alt+6.
For each problem, you can see the suggested quick-fix by pressing Alt+Enter or by clicking  . You can also jump to the corresponding line in the editor by pressing F4 or by double-clicking the problem in the tool window.
Alternatively, click  to be able to view and fix problems in the tool window.
The color stripe in the scrollbar also marks the detected code problems and helps you quickly access the corresponding lines without scrolling the file. Hover over a mark on the stripe to see the detected problem in a tooltip. Click a mark to jump to the corresponding line.
Navigate to detected problems
You can jump from one highlighted problem to another within a file by clicking 
 in the widget or by pressing F2 or Shift+F2 accordingly. By default, the IDE will navigate you to problems according to their severity: errors > warnings > weak warnings > server problems > typos.
You can configure PhpStorm to take you through the problems one by one regardless of their severity. Hover the mouse over the widget in top-right corner of the editor, click  , select ‘Next Error’ Action (F2) Goes Through, and enable All Problems.

Run inspections manually
Some inspections require global code analysis, and that is why they are disabled in the editor. These inspections are listed in . Click  and select Show only batch-mode inspections.
If you want to get a full report of all detected problems, run inspections manually.
Run all inspections
-
From the main menu, select .
-
Select the scope of files that you want to analyze.
Click the
 icon to configure a new scope.
 -
Select the inspection profile that you want to apply.
To create a new profile or modify one of the existing profiles, click Configure.
-
Click Analyze to start the analysis.
 icon to configure a new scope.
Specify Inspection Scope dialog
|
Item |
Description |
|---|---|
|
Whole project |
Inspect the whole project. |
|
Module <name> |
Inspect the module that is currently selected in the Project tool window. |
|
File <name> |
Inspect the file that is currently selected in the Project tool window or opened in the editor. |
|
Selected files |
Inspect the files that are currently selected in the Project tool window. |
|
Uncommitted files |
This scope is only available for the projects under version control. Inspect only the files that have not been committed to the version control system. |
|
Directory |
Inspect the directory that is currently selected in the Project tool window. |
|
Custom scope |
Inspect a custom scope of files. Select a pre-defined scope from the list, or click |
|
Include test sources |
Inspect the test sources included in the analysis scope. |
|
Inspect injected code |
Inspect pieces of code in other languages embedded in your code. |
|
Inspection profile |
Select a profile that you want to use to inspect your code. If the required profile is not in the list, click Configure and create a new profile. |
Run a single inspection
Running a single inspection is useful in case you want to track a specific problem. If you find a warning in a file, you can inspect your entire project, or the necessary scope of files, to ensure that there are no more such warnings in your code base.
-
From the main menu, select or press Ctrl+Alt+Shift+I.
-
Type the inspection name in the popup. Use CamelHumps to match camel case words and white spaces with initial letters of the words. The suggestion list will show you inspections that match your search request.
If you are not sure that you are selecting the correct inspection, you can view its description. To do so, select an inspection in the popup and press Ctrl+Q.
-
Double-click the necessary inspection to open its settings.
-
In the dialog that opens, select the scope of files that you want to analyze.
The File mask(s) option helps you narrow down the number of files that will be inspected.
Select the checkbox and specify a pattern of characters and wildcards that matches the names of files you want to analyse. Use a comma to separate multiple file masks.
-
Some inspections might have additional options that you will be prompted to configure.
These settings will only be applied to this run, and will not affect this inspection’s configuration in your current profile.
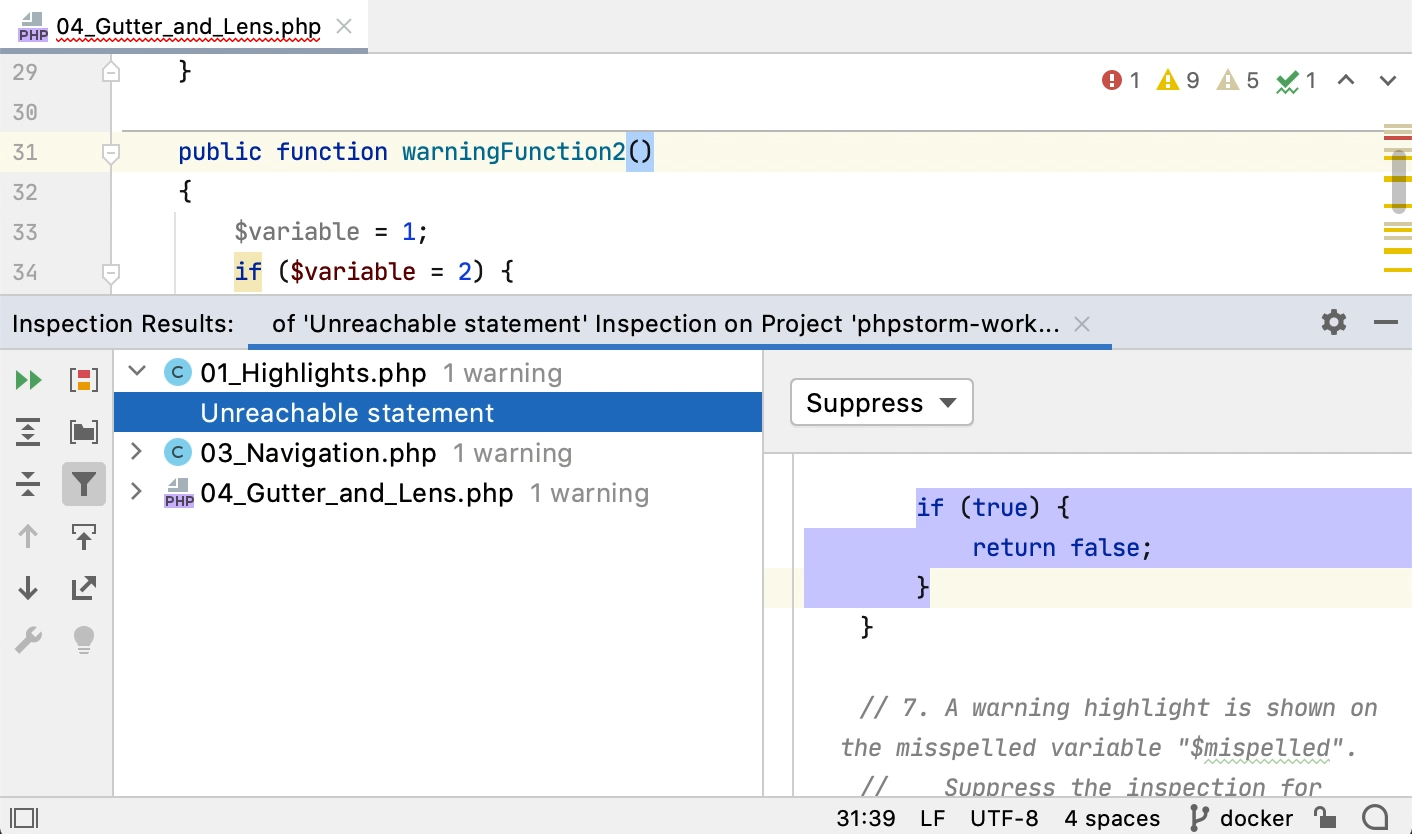
The IDE will show you the inspection results in the dedicated tool window tool window. There you can examine and fix detected problems.

Analyze code before committing it to Git
If your project is under Git version control, you can configure the IDE to analyze modified files before committing them.
-
Press Ctrl+K or select from the main menu.
-
In the Commit tool window, click
and in the Commit Checks area, select the Analyze code checkbox. -
Click Choose profile and select the required inspection profile from which the IDE will run inspections.

-
Click Commit.
PhpStorm analyzes the code from the modified files by running inspections from the selected profile.
If any errors or warnings are detected, you will see a notification.

-
In the notification, click Review code analysis to see the list of the detected problems in the Messages tool window. Click Commit to commit your changes without fixing the detected problems.
 and in the

Run inspections offline
In addition to running code inspections from the IDE, you can launch inspections from the command line without actually running PhpStorm. The inspection results will be stored in an XML file. For more information, refer to Run code inspections from the command line.
Change the order of scopes
By default, all enabled code inspections analyze all files in your project. Depending on your needs, you can run the same inspection in more than one scope of files with different settings.
If one file is included in two or more scopes, and you enable an inspection in these scopes, PhpStorm will process them according to their order in the list of scopes — the uppermost scope will have the highest priority, and therefore, it will be analyzed first.
-
In the Settings dialog (Ctrl+Alt+S), select .
-
Select any inspection from the list.
-
From the In All Scopes list, select Edit Scopes Order.
-
Select the necessary scope, and use
and to move it up and down the list.
-
If needed, create a new scope. To do so, click
(Edit Scopes), specify scope settings, and select the files and folders that you want to include in it. See Scopes and file colors for details.
 and
and  to move it up and down the list.
 (
(Last modified: 28 April 2023
The Problems tool window displays problems that PhpStorm detects in your project using several tabs:
When the design-time code inspection is enabled, this tab lists all code issues found in the current file. The list is updated as you switch between files in the editor.

You can select any problem in the window and press F4 or double-click any problem to jump to the corresponding line in the editor.
Toolbar
|
Item |
Tooltip and shortcut |
Description |
|---|---|---|
|
|
View Options |
Filter out code issues by their severity and configure their sorting. When no grouping or sorting options are selected, the issues are listed in the order they appear in the file. |
|
|
Open Editor Preview |
Open the preview pane to view the selected issue in its source context right in the Problems window. Note that this preview is a normal editor where you can change the code and apply available quick-fixes. |
|
|
Expand All Ctrl+NumPad + |
Expand all nodes. |
|
|
Collapse All Ctrl+NumPad - |
Collapse all nodes. |
|
|
Show Quick-Fixes Alt+Enter |
Show quick-fixes available for the selected problem. |


|
Item |
Shortcut |
Description |
|---|---|---|
|
Show Quick-Fixes |
Alt+Enter |
Show quick-fixes available for the selected problem. |
|
Copy Problem Description |
Ctrl+C |
Copy the problem description to the clipboard. |
|
Jump to Source |
F4 |
Open the code containing the problem in the editor. |

Toolbar
|
Item |
Tooltip and shortcut |
Description |
|---|---|---|
|
|
View Options |
Filter out code issues by their severity and configure their sorting. When no grouping or sorting options are selected, the issues are listed in the order they appear in the file. |
|
|
Open Editor Preview |
Open the preview pane to view the selected issue in its source context right in the Problems window. Note that this preview is a normal editor where you can change the code and apply available quick-fixes. |
|
|
Expand All Ctrl+NumPad + |
Expand all nodes. |
|
|
Collapse All Ctrl+NumPad - |
Collapse all nodes. |
|
Item |
Shortcut |
Description |
|---|---|---|
|
Copy Problem Description |
Ctrl+C |
Copy the problem description to the clipboard. |
|
Jump to Source |
F4 |
Open the code containing the problem in the editor. |

Toolbar
|
Item |
Shortcut |
Description |
|---|---|---|
|
|
Ctrl+F5 |
Run the inspection and show the results on the same tab. |
|
|
Ctrl+Shift+F4 |
Close the current tab or the tool window. |
|
|
Ctrl+NumPad + |
Expand all nodes. |
|
|
Ctrl+NumPad - |
Collapse all nodes. |
|
|
Ctrl+Alt+Down |
Navigate to the next problem. |
|
|
Ctrl+Alt+Up |
Navigate to the previous problem. |
|
|
Change the settings for the selected inspection or group of inspections in the Errors dialog. |
|
|
|
If this option is enabled, problems are grouped by the Error and Warning severity. Otherwise, they are grouped by inspection. |
|
|
|
Group detected problems by directory. |
|
|
|
Turns the Navigate with Single Click option on and off. When the option is on and you select an item, the corresponding source file opens in the editor and the appropriate fragment is highlighted. |
|
|
|
Hide resolved problems. |
|
|
|
Export the inspection results into XML or HTML format. |
|
|
|
Alt+Enter |
Resolve the problem for the selected inspection item by choosing one of the available quick fixes from the list. |


|
Item |
Shortcut |
Description |
|---|---|---|
|
Jump to Source |
F4 |
Open the file that contains the selected problem in the editor and place the caret at the beginning of the corresponding code fragment. |
|
Exclude |
Delete |
Exclude the selected items from further examination. Excluded nodes are shown strikethrough. If the filter toggle |
|
Include |
Insert |
Include previously excluded items in the list of results. All nested subelements are included too. |
|
|
Alt+Enter |
Select one of the suggested solutions. |
|
Suppress problem |
Suppress the inspection for the selected problem or the selected class. |
|
|
Edit Settings |
Change the settings for the selected inspection or group of inspections in the Errors dialog. |
|
|
Disable inspection |
Disable alerts for the selected inspection in the active tab of results. If the filter toggle |
|
|
Run inspection on |
Rerun the selected inspection and display the results on a new tab. |

Inspection report
The inspection report is shown in the right-hand pane of the results tab when an inspection node is selected in the left-hand pane. The report may include the following:
-
Problem resolution: A button for each of the available solutions. Clicking a button invokes the corresponding fix. If no buttons are present, you have to fix the problem yourself.
-
Suppress: Click this button to reveal the list of inspection suppress options.
-
Problem synopsis: A brief description of the problem.
-
Disable inspection: Disable alerts for the selected inspection in the active tab of results. If the filter toggle
is on, the nodes for disabled inspections are hidden. -
Run inspection on…: Rerun the selected inspection and display the results on a new tab.
Last modified: 18 April 2023
In PhpStorm I get a read mark on the upper right side of the code window if there’s a PHP bug in the file. That’s great. What I like to have is a list of all files which have this read mark.
Any ideas?
asked Oct 3, 2012 at 12:32
![]()
4
To get the list of all files with errors and warnings use Code | Inspect Code. It’s possible to specify what inspection profile to use, which directories to scan. Custom Scope provides a flexible way to include/exclude certain directories or files from the inspection results.
answered Oct 3, 2012 at 17:32
![]()
CrazyCoderCrazyCoder
386k170 gold badges980 silver badges894 bronze badges
Slightly off-topic, but may be helpful. If you need to jump through all the errors in a file (for example, CSS file), open up the file and and hit the F2 button on the keyboard. Repeat it to cycle through all the errors. To navigate back to the previous error, hit Shift + F2
answered Mar 30, 2017 at 8:45
![]()
DevnerDevner
6,75511 gold badges62 silver badges103 bronze badges
![]()
Сообщение от insideone

По идее это ошибка синтаксиса.
Нет, все работает, PHP на это ни как не ругается. Я лично никакой ошибки синтаксиса там не вижу. Это простая вставка в строку значения переменной, которое обрамляется экранированными скобками. Кстати, если вытянуть все в одну строчку — PHPStorm перестает ругаться. Похоже на его баг.
![]()
Сообщение от insideone
Внутри строки которая задается через ‘ можно писать любые символы, не экранируя, кроме ‘ — этот символ надо экранировать
Любые символы кроме скобки И слеша ПЕРЕД скобкой — его тоже надо экранировать, если он является символом.
![]()
Сообщение от insideone
Правильно писать так: ‘\’
Если необходимо получить строку со слешем (один слеш экранирует второй и тот не экранирует скобку):
| PHP | ||
|
Результат:
* результат 1 символ — слеш. Парсер при сохранении почему-то его вырезает из цитаты. Вот так и тут на форуме нашелся баг. ")
Мне же нужна лишь скобка.
![]()
Сообщение от insideone
И ещё пример, если надо написать ABC
То в строке это будет выглядеть так:
‘ABC\’
Тогда как в строке через » так:
«\A\B»
С чего это вдруг?
| PHP | ||
|
Результат:
string(6) «ABC» string(6) «ABC»
Добавлено через 4 минуты
![]()
Сообщение от ua30
Это простая вставка в строку значения переменной, которое обрамляется экранированными скобками.
Т.е. есть переменная $var = ‘qwerty’; а мне нужна строка ABC ‘qwerty’ DEF, я делаю $new_var = ‘ABC » . $var . » DEF’; — вот что по сути происходит…
PhpStorm – среда разработки с интеллектуальным редактором для PHP, HTML и JavaScript, обеспечивает автодополнение кода, анализирует код на лету предотвращая ошибки.
Сайт разработчика https://www.jetbrains.com/phpstorm/
1
Популярные команды
| Действие | Windows | MacOS |
|---|---|---|
| Вставить / Удалить многострочный комментарий | Ctrl + Shift + / | ⌘ + Shift + / |
| Переформатировать код | Ctrl + Alt + L | ⌘ + ⌥ + L |
| Автоотступ строки | Ctrl + Alt + I | ⌃ + ⌥ + I |
| Развернуть / Свернуть блок кода | Ctrl + + / - | ⌘ + + / - |
| Вычислить выражение | Alt + F8 | ⌥ + F8 |
| Выполнить | Shift + F10 | ⌃ + F10 |
| Отладить | Shift + F9 | ⌃ + F9 |
| Найти / Заменить | Ctrl + F / R | ⌘ + F / R |
| Перейти к классу | Ctrl + N | ⌘ + N |
| Перейти к символу | Ctrl + Alt + Shift + N | ⌘ + ⌥ + N |
| Перейти к строке | Ctrl + G | ⌘ + G |
| Переключиться в полноэкранный режим | Ctrl + Alt + F11 | ⌘ + ⌥ + F11 |
| Развернуть окно редактора | Ctrl + Shift + F12 | ⌘ + Shift + F12 |
2
Редактирование
| Действие | Windows | MacOS |
|---|---|---|
| Вывод возможных вариантов автодополнения | Ctrl + Space | ⌃ + Space |
| Показать меню с доступными действиями и быстрыми решениями | Alt + Enter | ⌥ + Return |
| Информация о параметре | Ctrl + P | ⌘ + P |
| Быстрый поиск по документации | Ctrl + Q | ⌃ + J |
| Краткая информация | Ctrl + Курсор над кодом | ⌘ + Курсор над кодом |
| Сгенерировать код… (getter-ы, setter-ы, конструкторы) | Alt + Insert | ⌘ + N, ⌃ + Return, ⌃ + N |
| Переопределение методов | Ctrl + O | ⌃ + O |
| Реализация методов | Ctrl + I | ⌃ + I |
| Окружить… (if..else, try..catch, for и т.д.) | Ctrl + Alt + T | ⌘ + ⌥ + T |
| Вставить / Удалить строковый комментарий | Ctrl + / | ⌘ + / |
| Вставить / Удалить многострочный комментарий | Ctrl + Shift + / | ⌘ + Shift + / |
| Переформатировать код | Ctrl + Alt + L | ⌘ + ⌥ + L |
| Автоотступ строки | Ctrl + Alt + I | ⌃ + ⌥ + I |
| Продублировать текущую строку или выбранный блок | Ctrl + D | ⌘ + D |
| Удалить строку, на которой установлен курсор | Ctrl + Y | ⌘ + Delete |
| Начать новую строку | Shift + Enter | Shift + Return |
| Выбрать код до конца/начала блока | Ctrl + Shift + ] / [ | ⌥ + Shift + ⌘ + ] / [ |
| Развернуть / Свернуть блок кода | Ctrl + + / - | ⌘ + + / - |
| Закрыть активную вкладку редактора | Ctrl + F4 | ⌘ + W |
3
Отладка
| Действие | Windows | MacOS |
|---|---|---|
| Шаг с обходом | F8 | F8 |
| Шаг с заходом | F7 | F7 |
| Шаг с выходом | Shift + F8 | Shift + F8 |
| Вычислить выражение | Alt + F8 | ⌥ + F8 |
| Установить или снять контрольную точку | Ctrl + F8 | ⌘ + F8 |
| Просмотр контрольных точек | Ctrl + Shift + F8 | ⌘ + Shift + F8 |
4
Выполнение
| Действие | Windows | MacOS |
|---|---|---|
| Выполнить | Shift + F10 | ⌃ + F10 |
| Отладить | Shift + F9 | ⌃ + F9 |
| Открыть командную строку | Ctrl + Shift + X | ⌘ + Shift + X |
5
Поиск и замена
| Действие | Windows | MacOS |
|---|---|---|
| Найти / Заменить | Ctrl + F / R | ⌘ + F / R |
| Найти следующее / предыдущее | F3 / Shift + F3 | ⌘ + G / ⌘ + Shift + G |
| Найти / Заменить в директории | Ctrl + Shift + F / R | ⌘ + Shift + F / R |
6
Навигация
| Действие | Windows | MacOS |
|---|---|---|
| Перейти к классу | Ctrl + N | ⌘ + N |
| Перейти к файлу | Ctrl + Shift + N | ⌘ + Shift + N |
| Перейти к символу | Ctrl + Alt + Shift + N | ⌘ + ⌥ + N |
| Перейти к строке | Ctrl + G | ⌘ + G |
| Перейти в редактор (из окна инструментов) | Esc | Esc |
| Перейти назад / вперед | Ctrl + Alt + ← / → | ⌘ + ⌥ + ← / → |
| Перейти в конец / начало блока | Ctrl + ] / [ | ⌘ + ] / [ |
| Следующая / Предыдущая выделенная ошибка | F2 / Shift + F2 | F2 / Shift + F2 |
| Редактировать файл / Просмотр файла | F4 / Ctrl + Enter | F4 / ⌘ + Enter |
7
Общие команды
| Действие | Windows | MacOS |
|---|---|---|
| Поиск везде | Shift + Shift | Shift + Shift |
| Найти действие | Ctrl + Shift + A | Shift + ⌘ + A |
| Открыть соответствующее окно инструментария | Alt + 0 … Alt + 9 | ⌘ + 0 … ⌘ + 9 |
| Переключиться в полноэкранный режим | Ctrl + Alt + F11 | ⌘ + ⌥ + F11 |
| Развернуть окно редактора | Ctrl + Shift + F12 | ⌘ + Shift + F12 |