
Системные администраторы, да и обычные пользователи Linux, часто должны смотреть лог файлы для устранения неполадок. На самом деле, это первое, что должен сделать любой сисадмин при возникновении любой ошибки в системе.
Сама операционная система Linux и работающие приложения генерируют различные типы сообщений, которые регистрируются в различных файлах журналов. В Linux используются специальное программное обеспечение, файлы и директории для хранения лог файлов. Знание в каких файлах находятся логи каких программ поможет вам сэкономить время и быстрее решить проблему. В этой статье мы рассмотрим основные части системы логирования в Linux, файлы логов, а также утилиты, с помощью которых можно посмотреть логи Linux.
Расположение логов по умолчанию
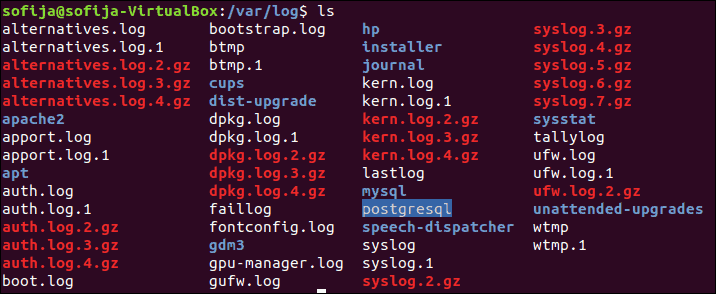
Большинство файлов логов Linux находятся в папке /var/log/ вы можете список файлов логов для вашей системы с помощью команды ls:
ls -l /var/log/
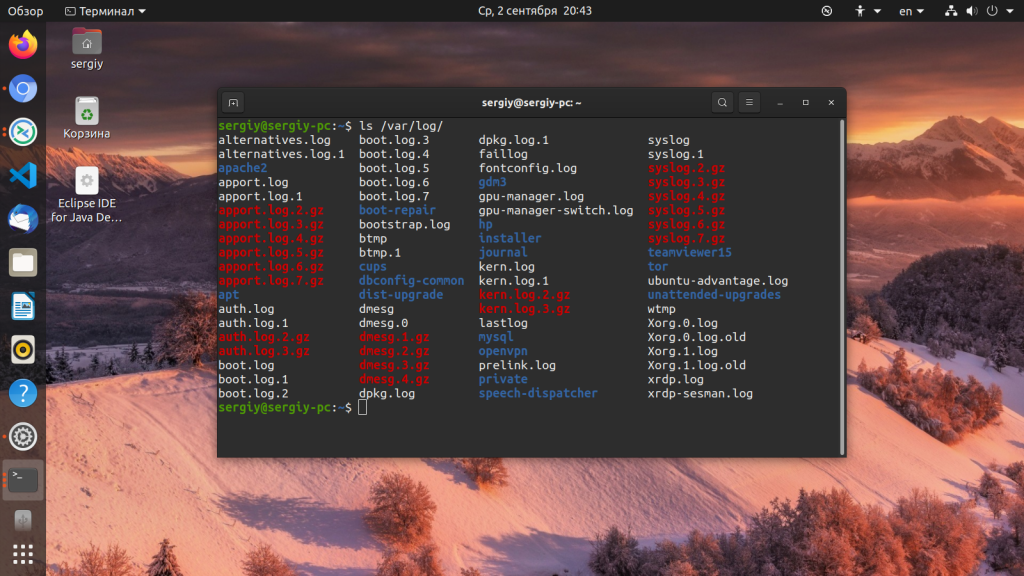
Ниже мы рассмотрим 20 различных файлов логов Linux, размещенных в каталоге /var/log/. Некоторые из этих логов встречаются только в определенных дистрибутивах, например, dpkg.log встречается только в системах, основанных на Debian.
- /var/log/messages — содержит глобальные системные логи Linux, в том числе те, которые регистрируются при запуске системы. В этот лог записываются несколько типов сообщений: это почта, cron, различные сервисы, ядро, аутентификация и другие.
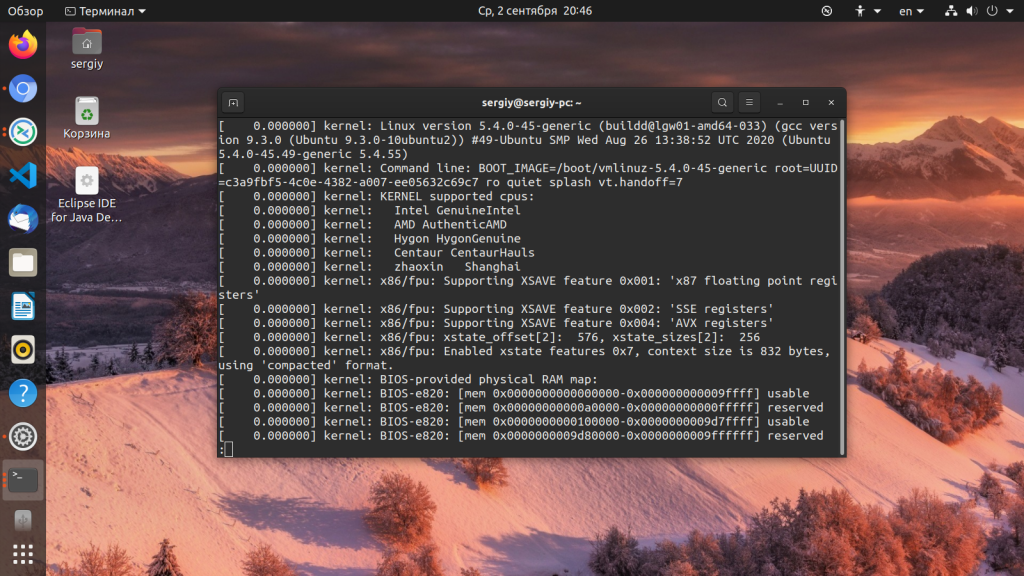
- /var/log/dmesg — содержит сообщения, полученные от ядра. Регистрирует много сообщений еще на этапе загрузки, в них отображается информация об аппаратных устройствах, которые инициализируются в процессе загрузки. Можно сказать это еще один лог системы Linux. Количество сообщений в логе ограничено, и когда файл будет переполнен, с каждым новым сообщением старые будут перезаписаны. Вы также можете посмотреть сообщения из этого лога с помощью команды dmseg.
- /var/log/auth.log — содержит информацию об авторизации пользователей в системе, включая пользовательские логины и механизмы аутентификации, которые были использованы.
- /var/log/boot.log — Содержит информацию, которая регистрируется при загрузке системы.
- /var/log/daemon.log — Включает сообщения от различных фоновых демонов
- /var/log/kern.log — Тоже содержит сообщения от ядра, полезны при устранении ошибок пользовательских модулей, встроенных в ядро.
- /var/log/lastlog — Отображает информацию о последней сессии всех пользователей. Это нетекстовый файл, для его просмотра необходимо использовать команду lastlog.
- /var/log/maillog /var/log/mail.log — журналы сервера электронной почты, запущенного в системе.
- /var/log/user.log — Информация из всех журналов на уровне пользователей.
- /var/log/Xorg.x.log — Лог сообщений Х сервера.
- /var/log/alternatives.log — Информация о работе программы update-alternatives. Это символические ссылки на команды или библиотеки по умолчанию.
- /var/log/btmp — лог файл Linux содержит информацию о неудачных попытках входа. Для просмотра файла удобно использовать команду last -f /var/log/btmp
- /var/log/cups — Все сообщения, связанные с печатью и принтерами.
- /var/log/anaconda.log — все сообщения, зарегистрированные при установке сохраняются в этом файле
- /var/log/yum.log — регистрирует всю информацию об установке пакетов с помощью Yum.
- /var/log/cron — Всякий раз когда демон Cron запускает выполнения программы, он записывает отчет и сообщения самой программы в этом файле.
- /var/log/secure — содержит информацию, относящуюся к аутентификации и авторизации. Например, SSHd регистрирует здесь все, в том числе неудачные попытки входа в систему.
- /var/log/wtmp или /var/log/utmp — системные логи Linux, содержат журнал входов пользователей в систему. С помощью команды wtmp вы можете узнать кто и когда вошел в систему.
- /var/log/faillog — лог системы linux, содержит неудачные попытки входа в систему. Используйте команду faillog, чтобы отобразить содержимое этого файла.
- /var/log/mysqld.log — файлы логов Linux от сервера баз данных MySQL.
- /var/log/httpd/ или /var/log/apache2 — лог файлы linux11 веб-сервера Apache. Логи доступа находятся в файле access_log, а ошибок в error_log
- /var/log/lighttpd/ — логи linux веб-сервера lighttpd
- /var/log/conman/ — файлы логов клиента ConMan,
- /var/log/mail/ — в этом каталоге содержатся дополнительные логи почтового сервера
- /var/log/prelink/ — Программа Prelink связывает библиотеки и исполняемые файлы, чтобы ускорить процесс их загрузки. /var/log/prelink/prelink.log содержит информацию о .so файлах, которые были изменены программой.
- /var/log/audit/— Содержит информацию, созданную демоном аудита auditd.
- /var/log/setroubleshoot/ — SE Linux использует демон setroubleshootd (SE Trouble Shoot Daemon) для уведомления о проблемах с безопасностью. В этом журнале находятся сообщения этой программы.
- /var/log/samba/ — содержит информацию и журналы файлового сервера Samba, который используется для подключения к общим папкам Windows.
- /var/log/sa/ — Содержит .cap файлы, собранные пакетом Sysstat.
- /var/log/sssd/ — Используется системным демоном безопасности, который управляет удаленным доступом к каталогам и механизмами аутентификации.
Чтобы посмотреть логи на Linux удобно использовать несколько утилит командной строки Linux. Это может быть любой текстовый редактор, или специальная утилита. Скорее всего, вам понадобятся права суперпользователя для того чтобы посмотреть логи в Linux. Вот команды, которые чаще всего используются для этих целей:
- less;
- more;
- cat;
- head;
- grep;
- tail;
- zcat;
- zgrep;
- zmore;
- vi;
- nano.
Я не буду останавливаться подробно на каждой из этих команд, поскольку большинство из них уже подробно рассмотрены на нашем сайте. Но приведу несколько примеров. Просмотр логов Linux выполняется очень просто:
Смотрим лог /var/log/dmesg, с возможностью прокрутки:
less /var/log/dmesg
Просмотр логов Linux, в реальном времени:
tail -f /var/log/dmesg
Открываем лог файл dmesg:
cat /var/log/dmesg
Первые строки dmesg:
head /var/log/dmesg
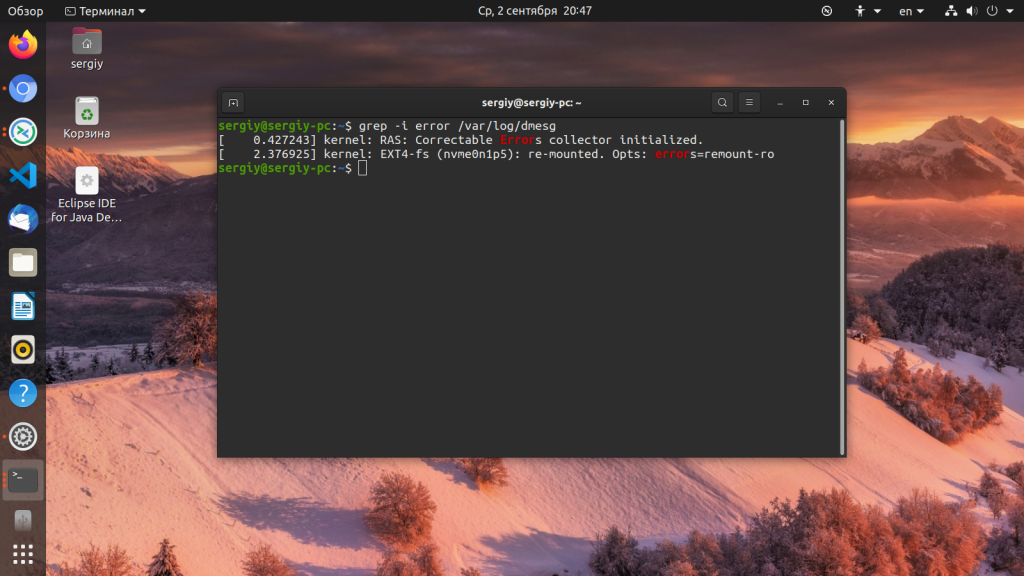
Выводим только ошибки из /var/log/messages:
grep -i error /var/log/dmesg
Кроме того, посмотреть логи на linux можно и с помощью графических утилит. Программа Журналы может быть использована для удобного просмотра и отслеживания системных журналов на ноутбуке или персональном компьютере с Linux.
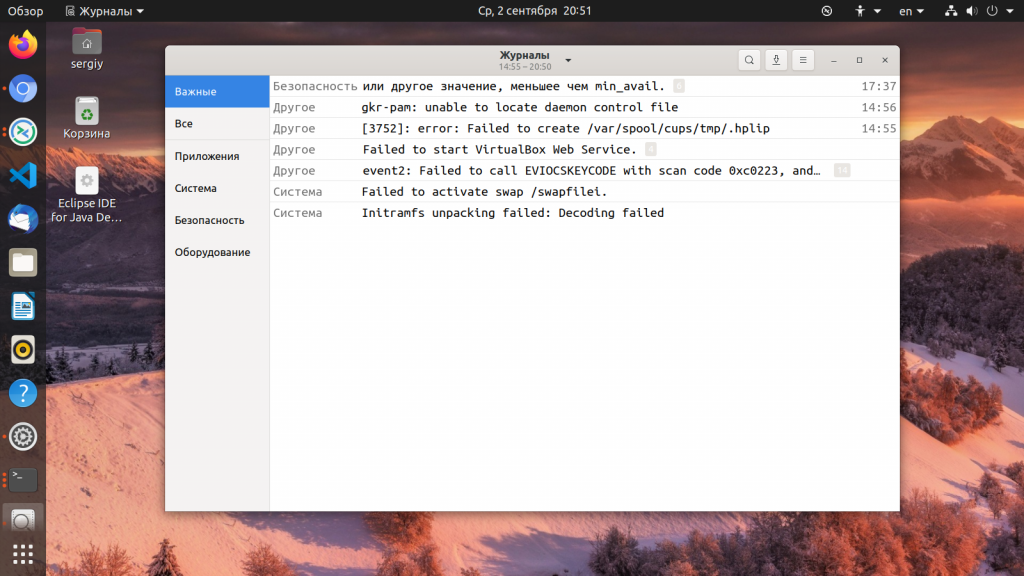
Вы можете установить программу в любой системе с установленным X сервером. Также для просмотра логов может использоваться любой графический тестовый редактор.
Кроме того, у каждого сервиса есть свой лог файл, который можно посмотреть с помощью утилиты journalctl.
Выводы
В каталоге /var/log вы можете найти всю необходимую информацию о работе Linux. Из сегодняшней статьи вы достаточно узнали, чтобы знать где искать, и что искать. Теперь просмотр логов в Linux не вызовет у вас проблем. Если остались вопросы, задавайте в комментариях!
Обнаружили ошибку в тексте? Сообщите мне об этом. Выделите текст с ошибкой и нажмите Ctrl+Enter.

Статья распространяется под лицензией Creative Commons ShareAlike 4.0 при копировании материала ссылка на источник обязательна .
Об авторе
![]()
Основатель и администратор сайта losst.ru, увлекаюсь открытым программным обеспечением и операционной системой Linux. В качестве основной ОС сейчас использую Ubuntu. Кроме Linux, интересуюсь всем, что связано с информационными технологиями и современной наукой.
1. Overview
The Linux operating system, and many applications that run on it, do a lot of logging. These logs are invaluable for monitoring and troubleshooting your system.
What you’ll learn
- Viewing logs with a simple GUI tool
- Basic command-line commands for working with log files
What you’ll need
- Ubuntu Desktop or Server
- Very basic command-line knowledge (
cd,ls, etc.)
Originally authored by Ivan Fonseca.
How will you use this tutorial?
-
Only read through it
Read it and complete the exercises
What is your current level of experience?
-
Novice
Intermediate
Proficient
2. Log files locations
There are many different log files that all serve different purposes. When trying to find a log about something, you should start by identifying the most relevant file. Below is a list of common log file locations.
System logs
System logs deal with exactly that — the Ubuntu system — as opposed to extra applications added by the user. These logs may contain information about authorizations, system daemons and system messages.
Authorization log
Location: /var/log/auth.log
Keeps track of authorization systems, such as password prompts, the sudo command and remote logins.
Daemon Log
Location: /var/log/daemon.log
Daemons are programs that run in the background, usually without user interaction. For example, display server, SSH sessions, printing services, bluetooth, and more.
Debug log
Location: /var/log/debug
Provides debugging information from the Ubuntu system and applications.
Kernel log
Location: /var/log/kern.log
Logs from the Linux kernel.
System log
Location: /var/log/syslog
Contains more information about your system. If you can’t find anything in the other logs, it’s probably here.
Application logs
Some applications also create logs in /var/log. Below are some examples.
Apache logs
Location: /var/log/apache2/ (subdirectory)
Apache creates several log files in the /var/log/apache2/ subdirectory. The access.log file records all requests made to the server to access files. error.log records all errors thrown by the server.
X11 server logs
Location: /var/log/Xorg.0.log
The X11 server creates a seperate log file for each of your displays. Display numbers start at zero, so your first display (display 0) will log to Xorg.0.log. The next display (display 1) would log to Xorg.1.log, and so on.
Non-human-readable logs
Not all log files are designed to be read by humans. Some were made to be parsed by applications. Below are some of examples.
Login failures log
Location: /var/log/faillog
Contains info about login failures. You can view it with the faillog command.
Last logins log
Location: /var/log/lastlog
Contains info about last logins. You can view it with the lastlog command.
Login records log
Location: /var/log/wtmp
Contains login info used by other utilities to find out who’s logged in. To view currently logged in users, use the who command.
This is not an exhaustive list!
You can search the web for more locations relevant to what you’re trying to debug. There is also a longer list here.
3. Viewing logs using GNOME System Log Viewer
The GNOME System Log Viewer provides a simple GUI for viewing and monitoring log files. If you’re running Ubuntu 17.10 or above, it will be called Logs. Otherwise, it will be under the name System Log.
System Log Viewer interface

The log viewer has a simple interface. The sidebar on the left shows a list of open log files, with the contents of the currently selected file displayed on the right.
The log viewer not only displays but also monitors log files for changes. The bold text (as seen in the screenshot above) indicates new lines that have been logged after opening the file. When a log that is not currently selected is updated, it’s name in the file list will turn bold (as shown by auth.log in the screenshot above).
Clicking on the cog at the top right of the window will open a menu allowing you to change some display settings, as well as open and close log files.
There is also a magnifying glass icon to the right of the cog that allows you to search within the currently selected log file.
More information
If you wish to learn more about the GNOME System Log Viewer, you may visit the official documentation.
4. Viewing and monitoring logs from the command line
It is also important to know how to view logs in the command line. This is especially useful when you’re remotely connected to a server and don’t have a GUI.
The following commands will be useful when working with log files from the command line.
Viewing files
The most basic way to view files from the command line is using the cat command. You simply pass in the filename, and it outputs the entire contents of the file: cat file.txt.
This can be inconvenient when dealing with large files (which isn’t uncommon for logs!). We could use an editor, although that may be overkill just to view a file. This is where the less command comes in. We pass it the filename (less file.txt), and it will open the file in a simple interface. From here, we can use the arrow keys (or j/k if you’re familiar with Vim) to move through the file, use / to search, and press q to quit. There are a few more features, all of which are described by pressing h to open the help.
Viewing the start or end of a file
We may also want to quickly view the first or last n number of lines of a file. This is where the head and tail commands come in handy. These commands work much like cat, although you can specify how many lines from the start/end of the file you want to view. To view the first 15 lines of a file, we run head -n 15 file.txt, and to view the last 15, we run tail -n 15 file.txt. Due to the nature of log files being appended to at the bottom, the tail command will generally be more useful.
Monitoring files
To monitor a log file, you may pass the -f flag to tail. It will keep running, printing new additions to the file, until you stop it (Ctrl + C). For example: tail -f file.txt.
Searching files
One way that we looked at to search files is to open the file in less and press /. A faster way to do this is to use the grep command. We specify what we want to search for in double quotes, along with the filename, and grep will print all the lines containing that search term in the file. For example, to search for lines containing “test” in file.txt, you would run grep "test" file.txt.
If the result of a grep search is too long, you may pipe it to less, allowing you to scroll and search through it: grep "test" file.txt | less.
Editing files
The simplest way to edit files from the command line is to use nano. nano is a simple command line editor, which has all the most useful keybindings printed directly on screen. To run it, just give it a filename (nano file.txt). To close or save a file, press Ctrl + X. The editor will ask you if you want to save your changes. Press y for yes or n for no. If you choose yes, it will ask you for the filename to save the file as. If you are editing an existing file, the filename will already be there. Simply leave it as it is and it will save to the proper file.
5. Conclusion
Congratulations, you now have enough knowledge of log file locations, usage of the GNOME System Log Viewer and basic command line commands to properly monitor and trouble-shoot problems that arise on your system.
Further reading
- The Ubuntu Wiki has an article that goes more in-depth into Ubuntu log files.
- This DigitalOcean Community article covers viewing Systemd logs
Was this tutorial useful?
Thank you for your feedback.
Если вы столкнулись с проблемами в работе сервера, первое, что нужно сделать — посмотреть логи Linux. В системный журнал записываются диагностические сообщения, поступающие от различных компонентов операционной системы, таких как ядро или службы, поэтому с большой долей вероятности причина сбоев будет найдена.
Каждое сообщение генерируется в результате возникновения какого-либо события в операционной системе. Событием может быть остановка службы, авторизации пользователя в системе или неполадки в работе приложения. События имеют определенный приоритет, в зависимости от степени критичности. В Linux различают следующие типы событий:
- emerg — авария, наивысший приоритет;
- alert — тревога;
- crit — критическое событие;
- err — ошибка;
- warn — внимание;
- notice — уведомление;
- info — информационное сообщение;
- debug — отладочная информация;
На сегодняшний день в Linux основными службами сбора логов являются rsyslog и systemd-journald, они работают независимо друг от друга и входят в состав большинства современных дистрибутивов.
rsyslog
Журналы службы находятся в директории “/var/log/” в виде обычных текстовых файлов. В зависимости от типа события, сообщения записываются в разные файлы. Например файл “/var/log/auth.log” содержит информацию о входе пользователей в систему, а в файл “/var/log/kern.log” записываются сообщения ядра. В разных дистрибутивах названия файлов могут отличаться, поэтому для точного понимания куда именно происходит запись сообщений рассмотрим файл конфигурации “/etc/rsyslog.d/50-default.conf”.

Правила описывают место хранения логов в зависимости от типа сообщения. В левой части строки указан тип сообщения в формате “[Источник].[Приоритет]”, а в правой части имя файла журнала. При записи типа сообщения можно применять символ “*”, обозначающий любое значение или параметр “none”, обозначающий исключение из списка. Рассмотрим более подробно первые два правила.
“auth,authpriv.* /var/log/auth.log”

“*.*;auth,authpriv.none -/var/log/syslog”
Первое правило означает, что все сообщения принятые от механизма авторизации будут записаны в файл “/var/log/auth.log”. В этом файле будут зарегистрированы все попытки входа пользователей в систему, как удачные так и не удачные. Второе правило говорит о том, что все сообщения, кроме тех, которые связаны с авторизацией будут записаны в файл “/var/log/syslog”. Именно к этим файлам приходится обращаться наиболее часто. Следующие правила определяют место хранения журналов ядра “kern.*” и почтовой службы “mail.*”
Журналы логов можно открыть любой утилитой для просмотра текста, например less, cat, tail. Откроем файл “/var/log/auth.log”
less /var/log/auth.log

Каждая строка файла является отдельным сообщением, поступившим от приложения или службы. Все сообщения, независимо от источника имеют единый формат и состоят из пяти частей. Рассмотрим их на примере выделенного сообщения на скриншоте.
- Дата и время регистрации сообщения — “Feb 12 06:18:33”
- Имя компьютера, с которого пришло сообщение — “vds”
- Имя программы или службы, к которой относится сообщение — “sshd”
- Идентификатор процесса, отправившего сообщение — [653]
- Текст сообщения — “Accepted password for mihail from 188.19.42.165 port 2849 ssh2”
Это был пример успешного подключения по ssh.
А так выглядит неудачная попытка:

В этом файле также фиксируется выполнение команд с повышенными правами.

Откроем файл /var/log/syslog

На скриншоте выделено сообщение о выключении сетевого интерфейса.
Для поиска нужной информации в больших текстовых файлах можно использовать утилиту grep. Найдем все сообщения от службы pptpd в файле “/var/log/syslog”
grep 'pptpd' /var/log/syslog

Во время диагностики можно использовать утилиту tail, которая выводит последние строки в файле. Команда “tail -f /var/log/syslog” позволит наблюдать запись логов в реальном времени.
Служба rsyslog является очень гибкой, высокопроизводительной и может использоваться для сбора логов как на локальных системах, так и на уровне предприятия. Полную документацию можно найти на официальном сайте https://www.rsyslog.com/
Запись логов происходит непрерывно и размер файлов постоянно растет. Механизм ротации обеспечивает автоматическое архивирование старых журналов и создание новых. В зависимости от правил, обработка журналов может выполняться ежедневно, еженедельно, ежемесячно или при достижении файлом определенного размера. По мере создания новых архивов, старые могут быть просто удалены или предварительно отправлены по электронной почте. Ротация выполняется утилитой logrotate. Основная конфигурация находится в файле “/etc/logrotate.conf”, также обрабатывается содержимое файлов в директории “/etc/logrotate.d/”
Новые правила можно записывать в основной файл конфигурации, но более правильным будет создание отдельного файла в директории “/etc/logrotate.d/” По умолчанию в директории уже содержится несколько файлов.

Рассмотрим файл “/etc/logrotate.d/rsyslog”, который содержит правила ротации для журналов службы rsyslog.

В начале правила указывается путь к файлу журнала, затем в фигурных скобках перечисляются директивы.
- rotate 7 — необходимо постоянно хранить 7 файлов
- daily — ежедневно будет создаваться новый файл
- compress — старые файлы необходимо архивировать.

На скриншоте видно, что в каталоге “/var/log/” находится основной журнал “syslog” и семь архивов, что соответствует правилам ротации.
Более подробное описание по настройке утилиты logrotate можно найти в мануале, выполнив команду “man logrotate”
journald
Служба сбора логов systemd-journald является частью системы инициализации systemd. Файлы журнал хранятся в директории “/var/log/journal/” в специальном формате и могут быть открыты с помощью утилиты journalctl. Формат записей такой же как у службы rsyslog.
Команда journalctl без параметров выводит на экран все записи, но учитывая, что объем журнала может достигать нескольких гигабайт, такой способ просмотра не подходит для практического применения. Рассмотрим некоторые опции утилиты.
- вывод записей с момента последней загрузки
journalctl -b - вывод записей за определенный период времени
journalctl -S "2020-02-17 12:00" -U "2020-02-17 12:10" - вывод записей, принятых от определенной службы
journalctl -u pptpd - вывод сообщений ядра
journalctl -k - вывод сообщений с определенным приоритетом, в данном случае будут выведены ошибки и более высокие приоритеты(crit, alert, emerg).
journalctl -p err - вывод сообщений в реальном времени
journalctl -f
Для более гибкого поиска опции можно совмещать. Выведем все ошибки службы pptpd
journalctl -u pptpd -p err

Если в качестве аргумента указать путь к исполняемому файлу, утилита выведет все сообщения, отправленные этим файлом. Выведем сообщения, отправленные файлом “/usr/bin/sudo” начиная с 04:15 18-го февраля 2020 года. Фактически будут выведены все команды, выполненные с повышенными правами.
journalctl -S "2020-02-18 04:15" /usr/bin/sudo

Для того, чтобы узнать сколько места на диске занимают файлы журнала, выполним команду
journalctl --disk-usage
Для ограничения объема журнала размером 1Gb выполним команду
journalctl --vacuum-size=1G
Открытие бинарных файлов
В заключении рассмотрим несколько специальных файлов в директории “/var/log/”, в которых регистрируются попытки входа пользователей в систему. Это бинарные файлы, которые могут быть открыты только специальными утилитами.
/var/log/wtmp — содержит информацию об успешном входе пользователей в систему, для открытия используется утилита last

/var/log/btmp — в файле регистрируются все неудачные попытки входа в систему, открывается командой lastb с повышенными правами. Параметр -n определяет количество выводимых строк начиная с конца файла.

/var/log/lastlog — содержит время последнего входа для каждой учетной записи, может быть открыт одноименной утилитой lastlog

This is a classic article written by Jack Wallen from the Linux.com archives. For more great SysAdmin tips and techniques check out our free intro to Linux course.
At some point in your career as a Linux administrator, you are going to have to view log files. After all, they are there for one very important reason…to help you troubleshoot an issue. In fact, every seasoned administrator will immediately tell you that the first thing to be done, when a problem arises, is to view the logs.
And there are plenty of logs to be found: logs for the system, logs for the kernel, for package managers, for Xorg, for the boot process, for Apache, for MySQL… For nearly anything you can think of, there is a log file.
Most log files can be found in one convenient location: /var/log. These are all system and service logs, those which you will lean on heavily when there is an issue with your operating system or one of the major services. For desktop app-specific issues, log files will be written to different locations (e.g., Thunderbird writes crash reports to ‘~/.thunderbird/Crash Reports’). Where a desktop application will write logs will depend upon the developer and if the app allows for custom log configuration.
We are going to be focus on system logs, as that is where the heart of Linux troubleshooting lies. And the key issue here is, how do you view those log files?
Fortunately there are numerous ways in which you can view your system logs, all quite simply executed from the command line.
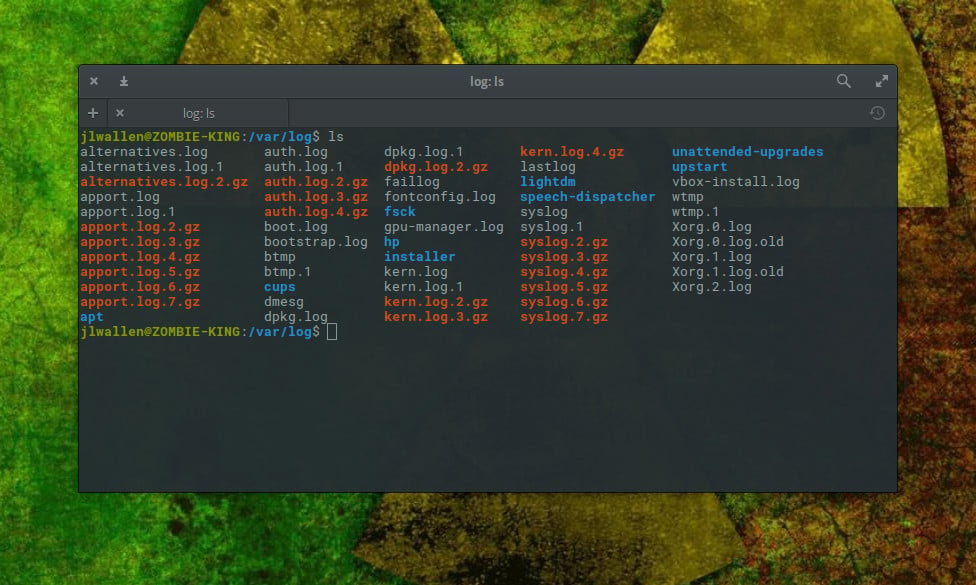
/var/log
This is such a crucial folder on your Linux systems. Open up a terminal window and issue the command cd /var/log. Now issue the command ls and you will see the logs housed within this directory (Figure 1).
Now, let’s take a peek into one of those logs.
Viewing logs with less
One of the most important logs contained within /var/log is syslog. This particular log file logs everything except auth-related messages. Say you want to view the contents of that particular log file. To do that, you could quickly issue the command less /var/log/syslog. This command will open the syslog log file to the top. You can then use the arrow keys to scroll down one line at a time, the spacebar to scroll down one page at a time, or the mouse wheel to easily scroll through the file.
The one problem with this method is that syslog can grow fairly large; and, considering what you’re looking for will most likely be at or near the bottom, you might not want to spend the time scrolling line or page at a time to reach that end. Will syslog open in the less command, you could also hit the [Shift]+[g] combination to immediately go to the end of the log file. The end will be denoted by (END). You can then scroll up with the arrow keys or the scroll wheel to find exactly what you want.
This, of course, isn’t terribly efficient.
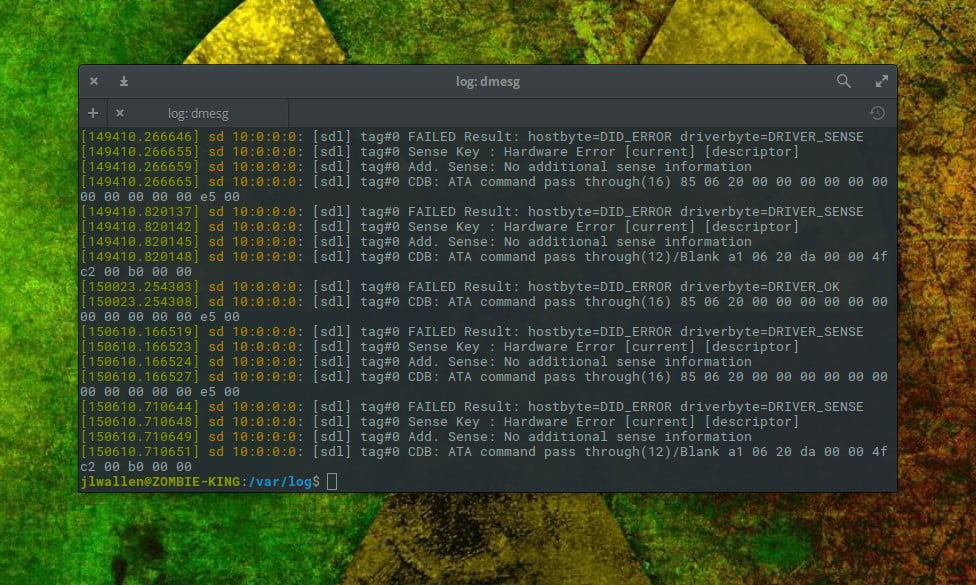
Viewing logs with dmesg
The dmesg command prints the kernel ring buffer. By default, the command will display all messages from the kernel ring buffer. From the terminal window, issue the command dmesg and the entire kernel ring buffer will print out (Figure 2).
Fortunately, there is a built-in control mechanism that allows you to print out only certain facilities (such as daemon).
Say you want to view log entries for the user facility. To do this, issue the command dmesg –facility=user. If anything has been logged to that facility, it will print out.
Unlike the less command, issuing dmesg will display the full contents of the log and send you to the end of the file. You can always use your scroll wheel to browse through the buffer of your terminal window (if applicable). Instead, you’ll want to pipe the output of dmesg to the less command like so:
dmesg | less
The above command will print out the contents of dmesg and allow you to scroll through the output just as you did viewing a standard log with the less command.
Viewing logs with tail
The tail command is probably one of the single most handy tools you have at your disposal for the viewing of log files. What tail does is output the last part of files. So, if you issue the command tail /var/log/syslog, it will print out only the last few lines of the syslog file.
But wait, the fun doesn’t end there. The tail command has a very important trick up its sleeve, by way of the
-f option. When you issue the command
tail -f /var/log/syslog, tail will continue watching the log file and print out the next line written to the file. This means you can follow what is written to syslog, as it happens, within your terminal window (Figure 3).
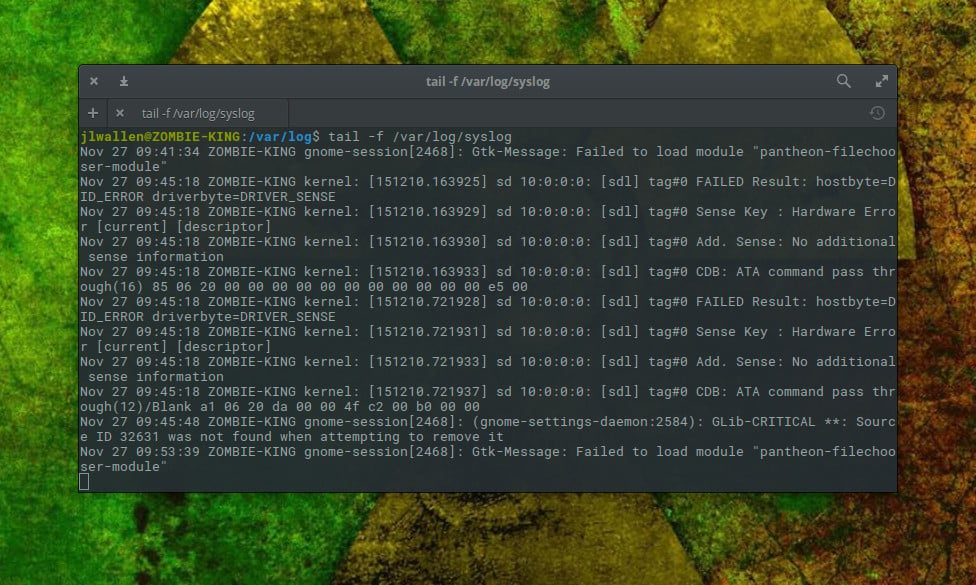
Using tail in this manner is invaluable for troubleshooting issues.
To escape the tail command (when following a file), hit the [Ctrl]+[x] combination.
You can also instruct tail to only follow a specific amount of lines. Say you only want to view the last five lines written to syslog; for that you could issue the command:
tail -f -n 5 /var/log/syslog
The above command would follow input to syslog and only print out the most recent five lines. As soon as a new line is written to syslog, it would remove the oldest from the top. This is a great way to make the process of following a log file even easier. I strongly recommend not using this to view anything less than four or five lines, as you’ll wind up getting input cut off and won’t get the full details of the entry.
There are other tools
You’ll find plenty of other commands (and even a few decent GUI tools) to enable the viewing of log files. Look to more, grep, head, cat, multitail, and System Log Viewer to aid you in your quest to troubleshooting systems via log files.
Advance your career with Linux system administration skills. Check out the Essentials of System Administration course from The Linux Foundation.
What are Linux Log Files?
All Linux systems create and store information log files for boot processes, applications, and other events. These files can be a helpful resource for troubleshooting system issues.
Most Linux log files are stored in a plain ASCII text file and are in the /var/log directory and subdirectory. Logs are generated by the Linux system daemon log, syslogd or rsyslogd.
This tutorial will walk you through how to find and read Linux log files, and configure the system logging daemon.

Prerequisites
- Access to Linux
- A user account with root user privileges
1. First, open the Linux terminal as a root user. This will enable root privileges.
2. Use the following command to see the log files:
cd /var/log3. To view the logs, type the following command:
lsThe command displays all Linux log files, such as kern.log and boot.log. These files contain the necessary information for the proper function of the operating system.
Log files are accessed using root privileges. By definition, root is the default account that has access to all Linux files.
Use the following example line command to access the respective file:
sudo less [log name here].logThis command displays a timeline of all information related to that operation.
Note that log files are stored in plain text so they can be viewed by using the following standard commands:
zcat – Displays all the contents of logfile.gz
zmore – See the file in pages, without decompressing the files
zgrep – Search inside a compressed file
grep – Find all occurrences of a search term in a file or filter a log file
<a href="https://phoenixnap.com/kb/linux-tail" target="_blank" rel="noreferrer noopener">tail</a> – Output the last few lines of files
head – View the very beginning of text files
Note: Check out our comprehensive guide on grep to learn how to use it with examples.
Important Linux System Logs
Logs can tell a lot about the operations of a system. A good understanding of each type of file will help how to distinguish the respective logs.
Most directories can be grouped into one of four categories:
- System Logs
- Event Logs
- Application Logs
- Service Logs
Many of these logs can be located in the var/log subdirectory.
System Logs
Systems log files are needed for Linux to work. On its own, it contains the most significant amount of information about system functionality. The most common log files are:
/var/log/boot.log: System Boot log (the boot log stores all information related to booting operations)/var/log/auth.log: Auth logs (the authentication log stores all authentication logs, including successful and failed attempts)/var/log/httpd/: Apache access and error logs/var/log/mysqld.log: MySQL database server log file/var/log/debug: Debug logs (the debug log stores detailed messages related to debugging and is useful for troubleshooting specific system operations)/var/log/daemon.log: Daemon logs (the daemon log contains information about events related to running the Linux operation)/var/log/maillog: Mail server logs (the mail log stores information related to mail servers and archiving emails)/var/log/kern.log: Kernel logs (the kernel log stores information from the Ubuntu Linux kernel)/var/log/yum.log: Yum command logs
System Logging Daemon
A daemon log is a program that runs in the background and is essential for system operations. These logs have their own category of logs and are seen as the heart of the logging operations for any system.
The path for the system login daemon’s configuration is /etc/syslog.conf.
Each file consists of a selector and an action entry field. The syslogd daemon can forward log messages as well. This can be useful for debugging purposes.
Application Logs
Application logs store information relevant to any application that is executed. This can include error messages, signs of system compromise, and browser identification string.
Log files that fall into this category include CUPS Print System logs, Rootkit Hunter log, Apache HTTP server logs, Samba SMB server logs, and X11 server log.
Non-Human-Readable Logs
Not all logs are designed in a human-readable format. Some are designed only to be read by system applications. Such files are often related to login information. They include login failure logs, last logins logs, and login records.
There are tools and software for reading Linux log files. They are not necessary for reading files as most can be read directly from the Linux terminal.
Supplemental GUIs for Viewing Linux Log Files
System Log Viewer is a GUI that can be used to monitor system logs.
The interface provides several functions for managing logs, including a log statistics display. It is a user-friendly log monitoring GUI.
Useful features include:
- A live view of logs
- Number of lines in the log
- Log size
- Most recent log dates
- Modifications made to logs
- Filters
- Keyboard Shortcuts
Alternatively, use Xlogmaster which can monitor a considerable number of log files. It features three different modes:
- Run mode: Starts a specified program and obtains stdout
- Cat mode: Cats files within specified intervals
- Tail mode: Checks log files within regular intervals
Xlogmaster is useful for increasing security. It translates all data for highlighting, hiding lines, and displays this information for taking user requested action.
How to Configure Log Files on Ubuntu and CentOS
This section explains different mechanisms for configuring log files. Let’s start with a CentOS example.
To view users currently logged onto a Linux server, enter the who command as a root user:
who
This also lists the login history of users. To view the login history of the system administrator, enter the following command:
last reboot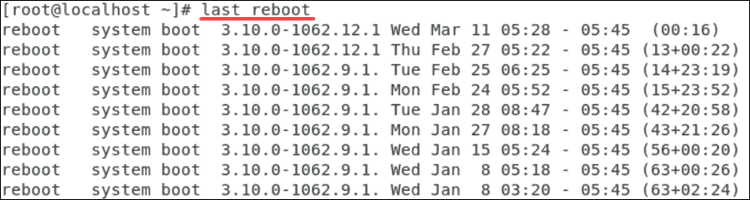
To view information of the last login, enter:
lastlog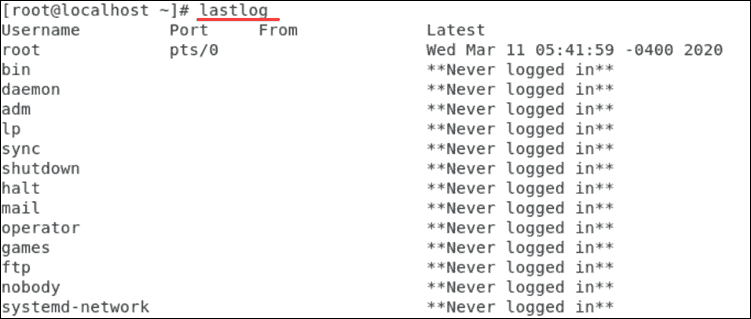
Execute Log Rotation
Log files that have zeroes appended at the end are rotated files. That means log file names have automatically been changed within the system.
The purpose of log rotation is to compress outdated logs that are taking up space. Log rotation can be done using the logrotate command. This command rotates, compresses, and mails system logs.
logrotate handles systems that create significant amounts of log files. The command is used by the cron scheduler and reads the logrotate configuration file /etc/logrotate.conf. It’s also used to read files in the logrotate configuration directory.
To include additional functionality to logrotate, start by entering the following command:
var/log/log name here].log {
Missingok
Notifempty
Compress
Size 20k
Daily
Create 0600 root root
}
It compresses and resizes the desired log file.
The commands perform the actions as follows:
missingok – Tells logrotate not to output an error if a log file is missing
notifempty – Does not rotate the log file if it is empty. It reduces the size of the log file with gzip
size – Ensures that the log file does not exceed the specified dimension and rotates it otherwise
daily – Rotates the log files on a daily schedule. This can also be done on a weekly or monthly schedule
create – Instantiates a log file where the owner and group are a root user
Conclusion
A thorough understanding of how to view and read Linux logs is necessary for troubleshooting a Linux system.
Using the proper commands and tools can simplify this process.