
| title | description | author | ms.date | ms.author |
|---|---|---|---|---|
|
Error handling |
An article on how to catch and handle errors in Power Query using the syntax try and otherwise. |
ptyx507x |
12/9/2022 |
miescobar |
Error handling
Similar to how Excel and the DAX language have an IFERROR function, Power Query has its own syntax to test and catch errors.
As mentioned in the article on dealing with errors in Power Query, errors can appear either at the step or cell level. This article will focus on how you can catch and manage errors based on your own specific logic.
[!Note]
To demonstrate this concept, this article will use an Excel Workbook as its data source. The concepts showcased here apply to all values in Power Query and not only the ones coming from an Excel Workbook.
The sample data source for this demonstration is an Excel Workbook with the following table.

This table from an Excel Workbook has Excel errors such as #NULL!, #REF!, and #DIV/0! in the Standard Rate column. When you import this table into the Power Query editor, the following image shows how it will look.

Notice how the errors from the Excel workbook are shown with the [Error] value in each of the cells.
In this article, you’ll learn how to replace an error with another value. In addition, you’ll also learn how to catch an error and use it for your own specific logic.
In this case, the goal is to create a new Final Rate column that will use the values from the Standard Rate column. If there are any errors, then it will use the value from the correspondent Special Rate column.
Provide an alternative value when finding errors
In this case, the goal is to create a new Final Rate column in the sample data source that will use the values from the Standard Rate column. If there are any errors, then it will use the value from the corresponding Special Rate column.
To create a new custom column, go to the Add column menu and select Custom column. In the Custom column window, enter the formula try [Standard Rate] otherwise [Special Rate]. Name this new column Final Rate.

The formula above will try to evaluate the Standard Rate column and will output its value if no errors are found. If errors are found in the Standard Rate column, then the output will be the value defined after the otherwise statement, which in this case is the Special Rate column.
After adding the correct data types to all columns in the table, the following image shows how the final table looks.

[!NOTE]
As an alternative approach, you can also enter the formulatry [Standard Rate] catch ()=> [Special Rate], which is equivalent to the previous formula, but using the catch keyword with a function that requires no parameters.The
catchkeyword was introduced to Power Query in May of 2022.
Provide your own conditional error logic
Using the same sample data source as the previous section, the new goal is to create a new column for the Final Rate. If the value from the Standard Rate exists, then that value will be used. Otherwise the value from the Special Rate column will be used, except for the rows with any #REF! error.
[!Note]
The sole purpose of excluding the#REF!error is for demonstration purposes. With the concepts showcased in this article, you can target any fields of your choice from the error record.
When you select any of the whitespace next to the error value, you get the details pane at the bottom of the screen. The details pane contains both the error reason, DataFormat.Error, and the error message, Invalid cell value '#REF!':

You can only select one cell at a time, so you can effectively only see the error components of one error value at a time. This is where you’ll create a new custom column and use the try expression.
Use try with custom logic
To create a new custom column, go to the Add column menu and select Custom column. In the Custom column window, enter the formula try [Standard Rate]. Name this new column All Errors.

The try expression converts values and errors into a record value that indicates whether the try expression handled an error or not, as well as the proper value or the error record.

You can expand this newly created column with record values and look at the available fields to be expanded by selecting the icon next to the column header.

This operation will expose three new fields:
- All Errors.HasError—displays whether the value from the Standard Rate column had an error or not.
- All Errors.Value—if the value from the Standard Rate column had no error, this column will display the value from the Standard Rate column. For values with errors this field won’t be available, and during the expand operation this column will have
nullvalues. - All Errors.Error—if the value from the Standard Rate column had an error, this column will display the error record for the value from the Standard Rate column. For values with no errors, this field won’t be available, and during the expand operation this column will have
nullvalues.

For further investigation, you can expand the All Errors.Error column to get the three components of the error record:
- Error reason
- Error message
- Error detail
After doing the expand operation, the All Errors.Error.Message field displays the specific error message that tells you exactly what Excel error each cell has. The error message is derived from the Error Message field of the error record.

Now with each error message in a new column, you can create a new conditional column with the name Final Rate and the following clauses:
- If the value in the All Errors.Errors.Message column equals
null, then the output will be the value from the Standard Rate column. - Else, if the value in the All Errors.Errors.Message column doesn’t equal
Invalid cell value '#REF!'., then the output will be the value from the Special Rate column. - Else, null.

After keeping only the Account, Standard Rate, Special Rate, and Final Rate columns, and adding the correct data type for each column, the following image demonstrates what the final table looks like.

Use try and catch with custom logic
Alternatively, you can also create a new custom column using the try and catch keywords.
try [Standard Rate] catch (r)=> if r[Message] <> "Invalid cell value '#REF!'." then [Special Rate] else null

More resources
- Understanding and working with errors in Power Query
- Add a Custom column in Power Query
- Add a Conditional column in Power Query
In Excel we can use IFERROR to if our calculation results in an error, and we can then tell Excel to produce a different result, instead of the error.
Power Query doesn’t have IFERROR but it does have a way of checking for errors and replacing that error with a default answer, it’s called try otherwise
In this post I’ll show you how to use try otherwise to handle errors when loading data, how to handle errors in your transformations and how to handle errors when your query can’t locate a data source.
Watch the Video

Download Sample Excel Workbook
Enter your email address below to download the sample workbook.
By submitting your email address you agree that we can email you our Excel newsletter.
First up, let’s load data from this table.
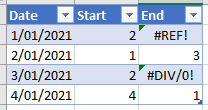
I’ve already generated a couple of errors in this table, and of course I can obviously see them and I could fix them before loading into Power Query.
But when using Power Query this isn’t always the situation. Your query will be loading data without knowing what it is so how would it handle these errors?
Let’s load the data into Power Query and call it Errors from Sheet
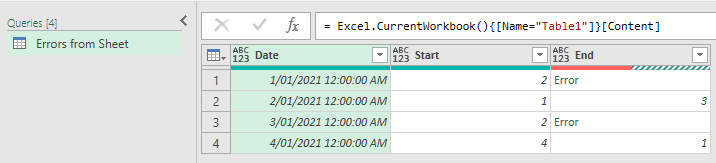
Straight away you can see the errors in the column.
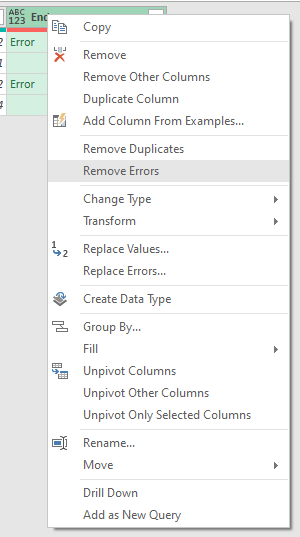
Now of course you could use Remove Errors but that would remove the rows with the errors and that’s not what I want.
Or I could use Replace Errors, but this doesn’t give me any idea what the cause of the error is.
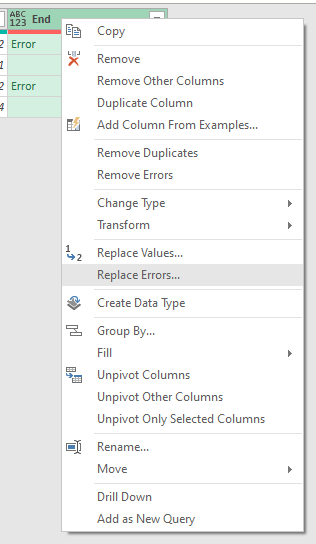
I want to see what caused the error and to do this I’ll add a Custom Column and use try [End]
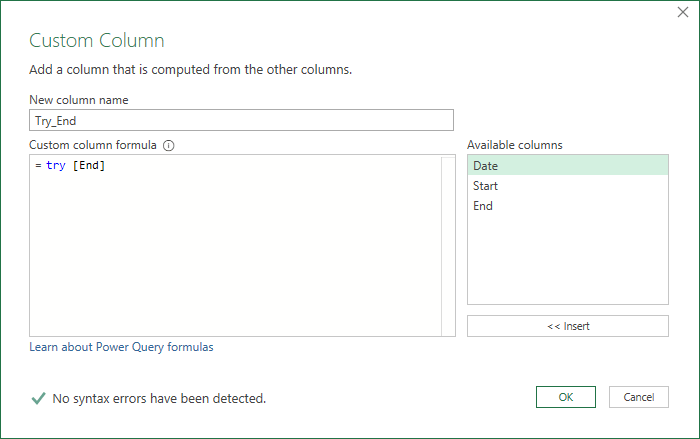
This creates a new column with a Record in each row

In this record are two fields. HasError states whether or not there’s an error in the [End] column
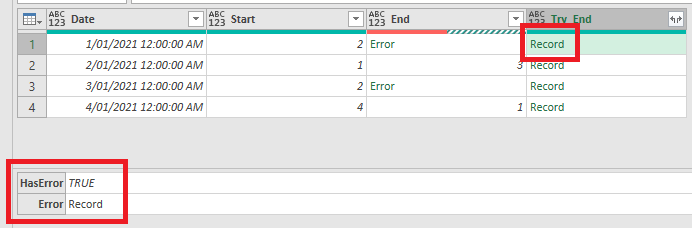
If there is an Error then the 2nd field is another record containing information about that error
If there isn’t an error, then the 2nd field is the value from the [End] column
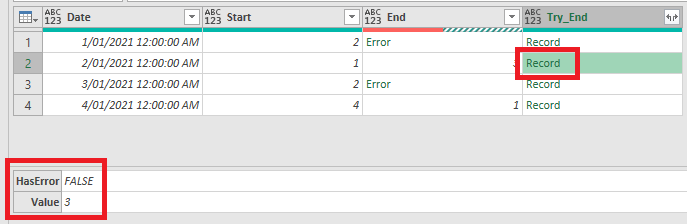
If I expand the new column I get 3 new columns containing the HasError value which is boolean, and either an Error or a Value

Checking what’s in the Error Records, you can see the Reason for the error, DataFormat.Error, this is from Power Query
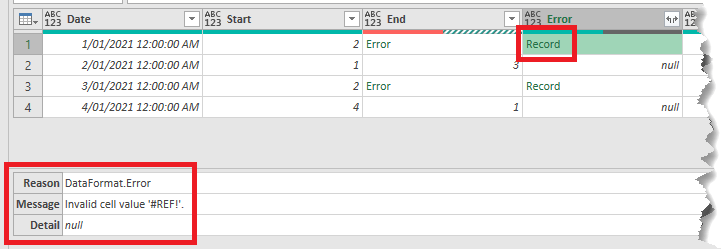
There’s the Message, which is the error from the Excel sheet, and some errors give extra Detail, but not in this case.
If I expand this Error column I can see all of these fields.

I’ve ended up with a lot of extra columns here and it’s a bit messy so let’s tidy it up. In fact I’ll duplicate the query and show you another way to get the same information in a neater way
The new query is called Errors from Sheet (Compact) and I’ve deleted all steps except the first two.
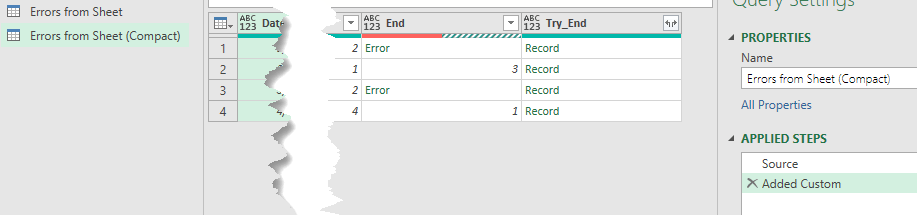
What I want to do is , check for an error in the Try_End column, and if there is one I want to see the error message from Excel.
If there isn’t an error I want the value from the [End] column.
I can do all of this in a new column using an if then else
Add a new Custom Column called Error or Value and enter this code
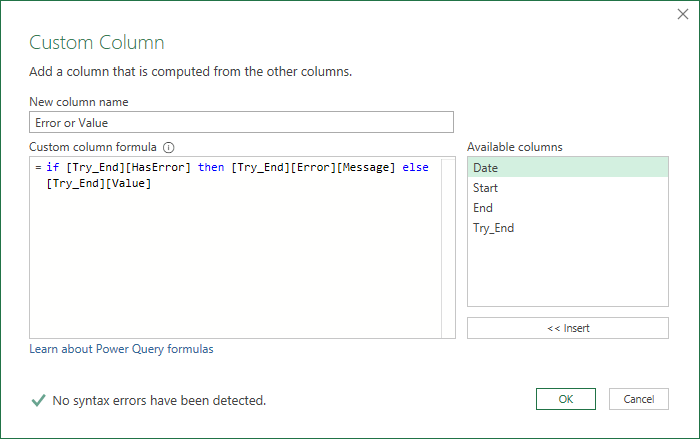
What this is saying is:
- If the boolean value [HasError] in the [Try_End] column is true then
- return the [Message] in the [Error] record of the [Try_End] column
- else return the [Value] from the [Try_End] column
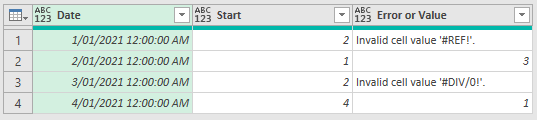
With that written I can remove both the End and Try_End columns so the final table looks like this
Checking for Errors and Replacing Them With Default Values
In this scenario I don’t care what the error is or what caused it, I just want to make sure my calculations don’t fail.
I duplicate the original query again, calling this one Error in Calculation, and remove every step except the Source step
I add a new Custom column called Result and what I’ll do here is divide [Start] by [End]
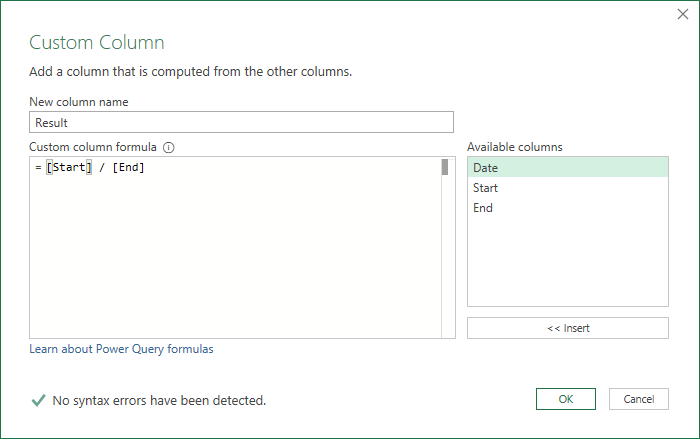
this gives me an error as I know it will in rows 1 and 3

so to avoid this, edit the step and use try .. otherwise
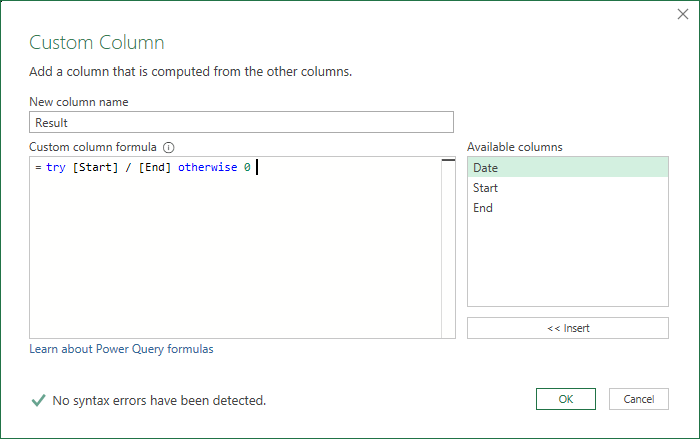
now the errors are replaced with 0.

Errors Loading Data from A Data Source
I’ll create a new query and load from an Excel workbook
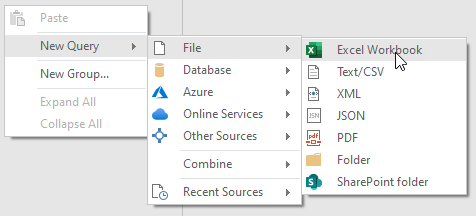
Navigating to the file I want I load it
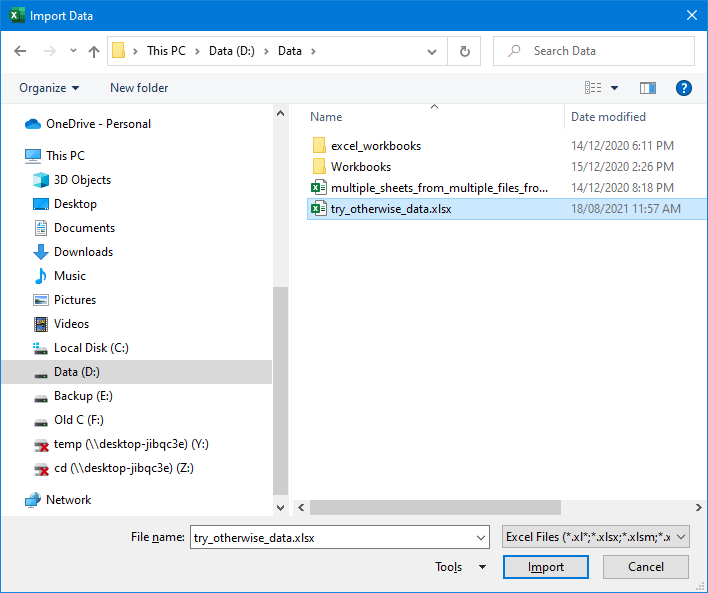
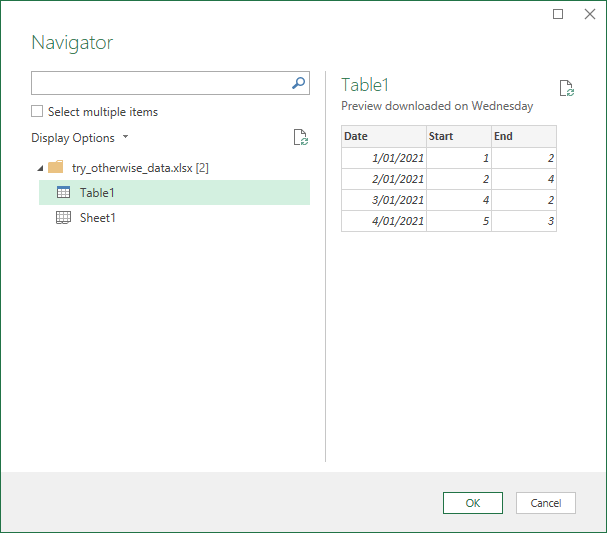
and loading this table

I’m not going to do any transformations because I just want to show you how to deal with errors finding this source file.
I’ll open the Advanced Editor (Home -> Advanced Editor) and change the path, so that I know I’ll get an error. Here I change the drive letter to X.
I don’t have an X: drive so I know this will cause the workbook loading to fail.


So that’s what happens when the file can’t be found so let’s say I have a backup or alternate file that I want to load if my main file can’t be found.
Open the Advanced Editor again and then use try otherwise to specify the backup file’s location
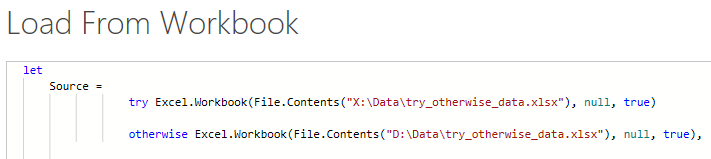
close the editor and now my backup file is loaded.

In this post, I am going to talk about the IFERROR function in Power Query. There is no explicit IFERROR function in Power Query but we have try and otherwise statement which works similar to the IFERROR function in Excel.
IFERROR in Power Query (try and otherwise) – Video
Power Query try and otherwise – Example 1
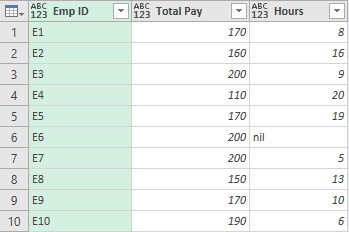
- Consider this sample data. I have Employee ID, Total Pay, and Hours.
- I created a Custom Column to calculate Pay per Hour
= [Total Pay] / [Hours]
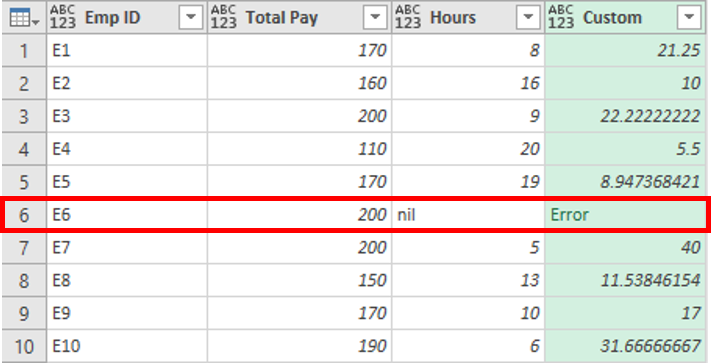
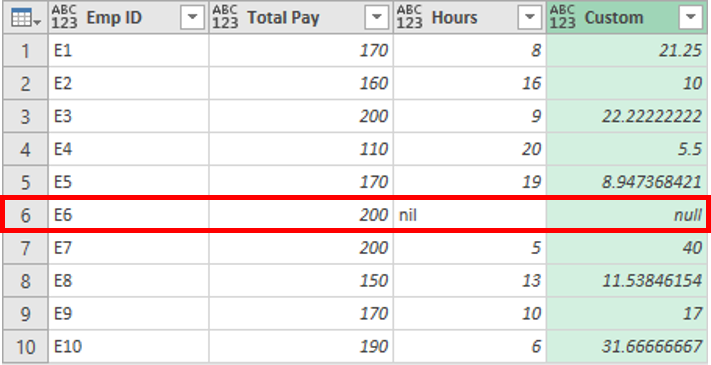
Note – Emp ID 6 returns an error because 200 is divided by a text = “nil”. To correct the above error, I am going use try and otherwise within the formula
= try [Total Pay]/[Hours] otherwise null
As an output, I got a null instead of an Error.
Power Query try and otherwise – Example 2
The try and otherwise statement can also be applied to the entire step.
- I deleted the Custom Column for Pay/Hours
- And Changed Type, results in an error since it wasn’t able to find the previous step
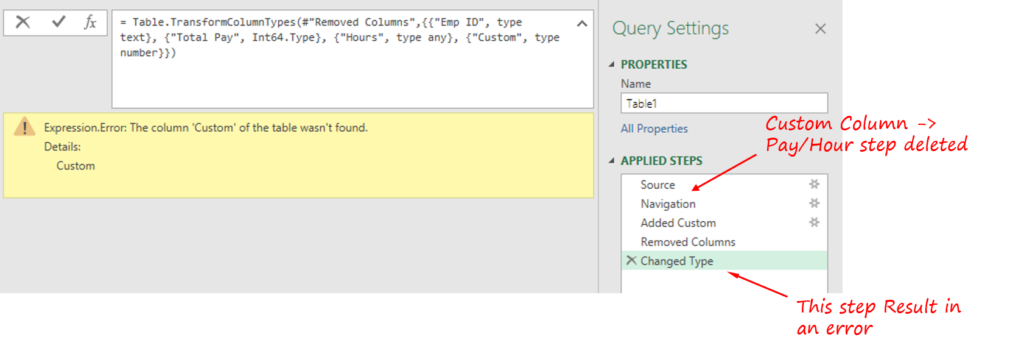
This is a step-level error that happened at the Changed Type Step.
To fix this error I will surround my entire formula with the try and otherwise statement in the formula bar.
= try
    Table.TransformColumnTypes(Source, {{'Pay/Hours', type number}})
otherwise
    #'Removed Columns'
If the above formula (which is trying to change the type of Pay/Hours) returns an error then the otherwise statement returns the previous step – Removed Columns. The query throws no errors.
Power Query try and otherwise – Example 3
This time let’s write the try statement (without otherwise). Let’s calculate Pay/Hours but this time with only the try keyword.
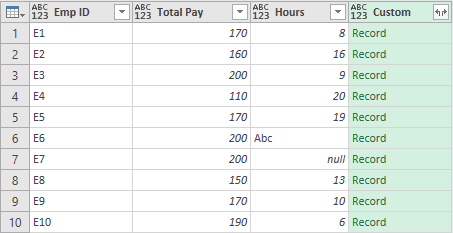
Create a new Custom column with the following formula,
= try [Total Pay]/[Hours]
As a result, it gives me a column that contains records.
Expanding Custom column is going to return 3 more columns.
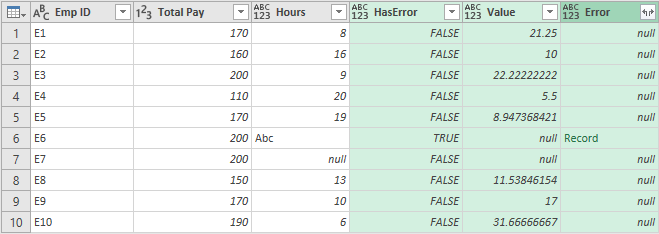
- HasError – Shows TRUE if the formula resulted in an Error.
- Value – Is the output of the formula with no errors.
- Error – Again contains records that will describe the error upon expanding.
Upon further expanding the Error column.
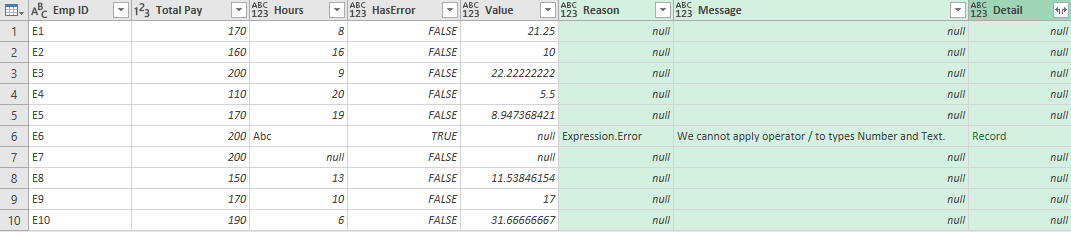
We again get 3 more columns,
- Reason – This tells the reason for the error.
- Message – This shows what actually the error is.
- Detail – Tells the information of the error, message about the error.
On further expanding Detail column we get even more details about the error on that particular row.

So this is a very crude way of doing some very basic error reporting on your data in case your Power Query steps result in any errors.
More on Power Query
Promote Double Headers in Power Query
5 Tricks to Reduce Steps in Power Query
Remove Top Rows and Combine Data from Multiple Excel Files
Quick VLOOKUP in Power Query
Dynamic Unpivoting in Power Query

Chandeep
Welcome to Goodly! My name is Chandeep.
On this blog I actively share my learning on practical use of Excel and Power BI. There is a ton of stuff that I have written in the last few years. I am sure you’ll like browsing around.
Please drop me a comment, in case you are interested in my training / consulting services. Thanks for being around
Chandeep
IMPORTANT: You can read the official documentation that Microsoft has on this topic from the following link (url).
If you haven’t read the first two posts (Part 1 | Part 2) in this series yet, I welcome you to do so before reading this one.
I also recommend that you check out this post on Query Error Auditing so you get a better understanding of what types of errors you can find in Power BI / Power Query.
This is a post on how to use error handling, similar to an IFERROR in DAX and Excel, but for Power Query (using its M language).
How does Error handling works in Excel & DAX?
In Excel and in DAX we have the IFERROR function which works like this:
=IFERROR( value, value_if_error)
Taken directly from the official DAX documentation:
Evaluates an expression and returns a specified value if the expression returns an error; otherwise returns the value of the expression itself.
It’s a pretty simple and straightforward function in DAX and Excel, where you can enter your formula in the “value” parameter and then, if you get an error from it, you can define what should be the output value in the “value_if_error” parameter.
The whole idea is that you can “catch” an error and use a different value when it finds an error.
How does Error handling works in Power BI / Power Query?
In Power Query the code is a bit different. Let’s see it in action and then talk more about it.
Imagine that we have an Excel workbook with a table like this
 :
:
What we would like to create is a new column that should multiply the values from the [Price] and [Amount] columns to create a new Subtotal column.
One caveat, as you can probably see, is that this spreadsheet has some cells with errors on the [Price] column. In the event that we find an error on the Price column, we need to use the value from the [List Price] instead of the [Price] value.
The first thing that we need to do is import that table from Excel. If you’d like to follow along, you can download the workbook by clicking the button below:
Importing data from the Excel Workbook
I’ll be using Power BI Desktop for this, but you can use Excel as well.
The first thing that we need to do is select the Excel connector and connect to our file:

and once you get the “Navigator” window, you can select the table that reads “Sample”:

Notice how there’s a bunch of errors in that [Price] column just in the preview. Let’s hit the “Edit” button so we can go to the Power Query Editor Window.
Using error handling in Power BI /Power Query
Now that we have our data in the Power Query Editor window:
 what we want to do is create a Custom Column, so we simply go to the “Add Column” menu and hit on “Custom Column”.
In there, we try do create a simple column that will multiply the [Price] column by the [Amount] column:

and as you can see, our [Subtotal] column has some errors.
We know that in Excel and DAX you can use IFERROR, but what can you use in Power Query ?
For Power Query, we need to hit modify that Custom Column code (just click the gear icon next to the Added Custom step) and add the following pieces to it:

try [Price]*[Amount] otherwise [Amount]*[List Price]
We need to use the keywords “try” and “otherwise”. It’s pretty easy to read, but it just says to try and evaluate the expression ([Price] * [Amount]) and if that gives an error, use the expression defined after the otherwise statement.
The result of that will look like this:

pretty simple! almost as simple as the IFERROR function in DAX and Excel where intellisense does explain you a bit how to use that function, but in Power Query you need to understand how this works in order to use it. Is nowhere in the User Interface of Power Query, so you need to write this code manually.
Understanding Errors
The workbook sample that I’m using is fairly simple. I’ve had experiences where some users / customers absolutely need to know when a specific error is found from an Excel Workbook.
What happens with Power Query is that it just flags any errors found as “Error” but, what if you needed to know WHY it shows as an error?
Let’s go back to our initial load of the file. Remember that in most cases Power Query will automatically try to add a “Changed Type” step, so what if we remove that step?

Well, I removed the step and I’m still seeing the errors and that’s because the error wasn’t triggered by a data type conversion, but rather it’s a source error, meaning that the error comes directly from the Excel Workbook.
In Workbook with vast amounts of rows, it’s hard to tell if there are any errors at all and doing a “Replace Errors” will not tell us why those errors occurred. We NEED to know what is the error from the source because we want to handle each type of error differently.
Error Message and Error Reason
To figure out what’s the reason why there’s an error, we need to use the “try” statement again.

Note how I only use “try” and not the “otherwise” statement. This will give me a new column with record values. We can expand those records like this:

the most important field from those records it’s the “Error” field which can be either a null or a record value:

and after expanding that column and deleting some others that we don’t need, I end up with this:

I’ve highlighted the most important field after this whole process which is the “Message” which tells me exactly the reason why this is an error.
I can later use this to my advantage and target specific errors differently or get a report of ALL the errors found on a series of files that my department / group uses. This is extremely helpful if you’re trying to validate everything and make sure that we don’t have any errors at the source.
Don’t forget that these same principles work for both Step and cell Value level errors.
Data is the daily bread-and-butter for any analyst. In order to provide good results you also need good data. Sometimes this data is very well prepared beforehand and you can use it as it is but it is also very common that you need to prepare and transform the data on your own. To do this Microsoft has introduced Power Query (on tool of the Power BI suite). Power Query can be used to extract, transform and load data into Excel and/or Power Pivot directly.
When using any data you usually know what the data looks like and what to expect from certain columns – e.g. a value is delivered as a number, a text contains exactly 4 characters, etc.
Though, sometimes this does not apply for all rows of that dataset and your transformation logics may cause errors because of that. In order to avoid this and still have a clean data load you need to handle those errors. Power Query offers several options to this which I will elaborate in this post.
This is the sample data I will use for the following samples:
| A | B | C |
| 1 | 4 | AXI23 |
| 2 | 5 | TZ560 |
| NA | 6 | UP945 |
we will perform simple transformations and type casts on this table to generate some errors:

Error-handling on row-level
This is the easiest way of handling errors. Whenever a transformation causes an error, we can simply remove the whole row from the result set:

This will generate the following result table:
| A | B | C |
| 1 | 4 | AX312 |
| 2 | 5 | TZ560 |
As you can see, the third row was simply removed. This is the easiest way on how to remove errors from your result set but of course this may not be what you want as those removed rows may contain other important information in other columns! Assume you want to calculate the SUM over all values in column B. As we removed the third row we also removed a value from column B and the SUM is not the same as without the error-handling (9 vs. 15)!
Error-handling on cell-level
As we now know that column A may result in an error, we can handle this error during our transformation steps. As “NA” could not be converted to a number we see Error as result for that column. Clicking on it gives use some more details on the error itself. To handle this error we need to create a new calculated column where we first check if the value can be converted to a number and otherwise return a default numeric value:

The M-function that we use is “try <expressions to try> otherwise <default if error>” which is very similar to a try-catch block in C#. If the expression causes an error, the default will be used instead. Details on the try-expression can be found in the Microsoft Power Query for Excel Formula Language Specification (PDF) which can be found here and is a must read for everyone interested in the M language.

We could further replace our column A by the new column A_cleaned to hide this error handling transformation.
| A | B | C | A_cleaned |
| 1 | 4 | AXI23 | 1 |
| 2 | 5 | TZ560 | 2 |
| NA | 6 | UP945 | 0 |
Error-handling on cell-level with error details
There may also be cases where it is OK to have one of this errors but you need/want to display the cause of the error so that a power user may correct the source data beforehand. Again we can use the try-function, but this time without the otherwise-clause. This will return a record-object for each row:


After expanding the A_Try column and also the A_Try.Error column we will get all available information on the error:

| A | B | C | A_Try.HasError | A_Try.Value | A_Try.Error.Reason | A_Try.Error.Message | A_Try.Error.Detail |
| 1 | 4 | AXI23 | FALSE | 1 | |||
| 2 | 5 | TZ560 | FALSE | 2 | |||
| 6 | UP945 | TRUE | DataFormat.Error | Could not convert to Number. | NA |
As you can see we get quite a lot of columns here. We could e.g. use A_Try.HasError to filter out error rows (similar to error-handling on row-level) or we could use it in a calculated column to mimic error-handling on cell-level. What you want to do with all the information is up to you, but in case you don’t need it you should remove all unnecessary columns.
Downloads:
Power Query Error Handling Workbook: Power Query Error Handling.xlsx