
Вы можете использовать простые текстовые лог файлы для контроля запуска и отслеживания всех действий, которые выполняются при запуске PowerShell скриптов. Это удобно при отладке ошибок, для аудита выполненных скриптом действий. В этой статье мы рассмотрим несколько способов ведения текстовых лог-файлов для ваших PowerShell скриптов.
В самом простом случае, если вам нужно записать вывод информационного сообщения или результатов определенной PowerShell команды в текстовый лог файл, вы можете использовать один из следующих форматов перенаправления вывода в txt файл:
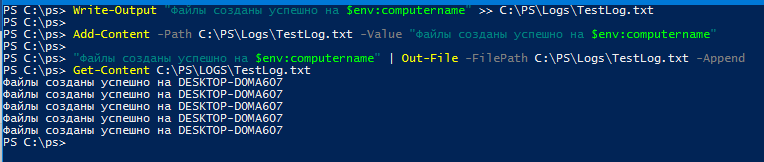
Write-Output "Файлы созданы успешно на $env:computername" >> C:PSLogsTestLog.txt
Add-Content -Path C:PSLogsTestLog.txt -Value "Файлы созданы успешно на $env:computername"
"Файлы созданы успешно на $env:computername" | Out-File -FilePath C:PSLogsTestLog.txt –Append
Во всех случаях команды добавляют в указанный текстовый файл новую строку c указанным вами текстом.
Если вам нужно каждый раз перезатирать содержимое ло-файла, используйте Set-Content.
Главный недостаток такого метода – по такому лог файлу нельзя определить, когда была внесена та или иная запись в лог (произошло событие). Вы можете добавить в лог текущую метку даты, времени (timestamp). Это поможет легко идентифицировать время запуска скрипта и конкретного события в нем.
Для удобства можно создать в PowerShell скрипте отдельную функцию, которая будет сохранять переданные ей данные в лог файл и добавлять время записи информации.
Можно сделать функцию:
$Logfile = "C:PSLogsproc_$env:computername.log"
function WriteLog
{
Param ([string]$LogString)
$Stamp = (Get-Date).toString("yyyy/MM/dd HH:mm:ss")
$LogMessage = "$Stamp $LogString"
Add-content $LogFile -value $LogMessage
}
Теперь, чтобы записать что-то в лог файл, вам нужно вызвать функцию WriteLog.
WriteLog "Скрипт запущен”
WriteLog "Выполняю вычисления…."
Start-Sleep 20
WriteLog "Скрипт выполнен успешно"
Теперь в лог файле содержится время, когда была произведена запись.

Можете заменить в своем скрипте вызовы Write-host на LogWrite.
В PowerShell также есть встроенная возможность сохранять в текстовый лог файл все команды и результаты, которые выводятся в консоль PS.
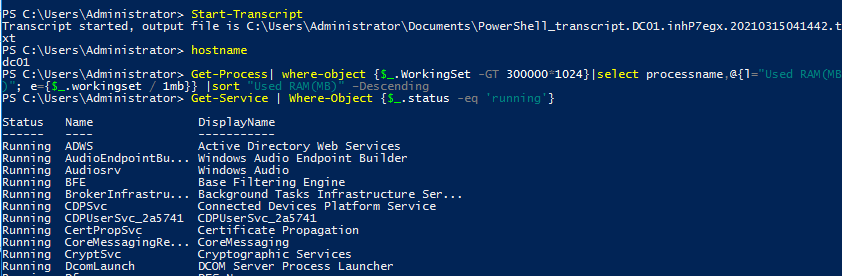
Чтобы начать запись текущей PowerShell сессии, используется командлет Start-Transcript.
После запуска этой команды появляется сообщение, в котором указано, в какой файл сохраняются результаты всех команд. По умолчанию лог файл пишется в профиль текущего пользователя:
Transcript started, output file is C:UsersAdministratorDocumentsPowerShell_transcript.DC01.inhP7egx.20210315041442.txt
Можно указать путь к текстовому файлу так:
Start-Transcript -Append C:PSLogsPSScriptLog.txt
Параметр –Append указывает, что нужно дописывать новые сессию в конец лог файла (не перезатирать его).
Выполните несколько PowerShell команд, которые выводят результаты в консоль. Например, выведем список тяжелых запущенных процессов, запущенных служб и состояние репликации в AD:
Get-Process| where-object {$_.WorkingSet -GT 300000*1024}|select processname,@{l="Used RAM(MB)"; e={$_.workingset / 1mb}} |sort "Used RAM(MB)" –Descending
Get-Service | Where-Object {$_.status -eq 'running'}
Get-ADReplicationFailure -Target DC01
Завершите запись сессии для текущей сессии:
Stop-Transcript
Теперь откройте текстовый файл с логом.
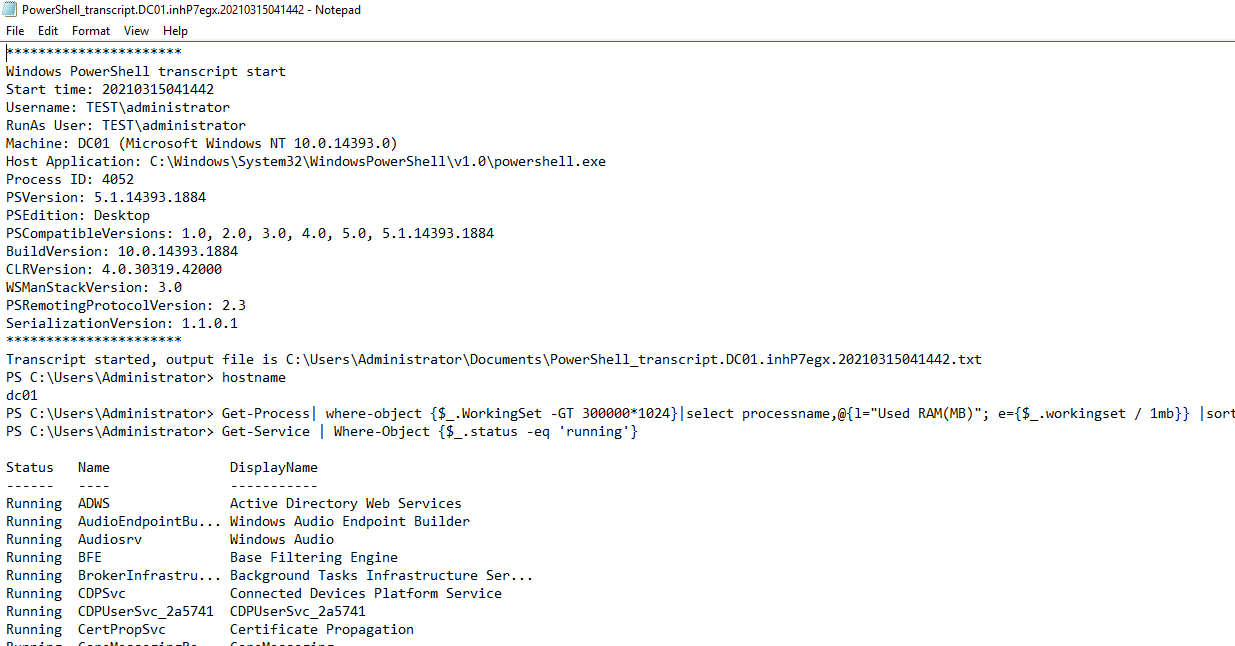
Как вы видите, в текстовом логе отображаются вся история PowerShell команд, которые запускались в скрипте и весь вывод, который выводился в консоль.
В лог файл попадают в том числе все ошибки и предупреждения, что бывает крайне удобно при диагностике и отладке сложных PowerShell скриптов.
Вы можете использовать Start-Transcript/Stop-Transcript в своих PowerShell скриптах чтобы нативно логировать все действия и результаты.
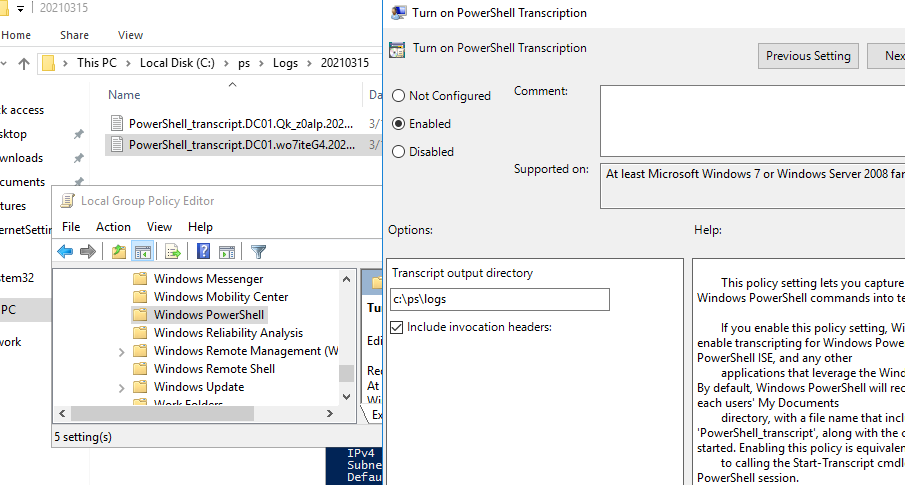
С помощью групповой политики Turn on PowerShell Transcription в Computer Configuration –> Administrative Templates –> Windows Components –> Windows PowerShell можно включить автоматическое логирование всех запускаемых PowerShell команд и выводимых результатов на компьютере. После обновления настроек GPO на компьютере, для каждого запущенного процесса powershell.exe будет создаваться отдельный тектовый лог файл, куда будут записываться все PS команды и результаты результаты.
Время на прочтение
2 мин
Количество просмотров 41K
Доброго времени суток, $username!
Хочу поделиться с вами функцией, которую я использую вместо обычного вывода информации на экран или только записи в файл.
Функция была написана для того, чтобы информация выводилась и на экран и в лог (текстовый), предназначается для замены стандартного write-host.
Из вкусностей:
- Точная дата и время события
- Тип события
- Подсчет ошибок и предупреждений
- Вывод информации цветом (в зависимости от типа события)
- Формат лога совместим с CSV ([TAB] separated)
Функция объявлена глобально, это значит что в пределах одной сессии достаточно один раз ее проиницилизировать — читай запустить файл с ней.
Варианты использования:
write-log "Hello Хабр!"

14.07.2011 00:22:15 info Hello Хабр!

write-log -message "Hello Хабр!" -type warning
write-log -message "Hello Хабр!" -type error -silent
Правда, путь должен существовать:
write-log -message "Hello Хабр!" -type CustomType logfile c:enteryourpathhere.log
Количество ошибок и предупреждений (за всю сессию или до ручного обнуления переменных) хранятся в $errorcount и $warningcount.
Лично у меня эта функция храниться в файле set-functions.ps1, и в скриптах я ее вызываю так:
Cамое начало любого (там где это необходимо) моего скрипта:
$ver="0.1"
$ProgrammName="SomeScriptName"

try
{
	# Функция вывода информации на экран и записи в лог
	./Set-Functions.ps1 #Инициализация функций
	$global:logfilename = "log`"+ $ProgrammName +".log"
	write-log "$ProgrammName (ver $ver) started."
}
catch
{
	return "Error loading functions Set-Functions.ps1"
}
Тело функции write-log:
$ver = "0.4"
$dt=Get-Date -Format "dd-MM-yyyy"
New-Item -ItemType directory log -Force | out-null #Создаю директорию для логов

$global:logfilename="log"+$dt+"_LOG.log"
[int]$global:errorcount=0 #Ведем подсчет ошибок
[int]$global:warningcount=0 #Ведем подсчет предупреждений

function global:Write-log	# Функция пишет сообщения в лог-файл и выводит на экран.
{param($message,[string]$type="info",[string]$logfile=$global:logfilename,[switch]$silent)
	$dt=Get-Date -Format "dd.MM.yyyy HH:mm:ss"
	$msg=$dt + "`t" + $type + "`t" + $message #формат: 01.01.2001 01:01:01 [tab] error [tab] Сообщение
	Out-File -FilePath $logfile -InputObject $msg -Append -encoding unicode
	if (-not $silent.IsPresent)
	{
		switch ( $type.toLower() )
		{
			"error"
			{
				$global:errorcount++
				write-host $msg -ForegroundColor red
			}
			"warning"
			{
				$global:warningcount++
				write-host $msg -ForegroundColor yellow
			}
			"completed"
			{
				write-host $msg -ForegroundColor green
			}
			"info"
			{
				write-host $msg
			}
			default
			{
				write-host $msg
			}
		}
	}
}
У этого примера есть только один недостаток — она «синхронная», то есть не обрабатывает проблемы одновременной записи в лог-файл. Кто знает как это изменить, прошу в комменты.
Вы можете использовать простые текстовые файлы логов для контроля работы и отслеживания всех действий в ваших скриптах PowerShell. Это полезно при отладке ошибок или при аудите действий скрипта. В этой статье мы покажем некоторые способы использования ведения журнала в скриптах PowerShell путём записи вывода в текстовые файлы журнала.
В простейшем случае, если вы хотите записать вывод информационного сообщения или результат команды PowerShell в текстовый файл журнала, вы можете использовать один из следующих форматов для перенаправления вывода PowerShell в текстовый файл:
Write-Output "Файлы успешно созданы в $env:computername" >> C:PSLogsTestLog.txt
Смотрите также: Аналог echo в PowerShell
Или:
Add-Content -Path C:PSLogsTestLog.txt -Value "Файлы успешно созданы в $env:computername"
Смотрите также: Командлеты Set-Content и Add-Content для обработки строк
Или:
"Файлы успешно созданы в $env:computername" | Out-File -FilePath C:PSLogsTestLog.txt -Append
Смотрите также: Как в PowerShell сохранить вывод в файл (аналоги > и »)
Во всех случаях команды добавляют новую строку в текстовый файл с указанным вами текстом.
Если вы хотите каждый раз перезаписывать содержимое файла журнала, используйте командлет Set-Content.

Основным недостатком этого метода является то, что вы не можете определить, когда запись была записана в журнал (произошло событие). Вы можете добавить текущую метку времени в файл журнала. Это поможет определить время, когда скрипт был запущен и произошло конкретное событие.
Чтобы сделать ведение логов более удобным, вы можете создать отдельную функцию в своём скрипте PowerShell, которая будет записывать полученные данные в файл журнала и добавлять временную метку для каждого события.
Вы можете создать функцию, как показано ниже:
$Logfile = "C:PSLogsproc_$env:computername.log"
function WriteLog
{
	Param ([string]$LogString)
	$Stamp = (Get-Date).toString("yyyy/MM/dd HH:mm:ss")
	$LogMessage = "$Stamp $LogString"
	Add-content $LogFile -value $LogMessage
}
Затем вызовите функцию WriteLog, если хотите что-то записать в журнал.
WriteLog "Скрипт запущен”
WriteLog "Вычисление…."
Start-Sleep 20
WriteLog "Скрипт успешно выполнен"
Теперь вы можете видеть время каждой записи в файле журнала.

В своём скрипте вы можете заменить вызовы Write-Host вызовами LogWrite.
PowerShell имеет встроенную функцию транскрипции для сохранения всех команд и выходных данных, отображаемых в консоли PS, в текстовый файл журнала.
Для регистрации текущего сеанса PowerShell используется командлет Start-Transcript.
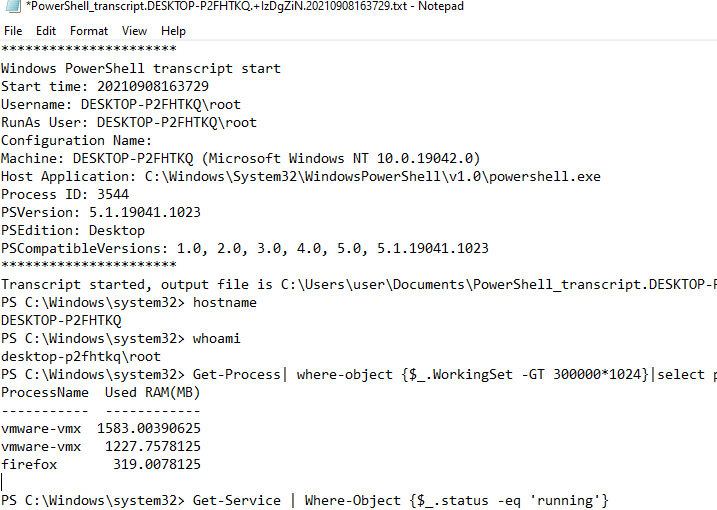
После выполнения команды появляется сообщение, показывающее файл, в который записываются выходные данные всех команд. По умолчанию файл журнала находится в текущем профиле пользователя:
Transcript started, output file is C:UsersuserDocumentsPowerShell_transcript.DESKTOP-P2FHTKQ.+IzDgZiN.20210908163729.txt
Вы можете указать путь к текстовому файлу следующим образом:
Start-Transcript -Append C:PSLogsPSScriptLog.txt
Параметр -Append указывает, что новые сеансы будут записываться в конец файла (без его перезаписи).
Выполните несколько команд PowerShell, которые выведут результаты на консоль. Например, давайте отобразим список запущенных процессов, служб и статус репликации AD:
Get-Process | Where-Object {$_.WorkingSet -GT 500000*1024} | select processname,@{l="Used RAM(MB)"; e={$_.workingset / 1mb}} | sort "Used RAM(MB)" -Descending
Get-Service | Where-Object {$_.status -eq 'Running'}
Get-ADReplicationFailure -Target mun-dc01
Остановить ведение журнала для текущего сеанса PowerShell:
Stop-Transcript
Затем откройте файл журнала транскрипции (стенограммы).
![]()
Как видите, в журнале отображается вся история команд PowerShell, которые были запущены в консоли, и весь их вывод.
Все ошибки и предупреждения также регистрируются, что чрезвычайно удобно при отладке сложных скриптов PowerShell.
Вы можете использовать командлеты Start-Transcript и Stop-Transcript в своих скриптах PowerShell для естественного протоколирования всех действий и выходных данных.
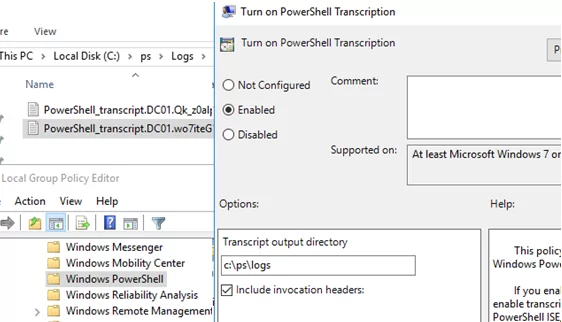
Используя параметр групповой политики «Включить транскрипции PowerShell» (в английской версии Windows он называется Turn on PowerShell Transcription) вы можете включить автоматическое ведение журнала всех выполняемых команд PowerShell и их вывода на компьютер. После обновления настроек GPO на компьютере для каждого запущенного процесса powershell.exe будет создан отдельный текстовый файл журнала, и будут регистрироваться все команды PS и их выходные данные.
Чтобы открыть редактор локальной групповой политики выполните:
GPEDIT
Вы найдёте этот пораметр по пути Конфигурация компьютера → Административные шаблоны → Компоненты Windows → Windows PowerShell, или для английской версии по пути Computer Configuration → Administrative Templates → Windows Components → Windows PowerShell.
![]()
После актуализации настроек GPO на компьютере для каждого запущенного процесса powershell.exe будет создан отдельный текстовый файл журнала, и будут регистрироваться все команды PS и их выходные данные.
Связанные статьи:
- Как в PowerShell сохранить вывод в файл (аналоги > и >>) (100%)
- Аналог echo в PowerShell (100%)
- Как в PowerShell менять набор выводимых по умолчанию данных (100%)
- Как выводить данные без таблицы в PowerShell (100%)
- В PowerShell таблица не помещается на экран — как исправить (РЕШЕНО) (100%)
- Тонкая настройка вывода с Format-Table (RANDOM — 100%)
Error Handling is a very important concept in every programming language including PowerShell which gives us several possibilities to manage errors in code.
In this article, I will try to cover as many as possible error handling concepts with examples from my practice and one of the important concepts is writing errors in external Error Log text file.
Why Should We Bother Handling Errors In PowerShell
It is no fun to run any code or application full of errors and bugs as the matter a fact it is quite annoying so in order for users to have a pleasant experience handling the errors is one of the essentials in programming.
PowerShell is no exception to that way of thinking and programming ethics although it can take some additional coding and effort but trust me it is always worth it.
I would be more than happy to share my experience with error handling and even more satisfied if I can hear your tips from the field so we can all enrich our knowledge on this very important subject.
Here is a general approach to error handling and logging errors into the external text file. I have an example in the next subheading that further explain each step so everything is much more understandable.
- Identify which Commands need Error Handling in your Function, CmdLet or Script.
- Set the ErrorAction parameter to value Stop for the command that needs Error Handling. This will stop executing the command when an error occurs and it will show the error message. Basically, we are making non-terminating errors into terminating in order to be able to handle the error in the catch block.
- Command that has ErrorAction parameter set to value Stop is wrapped in Try { } block. So when Error occurs handling of the code will jump from the Try block to Catch block.
- In Catch { } block that immediately follows after Try {} block, the error is handled by writing to the error log file on the disk.
- We use our own Write-ErrorLog CmdLet inside Catch{ } block to write the error in a text file on the disk. (See the explanation and code here)
- We have an additional switch error parameter to decide whether we want to write an error in the log file or not. This is totally optional.
- Use the Finally { } block if needed.
- Test the whole setup by intentionally breaking the code while in the development phase.
- Since some of the CmdLets calls are Scheduled we have routine to check external Error Log text file at least once a week and investigate errors that are caught. This step is part of improving the overall quality of the written code.
Example Of PowerShell Error Handling
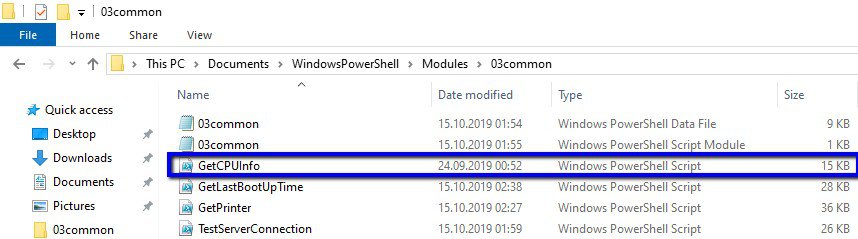
To show you Error Handling and implement previously defined steps I will use my own Get-CPUInfo CmdLet which is in the Common module of the Efficiency Booster PowerShell Project. Efficiency Booster PowerShell Project is a library of CmdLets that help us IT experts in day to day IT tasks.
In order to follow me along, I highly encourage you to download the zip file with the source code used in this example.
Here is the location of Get-CPUInfo script:
…[My] DocumentsWindowsPowerShellModules3common
Let’s use steps defined in the previous subheading to this example.
Step 1. I have identified the command that needs Error Handling in Get-CPUInfo CmdLet and that is a call to Get-CimInstance CmdLet.
Get-CimInstance @params Step 2. So I have set up the ErrorAction parameter to the value ‘Stop‘ for Get-CimInstance CmdLet in order to force non-terminating errors into terminating and then to be able to handle such errors.
INFO: I use parameter splatting when running CmdLet. If you want to know more about parameter splating please read this article.
            $params = @{ 'ComputerName'=$computer;
                         'Class'='Win32_Processor';
                         'ErrorAction'='Stop'}
            $CPUInfos = Get-CimInstance @params |
                            Select-Object   @{label="ServerName"; Expression={$_.SystemName}},
                                            @{label="CPU"; Expression={$_.Name}},
                                            @{label="CPUid"; Expression={$_.DeviceID}},
                                            NumberOfCores,
                                            AddressWidth
Step 3. Wrap up the call to Get-CimInstance CmdLet into the Try Block in order to be able to handle the error in a catch block that follows.
         try {
            Write-Verbose "Start processing: $computer - $env - $logicalname"
            Write-Verbose "Start Win32_Processor processing..."
            $CPUInfos = $null
            $params = @{ 'ComputerName'=$computer;
                         'Class'='Win32_Processor';
                         'ErrorAction'='Stop'}
            $CPUInfos = Get-CimInstance @params |
                            Select-Object   @{label="ServerName"; Expression={$_.SystemName}},
                                            @{label="CPU"; Expression={$_.Name}},
                                            @{label="CPUid"; Expression={$_.DeviceID}},
                                            NumberOfCores,
                                            AddressWidth
            Write-Verbose "Finish Win32_Processor processing..."
            foreach ($CPUInfo in $CPUInfos) {
                Write-Verbose "Start processing CPU: $CPUInfo"
                $properties = @{ 'Environment'=$env;
                                 'Logical name'=$logicalname;
                                 'Server name'=$CPUInfo.ServerName;
            	                 'CPU'=$CPUInfo.CPU;
            	                 'CPU ID'=$CPUInfo.CPUid;
            	                 'Number of CPU cores'=$CPUInfo.NumberOfCores;
                                 '64 or 32 bits'=$CPUInfo.AddressWidth;
                                 'IP'=$ip;
                                 'Collected'=(Get-Date -UFormat %Y.%m.%d' '%H:%M:%S)}
                $obj = New-Object -TypeName PSObject -Property $properties
                $obj.PSObject.TypeNames.Insert(0,'Report.CPUInfo')
                Write-Output $obj
                Write-Verbose "Finish processing CPU: $CPUInfo"
            }
 Write-Verbose "Finish processing: $computer - $env - $logicalname"
        }
Step 4. When the error occurs in the try block it is handled in the Catch Block.
It is important to notice following in the catch block of code:
- Get-CPUInfo CmdLet switch parameter $errorlog has been used to decide whether to log the errors in an external text file or not. This is completely optional.
- Certain Error properties are collected using an automatic variable $_ ($PSItem is another name for the same variable). If you want to know more about which properties we collect please read here.
- Collected data about the error that will be handled has been passed to another CmdLet Write-ErrorLog that will write the data in an external text log file. Please read here about Write-ErrorLog CmdLet.
catch {
            Write-Warning "Computer failed: $computer - $env - $logicalname CPU failed: $CPUInfos"
            Write-Warning "Error message: $_"
            if ( $errorlog ) {
                $errormsg = $_.ToString()
                $exception = $_.Exception
                $stacktrace = $_.ScriptStackTrace
                $failingline = $_.InvocationInfo.Line
                $positionmsg = $_.InvocationInfo.PositionMessage
                $pscommandpath = $_.InvocationInfo.PSCommandPath
                $failinglinenumber = $_.InvocationInfo.ScriptLineNumber
                $scriptname = $_.InvocationInfo.ScriptName
                Write-Verbose "Start writing to Error log."
                Write-ErrorLog -hostname $computer -env $env -logicalname $logicalname -errormsg $errormsg -exception $exception -scriptname $scriptname -failinglinenumber $failinglinenumber -failingline $failingline -pscommandpath $pscommandpath -positionmsg $pscommandpath -stacktrace $stacktrace
                Write-Verbose "Finish writing to Error log."
            }
        }
Step 5. I have already mentioned that Write-ErrorLog CmdLet has been used to write the error data into an external text log file. Read more about this CmdLet here.
Step 6. I did not need Finally { } block for this example.
Step 7. In the development phase, I was intentionally breaking Get-CPUInfo CmdLet to test my error handling code.
Step 8. If Get-CPUInfo CmdLet is part of the scheduled code I would look regularly Error log file and work on correcting all the bugs in the code produced by Get-CPUInfo CmdLet.
Chain Of Events When PowerShell Error Occurs
Let’s talk a little bit about what is happening when an error occurs in PowerShell and which events are triggered one after another.
- Call to CmdLet is failing and error has just occurred.
- Since we have ErrorAction parameter set to value Stop our non-terminating error has forced into terminating error so the execution of code stops.
- The error that is failing in the CmdLet is written in the $Error automatic variable by the PowerShell.
- We have forced the error to be terminating in order to be able to handle with try catch finally block of error handling.
- Since our CmdLet call is wrapped in Try block and error is terminating PowerShell can trigger error handling looking for a Catch block.
- We can have several Catch blocks for one try block. If we have a Catch block that handles the actual error number that block is executed.
- Otherwise, PowerShell will look Catch block that handles all error numbers.
- Optionally in the Catch block, we can have code that will write the error in the external text Error log file.
- We can use the automatic variable $Error or $_ object to read Error data and write them in the external file.
- If there is no Catch block PowerShell will look for Catch block in parent call if we have nested calls.
- If there are no further Catch block or no Catch block at all that will handle error then PowerShell looks for Finally block to execute which is used to clean up resources as needed.
- After executing Finally block error message will be sent to the error stream for further processing.
In further sections of this article, you can read in more detail about the many terms mentioned (ErrorAction, $Error, Try Catch Finally, Terminating, Non-Terminating, etc ) in this bulleted list in order to better understand them.
How To Write PowerShell Errors Into The External Log File
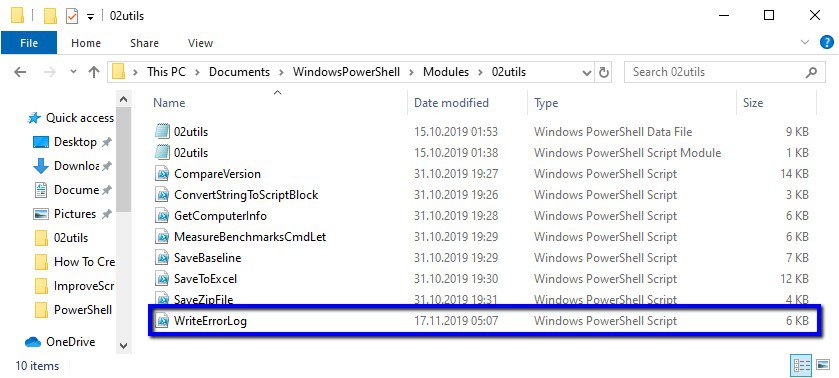
Here I will explain the code of Write-ErrorLog CmdLet that writes error data that occurs in CmdLets and handle the error data into an external text file.
Error data are written in the file named Error_Log.txt in folder PSlogs.

Write-ErrorLog CmdLet is part of the Efficiency Booster PowerShell Project and if you want to download the source code of this CmdLet please click here.
Here is the location of Write-ErrorLog script which is part of the Utils module:
…[My] DocumentsWindowsPowerShellModules2utils
Write-ErrorLog CmdLet Code
Here is the code of the whole Write-ErrorLog CmdLet.
<#
.SYNOPSIS
Writes errors that occur in powershell scripts into error log file.
.DESCRIPTION
Writes errors that occur in powershell scripts into error log file.
Error log file and error log folder will be created if doesn't exist.
Error log file name is Error_Log.txt and it has been saved into ..DocumentsPSlogs

.PARAMETER hostname
Name of the computer that is failing.

.PARAMETER env
Environment where computer is located. For example: Production, Acceptance, Test, Course etc.

.PARAMETER logicalname
Type of the server that is failing. For example: Application, Web, Integration, FTP, Scan, etc.

.PARAMETER errormsg
Error message.

.PARAMETER exception
Error number.

.PARAMETER scriptname
Name of the powershell script that is failing.

.PARAMETER failinglinenumber
Line number in the script that is failing.

.PARAMETER failingline
Content of failing line.

.PARAMETER pscommandpath
Path to the powershell command.

.PARAMETER positionmsg
Error message position.

.PARAMETER stacktrace
Stack trace of the error.

.EXAMPLE
Write-ErrorLog -hostname "Server1" -env "PROD" -logicalname "APP1" -errormsg "Error Message" -exception "HResult 0789343" -scriptname "Test.ps1" -failinglinenumber "25" -failingline "Get-Service" -pscommandpath "Command pathc." -positionmsg "Position message" -stacktrace "Stack trace"

.EXAMPLE
Help Write-ErrorLog -Full

.LINK
Out-File
#>
Function Write-ErrorLog {
[CmdletBinding()]
param (

    [Parameter(Mandatory=$false,
                HelpMessage="Error from computer.")]
    [string]$hostname,

    [Parameter(Mandatory=$false,
                HelpMessage="Environment that failed. (Test, Production, Course, Acceptance...)")]
    [string]$env,

    [Parameter(Mandatory=$false,
                HelpMessage="Type of server that failed. (Application, Web, Integration...)")]
    [string]$logicalname,

    [Parameter(Mandatory=$false,
                HelpMessage="Error message.")]
    [string]$errormsg,

    [Parameter( Mandatory=$false,
                HelpMessage="Exception.")]
    [string]$exception,

    [Parameter(Mandatory=$false,
                HelpMessage="Name of the script that is failing.")]
    [string]$scriptname,

    [Parameter(Mandatory=$false,
                HelpMessage="Script fails at line number.")]
    [string]$failinglinenumber,

    [Parameter(Mandatory=$false,
                HelpMessage="Failing line looks like.")]
    [string]$failingline,

    [Parameter(Mandatory=$false,
                HelpMessage="Powershell command path.")]
    [string]$pscommandpath,

    [Parameter(Mandatory=$false,
                HelpMessage="Position message.")]
    [string]$positionmsg,

    [Parameter(Mandatory=$false,
                HelpMessage="Stack trace.")]
    [string]$stacktrace
)
BEGIN {

        $errorlogfile = "$homeDocumentsPSlogsError_Log.txt"
        $errorlogfolder = "$homeDocumentsPSlogs"

        if  ( !( Test-Path -Path $errorlogfolder -PathType "Container" ) ) {

            Write-Verbose "Create error log folder in: $errorlogfolder"
            New-Item -Path $errorlogfolder -ItemType "Container" -ErrorAction Stop

            if ( !( Test-Path -Path $errorlogfile -PathType "Leaf" ) ) {
                Write-Verbose "Create error log file in folder $errorlogfolder with name Error_Log.txt"
                New-Item -Path $errorlogfile -ItemType "File" -ErrorAction Stop
            }
        }
}
PROCESS {

            Write-Verbose "Start writing to Error log file. $errorlogfile"
            $timestamp = Get-Date
            #IMPORTANT: Read just first value from collection not the whole collection.
            "   " | Out-File $errorlogfile -Append
            "************************************************************************************************************" | Out-File $errorlogfile -Append
            "Error happend at time: $timestamp on a computer: $hostname - $env - $logicalname" | Out-File $errorlogfile -Append
            "Error message: $errormsg" | Out-File $errorlogfile -Append
            "Error exception: $exception" | Out-File $errorlogfile -Append
            "Failing script: $scriptname" | Out-File $errorlogfile -Append
            "Failing at line number: $failinglinenumber" | Out-File $errorlogfile -Append
            "Failing at line: $failingline" | Out-File $errorlogfile -Append
            "Powershell command path: $pscommandpath" | Out-File $errorlogfile -Append
            "Position message: $positionmsg" | Out-File $errorlogfile -Append
            "Stack trace: $stacktrace" | Out-File $errorlogfile -Append
            "------------------------------------------------------------------------------------------------------------" | Out-File $errorlogfile -Append

            Write-Verbose "Finish writing to Error log file. $errorlogfile"
}
END {

}
}
#region Execution examples
#Write-ErrorLog -hostname "Server1" -env "PROD" -logicalname "APP1" -errormsg "Error Message" -exception "HResult 0789343" -scriptname "Test.ps1" -failinglinenumber "25" -failingline "Get-Service" -pscommandpath "Command pathc." -positionmsg "Position message" -stacktrace "Stack trace" -Verbose
#endregion
Write-ErrorLog CmdLet Explained
Let’s make our hand’s a little bit “dirty” and dive into PowerShell code.
In the BEGIN block we:
- Check if folder PSlogs exist in the (My) Documents folder of the current user.
- If the PSlogs folder doesn’t exist then create the folder.
- Check if file Error_Log.txt exists in the folder PSlogs.
- If Error_Log.txt doesn’t exist then create the file.
- Now we can move on to PROCESS block code.
BEGIN {

        $errorlogfile = "$homeDocumentsPSlogsError_Log.txt"
        $errorlogfolder = "$homeDocumentsPSlogs"

        if  ( !( Test-Path -Path $errorlogfolder -PathType "Container" ) ) {

            Write-Verbose "Create error log folder in: $errorlogfolder"
            New-Item -Path $errorlogfolder -ItemType "Container" -ErrorAction Stop

            if ( !( Test-Path -Path $errorlogfile -PathType "Leaf" ) ) {
                Write-Verbose "Create error log file in folder $errorlogfolder with name Error_Log.txt"
                New-Item -Path $errorlogfile -ItemType "File" -ErrorAction Stop
            }
        }
}
In the PROCESS block:
- We format the line of text that we want to write into the log file.
- Then we pipe formatted text to Out-File CmdLet with the Append parameter to write that line of text in the file.
- We repeat the process of formatting the line of text and appending of that line to the Error log file.
PROCESS {

            Write-Verbose "Start writing to Error log file. $errorlogfile"
            $timestamp = Get-Date
            #IMPORTANT: Read just first value from collection not the whole collection.
            "   " | Out-File $errorlogfile -Append
            "************************************************************************************************************" | Out-File $errorlogfile -Append
            "Error happend at time: $timestamp on a computer: $hostname - $env - $logicalname" | Out-File $errorlogfile -Append
            "Error message: $errormsg" | Out-File $errorlogfile -Append
            "Error exception: $exception" | Out-File $errorlogfile -Append
            "Failing script: $scriptname" | Out-File $errorlogfile -Append
            "Failing at line number: $failinglinenumber" | Out-File $errorlogfile -Append
            "Failing at line: $failingline" | Out-File $errorlogfile -Append
            "Powershell command path: $pscommandpath" | Out-File $errorlogfile -Append
            "Position message: $positionmsg" | Out-File $errorlogfile -Append
            "Stack trace: $stacktrace" | Out-File $errorlogfile -Append
            "------------------------------------------------------------------------------------------------------------" | Out-File $errorlogfile -Append

            Write-Verbose "Finish writing to Error log file. $errorlogfile"
}
$PSItem or $_
$PSItem contains the current object in the pipeline object and we use it to read Error properties in this case.
Just a quick explanation of each Error property from the $_ ($PSItem) automatic variable that we collect and write in Logfile:
- $_.ToString() – This is Error Message.
- $_.Exception – This is Error Exception.
- $_.InvocationInfo.ScriptName – This the PowerShell script name where Error occurred.
- $_.InvocationInfo.ScriptLineNumber – This is line number within the PowerShell script where Error occurred.
- $_.InvocationInfo.Line – This is the line of code within PowerShell script where Error occurred.
- $_.InvocationInfo.PSCommandPath – This is the path to the PowerShell script file on the disk.
- $_.InvocationInfo.PositionMessage – This is a formatted message indicating where the CmdLet appeared in the line.
- $_.ScriptStackTrace – This is the Trace of the Stack.
As you can see on the screenshot below we collect really useful information about the Error that we handle in the Logfile. The pieces of information are presented in very neatly fashion so we can immediately see:
- which error occurred,
- what were the message and exception,
- where the error occurred (script name, script location, line number and line of the code in the script)
- even the call stack is shown if needed.
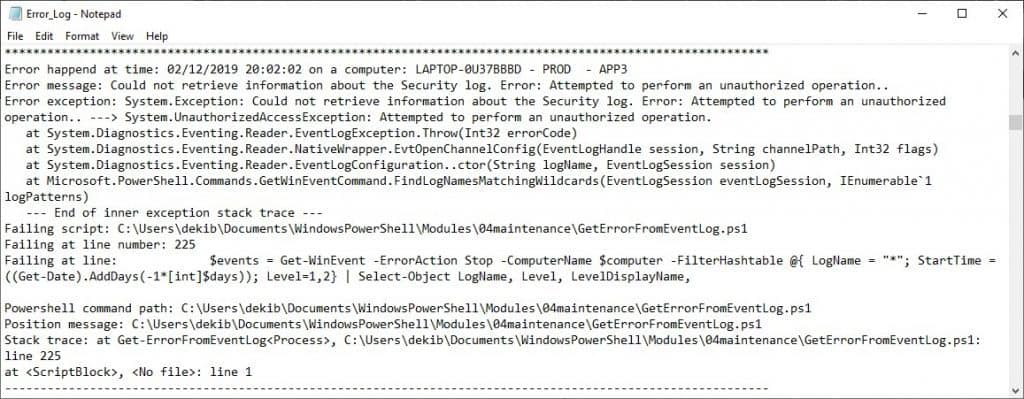
Here are the final result and an example of one formatted error logged in Error_Log.txt file.
************************************************************************************************************
Error happend at time: 09/11/2019 18:20:41 on a computer: APP01 -  -
Error message: The WinRM client cannot process the request. If the authentication scheme is different from Kerberos, or if the client computer is not joined to a domain, then HTTPS transport must be used or the destination machine must be added to the TrustedHosts configuration setting. Use winrm.cmd to configure TrustedHosts. Note that computers in the TrustedHosts list might not be authenticated. You can get more information about that by running the following command: winrm help config.
Error exception: Microsoft.Management.Infrastructure.CimException: The WinRM client cannot process the request. If the authentication scheme is different from Kerberos, or if the client computer is not joined to a domain, then HTTPS transport must be used or the destination machine must be added to the TrustedHosts configuration setting. Use winrm.cmd to configure TrustedHosts. Note that computers in the TrustedHosts list might not be authenticated. You can get more information about that by running the following command: winrm help config.
   at Microsoft.Management.Infrastructure.Internal.Operations.CimAsyncObserverProxyBase`1.ProcessNativeCallback(OperationCallbackProcessingContext callbackProcessingContext, T currentItem, Boolean moreResults, MiResult operationResult, String errorMessage, InstanceHandle errorDetailsHandle)
Failing script: C:UsersdekibDocumentsWindowsPowerShellModules3commonGetCPUInfo.ps1
Failing at line number: 214
Failing at line:             $CPUInfos = Get-CimInstance @params |

Powershell command path: C:UsersdekibDocumentsWindowsPowerShellModules3commonGetCPUInfo.ps1
Position message: C:UsersdekibDocumentsWindowsPowerShellModules3commonGetCPUInfo.ps1
Stack trace: at Get-CPUInfo, C:UsersdekibDocumentsWindowsPowerShellModules3commonGetCPUInfo.ps1: line 214
at , : line 1
------------------------------------------------------------------------------------------------------------
TIP: If your scripts are scheduled in Task Manager the best practice is to have a routine of regularly checking the Error Log file and investigate the errors that occurred since the last check. I am doing this once a week.
Errors In PowerShell
There are two types of Errors in PowerShell:
- Terminating
- Non-Terminating
Terminating Errors
Here are the important features of Terminating errors:
- terminates execution of command or script
- triggers Catch block and can be error handled by the Catch block.
Examples are syntax errors, non-existent CmdLets, or other fatal errors
Non-Terminating Errors
Here are important features of Non-Terminating Error:
- A non-fatal error.
- Allows execution to continue despite the failure that just occurred.
- It doesn’t trigger the Catch block and cannot be Error Handled in the Catch block by default.
Examples are permission problems, file not found, etc.
How To Force Non-Terminating Errors Into Terminating
Use the ErrorAction parameter with value Stop to force non-terminating error into terminating as in the following example. The reason why we want to make non-termination error into terminating one is to be able to catch the error when occurs.
$AuthorizedUser = Get-Content .DocumentsWindowsPowerShellProfile.ps1 -ErrorAction Stop Basically, the workflow is as follows.
- When an error occurs,
- a non-terminating error has changed into terminating one since we have Stop value on ErrrorAction parameter,
- then since terminating error has occurred try block will send the error handling to catch block where error can be processed and
- optionally written to the external log,
- optionally error handling can continue in the final block.
NOTE: ErrorAction parameter overrides temporarily ErrorActionPreference variable while the call to CmdLet has been processed.
How To Treat All Errors As Terminating
We use the ErrorActionPreference variable to treat all errors as terminating by setting to the value Stop in the:
- script
- or session
Write the following line of code at the begging of the script to treat all errors as terminating.
$ErrorActionPreference = StopType in Windows PowerShell Console the same command to setup terminating errors for the session.
ErrorAction Common Parameter
ErrorAction parameter belongs to the set of common parameters that we can use with any CmdLet. If we set CmdLetBinding on Advanced Functions than PowerShell automatically makes common parameters available for that command.
This is a parameter that I always use with CmdLets that need error handling since the ErrorAction Parameter determines how the CmdLet responds to a non-terminating error. It has several values that we will talk about in a minute but the value that I like to use is Stop and it is used to make non-terminating errors into terminating errors as written in previous sections.
The ErrorAction parameter overrides the value of the $ErrorActionPreference variable when applied to the specific command.
Here are valid values:
- Continue (Default)
- This is the default setting. Display error then continues execution.
- Stop
- Display error, and stop the execution.
- Inquire
- Displays error message and the user is asked to continue with execution.
- SilentlyContinue
- No error message is displayed and execution is continued. However, the error message is added to the $Error automatic variable.
- Ignore
- The same as SilentlyContinue, No error message is displayed and execution is continued. However, Ignore does not add an error message to the $Error automatic variable.
- Suspend
- This one is for workflows. A workflow job is suspended to investigate what happened, then the workflow can be resumed.
$ErrorActionPreference Preference Variable Explained
$ErrorActionPreference preference variable determines how Windows PowerShell responds to a non-terminating error (an error that does not stop the cmdlet processing) in a script, cmdlet or at the command line
If we want to override the value of the ErrorActionPreference preference variable for the specific command we use the ErrorAction common parameter as explained here.
The valid values for $ErrorActionPreference preference variable are:
- Continue (Default)
- This is the default setting. Display error then continues execution.
- Stop
- Display error message, and stop the execution.
- Inquire
- Displays error message and the user is asked to continue with execution.
- SilentlyContinue
- No error message is displayed and execution is continued. However, the error message is added to the $Error automatic variable.
- Suspend
- This one is for workflows. A workflow job is suspended to investigate what happened, then the workflow can be resumed.
Error Handling With Try/Catch/Finally Blocks
Try, Catch, and Finally, blocks are used to handle terminating errors in the scripts, functions, and CmdLets. A non-terminating error does not trigger Try block and Windows PowerShell will not look for Catch block to handle the error. So we need to force a non-terminating error to become terminating error using ErrorAction parameter with value Stop whenever we call some CmdLet or Advanced function.
Try block is used as part of the code that PowerShell will monitor for errors. The workflow in the Try block is as follows:
- Try block is the section of code that will be monitored for errors by Windows PowerShell.
- When the error occurs within Try block the error is saved to $Error automatic variable first.
- Windows PowerShell searches for a Catch block to handle the error if the error is terminating. If the Catch block has not been found in current scope Windows PowerShell will search for catch block in parent scopes for nested calls.
- Then the Finally block is run if exists.
- If there is no Catch block than the error is not handled and the error is written to the error stream.
One Try block can have several Catch Blocks that will handle different error types.
Catch block usually handles the error.
The Finally block is optional and can be only one. Usually, it is used to clean up and free the resources.
The syntax for Try, Catch, and Finally block:
try { }
catch [],[]
   { }
catch { }
finally { }
Getting Error Information With $Error Automatic Variable
$Error automatic variable is an array of error objects (both terminating and the non-terminating) that occurred in the current PowerShell session. The most recent error that occurred is written with index 0 in the array as $Error[0]. If we have just opened the Windows PowerShell session the $Error variable is an empty array and ready to be used.
Check the number of Errors in $Error variable with the following code:
$Error.CountTo prevent the error from being written in $Error automatic variable set ErrorAction parameter to value Ignore.
$Error variable is a rich object that has many useful properties worth reading and helpful for further understanding of the error that just occurred.
Let’s see some useful properties and in section Write-ErrorLog CmdLet Explained I have explained to you some useful examples of properties that are interesting to be written in an external log file.
$error[0] | Get-Member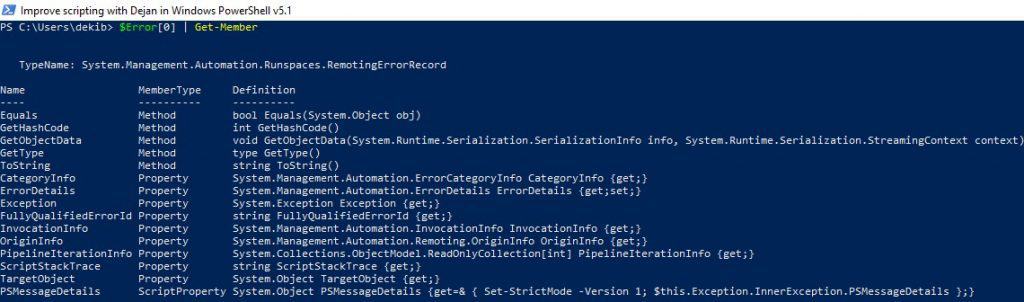
$Error.CategoryInfo | Get-Member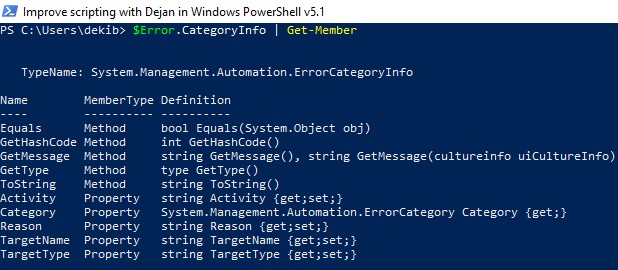
$Error[0].Exception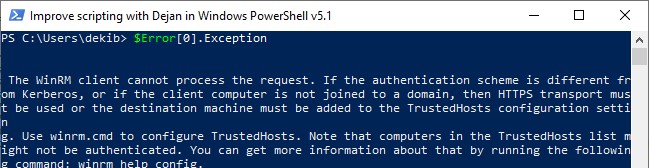
$Error.InvocationInfo | Get-Member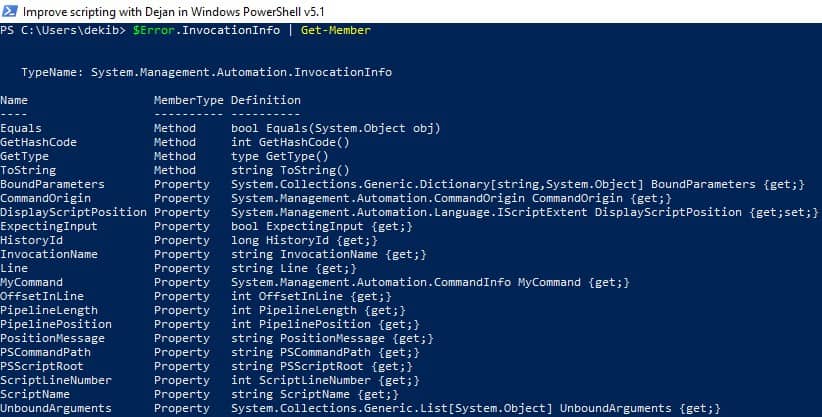
Write-Error CmdLet
Write-Error CmdLet writes an object to the error stream.
Please read this article from Microsoft PowerShell documentation regarding this CmdLet.
Handling Errors from non-PowerShell processes
We can run applications from PowerShell script like for example, PsExec.exe or robocopy.exe and they are external processes for PowerShell. Since it is an external process, errors from it will not be caught by our try/catch blocks in PowerShell script. So how we will know whether our external process was successful or not.
Well, we can use the $LastExitCode PowerShell automatic variable.
PowerShell will write the exit code to the $LastExitCode automatic variable when the external process exits. Check the external tool’s documentation for exit code values but usually, 0 means success and 1 or greater values mean a failure.
Useful PowerShell Error Handling Articles
Here are some useful articles and resources:
- Windows PowerShell Error Reporting
- About Try Catch Finally
- About CommonParameters
- About Automatic Variables
- About Preference Variables
- Write-Error
- About Throw
- About Break
- About Continue
 Всем привет.
В предыдущих двух постах были подробно изложены методы отлова критических и некритических ошибок при работе с PowerShell. Но я решил что будет несправедливым не отметить самые основные моменты, которые возникают в работе если что-то пошло не так. Т.е. переменные и обьекты в PowerShell которые содержат первичную информацию о работе нашего скрипта. Речь пойдет об объекте ErrorRecord, о переменной $Error, о мониторинге возникновения ошибки c помощью переменной $? и кодов возврата, а также упомянем командлет Set-PSDebug и точки прерывания. Поможет нам в этом замечательная книга Попова А. В. «Введение в Windows PowerShell» — СПб.: БХВ-Петербург, 2009.
Поехали.
1. Объект ErrorRecord и поток ошибок.
В PowerShell информация о возникающих ошибках записывается в поток ошибок, который по умолчанию отображается на экране, например:
PS C:> dir «C:Folder doesn’t exist»
Get-ChildItem : Не удается найти путь «C:Folder doesn’t exist»,
так как он не существует.
В строка:1 знак:4
+ dir <<<< «C:Folder doesn’t exist»
Поток ошибок можно перенаправить в текстовый файл с помощью специального оператора 2>, например:
PS C:> dir «C:Folder doesn’t exist» 2>err.txt
Проверим теперь содержимое файла err.txt:
PS C:> Get-Content err.txt
Get-ChildItem : Не удается найти путь «C:Folder doesn’t exist»,
так как он не существует.
В строка:1 знак:4
+ dir <<<< «Folder doesn’t exist» 2> err.txt
Как видите, в файл err.txt полностью записалось сообщение об ошибке, однако никакой дополнительной информации не появилось.
Где произошла ошибка смотрим так
PS C:> $err.InvocationInfo
MyCommand : Get-ChildItem
ScriptLineNumber : 1
OffsetInLine : -2147483648
ScriptName :
Line : $err = dir «C:Folder doesn’t exist» 2>&1
PositionMessage :
В строка:1 знак:11
+ $err = dir <<<< «C:Folder doesn’t exist» 2>&1
InvocationName : dir
PipelineLength : 1
PipelinePosition : 1
Хотя этот вывод даст нам место скрипта(или непсредственного ввода)
где ошибку интепретирует сама PowerShell, истинное место проблемы надо будет
искать самим.
2. Специальная переменная $Error.
В PowerShell имеется специальная переменная $Error, которая содержит коллекцию (массив) объектов ErrorRecord, соответствующих ошибкам, возникавшим в текущем сеансе работы. Максимальное количество элементов в данной коллекции задается значением переменной $MaximumErrorCount (по умолчанию это 256):
PS C:> $MaximumErrorCount
256
После заполнения массива $Error объекты для вновь возникающих ошибок будут заменять объекты, соответствующие старым ошибкам. Возникновение каждой новой ошибки приводит к смещению элементов в массиве $Error: объект для последней ошибки хранится в первом элементе ($Error[0]), объект для предыдущей ошибки — во втором элементе ($Error[1]) и т. д.
Убедимся, что элемент $Error[0] имеет тип ErrorRecord, и выведем содержимое этого элемента:
PS C:> $Error[0].GetType().FullName
System.Management.Automation.ErrorRecord
PS C:> $Error[0]
Get-ChildItem : Не удается найти путь «C:Несуществующий каталог»,
так как он не существует.
В строка:1 знак:4
+ dir <<<< «Несуществующий каталог»
Естественно, мы можем обращаться ко всем свойствам объекта ErrorRecord:
PS C:> $Error[0].Exception
Не удается найти путь «C:Несуществующий каталог», так как он не существует.
Повторим вывод свойства InvocationInfo
PS C:> $Error[0].InvocationInfo
MyCommand : Get-ChildItem
ScriptLineNumber : 1
OffsetInLine : -2147483648
ScriptName :
Line : $err = dir «C:Folder doesn’t exist» 2>&1
PositionMessage :
В строка:1 знак:11
+ $err = dir <<<< «C:Folder doesn’t exist» 2>&1
InvocationName : dir
PipelineLength : 1
PipelinePosition : 1
3. Мониторинг возникновения ошибки переменной $?.
В PowerShell имеется логическая переменная $?, которая равна $True, если последняя выполняемая операция завершена успешно, и $False, если во время выполнения последней
операции возникла ошибка. Такая же существует и в Linux.) Например, если выполнить командлет Get-Item для заведомо существующего каталога, то значение переменной $? будет равно $True:
PS C:> Get-Item С:
Каталог:
Mode LastWriteTime Length Name
—- ————- —— —-
d—hs 21.03.2016 12:00 C:
PS C:> $?
True
Если же выполнить этот же командлет для несуществующего каталога, то значение переменной $? будет равно $False:
PS C:> Get-Item С:321
Get-Item : Не удается найти путь «C:321», так как он не существует.
В строка:1 знак:9
Глава 9. Обработка ошибок и отладка 183
+ Get-Item <<<< С:321
PS C:> $?
False
4. Мониторинг возникновения ошибки по коду возврата.
Для внешних команд Windows и сценариев PowerShell определено понятие кода возврата (напомним, что для сценариев PowerShell этот код можно установить с помощью инструкции Exit). В операционной системе код возврата последней команды доступен через переменную среды %ERRORLEVEL%; в оболочке PowerShell данный код возврата хранится в специальной переменной $LASTEXITCODE. При этом, если код возврата равен нулю, то переменной $? присваивается значение $True. Если же код возврата не равен нулю, то считается, что при выполнении данной команды произошла ошибка, и переменной $? присваивается значение $False.
В качестве примера выполним команду интерпретатора cmd.exe, которая устанавливает нулевой код возврата. Для этого можно запустить cmd.exe с ключом /c (выполнить команду и завершить работу интерпретатора) и указать для исполнения команду exit 0:
PS C:> cmd /c exit 0
Проверим значения переменных $LASTEXITCODE и $?:
PS C:> $LASTEXITCODE
0
PS C:> $?
True
Теперь выполним команду интерпретатора cmd.exe с ненулевым кодом возврата (пусть, например, код возврата равен 10):
PS C:> cmd /c exit 10
Вновь проверим переменные $LASTEXITCODE и $?:
PS C:> $?
False
PS C:> $LASTEXITCODE
10
5. Командлет Set-PSDebug и точки прерывания.
Процесс поиска ошибок в сценариях неразрывно связан с отладкой. Поэтому нам стоит упомянуть что основным встроенным инструментом для отладки сценариев является командлет Set-PSDebug. Параметры этого командлета позволяют включить режимы трассировки и пошагового выполнения команд, а также режим обязательного объявления переменных:
-Trace 0 Отключение трассировки
-Trace 1 Включение основного режима трассировки
-Trace 2 Включение полного режима трассировки
-Step Включение режима пошагового выполнения
-Strict Включение режима обязательного объявления переменных
-Off Отключение всех механизмов отладки.
Примеры приводить не буду, назначение ключей очевидно из их названия. Самым интересным является режим пошагового выполнения -Step, который позволяет в любой момент вызвать вложенную командную строку для анализа или изменения состояния интерпретатора. Однако отлаживать более-менее большие сценарии с помощью данного метода часто оказывается неудобно, так как для запуска вложенного сеанса в определенной строке сценария придется каждый раз добираться до этой строки с самого начала сценария (каждую команду при этом
нужно выполнять, нажимая клавишу <A>).
Гораздо удобнее было бы использовать точки прерывания, позволяющие запускать сценарий в автоматическом режиме и приостанавливать выполнение на нужной команде. В PowerShell аналогом установки точки прерывания можно считать вызов метода $Host.EnterNestedPrompt(), например:
PS C:> for ($i=0; $i -lt 10; $i++) {
>> «i = $i»
>> if ($i -eq 5) {
>> «Моя точка прерывания»
>> $Host.EnterNestedPrompt()
>> }
>> }
>>
i = 0
i = 1
i = 2
i = 3
i = 4
i = 5
Моя точка прерывания
PS C:>>>
В данном примере на пятой итерации цикла выводится строка «Моя точка прерывания» и вызывается метод $Host.EnterNestedPrompt(). В результате выполнение цикла приостанавливается, и мы попадаем во вложенную командную строку (вид приглашения изменяется на >>>).
Выход из вложенного сеанса с помощью инструкции Exit:
PS C:>>> Exit
PS C:>
Вот так вот.
You can use simple text log files to control running and track all of the activities in your PowerShell scripts. This is useful when debugging errors or auditing script actions. In this article, we’ll show some ways to use logging in PowerShell scripts by writing output to text log files.
In the simplest case, if you want to write the output of an information message or a PowerShell command result to a text log file, you can use one of the following formats to redirect the PS output to a text file:
Write-Output "Files are successfully created in $env:computername" >> C:PSLogsTestLog.txt
 Add-Content -Path C:PSLogsTestLog.txt -Value "Files are successfully created in $env:computername"
 "Files are successfully created in $env:computername" | Out-File -FilePath C:PSLogsTestLog.txt –Append
In all cases, the commands add a new line to a txt file with the text you have specified.
If you want to overwrite the log file contents each time, use the Set-Content cmdlet.

The main drawback of this method is that you cannot figure out when an entry was written to the log (an event occurred). You can add the current timestamp to the log file. It will help to identify the time when the script was run and a specific event occurred.
To make it more convenient, you can create a separate function in your PowerShell script that will write the data it receives to a log file and add the timestamp for each event.
You can create a function as shown below:
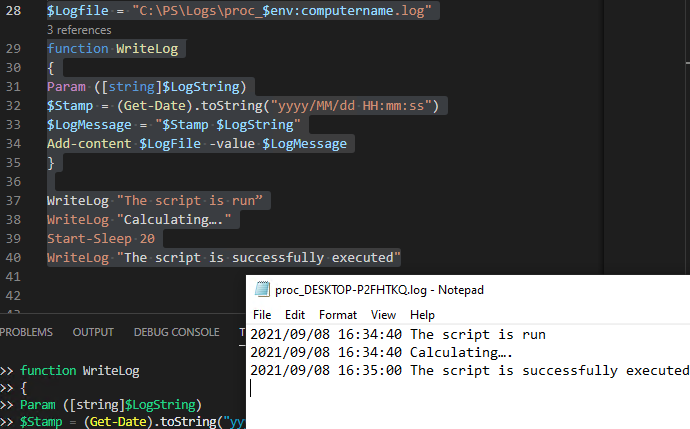
$Logfile = "C:PSLogsproc_$env:computername.log"
 function WriteLog
 {
 Param ([string]$LogString)
 $Stamp = (Get-Date).toString("yyyy/MM/dd HH:mm:ss")
 $LogMessage = "$Stamp $LogString"
 Add-content $LogFile -value $LogMessage
 }
Then call the WriteLog function if you want to log something.
WriteLog "The script is run"
 WriteLog "Calculating…."
 Start-Sleep 20
 WriteLog "The script is successfully executed"
Now you can see the time of each entry in the log file.
You can replace Write-Host calls with LogWrite ones in your script.
PowerShell has a built-in transcript feature to save all commands and outputs shown in the PS console to a text log file.
To log your current PowerShell session, the Start-Transcript cmdlet is used.
After running the command, a message appears showing the file the output of all commands is logged to. By default, the log file is located in the current user profile:
Transcript started, output file is C:UsersuserDocumentsPowerShell_transcript.DESKTOP-P2FHTKQ.+IzDgZiN.20210908163729.txt
You can specify the path to the text file as follows:
Start-Transcript -Append C:PSLogsPSScriptLog.txt
The –Append option indicates that new sessions will be logged to the end of the file (without overwriting it).
Run some PowerShell commands that output the results to the console. For example, let’s display a list of running processes, services, and the AD replication status:
Get-Process| where-object {$_.WorkingSet -GT 500000*1024}|select processname,@{l="Used RAM(MB)"; e={$_.workingset / 1mb}} |sort "Used RAM(MB)" –Descending
 Get-Service | Where-Object {$_.status -eq 'Running'}
 Get-ADReplicationFailure -Target mun-dc01
Stop logging for the current PowerShell session:
Stop-Transcript
Then open the transcript log file.
As you can see, the log shows the entire history of the PowerShell commands that were run in the console and all the output.
All errors and warnings are also logged, and it is extremely convenient when debugging complex PowerShell scripts.
You can use Start-Transcript and Stop-Transcript cmdlets in your PowerShell scripts to natively log all actions and outputs.
Using the Group Policy option Turn on PowerShell Transcription (Computer Configuration –> Administrative Templates –> Windows Components –> Windows PowerShell), you can enable automatic logging of all run PowerShell commands and output on a computer. After updating GPO settings on the computer, a separate text log file will be created for each running powershell.exe process and all PS commands and their outputs will be logged.
I have a script that I’m running, and I want to log all of the exceptions generated by that script. I would like to be able to generate one logfile per run. Since this is the first logfile I’m creating, I don’t have any prior versions to use as a reasonability check…so I want to make sure I’ve got the CODE as correct as it can be.
I’m starting off my script with
$error.Clear()                                          # flush PowerShell's error buffer
$systemRunDate    = Get-Date -format yyyyMdd"_"Hms      # get date as string
$errorLogFileName = "$($thedate)_Conversion_Test.log"   # generate logfile name
then moving on to a bunch of functions…
function foo {
     do stuff
}

function foo2 {
     do stuff
}

function foo3 {
     do stuff
}
Executing the functions….
foo
foo1
foo2
and ending with…
write-output $error | format-list | out-file -Append "$errorLog"
Foreach($erritem in $error) {
write-output $erritem.ExceptionMessage | out-file -Append "$errorLog"
}
My error logs seem very slim considering what I’m used to seeing flash by in the console and I’m wondering if I have some scope issues. My thinking was that by declaring the filename and writing to it OUTSIDE of the individual functions, it would capture every error. Do I also need to write errors inside each individual function? I’m guessing not, but I’d love a second set of eyes to let me know if I’ve got this right.
В Powershell существует несколько уровней ошибок и несколько способов их обработать. Проблемы одного уровня (Non-Terminating Errors) можно решить с помощью привычных для Powershell команд. Другой уровень ошибок (Terminating Errors) решается с помощью исключений (Exceptions) стандартного, для большинства языков, блока в виде Try, Catch и Finally.
Как Powershell обрабатывает ошибки
До рассмотрения основных методов посмотрим на теоретическую часть.
Автоматические переменные $Error
В Powershell существует множество переменных, которые создаются автоматически. Одна из таких переменных — $Error хранит в себе все ошибки за текущий сеанс PS. Например так я выведу количество ошибок и их сообщение за весь сеанс:
Get-TestTest
$Error
$Error.Count
При отсутствии каких либо ошибок мы бы получили пустой ответ, а счетчик будет равняться 0:

Переменная $Error являет массивом и мы можем по нему пройтись или обратиться по индексу что бы найти нужную ошибку:
$Error[0]

foreach ($item in $Error){$item}
Свойства объекта $Error
Так же как и все что создается в Powershell переменная $Error так же имеет свойства (дополнительную информацию) и методы. Названия свойств и методов можно увидеть через команду Get-Member:
$Error | Get-Member
Например, с помощью свойства InvocationInfo, мы можем вывести более структурный отчет об ошибки:
$Error[0].InvocationInfo
Методы объекта $Error
Например мы можем очистить логи ошибок используя clear:
$Error.clear()
Критические ошибки (Terminating Errors)
Критические (завершающие) ошибки останавливают работу скрипта. Например это может быть ошибка в названии командлета или параметра. В следующем примере команда должна была бы вернуть процессы «svchost» дважды, но из-за использования несуществующего параметра ‘—Error’ не выполнится вообще:
'svchost','svchost' | % {Get-Process -Name $PSItem} --Error 
Не критические ошибки (Non-Terminating Errors)
Не критические (не завершающие) ошибки не остановят работу скрипта полностью, но могут вывести сообщение об этом. Это могут быть ошибки не в самих командлетах Powershell, а в значениях, которые вы используете. На предыдущем примере мы можем допустить опечатку в названии процессов, но команда все равно продолжит работу:
'svchost111','svchost' | % {Get-Process -Name $PSItem}
Как видно у нас появилась информация о проблеме с первым процессом ‘svchost111’, так как его не существует. Обычный процесс ‘svchost’ он у нас вывелся корректно.
Параметр ErrorVariable
Если вы не хотите использовать автоматическую переменную $Error, то сможете определять свою переменную индивидуально для каждой команды. Эта переменная определяется в параметре ErrorVariable:
'svchost111','svchost' | % {Get-Process -Name $PSItem } -ErrorVariable my_err_var
$my_err_var
Переменная будет иметь те же свойства, что и автоматическая:
$my_err_var.InvocationInfo
Обработка некритических ошибок
У нас есть два способа определения последующих действий при ‘Non-Terminating Errors’. Это правило можно задать локально и глобально (в рамках сессии). Мы сможем полностью остановить работу скрипта или вообще отменить вывод ошибок.
Приоритет ошибок с $ErrorActionPreference
Еще одна встроенная переменная в Powershell $ErrorActionPreference глобально определяет что должно случится, если у нас появится обычная ошибка. По умолчанию это значение равно ‘Continue’, что значит «вывести информацию об ошибке и продолжить работу»:
$ErrorActionPreference
Если мы поменяем значение этой переменной на ‘Stop’, то поведение скриптов и команд будет аналогично критичным ошибкам. Вы можете убедиться в этом на прошлом скрипте с неверным именем процесса:
$ErrorActionPreference = 'Stop'
'svchost111','svchost' | % {Get-Process -Name $PSItem}
Т.е. скрипт был остановлен в самом начале. Значение переменной будет храниться до момента завершения сессии Powershell. При перезагрузке компьютера, например, вернется значение по умолчанию.
Ниже значение, которые мы можем установить в переменной $ErrorActionPreference:
- Continue — вывод ошибки и продолжение работы;
- Inquire — приостановит работу скрипта и спросит о дальнейших действиях;
- SilentlyContinue — скрипт продолжит свою работу без вывода ошибок;
- Stop — остановка скрипта при первой ошибке.
Самый частый параметр, который мне приходится использовать — SilentlyContinue:
$ErrorActionPreference = 'SilentlyContinue'
'svchost111','svchost' | % {Get-Process -Name $PSItem}
Использование параметра ErrorAction
Переменная $ErrorActionPreference указывает глобальный приоритет, но мы можем определить такую логику в рамках команды с параметром ErrorAction. Этот параметр имеет больший приоритет чем $ErrorActionPreference. В следующем примере, глобальная переменная определяет полную остановку скрипта, а в параметр ErrorAction говорит «не выводить ошибок и продолжить работу»:
$ErrorActionPreference = 'Stop'
'svchost111','svchost' | % {Get-Process -Name $PSItem -ErrorAction 'SilentlyContinue'}
Кроме ‘SilentlyContinue’ мы можем указывать те же параметры, что и в переменной $ErrorActionPreference.
Значение Stop, в обоих случаях, делает ошибку критической.
Обработка критических ошибок и исключений с Try, Catch и Finally
Когда мы ожидаем получить какую-то ошибку и добавить логику нужно использовать Try и Catch. Например, если в вариантах выше мы определяли нужно ли нам отображать ошибку или останавливать скрипт, то теперь сможем изменить выполнение скрипта или команды вообще. Блок Try и Catch работает только с критическими ошибками и в случаях если $ErrorActionPreference или ErrorAction имеют значение Stop.
Например, если с помощью Powershell мы пытаемся подключиться к множеству компьютеров один из них может быть выключен — это приведет к ошибке. Так как эту ситуацию мы можем предвидеть, то мы можем обработать ее. Процесс обработки ошибок называется исключением (Exception).
Синтаксис и логика работы команды следующая:
try {
    # Пытаемся подключиться к компьютеру
}
catch [Имя исключения 1],[Имя исключения 2]{
    # Раз компьютер не доступен, сделать то-то
}
finally {
    # Блок, который выполняется в любом случае последним
}
Блок try мониторит ошибки и если она произойдет, то она добавится в переменную $Error и скрипт перейдет к блоку Catch. Так как ошибки могут быть разные (нет доступа, нет сети, блокирует правило фаервола и т.д.) то мы можем прописывать один блок Try и несколько Catch:
try {
    # Пытаемся подключится
}
catch ['Нет сети']['Блокирует фаервол']{
    # Записываем в файл
}
catch ['Нет прав на подключение']{
    # Подключаемся под другим пользователем
}
Сам блок finally — не обязательный и используется редко. Он выполняется самым последним, после try и catch и не имеет каких-то условий.
Catch для всех типов исключений
Как и было показано выше мы можем использовать блок Catch для конкретного типа ошибок, например при проблемах с доступом. Если в этом месте ничего не указывать — в этом блоке будут обрабатываться все варианты ошибок:
try {
   'svchost111','svchost' | % {Get-Process -Name $PSItem -ErrorAction 'Stop'}
}
catch {
   Write-Host "Какая-то неисправность" -ForegroundColor RED
}
Такой подход не рекомендуется использовать часто, так как вы можете пропустить что-то важное.
Мы можем вывести в блоке catch текст ошибки используя $PSItem.Exception:
try {
   'svchost111','svchost' | % {Get-Process -Name $PSItem -ErrorAction 'Stop'}
}
catch {
   Write-Host "Какая-то неисправность" -ForegroundColor RED
   $PSItem.Exception
}
Переменная $PSItem хранит информацию о текущей ошибке, а глобальная переменная $Error будет хранит информацию обо всех ошибках. Так, например, я выведу одну и ту же информацию:
$Error[0].Exception
Создание отдельных исключений
Что бы обработать отдельную ошибку сначала нужно найти ее имя. Это имя можно увидеть при получении свойств и методов у значения переменной $Error:
$Error[0].Exception | Get-Member
Так же сработает и в блоке Catch с $PSItem:

Для вывода только имени можно использовать свойство FullName:
$Error[0].Exception.GetType().FullName
Далее, это имя, мы вставляем в блок Catch:
try {
   'svchost111','svchost' | % {Get-Process -Name $PSItem -ErrorAction 'Stop'}
}
catch [Microsoft.PowerShell.Commands.ProcessCommandException]{
   Write-Host "Произошла ошибка" -ForegroundColor RED
   $PSItem.Exception
}
Так же, как и было описано выше мы можем усложнять эти блоки как угодно указывая множество исключений в одном catch.
Выброс своих исключений
Иногда нужно создать свои собственные исключения. Например мы можем запретить добавлять через какой-то скрипт названия содержащие маленькие буквы или сотрудников без указания возраста и т.д. Способов создать такие ошибки — два и они тоже делятся на критические и обычные.
Выброс с throw
Throw — выбрасывает ошибку, которая останавливает работу скрипта. Этот тип ошибок относится к критическим. Например мы можем указать только текст для дополнительной информации:
$name = 'AD.1'

if ($name -match '.'){
   throw 'Запрещено использовать точки в названиях'
}

Если нужно, то мы можем использовать исключения, которые уже были созданы в Powershell:
$name = 'AD.1'

if ($name -like '*.*'){
   throw [System.IO.FileNotFoundException]'Запрещено использовать точки в названиях'
}

Использование Write-Error
Команда Write-Error работает так же, как и ключ ErrorAction. Мы можем просто отобразить какую-то ошибку и продолжить выполнение скрипта:
$names = @('CL1', 'AD.1', 'CL3')

foreach ($name in $names){
   if ($name -like '*.*'){
      Write-Error -Message 'Обычная ошибка'
   }
   else{
      $name
   }
}
При необходимости мы можем использовать параметр ErrorAction. Значения этого параметра были описаны выше. Мы можем указать значение ‘Stop’, что полностью остановит выполнение скрипта:
$names = @('CL1', 'AD.1', 'CL3')

foreach ($name in $names){
   if ($name -like '*.*'){
      Write-Error -Message 'Обычная ошибка' -ErrorAction 'Stop'
   }
   else{
      $name
   }
}
Отличие команды Write-Error с ключом ErrorAction от обычных команд в том, что мы можем указывать исключения в параметре Exception:
Write-Error -Message 'Обычная ошибка' -ErrorAction 'Stop'

Write-Error -Message 'Исключение' -Exception [System.IO.FileNotFoundException] -ErrorAction 'Stop'

В Exception мы так же можем указывать сообщение. При этом оно будет отображаться в переменной $Error:
Write-Error -Exception [System.IO.FileNotFoundException]'Моё сообщение'
…
Теги:
#powershell
#ошибки

In this PowerShell tutorial, we will discuss how to create a log file in PowerShell. We use log files to track information while running a PowerShell script.
If you are a little familiar with PowerShell, then you might realize we use PowerShell for simple to complex and to complete a long time-consuming task. Your PowerShell script might be also running automatically through a scheduler.
So it is very much necessary that, we should tack information while the script is running and that when we use log files. We can track information, error, warning, etc on a log file in PowerShell.
But you should not log sensitive information or personal data like password, credit card numbers, email address, social security numbers etc.
So let us see different ways to create a log file in PowerShell.
We will discuss here different approaches here to write information to a log file as well as how to create PowerShell log file.
I always use PowerShell ISE to write, test, and debug PowerShell scripts. You can use the Visual Studio Code also.
Open PowerShell ISE in administrator mode (Right-click and Run as administrator) and go through the examples step by step.
Example-1: PowerShell create simple log file
This is one of the simplest way to write a message to a log file in PowerShell.
$logfilepath="D:Log.txt"
$logmessage="This is a test message for the PowerShell create log file"
$logmessage >> $logfilepath
The above PowerShell script will write the message in the Log.txt file that is presented in D drive.
If the file is presented before then it will keep appending the message like by like. And if the Log.txt file is not presented in the D drive, then it will create the log file first and then write the message.
Example-2: Create simple log file in PowerShell
The below example will check if the log file is presented already, then it will delete the file and create a new file and write the message into it.
$logfilepath="D:Log.txt"
$logmessage="This is a test message for the PowerShell create log file"
if(Test-Path $logfilepath)
{
    Remove-Item $logfilepath
}
$logmessage >> $logfilepath
We can use the Test-Path PowerShell command to check if a file exists or not in the file path.
Example-3:
We can also use the date and time when the message is logged using PowerShell Get-Date.
$logfilepath="D:Log.txt"
$logmessage="This is a test message for the PowerShell create log file"
if(Test-Path $logfilepath)
{
    Remove-Item $logfilepath
}
$logmessage +" - "+ (Get-Date).ToString() >> $logfilepath
The above PowerShell script will log the message with the current date and time.

Example-4:
If you want to track multiple log messages, then you can create a PowerShell function like below:
$logfilepath="D:Log.txt"

function WriteToLogFile ($message)
{
$message +" - "+ (Get-Date).ToString() >> $logfilepath
}

if(Test-Path $logfilepath)
{
    Remove-Item $logfilepath
}

WriteToLogFile "This is a test message for the PowerShell create log file"
WriteToLogFile "This is another message"
WriteToLogFile "This is another another message"
The above PowerShell script will check if the log file exists in the path, if yes then it will delete the file. And then it will call 3 times the function to write the messages to the PowerShell log file.
Example-5:
Below is a PowerShell script where we have used the Add-content PowerShell cmdlets to write the message to a .log file.
$logfilepath = "D:Logs.log"

function WriteToLogFile ($message)
{
   Add-content $logfilepath -value $message
}
if(Test-Path $logfilepath)
{
    Remove-Item $logfilepath
}

WriteToLogFile "This is a test message for the PowerShell create log file"
WriteToLogFile "This is another message"
WriteToLogFile "This is another another message"
Rather using a .txt file, most of times we write the extension as .log file.
Example-6:
We can also use Start-Transcript PowerShell cmdlets to write to a log file. This not only writes the log message but also tracks other information like username, machine, host application, PSVersion, CLRVersion, etc.
$logfilepath="D:Log.log"

Start-Transcript -Path $logfilepath

Write-Host "This is a message"

Stop-Transcript
The file looks like below:

PowerShell Log Levels
In the Write- PowerShell cmdlets, PowerShell provides various types of log levels like:
- Write-Verbose
- Write-Debug
- Write-Information
- Write-Warning
- Write-Error
PowerShell create log file with date
Now, let us see how to create log file with date in PowerShell. Basically, it will create the file with the file name as of today’s date.
The script will check if any file exists with name as today’s date, if the file exists, then it will delete will first delete the file, else it will create the file and write the log message into it.
$todaysdate=Get-Date -Format "MM-dd-yyyy"

$logfilepath = "D:"+$todaysdate+".log"

function WriteToLogFile ($message)
{
   Add-content $logfilepath -value $message
}
if(Test-Path $logfilepath)
{
    Remove-Item $logfilepath
}

WriteToLogFile "PowerShell log file message"
WriteToLogFile "This is another message"
WriteToLogFile "This is another another message"
This is how we can create log file with date in PowerShell.
This is how we can create a daily log file in PowerShell that will be created on today’s date.
PowerShell create log file with datetime
Now, we can see how to create a log file with datetime using PowerShell.
We need to format the Get-Date PowerShell cmdlet to get the current date and time like below:
$todaysdate=Get-Date -Format "MM-dd-yyyy-hh-mm"

$logfilepath = "D:"+$todaysdate+".log"

function WriteToLogFile ($message)
{
   Add-content $logfilepath -value $message
}
if(Test-Path $logfilepath)
{
    Remove-Item $logfilepath
}

WriteToLogFile "PowerShell log file message"
In the above example the PowerShell log file will be created on the name as today’s date and time.
PowerShell create log file if not exists
Now, let us see how to create a log file if not exists in PowerShell.
We can use the Test-Path PowerShell cmdlet to check if the file exists in the path or not.
And we can use New-Item PowerShell cmdlets to create a file in the folder path.
$todaysdate=Get-Date -Format "MM-dd-yyyy"
$folderpath="D:"
$filename = $todaysdate+".log"

if (!(Test-Path $logfilepath))
{
New-Item -itemType File -Path $folderpath -Name $filename
}
You can see the output like below:

This is how we can create a log file if not exists in PowerShell.
PowerShell create log file with headers
Now, let us see how to create a log file with headers in PowerShell. Here we will create a .csv file and also will add headers to the CSV file.
$filename = "Log-"+ (Get-Date -Format "MM-dd-yyyy")
$outfile = "D:"+$filename+".csv"

$newcsv = {} | Select "DateAndTime","Message" | Export-Csv $outfile

$csvfile = Import-Csv $outfile
$csvfile.DateAndTime = Get-Date -Format "MM-dd-yyyy-hh-mm"
$csvfile.Message = "This is a test message"

$csvfile | Export-CSV $outfile
The above PowerShell script will create a .csv file and then it will add two headers (DateAndTime and Message). We will add a test log message also.
PowerShell create error log file
Now, we will see how to create an error log file in PowerShell. Basically, we will use the try-catch statement and in the catch statement, we will log the error message in a log file in PowerShell.
$filename = "Log-"+ (Get-Date -Format "MM-dd-yyyy")
$logfile = "D:"+$filename+".log"

try
{
1/0
}
catch
{
$_.Exception.Message | Out-File $logfile
}
In the above PowerShell script, whenever an error will appear in the try statement, then the message will be logged in the catch statement in the PowerShell error log file.
PowerShell create csv log file
In the same way, we are creating .txt or .log file, we can also create .csv file in PowerShell to log information.
Now, let us see how to create a .csv log file in PowerShell.
To create a .csv file, we just need to change the file extension to .csv.
$todaysdate=Get-Date -Format "MM-dd-yyyy"

$logfilepath = "D:"+$todaysdate+".csv"

function WriteToLogFile ($message)
{
   Add-content $logfilepath -value $message
}
if(Test-Path $logfilepath)
{
    Remove-Item $logfilepath
}

WriteToLogFile "PowerShell log file message"
This is how we can create csv log file in PowerShell.
Use PowerShell Framework (PSFramework) to Log Information
You can also use PSFramework or PowerShell Framework to log information.
To use PSFramework, the first thing you need to install it by running the following command.
Install-Module PSFrameworkBy using the PSFramework, we can write to the log file by using the Write-PSFMessage script. Check out moe on PSFramwwork site.
PowerShell create simple log file
Now, let us see how to create a simple log file in PowerShell. The PowerShell script will create a very simple log file and will log a text message. The file will be created on today’s date.
$filename = "Log- "+ (Get-Date -Format "MM-dd-yyyy")
$logfilepath = "C:"+$filename+".log"
New-Item -Path $logfilepath  -ItemType file
Add-Content -Path $logfilepath -Value "This is a text file message"
You may like the following PowerShell tutorials:
- How to loop through a PowerShell array
- How to create and use PowerShell ArrayList
- How to create an array in PowerShell from CSV file
- What is PowerShell Array
- How to use PowerShell reference variable
- What is a PowerShell variable
- SharePoint 2013 backup and restore using PowerShell
- The term ‘Get-MsolUser’ is not recognized as the name of a cmdlet
In this tutorial, we learned how to create a log file in PowerShell and the below things:
- PowerShell create log file
- PowerShell Log Levels
- PowerShell create log file with date
- PowerShell create log file with datetime
- PowerShell create log file if not exists
- PowerShell create log file with headers
- PowerShell create error log file
- PowerShell create csv log file
- Use PowerShell Framework (PSFramework) to Log Information
- PowerShell create simple log file
- powershell write to log file
- powershell log to file
- create log file powershell
- powershell logging to file

I am Bijay a Microsoft MVP (8 times – My MVP Profile) in SharePoint and have more than 15 years of expertise in SharePoint Online Office 365, SharePoint subscription edition, and SharePoint 2019/2016/2013. Currently working in my own venture TSInfo Technologies a SharePoint development, consulting, and training company. I also run the popular SharePoint website EnjoySharePoint.com