
В Powershell существует несколько уровней ошибок и несколько способов их обработать. Проблемы одного уровня (Non-Terminating Errors) можно решить с помощью привычных для Powershell команд. Другой уровень ошибок (Terminating Errors) решается с помощью исключений (Exceptions) стандартного, для большинства языков, блока в виде Try, Catch и Finally.
Как Powershell обрабатывает ошибки
До рассмотрения основных методов посмотрим на теоретическую часть.
Автоматические переменные $Error
В Powershell существует множество переменных, которые создаются автоматически. Одна из таких переменных — $Error хранит в себе все ошибки за текущий сеанс PS. Например так я выведу количество ошибок и их сообщение за весь сеанс:
Get-TestTest
$Error
$Error.Count
При отсутствии каких либо ошибок мы бы получили пустой ответ, а счетчик будет равняться 0:

Переменная $Error являет массивом и мы можем по нему пройтись или обратиться по индексу что бы найти нужную ошибку:
$Error[0]

foreach ($item in $Error){$item}
Свойства объекта $Error
Так же как и все что создается в Powershell переменная $Error так же имеет свойства (дополнительную информацию) и методы. Названия свойств и методов можно увидеть через команду Get-Member:
$Error | Get-Member
Например, с помощью свойства InvocationInfo, мы можем вывести более структурный отчет об ошибки:
$Error[0].InvocationInfo
Методы объекта $Error
Например мы можем очистить логи ошибок используя clear:
$Error.clear()
Критические ошибки (Terminating Errors)
Критические (завершающие) ошибки останавливают работу скрипта. Например это может быть ошибка в названии командлета или параметра. В следующем примере команда должна была бы вернуть процессы «svchost» дважды, но из-за использования несуществующего параметра ‘—Error’ не выполнится вообще:
'svchost','svchost' | % {Get-Process -Name $PSItem} --Error 
Не критические ошибки (Non-Terminating Errors)
Не критические (не завершающие) ошибки не остановят работу скрипта полностью, но могут вывести сообщение об этом. Это могут быть ошибки не в самих командлетах Powershell, а в значениях, которые вы используете. На предыдущем примере мы можем допустить опечатку в названии процессов, но команда все равно продолжит работу:
'svchost111','svchost' | % {Get-Process -Name $PSItem}
Как видно у нас появилась информация о проблеме с первым процессом ‘svchost111’, так как его не существует. Обычный процесс ‘svchost’ он у нас вывелся корректно.
Параметр ErrorVariable
Если вы не хотите использовать автоматическую переменную $Error, то сможете определять свою переменную индивидуально для каждой команды. Эта переменная определяется в параметре ErrorVariable:
'svchost111','svchost' | % {Get-Process -Name $PSItem } -ErrorVariable my_err_var
$my_err_var
Переменная будет иметь те же свойства, что и автоматическая:
$my_err_var.InvocationInfo
Обработка некритических ошибок
У нас есть два способа определения последующих действий при ‘Non-Terminating Errors’. Это правило можно задать локально и глобально (в рамках сессии). Мы сможем полностью остановить работу скрипта или вообще отменить вывод ошибок.
Приоритет ошибок с $ErrorActionPreference
Еще одна встроенная переменная в Powershell $ErrorActionPreference глобально определяет что должно случится, если у нас появится обычная ошибка. По умолчанию это значение равно ‘Continue’, что значит «вывести информацию об ошибке и продолжить работу»:
$ErrorActionPreference
Если мы поменяем значение этой переменной на ‘Stop’, то поведение скриптов и команд будет аналогично критичным ошибкам. Вы можете убедиться в этом на прошлом скрипте с неверным именем процесса:
$ErrorActionPreference = 'Stop'
'svchost111','svchost' | % {Get-Process -Name $PSItem}
Т.е. скрипт был остановлен в самом начале. Значение переменной будет храниться до момента завершения сессии Powershell. При перезагрузке компьютера, например, вернется значение по умолчанию.
Ниже значение, которые мы можем установить в переменной $ErrorActionPreference:
- Continue — вывод ошибки и продолжение работы;
- Inquire — приостановит работу скрипта и спросит о дальнейших действиях;
- SilentlyContinue — скрипт продолжит свою работу без вывода ошибок;
- Stop — остановка скрипта при первой ошибке.
Самый частый параметр, который мне приходится использовать — SilentlyContinue:
$ErrorActionPreference = 'SilentlyContinue'
'svchost111','svchost' | % {Get-Process -Name $PSItem}
Использование параметра ErrorAction
Переменная $ErrorActionPreference указывает глобальный приоритет, но мы можем определить такую логику в рамках команды с параметром ErrorAction. Этот параметр имеет больший приоритет чем $ErrorActionPreference. В следующем примере, глобальная переменная определяет полную остановку скрипта, а в параметр ErrorAction говорит «не выводить ошибок и продолжить работу»:
$ErrorActionPreference = 'Stop'
'svchost111','svchost' | % {Get-Process -Name $PSItem -ErrorAction 'SilentlyContinue'}
Кроме ‘SilentlyContinue’ мы можем указывать те же параметры, что и в переменной $ErrorActionPreference.
Значение Stop, в обоих случаях, делает ошибку критической.
Обработка критических ошибок и исключений с Try, Catch и Finally
Когда мы ожидаем получить какую-то ошибку и добавить логику нужно использовать Try и Catch. Например, если в вариантах выше мы определяли нужно ли нам отображать ошибку или останавливать скрипт, то теперь сможем изменить выполнение скрипта или команды вообще. Блок Try и Catch работает только с критическими ошибками и в случаях если $ErrorActionPreference или ErrorAction имеют значение Stop.
Например, если с помощью Powershell мы пытаемся подключиться к множеству компьютеров один из них может быть выключен — это приведет к ошибке. Так как эту ситуацию мы можем предвидеть, то мы можем обработать ее. Процесс обработки ошибок называется исключением (Exception).
Синтаксис и логика работы команды следующая:
try {
    # Пытаемся подключиться к компьютеру
}
catch [Имя исключения 1],[Имя исключения 2]{
    # Раз компьютер не доступен, сделать то-то
}
finally {
    # Блок, который выполняется в любом случае последним
}
Блок try мониторит ошибки и если она произойдет, то она добавится в переменную $Error и скрипт перейдет к блоку Catch. Так как ошибки могут быть разные (нет доступа, нет сети, блокирует правило фаервола и т.д.) то мы можем прописывать один блок Try и несколько Catch:
try {
    # Пытаемся подключится
}
catch ['Нет сети']['Блокирует фаервол']{
    # Записываем в файл
}
catch ['Нет прав на подключение']{
    # Подключаемся под другим пользователем
}
Сам блок finally — не обязательный и используется редко. Он выполняется самым последним, после try и catch и не имеет каких-то условий.
Catch для всех типов исключений
Как и было показано выше мы можем использовать блок Catch для конкретного типа ошибок, например при проблемах с доступом. Если в этом месте ничего не указывать — в этом блоке будут обрабатываться все варианты ошибок:
try {
   'svchost111','svchost' | % {Get-Process -Name $PSItem -ErrorAction 'Stop'}
}
catch {
   Write-Host "Какая-то неисправность" -ForegroundColor RED
}
Такой подход не рекомендуется использовать часто, так как вы можете пропустить что-то важное.
Мы можем вывести в блоке catch текст ошибки используя $PSItem.Exception:
try {
   'svchost111','svchost' | % {Get-Process -Name $PSItem -ErrorAction 'Stop'}
}
catch {
   Write-Host "Какая-то неисправность" -ForegroundColor RED
   $PSItem.Exception
}
Переменная $PSItem хранит информацию о текущей ошибке, а глобальная переменная $Error будет хранит информацию обо всех ошибках. Так, например, я выведу одну и ту же информацию:
$Error[0].Exception
Создание отдельных исключений
Что бы обработать отдельную ошибку сначала нужно найти ее имя. Это имя можно увидеть при получении свойств и методов у значения переменной $Error:
$Error[0].Exception | Get-Member
Так же сработает и в блоке Catch с $PSItem:

Для вывода только имени можно использовать свойство FullName:
$Error[0].Exception.GetType().FullName
Далее, это имя, мы вставляем в блок Catch:
try {
   'svchost111','svchost' | % {Get-Process -Name $PSItem -ErrorAction 'Stop'}
}
catch [Microsoft.PowerShell.Commands.ProcessCommandException]{
   Write-Host "Произошла ошибка" -ForegroundColor RED
   $PSItem.Exception
}
Так же, как и было описано выше мы можем усложнять эти блоки как угодно указывая множество исключений в одном catch.
Выброс своих исключений
Иногда нужно создать свои собственные исключения. Например мы можем запретить добавлять через какой-то скрипт названия содержащие маленькие буквы или сотрудников без указания возраста и т.д. Способов создать такие ошибки — два и они тоже делятся на критические и обычные.
Выброс с throw
Throw — выбрасывает ошибку, которая останавливает работу скрипта. Этот тип ошибок относится к критическим. Например мы можем указать только текст для дополнительной информации:
$name = 'AD.1'

if ($name -match '.'){
   throw 'Запрещено использовать точки в названиях'
}

Если нужно, то мы можем использовать исключения, которые уже были созданы в Powershell:
$name = 'AD.1'

if ($name -like '*.*'){
   throw [System.IO.FileNotFoundException]'Запрещено использовать точки в названиях'
}

Использование Write-Error
Команда Write-Error работает так же, как и ключ ErrorAction. Мы можем просто отобразить какую-то ошибку и продолжить выполнение скрипта:
$names = @('CL1', 'AD.1', 'CL3')

foreach ($name in $names){
   if ($name -like '*.*'){
      Write-Error -Message 'Обычная ошибка'
   }
   else{
      $name
   }
}
При необходимости мы можем использовать параметр ErrorAction. Значения этого параметра были описаны выше. Мы можем указать значение ‘Stop’, что полностью остановит выполнение скрипта:
$names = @('CL1', 'AD.1', 'CL3')

foreach ($name in $names){
   if ($name -like '*.*'){
      Write-Error -Message 'Обычная ошибка' -ErrorAction 'Stop'
   }
   else{
      $name
   }
}
Отличие команды Write-Error с ключом ErrorAction от обычных команд в том, что мы можем указывать исключения в параметре Exception:
Write-Error -Message 'Обычная ошибка' -ErrorAction 'Stop'

Write-Error -Message 'Исключение' -Exception [System.IO.FileNotFoundException] -ErrorAction 'Stop'

В Exception мы так же можем указывать сообщение. При этом оно будет отображаться в переменной $Error:
Write-Error -Exception [System.IO.FileNotFoundException]'Моё сообщение'
…
Теги:
#powershell
#ошибки
На чтение 4 мин. Просмотров 19.1k. Опубликовано 03.09.2019
Испытание ошибок Windows PowerShell не является распространенной ситуацией, поэтому вам необходимо принять меры при получении сообщения Windows PowerShell перестало работать .
Эта ошибка очень раздражает, так как она остановит процессы, запущенные в вашей системе Windows 10. Более того, вы получите сообщение об ошибке без дополнительной информации, поэтому вы не можете сказать, что именно вызвало эту проблему.
Во всяком случае, вы не должны паниковать. Как всегда, существуют различные решения для устранения неполадок, которые можно применить для исправления ошибки «Windows PowerShell прекратил работу».
Содержание
- Действия по исправлению ошибок Windows PowerShell перестали работать
- 1. Инициируйте полное сканирование системы
- 2. Инициируйте чистую загрузку
- 3. Отключите и снова включите Windows PowerShell
- 4. Создайте новую учетную запись Microsoft
Действия по исправлению ошибок Windows PowerShell перестали работать
- Инициируйте полное сканирование системы.
- Сделайте чистый процесс загрузки.
- Отключите и снова включите Windows PowerShell.
- Создайте новую учетную запись Microsoft.
1. Инициируйте полное сканирование системы
В некоторых ситуациях атака вредоносного ПО может быть причиной того, что Windows PowerShell не работает должным образом. Итак, первое, что нужно сделать, это запустить сканирование безопасности.
Скорее всего, вы заразились Poweliks , вредоносной программой, которая мешает PowerShell. Файл, связанный с этим вирусом: dllhost.exe * 32 или dllhst3g.exe * 32, и его обычно можно остановить из диспетчера задач.
Теперь в этом случае вам нужно использовать антивирусную или антивирусную программу, например Malwarebytes, и сканировать систему Windows 10 на наличие возможных зараженных файлов. Программа безопасности должна автоматически находить и удалять вредоносные программы.
Примечание : рекомендуется запускать сканирование безопасности из безопасного режима, то есть когда сторонние приложения и процессы отключаются платформой Windows 10. Вы можете перейти в безопасный режим:
- Нажмите горячие клавиши Win + R и в поле RUN введите msconfig и нажмите Enter.
-
Из окна Конфигурация системы перейдите на вкладку Загрузка .

- В разделе «Загрузка» выберите Безопасная загрузка .
- Сохраните изменения и перезагрузите компьютер.
- Это все.

2. Инициируйте чистую загрузку
Вы можете увидеть, вызывает ли программный конфликт сбой в Windows PowerShell, инициировав чистую загрузку. Таким образом, вы можете запустить систему Windows 10 только с функциями по умолчанию.
Если ошибка Windows PowerShell перестала работать не отображается после выполнения чистой загрузки, это означает, что существует конфликт программного обеспечения, поэтому необходимо удалить программу, которая стоит за этой проблемой.
Вот как вы можете запустить процесс чистой загрузки:
- Нажмите горячие клавиши Win + R на клавиатуре, чтобы запустить окно RUN.
-
Там введите msconfig и нажмите Enter.
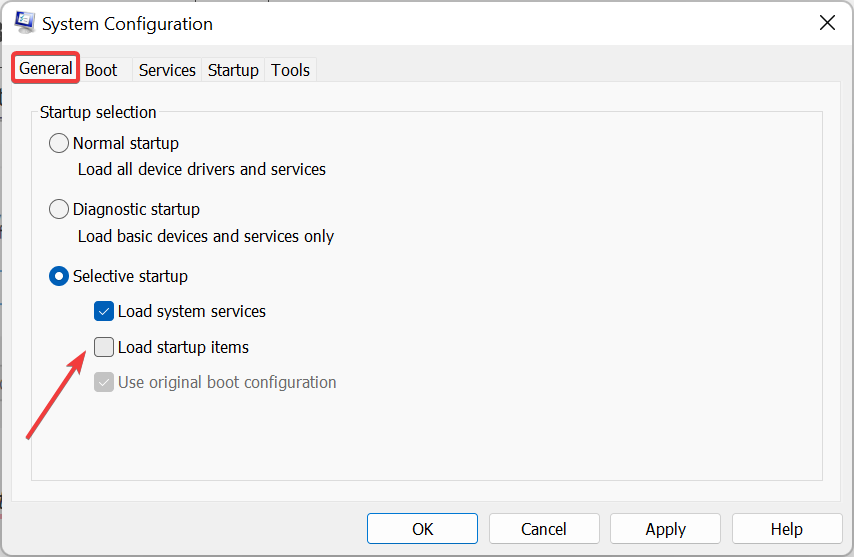
- В Конфигурация системы перейдите на вкладку Общие.
- С этого момента в разделе Выборочный запуск снимите флажок «Загружать элементы запуска».
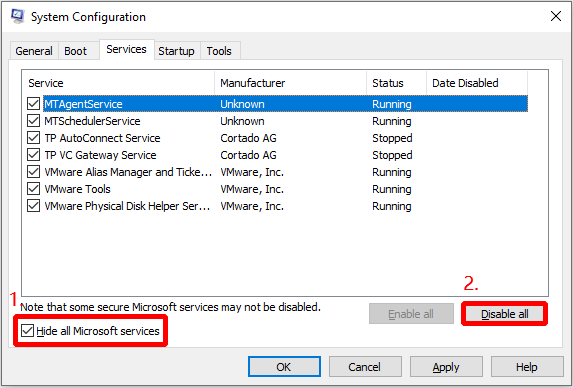
- Затем перейдите на вкладку Услуги .
-
Установите флажок скрыть все службы Microsoft , а затем нажмите Отключить все .
-
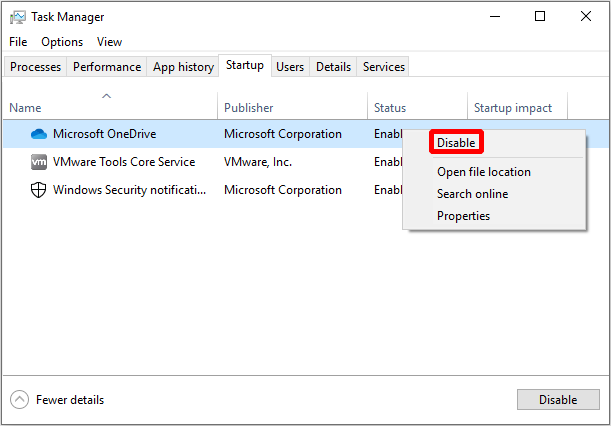
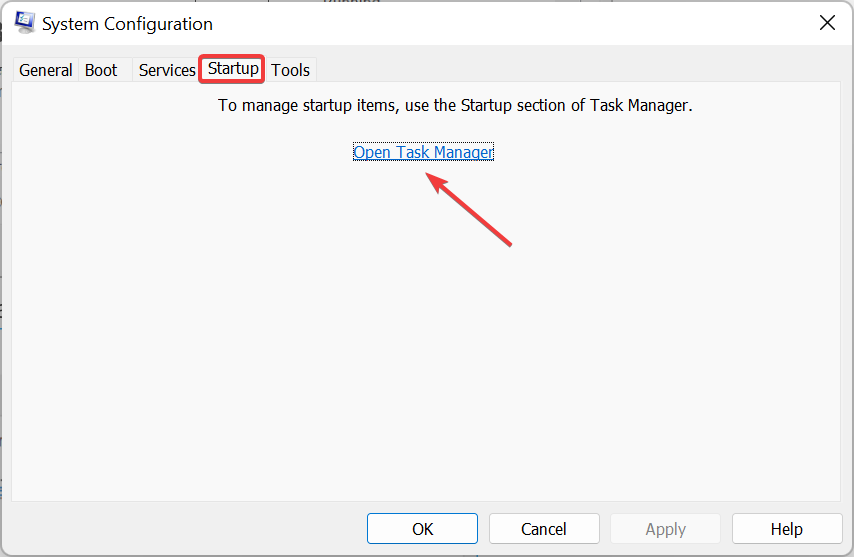
Теперь перейдите на вкладку Автозагрузка и нажмите ссылку открыть диспетчер задач .
- Из диспетчера задач отключите все автозагрузки программ.
- Сохраните ваши изменения и закройте эти окна.
- Перезагрузите систему Windows 10.


ТАКЖЕ ПРОЧИТАЙТЕ . Microsoft PowerShell все чаще используется для распространения вредоносного ПО.
3. Отключите и снова включите Windows PowerShell
- Нажмите горячие клавиши Win + X и выберите Панель управления .
- С панели управления перейдите в категорию .
-
А из отображаемого списка выберите Удалить – в разделе «Программы».
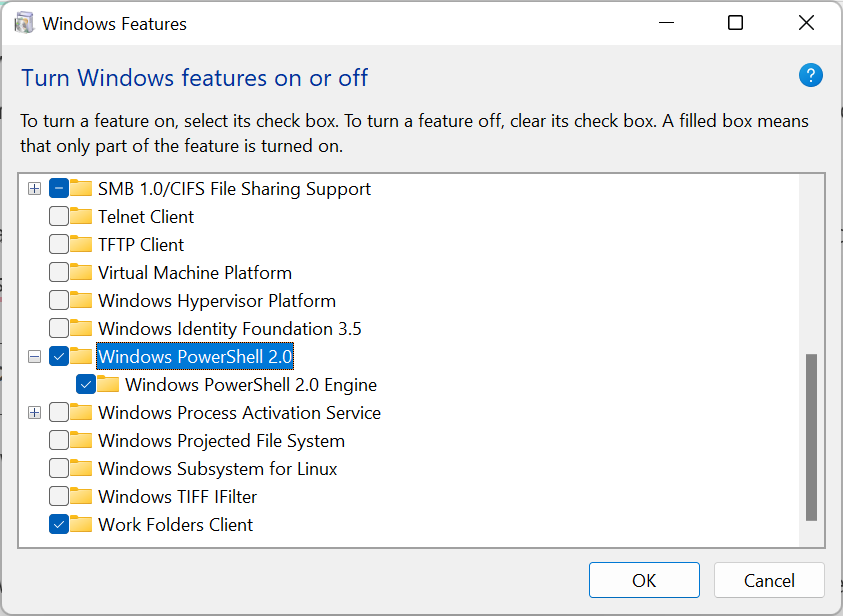
- На левой панели главного окна нажмите ссылку Включить или отключить функции Windows .
- Прокрутите вниз и найдите запись Windows PowerShell .
- Снимите флажок с PowerShell.
- Сохраните и примените ваши изменения.
- Перезагрузите компьютер с Windows 10.
- После этого повторите шаги, описанные выше, и снова включите функцию Windows PowerShell.

ТАКЖЕ ЧИТАЙТЕ: 10 лучших программ для удаления для пользователей ПК
4. Создайте новую учетную запись Microsoft
Ваша учетная запись может быть повреждена (по разным причинам), и поэтому вы можете получить сообщение об ошибке «Windows PowerShell прекратил работу».
Итак, попробуйте создать новую учетную запись, а затем убедитесь, что проблема все еще возникает или нет.Вот то, что вам нужно следовать:
- Нажмите на значок запуска Windows.
- Выберите Настройки и перейдите в раздел Аккаунты .
-
Оттуда выберите Семья и другие пользователи .
- Нажмите Добавить кого-то еще на этот компьютер.
- Просто следуйте инструкциям на экране для возобновления этого процесса.
- Подсказка: не забудьте сделать резервную копию своих данных перед завершением этого процесса – возможно, вам придется импортировать ваши личные файлы и приложение под новой учетной записью.

Надеемся, что сообщение об ошибке «Windows PowerShell перестало работать» исчезло. Если у вас есть вопросы, связанные с решениями для устранения неполадок, описанными выше, свяжитесь с нашей командой.
Вы можете легко связаться с нами, используя поле для комментариев снизу или заполнив контактную форму, доступную на странице О нас.
Кроме того, если вы сталкивались с другими решениями для исправления этой ошибки, перечислите шаги по устранению неполадок в комментариях ниже, и мы соответствующим образом обновим это пошаговое руководство.
Для начала определимся, что такое обработка ошибок вообще. В общем случае ошибка — это поведение программы или скрипта, отличное от запланированного. Совсем избежать ошибок не очень возможно, поэтому надо предвидеть, где они могут возникнуть и писать код так, чтобы при возникновении ошибки можно было перехватить ее, проанализировать и определить дальнейшее поведение скрипта. Именно это обычно и подразумевается под обработкой ошибок.
В PowerShell ошибки делятся на два типа: прерывающие (Terminating) и непрерывающие (Non-Terminating). Как следует из названия, непрерывающие ошибки позволяют продолжить выполнение команды, тогда как при возникновении прерывающей ошибки дальнейшее продолжение выполнения команды невозможно. К примеру, у нас есть файл со списком служб, которые необходимо перезапустить следующей командой:
Get-Content -Path C:Filesservices.txt | Restart-Service
Предположим, что перезапуск одной из перечисленных служб по какой либо причине невозможен. Тем не менее можно продолжать выполнение задачи, поскольку остальные службы доступны и их можно перезапустить. Это пример непрерывающей ошибки.
А теперь представьте, что у нас нет прав на открытие этого файла, и соответственно прочитать список служб мы не можем. В этой ситуации продолжение работы невозможно, т.е. это прерывающая ошибка.
PowerShell позволяет обрабатывать оба эти типа ошибок. Большинство ошибок в PowerShell непрерывающие, и сегодня речь пойдет о том, как их обрабатывать.
Обработка непрерывающих ошибок
Для получения ошибки возьмем службу с ″оригинальным″ названием Service. Поскольку службы этой на сервере нет, то обращение к ней стабильно будет генерировать ошибку. Запросим данные о нескольких службах командой:
Get-Service service,spooler
Как видно из примера, PowerShell не нашел службу Service, о чем выдал ошибку и затем продолжил выполнение команды. Давайте разберемся, почему команда повела себя именно так и как это поведение изменить.

За поведение команды при возникновении ошибки отвечает параметр ErrorAction, который может принимать одно из пяти значений:
• Continue;
• SilentlyContinue;
• Stop;
• Ignore;
• Inquire.
Примечание. Еще у ErrorAction может быть значение Suspend. Но это значение может применяться только к рабочим процессам (workflows), поэтому в рамках данной статьи речь о нем не пойдет.
Значение Continue означает, что при возникновении ошибки информация об этом будет выведена на экран (отправлена в поток вывода Error) и добавлена в автоматическую переменную $Error, после чего выполнение команды будет продолжено. Надо сказать, что Continue — это действие, определенное в сеансе по умолчанию, поэтому его можно не указывать явно.

При значении SilentlyContinue информация об ошибке добавляется в переменную $Error, но не выводится на экран. При этом команда продолжает выполняться дальше, также как и в предыдущем случае.

Значение Stop останавливает дальнейшее выполнение команды при возникновении ошибки. И наоборот, значение Ignore полностью игнорирует возникновение ошибки, при этом не выводится сообщение на экран и не производится запись в $Error. Это значение появилось в PowerShell 3.0.

Inquire — наиболее интересное значение ErrorAction. Если задать это значение, то при возникновении ошибки предлагается на выбор несколько действий: продолжить (Yes), продолжить не смотря на эту и все последующие ошибки (Yes to All), остановить (Halt) или приостановить (Suspend) выполнение команды.
Самый необычный эффект дает Suspend, при выборе которого открывается параллельный сеанс (Nested Namespace). Определить его можно по значку >>. Nested Namespace представляет из себя дочерний процесс, в котором можно полноценно работать — выполнять команды, запускать скрипты и т.п. Этот режим удобно использовать для отладки скриптов, например можно по быстрому исправить причину ошибки и продолжить выполнение. Для выхода из Nested Namespace достаточно набрать exit и выбрать необходимое действие.

Примечание. У параметра ErrorAction есть алиас — EA. Кроме того, вместо названия параметра можно указывать числовые значения: 0 (SilentlyContinue), 1 (Stop), 2 (Continue), 3 (Inquire). Так например, вместо:
Get-Service service,spooler -ErrorAction SilentlyContinue
можно написать так:
Get-Service service,spooler -EA 0
Переменные для обработки ошибок
Как я уже говорил, если не указывать параметр ErrorAction, то для команды действует режим обработки ошибок, определенный в сеансе. Этот режим задается переменной $ErrorActionPreference, которая по умолчанию имеет значение Continue. При желании можно переопределить режим для всего сеанса, задав переменной $ErrorActionPreference нужное значение.

Все ошибки PowerShell сохраняет в автоматическую переменную $Error. Это глобальная переменная, которая представляет из себя массив строк, содержащий записи обо всех ошибках в текущем сеансе. Каждая новая ошибка добавляется в начало массива, соответственно для просмотра последней ошибки надо обратиться к самому первому элементу массива $Error[0].
$Error имеет свои свойства и методы, которые можно использовать. Например, посмотреть общее количество ошибок в текущем сеансе можно командой $Error.Count, а очистить список — командой $Error.Clear().

Переменная $Error не безразмерна, по умолчанию она хранит не более 256 ошибок. При превышении этого количества наиболее старые ошибки будут затираться. При необходимости количество записей в переменной $Error можно увеличить, изменив значение другой переменной $MaximumErrorCount.
Кроме $Error для хранения ошибок допускается задавать собственные переменные. Сделать это можно с помощью параметра ErrorVariable, например так:
Get-Service service,spooler -ErrorAction SilentlyContinue -ErrorVariable var
Обратите внимание, что имя переменной в команде задается без знака $, хотя в дальнейшем к ней обращаемся как к обычной переменной $var.

В отличие от глобальной переменной $Error заданные вручную переменные хранят только ошибки той команды, в которой они определены. Кроме того, по умолчанию эти переменные каждый раз перезаписываются и поэтому хранят только последнюю ошибку. Если вы хотите, чтобы новые ошибки добавлялись в переменную, не перезаписывая ее содержимое, то перед именем переменной надо поставить знак +, например +var.
Пока все, а в следующей части пойдет о способах обработки прерывающих ошибок.
I was able to bypass this error by invoking PowerShell like this:
powershell -executionpolicy bypass -File .MYSCRIPT.ps1
That is, I added the -executionpolicy bypass to the way I invoked the script.
This worked on Windows 7 Service Pack 1. I am new to PowerShell, so there could be caveats to doing that that I am not aware of.
[Edit 2017-06-26] I have continued to use this technique on other systems including Windows 10 and Windows 2012 R2 without issue.
Here is what I am using now. This keeps me from accidentally running the script by clicking on it. When I run it in the scheduler I add one argument: «scheduler» and that bypasses the prompt.
This also pauses the window at the end so I can see the output of PowerShell.
if NOT "%1" == "scheduler" (
   @echo looks like you started the script by clicking on it.
   @echo press space to continue or control C to exit.
   pause
)

C:
cd Scripts

powershell -executionpolicy bypass -File .rundps.ps1

set psexitcode=%errorlevel%

if NOT "%1" == "scheduler" (
   @echo Powershell finished.  Press space to exit.
   pause
)

exit /b %psexitcode%
If PowerShell is doing more harm than good, here’s how to fix it if it starts giving you error messages.

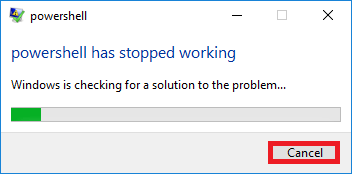
PowerShell is a reliable tool that you can use to automate and manage your PC tasks. However, this tool often fails and pops up the “PowerShell has stopped working” error.
In most cases, this error stems from faulty system files or corrupted third-party apps. As such, let’s check out how you can easily fix PowerShell if it goes unresponsive often.
1. Enable the Windows PowerShell
This error might pop up simply because the Windows PowerShell is disabled. So, you can tackle the issue by tweaking a few settings as follows:
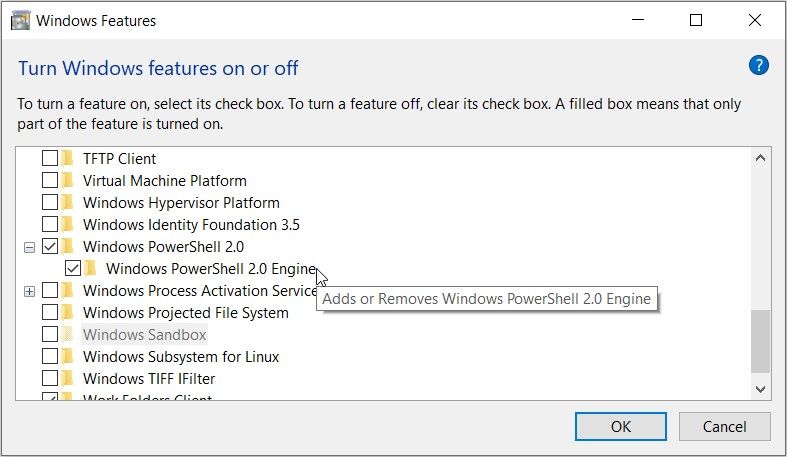
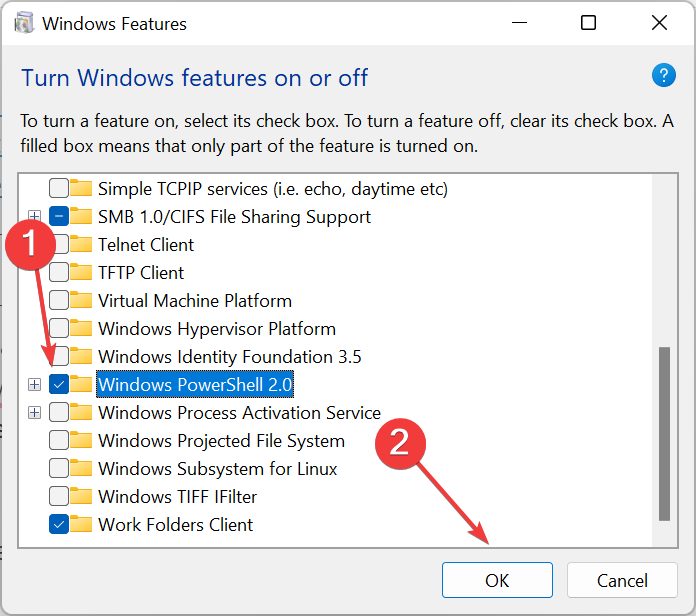
- Type Turn Windows Features on or off in the Start Menu search bar and select the Best match.
- Locate the Windows PowerShell option and click its drop-down menu.
- Check all the Windows PowerShell boxes, press OK, and then close the Windows Features screen. Finally, restart your device to apply these changes.
2. Run the Windows PowerShell With Administrative Privileges
Opening the Windows PowerShell with administrative privileges might help. So, let’s check out how you can do this:
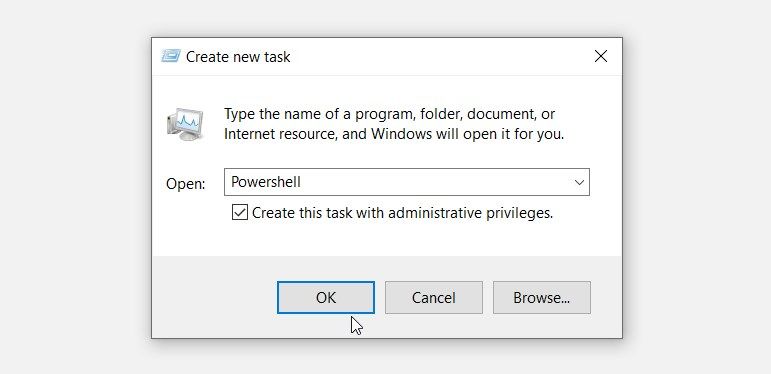
- Type Task Manager in the Start Menu search bar and select the Best match.
- Click the File tab in the top-left corner and select the Run new task option.
- Type Powershell and check the Create this task with administrative privileges box. Finally, click OK to open an elevated PowerShell window.
3. Try Using a Different Microsoft Account
In some instances, this issue might only be affecting the account you’re currently using. So, the best way to tackle the issue is to use a different Microsoft account. If you don’t have a Microsoft account, you might just consider creating it to check if this resolves the issue.
Now, here’s how you can create or sign in to a Microsoft account on Windows:
- Click the Windows key and select the Settings option.
- Select Accounts and then click Email & accounts on the left-hand side.
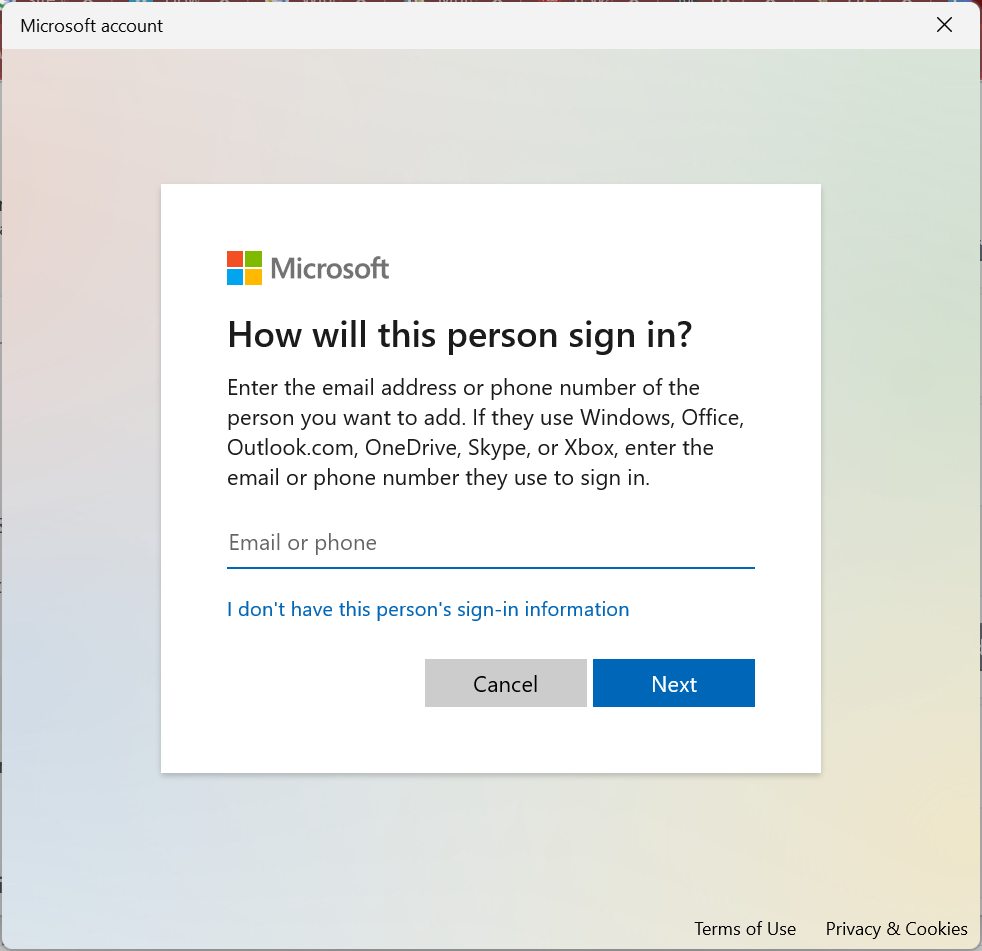
- Click Add a Microsoft account on the right-hand side and fill in your details.
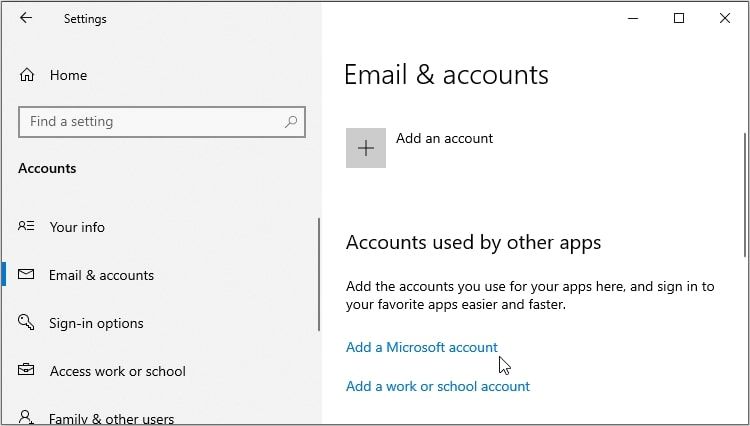
Follow the on-screen instructions and then try open the PowerShell tool.
If the issue persists, then you’re likely dealing with system issues. In this case, we’ll show you how you can resolve the problem.
4. Get Rid of Suspicious Third-Party Programs

Some faulty third-party apps might be the ones responsible for this error. However, you might find it difficult to locate the corrupted app that’s causing this issue. In this case, performing a clean boot will help you out.
Once you find the faulty app, you could either update it or completely get rid of it. And if you decide to delete the problematic app, use a reliable third-party uninstaller. This will help get rid of the residual files that might remain and cause other issues.
5. Try the Built-In Troubleshooters
There are a couple of built-in troubleshooters that you can use in various situations. If we assume that this error is caused by system maintenance issues, then the System Maintenance troubleshooter could help.
So, let’s check out how you can run this troubleshooter to tackle the issue at hand:
- Type Control Panel in the Start Menu search bar and select the Best match.
- Click the View by drop-down menu and select Small icons.
- Click Troubleshooting from the menu items. Next, scroll down and select the System and Security option.
- Click the System Maintenance option.
- Next, click Advanced and then check the Apply repairs automatically box.
- Finally, press Next and follow the on-screen steps.

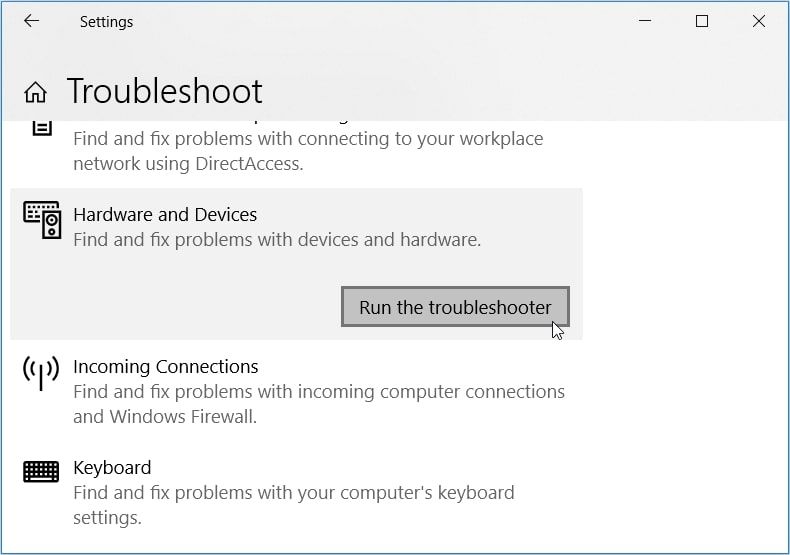
If the issue persists, then we should take a different approach. Since this might be a hardware-related problem, let’s see how the Hardware and Devices troubleshooter could help:
- Press Win + I to open the System Settings.
- Select Update & Security and then click Troubleshoot on the left-hand side.
- Locate and click on the Hardware and Devices troubleshooter. Finally, press the Run the troubleshooter button and follow the on-screen steps.
6. Perform a System Scan

This error could be caused by faulty system files. In this case, you’d need to perform a system scan and repair those problematic files.
And when it comes to scanning and repairing system files, you can always rely on the Check Disk, DISM, and SFC tools.
Now, let’s get started and check how you can run a Check Disk scan:
- Open the Start Menu search bar and type Command Prompt.
- Right-click on the Command Prompt option and select Run as administrator.
- Type the following command and press Enter to run a Check Disk scan:
chkdsk C: /f
Replace the C: command with the correct drive letter if your Windows OS is installed on a different drive.
After running this scan, follow these steps to run the DISM tool:
- Open an elevated Command Prompt by following the previous steps.
- Type the following command and press Enter:
DISM /Online /Cleanup-Image /ScanHealth
From there, type the command below and press Enter:
DISM /Online /Cleanup-Image /RestoreHealth
Restart your device once the scan is complete. Now, run an SFC scan through these steps:
- Open an elevated Command Prompt as per the previous steps.
- Type the following command and press Enter:
sfc /scannow
Wait for the SFC scan to complete and then restart your device.
7. Restore Your Windows Device

Restoring your device with the System Restore tool could also help. The System Restore feature helps undo any recent changes that might be causing system errors. So, this might also get rid of the bugs that are interfering with PowerShell.
Now, here’s how you can use the System Restore tool to tackle this issue:
- Type Control Panel in the Start Menu search bar and select the Best match.
- Click the View by drop-down menu and select Small icons.
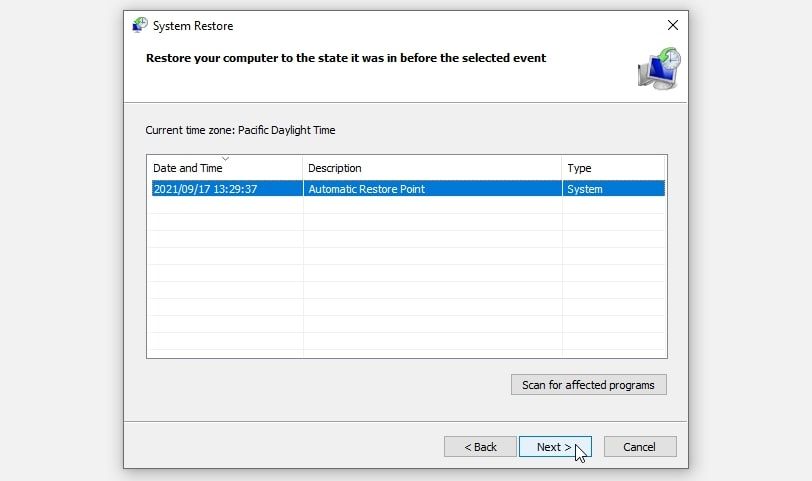
- Scroll down and select the Recovery option. Now, click the Open System Restore option and click Next to continue.
- Select a restore point from the options, press Next, and then follow the on-screen steps.
8. Reset the Device to Its Factory Settings
As a last resort, resetting Windows to its factory settings could help. But before you proceed, keep your data safe by backing up your device.
Now, here’s how you can reset your Windows device:
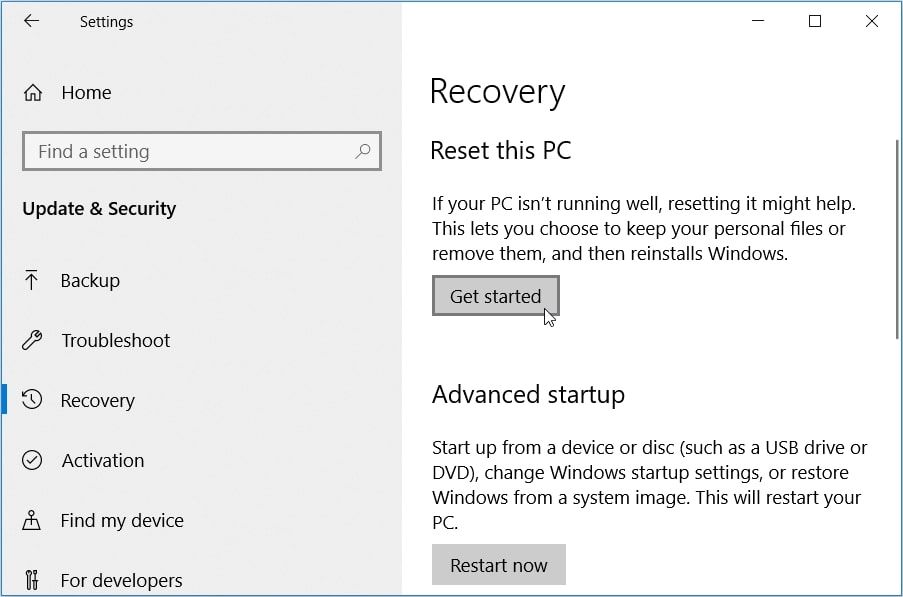
- Press Win + I to open the System Settings.
- Click Update & Security and then select Recovery on the left.
- Finally, press the Get started button on the right and follow the on-screen instructions.
Automate Your Favorite Tasks With the Windows PowerShell
The “PowerShell has stopped working” error can be quite annoying—especially if you don’t know what’s causing it. Fortunately, the methods we’ve covered should help you easily get rid of this error.
Encountering errors is all part of the PowerShell routine. Well, unless you’re like me, in which case you’ve never encountered a scripting error. In fact, I had to force the scripts in this article to error out just so I could see what it feels like. Dialing back the heavy amounts of sarcasm for a moment, what should we do when we encounter scripting errors? We embark on the ancient battle that has gone on for generations called “error handling.”
What is error handling?
Error handling is the action of dealing with or “handling” errors encountered in a script. It involves dealing with both unexpected and expected errors. With proper foresight and testing, a script should account for the majority of errors it could encounter. Anticipating, detecting, and addressing conditions that could result in an error is the sign of a seasoned script writer.
Terminating versus nonterminating errors in PowerShell
While there are probably thousands of ways a PowerShell script can encounter an error, the key is to know the distinction between terminating and nonterminating errors. Terminating errors are known as exceptions. Exceptions terminate the current execution process or are caught by a Try, Catch, and Finally block (which we’ll cover a bit later). On the other hand, nonterminating errors write the encountered error to the pipeline, then continue executing the script.
ErrorAction in PowerShell
When PowerShell encounters an error, the default behavior is to continue executing the script if it can. This behavior is set with the global variable $ErrorActionPreference. By default, this variable is set to Continue, but you can set several other options. Error behavior can also be set per command using the -ErrorAction common parameter, which is available to every PowerShell command. Here are the options available with the $ErrorActionPreference and -ErrorAction parameters:
-
Continue: Writes the error to the pipeline and continues executing the command or script. This is the default behavior in PowerShell. -
Ignore: Suppresses error messages and continues executing the command. The errors are never written to the error stream. -
Inquire: Pauses the execution of the command and asks the user how to proceed. Cannot be set globally with the$ErrorActionPreferencevariable. -
SilentlyContinue: Suppresses error messages and continues executing the command. The errors are still written to the error stream, which you can query with the$Errorautomatic variable. -
Stop: Displays the error and stops executing the command. This option also generates anActionPreferenceStopExceptionobject to the error stream. -
Suspend: Suspends a workflow that can later be resumed. TheSuspendoption is only available to workflows.
I appreciate that the default behavior of PowerShell is set to continue executing the script or command after encountering a nonterminating error. This behavior sets it apart from many other programming languages. But there are times when you’ll want to take advantage of the -ErrorAction options to deal with an error instead of pretending it doesn’t exist (which is what I do with most of my problems).
Anticipating errors in a PowerShell script
One of the most useful skills to develop when writing scripts is the ability to anticipate errors you could encounter. Anticipating errors and proactively addressing them produces highly dependable scripts.
For example, if you write a script that depends on an external file to function properly, it’s feasible to assume a situation where that file no longer exists, its path has changed, or the file name has changed.
Another example is a script that connects to a remote endpoint and returns information. What happens if that remote endpoint is offline and the connection fails?
The more you work with PowerShell, the easier it is to anticipate the types of errors you could encounter and handle them proactively. Now, if I could just anticipate my typing errers …
PowerShell error handling example
Error handling with PowerShell helps ensure that an unexpected exception does not let a script continue to cause issues. Let’s take a look at a script that makes sure only cool people have access to all the cool stuff. (See Get-Content.)
$GroupMembership = Get-ADGroupMember -Identity "Cool Users"
$UpdatedCoolList = Get-Content \FileShareLocationCoolPeople.csv
Foreach($Person in $GroupMembership){
If($UpdatedCoolList -notcontains $Person){
Remove-ADGRoupMember -Identity "Cool Users" -User $Person
}
}
Works great! However, Kris Powell found out about the cool list. Angry at being left off the list, he performs an action that proves we are right to keep him out. He deletes CoolPeople.csv.
Next time the script runs, we get an exception:

With a blank $UpdatedCoolList variable, it removes everyone’s access — very not cool, Kris.
ErrorAction example in PowerShell
Before we deal with Kris’s sabotage, let’s look at an example of the -ErrorAction parameter in use. We can use -ErrorAction Stop to turn a nonterminating error into a terminating exception.
$UpdatedCoolList = Get-Content \FileShareLocationCoolPeople.csv -ErrorAction Stop
You can also set the default action of all errors to stop by setting the error action global variable.
$ErrorActionPreference = "Stop".
Setting the global variable is generally frowned upon. You have much more control if you set the parameter on each command rather than setting it globally. Just remember, in most cases, a cmdlet generates a nonterminating exception, but error handling with PowerShell requires a terminating exception to work.
Try/Catch/Finally
After the -ErrorAction is set to Stop, we can wrap it in a Try/Catch block. Try is where we run the command, and Catch is what runs if Try encounters a terminating exception. (See Out-File.)
Try {

    $UpdatedCoolList = Get-Content \FileShareLocationCoolPeople.csv -ErrorAction Stop

}

Catch {

    $_.Exception | Out-File C:cool_logkrisdidit.log -Append

    Break

}
In this script block, we captured the exception and put it in a log file. Break was used to exit the script so it would not continue. If we had left the Catch block empty, it would absorb the error and continue the script.
The last piece of the error handling with a Try/Catch/Finally block is the Finally. This is used to provide actions that always run before exiting the script (or continuing on). It is mostly used for cleanup. You can use it to close database connections, remove files, or close file locks. Finally allows you to revert any changes done as a result of the script, whether an exception is encountered or not.
Conclusion
That’s it for the basics. Whenever you are dealing with elements that are volatile or out of your control, error handling is a great way to make sure that your script won’t cause problems if things go wrong.
If you’re looking for ways to test your newly developed skills, check out PDQ Deploy and Inventory. With Deploy and Inventory, you can run scripts remotely on all your endpoints in a flash — or just deploy scripts to the people on your cool list. The choice is yours.

Jordan Hammond
Jordan had spent his life wondering why tasks he didn’t like to do had no options to complete themselves. Eventually he had to make that happen on his own. It turned out that he enjoyed making tasks complete themselves, and PDQ thought that is something he should talk about on the internet while drinking most Thursdays on the PDQ webcast.
Murphy’s Law is an old saying that promises, «Anything that can go wrong will go wrong.» Coders and programmers know this saying particularly well. If you’ve spent any time writing code, you understand why. What coder doesn’t know the feeling of writing the perfect script that accomplishes just what you need, but some external variable pops up that causes it to malfunction?
In this blog post, we’re going to discuss the process for anticipating potential errors, mistakes and problems with your scripts and code: error handling. We’ll look at a small, simple program and insert some key lines and functions that will show you how to spot errors and identify them, rather than let your programs and machines churn along with faulty inputs.
What is a PowerShell Exception?
Quick Definition: A PowerShell exception is an error that happens while running PowerShell scripts, errors that PowerShell needs to be handled for it. PowerShell will try to handle errors on its own, but exceptions are, as the name may suggest, exceptions to its ability to do so. When an exception occurs, the phrase used is «throw». Handling a «thrown» exception means «catching» it, which is telling the script what to do. If a thrown exception isn’t caught, the script stops.
What is PowerShell Error Handling?
Quick Definition: Error handling in PowerShell is a process of analyzing your code for where exceptions could occur, for what exceptions could happen, and then writing code that anticipates and handles those exceptions.
An Overview of PowerShell Error Handling
In this video, Don Jones covers error handling in PowerShell. Something that sets a good script apart from a truly great one is its ability to respond to errors that you anticipated ahead of time. Watch as Don demonstrates the fine art of error handling.
When is Error Handling Necessary?
One of the things that really sets apart a good script from a great script is the script’s ability to respond to errors that you can anticipate ahead of time. It’s called Error Handling.
If you’re writing code or programming behavior for a computer, doing error handling can help in a number of ways. First of all, written well, a program can inform you what’s wrong — like a patient explaining symptoms to their doctor. Not only that, a program that stops at an exception won’t waste time and resources continuing a process that’s doomed to failure.
Don’t mistake error handling with faulty scripting. Errors in code can be a problem too, but usually it’s easy to spot those before running the program. Most people know the old «missing semicolon ruins day» problem. Error handling is about finding externalities — variables that you and your program don’t have control over while the program is doing its job.
Since the goal of error handling is to anticipate errors and then deal with them as they occur rather than just allow PowerShell to explode, the first step is spending some time with the program. Take a look at the following script and try to spot where you think errors might occur.
param (
        $computername = 'localhost'
)
   $os = Get-WmiObject -Class Win32_OperatingSystem -ComputerName $computername
   $system = Get-WmiObject -Class Win32_ComputerSystem -ComputerName $computername
   $props = @ {        'ComputerName'=$computername;
                'OSVersion'=$os.caption;
                'TotalRAM'=$system.TotalPhysicalMemory;
                'Manufacturer'=$system.Manufacturer}
   $obj = New-Object =TypeName PowerShellObject -Property $props
   Write-Output $obj
Now, because this is a short one, it’s reasonably safe to assume that errors are going to happen on one of these two lines – if they happen anywhere:
   $os = Get-WmiObject -Class Win32_OperatingSystem -ComputerName $computername
   $system = Get-WmiObject -Class Win32_ComputerSystem -ComputerName $computername
These are really the only two lines that are doing anything. They’re «leaving» the code and working with data from an external source. They’re working with an external entity. Some of the errors that we can anticipate include the computer in question not being available when we try to query it, or it could be that we don’t have permission to query it. There are a few things that could go wrong, but they’ll likely happen on those lines.
How to Code PowerShell Error Handling
There are three big steps to writing error handling in PowerShell: first is to identify where an error may occur: which command. Then, you put that command inside a try { } block. Third, you put inside a catch { } block what should be done if the error happens. We’ll walk through these three steps next.
First of all, choose one command — typically one. While it’s possible to do error handling for a block of commands, it’s usually best to limit your focus. Plus, the method we’ll be demonstrating below works best on one command. So, choose your one command and wrap it in a try-catch block.
$os = Get-WmiObject -Class Win32_OperatingSystem -ComputerName $computernameThat’s part of the first step to writing PowerShell error handling: identify the command you think might cause an error. The second step is to put it inside a try { } block. Although the third step is to put inside the catch { } block whatever we want to do in the event of an error occurring, there’s another tweak we have to do first.
Most PowerShell commands are going to need a little bit of extra work. Still inside the try { } block, you’ll have to add a parameter to your function called ErrorAction and set it to «Stop».
try {
   $os = Get-WmiObject -Class Win32_OperatingSystem -ComputerName $computername
} catch {
}
Sometimes you’ll see that as -EA, which is what we’ll abbreviate it as going forward. Now, it’s possible you might want to take a different action based on the type of error that occurs. And so, you can capture the error in an -ErrorVariable. We’re going to call it «x».
try {
   $os = Get-WmiObject -Class Win32_OperatingSystem -ComputerName $computername -EA Stop
} catch {
}
Sometimes you’ll see that abbreviated -EV, which is again what we’ll abbreviate it as going forward. Also, it’s important to note that the variable name for the error does not include a dollar sign ($).
Next, we have to ask ourselves what we want to do about it when an error occurs? Well, let’s say we want to write the computer name that failed to a log file. To do that, we take the computer name variable $computername, and pump it to a file. And Append it to whatever else is in there:
try {
   $os = Get-WmiObject -Class Win32_OperatingSystem -ComputerName $computername -EA Stop -EV x
} catch {

}
Maybe we also want to display a warning on the screen. We can make up our own error message, but for now let’s keep it pretty boilerplate: «Error talking to $computername : $x»
try {
   $os = Get-WmiObject -Class Win32_OperatingSystem -ComputerName $computername -EA Stop -EV x
} catch {
   $computername | out-File c:errors.txt -Append

}
Note, be sure to keep that additional space behind the first variable «$computername». And, by using double quotation marks, we can include these variables and they’ll be expanded into their values.
How to Optimize Your PowerShell Error Handling
The trick to good PowerShell error handling is applying logic and reasoning to your code. Really good error handling anticipates errors and thinks about their consequences. Before we move on, let’s take a look at what our changes so far have gotten us:
try {
   $os = Get-WmiObject -Class Win32_OperatingSystem -ComputerName $computername -EA Stop -EV x
} catch {
   $computername | out-File c:errors.txt -Append
   Write-Warning "Error talking to $computername : $x"
}
$system = Get-WmiObject -Class Win32_ComputerSystem -ComputerName $computername
   $props = @ {        'ComputerName'=$computername;
                'OSVersion'=$os.caption;
                'TotalRAM'=$system.TotalPhysicalMemory;
                'Manufacturer'=$system.Manufacturer}
   $obj = New-Object =TypeName PowerShellObject -Property $props
   Write-Output $obj
But let’s think about this. If the computer doesn’t respond to the first query,
try {

   $os = Get-WmiObject -Class Win32_OperatingSystem -ComputerName $computername -EA Stop -EV x
} catch {
   $computername | out-File c:errors.txt -Append
   Write-Warning "Error talking to $computername : $x"
}
Then, down inside the catch { }, we’ll tell the program to set that variable to false if and when we get an error:
try {
   $everything_is_ok = $true
   $os = Get-WmiObject -Class Win32_OperatingSystem -ComputerName $computername -EA Stop -EV x
} catch {
   $computername | out-File c:errors.txt -Append
   Write-Warning "Error talking to $computername : $x"
}
And then, wrap the output in an if statement regarding that variable:
$system = Get-WmiObject -Class Win32_ComputerSystem -ComputerName $computername
   $props = @ {        'ComputerName'=$computername;
                'OSVersion'=$os.caption;
                'TotalRAM'=$system.TotalPhysicalMemory;
                'Manufacturer'=$system.Manufacturer}
   $obj = New-Object =TypeName PowerShellObject -Property $props
   Write-Output $obj
So what is this doing? What it’s telling our program is that if our first function fails, the lines inside our catch { } will execute. When that happens, our variable becomes false, and none of the subsequent lines wrapped inside the if { } will ever execute. After all, if the first query failed, there’s no point in trying the second one – it’ll almost certainly fail too.
Once again, this is a small example. But hopefully it helps illustrate one of the approaches you can take to uncovering not just the first thrown exception in a program, but what to do about subsequent functions too.
How to Test Your PowerShell Error Handling
It’s always a good idea to check your code, both for success states and failure states, and this program is no different. If you can do it from your own device, go ahead and save the above code and give it a test. The program we’ve written is going to search for a server «localhost», which should obviously be discoverable on the network. If you’re like us, running the program results in success.
Of course, it’s not enough that your successes succeed correctly. You also want your failures to fail correctly. The way we can test for the errors we’ve anticipated is by changing our first parameter, «localhost» to the name of a server that definitely doesn’t exist on the network. We went with «NOTONLINE».
After we run that, eventually there will be an error. We see: «Error talking to NOTONLINE» followed by the exception that occurred: «The RPC server is unavailable.»
Not only that, but we can pull up errors.txt and see that the name of that computer was successfully logged to the file.
The thing to remember about Error Handling in PowerShell is the -ErrorAction. That tells the command, «Look, if a problem happens, rather than just keep going and trying to continue, I want you to stop and throw a complete exception — a trappable exception.» Without the -EA Stop, no part of the try-catch block would function.
In fact, removing it shows quite a different result. We’ll leave our «NOTONLINE» server name, remove the -EA Stop from our code, and try running the code again.
If you’re doing this too, you might find that your Windows Management Instrumentation takes a while to time out. But once it finally does, you should see an error that’s far less manageable. That’s because this time the error comes directly from the command. It’s not a warning generated by the code which detected an error, it’s a full-on uncaught exception. Not only that, but the second command tried to run, and a different WMI error came through for that. Because the input for the second function was an error, the output of it is gibberish.
The difference should be obvious: if you can avoid a full-blown error and instead catch every exception as a warning and halt the functions, you do a lot for your program. Not only do you prevent time, energy, and resources from being wasted, but you also increase the chances of pinpointing where the error occurred and how you can fix it.
If you leave PowerShell to its own devices, it’ll try to carry out your commands as best it can, with increasingly faulty data coming from error after error. Instead, tell it you want it to stop when there’s an error so that you can fix what caused it. You should see now that the -ErrorAction Stop is the key to making ErrorHandling work in PowerShell.
Wrapping Up
If you’re looking to master PowerShell, CBT Nuggets has training that will do much more than one blog post could. Here, we only had time to address some of the top-level ideas of PowerShell error handling, but consider this PowerShell 7 training that features 9 hours of training and 104 videos about scripts, and automation.
На чтение 4 мин. Просмотров 17.4k. Опубликовано 03.09.2019
Испытание ошибок Windows PowerShell не является распространенной ситуацией, поэтому вам необходимо принять меры при получении сообщения Windows PowerShell перестало работать .
Эта ошибка очень раздражает, так как она остановит процессы, запущенные в вашей системе Windows 10. Более того, вы получите сообщение об ошибке без дополнительной информации, поэтому вы не можете сказать, что именно вызвало эту проблему.
Во всяком случае, вы не должны паниковать. Как всегда, существуют различные решения для устранения неполадок, которые можно применить для исправления ошибки «Windows PowerShell прекратил работу».
Содержание
- Действия по исправлению ошибок Windows PowerShell перестали работать
- 1. Инициируйте полное сканирование системы
- 2. Инициируйте чистую загрузку
- 3. Отключите и снова включите Windows PowerShell
- 4. Создайте новую учетную запись Microsoft
- Инициируйте полное сканирование системы.
- Сделайте чистый процесс загрузки.
- Отключите и снова включите Windows PowerShell.
- Создайте новую учетную запись Microsoft.
1. Инициируйте полное сканирование системы
В некоторых ситуациях атака вредоносного ПО может быть причиной того, что Windows PowerShell не работает должным образом. Итак, первое, что нужно сделать, это запустить сканирование безопасности.
Скорее всего, вы заразились Poweliks , вредоносной программой, которая мешает PowerShell. Файл, связанный с этим вирусом: dllhost.exe * 32 или dllhst3g.exe * 32, и его обычно можно остановить из диспетчера задач.
Теперь в этом случае вам нужно использовать антивирусную или антивирусную программу, например Malwarebytes, и сканировать систему Windows 10 на наличие возможных зараженных файлов. Программа безопасности должна автоматически находить и удалять вредоносные программы.
Примечание : рекомендуется запускать сканирование безопасности из безопасного режима, то есть когда сторонние приложения и процессы отключаются платформой Windows 10. Вы можете перейти в безопасный режим:
- Нажмите горячие клавиши Win + R и в поле RUN введите msconfig и нажмите Enter.
- Из окна Конфигурация системы перейдите на вкладку Загрузка .
- В разделе «Загрузка» выберите Безопасная загрузка .
- Сохраните изменения и перезагрузите компьютер.
- Это все.
2. Инициируйте чистую загрузку
Вы можете увидеть, вызывает ли программный конфликт сбой в Windows PowerShell, инициировав чистую загрузку. Таким образом, вы можете запустить систему Windows 10 только с функциями по умолчанию.
Если ошибка Windows PowerShell перестала работать не отображается после выполнения чистой загрузки, это означает, что существует конфликт программного обеспечения, поэтому необходимо удалить программу, которая стоит за этой проблемой.
Вот как вы можете запустить процесс чистой загрузки:
- Нажмите горячие клавиши Win + R на клавиатуре, чтобы запустить окно RUN.
- Там введите msconfig и нажмите Enter.
- В Конфигурация системы перейдите на вкладку Общие.
- С этого момента в разделе Выборочный запуск снимите флажок «Загружать элементы запуска».
- Затем перейдите на вкладку Услуги .
- Установите флажок скрыть все службы Microsoft , а затем нажмите Отключить все .
- Теперь перейдите на вкладку Автозагрузка и нажмите ссылку открыть диспетчер задач .
- Из диспетчера задач отключите все автозагрузки программ.
- Сохраните ваши изменения и закройте эти окна.
- Перезагрузите систему Windows 10.
ТАКЖЕ ПРОЧИТАЙТЕ . Microsoft PowerShell все чаще используется для распространения вредоносного ПО.
3. Отключите и снова включите Windows PowerShell
- Нажмите горячие клавиши Win + X и выберите Панель управления .
- С панели управления перейдите в категорию .
- А из отображаемого списка выберите Удалить – в разделе «Программы».
- На левой панели главного окна нажмите ссылку Включить или отключить функции Windows .
- Прокрутите вниз и найдите запись Windows PowerShell .
- Снимите флажок с PowerShell.
- Сохраните и примените ваши изменения.
- Перезагрузите компьютер с Windows 10.
- После этого повторите шаги, описанные выше, и снова включите функцию Windows PowerShell.
ТАКЖЕ ЧИТАЙТЕ: 10 лучших программ для удаления для пользователей ПК
4. Создайте новую учетную запись Microsoft
Ваша учетная запись может быть повреждена (по разным причинам), и поэтому вы можете получить сообщение об ошибке «Windows PowerShell прекратил работу».
Итак, попробуйте создать новую учетную запись, а затем убедитесь, что проблема все еще возникает или нет.Вот то, что вам нужно следовать:
- Нажмите на значок запуска Windows.
- Выберите Настройки и перейдите в раздел Аккаунты .
- Оттуда выберите Семья и другие пользователи .
- Нажмите Добавить кого-то еще на этот компьютер.
- Просто следуйте инструкциям на экране для возобновления этого процесса.
- Подсказка: не забудьте сделать резервную копию своих данных перед завершением этого процесса – возможно, вам придется импортировать ваши личные файлы и приложение под новой учетной записью.
Надеемся, что сообщение об ошибке «Windows PowerShell перестало работать» исчезло. Если у вас есть вопросы, связанные с решениями для устранения неполадок, описанными выше, свяжитесь с нашей командой.
Вы можете легко связаться с нами, используя поле для комментариев снизу или заполнив контактную форму, доступную на странице О нас.
Кроме того, если вы сталкивались с другими решениями для исправления этой ошибки, перечислите шаги по устранению неполадок в комментариях ниже, и мы соответствующим образом обновим это пошаговое руководство.
3 Useful Methods Fix Powershell Has Stopped Working Error

Резюме :

Ошибка Powershell перестала работать — это не обычная ошибка, а досадная ошибка, поэтому вам лучше немедленно принять меры, чтобы исправить эту ошибку. Тогда что делать, чтобы исправить ошибку Windows Powershell, которая перестала работать? Прочтите эту статью, и вы найдете несколько эффективных методов ее решения. Дополнительную информацию о Windows PowerShell можно получить из MiniTool .
Ошибки Windows PowerShell в Windows 10 появляются нечасто, поэтому, если вы получаете сообщение об ошибке Powershell перестала работать, вам следует попробовать некоторые возможные методы, чтобы исправить это.
Появление ошибки Powershell перестал работать означает, что что-то остановило запущенный процесс на вашем компьютере с Windows 10, но дополнительных сведений о том, что вызвало эту проблему, нет. Итак, как исправить ошибку Powershell перестала работать Windows 10? Посмотрите следующие абзацы, чтобы узнать о методах.
Метод 1. Запустите проверку безопасности
Иногда ошибка Windows Powershell перестала работать из-за атаки вредоносного ПО, поэтому вы можете попробовать запустить сканирование безопасности, чтобы антивирусное программное обеспечение автоматически удалило вредоносное ПО.
Наконечник: Я очень рекомендую вам войти в безопасный режим с сетью, прежде чем запускать сканирование безопасности.
Ваш компьютер может быть заражен Poweliks, вредоносной программой, которая мешает работе Powershell . С этим вирусом связан файл dllhost.exe * 32 или dllhst3g.exe * 32, который обычно можно остановить из диспетчера задач.
Поэтому вы можете использовать антивирус, такой как Malwarebytes, для сканирования ваших системных файлов, если они есть, антивирус удалит их автоматически.
Если этот метод не может исправить ошибку Powershell перестал работать, попробуйте следующие.
Метод 2: выполните чистую загрузку
Конфликты программного обеспечения приведут к тому, что Powershell также перестал работать. Поэтому вам следует выполнить чистую загрузку, чтобы проверить, есть ли конфликт программного обеспечения.
Похоже, что возникает конфликт программного обеспечения, если Powershell перестала работать, ошибка не возникает после чистой загрузки, поэтому вам необходимо удалить программу, которая вызвала эту ошибку.
Вот способ выполнить чистую загрузку:
Шаг 1. Нажмите кнопку Выиграть + р ключ в то же время, чтобы открыть Бежать коробка.
Шаг 2: введите msconfig и нажмите Хорошо .
Шаг 3: перейдите к генеральный вкладка, снимите флажок Загрузить элементы автозагрузки под Выборочный запуск .
Шаг 4: перейдите к Сервисы вкладка, проверьте Скрыть все службы Microsoft сначала, а затем нажмите Отключить все .
Шаг 5: перейдите к Запускать вкладку, щелкните Открыть диспетчер задач . Отключите все программы автозагрузки одну за другой в окне отказа.
Шаг 6: Сохраните все изменения и закройте все окна, затем перезагрузите компьютер.
Проверьте, перестала ли работать Powershell, ошибка возникает снова, если да, попробуйте следующий метод.
Метод 3: отключить и снова включить Windows Powershell
В некоторых случаях вы можете попытаться отключить и снова включить Windows PowerShell, чтобы исправить ошибку Powershell, которая перестала работать. Вот учебник:
Шаг 1. Откройте Панель управления я выбирать Программы .
Шаг 2: нажмите Удалить программу а затем щелкните Включение и отключение функций Windows на левой панели.
Шаг 3. Найдите Windows PowerShell и снимите флажок, затем нажмите Хорошо чтобы сохранить изменения.

Шаг 4. Перезагрузите компьютер, затем повторите описанные выше шаги и повторно включите функцию Windows PowerShell.
Примечание. Иногда функция Windows PowerShell была отключена, поэтому, если она отключена, вы можете выполнить шаги, чтобы включить функцию Windows PowerShell для исправления ошибки Powershell, которая перестала работать.
 Как легко записать командный сеанс Powershell в Windows 10?
Вы можете сохранить все выполняемые команды и вывод в текстовый файл в Powershell. Вот как записать командный сеанс Powershell в Windows 10.
Читать больше
Заключительные слова
Из этой статьи вы можете получить три полезных метода исправления ошибки Powershell, которая перестала работать. Поэтому, если вы обнаружите, что Powershell перестала работать, вы можете попробовать эти методы, упомянутые выше.
PowerShell is a reliable tool that you can use to automate and manage your PC tasks. However, this tool often fails and pops up the “PowerShell has stopped working” error.
In most cases, this error stems from faulty system files or corrupted third-party apps. As such, let’s check out how you can easily fix PowerShell if it goes unresponsive often.
1. Enable the Windows PowerShell
This error might pop up simply because the Windows PowerShell is disabled. So, you can tackle the issue by tweaking a few settings as follows:
- Type Turn Windows Features on or off in the Start Menu search bar and select the Best match.
- Locate the Windows PowerShell option and click its drop-down menu.
- Check all the Windows PowerShell boxes, press OK, and then close the Windows Features screen. Finally, restart your device to apply these changes.
2. Run the Windows PowerShell With Administrative Privileges
Opening the Windows PowerShell with administrative privileges might help. So, let’s check out how you can do this:
- Type Task Manager in the Start Menu search bar and select the Best match.
- Click the File tab in the top-left corner and select the Run new task option.
- Type Powershell and check the Create this task with administrative privileges box. Finally, click OK to open an elevated PowerShell window.
3. Try Using a Different Microsoft Account
In some instances, this issue might only be affecting the account you’re currently using. So, the best way to tackle the issue is to use a different Microsoft account. If you don’t have a Microsoft account, you might just consider creating it to check if this resolves the issue.
Now, here’s how you can create or sign in to a Microsoft account on Windows:
- Click the Windows key and select the Settings option.
- Select Accounts and then click Email & accounts on the left-hand side.
- Click Add a Microsoft account on the right-hand side and fill in your details.
Follow the on-screen instructions and then try open the PowerShell tool.
If the issue persists, then you’re likely dealing with system issues. In this case, we’ll show you how you can resolve the problem.
4. Get Rid of Suspicious Third-Party Programs
Some faulty third-party apps might be the ones responsible for this error. However, you might find it difficult to locate the corrupted app that’s causing this issue. In this case, performing a clean boot will help you out.
Once you find the faulty app, you could either update it or completely get rid of it. And if you decide to delete the problematic app, use a reliable third-party uninstaller. This will help get rid of the residual files that might remain and cause other issues.
5. Try the Built-In Troubleshooters
There are a couple of built-in troubleshooters that you can use in various situations. If we assume that this error is caused by system maintenance issues, then the System Maintenance troubleshooter could help.
So, let’s check out how you can run this troubleshooter to tackle the issue at hand:
- Type Control Panel in the Start Menu search bar and select the Best match.
- Click the View by drop-down menu and select Small icons.
- Click Troubleshooting from the menu items. Next, scroll down and select the System and Security option.
- Click the System Maintenance option.
- Next, click Advanced and then check the Apply repairs automatically box.
- Finally, press Next and follow the on-screen steps.
If the issue persists, then we should take a different approach. Since this might be a hardware-related problem, let’s see how the Hardware and Devices troubleshooter could help:
- Press Win + I to open the System Settings.
- Select Update & Security and then click Troubleshoot on the left-hand side.
- Locate and click on the Hardware and Devices troubleshooter. Finally, press the Run the troubleshooter button and follow the on-screen steps.
6. Perform a System Scan
This error could be caused by faulty system files. In this case, you’d need to perform a system scan and repair those problematic files.
And when it comes to scanning and repairing system files, you can always rely on the Check Disk, DISM, and SFC tools.
Now, let’s get started and check how you can run a Check Disk scan:
- Open the Start Menu search bar and type Command Prompt.
- Right-click on the Command Prompt option and select Run as administrator.
- Type the following command and press Enter to run a Check Disk scan:
chkdsk C: /f
Replace the C: command with the correct drive letter if your Windows OS is installed on a different drive.
After running this scan, follow these steps to run the DISM tool:
- Open an elevated Command Prompt by following the previous steps.
- Type the following command and press Enter:
DISM /Online /Cleanup-Image /ScanHealth
From there, type the command below and press Enter:
DISM /Online /Cleanup-Image /RestoreHealth
Restart your device once the scan is complete. Now, run an SFC scan through these steps:
- Open an elevated Command Prompt as per the previous steps.
- Type the following command and press Enter:
sfc /scannow
Wait for the SFC scan to complete and then restart your device.
7. Restore Your Windows Device
Restoring your device with the System Restore tool could also help. The System Restore feature helps undo any recent changes that might be causing system errors. So, this might also get rid of the bugs that are interfering with PowerShell.
Now, here’s how you can use the System Restore tool to tackle this issue:
- Type Control Panel in the Start Menu search bar and select the Best match.
- Click the View by drop-down menu and select Small icons.
- Scroll down and select the Recovery option. Now, click the Open System Restore option and click Next to continue.
- Select a restore point from the options, press Next, and then follow the on-screen steps.
8. Reset the Device to Its Factory Settings
As a last resort, resetting Windows to its factory settings could help. But before you proceed, keep your data safe by backing up your device.
Now, here’s how you can reset your Windows device:
- Press Win + I to open the System Settings.
- Click Update & Security and then select Recovery on the left.
- Finally, press the Get started button on the right and follow the on-screen instructions.
Automate Your Favorite Tasks With the Windows PowerShell
The “PowerShell has stopped working” error can be quite annoying—especially if you don’t know what’s causing it. Fortunately, the methods we’ve covered should help you easily get rid of this error.
Identify issues in a clean boot environment
by Andrew Wafer
Andrew is not just trying to bring you closer to Windows, but he’s truly interested in this platform. He just happens to be passionate about sharing that knowledge… read more
Updated on December 20, 2022
Reviewed by
Vlad Turiceanu

Passionate about technology, Windows, and everything that has a power button, he spent most of his time developing new skills and learning more about the tech world. Coming… read more
- PowerShell issues are part of the Windows errors that users experience day by day.
- If Windows PowerShell has stopped working, chances are your computer contains hidden software, like a virus.
- Be sure to run a malware scan with your security software or initiate a clean boot to verify if it’s a third-party app creating conflicts.
XINSTALL BY CLICKING THE DOWNLOAD FILE
This software will repair common computer errors, protect you from file loss, malware, hardware failure and optimize your PC for maximum performance. Fix PC issues and remove viruses now in 3 easy steps:
- Download Restoro PC Repair Tool that comes with Patented Technologies (patent available here).
- Click Start Scan to find Windows issues that could be causing PC problems.
- Click Repair All to fix issues affecting your computer’s security and performance
- Restoro has been downloaded by 0 readers this month.
Experiencing Windows PowerShell errors is not a pleasant situation, so you need to take action when receiving the Windows PowerShell has stopped working message.
Why is PowerShell not working? In some situations, a malware attack might be the reason why Windows PowerShell is not functioning properly.
This error is quite annoying as it will stop the processes that are running on your Windows 10 system. Also, you will get this error message with no further details, and as a result, you cannot tell what exactly caused this issue.
Anyway, you shouldn’t panic. As always, there are different troubleshooting solutions that can be applied to fix the Windows PowerShell has stopped working error.
Why is Powershell not working?
Windows PowerShell won’t open due to the presence of corrupt system files or when conflicting third-party apps are installed on the computer.
Besides, there is a chance that PowerShell is disabled, and as a result, it has stopped working. In this case, you will need to enable it from Windows Features.
In addition to that, the solutions listed here would also work in the following cases:
- Windows PowerShell not running scripts try catch / import module / unblock-file / uninstall-package / update-help powershell not working
- Windows PowerShell commands not working after Windows Update
- Powershell has stopped working
- Windows PowerShell not typing
- Windows Powershell not opening as administrator – Windows Powershell won’t open
- Powershell not working in Windows 11, 10
- CMD and Powershell not working
- Powershell not showing prompt
- Visual Studio code Powershell not working
- Task Scheduler Powershell not working
- Server 2016, 2012 r2 Powershell not working
Many users reported that nothing happens when they click Run as administrator on PowerShell, and this is most likely caused by corrupted system files.
This isn’t the only application affected by this issue, and many reported that they couldn’t run Command Prompt as administrator on their PC.
Another indication that you have a system corruption issue is the PowerShell is not recognized message, but luckily, there are ways to fix that.
How do I fix PowerShell has stopped working?
- Why is Powershell not working?
- How do I fix PowerShell has stopped working?
- 1. Initiate a full system scan
- 2. Initiate a clean boot
- 3. Disable and re-enable Windows PowerShell
- 4. Create a new Microsoft account
- 5. Reset PowerShell to default
- What can I do if PowerShell is not working on Windows 11?
1. Initiate a full system scan
In some situations, a malware attack might be the reason why Windows PowerShell is not working properly. So, the first thing to do is to initiate a security scan.
Chances are you got infected with Poweliks, a malware that interferes with PowerShell. The file associated with this virus are dllhost.exe *32 or dllhst3g.exe *32 and can usually be stopped from Task Manager.
Now, in this case, you need to use an antivirus tool, and scan your Windows 10 system for possible infected files. The security program should find and remove the malware automatically.
It’s recommended to run the security scan from Safe Mode – that’s when third-party apps and processes are disabled by the Windows 10 platform.
Some PC issues are hard to tackle, especially when it comes to corrupted repositories or missing Windows files. If you are having troubles fixing an error, your system may be partially broken.
We recommend installing Restoro, a tool that will scan your machine and identify what the fault is.
Click here to download and start repairing.
Restoro scans, diagnoses, and repairs any file damaged on your PC with technology that not only fix your Windows operating system but also undoes the damage already done with a complete database of replacement files.
At the end of the scan, you can check the hardware, security, and stability scores of your PC compared to the global average and fix them within one single click.

Restoro
Use this powerful technology that secures and safely repairs any PC to an optimized state.
2. Initiate a clean boot
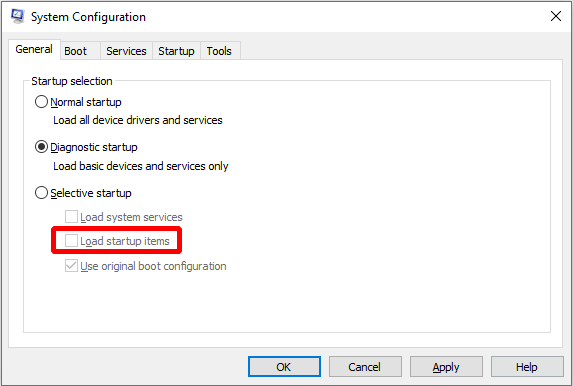
- Press the Windows + R to open the Run command, type msconfig, and click OK.

- From System Configuration, go to the General tab, and uncheck the Load startup items field under Selective startup.

- Next, switch to the Services tab, check the Hide all Microsoft services checkbox and afterward click on Disable all.
- Now, switch to the Startup tab and click on the Open Task Manager link.
- Select the programs listed here individually and click on Disable at the bottom.

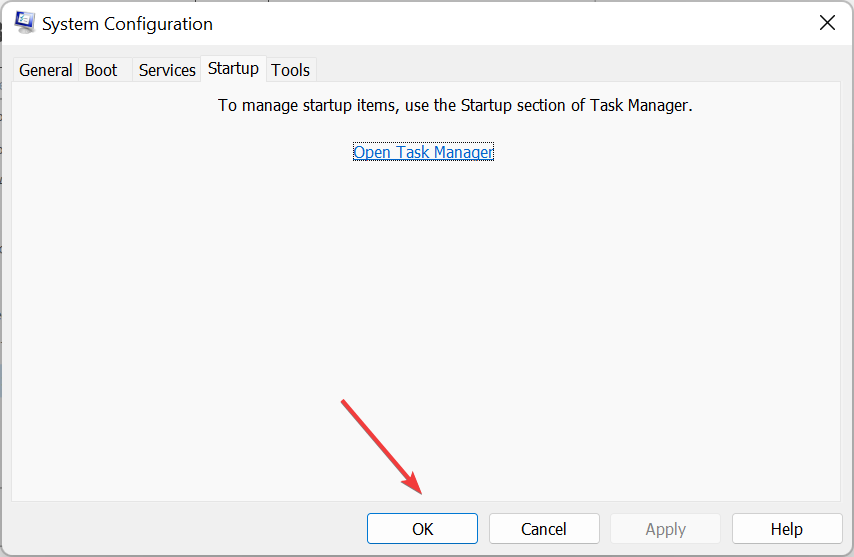
- Now, head back to the System Configuration window, and click on OK.
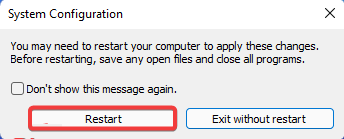
- Click Restart in the prompt that appears.


You can see if a software conflict is causing Windows PowerShell malfunctions by initiating a clean boot. In this way, you can start the Windows 10 system only with default features.
If the Windows PowerShell has stopped working error is not displayed after the clean boot is performed it means that there is a software conflict, so you need to remove the program responsible for this issue.
- PowerShell module cannot be loaded? Try these simple fixes
- How to use the Windows Update reset script in Windows 10
- PowerShell history is not working? Check out these solutions
3. Disable and re-enable Windows PowerShell
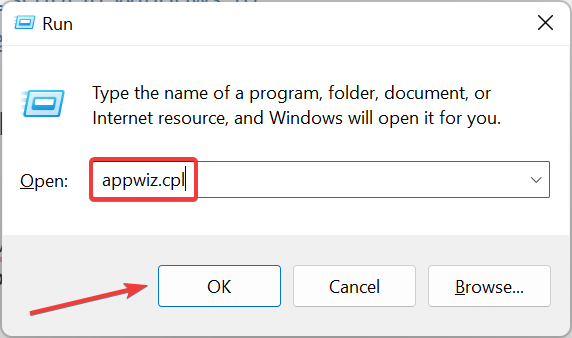
- Press Windows + R to open Run, enter appwiz.cpl in the text field, and click OK.
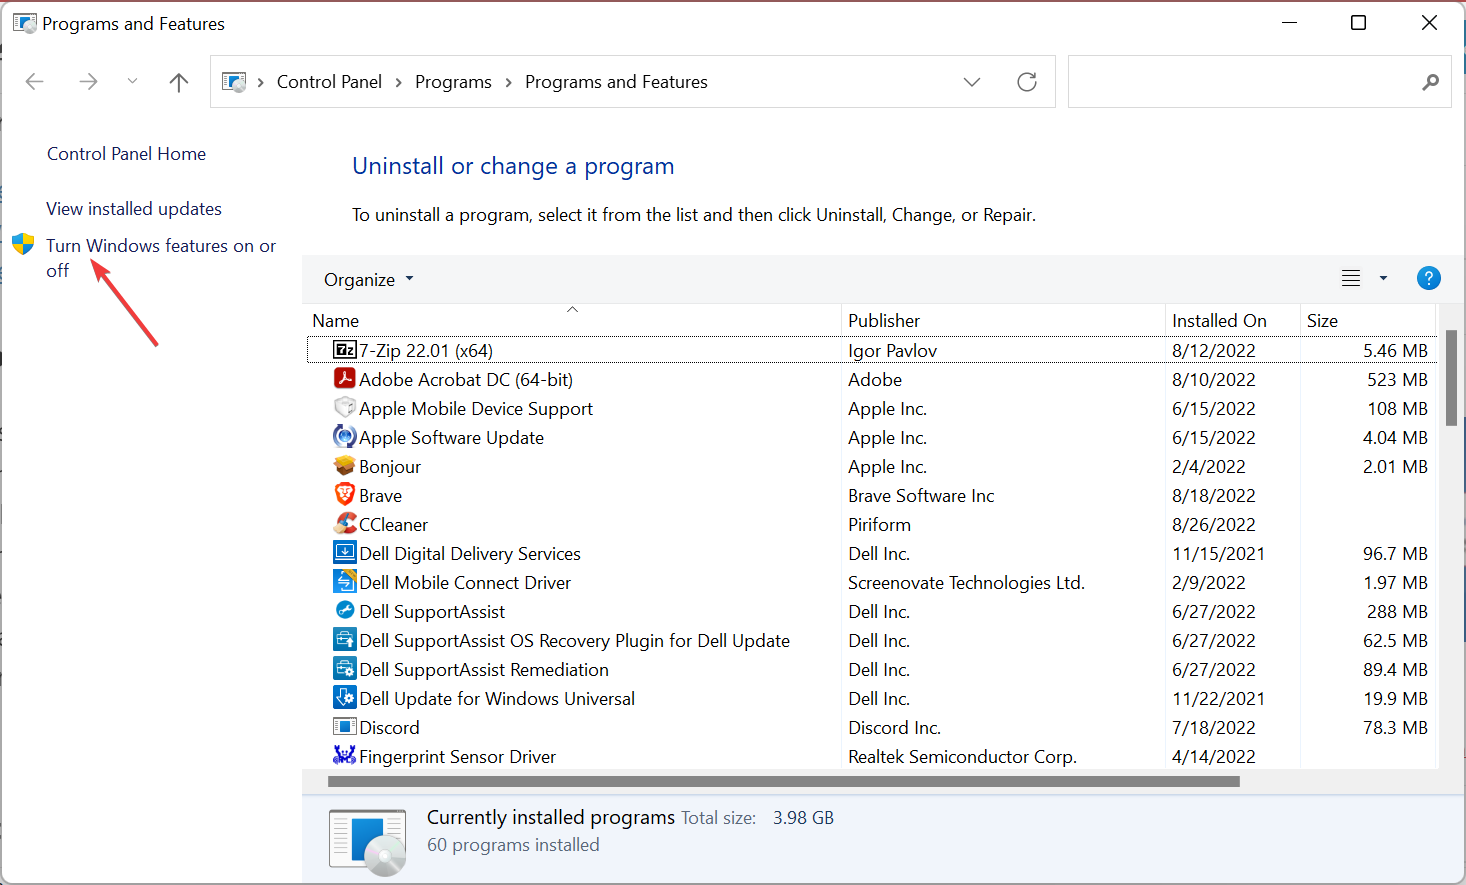
- From the left panel of the main window, click on Turn Windows features on or off.

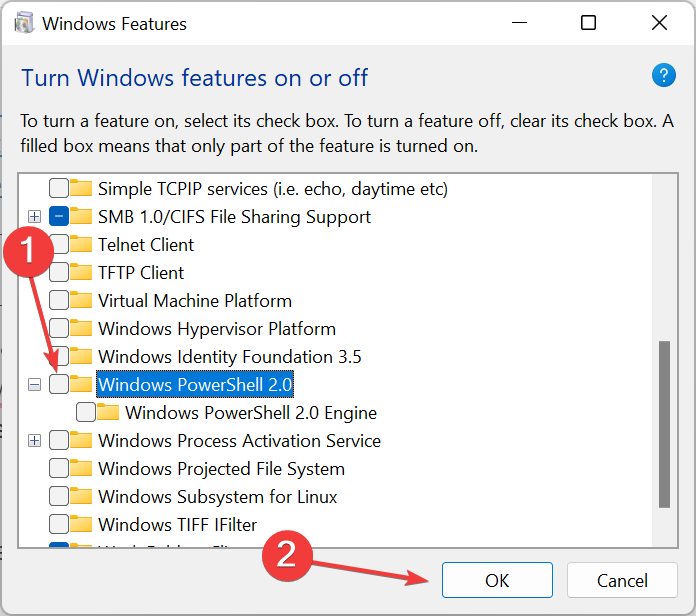
- Scroll down, locate the Windows PowerShell entry, uncheck the option and then click OK.

- Restart the computer for the changes to come into effect.
- Once the PC turns on, head back to the Windows Features window, tick the checkbox for Windows PowerShell, and click OK to re-enable it.
- Wait for it to install.

After re-enabling the feature, check if the Windows Powershell stopped working issue is resolved.
4. Create a new Microsoft account
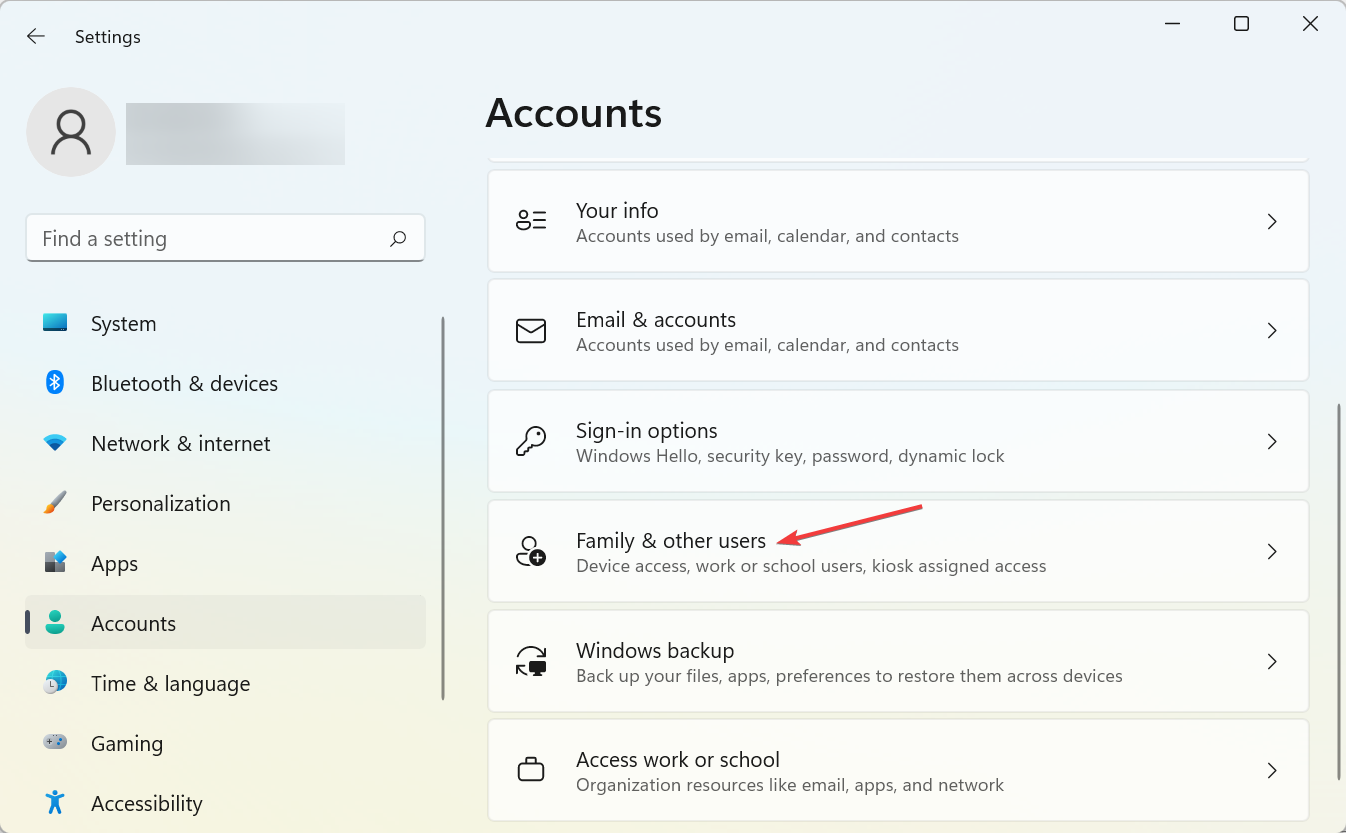
- Press Windows + I to launch Settings, select Accounts from the navigation pane, and then click on Family & other users.

- Click the Add account button next to Add other user.
- Provide the required information and follow the on-screen instructions to complete the process.


Remember to back up your data before completing this process. You might have to import your personal files and app under the new account.
Your account might be corrupted (due to various reasons), and that’s why you still get the Windows PowerShell has stopped working error. So, try to create a new account, and the problem should be fixed.
5. Reset PowerShell to default
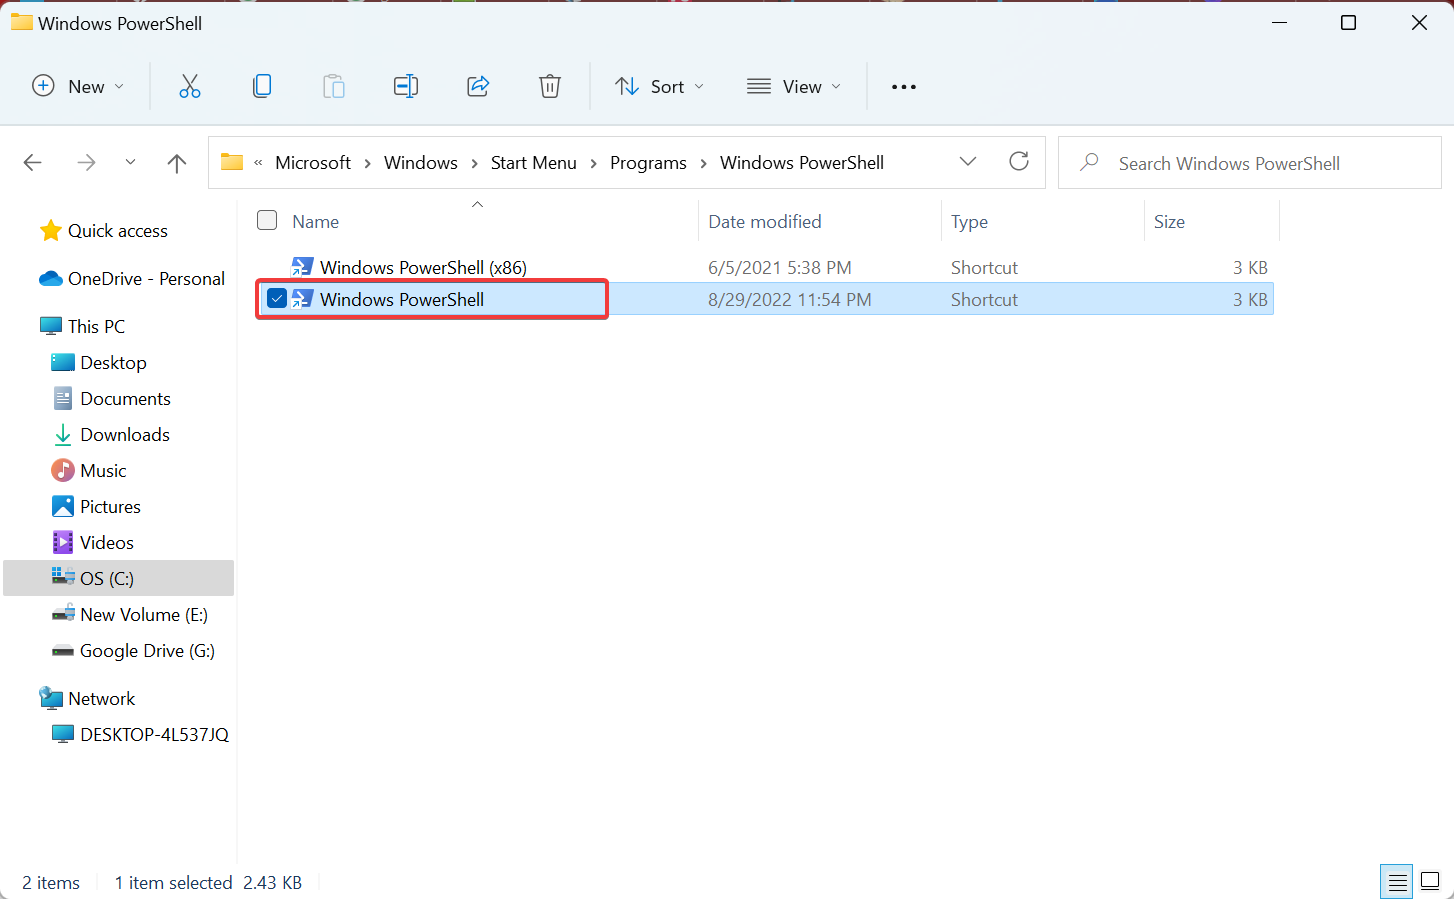
- Press Windows + E to launch File Explorer, paste the following path in the address bar while replacing Username with the one on your device, and hit Enter:
C:UsersUsernameAppDataRoamingMicrosoftWindowsStart MenuProgramsWindows PowerShell - Now, select the Windows PowerShell entry, and hit the Del key to delete it. Choose the appropriate response in case a confirmation prompt show up.

- Now, create a new user account on the same computer, head down the same path, and copy the PowerShell shortcut to a USB drive.
- Next, go back to the initial account, navigate to the Windows PowerShell folder, and paste the PowerShell shortcut here.
That’s it! PowerShell has now been reset to the factory settings, and any changes made will automatically be removed.
What can I do if PowerShell is not working on Windows 11?
You can install the latest version of Windows 11, remove conflicting third-party apps, scan for malware, or identify and eliminate corrupt system files.
In addition to these solutions, if the problem started recently, performing a system restore should do the trick and get things up and running in no time.
What version of PowerShell comes with Windows 11?
Right now on Windows 11, we have PowerShell version 5. However, you can see your exact version by entering the script below into Powershell and hitting Enter.
$PSversionTable
Hopefully, the error message is gone now. If you have questions related to the troubleshooting solutions from above, contact our team. You can get in touch with us by using the comments field below.
Also, if you come across other solutions to fix this error, list the troubleshooting steps in the comments, and we’ll update this guide accordingly.
Still having issues? Fix them with this tool:
SPONSORED
If the advices above haven’t solved your issue, your PC may experience deeper Windows problems. We recommend downloading this PC Repair tool (rated Great on TrustPilot.com) to easily address them. After installation, simply click the Start Scan button and then press on Repair All.
![]()
Newsletter
Identify issues in a clean boot environment
by Andrew Wafer
Andrew is not just trying to bring you closer to Windows, but he’s truly interested in this platform. He just happens to be passionate about sharing that knowledge… read more
Updated on December 20, 2022
Reviewed by
Vlad Turiceanu
Passionate about technology, Windows, and everything that has a power button, he spent most of his time developing new skills and learning more about the tech world. Coming… read more
- PowerShell issues are part of the Windows errors that users experience day by day.
- If Windows PowerShell has stopped working, chances are your computer contains hidden software, like a virus.
- Be sure to run a malware scan with your security software or initiate a clean boot to verify if it’s a third-party app creating conflicts.
XINSTALL BY CLICKING THE DOWNLOAD FILE
This software will repair common computer errors, protect you from file loss, malware, hardware failure and optimize your PC for maximum performance. Fix PC issues and remove viruses now in 3 easy steps:
- Download Restoro PC Repair Tool that comes with Patented Technologies (patent available here).
- Click Start Scan to find Windows issues that could be causing PC problems.
- Click Repair All to fix issues affecting your computer’s security and performance
- Restoro has been downloaded by 0 readers this month.
Experiencing Windows PowerShell errors is not a pleasant situation, so you need to take action when receiving the Windows PowerShell has stopped working message.
Why is PowerShell not working? In some situations, a malware attack might be the reason why Windows PowerShell is not functioning properly.
This error is quite annoying as it will stop the processes that are running on your Windows 10 system. Also, you will get this error message with no further details, and as a result, you cannot tell what exactly caused this issue.
Anyway, you shouldn’t panic. As always, there are different troubleshooting solutions that can be applied to fix the Windows PowerShell has stopped working error.
Why is Powershell not working?
Windows PowerShell won’t open due to the presence of corrupt system files or when conflicting third-party apps are installed on the computer.
Besides, there is a chance that PowerShell is disabled, and as a result, it has stopped working. In this case, you will need to enable it from Windows Features.
In addition to that, the solutions listed here would also work in the following cases:
- Windows PowerShell not running scripts try catch / import module / unblock-file / uninstall-package / update-help powershell not working
- Windows PowerShell commands not working after Windows Update
- Powershell has stopped working
- Windows PowerShell not typing
- Windows Powershell not opening as administrator – Windows Powershell won’t open
- Powershell not working in Windows 11, 10
- CMD and Powershell not working
- Powershell not showing prompt
- Visual Studio code Powershell not working
- Task Scheduler Powershell not working
- Server 2016, 2012 r2 Powershell not working
Many users reported that nothing happens when they click Run as administrator on PowerShell, and this is most likely caused by corrupted system files.
This isn’t the only application affected by this issue, and many reported that they couldn’t run Command Prompt as administrator on their PC.
Another indication that you have a system corruption issue is the PowerShell is not recognized message, but luckily, there are ways to fix that.
How do I fix PowerShell has stopped working?
- Why is Powershell not working?
- How do I fix PowerShell has stopped working?
- 1. Initiate a full system scan
- 2. Initiate a clean boot
- 3. Disable and re-enable Windows PowerShell
- 4. Create a new Microsoft account
- 5. Reset PowerShell to default
- What can I do if PowerShell is not working on Windows 11?
1. Initiate a full system scan
In some situations, a malware attack might be the reason why Windows PowerShell is not working properly. So, the first thing to do is to initiate a security scan.
Chances are you got infected with Poweliks, a malware that interferes with PowerShell. The file associated with this virus are dllhost.exe *32 or dllhst3g.exe *32 and can usually be stopped from Task Manager.
Now, in this case, you need to use an antivirus tool, and scan your Windows 10 system for possible infected files. The security program should find and remove the malware automatically.
It’s recommended to run the security scan from Safe Mode – that’s when third-party apps and processes are disabled by the Windows 10 platform.
Some PC issues are hard to tackle, especially when it comes to corrupted repositories or missing Windows files. If you are having troubles fixing an error, your system may be partially broken.
We recommend installing Restoro, a tool that will scan your machine and identify what the fault is.
Click here to download and start repairing.
Restoro scans, diagnoses, and repairs any file damaged on your PC with technology that not only fix your Windows operating system but also undoes the damage already done with a complete database of replacement files.
At the end of the scan, you can check the hardware, security, and stability scores of your PC compared to the global average and fix them within one single click.
Restoro
Use this powerful technology that secures and safely repairs any PC to an optimized state.
2. Initiate a clean boot
- Press the Windows + R to open the Run command, type msconfig, and click OK.
- From System Configuration, go to the General tab, and uncheck the Load startup items field under Selective startup.
- Next, switch to the Services tab, check the Hide all Microsoft services checkbox and afterward click on Disable all.
- Now, switch to the Startup tab and click on the Open Task Manager link.
- Select the programs listed here individually and click on Disable at the bottom.
- Now, head back to the System Configuration window, and click on OK.
- Click Restart in the prompt that appears.
You can see if a software conflict is causing Windows PowerShell malfunctions by initiating a clean boot. In this way, you can start the Windows 10 system only with default features.
If the Windows PowerShell has stopped working error is not displayed after the clean boot is performed it means that there is a software conflict, so you need to remove the program responsible for this issue.
- PowerShell module cannot be loaded? Try these simple fixes
- How to use the Windows Update reset script in Windows 10
- PowerShell history is not working? Check out these solutions
3. Disable and re-enable Windows PowerShell
- Press Windows + R to open Run, enter appwiz.cpl in the text field, and click OK.
- From the left panel of the main window, click on Turn Windows features on or off.
- Scroll down, locate the Windows PowerShell entry, uncheck the option and then click OK.
- Restart the computer for the changes to come into effect.
- Once the PC turns on, head back to the Windows Features window, tick the checkbox for Windows PowerShell, and click OK to re-enable it.
- Wait for it to install.
After re-enabling the feature, check if the Windows Powershell stopped working issue is resolved.
4. Create a new Microsoft account
- Press Windows + I to launch Settings, select Accounts from the navigation pane, and then click on Family & other users.
- Click the Add account button next to Add other user.
- Provide the required information and follow the on-screen instructions to complete the process.
Remember to back up your data before completing this process. You might have to import your personal files and app under the new account.
Your account might be corrupted (due to various reasons), and that’s why you still get the Windows PowerShell has stopped working error. So, try to create a new account, and the problem should be fixed.
5. Reset PowerShell to default
- Press Windows + E to launch File Explorer, paste the following path in the address bar while replacing Username with the one on your device, and hit Enter:
C:UsersUsernameAppDataRoamingMicrosoftWindowsStart MenuProgramsWindows PowerShell - Now, select the Windows PowerShell entry, and hit the Del key to delete it. Choose the appropriate response in case a confirmation prompt show up.
- Now, create a new user account on the same computer, head down the same path, and copy the PowerShell shortcut to a USB drive.
- Next, go back to the initial account, navigate to the Windows PowerShell folder, and paste the PowerShell shortcut here.
That’s it! PowerShell has now been reset to the factory settings, and any changes made will automatically be removed.
What can I do if PowerShell is not working on Windows 11?
You can install the latest version of Windows 11, remove conflicting third-party apps, scan for malware, or identify and eliminate corrupt system files.
In addition to these solutions, if the problem started recently, performing a system restore should do the trick and get things up and running in no time.
What version of PowerShell comes with Windows 11?
Right now on Windows 11, we have PowerShell version 5. However, you can see your exact version by entering the script below into Powershell and hitting Enter.
$PSversionTable
Hopefully, the error message is gone now. If you have questions related to the troubleshooting solutions from above, contact our team. You can get in touch with us by using the comments field below.
Also, if you come across other solutions to fix this error, list the troubleshooting steps in the comments, and we’ll update this guide accordingly.
Still having issues? Fix them with this tool:
SPONSORED
If the advices above haven’t solved your issue, your PC may experience deeper Windows problems. We recommend downloading this PC Repair tool (rated Great on TrustPilot.com) to easily address them. After installation, simply click the Start Scan button and then press on Repair All.
![]()
Newsletter
Возникновение ошибок Windows PowerShell — неприятная ситуация, поэтому вам необходимо принять меры при получении сообщения о прекращении работы Windows PowerShell.
Почему PowerShell не работает? В некоторых случаях причиной неправильной работы Windows PowerShell может быть атака вредоносного ПО.
Эта ошибка довольно раздражает, поскольку она останавливает процессы, запущенные в вашей системе Windows 10. Более того, вы получите сообщение об ошибке без каких-либо подробностей, поэтому вы не можете сказать, что именно вызвало эту проблему.
В любом случае, не стоит паниковать. Как всегда, существуют различные решения по устранению неполадок, которые можно применить для исправления ошибки Windows PowerShell перестала работать.
Почему Windows PowerShell не открывается от имени администратора?
Многие пользователи сообщают, что ничего не происходит, когда они нажимают «Запуск от имени администратора» в PowerShell, и это, скорее всего, вызвано повреждением системных файлов.
Это не единственное приложение, затронутое этой проблемой, и многие сообщают, что не могут запустить командную строку от имени администратора на своем ПК.
Еще одним признаком того, что у вас есть проблема с повреждением системы, является сообщение PowerShell не распознано, но, к счастью, есть способы это исправить.
Как исправить, что Windows PowerShell перестала работать?
1. Запустите полное сканирование системы

В некоторых случаях атака вредоносного ПО может быть причиной неправильной работы Windows PowerShell. Итак, первое, что нужно сделать, это запустить сканирование безопасности.
Скорее всего, вы заразились Poweliks, вредоносной программой, которая мешает работе PowerShell. Файл, связанный с этим вирусом, называется dllhost.exe *32 или dllhst3g.exe *32 и обычно может быть остановлен из диспетчера задач.
Теперь, в этом случае, вам нужно использовать антивирус и сканировать вашу систему Windows 10 на наличие возможных зараженных файлов. Программа безопасности должна автоматически найти и удалить вредоносное ПО.
Рекомендуется запускать проверку безопасности из безопасного режима — в этом случае сторонние приложения и процессы отключены платформой Windows 10.
2. Начните чистую загрузку
- Нажмите горячие клавиши Win + R, чтобы запустить окно запуска.
- Там введите msconfig и нажмите Enter.

- В разделе «Конфигурация системы» перейдите на вкладку «Общие».
- Оттуда в разделе «Выборочный запуск» снимите флажок «Загрузить элементы запуска».
- Далее перейдите на вкладку «Услуги».
- Установите флажок «Скрыть все службы Microsoft», а затем нажмите «Отключить все».

- Теперь перейдите на вкладку «Автозагрузка» и нажмите ссылку «Открыть диспетчер задач».

- В диспетчере задач отключите все автозапуск программ.
- Сохраните изменения и закройте эти окна.
- Перезагрузите систему Windows 10.


Вы можете увидеть, вызывает ли конфликт программного обеспечения сбои в работе Windows PowerShell, запустив чистую загрузку. Таким образом, вы можете запустить систему Windows 10 только с функциями по умолчанию.
Если ошибка Windows PowerShell прекратила работу не отображается после выполнения чистой загрузки, это означает, что существует конфликт программного обеспечения, поэтому вам необходимо удалить программу, которая стоит за этой проблемой.
3. Отключите и снова включите Windows PowerShell.
- Нажмите горячие клавиши Win+X и выберите Панель управления.
- Из Панели управления перейдите в категорию.
- Из отображаемого списка пришло время выбрать «Удалить», расположенный в разделе «Программы».

- На левой панели главного окна нажмите «Включить или отключить функции Windows».
- Прокрутите вниз и найдите запись Windows PowerShell.
- Снимите флажок с функции PowerShell.
- Сохраните и примените изменения.
- Перезагрузите компьютер с Windows 10.
- После этого повторите шаги, описанные выше, и снова включите функцию Windows PowerShell.

4. Создайте новую учетную запись Майкрософт
- Нажмите на значок запуска Windows.
- Выберите «Настройки», а затем перейдите к «Учетные записи».
- Оттуда выберите Семья и другие пользователи.

- Нажмите «Добавить кого-то еще на этот компьютер».
- Просто следуйте инструкциям на экране для возобновления этого процесса.

Примечание. Не забудьте сделать резервную копию своих данных перед завершением этого процесса — возможно, вам придется импортировать свои личные файлы и приложение под новой учетной записью.
Ваша учетная запись может быть повреждена (по разным причинам), и поэтому вы все еще получаете сообщение об ошибке Windows PowerShell перестала работать. Итак, попробуйте создать новую учетную запись, а затем проверьте, возникает ли проблема по-прежнему или нет.
Надеюсь, сообщение об ошибке исчезло. Если у вас есть вопросы, связанные с решениями по устранению неполадок, описанными выше, свяжитесь с нашей командой. Вы можете легко связаться с нами, используя поле для комментариев внизу.
Кроме того, если вы столкнетесь с другими решениями для исправления этой ошибки, перечислите шаги по устранению неполадок в комментариях, и мы соответствующим образом обновим это руководство.
Обновлено 2023 января: перестаньте получать сообщения об ошибках и замедлите работу вашей системы с помощью нашего инструмента оптимизации. Получить сейчас в эту ссылку
- Скачайте и установите инструмент для ремонта здесь.
- Пусть он просканирует ваш компьютер.
- Затем инструмент почини свой компьютер.
Ошибки Windows PowerShell — неприятная ситуация. Поэтому необходимо принять меры, если получение сообщения Windows PowerShell больше не работает.

Powershell — это объектно-ориентированный язык программирования и интерактивная оболочка командной строки для операционных систем Windows. Powershell используется администраторами для выполнения административных задач в локальных и удаленных системах Windows. Для обычных пользователей Powershell — прозрачный инструмент. Работает в фоновом режиме. Вы можете не знать, когда другие приложения, установленные на вашем компьютере, используют функции Powershell.
Почему не работает PowerShell? В определенных ситуациях атака вредоносного ПО может помешать правильной работе Windows PowerShell.
Эта ошибка очень раздражает, поскольку останавливает запущенные процессы в вашей системе Windows 10. Также, вы получите сообщение об ошибке без какой-либо дополнительной информации, поэтому вы не можете точно сказать, что вызвало проблему.
В любом случае не паникуйте. Как всегда, существует несколько различных решений для устранения неполадок, которые можно использовать, чтобы исправить ошибку, при которой Windows PowerShell перестал работать.
Загрузка в безопасном режиме
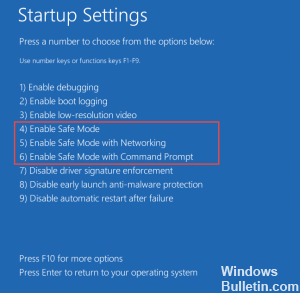
Давайте попробуем загрузиться в безопасном режиме и посмотрим, сможем ли мы использовать опцию разблокировки экрана:
Чтобы запустить компьютер в безопасном режиме, выполните следующие действия:
а) Когда вы запускаете компьютер, нажмите клавишу F8. Это может привести к запуску настроек, включающих безопасный режим.
б) Если нажатие F8 не работает и у вас есть носитель для Windows 8 (например, DVD или USB-накопитель), вы можете использовать приведенные здесь инструкции для загрузки с носителя. Вы можете найти дополнительные инструкции по безопасному режиму здесь.
c) Если у вас нет носителя, перезагрузите компьютер с помощью кнопки питания три раза во время процесса загрузки (не позволяйте ему запускаться до завершения процесса загрузки). Это должно запустить среду восстановления Windows.
Обновление за январь 2023 года:
Теперь вы можете предотвратить проблемы с ПК с помощью этого инструмента, например, защитить вас от потери файлов и вредоносных программ. Кроме того, это отличный способ оптимизировать ваш компьютер для достижения максимальной производительности. Программа с легкостью исправляет типичные ошибки, которые могут возникнуть в системах Windows — нет необходимости часами искать и устранять неполадки, если у вас под рукой есть идеальное решение:
- Шаг 1: Скачать PC Repair & Optimizer Tool (Windows 10, 8, 7, XP, Vista — Microsoft Gold Certified).
- Шаг 2: Нажмите «Начать сканирование”, Чтобы найти проблемы реестра Windows, которые могут вызывать проблемы с ПК.
- Шаг 3: Нажмите «Починить все», Чтобы исправить все проблемы.

г) Вы можете сбросить настройки своего компьютера до предыдущего рабочего часа и посмотреть, поможет ли это.
е. Если восстановление вашей системы не работает, попробуйте восстановить его автоматически в среде восстановления Windows.
Выполните сканирование безопасности
![]()
Иногда Windows PowerShell перестает работать из-за атаки вредоносного ПО. Таким образом, вы можете попробовать запустить сканирование безопасности, чтобы антивирусное программное обеспечение автоматически удалило вредоносное ПО.
Ваш компьютер может быть заражен Poweliks, вредоносной программой, которая мешает работе Powershell. С этим вирусом связан файл dllhost.exe * 32 или dllhst3g.exe * 32, и обычно его можно остановить с помощью диспетчера задач.
Таким образом, вы можете сканировать системные файлы с помощью антивируса, такого как Malwarebytes. Если это так, антивирус автоматически удалит их.
Если этот метод не устраняет ошибку Powershell, попробуйте следующий.
Чтобы решить эту проблему, удалите обновление безопасности Microsoft KB3163245.
Если ваше приложение безопасности ничего не нашло в вашей системе, вы можете попробовать удалить упомянутое выше обновление безопасности. Пожалуйста, попробуйте установить его позже. Возможно, установка обновления была прервана из-за мелких технических проблем. Обратите внимание, что обновление необходимо скачать с официального сайта MS.
Чтобы удалить неправильно установленное обновление, выполните следующие действия:
- Если вы используете Windows 7, нажмите клавишу F8, чтобы открыть меню «Пуск» и войти в безопасный режим.
- Затем откройте Панель управления -> Программы и компоненты.
3 Щелкните ссылку «Просмотр установленных обновлений» на левой панели. - Выберите обновление KB3163245 и нажмите Удалить.
- Если вы используете Windows 10, удерживайте нажатой клавишу Shift, одновременно нажимая кнопку «Перезагрузка» в меню «Пуск».
- Теперь нажмите клавиши Windows + I и выберите «Обновление и безопасность».
- В следующем окне щелкните ссылку «История обновлений» и удалите обновления.
- Щелкните правой кнопкой мыши неправильное обновление и выберите «Удалить».
- Наконец, перезагрузите компьютер.
Надеюсь, хотя бы один из вышеперечисленных методов решит вашу проблему с Powershell. Не стесняйтесь оставлять комментарий.
Совет экспертов: Этот инструмент восстановления сканирует репозитории и заменяет поврежденные или отсутствующие файлы, если ни один из этих методов не сработал. Это хорошо работает в большинстве случаев, когда проблема связана с повреждением системы. Этот инструмент также оптимизирует вашу систему, чтобы максимизировать производительность. Его можно скачать по Щелчок Здесь

CCNA, веб-разработчик, ПК для устранения неполадок
Я компьютерный энтузиаст и практикующий ИТ-специалист. У меня за плечами многолетний опыт работы в области компьютерного программирования, устранения неисправностей и ремонта оборудования. Я специализируюсь на веб-разработке и дизайне баз данных. У меня также есть сертификат CCNA для проектирования сетей и устранения неполадок.
Сообщение Просмотров: 140
Многие пользователи сообщают о проблеме с Windows PowerShell, из-за которой он перестает работать или вообще не открывается. Одной из наиболее распространенных причин появления сообщения PowerShell перестала работать является наличие скрытого вируса на вашем компьютере. Это, в свою очередь, замедляет работу вашей системы, и другие процессы в вашей системе перестают работать. Сообщение об ошибке не дает никакой информации о причине этой проблемы, поэтому ее трудно решить.
Если вас раздражает, что PowerShell не работает или не открывает проблемы на вашем ПК, то эта статья предназначена для ты. В этой статье мы обсудили некоторые решения, которые можно применить для исправления этой ошибки.
РЕКЛАМА
Оглавление
1. Откройте Диспетчер задач с помощью комбинации клавиш Ctrl + Shift + Esc.
2. Найдите запись PowerShell в списке запущенных процессов.
3. Выберите PowerShell и нажмите кнопку Завершить задачу, чтобы завершить запущенный процесс, прежде чем переходить к следующим шагам.
4. Нажмите клавиши Windows и R, чтобы открыть диалоговое окно Выполнить.
5. Введите Optionalfeatures и нажмите Enter, чтобы открыть Windows Features и включить или отключить функции Windows. сильный>.
6. Прокрутите список вниз и найдите Windows PowerShell
7. Снимите флажок рядом с Windows PowerShell и нажмите ОК.
РЕКЛАМА
8. Перезагрузите систему после применения запрошенных изменений.
9. Повторите описанные выше шаги, но теперь установите флажок рядом с Windows PowerShell на шаге 7, чтобы включить его.
10. Попробуйте открыть PowerShell, чтобы проверить, решена ли проблема.
Решение 2. Запустите полное антивирусное сканирование системы
1. Во-первых, загрузите систему в безопасном режиме с поддержкой сети.
2. Воспользуйтесь любым антивирусным ПО и выполните полное сканирование системы.
3. В случае атаки вредоносных программ сканирование автоматически удалит вирус из вашей системы.
4. Проверьте, решает ли это проблему с PowerShell.
Исправить 3 — выполнить сканирование SFC
1. Нажмите Windows +S и введите командную строку в поле поиска Windows.
2. Нажмите правой кнопкой мыши на Командная строка в результатах поиска и выберите Запуск от имени администратора.
РЕКЛАМА
<р>3. Введите приведенную ниже команду и нажмите Enter.
sfc/scannow
4. Дождитесь завершения процесса сканирования и устраните все проблемы, если они есть.
5. Перезагрузите компьютер.
Проверьте, устранена ли проблема с PowerShell.
Решение 4 — выполните чистую загрузку
1. Нажмите Windows + R, чтобы открыть диалоговое окно Выполнить.
2. Введите msconfig и нажмите Enter, чтобы открыть Конфигурация системы
3. Перейдите на вкладку Общие.
4. Снимите галочку с параметра Загружать элементы автозагрузки под Выборочный запуск.
РЕКЛАМА
5. Выберите вкладку Службы.
6. Отметьте параметр Скрыть все службы Microsoft.
7. Затем нажмите Отключить все.
8. Перейдите на вкладку Автозагрузка.
9. Нажмите ссылку Открыть диспетчер задач здесь.
10. Отключите все запускаемые программы в Диспетчере задач по одной. Щелкните правой кнопкой мыши программу и выберите вариант Отключить.
11. Сохраните все эти изменения и закройте открытые окна.
12. Перезагрузите компьютер и проверьте, открывается ли PowerShell без ошибок.
Спасибо за внимание.
Прокомментируйте и сообщите нам об исправлении, которое помогло вам решить эту проблему. на вашем ПК
РЕКЛАМА
Инженер-программист превратился в преподавателя с большим опытом преподавания в университетах. В настоящее время работаю над своей страстью к писательству.
В этом руководстве мы покажем вам различные способы устранения проблемы с Windows Powershell, которая не работает на вашем ПК с Windows 11. Эта оболочка командной строки от гигантов из Редмонда претерпела серьезные изменения в последней версии ОС. Кроме того, он также был благословлен несколькими примечательными особенностями. Помимо возможности выполнять команды, его также можно использовать в качестве языка сценариев и платформы автоматизации для Microsoft, а также сторонних сервисов, таких как Google Cloud и AWS.
Однако, несмотря на все приложенные плюсы, он также не свободен от своей доли проблем. Различные пользователи выразили обеспокоенность тем, что Powershell не работает на их ПК с Windows 11. Что же касается причин того же, то их может быть немало. включая повреждение системных файлов и вмешательство в работу сторонних сервисов. С учетом сказанного, это руководство познакомит вас с несколькими обходными путями, которые помогут вам решить эту проблему. Следуйте вместе.
Рекомендуется попробовать каждый из перечисленных ниже обходных путей, а затем посмотреть, какой из них принесет вам успех. Итак, имея это в виду, давайте начнем.
ИСПРАВЛЕНИЕ 1. Повторно включите Windows PowerShell
Прежде всего, вам следует подумать об отключении, а затем повторном включении Powershell. Это обновит его основные настройки и вполне может решить основную проблему. Поэтому обратитесь к приведенным ниже инструкциям, чтобы попробовать его.
- Запустите «Включить или отключить функцию Windows» в меню «Пуск».
- Затем снимите флажок Windows Powershell 2.0 и нажмите «ОК».
- Снова вызовите это меню и на этот раз установите флажок Windows Powershell 2.0.
- Теперь проверьте, устраняет ли это проблему с тем, что Powershell не работает в Windows 11.
ИСПРАВЛЕНИЕ 2. Запуск PowerShell от имени администратора
В некоторых случаях Powershell может не работать в ограниченной среде из-за отсутствия необходимых разрешений. Поэтому вам следует подумать о запуске с правами администратора, используя приведенные ниже инструкции.
- Вызовите Диспетчер задач с помощью сочетания клавиш Ctrl Shift Esc.
- Затем перейдите в «Файл, запустить новую задачу» и введите Powershell.
- Теперь отметьте «Создать эту задачу с правами администратора» и нажмите «ОК».
- Проверьте, устраняет ли это проблему с неработающей Powershell в Windows 11.
ИСПРАВЛЕНИЕ 3. Используйте средства устранения неполадок Windows
В Windows встроено довольно много приложений для устранения неполадок, которые сканируют проблемы и выявляют соответствующие исправления. Что касается текущей проблемы, мы будем использовать средства «Обслуживание системы» и «Устранение неполадок оборудования и устройств», поскольку они лучше всего подходят для устранения этой ошибки.
- Откройте диалоговое окно «Выполнить» с помощью сочетаний клавиш Windows R.
- Затем введите приведенную ниже команду и нажмите Entermsdt.exe -id MaintenanceDiagnostic.
- Это запустит средство устранения неполадок обслуживания системы, нажмите «Далее», чтобы продолжить.
- Теперь он будет сканировать основные проблемы и предлагать соответствующие исправления.
- Просто выберите исправление для реализации, а затем проверьте, устранена ли проблема или нет.
- Если он все еще там, включите средство устранения неполадок оборудования и устройств на вашем ПК.
- Затем запустите его, нажмите «Далее» и дайте ему выполнить поиск проблем. Затем примените исправления, которые он вызывает.
- Проверьте, устраняет ли это проблему неработающей Windows Powershell в Windows 11.
ИСПРАВЛЕНИЕ 4. Загрузитесь в безопасном режиме
В некоторых случаях стороннее приложение также может конфликтовать с функциональностью ОС. Лучший способ проверить и, следовательно, исправить эту проблему — загрузить компьютер в безопасном режиме. Это отключит все сторонние приложения и даст вам стандартную среду только с системными приложениями. Если вы можете выбрать несколько файлов в этом режиме, виновником является приложение или программное обеспечение. Поэтому вам следует подумать об удалении недавно установленных приложений, после которых впервые возникла проблема. Вот как:
- Откройте диалоговое окно «Выполнить» с помощью сочетания клавиш Windows + R.
- Затем введите приведенную ниже команду и нажмите Enter, чтобы открыть менюmsconfig конфигурации системы.
- Теперь перейдите на вкладку «Загрузка» и установите флажок «Безопасный режим» в разделе «Параметры загрузки».
- Наконец, нажмите «ОК», а затем «Перезагрузить» в диалоговом окне подтверждения.
- Теперь ваш компьютер загрузится в среду восстановления Windows.
- Перейдите в раздел «Устранение неполадок»> «Дополнительные параметры»> «Параметры запуска»> «Перезагрузить»> «Нажмите 4», чтобы загрузиться в безопасном режиме.
- Теперь проверьте, устраняет ли это проблему неработающей Windows Powershell в Windows 11.
ИСПРАВЛЕНИЕ 5: отключить стороннюю службу
Сторонний сервис также может создать несколько препятствий для работы этой функции. Поэтому вам следует подумать об отключении всех служб, не связанных с Microsoft, а затем проверить результаты. Вот как это можно сделать
- Перейдите в меню «Пуск», найдите «Конфигурация системы» и откройте его.
- Затем перейдите на вкладку «Службы», установите флажок «Скрыть все службы Microsoft» и нажмите кнопку «Отключить все».
- Затем перейдите на вкладку «Автозагрузка» и нажмите «Открыть диспетчер задач».
- Теперь выберите процесс из списка и нажмите «Отключить». Сделайте это для всех запущенных служб.
- После этого перезагрузите компьютер и проверьте, устраняет ли он неработающую проблему Windows Powershell в Windows 11.
ИСПРАВЛЕНИЕ 6. Используйте команды SFC и DISM
Средство проверки системных файлов и система обслуживания и управления образами развертывания — это два служебных инструмента командной строки, которые сканируют поврежденные файлы Windows, а затем заменяют их рабочими аналогами. Основное различие между ними заключается в том, что SFC заменяет поврежденные файлы рабочими из кэшированного каталога на вашем ПК, а DISM делает это, загружая рабочие файлы с онлайн-серверов Microsoft. И на данный момент мы будем использовать оба этих инструмента для решения основной проблемы.
- Перейдите в меню «Пуск», найдите командную строку и запустите ее от имени администратора.
- Затем скопируйте и вставьте приведенную ниже команду, чтобы открыть инструмент SFC: sfc /scannow
- После завершения сканирования SFC пришло время использовать инструмент DISM. Поэтому скопируйте и вставьте следующую команду: DISM/Online/Cleanup-Image/RestoreHealth.
- После того, как DISM завершит сканирование, рекомендуется перезагрузить компьютер.
- Теперь проверьте, устраняет ли это проблему неработающей Windows Powershell в Windows 11.
ИСПРАВЛЕНИЕ 7. Используйте точку восстановления
Если ни один из вышеупомянутых методов не увенчался успехом, вам следует подумать о восстановлении вашей системы до более ранней точки, когда в ней не было этой проблемы. Вот как это можно сделать
- Для начала откройте страницу настроек с помощью сочетания клавиш Windows+I.
- Затем перейдите на вкладку «Система» в левой строке меню, прокрутите до конца и нажмите «О программе».
- После этого щелкните параметр «Защита системы», присутствующий на вкладке «Связанные ссылки».
- Это запустит диалоговое окно «Свойства системы». Перейдите на вкладку «Защита системы» и нажмите «Восстановление системы».
- Теперь Windows откроет резервную копию в разделе «Рекомендуемое восстановление». Это резервная копия, которую он считает наиболее подходящей в соответствии с текущим состоянием вашего ПК.
- Если вас это устраивает, включите параметр «Рекомендуемое восстановление» и нажмите «Далее».
- Однако, если вы хотите выбрать любую другую пользовательскую резервную копию, выберите «Выбрать другую точку восстановления» и нажмите «Далее».
- Теперь выберите нужную пользовательскую точку восстановления и нажмите «Далее».
- Теперь Windows откроет окончательный экран, показывающий все ваши варианты. Вы можете щелкнуть параметр «Сканировать на наличие уязвимых программ» и получить список всех программ, которые будут удалены/переустановлены после этого восстановления.
- Если все соответствует вашим требованиям, нажмите кнопку «Готово» и дождитесь завершения восстановления.
- После этого ваш компьютер автоматически загрузится с этой точки восстановления системы, и основная проблема будет решена.
Итак, на этом мы завершаем руководство о том, как можно исправить неработающую проблему Windows Powershell в Windows 11.
. Мы перечислили шесть различных методов для одного и того же. Дайте нам знать в разделе комментариев, какой из них принес вам успех. Кроме того, все ваши вопросы приветствуются в комментариях ниже.