
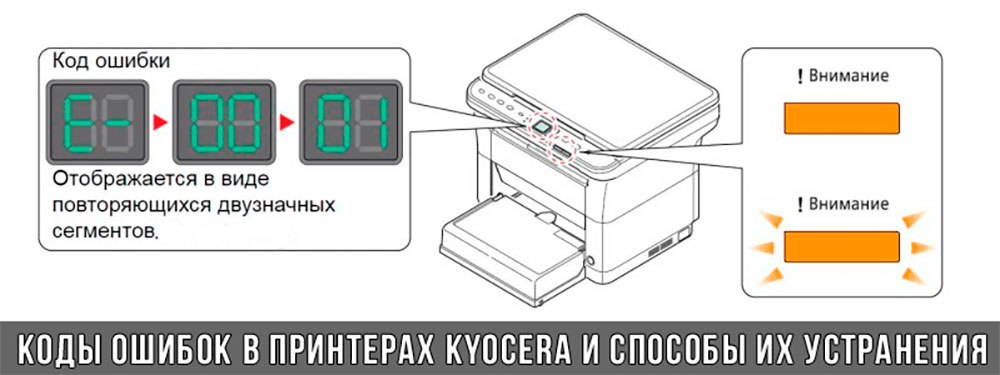
Troubleshooting > Indicator pattern when an error occurs
Error Indication
If the indicator pattern is not one of the patterns in the table above, an error that requires repair may have occurred. Turn
off the power, unplug the power cord, and then plug the power cord back in and turn on the power. This may clear the
error. If the error is not cleared, contact your service technician.
Error Code
The error code is displayed as follows. Check the error code as described below and provide the error code when
contacting us.
Indicator
Indicator
Number
0
1
●
Alphabet
Indicator pattern
A
B
●
●
●
●
●
Indicator pattern
2
3
4
5
●
●
●
●
●
●
C
D
E
F
●
●
●
●
●
●
●
●
●
●
●
●
6-26
6
7
8
9
●
●
●
●
●
●
●
●
Содержание
- Причины и типы горящей кнопки «Внимание» на принтере Kyocera
- Ошибки картриджей
- Код C7990
- Замятие бумаги
- Другие неисправности
- Сброс ошибок у принтеров Kyocera своими руками
Причины и типы горящей кнопки «Внимание» на принтере Kyocera
Для начала необходимо разобраться, какие варианты свечения красной кнопки на принтере Kyocera существуют. В большинстве случаев именно определение характера свечения позволяет устранить проблему, не делая ничего лишнего. Каждый из этих типов связан с конкретной природой проблемы, которую мы рассмотрим ниже.

- Медленное мигание лампочки. Если свет тускнеет, а затем ярко вспыхивает и медленно меняет яркость, это может быть одной из двух проблем печати. Первый вызван тем, что закончилась бумага, которую следует проверить и при необходимости вставить заново. Если бумага уже вставлена, но принтер ее не видит, попробуйте слегка отрегулировать ее и отрегулировать ручки, затянув или ослабив их. Вторая причина заключается в том, что тонер в картридже заканчивается, и чтобы проверить это, просто визуально проверьте качество печати готового документа и вспомните, когда принтер заправлялся в последний раз.
- Быстрое мигание света. Иногда свет имеет другой коэффициент горения, довольно часто мигая. Это может означать, что был обнаружен неоригинальный картридж, не совместимый с данным устройством. Другой причиной этого явления является переполнение памяти принтера, вызванное попыткой распечатать слишком большой документ. Реже быстрое мигание вызвано перегруженным или засоренным лотком для бумаги, поэтому мы рекомендуем немедленно проверить это и при необходимости устранить неисправность.
- Непрерывное мигание индикаторной лампочки. Если возникают ошибки печати и кнопка горит постоянно, стоит проверить, закрыта ли крышка принтера и есть ли тонер в кассете. Вы можете устранить эти неисправности самостоятельно, поэтому трудностей возникнуть не должно. Более редкой и серьезной проблемой является выход из строя барабана формирования изображения. В таких случаях следует обратиться в сервисный центр для дальнейшей диагностики и ремонта.
Теперь, когда вы знаете, какой мигающий рисунок отвечает за те или иные проблемы, вы сможете провести диагностику устройства и понять, какие действия необходимо предпринять. Тем, кто недавно заправил чернильный картридж и столкнулся с этой проблемой, следует перезагрузить принтер, как описано ниже. Всем, кому не удалось самостоятельно устранить ошибку, рекомендуется выполнить следующие шаги, а затем перейти к последнему совету, если и он окажется безуспешным.
Ошибки картриджей
Все современные принтеры страдают от ошибок картриджей. В большинстве случаев они возникают после отгрузки устройства. Решение заключается в извлечении и повторной установке картриджа. Сделать это можно следующим образом (на примере многофункционального устройства Kyocera FS-1040):
- Выключите принтер.
- На передней панели принтера находится откидная крышка. Откройте откидную крышку.
- Под откидной крышкой с левой стороны находится картридж. Извлеките картридж.
- Чтобы подстраховаться, проверьте переднюю часть картриджа. Если на контактах есть грязь, удалите ее мягкой безворсовой тканью. Для засохших чернил смочите салфетку в воде и протрите ею контакты.
- Замените чернильный картридж, плотно задвинув его до щелчка.
- Включите принтер и подождите около 5-10 секунд, пока картридж инициализируется.
Если проблема была связана с картриджем, эта процедура должна помочь ее решить.
Код C7990
Этот номер ошибки в таких моделях, как FS 1020MFP, указывает на то, что бункер для тонера переполнен.

Ошибка C7990
Возможны три причины ошибки C7990:
-плата PWB неисправна;
-Датчик чернил неисправен;
Неисправен блок барабана; — Картридж переполнен — Рекомендуется заменить блок барабана.

Блок барабана формирования изображения
В первых двух случаях обратитесь в сервисный центр.
В третьем случае появляется код C7990, если срок службы барабана изображения не закончился, барабан изображения можно очистить от чернил. Процедура выполняется следующим образом:
1.Откройте переднюю крышку и извлеките блок проявителя.
2.Извлеките барабан с изображением.
3.Осторожно откройте крышку резервуара и удалите чернила.
4.Соберите машину в обратном порядке.
Как видите, ошибку C7990 в принтере Kyocera легко устранить самостоятельно, и к специалисту нужно обращаться только в том случае, если платы действительно неисправны.

Замятие бумаги
Застревание бумаги внутри принтера — распространенная проблема принтеров. Устройства Kyocera не являются исключением. Механизм подачи бумаги состоит из нескольких вращающихся роликов. Если любой из них застрянет, печать не будет выполнена. Если произошло замятие бумаги, на передней панели принтера также появится соответствующее сообщение.
В самых оптимистичных случаях нет необходимости разбирать принтер для извлечения бумаги. Чаще всего он заклинивает прямо на входе. Однако если замятие бумаги произошло внутри принтера, его необходимо удалить.
Другие неисправности
Также могут возникнуть следующие коды:
-C-F040. Выключите и снова включите принтер, нажав кнопку питания.
-J-0511 Код указывает на замятие бумаги под задней крышкой. В инструкциях описано, как удалить бумагу в соответствующем разделе.
-PF. Принтер показывает, что листы были добавлены во входной лоток.

Как видите, японские принтеры Kyocera редко ломаются. Чаще всего ошибки возникают из-за неправильного или невнимательного обращения. Вы можете починить их самостоятельно, но если вы не уверены, лучше обратиться к профессионалу.
Сброс ошибок у принтеров Kyocera своими руками
Сброс ошибок на принтерах Kyocera следует понимать как набор шагов, которые потенциально может выполнить опытный пользователь для восстановления работоспособности печатающих устройств, не прибегая к услугам сервиса.
|
Ошибка # |
Причина |
Решение |
|
E-0001 |
В принтер был установлен совместимый картридж или поврежден чип расходного материала. | Эта проблема может быть решена несколькими способами:
1. установка оригинального картриджа; 2. замена неисправного чипа; 3. перепрошивка принтера — после этого любой картридж может быть установлен в принтер неограниченное количество раз; 4. сброс ошибки — Нажмите кнопки «Режим» и «Сброс» на несколько секунд. |
|
E-0002 |
Регион используемого картриджа не соответствует принтеру. | Эта проблема может быть решена несколькими способами:
1. установите правильный картридж для региона принтера; 2. Замените микросхему; 3) Обновите микропрограмму принтера. |
|
E-0003 |
Память в принтере заполнена. | Распечатайте документы, которые уже были отсканированы, или сбросьте операцию с помощью соответствующей кнопки. |
|
E-0007 |
Тонер-картридж закончился. | Замените новый оригинальный тонер-картридж, совместимый тонер-картридж или перезарядите картридж. |
|
E-0008 |
Одна из крышек принтера не закрыта. | Закройте переднюю и заднюю крышки принтера, звучно щелкнув. |
|
E-0009 |
Лоток для печати заполнен. | Извлеките отпечатанные листы бумаги, затем нажмите кнопку Старт, чтобы возобновить печать. |
|
E-0012 |
Память принтера заполнена. | Уменьшите разрешение печати до 600 точек на дюйм. |
|
E-0014 |
Установлен размер бумаги, который не поддерживается принтером. | Замените бумагу на совместимую по размеру.
Иногда функциональность принтера может быть ограничена на уровне программного обеспечения. Для расширения диапазона размеров рекомендуется обновить программное обеспечение принтера. |
|
E-0015 |
1 Принтер не имеет источника питания.
2. сетевой кабель не подключен. 3. на персональном компьютере отсутствует драйвер. |
Проверьте целостность сетевого кабеля.
Включите принтер. При необходимости установите драйвер. |
|
E-0018 |
Выбранный файл отсутствует в очереди печати. | Сбросьте операцию, нажав кнопку «Сброс». Затем выберите новый файл и продолжите печать. |
|
E-0019 |
Формат печати не поддерживается принтером. | Сбросьте действие, нажав кнопку «Сброс». |
|
J-0511 |
Бумага замята. | Осторожно извлеките оставшуюся бумагу из корпуса принтера. |
|
ПФ |
Во входном лотке нет бумаги. | Вставьте бумагу во входной лоток и возобновите печать, нажав кнопку Старт. |
Источники
- https://Lumpics.ru/kyocera-printer-does-not-print-attention-button-is-on/
- https://ru.NoDevice.com/articles/printers/does-not-print-a-kyocera-printer
- https://www.dvenashka.ru/2021/11/kody-oshibok-printerov-kyocera-i-ih-sbros.html
- https://computermaker.info/ecosys-fs-1020mfp-oshibka-e7.html
- http://printergid.ru/neispravnosti/oshibki-kyocera
- https://moscowtoner.ru/kody-oshibok-u-printerov-kyocera/
Ошибки Kyocera ECOSYS M2030dn
Ошибки Kyocera ECOSYS M2030pn
Ошибки Kyocera ECOSYS M2035dn
Ошибки Kyocera ECOSYS M2040dn
Ошибки Kyocera ECOSYS M2135dn
Ошибки Kyocera ECOSYS M2530dn
Ошибки Kyocera ECOSYS M2535dn
Ошибки Kyocera ECOSYS M2540dn
Ошибки Kyocera ECOSYS M2540dw
Ошибки Kyocera ECOSYS M2635dn
Ошибки Kyocera ECOSYS M2635dw
Ошибки Kyocera ECOSYS M2640idw
Ошибки Kyocera ECOSYS M3040dn
Ошибки Kyocera ECOSYS M3040idn
Ошибки Kyocera ECOSYS M3145dn
Ошибки Kyocera ECOSYS M3145idn
Ошибки Kyocera ECOSYS M2735dw
Ошибки Kyocera ECOSYS M3540dn
Ошибки Kyocera ECOSYS M3540idn
Ошибки Kyocera ECOSYS M3550idn
Ошибки Kyocera ECOSYS M3560idn
Ошибки Kyocera ECOSYS M3645dn
Ошибки Kyocera ECOSYS M3645idn
Ошибки Kyocera ECOSYS M3655idn
Ошибки Kyocera ECOSYS M3660idn
Ошибки Kyocera ECOSYS M3860idn
Ошибки Kyocera ECOSYS M3860idn
Ошибки Kyocera ECOSYS M4125idn
Ошибки Kyocera ECOSYS M4132idn
Ошибки Kyocera ECOSYS M5521cdn
Ошибки Kyocera ECOSYS M5521cdw
Ошибки Kyocera ECOSYS M5526cdn
Ошибки Kyocera ECOSYS M5526cdw
Ошибки Kyocera ECOSYS M6026cdn
Ошибки Kyocera ECOSYS M6026cidn
Ошибки Kyocera ECOSYS M6030cdn
Ошибки Kyocera ECOSYS M6035cidn
Ошибки Kyocera ECOSYS M6230cidn
Ошибки Kyocera ECOSYS M6235cidn
Ошибки Kyocera ECOSYS M6526cdn
Ошибки Kyocera ECOSYS M6526cidn
Ошибки Kyocera ECOSYS M6530cdn
Ошибки Kyocera ECOSYS M6535cidn
Ошибки Kyocera ECOSYS M6630cidn
Ошибки Kyocera ECOSYS M6635cidn
Ошибки Kyocera ECOSYS M8124cidn
Ошибки Kyocera ECOSYS M8130cidn
Ошибки Kyocera ECOSYS P2035d
Ошибки Kyocera ECOSYS P2040dn
Ошибки Kyocera ECOSYS P2040dw
Ошибки Kyocera ECOSYS P2135d
Ошибки Kyocera ECOSYS P2135dn
Ошибки Kyocera ECOSYS P2235dn
Ошибки Kyocera ECOSYS P2235dw
Ошибки Kyocera ECOSYS P3045dn
Ошибки Kyocera ECOSYS P3050dn
Ошибки Kyocera ECOSYS P3055dn
Ошибки Kyocera ECOSYS P3060dn
Ошибки Kyocera ECOSYS P3145dn
Ошибки Kyocera ECOSYS P3150dn
Ошибки Kyocera ECOSYS P3155dn
Ошибки Kyocera ECOSYS P3160dn
Ошибки Kyocera ECOSYS P3260dn
Ошибки Kyocera ECOSYS P4035dn
Ошибки Kyocera ECOSYS P4040dn
Ошибки Kyocera ECOSYS P5021cdn
Ошибки Kyocera ECOSYS P5021cdw
Ошибки Kyocera ECOSYS P5026cdn
Ошибки Kyocera ECOSYS P5026cdw
Ошибки Kyocera ECOSYS P6021cdn
Ошибки Kyocera ECOSYS P6026cdn
Ошибки Kyocera ECOSYS P6030cdn
Ошибки Kyocera ECOSYS P6035cdn
Ошибки Kyocera ECOSYS P6130cdn
Ошибки Kyocera ECOSYS P6230cdn
Ошибки Kyocera ECOSYS P6235cdn
Ошибки Kyocera ECOSYS P7035cdn
Ошибки Kyocera ECOSYS P7040cdn
Ошибки Kyocera ECOSYS P7240cdn
Ошибки Kyocera ECOSYS P8060cdn
Ошибки Kyocera FS-C8600DN
Ошибки Kyocera FS-C8650DN
Ошибки Kyocera FS1016MFP
Ошибки Kyocera FS1018MFP
Ошибки Kyocera FS1020MFP
Ошибки Kyocera FS1024MFP
Ошибки Kyocera FS1025MFP
Ошибки Kyocera FS1028MFP
Ошибки Kyocera FS1030MFP
Ошибки Kyocera FS1035MFP
Ошибки Kyocera FS1040
Ошибки Kyocera FS1050
Ошибки Kyocera FS1060DN
Ошибки Kyocera FS1100
Ошибки Kyocera FS1110
Ошибки Kyocera FS1116MFP
Ошибки Kyocera FS1118MFP
Ошибки Kyocera FS1120
Ошибки Kyocera FS1120MFP
Ошибки Kyocera FS1124MFP
Ошибки Kyocera FS1125MFP
Ошибки Kyocera FS1128MFP
Ошибки Kyocera FS1130MFP
Ошибки Kyocera FS1135MFP
Ошибки Kyocera FS1200
Ошибки Kyocera FS1220MFP
Ошибки Kyocera FS1300D
Ошибки Kyocera FS1320D
Ошибки Kyocera FS1320MFP
Ошибки Kyocera FS1325MFP
Ошибки Kyocera FS1350DN
Ошибки Kyocera FS1370DN
Ошибки Kyocera FS1500
Ошибки Kyocera FS6020
Ошибки Kyocera FS6025MFP
Ошибки Kyocera FS6025MFPB
Ошибки Kyocera FS6030MFP
Ошибки Kyocera FS6500
Ошибки Kyocera FS6525MFP
Ошибки Kyocera FS6530MFP
Ошибки Kyocera FS6700
Ошибки Kyocera FS6900
Ошибки Kyocera FS6950DN
Ошибки Kyocera FS8000CD
Ошибки Kyocera FS8000CN
Ошибки Kyocera FS8100DN
Ошибки Kyocera TASKalfa 180
Ошибки Kyocera TASKalfa 1800
Ошибки Kyocera TASKalfa 1801
Ошибки Kyocera TASKalfa 181
Ошибки Kyocera TASKalfa 205c
Ошибки Kyocera TASKalfa 220
Ошибки Kyocera TASKalfa 2200
Ошибки Kyocera TASKalfa 2201
Ошибки Kyocera TASKalfa 221
Ошибки Kyocera TASKalfa 2420w
Ошибки Kyocera TASKalfa 2460ci
Ошибки Kyocera TASKalfa 2470ci
Ошибки Kyocera TASKalfa 250ci
Ошибки Kyocera TASKalfa 2510i
Ошибки Kyocera TASKalfa 2520i
Ошибки Kyocera TASKalfa 255
Ошибки Kyocera TASKalfa 2550ci
Ошибки Kyocera TASKalfa 2551ci
Ошибки Kyocera TASKalfa 2552ci
Ошибки Kyocera TASKalfa 2553ci
Ошибки Kyocera TASKalfa 255b
Ошибки Kyocera TASKalfa 255c
Ошибки Kyocera TASKalfa 265ci
Ошибки Kyocera TASKalfa 300ci
Ошибки Kyocera TASKalfa 300i
Ошибки Kyocera TASKalfa 3010i
Ошибки Kyocera TASKalfa 3011i
Ошибки Kyocera TASKalfa 305
Ошибки Kyocera TASKalfa 3050ci
Ошибки Kyocera TASKalfa 3051ci
Ошибки Kyocera TASKalfa 306ci
Ошибки Kyocera TASKalfa 307ci
Ошибки Kyocera TASKalfa 308ci
Ошибки Kyocera TASKalfa 3212i
Ошибки Kyocera TASKalfa 3252ci
Ошибки Kyocera TASKalfa 3253ci
Ошибки Kyocera TASKalfa 3500i
Ошибки Kyocera TASKalfa 3501i
Ошибки Kyocera TASKalfa 350ci
Ошибки Kyocera TASKalfa 3510i
Ошибки Kyocera TASKalfa 3511i
Ошибки Kyocera TASKalfa 3550ci
Ошибки Kyocera TASKalfa 3551ci
Ошибки Kyocera TASKalfa 3552ci
Ошибки Kyocera TASKalfa 3553ci
Ошибки Kyocera TASKalfa 356ci
Ошибки Kyocera TASKalfa 358ci
Ошибки Kyocera TASKalfa 4002i
Ошибки Kyocera TASKalfa 4003i
Ошибки Kyocera TASKalfa 400ci
Ошибки Kyocera TASKalfa 4012i
Ошибки Kyocera TASKalfa 4052ci
Ошибки Kyocera TASKalfa 4053ci
Ошибки Kyocera TASKalfa 406ci
Ошибки Kyocera TASKalfa 408ci
Ошибки Kyocera TASKalfa 420i
Ошибки Kyocera TASKalfa 4500i
Ошибки Kyocera TASKalfa 4501i
Ошибки Kyocera TASKalfa 4550ci
Ошибки Kyocera TASKalfa 4551ci
Ошибки Kyocera TASKalfa 4820w
Ошибки Kyocera TASKalfa 5002i
Ошибки Kyocera TASKalfa 5003i
Ошибки Kyocera TASKalfa 500ci
Ошибки Kyocera TASKalfa 5052ci
Ошибки Kyocera TASKalfa 5053ci
Ошибки Kyocera TASKalfa 508ci
Ошибки Kyocera TASKalfa 520i
Ошибки Kyocera TASKalfa 5500i
Ошибки Kyocera TASKalfa 5501i
Ошибки Kyocera TASKalfa 550c
Ошибки Kyocera TASKalfa 552ci
Ошибки Kyocera TASKalfa 5550ci
Ошибки Kyocera TASKalfa 5551ci
Ошибки Kyocera TASKalfa 6002i
Ошибки Kyocera TASKalfa 6003i
Ошибки Kyocera TASKalfa 6052ci
Ошибки Kyocera TASKalfa 6053ci
Ошибки Kyocera TASKalfa 620
Ошибки Kyocera TASKalfa 6500i
Ошибки Kyocera TASKalfa 6501i
Ошибки Kyocera TASKalfa 650c
Ошибки Kyocera TASKalfa 6550ci
Ошибки Kyocera TASKalfa 6551ci
Ошибки Kyocera TASKalfa 7002i
Ошибки Kyocera TASKalfa 7003i
Ошибки Kyocera TASKalfa 7052ci
Ошибки Kyocera TASKalfa 7353ci
Ошибки Kyocera TASKalfa 750c
Ошибки Kyocera TASKalfa 7550ci
Ошибки Kyocera TASKalfa 7551ci
Ошибки Kyocera TASKalfa 8000i
Ошибки Kyocera TASKalfa 8001i
Ошибки Kyocera TASKalfa 8002i
Ошибки Kyocera TASKalfa 8003i
Ошибки Kyocera TASKalfa 8052ci
Ошибки Kyocera TASKalfa 820
Ошибки Kyocera TASKalfa 8353ci
Ошибки Kyocera TASKalfa 9002i
Ошибки Kyocera TASKalfa 9003i
Японская компания Kyocera производит высококачественные лазерные принтеры и МФУ для офисной печати. Их продукция одна из самых востребованных на сегодняшний день. Ведь печатающие устройства Kyocera характеризуются высокой надежностью, износостойкостью и большим сроком эксплуатации. Однако даже их изделия не являются вечными. Со временем принтеры Kyocera начинают сбоить.
К счастью, оргтехника Kyocera оснащена системой самодиагностики (так же, как и струйные принтеры Canon). Поэтому, в случае возникновения проблемы, устройство самостоятельно выявит уязвимое место и сообщит Вам об этом миганием соответствующего индикатора на панели управления либо кодом ошибки, выведенным на дисплей принтера.
Если Вы не являетесь мастером по обслуживанию принтеров и МФУ Kyocera, то, чтобы понять, о чем сообщает печатающее устройство, Вам потребуется расшифровать указанный им код. Для этого мы добавили в статью таблицу кодов ошибок лазерных принтеров Kyocera серии FS и не только.
Коды ошибок принтеров и МФУ Kyocera, которые можно исправить самостоятельно
|
Код ошибки |
Значение ошибки |
Решение проблемы |
|
E-0001 (E1) |
Поврежден чип картриджа либо установлен неоригинальный картридж. |
Замените установленный картридж оригинальной версией изделия. Если хотите сэкономить, тогда купите и установите новый чип на картридж или перепрошейте принтер Kyocera. Однако предварительно не помешает попробовать сбросить ошибку соответствующей комбинацией клавиш (как это сделать, читайте в статье «Сброс ошибки установки неоригинального картриджа в принтерах Kyocera»). |
|
E-0002 (E2) |
Регион использования картриджа и принтера не совпадают. |
Замените чип или прошейте принтер Kyocera. |
|
E-0003 (E3) |
Заполнена память принтера или МФУ Kyocera. |
Отпечатайте ранее отсканированные листы или очистите очередь печати нажатием кнопки Стоп/Сброс (ранее отсканированные листы также удалятся из памяти принтера, даже если они еще не были распечатаны). |
|
E-0007 (E7) |
Тонер-картридж Kyocera израсходовал ресурс красящего вещества. |
Замените или заправьте картридж Kyocera (если используете совместимый или перезаправленный расходник, то после установки его в принтер не забудьте сбросить ошибку зажатием на 3-5 секунды кнопок [Ок] и [Сброс/Стоп]). |
|
E-0008 (E8) |
Открыта крышка принтера либо не работает датчик закрытия крышек устройства. |
Откройте и еще раз закройте переднюю и заднюю крышку принтера. Во время закрытия Вы должны услышать характерный щелчок. Если не помогло, то причина в неисправности датчика. |
|
E-0009 (E9) |
Лоток приема бумаги полон. |
Уберите все отпечатанные листы бумаги из выходящего лотка. Чтобы возобновить печать, нажмите кнопку [Старт]. |
|
E-0012 (E12) |
Ошибка памяти принтера Kyocera. |
Попробуйте уменьшить разрешение печати. Скорее всего, формат создаваемого отпечатка не соответствует возможностям принтера. |
|
E-0014 (E14) |
Установлен неверный формат бумаги (неподдерживаемый принтером Kyocera). |
Поменяйте бумагу на поддерживаемую принтером либо смените ее формат в настройках печати. Попробуйте обновить программное обеспечение. Возможно, это расширит поддерживаемые принтером Kyocera форматы. |
|
E-0015 (E15) |
Устройство не подключено к электрической сети либо на компьютере нет (не работает) драйвера принтера Kyocera. |
Проверьте подключение печатающего аппарата к электрической сети, а также целостность кабеля. Если ошибка не исчезает, скачайте драйвер принтера Kyocera и установите его на компьютер. |
|
E-0017 (E17) |
Ошибка передачи данных. |
Проверьте подключение принтера к компьютеру. Кабель не должен быть длиннее 5 метров, а также обязан поддерживать стандарт USB 2.0. Кроме того, переустановите драйвер принтера и утилиту Kyocera Client Tool. |
|
E-0018 (E18) |
Очередь печати заполнена. |
Очистите очередь печати нажатием кнопки [Сброс] либо через драйвер принтера. |
|
E-0019 (E19) |
Неверный формат печати. |
Отмените печать нажатием кнопки [Стоп/Сброс]. Выберите в настройках принтера соответствующий режим печати, а также установите в лоток поддерживаемый принтером формат бумаги. |
|
J-0000 (jam0000) |
Замятие бумаги за задней крышкой. |
Откройте крышку и извлеките бумагу. Проверьте надежность крепления бумаги в лотке, а также принтер на наличие посторонних предметов. Еще причина может быть в пружине выходного флажка. Если она растянулась, то может плохо работать фиксатор. Также проблема может быть из-за печки, сделайте ее ревизию, переборку и смазку. |
|
J-0501 (jam0501) |
Бумага застряла в принтере Kyocera |
Извлеките замятую бумагу. Проверьте надежность установки бумаги во входной лоток. Проверьте целостность роликов протяжки бумаги, а также принтер на наличие посторонних предметов. Если не помогло, стоит внимательно осмотреть ребра на направляющей пластине. На них могут образоваться сколы, трещины и заусенцы. Их можно слегка подчистить наждачной бумагой (нулевкой). |
|
J-0511 (jam0511) |
Принтер Kyocera замял бумагу. |
Извлеките замятую бумагу и повторите печать. Если проблема не исчезла, несите принтер в сервис. Скорее всего, изношен ролик протяжки бумаги. |
|
C7990 |
Бункер драм-картриджа (блока фотобарабана) заполнен отработанным тонером либо неисправен счетчик отработки красящего вещества. Еще проблема может быть в главной плате PWB. |
Осуществите чистку драм-картриджа (блока фотобарабана). Если проблема в датчике или плате, то нужно отнести принтер в СЦ на диагностику. |
|
F248 |
Ошибка обработки отпечатываемого материала. |
Перезагрузите принтер. Уберите неподдерживаемые спецсимволы из отпечатка. Обновите ПО принтера Kyocera. Смените режим работы принтера с PDL на GDI (Пуск -> Принтеры -> Свойства -> Параметры устройства). |
|
PF |
Отсутствует бумага в лотке подачи. |
Загрузите листы бумаги во входной лоток. Если принтер по-прежнему не печатает, значит нужно искать проблему в чем-то другом. |
|
1101 |
Ошибка сканирования через сеть из-за неправильного имени SMTP сервера. |
Пропишите DNS-адреса помимо прочих настроек печати по сети. |
|
1102 |
Некорректная настройка сканера для работы через сеть |
Зайдите в Web-панель управления принтером (нужно в адресную строку браузера ввести iP принтера Kyocera). Далее в зависимости от модели введите логин и пароль (Admin/Admin или просто admin00 без логина). Далее следуйте инструкции:
Логин и пароль нужны обязательно, если их нет, то следует создать. |
|
2101 |
Ошибка передачи данных при сканировании через сеть. |
Правильно настройте параметры (как для ошибки 1102), только предварительно отключите на ПК антивирус и брандмауэр. |
Если Вы испытали все способы, но не смогли убрать ошибку, то следует нести печатающее устройство в сервисный центр. Кроме того, есть ряд ошибок (высвечиваемых на дисплее принтера), которые нельзя устранить в домашних условиях. Соответствующие коды ошибок принтеров Kyocera представляем в очередной таблице.
Коды ошибок принтеров и МФУ Kyocera, которые нужно устранять в сервисном центре
|
Код ошибки |
Значение ошибки |
Решение проблемы |
|
0030 |
Неисправность платы управления факсом принтера. |
Замена платы. |
|
0100 |
Неисправность платы управления или флеш-памяти принтера. |
Замена платы. |
|
0120 |
Ошибка чтения mac-адреса из-за неисправности флеш-памяти принтера. |
Замена платы. |
|
0190 |
Неисправность платы управления или флеш-памяти принтера. |
Замена платы. |
|
0630 |
Неисправность платы управления принтера. |
Замена платы. |
|
1020 |
Неисправность мотора, привода или отсутствие контакта. |
Разборка принтера и замена изношенных частей. Проверка надежности подключений, замена разорванных (прогоревших) кабелей. Ремонт или замена привода мотора. |
|
1040 |
Неисправность мотора, привода или отсутствие контакта. |
Разборка принтера и замена изношенных частей. Проверка надежности подключений, замена разорванных (прогоревших) кабелей. Ремонт или замена привода мотора. |
|
2000 |
Неисправность главной платы управления, соединительного кабеля или привода принтера. |
Проверить ремни, шестерни и ролики привода. Смазать или заменить, если есть дефекты. Заменить привод или главную плату. |
|
3100 (C3100) |
Неисправность главной платы, привода сканера, датчика положения или нарушение целостности соединений. |
Проверить наличие разрывов и отсутствия контакта. Смазать или заменить изношенные элементы привода. Заменить привод, главную плату, датчик или соединительный кабель. Если Вам повезло, то возможно забыли отключить фиксатор блока сканера. |
|
3101 |
Сетевой кабель не подсоединен, или нарушена работа концентратора. Еще может быть из-за наличия вирусов в системе или неправильно заданным параметрам сервера SMTP. |
Проверить соединения, правильно настроить параметры сети. |
|
3300 |
Неисправность главной платы, датчика CIS или соединительного кабеля. |
Проверить контакты, заменить плату или датчик. |
|
3500 |
Неисправность главной платы или нарушение соединения контактов. |
Проверить контакты, заменить плату. |
|
4000 (C4000) |
Неисправность главной платы, привода сканера или нарушение соединений. Однако чаще всего ошибка лазера. |
Проверить контакты, заменить плату или привод блока сканера. Почистить лазер, смазать ось полигон-мотора, либо полностью заменить блок лазера. |
|
4200 |
Неисправность главной платы, блока сканера или датчика BD. |
Отключить питание принтера на 30 минут. Если не помогло, то следует заменить привод сканера или главную плату принтера. |
|
6000 (С6000) |
Неисправность главной платы, термостата, печки или нарушение соединения контактов. |
Проверить и поправить контакты. Заменить фьюзер. Ремонт или замена печки, термодатчика, термопредохранителя и т.д. |
|
6020 |
Сгорание термистора или главной платы. |
Замена термистора или главной платы. |
|
6030 |
Неисправность главной платы, термостата или термистора. Возможно, причина в отсутствии контакта. |
Проверить соединения. Заменить плату, термостат или термистор. |
|
6400 |
Неисправность главной платы, отсутствие питания или контакта. |
Заменить плату или источник питания. |
|
F000 |
Неисправность главной платы или отсутствие контакта. |
Проверить соединение ремня безопасности. Заменить ремень или плату управления. |
|
F020 |
Неисправность элементов памяти принтера. |
Перезагрузить принтер. Если ошибка не устранилась – заменить плату управления. |
|
F040 |
Неисправность главной платы принтера. |
Перезагрузить принтер. Если ошибка не устранилась – заменить плату управления. |
|
F05D |
Неисправность главной платы. Сбой программного оборудования привода. Проблемы с прошивкой принтера Kyocera. |
Перезагрузить принтер. Если ошибка не устранилась – заменить плату управления. Перепрошить принтер Kyocera. |
|
F245 F246 F247 F375 |
Принтер Kyocera заблокирован из-за проблемы, вызванной отказом источника питания. |
Нужно перепрошить принтер специальной сервисной микропрограммой. |
Обратите внимание: Если у печатающего устройства нет дисплея, то определить проблему можно по светодиодным индикаторам, встроенным в панель управления принтером. Например, у Kyocera Ecosys P2135D нужно сосчитать количество миганий индикаторов красного цвета и таким образом определить число, указывающее на ту или иную ошибку. В свою очередь, у модели Kyocera FS-1040 все зависит от темпа мигания светодиода с надписью «Внимание!» («Attention!»):
- Мигает медленно – указывает на отсутствие бумаги в лотке или тонера в картридже.
- Мигает быстро – оповещает о проблеме с памятью устройства, переполненном лотке или замятии бумаги, а также об использовании неоригинальных расходных материалов.
- Горит постоянно – говорит о проблемах с картриджем или фотобарабаном либо указывает на открытые крышки принтера.

Чтобы потребитель мог наверняка определить проблему, рекомендуем использовать утилиту Kyocera Client Tool, которая идет в комплекте с драйверами принтера.
Ваше Имя:
Ваш вопрос:
Внимание: HTML не поддерживается! Используйте обычный текст.
Оценка:
Плохо
Хорошо
Введите код, указанный на картинке:


- Информация о материале
-
Опубликовано: 14 июля 2020
-
Просмотров: 20992
Когда я впервые столкнулся с такой проблемой, это случилось после замены картриджа
Принтер начал просить тонер, поменяли картридж, но вместо того, чтобы продолжить печать, сразу же начали мигать все лампочки на панели:

Для исправления ошибки нужно нажать на несколько секунд кнопку GO на верхней панели (находится там же, где мигают лампочки):

- Manuals
- Brands
- Kyocera Manuals
- Printer
- ECOSYS P2335dn
- Operation manual
-
Bookmarks
Quick Links
OPERATION GUIDE
ECOSYS P2335dw
ECOSYS P2335dn
ECOSYS P2335d
Related Manuals for Kyocera ECOSYS P2335dn
Summary of Contents for Kyocera ECOSYS P2335dn
-
Page 1
PRINT OPERATION GUIDE ECOSYS P2335dw ECOSYS P2335dn ECOSYS P2335d… -
Page 2
Please read this Operation Guide before using the machine. To maintain quality, we recommend using genuine Kyocera toner containers, which must pass numerous quality inspections. -
Page 3
Contents Preface ……………………….. i Contents ……………………..ii Machine Features ……………………v Guides Provided with the Machine ………………vii About the Operation Guide (this Guide) …………….viii Structure of the guide ………………..viii Conventions Used in This Guide………………. ix Legal and Safety Information …………..1-1 Notice …………………….. -
Page 4
Command Center RX …………………. 2-35 Accessing Command Center RX …………….2-36 Changing Security Settings ………………2-37 Changing Device Information ……………… 2-39 E-mail Settings ………………….2-41 Preparation before Use …………….3-1 Loading Paper ……………………3-2 Precaution for Loading Paper ………………. 3-2 Selecting the Paper Feeder Units ……………. -
Page 5
Machine Operation Trouble ………………6-11 Printed Image Trouble ………………… 6-13 Indicator pattern when an error occurs ……………. 6-16 Maintenance Indication ………………. 6-16 Error Indication ………………….6-26 Clearing Paper Jams ………………….. 6-28 Remove any jammed paper in the Multipurpose Tray ……….6-29 Remove any jammed paper in Cassette 1 ………….. -
Page 6
> Machine Features Machine Features The machine is equipped with many useful functions. Here are some examples. Save energy and cost Save energy as needed Use less toner for printing Reduce paper use (Energy Saver function) (EcoPrint) (Paper Saving Printing) The machine is equipped with Energy You can save toner consumption with this You can print originals on both sides of… -
Page 7
> Machine Features Use functions more efficiently Perform remote operation (Command Center RX) You can access to the machine remotely to print, send or download data. Administrators can configure the machine behavior or management settings. Command Center RX (page 2-35) -
Page 8
Explains how to print PDF files without launching Adobe Acrobat or Reader. Monitor the machine KYOCERA Net Viewer User Guide and printers on the Explains how to monitor your network printing system (the machine) with KYOCERA Net network Viewer. PRESCRIBE Commands Command Reference Describes the native printer language (PRESCRIBE commands). -
Page 9
> About the Operation Guide (this Guide) About the Operation Guide (this Guide) Structure of the guide The Operation Guide contains the following chapters. Chapter Contents Legal and Safety Information Provides precautions regarding use of the machine and trademark information. Installing and Setting up the Explains part names, cable connections, installation of the software, login, logout, and Machine… -
Page 10
> About the Operation Guide (this Guide) Conventions Used in This Guide Adobe Reader XI is used as an example in the explanations below. Click an item in the Table of Click to move from the current page to the previously Contents to jump to the displayed page. -
Page 11
> About the Operation Guide (this Guide) Size and Orientation of Paper Paper sizes such as A5 can be used in both the horizontal and vertical orientations. To distinguish the orientations when these sizes are used, «R» is added to sizes used in the vertical orientation. Orientation Setting Position Indicated size in this Guide… -
Page 12
Legal and Safety Information Please read this information before using your machine. This chapter provides information on the following topics. Notice …………………………… 1-2 Safety Conventions in This Guide ………………….1-2 Environment ……………………….. 1-3 Precautions for Use ……………………..1-4 Laser Safety (Europe) ……………………..1-5 Compliance and Conformity …………………… -
Page 13
Legal and Safety Information > Notice Notice Safety Conventions in This Guide The sections of this guide and parts of the machine marked with symbols are safety warnings meant to protect the user, other individuals and surrounding objects, and ensure correct and safe usage of the machine. The symbols and their meanings are indicated below. -
Page 14
Legal and Safety Information > Notice Environment The service environmental conditions are as follows: Temperature 50 to 90.5°F (10 to 32.5°C) Humidity 10 to 80% Avoid the following locations when selecting a site for the machine. • Avoid locations near a window or with exposure to direct sunlight. •… -
Page 15
Legal and Safety Information > Notice Precautions for Use Cautions when handling consumables CAUTION Do not attempt to incinerate parts which contain toner. Dangerous sparks may cause burns. Keep parts which contain toner out of the reach of children. If toner happens to spill from parts which contain toner, avoid inhalation and ingestion, as well as contact with your eyes and skin. -
Page 16
Regarding CLASS 1 laser products, information is provided on the rating label. Compliance and Conformity Hereby, KYOCERA Document Solutions Inc. declares that the radio equipment type ECOSYS P2335dw is in compliance with Directive 2014/53/EU. The full text of the EU declaration of conformity is available at the following internet address: https://www.kyoceradocumentsolutions.eu/index/service/dlc.html… -
Page 17
Legal and Safety Information > Notice Security Precautions when Using Wireless LAN (If equipped) Wireless LAN allows information to be exchanged between wireless access points instead of using a network cable, which offers the advantage that a LAN connection can be established freely within an area in which radio waves can be transmitted. -
Page 18
Legal and Safety Information > Notice Legal Information Copying or other reproduction of all or part of this guide without the prior written consent of KYOCERA Document Solutions Inc. is prohibited. Regarding Trade Names • PRESCRIBE and ECOSYS are registered trademark of Kyocera Corporation. -
Page 19
Legal and Safety Information > Notice GPL/LGPL This product contains GPL (http://www.gnu.org/licenses/gpl.html) and/or LGPL (http://www.gnu.org/licenses/lgpl.html) software as part of its firmware. You can get the source code, and you are permitted to copy, redistribute and modify it under the terms of GPL/LGPL. For further information including availability of the source code, visit http://www.kyoceradocumentsolutions.com/gpl/. -
Page 20
Legal and Safety Information > Notice 1. Redistributions of source code must retain the copyright notice, this list of conditions and the following disclaimer. 2. Redistributions in binary form must reproduce the above copyright notice, this list of conditions and the following disclaimer in the documentation and/or other materials provided with the distribution. -
Page 21
Legal and Safety Information > Notice 10 You shall not sublicense, sell, lease, or otherwise transfer the Software and/or Typefaces without the prior written consent of Monotype Imaging. 11 Use, duplication or disclosure by the Government is subject to restrictions as set forth in the Rights in Technical Data and Computer Software clause at FAR 252-227-7013, subdivision (b)(3)(ii) or subparagraph (c)(1)(ii), as appropriate. -
Page 22
Legal and Safety Information > Notice Energy Saving Control Function The device comes equipped with a Sleep where printer functions remain in a waiting state but power consumption is reduced to a minimum after a certain amount of time elapses since the device was last used. If the machine is not used while in sleep mode, the power automatically turns off. -
Page 23
Installing and Setting up the Machine This chapter provides information for the administrator of this machine, such as part names, cable connection, and software installation. Part Names (Machine Exterior) …………………….. 2-2 Part Names (Connectors/Interior) ……………………2-3 Part Names (With Optional Equipments Attached) ……………….. 2-5 Connecting the Machine and Other Devices ………………… -
Page 24
Installing and Setting up the Machine > Part Names (Machine Exterior) Part Names (Machine Exterior) 1 Top Tray 5 Front Cover Open Button 2 Paper Stopper 6 Operation Panel 3 Cassette 1 7 Rear Cover 4 Power Switch 8 Anti-theft Lock Slot… -
Page 25
Part Names (Connectors/Interior) 1 USB Interface Connector 6 Tray Extension 2 Network Interface Connector 7 Multipurpose Tray (Only ECOSYS P2335dn and ECOSYS P2335dw) 8 Paper Width Guides 3 Feed Cover 9 Fuser Cover 4 Paper Length Guide 5 Paper Width Guides… -
Page 26
Installing and Setting up the Machine > Part Names (Connectors/Interior) 10 Toner Container Release Button 11 Toner Container… -
Page 27
Installing and Setting up the Machine > Part Names (With Optional Equipments Attached) Part Names (With Optional Equipments Attached) 1 Cassette 2 2 Cassette 3 Optional Equipment (page 7-2) -
Page 28
Installing and Setting up the Machine > Connecting the Machine and Other Devices Connecting the Machine and Other Devices Prepare the cables necessary to suit the environment and purpose of the machine use. When Connecting the Machine to the PC via USB When Connecting the Machine to the PC or Tablet by network cable, Wi-Fi, or Wi-Fi direct Network cable connection… -
Page 29
Installing and Setting up the Machine > Connecting Cables Connecting Cables Connecting LAN Cable NOTE Only for models with the network function. IMPORTANT Make sure that the power to the machine is turned off. Power Off (page 2-9) Connect the cable to the machine. Connect the LAN cable to the network interface connector. -
Page 30
Installing and Setting up the Machine > Connecting Cables Connecting USB Cable IMPORTANT Make sure that the power to the machine is turned off. Power Off (page 2-9) Connect the cable to the machine. Connect the USB cable to the USB interface connector. Connect the other end of the cable to the PC. -
Page 31
Installing and Setting up the Machine > Power On/Off Power On/Off Power On Turn the power switch on. Power Off Turn the power switch off. It takes about 3 minutes for power off. CAUTION If this machine will be left unused for an extended period (e.g. overnight), turn it off at the power switch. If the machine will not be used for an even longer period of time (e.g. -
Page 32
Installing and Setting up the Machine > Using the Operation Panel Using the Operation Panel Operation Panel 1 [Attention] indicator 8 [Quiet Mode] key 2 [JAM] indicator 9 [GO] key 3 [Toner] indicator 10 [Cancel] key 4 [Paper] indicator 11 [Wi-Fi Direct] key 5 [Wi-Fi] indicator 6 [Energy Saver] indicator 7 [Processing] indicator… -
Page 33
Installing and Setting up the Machine > Using the Operation Panel Indicator States The indicators are used to identify the status of the printer at any time. To identify the printer status, check the indicators on the printer and then refer to the table below to check the status of the machine. Name Indicator Status… -
Page 34
Installing and Setting up the Machine > Using the Operation Panel Basic Functions of Each Key Refer to the following table for description of the basic functions of each key. Name Meaning Reference page Quiet Mode Lower print speed for quiet processing. page 2-24 Clears a specific error, and wakes the machine from the sleep page 2-23… -
Page 35
Installing and Setting up the Machine > Network Setup Network Setup Configuring the Wired Network NOTE This function can only be used on models with the network function. The machine is equipped with network interface, which is compatible with network protocols such as TCP/IP (IPv4), TCP/IP (IPv6), NetBEUI, and IPSec. -
Page 36
Installing and Setting up the Machine > Network Setup Configure the settings. In «TCP/IP» — «IPv4 Settings (Wired Network)», set [DHCP/BOOTP] and [Auto-IP] to [Off]. Configure the [IP Address] and [Subnet Mask]. If needed, configure the [Default Gateway], [DNS Server], [WINS Server], and [Host Name] in «IPv4 Settings (Common)». -
Page 37
Installing and Setting up the Machine > Network Setup Configuring the Wireless Network When the wireless network function is available on the machine and the connection settings are configured, it is possible to print in a wireless network (wireless LAN) environment. The configuration methods are as follows: Configuration Method Description Reference Page… -
Page 38
Installing and Setting up the Machine > Network Setup Preparation before configuring the Wireless Network by Using Computer Before configuring the wireless network by using computer, connect the machine with the following methods. Wired Connection directly by Using LAN Cable Connect the machine with a computer via LAN cable when the machine is powered on. -
Page 39
Installing and Setting up the Machine > Network Setup Setting the Connection by Using the Wi-Fi Setup Tool To send the Wi-Fi settings configured in the Wi-Fi Setup Tool to the machine, connect the computer or handheld device with the machine locally. The connection methods are wired connection via LAN cable or wireless LAN connection (Wi-Fi Direct). -
Page 40
Installing and Setting up the Machine > Network Setup Configure the settings. [Do not use automatic configuration] > [Next] > [Next] [Use LAN cable] > [Next] > [Next] [Easy setup] > [Next] The machine is detected. NOTE • Only one machine can be searched using Wi-Fi Setup Tool. It may take times to search the machine. -
Page 41
Installing and Setting up the Machine > Network Setup Configure the settings. Set the item in «Wireless LAN Settings». Command Center RX User Guide Click [Submit]. Restart the network. Click [Reset] in the [Management Settings] menu, and then click [Restart Network] in «Restart». -
Page 42
Installing and Setting up the Machine > Network Setup Setting Wi-Fi Direct When the wireless network function is available on the machine, setting Wi-Fi Direct enables you to print from the Wi-Fi Direct environment. The configuration methods are as follows: Configuration Method Description Reference Page… -
Page 43
Installing and Setting up the Machine > Network Setup Using the Wi-Fi Mode and Detecting the Machine from the Handheld Device Here, we’ll explain the procedures for connecting to iOS handheld devices. You can connect to Android handheld devices or computers using the similar procedure. Enable Wi-Fi Direct mode. -
Page 44
Installing and Setting up the Machine > Network Setup Using the Wi-Fi mode and WPS Push Button on both the Computer or Handheld Device When your computer or handheld device supports WPS push button on the Wi-Fi mode, you can configure the connection by pressing WPS push button on both the machine and the computer or handheld device side. -
Page 45
Installing and Setting up the Machine > Energy Saver function Energy Saver function If a certain period of time elapses after the machine is last used, the machine automatically enters sleep mode, which minimizes power consumption. If the machine is not used while in sleep mode, the power automatically turns off. Auto Sleep Auto Sleep automatically switches the machine into Sleep if left idle for a preset time. -
Page 46
Installing and Setting up the Machine > Quiet Mode Quiet Mode Lower print speed for quiet processing. Select this mode when the running noise is uncomfortable. When the [Quiet Mode] key is selected, the [Quiet Mode] key blinks and Quiet Mode is enabled. [Quiet Mode] key NOTE The processing speed will be slower than normal when in Quiet Mode. -
Page 47
This is a utility that enables monitoring of the machine on the network. Status Monitor This is a utility that monitors the printer status and provides an ongoing reporting function. KYOCERA Net Direct Print This makes it possible to print a PDF file without starting Adobe Acrobat/ Reader. FONTS These are display fonts that enable the machine’s built-in fonts to be used in a software application. -
Page 48
Installing and Setting up the Machine > Installing Software Installing Software in Windows Express Install The following procedure is an example for installing the software in Windows 8.1 using [Express Install]. For details on Custom Installation, refer to the following: Custom Install (page 2-28) Insert the DVD. -
Page 49
Installing and Setting up the Machine > Installing Software Install the software. You can also select [Use host name for port name] and set to use the host name of the standard TCP/IP port. (A USB connection cannot be used.) IMPORTANT If Wi-Fi or Wi-Fi Direct is enabled, be sure to specify the IP address for the port name. -
Page 50
Installing and Setting up the Machine > Installing Software Finish the installation. When «Your software is ready to use» appears, you can use the software. To print a test page, click the «Print a test page» checkbox and select the machine. Click [Finish] to exit the wizard. -
Page 51
Installing and Setting up the Machine > Installing Software Install the software. Select the device to be installed. IMPORTANT If Wi-Fi or Wi-Fi Direct is enabled, be sure to specify the IP address for the port name. Installation may fail if the host name is specified. NOTE •… -
Page 52
Installing and Setting up the Machine > Installing Software Click [Utility] tab and select the utility to be installed. Click [Install]. NOTE To install Status Monitor on Windows versions preceding Windows 8, it is necessary to install Microsoft .NET Framework 4.0 beforehand. 2-30… -
Page 53
Installing and Setting up the Machine > Installing Software Finish the installation. When «Your software is ready to use» appears, you can use the software. To print a test page, click the «Print a test page» checkbox and select the machine. Click [Finish] to exit the wizard. -
Page 54
Uninstallation on Windows must be done by a user logged on with administrator privileges. Display the screen. Click [Search] in charms, and enter «Uninstall Kyocera Product Library» in the search box. Select [Uninstall Kyocera Product Library] in the search list. -
Page 55
Insert the DVD. Double-click the [Kyocera] icon. Display the screen. Double-click [Kyocera OS X x.x] depending on your Mac OS version. Install the Printer Driver. Install the printer driver as directed by the instructions in the installation software. This completes the printer driver installation. -
Page 56
Installing and Setting up the Machine > Installing Software Configure the printer. Open System Preferences and add the printer. Select [Default] and then select the driver after clicking on the item that appears in «Name.» NOTE When using an IP connection, click the IP icon for an IP connection and then enter the host name or IP address. -
Page 57
Installing and Setting up the Machine > Command Center RX Command Center RX If the machine is connected to the network, you can configure various settings using Command Center RX. This section explains how to access Command Center RX, and how to change security settings and the host name. Command Center RX User Guide NOTE To fully access the features of the Command Center RX pages, enter the User Name and Password and click [Login]. -
Page 58
Installing and Setting up the Machine > Command Center RX Accessing Command Center RX Display the screen. Launch your Web browser. In the address or location bar, enter the machine’s IP address or the host name. You can check the IP address or host name of the machine on the status page. To print the status page, press the [GO] key on the operation panel for 3 to 9 seconds. -
Page 59
Installing and Setting up the Machine > Command Center RX Changing Security Settings Display the screen. Launch your Web browser. In the address or location bar, enter the machine’s IP address or the host name. You can check the IP address or host name of the machine on the status page. To print the status page, press the [GO] key on the operation panel for 3 to 9 seconds. -
Page 60
Installing and Setting up the Machine > Command Center RX Configure the Security Settings. From the [Security Settings] menu, select the setting you want to configure. NOTE For details on settings related to certificates, refer to the following: Command Center RX User Guide 2-38… -
Page 61
Installing and Setting up the Machine > Command Center RX Changing Device Information Display the screen. Launch your Web browser. In the address or location bar, enter the machine’s IP address or the host name. You can check the IP address or host name of the machine on the status page. To print the status page, press the [GO] key on the operation panel for 3 to 9 seconds. -
Page 62
Installing and Setting up the Machine > Command Center RX Specify the host name. Enter the device information, and then click [Submit]. IMPORTANT After changing the setting, restart the network or turn the machine OFF and then ON. To restart the network, click [Reset] in the [Management Settings] menu, and then click [Restart Network] in «Restart». -
Page 63
Installing and Setting up the Machine > Command Center RX E-mail Settings By configuring the SMTP settings, it is possible to send E-mail notices when jobs have been completed. To use this function, this machine must be connected to a mail server using the SMTP protocol. In addition, configure the following. -
Page 64
Installing and Setting up the Machine > Command Center RX From the [Network Settings] menu, click [Protocol]. Configure the settings. Set «SMTP (E-mail TX)» to [On] in the «Send Protocols». 2-42… -
Page 65
Installing and Setting up the Machine > Command Center RX Display the screen. Display the E-mail Settings screen. From the [Function Settings] menu, click [E-mail]. Configure the settings. Enter «SMTP» and «E-mail Send Settings» items. Setting Description SMTP Set to send e-mail from the machine. SMTP Protocol Displays the SMTP protocol settings. -
Page 66
Installing and Setting up the Machine > Command Center RX Setting Description POP3 POP3 Protocol You don’t need to set the following items when you only enable the function of sending e-mail from the machine. Set Check Interval the following items if you want to enable the function of receiving e-mail on the machine. -
Page 67
Preparation before Use This chapter explains the following operations. Loading Paper …………………………3-2 Precaution for Loading Paper ……………………3-2 Selecting the Paper Feeder Units ………………….3-3 Loading in the Cassettes ……………………. 3-4 Precautions for Outputting Paper ……………………3-8 Paper Stopper ……………………….3-8… -
Page 68
Preparation before Use > Loading Paper Loading Paper Load paper in the cassettes. Precaution for Loading Paper When you open a new package of paper, fan the sheets to separate them slightly prior to loading in the following steps. Fan the paper, then tap it on a level surface. In addition, note the following points. -
Page 69
Preparation before Use > Loading Paper Selecting the Paper Feeder Units Select the paper feeder units according to the size and type of paper. Name Paper Size Paper Type Capacity Page Cassette 1 A4, B5, A5-R, A5, A6, Legal, Plain, Preprinted, Bond, Recycled, 250 sheets page 3-4 Oficio II, Letter, Executive,… -
Page 70
Preparation before Use > Loading Paper Loading in the Cassettes Load paper in the cassettes. The procedures here represent the cassette 1. Pull the Cassette completely out of the machine. NOTE If the bottom plate is up, press the bottom plate down until it locks. -
Page 71
Preparation before Use > Loading Paper Adjust the paper length guide to the paper size required. When using Folio, Oficio II or Legal Adjust the position of the paper width guides located on the left and right sides of the Cassette. -
Page 72
Preparation before Use > Loading Paper Load paper. IMPORTANT • Load the paper with the print side facing down. • After removing new paper from its packaging, fan the paper before loading it in the multipurpose tray. Precaution for Loading Paper (page 3-2) •… -
Page 73
Preparation before Use > Loading Paper Gently push the Cassette back in. IMPORTANT Push all cassettes all the way in. Paper jams may result if a cassette is not pushed all the way in. NOTE There is a paper gauge on the left side of the front of the cassette to indicate the remaining paper supply. -
Page 74
Preparation before Use > Precautions for Outputting Paper Precautions for Outputting Paper Paper Stopper When using paper A4/letter or larger, open the paper stopper shown in the figure. -
Page 75
Printing from PC This chapter explains the following topics: Printer Driver Properties Screen ……………………4-2 Displaying the Printer Driver Help ………………….4-3 Changing the Default Printer Driver Settings (Windows 8.1) …………..4-3 Printing from PC …………………………4-4 Printing on Standard Sized Paper ………………….4-4 Printing on Non-standard Sized Paper ……………….. -
Page 76
Printing from PC > Printer Driver Properties Screen Printer Driver Properties Screen The printer driver properties screen allows you to configure a variety of print-related settings. Printer Driver User Guide Description [Quick Print] tab Provides icons that can be used to easily configure frequently used functions. Each time you click an icon, it changes to an image resembling the print results and applies the settings. -
Page 77
Printing from PC > Printer Driver Properties Screen Displaying the Printer Driver Help The printer driver includes Help. To learn about print settings, open the printer driver print settings screen and display Help as explained below. 1 Click the [?] button in the upper right corner of the screen. -
Page 78
Printing from PC > Printing from PC Printing from PC This section provides the printing method using the KX DRIVER. NOTE • To print the document from applications, install the printer driver on your computer from the supplied DVD (Product Library). •… -
Page 79
Printing from PC > Printing from PC Select the [Basic] tab. Click «Print size» menu and select the paper size to use for printing. To load the paper of size that is not included in print sizes of the machine such as cardstock or envelopes, the paper size needs to be registered. -
Page 80
Printing from PC > Printing from PC Printing on Non-standard Sized Paper If you loaded a paper size that is not included in the print sizes of the machine, register the paper size in the [Basic] tab of the print settings screen of the printer driver. The registered size can be selected from the «Print size»… -
Page 81
Printing from PC > Printing from PC Click the [OK] button. Click the [OK] button. Display the print settings screen. Click [File] and select [Print] in the application. Select the paper size and type of non-standard size paper. Select the machine from the «Printer» menu and click the [Properties] button. Select the [Basic] tab. -
Page 82
Printing from PC > Printing from PC Click «Print size» menu and select the paper size registered in step 2. To print on the special paper such as thick paper or transparency, click «Media type» menu and select the media type. NOTE If you loaded a postcard or envelope, select [Cardstock] or [Envelope] in the «Media type»… -
Page 83
Printing from PC > Printing from PC Canceling Printing from a Computer To cancel a print job executed using the printer driver before the printer begins printing, do the following: NOTE When canceling printing from this machine, refer to the following: Pausing and Resuming a Job (page 5-5) Double-click the printer icon ( ) displayed on the taskbar at… -
Page 84
Printing from PC > Printing from the Handheld Device Printing from the Handheld Device This machine supports the Google Cloud Print, Mopria and Wi-Fi Direct. According to the supported OS and application, you can print the job from any handheld device or computer without installing a printer driver. -
Page 85
Printing from PC > Monitoring the Printer Status (Status Monitor) Monitoring the Printer Status (Status Monitor) The Status Monitor monitors the machine status and provides an ongoing reporting function. NOTE When you activate Status Monitor, check the status below. • KX DRIVER is installed. Accessing the Status Monitor The Status Monitor also starts up when printing is started. -
Page 86
Printing from PC > Monitoring the Printer Status (Status Monitor) Printing Progress Tab The status of the print jobs is displayed. 1 Status icon 2 Job list Select a job on the job list and it can be canceled using the menu displayed with a right-click. Paper Tray Status Tab Information is displayed about the paper in the printer and about the amount of paper remaining. -
Page 87
Printing from PC > Monitoring the Printer Status (Status Monitor) Alert Tab If an error occurs, a notice is displayed using a 3D image and a message. Status Monitor Context Menu The following menu is displayed when the settings icon is clicked. •… -
Page 88
Printing from PC > Monitoring the Printer Status (Status Monitor) Status Monitor Notification Settings Click the setting icon to display valid events in the status monitor notification screen. Select whether notification is performed when an error in the event list occurs. Select Enable event notification. -
Page 89
Printing from PC > Configuration Tool Configuration Tool You can use the Configuration Tool to check and change settings on the machine. Accessing the Configuration Tool Insert the DVD. NOTE • Installation on Windows must be done by a user logged on with administrator privileges. •… -
Page 90
Printing from PC > Configuration Tool Exiting the Configuration Tool Use either of the methods listed below to exit the Configuration Tool. • Exit using the Close button: Click in the top-right corner of the Configuration Tool window. • Exit using the OK or Cancel button: Clicking OK exits the Configuration Tool after applying the modified printer settings. -
Page 91
Printing from PC > Configuration Tool Configuration Tool Settings Screen Device Defaults Settings Configure printer driver default settings and the energy save function of the machine. Item Description Print density Adjust print density. Value: Light, Medium light, Normal, Medium dark, Dark MP tray priority If paper is set in the multipurpose tray then it is possible for priority to be given to that multipurpose tray in the paper feed. -
Page 92
Printing from PC > Configuration Tool Item Description Form feed timeout Receiving print data from the computer, the machine may sometimes wait if there is no information signaling that the last page does not have any more data to be printed. When the preset timeout passes, the machine automatically prints paper. -
Page 93
Printing from PC > Configuration Tool Device Overview Display machine information. Item Description Model name Displays the machine’s model name. System firmware Displays the version of the machine’s system firmware. Engine firmware Displays the version of the machine’s engine firmware. Serial number Displays the machine’s serial number. -
Page 94
Operation on the Machine This chapter explains the following topics: Loading Paper in the Multipurpose Tray ………………….5-2 Pausing and Resuming a Job ……………………..5-5 Canceling Jobs …………………………5-5 Print Report ………………………….. 5-6… -
Page 95
Operation on the Machine > Loading Paper in the Multipurpose Tray Loading Paper in the Multipurpose Tray For details of the supported paper sizes, refer to the following: Choosing the Appropriate Paper (page 7-6) For the paper type setting, refer to the following: Media type (page 4-18) Be sure to use the multipurpose tray when you print on any special paper. -
Page 96
Operation on the Machine > Loading Paper in the Multipurpose Tray Adjust the multipurpose tray size. Paper sizes are marked on the multipurpose tray. Load paper. Insert the paper along the paper width guides into the tray until it stops. After removing new paper from its packaging, fan the paper before loading it in the multipurpose tray. -
Page 97
Operation on the Machine > Loading Paper in the Multipurpose Tray When you load envelopes or cardstock in the multipurpose tray Load the paper with the print side facing up. For the procedure for printing, refer to the following: Printer Driver User Guide Example: When printing the address. -
Page 98
Operation on the Machine > Pausing and Resuming a Job Pausing and Resuming a Job To pause a job that is in progress, select the [Cancel] key. While the job is paused, the indicator blinks as follows. To resume the job, select the [Cancel] key again. Canceling Jobs To cancel a job that is in progress, press the [Cancel] key for one second. -
Page 99
Operation on the Machine > Print Report Print Report Print reports to check the machine settings, status. Print Status Page Prints the status page, allowing you to check the information including current settings, memory capacity, and optional equipment installed. To print a status page, press the [Go] key for 3 to 9 seconds. When the machine is ready to print the report, the indicator blinks as follows. -
Page 100
Operation on the Machine > Print Report Prints Service Status Page This provides more detailed information than the status page. Normally your service technician prints this page when performing maintenance. To print the service status page, press the [Go] key for 10 seconds or more. When the machine is ready to print the report, the indicator blinks in the same way as for the status page. -
Page 101
Troubleshooting This chapter explains the following topics: Regular Maintenance ……………………….6-2 Cleaning …………………………6-2 Cleaning the inside of the Machine ………………….6-2 Toner Container Replacement ……………………. 6-6 Loading Paper ……………………….6-9 Using the Maintenance Menu …………………….. 6-10 Troubleshooting …………………………6-11 Solving Malfunctions …………………….. -
Page 102
Troubleshooting > Regular Maintenance Regular Maintenance Cleaning Clean the machine regularly to ensure optimum printing quality. CAUTION For safety, always unplug the power cord before cleaning the machine. Cleaning the inside of the Machine To avoid print quality problems, the interior of the machine must be cleaned with every toner container replacement. Open the front cover. -
Page 103
Troubleshooting > Regular Maintenance Place the developer unit together with the toner container flat on a clean, level surface. IMPORTANT Do not place the developer unit together with the toner container on end. Remove the drum unit from the machine. IMPORTANT Do not touch the drum or subject the drum to shock. -
Page 104
Troubleshooting > Regular Maintenance Use a clean, lint free cloth to clean dust and dirt away from the metal registration roller. On the drum unit, slide the main charger cleaner back and forth 2 or 3 times to clean the charger wire. IMPORTANT •… -
Page 105
Troubleshooting > Regular Maintenance Return the developer unit together with the toner container to its position, aligning the guides at both ends with the slots in the machine. Close the front cover. -
Page 106
NOTE • The average number of images that can be printed with the toner containers provided with the machine is 1,000 images • To maintain quality, we recommend using genuine Kyocera toner containers, which must pass numerous quality inspections. CAUTION… -
Page 107
Troubleshooting > Regular Maintenance Replacing the Toner Container Open the front cover. Unlock the toner container. Remove the toner container. Put used toner containers into the plastic waste bag. -
Page 108
Troubleshooting > Regular Maintenance Remove the new toner container from the box. IMPORTANT Do not touch the points shown below. Shake the toner container. 1 0 ~ 1 0 ~ Install the toner container. -
Page 109
Troubleshooting > Regular Maintenance Close the front cover. NOTE • If the front cover does not close, check that the new toner container is installed correctly. • Return the exhausted toner container to your dealer or service representative. The collected toner container will be recycled or disposed in accordance with the relevant regulations. -
Page 110
Troubleshooting > Using the Maintenance Menu Using the Maintenance Menu You can use the [Maintenance Menu] to adjust the print position, and maximize the print quality for the elevation of your location. Maintenance Menu User Guide Item Description Adjust print Printing start position Enter or select the top margin start position for printing. -
Page 111
Troubleshooting > Troubleshooting Troubleshooting Solving Malfunctions The table below provides general guidelines for problem solving. If a problem occurs with your machine, look into the checkpoints and perform procedures indicated on the following pages. If the problem persists, contact your Service Representative. NOTE When contacting us, the serial number will be necessary. -
Page 112
Troubleshooting > Troubleshooting Reference Symptom Checkpoints Corrective Actions Page Printouts are curled. — Turn the paper over in the cassette, or page 3-2 turn the orientation 180 degrees around in which the paper is positioned. Is the paper damp? Replace the paper with new paper. page 3-4 I can’t install the printer Are you trying to install the driver using… -
Page 113
Troubleshooting > Troubleshooting Printed Image Trouble When the following printed image trouble occurs, implement appropriate procedures. Reference Symptom Checkpoints Corrective Actions Page Printed images are totally Is the paper damp? Replace the paper with new paper. page 3-2 too light. Have you changed the density? Select appropriate density level. -
Page 114
Troubleshooting > Troubleshooting Reference Symptom Checkpoints Corrective Actions Page Printed images are fuzzy. Is the device used in an environment Use in an environment that has suitable — with high humidity or where the humidity. temperature or humidity changes suddenly? —… -
Page 115
Troubleshooting > Troubleshooting Reference Symptom Checkpoints Corrective Actions Page Part of the image is — Open and then close the front cover. — periodically faint or shows — Select [Adjust print quality] in the page 6-10 white lines. Maintenance menu, and select [Refresh] in [Drum refresh]. -
Page 116
Troubleshooting > Indicator pattern when an error occurs Indicator pattern when an error occurs When a problem occurs on the machine, the indicator on the operation panel lights in a specific pattern. Problems that can be resolved by the user are described below. If the problem persists, contact your Service Representative. Maintenance Indication Indicator Meaning… -
Page 117
Troubleshooting > Indicator pattern when an error occurs Indicator Meaning Corrective Actions Reference Page Toner is empty. Replace the toner container. For details, you can page 4-11 also check the error in the status monitor on your page 6-6 computer. NOTE The indicator lights as follows when toner is being replenished. -
Page 118
Troubleshooting > Indicator pattern when an error occurs Indicator Meaning Corrective Actions Reference Page The toner is running low. It is almost time to replace the toner container. Obtain ― a new toner container. Indicator Meaning Corrective Actions Reference Page Replace Maintenance Kit. -
Page 119
Troubleshooting > Indicator pattern when an error occurs Indicator Meaning Corrective Actions Reference Page Out of paper. Add paper to the cassette or multipurpose tray. For page 3-2 details, you can also check the error in the status page 4-11 monitor on your computer. -
Page 120
Troubleshooting > Indicator pattern when an error occurs Indicator Meaning Corrective Actions Reference Page Memory is full. Unable to continue the job as the memory is used up. ― Select [GO] key to print the scanned pages. The print job cannot be processed completely. To cancel a job, press and hold the [Cancel] key. -
Page 121
Troubleshooting > Indicator pattern when an error occurs Indicator Meaning Corrective Actions Reference Page Waste toner near full. The waste toner container will soon be full. Contact ― your service representative. Indicator Meaning Corrective Actions Reference Page Toner other than genuine toner has been installed. We cannot bear any responsibility for failures that ―… -
Page 122
Troubleshooting > Indicator pattern when an error occurs Indicator Meaning Corrective Actions Reference Page Restarting. Please wait. ― Cooling… The machine is under the adjustment to maintain its quality. Starting the update. Performing Drum Refresh… Downloading the firmware from the network. Indicator Meaning Corrective Actions… -
Page 123
Troubleshooting > Indicator pattern when an error occurs Indicator Meaning Corrective Actions Reference Page Failed to establish the Wi-Fi Direct connection. Check the settings and wireless communication page 2-20 conditions. Connection limit exceeded. Cancel a connection to a portable device that is not ―… -
Page 124
Troubleshooting > Indicator pattern when an error occurs Indicator Meaning Corrective Actions Reference Page The regional specification of toner container does not Install the specified toner container. ― match that of the machine. Indicator Meaning Corrective Actions Reference Page The machine ran out of paper during printing. Add paper to the cassette or multipurpose tray. -
Page 125
Troubleshooting > Indicator pattern when an error occurs Indicator Meaning Corrective Actions Reference Page Register with Google Cloud Print? The message is displayed when the printer receives ― the register request for Google Cloud Print. Press and hold the [GO] key to register the printer as a Google Cloud Print device. -
Page 126
Troubleshooting > Indicator pattern when an error occurs Error Indication If the indicator pattern is not one of the patterns in the table above, an error that requires repair may have occurred. Turn off the power, unplug the power cord, and then plug the power cord back in and turn on the power. This may clear the error. -
Page 127
Troubleshooting > Indicator pattern when an error occurs Example: 6-27… -
Page 128
Troubleshooting > Clearing Paper Jams Clearing Paper Jams If a paper jam occurs, the [JAM] indicator lights and the machine will stop. Refer to these procedures to remove the jammed paper. Paper Jam Location Reference Page Multipurpose Tray page 6-29 Cassettes 1 (to 3) page 6-30 page 6-32… -
Page 129
Troubleshooting > Clearing Paper Jams Remove any jammed paper in the Multipurpose Tray CAUTION • Do not reuse jammed papers. • If the paper tears during removal, be sure to remove any loose scraps of paper from inside the machine. Scraps of paper left in the machine could cause subsequent jamming. -
Page 130
Troubleshooting > Clearing Paper Jams Remove any jammed paper in Cassette 1 CAUTION • Do not reuse jammed papers. • If the paper tears during removal, be sure to remove any loose scraps of paper from inside the machine. Scraps of paper left in the machine could cause subsequent jamming. Pull Cassette 1 out toward you until it stops. -
Page 131
Troubleshooting > Clearing Paper Jams Open the front cover. Close the front cover. 6-31… -
Page 132
Troubleshooting > Clearing Paper Jams Remove any jammed paper in Cassette 2 CAUTION • Do not reuse jammed papers. • If the paper tears during removal, be sure to remove any loose scraps of paper from inside the machine. Scraps of paper left in the machine could cause subsequent jamming. Pull Cassette 2 out toward you until it stops. -
Page 133
Troubleshooting > Clearing Paper Jams Open the front cover. Close the front cover. 6-33… -
Page 134
Troubleshooting > Clearing Paper Jams Remove any jammed paper in Cassette 3 CAUTION • Do not reuse jammed papers. • If the paper tears during removal, be sure to remove any loose scraps of paper from inside the machine. Scraps of paper left in the machine could cause subsequent jamming. Pull Cassette 3 out toward you until it stops. -
Page 135
Troubleshooting > Clearing Paper Jams Open the front cover. Close the front cover. 6-35… -
Page 136
Troubleshooting > Clearing Paper Jams Remove any jammed paper in Rear Cover CAUTION The fixing unit is extremely hot. Take sufficient care when working in this area, as there is a danger of getting burned. Open Rear Cover. Remove any jammed paper. Open the feed cover (D). -
Page 137
Troubleshooting > Clearing Paper Jams Remove any jammed paper. Pull Cassette 1 out toward you until it stops. Open Feed Cover. Remove any jammed paper. 6-37… -
Page 138
Troubleshooting > Clearing Paper Jams Push Feed Cover back in. Push Cassette 1 back in. Push Rear Cover. Open the front cover. 6-38… -
Page 139
Troubleshooting > Clearing Paper Jams Close the front cover. 6-39… -
Page 140
Troubleshooting > Clearing Paper Jams Remove any jammed paper inside of the Machine CAUTION • Do not reuse jammed papers. • If the paper tears during removal, be sure to remove any loose scraps of paper from inside the machine. Scraps of paper left in the machine could cause subsequent jamming. -
Page 141
Troubleshooting > Clearing Paper Jams Open the front cover. Lift the developer unit together with the toner container out of the machine. IMPORTANT Do not touch the developer roller or subject the developer roller to shock. Print quality will be degraded. Place the developer unit together with the toner container flat on a clean, level surface. -
Page 142
Troubleshooting > Clearing Paper Jams Remove the drum unit from the machine. IMPORTANT • The fuser unit inside the machine is hot. Do not touch it, as it may result in burn injury. • Do not touch the drum or subject the drum to shock. Print quality will be degraded if the drum is exposed to direct sunlight or intense light. -
Page 143
Troubleshooting > Clearing Paper Jams Remove any jammed paper. Push Feed Cover back in. Return the drum unit to the original position. Return the developer unit together with the toner container to its position, aligning the guides at both ends with the slots in the machine. -
Page 144
Troubleshooting > Clearing Paper Jams Close the front cover. 6-44… -
Page 145
Appendix This chapter explains the following topics: Optional Equipment ……………………….7-2 Overview of Optional Equipment ………………….7-2 Paper …………………………… 7-5 Basic Paper Specifications ……………………7-5 Choosing the Appropriate Paper ………………….7-6 Special Paper ……………………….7-9 Specifications …………………………7-13 Machine …………………………7-13 Printer Functions ………………………. -
Page 146
Appendix > Optional Equipment Optional Equipment Overview of Optional Equipment The following optional equipment is available for the machine. (1) PF-1100 Software option (2) UG-33 (3) SD/SDHC Memory Card (1) PF-1100 «Paper Feeder» The paper feeder can be installed in the machine. Loading in the Cassettes (page 3-4) (2) UG-33 «ThinPrint Option»… -
Page 147
Appendix > Optional Equipment (3) «SD/SDHC Memory Card» An SD/SDHC memory card is useful for storing fonts, macros, and overlays. The machine is equipped with a slot for an SDHC memory card with a maximum size of 32 GB, and an SD memory card with a maximum size of 2 GB. IMPORTANT Unencrypted data is saved on the SD/SDHC memory card. -
Page 148
Appendix > Optional Equipment Replace the covers. -
Page 149
Appendix > Paper Paper This section explains the paper sizes and types that can be used in the paper source. For details on the sizes, types, and number of sheets of paper that can be loaded in each paper tray, refer to the following: Specifications (page 7-13) Basic Paper Specifications… -
Page 150
Appendix > Paper Choosing the Appropriate Paper This section describes guidelines for choosing paper. Condition Avoid using paper with bent corners or that is curled, dirty, or torn. Do not use paper that has a rough surface or paper fiber lint, or that is especially delicate. Use of paper in any of these conditions will not only deliver poor copies but may also cause jams and shorten the useful life of the machine. -
Page 151
Appendix > Paper Other Paper Specifications Porosity: The density of the paper fibers. Stiffness: Paper must be stiff enough or it may buckle in the machine, causing jams. Curl: Most paper naturally tends to curl after the package is opened. When paper passes through the fixing unit, it curls upward slightly. -
Page 152
Appendix > Paper Paper Sizes that can be Used with This Machine Paper of the following sizes is supported by the machine. Measurements in the table take into account a ±0.7 mm dimensional accuracy for length and width. Corner angles must be 90°… -
Page 153
Appendix > Paper Special Paper This section describes printing onto special paper and print media. Special Paper that can be Used with This Machine • Transparencies • Preprinted paper • Bond paper • Recycled paper • Vellum • Thin paper •… -
Page 154
Appendix > Paper Label Be sure to feed labels from the multipurpose tray. For selecting labels, use extreme care so that the adhesive may not come in direct contact with any part of the machine and that the labels are not easily peeled from the carrier sheet. Adhesives that stick to the drum or rollers and peeled labels remaining in the machine may cause a failure. -
Page 155
Appendix > Paper Hagaki (Cardstock) Burrs Burrs Before loading Hagaki (Cardstock) into the multipurpose tray, fan them and align the edges. If the Hagaki (Cardstock) paper is curled, straighten it before loading. Printing onto curled Hagaki (Cardstock) may cause jams. Use unfolded Oufuku hagaki (Return postcard) (available at post offices). -
Page 156
Appendix > Paper Preprinted Paper Preprinted paper must conform to the specifications. Basic Paper Specifications (page 7-5) The colored ink must be able to withstand the heat of printing. It must be resistant to silicone oil as well. Do not use paper with a treated surface such as glossy paper used for calendars. -
Page 157
USB Interface Connector: 1 (Hi-Speed USB) Network interface : 1 (10 BASE-T/100 BASE-TX/1000 BASE-T) USB Port: 1 (Hi-Speed USB) Wireless LAN support *1 Up to upper limit height line in the cassette. *2 Only ECOSYS P2335dn and ECOSYS P2335dw *3 Only ECOSYS P2335dw 7-13… -
Page 158
Appendix > Specifications Item Description Operating Temperature 10 to 32.5°C/50 to 90.5°F Environment Humidity 10 to 80 % Altitude 3,500 m/11,482 ft maximum Brightness 1,500 lux maximum Dimension (W × D × H) 14.77″ × 15.48″ × 10.71″ 375 × 393 × 272 mm Weight Approx. -
Page 159
USB Interface Connector: 1 (Hi-Speed USB) Network interface : 1 (10 BASE-T/100 BASE-TX/1000 BASE-T) Wireless LAN support Page Description Language PRESCRIBE Emulations PCL6 (PCL-XL, PCL5c), KPDL3 (PostScript3 compatible), PDF, XPS, OpenXPS *1 Only ECOSYS P2335dn and ECOSYS P2335dw *2 Only ECOSYS P2335dw 7-15… -
Page 160
Appendix > Specifications Paper Feeder Item Description Paper Supply Method Friction roller feeder (No. Sheets: 250, 80 g/m , 1 cassette) Paper Size A4, B5, A5-R, A5, A6, Letter, Legal, Folio, 216 × 340 mm, Statement, Executive, Oficio II, 16K, B5 (ISO), Custom (105 ×… -
Page 161
Appendix > Glossary Glossary Accessibility The machine is designed featuring good accessibility even for the elderly and those who are physically challenged or visually impaired. Apple Talk AppleTalk offers file sharing and printer sharing and it also enables you to utilize application software that is on another computer on the same AppleTalk network. -
Page 162
The Job Box function stores print data on the printer and allows users to print single or multiple copies of the stored data later using the printer’s operation panel. KPDL (Kyocera Page Description Language) Kyocera’s PostScript page description language compatible with Adobe PostScript Level 3. 7-18… -
Page 163
Appendix > Glossary Multipurpose (MP) Tray The paper supply tray on the front side of the machine. Use this tray instead of the cassettes when printing onto envelopes, Hagaki (Cardstock), transparencies, or labels. NetBEUI (NetBIOS Extended User Interface) An interface, developed by IBM in 1985, as an update from NetBIOS. It enables more advanced functions on smaller networks than other protocols such as TCP/IP, etc. -
Page 164
Appendix > Glossary SMTP (Simple Mail Transfer Protocol) A protocol for E-mail transmission over the Internet or an intranet. It is used for transferring mail between mail servers as well as for sending mail from clients to their servers. Status Page The page lists machine conditions. -
Page 165
Index Glossary 7-17 Google Cloud Print 4-10 GPL/LGPL Grayscale 7-18 Accessibility 7-17 Guides Provided with the Machine Anti-theft Lock Slot AppleTalk 7-17 Auto Form Feed Timeout 7-17 Auto Paper Selection 7-17 Install Auto Sleep 7-17 Macintosh 2-33 Auto-IP 7-17 Software 2-25 Automatic 2-Sided Print Function 1-11… -
Page 166
Specifications 7-13 Machine 7-13 Paper Paper Feeder (500-sheet) 7-16 Appropriate Paper Printer Functions 7-15 Loading Cardstock Status Page 7-20 Loading Envelopes Subnet Mask 7-20 Loading Paper Symbols Size and Media Type Special Paper Specifications Paper Feeder TCP/IP 7-20 Paper Jams 6-28 TCP/IP (IPv4) Cassette 1… -
Page 168
8F, No. 288 Nanjing Road West, Huangpu District, Phone: +1-305-421-6640 Shanghai,200003, China Fax: +1-305-421-6666 Phone: +86-21-5301-1777 Fax: +86-21-5302-8300 KYOCERA Document Solutions Canada , Ltd. KYOCERA Document Solutions 6120 Kestrel Rd., Mississauga, ON L5T 1S8, Canada (Thailand) Corp., Ltd. Phone: +1-905-670-4425… -
Page 169
KYOCERA Document Solutions South Africa (Pty) Ltd. KYOCERA Document Solutions Espana, S.A. KYOCERA House, Hertford Office Park, Edificio Kyocera, Avda. de Manacor No.2, 90 Bekker Road (Cnr. Allandale), Midrand, South Africa 28290 Las Matas (Madrid), Spain Phone: +27-11-540-2600 Phone: +34-91-6318392… -
Page 170
2017.7 2VNKDEN000…
перейти к содержанию
Лазерный принтер KYOCERa ECOSYS P2335dw

Предисловие

В этом руководстве (A) объясняются только основные операции машины. Дополнительную информацию см. в Руководстве по эксплуатации (B) на диске Product Library.
Распаковка

Входящие в комплект компоненты различаются в зависимости от страны или региона.
Установка контейнера с тонером

Подключить кабель


Загрузка бумаги

Подключите шнур питания

Включение

Страница состояния печати

Установите драйверы и утилиты

Если появится окно «Найдено новое оборудование», нажмите «Отмена».
Мастер установки

Следуйте инструкциям мастера установки.
Отменить печать

Решение Проблем

Если на аппарате возникает ошибка, индикатор Внимание на панели управления загорается или мигает. Обратитесь к Руководству по эксплуатации, чтобы устранить ошибку. Подробнее см. в руководстве по эксплуатации на диске Product Library.
Устранение замятия бумаги


https://tm.by
Документы / Ресурсы