
I have created a pure Python project in PyCharm and imported numpy, tensorflow and opencv in order to test a small program.
All packages are updated to the latest version.My Python version is 3.6.4 and I am running on Windows x64. I have browsed through all the solutions on related threads that suggested updating NVIDIA driver, but I have an Intel driver.
I am new to Python, Tensorflow and Pycharm.
Here is the logged error:
Faulting application name: python.exe, version: 3.6.4150.1013, time stamp: 0x5a38b889
Faulting module name: ucrtbase.dll, version: 10.0.16299.248, time stamp: 0xe71e5dfe
Exception code: 0xc0000409
Fault offset: 0x000000000006b79e
Faulting process ID: 0x4004
Faulting application start time: 0x01d3c1ef8a3d751c
Faulting application path: C:UsersxtrTestTfLayersScriptspython.exe
Faulting module path: C:WINDOWSSystem32ucrtbase.dll
Report ID: e96d98cb-28c9-4340-bcd3-a7033d4b4972
Faulting package full name:
Faulting package-relative application ID:
![]()
asked Mar 22, 2018 at 15:43
![]()
3
This was solved by installing pyqt. I installed pyqt with the command (from conda-forge)
conda install -c conda-forge pyqt
answered Oct 28, 2018 at 11:18
![]()
2
In my case it was obsolete pyqt library. This following worked for me.
conda install -c anaconda pyqt
answered May 1, 2019 at 9:36
![]()
math_lawmath_law
3911 gold badge4 silver badges16 bronze badges
The problem does not come from PyCharm, if you use any other IDEs, the result would be the same. In fact, they all use a package called pydev to debug. Your best bet would be to create a brand new Python environment (PyCharm has a function for this) and gradually install packages.
If the solution works and you can find out which package conflicts with pydev, it will be most helpful.
answered Aug 9, 2018 at 21:38
![]()
Minh TrietMinh Triet
1,1801 gold badge15 silver badges35 bronze badges
I got the same error and bumped into this question, but for a different reason which I want to present in case somebody else faces the same situation. I already had pyqt installed as mentioned in other answers. But, just to be sure and according to the unspoken «did you try restarting» principle, I reinstalled pyqt in my conda env alongside PyQt5 (and also PyQt6) — bot PyQts installed via pip.
No idea why and sadly I do not have the time to debug it, but PyQt6 was the problematic part in my code (which I am trying for the 1st time). My minimal test code is as follows and includes two subversions denoted by v1 and v2. I hope that part is obvious:
from PyQt6.QtWidgets import QApplication, QWidget  # v1
# from PyQt5.QtWidgets import QApplication, QWidget  # v2
import sys
q = QApplication(sys.argv)
w = QWidget()
w.show()  # in debug mode, ran ok till here (?)
sys.exit(q.exec())  # for `v1` from above
# sys.exit(q.exec_())  # for `v2` from above
The code variation v2 is working while v1 throws the same error mentioned by the OP.
answered Oct 5, 2021 at 20:15
![]()
deponovodeponovo
1,0796 silver badges23 bronze badges
If you are a developer working with Windows, you might have faced the issue of «Process Finished with Exit Code -1073740791 (0xc0000409)» error. This error is a result of a missing dependency or a corrupt file in your project. In this guide, we will discuss the steps you can take to troubleshoot this error.
The «Process Finished with Exit Code -1073740791 (0xc0000409)» error is a common issue faced by Windows developers. It occurs when a process or program fails to execute due to a missing or corrupt file in the project.
How to Fix the Process Finished with Exit Code -1073740791 (0xc0000409) error?
The following steps can help you troubleshoot and fix the «Process Finished with Exit Code -1073740791 (0xc0000409)» error:
Step 1: Check for Missing Dependencies
The first step in fixing this error is to check for missing dependencies in your project. You can use a tool like Dependency Walker or Visual Studio to identify the missing files. Once you have identified the missing files, you can download and install them to fix the error.
Step 2: Check for Corrupt Files
If the error persists even after installing missing dependencies, you should check for corrupt files in your project. You can use a tool like System File Checker to scan and repair corrupt system files. Also, try rebuilding your project to replace the corrupt files.
Step 3: Update the Drivers
Outdated drivers can also cause the «Process Finished with Exit Code -1073740791 (0xc0000409)» error. You can update the drivers for your hardware components using Device Manager or a third-party driver updater tool.
Step 4: Disable Antivirus and Firewall
Sometimes, antivirus software and firewalls can interfere with the execution of a process or program and cause the error. Try disabling your antivirus and firewall temporarily to see if it fixes the issue.
Step 5: Run the Program as an Administrator
You can also try running the program as an administrator to fix the error. Right-click on the program executable and select «Run as administrator» from the context menu.
FAQ
Q1. What causes the «Process Finished with Exit Code -1073740791 (0xc0000409)» error?
A1. The error is caused due to a missing or corrupt file in the project, outdated drivers, or interference from antivirus and firewall.
Q2. How do I identify missing dependencies in my project?
A2. You can use a tool like Dependency Walker or Visual Studio to identify missing dependencies in your project.
Q3. How do I check for corrupt files in my project?
A3. You can use a tool like System File Checker to scan and repair corrupt system files.
Q4. Can I fix the error by reinstalling the program?
A4. Reinstalling the program may not fix the error if the issue is with missing dependencies or corrupt files.
Q5. What should I do if none of the above steps work?
A5. If none of the above steps work, you can try reinstalling the operating system or seeking help from a technical expert.
- Dependency Walker
- Visual Studio
- System File Checker
RTX 3090 and Tensorflow for Windows 10 — step by step
I recently bought an RTX 3090 (upgrading from a GTX 1060) and needed my keras/tensorflow notebooks to work. There are some guides on this on the internet, but these were often skipping some steps or explanations, so I wanted to share a very simple, «for dummies» kind of step by step instruction with explanations on how I got it to work on my system. It is similar to this guide, but a bit different as I encountered some problems that was not mentioned in that guide. I am using a Ryzen 2700X and Windows 10 Home.
So, what you need to know beforehand: The NVIDIA 3000 Series GPUs (Ampere) require CUDA v11 and cuDNN v8 to work. The tensorflow versions on anaconda and pip on Windows (currently at max tensorflow 2.3) do not include a tensorflow built with CUDA v11. But you can use pip to install a nightly build of tensorflow (currently tensorflow 2.5) which built with CUDA v11. Apart from a tensorflow build with CUDA v11, you will also need the actual DLLs for CUDA v11 and cuDNN v8. Normally, you would just install these with anaconda with the packages cudatoolkit and cudnn, but while cudatoolkit is available with v11, for cudnn, at least for Windows, v8 is not available in anaconda. The workaround is to manually get these DLLs and set them in the system environment path (so that python/tensorflow can find and load them). So let’s start:
First, install anaconda if you haven’t already. Open the anaconda prompt with admin rights.
Type conda create -n tf2 python=3.8 and hit enter to create a new anaconda environment with python 3.8 (the tensorflow nightly build needs python 3.8 or higher, that’s why we are using python 3.8)
Type activate tf2 or conda activate tf2 and hit enter to enter that new environment.
Install the nightly tensorflow build with pip3 install tf-nightly-gpu
Install other packages that you might need. For me, it’s conda install jupyter scikit-learn matplotlib pandas
Now, download CUDA v11 from NVIDIA (https://developer.nvidia.com/cuda-downloads or https://developer.nvidia.com/cuda-toolkit-archive). Yeah, the file is pretty big with 3GB.
Additionally, apparently we also need a Microsoft Visual Studio version for C++ for the installer to run properly. Download the free Visual Studio Community Edition (https://visualstudio.microsoft.com/downloads/) and install the C++ components. For this, select «Desktop development with C++», select the first 6 options and install. This step is taken from the guide I mentioned earlier, so refer to it if you have trouble with this. For me, I already had Visual Studio with C++ in mind set up on my computer, so I could skip this step.
Now, let’s first execute the CUDA v11 installer. Execute it. You can do the express installation, but if you already have GeForce Experience installed, you can also choose the Custom option and deselect everything that you already have installed with a higher version. For me, I only needed the very first checkbox with the CUDA options, so that might be enough.
What the CUDA v11 installer basically did was installing all the CUDA v11 DLLs, Headers, and stuff in the directory «C:Program FilesNVIDIA GPU Computing ToolkitCUDAv11.1» (the version may be different for you). What we will do next: Add the cuDNN DLLs, Headers, etc. in this directory as well and then add this directory to the system path. Ok, let’s go.
Download cuDNN from NVIDIA (https://developer.nvidia.com/rdp/cudnn-download). This file is around 700MB. You need to register as a developer and answer some questions, but don’t worry, it’s free. When asked for an email, you can type in any email, since in the next page, you will get an option to login using google or facebook as an alternative (which you may or may not prefer). Once you downloaded the file, extract it. Going into the directory, you will see three folders «bin», «include», «lib». Comparing it with the CUDA v11 directory (C:Program FilesNVIDIA GPU Computing ToolkitCUDAv11.1), you’ll notice that these directories are present there as well! So just copy the folders from cuDNN to the CUDA v11 directory. Windows will add the files into the existing folders.
Now, let’s add those directories to the system path. In windows, open start and search for «This PC». Rightclick and select «Properties» to open a Window called «System». On the left side at the bottom, select «Advanced system settings». Click «Environment Variables…» at the bottom. Here, in the lower half, in «System variables», find and open «Path». Here, click «New» to add a new directory to the system path. Do this every time for each of the following directories (as mentioned earlier, the version number may be different for you). Some of the directories may be already listed there, so feel free to skip them (there is no negative effect from double entries though, so don’t worry too much):
C:Program FilesNVIDIA GPU Computing ToolkitCUDAv11.1bin
C:Program FilesNVIDIA GPU Computing ToolkitCUDAv11.1libnvvp
C:Program FilesNVIDIA GPU Computing ToolkitCUDAv11.1extrasCUPTIlib64
C:Program FilesNVIDIA GPU Computing ToolkitCUDAv11.1include
Now, very important: Restart your system!
Now, run your code to see if everything works. For me, it was through a jupyter notebook. A simple thing to do first is to import tensorflow and check the physical devices:import tensorflow as tftf.config.list_physical_devices()
Your GPU may not show up. Take a close look at the output of the console (for me, it was the anaconda prompt with which I started up my jupyter notebook). There, you should see logs like tensorflow/stream_executor/platform/default/dso_loader.cc:49] Successfully opened dynamic library cudart64_110.dll or a similar log stating that a certain DLL could not be loaded! In my case, everything loaded except the DLL «cusolver64_10.dll». So, I went to the CUDA v11 directory (C:Program FilesNVIDIA GPU Computing ToolkitCUDAv11.1), opened the «bin» folder (the DLLs are in there) to check if that DLL was there. Nope, it was not. Instead, there was «cusolver64_11.dll». So what I did was just copy that DLL and renamed the copy to «cusolver64_10.dll». Yeah, sounds dumb, but after that, everything worked.
I hope this guide helps at least someone. Hopefully, we will get official versions of tensorflow 2.5 and the CUDA/cudnn packages soon so that these kind of workarounds will not be required anymore.
EDIT: Somewhat obvious thing I noticed today: Had a video call running and was using the background removal of NVIDIA Broadcast. Tried to do some inference during the call and it was failing with error messages like Could not create cudnn handle: CUDNN_STATUS_ALLOC_FAILED and tensorflow.python.framework.errors_impl.UnknownError: Failed to get convolution algorithm. This is probably because cuDNN failed to initialize, so try looking to see if a warning log message was printed above.. Well, yeah, that was because NVIDIA Broadcast was running, which itself uses the machine learning capabilities of the GPU. After closing it, things worked normally again. Kind of obvious, but somewhat easy to overlook/forget.
72 Comments
Share
Save
Hide
Report
Уведомления
- Начало
- » Python для экспертов
- » PyQT6 Process finished with exit code -1073740791 (0xC0000409)
#1 Авг. 12, 2022 21:14:59
PyQT6 Process finished with exit code -1073740791 (0xC0000409)
пишу программу на основе PyQt6
סאיאפ QFileDialog.getOpenFileName передаю ссылку на него в дрегой модуль чтоб собрать инфу о файлике.
пытаюсь сохранять инфу в список или словарик прога вылетает с вот таким кодом:
Process finished with exit code -1073740791 (0xC0000409)
что за странность? и как это лечить? в гугле смотрел там коды другие
Офлайн
- Пожаловаться
#2 Авг. 12, 2022 21:46:12
PyQT6 Process finished with exit code -1073740791 (0xC0000409)
Areostar
ну ты же уже не первый топик на форуме создаешь, ты совсем что-ли тупой? Ну нифига же невозможно понять из твоего сообщения
ну допустим
code -1073740791 (0xC0000409)
ты правда думаешь что кто-то знает эти коды?
Ты не дал ни кода, ни трейсбэка ошибки, не попытался самостоятельно отдебажить собственный говнокод…
Ты дурачок что-ли совсем?
Areostar
как это лечить?
попробуй с разбегу о стену
Офлайн
- Пожаловаться
#3 Авг. 13, 2022 07:55:29
PyQT6 Process finished with exit code -1073740791 (0xC0000409)
Не за чем так орать, если нечего сказать по теме.
Ответ нащёл. глюк самого пайчарма.
мена Run->Edit Configuration ставим галочку Run with Python Console
после чего вижу в консоли ощибки(помарки в коде)
Офлайн
- Пожаловаться
#4 Авг. 13, 2022 10:55:59
PyQT6 Process finished with exit code -1073740791 (0xC0000409)
Areostar
Мне нечего сказать по теме потому что ты по теме нифига не сообщил. Я извиняюсь за грубость речи, согласен, это было невежливо. Но блин, вот представь себя на месте читателя твоего топика. Вот что бы ты понял из собственного сообщения? Что какой-то код пишется куда-то? Ну и что, что делать то с этой информацией, как ты видишь процесс решения твоей проблемы на основании представленных данных?
Офлайн
- Пожаловаться
#5 Авг. 13, 2022 11:36:39
PyQT6 Process finished with exit code -1073740791 (0xC0000409)
Согласеню Но и я на тот момент нифига понять не мог 
Офлайн
- Пожаловаться
#6 Авг. 13, 2022 14:52:25
PyQT6 Process finished with exit code -1073740791 (0xC0000409)
Areostar
Если ты хочешь помощи, то это твоя обязанность сделать все для облегчения этой помощи. Помощь значит что ты сделал все что мог, что знаешь, и столкнулся с областью незнания, где тебе нужны чужие знания. Ты пишешь код и имеешь проблемы. Окей, изолируй проблему. Какой-то диалог выдаёт ошибку? Ну хорошо, мне нафиг не нужна вся твоя великая программа, создай минимальную ситуацию, которую я могу воспроизвести на своём компьютере и увидеть проблему. Тогда я смогу её решить. А ты то что делаешь? Парни, привет, я тут пишу свои вирши и у меня код ошибки 464357632. Ну это же скотство просто, ты даже не попытался свою проблему представить в понятном и воспроизводимом виде, как до этого десятки раз ты не пытался гуглить даже. Уважаемый, пересмотри своё отношение к освоению профессии, не будет тебе никто жопу подтирать всю жизнь
Офлайн
- Пожаловаться
- Начало
- » Python для экспертов
- » PyQT6 Process finished with exit code -1073740791 (0xC0000409)
|
Ksmnwt 8 / 7 / 2 Регистрация: 20.11.2018 Сообщений: 66 |
||||||||
|
1 |
||||||||
|
PyQt5 23.09.2020, 14:11. Показов 32579. Ответов 10 Метки нет (Все метки)
суть задачи: при нажатии кнопки, решение задачи в первом поле ввода отображается во втором поле ввода
вот ошибка:
первый день этим занимаюсь, помогите с фиксом
__________________ 0 |

|
vic5710 828 / 614 / 245 Регистрация: 10.12.2016 Сообщений: 1,523 |
||||
|
23.09.2020, 14:16 |
2 |
|||
|
eval не нужен
0 |
|
8 / 7 / 2 Регистрация: 20.11.2018 Сообщений: 66 |
|
|
23.09.2020, 14:25 [ТС] |
3 |
|
eval не нужен как тогда программа будет вычислять значение первого окна? 0 |

|
828 / 614 / 245 Регистрация: 10.12.2016 Сообщений: 1,523 |
|
|
23.09.2020, 14:58 |
4 |
|
0 |
|
1325 / 587 / 284 Регистрация: 02.05.2020 Сообщений: 1,416 |
|
|
23.09.2020, 15:42 |
5 |
|
а что конкретно вы вводите в первом поле ввода, чтобы такую ошибку получить? 0 |
|
8 / 7 / 2 Регистрация: 20.11.2018 Сообщений: 66 |
|
|
23.09.2020, 15:43 [ТС] |
6 |
|
а что конкретно вы вводите в первом поле ввода Напишите программу с графическим пользовательским интерфейсом на PyQT. В однострочное поле вводится корректное арифметическое выражение, которое можно вычислить без ошибок. По кнопке «Вычислить» надо посчитать результат этого выражения и вывести его в другое поле для ввода. Чтобы вычислить любое выражение, заданное в строке,
матчасть учите следует использовать функцию eval(). Пример: 1 + 2 * 3 -> 7 0 |
|
kapbepucm 1325 / 587 / 284 Регистрация: 02.05.2020 Сообщений: 1,416 |
||||
|
23.09.2020, 15:48 |
7 |
|||
|
Решение
1 |
 Сообщение было отмечено Ksmnwt как решение
|
8 / 7 / 2 Регистрация: 20.11.2018 Сообщений: 66 |
|
|
23.09.2020, 15:53 [ТС] |
8 |
|
kapbepucm, much love, в чем была ошибка??? 0 |
|
1325 / 587 / 284 Регистрация: 02.05.2020 Сообщений: 1,416 |
|
|
23.09.2020, 15:59 |
9 |
|
в чем была ошибка Чтобы точно ответить на этот вопрос, надо получить ответ на этот:
а что конкретно вы вводите в первом поле ввода, чтобы такую ошибку получить? 0 |
|
8 / 7 / 2 Регистрация: 20.11.2018 Сообщений: 66 |
|
|
23.09.2020, 16:00 [ТС] |
10 |
|
—
а что конкретно вы вводите в первом поле ввода, чтобы такую ошибку получить? то же самое 0 |
|
1325 / 587 / 284 Регистрация: 02.05.2020 Сообщений: 1,416 |
|
|
23.09.2020, 16:02 |
11 |
|
хмм… ну тогда программа падала в обморок от того, что tr.setText получал целочисленный тип вместо ожидаемого текстового 1 |
Ошибка файловой системы 1073740791 в Windows 10 еще недостаточно хорошо изучена, поэтому приходится только догадываться об истинных причинах проблемы. Конечно, мы уже сделали логические выводы о том, что же именно провоцирует данный сбой, но нам пришлось руководствоваться данными, найденными на форумах. Способы, сработавшие у нескольких пользователей с данными ошибками, указывают на несколько основных причин неисправности. Среди них: повреждение системных файлов, битые сектора или ошибки жесткого диска, некорректные данные магазина Microsoft или поломка пользовательских данных. Есть и весьма специфические причины, одна из них – установка новой темы или изменение звуковой схемы. Сейчас мы расскажем,
Важно! В рамках этой статьи мы говорим об ошибке файловой системы. Есть еще подобное сообщение Process finished with exit code -1073740791 (0xC0000409) в коде Python – это уже не по нашей части, вам на тематические форумы разработчиков. Также для избегания путаницы мы не затрагиваем эту же ошибку в Minecraft, там методы отличаются.
Содержание
- Алгоритм действий по исправлению ошибки 1073740791
- Запуск в безопасном режиме
- Сканирование системы
- Изменение звуковой схемы
- Замена темы на предустановленную по умолчанию
- Удаление кэша Microsoft Store
- Создание новой учетной записи
Перечисленные ниже способы представляют собой руководство, по которому нужно двигаться поочередно, в отличие от независимых методов, как часто бывает для других ошибок. Возможно, вам не придется доходить до самого конца, но первые несколько процедур скорее всего нужно будет выполнить практически всем.
Запуск в безопасном режиме
Так как эта ошибка может препятствовать запуску различных программ и даже командной строки, для получения удовлетворительного результата обязательно нужно все делать в безопасном режиме.
Вот быстрая инструкция по его запуску:
- Жмем комбинацию Win + R и в новое окно вводим msconfig, затем кликаем на Enter.
- В левой нижней части окна должна быть «Безопасная загрузка», выделяем ее и нажимаем на кнопку «Применить».
- Перезагружаем компьютер.
Сканирование системы
Как только ПК будет перезагружен в безопасном режиме, нужно проверить возможность запуска консоли от имени администратора (командной строки или PowerShell). После этого последовательно вводим такие команды:
- Сканирование sfc. Команда sfc /scannow начинает проверку файловой системы. Есть некоторая вероятность, что эта процедура не сработает. В таком случае можем попробовать sfc /scannow /offbootdir=c: /offwindir=c:windows.
- Анализ системы DISM. Здесь желательно ввести несколько команд, после каждой нажимая Enter: Dism /Online /Cleanup-Image /CheckHealth, Dism /Online /Cleanup-Image /ScanHealth, Dism /Online /Cleanup-Image /RestoreHealth.
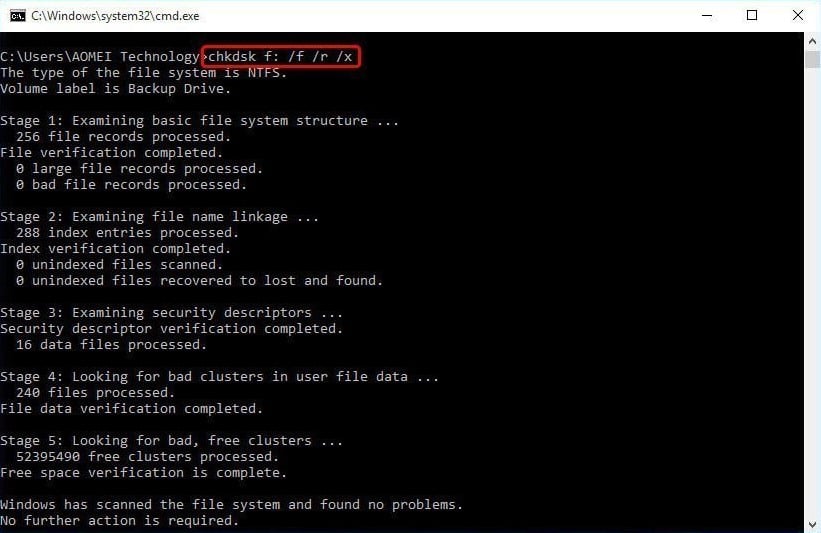
- Проверка жесткого диска. Процедура займет минут 15. За это время система просканирует HDD и попытается исправить найденные проблемы, если такие будут. Запускается процедура командой chkdsk C: /f /r /x.
Изменение звуковой схемы
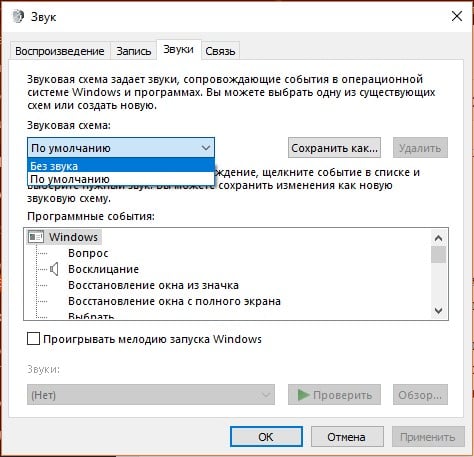
По не до конца известным причинам, переход на другую звуковую схему помогает исправить ошибку файловой системы. Не будем долго рассуждать над причинами, просто опишем то, что помогло нескольким другим пользователям на форуме:
- Кликаем правой кнопкой мыши по значку динамика на панели задач (справа в нижнем углу) и выбираем опцию «Звуки».
- На вкладке «Звуки» выбираем «Звуковую схему» – «Без звуков» или, если такой вариант присутствует, «По умолчанию Windows».
- Применяем изменения и перезагружаем компьютер.
Замена темы на предустановленную по умолчанию
Темы для Windows 10 от сторонних производителей могут провоцировать проблемы в файловой системе, по крайней мере на это указывает пара отчетов пользователей. Благо, это легко изменить.
Инструкция:
- Нажимаем Win + I и в окне «Параметры» переходим в раздел «Персонализация».
- Жмем на вкладку «Темы», далее – «Параметры темы».
- Пролистываем до списка «Темы по умолчанию» и выбираем один из доступных вариантов.
- Выходим и повторно входим в систему.

Удаление кэша Microsoft Store
Накопительные данные Microsoft Store могут провоцировать ошибку 1073740791 Windows 10. Очистка кэша нередко помогает, если причина проблемы действительно была в нем. Учитывая, что мы исключили многие другие, данный способ имеет действительно неплохие шансы на успех.
Что нужно сделать:
- Жмем комбинацию Win + R.
- В строку выполнить вставляем запись wsreset.exe.
- Процедура удаления временных файлов должна пройти автоматически.
Создание новой учетной записи
Это последний способ в списке именно в таком порядке к нему и нужно подходить. Он помогает в тех ситуациях, когда ошибка файловой системы 1073740791 связана с данными пользователя. Проблема в том, что данный метод подразумевает удаление текущей учетной записи и создание новой. Будут утеряны данные, которые хранятся в C:Users[ник пользователя]. Заранее стоит сделать бекап этих файлов. Остальная информация не пострадает.
Подробное руководство по созданию обычного аккаунта:
- Жмем по Пуску и переходим в «Параметры».
- Выбираем пункт «Учетные записи» и выбираем «Войти с локальной учетной записи» в правой области.
- Указываем необходимые данные для создания аккаунта и завершаем процедуру его генерации.
Как создать учетную запись с правами администратора
- Переходим в «Параметры».
- На той же странице «Учетные записи» переходим в раздел «Семья и другие люди».
- Выбираем «Добавить пользователя для этого компьютера».
- В окне «Семья и другие люди» кликаем по кнопке «Изменить тип учетной записи». Для этого у текущего профиля должны быть соответствующие полномочия.
- Выставляем «Администратор» и жмем на кнопку «Ок».
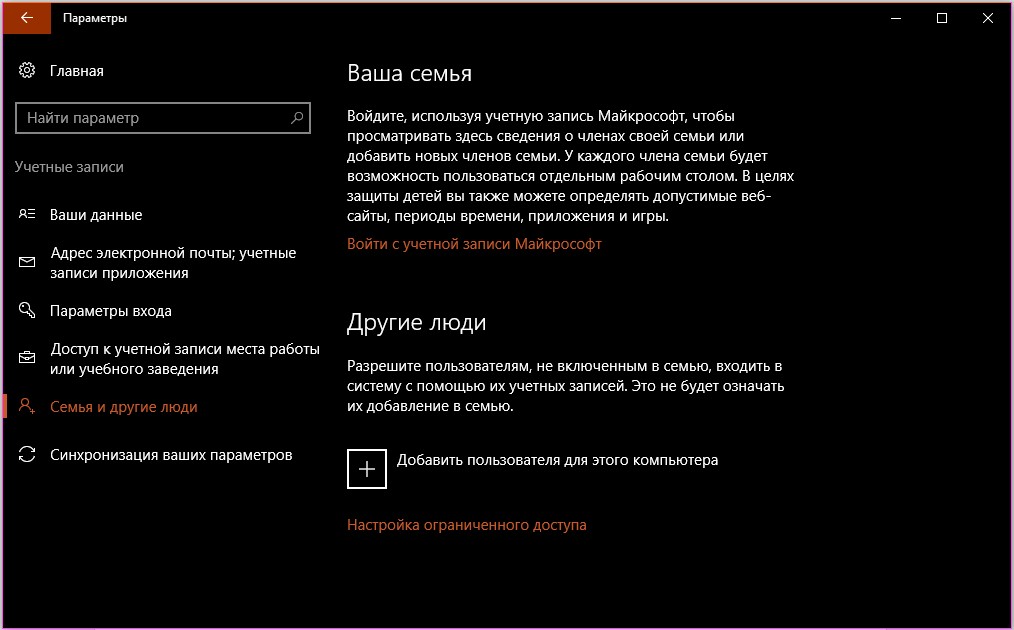
Остается только переключиться на новый аккаунт и проверить результат. Если все работает нормально, уже не должна появляться ошибка, просто удаляем старый профиль.
На сегодня это все, что нам известно об ошибке файловой системы 1073740791 в Windows 10. Если вам есть что добавить или остались вопросы, задавайте их в комментариях.
RTX 3090 and Tensorflow for Windows 10 — step by step
I recently bought an RTX 3090 (upgrading from a GTX 1060) and needed my keras/tensorflow notebooks to work. There are some guides on this on the internet, but these were often skipping some steps or explanations, so I wanted to share a very simple, «for dummies» kind of step by step instruction with explanations on how I got it to work on my system. It is similar to this guide, but a bit different as I encountered some problems that was not mentioned in that guide. I am using a Ryzen 2700X and Windows 10 Home.
So, what you need to know beforehand: The NVIDIA 3000 Series GPUs (Ampere) require CUDA v11 and cuDNN v8 to work. The tensorflow versions on anaconda and pip on Windows (currently at max tensorflow 2.3) do not include a tensorflow built with CUDA v11. But you can use pip to install a nightly build of tensorflow (currently tensorflow 2.5) which built with CUDA v11. Apart from a tensorflow build with CUDA v11, you will also need the actual DLLs for CUDA v11 and cuDNN v8. Normally, you would just install these with anaconda with the packages cudatoolkit and cudnn, but while cudatoolkit is available with v11, for cudnn, at least for Windows, v8 is not available in anaconda. The workaround is to manually get these DLLs and set them in the system environment path (so that python/tensorflow can find and load them). So let’s start:
First, install anaconda if you haven’t already. Open the anaconda prompt with admin rights.
Type conda create -n tf2 python=3.8 and hit enter to create a new anaconda environment with python 3.8 (the tensorflow nightly build needs python 3.8 or higher, that’s why we are using python 3.8)
Type activate tf2 or conda activate tf2 and hit enter to enter that new environment.
Install the nightly tensorflow build with pip3 install tf-nightly-gpu
Install other packages that you might need. For me, it’s conda install jupyter scikit-learn matplotlib pandas
Now, download CUDA v11 from NVIDIA (https://developer.nvidia.com/cuda-downloads or https://developer.nvidia.com/cuda-toolkit-archive). Yeah, the file is pretty big with 3GB.
Additionally, apparently we also need a Microsoft Visual Studio version for C++ for the installer to run properly. Download the free Visual Studio Community Edition (https://visualstudio.microsoft.com/downloads/) and install the C++ components. For this, select «Desktop development with C++», select the first 6 options and install. This step is taken from the guide I mentioned earlier, so refer to it if you have trouble with this. For me, I already had Visual Studio with C++ in mind set up on my computer, so I could skip this step.
Now, let’s first execute the CUDA v11 installer. Execute it. You can do the express installation, but if you already have GeForce Experience installed, you can also choose the Custom option and deselect everything that you already have installed with a higher version. For me, I only needed the very first checkbox with the CUDA options, so that might be enough.
What the CUDA v11 installer basically did was installing all the CUDA v11 DLLs, Headers, and stuff in the directory «C:Program FilesNVIDIA GPU Computing ToolkitCUDAv11.1» (the version may be different for you). What we will do next: Add the cuDNN DLLs, Headers, etc. in this directory as well and then add this directory to the system path. Ok, let’s go.
Download cuDNN from NVIDIA (https://developer.nvidia.com/rdp/cudnn-download). This file is around 700MB. You need to register as a developer and answer some questions, but don’t worry, it’s free. When asked for an email, you can type in any email, since in the next page, you will get an option to login using google or facebook as an alternative (which you may or may not prefer). Once you downloaded the file, extract it. Going into the directory, you will see three folders «bin», «include», «lib». Comparing it with the CUDA v11 directory (C:Program FilesNVIDIA GPU Computing ToolkitCUDAv11.1), you’ll notice that these directories are present there as well! So just copy the folders from cuDNN to the CUDA v11 directory. Windows will add the files into the existing folders.
Now, let’s add those directories to the system path. In windows, open start and search for «This PC». Rightclick and select «Properties» to open a Window called «System». On the left side at the bottom, select «Advanced system settings». Click «Environment Variables…» at the bottom. Here, in the lower half, in «System variables», find and open «Path». Here, click «New» to add a new directory to the system path. Do this every time for each of the following directories (as mentioned earlier, the version number may be different for you). Some of the directories may be already listed there, so feel free to skip them (there is no negative effect from double entries though, so don’t worry too much):
C:Program FilesNVIDIA GPU Computing ToolkitCUDAv11.1bin
C:Program FilesNVIDIA GPU Computing ToolkitCUDAv11.1libnvvp
C:Program FilesNVIDIA GPU Computing ToolkitCUDAv11.1extrasCUPTIlib64
C:Program FilesNVIDIA GPU Computing ToolkitCUDAv11.1include
Now, very important: Restart your system!
Now, run your code to see if everything works. For me, it was through a jupyter notebook. A simple thing to do first is to import tensorflow and check the physical devices:import tensorflow as tftf.config.list_physical_devices()
Your GPU may not show up. Take a close look at the output of the console (for me, it was the anaconda prompt with which I started up my jupyter notebook). There, you should see logs like tensorflow/stream_executor/platform/default/dso_loader.cc:49] Successfully opened dynamic library cudart64_110.dll or a similar log stating that a certain DLL could not be loaded! In my case, everything loaded except the DLL «cusolver64_10.dll». So, I went to the CUDA v11 directory (C:Program FilesNVIDIA GPU Computing ToolkitCUDAv11.1), opened the «bin» folder (the DLLs are in there) to check if that DLL was there. Nope, it was not. Instead, there was «cusolver64_11.dll». So what I did was just copy that DLL and renamed the copy to «cusolver64_10.dll». Yeah, sounds dumb, but after that, everything worked.
I hope this guide helps at least someone. Hopefully, we will get official versions of tensorflow 2.5 and the CUDA/cudnn packages soon so that these kind of workarounds will not be required anymore.
EDIT: Somewhat obvious thing I noticed today: Had a video call running and was using the background removal of NVIDIA Broadcast. Tried to do some inference during the call and it was failing with error messages like Could not create cudnn handle: CUDNN_STATUS_ALLOC_FAILED and tensorflow.python.framework.errors_impl.UnknownError: Failed to get convolution algorithm. This is probably because cuDNN failed to initialize, so try looking to see if a warning log message was printed above.. Well, yeah, that was because NVIDIA Broadcast was running, which itself uses the machine learning capabilities of the GPU. After closing it, things worked normally again. Kind of obvious, but somewhat easy to overlook/forget.
72 Comments
Share
Save
Hide
Report
Иногда сталкиваемся с тем, что запуск некоторых программ прерывается ошибками файловой системы. В этой статье узнаем, как исправить ошибку с кодом (-1073740791) на компьютере с Windows 10. По характеру ее возникновения можно предположить, что причина связана с образовавшимся сбойным сектором в месте записи проблемной программы или из-за ошибки файловой системы, возникшей, например, после внезапного отключения питания ПК. Иногда она может возникнуть после изменения звуковой схемы.
Во многих случаях ошибки файловой системы удается исправить встроенными утилитами SFC и Chkdsk. Установка пользовательских тем и звуков также создают такие ошибки, поэтому сбросьте их обратно по умолчанию. В некоторых случаях ее удается избежать путем создания новой учетной записи пользователя и запуском из не проблемной программы.
Перед применением решений создайте точку восстановления, чтобы была возможность вернуть систему в предыдущее состояние при возникновении каких-либо неполадок. Кроме того, все указанные шаги нужно выполнять, загрузив систему в безопасном режиме. Для этого откройте окно Конфигурации системы командой msconfig из окна Win + R. На вкладке Загрузки отметьте флажком опцию Безопасный режим, примените изменения и нажмите на «ОК». Наконец, перезагрузите систему и примените различные способы в указанном порядке после входа в безопасный режим. Когда ошибка 1073740791 будет исправлена, вернитесь в окно Конфигурации системы – Загрузки и снимите флажок с безопасного режима.
Содержание
- 1 Сканирование системы на наличие повреждений утилитой SFC
- 2 Запуск утилиты проверки диска Chkdsk
- 3 Изменение звуковой схемы
- 4 Установка темы Windows 10 по умолчанию
- 5 Сброс кэша магазина Windows
Сканирование системы на наличие повреждений утилитой SFC
Проверка системных файлов (SFC) – это служебная команда, используемая для сканирования и восстановления поврежденных системных файлов. Для ее запуска, следуйте инструкции.
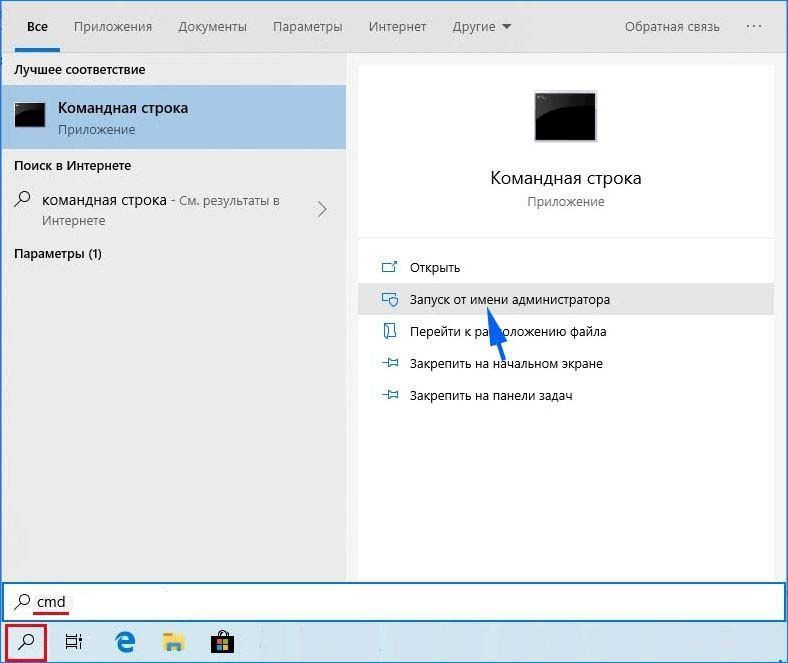
Откройте панель системного поиска и наберите «cmd». В результатах поиска запустите командную строку, предоставив ей доступ администратора. Нажмите «Да», если контроль учетных записей пользователей (UAC) запросит подтверждение доступа.
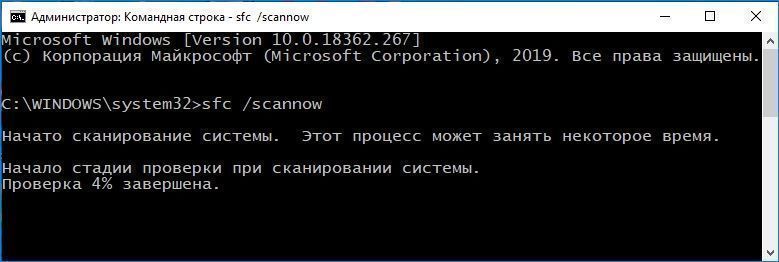
В консоли введите следующую команду и подтвердите ее запуск на Enter, чтобы запустить проверку системных файлов:
sfc /scannow
Сканирование занимает несколько минут, дождитесь его завершения. После перезагрузите систему в обычном режиме и выполните то действие, которое прерывалось ошибкой файловой системы 1073740791.
Запуск утилиты проверки диска Chkdsk
Сбой при запуске программы может произойти из-за файловой ошибки или образования сбойных секторов в области записи ее файлов на диске. В этом случае попробуйте запустить служебную команду Chkdsk, которая способна обнаружить неисправности в секторах и устранить их.
Снова откройте командную строку с помощью системного поиска, предоставив ей доступ администратора. При отображении запроса UAC, нажмите на кнопку «Да».
В консоли запустите команду: chkdsk C: /f /r

Здесь «С» указывает на диск, который нужно проверить, «f» исправляет найденные ошибки, «r» — находит поврежденные сектора.
Если появятся новые инструкции с указанием запланировать сканирование после перезагрузки, нажмите на «Y», чтобы подтвердить разрешение.
Сканирование может занять от нескольких минут до часа, поэтому дождитесь ее завершения.
После перезагрузите ПК и проверьте, прерывается ли ошибкой 1073740791 запуск программы или вход в систему.
Изменение звуковой схемы
К ошибкам файловой системы также может привести установка новой звуковой схемы. В этом случае нужно вернуть ее по умолчанию. Чтобы это сделать, выполните указанные шаги.
На панели задач (в области уведомлений) кликните правой копкой мыши на значок динамика. При отображении всплывающего меню выберите опцию Звуки. Затем перейдите на вкладку «Звуки».
Щелкните на выпадающее меню Звуковой схемы и выберите значение «Без звука» или «По умолчанию».
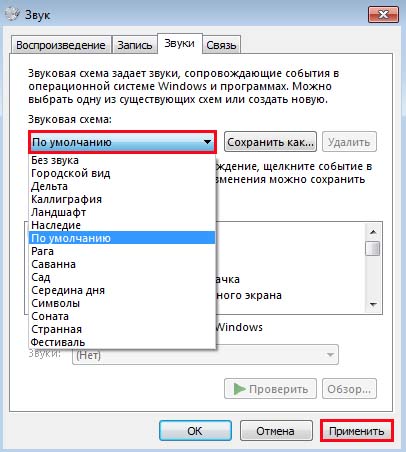
Примените изменения и перезапустите систему. Проверьте, удалось ли исправить ошибку 1073740791.
Иногда пользователи сталкиваются с ошибкой после установки новой темы Windows 10, которая возникает сразу после следующего входа в систему. В этом случае попробуйте возвратится к теме по умолчанию.
Откройте меню Пуск и нажмите на значок шестеренки для входа в системные параметры, либо просто нажмите на сочетание клавиш Win + I с экрана рабочего стола. Перейдите в раздел Персонализация.
На панели слева перейдите на вкладку Темы. В правой части экрана выберите тему Windows по умолчанию. Сохраните изменения и перезагрузите ПК.
Сброс кэша магазина Windows
Кэшированные данные, хранящиеся в Магазине Microsoft, также могут привести к ошибке файловой системы 1073740791, в результате их повреждения. В этом случае очистите кэш этого приложения, следуя инструкции.
Откройте окно «Выполнить» сочетанием клавиш Win + R. В диалоговом окне введите команду Wsreset.exe и щелкните на «ОК» для запуска очистки.
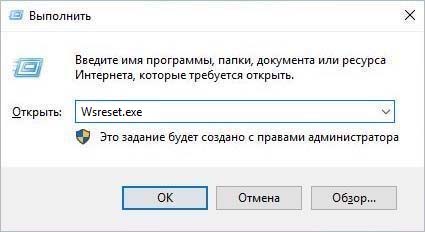
После выполнения команды перезагрузите компьютер.
Есть код который я полностью скопировал :), так вот при обучении нейросети на первой эпохе получаю: Process finished with exit code -1073740791 (0xC0000409), сам текст написан на русском, но для проверки попробовал взять английский текст и получаю тоже самое
P.s если нужно скину ссылку на сайт где брал код, в диспетчере задач на несколько секунд запускается отчёт об ошибках Windows, Win 11, python 3.10
import numpy
import sys
from nltk.tokenize import RegexpTokenizer
from nltk.corpus import stopwords
from keras.models import Sequential
from keras.layers import Dense, Dropout, LSTM
from keras.utils import np_utils
from keras.callbacks import ModelCheckpoint

data = open("data_on_text_generate.txt", encoding='utf-8').read()
file = data.lower()

def tokenize_words(input):
    input = input.lower()

    tokenizer = RegexpTokenizer(r'w+')
    tokens = tokenizer.tokenize(input)

    filtered = filter(lambda token: token not in stopwords.words('russian'), tokens)
    return " ".join(filtered)

processed_inputs = tokenize_words(file)
chars = sorted(list(set(processed_inputs)))
char_to_num = dict((c, i) for i, c in enumerate(chars))
input_len = len(processed_inputs)
vocab_len = len(chars)
# print ("Total number of characters:", input_len)
# print ("Total vocab:", vocab_len)

seq_length = 100
x_data = []
y_data = []

for i in range(0, input_len - seq_length, 1):
    in_seq = processed_inputs[i:i + seq_length]

    out_seq = processed_inputs[i + seq_length]

    x_data.append([char_to_num[char] for char in in_seq])
    y_data.append(char_to_num[out_seq])

n_patterns = len(x_data)
# print ("Total Patterns:", n_patterns)

X = numpy.reshape(x_data, (n_patterns, seq_length, 1))
X = X/float(vocab_len)

y = np_utils.to_categorical(y_data)

model = Sequential()
model.add(LSTM(256, input_shape=(X.shape[1], X.shape[2]), return_sequences=True))
model.add(Dropout(0.2))
model.add(LSTM(256, return_sequences=True))
model.add(Dropout(0.2))
model.add(LSTM(128))
model.add(Dropout(0.2))
model.add(Dense(y.shape[1], activation='softmax'))

model.compile(loss='categorical_crossentropy', optimizer='adam')

filepath = "model_weights_saved.hdf5"
checkpoint = ModelCheckpoint(filepath, monitor='loss', verbose=1, save_best_only=True, mode='min')
desired_callbacks = [checkpoint]

model.fit(X, y, epochs=4, batch_size=256, callbacks=desired_callbacks)

filename = "model_weights_saved.hdf5"
model.load_weights(filename)
model.compile(loss='categorical_crossentropy', optimizer='adam')

num_to_char = dict((i, c) for i, c in enumerate(chars))

start = numpy.random.randint(0, len(x_data) - 1)
pattern = x_data[start]
print("Random Seed:")
print(""", ''.join([num_to_char[value] for value in pattern]), """)

for i in range(1000):
    x = numpy.reshape(pattern, (1, len(pattern), 1))
    x = x / float(vocab_len)
    prediction = model.predict(x, verbose=0)
    index = numpy.argmax(prediction)
    result = num_to_char[index]

    sys.stdout.write(result)

    pattern.append(index)
    pattern = pattern[1:len(pattern)]
Уведомление об авторских правах: эта статья является оригинальной статьей Blogger. Если вам нужно перепечатать, пожалуйста, опубликуйте оригинальный пост блога:https://blog.csdn.net/u011628215/article/details/106070829
Предисловие 1:Прежде всего, спасибо за ваших участников литературы! Я дал мне много вдохновения, я не ужас, ужасно, что нет способа попробовать это.
Предисловие 2:Эта проблема заключается в предварительном исследовательском тесте проекта компании, и упрощение примерно преобразуется в данные, а затем использует нейронную сеть, чтобы соответствовать этим данным, и заинтересованнымЭтот пост блога (обновлен)Отказ Предыдущий период очень гладкий, рисунок показывает и т. Д., Но когда я присоединился к нейронному сетевому модулю, я сообщил, что «код выхода -1073740791 (0xC0000409)» команда завершения процесса, как показано на рисунке 1, так что думая, что я думал, что Модуль нейронного сетевого модуля вызвал ошибку (проблема, встречающаяся вчера днем, до этого утра все решено, цикл длинный, но простые вопросы, которые я не использую самый прямой путь:DebugПосле этого утра после одного шагового отладки я обнаружил, что проблема в том, что она «
import matplotlib.pyplot as plt«Конечно, сам этот шаг не имеет никаких проблем (отладка не имеет никакой ненормальности), и проблема в том, что если« PLT »(например, PLT.Figure ()) будет сообщать об выходе в тему.

Решение:
Поскольку большая часть комментария 1 области обзора — это шестое решение в статье (в другой форме, я также чищу), я попробовал его, я не решил проблему, поэтому я задержал его. После отладки, я Знал причину выходного кода и напомнил статью снова и снова, я увидел, что третий способ в статье это проблема, которую я столкнулся, но только изменился одинОписание «Файл эталонного заголовка»Проблема (см. Ссылку 2 для деталей), затем найдите решения из комментария документа 2 —Обновите пакеты Matplotlib!

Потому что я уже установил MATPLOTLIB с помощью AnaConda перед компьютером, я хочу прямо использовать обновление AnaConda, и нет последней версии, как показано на рисунке 2 (я не понимаю этого, я не знаю последнюю версию, У меня нет последней версии. Это уже последняя версия из переводчика Pycharm). Нет способа установить его с помощью PIP, вызовите CMD, используйте команду «Установить PIP -US -U MATPLOTLIB» (обновлено, см. Ссылка 3), результат также дан, я сообщал неправильно T_T, как показано на рисунке 3, но, к счастью, дать версию MATPLOTLIB, которая соответствует моему компьютеру (см. Синюю коробку на рисунке).

Этот случай только «Официальный сайт Dafa Aragrance«О, найдите соответствующую версию загрузки, после загрузки, поместите его в каталог учетной записи, затем используйте установку PIP, и дайте мне сообщение, как показано на рисунке 4, приглашение ошибки — использовать операцию идентификатора администратора (CMD Используйте управление, когда вы работаете, см. Ссылку 4), затем я снова запустите, как показано на рисунке 5, не было сообщено.


Откройте вид переводчика Pycharm, как показано на рисунке 6, MATPLOTLIB обновляется до 3.2.1, а официальный веб-сайт, но последняя версия библиотеки все еще отображается 3.1.3. После снова запустив программу, нет необходимости сообщать о выходе Code! ! !

подводить итоги:Благодаря этой проблеме наиболее важным выводом является то, чтоИспользуйте BEBUG в одноступенчатый отладчик(Это не точна здесь), это хороший способ устранения неполадок; я обычно напрямую бегаю для отладки, потому что есть ошибка, чтобы дать неверную информацию и местоположение, но встречающую этот неинтересный отчет без кода, нет способ.
Рекомендации:(Благодаря участникам следующих документов! Особенно первый метод решения проблем, дай мне много размышлений!)
1.Ошибка Pycharm: процесс завершен с кодом выхода кода -1073741819 (0xc0000005)
2.Process finished with exit code -1073741819 (0xC0000005)
3.Просмотр Python, Numpy, Scipy, Matplotlib Версия и обновление версии
4.Рассмотрим возможность использования опции «- прозеров» или проверьте ошибку разрешений