
- Remove From My Forums
-
Вопрос
-
Делаю вручную бэкап ВМ, пытаюсь Экспортировать виртуальную машину на внешний жесткий диск «E:Backup» но появляется ошибка:
Произошла ошибка при попытки экспорта виртуальной машины. Не удалось скопировать файл из
«C:Hyper-VJKHVirtual Hard DisksJKH.vhd»
в «E:BackupJKH10 JKHVirtual Hard DisksJKH.vhd»:
Аргументы заданы неправильно (0х80070057)Имя журнала: Microsoft-Windows-Hyper-V-VMMS-Admin Источник: Microsoft-Windows-Hyper-V-VMMS Дата: 18.01.2015 21:03:09 Код события: 18110 Категория задачи:Отсутствует Уровень: Ошибка Ключевые слова: Пользователь: система Компьютер: SRV-VM.irkraion.local Описание: Не удалось скопировать файл из "C:Hyper-VJKHVirtual Hard DisksJKH.vhd" в "E:Backup10 JKHVirtual Hard DisksJKH.vhd": Аргументы заданы неправильно (0x80070057) Xml события: <Event xmlns="http://schemas.microsoft.com/win/2004/08/events/event"> <System> <Provider Name="Microsoft-Windows-Hyper-V-VMMS" Guid="{6066F867-7CA1-4418-85FD-36E3F9C0600C}" /> <EventID>18110</EventID> <Version>0</Version> <Level>2</Level> <Task>0</Task> <Opcode>0</Opcode> <Keywords>0x8000000000000000</Keywords> <TimeCreated SystemTime="2015-01-18T13:03:09.058235000Z" /> <EventRecordID>446</EventRecordID> <Correlation /> <Execution ProcessID="2084" ThreadID="2872" /> <Channel>Microsoft-Windows-Hyper-V-VMMS-Admin</Channel> <Computer>SRV-VM.irkraion.local</Computer> <Security UserID="S-1-5-18" /> </System> <UserData> <VmlEventLog xmlns:auto-ns2="http://schemas.microsoft.com/win/2004/08/events" xmlns="http://www.microsoft.com/Windows/Virtualization/Events"> <ErrorMessage>%%2147942487</ErrorMessage> <ErrorCode>0x80070057</ErrorCode> <Parameter0>C:Hyper-VJKHVirtual Hard DisksJKH.vhd</Parameter0> <Parameter1>E:Backup10 JKHVirtual Hard DisksJKH.vhd</Parameter1> </VmlEventLog> </UserData> </Event>Нашел инфу по данной ошибке Event ID 18110 — VMMS (Не могу вставить ссылку), но перезапуск службы не помогает
 может знаете что именно понимается под Check the environment?
-
Изменено
19 января 2015 г. 0:55
-
Изменено
 может знаете что именно понимается под Check the environment?
Ответы
-
Я не заметил что внешний диск имеет файловую структуру FAT32
не думал, что диски ещё в неё форматируют. Отформатировал в NTFS, все заработало.-
Помечено в качестве ответа
AIRMO38
20 января 2015 г. 0:23
-
Помечено в качестве ответа
- Remove From My Forums
-
Question
-
I am running 2 VMs in Server 2008 R2 with Hyper-V. But am running out of space on the partition where the VMs were created. I have another larger partition on the same Hyper-V server and want to move the VMs to this larger partition.
I was able to successfully export one of the VMs to the larger partion and import it succesfully. The process ran perfectly.
However when I try to export the second VM the following error is is generated…
————————————————————————————-
An error occured while attempting to export the virtual machine.
Export filed for virtual machine ‘SALVO’.
Export failed for virtual machine ‘SALVO’
(41322DFC-B316-4CF8-9B19-7753078F0D4B) with error ‘The system cannot find the file specified.’ (0x80070002).
————————————————————————————-What can I do to resolve this error. The VM is functioning fine. I don’t understand why I am not able to export it. At one point in time I did have a second vhd attached to the system. But I removed it long ago and there were no observable side effects.
Thanks, David
-
Moved by
Friday, June 18, 2010 3:46 AM
(From:Windows Server 2008 R2 Hyper-V)
-
Moved by
Answers
-
Maybe, but I doubt it. You need lots more disk space than 2.5 MB, which explains why it’s so slow (or stuck), since having so little space to work with is hard. It would be good to free up
several GBs.Also, given the size of the available space, you may want to carry over less snapshots (i.e. delete some snapshots in the UI) and keep this more manageable for the system, Ideally, get a bigger drive, but for that Export needs to work :-), so start with
making more space available to Hyper-V, then do the export to what hopefully will be a much bigger drive.
Cheers, Dan Boldo – Program Manager Hyper-V, Windows Core OS
-
Marked as answer by
Dan Boldo [MSFT]
Tuesday, June 22, 2010 10:43 PM
-
Marked as answer by
Сегодня столкнулся с интересной ситуацией: Нужно экспортировать виртуальную машину Hyper-V, а на локальном диске уже нет места. Ну, думаю, экспортну в сетевую папку. Расшариваю папку, прописываю права на доступ для нужных пользователей, запускаю экспорт … И получаю сообщение об ошибке «Failed to copy file from source to network share: General access denied error (0x80070005)»
Начинаю разбираться и нахожу вполне логичное хотя сразу и не всегда очевидное решение. Оказывается, при запуске экспорта машины в сетевую папку данные записываются от учетной записи самого Hyper-V хоста.
Таким образом, для решения проблемы нужно просто прописать разрешения на запись в сетевую папку для учетной записи компьютера Hyper-V.
Если вы вдруг забыли как это делается:
Обновление разрешений уровня NTFS :
- На сервере куда собираетесь экспортировать , правый клик мыши по нужной папке и выбираем «Свойства».
- Вкладка «Безопасность».
- Кнопка «Изменить» -> Кнопка «Добавить».
- Клик «Типы объектов» и отметить тип «Компьютер»
- В диалоговом окне «Введите имена выбираемых объектов» впишите имя хоста Hyper-V и кликните «Проверить имена»
- Для учетной записи Hyper-V поставьте в колонке «Разрешения» Полный доступ и нажмите Ок.
Обновление разрешений уровня сетевого доступа:
- На сервере куда собираетесь экспортировать , правый клик мыши по нужной папке и выбираем «Свойства».
- Выбираем закладку «Доступ» -> Клик «Расширенная настройка»
- В диалоговом окне «Расширенная настройка» клик «Разрешения» -> «Добавить».
- Клик «Типы объектов» и отметить тип «Компьютер»
- В диалоговом окне «Введите имена выбираемых объектов» впишите имя хоста Hyper-V и кликните «Проверить имена».
- Для учетной записи Hyper-V поставьте в колонке «Разрешения» Полный доступ и нажмите Ок.
После этого повторяем попытку и наслаждаемся экспортом виртуальной машины без ошибок.
Содержание
- Error 0x80070005 when you export Hyper-V VMs over the Network
- Symptoms
- Cause
- Resolution
- Ошибка 0x80070005 при экспорте виртуальных машин Hyper-V по сети
- Симптомы
- Причина
- Решение
- Сказки под шум серверов
- Windows, Linux, VMWare и все все все… в одной сети
- Hyper-V VM export error: General access denied (0x80070005)
- Hyper-V VM export error: General access denied (0x80070005) : 4 комментария
- Hyper v failed to create export directory with error general access denied error 0x80070005
- Вопрос
- Ответы
- Все ответы
- Hyper v failed to create export directory with error general access denied error 0x80070005
- Answered by:
- Question
- Answers
- All replies
Error 0x80070005 when you export Hyper-V VMs over the Network
This article provides a solution to an issue where the error 0x80070005 occurs when you export a virtual machine to a network share.
Applies to: В Windows Server 2012 R2
Original KB number: В 2008849
Symptoms
You use Hyper-V on a computer that is running Windows Server 2008 or Windows Server 2008 R2.
- In Hyper-V Manager, you try to export a virtual machine to a network share.
- You have the full control permissions on the network share.
In this scenario, the export may fail with an error that resembles the following:
An error occurred while attempting to export the virtual machine.
Failed to copy file during export.
Failed to copy file from ‘ ‘ to ‘ ‘: General access denied error (0x80070005)
Cause
When you export a virtual machine in Hyper-V manager, it is the System account of the Hyper-V host that executes the export. This problem occurs because the Hyper-V host does not have permission on the network share.
Resolution
Ensure the permissions allow the Computer account of the Hyper-V host performing the Export to update the shared folder.
While following steps are specific to 2008, the idea is the same for updating the share and NTFS permissions if the share is hosted on another version of Windows.
Источник
В этой статье описано решение проблемы, из-за которой 0x80070005 возникает при экспорте виртуальной машины в сетевую папку.
Применяется к: Windows Server 2012 R2
Исходный номер базы знаний: 2008849
Симптомы
Hyper-V используется на компьютере под управлением Windows Server 2008 или Windows Server 2008 R2.
- В диспетчере Hyper-V вы пытаетесь экспортировать виртуальную машину в сетевую папку.
- У вас есть разрешения на полный доступ к сетевой папке.
В этом сценарии экспорт может завершиться ошибкой, похожей на следующую:
При попытке экспорта виртуальной машины произошла ошибка.
Не удалось скопировать файл во время экспорта.
Не удалось скопировать файл из исходного в сетевую<> папку: общая ошибка отказа в доступе (0x80070005)
Причина
При экспорте виртуальной машины в диспетчере Hyper-V экспорт выполняется с помощью системной учетной записи узла Hyper-V. Эта проблема возникает из-за того, что узел Hyper-V не имеет разрешений на сетевую папку.
Решение
Убедитесь, что разрешения позволяют учетной записи компьютера узла Hyper-V, выполняющее экспорт, обновить общую папку.
Хотя следующие действия относятся к версии 2008, идея в обновлении общего ресурса и разрешений NTFS совпадает, если общий ресурс размещен в другой версии Windows.
Источник
Сказки под шум серверов
Windows, Linux, VMWare и все все все… в одной сети

Hyper-V VM export error: General access denied (0x80070005)
Сегодня столкнулся с интересной ситуацией: Нужно экспортировать виртуальную машину Hyper-V, а на локальном диске уже нет места. Ну, думаю, экспортну в сетевую папку. Расшариваю папку, прописываю права на доступ для нужных пользователей, запускаю экспорт … И получаю сообщение об ошибке «Failed to copy file from source to network share: General access denied error (0x80070005)»
Начинаю разбираться и нахожу вполне логичное хотя сразу и не всегда очевидное решение. Оказывается, при запуске экспорта машины в сетевую папку данные записываются от учетной записи самого Hyper-V хоста.
Таким образом, для решения проблемы нужно просто прописать разрешения на запись в сетевую папку для учетной записи компьютера Hyper-V.
Если вы вдруг забыли как это делается:
Обновление разрешений уровня NTFS :
- На сервере куда собираетесь экспортировать , правый клик мыши по нужной папке и выбираем «Свойства».
- Вкладка «Безопасность».
- Кнопка «Изменить» -> Кнопка «Добавить».
- Клик «Типы объектов» и отметить тип «Компьютер»
- В диалоговом окне «Введите имена выбираемых объектов» впишите имя хоста Hyper-V и кликните «Проверить имена»
- Для учетной записи Hyper-V поставьте в колонке «Разрешения» Полный доступ и нажмите Ок.
Обновление разрешений уровня сетевого доступа:
- На сервере куда собираетесь экспортировать , правый клик мыши по нужной папке и выбираем «Свойства».
- Выбираем закладку «Доступ» -> Клик «Расширенная настройка»
- В диалоговом окне «Расширенная настройка» клик «Разрешения» -> «Добавить».
- Клик «Типы объектов» и отметить тип «Компьютер»
- В диалоговом окне «Введите имена выбираемых объектов» впишите имя хоста Hyper-V и кликните «Проверить имена».
- Для учетной записи Hyper-V поставьте в колонке «Разрешения» Полный доступ и нажмите Ок.
После этого повторяем попытку и наслаждаемся экспортом виртуальной машины без ошибок.
Hyper-V VM export error: General access denied (0x80070005) : 4 комментария
УРА . спасибо за подсказку, было бы интересно узнать каким образом вы определили каких прав не хватает, может включение аудита на папку? но видимо как-то проще.
Если я правильно помню, то где-то в книжках было написано, что Hyper-V делает экспорт под системной учеткой. Соответственно, чтобы выгрузить VM по сети нужно прописать разрешения для учетной записи компьютера.
А у меня нет возможности выбрать «Компьютер» сервер не в домене. Что делать?
Т.к. компьютер не в домене, то нет доверия между компьютерами. Как вариант, можно создать локальную учетку на Hyper-V хосте, запускать из под нее службу. И точно такую же учетку создать на второй машине, куда делаете экспорт. В теории, проблем быть не должно.
Источник
Hyper v failed to create export directory with error general access denied error 0x80070005
![]()
Вопрос
![]()
![]()
I’m having some issues with exporting hyper-v virtual machines to any 2003 R2 server in my domain. I’m using Hyper-V Server 2008 R2. I’m trying to get the Hyper-V manager to export a VM to a share I have created on a 2003 R2 server. I have given Hyper-V server access like instruced from many different sources on by giving the computer account both the Share and NTFS permissions level full control. The follow is the error I get. This happens on any 2003 R2 server I try it on.
Failed to create export directory
Failed to create export directory with error ‘General access denied error'(0x80070005) then it gives the GUID and name of the VM.
Is there some issue with trying to export to a 2003 server instead of a 2008 server?
Ответы
![]()
![]()
Are you initiating the export on the Hyper-V host or are you connecting to Hyper-V host from a remote machine and initiating the export? Credential delegation should be enabled on your domain if you are trying to export from a remote machine?
Serdar Sutay [MSFT]
Program Manager, Hyper-V
This posting is provided «AS IS» with no warranties, and confers no rights.
![]()
![]()
I found out how to with this link. It worked! I can export to any server that I setup the credential Delegation. I don’t understand why people haven’t had a problem with this and why it’s not documented anywhere when exporting VMs. Thanks for the help. Quite frustrating when there is not documentation for something like this. If a Hyper-v server is in a domain it would happen every time because by default there is no delegation setup on the Hyper-v server in ADUC.
Все ответы
![]()
![]()
The Hyper-V services run in the local Host security context, therefore they only have access to local physical resources.
The Export (for example) is not performed in the security context of your user account as that would be a security risk (it would technically be spoofing your security access) and also since you are using an MMC snapin for management, these security contexts cannot be spoofed.
the workaround you can use to export to a share on another machine. Warning, it opens up a pretty big security hole, so don’t leave the workaround up.
First, set up an actual share (not an admin share like c$).
Next, edit the permissions on the share (advanced sharing tab in Vista). On the permissions sceen clic «Add. » . However, in the dialog where you would normally type a username, click the «Object Types» button and check «computer».
Give that COMPUTER «Full control». Now the Hyper-V account can write to that share.
Alternatively you can change the user loging for Hyper-V to a domain account with permissions to the share. I have not tried that. It’s probably also a giant security hole.
Источник
Hyper v failed to create export directory with error general access denied error 0x80070005
This forum has migrated to Microsoft Q&A. Visit Microsoft Q&A to post new questions.
Answered by:
![]()
Question
![]()
![]()
I have VM, its name VMserver2008_Two, on host VMS2008_Test1. I have tried to migrate VMserver2008_two to another host, VMS2008_Test2. But it failed with this message: ‘Export failed for virtual machine ‘VMServer2008_Two’ with error ‘General access denied error’ (0x80070005).
Both host is Server 2008 with Hyper-V RC1 and same domain. And I did this as domain administrator.
Here are steps I did:
— Turn off VMServer2008_Two
— Right click on VMServer2008_Two and choose Export
— At Export Path, I browse to another host: VMS2008_Test2c$
— Then hit Export tab
— After that I got that message.
Please help me and let me know what I did wrong.
Answers
![]()
![]()
Export can only be used to a local path (onto a local mounted volume).
The VMMServer runs on the local security context and does not have access to any shares at all.
You need to export locally, then copy the exported folder to your desired destination, then import.
Brian Ehlert (hopefully you have found this useful)
- Proposed as answer by BrianEh MVP Wednesday, June 4, 2008 6:46 PM
- Marked as answer by Chang Yin Tuesday, June 17, 2008 2:27 AM
![]()
![]()
![]()
![]()
Are there any suggestions for a workaround? Expecting there to be enough free disk space to duplicate a VM will be unrealistic and unworkable in many production systems.
Example in my case: 147 GB disk with 3 VMs consuming about 110 GB. I need to export a VM that’s about 50 GB. Obviously not enough disk space.
I have tried to export just the config (after fully shutting down the VM). I copy that config to the new chassis, and then copy the .VHD. But when I try to import at the other end, I get the error that the VM state is not present. (forget the exact syntax, but there were no snapshots made and the VM was fully shut down prior to export)
Do you know if MS plans to add a network-aware export component? Being able to copy to newserverx$newpath directly would be an ENORMOUS benefit.
![]()
![]()
![]()
![]()
Due to the security context issue, the Hyper-V VM Management service cannot see beyond the local server physical resources.
When you login to a Windows Server as a user you execute commands in that user security context.
Actually, either way to need physical space to move the VM to. Whether that be a file share, or another server.
I will update this thread in a couple days with a tool that may help — stay tuned!
But, the big caveot that you must be aware of. Make sure that you do not have any snapshots associated with your VM. This will prevent any copy operation that you want to do.
Hyper-V Export is the only operation that fixes up snapshots to make a VM portable.
So make sure you delete all snapshots and then power down your VM to give those snapshots time to merge.
Brian Ehlert (hopefully you have found this useful)
![]()
![]()
Will stay tuned for the tool.
I know Hyper-V is still a work in progress, so I’m cutting it some slack. On my wishlist so far are:
1) If Hyper-V manager is not network-aware, add a component to the Import/Export function that IS network aware. Having to export to a local disk (which takes time) and then manually copy to a network share elsewhere (which takes more time) is too clumsy. Being able to Import from, or Export to, a network share would make the process more elegant and— perhaps most importantly— eliminate the problem of inadequate local disk space currently required for export.
2) Ability to easily shift the VM config and VHD(s) from one local drive to another, without having to export/import.
3) Performance improvements. I’ve run my own high-resource-utilization tests on the same physical machine. First I ran them as a stand-alone Server 2003 instance. Then I ran a P2V migration, creating a fixed-size .VHD of this machine. Next, I installed a bare hard disk of the exact same make/model from the same batch, installed Server 2008 and Hyper-V role, added the VM, installed Integration Components, and ran the same tests on the virtualized instance. Performance on all tests in virtual format were consistently around 75% of the physical instance results— a 25% performance loss for virtual vs. physical. Tests consisted of video encoding (strictly converting bits, no graphics rendering), Zipping a 2 GB file, and running an MD5 hash on a 10 GB file. The first two tests stress both CPU and disk I/O, while the MD5 is primarily disk reads.
Источник
System Requirements:
- Windows Server 2012 R2
- Windows Server 2016
The Problem:
Hyper-V 2012 R2 has a lot of new features that are worthy of note and one of the most appealing features for Virtualisation Administrators is shared nothing migration between hosts via SMB. If you are in an environment that doesn’t have shared storage it’s useful enough in itself because for VM purposes it may have just validated your decision not to get shared storage in the first place. Yet less well documented is the features value for setups where when you do have shared storage as you can use shared nothing migration as a mechanism to live migrate VM’s between clusters that are backed onto shared storage – or more specifically between “Cluster Shared Volumes” (CSV).
The picture on the back of the box of the smiling, happy systems administrator performing a shared nothing administrator makes it look so easy right? This is however an all too common occurrence:
'General access denied error'('0x80070005')
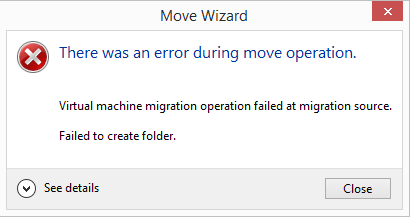
There was an error during move operation.
Virtual machine migration operation failed at migration source.
Failed to create folder.
There was an error during move operation.
Virtual machine migration operation failed at migration source.
Failed to create folder.
Virtual machine migration operation for ‘<VM Name>’ failed at migration source ‘<Source Hypervisor name>’. (Virtual machine ID <VM-SID>)
Migration did not succeed. Failed to create folder ‘<RPC path>…Virtual Hard Disks’: ‘General access denied error'(0x80070005’).
If you look at the specified destination path (e.g. c:ClusterStorageVolume1test) after receiving this error, you will find that it has created the test folder and it will have created a ‘Planned Virtual Machines’ folder beneath it which will in turn contain a folder named with the VM’s VM-SID (the Virtual Machines unique security ID) and a .xml file named with the same VM-SID.
The migration will however not progress any further.
If you attempt to perform the same operation in PowerShell you will receive the PowerShell version of the same error:
VERBOSE: Move-VM will move the virtual machine "<VM Name>" to host "<Destination Server>"
Move-VM : Virtual machine migration operation for '<VM Name>' failed at migration source '<Source Server>'. (Virtual machine ID<VM-SID>)
Migration did not succeed. Failed to create folder
'<Destination Server><Source Server>.762091686${e166ba26-8a4a-4029-ac34-c2466451e439}<VM Name>Virtual Hard Disks': 'General access denied error'('0x80070005').
You do not have permission to perform the operation. Contact your administrator if you believe you should have permission to perform this operation.
At line:1 char:69
+ $vm = Get-VM -Name 'test' -ComputerName "<Source Server>" | Move-VM -Des ...
+ ~~~~~~~~~~~~~~~~~~~~~~~~~~~~~~~~~~~~~~~~~~~~~~~~~~~~~~~~~~~~~~~~~~~~~~~~~~~~~~~~
+ CategoryInfo : PermissionDenied: (Microsoft.Hyper...VMMigrationTask:VMMigrationTask) [Move-VM], Virtual izationOperationFailedException + FullyQualifiedErrorId : AccessDenied,Microsoft.HyperV.PowerShell.Commands.MoveVMCommand
Please Note: This document does not specifically address 0x80070005 for Hyper-V Replication Troubleshooting, which is a slightly different (yet related) issue.
More Info
Understanding the topology involved in my setup also reveals my reason for needing to get this working – this is important as setup and reasons yours may differ slightly. What I was attempting to do was migrate between two multi-node Windows Hyper-V Server 2012 R2 clusters while being able to initiate the migration from a third device, a Windows 8.1 management console.
Much of the discussion surrounding 0x80070005 suggests that you simply need to deal with the fact that you need to log onto the source workstation and initiate a push of the VM from the source server to the destination server using CredSSP. This is fine if you have a general purpose commodity server that happens to have Hyper-V on it. In the real world if you have a Hyper-V Cluster, you should not be running it in GUI mode, you should be using Server Core – and if you are using Windows Hyper-V Server to begin with, you don’t even have the option of a GUI.
So we can eliminate the use of the GUI tools or the simplicity of “just RDP into the server” immediately from this discussion. People answering as such are running in very simple Hyper-V setups and in environments with simple, very liberal security policies.
You can of course use PowerShell to perform a CredSSP migration on a Server Core installation and as a mater of good practice the ability to transfer VM’s using CredSSP should be confirmed as working before you start out with Kerberos. To do that, log onto the Source Server and execute the following command in a PowerShell session:
Get-VM -Name ‘<VM Name To Move>’ | Move-VM -DestinationHost “<Destination Server>” -DestinationStoragePath “C:ClusterStorageVolume1<VM Name to Move>” -Verbose
If that doesn’t work, I recommend that you troubleshoot this issue before you look to go any further on the 0x80070005 issue.
Additionally, before make sure that you have done performed the basic troubleshooting steps and also ensure that you are simplifying the problem as much as possible before starting. The following provides an overview of such steps in no particular order:
- Log-in as a Domain Admin to perform this test (if possible). After you have that working migrate down to delegated users and troubleshoot any issues that they are experiencing
- Only try to ‘shared nothing’ migrate a VM that is turned off (create a new VM, attached a default sized dynamically expanding disk, don’t add any networks and leave it off as this means that you will only have 4MB of data to test move). Once you can migrate a VM that is off, attempt to migrate a running VM with a Live Migration.
- Only test migrate between the Source Cluster storage (CSV) owner node and the Destination Cluster storage owner node
- If possible, make the owner of the source and destination cluster core resources the same node that owns the CSV
- Remember that you must use Hyper-V Manager after you have de-clustered the VM from within Failover Cluster Manager before you can perform a shared nothing migration – the fact that your VM has anything to do with a cluster is an aside for Hyper-V. Treat this process as a Hypervisor to Hypervisor move that happens to be on a CSV and forget about the cluster.
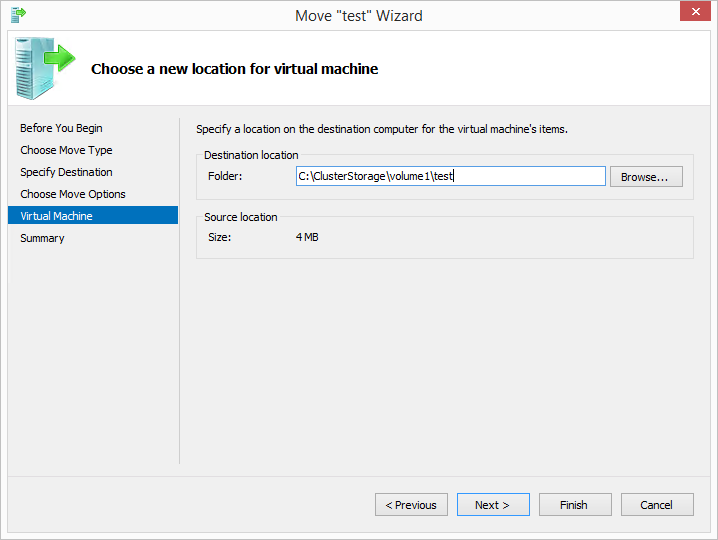
- On the ‘Choose a new location for virtual machine’ page of the migration wizard, remember that you must enter a file system path (e.g. C:ClusterStoragevolume 1test) and not a UNC path (e.g. serverc$ClusterStoragevolume 1test). The migration is going to take place using RPC and not SMB. Thus do not use a UNC path.

- Ensure that you can migrate the VM using CredSSP as discussed at the beginning of this section
- Ensure that your Domain Controllers are running Windows Server 2008 or higher (or at least your logon server), Windows Server 2003 Domain Controllers are known to have issues here (possibly due to lack of AES support). Your domain / forest functional levels can reportedly be Windows Server 2003 if required. I have only tested with Windows Server 2008 domain functional and Windows Server 2008 forest functional levels
- If you are attempting to move between servers in a domain trust, you must ensure that the domain trust supports AES
- Keep your initial testing paths simple and avoid overly complicated NTFS structures. For example, target the destination to be a local sub folder of c: and not a junction (such as ClusterStorageVolume #) or a non-drive letter NTFS Mount Point (i.e. a iSCSI share or drive mount point exposed as a sub-folder to a higher file system). See the links below for more on this.View: Snapshot – General access denied error (0x80070005)
View: Migrating a Virtual Machine problemNote: The iCACLS command listed in the second link does not use the principal of least permission. The command to enact the principal of least permission would be as follows:icacls F:hvtest /grant “NT VIRTUAL MACHINEVirtual Machines”:(OI)(CI)(R,RD,RA,REA,WD,AD) /T
Finally, keep in mind that for delegation purposes, permissions must be valid for the user account that you are using to perform the move as well as the SYSTEM account.
- Initially, forget about testing the migration into the cluster CSV itself. Instead, create a new folder on the root of the C Drive of the destination server and migrate into this. There are a few suggestions online that you need to put a couple of folder depths between the root of the drive and the VM itself so try something like:
- C:VM StoreTest
- If you are following my advice, you will be testing with a 4MB VM called ‘test’ so there won’t be any issue with storage space and the use of the C Drive for testing
- User PowerShell for testing, otherwise you will go insane from having to repeatedly re-enter information in the Move VM wizard. The general gist of the command is:
Get-VM -Name ‘<VM Name To Move>’ -ComputerName “<Source Server>” | Move-VM -DestinationHost “<Destination Server>” -DestinationStoragePath “C:ClusterStorageVolume1<VM Name to Move>” -Verbose
With the 0x80070005 error, you should find that it will get to 2% and then error after a few seconds.
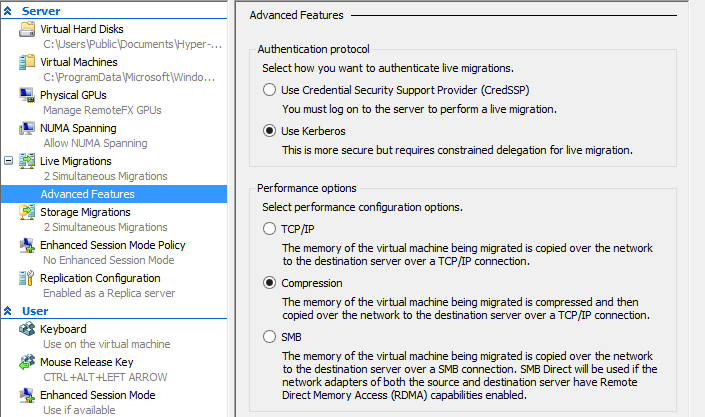
- Ensure that you have enabled Kerberos authenticated Live Migrations in the properties for the Hypervisor in Hyper-V Manager
 Note: You can perform this action in PowerShell using
Enable-VMMigration -ComputerName <Server Hostname>
Set-VMHost -ComputerName <Server Hostname> -VirtualMachineMigrationAuthenticationType Kerberos - Ensure that your Hypervisor’s and the Windows 8.1 management VM are up to date (at the same patch level) and are joined to the same domain
- Ensure that all parties in the process have properly registered DNS records in AD DNS
- Check your Windows Firewall rules – for testing purposes just turn them off if you can (remember to turn them back on afterwards!)
- Check your ASA/Hardware Firewall rules for the same
- Keep an eye on the Hyper-V event logs for any additional information. The log of consequence is found in event Viewer under:Applications and Services Logs > Microsoft > Windows > Hyper-V-VMMS > AdminIf you are experiencing the same problem that I was, you will see three events on the Source Server’s log (20414, 20770 and 21024). The 20770 error is the one being reflected by PowerShell or the Hyper-V Management console. Shortly there-after, the Destination Server will log a 13003 event informing you that the virtual machine from the Source Server (with the same VM-SID) was deleted, indicating that the Destination Server performed a clean-up of the initial migration process.
 Note: You can perform this action in PowerShell using
Permissions
There is a lot of discussion about permissions and 0x80070005 errors. Let us look at the salient points
VERBOSE: Move-VM will move the virtual machine "<VM Name>" to host "<Destination Server>"
Move-VM : Virtual machine migration operation for '<VM Name>' failed at migration source '<Source Server>'. (Virtual machine ID <VM-SID>)
Migration did not succeed. Failed to create folder
'<Destination Server><Source Server>.762091686${e166ba26-8a4a-4029-ac34-c2466451e439}<VM Name>Virtual Hard Disks': 'General access denied error'('0x80070005').
You do not have permission to perform the operation. Contact your administrator if you believe you should have permission to perform this operation.
At line:1 char:69
+ $vm = Get-VM -Name 'test' -ComputerName "<Source Server>" | Move-VM -Des ...
+ ~~~~~~~~~~~~~~~~~~~~~~~~~~~~~~~~~~~~~~~~~~~~~~~~~~~~~~~~~~~~~~~~~~~~~~~~~~~~~~~~
+ CategoryInfo : PermissionDenied: (Microsoft.Hyper...VMMigrationTask:VMMigrationTask) [Move-VM], VirtualizationOperationFailedException + FullyQualifiedErrorId : AccessDenied,Microsoft.HyperV.PowerShell.Commands.MoveVMCommand
- The Migration failed at the Source Server
- The Source Server failed the migration because it could not ‘create a folder‘
- We know that the folder in question is the Source Server being unable to create a ‘<VM Name>Virtual Hard Disks‘ folder
- We know that the Source Server was able to create a ‘<VM Name>Planned Virtual Machines’ folder because we can see it in the file system if we use the GUI Wizard to perform the migration.
Note: The PowerShell version cleans up after itself! - You have told the Hypervisor to use Kerberos to perform the migration
What does this tell us? It tells us that YOU, the administrator are being told that you cannot create the folder. You are using Kerberos to perform the migration, not CredSSP, so the entire process is being run end-to-end using YOUR credentials. The Management Workstation is logging onto the Source Server as YOU. The Management Workstation is telling the Source Server to initiate the move and in turn the Source Server is delegating your authentication session to the Destination Server and telling it to receive instructions from the Source Server using your credentials. At this point it has nothing to do with ‘NT Virtual Machine’ or VM-SID permissions, this comes after the migration of the core parts of the VM and during initialisation of the VM on the Destination Server. We are not there yet.
So the first thing to check is that your account is authorised to perform the move. If you are a Domain Admin, you should be OK, however you should ensure that the Domain Admin’s security group is a member of the Local Administrators Group on the all participating machines – source server, destination server and management workstation.
If you do not want the user account to have full local admin rights you can add them to the “Hyper-V Administrators” group on each server. To add an account to a local group on Server Core or Windows Hyper-V Server:
net localgroup "Hyper-V Administrators" /add domainuser
net localgroup "Administrators" /add domainuser
Constrained Delegation
When viewing the Delegation tab on the computer account in Active Directory Users & Computers (ADUC) ensure that:
- You are using “Trust this computer for delegation to specified services only” (it doesn’t appear to work if you use the “any service” option)
- You have selected “Use Kerberos only”
- You tick the ‘Expanded’ checkbox to view the full list of entries
- That (once Expanded) there are two entries for each type (types being CIFS and Microsoft Virtual System Migration Service), one entry will have the NetBIOS Name and the other will have the FQDN i.e. there are 4 entries for each delegated host, two with NetBIOS Names and two with FQDN entries.
- When you create the Kerberos Constrained Delegation, you need to ensure that the “Service Name” field column is blank. If there is something listed in the Service Name column, your delegation is not going to work properly.
- You need to have the same number of “CIFS” entries for each host as you do for “Microsoft Virtual System Migration Service”
- It is not necessary to add the Management Workstation to the Constrained Delegation
When you issue the Move-VM command in PowerShell, try substituting the -ComputerName and -DestinationHost values for four combinations of the NetBIOS Name and FQDN.
Get-VM -Name ‘<VM Name To Move>’ -ComputerName “<Source Server>” | Move-VM -DestinationHost “<Destination Server>” -DestinationStoragePath “C:ClusterStorageVolume1<VM Name to Move>” -Verbose
For example, if your have Server1 and Server1 and your domain is domain.local the combinations to test are:
| Source | Destination |
|---|---|
| Server1 | Server2 |
| Server1.domain.local | Server2 |
| Server1 | Server2.domain.local |
| Server1.domain.local | Server2.domain.local |
If you find that one of these works while the others do not, you have an error in the constrained delegation setup for DNS or NetBIOS aliasing. Carefully recreate the delegation.
After you have setup the delegation, go into a LDAP browser, ADSI Edit or the Attribute Editor in ADUC. For each delegated server, find the servicePrincipalName property and look at the value list. You should have two of each of the following entries (one with the NetBIOS Name and the other with the FQDN).
- Hyper-V Replica Service/
- Microsoft Virtual System Migration Service/
- RestrictedKrbHost/
If you do not see these, you have a Delegation Error and/or an issue in creating SPN records. Either delete and try to recreate them by recreating the delegation or carefully add them by hand.
DNS
Bindings. I know that you checked them, but check them again. Trust me. On Server Core where you have very little contact with the actual server console this is very easy to overlook.
Constrained delegation may work with both NetBIOS and DNS, however Kerberos does not care for NetBIOS. If your DNS doesn’t work, you aren’t going to get a successful ticket session creation that you will need in order to pass credentials forward as part of the Constrained Delegation setup.
Check the following using short hand and FQDN lookups i.e. nslookup server1.domain.local and just nslookup server1. Are they both going where you expect? Crucially, which server NIC is the DNS query going out of and once the reply comes back, which NIC is being used to attempt to contact the host?
- The management console can query all domain controllers in DNS
- The management console can query all Hypervisors in DNS
- The hypervisors can all query the management console in DNS
- The hypervisors can all query all domain controllers in DNS
- The hypervisors can all query each other in DNS
This also requires you to check your default gateway settings.
This is important in the following scenario. Most of you will not encounter this because of the scale of your operations, however the fact is that at Enterprise level I did encounter this problem, hence why I able to write about it.
- Lets assume that you follow best practice and have separate public, management, cluster, iSCSI and heartbeat networks.
- Your management network is data centre local, on a private network with minimal routing and is designated to management of servers, IPC traffic, un-routed VM’s etc in a secure fashion
- Local DNS is available on the management network but does not expose Internet Resolution
- Your public VM address ranges come from the public network and are not exposed via NAT/PAT i.e. routing and firewall’s
- Your domain controllers exist on a public routed network subnet that is separate from the public VM address ranges used for VM’s
- You followed best practice and set your management networks binding order to be the first adapter in the binding order on the hypervisors
- You will now receive 0x80070005 when you attempt to replicate, live migrate of off-line migrate a VM between cluster nodes using Kerberos Constrained Delegation
The problem is the adapter binding order caused by the use of local DNS on a network that offers no connectivity to the domain controllers. When the KDC attempts to generate a Kerberos ticket for the constrained delegation, the lookups for the domain controllers will be performed using the DNS servers on the management network and will mistakenly attempt to connect to the domain controllers via the management network. This is simply going to time out – causing the wait during migration. Once it times out, Windows DNS doesn’t defer to the next set of DNS servers or attempt to get to the DC’s on a different NIC. It simply gives up.
The resulting very helpful error code that Hyper-V offers back is Access Denied while seemingly attempting to create files in the file system – the Hypervisor will log that it was unable to create the ‘Virtual Hard Drives’ folder on the destination Hypervisor. What it should actually say here is that it could not properly initialise the end to end Kerberos Constrained Delegation ticket session due to a timeout. It of course doesn’t do that.
In this situation the fixes are one of:
- Add an interface on the domain controllers on the management LAN
- Add a network interface which can connect to the domain controllers in a higher adapter binding order position in the Hypervisor binding order
- Remove the DNS servers from the management networks TCP/IP properties, thus forcing Windows Server to use the first available DNS server configuration on a lower ordinal adapter
- Allow routing from the management LAN to the domain controllers. Alias, stub or secondary zone the domain controllers in the management networks DNS and hope you remember to keep them up to date when you make changes to Domain Controller DNS records
Assuming that your constrained delegations are correct, it will start working as soon as the DNS updates have propagated.
The Fix
Ultimately the problem that I had was in the setup of the Constrained Delegation and in another case as discussed above, the DNS binding order. For the Constrained Delegation issueI only had NetBIOS values for the ‘Microsoft Virtual System Migration Service’ while I only had FQDN values for CIFS entries which in turn meant that the associated SPN records were missing.
I was originally using a script by Robin CM for this purpose, it appears that it is this script which isn’t quite ticking all of the boxes.
View: Robin CM’s IT Blog – PowerShell: Kerberos Constrained Delegation for Hyper-V Live Migration
In my environment, the following represents a corrected version of the script.
The script assumes that you have placed all of your Hypervisor’s in a dedicated OU. The script will obtain a list of all servers in the OU and automatically create the constrained delegation complete with both pairs of the NetBIOS Name and FQDN records.
In addition, the script also now ensures that the system is not adding a constrained delegation back to itself into the AD database.
You must be a domain admin or have permissions to write to msDS-AllowedToDelegateTo objects in AD in order to run this script.
$OU = [ADSI]"LDAP://OU=Hypervisor's,OU=Servers,DC=ad,DC=domain,DC=co,DC=uk"
$DNSSuffix = "ad.domain.co.uk"
$Computers = @{} # Hash tableforeach ($child in $OU.PSBase.Children){
# add each computer in the OU to the hash table
if ($child.ObjectCategory -like '*computer*'){
$Computers.Add($child.Name.Value, $child.distinguishedName.Value)
}
}# Process each AD computer object in the OU in turn
foreach ($ADObjectName in $Computers.Keys){
Write-Host $ADObjectName
Write-Host "Enable VM Live Migration"
Enable-VMMigration -ComputerName $ADObjectName
Write-Host "Set VM migration authentication to Kerberos"
Set-VMHost -ComputerName $ADObjectName -VirtualMachineMigrationAuthenticationType Kerberos
Write-Host "Processing KCD for AD object"
# Add delegation to the current AD computer object for each computer in the OU
foreach ($ComputerName in $Computers.Keys){
#Write-Host $ComputerName.toUpper() $ADObjectName.toUpper()
if ($ComputerName.toUpper() -ne $ADObjectName.toUpper()) {
Write-Host (" Processing "+$ComputerName+", added ") -NoNewline
$ServiceString = "cifs/"+$ComputerName+"."+$DNSSuffix
Set-ADObject -Identity $Computers.$ADObjectName -Add @{"msDS-AllowedToDelegateTo" = $ServiceString}
$ServiceString = "cifs/"+$ComputerName
Set-ADObject -Identity $Computers.$ADObjectName -Add @{"msDS-AllowedToDelegateTo" = $ServiceString}
Write-Host ("cifs") -NoNewline
$ServiceString = "Microsoft Virtual System Migration Service/"+$ComputerName
Set-ADObject -Identity $Computers.$ADObjectName -Add @{"msDS-AllowedToDelegateTo" = $ServiceString}
$ServiceString = "Microsoft Virtual System Migration Service/"+$ComputerName+"."+$DNSSuffix
Set-ADObject -Identity $Computers.$ADObjectName -Add @{"msDS-AllowedToDelegateTo" = $ServiceString}
Write-Host (", Microsoft Virtual System Migration Service")
}
}
}
Once you have run it, give the system a few minutes so that AD can distribute the update to all DC’s and for the Kerberos session on the respective nodes to refresh.
Update for Windows Server 2016
So I decided to reinstall a node to Hyper-V Server 2016 and have a play with it in amongst HyperV Server 2012 R2.
The experience did not go swimmingly well. Here is a quick overview of some issues and I encountered/created myself to keep in mind when troubleshooting this
- The Hyper-V server Win32 installer will perform an in-place upgrade as a clean install. Remember that this means that you will need to delete the AD computer account object and DNS records and then re-join the system to the domain in the correct OU.
- Once you have done this, you will need to re-create the Kerberos Constrained Delegation records for all Hyper-V nodes
- I was experiencing a problem where I could use Kerberos to Live Migrate or offline migrate to the Hyper-V 2016 host, however I could not migrate back unless I logged onto the 2016 node and use CredSSP to move it back again. Looking at the Windows Server 2008 R2 domain controller security logs, Kerberos authentication was failing. In the end the fix was to add a Delegation for CIFS and the ‘Microsoft Virtual Systems Migration’ delegation classes of the computer account object — TO ITSELF. Yes, if you have Computer Accounts HVNode01, HVNode02, HVNode03, the delegation tab for HVNode01 must include CIFS and MVSM entries in DNS and NetBIOS nomenclature for not only HVNode02 and HVNode03 but ALSO HVNode01 (itself). Once I did this, I could magically migrate the VMs back again.
- If you are using Jumbo Frames, remember to perform a test using the following command. If it doesn’t work, fix this before doing anything else
ping <ipAddress> -l 8500 -f
- I made a silly mistake in late night PowerShell command entry when setting up the networking on the 2016 box, I entered
add-vmnetworkadapter -managementos -Name Management
when I actually meant to enter
add-vmnetworkadapter -managementos -Name Management -SwitchName VS_Managmement
This hooked up a new Virtual network adapter on the Hypervisor called ‘Management’ to each and every Virtual Switch on the Hypervisor. So I wound up with 3 NIC’s called Management all on different networks. They went off and got their own IP addresses from DHCP, registered themselves in DNS and created chaos in the adapter binding order. Naturally the one on the unrouted Management network wound up at the top of the binding order and things got a little upset!
- The very first randomly selected non-production critical VM that I attempted to migrate was the nodes local console VM. This VM was not designed to move from the node and didn’t have CPU compatibility mode enabled. This caused additional failure issues.
- The second randomly selected non-production critical VM that I attempted to migrate gave no hex error code or message what so ever either through the UI or the event log, just throwing Event ID 24024 and stating that the migration failed and the error message could not be found. To cut a long winded story short, in the end I (correctly) assumed it was the VM itself at fault and decided to Export / Import it in order to lazily cycle the file system permissions. It turns out that when I attempted to re-import the VM (as a restore) the import wizard notified me that it was expecting to find a snapshot file but that the snapshot itself was unavailable (this VM had no snapshot on the UI and no snapshot file in the export snapshots folder). The wizard asked me if it could clear the snapshot remnant and imported the VM. Once it was imported again, it could now live migrate and offline migrate properly. It had nothing to do with the 2016 node.Note: Remember to check on the source Hypervisor for remnants of the original Exported VM which may be left in place on the file system.
With the above issues resolved, everything is working correctly between the Hyper-V Server 2012 R2 nodes and the test Hyper-V Server 2016 node.

Столкнулся с проблемой экспорта виртуальной машины из VMware. Проблема конечно странная, так как скачать диск формата vmdk не получилось ни одним браузером. Edge, Firefox и Chrome выдавали ошибку при скачивании.
В начале думал проблемы с большим количеством snapshot у виртуальной машины, пришлось удалить и объединить диск. Но ошибка осталась.
Для решения проблем с экспортом виртуальной машины из VMware помог инструмент под названием VMware OVF Tool. Программа консольная, но полностью рабочая.
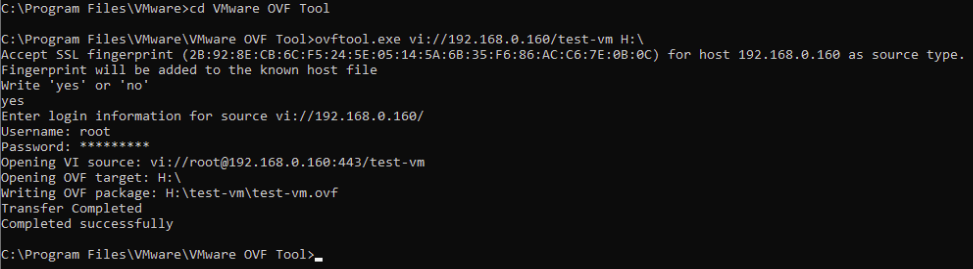
Скачать инструмент можно с официального сайта: https://www.vmware.com/support/developer/ovf/ Нужна будет учетная запись, для загрузки.
После установки переходим в каталог с программой:
|
C:Program FilesVMwareVMware OVF Tool |
и запускаем ovftool.exe
ovftool.exe vi://ip-vwmare/nameVM C:temp
ip-vwmare – ip адрес гипервизора VMware
nameVM – полное название виртуальной машины
C:temp – папка куда будет произведен экспорт
На выходе получаем OVF и VMDK файлы.