
Попались мне как то в руки большие не отформатированные xml файлы, мне нужно было разобраться в структуре этих файлов и сделать скрипт для чтения этих файлов с последующей записью данных в базу данных MySQL. Сидеть и форматировать такие файлы руками — что бы разобраться в структуре у меня не было ни времени ни желания, и я решил поискать решение. Первое что пришло в голову это найти плагин, для моего любимого Notepad++, и я нашел его — XML Tools.
Начну с установки плагина, понимаю что все умеют, но для полноты описания все же объясню все по пунктам:
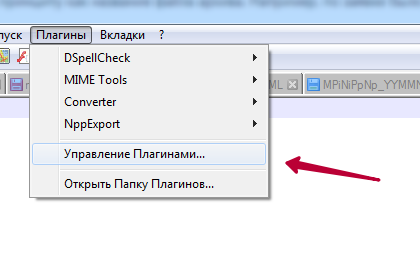
Идем в меню «Плагины», далее «Plugin Manager», далее «Show Plugin Manager», в открывшемся окне ищем XML Tools устанавливаем галочку и жмем кнопку «Install». Второй способ установки: скачиваем отсюда последнюю версию плагина затем распаковываем и копируем в директорию plugins которая находится в корне с установленным notepad++.
После завершения установки необходимо перезагрузить notepad++. После перезагрузки в меню «Плагины» вы должны увидеть вновь добавленный плагин — XML Tools.
Итак, что умеет XML Tools?
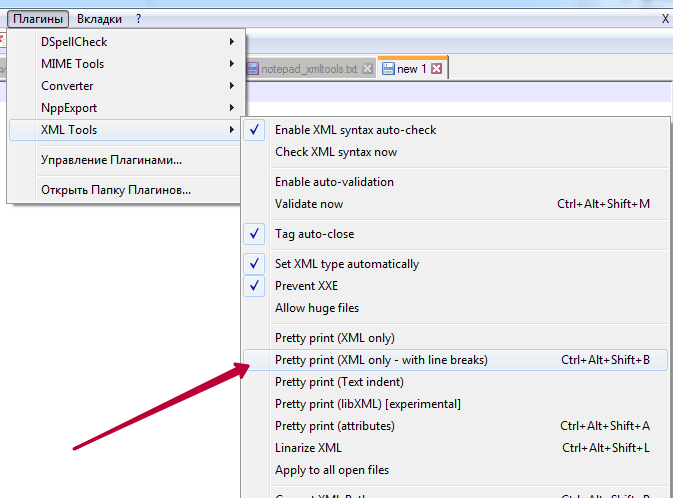
Начну с конца, а именно с функции которая была необходима мне, для приведения в порядок не отформатированных файлов. Для того что бы отформатировать XML файл «легким движением руки», перейдите в меню «Плагины» далее XML Tools и выберите пункт: Pretty Print (XML only with-line breaks) в результате этой операции вы получите полностью отформатированный файл.
Теперь о других возможностях этого плагина:
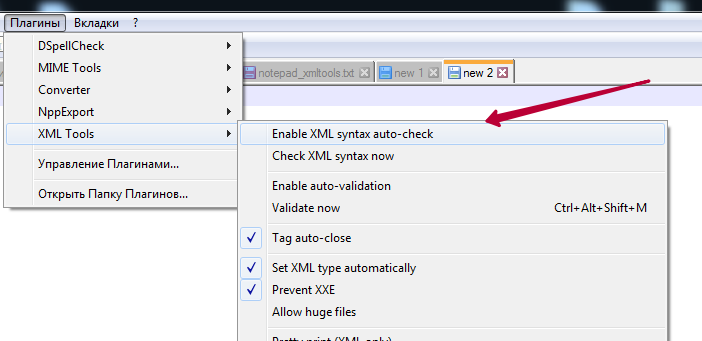
Установив опцию Enable XML syntax auto-check, вы тем самым включите автоматическую проверку синтаксиса xml и в случае ошибки в вашем xml файле, вы будете проинформированы сообщением об ошибке — при попытке сохранить файл.
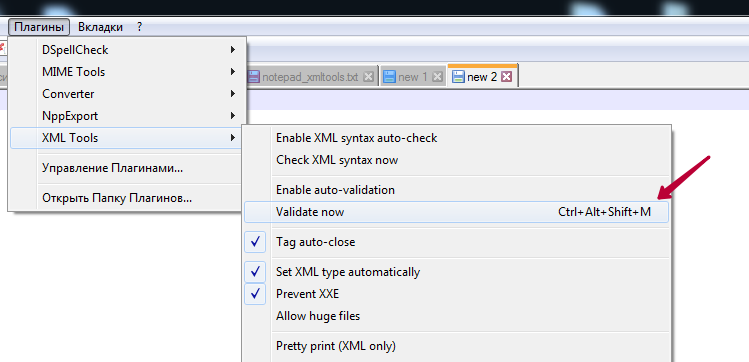
Если вы просто хотите проверить имеющийся у вас xml файл на ошибки воспользуйтесь Check XML syntax now. Для автоматической валидации кода используйте Enable Auto Validation или для валидации файла воспользуйтесь Validate Now.
Для автоматического закрытия тегов используйте Tag auto close.
Я описал основной функционал этого плагина, там есть еще много функций которые я за ненадобностью пока не использовал. Плагин не сложный и если у вас есть какие то задачи по обработке XML фалов то этот плагин значительно облегчит вам жизнь
Описание работы с плагином для Notepad++open in new window XML Tools:
- Установка
- Автоматическая првоерка XML
- Форматирование XML
- Проверка XML по XSD
Заходим в Управление плагинами:
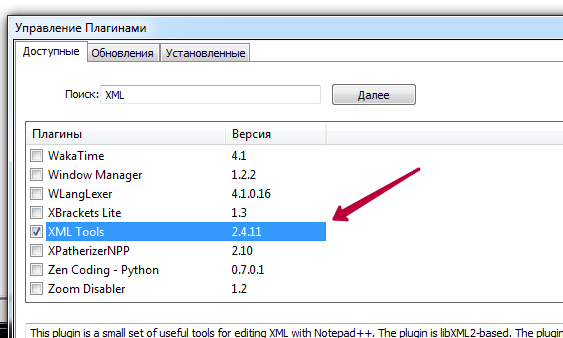
Выбираем XML Tools и нажимаем установить:
Проверка xml
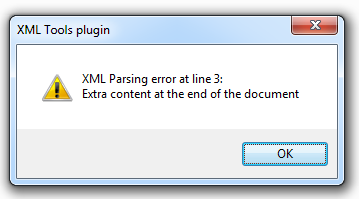
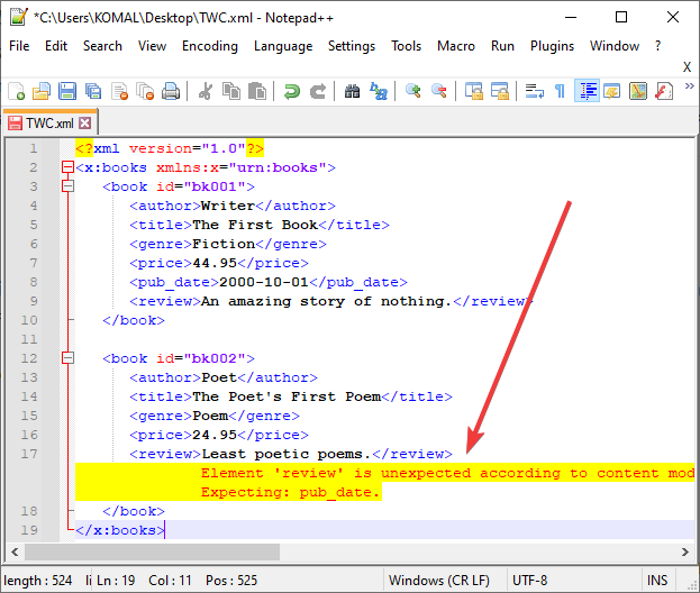
При сохранении xml-фала плагин проверяет корректность xml и выдаёт ошибки:
XML Parsing error at line 3:

Extra content at the end of the document
1
2
3
Проверка не работает с кодировкой widows-1251, чтобы работала проверка преобразуйте xml в utf-8:
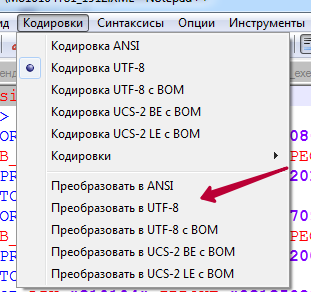
В заголовке файла так же необходимо указать кодировку:
<?xml version="1.0" encoding="utf-8"?>
1
Если автоматическая проверка не нужна то можно её отключить XML Tools - Enable XML syntax auto-check:
Форматирование
Чтобы привести xml-документ к читаемому виду выберите пункт Pretty XML (XML only - xml with line break) в меню плагина:
Проверка по xsd
Перед проверкой xsd происходит проверка xml файла, поэтому, как было написано выше, кодировка файла должна быть utf-8.
Для проверки по xsd выберите пункт XML Tools - Validate now.
В появившемся окне выберите файл XSD.
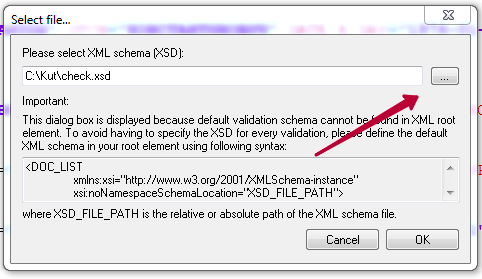
Ссылка на XSD может быть уже указана в XML, тогда выбирать файл не нужно. После выбора появится окно со списком ошибок:
Download PC Repair Tool to quickly find & fix Windows errors automatically
In this post, we will talk about how to validate XML against XSD in Notepad++. An XML (eXtensible Markup Language) file is a markup file that consists of a set of rules for encoding documents in both human-readable and machine-readable formats. It is used to store and transport the data. While XSD stands for XML Schema Definition given by World Wide Web Consortium (W3C). It is primarily used for defining the structure and content of an XML file.
XSD contains a set of validation rules to validate the correctness of an XML file. It defines the syntax and the way in which elements and attributes must be used in an XML file. An XML document is well-formed if it is validated against XSD. Programmers use XML Schema to verify and assure that items and elements in a document are correctly used and are error-free. When you perform XSD validation on an XML file, it highlights and displays the errors in the document that you need to fix. You can easily eliminate all the errors in the document using the highlighted errors and comments.
You can easily validate your XML document against XSD using the Notepad++ application. Notepad++ is a popular text and source code editor for various programming languages and can also be used as a LaTeX editor. You can use its Plugins functionality to validate an XML document using an XSD file. Here, we are going to show you the exact step-by-step procedure to perform XML validation against XML Schema. Let’s get straight to the tutorial now!
See: How to set Notepad++ as default editor for .xml files.
Here are the main steps to validate XML documents using XSD files in Notepad++:
- Download and install the Notepad++ application.
- Launch Notepad++ application.
- Open Plugins Admin.
- Select and Install XML Tools in Notepad++.
- Import the XML document that you want to validate.
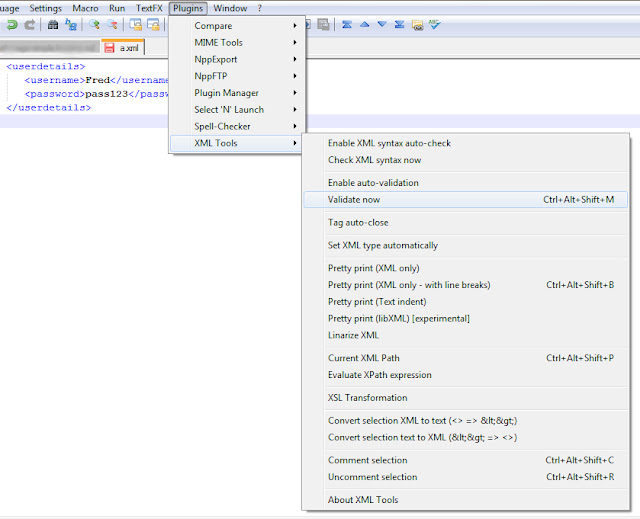
- Click on the Plugins > XML Tools > Validate Now option.
- Browse and select an XSD file to validate the XML file against it.
Now, let us discuss the above steps in elaboration!
Firstly, if you don’t already have it, you need to download Notepad++ and then install it on your Windows 11/10 PC. If you don’t want to install it, you can use its portable edition as it comes in both installer and portable packages. So, use the version you prefer.
After installation, simply launch the Notepad++ application. Now, go to its Plugins menu and click on the Plugins Admin option.

In the Plugins Admin window, you will see a list of available plugins that you can enable or disable whenever you want. Also, it shows the plugins that you have installed and for which updates are available. From this list of plugins in the Available tab, scroll down to the XML Tools; it will be present at the end of the list.
Select the XML Tools plugin and you will be able to view the plugin description and uses. Enable the XML Tools checkbox and then press the Install button.
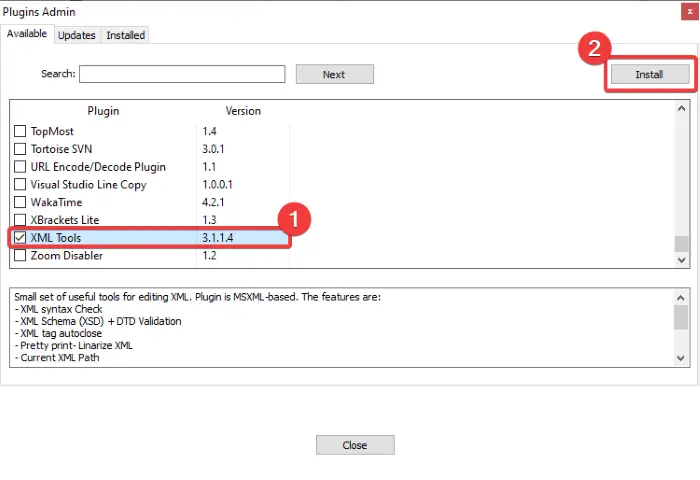
Notepad++ will have to exit and restart to install the plugin. Confirm the same on the next prompt by clicking the OK button. The installation takes few seconds only. After the XML Tools plugin’s installation, Notepad++ will be restarted quickly.
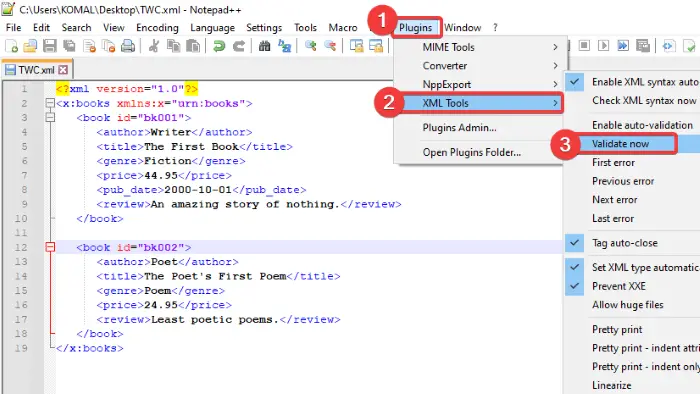
You now need to open the XML document that you want to validate against XSD. After opening the XML file, go to the Plugins menu and you will now see the XML Tools option added to it. Simply go to the XML Tools > Validate Now option and click on it. You can also press Ctrl + Alt + Shift + M key combination to open Validate Now option.
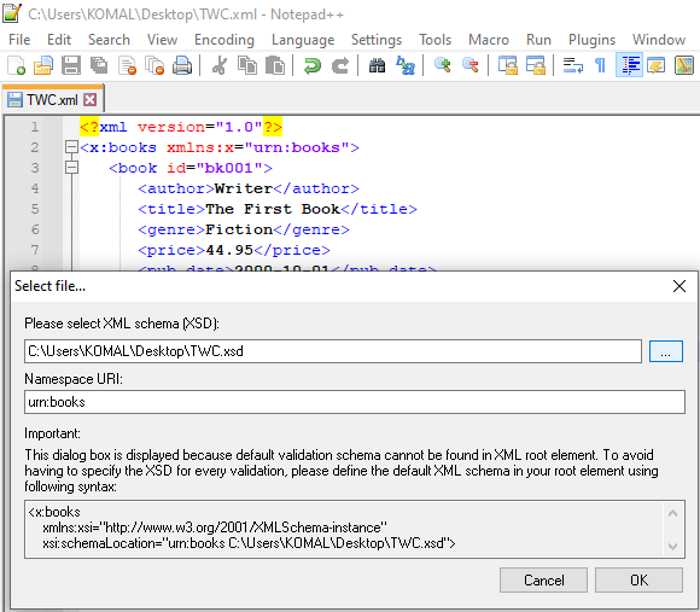
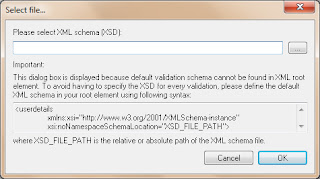
Now, select the XSD file against which you want to validate the opened XML document. Simply browse and then import the XSD file in the respective field. It shows the Namespace URI too.
Press the OK button to start validating XML against the imported XML schema file.
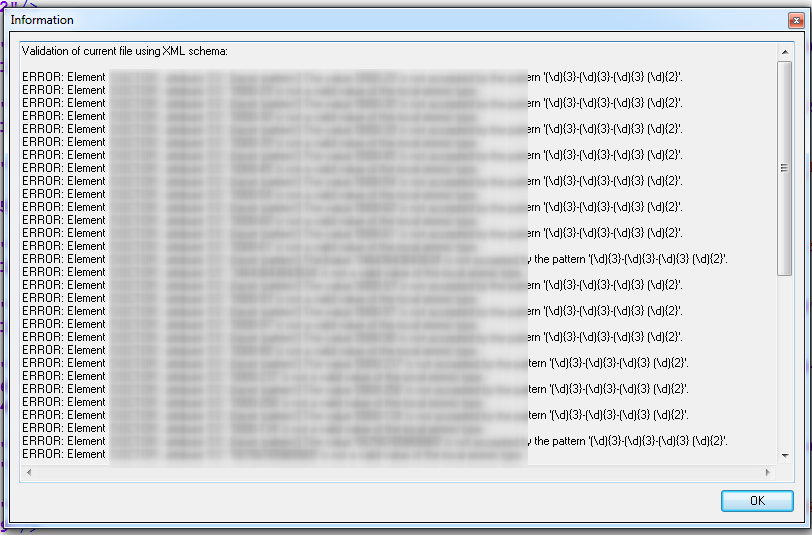
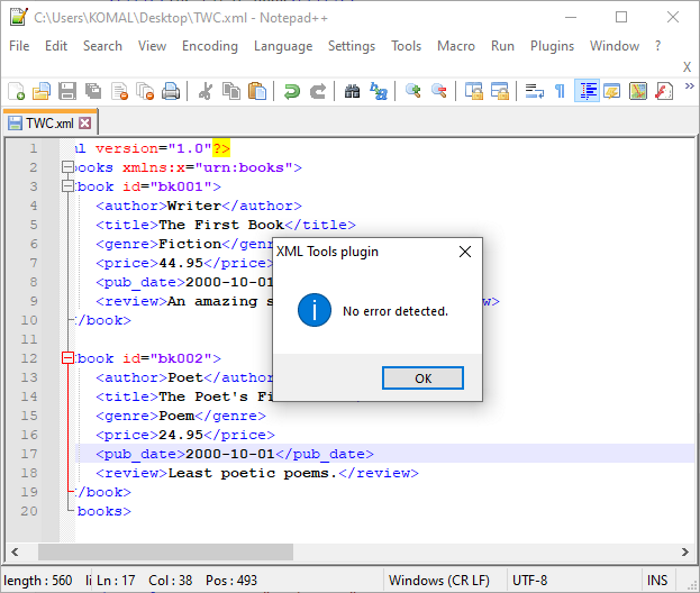
XML document file will now be validated against XSD and if there are any issues, it will highlight the errors with comments to correct them.
You can now correct the errors present in your XML document using the comments given by XSD validation. When you have rectified all the errors, re-run Validate Now button to validate XML content. If all is good in the XML file, it will show a message prompt saying No error detected.
If you have turned on the Enable Auto-validation from Plugins > XML Tools options, every time you make and save changes to your XML document, it will let you validate XML against XSD.
So, this is how you can use Notepad++ to validate XML documents against XSD by installing a simple plugin from its Plugins Admin.
Now read: Task SvcRestartTask, The task XML contains an unexpected node.

Komal has done M.Tech in Computer Science & Engineering. She is a keen follower of the Windows ecosystem & a technical writer since the last six years. She loves finding solutions for day-to-day tech problems.
 Плагин xml tools редактора Notepad++ устанавливается так же, как и остальные плагины, через менеджер плагинов. Плагины — менеджер плагинов — показать менеджер плагинов. Далее выбираем xml tools и устанавливаем плагин.
Главное достоинство плагина на мой взгляд – указание на ошибки при попытке сохранить файл. Например, вы забыли закрыть тег, а сидя за компьютером по 10-14 часов в сутки такое случается.
Notepad xml tools plugin – основные функции
Включить автопроверку синтаксиса XML — позволяет проверять файл с расширением .xml на ошибки автоматически.

Проверить XML синтаксис сейчас — проверит файл на наличие ошибок и укажет на строки с ошибками. Обратите внимание – ошибка может быть строкой выше указанной.
Включить авто-валидацию — задает автоматическую валидацию файла, при открытии и закрытии файла опция предложит вам указать XDS файл для проверки. Никогда не пользовался этой функцией.
Валидировать сейчас — делает то же, что и предыдущая функция в режиме реального времени.
Автоматическое закрытие тегов — добавляет к новому тегу закрывающий тег автоматически.

Автоматически установить xml тип — редактор notepad++ автоматически устанавливает тип xml по содержимому файла, а не по расширению.
Не допускать xxl — запрещает подключение внешних xml объектов (external entity XML).
Красивая печать – несколько опций, которые производят манипуляции с отступами для более качественного вывода кода на печать, по мне так бесполезная опция.
Линезировать XML – весь код преобразуется в одну линию на одной строке, обычное сжатие для более быстрой загрузки.
Применить ко всем открытым файлам – применит выбранную опцию не только к текущему документу, но и ко всем открытым.
Текущий путь xml – получить путь к документу.
Оценить выражение пути – не пользовался этой опцией.
Закомментировать выбранное — закомментирует выбранный код.
Раскоментировать выбранное — раскоментирует выбранный код соответственно.
Как видите плагин xml tools редактора Notepad ++ это отличная вещь для работы с xml. Если у вас нет менеджера плагинов в 64 битной версии редактора, читайте заметку: отсутствует менеджер плагинов в Notepad++.
The application Notepad++ is free to download.
A plugin called xml tools is also free to download.
One feature of the plugin is the ability to validate XML against an XSD.
As an example, if we have the following xsd saved in a file
<?xml version="1.0" encoding="UTF-8"?>
<xs:schema xmlns:xs="http://www.w3.org/2001/XMLSchema">
   <xs:element name="userdetails">
      <xs:complexType>
         <xs:sequence>
            <xs:element name="username" type="xs:string"/>
            <xs:element name="password"  type="xs:string"/>
         </xs:sequence>
      </xs:complexType>
   </xs:element>
</xs:schema>
and the following xml saved in another file
<userdetails>
   <username>Fred</username>
   <password>pass123</password>
</userdetails>
we can open the xml file in Notepad++. Once opened the XML can be validated against the XSD by clicking on Plugins —> XML Tools —> Validate now
On clicking Validate now the dialogue box below will be displayed. Navigate to where the xsd is stored on your hard drive and click OK.
If the xml validates against the xsd the following dialogue will be displayed.

If the xml is modified by adding an element which is not defined in the xsd
 <userdetails>
 <username>Fred</username>
 <password>pass123</password>
 <newelement>dummy value</newelement>
</userdetails>
then when the validation is run an error is displayed

Referencing the xsd within the xml file
Instead of navigating to the xsd file the location can be specified in the xml document. In the example below the xsd file is called simple_xsd_1.xsd
and is located at http://www.onsheld.co.uk/files/xml_files/simple_xsd_1.xsd
<userdetails xmlns:xsi="http://www.w3.org/2001/XMLSchema-instance"
          xsi:noNamespaceSchemaLocation="http://www.onsheld.co.uk/files/xml_files/simple_xsd_1.xsd">
   <username>Fred</username>
   <password>pass123</password>
</userdetails>
Validating xml with a namespace against an xsd
The example below shows the same xml but with a default namespace of http://www.onsheld.co.uk/ns1 added
<?xml version="1.0"?>
<userdetails xmlns="http://www.onsheld.co.uk/ns1">
   <username>Fred</username>
   <password>pass123</password>
</userdetails>
The xsd is amended to include the new namespace
<xs:schema elementFormDefault="qualified"
           targetNamespace="http://www.onsheld.co.uk/ns1"
           xmlns:xs="http://www.w3.org/2001/XMLSchema">
  <xs:element name="userdetails">
    <xs:complexType>
      <xs:sequence>
        <xs:element type="xs:string" name="username"/>
        <xs:element type="xs:string" name="password"/>
      </xs:sequence>
    </xs:complexType>
  </xs:element>
</xs:schema>
The xml would require the following two tags to point the xml to the xsd and indicate validation was required
xmlns:xsi=»http://www.w3.org/2001/XMLSchema-instance»
This indicates xml validation
xsi:schemaLocation=»http://www.onsheld.co.uk/ns1 http://www.onsheld.co.uk/files/xml_files/a.xsd»
This has two parts, first the namespace followed by a space followed by the name and
location of the xsd file (in this case the file is called a.xsd which resides on the web at location http://www.onsheld.co.uk/files/xml_files/a.xsd )
The revised xml would be:
<?xml version="1.0"?>
<userdetails xmlns="http://www.onsheld.co.uk/ns1"
             xmlns:xsi="http://www.w3.org/2001/XMLSchema-instance"
             xsi:schemaLocation="http://www.onsheld.co.uk/ns1 http://www.onsheld.co.uk/files/xml_files/a.xsd">
   <username>Fred</username>
   <password>pass123</password>
</userdetails>
If the schema (xsd file) is not accessible then the unable to parse schema file error is returned
