Chkdsk — проверка диска на ошибки
Служебная программа Check Disk (Chkdsk.exe) применяется для проверки диска на ошибки и поврежденные сектора. Эта утилита командной строки Windows проверяет целостность как базовых, так и динамических дисков. Она применяется для проверки и исправления ошибок, обнаруженных на томах NTFS и более старых форматов как FAT, FAT32.
Check Disk способен найти и исправить много видов ошибок. Утилита прежде всего ищет несогласованность в файловой системе и связанных с ней метаданных. Один из способов, при помощи которого Check Disk находит ошибки это сравнение битовой карты тома с дисковыми секторами, назначенными файлам.
У многих пользователей возникает вопрос — Как запустить CHKDSK? Для этого нужно:
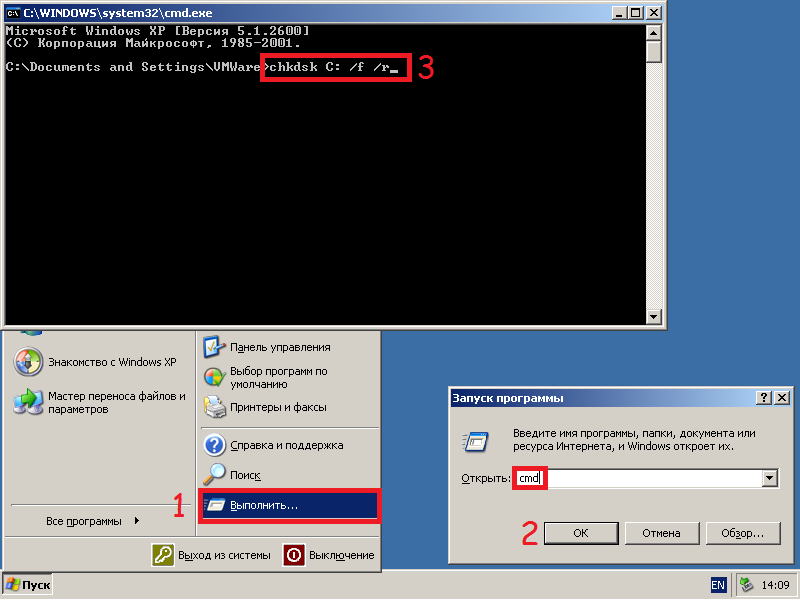
- Запускаем командную строку с правами администратора — Пуск — Выполнить — Cmd;
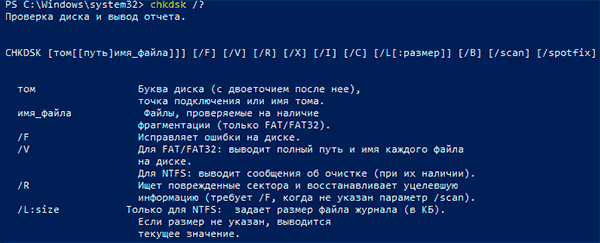
- В командной строке вводим команду CHKDSK /? и ознакамливаемся с ее параметрами.
Параметры команды CHKDSK
CHKDSK [том[[путь]имя_файла]] [/F] [/V] [/R] [/X] [/I] [/C] [/L[:размер]] [/B], где
- Том — Определяет точку подключения, имя тома или букву проверяемого диска с двоеточием.
- имя_файла — Файлы, проверяемые на наличие фрагментации (только FAT/FAT32).
- /F — Исправление ошибок на диске.
- /V — Для FAT/FAT32: вывод полного пути и имени каждого файла на диске. Для NTFS: вывод сообщений об очистке (при их наличии).
- /R — Поиск поврежденных секторов и восстановление уцелевшего содержимого (требует /F).
- /L:размер — Только для NTFS: задание размера файла журнала (в КБ). Если размер не указан, выводится текущее значение размера.
- /X — Предварительное отключение тома (при необходимости). Все открытые дескрипторы для этого тома будут недействительны (требует /F)
- /I — Только для NTFS: менее строгая проверка элементов индекса.
- /C — Только для NTFS: пропуск проверки циклов внутри структуры папок.
- /B — Только для NTFS: повторная оценка поврежденных кластеров на диске (требует /R)
- Параметры /I или /C сокращают время выполнения Chkdsk за счет пропуска некоторых проверок тома.
Пример анализа диска без исправления ошибок Chkdsk
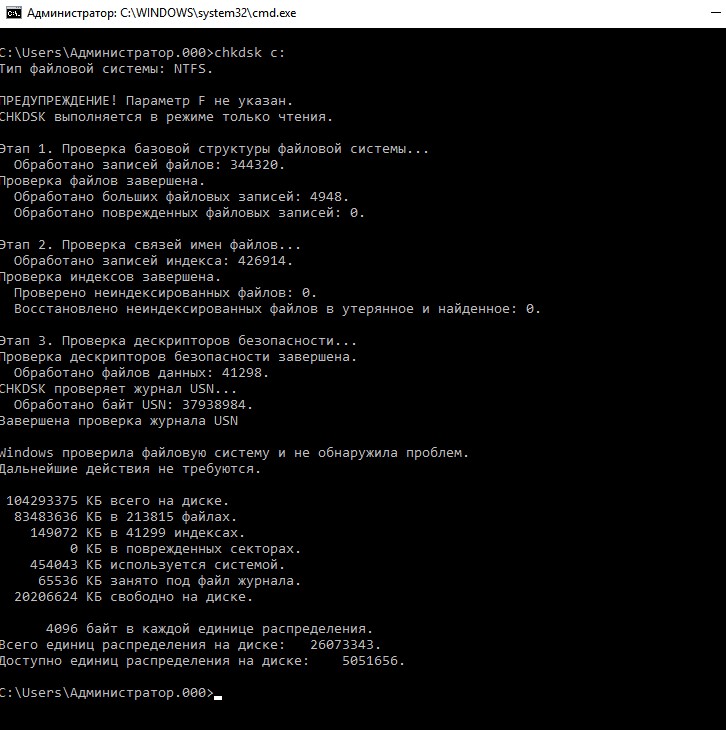
Вы можете проверить целостность диска, введя имя команды и букву диска с двоеточием. Например, для проверки целостности диска С, введите:
- chkdsk с:
Если в результате проверки индексов будут найдены потерянные файлы, Check Disk восстановит их такими, как они есть. Обычно восстановленные файлы хранятся с расширением .chk в корневом каталоге соответствующего диска. В завершение Check Disk выводит отчет, где сообщает, было ли свободное пространство ошибочно отмечено как используемое, и если да, рекомендует исправить ошибку, запустив Check Disk с ключом / F.
Пример исправления ошибок диска с помощью Chkdsk
Анализируя диск, вы его проверяете, но в действительности ничего не исправляете. Для проверки диска и устранения любых обнаруженных проблем нужно указывать ключ /f, после чего Check Disk будет искать и исправлять ошибки:
- chkdsk /f С:
Check Disk не может восстанавливать тома, которые находятся в использовании. Если том используется, Check Disk запрашивает, хотите ли вы, чтобы том был проверен при следующей загрузке компьютера. Ключ /R задает поиск плохих секторов диска и восстановление читаемой информации, а ключ /X — принудительное отключение NTFS-тома в случае необходимости.
Check Disk может выводить более подробную информацию о ходе проверки при помощи ключа /V. Для томов NTFS можно ограничить проверку индексов, задав ключ /I, и пропустить проверку циклов внутри структур папок, указав ключ /С.
Сценарий: У вас системные ошибки, и их необходимо исправить.
Утилита проверки и исправления ошибок на жёстком диске Microsoft CHKDSK (“проверка диска”) была представлена более 30 лет назад, но используется до сих пор. Даже пользователи последних версий операционной системы Microsoft могут воспользоваться данной командой, чтобы выполнить проверку своих жёстких дисков на ошибки и их исправление при необходимости. Ниже приведена инструкция по запуску CHKDSK в Windows 10.
Если после использования утилиты CHKDSK у вас всё ещё возникают ошибки, попробуйте альтернативные программы.
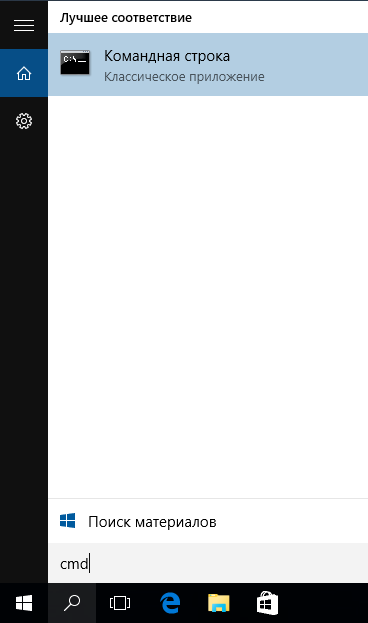
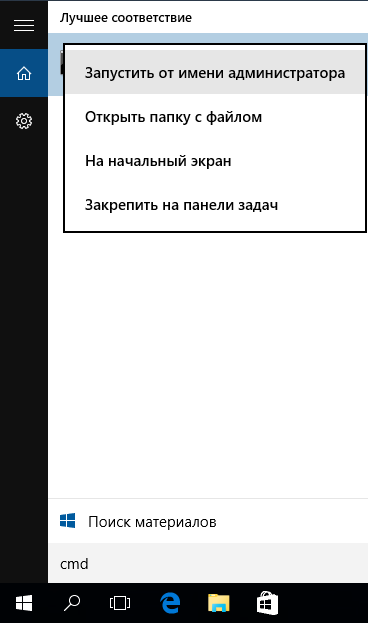
Сначала выберите “Поиск в Windows” и выполните поиск Командной строки, введя “cmd”. Щёлкните по ярлыку правой кнопкой мыши и выберите “Запуск от имени администратора” в контекстном меню.
После входа в качестве администратора, вы окажетесь в Командной Строке Windows, знакомой пользователям операционных систем до Windows NT. Введите команду “chkdsk”, нажмите пробел, а затем букву диска, который вы желаете проверить или исправить. В нашем случае, это внешний диск “L”.
Выполнение команды CHKDSK без аргументов лишь покажет состояние диска, и не исправит ошибки, присутствующие на разделе. Чтобы попросить CHKDSK исправить ошибки на диске, нужно указать параметры. После ввода буквы диска введите следующие параметры, каждый из которых отделён пробелом: “/f /r /x”.
Параметр “/f” указывает CHKDSK выполнить исправление найденных ошибок; “/r” указывает программе обнаружить повреждённые секторы на диске и восстановить информацию, которую возможно прочитать; “/x” заставляет диск размонтироваться перед началом процесса. Дополнительные параметры доступны для более специализированных заданий, и подробно расписаны на web-сайте Microsoft.
В итоге полная команда, которую требуется ввестив Командную Строку, выглядит так:
chkdsk [Диск:] [параметры]
В нашем случае:
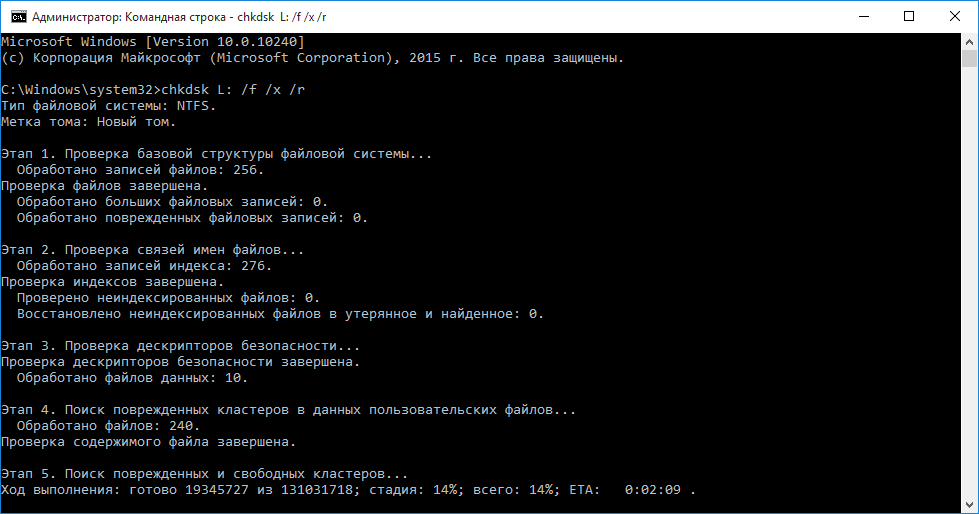
chkdsk L: /f /r /x
Стоит отметить, что CHKDSK должен заблокировать диск, поэтому не удастся выполнить проверку системного загрузочного диска, если компьютер работает. В нашем случае целевой диск – внешний, поэтому процесс начнётся сразу после ввода команды. Если целевой диск – загрузочный, система спросит вас, хотите ли вы запустить команду перед следующей загрузкой. Введите “yes”, перезагрузите компьютер, и команда запустится до загрузки операционной системы, получив полный доступ к диску.
Выполнение команды CHKDSK может занять продолжительное время, особенно на больших дисках. При завершении программа подытожит результаты, такие как общий объём места на диске, размещение байтов, а также самое главное – информацию о найденных и исправленных ошибках.
Команда CHKDSK доступна во всех версиях Windows, поэтому пользователи как Windows 7, так и Windows XP, могут выполнить приведённые выше шаги для инициализации проверки жёсткого диска. В случае использования старых версий Windows, можно выполнить следующее:
- Нажать “Пуск – Выполнить…”
- Ввести cmd
- Ввести chkdsk [Диск:] [параметры]
Этапы “CHKDSK”
5 главных этапов описаны ниже:
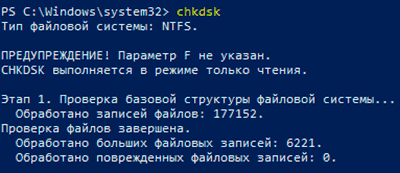
Этап 1. Проверка базовой структуры файловой системы…
На первом этапе файлы с записями в MFT (главная файловая таблица) сравниваются и проверяются.
Этап 2. Проверка связей имен файлов…
На данном этапе проверяются директории и структура. Они проверяются на соответствие размеру файла и временной метки информации.
Этап 3. Проверка дескрипторов безопасности…
На последнем этапе проверки (3), файлы и папки проверяются на наличие дескрипторов безопасности, включая информацию о владельце прав NTFS.
Четвёртый и пятый этапы выполняются только при наличии аргумента /r!
Этап 4. Поиск поврежденных кластеров в данных пользовательских файлов…
Секторы кластера, включая данные, проверяются на возможность использования.
Этап 5. Поиск поврежденных и свободных кластеров…
На пятом этапе секторы кластера проверяются на отсутствие данных.
Если невозможно решить проблемы с жёстким диском, используя “CHKDSK”, рекомендуется использовать утилиты для работы с жёстким диском соответствующих производителей.
Также в Windows можно получить доступ к графическому интерфейсу CHKDSK
Для выполнения проверки с использованием графического интерфейса, выполните следующее:
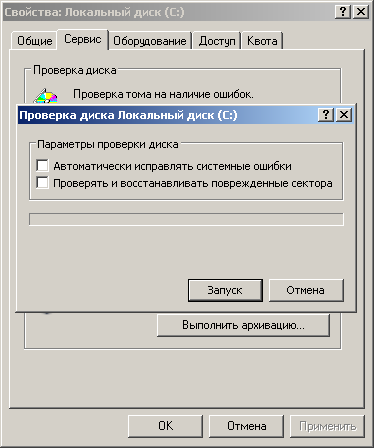
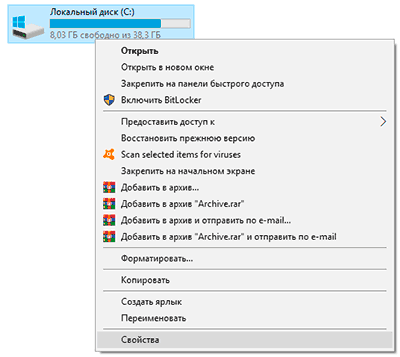
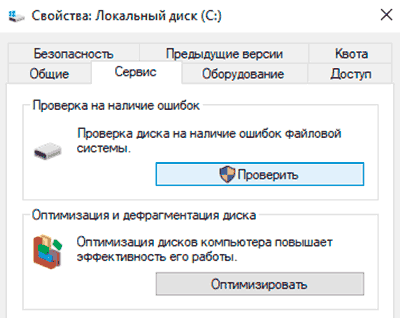
Щёлкните правой кнопкой мыши по диску, который вы хотите проверить. Выберите Свойства – Сервис – Выполнить проверку.
Это графический интерфейс “CHKDSK”. Две опции соответствуют параметрам “/f” и “/r”.
Alignment Tool, Backup & Recovery, Disk Wiper, Drive Copy, ExtFS for Windows, GPT Loader, Hard Disk Manager, HFS+ for Windows, Migrate OS to SSD, Partition Manager, Virtualization Manager, Продукты для Windows, Частные
Tags: check, check disk, chkdsk, disk, windows, диск, инструкция, общее, ошибки, проблема, проверить
Loading…
Команда CHKDSK предназначена для проверки и устранения логических ошибок на жестком диске. Ниже мы рассмотрим особенности её работы и другие функции утилиты.
Содержание
- Проверка жесткого диска в работающей Windows
- Проверка диска из командной строки
- Команды для работы с CHKDSK в командной строке
- Восстановление информации с проблемного жесткого диска
Команда CHKDSK является встроенной утилитой, основная функция которой заключается в проверке и исправлении ошибок жесткого диска. Помимо этого, при помощи CHKDSK можно быстро находить и исправлять поврежденные сектора, а также ошибки в файловой системе накопителя.
Таким образом, CHKDSK – важная утилита, позволяющая продлить строк службы жесткого диска, а также увеличить скорость его работы, поэтому абсолютно каждый пользователь ОС Windows должен уметь пользоваться и проверять свои носители встроенными средствами. Ниже будет представлено несколько способов проверки дисков из работающей ОС и командной строки.
Проверка жесткого диска в работающей Windows
Для проверки логических разделов жесткого диска при помощи CHKDSK в работающей Windows необходимо:
Шаг 1. Открыть каталог «Этот компьютер», нажать правой кнопкой мыши по необходимому логическому разделу и выбрать пункт «Свойства».
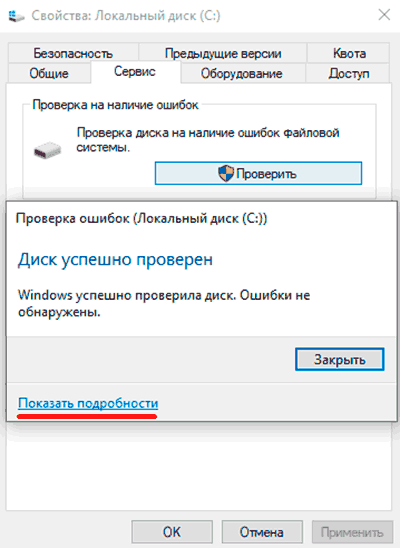
Шаг 2. В открывшемся окне перейти во вкладку «Сервис» и выбрать пункт «Проверить».
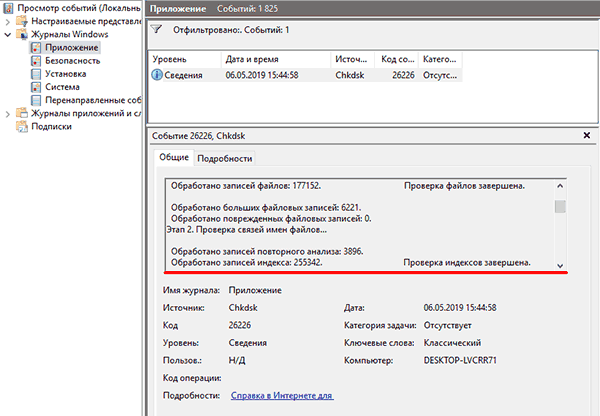
Шаг 3. Подтверждаем проверку диска и после ее завершения нажимаем по кнопке «Показать подробности».
Шаг 4. Вся информация и результаты проверки диска будут доступны в графе «Сведения».
Проверка диска из командной строки
В некоторых ситуациях пользователю может понадобиться запуск утилиты CHKDSK из командной строки. Такая возможность позволит проверить и восстановить диск в том случае, если система не запускается и графический интерфейс Windows остается недоступным.
Чтобы запустить командную строку из среды восстановления ОС, необходимо:
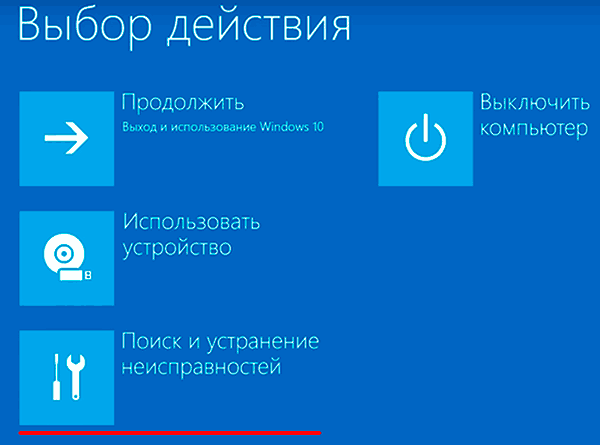
Шаг 1. Воспользоваться установочным диском или загрузочной флешкой Windows и после окна выбора языка нажать по пункту «Восстановление системы». Перейдя в среду восстановления, следует нажать по пункту «Поиск и устранение неисправностей».
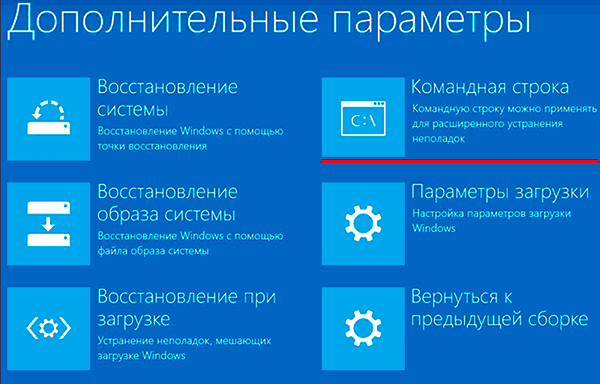
Шаг 2. На следующем окне следует выбрать пункт «Дополнительные параметры», после чего можно обнаружить кнопку «Командная строка».
Также всегда остается возможность запустить утилиту проверки дисков через командную строку из работающей системы. Важно! Для использования полного потенциала CHKDSK следует производить запуск командной строки только с правами администратора. В ином случае утилита CHKDSK проведет проверку без устранения выявленных неполадок.
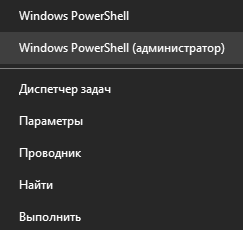
Запустить командную строку или Windows PowerShell от имени администратора можно, нажав правой кнопкой мыши по кнопке «Пуск» и выбрав пункт «Командная строка(администратор)».
Команды для работы с CHKDSK в командной строке
Находясь в командной строке, можно провести быструю проверку жесткого диска (аналогичная проверка была описана в начале) без перезагрузки системы. Для этого достаточно ввести команду «CHKDSK» и подтвердить действие кнопкой Enter.
Для проверки диска и исправления логических ошибок на нем необходимо воспользоваться командой «chkdsk C: /F /R», где С – имя необходимого диска.
Для подтверждения проверки диска после перезагрузки необходимо нажать клавишу «Y».
Помимо полного анализа и по возможности исправления поврежденных секторов, утилита может выполнять проверку и решение ошибок только файловой системы. Для этого следует воспользоваться командой «chkdsk C: /F» и подтвердить действие «Y».
С полным списком и описанием возможностей утилиты можно ознакомится, введя команду «chkdsk /?».
Стоит отметить, что проблемы с диском могут быть вызваны не только программными ошибками, но и физическим износом, механическими повреждениями поверхности и другими факторами, которые невозможно исправить при помощи встроенной утилиты CHKDSK.
Чтобы получить полную картину о состоянии носителя, можно воспользоваться бесплатной программой для проверки дисков Victoria. Узнать о том, как пользоваться, исправлять и проводить диагностику HDD с помощью Victoria Вы сможете в статье: «Используем программу Victoria для тестирования и исправления жесткого диска»
Восстановление информации с проблемного жесткого диска
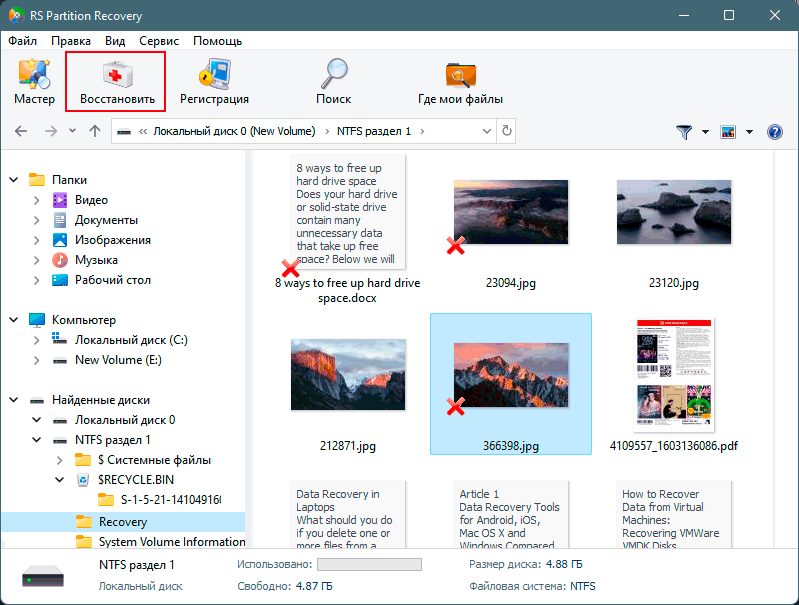
Проблемы с жестким диском – всегда большая угроза для важной информации и документов, хранящихся на компьютере. Чтобы быть готовым к любым обстоятельствам, рекомендуем всегда иметь под рукой специальную программу для эффективного восстановления файлов RS Partition Recovery. Данная утилита поможет восстановить всю утерянную информацию даже в самых сложных случаях.
При помощи RS Partition Recovery можно восстанавливать:
- Случайно удаленные файлы и документы.
- Отформатированные фотографии и медиафайлы.
- Данные, удаленные вирусами.
- Информацию, которая была утеряна при изменении файловой системы и структуры диска.
Часто задаваемые вопросы
CHKDSK это системная утилита, которая предназначена для работы с дисками. CHKDSK не имеет графического интерфейса. Все команды выполняются в командной строке или Windows PowerShell.
Запустите режим Windows Recovery и выберите «Командная строка». Затем выполните командe: «chkdsk C: /F /R». Если нужно просканировать и исправить ошибки на любом другом диске — замените букву «С» на букву вашего диска.
В таких случаях лучше сразу же использовать RS Partition Recovery. Программа создана как раз для таких ситуаций и успешно восстанавливает данные в 99% случаев.
К сожалению нет. CHKDSK занимается поиском и исправлением логических ошибок на диске, в то время как ошибка RAW – это ошибка файловой системы. В таком случае лучше всего восстановить важные данные при помощи RS Partition Recovery, а затем отформатировать диск.
В поиске Windows впишите «Windows Event Viewer» и в открывшейся программе перейдите в Windows Logs -> Application. Затем щелкните правой кнопкой мыши и выберите «Найти». Введите «chkdsk» и нажмите «Enter». В открывшихся результатах поиска найдите последнее событие с Event ID 1001 и источником Wininit. Затем откройте вкладку «General». Там вы найдете подробный лог сканирования накопителя.
Как сделать проверку диска


В инструкции описан способ выполнения проверки дисковой системы на логические ошибки в операционных системах семейства Windows.
Нажимаем «Пуск» > «Выполнить» (или комбинацию win + R) > вводим команду cmd > «OK»:
В появившейся командной строке вводим:
chkdsk C: /f
* где С: — буква диска, /f — параметр команды для исправления найденных ошибок);
Если выбранный диск является системным, то выскочит следующее сообщение:
Вводим Y и нажимаем Enter;
Перезагружаем компьютер и ждем окончания проверки диска;
Если вы хотите проверить на наличие ошибок поверхность жесткого диска, то сделайте полную проверку. Для этого введите команду:
chkdsk C: /f /r
* добавляем опцию /r.
Для получения полного перечня возможностей команды, введите:
chkdsk /?
Если система вернула ошибку, что у нас недостаточно привилегий, необходимо запустить командную строку от имени администратора. Для этого можно кликнуть правой снопкой мыши по Пуск и выбрать Командная строка (администратор) или Windows Powershell (администратор).
Была ли полезна вам эта инструкция?
Да Нет
What is CHKDSK?
CHKDSK (check disk) is a Windows utility designed to scan for and repair system errors. It checks whether a file’s size, location, and other system information matches the data that’s actually on the disk. CHKDSK also looks for parts of the hard drive that may corrupt your data.
CHKDSK lets you check a hard drive for errors in Windows 10 or 11, specifically the kind of errors that arise when files aren’t where they’re supposed to be. Hard drive problems are one reason why PCs get slower over time.
If you think your computer’s performance is lagging, test your PC’s battery life. And get rid of unnecessary apps on your PC to help it run faster, smoother, and longer.
How long does CHKDSK take?
CHKDSK can take between 20 minutes and several hours to complete, depending on the age and capacity of your hardware. Bear in mind that your computer will run slowly while CHKDSK is working. If possible, let the CHKDSK scan finish before resuming other processes.
If it fails to complete, try canceling the scan and running CHKDSK again. But repeated failure to complete is a sign that something may be seriously wrong. If so, you’ll likely need to work through the steps for repairing a drive in Windows 10 or troubleshooting CHKDSK.
CHKDSK commands
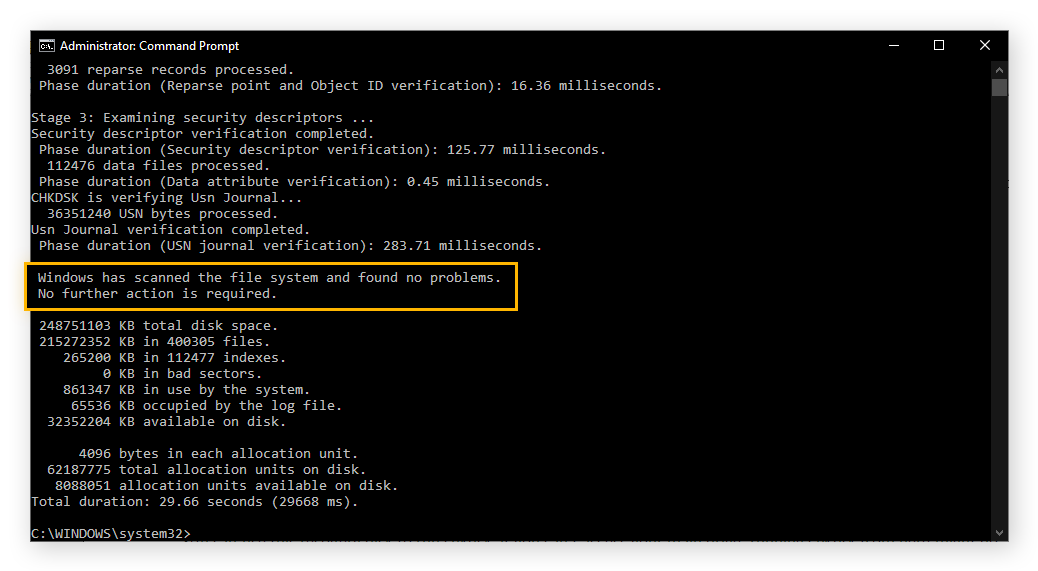
You can choose different CHKDSK parameters to pinpoint specific problems. The chkdsk command will search the disk drive for issues, but it won’t fix any of them. If your results tell you that “No further action is required,” you won’t need to use any other commands this time.
Here’s an overview of the CHKDSK commands:
-
chkdsk cross-references the directory of files with the file system to verify that they match. It’s just a diagnostic and doesn’t try to fix anything.
-
chkdsk /f fixes any structural issues with the file system and directory, correcting inconsistencies between the two.
-
chkdsk /r searches for corrupted parts of the physical hard drive (while also running chkdsk /f) and tries to recover the data there to put it in a part of the drive that isn’t damaged.
-
chkdsk /x dismounts a drive so that it can be checked and fixed. Running this command also runs /f.
-
chkdsk /v shows the path and name of all files while running a check.
These commands will automatically run on the active drive shown next to your cursor. To run CHKDSK on a different drive, type chkdsk [drive letter]: /f, replacing [drive letter] with the letter of the drive you want to scan. For example, to repair the D drive, enter chkdsk D: /f.
The drive with Windows on it (usually C) will ask you to restart before CHKDSK can run. Choose Y to continue. Windows will run CHKDSK right after it’s restarted.
What does chkdsk /r do?
Chkdsk /r finds and attempts to repair corrupted portions of your hard drive. It automatically runs chkdsk /f as part of this process to correct errors on your disk as well. This means that you don’t have to run the command chkdsk /f /r.
Chkdsk /r is one of the most valuable check disk commands, because it can alert you to parts of your hard drive that are starting to malfunction. This can serve as a reminder to back up important files so you don’t lose them to hard drive failure.
Before running chkdsk /r, you should backup any valuable files to another storage drive, as they may get deleted after the process completes. There’s a small chance that if these files are located near a bad sector, chkdsk /r will identify them as corrupted and get rid of them.
Chkdsk /r is not meant to be a data recovery utility, and it sometimes doesn’t recover corrupted files properly. The safest method for data recovery is to use a previously created backup, or to ask an expert before executing chkdsk /r.
If you’re wondering whether to do chkdsk /f or /r, you find out much more information doing /r.
If you’re having trouble getting the scan to work, opening the command prompt as an administrator and running chkdsk /f /r /x should do the trick.
What does chkdsk /f do?
Chkdsk /f performs a whole disk check and rewrites the directory of folders to match what’s actually on the drive. This is important because if Windows tries to access an important system file and it isn’t there, it can lead to a blue or black screen of death or cause other glitches and crashes.
A computer hard drive can be thought of a bit like a book, except the information stored within it is constantly being added, updated, moved, and deleted. So the chkdsk /f function ensures that your disk’s “table of contents” lists all the right “chapters,” that every “chapter” has an entry, and that all entries point to the correct “page numbers.”
CHKDSK commands glossary
Want to know how to run check disk in even more ways? Here are some other commands you can use when performing a disk check in Command Prompt:
-
chkdsk — Checks for issues on the default drive and file system without fixing or repairing.
-
chkdsk [drive letter]: — Does the same, but for the specified drive.
-
/f — The “f” stands for “fix,” and here it means fixing the file system information so that it directs you to the right files.
-
/r — The “r” stands for “repair.” /r finds corrupted parts of the hard drive and attempts to recover the files that were stored there.
-
/x — Dismounts the drive before running CHKDSK, which may be necessary to get it to run.
-
/f /r /x — Runs the /f and /r commands on a dismounted drive.
-
/scan — Scans the disk without dismounting it (only possible with NTFS).
-
/b — Resets the list of bad clusters (damaged parts of the disk) and re-scans for the same.
-
/v — Checks the disk, but displays the names of the files as it’s doing so.
-
/i — A quicker and less thorough scan, where index entries are skimmed rather than checked deeply.
-
/c — Another type of superficial scan, which doesn’t check cycles in folders.
How to run CHKDSK in Windows 10
There are multiple ways to run CHKDSK in Windows 10, even when your PC doesn’t seem to be working. If you have to repair your Windows 10 hard drive in an emergency, CHKDSK might be the answer.
There are several ways to check your hard drive for errors in Windows 10. Here are three Windows 10 CHKDSK options you can try:
Run CHKDSK from your computer
You can use the check disk utility from within Windows, and it’ll scan your drive for errors. Here’s how to run CHKDSK in Windows 10:
-
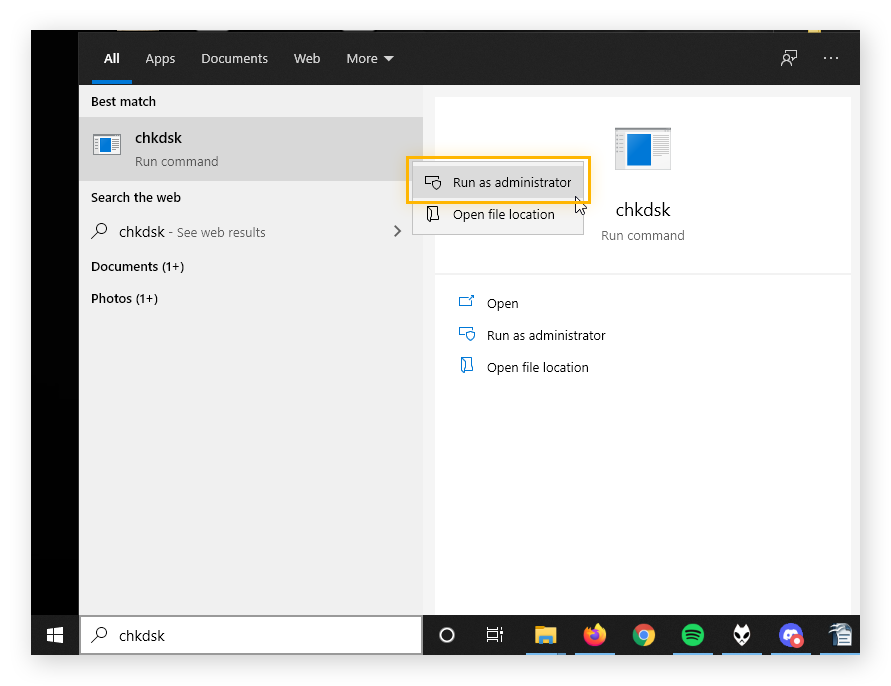
Type chkdsk in the search box in your taskbar.
-
Right-click chkdsk and choose Run as Administrator.
This method may cause CHKDSK to run without showing you the results. For more detailed and customized results, try running CHKDSK from the Command Prompt. The CHKDSK commands in Windows 10 are the same as in all other versions of Windows.
Run CHKDSK from Command Prompt
Command Prompt is a useful tool that lets you execute commands in Windows and directly tell Windows what to do. If you’re not careful, this can result in additional complications, so make sure to follow these steps closely.
Here’s how to use Command Prompt to check your disk:
-
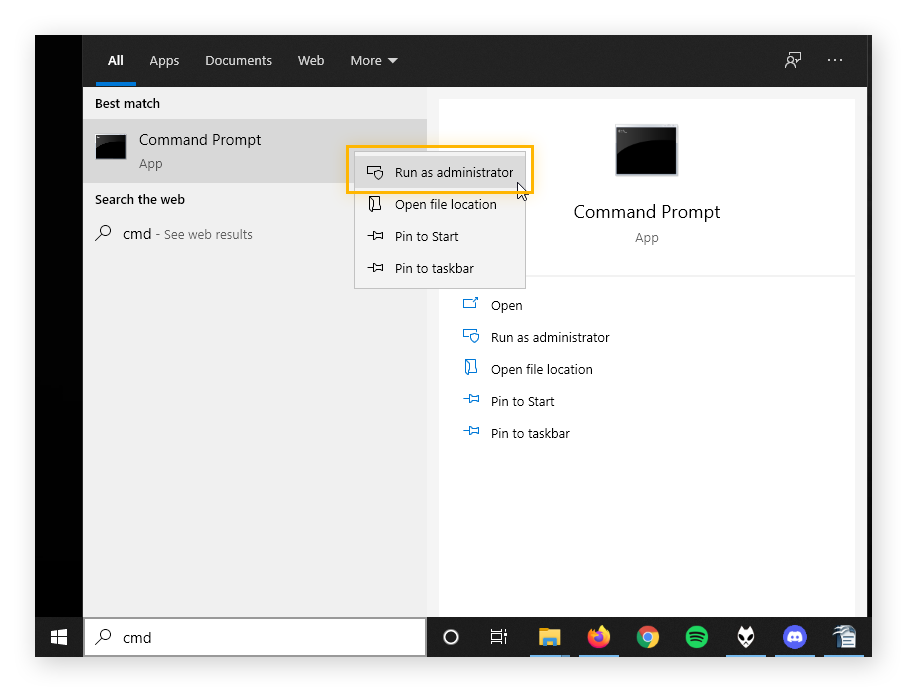
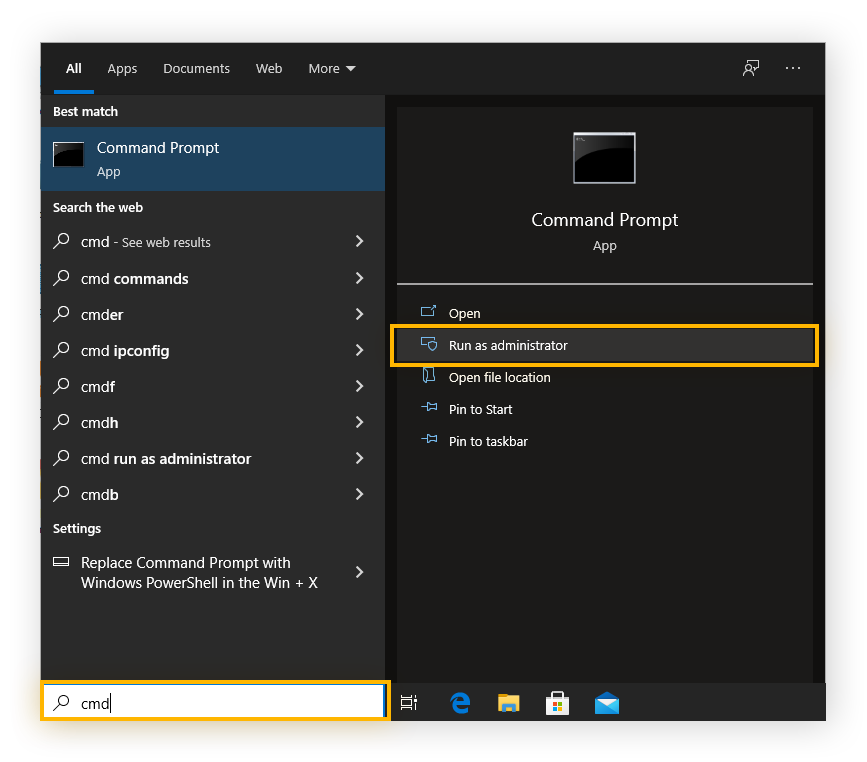
Type cmd (or command prompt) in the search box in your taskbar.
-
Right-click Command Prompt and select Run as Administrator.
-
Type chkdsk and hit Enter. This command will make the CHKDSK utility scan for problems without making changes.
-
To run CHKDSK on a drive other than your C drive, specify the volume right after chkdsk. For example, check your D drive by typing chkdsk D: /f.
Type chkdsk /r to make CHKDSK repair corrupted files – but only if a problem was found. If there are no problems at this stage, you don’t need to do anything further.
The best part about Command Prompt is that it’s been consistently used across all Windows operating systems. Whether your computer is brand-new or 20 years old, you can use the same commands, which is helpful when learning how to run chkdsk in Windows 10 or Windows 11.
Run CHKDSK from the Windows 10 installation disk
Your Windows 10 installation disk is a partition of your hard drive isolated from the rest of your data. If you can’t access your main hard drive, the installation disk will let you install a fresh version of Windows. It should be accessible as long as you can turn your computer on.
If you can’t access your main drive, running CHKDSK from here might do the trick. Here’s how to run CHKDSK from your Windows 10 installation disk before boot:
-
Turn on your computer and repeatedly tap F8 before the Windows logo shows up.
-
When prompted, click Repair Your Computer.
-
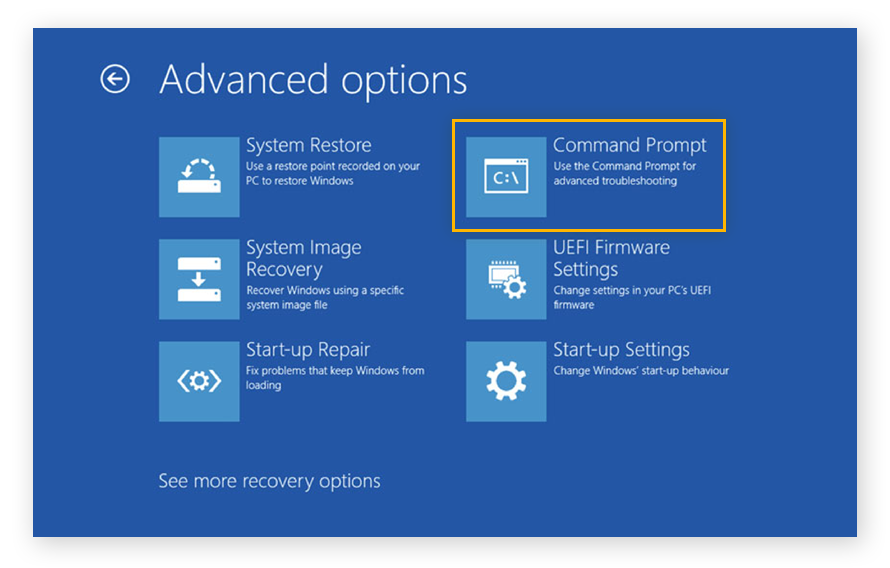
Click Troubleshoot and select Advanced Options.
-
Click Command Prompt. You can use this command prompt just the same as any other, and you can run CHKDSK on your Windows drive before it boots.
CHKDSK should identify and remove bad sectors or corrupted data so that your computer will work normally again.
Now that you know how to run CHKDSK, you have a new tool to keep your computer and hard drive in tip-top shape. But what about other types of necessary maintenance?
AVG TuneUp is a specialized maintenance and optimization tool that helps ensure your PC runs smoothly. No task is left behind, whether it’s clearing the cookies and cache from your browser or finding and rooting out corrupted data. Don’t bother poking around in Command Prompt — use an app to do it automatically.
How to run CHKDSK on Windows 11
If you’ve made the switch to Windows 11, one thing that hasn’t changed is how to do CHKDSK. Just as in previous versions of Windows, you can still use Command Prompt to run the scan, as well as the exact same parameters listed above.
Here’s how to run CHKDSK in Windows 11:
-
Type cmd in the taskbar and click Command Prompt.
-
Type the CHKDSK command of your choosing, for example, chkdsk /f, and then hit Enter.
To help keep things running smoothly, Windows 11 runs CHKDSK every so often automatically, but it may improve Windows 11 performance if you change the schedule.
If you’re thinking of upgrading to Windows 11 or to a new PC, be sure to check your computer specs carefully. When determining how powerful a computer you need, the answer usually depends on how you intend to use it.
Older Windows versions
Every outdated version of Windows can still run CHKDSK — even Windows XP. The blue screen of death has been with Windows since time immemorial, but so have disk scans and methods for fixing the blue screen of death. The CHKDSK parameters will work the same on all versions.

In any version of Windows, the Command Prompt and the commands to use are the same, whether you’re trying CHKDSK on Windows 7 or XP. Use chkdsk /f for reviewing and fixing structural integrity, and chkdsk /r for finding and fixing bad sectors.
-
In Windows XP, you can access Command Prompt by clicking Start, then Run, and typing cmd.
-
In Windows Vista and Windows 7, type cmd in the Start menu search bar. You can run CHKDSK in Windows 7 or Vista just as you would in Windows 10.
-
In Windows 8, you may need to press the Windows key + C to open the Charms bar, and then Search. Type cmd there.
Once you’re in, refer to the earlier instructions for running CHKDSK from the Command Prompt. You don’t need to wonder how to check your disk, because it’s the same in any command prompt. Windows 7 check disk will look and work the same as it does on Windows 10.
If you’ve started up an old computer and see a black screen, don’t worry. You may be able to fix a black screen on Windows startup and make your computer usable again. Look up other ways to revive an old PC, too.
Older computers can be riddled with issues like junk files or broken shortcuts — you can use a dedicated PC cleaner tool to help you tidy up your machine. Or, you might also want to physically clean your PC — just don’t do both at the same time.
You may be wondering if you can use Scan Disk in Windows 10. The ScanDisk command isn’t in use anymore, and it’s been replaced by CHKDSK.
Why do I need to use CHKDSK?
You need to use CHKDSK when a boot error occurs. Corrupted data can break Windows, and CHKDSK can find those bad files and let Windows install a fresh copy in a new location. You can also use CHKDSK to prevent data loss.
What does CHKDSK do? It monitors the long-term health of your data storage device. Disk repair in Windows 10 is essential to keep your computer working smoothly for many years.
How does data go missing or get corrupted in Windows?
Ruined parts of a hard drive are called bad sectors, and CHKDSK can detect them with a disk scan. CHKDSK will then attempt to fix the bad sectors so they’re usable again, potentially recovering the data in the process.
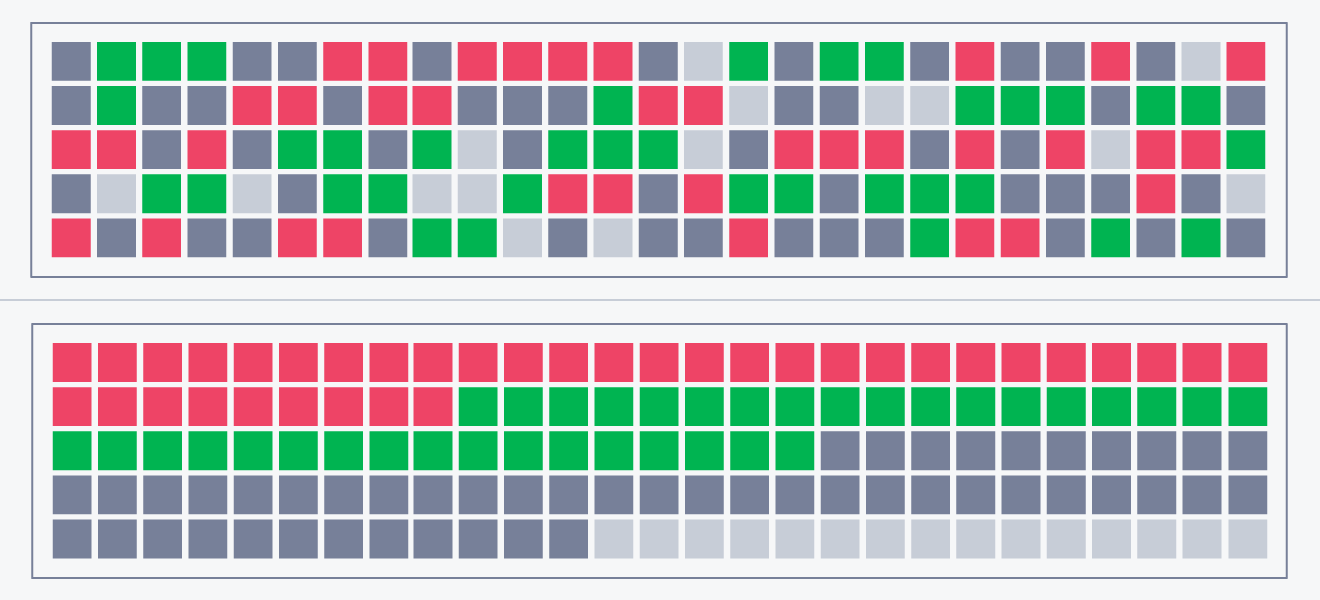
Here are the ways data can get corrupted:
-
Hard bad sectors occur when the media is physically damaged, like when a speck of dust lands on the disk or the read/write head makes contact and ruins the surface.
-
Soft bad sectors are when malware or an improper shutdown confuses the disk drive. From that point on, the computer remembers that this data wasn’t verifiable and marks it as a bad sector. You lose disk space and possibly even the file that didn’t get written correctly.
How to prevent corrupted data
An increasing number of bad sectors means your hard drive is about to fail. Back up your data immediately to avoid losing it, and get a new hard drive. In the meantime, run CHKDSK regularly to keep your PC running as fast and smoothly as possible, and tune up Windows 10 when you can.
A large number of bad sectors can also indicate malware, which must be taken care of immediately if you don’t want to lose any more data. Malware can cause your computer’s performance to suffer, with 100% disk usage at all times (something that should be addressed immediately).
When your hard drive is healthy, your PC boots up quickly and functions properly. Keep yours in top shape by running the defragger or letting your chosen malware and virus removal tool do a sweep to make sure there’s nothing hindering your computer’s performance.
Don’t have time to mess with multiple apps to keep your computer in good shape? Want to use a tool that you can set and forget? AVG TuneUp automatically clears out all the stuff that builds up behind the scenes like traces from your browsing history, old downloaded files, and more. Give AVG a spin today.
CHKDSK Troubleshooting
Here are some common issues that people struggle with before CHKDSK can run a disk scan.
Volume is in use or read-only
CHKDSK can’t run on any drives currently being used by Windows. Your drive needs to be inactive before CHKDSK can make any changes. Windows runs all sorts of services, including Service Host Superfetch, that keep a hard drive occupied.
The following error messages indicate the drive is active and cannot be checked:
-
Cannot continue in read-only mode.
-
Volume is in use by another process.
-
Cannot lock current drive.
All these errors mean that the drive is currently busy. You might have a photo open, for example, and you simply need to close the program so the volume is no longer in use.
Check if you have a file open
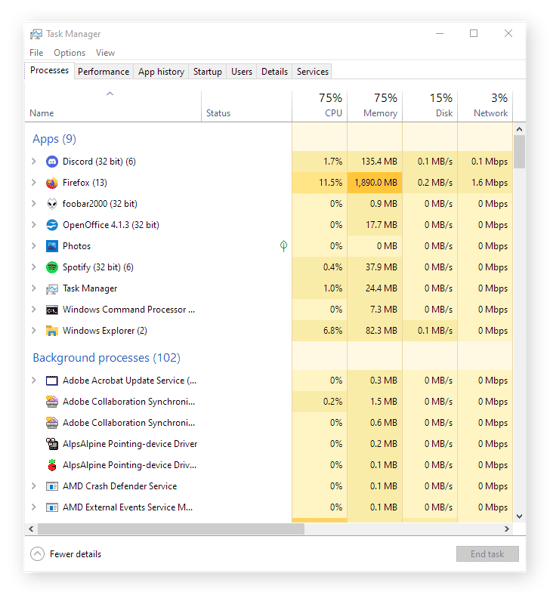
Use your Task Manager to see if there’s anything you can close. Maybe then you can run the Windows disk check.
Use Safe Mode
Another possibility is that Windows is using your drive. You can get around this by agreeing to schedule CHKDSK so it runs on the next startup. If you see this prompt and want to check your disk the next time you start up, type Y here:
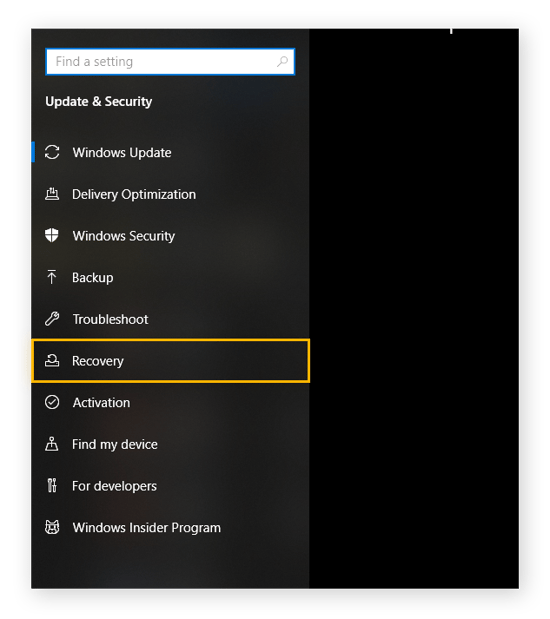
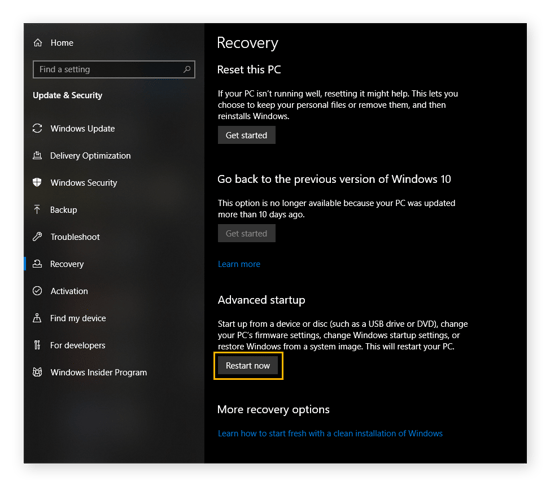
You can also get to the advanced options from your desktop by following these steps:
-
Go to Settings and select Update & Security Options.
-
Click Recovery.
-
Click Restart now under Advanced Startup.
You will now go straight to the Advanced Startup options, where you can run the Command Prompt and execute CHKDSK in cmd on the Windows drive without issue.
One way to avoid these obstacles is to use an all-in-one maintenance program. AVG TuneUp knows the right time to scan your hard drive with CHKDSK, so you don’t have to bother with advanced settings. It also covers everything from clearing the browser cache to deleting junk files.
Enjoy a continually optimized PC without spending any time on it yourself. Try AVG TuneUp today.
What to do when CHKDSK is frozen
If CHKDSK freezes, you can safely cancel the process ― but you need to find out what made it freeze and run another scan as soon as possible. Just like an extremely loud fan, this could be a sign of poor hard drive health, so you should try to fix the problem immediately by following these steps:
-
Backup all or your most important data to an external drive, because this can be a clear sign that your hard drive is failing.
-
Defrag your hard drive by typing “defrag” into the taskbar and running Defragment and Optimize Drives.
-
Try running Disk Cleanup. Type “disk cleanup” in the taskbar and run Disk Cleanup.
-
Open Command Prompt as admin and type sfc /scannow and reboot your computer once it’s done. This replaces essential system files which have been corrupted.
-
Open Command Prompt as admin again and type dism.exe /online /cleanup-image /restorehealth. This restores parts of your Windows installation that have been damaged or corrupted.
If these steps don’t work, try repairing Windows with another Windows installation media.
If you’ve tried everything else and still didn’t manage to run a successful scan, you could try formatting the hard drive. To avoid complete disk failure and data loss, we highly recommend that you upgrade to a new HDD or SSD and back up any important data.
“Windows found errors on this drive that need to be repaired”
This error message means that CHKDSK has found something that needs fixing. First, make sure you understand what chkdsk /r does, and bear in mind that there is some risk of losing important files when running a repair scan. Then, run chkdsk /r using Command Prompt.
If you still get the same message, try following the steps for what to do when CHKDSK is frozen. You may also get a message saying there isn’t enough space to restore corrupted files. In this case, you may be able to fix the problem temporarily by deleting files and removing bloatware.
How to change a scheduled disk check
CHKDSK runs automatically on some versions of Windows, which can be an inconvenience ― especially if you’re already struggling with a slow computer. And the process only gets longer and slower as hardware ages. Here’s how to change a scheduled disk check:
-
Type cmd in the taskbar and click Run as administrator under Command Prompt.
-
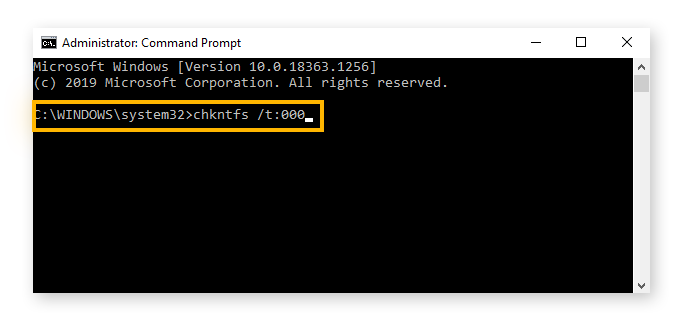
Type chkntfs /t:[000], with [000] being the number of seconds (up to 259,200 seconds or 72 hours) to delay CHKDSK. For example, if you type chkntfs /t:60, the CHKDSK hard disk scan will be postponed by one minute.
Keep your PC performing its best with AVG TuneUp
You can ensure that your current computer functions properly for years with proper PC maintenance. Even better, you don’t have to do anything different — you just have to download one program that does it all for you.
AVG TuneUp schedules regular maintenance to clear out the stuff that commonly bogs down your PC. It uninstalls what you don’t need, cleans up the files that aren’t being used anymore, and automatically updates your programs. The result is a computer that runs faster than ever. Try AVG TuneUp for free right now.

