
![]()
![]()
-
#5
Note that I would like the root partition in zfs raid1…
in that case i’d recommend going via 6.4 and upgrading first
if nothing is on it, the upgrade should not take long and there should not be any issues
-
#10
I solved this problem as follows:
On the initial installation screen I chose the option «with DEBUG», at the first stop, I gave the sequence (CTRL+D), at the second stop I switched to another console (ALT+F3) for example, I typed Xorg -configure, it will generate a file called xorg.conf.new in /root or / , then copied it to the directory /etc/X11/ with the name of xorg.conf (cp /root/xorg.conf.new /etc/X11/xorg.conf and in then I edited this file with nano /etc/X11/xorg.conf and in the «Device» section I changed the «Driver» option to «fbdev», save the change. Return to the installation console (ALT+F1) and press CTRL +D to continue, after finishing the installation of everything it will return to the F1 console, just press CTRL+D again and it will finish the installation.
Last edited: Apr 14, 2022
 Плохо, когда ошибки возникают во время установки системы, еще хуже, если это такая ответственная вещь как гипервизор. А если проблема связана с железом, то становится совсем тоскливо. Именно с такой ситуацией мы столкнулись буквально на днях, установщик Proxmox VE 6 завершал свою работу с ошибкой на системе с процессором AMD Ryzen содержащим встроенное видеоядро. К счастью, Proxmox — это открытое по на базе Debian, а значит есть, как минимум, несколько вариантов решения проблемы. Один из них — исправить все на месте, прямо здесь и сейчас, именно о нем мы расскажем в данной статье.
Научиться настраивать MikroTik с нуля или систематизировать уже имеющиеся знания можно на углубленном курсе по администрированию MikroTik. Автор курса, сертифицированный тренер MikroTik Дмитрий Скоромнов, лично проверяет лабораторные работы и контролирует прогресс каждого своего студента. В три раза больше информации, чем в вендорской программе MTCNA, более 20 часов практики и доступ навсегда.
Данной ошибке подвержены все версии Proxmox Virtual Environment 6.х и возникает она на системах, содержащих процессоры AMD со встроенным видеоядром. Причина — установщик не может запуститься в графическом режиме, а текстовый вариант установщика не предусмотрен. Внешне это проявляется так: система получает сетевые настройки по DHCP, затем долго задумывается после сообщения:
Starting a root shell on tty3.И наконец «радует» нас сообщением:
nInstallation aborted - unable to continue (type exit or CTRL-D to reboot)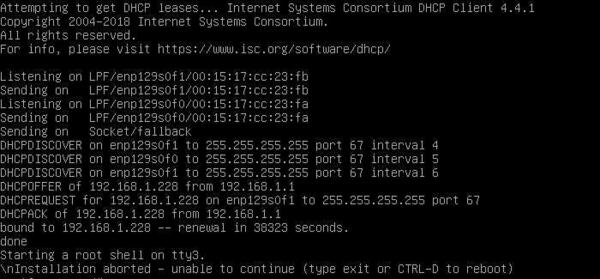 Есть два пути решения этой проблемы. Один из них, который рекомендуют разработчики Proxmox — это установить сначала Debian 10, а затем уже на него Proxmox VE, об этом мы рассказывали в статье: Установка Proxmox VE 6 в Debian 10.
Второй — попытаться исправить все прямо здесь и сейчас. Предложенный ниже способ не панацея, однако в большинстве случаев способен помочь.
Прежде всего переключаемся в третью консоль — tty3. Для этого используйте сочетание клавиш Alt + F3. Уже в ней установим необходимые права на директорию временных файлов:
chmod 1777 /tmpИ обновим систему:
apt update && apt upgradeНа все запросы отвечаем положительно.
Теперь перенастроим графическую подсистему:
Xorg -configureОбратите внимание на регистр команд, в Linux это важно. Переместим полученный нами файл настроек в /etc:
mv /root/xorg.conf.new /etc/X11/xorg.confПосле чего заменим в нем все вхождения amdgpu на fbdev:
sed -i "s/amdgpu/fbdev/g" /etc/X11/xorg.confЗатем снова вернемся в первую консоль tty1 — Alt + F1 и запустим графическую оболочку:
startxВ большинстве случаев это должно помочь, и установка успешно продолжится. Иначе следует прислушаться к совету разработчиков и установить сначала Debian 10, а уже на него Proxmox.
По материалам: Proxmox 6.2-1 installation fails after DHCP lease obtained.
Научиться настраивать MikroTik с нуля или систематизировать уже имеющиеся знания можно на углубленном курсе по администрированию MikroTik. Автор курса, сертифицированный тренер MikroTik Дмитрий Скоромнов, лично проверяет лабораторные работы и контролирует прогресс каждого своего студента. В три раза больше информации, чем в вендорской программе MTCNA, более 20 часов практики и доступ навсегда.
0
1
Доброе время суток форумчане!
Есть не большие проблемы с установкой proxmox.
Прошу сильно тапками и камнями не закидывать, а кот носом натыкать можно )))
Не большая предыстория:
на протяжении последнего месяца бьюсь над установкой proxmox на сервер.
Характеристики сервера: h
p proliant dl380 g7
2 Xeon e5620
50Gb ram
Raid контролер 410i
4 sas 500gb
4 sata 1Tb
(2 raid 1+0 (2 по 500Gb) и raid5 (2.7Tb)
Если что то из характеристики нежно будет могу дополнить.
что я вообще делал:
пробовал поставить Proxmox 7.2.0 — при установки на экран выводит вне диапазона 80Mhz/100Hz, через iLo Тоже самое, только без таблички просто черный экран, плюнул, подумал попробую поставить версию по младше 7.1.2.
Тут все хорошо все устанавливается, указываю все характеристики после установки как обычно перезагружается сервер и выводится экран с ip доступа (на перед да я всегда писал порт 8006) и на этом моя радость была не долгой, попробовал подключится выходит белый экран (попробовал посмотреть кож html вроде как есть (в нем тоже не селен) на закладке появляется значке иконки proxmox. По думаю может у меня комп глючный попробовал еще на 3 ноутбуках и 1 ПК планшете. к сожаления не чего не выходит планшет выдает не удалось установить защищенное соединения остальные все выдают ошибку ERR_EMPTY_RESPONSE, самое что интересное на 1 ноутбуке показывал только internet explorer, а на других компах даже он не чего не выдает, на днях установил лису и тоже самое (да на перед ключи сбрасывал, куки чистил, загружался с 1 компа через Life-CD, история с internet explorer повторяется).
после были предприняты установку через дебиан 10 ( 11 к сожаления не видит диски в рейде тоже не знаю по чему) по верх него уже ставил proxmox 6.4 и обновления дебиана и proxmox до последнего релиза, история все так же сохраняется из 5 устройств частично видит только лишь одно.
уже высосан пробовал другой гипер поставить VMware и тут получил болт, проци не подходящие для этого гипера
да по характеристикам сети стоит старенький d-link dir 320 на нем OpenWrt, пробовал TP-Link Тоже старенький на родной прошивке история таже
p.s. гуглил яндексил ))), не только российские форумы статьи и какие то блоги но и зарубежные, у всег все просто и быстро, как говорится без сучка и задоринки, буду благодарен за помощь каждому
Issue
On SuperMicro AS-4124GS-TNR server with ASPEED AST2500 BMC, Proxmox 7.1 installation does not start with «installation aborted» message.
Details
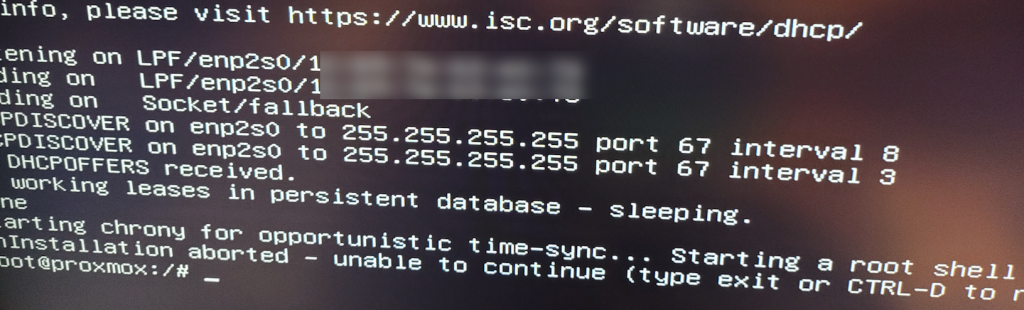
After setting up DHCP and Chrony, Proxmox fails to start the graphical installer and drops into the shell:
...
Starting Chrony for opportunistic time-sync... Starting a root shell on tty3.

Installation aborted - unable to continue (type exit or CTRL-D to reboot)
root@proxmox:/#
An attempt to start the X server with startx fails:
...
he log file at "/var/log/Xorg.1.log" for additional information.(EE) (EE) Server terminated with error (1). Closing lof file.
xinit: giving up
xinit: unable to connect to X server: No such file or directory
xinit: server error
The X log file (/var/log/Xorg.N.log) shows a Segmentation fault:
Fatal server error:
[1299.174] (EE) Caught signal 11 (Segmentation fault). Server aboring.
or alternatively a Signal 6:
Fatal server error:
[1299.174] (EE) Caught signal 6 (Aborting). Server aboring.
Solution
Using xorg.conf file, disable modules glx and glamoregl, also change modesetting driver to fbdev.
Details
Create and edit the xorg.conf file:
Xorg -configure
mv xorg.conf.new /etc/X11/xorg.conf
nano /etc/X11/xorg.conf
Make the following changes:
- Find the line:
Load "glx"and replace withDisable "glx". - After that line, add
Disable "glamoregl". - Find the line:
Driver "modesetting"and replace withDriver "fbdev". - Start the X server with
startxwhich will automatically start the graphical installer.
I have done a lot of Proxmox installations inside my lab, but one with the NUC 11 was toughest I ever did. I had a lot of issues and one of them was “installation aborted – unable to continue” on every Proxmox installation I started.
Before we begin
I have a small lab which consist of various Intel NUC machines, I love them because they don’t take a lot of space, they are pretty powerful for the size and a lot of “enterprise” software works on them without a lot of fiddling.
So far, my Proxmox installations on these NUCs went mostly trouble free, but the last one was – well troublesome at best.
- Installation would end with “unable to continue”
- I also got “failed to prepare EFI boot using Grub” error
- Not all of my network adapters would work
I lost cca 8 hours in the end to get everything to work, and it was pretty frustrating, because I planned other things to do on these machines, but instead I was wrestling with the Proxmox.
In the end I managed to get everything to work, I found some bits on the internet, a lot of parts I figured myself after I did some diagnostics.
I can see that other people are struggling too with the NUC 11 configurations.
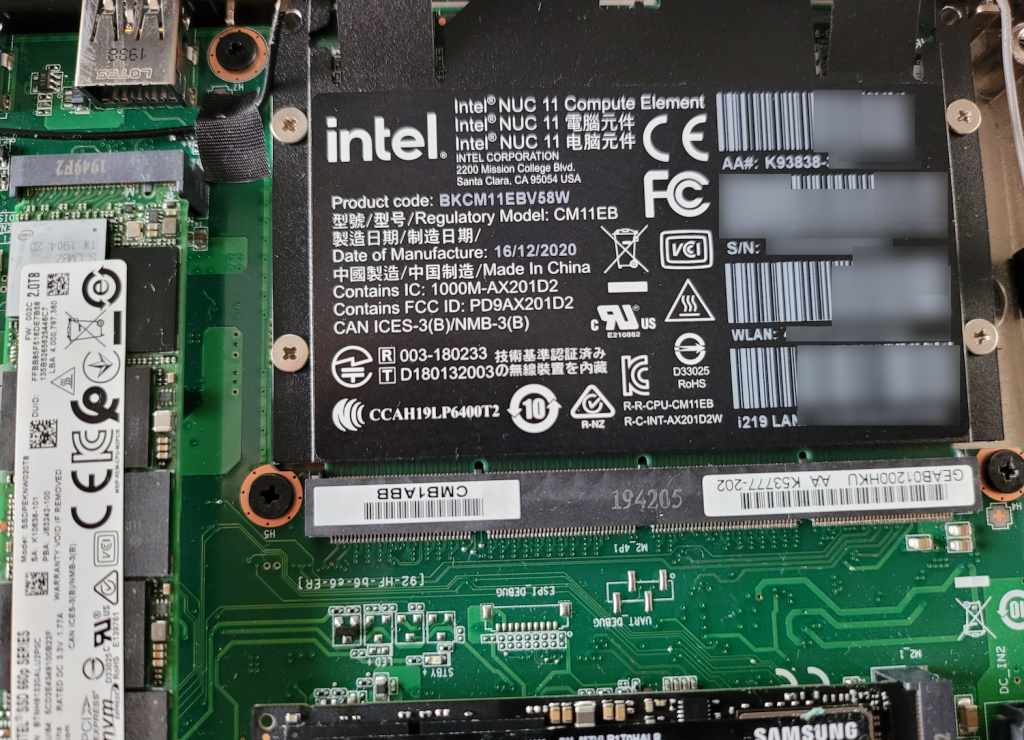
Here is what I have:
Intel NUC Rugged Chassis Element BKCMCR1ABB2 – that is chassis with board in it – board itself has two network cards on it (Intel I219-LM and I211-AT). Great for my needs, it also has two NVMe slots.
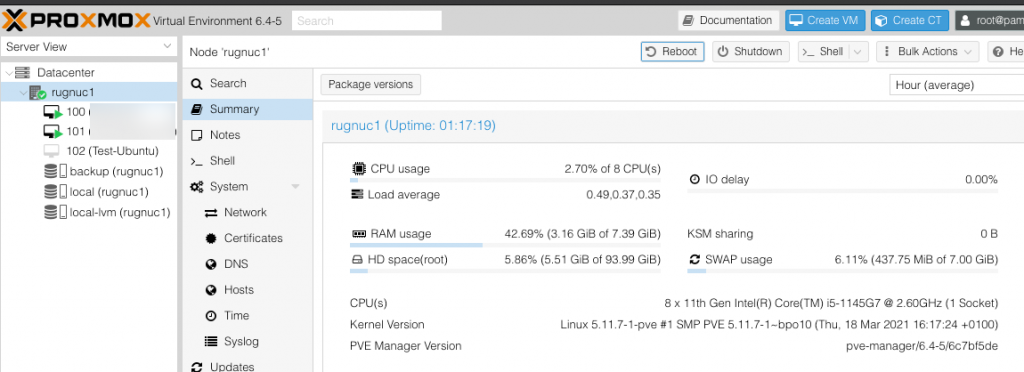
On that board I plugged in Intel NUC11 Compute Element – it has Intel i5 1145G7 CPU on it with 8GB of RAM
I can see that people with various other NUC11 configs have problems with Proxmox installation.
Installation errors
Installation aborted – unable to continue
I downloaded latest Proxmox 6.4.4 install from the Proxmox website (for the first time, I have older 6.xx installers).
I prepared ISO on USB drive with Rufus and made UEFI install in DD mode.
I also disabled Secure Boot on the new NUC11.
After the first installer boot, it would try to get address from DHCP, but would fail and after that I got “installation aborted – unable to continue”
Sorry for the poor screenshots, it was late and I wasn’t really in the good mood.
I tried with older Proxmox installs and on both ports on my NUC – but no luck. I would stuck here every time.
If you want to use network during install you can use USB dongle (you should also have DHCP available on your network).
Let’s now resolve the error above.
After you get the “installation aborted – unable to continue” error press ALT + F3 to switch to TTY3 console
Enter following commands
Xorg -configure
mv /root/xorg.conf.new /etc/X11/xorg.conf
After that we need to edit xorg.conf file
nano /etc/X11/xorg.confFind value Driver “modesetting” in that file.
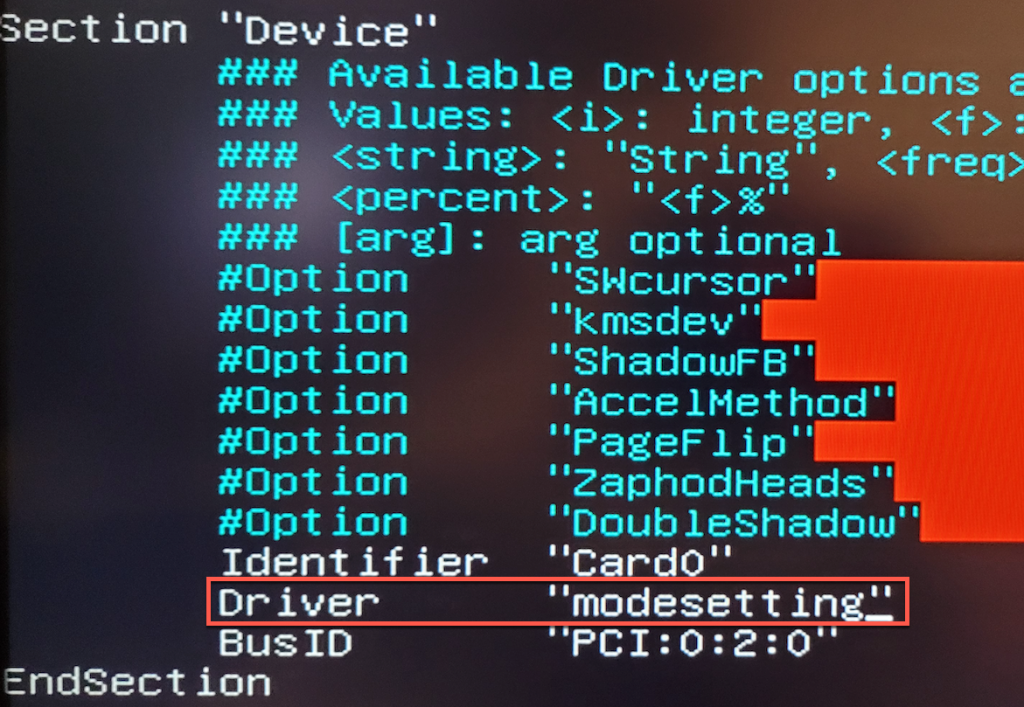
Change it to “fbdev”
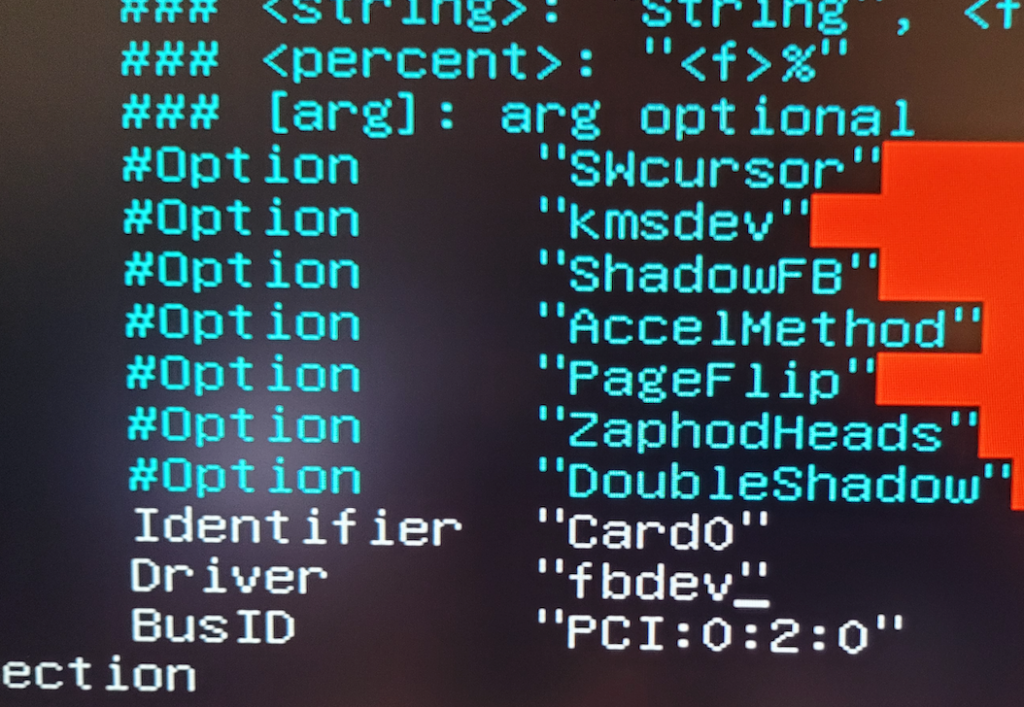
Save and exit file
Type in following command in order to exit TTY3
exitGo back to TTY 1 by pressing ALT+F1.
Type in following command to start your installation
startxIf you only have this error, that will be the end for you.
In case this procedure above does not work for some reason for you (lack of rights…), after you get error just type following commands
Do this only if the above procedure does not work!
chmod 1777 /tmp
apt update
Xorg -configure
mv /xorg.conf.new /etc/X11/xorg.conf
nano /etc/X11/xorg.conf
After you enter xorg.conf change driver value to fbdev, like depicted above. Save and exit file
Type in
startxFailed to prepare EFI boot using Grub
I was able to start installation procedure, but in the end, on 99% of the installation done, I got following
“bootloader setup errors: failed to prepare efi boot using Grub”
“unable to install the EFI boot loader on…”

I really tried a lot of thing the get around this.
One of the things to get around all these issues was to use Debian and then Proxmox on top of it – but I was stubborn to do that. 🙂
On new NUCs there is no more “legacy BIOS” and trick to Disable Secure Boot and Modern Standby in NUCs BIOS to get “legacy BIOS” does not work.
I tried different drives, repair procedures, setup tricks, but I couldn’t get past this error.
What I did in the end is that I used older NUC8 Compute Element inside my new chassis to install Proxmox.
So, I unplugged mu NUC11 Compute Element
And installed NUC 8 Compute Element I got at hand

With NUC 8 Compute Element everyhing went smooth – no errors, no hickups, and I got past the boot error.
After installer was done and I was into Proxmox GUI – i turned it off and put my NUC 11 card back into the Chassis.
It was able to boot and I finally was able to have working installation of Proxmox
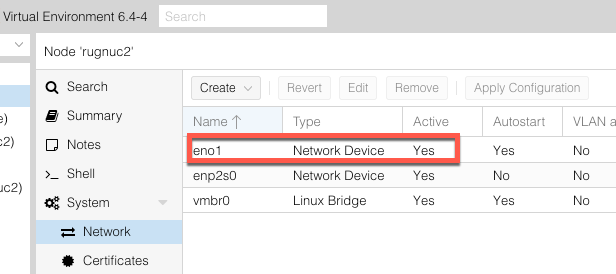
But, not all was great. I have two network adapters. Only one was working – I211-AT.
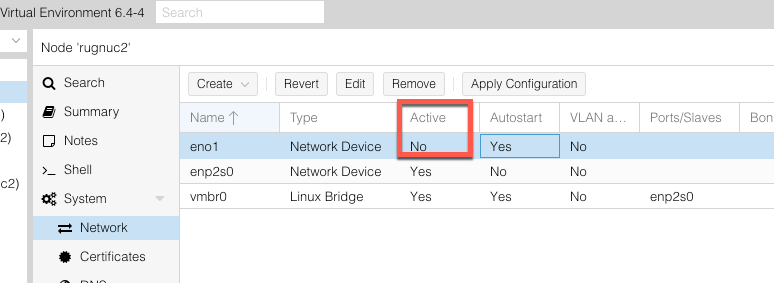
Networking issues
Interface eno1 would not go up (be in active mode) whatever I do.
Second card enp2s0 (Intel I 211) was working ok, and I was using it to manage my Proxmox install. But, it is crucial for me to have both card working, and I didn’t want to use USB network cards.
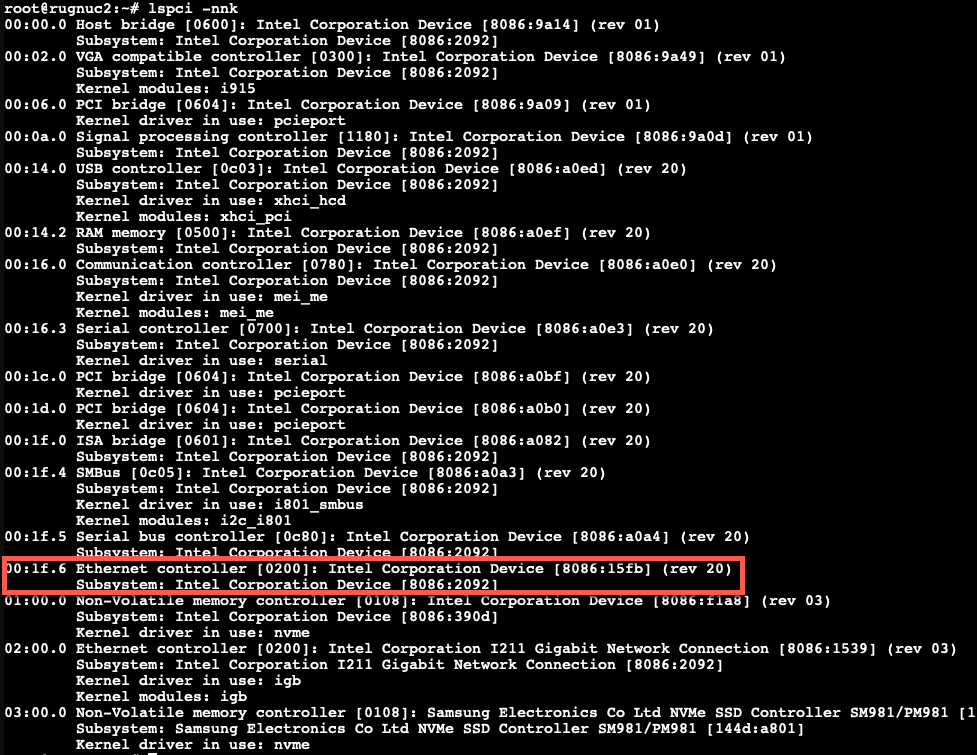
In shell after I executed lspci -nnk command, I could see that 00:1f:6 which is my dirst NIC, does not have proper drivers displayed.
I know for a fact that Intel I219 is recognized inside Proxmox 6.xx, so this is another weird glitch.
To resolve this I run first (you need to enable pvetest repos before you do this). Here is how to enable repos on Proxmox
apt updateand then I run following
apt install pve-kernel-5.11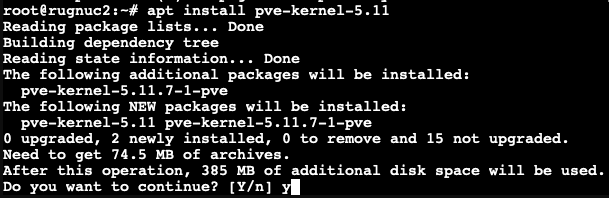
After installation reboot your Proxmox install
After reboot, again open shell and type in
uname -rYou should be running 5.11 kernel

and now my network interfaces are working
To be honest, if I put network adapter in passthrough mode and assign it to VM, it still doesn’t work, but as a workaround, I create Linux Bridge and assign it to VM.
That is it, we now have functioning Proxmox on NUC 11
Disclaimer